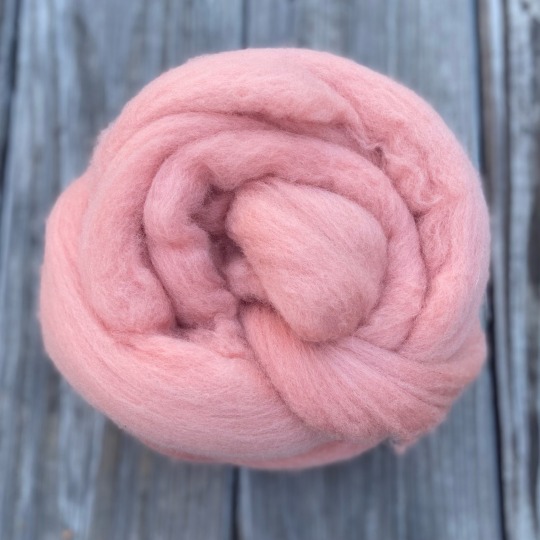
#alum mordant
Text
youtube
Before you comment that I should be using tannins if I want the colors to last in the sun, please check out my newest video:
Mordanting Cotton With vs Without Tannin -
• Mordanting Cotton With...
In this video I use 6 mordanting methods on cotton fabric and then dye the fabric pieces with 4 natural dyes. You will see the mordanting process and the results. I also performed a light/wash fastness test on the dyed fabrics to see how the colors last.
Blog post with photos of the results and descriptions of all mordanting methods: https://www.chromaticnatureclothing.c...
Mordant ingredients I used:
Aluminum Acetate - https://www.chromaticnatureclothing.c...
Aluminum Lactate - https://www.chromaticnatureclothing.c...
Alum (Potassium Aluminum Sulfate) - https://chromaticnatureclothing.com/p...
Sodium Acetate - https://chromaticnatureclothing.com/p...
Soda Ash - https://www.chromaticnatureclothing.c...
Calcium Carbonate (chalk) - https://www.chromaticnatureclothing.c...
Soy milk & vinegar - grocery store
Synthrapol detergent - https://www.misterart.com/crafts/text...
The dyes I used:
Madder root - https://www.chromaticnatureclothing.c...
Osage Orange - https://www.etsy.com/listing/62246447...
Avocado skins - eat some avocados
Logwood -https://chromaticnatureclothing.com/p...
00:00 - What this is about
01:45 - Soy milk mordant method
04:03 - All the other mordant methods
10:44 - Dyeing the fabrics
12:56 - Light/wash fastness test
14:01 - Soy milk debacle
15:07 - Madder root results
19:22 - Osage Orange results
21:46 - Avocado skins results
24:14 - Logwood results
26:31 - My closing thoughts
#Chromatic Nature#solarpunk#natural dye#how to#how to dye#diy#do it yourself#mordant#cotton#cotton fabric#Aluminum Acetate#Aluminum Lactate#Alum#Sodium Acetate#Soda Ash#Calcium Carbonate#chalk#Soy milk#vinegar#Madder root#Osage Orange#Avocado skins#avocado#Logwood#Youtube
13 notes
·
View notes
Text

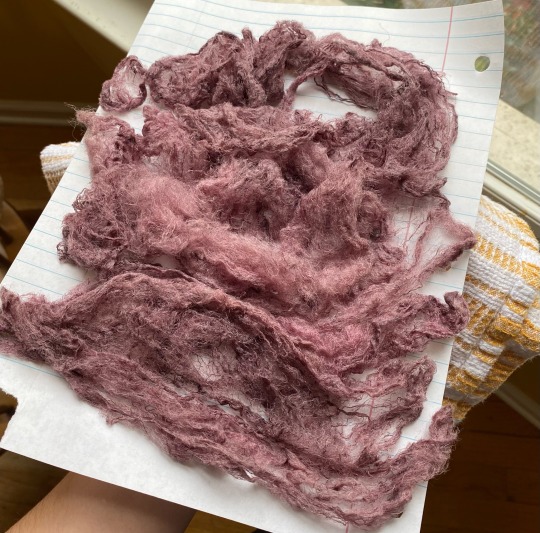
Hand dyed silk hankies ❤️🖤❤️
Top is dyed w tea and touch of iron, the one under it is avocado pit and peel and the last is just the pit; both with alum mordant.
#I think I actually mordanted the tea one w alum as well I just wanted the barest hint of gray in it#spinning#silk#hand spinning#yarn#handmade#natural dye#natural dyeing#handspinning#the last one is actually a little creamier in person I really like it but it’s hard to see w cameras
5 notes
·
View notes
Text
Natural Dye Sites/Books: Be careful to use pH neutral soaps, cleaners, etc. when dying with turmeric, because it can shift the colour.
Me: Rodger that!
- Wednesday -
Me: *looking at powdery yellow and red streak across the store floor* What’s that?
My Manager: Turmeric. But watch this - what colour is that?
Me: .. .. ... *noting the presence of both yellow and red* ....yeeeeeellow?
My Manager: Right! But now - *hits smear with cleaning solution and watches it turns straight up CRIMSON* - isn’t that a cool chemistry lesson?
Me: *looks sideways at Natural Dye Sites/Books* Yes! Yes it IS!
- Today -
Me: Okay, internet - how do I make turmeric do the red thing?
Internet: Oh HO! Let me tell you all about the nifty things you can do with turmeric and ways you can make it change colour and...
Me: *an hour later* Okay, so I need A MILLION SKEINS of undyed yarn....!
...no, seriously, it’s an amazing colour! I don’t know why the stuff I’ve read to date has said to completely avoid it rather than how to control whether you get it or not! For serious!
#natural dying#turmeric#ph sensitive dyes#seriously i immediately did a batch of wooden beads#they're drying more red-brown but still look great!#and that's without any mordants#alum mordant plus soda wash modifier might be pretty awesome#diy dyes
5 notes
·
View notes
Text
Huh, upon cursory search everyone talking about black bean dye talks about dyeing cotton yarn even though cellulose-based fibers have a reputation for being trickier to dye. I think I forgot the extent to which animal fibers are foreign to a general audience...
#to be clear this is not a dig#it was something i experienced#'tis hard to find protein fibers at your average craft store. though felting has made unspun protein fibers more common#with the caveat that you can find a few wool blends and maybe some 100% superwash wool#and one brand of feltable singles (paton's classic <3)#but i've been so immersed in the animal fiber world of late that i forgot that people don't use it#because 'tis actually hard to find and thus more inaccessible to a general audience#though i must say. if you've got alum lying around and aren't pickling then i'm surprised you're not reaching for protein fibers#but maybe it's the reputation for uncomfortable fabric or the cheapness of cotton#(should not be so cheap with how resource-intensive it is to grow and process it imo)#anyways i have a dedicated dye pot now and can use mordants without worrying about poisoning the cooking pots
0 notes
Text

I’m practicing dying white cotton (mostly yarn but some clothing items) with herbs and roots and such.
It makes me feel like a kid mixing potions outside with whatever I find in a bucket.
With this one (one of my husband’s white undershirts) I attempted a tie dye effect with iron water I made with rusty nails.
This shirt has been washed normally with detergent and dried. I’ve only been doing this 4-5 weeks so I’m still learning.
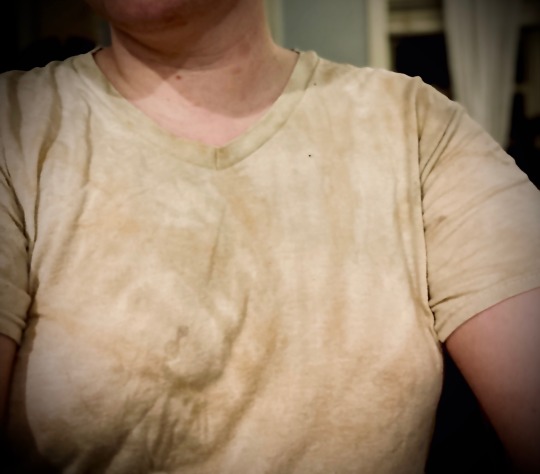

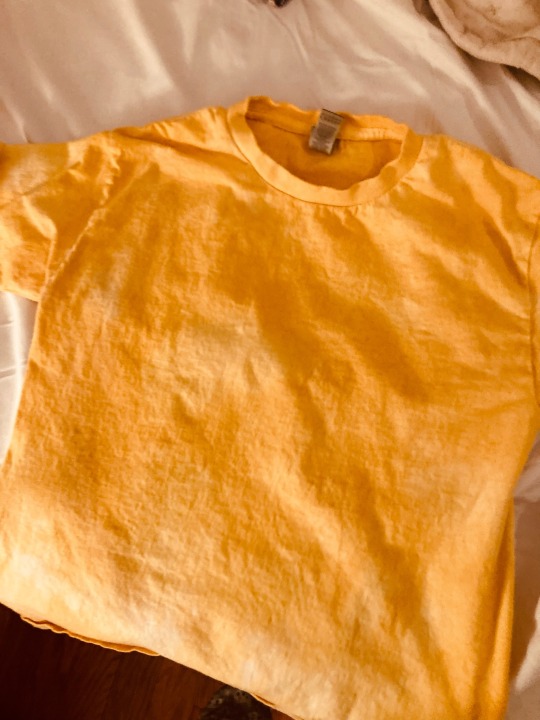
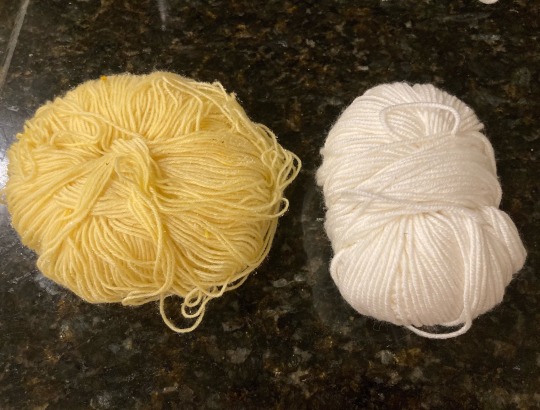


So far I’m doing the best with dying things yellow.
Knowing me I will obsess over it for a little while longer then drop it and move onto something else. ♥️
#new hobby#dying with plants#iron water#mordants#bedstraw plant#onion skin#marigolds#cream of tartar#alum#making potions
1 note
·
View note
Text
oohhhhh im so excited y'all
#im making a viking dress and the mock up is almost done!!!#salisha speaks#i think its actually pretty good im v happy i hope i may be able to wear it as a normal dress#anddddddd im gonna try plant dying next week!!!!#i bought a dye pot and a hot plate and im gonna go to the forest to gather materials this sunday#im gonna pick up birch bark (that has fallen so i wont harm the trees) and maybe some heather#i was actuallly also gonna buy alum mordant but im not gonna do that yet#the bark im using can be used without a mordant so im gonna just try it without#and then i can always buy it later but i think i may use oak gall bc i dont rlly wanna use chemicals#ANYWAY im gonna take this dress on vacation w me and if i get good pictures of it i'll post them!#maybe together w the other dress bc this is technically a mock up
0 notes
Text
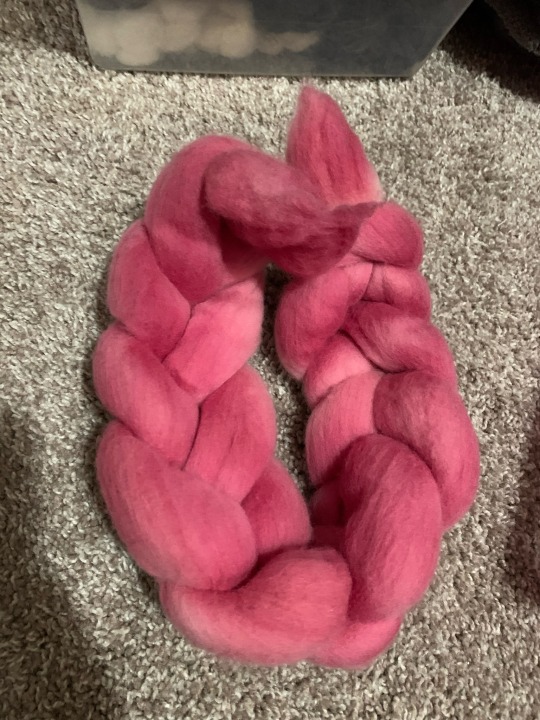
My pokeberry dye project is dry!

Above is the finished product- on the left is some white merino dyed with the juice of the berries, and on the left is some greyish merino (old faded natural dye project) over dyed with the skins and seeds.
More images and information on the process under the cut:
What I did:
- Pick pokeberries. Some were plump and ripe, others were more like raisins. They were all pretty full of pigment though.
- Mash berries with gloved hands. Strain the juice out (I used a cheesecloth) into one container and place the skins and seeds in another.
- Add 1 part distilled white vinegar to one part berry juice. For the skins and seeds, I poured the vinegar over them until they were just covered and let them soak overnight at room temperature.
- Strain out the seeds and skins from the vinegar- when I did this, the skins were translucent as all the pigment had gone into the vinegar.
- Add to mordanted wool. I used alum at 12% the weight of the wool, heated up to steaming without boiling and held there for a couple hours before cutting the heat and letting cool overnight. My wool was unevenly mordanted, which I think is partly why it dyed unevenly.
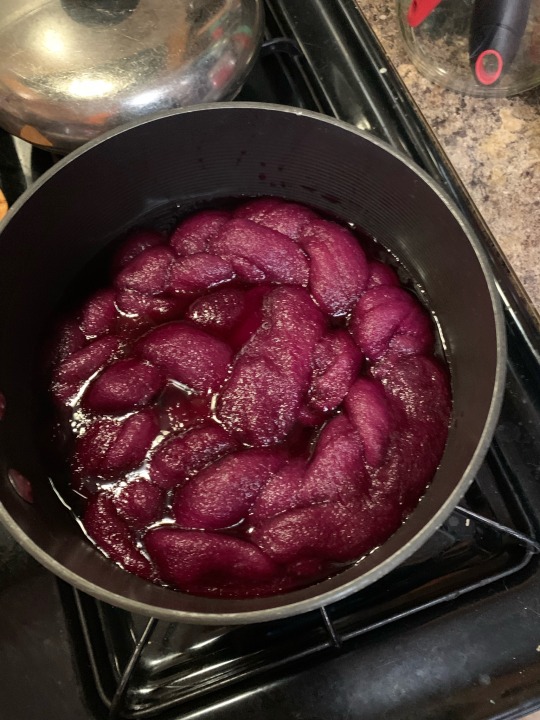
- Heat the dye bath over low heat until it’s steaming but not boiling. Once it got hot, I turned the heat off and covered with a lid to let it cool slowly overnight.
- Remove from the dye bath and lay out in a tray for an hour or so. Apparently this is to oxidize the dye, though I saw no significant change in color.

- Rinse and dry
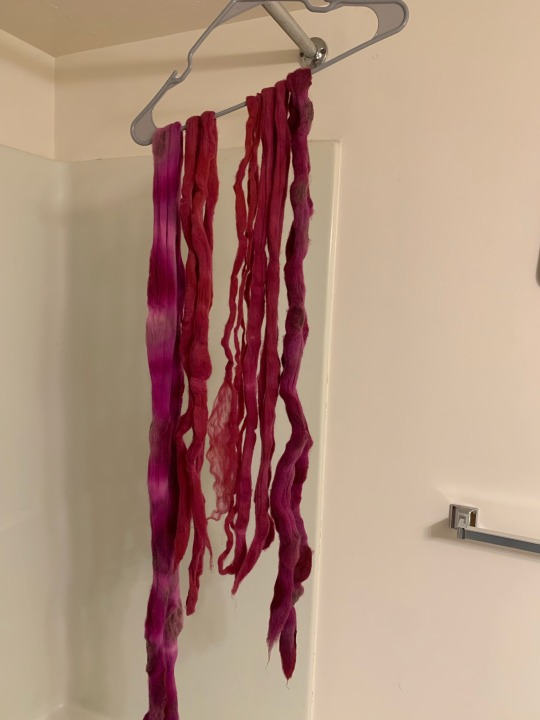
I’m very happy with how this came out! I do wish I’d strained with more layers of cheesecloth since I still had some small bits that have settled into my wool, but they should fall out when I spin. I think my wool dyed unevenly due to a combination of uneven mordanting and being compressed into a braid.
Bonus: why you need gloves… this was after sticking my hand in to press the wool down into the dye bath. It took several washes to mostly fade 🤠

EXTRA bonus: some wool I dyed with pokeberries two years ago!
196 notes
·
View notes
Text
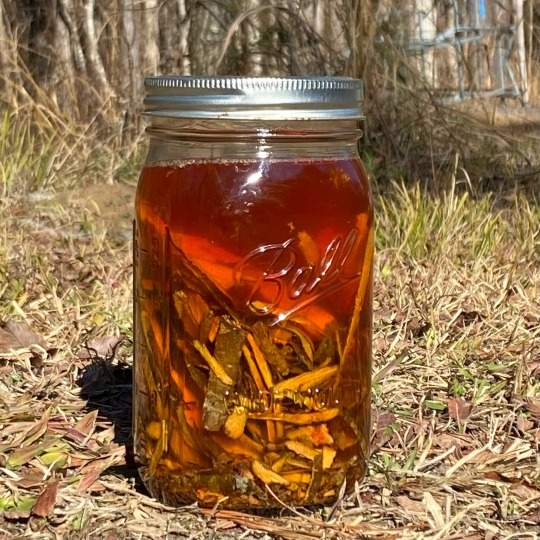
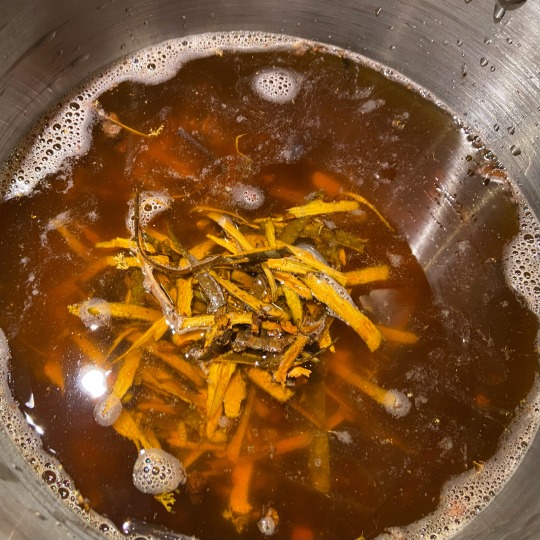
Alrighty so this is the post on lichen dyes!
this particular bath of lichen dyes was originally started over a year ago scraping a tentatively-ID'd lecanora and/or ochrolechia genus lichen off of a fallen branch (remember, don't gather lichen when it's still growing! it's very slow growing and easy to overharvest)
to start off, this particular type of dye is made through the ammonia-fermentation method, also known as ammonia maceration. No actual bacterial fermentation occurs though. Rather, the compound orcinol (and precursor compound to orcinols) react with ammonia (N2) and oxygen to form the compound orcein (also called orchil/archil) which is what makes the final dye!
this process takes anywhere from 3 weeks to 16+ weeks depending on the lichen species, its constituent acids, the temperature, and the frequency of aeration.
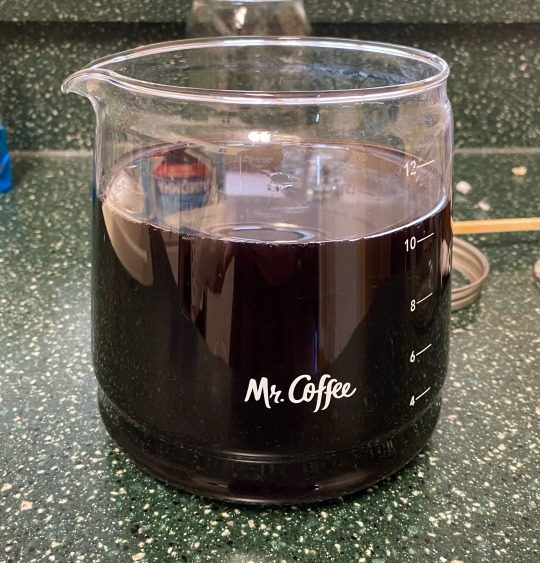
This batch was set aside for several months and neglected a good bit, but it still works. I strained out the crumbled lichens (which i set aside for later) and diluted it 1:4 as instructed by a very good book called Lichen Dyes: The New Source Book by Karen Diadick Casselman. This book is basically omnipresent everywhere you see lichen dyes mentioned, especially the orcein-based dyes. I also used several websites/videos/papers and such that i've hunted down over various internet crawls.
I use an old coffee pot for this as it's both a non-reactive material (glass) and is built to withstand heat. Ironically i also scraped the lichens off the branch using a tool i made out of a metal band from the broken handle of this same coffee pot!

I decided to dye some eri silk cakes that i fluffed up and scoured. these have been very good at absorbing dye in the past so i would hopefully get a good result from them. As lichens are a substantive dye i don't have to put a mordant on them, but i did soak them in an alum solution just before adding them to the dye bath to hopefully maximize dye uptake as well as improve fastness as lichen dyes are also fugitive and can fade in sunlight.
Substantive dyes contain mordants already embedded in them; fugitive dyes are a bit fuzzy to me but my understanding is they end up trapped in the fiber instead of actually bonding to the fiber in a stronger way. Mordants are used to help the dye "bite" onto the fiber better, improving both fastness (the ability of a due to resist fading from sunlight/washing/time) and the brightness of a color. Alum is useful in that it typically doesn't affect the end color of a dye more than simply making it slightly more strong!
it was pretty successful i'd say! i warmed up the dyebath, added the silk, let it simmer for a few hours, let it cool down overnight, and then warmed it back up the next day for a few hours; then, when it cooled, i took it out, let it dry, then rinsed it, and let it dry a second time. At that point, it was ready for spinning!
It was a lovely pink color that's not fully captured by the camera like most dyes, and eri silk is lovely because you can spin the clouds directly and easily without carding and make lovely relatively threadlike yarn

this was the first skein i got! i love how shiny the silk is. Some dyes can get really purple or even magenta-like!
next, i had the leftover lichens that i had set aside. They were a crumbly texture and dark black and i dried them out, crushed them up more, set them back in a jar, added more ammonia and water, and did the ammonia fermentation method a second time! this was after reading about the method for making french purple, and while this is definitely a very pale imitation of the method, the double-soak is the key feature here
here it is (on the left); it was already way darker purple than an in-progress lichen dye i had yet to crack open and use

speaking of which, heres a shot of various test lichens i had while working on this, you can see the blue-capped jar that has the second-soaked lichens. the foam will often give a preview of whether or not the dye will be red/purple or not!

Here it is, i forget how long i let it soak but i think it was a bit over a week. i strained the material out, diluted it, and then repeated the same warm/cool/warm/cool/dry/rinse/dry method with more eri silk

And below you can see the difference, it's definitely slight but still cool!

the left is from the original dyebath, the right is the second-soaked one. the first one is more salmon-colored while the second is a tad more blue-purpled!
I'm extremely excited about this, these dyes have such a fascinating history and have multiple historical uses everywhere from florentine orchil to norwegian korkje to scottish cudbear and more, and it was often used in tandem with the roman murex/tyrian purple dyes that come from a mussel. Some folks used the lichens to pre-dye the fabric before dyeing with tyrian purple, both to stretch the expensive tyrian purple and to make the end color more vibrant. It's all such a great topic that's mightily confusing and could take up a post of its own, same with the underlying chemistry of what makes these dyes work in the first place!
Anyways that's all for this post, i have more i'm working on involving actually turning these dyes into paint that i'll hopefully turn into a post on its own soon! I've also got other lichen dyes I'm waiting to get through the ammonia fermentation process that will hopefully give other colors, whenever that may be!
#lichen dyes#ammonia fermentaion#handspinning#natural dyes#eri silk#yarnmaking#fiber arts#vegetable dyes#orcinol#art#orcein#archil#crafts#yarn#silk#drop spindle
607 notes
·
View notes
Note
my mother has asked me to ask “that weaver friend of yours” lol — do you have experience dyeing linen? what does the process look like for natural vs synthetic dyes?
happy to be that weaver friend of yours 🥰❤️ dyeing linen is basically the same as dyeing cotton or any other cellulose fiber, so any synthetic dye that works for cotton will also work for linen. a professional grade fiber reactive dye like procion mx or dharma's procion (here) dyes cellulose fiber without heat, and the process is quick and painless. it just involves a large bucket, water, the dye powder and the cloth you wish to dye. i have little experience with rit dye so i'm not sure if you'd need heat for that, but procion dye is higher quality, comes in a lot more colours than rit, and a 2oz container is like $2 usd and goes a long way
the natural dye process for linen takes a lot longer than the procion dye process and requires several steps. cellulose fibers really don't like to take dyes so you basically have to do a bunch of alchemy to convince it to do what you want (compared to protein fibers like wool and silk which love dyes and only need some gentle nudges)
naturally dyeing linen depends on the dye you'd wish to use, but the process is essentially: scouring, mordanting, and dyeing. it's really important that you scour linen especially because it contains a lot of pectins that prevent dye from penetrating the fiber, so a harsh scouring is best (ie. washing it with hot water and ph neutral soap, even to the point of boiling the cloth. linen can take a lot of heat and is better for it, cotton is more sensitive) you'll probably have to do this before dyeing it with the synthetic dye too for best results
most natural dyes require that you mordant the cloth before dyeing. some dyes don't require a mordant (indigo is the big one, but if you're working with onion skins or other materials that contain tannins this is also true. however mordanting the cloth before dyeing with tannins or even mordanting with tannins is still recommended for better colour performance long-term unless you're working with indigo in which case using a mordant can actually cause problems) but if you're unsure, assume that you need to apply a mordant. you essentially have to simmer the cloth in a hot pot with either a material that contains tannins (tannic acid), a natural bio-accumulator of aluminum (symplocos), or use a metal salt (alum acetate is best for cellulose, but iron and copper salts can also be used. the metal salts route requires more safety precautions esp if you use copper salt, you can't dump that down the drain) your choice of mordant impacts the final colour with different mordants shifting the chemical reaction that happens in the cloth when you dye it
with cotton and linen, after you use the mordant you need to use either a chalk or wheat bran bath to remove excess mordant from the cloth, esp if you use alum acetate, otherwise it can leave a whitish cast over the cloth and also impede dyeing lol. wheat bran baths tend to cause a warmer tone to the final dyed cloth, chalk baths cause a cooler tone. i only use wheat bran baths bc i prefer the warmth and i get the bran cheaply at my local punjabi grocer
only then can you dye the cloth, again unless you're working with a dye like coffee or tea or onion skins OR indigo. linen really doesn't like to take natural dyes unless you do all the above steps, it's stubborn. the dye process itself depends on what dye you use and you can do stuff like solar dyeing if you don't want to simmer it in a pot on a stove. if you plan to go the natural dye route lmk and i can send you some scans of a book i have that contains precise instructions for preparing linen for dyeing
#fun fact the word for mordant in bahasa (both msia and indonesia) is mordan lol#i love when stuff like that happens. like computer in bahasa msia being komputer#as a caveat these are the western steps for natural dyeing there are other approaches that include the same chemical processes#but dif techniques like ex. in malaysia/indonesia mordants and dye baths are fermented for several weeks to months#and the fermentation makes it so they can be used cold and you only have to dip them in the baths rather than simmer#but that takes even longer than the western methods and is less documented in an instructional sense so the western approach is easier
44 notes
·
View notes
Text
New skill unlocked: dyeing with onions
Shout out to @milkweedman, the posts you always make an share about your dyeing efforts make it feel way less daunting starting! You're a star and I wouldn't have done this without your blog posts.

Brown onion skins, so many skins tbh. I boiled them for a 2-3 hours, and left them to cool in the water. Made such a rich red coloured water!
Alum mordant for the merino, was actually super easy. I did 15-20% of the weight of the fleece, worked a charm.

The onion skins did not go translucent, so after all the dyeing I chucked them back in the exhaust pot and left them to simmer some more.
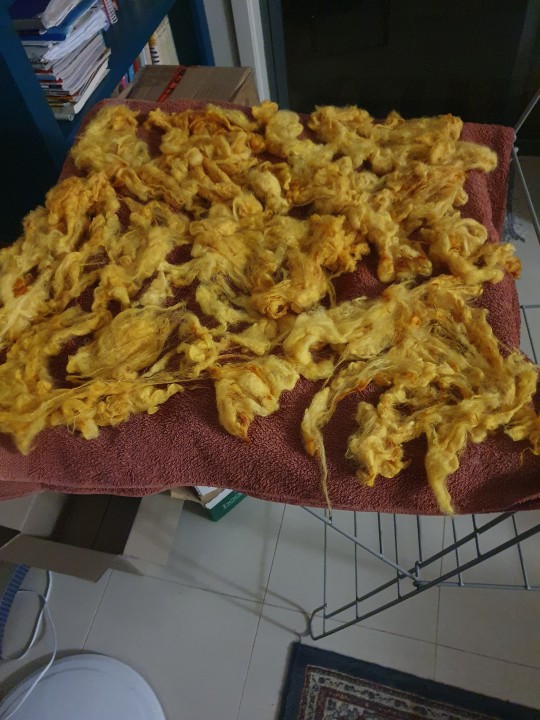
The yellow was so immediately bright and vibrant on the wool. I cooked it for an hour and left it to sit for several more. But the water was staining my fingers, which I didn't expect!
And it came out so wonderful and rich and saffron yellow!
Going to strain and decant rhe leftovers for use another day, and avocado pits are up next!
101 notes
·
View notes
Text
youtube
Stevia is a naturally 'sweet' way to create a neutral palette, and if you're lucky, a green dye for your textile and craft projects. And, as long as we are looking for green in spring, why not try stinging nettles one more time from the PNW? This tutorial will show you how to brew stevia and nettles for dye, as well as the resulting color swatch samples (cotton & silk) with a soy milk & alum mordant.
CHAPTERS
0:00 Introduction - Stevia & nettle dye
0:53 Digital download - Natural Dyer's Quick Start Guide
1:47 Foraging for nettle
6:27 Garden surprise - bleeding heart
8:13 Making stevia dye
10:16 Making nettle dye
17:11 Dye results
17:42 Wrap up
18:33 Sneak peek of next tutorial
19:25 Blooper
SUPPLY LIST
Stevia leaves
Stinging nettle
Cutting shears
Collecting bucket
Gloves
Pot with lid
Spoon
Bowl
Strainer
Mason jar
Textile
#Margaret Byrd: Color Quest#solarpunk#dye#natural dye#how to dye#how to#diy#do it yourself#Stevia#nettles#stinging nettles#cotton#silk#soy milk#alum#mordant#fabric#cotton fabric#silk fabric#Youtube
7 notes
·
View notes
Text
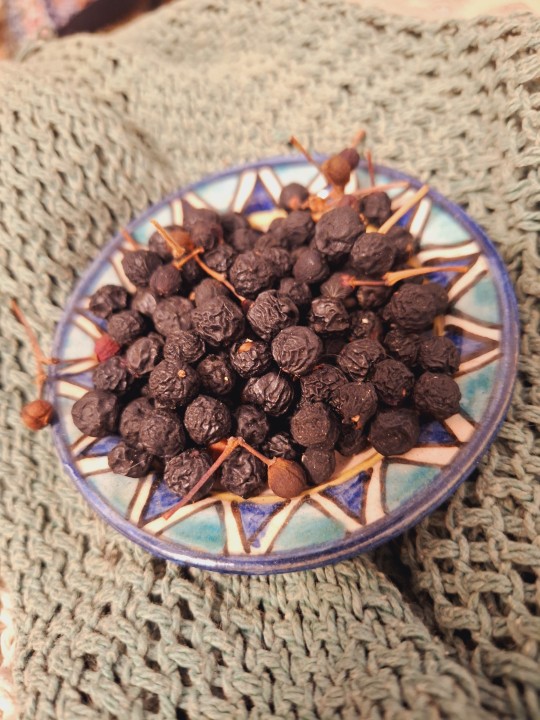

Dried buckthorn berries from in front of my house. I don't know the genus so I don't totally know what color I'm going to get, but I've seen some talk of ending up with a green if mordanted with alum. I want to dye some hampshire with it but um... Haven't actually mordanted any yet, lol. So I might mordant some tonight, I guess ? And then let it sit overnight and start dyeing in the morning.
I've washed a little more hampshire since I last posted about it, although not very much. The more recent batch is also somewhat yellow, so I think those who suggested it was lanolin staining from the 2 years growth of this particular batch of fleeces were correct. That will probably affect my colors somewhat, but that's okay.


101 notes
·
View notes
Text
Adventures in Plant Dyeing: Part 6 - Tansy
During the spring break I decided to do some more plant dyeing, this time with tansy. Tansy is a yellow flower that was traditionally used for medicinal purposes. It's meant to yield bright yellows on its own, and olive green with iron.

I used 50g of dried tansy to dye 250g of wool fibre, which ended up not being a great idea as the dye wasn't very concentrated and all my colours were quite pale. I could have partially solved this by putting some of the skeins in first to obtain a more vibrant shade, then putting the rest after a few minutes to get a paler colour, but I was unreasonably optimistic and hoped I'd get some bright colours anyway.
I used 3 50g skeins of white pure wool, one of which was my handspun, and 1 100g skein.
I mordanted all the skeins with alum for 45 minutes while I soaked the dried tansy in hot water to extract the dye. The dyebath turned a rich, dark brown.
Then I strained the dye bath and split it into 2 pots, adding calcium carbonate to one. I put 3 skeins in the original bath and one in the bath with the calcium carbonate. I heated them for half an hour, making sure they didn't boil, and left them to cool for 15 minutes. The skein in the bath with the calcium carbonate turned a pretty shade of lemon yellow, while the others were a slightly more mustard colour.
I then rinsed all the skeins before preparing one afterbath of citric acid and one of ferrous sulphate (iron), to use as colour modifiers. I did this by adding roughly a teaspoon of the modifier to a few inches of hot water, then adding the yarn and heating gently for 15 minutes until they had changed colour.
The iron did indeed turn the pale yellow into a pale green as expected, however the citric acid, which is meant to produce cooler yellows, only succeeded in lightening the already-pale yarn, leaving me with a beige yarn barely more pigmented than the white I started off with.
Here are the yarns after drying:
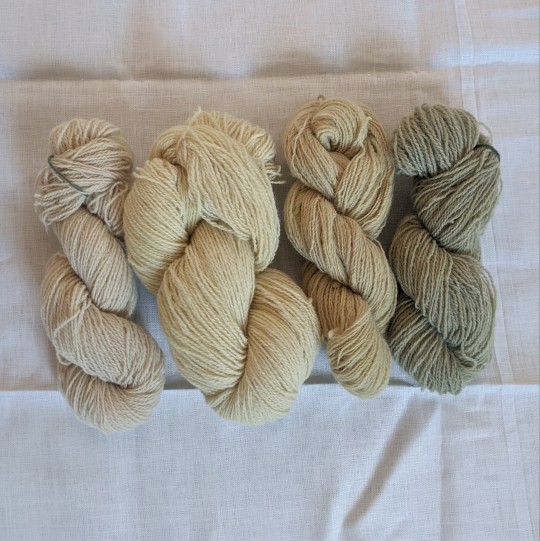
From left to right: Citric acid, calcium carbonate, no modifier, ferrous sulphate
On the whole I'm pretty happy with the results given how little dyestuff I used, but I would definitely try this again with a much higher dye-to-fibre ratio. I think I'll leave the beige skein in my dyeing basket to be redyed next time...
31 notes
·
View notes
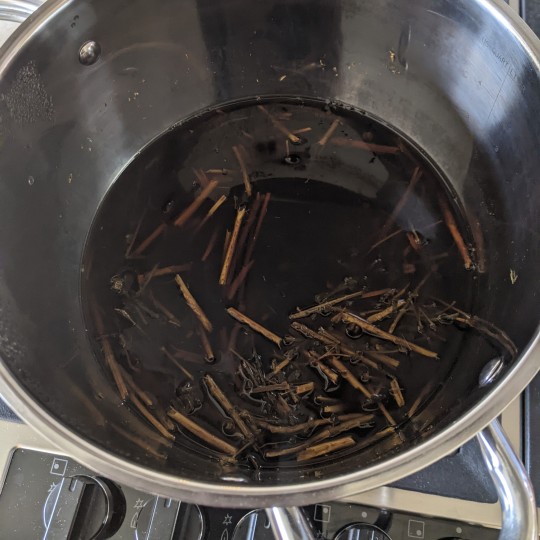
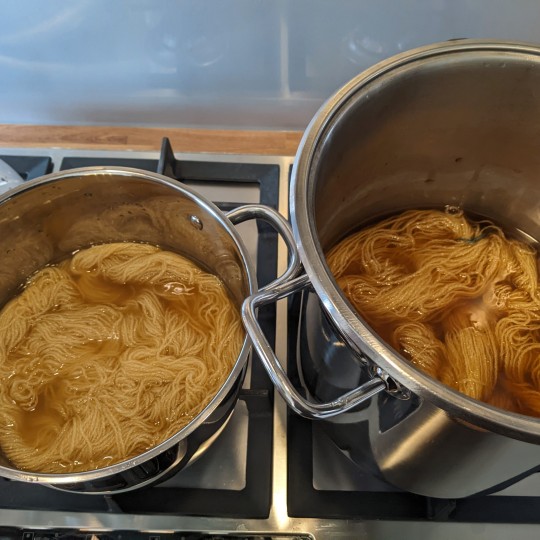
Text
Experiment results! 🧶
I soaked the pear tree bark & twigs in water for a week, then simmered for an hour. Popped in some cormo wool pre-mordanted with alum. I’m quite pleased with the results. Such a nice peachy color!

#fiber art#wool#artisan#natural dye#dead bradford pears are the best Bradford pears#invasive species
40 notes
·
View notes
Text
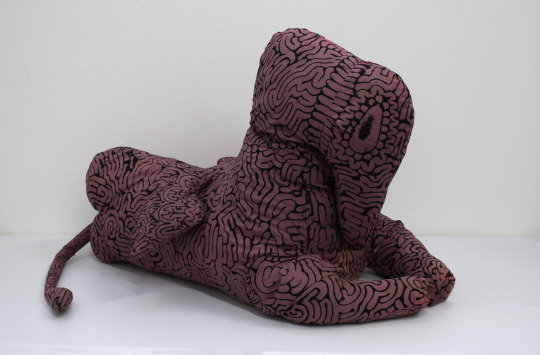
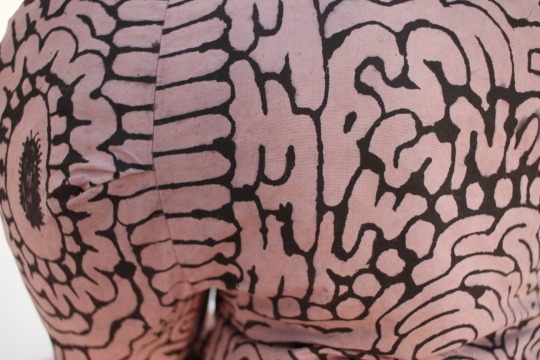

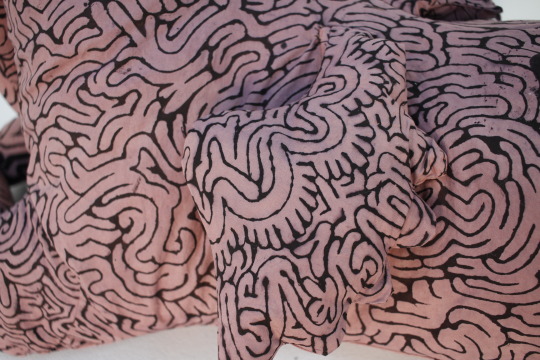
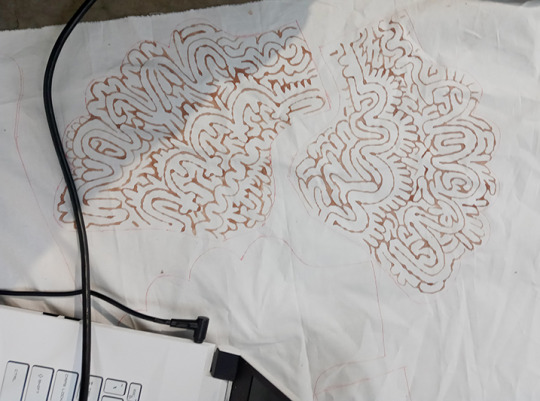
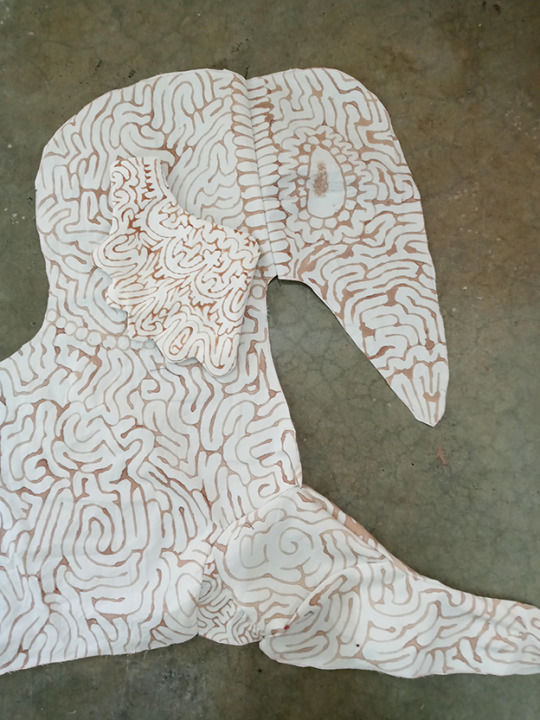
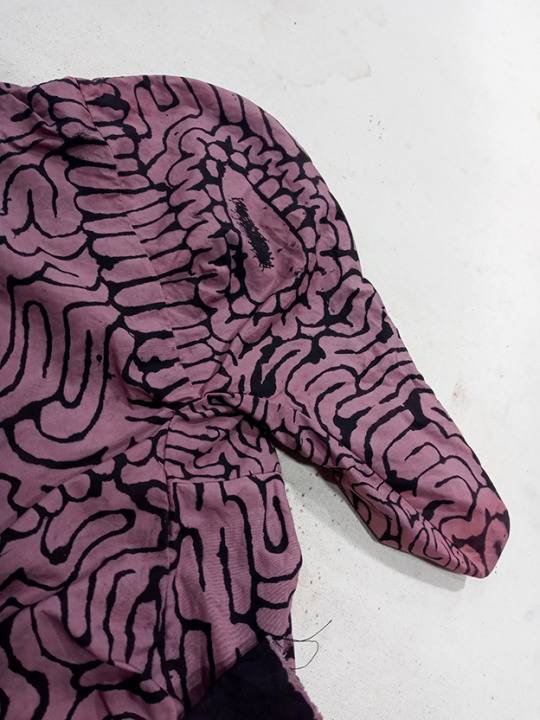
Meatcat, 2022.
the majestic sphinx is known for her riddles and oracles. please ask her about whatever's on your mind.
materials, processes, measurements:
organic cotton naturally dyed with madder and alum+ferrous sulfate mordant. I didn't mordant the base cloth so the madder would come out as this dusty pink instead of a bright red. I drew out my pattern pieces on the fabric and then spent a full week drawing on the mordant pattern with a little squeeze bottle applicator. Then I cut, sewed, and garment-dyed her. She's stuffed mostly with scrap foam and yarn from my school. She is Heavy and big, maybe 3.5 ft / 1 m long.
69 notes
·
View notes
Text
heres some of my fibers and metalsmithing work if yall wanna see it :) im putting it all under the cut so i can explain them a bit lmao (and theres also a good amount of them)
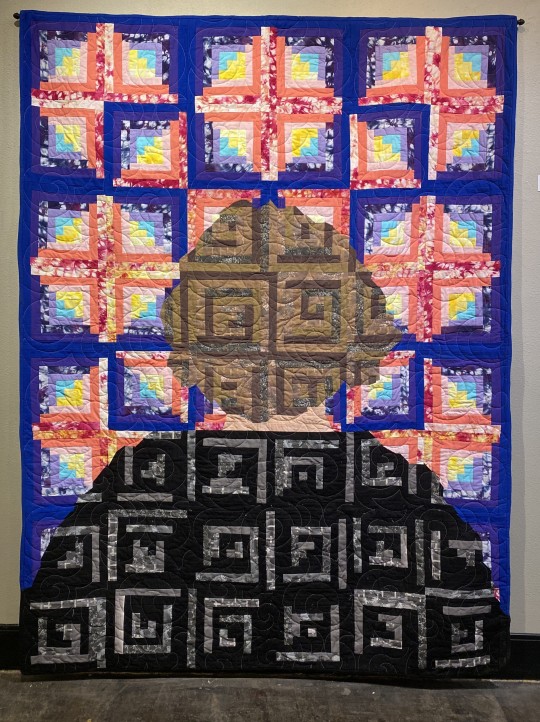
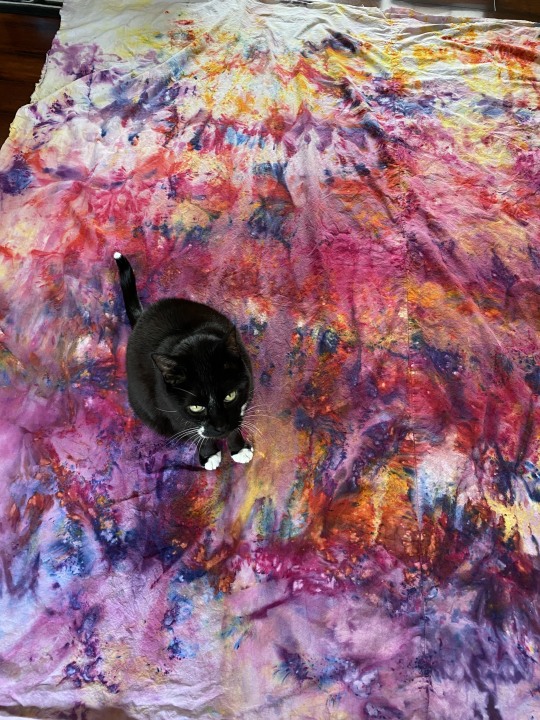
this one is probably my favorite maybe ever. its a self portrait and i dyed the three colors in the background that arent solids and the patterns in my hair and shirt i designed in illustrator and printed them out on fabric with this rly cool fabric printer. this is also 60x80 inches so its big. and the backing fabric is also fully dyed (the photo on the right featuring my cat helping ofc)
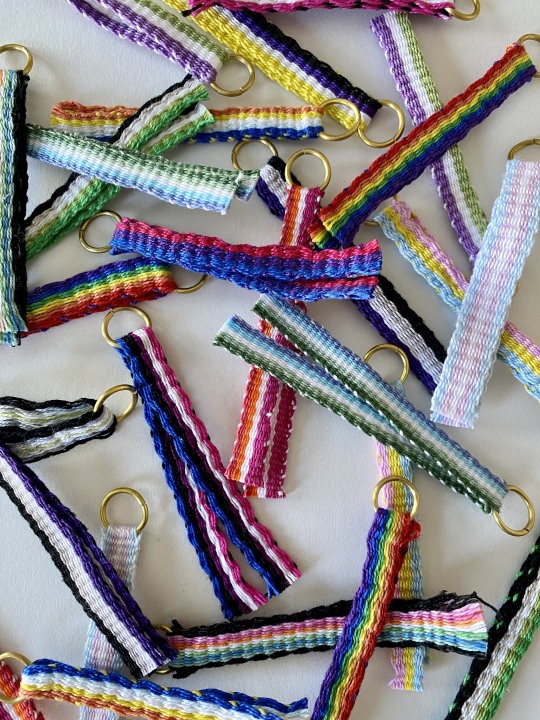
these are little keychains/zipper pulls of pride flags that i dyed most of the colors for (excluding the basic rainbow) and wove on an inkle loom. we sold them to raise money for various queer charities (i started this project after a shooting at a queer club in my state. we donated about $500 to them)

these rings were lost wax cast in sterling silver and bronze. the two on the left are knit and purl stitches and i hand carved them out of wax. the next three are cat food, corn, and a tractor tire and those i designed in a 3d modeling program and 3d printed them out. and the last one is a design from a spoon handle that i took a mold of and then cast.
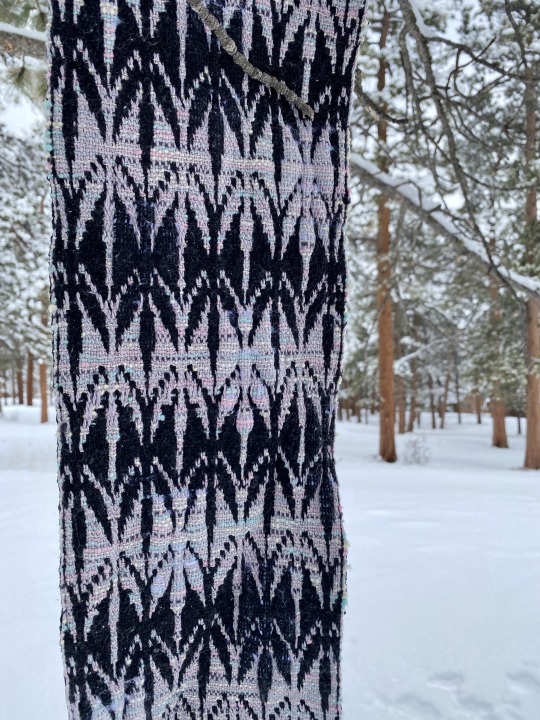
this one is another favorite. instead of weaving just one solid fabric, this is weaving two at the same time (called double weave) and basically the black butterflies can be/are a seperate fabric than the purple ones. but they are interwoven together to make this pattern. it took foreverrrr to weave this and i came up with the pattern myself. (i was also individually picking up the strands to make the pattern based off of my graph paper sketch)
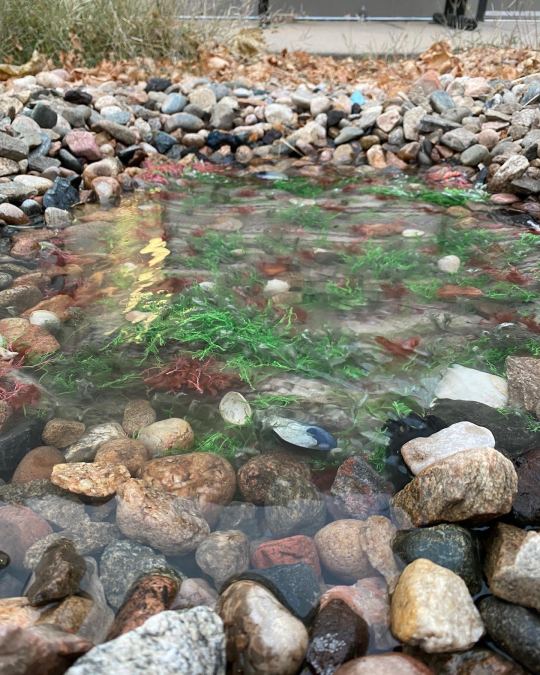

another weaving here that ended up being like 2x3 feet big. i wove it on a giant frame loom i made. its a tide pool and for our critique i submerged it in water and had a little aquarium pump running to create some waves. a fun fact about this piece was i made it when i first started watching foolish. this took absolutely forever and i watched foolish build the xd statue wings at the same time so we were 'suffering' together XD

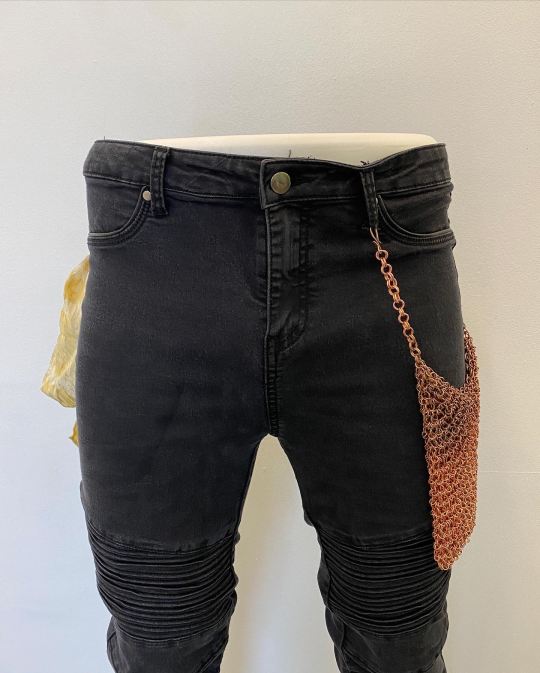
i definitely have more to share if anyone wants to see them but ill end with this one for now. this is a copper chain mail pocket that can be used to help dye fabric. i made all of the jump rings myself (winding wire around a dowel and then sawing the spring into rings and which also took forever) and the chainmail pattern is called japanese 6 in 1. there is one slightly bigger and thicker ring with 6 smaller ones coming off of it. and it is so satisfying to hold bc its so heavy and makes such a nice noise. and the fabric dying bit, when dying with natural dyes (marigolds, logwood, etc) you need a mordant that basically allows the color to 'stick' to the fabric. most of the time, ive used alum which comes from aluminum, but copper also works. so i get to skip the step of pre-soaking the fabric in an alum mixture and can instead just put my marigolds into the copper pocket and that will mordant it and the same time its being dyed. you can see the little yellow fabric sticking out of the pocket there and that was dyed using the bag.
anyway if you made it this far down thanks for reading and id looove to talk more about any of this if you have questions or want to see more works of mine,, i have a lot XD :)
#if you open the read more you also get to see a photo of my cat helping me so id highly recommend :)#jace's art#i guess ill start that tag now just in case
11 notes
·
View notes
Last Seen Blogs

torturedcrab
Untitled

oh-se-huns
...love me right...

clowndogcollective
Clown Dog Collective

twinkle-twinkle-not
𝙎𝙩𝙖𝙧𝙨

mixmiu7
Untitled