#dyeing
Text


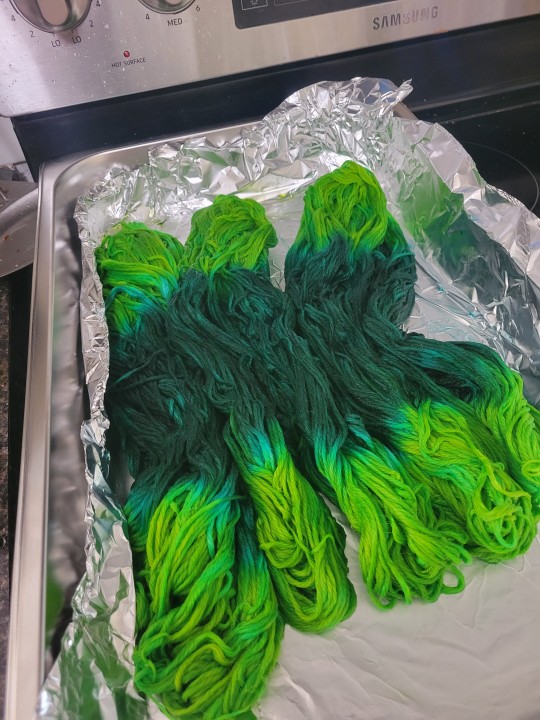
I've had this sweatshirt since high school (shout out to the lost and found ✌️), but the sleeves and waist have been slowly discoloring so I decided to dye it! It's 60% cotton 40% polyester, so I used RIT synthetic dye. The color held pretty well, although it seems a little lighter than expected to me.
Gonna sit with the green for a while and decide if I like it or if I want to go back in with some blue and try making teal.
#anticonsumerism#dyeing#clothing... alteration?#i dont have a tag for that i think#mine#fiber arts#reduce reuse recycle
24 notes
·
View notes
Text
I love you crafts i love you bookbinding i love you pottery i love you carpentry i love you baking i love you leatherworking i love you embroidery i love you knitting i love you smithing i love you weaving I love you dyeing i love you glassblowing i love you gardening i love you art that doesn't get enough recognition as art
#it's just#so important to me#crafts#bookbinding#pottery#carpentry#baking#leatherwork#embroidery#knitting#smithing#weaving#dyeing#glass blowing#gardening#brainbow vomit#28k
29K notes
·
View notes
Text
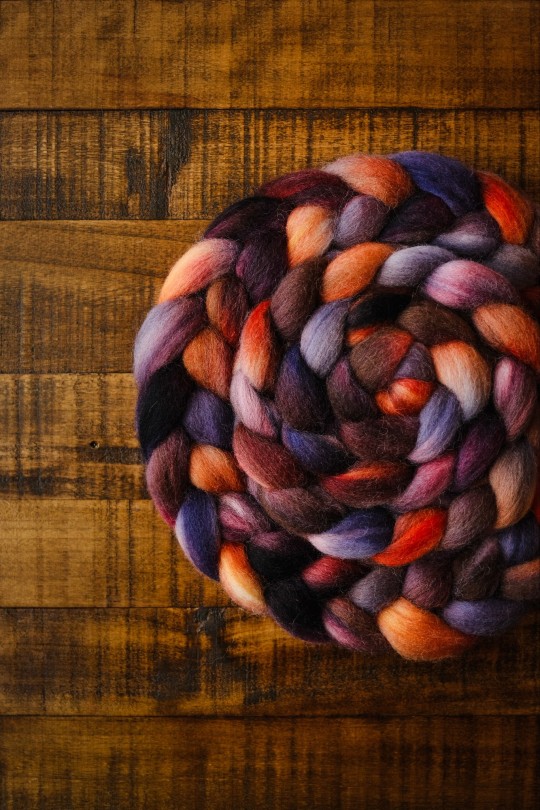

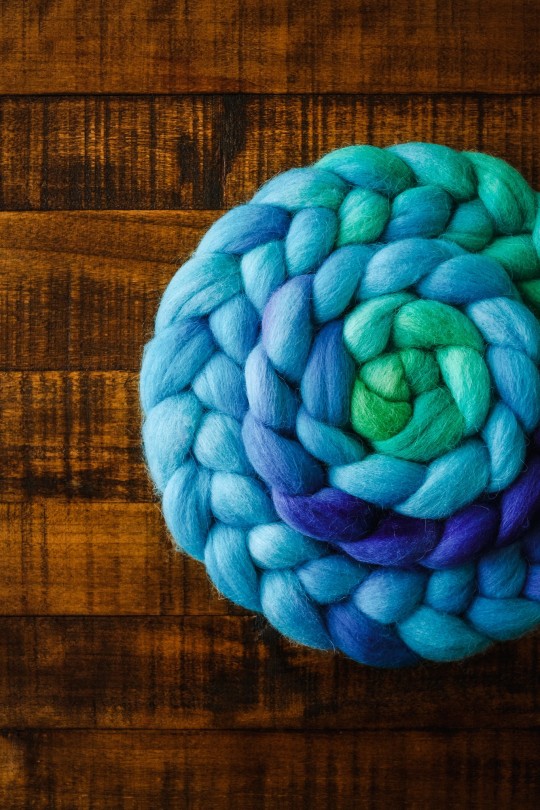

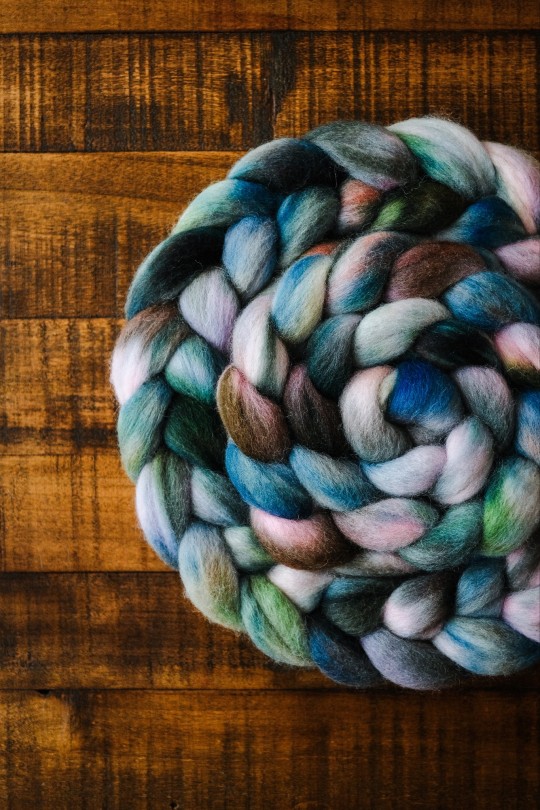
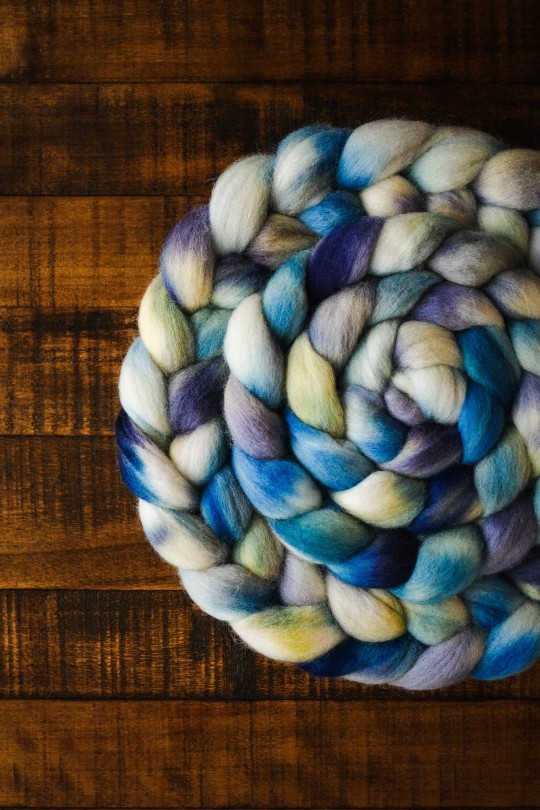
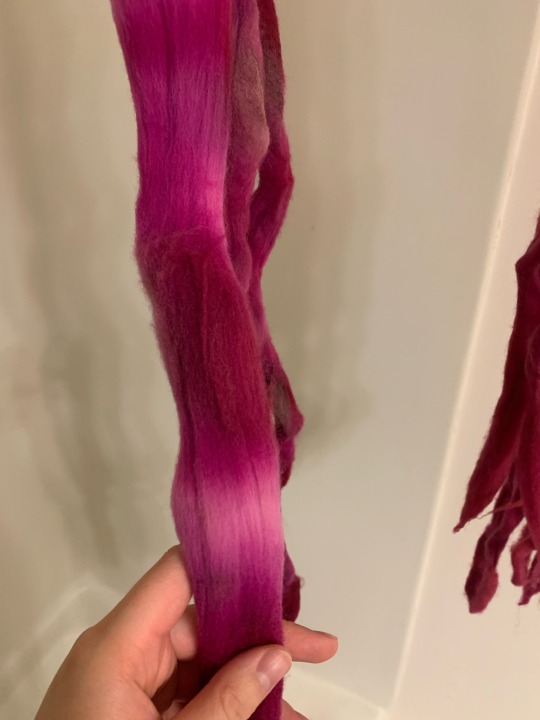
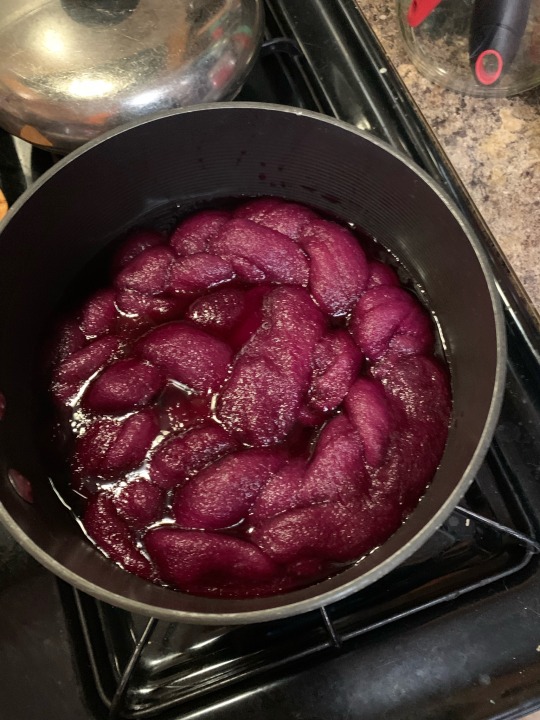
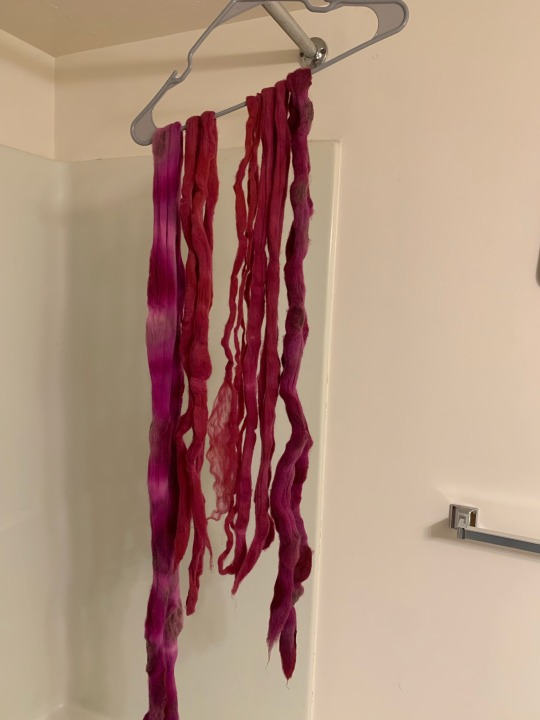
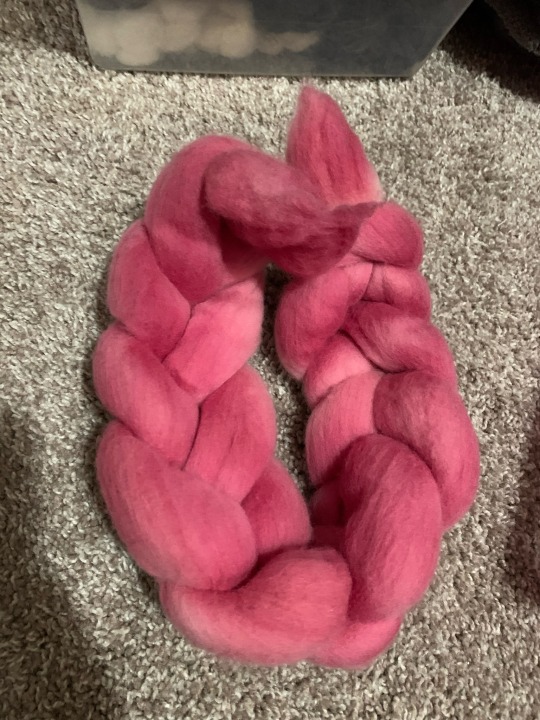
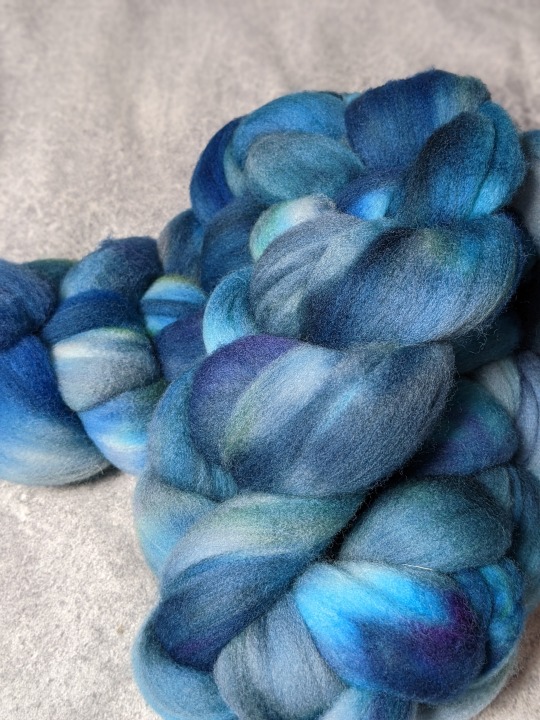
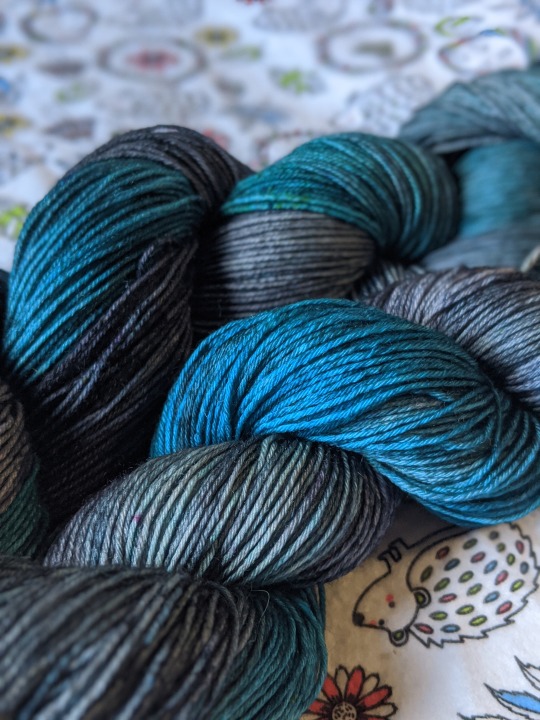
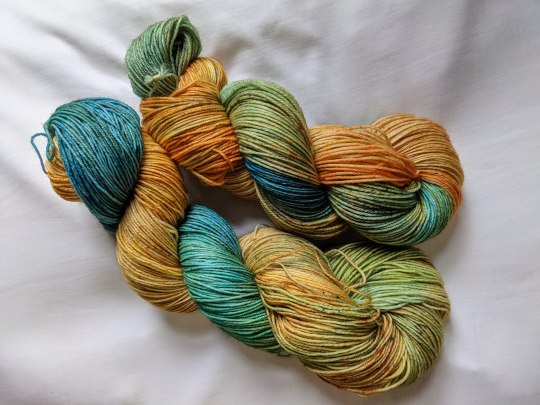
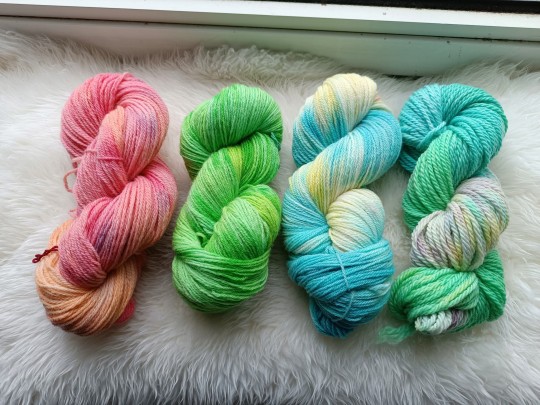
Here are the results from my week of dyeing!! I shared the last two photos already but I wanted to post them all as a group. The first four (plus a couple more) are available in my shop right now ✨ and if you buy fiber from me PLEASE tag me in any photo posts of your finished yarn once (if) you spin it, I need to see it 👀
#spinning yarn#spinning fiber#wool#dyeing#hand dyed#hand dyed wool#hand dyeing#stuff you can buy from me#allonsybadwolf#my dyeing
181 notes
·
View notes
Text
Lately I have been obsessed with the concept of using mushrooms and lichen to dye fibers with. I came across the Mushroom Color Atlas, created by Julie Beeler and her team, which is a wonderful reference and so so beautiful. I could not have imagined the colors you could get with mushrooms, especially the blues and purples. Each color will tell you the fiber the color was achieved on, the mordant used, the weight of mushroom to fiber, the freshness of and parts of mushroom used, the temperature the dye baths were brought to, and the period of time it was on heat, and the acidity the bath was brought to, if you’re interested in the process. Or you could just look at the amazing array of dye and pigment that were created by mushrooms
420 notes
·
View notes
Text
My pokeberry dye project is dry!

Above is the finished product- on the left is some white merino dyed with the juice of the berries, and on the left is some greyish merino (old faded natural dye project) over dyed with the skins and seeds.
More images and information on the process under the cut:
What I did:
- Pick pokeberries. Some were plump and ripe, others were more like raisins. They were all pretty full of pigment though.
- Mash berries with gloved hands. Strain the juice out (I used a cheesecloth) into one container and place the skins and seeds in another.
- Add 1 part distilled white vinegar to one part berry juice. For the skins and seeds, I poured the vinegar over them until they were just covered and let them soak overnight at room temperature.
- Strain out the seeds and skins from the vinegar- when I did this, the skins were translucent as all the pigment had gone into the vinegar.
- Add to mordanted wool. I used alum at 12% the weight of the wool, heated up to steaming without boiling and held there for a couple hours before cutting the heat and letting cool overnight. My wool was unevenly mordanted, which I think is partly why it dyed unevenly.
- Heat the dye bath over low heat until it’s steaming but not boiling. Once it got hot, I turned the heat off and covered with a lid to let it cool slowly overnight.
- Remove from the dye bath and lay out in a tray for an hour or so. Apparently this is to oxidize the dye, though I saw no significant change in color.

- Rinse and dry
I’m very happy with how this came out! I do wish I’d strained with more layers of cheesecloth since I still had some small bits that have settled into my wool, but they should fall out when I spin. I think my wool dyed unevenly due to a combination of uneven mordanting and being compressed into a braid.
Bonus: why you need gloves… this was after sticking my hand in to press the wool down into the dye bath. It took several washes to mostly fade 🤠

EXTRA bonus: some wool I dyed with pokeberries two years ago!
196 notes
·
View notes
Text
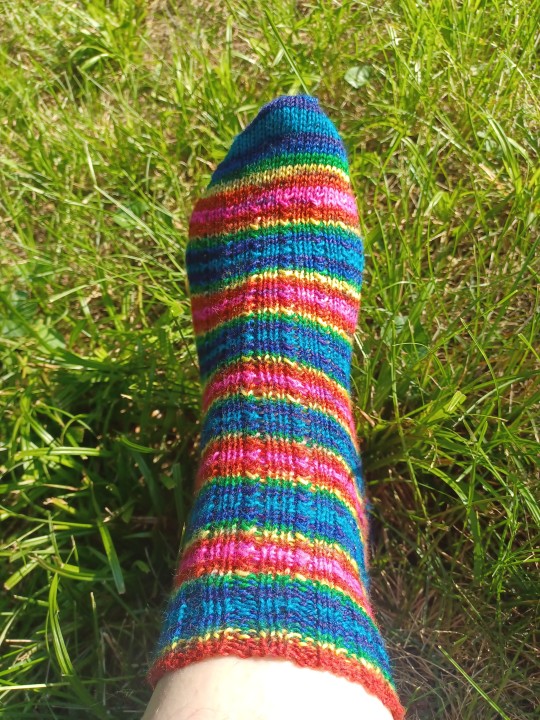
This summer I had a sudden desire to dye a bunch of rainbow striped yarn in different ways, and play with the results. So far:
Method 1, i thought it would be a cool challenge to dye a skein of yarn carefully planned so that i could knit a crescent shawl and have stripes the size I want all in one skein. So I picked a pattern, did a swatch, did a bunch of math (yes, there was a spreadsheet), portioned out the yarn by weight and I think it turned out pretty well. Almost all the color changes happened where I wanted them, but I did have to dye more yarn to finish the bindoff.
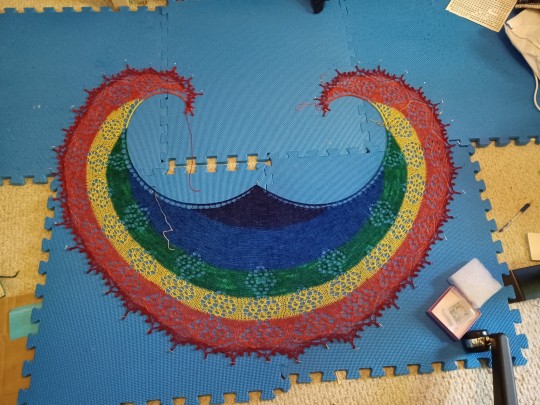
Method 2: I wound a longish warp on my warp board, and dyed sections of the warp in sequence. Unfortunately I did it in the evening when I was tired, and put the turquoise not where I actually wanted it, but it still turned out really fun
Sock 1, a herringbone rib
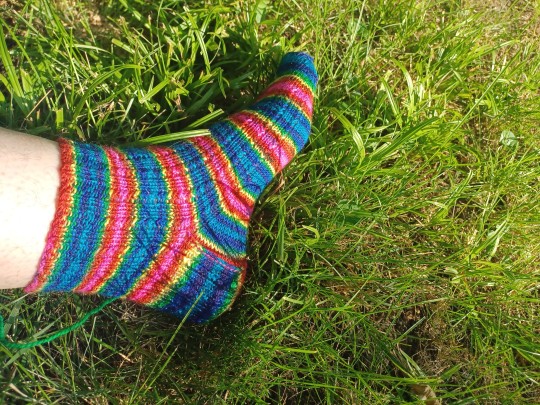
Sock 2, SlipStripeSpiral combined with a plain white yarn

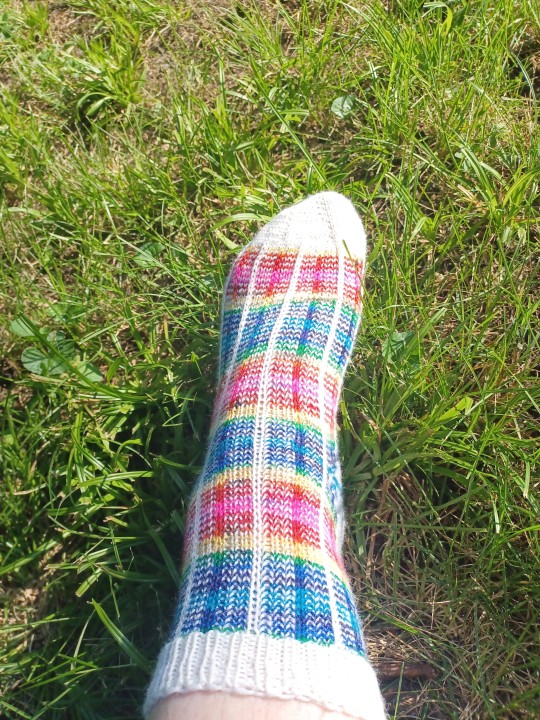
Method 3: I held the yarn double, and knit a blank in garter stitch on size 15 needles. I then dyed it as a repeating long gradient, using the garter ridges for even spacing. I did it on our somewhat sloped sidewalk, so the dye would run more, and the underside would get an interesting effect.

Sock 1: standard top down sock with a sailors rib pattern
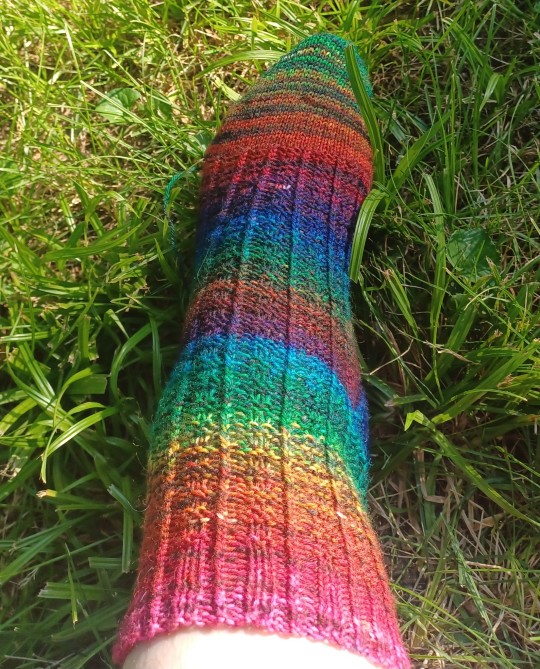
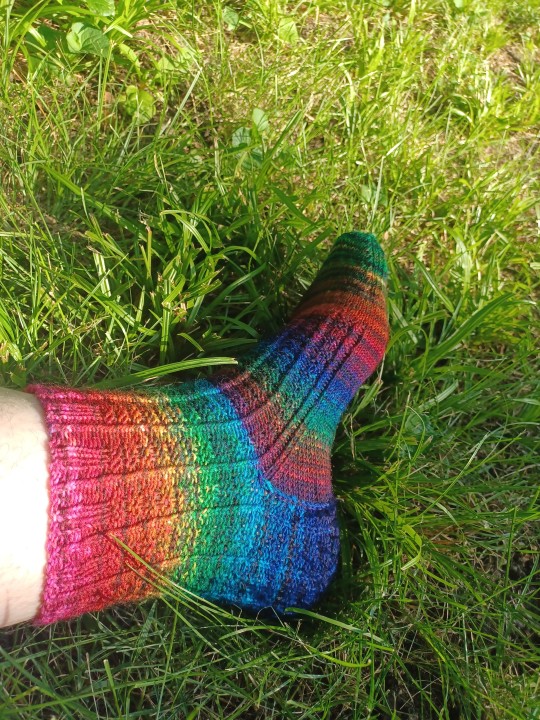
Sock 2: toe up with a traveling stitch zigzag
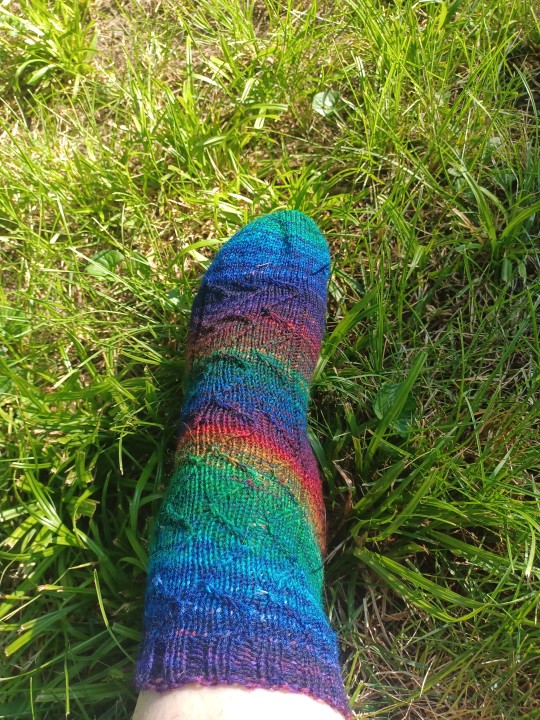
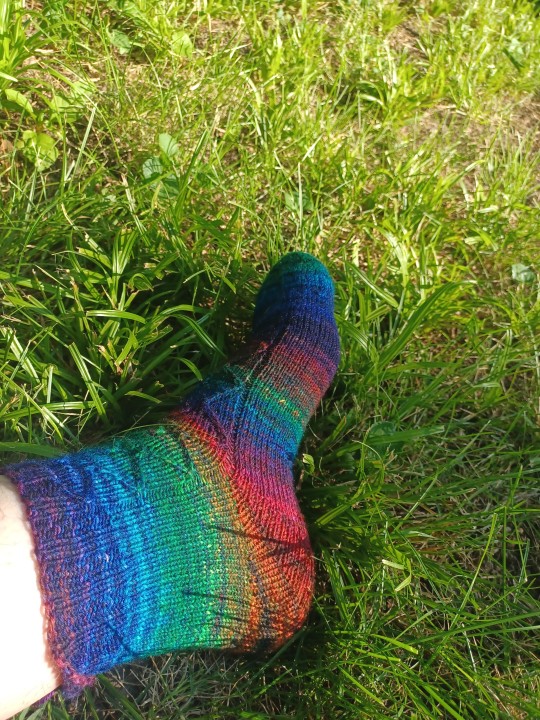
I should be able to get probably 3 more pairs of socks out of this, but I haven't decided on what design I want to do yet, so nominate your favorites if you get so moved
253 notes
·
View notes
Text
Hypothetically, if someone (not me) was to decide they wanted to start dyeing wool and had no idea where to start, which direction would you point them in?
#this hypothetical person has asthma and eczema if that even matters#wool#yarn#fibre#dyeing#craftblr#fiber
102 notes
·
View notes
Text
hi! ok so i'm going to talk about one of my top-five favourite things, which is: dyeing stuff! this is going to be specifically about dyeing protein fibres (animal fibres—wool, alpaca, silk, etc) in a pretty low-key way in your kitchen.
to be clear up front: this is not the most scientific, most perfectly reproducible, or most Objectively Correct way to dye things. i get a lot of fibre that i like this way, though, and i think that other people can, too.
fibre i've dyed that i think is neat:
you can also dye yarn like this:
yes, i like blue a lot. i also really like variegation and heathering, which is why most of the fibre here has patches of white—it's an intentional choice that i've made. you can make different choices.
here is what you need to dye things:
fibre, vinegar, dye, a pot, heat, and some water.
that was so you don't get overwhelmed by the impending wall of text. here is what you need to dye things (it's the same stuff!), but with way more detail:
fibre or yarn. this is the big one, obviously. i tend to dye in 100-200 gram batches, because that's approximately what fits on my stovetop easily. if you're very nervous about felting or harming your fibre, you can use stuff that's been treated to be superwash, start with yarn (which is harder to felt than fibre is), or use a felt-resistant breed like dorset or suffolk. honestly, though, i learned with merino because that's what i had, and it was fine. again, though, this guide is only for protein fibres. it will not work for things like cotton. the only exception to this is nylon, which will take on some colour, but less than a protein fibre will.
a mordant. this is a fancy way of saying a thing that makes dye stick, and for what we're doing here, it's citric acid or vinegar. your grocery store definitely has at least one of them, though if you can choose, i prefer citric acid, because i love wet wool smell but i do not always love wet wool vinegar smell.
dye. i use acid dyes, and am personally deeply loyal to dharma acid dyes, but ashford and jacquard acid dyes work the same way. if you don't want to buy dye or don't have access to it, food colouring will often work, as well, though i haven't tried this with natural food colourings and have no idea how well they'll work.
a dedicated dye pot. ok, if you're doing food dyes, you don't need this. if you're not, it's definitely best practice, though i don't know how dangerous it is not to. any large metal pot will do, but my favourite option is hotel pans, which are those huge metal pan/tray things that hold food at buffets and the like. i have a full-size one that's 15cm deep, and a half-size one that's 4cm deep. they're great because they let you lay out the fibre you're working with so you can see most of it in a single layer.
dedicated dye utensils. as before, i don't know how much of a huge deal this is. i'll be honest and admit that for several years i had a single pair of tongs that got used for all tong-requiring events, including dyeing, and i'm still alive. i suggest that you have at least a big spoon, and a big spoon and tongs are even better.
something to mix the dye in. yeah, i use empty plastic sports drink or soda bottles for this. you can be fancy and get mason jars or little squirt bottles or whatever, and if you get super into dyeing you'll want to mix up dye stocks, but that's way outside the scope of what we're doing here. i like the powerade bottles that have a little squirty mouthpiece, because it's fun to squirt dye onto things.
personal protective equipment. i think this is the part of things that freaks people out. ideally, you wear plastic gloves and a mask (yeah, like your covid masks) when you're working with dye. realistically, i almost never remember to put on gloves and just accept that my hands are going to be blue sometimes. you should wear a mask, because dye is an irritant, but the world is an imperfect place and i have wicked bad adhd and sometimes i forget. this isn't advice. i'm just being honest. you should use some kind of safety stuff. you probably won't die if you don't.
you might also want some little random bits: an old toothbrush or paintbrush, a pipe cleaner, some toothpicks, etc. this is mostly if you like speckles, or if you want very small patches of colour.
so first: there are a million ways to dye things, and i'm not convinced that any of them are objectively correct. i do what i do and it works for me. some of the things i do are the opposite of what most guides suggest, but i do them because i like the effects they create.
ok, that's all the background stuff you need. let's dye some stuff!
the number one most important thing to remember when you're dyeing is this:
you can always add more colour. you cannot take it away.
that's in fancy writing and bold because every once in a while i forget this, and every single time i end up regretting it.
here is how to dye things:
put water, citric acid (or vinegar), and fibre into a pot. add dye and heat. let cool completely. rinse the fibre in cool water, then hang to dry.
like, sure, we're going to go into way more detail, but push come to shove, if you do that, you're going to end up with dyed fibre. there are a lot of tutorials telling you that you must soak your fibre first, or you must add your citric acid this way, or hold the water at exactly this temperature, and i'm here to tell you that while any of these things can give you different results, those results aren't necessarily better.
the only way that you can totally screw this up is by accidentally felting your fibre, so before i get into the way more detail part of things, i'm going to talk about that.
how not to felt your fibre
i feel like if you've read this far, you know how things felt: wool, heat, and agitation. you may also notice that at least two of these things are required for dyeing. this can be stressful! but you don't have to be afraid of it. there's only been one time that i felted something to the point that it was unusable, and that happened because i literally fell asleep for several hours while the pot was on the stove. you can avoid doing this by simply setting an alarm—this is a good idea anyhow, because you'll want to check on your dye pot!
when you're dyeing, use the lowest heat that you can while still keeping the water at a simmer. if your stove, like mine, has one burner that's wildly unpredictable and sort of out of control, you may want to look for some sort of flame diffuser, also called a flame tamer or a simmer ring. i bought one on amazon for about fourteen dollars, and it's literally just a thick metal circle. it works fine.
you can also keep the heat low by using a pot with a thick bottom, though in my experience those are expensive, and if i had one i would be using it for soup, not wool.
avoid shocking your wool—never put room temperature wool into hot water, and never put hot wool into cold water. leave your wool in the dye bath until it's cooled completely, which for me usually means overnight.
finally, obviously you have to move the fibre around some. you'll need to peek under it in the pan, and when you're done, you have to rinse it and squish out the water. try to minimise handling, though. don't run water directly onto the fibre, don't get a wooden spoon and stir your dye pot around, don't wring the fibre dry when it's done.
you're probably never going to be perfect. i often find that i lose a gram or two of wool where fibres have grabbed onto each other, or where parts of the ends clumped up. it's not really felted, just sort of compacted, but it's not great to work with, and i'd rather lose a gram of fibre than fuss with the clumpy bits.
back to how to dye things
let's take it step by step, assuming a hundred grams of fibre.
put your pan on the stove and fill it halfway with water. add either a teaspoon of citric acid or a tablespoon of vinegar. this is going to help the dye strike, or stick to the fibre. the teaspoon/tablespoon is a guideline, but one that it's fine to exceed. adding more will help the dye strike faster, which can be useful if you're trying to create blocks of colour on your fibre. i usually err on the side of a little more than the guidelines, and just eyeball this—if you feel like the dye isn't taking well, you can add more later.
add your fibre to the pan. this is the first place you have to think about what you want the finished fibre to look like! you can put it into the pan any way you want, but i suggest trying to keep it in a relatively even layer, regardless of what that layer looks like. here are some ways to get specific effects:
if you want a gradient from one end of the fibre to the other, use a rectangular pan and lay your fibre out so that the line of it is parallel to the short sides of the pan
if you want a short, repeating gradient, use a rectangular pan and lay your fibre out so that the line of it is parallel to the long sides of the pan
if you want something that starts with very close repeats that get further apart as you go down the fibre, make an approximate spiral
if you don't want A Pattern (i usually don't) just lay things out in a single layer, more or less
here comes the next exciting part! decide if you want to let your fibre soak or not. again, doing or not doing this gives you some different effects!
soaking your fibre will mean that dye takes more evenly. if you want consistent colours, you'll want to soak.
not soaking your fibre means that the dye takes less evenly. the fibre on top will have less acid available to it, spends less time in the dye bath, and also has to actually get wet before it will start to dye. i actually love doing this, and think it affords a lot of cool opportunities to play with and layer colours.
if you're soaking, leave the fibre there until it's submerged. if not, don't.
now you're going to add dye! decision time, again.
you can add dye when the water is cold, which will give you more even dye coverage, and in my experience gives the colours more time to mix together
you can add dye when when the water is hot, which will give you less even coverage, and tends to encourage the colours to stay more delineated
probably surprising no one, i tend to heat the water first unless i'm starting with a base colour or i'm doing a two-colour gradient.
time to mix up some dye
as i mentioned earlier, i'm assuming that you're using powered acid dyes for this. if you're not, this mixing up part is technically optional—but doing it gives you way more control about how and where you place your colours, so i'm going to assume that you'll do it.
i usually mix dye in some sort of empty drink bottle. regardless of what you're using, before you add dye to anything, put some water in the bottle, wipe off the lip, put the lid on tightly, and shake the bottle vigorously. if there is any leakage at all, do not use that bottle. find a better bottle. if your bottle cap doesn't seal well or if you have an empty condiment bottle that's just a little wonky or whatever, you will get dye all over the kitchen, and your landlord will be really really mad about it, and you will regret your life choices. (if you own your kitchen, you can do whatever you want, but this isn't about you and you know it.)
so you have a bottle that seals tightly! great job. dump out the water and carefully put some dye powder into the bottle. remember earlier how i said you should be wearing a mask? this is the part where you should be wearing a mask.
i know that people are reading this and going, ok, but how much dye do i put in?
my answer is put in the amount that feels right in your heart, and don't forget the number one rule of dyeing things, which is that you can always add more colour, but you cannot take it away.
this isn't a very scientific answer. most dyes have a guideline about how much to use, expressed as a percentage of the dry weight of the fibre, which is what you use to get the whole quantity of fibre dyed evenly. for dharma dyes, it's like 1.5-2%, i think ashford is 1%, and jacquard is more like 2-4%, depending on the colour.
here is the problems with doing that in your kitchen: first, using that much dye will get you an evenly dyed piece of fibre, which—for me, at least—is basically the opposite of what i want. second, and more importantly, unless you have one of those teeny tiny scales used by jewelers and drug dealers, your kitchen scale will not weigh out such tiny quantities with any accuracy. third, if you do it like this, you really have to plan what you're doing ahead of time, because there's a point after which no more dye will bind! the fibre will be like enough thank u that's it i'm good and that'll be it, so you lose some of your ability to decide that actually, you want more green.
you can probably guess, at this point, that i don't weigh the dye. once you've done a couple batches of fibre with a given brand of dye, you'll start to get the vibes for how much you should use. if you really want a guideline, for a hundred grams of fibre, start with a quarter teaspoon of a given colour. you can add more—either more of this colour or a different one—later, as desired.
put your dye in the empty bottle, and then fill the bottle partway with hot water. the amount of water doesn't really matter here, nor does the specific temperature of the water. i usually fill about 3/4 of the way, because that way there's plenty of room for this next step, which is: wipe the lip of the bottle, recap it tightly, and then shake it up real good. the dye powder is going to dissolve into the water, and you now have a bottle of dye!
if you're going for a gradient, you might want to mix up your second colour so you can add them at (basically) the same time for more even mixing. if you're not, or if you only have one mixing bottle, you can do them one at a time.
oh my god we're finally putting dye on the fibre
are you ready? it's time!!
you have basically infinite options for how to do this, and many of them will give you different effects. here are some ideas:
pour the dye all at one side of the pan. and if you don't add anything else, your fibre will fade from the colour of the dye to the natural colour of the fibre
pour two colours, one at either side of the pan. depending on how much dye you use (and remember, you can always add more), this will give you either chunks of colour surrounded by white, or a two-colour gradient
add all the dye to unheated water and mix it gently, then let the fibre soak for a few minutes longer before turning on the heat. this will give you a fairly even colour
pour randomly all over, and you'll either end up with a tonal yarn or a heathered one, depending on how much dye you're using
add the dye to the water under the dry fibre, which will sink in and take up more dye on the bottom of the fibre than the top
if your heat wasn't on before, it should be now, and you're going to let the dye hang out in the hot but not boiling water for a while. how long? well, one of the cool things about dyeing with these dyes is that they exhaust, which means that when the dye has been sucked up by the fibre, the surrounding water will be clear. how long this takes will depend on the specific dye, how much of it you used, how much mordant you used, etc. i try to check every fifteen minutes.
reminder: if you started with room temperature water, the dye's not going to start taking until the water heats up, so don't check it after fifteen minutes and freak out that nothing has happened. it is fully normal for it to take up to an hour for the dye to exhaust. don't turn up the temperature, just give it time.
yay it worked!
at this point, you have a pot of hot water with some beautifully coloured fibre in it! but maybe it's not beautiful enough. maybe you want...more colours.
that's cool as hell and you should go for it. we mentioned two-colour gradients up there, but what if you want something else?
the answer, probably obviously, is adding more dye.
first, a caveat: while you can successfully make multicoloured gradients like this, it's more difficult than you think, and if it gets messed up—all the colours bleed into each other, say—it turns into a muddy mess. my suggestion is to stick to two (or three at most!) colour gradients until you have a much better feel for what you're doing.
let's talk about ways you can add more colour. you have two options: big colour and little colour.
big colour is going to add a lot of colour—you're going to mix up the dye and pour it just like you did before, but paying more attention to places that don't have dye yet. sometimes it's the middle of a gradient, or the white splotches from random pouring, or the half of the fibre that wasn't submerged when you started. or maybe you dyed the whole thing yellow, and now you want to add a blue gradient over top. whatever!
if you don't want to freehand pour, consider buying a couple large syringes, or a bottle with a squeezy top. these are also fun because you can easily get more colour between the laid-out fibre, or even under it.
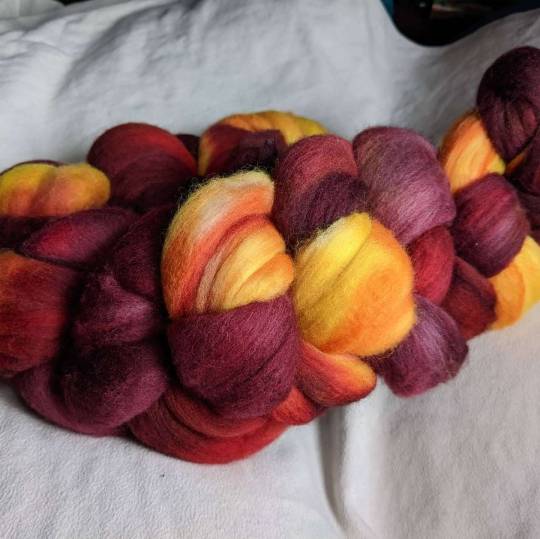
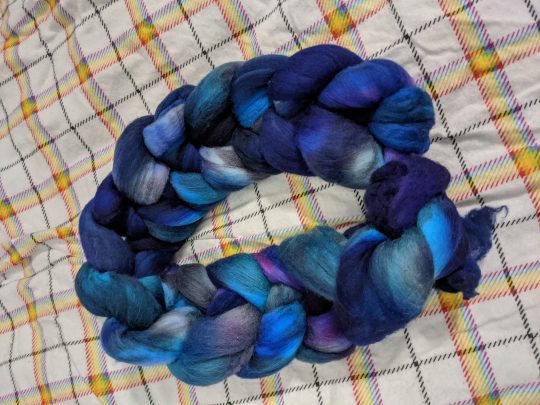
in the pictures at the start of this post, the red-and-gold top and both yarns were dyed by adding big colour.
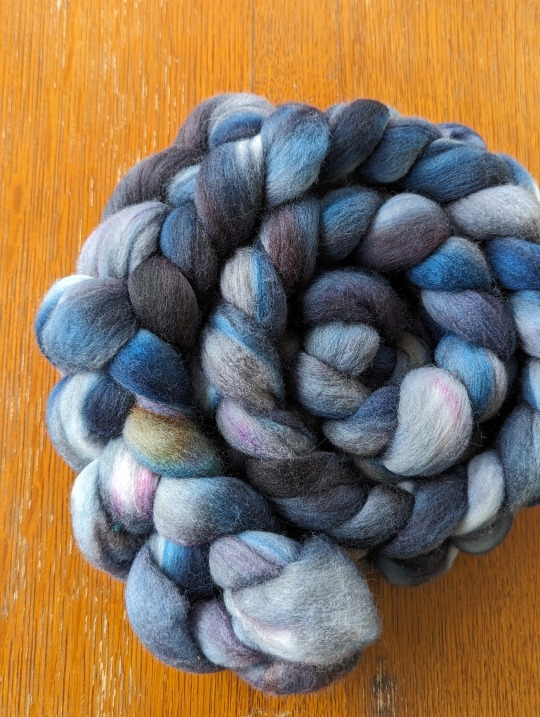
little colour isn't going to add big patches, but is going to add speckling, tonal depth, or smaller patches of colour. all of the blue-base fibres and the yellow-and-blue yarn were dyed like this.
if you're still reading this closely, you might have caught that i just said both yarns were dyed with big colour, and that the yellow-and-blue yarn was also dyed with little colour. these are both true! the base colours of the yarn were done to make big colour, but if you look at the full-size image, there are also a bunch of speckles. you can do whatever you want! no one can stop you!
here are some ways to add little colour:
mix up some dye, but use less water. add drops of the dye, either directly onto the fibre (more dramatic!) or in the water (tonal!)
use a toothpick to grab a little bit of dye powder and drop it into the dye bath (similar to the previous one, but a little less predictable)
put on a damn facemask. take a clean toothbrush, paintbrush, or pipecleaner, and just barely touch it to the dye powder. gently flick or tap the brush to add speckles of that colour
find a salt shaker that you're never going to use for anything but this. put citric acid, salt (to make it distribute better), and dye powder into it, and shake it up (with the holes covered, please cover the holes) to make sure they're evenly distributed. gently shake this over the fibre to add speckles, but more of them, and clustered together
put a little dye in a spray bottle and gently mist the exposed fibre, kinda glazing it with colour
another thing is that if you like a natural coloured yarn with dyed speckles, you can do any of these techniques without doing big colour first. the only thing to note when doing this is that you'll want to be very sure to spread out the fibre well, and maybe to consider dyeing one side, then very very carefully flipping it over and getting the other side.
ok, now what?
let's say that you've added all the colours that you want, and you've let your bath simmer long enough that the water is clear, or nearly clear. (if it's not, check troubleshooting, below.)
put the lid on your pan and walk away. if you don't have a lid, just walk away, but it's less dramatic.
the super frustrating part here is that the safest thing to do is wait until the water and fibre is fully cooled before you do anything else.
have i ignored this? yes
has it ever gone horribly wrong? not horribly wrong, but it's definitely caused me to lose an inch or two of roving on occasion
is it way more stressful if you don't wait? absolutely yes
honestly maybe just go to bed and deal with your fibre in the morning
so now let's say that it's morning and you slept long enough that your water and fibre are both room temperature, which often actually feels quite cool on your hands.
you have to drain your fibre. there are two ways to do this:
lift the fibre out of the water. this has the upside of not risking dumping your beautiful fibre into your sink, and not needing to maneuver a full pot of water, both of which are admirable. the downside is that wet fibre is fragile, and you'll want to be careful to support it.
dump the water out of the pan. this has the upside of minimising how much handling you're doing of the fibre, as well as (in my opinion) making rinsing easier. the downside is attempting to keep the fibre into the pot while you dump the water into the sink, and also needing to carry around a full pot of water.
secret third option: dump the fibre (and the water) into a strainer. upside: very easy, and you can keep the fibre in the strainer while you rinse, minimising both how much it needs to be handled and the weight on the fibre. downside: i never remember that this is an option until i'm already elbows-deep in acidulated water, discovering every tiny cuticle tear.
you're going to fill your dyepot with water again so that you can rinse the fibre. you want to minimise thermal shock, so keep the water temperature as close to the temperature of the fibre as you can, and don't run the water directly onto the fibre. i like to pull all the fibre to one side of the pan, and fill the pan on the other side.
side note: if you, smart person, remembered that you can use a colander, simply fill a pot with water, put the colander in the pot, and gently agitate the colander.
if you, person who is deeply relatable, did not remember you can use a colander and now have a pot with clean water and fibre, gently move your fibre in the water to encourage any excess dye and also citric acid to get out of there.
drain your fibre again, and this time, you're going to squeeze it dry. you're still trying to minimise agitation, so this isn't a 'wring it out' situation, it's a 'gently squish it between your hands and/or a hand and the side of the pot' situation.
hang your fibre to dry. remember what i was saying earlier about it being fragile? let me suggest, here, that you do not simply drape the entire length over a single hanger or something and hope for the best. if you literally have a single hanger, at least drape it back and forth a bit, but better if you can use more than one hanger, or a clothes drying rack, or that weird metal wine rack thing that came with your fridge that you've never used, or whatever.
important reminder: drip-drying things will make your floor wet! if you live somewhere very clear with no major roads or pollen nearby, you can probably dry things outside, but if you don't, you'll probably want to position the drying rack in a bath, shower, laundry area, or otherwise over something that will catch and/or absorb the water.
how long it takes for the fibre to dry is another unknowable variable. if it's warm and dry where you are, it might literally be overnight. if it's damp and cool, it can take days. the batch i posted a couple days ago literally took almost a full week to dry. spread it out as best you can, gently squeeze out the water you can, and otherwise you just have to wait.
you're done!
when it's dry, that's it, you're done! you might find that you need to pick off some little lint balls or a bit of compacted or slightly felted fibre from the tips, but other than that, you should be good to go.
like most fibre stuff, this is best maintained by handwashing in cool water. you may see a little bit of dye or colour loss the first time you wash it, which is pretty normal and nothing to worry about.
congratulations! you made it to the end of this incredibly long post, and if you followed along, you've just dyed some fibre!
troubleshooting
this isn't dyed enough! i want more colours!
add more dye! i'm not the boss of you.
this is true even after the fibre is all done and dryed. there's nothing that says you can't dye it again—you can, and i have.
some fibre seems to require more dye than others. silk, for example, dyes beautifully with acid dyes, but also needs way more dye than i expect it to.
remember that if you're dyeing something that's a wool/cotton blend, for example, the cotton isn't going to dye. the only exception is nylon, which will kinda dye, but not as dramatically. this guide will not work for plant fibres.
this is too dyed! i want fewer colours!
please refer back to the number one most important thing about dyeing, which—as you know—is: you can always add more colour, but you cannot take it away.
pull out some more fibre and try again. this has a learning curve, just like any other fibre craft.
these colours don't look like i expected!
this can be about a lot of things.
colour guides, especially if you're looking at them online, aren't always very accurate.
colour guides tend to assume that you're dyeing a single colour at the suggested dye percentage of weight, and using less than that will give paler colours.
dyes, especially if you're mixing brands, can interact with each other and behave in ways you didn't expect.
dyes can also break, which is when they split into their component colour molecules. this happens commonly with blacks and browns, food colouring, and anything that dharma trading has marked as 'advanced'. some people find this very desirable and seek it out; some people are very frustrated by it.
the ph of your water can sometimes affect your dye. i've been lucky enough that i've only lived places with lead problems, not weird ph stuff, so i haven't investigated this closely, but if you're consistently not getting the results you expect, even going for a single, solid-colour dye, look at the ph.
my dye water's not clear!
if you used a quarter teaspoon of dye and a hundred grams of fibre, and it's been, say, 45 minutes of actually hot water and your water still isn't clear, you probably didn't use enough mordant, and you should add some more citric acid or vinegar to encourage the dye to get in there and do its thing.
if you used you used more like a teaspoon of dye, or if the citric acid doesn't change anything, you used too much dye for your fibre. you can either shrug and pour it down the drain, or you can add some more fibre and dye that, too.
my rinse water's not clear!
you probably used too much dye. it's ok—just keep rinsing it, gently, until it's more or less clear.
some colours just like to run—you know how every once in a while you get a yarn and it just bleeds a little bit every time you wash it? sometimes it's just like that. i wouldn't worry about it too much.
my fibre has felty/clumpy bits!
a little bit of this is normal, especially at the ends of a fibre that felts easily (this means you, merino!)
pick off the bits that you don't like—this is generally fairly easy, and involves very minimal fibre loss. i don't bother doing it until i sit down to spin, and then just pull off bits as i come to them.
if there's a lot of felty/clumpy bits, more than you can reasonably pick out, you agitated the fibre too much. there's not much for this other than trying to card it out, which may or may not work.
sometimes this happens because your stove got weirdly aggressive and boiled your fibre. especially for wool that's prone to felting, the bubbling and jostling can be enough to encourage more clinginess than you'd like.
i want my dyeing to be reproducible!
this is kinda doable. it's a handmade thing, so it's always going to have some natural variance, but you can do it.
buy a jeweler's scale that measures in fractions of a gram.
start measuring your dye and acid, and take detailed notes about what you do.
follow those notes in the future, and you'll be probably 90% of the way there.
i want to dye with natural dyes!
i fully support this and have played around with it a little bit myself, but absolutely do not know enough about it to advise you.
the internet is very large and full of many people who are much smarter than i am, and i feel confident that at least one of them is desperate to tell you all about how to do natural dyeing.
i am, at this point, not that person.
i want to dye plant fibres!
i am begging you to find another guide, because this one will not work.
you didn't answer my question!
that's what my inbox is for
i have to reiterate that i'm just a person with real specific interests who started dyeing things because i couldn't find or afford the kinds of colourways that i wanted.
i am not a professional
i will do my best to answer questions, but sometimes the answer is 'just fuck around until you find out'
plant fi—
shhhhh
the end
thank you for reading this incredibly long post! i might make another one in the near future, either so i can show pictures or because i took out an entire section about how to choose colours and pick a colour scheme and work with colours, and i kinda want to talk more about that, but this is no joke almost six thousand words long, so i thought, you know. maybe not tonight.
anyhow, i hope that this was useful to someone! thank you for letting me talk about one of my very favourite things.
#dyeing#craftblr#fiber arts#fiber craft#fibre arts#fiber#fibre#dyeing wool#i'm sorry this is so long#it kinda got away from me#i just want to tell people about cool stuff!#and then talk about the cool stuff for an unreasonably long time#you know#like a normal person#anyhow this was fun#dyeing is super fun and you should try it#sorry to say that i am Not editing this#because i only edit things when people are paying me for them#but i did make my wife read it to make sure i got all the main stuff#so we should be good#still: sorry for any stylistic inconsistencies#smartest raccoon i know
307 notes
·
View notes
Text
Trying dyeing in the oven following this knitpicks tutorial (undyed yarn is in sale this month at knitpicks so they sent out a link to this tutorial). I've been looking for a good oven dyeing tutorial so I can dye more than two skeins of hand painted yarn at a time since my dye pot with the steamer tray only fits 2 skeins of yarn at a time. I currently have six skeins in the oven! Like a cat that has learned a new trick I am now unstoppable hohohohohoho.
I used 16 oz of each color of dye liquid per 300g of yarn. I probably could've used another 4 oz of chartreuse dye liquid but that's okay. I did an intensity of 1TSP chartreuse dye per 8oz and 1/2 TSP emerald dye (Jacquard acid dye color names) per 8oz of water. So all total for 6 skeins I used 4 TSP chartreuse dye and 2 TSP emerald dye.
They both bled blueish green or just flat out blue. I left the emerald in the center a bit mottled on purpose because I am using this yarn to test my moss stitch shawl I'm designing and I thought the mottled look would add to the overall texture I am going for. I can't wait for them to dry so I can wind a skein into a cake and see how it looks! Definitely should've tied it off a couple more times because this came with only two ties in the skein. It's really annoying that knitpick's undyed yarn comes with only one or two tie offs. That's not enough.
Anyway, I'm having the time of my life dyeing yarn. This is art for me. It's like painting except after you do the painting you get to use the thing to make more art. It's the best!
63 notes
·
View notes
Text


I want to eat this yarn so bad it's not even funny. How dare I not be able stuff this in my mouth and it taste like berries
#artists on tumblr#fiber art#fiber crafts#hand spinning#dyeing#diy#spinning#yarnblr#craftblr#knitblr
53 notes
·
View notes
Text

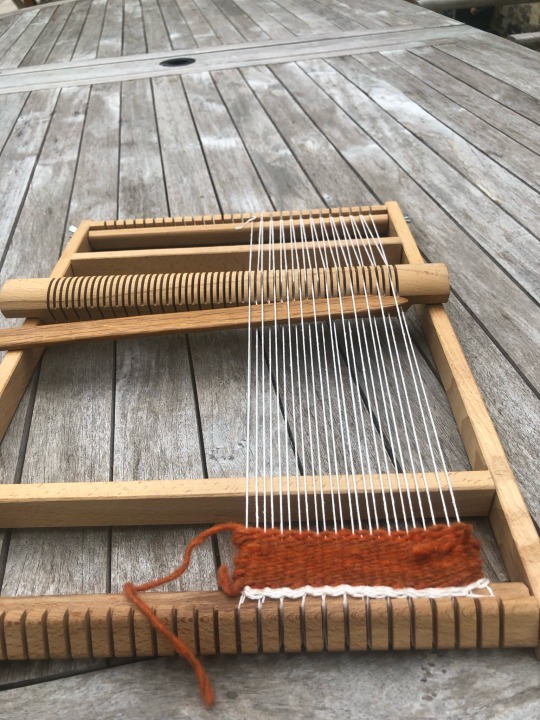
I am extremely in love with my new weaving project.
Warp is Malabrigo Sock, weft is Ella Rae Marmel, embroidery is unidentified laceweight wool that I dyed last week.
151 notes
·
View notes
Text

Solar dyeing with turmeric and weaving wool on a hand loom - I feel intensely retrofuturistic today
199 notes
·
View notes
Text


I've been IN the dye pots y'all. New braids dropping in my shop very soon. I have so much wool to spin right now. It's literally all over the house. We've way over capacity. I need to finish the lace weight spin on my EEW and my spindle spin and then maybe I'll do a poll on what to spin next, because I am currently SPOILED for choice. and. famously bad at choosing 😂
#dyeing#hand dyeing#hand dyed#hand dyed wool#wool#spinning fiber#handspinning#fiber arts#fiber crafts#allonsybadwolf#my dyeing
94 notes
·
View notes
Text
The results of some yarn dyeing experiments with food coloring/Easter egg dyes
37 notes
·
View notes
Text
New skill unlocked: dyeing with onions
Shout out to @milkweedman, the posts you always make an share about your dyeing efforts make it feel way less daunting starting! You're a star and I wouldn't have done this without your blog posts.

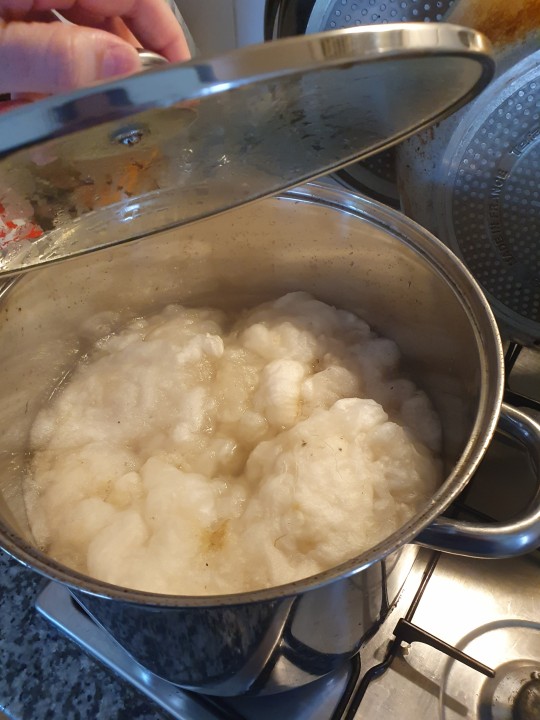
Brown onion skins, so many skins tbh. I boiled them for a 2-3 hours, and left them to cool in the water. Made such a rich red coloured water!
Alum mordant for the merino, was actually super easy. I did 15-20% of the weight of the fleece, worked a charm.

The onion skins did not go translucent, so after all the dyeing I chucked them back in the exhaust pot and left them to simmer some more.
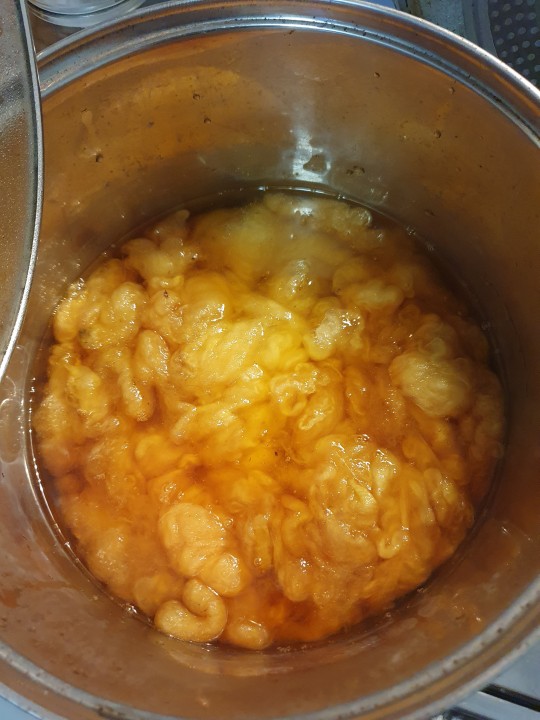
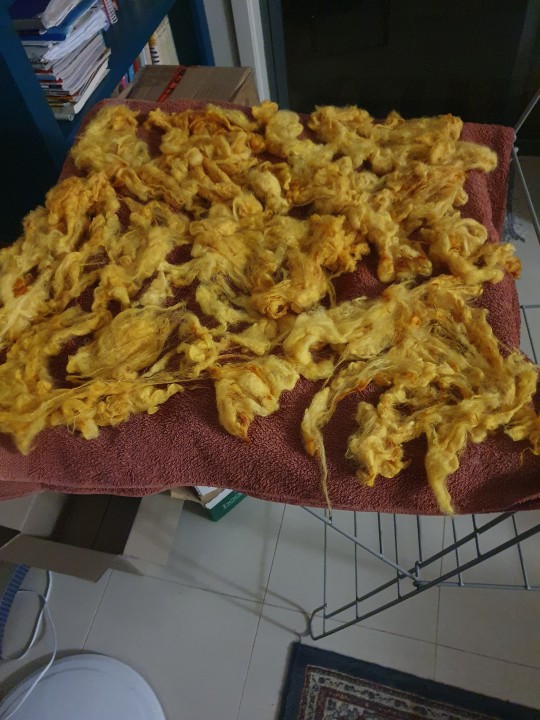
The yellow was so immediately bright and vibrant on the wool. I cooked it for an hour and left it to sit for several more. But the water was staining my fingers, which I didn't expect!
And it came out so wonderful and rich and saffron yellow!
Going to strain and decant rhe leftovers for use another day, and avocado pits are up next!
95 notes
·
View notes
Text
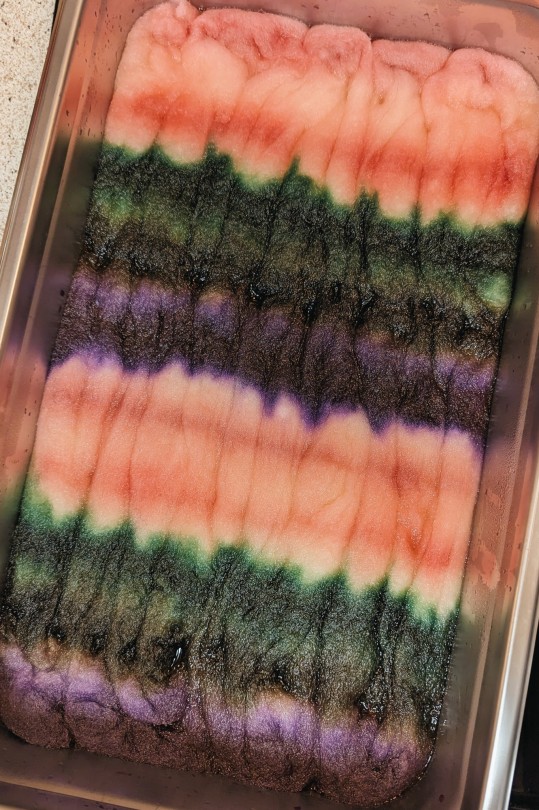
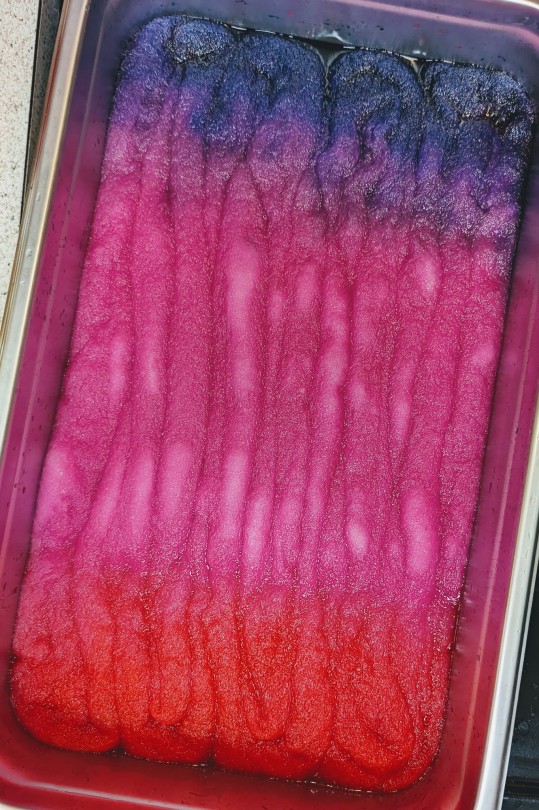
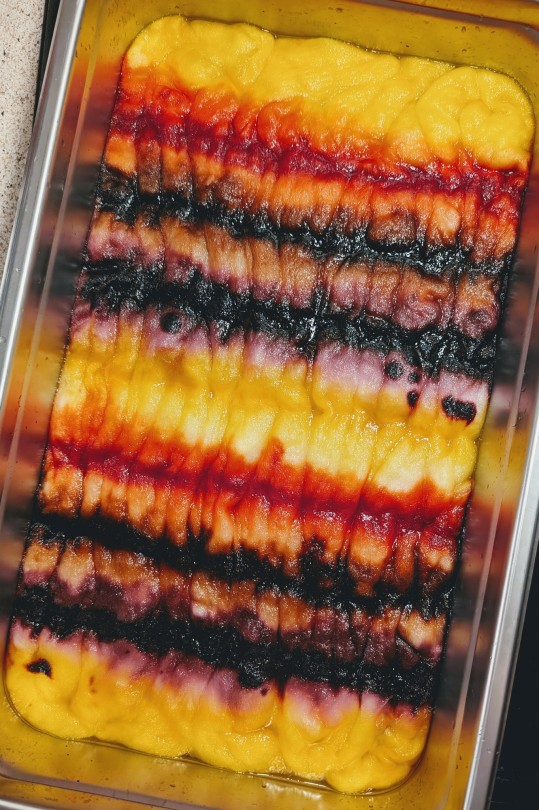
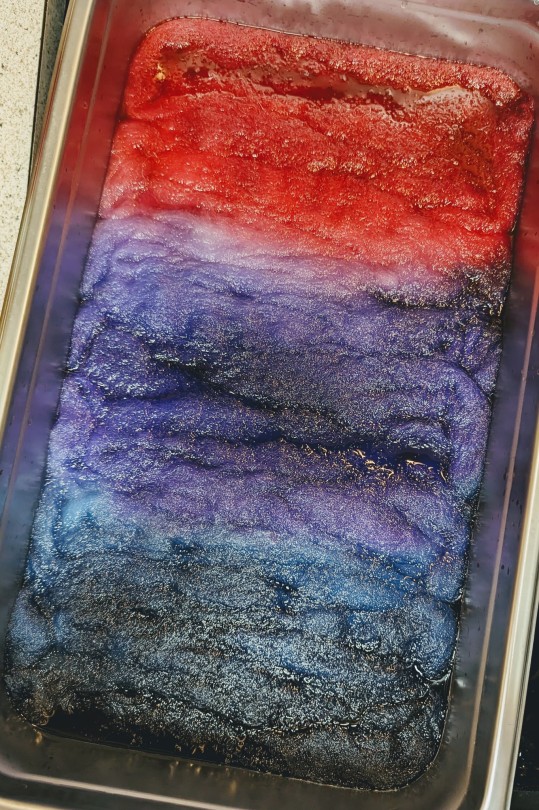
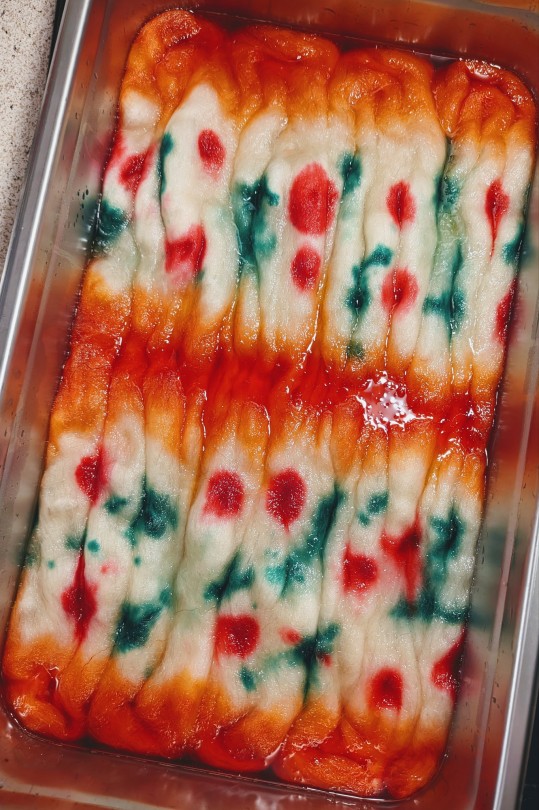
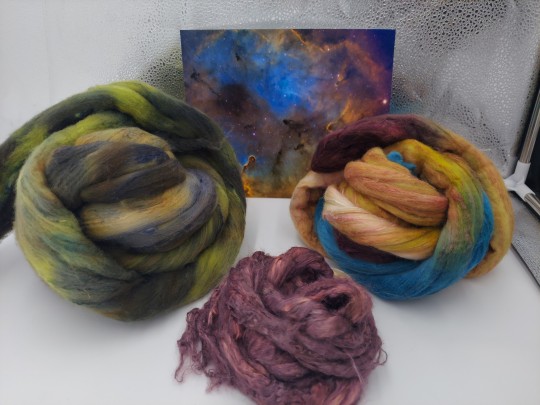
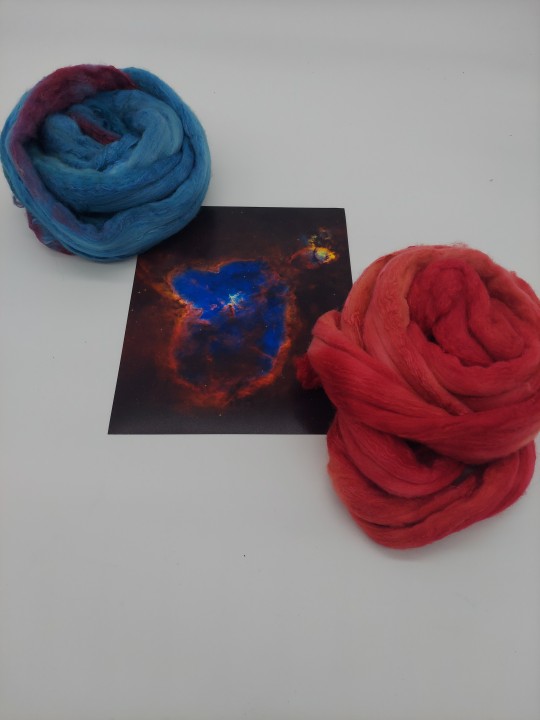
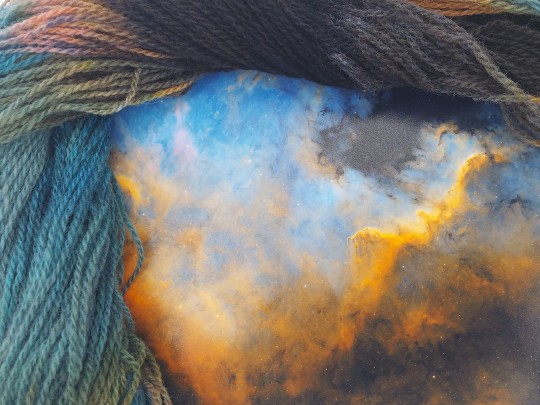
Better pictures, now with plans!
Astronomy photography credit to starman_astro. How he gets these images from our light polluted area is beyond me. I'm so thankful for his consent and support in using his photos as inspiration!
Ok, the first. The Elephant Nebula, and so full of colors! The green/orange on the left and the blue/orange/violet on the right are polwarth/silk. Green orange was pan dyed, then did an ice overdye with black. Blue/orange/violet was paint dyed, as was the violet. The violet is a soy silk blend, shinier but much flatter. The intent is to create a weaving using bits of each to recreate the picture. I'll be using some colored locks for additional texture.
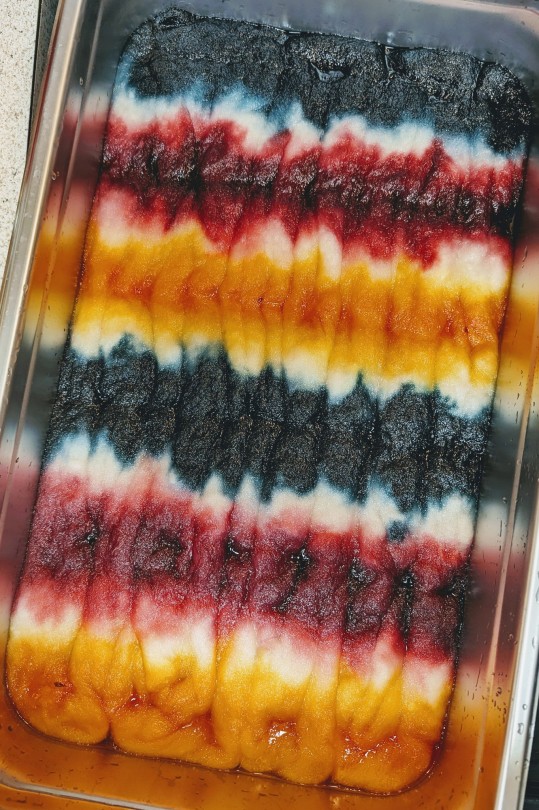
The second is the Heart Nebula. I might have gone too literal, but eh. Also, polwarth silk blend. Planning to spin individually, chain ply, and do a scarf with the shape of the heart nebula embedded. Maybe learn to do double knitting for this?
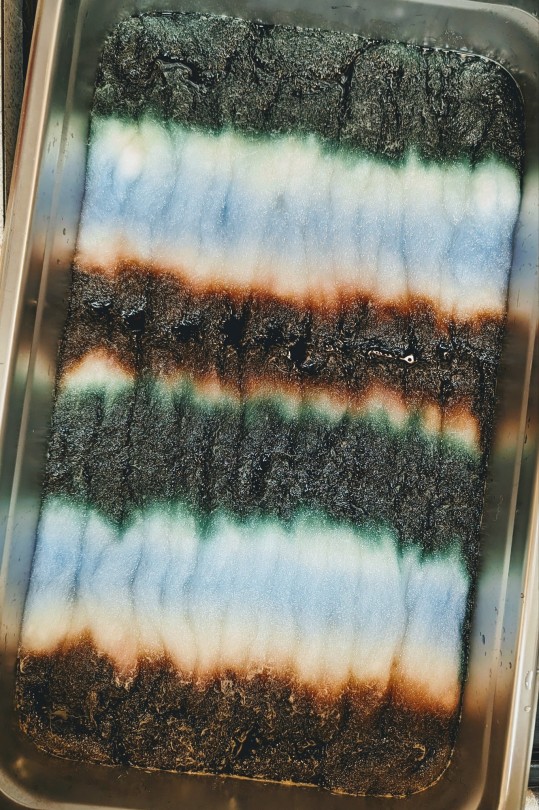
The last is the yarn, inspired by the North America Nebula. Oh gods, the yarn. I could not have possibly planned these colors coming out so perfectly if i had even known what i was doing. The yarn is a Romney blend from Island Fibers. Pan dyed. Holy smokes, people. I had to take two pictures to show this one specific detail... in my friend's picture, there is a small spot of pink. Somehow, my yarn found itself with a similar small spit of pink. I'm over the moon. The plan for this is to knit some accessories up (hat, gloves) that more abstractly reference the image.
The next pictures will be either progress or completion photos. I'll likely do the weaving first once I get the loom warped with some colors that will enhance this whole thing.

59 notes
·
View notes
Last Seen Blogs

cartas-que-nao-entreguei
Cartas que não entreguei

chiefbrandi-blog
ɪ'ᴍ ɢᴏɪɴɢ ɪɴ !

grandmacynthia666
Welcome To My shop

freshnewmeat4u2
Untitled