#Resin Kit Sculpture
Text
LEGS & BRIDAL BUM CAKES FOR AGES, EONS, MILLENNIA, ETC...
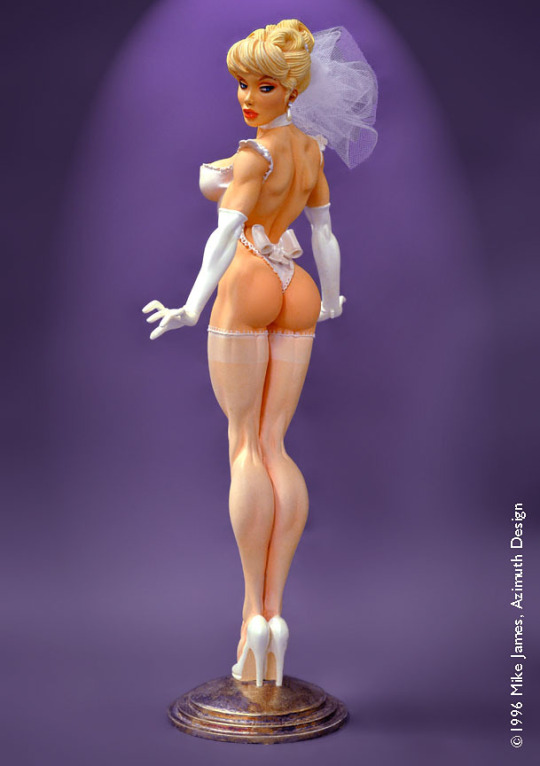
PIC(S) INFO: Spotlight on a promo shot of Mike James' "Bride" resin kit model, designed and/or sculpted by Mike James (American pin-up artist/ photographer/ sculptor) for Azimuth Design, c. 1995.
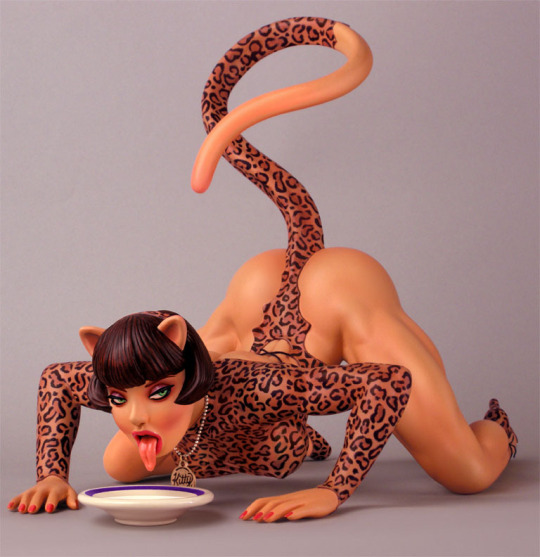
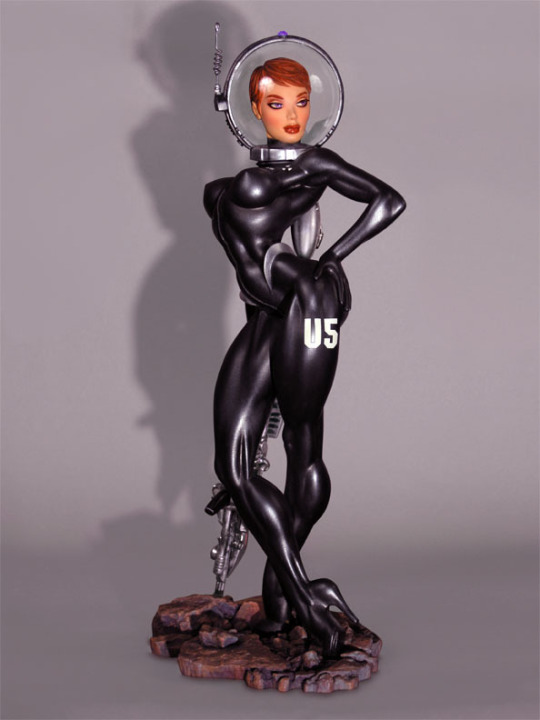
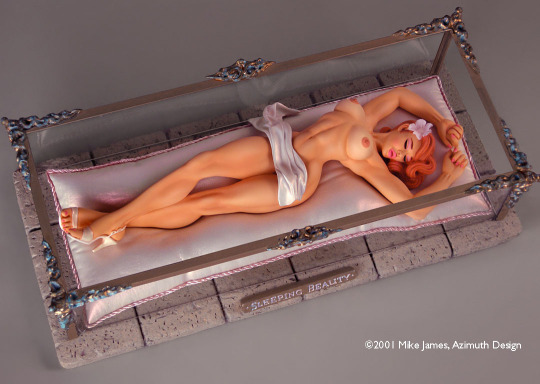
EXTRA INFO: Bonus shots of "Kitty," "Agent Venus," and "Sleeping Beauty" resin kit girl sculptures also by Mike James -- for Azimuth Design, c. 1998 & 2001 (2x).
Source: www.tumblr.com/mikejamespinupart/43726448001 (4x).
#Mike James Bride#Resin Kit Sculpture#Bride Girl Kit#Bride 1995#Mike James#Azimuth Design#Resin Girl Kit#Bride#Resin Model#Girl Kit Resin Model#Mike James Art#Resin Kit#Azimuth#Bride Resin Model#Girl Kit Sculpture#Bride Girl Kit 1995#James Girls#1990s#1995#Female beauty#Female figure#Resin Sculpture#Bride Resin Girl Kit#Bride Resin Kit Sculpture#Bride Resin Kit#Girl Kit Resin Sculpture#Girl Kit Model#Girl Kit#Female form#Female body
0 notes
Text
Casting and finishing Sailor Moon Sleeping Luna cat molds.
#art#etsyshop#handmade#fypツ#resin art#sculpting#sculpture#sailor moon#bishoujo senshi sailor moon#resincraft#resin kit#anime and manga
5 notes
·
View notes
Text
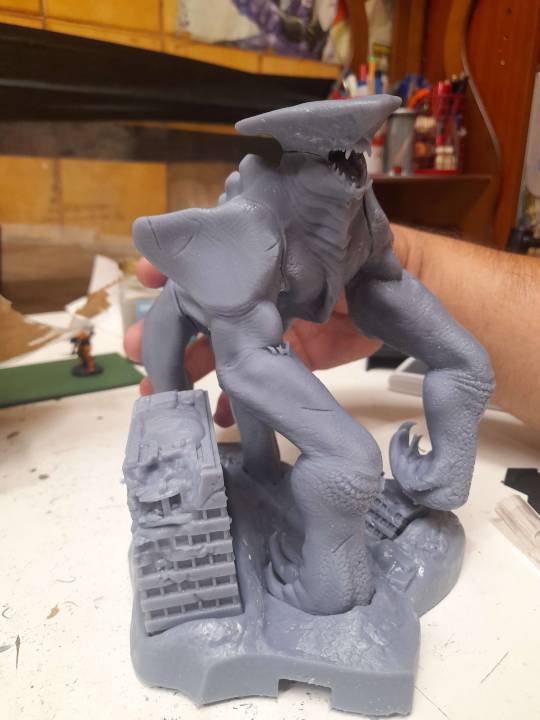
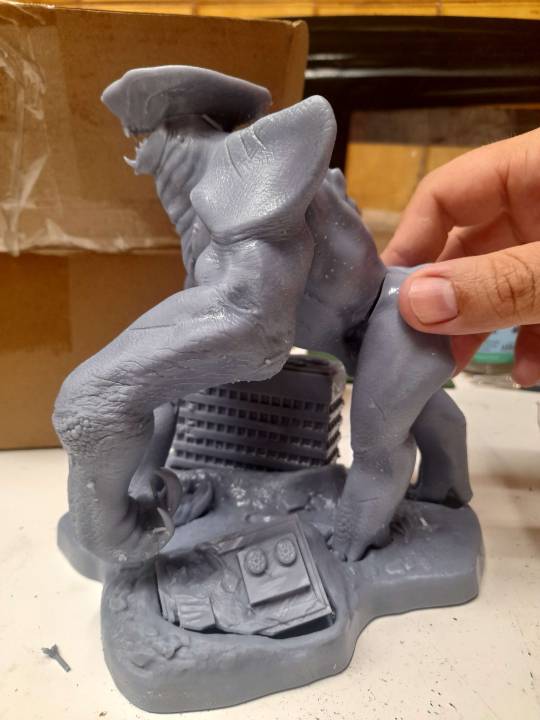
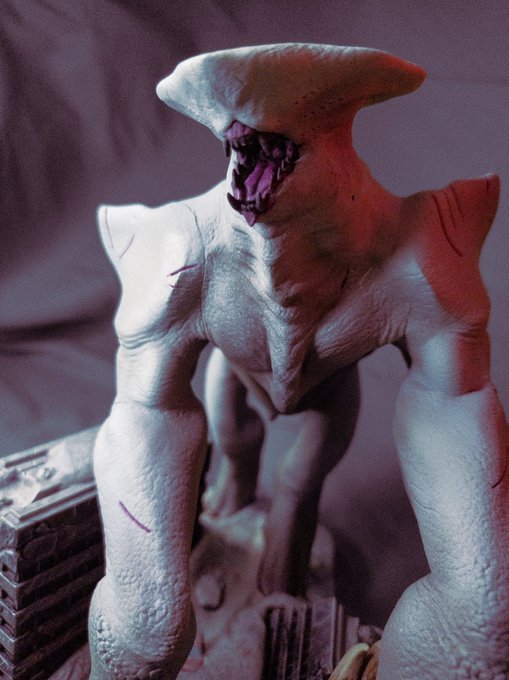
GIANTS MONSTER SERIES 1: WRAITH
Our first resin kit is printed and ready!
I'm very excited to show you the Wraith prototype! For me, it is a thing of pure magic to see how a sculpture made on a computer, a digital file, can gain a physical form. It would never cease to amuse me... But here it is.
For this model, I wanted a little base with a mini diorama to display, although you can put the monster wherever you want without it. Also, you may notice the little hole in the base. Let's say it would make sense in the future...
I'll show you more about this figure soon! We at GARGANTUA want to announce the pre-order date later this October, so stay tuned. In the meantime, here's a sneak peek at our fully painted proto.
#digital art#digital sculpting#kaiju#giants#valderrama bros#creature design#giants comic#Giants Monster Series#resin kit#model kit#garage kit#diorama#miniature painting
23 notes
·
View notes
Text
It took Acacia embarrassingly way too long to realize that bling could extend past the patch.
To be fair, eye patches were in and of themselves inherently cool, even as plain black cloth, let alone before you began to get crafty.
So there were cloths of a hundred many hues, embroidery, beads, buttons, sequins…
She had started 2-D but then began to go 3-D, first with things dangling down, layered thread and cloth and media on top. Then little sculptures, mechanisms, LED screens, special effects such as localized rainfall or fog powered by a rune below….
Her doctor, who had been the family doctor since the triplets were three, was pretty game with anything Acacia did, but put her foot down when Acacia started mentioning extra support straps and neck pain.
“Can’t you just make your own eye. I’ll send you the specs if it’ll keep you from blowing the rest of your face off accidentally.”
Acacia had never done anything in resin before but of course her mother had helped Acacia figured out the best kit for her needs. When she got it in, she was paralyzed for a second with indecision- so many choices!- but then she had THE best idea.
You couldn’t bedazzle an eye- obviously too pokey to do on the surface, impossible to recreate the same effect from within.
But she was Acacia Ruth Polaris Pines and nothing was impossible for her.
It took longer than she would have liked- five days instead of three- but at the end she had a eyeball that was both Barbie Girl and comfortable at the same time.
It sparkled. It shined. It was pink and yellow and rainbow and iridescent all at once. She wore it to do a mail run and it literally stopped traffic.
The eye was clearly a success and a week or two later, Acacia was in her workshop, resin on one side, and the material for the next eye, a glow in the dark eye, on the other. But she found herself… paused.
Her hands hovered, fluttered above the resin, the dye, but they didn’t descend…and she wasn’t forcing herself to try either.
It had only been five years since it happened. It wasn’t a long time in the grand scheme of things- she was only 23. She was young, her brain was still elastic…
Her identity was not fully cemented, it was ever changing, she was ever evolving, she didn’t need to be wedded to a stupid scrap of cloth.
Shouldn’t feel so naked without it.
She felt wet cloth on her face and realized more than crying, she had put on a spare patch without even realizing.
(she told everyone the glitter eye hurt too badly to use, and never spoke of it again.)
42 notes
·
View notes
Note
How did you make that Kaiji figurine/Sculpture/Statue? please tell me your secrets
I started by creating a 3d model in a program called Nomad Sculpt (for the Ipad, it was about $15 which is great for a 3d program, but there are free and laptop based options as well like Blender).
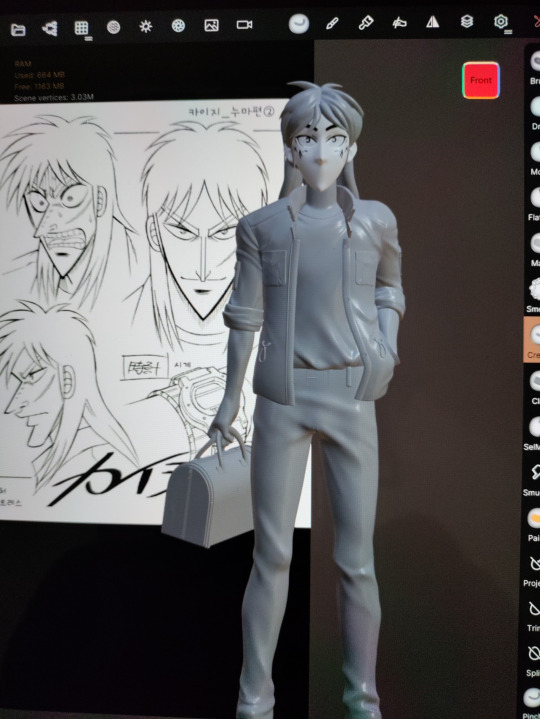
Here's a pic of the model, no color, to get an idea of what he looked like in this stage. His head looks different from the final because I actually created some different options to swap them, but due to printer issues currently only have the one displayed on the final fig.
Getting to this point is basically just 3d modelling skills, but I can say that I use tubes a lot and then build up over that. In Kaiji's case, I also split the model at a few points (neck, waist, right arm) for the sake of easier printing and because of size constraints.
Then I printed him with a 3d printer. I use an elegoo mars 2, just the basic one. It's a resin (SLA) printer, which allows for a much smoother print & better detail than an FDM printer (the filament based ones).
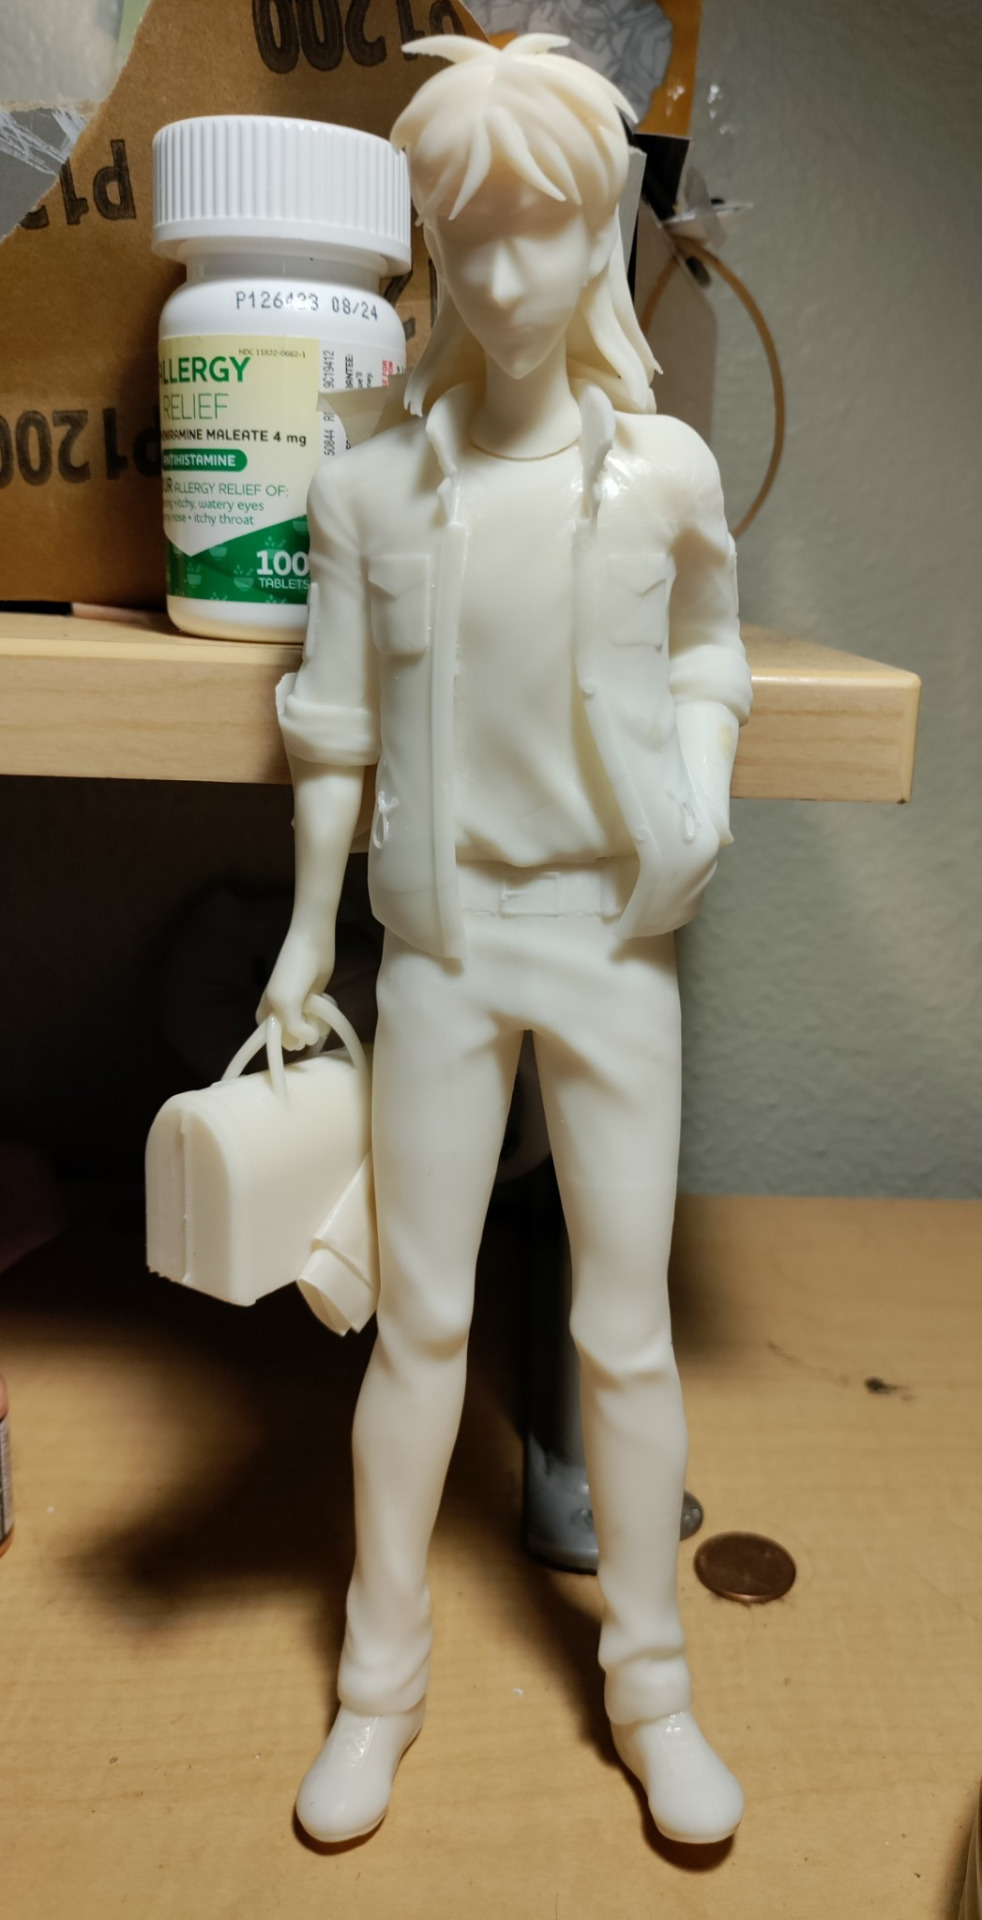
(Kaiji's model after some sanding to the joints for a decent fit)
After having a model I was happy with, I moved on to painting. If you're interested in painting stuff like this overall, I'd suggest looking into garage kits. There are some really talented painters who can give you much better information than me!
Although airbrushes are pretty standard for this, my college apartment & budget meant that was out of the question, so I painted him with a hand brush. I used primarily Vallejo acrylic paints, but pretty much any brand of miniature paints would work. I prefer them over regular artist paints because they're matte and thin (with water) easily.
After that, I did some chalk pastel shading for the shadows. He got a coat of sealant, and I drilled through a wood plaque and the bottom of his shoes to insert metal rods for extra stability.
And there you go!
A Kaiji :)
If you have any other questions about specifics or materials, feel free to send me a DM or another ask.
#long post#sculpting#i love making figs...hope some more people get into it!!#hope this helps but like i said feel free to ask anything more!#currently i have wips for ich*jou and ak*gi as well but we'll see how they turn out lol
10 notes
·
View notes
Text
August Part 1
As I mentioned at the end of my last post, there were three projects that I wanted to get back to and perhaps finish;

The first was the first custom doll I attempted; Very Merri's streaming mascot, Lami. When I had first worked on her I was so excited to start that I didn't bother waiting for some of my materials to arrive. Now I'm not saying you need the best of the best to even attempt this kind of craft, but having something of a little quality will save you the headache and heartache. For those who might not know, in order to do a face up to remove the original paint with acetone. After that you could repaint the face with acrylics or build layers with water colored pencils. Seeing Dollightful build those layers I knew thats how I wanted to do it. I had ordered the same brand she had used and was awaiting them, but I was too impatient with my excitement that I opted to use the lesser ones I had, those being the Artist Loft brand. I did what I was supposed to; removed the paint, layer three layers of Mr. Super Clear and start, only the colors weren't building up at all. I had I think seven layers with nothing really showing before I said f it and went to my paints. I broke three out of four of my needles doing the reroot as well. Part of this project originally was to teach myself how to sew, but I just couldn't wrap my head around it and with where I was living at the time I had little space to work in. It was actually quite discouraging, so I gave up.
The next project was a sculpture of my friend's FFXIV character that I was trying to make for Christmas last year, using Nerdecrafter's Not Another Crap Kit. Now, I've never really worked with polymer clay, only air dry, so this was a challenge in of itself and I foolishly didn't bake it to save my progress and let it sit so at one point things just fell off. I fixed it, baked it this time and thought everything was okay, only to have it topple over one day and break so it once again needed repairs.
And the third I never actually touched, but have had the bade for four years and thats the DIY Funko. I always knew I wanted this to br FFXIV Lus, but I could never settle on the look. First it was my look from Stormblood, then I went DNC main in Shadowbringers and was gonna do that, only to fall in love with my BRD glam and go back to BRD main. I have multiple versions of Lus as the Miqo'te through my years of playing, but I realized that this was the perfect opportunity to make my Lalafell version that I fantasia into during October.
So with plans in motion I started to work on Lami, with the idea of flipping between her and the statue for my friend, but Lami took up a lot of space so I was unable to.
After doing Celes the way I did I didn't feel the need to force myself to sew and instead made a base for her to sit on and sculpt onto her.
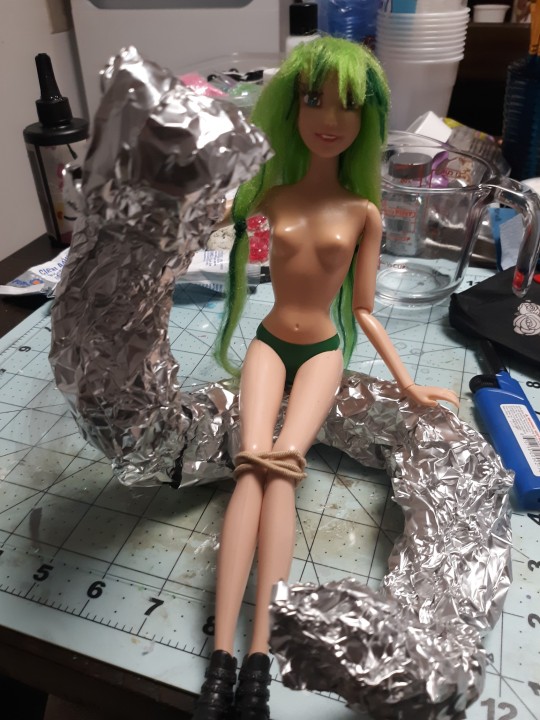
I made an armature out of foil in the shape of a snake and glued Lami's legs together. Now I am telling you right now, this Disney princess doll was the worst base I could have chosen all because of those damn vinyl legs! Because of the weird flex they have, I had a hell of a time gluing them together.
Once the glue dried I painted her legs with multiple layers gesso and began to use my air dry clay to make the snake.
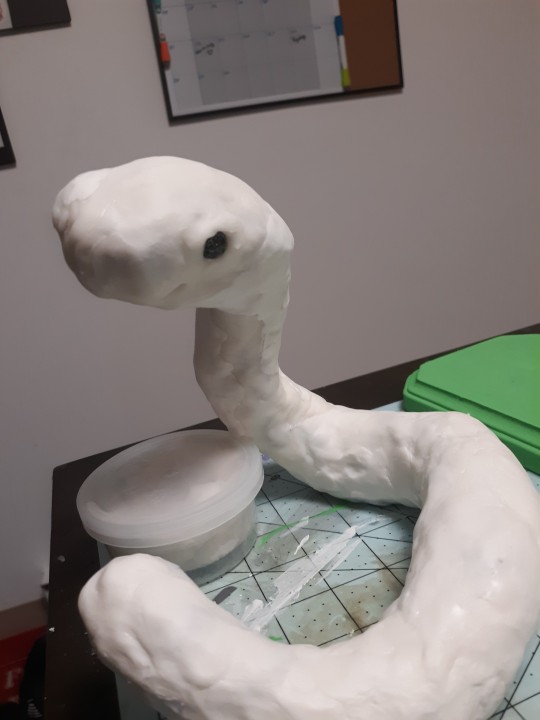
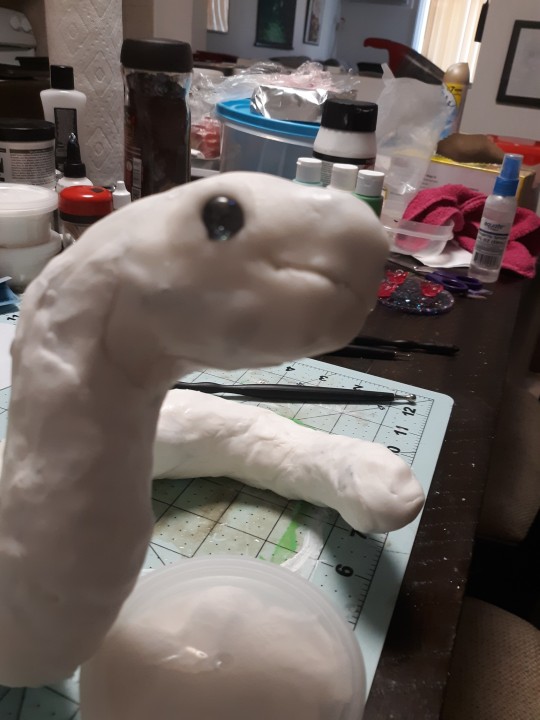
He's derpy and I love him. You cand see I also painted a wooden plaque to attach him to cause he was a little top heavy.
In this time I sadly had disaster strike... twice. Remember the chibi of Luscia I made on the BRD swing? Well somehow I managed to yank the jump ring through not only the plastic, but also the resin.
Not wanting to trash it I turned it into a standee using one of the test coasters from the Hythades standee as well as the botched flowers from the Lotura dome. And the other was sadly my Zack and Aerith snow dome.

This one had come out so well and I loved shaking it, so I was shocked to see the resin layer peeling off of Aerith. I managed to break the seal and drain the liquid only to find the situation was much worse. The resin had become bendy and I'm not really sure how or why, but I have seen two possibilities. The first thing I read said that ot might have bern too humid when I had applied the resin. I did dome Zack a day or so before Aerith so that could be why his doming was still in tact. He is leaning like Aerith which does lend to the humid theory since I attached them the same day I domed her. But let me flash forward to early November, now, I have no real reason to shake my Lotura dome since the micro glitter all but disintegrated and the stars just stick to things, but I for some reason I decided to pick it up and shake ut only to see my plastic piece of the characters wobble, so they too had a problem like the Zack and Aerith one. My Sheith one still stands like a rock and I attached it and the Lotura one the same day, so why?
Upon some more research the glycerin and the resin don't play well together. But if that was the case, wouldn't Zack and Lotura's doming peel off too? And what about the thicker resin pieces like the life stream or the flowers? Since I can't find a clear answer this put the plans I had for doing a Sheith giveaway for the domes on hold.
As saddened as I am to see my work crumble, I'm more fascinated as to why it happened. If anyone knows, please feel free to drop a comment.
Needless to say I didn't let that stop me from moving forward.
4 notes
·
View notes
Text
A winter scene in summer. . 105mm Flak. Complete Resin kit with aluminium gun. ...
A winter scene in summer. 🤔
.
105mm Flak. Complete Resin kit with aluminium gun. Kit from airmodel, 1:35 scale.
Made in 2007.
.
This Flak was used to shoot high flying bombers, up to 12.800 meters.
.
Fixing the heavy gun onto this resin kit was … tricky. 😉
.
Figure sculptured myself, head is from hornet range.
.
.
.
.
.
#militarymodelling #plasticmodels #miniature #plasticmodeling #modelbuilder…

View On WordPress
0 notes
Text
Elevate Your Artistry with the Perfect Art Resin Kit
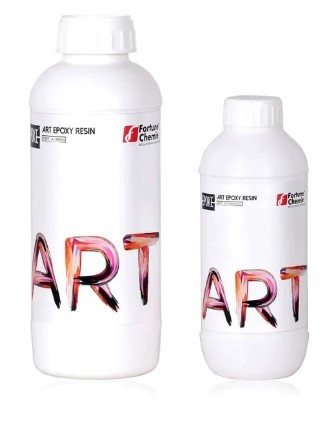
Unlock new dimensions in your artistic journey with the Art Resin Kit that promises to elevate your creations to awe-inspiring heights. Whether you're a seasoned artist or just starting, this all-inclusive Art Resin Kit empowers you to turn ordinary pieces into extraordinary masterpieces.
Experience the seamless blend of functionality and creativity as the Art Resin Kit provides crystal-clear clarity and a glossy finish that captures every intricate detail. With user-friendly instructions, the kit caters to beginners and professionals alike, making it a versatile addition to your artistic arsenal.
Bring life to your paintings, sculptures, and mixed-media projects, as the Art Resin Kit enhances vibrancy and depth while ensuring long-lasting durability. Explore a world of possibilities and let your imagination run wild with this Art Resin Kit available at Canvazo - your ultimate companion in the quest for artistic perfection.
0 notes
Text
Resin mini Prentiss customised sculpture... initial kit; modifications; scale comparison and shitty paintwork LOL xxx

1 note
·
View note
Text
Bomb Devil statue from The Nailon Real at their ETSY shop. Check it out.
#thenalonrealm#sculpture#statue#bomb devil#bombdevil#3d artwork#3d model#etsyseller#etsyshop#etsyfinds#etsy#etsystore
1 note
·
View note
Text


"...PERHAPS THE BEST-SELLING GIRL-KIT IN THE WORLD."
PIC(S) INFO: Part 1 of 2 -- Spotlight on promo shots of the 1995 Bride resin kit model, sculpted by Mike James (American pin-up artist/ photographer/ sculptor) for Azimuth Design.
Source: www.jamesart.com/bride.html.
#Mike James Bride#Bride Girl Kit 1995#Bride Girl Kit#James Girls#Mike James#Azimuth Design#Girl Kit Resin Model#Girl Kit Resin Sculpture#Girl Kit Model#Resin Sculpture#Azimuth#Girl Kit#Bride#Resin Model#Girl Kit Sculpture#Bride Resin Kit Model#Mike James Art#Bride 1995#Female form#Female figure#Female Body#Female Beauty#1995#Bride Resin Kit#Girl Kit Scuplture#Bride Resin Model#Pin-up Girls#Pin-up Ladies#Pin-ups#Female body
0 notes
Text
paryavaran Micron Electric Portable Clay Sculpture Model Grinder Machine Polisher Polishing Pedicure Manicure Nail Tools Kit | Multicolour
paryavaran Micron Electric Portable Clay Sculpture Model Grinder Machine Polisher Polishing Pedicure Manicure Nail Tools Kit | Multicolour
Price: (as of – Details)
Description: Great for metal, resin, plastic, wood polishing, also can be used for manicure art. High speed rotation, powerful enough to trim and shape tough items and toenails. Low noise and slight vibration for smooth and long-time operation. Inclued 5 kinds of drills. Powered by 2 x AA batteries (not included). Specification: Material: Plastic Length:…
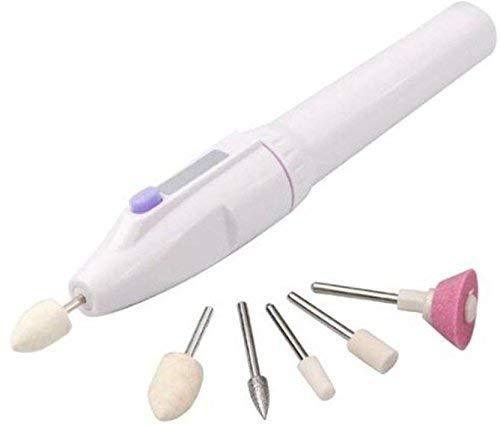
View On WordPress
0 notes
Text
Ongle en resine mode d'emploi pour ps4
ONGLE EN RESINE MODE D'EMPLOI POUR PS4 >> DOWNLOAD LINK
vk.cc/c7jKeU
ONGLE EN RESINE MODE D'EMPLOI POUR PS4 >> READ ONLINE
bit.do/fSmfG
faire un moule pour fibre de verrerésine et moulage
fabriquer une pièce en résine
quel moule pour résine époxy
fabriquer moule silicone
faire un moule d'un objet
comment faire un moule pour sculpture
fabriquer un moule pour résine époxy
Celui-ci vous sera délivré sous conditionnement verre et disposera d'un bouchon équipé d'un pinceau ce qui facilitera considérablement son emploi. Plus de Découvrez leurs nombreux avis laissés sur les nouveautés Lampe pour ongles reglable août 2022. Comme eux, profitez des garanties et modes de livraison Solution économique pour le nail art, la french ou le remplissage, les kits vernis semi permanents sont constitués de vernis hybrides. A mi chemin entre gel UV Parcourez notre sélection de foot slime : vous y trouverez les meilleures pièces Carte Embellissements Acrylique Ongle Résine Fournitures Bougies. Mode d'emploi : Commencez par emballer le modèle d'un film étirable alimentaire pour l'isoler des étapes suivantes; puis faites des bandes de Plastiline® d' Set découverte peinture Flashe vinylique - 6 x 20 ml - Avec flacon de vernis mat 120 ml. Lefranc Bourgeois. en stock en ligne.Blue Cat Fimo Slices - Embellissements en argile polymère pour chaton pour les inclusions de slime, d'ongles ou de résine - Fournitures d'artisanat
https://gotilequrafa.tumblr.com/post/694649212980330496/php-edit-pdf, https://gotilequrafa.tumblr.com/post/694648112554328064/casio-qt-2100-mode-demploi-de-lipad, https://gotilequrafa.tumblr.com/post/694649093285429248/tournevis-testeur-electrique-mode-demploi-iphone, https://gotilequrafa.tumblr.com/post/694651346002018304/offre-demploi-neuchatel-nettoyage, https://gotilequrafa.tumblr.com/post/694648260206428160/testo-425-mode-demploi-pour-ps4.
0 notes
Text
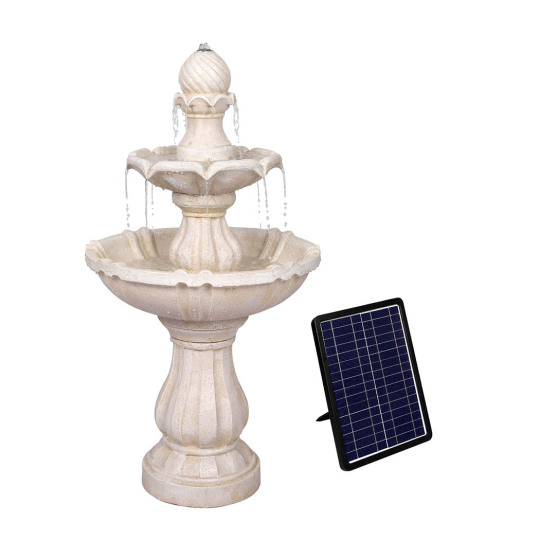
Lambu Solar Fountain Water Bird Bath Power Pump Kit Indoor Garden Outdoor
buy now on :- https://www.buymetoday.com.au/
As the sun goes behind a cloud the fountain will slow down. Give yourself a water feature out on your balcony.
Key Features
Unique fountain sculpture
Indoors and outdoors
Durable weather-resistant resin
Easy to assemble
Energy efficient
SPECIFICATION
Fountain
Brand: Lambu
Material: Polyresin
Dimension: 98cm x 49cm (H x Dia)
Colour: White
Solar Panel and Pump
Material: Polycrystalline
Power: 12V/2.4W
Battery type: Lithium
Maximum flow rate: 350L/h
Panel dimension: 31cm x 24cm 1.5cm
Colour: Black
PACKAGE CONTENTS
1 x Lambu Fountain
1 x Solar Panel
1 x Water Pump
#fountain#water#travel#architecture#photography#art#italy#nature#garden#ig#travelphotography#fontana#summer#photooftheday#rome#roma#italia#landscape#beautiful#waterfountain#fountains#city#picoftheday#love#instagood#park#travelgram#sculpture#fontaine#photo
0 notes
Text
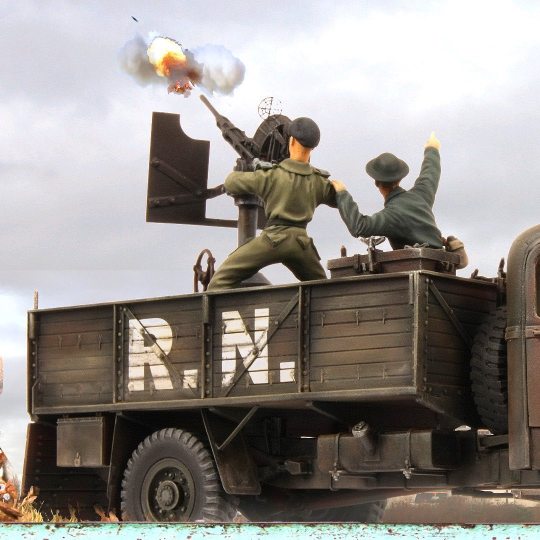
Bedford Oyd truck of Royal Navy during Battle of Britain. Work from 2008. . Resi...
Bedford Oyd truck of Royal Navy during Battle of Britain. Work from 2008.
.
Resin Kit 1/35 from accurate armour, Oerlikon 20mm AA Gun from same brand.
Figures sculptured myself using fimo. Heads from hornet.
.
.
.
.
#royalnavy #oerlikongun #scalemodelling #modelkits #modelkits_insta #bedfordtruck #hobby #plamo #scalemodel #figuresculpting #135scaleminiatures #weatheredmodels
Source
View On WordPress
0 notes
Photo
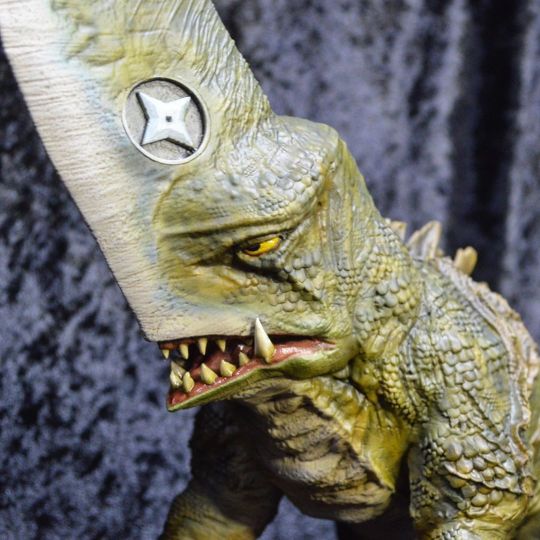
GIANT EVIL GUIRON Treasure Festa Online copyright kit on Sept 20th Resin cast kit Total length about 44 cm 1/200 scale all 5 parts JP¥ 24,000 #dopepope #daiei #gamera #guiron #kaiju #creature #monster #knife #blade #axe #sharp #zbrush #3D #kit #resin #sculpture #collectible #hobby #figure #shuriken #derp #artoninstagram #トレフェスオンライン#当日版権キット https://www.instagram.com/p/CE6yuxqBKz1/?igshid=1wpcbt7ulow6l
#dopepope#daiei#gamera#guiron#kaiju#creature#monster#knife#blade#axe#sharp#zbrush#3d#kit#resin#sculpture#collectible#hobby#figure#shuriken#derp#artoninstagram#トレフェスオンライン
13 notes
·
View notes
Last Seen Blogs

myangieworld-blog1
Untitled

vally8
💖💖💖

itskimmykay
ItsKimmyKay!

queenofmiscellany
miscellany

pixpunk
Pixelated Cyberpunk & Sci-Fi