#Photoshop tutorial C6
Note
Hello the gorgeous Lati! :D Would you be willing to make a tutorial or explain how you take such great sim photos with nice background and crisp lighting?
Hi Anon! <3
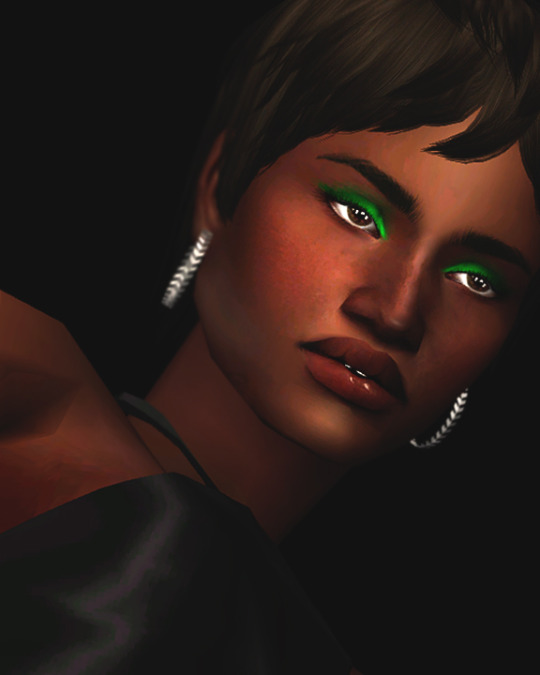
I'm going to assume you're referring to the portraits I have of my sims here on my tumblr, and not pictures of my gameplay over at my gameplay twitter (there I usually just take random pics as I play, and crop them. None of the technical stuff like with portrait photos)
How I take my sims portraits is pretty simple also, so i'm sorry if you're expecting more. Either way, I hope this is helpful.
Basically, I start off in an empty lot, and then include the following items:
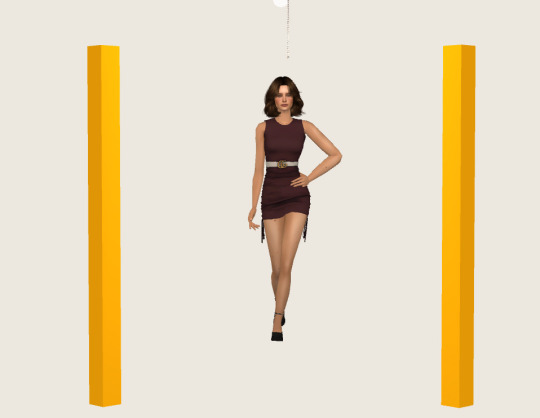
THE BACKGROUND

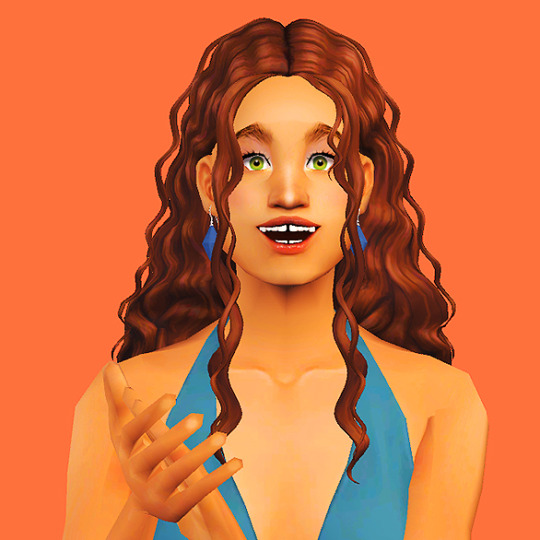
These recolors of MixedUp's Screenshot Background Rug. I usually go for the white or the black if they're "serious" pictures (usually of character reveals of my show) but more fun colors when it comes to portraits of my gameplay sims (see below for the difference. Same set up, same lighting, different color background)
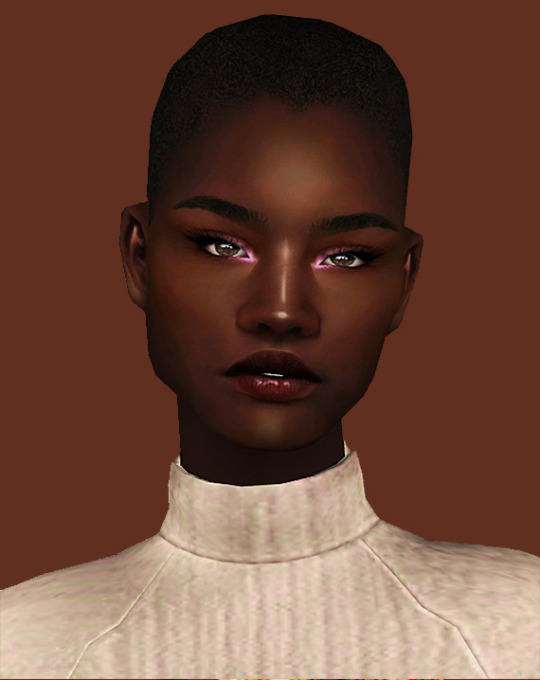
Lately I've opted for a clear background, as opposed to a set. I don't know, I feel like it looks way better when it comes to taking clear portraits of the sims you wanna showcase.
LIGHTING:
For lighting, I use two things:
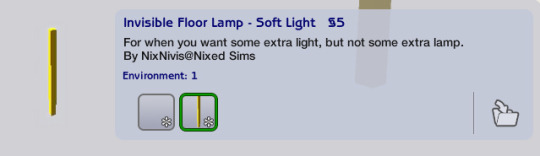
The invisible Floor lamp in soft light, which is just everything to me both in terms of taking portraits and filming. Can't live without it!! And how much light you use really determines the vibe you want to achieve from a certain photoshoot. Here's an example of what I mean: Fun little gameplay portrait (bright) vs. Mystery series protagonist (dark)

If you would like to achieve different type of lightings (such as bisexual lighting, for example), I highly recommend colored lights such as this, this and this.
Of course, whichever lighting you choose, it helps to have a lighting mod such as this one!
OMSPs AND OTHER MODS
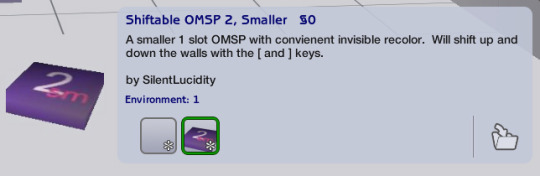
And then, of course, OMSPs are a must-have. These are the ones I use, but there's a HUGE number of OMSPs to choose from. I also use the look at me now mod, to get the sim to look at me (the camera).
And then, finally, I use poseboxes! There are a bunch of useful pinterest boards with poseboxes, such as here and here! For more whimsical portraits/facial expressions, I use Jaydee's boxes.
PROGRAMS
I use FRAPS to take my pictures and PHOTOSHOP C6 to edit them!
EDITING
Of course, editing is also a part of the ordeal. I don't do much, but I think it does make a difference I do things such as change the levels/brightness/hue of the photos, add sharpening, and smooth out any edges! I also sometimes add shadows, but very occasionally.
Here's a side-by-side with a recent sim I took:


RESHADE
I wasn't using reshade for this photoshoot in particular, but if you get it to work it helps with smoothing out some edges and adding shadowing. If you don't get it work, then don't stress too much about it because I don't think it makes that big of a difference personally!
I have it off most of the time when I'm taking pictures, because I enjoy doing my editing in photoshop instead :)
If you do want it, though, here's an excellent video on how to install it for The Sims 2. I use Falkii's Turniphead reshade. The video itself also has a great reshade in the description, albeit one that's less colorful/bright (recommend more for filming than taking photos).
HOPE THAT HELPS!
Please let me know if you have any other/follow up questions <3
39 notes
·
View notes
Text
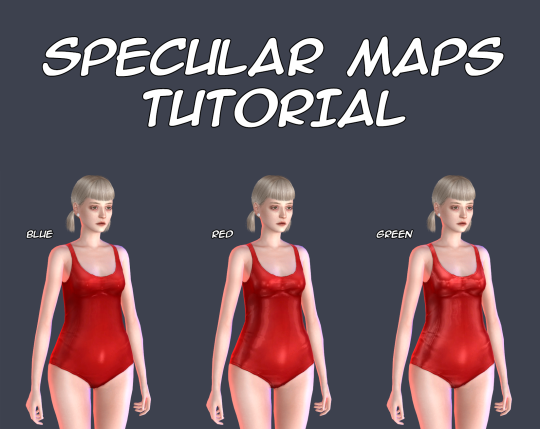
Specular Maps Tutorial
There is no so many information about these maps and most of this information is too difficult for my understanding, so I decided to make my own tutorial about them.
This tutorial shows you how to make your own specular maps from scratch without using EA’s maps as a base. You can read it under the cut.
Note: English isn’t my native language and I’m pretty bad in writing in it, so sorry for any mistakes. Still hope this tutorial will be understandable for you.
First of all I recommend you to check out this tutorial for specular maps. It’s for build CC and it’s in Russian (still can translate it with google), but it has some nice examples. It also helps me a lot to understand the process.
That you need? Any image editor that supports dds format and alpha channels. In my case it’s Photoshop C6. You also need to download dds plugin for it.
Let’s start!
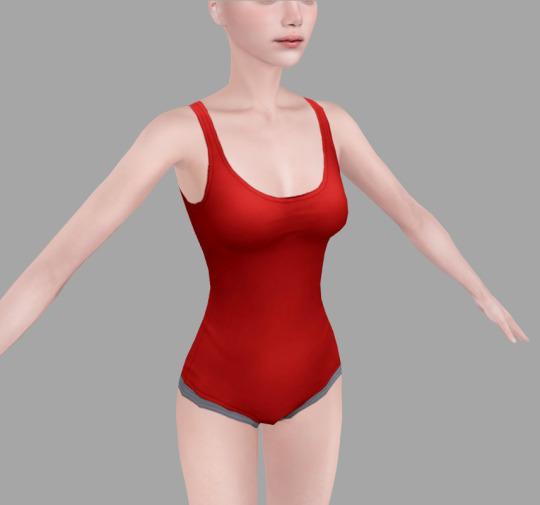
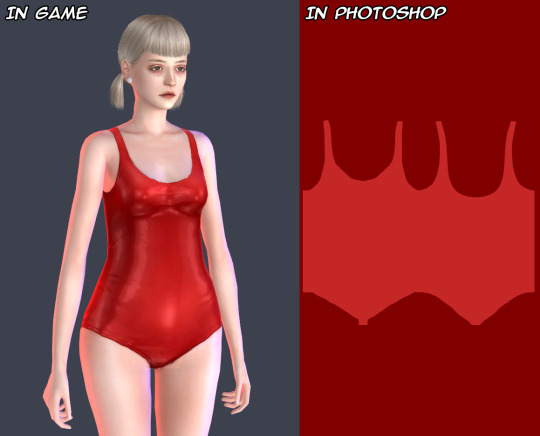
I’ll be working with this EA’s swimsuit.
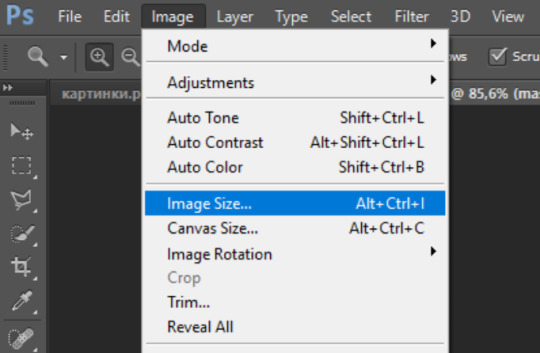
1. Open your texture in Photoshop. For now, we need change image resolution. If you make non-hq texture the size for your normal map should be 512*1024 pixels, if hq then 1024*2048 pixels.
Easy way to doing it is to go to «Image->Image Size», copy the first value and past it in the second. Don’t forget to check out «Costrain Proportions». It should be turn on.

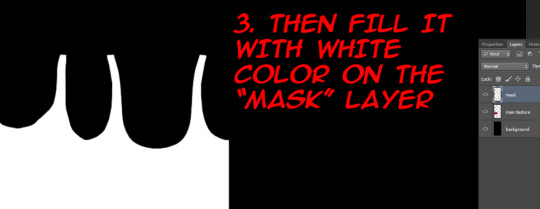
2. Now make new layer under the layer of texture and fill it with black color, lets name it «background» and the texture as «main texture». Then create the another new layer, name it «mask». It should be the plain white copy of the «main texture» like in pics below.
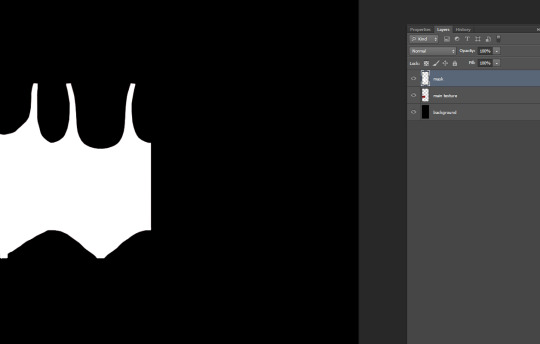
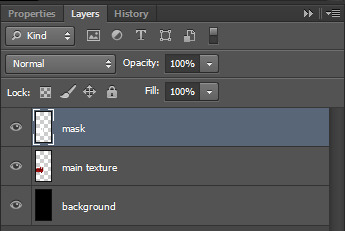
Easy way to doing it in Photoshop:
3. Save the file as psd format. This is our base for the specular maps.
4. At the first we should make mask map. This map is needed for avoiding speculars from others CAS items to overlap your own. Examples can be found here.
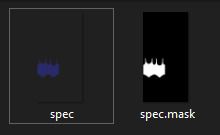
For mask map you need to delete «main texture» layer, merge remaining layers in one and save file in dds format. Name it «spec.mask».
The saving settings which I use for dds plugin.
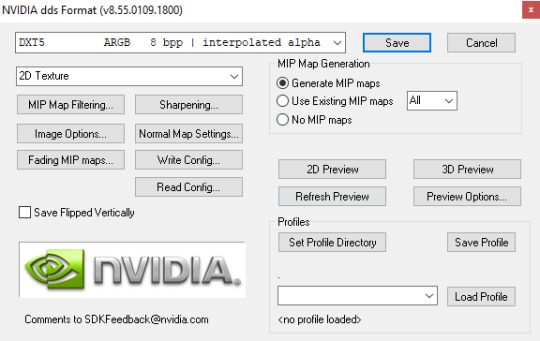
Note: If you want to make your specular map without any shines you need to save your mask map as DXT1 and spec map as DXT5, otherwise your specular maps will be broken in Studio.
5. Close your psd file without saving and open it again. Now we start to make the spec map. It’s responsible for the shine.
There is two ways. You can work with plain texture or with texture itself. The first option is good for clothes with normap maps, the second can be pretty useful for make up, stockings, gloves and ect (the CAS items which can’t have normal maps).
In this tutorial I’ll be working with plain texture.
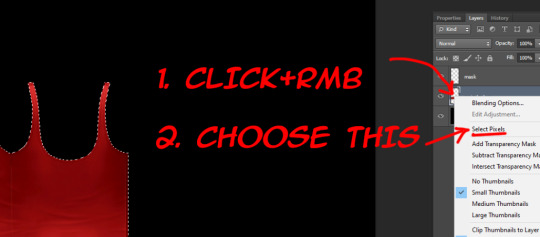
Merge all textures again. Select the layer and copy it (ctrl + A and ctrl + C).
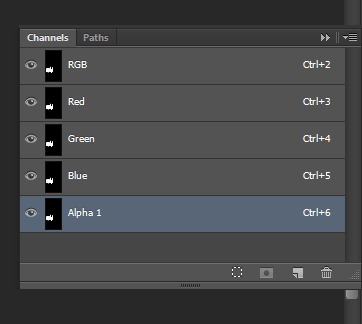
Go to channels and create Alpha channel. Paste your layer in this Alpha channel (ctrl + V).
Should be looking like this.

I will use lighter shades of gray to make the tutorial more obvious. But for my CC I personally use more darker shades to make CC barely shine.
Choose “Brush Tool” with black color and put it’s Opacity to 50%.
Note: You also can use “Paint Bucket Tool” or “Brightness/Contrast”, but they don’t always work fine, so be aware of that.
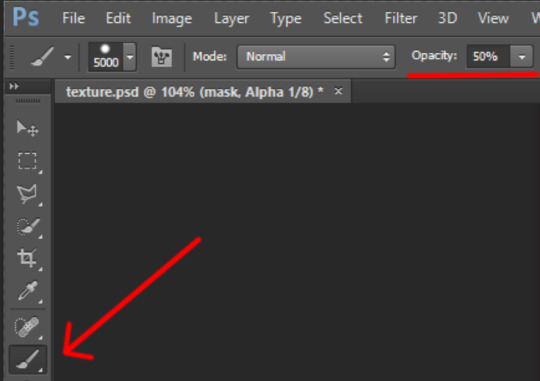
The choosen color should be black! (#000000 color code)
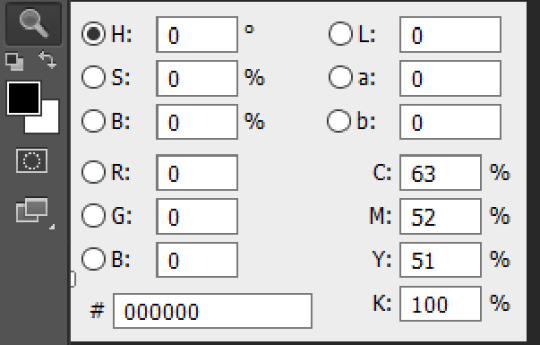
Make the size of brush big enough to color in channels in one touch.
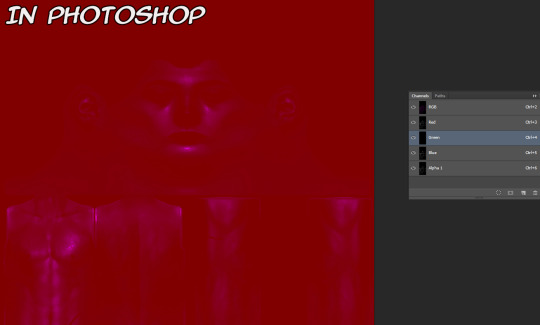
Go to channels. I decided to color in Alpha channel in 50% Opacity.

Red channel in 80%. (Put Brush Tool’s Opacity in 80%. Make sure the color is still black.) The same way with Green channel.
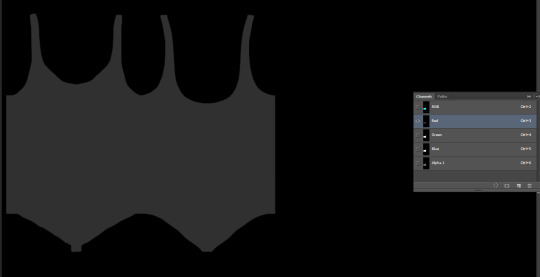
For Blue chanel I chose 30% Opacity.
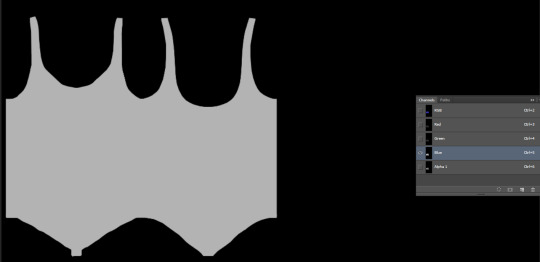
Make all channels visible. The result should be looking something like this. Making different shades of gray in different channels causes the diffent results in game, so I recommed to test this channels more to get more interesting results.
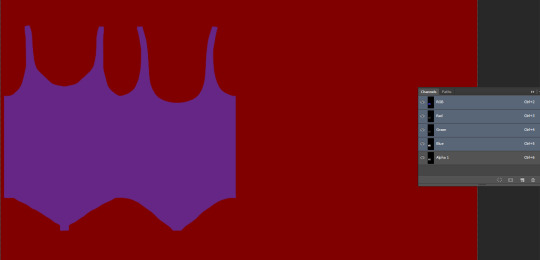
Note: Make shure that the area around your texture is still black while Alpha channel invisible and red while all channels is visible! Otherwise the whole body of your sim and any CC without mask map will be shiny!
6. Save your file as dds format, name it “spec”. You can close your psd file without saving it or saving it as another file, if something goes wrong.
Your specular maps should be lookig like this.
Note: If you name your spec map as “myspecmap”, the mask map also should have the same name, but with “.mask” in the end ( for example: “myspecmap” and “myspecmap.mask”). Otherwise Studio won't see your specular maps.
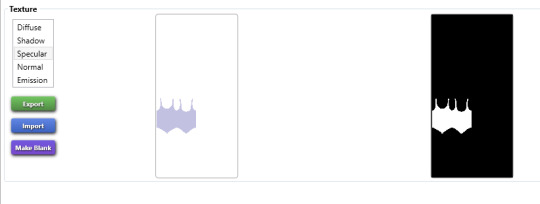
7. Open your CC in Studio and put your specular maps back. Choose one of the files, the other file will be placed there automatically.
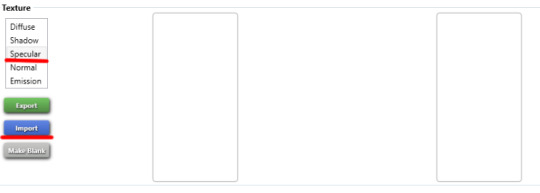
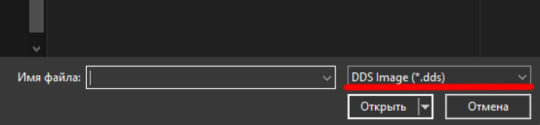
Don't forget to change to dds format while looking for your maps.
Should be looking like this. The first map is transparent and the second is black and white. It’s important!
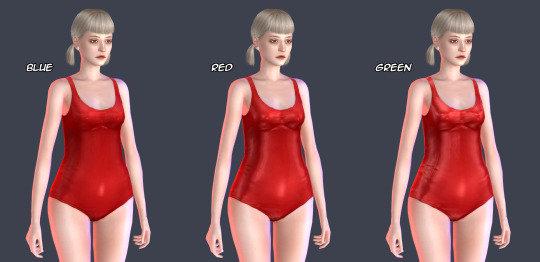
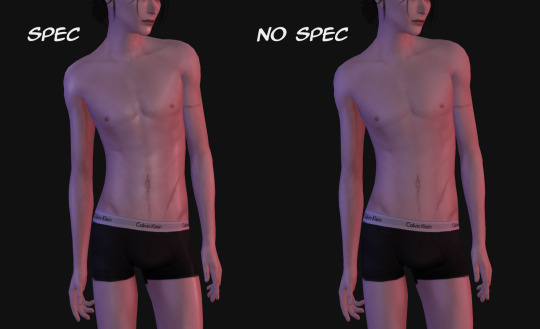
8. Lets check out our maps in game! I also made others specular maps to feel the difference between their effects.
If Blue channel is lighter than others RGB channels. Result of the tutorial.

If Red channel is lighter than others RGB channels.
If Green channel is lighter than others RGB channels.

For a better view.
And another example how specular maps can be used. You can make speculars with wet skin vibes for your sim. I used skindetails by obsurus-sims and by me.
Note: Make shure not posting for public such СС and use it only for personal uses or with creator’s permission! Let's respect the work of others creators!
That's all! Maybe in future I'll add more information about specular maps and some tricks. But for now the language barrier still is problem for me :(
Hope it’ll help you somehow! Wish you good luck and inspiration for your future creations!
478 notes
·
View notes
Note
hello love. im a beginner in gif making! your gifs inspire me to make my own. may i ask which application you use to make them and also edit it's colouring/saturation/etc.?
hello! i just edit it all in photoshop c6! tumblr has a lot of tutorials about gif making if you really need specifics. :D
3 notes
·
View notes
Link
#Photoshop tutorial#photo#Photoshop video tutorial#how to create photo in photoshop#learn photoshop#learn photography#photo editing#photo manipulation#image#image manipulation#how to create photoshop#slow motion effect#Photoshop tutorial C6
0 notes
Note
Do you know any good tutorials on how to make gifs collages on Photoshop c6s?
when making gif collages, most people use a template. there are a lot of different kinds and they’re actually really easy to make in photoshop.
here is a basic gif + template tutorial that is easy to follow (x)
although this person is using cs5, nothing will change in terms of the process
templates (x)
there is a tags page so you can narrow your search to something more specific
i can’t remember the tutorial said anything about a size limit, but remember to keep your gif size below 3mb.
i hope this helps and thank you so much for asking!!
8 notes
·
View notes
Text
OLD TO NEW
The aim in this brief is to create digital darkroom effects for our images, these techniques are:
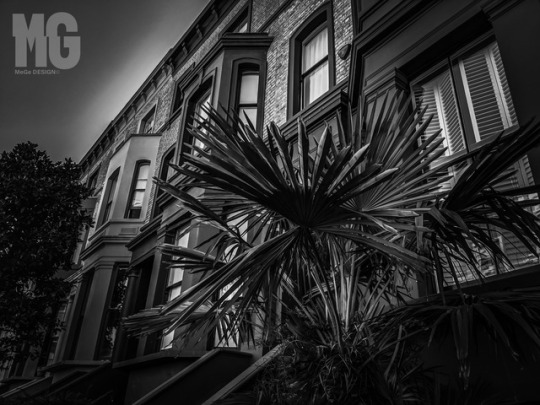
BLACK AND WHITE
Alfred Stieglitz, (1935), Hands (Variant IV) [ONLINE]. Available at: http://www.getty.edu/art/collection/objects/106556/dorothy-s-norman-alfred-stieglitz-hands-variant-iv-american-1935/ [Accessed 29 December 2018].
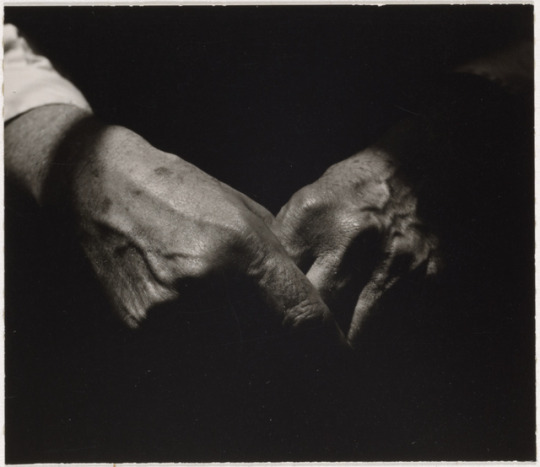
Black and white photos are those which show the tints and shades of grey from pure white to absolute black. It's recommended to shoot in colour and then convert it to black and white so no values are lost and you can customise it in post.
Expert Photography. 2017. Monochrome vs. Black and White Photography: Is There A Difference?. [ONLINE] Available at: https://expertphotography.com/monochrome-vs-black-and-white-photography/. [Accessed 29 December 2018].
Photoshop Tutorial:
https://photography.tutsplus.com/tutorials/how-to-convert-your-images-to-black-and-white-in-photoshop--photo-488
CROSS-PROCESSING
Sage Ross, (2011), Young man in bar, cross processed [ONLINE]. Available at: https://upload.wikimedia.org/wikipedia/commons/c/c6/Young_man_in_bar%2C_cross_processed.JPG[Accessed 29 December 2018].
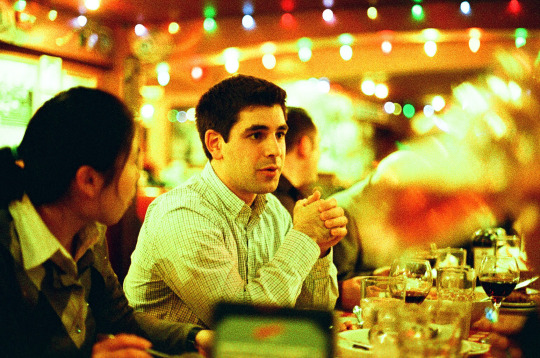
Cross-processing (also known as 'x-pro') is the procedure of deliberately processing one type of film in a chemical solution intended for another type of film. As particular chemical solutions are optimized for specific kinds of film, you will get unpredictable and interesting results when they are combined differently.
Lomography Magazine. 2014. What the Hell is Cross-Processing?. [ONLINE] Available at: https://crossprocessing.info/. [Accessed 29 December 2018].
Photoshop Tutorial:
https://photography.tutsplus.com/tutorials/quick-tip-using-adobe-photoshop-to-create-a-solarised-photograph--photo-5973
SOLARISATION (SABBATIER EFFECT)
Ralf Roletschek, (1981), Porträt im Studio - Aufnahmedatum 01/1981 [ONLINE]. Available at: https://upload.wikimedia.org/wikipedia/commons/thumb/b/b5/Katrin-briedermann-04.jpg/425px-Katrin-briedermann-04.jpg [Accessed 29 December 2018].
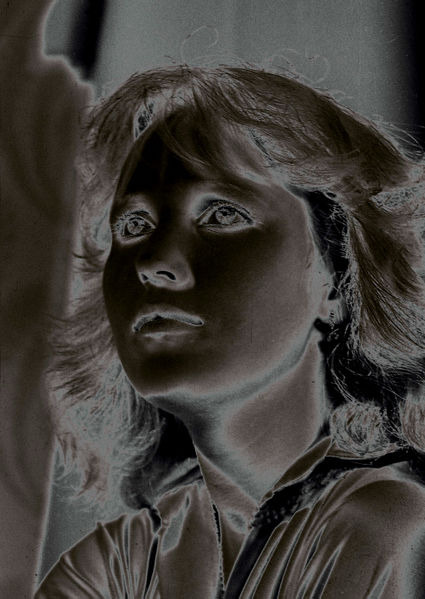
Solarization is the process of re-exposing photographic paper during the development process. The result is an eerie silver image which contains light lines between the shadows and the highlighted areas.
Felt Magnet. 2016. How To Solarize Black and White Photography - The Sabattier Effect. [ONLINE] Available at: https://feltmagnet.com/photography/Photography-The-Sabattier-Effect. [Accessed 29 December 2018].
Photoshop Tutorial:
http://justthisgood.com/2016/02/02/photoshop-tutorial-46-solarisation-solarization-photo-effect/
CYANOTYPE
Karl Thomas Moore, (2016), Cyanotype of the Cloisters [ONLINE]. Available at: https://upload.wikimedia.org/wikipedia/commons/b/bc/Cyanotype_of_the_Cloisters.jpg [Accessed 29 December 2018].

A process which produces a continuous tone image of Prussian Blue using a sensitizing solution of ferric ammonium citrate and potassium ferricyanide.
These iron salts, when exposed to natural or artificial ultraviolet light, are reduced to their ferrous state, producing a high contrast blue image when oxidised. Oxidation is hastened by immersion in running water, which also washes away the unused iron salts.The process was traditionally used in reproducing technical drawings.
The National Science and Media Museum. 2011. INTRODUCTION TO THE CYANOTYPE PROCESS. [ONLINE] Available at: https://blog.scienceandmediamuseum.org.uk/introduction-cyanotype-process/. [Accessed 29 December 2018].
Photoshop Tutorial:
https://flylib.com/books/en/2.549.1.56/1/
TILT-SHIFT
Joseph Tremblay, (2005), Fake tilt-shift DVP [ONLINE]. Available at: https://upload.wikimedia.org/wikipedia/commons/d/d1/Fake_tilt-shift_DVP.jpg [Accessed 29 December 2018].

Tilt-shift photography (or “miniature faking”) is taking a photograph of a real-world scene and making it look like a miniature scene, such as you’d find in a model railroader’s setup. The effect is created by using blurs in selective areas (typically above and below the subject)
Digital Photo Secrets - David Peterson. 2015. What is tilt-shift photography?. [ONLINE] Available at: http://www.digital-photo-secrets.com/tip/1368/what-is-tilt-shift-photography/. [Accessed 29 December 2018].
Photoshop Tutorial:
https://mashable.com/2013/09/24/photoshop-tilt-shift/?europe=true#FfPcefvcZaqC
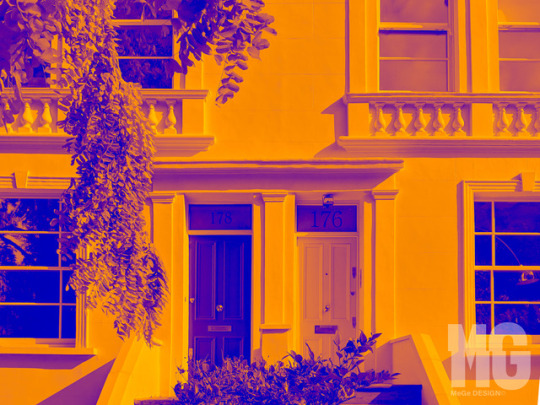
TONED PRINT (DUO-TONE, TRI-TONE, QUAD-TONE, ETC.)
Mason Gentry, (2018), DuoTone 2 [ONLINE]. Available at: https://speckyboy.com/wp-content/uploads/2016/07/duotone2.jpg [Accessed 29 December 2018].

In photography, toning is a photographic print toning process carried out on silver-based (black-and-white) photographic prints to change their colour. Modern versions of this can be Duo-Tone, Tri-Tone and Quad-Tone using bright colours for the tones.
DePaul University. 2015. Photographic Toning. [ONLINE] Available at: http://facweb.cs.depaul.edu/sgrais/photo%20toning.htm. [Accessed 29 December 2018].
Photoshop Tutorial:
https://create.adobe.com/2017/10/31/make_it_in_a_minute_duotone_effect_in_photoshop.html
VIGNETTE
Alex Eflon, (2010), Bokeh Buds [ONLINE]. Available at: https://upload.wikimedia.org/wikipedia/commons/7/72/Bokeh_buds.jpg [Accessed 29 December 2018].
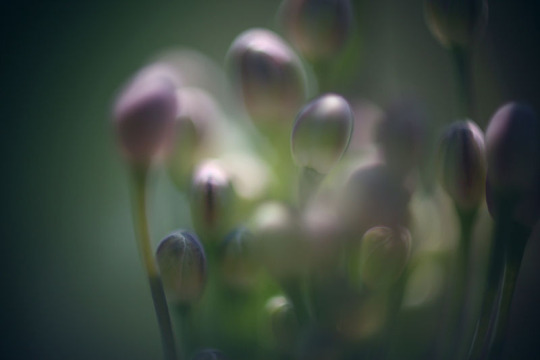
Vignetting, also known as “light fall-off” (sometimes spelled “light falloff”) is common in optics and photography, which in simple terms means darkening of image corners when compared to the center. Vignetting is either caused by optics, or is purposefully added in post-processing in order to draw the viewer’s eye away from the distractions in the corner, towards the center of the image.
NASIM MANSUROV. 2013. What is Vignetting. [ONLINE] Available at: https://photographylife.com/what-is-vignetting. [Accessed 29 December 2018].
Photoshop Tutorial:
https://www.photographymad.com/pages/view/creating-a-vignette-effect-in-photoshop
My Decision:
For my final images I have decided to use the techniques of Black and White, Duo-Tone and a Vignette as I feel they work best to emphasise my photos I have taken.

0 notes
Link
JUST™ Creative http://j.mp/2tDmzmc
Want to become a graphic designer?
Teach yourself with these 20 great resources to learn graphic design, quick fast!
Online Resources
1. Udemy: Introduction to Graphic Design
Visit Udemy
Udemy, as most of you already know, is an online learning platform aimed at professionals, catering courses created by experts. The platform is filled with amazing courses whose legibility you can judge by the number of people who have rated/taken the course. If you are starting out, we would recommend the course: Introduction to Graphic Design, which is available for free.
2. Skillshare
Visit Skillshare
Skillshare is another online learning platform, but it also doubles as a community for creative individuals. It offers plenty of graphic design courses, all of which can be readily accessed by a subscription plan. You don’t have to pay for the courses individually, but through a single monthly subscription fee, you get access to all of Skillshares content. This is highly recommendable if you have a lot of spare time and are willing to dedicate it towards learning.
3. Hackdesign.org
Visit HackDesign
Hackdesign offers one of the most complete and structured online course for learning graphic designing. If you want to explore this skill but don’t feel like investing, then you will find Hack Design to offer the perfect solution. You will get access to a number of links and posts, all of which are well structured, so you don’t have to Google around and create a mess unorganized resources.
4. Alison Online
Visit Alison
Alison Online offers a free online platform with certification courses. The site is very useful if you feel like adding new skills to your resume. Some recommended courses on the platform regarding graphic designing would be Visual and Graphic Skills, Design principles, Photoshop Essential C6 Tools and so on. There are also many more courses available, if you want something different from our recommendations.
5. DesignLab
Visit DesignLab
If you are looking to ace your design game, DesignLab is an ideal online graphic design learning platform for you. The platform provides users with complete hands-on projects to help them grasp the designing concepts. Their service even includes a weekly Skype mentoring session with an expert and the facility of availing feedback from peer users and mentors on-board. Offering umpteen number of designing courses, DesignLab can be your one-stop platform for learning everything related to graphic designing.
6. Creative Bloq
Visit Creative Bloq
Creative Bloq is one of the best blogs for web designers, graphic designers, and the like. Every day, it is updated with an inspiring catalog of advice along with illustrations to help you out in your journey to be the best. Just pop into the blog once a day, go through the latest news, tips, and tricks, and you will never even realize when you became an awesome designer.
7. Teach Yourself Graphic Design: A Self-Study Course Online
Visit Course
This is a like a blog post version of hackdesign.org. It is an article written by Sean Hodge, where he has efficiently outlined an array of resources which you can use to make a self-taught course on graphic design for yourself. You will find names of great books, and some online resources, all of which are broken down into some thoughtful subtopics. Studious individuals can couple this with HackDesign to make a diverse, well-covered study material.
8. Book Cover Archive
Visit Book Cover Archive
Book Cover Archive is the perfect place to go if you intend on gathering some inspiration or ideas for creating your next book cover. The website offers a sortable catalog of historic and new book covers, which can be filtered based on photographer, art director, designer, title, author, and genre. Then there is a blog which offers some educative commentary on designs and style. See here for tips for designing a great book cover.
9. The Noun Project
Visit The Noun Project
The Noun Project is one of the best go-to destinations for iconography. Here you can get great inspirations on how to create high-quality stock icons. The platform also allows designers to upload their work and put them on sale.
10. Grain Edit
Visit Grain Edit
If you are next project is going to revolve around design styles from the 70’s or 50’s, then the Grain Edit will prove to be a great help. It offers quality examples of vintage aesthetics. You can find talks on a variety of design pieces, designing tips and product reviews, which will help refine your skills as a graphic designer.
11. Creative Pro
Visit CreativePro
Creative Pro is an online magazine for experienced designers with great how-to articles that will help you no doubt. It is filled with expert level articles and videos that will help solve many roadblocks. Many graphic designers should keep this site bookmarked for future reference.
12. Envato Tuts+ Illustration and Design Courses
Visit Envato Tuts
There are nearly a thousand tutorials in Evanto’s design and illustration database that will be of immense help in your career as a graphic designer. You will find topics ranging from Illustrator, Photoshop, Cinema 4D, Rhino and much more. While you are working on a designing project and stuck at some problem, this would be one of the best sites to refer to a solution.
13. Canva Design School
Visit Canva Design School
Here you will find a free self-paced graphic designing course curated for people getting into this area. It covers all the basic topics such as fonts, colors, images, background, layouts, and shapes. Despite being targeted at beginners, it is very comprehensive and will help to create a better foundation.
Offline Resources/Books
14. Making and Breaking the Grid
See Details
Grids offer a fantastic reference structure to build your design, bu only if you know how to use it correctly. In this book, Timothy Samara discusses how to use the grid appropriately, including situations where it serves most benefits, and times when it becomes just a hindrance.
15. Designing Brand Identity
See Details
Everybody wants a memorable logo, one which everyone will be able to recognize. This book offers priceless insight on how to create a premium quality logo that will help create a powerful brand presence. So whether you are creating a logo or favicon for yourself or for clients, this is a book, that is going to be of irrefutable help. This is one of Jacob’s top logo/branding books.
16. Paul Rand: A Designer’s Art
See Details
Everybody can’t draw and write with equal caliber, but Paul Rand isn’t everybody. In this book, the iconic graphic designer discusses how he approaches graphic designing along with some his experiences while handling clients, audience, and not to mention, his art.
17. The Elements of Graphic Design
See Details
This is the best beginner level book for graphic designing. It will help you build a concrete notion relating to spacing, unity, page architecture, and typography. It also showcases some space to discuss about the history of graphic designing, which too can be very much informative and helpful.
18. Thinking With Type
See Details
Thinking with Type is a great book on typography which will teach you some practical approaches for blending typography into your designs. After reading this, you will rarely suffer from questions such as what type of font to use, which font sizes to pick, and also help you understand the impact of alignment, spacing, ordering, and so on.
19. The Art of Color
See Details
The Art of Color is the best and complete guide to help you understand the topics ranging from how to mix color, color effect, to the physics of color, and much more. It goes through two different principles – a subjective feeling method, and objective colors principle- to help you understand who to use color. Everything is provided with much detail and clarified with multiple color reproductions.
20. Stationery Design Now
See Details
This book will provide you with plenty of examples regarding stationary designs. Every company/business needs letterheads, envelopes, and business cards, and thus the scope of stationery designers isn’t going to run dry anytime soon. Now, if you are thinking of getting into this field, then this book will provide you with plenty of ideas and inspiration to create some compelling designs for your clients.
In Conclusion:
So these were our picks for the best learning resources for graphic design.Do let us know, which resources you choose or preferred over the others. Also, if you know of some other good places to hone your skills in graphic designing, then do share with us and all your fellow readers.
—
About Author: Pawan Sahu is the founder of MarkupTrend. He is a passionate blogger and marketing geek. He has helped many business to build their brands and improve their visibility in SERPs.
http://j.mp/2FuO3jq via JUST™ Creative URL : http://j.mp/2c6V88b
0 notes
Link
#Photoshop tutorial#how to create photo in photoshop#learn photoshop#how to use photoshop#iamge#image manipulation#photo manipulation#photo#photo editing#learn photography#3D Trangle Photoshop Tutorial#Tutorial#Photoshop#C6#Photoshop C6
0 notes
Video
youtube
#Photoshop Tutorial#tuorial#photoshop#adop photoshop c6#Photoshop video#waterfall over earth photo manipulation#learn photoshop#how to create photo in photoshop#Photoshop video tutorial#photo manipulation#image#image manipulation#photo editing#photo edit#clipping mask
0 notes
Link
#Photoshop tutorial#Photoshop video tutorial#Photoshop#learn photoshop#how to create photo in photoshop#learn photography#photo editing#photo edit#photo manipulation#waterfall over earth photo manipulation#image#image manipulation#clipping mask
0 notes
Video
youtube
Waterfall Over Earth Photo Manipulation - Photoshop Tutorial C6
#Photoshop tutorial#Photoshop#Tutorial#Photoshop video tutorial#how to create photo in photoshop#learn photoshop#photo manipulation#manipulation#manipulated photography#clipping mask#image#image manipul#image manipulation#photo editing#photoshop video#waterfall over earth photo manipulation#learn photography
0 notes
Last Seen Blogs

sunnydayjackshit
🌼 sunny 🌼

ciemnosc-uczuc
💞💕💞

garryindia
Untitled

loveyourseniors
Naughty old neighbours
down-at-the-whiskey
down-at-the-whiskey