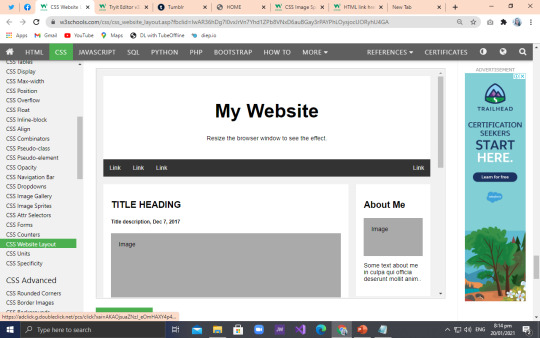
#Iframe w3schools
Text
Iframe w3schools

#Iframe w3schools update#
#Iframe w3schools code#
The easiest way to start is using the p5.js editor, you can open the web. If you're more of the copy-and-paste type, or just want an in-page preview of what you'll be getting, here it is. This page walks you through setting up a p5.js project and making your first sketch. You can grab a copy of the file to use and tweak as fits you best. If you want to use my reset styles, then feel free! It's all explicitly in the public domain (I have to formally say that or else people ask me about licensing). In other words, this is a starting point, not a self-contained black box of no-touchiness. Fill in your preferred colors for the page, links, and so on. It should be tweaked, edited, extended, and otherwise tuned to match your specific reset baseline. CSS gives you the power to dress your iframe up a bit.
#Iframe w3schools code#
longdesc: Was used to specify URL containing a long description of an iframe. While I am a strong supporter of using the HTML strict doctype and writing validating, standard-compliant code iframes will not validate, which leaves us with two options: Either suck up the iframe-related validation errors or switch to HTML transitional doctype for the pages with iframes. src: Specifies the URL of a document to display in an iframe. I don't particularly recommend that you just use this in its unaltered state in your own projects. Places a set of security and usability restrictions on the iframe. There isn't any default color or background set for the body element, for example. The reset styles given here are intentionally very generic.
The different attributes of tag are: Attribute.
But this tag has been deprecated in the new version of HTML, i.e., HTML 5.
Reset styles quite often appear in CSS frameworks, and the original "meyerweb reset" found its way into Blueprint, among others. To use an iframe as the target frame for a link, the specified target attribute of the link should refer to the name attribute of the iframe. The tag is a container tag of HTML is implemented for creating scrollable text or images within a web page from either left to right or vice versa, or top to bottom or vice versa.
The general reasoning behind this was discussed in a May 2007 post, if you're interested. With that in mind i changed gatsby-node.The goal of a reset stylesheet is to reduce browser inconsistencies in things like default line heights, margins and font sizes of headings, and so on. Went through the issue and pieh's comment offered a workaround and a explanation on what is happening. src: URL: Used to to define the web address of the inline. width: Pixels: Used to specify the width of embedded frame (default width is 300 px). frameborder: 1 or 0: Used to specify whether an iframe should have a border or not.
Like every other tag, the
tag also has a few attributes associated with it.
The web browser can display another document within the current page, including the scrollbars and borders.
#Iframe w3schools update#
You need to update X-Frame-Options on the website that you are trying to embed to allow your Power Apps Portal (if you have control over that website).
The
tag defines a rectangular area within the current document or web page. Most probably web site that you try to embed as an iframe doesn't allow to be embedded.
name: text: Used to provide a name to the iframe. The iframe in HTML stands for Inline Frame. Did a little search and it seems your issue is related to Properly serve HTML files in the static directory #13072. Used to specify the height of the iframe (default height 150 px). Loading of iframes can be prevented by installing a browser add-on, for example, NoScript from Firefox.It seems that on build you can see the actual html without any issues. Tried gatsby build & gatsby serve and i opened up on one window and and i can now see the content as you can see below:.Issued gatsby develop and opened up and i'm presented with the folllowing, also on the right side i tried to access the page directly and as you can see by the image the issue persists:.Import React from "react" export default ( ) => ( this is content for the page )
0 notes
Text
re-learning html without the pressure of a project deadline
When practicing HTML again, I worked through a PowerPoint presentation given to us by my lecturer Phil. It went a lot smoother than expected, and actually was a lot simpler than I thought it would be. I decided to document my process of going through it:
To start off with I created a NotePad file and saved it on my desktop under the name "index.html" as the tutorial advised. I have also experimented with other coding software - such as Adobe Dreamweaver and Visual Studio Code - but this was my first time coding without any of the helpful autofill suggestions and colour-coding both of these applications offer.
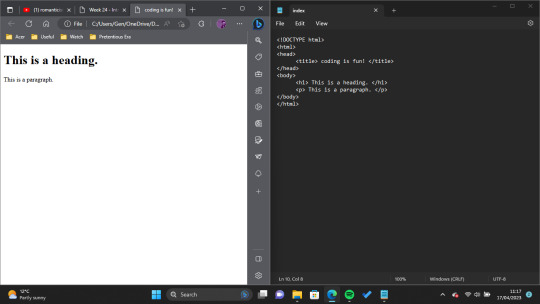
Next, I set up the basics of the HTML page, including its document type and title. Then I added my first heading and paragraph. I decided to keep my text pretty clear and to the point so that I wouldn't get mixed up looking through the code.
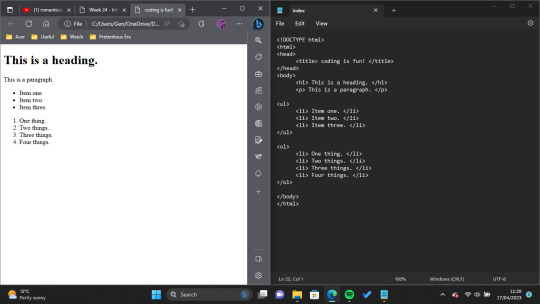
After this I experimented with lists! We didn't really need anything like this when coding our Narrative Project, so it was nice to just have fun and explore the many possibilities HTML has to offer.
As I have had experience coding images from the previous project, I decided to skip these for now and focus my learning on things which I didn't know.
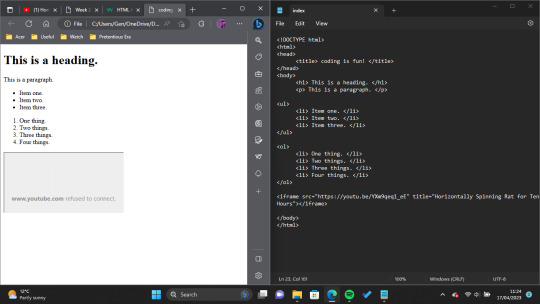
The next thing I decided to try was "inline frame" or <iframe> tags. The presentation I worked through describes inline frames as "An HTML document embedded inside another... Typically, MS Stream or YouTube videos." To play with this, I tried to link a YouTube video (to make myself chuckle, I decided on this video posted by the account Rat. However, even though my code was correct, YouTube wouldn't show the video on the page, so I ended up scrapping this feature.

So that the Horizontally Spinning Rat video still got a feature on the page, my next experiment was with hyperlinks! I tried this a couple of different ways, first of all by leaving it as just a generic hyperlink that opens in lieu of whatever webpage you're on, but - once again, supported by the tutorial provided - was able to change it so that the video opened in a new tab when clicked.

The last thing I wanted to experiment with was adding boxes and borders and I did this by attempting to use the CSS box model. I learned the base code for this from this W3Schools tutorial, and used it to essentially add a pink border around all of my <div> code (which essentially gives some really clean line breaks).
All in all, I really enjoyed this exercise. Admittedly the code I produced here is nothing special, and the web file is quite plain to look at, but as I have already used a lot of style functions for other projects I wanted to focus purely on things which were new to me. Coding in NotePad wasn't as hard as I was worried it would be, either, though it was frustrating having to comb through personally to figure out what wasn't working each time I made a mistake (I decided to leave those moments out of my walkthrough as there would have been many.) In the future, when I have more time, I would love to explore creating my own websites in this way, and giving them more interactivity.
My newfound interest in interactive websites I owe almost entirely to the ARG Welcome Home, created by Tumblr user partycoffin. ARG stands for Alternate Reality Game, and essentially these games use real world mediums like websites and social media to tell a story (. I feel particularly inspired by Clown's website as it is of the psychological horror genre, and utilises a lot of hidden/floating text elements to tell its story. I would love to have the ability to create something like it one day, I just think it's so cool.
Bibliography:
Clown. (2023) Welcome Home. Available at: https://www.clownillustration.com/welcomehomeyou (Accessed: 17 April 2023).
Rat (2022) 'Horizontally Spinning Rat for 10 Hours' [YouTube] 15 May. Available at: https://www.youtube.com/watch?v=YXm9qeq1_eE (Accessed: 17 April 2023).
Richardson, P. (2023) 'Into Web Design'. MD4004: Digital Media Foundations. Kingston University London. Unpublished.
w3schools (2023) CSS Box Model. Available at: https://www.w3schools.com/css/css_boxmodel.asp (Accessed:17 April 2023).
0 notes
Text
All tags of html5 pdf embed
ALL TAGS OF HTML5 PDF EMBED >>Download (Descargar)
vk.cc/c7jKeU
ALL TAGS OF HTML5 PDF EMBED >> Leer en línea
bit.do/fSmfG
pdf etiquetas html5
lista de etiquetas html pdf
etiquetas html5 w3schools
todas las etiquetas de html5 pdf
todas las etiquetas de css3 y sus atributos pdflista de etiquetas html5
html5 pdf 2022
100 códigos html pdf
Learn the best way of PDF embedding in WordPress webpages—let your digital documents turn into interactive, eye-catching elements on your website. Use the applyHtmlTag and applyBodyTag attributes of the tag to suppress the automatic </h1> </header> <article> <p>This page looks almost like HTML5!Embed PDF Viewer and 3D PDF Flipbook in your WordPress post and pages. 2D flipbook use CSS and HTMl5 tags to create flippable and interactive flipbook. Learn the best way of PDF embedding in WordPress webpages—let your digital documents turn into interactive, eye-catching elements on your website. Listado de elementos o etiquetas HTML5. Etiqueta. Función. <!----> <embed>. Define el contenedor de una aplicación externa (no html). <fieldset>. Format HTML; View Compiled HTML; Analyze HTML; Maximize HTML Editor; Minimize HTML Editor; Fold All; Unfold All. xxxxxxxxxx. 5. 1. //- <iframe
https://www.tumblr.com/dikosetopuqe/697599772518907904/tdd-java-pdf, https://www.tumblr.com/dikosetopuqe/697599627730583552/ensnared-ag-howard-pdf, https://www.tumblr.com/dikosetopuqe/697599627730583552/ensnared-ag-howard-pdf, https://www.tumblr.com/dikosetopuqe/697599526165528576/dc-motor-300-rpm-pdf-merge, https://www.tumblr.com/dikosetopuqe/697599526165528576/dc-motor-300-rpm-pdf-merge.
0 notes
Text
Function showhide

#Function showhide code#
This example has a link that, when clicked, will hide itself and reveal two divs. When the link is clicked, the div's display value is changed from none to block. This example has a link to reveal a hidden div. Remember, the JavaScript function PowerhouseShowHide() needs to be available on the page for these to work. Div id values are colored blue and display values are colored red. For clarity, here are a couple examples with only essential code.
#Function showhide code#
The source code for the demonstrations earlier in this article contain examples of use with text links and with buttons. It can be none (for hiding the element), block, inline, table, or any other valid value for the display property. The "Value" part of the ID=Value set is the value for the display property. (The CSS display declaration needs to be inline for every div or other HTML container that is to be shown or hidden with the PowerhouseShowHide() function.) The "ID" part of the ID=Value set is the id of the div or other HTML element with an inline CSS display property. PowerhouseShowHide() updates the display property value of the container according to the information in each ID=Value set. PowerhouseShowHide('one=block','two=none','three=inline','four=table') PowerhouseShowHide('an-id=block','another-id=none') Multiple ID=Value sets are comma-separated. It expects to receive instructions in the ID=Value format. This W3schools page lists valid values with descriptions. The things it can do is change the CSS display property value for any HTML element where display is a valid CSS property. In essence, you give PowerhouseShowHide() a list of things it can do and it does them. To close this individual div, click this close link. The second of three divs opened with a click on the relevant link. The first of three divs opened with a click on the relevant link. The third of three divs opened with a click on the relevant link. No customization of the PowerhouseShowHide() function is required. It can be hard coded into the page or imported from an external file. The JavaScript PowerhouseShowHide() function needs to be somewhere on the page for it to be used. But first, here's the Powerhouse Show/Hide JavaScript function. Reveal one or more divs with one click, or when the mouse moves over an existing div, or when the site visitor has been on the page for a certain amount of time.Īdjust the display property of any number of divs with one call to the PowerhouseShowHide() function. Reveal a bunch of divs each with their own "hide" button. Optionally, simultaneously (i) hide the link or button clicked on and (ii) reveal a link or button to hide the div again. Use the function for virtually all your hide/show needs. Hide or reveal divs that are popups or sliders, divs that contain an iframe, span tags with an image, or entire tables. Simply feed the ids and actions to the function and it does the rest. Show or hide as many divs as desired - with one JavaScript function call. The show/hide JavaScript function in this article is one of them. With 24 years experience, there are a few in my toolbox. There is a handy, short, powerhouse JavaScript function for showing and hiding divs (or other HTML tag containers, like span, table, etc).Īs programmers gain experience over the years, the tools they use evolve. Powerhouse JavaScript Function for Show/Hide
0 notes
Note
If you don't mind my asking, how did you get that glowy effect on the text in your banner?
It's a bit of CSS I stumbled upon completely by accident. Basically, there's a way to do a drop shadow in text, and the parameters let you specify position, color, and blur percent.
So if you pop open the web page source on my blog, near the top, you'll see this in the script section inside the header:
cooltext{text-shadow:0 0 0.9em #22FFFF, 0 0 0.4em #44FFFF, 0 0 0.1em #66FFFF;}
This effectively lets me establish my own HTML tag where anything I put in the <cooltext></cooltext> tag will glow. It applies the three layered CSS text-shadow properties. I also have a "coollink" class for sidebar links, so they only light up when you mouse over them.
It's worth mentioning that I am a super CSS novice and basically I stumbled upon someone else's code to make text glow and understood just enough of it to adapt to fit here. It's probably sloppy and I could make a lot of parts about it better, but I'm happy with the way it looks.
Generally my CSS knowledge comes from just googling for stuff on the w3schools website. Usually I can bang rocks together from there and figure it out.
I was pretty decent with HTML back in my day, but my expertise was like, tables and iframes, which aren't exactly in vogue anymore. I still lean on tables a lot when I design pages, even though I know there's fancy CSS alignment stuff that negates most of what tables were used for.
But my motto is "if it works, it works."
4 notes
·
View notes
Note
¡Hola, necro! ¿Es posible añadir a una tablilla un slideshow de imágenes? He probado con los códigos que da w3schools poniendo el javascript en todas las páginas y usando el css y html que dan pero... nada. ¡Un saludo!
Pf, es complicado, porque muchos slideshows usan javascript... Lo único que se me ocurre así, de cabeza, es probar con un iframe, cosa que FA sí que acepta en los posts 🤔
1 note
·
View note
Note
hi, did you make spoiled on neocities? i wasn't sure but if you did, i really liked how it turned out :^) (i'm also sort of new to coding so if you have any tips about how you managed to make the game(?) work like that i'd appreciate it a lot ^^)
:D i did !! im glad u liked it !!!
i had to work backwords bc my coding knowledge is a little wonky but ill try to explain the best i can !
first i put the game an in iframe tag, so each “scene” is its own html, & the arrows link to the next one. i think a lot of ppl dont like iframes because theyre janky but theyve always worked for me. it goes /scene1.html > /scene2.html > etc !
the dialogue boxes are “modals” im gonna be honest i hate modals. theyre finicky & use javascript but i can post the code i used if youre interested in it :) i think i got it from w3schools
i used a lot of javascript tutorials bc i dont know java yet, the moving eyes were from a youtube video (ill rb w links because ill have to find them again), the zoom on hover thing was from stack exchange i believe.
i think the best advice would be using websites with forums. a lot of times ill google what my problem is & itll come up on some forum somewhere. also w3schools has so much coding documented !!!! its like a dictionary.
4 notes
·
View notes
Text
My personal favourite & helpful things that I use during coding.
z-index:######################!important;
this basically ensures that whichever you put this on will show up on top. IE if I had a title over a png, the z-index would ensure it is laying on top.
iframe, img, embed, object, video { max-width: 100%; }
this ensures your images show in their entirety, not distorted or half cut off.
transform: rotate(#deg);
Want to rotate literally anything? Put this.
Actual websites:
Lorem Ipsum generator (I use this as filler text)
Copy paste symbols
Google Fonts
Text Gradient generator
W3Schools!
2 notes
·
View notes
Text
Barangay Canitoan Website
<!DOCTYPE html> <html> <head> <meta charset="UTF-8"> <title>Canitoan</title> <meta name="viewport" content="width=device-width, initial-scale=1"> <!--W3schools CSS--> <link rel="stylesheet" href="https://www.w3schools.com/w3css/3/w3.css"> <!-- Main Stylesheet File --> <link href="css/styles.css" rel="stylesheet"> </head> <body> <div> <a href="index.html"> <img src="img/Canitoan012.png" style="height:120px"> </div> <!--Navigation--> <div id="navbar"> <nav class="w3-bar w3-green"> <a href="index.html" class="w3-button w3-bar-item">Home</a> <a href="about.html" class="w3-button w3-bar-item">About</a> <a href="achievements.html" class="w3-button w3-bar-item">Achievements</a> <a href="contact.html" class="w3-button w3-bar-item">Contact</a> <a href="forms.html" class="w3-button w3-bar-item">Forms</a> <a href="articleind.php" class="w3-button w3-bar-item">Articles</a> <!--Script for sticky navbar--> <script src="js/Main.js"></script> </nav> </header> </div> <!-- Slide Show --> <section> <a href = "about.html" > <img class="mySlides" src="img/CanitoanP.jpg" style="width:100%"> </a> <a href = "contact.html" > <img class="mySlides" src="img/Canitoan001.jpg" style="width:100%"> </a> <img class="mySlides" src="img/CanitoanP.jpg" style="width:100%"> </section> <!--Script for slideshow--> <script src="js/Main.js"></script> <!--About--> <section class="w3-container w3-center w3-content" style="max-width:600px"> <h2 class="w3-wide">Barangay Canitoan </h2> <p class="w3-opacity"><i>Environment Friendly Barangay</i></p> <p class="w3-justify">Barangay Canitoan is situated in the Southern part of the city of Cagayan De Oro.It is subdivided into ten (10) known sitios namely: from Zone 1-Zone 10. Three (3) Subdivisions namely: Scions Subd, PN Roa Subd and Camella Cerritos (on-going construction). Barangay Canitoan has also Relocation Sites namely: Phase 1, Phase 2A & B, Phase 3 Relocation Site, Oro Habitat, Lutheran Village, Mahogany Village, Talongan Village, GK Shell, Filipino Chinese, Crayola, Quadruplex &; GK/SM BDO. About 15% of the land area is classified as Agricultural; 70% is residential and those used by the government; and 15% is covered by commercial establishment.</p> </section> <!--Officials--> <h2 class="officials"> Officials </h2> <section class="w3-row-padding w3-center w3-light-grey"> <article class="w3-third"> <p>Brangay Captain</p> <img src="img/official.jpg" style="width:20%"> <p>Joshua</p> </article> <article class="w3-third"> <p>Kagawad</p> <img src="img/official.jpg" style="width:20%"> <p>Lagumen</p> </article> <article class="w3-third"> <p>Kagawad</p> <img src="img/official.jpg"style="width:20%"> <p>Yanez</p> </article> <article class="w3-third"> <p>Kagawad</p> <img src="img/official.jpg"style="width:20%"> <p>Taboclaon</p> </article> <article class="w3-third"> <p>Kagawad</p> <img src="img/official.jpg"style="width:20%"> <p>Lustre</p> </article> <article class="w3-third"> <p>Kagawad</p> <img src="img/official.jpg"style="width:20%"> <p>Padla</p> </article> <article class="w3-third"> <p>Kagawad</p> <img src="img/official.jpg"style="width:20%"> <p>Tante</p> </article> <article class="w3-third"> <p>Kagawad</p> <img src="img/official.jpg"style="width:20%"> <p>Callo</p> </article> <article class="w3-third"> <p>SK Chairman</p> <img src="img/official.jpg"style="width:20%"> <p>Datahan</p> </article> </section> <!--Achievements--> <div class="achievements"> <h1> Achievements </h1> <li>Eco Friendly Barangay </li> </div> <!--Contacts--> <h1> Contact Us </h1> <p> Location of Canitoan </p> <section class="map"> <iframe src="https://www.google.com/maps/embed?pb=!1m18!1m12!1m3!1d31570.919457453183!2d124.58239503643732!3d8.46384775894017!2m3!1f0!2f0!3f0!3m2!1i1024!2i768!4f13.1!3m3!1m2!1s0x32ff8ca6efa76217%3A0x8a2c13aa584988a4!2sCanitoan%2C+Cagayan+de+Oro%2C+Misamis+Oriental!5e0!3m2!1sen!2sph!4v1551891400386" width="600" height="450" frameborder="0" style="border:0" allowfullscreen></iframe> </section> <h2> Weather </h2> <a class="weatherwidget-io" href="https://forecast7.com/en/8d45124d63/cagayan-de-oro/" data-label_1="Cagayan de Oro City" data-label_2="WEATHER" data-theme="original" >Cagayan de Oro City</a><br> <script> !function(d,s,id){var js,fjs=d.getElementsByTagName(s)[0];if(!d.getElementById(id)){js=d.createElement(s);js.id=id;js.src='https://weatherwidget.io/js/widget.min.js';fjs.parentNode.insertBefore(js,fjs);}}(document,'script','weatherwidget-io-js'); </script> <!--footer--> <footer class="w3-container w3-padding-64 w3-center w3-black w3-xlarge"> Powered by <a href="https://www.w3schools.com/w3css/default.asp" target="_blank">w3.css</a> <br> © Barangay Canitoan 2019 </p> </footer> </body> </html>
1 note
·
View note
Text
INFO MADNESS
#January 18 - 22, 2021 ( Week 14)
Howdy folks! As to what I have said last week, I will be talking about the things I have learned upon coding my website! See the title? Yeah that’s right! INFO MADNESS! Let’s start!
Here is a quick overview of what I'll be talking about.
Layout
Navigation bar
Card
Columns
Slideshow
Video
Audio
Hover
Responsive
Gallery
Shaking Image and Flipping Image
Image Sprites
Search bar
Center Image
iFrames
So let's start this up with the Layout!
As to what Sir Peralta said when he announced this project, "All information you need in creating your website are within the reach of your fingertips." So I made the most of it. He actually sent a file which contains some code that we can use. We just have to fix it base on our likings but I didn’t use it since I wanna challenge myself more even though it will be harder in my part.
And so I watched some videos in YouTube on how to make a two-columned website but I ended up not doing them because I find them complicated and offers a lot of complexity that my last three braincells cannot process. And luckily when I searched on Google how to make a two-column website, I stumbled upon W3Schools so expect that all of my reference will come from here!
So as I was saying, I found a two column website layout and the codes were much easier to understand than those of the ones the Sir Peralta sent so I used them instead.
That’s the layout I found. This layout offers two unequal columns just like what Sir Peralta wanted. contents can also be separated by card for easy findings. So how does this work? Well, according to w3school: “The main content is the biggest and the most important part of your site. It is common with unequal column widths, so that most of the space is reserved for the main content. The side content (if any) is often used as an alternative navigation or to specify information relevant to the main content. Change the widths as you like, only remember that it should add up to 100% in total:”
Since I used two columns, I use 30% and 60% for the width and added 5% left and right margins so they all add up to 100!
Navigation Bar
For the navigation in which I had a hard time fixing and coding it, I watched a video on YouTube if how can I make a navigation bar with dropdown and I just copied its code. It was actually hard at first because I have to customize it the way I wanted it to be and I always mess up. And when I finally get to understand the codes in which it took me almost two hours to do so, I finally got the flow of coding the navigation bar alone.
Ok so I keep on babbling about navigation bar, so for y’all information, navigation bar is a list of links in a website and if you click one of it, it will direct you to your desire page.
Card
I didn’t, like, code this myself, I just adjusted the padding, width, size and etc from the layout that I found. To find my desired card size, I did a trial and error which was a wrong decision to do because I always mess up and ended up ruining my website layout.
“Is a bordered box with some padding around its content. It includes options for headers, footers, content, colors, etc.“
Slideshow
Slideshow is for words, pictures, gifs that is projected in slides in a limited time. Slideshows are mostly on loop that’s why you can see the pictures again and again after the sequence.
Disclaimer!!! I made that description myself because I can’t find any. As for the slide show, I coded it easily since I already have a background on it. I edited the sizes of the pictures first so they will be uniform to each other and it’s pleasing to the eyes of my viewers!
Video
As for this, the HTML <video> element is used to show a video on a web page. I have actually known this already since it was discussed to us by our previous ICT teacher. But the problem here is that, it wasn’t responsive to the size of the screen so when I searched how, I just have to put the max-width on 100% full and it will be responsive! Tada~ as easy as one, two three!
Audio
The HTML <audio> element is used to play an audio file on a web page. What I did to audio is the same as for the video. It was kinda frustrating at first since I really don’t know what to do with it and how to make it responsive not until I realized that... oh max-width, of course! So for this, I’m not familiar with it since it wasn’t introduced to us back then so I have to do some research for this feature.
Hover
“The :hover selector is used to select elements when you mouse over them.
Tip: The :hover selector can be used on all elements, not only on links.
Tip: Use the :link selector to style links to unvisited pages, the :visited selector to style links to visited pages, and the :active selector to style the active link.
Note: :hover MUST come after :link and :visited (if they are present) in the CSS definition, in order to be effective!”
This thing is so hard!!! I swear I had a hard time doing this feature because I will either mess up my codes or it will not work. I mean, I searched the codes and all but still, adding it to my existing features is hard! But as for my navbar, I wasn’t the one who coded it since it was already included to the navbar code that I found.
Responsive
Ok not me babbling about responsive thingy when in fact I haven’t introduced it to y’all yet. Sorry for the delay of info but according to a to w3school “ It is called responsive web design when you use CSS and HTML to resize, hide, shrink, enlarge, or move the content to make it look good on any screen.”
Image Gallery
I used image gallery so I can put pictures with caption side by side. I only used this for one webpage since I don’t really need it. Instead of linking it to its actual picture, I linked them to various website that is related to the person or band in the feature, in that way, people who gets intrigue about them can just click the picture and tada~ they will get to know them more!
Image Sprites
“An image sprite is a collection of images put into a single image. A web page with many images can take a long time to load and generates multiple server requests. Using image sprites will reduce the number of server requests and save bandwidth.“
So what did I used this for? I used this to link my social media accounts. They just have to choose if which one do they wanna see, Facebook, Instagram or this blog site. I did this because it is more convenient and it kinda fits my liking. Plus, this is my website mins so I should be the one who will decide if what features should I use and add.
Search bar
And the last feature that I will introduce is this one. So for this, I’m really hesitant if should I add this or nah since I don’t know how to make it work although you can see it in my website. Yes you can see it it’s just that when you search, nothing appears. It is just like a display and it’s kinda frustrating to know that it won’t work!!! So to anyone who is reading this right now, how can you make a search bar work? Please drop it down on the comments below if you know how!
So i guess this will be all for now huh? For next week’s blog content, I will update you if how is my website, my plus points and etc so stay tuned! I hope you learned something new today. Bye~!
0 notes
Link
أول جولةiframe src="https://www.aqarly.com/ipanorama/virtualtour/1" title="W3Schools Free Online Web Tutorials">/iframe>https://www.aqarly.com/%d8%a3%d9%88%d9%84-%d8%ac%d9%88%d9%84%d8%a9/?feed_id=450&_unique_id=5f78b1418bb35#uncategorized
0 notes
Text
60b3r’s スクリプト: Edit Post Bookmarklet
After hours of tweaking your Tumblr blog with custom themes, you feel like an accomplished web developer. But some time later some you might start wondering where the edit post button has gone. Well, this is especially true if you disable (both intentionally or unintentionally) the Tumblr’s own control bar which is not that pretty either. Some custom theme are to blame: they are getting rid of the default control bar at the top of the page (with those tools and follow buttons) and might replace them with their own menu bar some of which are much cooler anyway. The missing edit appearance button used to be there too. But, if you insist on bringing back that feature, annesmiless has made a tutorial to re-enable the feature several years ago.
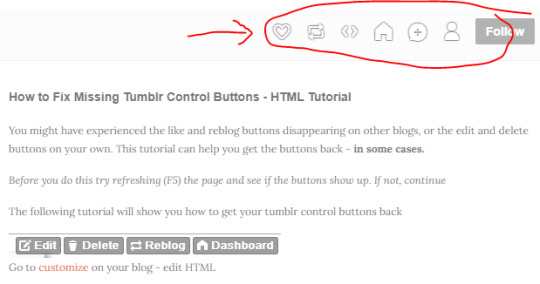
Wait, my custom theme does not remove the cluttering control bar! Oh no, I don’t want to re-do all my stuff just to look for another theme! Relax, babe. If you would rather disable the toolbar but keep your current theme you’ve been working hard on, you know the drill. Come on, don’t be kidding me. If you have changed themes several times, you must have known what you’re doing. Head over to the Custom HTML editor and delete this line from under <body> tag.
<iframe frameborder="0" id="tumblr_controls" scrolling="no" src="http://assets.tumblr.com/iframe.html?...blablabla...</iframe>
Now, back to that particular time when you realize actually need the edit post button. Just that one button, not the others. But you cannot bring back all the control bar, that’s too much work! Even if you could customize which icons to appear, that’s not worth the time and effort to scour hundreds of lines of HTML and CSS codes. To fix this issue, a decade ago szajmon started making this bookmarklet with JavaScript to redirect quickly to post edit page directly from the main blogpost page. The principle behind the script is simple: to change the “post” part from the URL into "edit” using string manipulations, press enter and voila, you will be taken to the edit post page. However, since another update around 2017 (after the Yahoo purchase) Tumblr made it impossible to redirect from simply changing the URL. For further technical stuff, go see this discussion thread from StackExchange. Scouring Tumblr blogs itself seems not helping, since people are happily visiting dashboard first then use the features there. Me? No. I just want to simply visit my blog and directly open the edit page whenever I feel like it. I don’t like to go back to dashboard just to scroll to a post I made in 2000s manually to click edit post. No.
If you are familiar with downloading videos from YouTube or Vimeo, you must have already known there are several bookmarklet tools available out there that you could just simply click while watching a video. Wait for a while and you will be taken to another site with links to different video quality to download. So I utilize this logic to bring back the JavaScript bookmarklet, inspired by the late szajmon. Here, the only variable is not predefined and directly integrated inside the script:
Input: VID-SRC.com/watch?v=<UniqueID>
Output: VID-DLD.com/download/?id=<UniqueID>
function(){ window.open('http://vid-dld.com/download/?id='+location.href.replace('https://www.vid-src.com/watch?v=', '')) }();
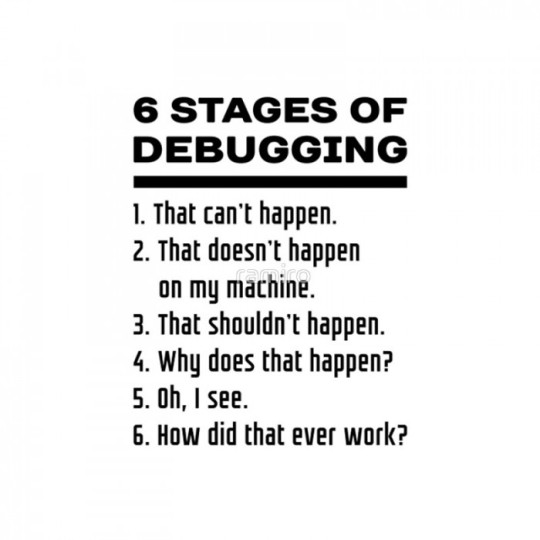
As you can see, this simple string manipulation technique only requires one variable: those sequences following "watch?v=" part. For Tumblr after the update, it requires us to be redirected first to dashboard (so the script need to ask the blog name <userid>) and inquires the unique post designation <postid>. This could be done by extracting the custom URL into two parts: the numbers <numberid> and the text you input during drafting <titleid>. This is very easy, ater all the script needs to be simple enough with few variables. So clickity tappity, code finished, and I tried to use this script to test on several older posts in this blog. Turns out—just like every other coding sessions—another problem exist: the bookmarklet can only be used in posts with limited sets of <numberid> digits. Now’s debugging time.
One of my earliest post in this blog: Some crappy “Hello, World!” stuff here, the <numberid> is 13925375970, which is 16 digits.
One of my latest post: 60b3r’s スクリプト: CUT (CleanUpTool) this post (615170514109038592) has a whopping 18 digits.
See, some of the older posts in Tumblr have less numbering in the <numberid> subset. Newer posts, however, might have more. This problem arise because I was using the substr() function to cut up the numbers from set character positions relative to the beginning of the URL. So with that sequence, I need to make many bookmarklets to accommodate different <numberid> digits for different posts, which is not efficient at all. You could see from the code snippets below that I can only accommodate 12 digits for a post, but not posts with 8, 14, or 15 digits. So I cannot use this bookmarklets directly on every other posts. Here is the conceptualization and the resulting raw script:
Input: <userid>.tumblr.com/post/<numberid>/<titleid>
Desired output: tumblr.com/edit/<numberid>/?redirect_to=<userid>.tumblr.com/post/<numberid>/<titleid>
(here, <postid> is just “<numberid>/<titleid>”)
function(){
var userid = location.href.slice(8, location.href.search('.tumblr')); var postid = location.href.replace(+userid+'.tumblr.com/post/', ''); var numberid = postid.substr(0, 12); window.open('www.tumblr.com/edit/'+numberid+'/?redirect_to='+userid+'.tumblr.com/post/'+postid)
}();
I have also optimized the code with each variable predefined to ease readability. To fix this issue, I changed the problematic function with another string manipulation split() and call the first value in the newly created array. Other than that, I also find that you could slim down the redirection URL into the following and would still bring you to the functional edit post page:
Desired output, simplified: /edit/<numid>?redirect_to=/blog/<usrid>
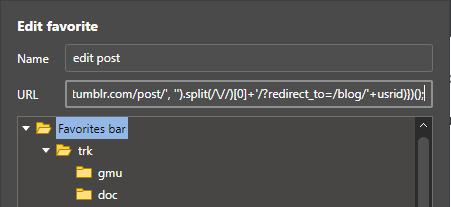
The resulting final script you could use as the edit post bookmarklet is here, no more hassle of having to go to dashboard anymore. Because of the Tumblr automatic URL redirection settings, you cannot just simply drag that link to your favorites bar. You need to visit my GitHub repository, copy the script and paste the script on a new bookmark’s URL box. Don’t forget to format the snippet into proper JavaScript syntax which is compatible with your browser. To use the bookmarklet, simple. Just navigate to the post you want to edit and click the bookmark on your favorites bar. The browser then will open the edit page for the post.
function(){
var usrid = location.href.slice(8, location.href.search('.tumblr')); var pstid = location.href.replace('https://'+usrid+'.tumblr.com/post/', ''); var numid = pstid.split(/\//)[0]; window.open('https://www.tumblr.com/edit/'+numid+'/?redirect_to=/blog/'+usrid)
}();
This is actually one of my numerous simple scripts project. I do not have any formal training in programming, I just collect small snippets from coding forums and gather them into collections. Moreover, this is my first time doing JS in 9 years. Last time, I made a simple batch clean-up tool and you could reach the tutorial here. Other than JS and Batch, I was also doing some VBScript and PowerShell scripting. I hope I could review my scripting skills again in the future. See you later at another series of 60b3r’s スクリプト!
source for learning: W3Schools
0 notes
Text
Web Home Bakend Background view | Ultra HD | 2020
youtube
#web home#rifat ul islam#backend background video#home pages for website#websites for home builders#assembly code#programing#free hd motion backgrounds#power bi iframe#home slomo#bootstrap cdn#website design#python w3schools#home view
0 notes
Photo

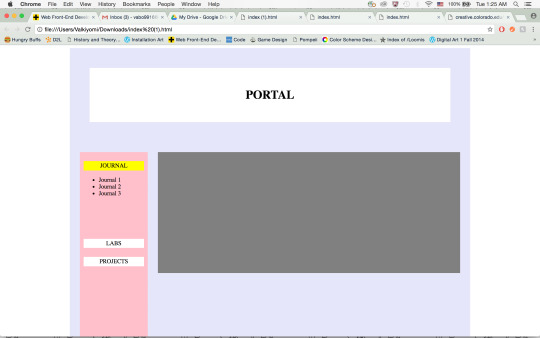
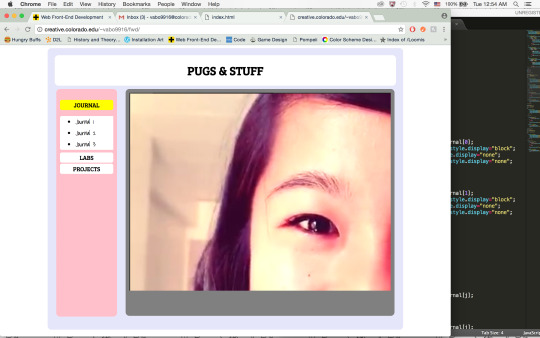
Here’s the link to my portal: http://creative.colorado.edu/~vabo9916/fwd/
The first thing that I needed to figure out for my portal was how to get everything to look and work the way I wanted to. I knew I needed CSS transitions for the dropdown menus, and I also knew I would need some Javascript to have my pages show up in the iframe. Once I got all the mechanics of the site down, I was able to easily add the glittery backgrounds and colors that I needed to bring the site together.
I knew a lot of what I needed to do from coding my own portfolio website from the past. I knew how to create arrow keys to go back and forth in a list of items, as well as how call the action by clicking on a button. All I needed to do now was to input it into this site and make sure it worked with the layout. I did run into a problem because instead of running through one list of items with one variable, I now had three different lists. I figured out how to work around this by adding two other variables that would track the position to their respective list.
Right now I've kept the design of my portal pretty simple. The focus for me this first time was to get it to function correctly and not do weird things when resizing the window. I hope to make this site more creative and have more pugs in it as the semester goes on.
As I mentioned before, I used a lot of the knowledge I already had from coding my previous website to make this one. I don't know exactly where I got all of my source code, but I mainly used W3Schools to figure things out on my own rather than copy-and-pasting someone else's code.
0 notes
Last Seen Blogs

ilkdunyam
ilk dünyam, ikinci dünyaya karşı

threesudsybubs
Three Sudsy Bubs

piggyjrc19
PiggyJRC

alastair42
AL

rdg-red-data-girl
I want to change.