#I know how to use all the adobe design tools & have programmed my own website & am learning Glyphs atm!
Text
If anyone knows any design agencies throughout the UK who are looking for interns (for half a year or one year), pleasee let me know!! I’m a graphic and communications design student (focusing on typography but willing to work in any field, in my fourth semester) and are looking to come to England for a year. I have top grades with an average of A/1.1. My professors are very renowned & well known in their field and would definitely write me a letter of recommendation! Thank you so much in advance <3
#sharing this would be greatly appreciated <3#I know how to use all the adobe design tools & have programmed my own website & am learning Glyphs atm!#I’m a hard worker & very responsible!! I live for my studies and pour my heart and soul into what I do. I promise I’m not half-assing this#ok bye now I hate pimping myself out like this lol#thanks!!!!!!!#mine#graphic design#design#type design
1 note
·
View note
Text
Week 9 - In Design - May 5th
Hello everyone!! before I go into what we did this week I'm going to show my work on my in Illustrator from last week. *note due to having a lot of work due at the moment in other courses it's not fully finished to how I would like, like have the cows body being shaded and highlights on the spots and ears. But other than that I am happy with how it turned out and I think it looks cute.


here you can see it fully flat coloured with an added black background top allow the cow to pop more off the page as it's body contrast to the background. I also added in eye highlights. For the c colours of the spots and body I went through lots of different variations, changing the hue, saturation and brightness. On the right is what I decided on.

here is the cow mid way through adding the shadows. I ended up using the pen tool to draw them on then filling them in. I couldn't exactly remember how we did the shadows for the penguin, which Was a lot easier and fast. And I know I could have checked my post about it or Moodle but I had already started this. So that's on me for making it more time consuming for myself.

Here is a photo of all my layers, I tried to organise and name them but I forgot for some of them. I locked all the layers apart from the one I was working on as to not work on the wrong layer by mistake, which I have done.

And here is the final cow so far. As I said at the beginning there is definitely more that I'd like todo to it, but I am happy with how it is going.
Now onto this week! This week we started learning to use In Design. I had never used In Design prior to this year so this class was very helpful. We did a day prior in Graphic Design start to use it but was it was my first time using the software I was very confused with the terminology and mechanics. But after today everything makes a lot more sense.
We looked to start with about page layouts in terms of hierarchy of text size. like Heading, Subheadings and body text. And how this helps to tell the user what to look at. And discussed the readability and usability. Which I know a bit about already from take Digital Technology at high school, and in yr 11 we designed and coded websites for The Blind Foundation in NZ and had to focus on the usability and readability, especially for text and colour choices.
I also learnt about different tools and the shortcuts for changing tools and using them. some were similar to other adobe programs we have used which was nice. and Below is a photo of my notes about them.


In the class we looked at setting up a page, and also columns on the page and how to make them. below is before and after we added the columns.

We also looked at creating character and paragraph styles for our work. which allows you to highlight the text when click on your style and and it will add the style to it. and here are some screenshots when learning todo this.


This makes doing your work and layouts so much faster like having your own custom presets. we also learnt how todo this for things like creating bullet points and adjusting the margins for them. - I found this part a little bit more confusing, so something for me to work on.

once we did this we looked at importing images, making them to be circles and wrapping text around them. The importing images Is basically the same as other adobe software, it's like I'm pretty sure AI were it like them not embeds. But it might be PS not AI. but to move them around the page and adjust the size you need to hold shift+command. It does this was I'm pretty sure the images default have masks on them. I don't entirely remember how to put the images inside circles, well I thought I did but then tried in graphic design and did it wrong. So that is something I'd like to go over again at some point. We also added doodles to our images then erased them.
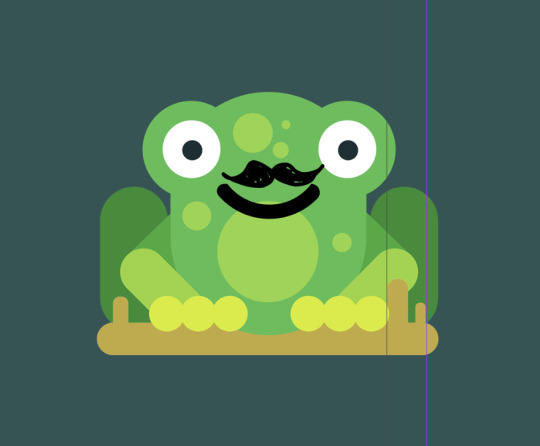
I gave my frog a moustache And was going to add a red barre soo it looked french.
Then we used the wrap text tool to wrap our tex around the frog image, which was pretty easy. Then we used the shortcut, command+return to slightly adjust the wrapping on the image and its location.


and all of these steps together left us with this!

I feel like this post may of not made a lot of sense as I was trying to wrap my head around everything while writing it, so it might be all over the show. But that is what we did in this weeks class. Im looking forward to learning more sand understanding it better as it will be very helpful in graphic design. There is probably also a bit I forgot to include but I know some if it is also in my (messy sadly) physical notes from class, so I can look through them as well.
0 notes
Text
Cs6 master collection serial number 2017

#Cs6 master collection serial number 2017 serial number
#Cs6 master collection serial number 2017 full
#Cs6 master collection serial number 2017 software
#Cs6 master collection serial number 2017 code
One important tool to accomplish this is the Adobe Photoshop CS6 Extended. It promises unlimited designs depending on your image at a fast speed.
Digital imaging: There are precision tools that will ensure stunning and vibrant artworks.
There is easy editing with the newest Content-Aware tools, adaptive designs, layouts, and new editing tools. So what can you expect in using the Adobe Master Collection CS6 Crack Knowing the different components, you are sure to have the ultimate performance together with the raging fast 64-bit support and GPU acceleration. There are also additional components that Adobe has placed to boost your editing experience.Īdobe Master Collection CS6 Crack Features : A careful examination :
#Cs6 master collection serial number 2017 serial number
The various aspects of this collection would be the A dobe CS6 Master Collection Serial Number Illustrator CS6 Extended, Illustrator CS6, InDesign CS6, Acrobat X Pro, Flash Professional CS6, Flash Builder, Dreamweaver CS6, Fireworks CS6, Premiere Pro CS6, Consequences CS6, Audition CS6, SpeedGrade CS6, Prelude CS6, and Encore CS6. As it would seem, it's an Adobe CS6 Master Collection Serial Quantity of all editing tools, from non-motion to motion files, without compromising the standard, the initial files, and also the final output.
#Cs6 master collection serial number 2017 software
Many works together with all the best and every type of this program released by the Adobe Designers.Įveryone has their very own degree of creativeness, and it takes only good software to uncover and enhance that creative nature in your soul. With exceptional power and precision, you can create inspiring experiences that go anywhere.The improving technique of Adobe products is tough and time taking too sometimes, and so the designers make many of that ease also to save your time, additionally, to creating Adobe services designed for u. Groundbreaking new creative tools provide innovative ways to design for the latest devices. It's D: all the above.Īdobe Creative Suite 6 Master Collection software delivers unprecedented performance with blazing-fast 64-bit native support and GPU acceleration. Highly recommend this if your looking for simple, basic, easy, etc.
#Cs6 master collection serial number 2017 code
STEP 13- Copy/paste the request code Adobe gives you into the 'Request' field in the keygen. Details: Source: Trial Type: Application Image Format: None Number of DVD's: 1 Protection: Serial, Activation Total Size: 8,37 GB Release Date: 2012-April-28 Website: Note: Adobe Creative Suite 6 Master Collection software delivers unprecedented performance with blazing-fast 64-bit native support. CS6 License Code #Adobe Master Collection Cs6 Ls16. Adobe Master Collection CS6 KeyGen, Adobe Master.
#Cs6 master collection serial number 2017 full
Master Collection CS6 Full Serial Number freeload. I can open it up and log my transactions and have my on-line checking account open at the same time to reconcile everything on the fly Thus far it looks like I can keep a running available balance daily which is nice. Would recommend it to someone moving from the old paper booklet register to on the computer. I can open it up and log my transactions and have my on-line checking account open at the same time to reconcile everything on the fly Thus far it looks like I can keep a running available. Being in the mortgage industry for over 10 years I wanted a easy form to quickly show others just how the impact on adding extra payments can add equity and reduce interest. I purchased this form as it is far easier to use than any other online software calculator I have. Adobe Creative Suite Cs6 Master Collection Incl Keygen Final.
0 notes
Note
hi there!! your ayato gfx was absolutely stunning i stared at it for a good minute just processing everything!! i've always been interesting in dabbling in gfx but i'm tech noob at best, an idiot at worst. do you have any advice for someone looking to start out? like resources, software etc. thank you sm and have a wonderful day/night
hello, sweet anon! first of all, thank you so much for your kind words! :)
note: text-heavy!
PEP TALK?
before we proceed, i just want to preface that getting into gfx design can be extremely frustrating. it is a part of the arts and as anything relating to the arts, it takes time and a LOT of practice. you, yourself is the biggest critic of your own work and you're also learning 21612198 tools. you will want to tear your hair out. you might have to learn theories and concepts that traditional artists learn in class to improve your own work. that being said, it is also very rewarding and fun, hehe
so what i always say to someone who wants to get into gfx design is, to just have fun. make the things you want and don't stop making them. the more you make, the more you improve. you can always learn the essentials of gfx design ofc!! but it's kinda boring so use whatever fandom as the subject to make it more fun
SOFTWARE
so the most well-known program that it's used in gfx is adobe photoshop and illustrator (there's more but those are the main two). it is not free and you gotta pay a subscription. if you can't afford it, you can always pirate it. BUUUUT, there's nice, free alternatives out there such as: GIMP (app), Photopea (browser based). it doesn't have everything photoshop does, but it's a nice way to dip your toes in!
RESOURCES
- your best resource is literally youtube and google haha! there are so many good videos you can search up and you can follow along. this is risky imo bc you can spend more time watching than doing, which defeats my points above.
- behance is a platform by adobe where you can find some resources, tutorials, and portfolios of other artists. it is a HUGE source of inspiration for me. i go on that website like at least once a week lMAO.
- pinterest is also a website i peruse often for inspirations! but at the same time, i'm torn bc there's a lot of stolen work here. so just keep that in mind
- the iconic gif tutorial by anue and this gaming gif tutorial by senka (yyh) is a GREAT way to start gfx design tbh. you'll learn to mess around with various tools when you make gifs!
GENERAL + IMPROVEMENT TIPS
i really wish i can just tell you the topics and tools you should learn but there's so much that it can get overwhelming. so take it at your own speed:
- like i mention above, learn the fundamentals. this is gonna be boring but use your favorite subject to make it fun!
- ok hear me out but as a beginner: copy and emulate. there's a reason why artists do master studies. you learn how the old and new masters paint, analyze their techniques and apply them to your own. it's pretty much the same in gfx design. emulate your favorite designs, learn why they use the colors they do and why they placed a certain font there. try to remake your favorite posters that you've seen and ask yourself why did they do that?
but ofc this is strictly for studying! this does not mean should plagiarize and post the same poster, but ayato version or something LOL. the line between plagiarism and inspiration/homage can be blurry but you need to make sure you are using this chance to learn and develop your own style! :)
- write down your ideas! sketch them out! whatever is in your brain might come out completely different on paper. and that's natural! it just help to visualize things
- PEN TOOL IS YOUR BEST FRIEND. i use this shit for EVERY single project so know it like the back of your hand.
- keep your past works and use it for self-critiques or just to look back and see how far you've come
CONCLUSION
remember, it will suck for a little bit while you learn all the tools in your software. you might not be able to materialize your ideas bc you don't know how to do something. it's ok!! you will get there once you're more experienced. just keep making gfx and ask for critiques. you will learn a ton! or sometimes, just walk away and let your brain rest. sometimes, we make a better product when you let it sit for a bit.
you got this, anon :) shoot me an ask/DM if you need anything else!
8 notes
·
View notes
Note
I've been really into graphic design lately and I want to start! do you have any tips?
Hey, thanks for asking, I guess I do have some tips
• For absolute beginners I'd recommend first looking into graphic programs and finding the best fit for what you want to create - the adobe cloud is great but to start out there are many free alternatives. If you're into drawing as well I'd recommend checking out Procreate.
• Study the basics - e.g. look at the difference between vectors and pixel graphics, file formats (jpg vs png vs tiff etc.), look up different methods to cut out images as it's something you'll probably need at some point, and maybe also have a look at recent design or color trends (that's always fun, too). Also advisable as a beginner is to study general do's and don'ts (for example working with text, website design or layouting have some clear rules for what works and what doesn't - most people already have a sense of aesthetic but it's always a good idea to prevent creating some graphic design is my passion meme stuff, see r/crappydesign or the likes).
• If you want to create with the intention of publishing your works effectively on certain platforms (like Instagram) it's always clever to look up which formats work best (1080x1080 is standard square for Instagram for example). If you want to create wallpapers look up common sizes and set up your canvas accordingly.
• Find inspiration and ideas - of course you need at least a rough idea about what you want to create. I for example love all things 80s, so for inspiration I look up 80s media, technology, fashion etc. to find things I could incorporate in my designs (e.g. patterns, color schemes, shapes, fonts etc.). An amazing platform for this is Pinterest of course, but I also frequently use unsplash.com (free to use gorgeous photography that you can use right away for your designs), youtube (for tutorials mainly) and lots of tumblr blogs.
• If you want to use photos make sure you know about copyright and fair use - platforms like Pinterest mostly feature copyrighted images, so never just use an image without considering this. Always ask first and give credit.
• Watch lots of tutorials - in the beginning I had no idea about the capabilities of graphic programs and was often wondering how artists were able to create certain things. So of course you need to learn somehow and watching tutorials on youtube is a great way to do so. It’s also fun to just look through random design tutorials until the algorythm shows you something you really like and want to recreate or use for your own works. Like this I also learned lots of basics (advanced working with layers, clipping masks, transparency, layer styles, filters and all kinds of photoshop tools).
• Familiarize yourself with the graphic program of your choice. Check out which tools are available and try to use them. Experiment with shapes, brushes, text, gradients, etc. Set up your workplace according to your needs and look through all options, settings and tabs to see what your possibilities are. Play around with a photo and try to edit the hell out of it. Like this you’ll probably already find some tools or settings that inspire you and ways you might want to incorporate them into your designs.
• Recreate and adopt. Recreating artworks that inspire you or designing along tutorials is the best way to learn in my opinion, as it is with drawing as well. As you learn new techniques you can begin to incorporate more and more of them into your own artworks, your drafting process will change as you’re able to consider more ways to reach your design goal, and you will also gain lots of new inspiration as well. When I discovered the possibilities of layer mixing I began designing with them in mind and just playing around yielded some amazing results; I made note of my favourite styles and now am frequently using them in my designs.
• Draft and save inspiration. I always carry my sketchbook around and doodle things when I have a few minutes of time or when inspiration hits me. You often see things in the real world that strike you as interesting, so make sure you don’t forget about them later when you want to design. This can be posters, flyers or other design works but also nature, people, clothes, etc. Taking written notes also works great for me. For collecting inspiration online I mostly use Pinterest (create artboards for specific aesthetics and pin all images that fit and inspire you in some way so you can look them up later as reference), but I also have lots of bookmarks neatly organized to save images that aren’t on pinterest. I never just copy and save on my computer because I might not know who to credit later.
• Refine your own aesthetic, polish your artworks and take challenges. Try to design outside of your comfort zone (I’m really not a fan of working with Adobe Illustrator for example but need it a lot for my job so I decided to use it more at home for my own art and am now quite fond of some of the tools) and challenge yourself - e.g. you can try to design within a certain decade’s aesthetic, participate in online design challenges, ask for requests from friends or followers, etc. Keep up with design trends (especially if you’re planning to sell your artworks in some way at some point).
• Less is more. Edit edit edit. Something I still struggle with given that the 80s aesthetic I love always screams more is more. Train your abstraction ability (making pixel art or super minimalist things is a great way to practice). Learn what an artwork / layout / website etc. really needs and what can be scrapped. Don't be afraid of blank spaces. Never bedazzle just for the sake of filling space.
That’s all I can think of right now, hope this helps ♡ if you have questions about specific things you can always hit me up.

39 notes
·
View notes
Text
Download Ad Blocker For Mac Free

Written by Eyeo GmbH
Free Ad Blocker Windows 7
Ad Blocker For Mac Safari Free Download
Best Free Ad Blocker Mac
Ad Blocker For Macbook Air
Best Free Ad Blocker
Category: Productivity
Release date: 2019-11-27
Licence: Free
Software version: 2.1.0
File size: 19.24 MB
Compatibility: Windows 10/8.1/8/7/Vista and Mac OS X 10.12.6
Adblock Plus for Safari for PC and Mac Screenshots
Adblock for Mac, free and safe download. Adblock latest version: Block ads in Google Chrome. UBlock, the fastest, most powerful ad blocker for Mac is here. UBlock blocks all annoying pop-ups and ads while you browse on your Mac. It’s simple, easy-to-install, and best of all- completely free. Download uBlock ad blocker for Mac and browse faster today.
Key Features
Latest Version: 2.1.0
Licence: Free
Rated 3/5 By 740 People
What does Adblock Plus for Safari do? Adblock Plus for Safari is a totally free ad blocker that allows you to block annoying ads on your favorite websites and video channels. Simply install the app, and see the web in a better way. No more pop-ups, banners or autoplay ads. The Adblock Plus app for Mac supports great websites with Acceptable Ads (on by default). Don’t want to see any ads? Simply deactivate Acceptable Ads. You can also have the option to whitelist websites you trust.By downloading and installing the application, you agree to our Terms of Use. https://adblockplus.org/terms
Download for MacOS - server 1 --> Free
Download and Install Adblock Plus for Safari
Download for PC - server 1 -->
MAC:


Download for MacOS - server 1 --> Free
Thank you for visiting our site. Have a nice day!
PC Compactibility/Requirements for Installation
Compactible OS list:
Windows 10
Windows 8.1
Windows 7
Windows Vista
Free Ad Blocker Windows 7
Requirements for MacOS Installation
Ad Blocker For Mac Safari Free Download
Intel, 64-bit processor, OS X 10.7 or later.
Compactible OS list:
OS X 10.10: Yosemite
OS X 10.11: El Capitan
macOS 10.12: Sierra
macOS 10.13: High Sierra
macOS 10.14: Mojave8
macOS 10.15: Catalina
Adblock Plus for Safari - how do I download the app on PC?
If you want to download the software on your pc or mac, you could either first visit the Mac store or Windows AppStore and search for the app OR you can easily use any of the download links we provided above under the 'Download and Install' header section to download the application
Adblock Plus for Safari - Is it safe to download?
Yes. The app is 100 percent (100%) safe to download and Install. Our download links are from safe sources and are frequently virus scanned to protect you
By Glendale2x
New framework seems to have performance issues
This version of ABP for the new Safari framework unfortuantely seems to kill performance on my computers. Maybe it’s partially related to them being a bit older (one is a Mid 2011 Mini, the other is a 2012 iMac), but with ABP enabled I can’t even open a new tab/window and type a URL into the bar and expect Safari to accept the input without having to hold down the return key until it goes or wait a minute after opening a new tab or window. I also noticed that using Twitter was jumpy and lagged even with simple typing, it felt like all the dynamic content it relies on was just struggling to be processed through whatever framework Apple is forcing. Hopefully the devloper can figure out the performance issues because it’s really, really bad now.
By Ramblin'Rose
why isn’t this working?
I have ABP and it wasn’t perfect but worked fairly well for my needs. Recently, it simply disappeared. (I see someone else said that could be from the latest iOS update, but I don’t have that on my desktop yet). When I tried to reinstall, it showed me two boxes to check. The way I read it, if you checked the box that said you wanted the icon visible in the toolbar, it would be able to read sensitive information of all kinds on any page. What good is an app of any kind that allows for that?! As it was, with only the one box checked, it only blocked very few ads, and I was still getting requests from sites to be whitelisted without being able to fnd any way to do it. I’ve got all kinds of garage showing up on my Facebook page, and you guys have ruined what was a reasonable product. WHY?
By PeopleRsad
Still works for me
Almost didn’t download the new version based on the recent reviews, however after looking at the other apps here that claim to be ad blockers I didn’t’t see too many alternatives. I decided to go ahead and get the new version and so far its pretty much the same as the old version, lots of ads blocked. I’m happy, just make sure you go through the simple set-up.
By achilds19
Works well but
After much research, I understand the issue with Apple changing the rules on the devs so they had to build this app from scratch. Works well for me so far, except for one annoying problem. I use Yahoo mail and it's not hiding the ad that appears in the top line of the inbox even with unchecking the Acceptable Ads box, which is super annoying. I know the devs are watching these reviews, so if someone can point me to an extension or something that will fix that, I'd appreciate it. Was using AdGuard and it fixed that problem, but that app behaves like spyware and is constantly running in the background even after you close Safari.
Advertisement
Adguard for Mac v.1.1.0Adguard is the first standalone adblocker for Mac OS X. It is an ultimate program has all the features to ensure more efficient and comfortable use of the Internet. Ad blocking, phishing and malware protection, and privacy protection!
SlimBoat for Mac v.1.1.6SlimBoat is a fast and secure FREE web browser software with a lot of powerful features, such as intelligent form filler, popup blocker, adblocker, social network integration, download manager, web page translation, quick search and site groups.
Safari AdBlocker for Mac OS v.1.9.8.6The only 64-bit adblocker built for Mac OS X 10.5+ to integrate directly into Safari, for minimum disruption to your browsing experienceMain Features- Adblock Plus subscription support- Right-click to block images, and frames- Automatic ...
Vivaldi for MacOS v.3.2.1967The Vivaldi browser lets you be in control of how your browser looks, feels and works. It does not track you, adapts to your style with features that you need and has values that you can stand by.
Maiar Browser v.80.0.1.40Maiar is an extremely fast and privacy-friendly browser for the modern web. It loads major websites 2-8 times faster than Chrome and Safari. Maiar can block ads without modules or extensions.
Izenda Ad Hoc - Express Edition v.4.0Izenda Ad Hoc - Agile Business Intelligence for ASP.NETLiberate Your Organization's Relational Data Today!Izenda Ad Hoc empowers business users to directly explore relational data from a web browser. * Intuitive and Completely Web-Based AJAX Report ...
Avian Freeware Suite v.0.1Avian Freeware Suite (AFS) provides two things: Developers with libraries for Java Swing Widgets, XML handling, Fortran95 and Pascal; End users (Medical students, doctors, scientists) with productivity tools they can use (quizzes, XML databasing & ...
IP Blocker v.20050403IP Blocker is an incident response tool that automatically updates access control lists on Cisco routers and other devices. Web and command line interfaces are both supported, as is logging, email notification, and automatic expiration of ...
QR-Code Maker Freeware v.1.0.0Use QR-Code Studio to create QR codes for free. An assistant simplifies the creation of QR codes for mobile tagging, social media and more. The generated QR-Codes are available immediately as BMP, GIF, JPG, PNG and TIFF graphic file.
Freeware Advanced Audio Coder v.2.2.7FAAC is an Advanced Audio Coder (MPEG2-AAC, MPEG4-AAC). The goal of FAAC is to explore the possibilities of AAC and exceed the quality of the currently best MP3 ...
Zhang Hong's Freeware v.1.0[1] English-Portuguese-Chinese Dictionary [2] Japanese-English-Chinese Dictionary [3] MP3 Sponge [4] JPG Sponge [5] RedDays [6] RadSensor [7] descriptions and updates: ...
Mimosa Scheduling Software Freeware v.6.5.8Mimosa is a scheduling and event planning software application for use to create timetables in any kind of school and university of varying type and size. It is also used to schedule conferences and work-shifts in business and industry environments.
Flash Banner Maker for Mac v.1.00With AnvSoft Flash Banner Maker for Mac, you can easily create gorgeous flash banners in SWF format and html file for flash intros or for building website. You can add any image backgroud from your hard drive and choose from the 50+ animation effects for.
BiblePlayer for iPod v.1.1Take God’s Word to Go! Do you need to have a daily dose of bible scriptures? Or maybe you need a bible reading plan? Now you can read and listen to the King James version of the Bible on your iPod with this new freeware program. Bibleplayer ...
Mach-O OSAX v.0.1Mach-O OSAX is a scripting addition for CodeWarrior which provides different samples. The package is completly freeware and the source code is ...
QuickCart v.2.2QuickCart 2.2 is regarded as a flexible and handy program which is designed to run your own web shop. Freeware and easy to use e-commerce solution is designed to run Your own web shop. As a database it uses files structure so that the SQL database is ...
Flippagemaker PDF to Flash (SWF) for Mac v.1.0.0Flippagemaker Free PDF to Flash (SWF) for Mac is freeware for Mac users to convert pdf to swf flash video. Create Macromedia Flash (SWF) file from Adobe PDF file for embedding into web page easily.
DVDSmith Movie Backup v.1.0.0DVDSmith Movie Backup is DVD Decrypter, DVD copying Freeware to backup, clone or copy DVD movie to computer as DVD folder and removes all the protections (CSS, RC, RCE, APS, UOPs and Sony ARccOS) while copying.
Hubblescreensavermac v.1.0'Hubble Space Telescope (Mac) free screensaver containing 99 high quality NASA-ESA space images. Screensaver designed by the Creative Department, an award winning advertising and interactive agency based in Cincinnati. Fully functional freeware.' ...
MediaHuman Audio Converter MAC v.1.8MediaHuman Audio Converter is a freeware for Mac OS X. It can help you in case you need to convert your music in WMA, AAC, WAV, FLAC, OGG or Apple Loseless format. This program was designed to simplify as much as possible the process of conversion.
Best Free Ad Blocker Mac
Freeware Ad Blocker software by TitlePopularityFreewareLinuxMac
Ad Blocker For Macbook Air
Today's Top Ten Downloads for Freeware Ad Blocker
Best Free Ad Blocker
Zoiper Webphone ZOIPER webphone is fully-compliant with Internet Explorer,
1000apps NetVibes Widget Avec ce Widget vous pourrez rechercher des logiciels ,
Vivaldi for MacOS The Vivaldi browser lets you be in control of how your
QR-Code Maker Freeware Use QR-Code Studio to create QR codes for free. An assistant
Flash Banner Maker for Mac With AnvSoft Flash Banner Maker for Mac, you can easily
PC Protect Your PC First screensaver application protecting your PC from
Flippagemaker PDF to Flash (SWF) for Mac Flippagemaker Free PDF to Flash (SWF) for Mac is freeware
DVDSmith Movie Backup DVDSmith Movie Backup is DVD Decrypter, DVD copying
Maiar Browser Maiar is an extremely fast and privacy-friendly browser for
BiblePlayer for iPod Take God’s Word to Go! Do you need to have a daily
Visit HotFiles@Winsite for more of the top downloads here at WinSite!
2 notes
·
View notes
Text
My Photoshop - kind of - Tutorial
Skill-share (pixel animation tutorial)
Hello, I am sharing my new-found pixel animation skills that I learned using Adobe Photoshop, in the hope that I can help other people to learn how to make simple 2D GIF pixel animations. Some people out there may be wondering how to create their own GIFs to add to their social media sites, or to other sharing platforms. As I am new to Tumblr, I will also be using my new-found Tumblr blogging skills to create my very first tutorial blog-post for readers to follow. 😉
This post is a very basic, easy-to-follow tutorial, for anyone who is looking to start animating in Adobe Photoshop, suitable for all ages. So, if you are a beginner and you want to have a go at pixel animation, then please, follow my tutorial. I have tried to use plain language and instructions (no jargon). I believe that everything I have explained, every instruction, is easy to understand. If not, please feel free to comment and I will do my best to help and rectify any problems. Your feedback posts will let me know if my tutorial has been a success or not. Anyway, I really hope that you find my tutorial useful.
The basic knowledge and skills that I will be sharing are:
How to create, upload or select an image to develop (digital character-design).
How to use editing tools in Photoshop.
How to use ‘Layers’ in Photoshop to create frames.
How to use tabs in Photoshop.
How to use drop-down selection menus in Photoshop.
Animation concepts and how to create walk-cycles.
How to save and export created pixel animation GIFs.
Rule number one about Photoshop is that it is very hard. If you are using it for the first time, take it easy, don’t over complicate things because otherwise, you will most likely get very frustrated and may even quit before you begin your animated journey.
The first thing you are probably going to want to do, if you want to start animating in Photoshop, is to open the program and start a new document. Open the desired image file or create your own images from scratch. You can rearrange the details so it fits your needs perfectly; don’t worry, that part is fairly simple.
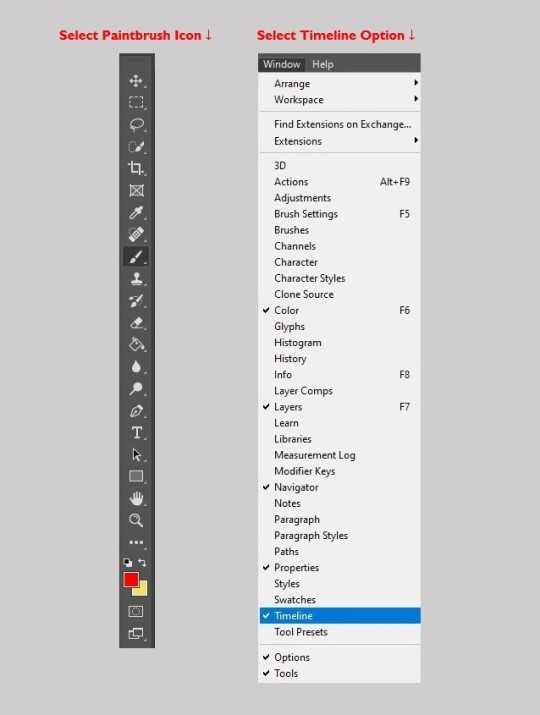
Next, select the ‘Paintbrush Icon’ from the toolbar, get out your brush-tool and start drawing! Keep trying to get the character to look how you desire. Remember, you can use the drawing tools to edit images you have uploaded or you can create images from scratch. It’s okay if it doesn’t look great immediately, you’ll get there, most good things happen with time.
‘Layers’, they are a thing and a very useful thing. If you layer-up your work, you can start to make your animation. Also, the useful thing about layers is that you can trace over other layers, so, they look the same and are in equal proportion. You start at the base layer and stack-up layers as you create your characters. The final layer will be the first visible.
Once you have some layers sorted out, you can look to the bar at the very top and see where the tab says “Window”, go all of the way down the drop-down selection menu list and click on “Timeline” and when you do, a bar will pop up at the bottom of your screen. You will see a button that says either “Create Frame Animation” (which is the one that I used) or “Create Video Timeline”, for the animation I would suggest using Frame Animation, as I don’t know yet what the other one does exactly. After you have clicked on Frame Animation, you can put all of your layers side-by-side and move them around, edit them. You can do whatever to make the animation how you want it to be. When you have finished creating, don’t forget to name and save your animation.
Once you export your finished animation, you can upload it to your blog, social media, any website or email messages.
Figure 1 - Adobe Photoshop Toolbar and Drop-Down Selection Menu
Simple Steps to Create a GIF:
Open Adobe Photoshop.
Upload and open your created image.
If you want to, you can edit your uploaded image or draw your own character using the drawing tools from the toolbar on the left.
Click on ‘Timeline’ in the window drop-down menu.
Click ‘Create Frame Animation’.
For every new frame, create a new layer.
Open the menu icon on the right, select ‘Make Frames From Layers’.
Under every frame, choose the time-span length for appearance before switching to the next frame.
At the bottom of the toolbar, select amount of times to loop.
Press the ‘Play’ icon to preview your GIF.
Name, save and Export Your GIF.
Upload your GIF to your blog, social media site or email messages.
Steps (from Adobe Photoshop) to Export Your GIF:
Go to File > Export > Save for Web (Legacy)...
1. Select GIF 128 Dithered from the ‘Preset’ menu.
2. Select 256 from the ‘Colors’ menu.
3. If you are using the GIF online or want to limit the file size of the animation, change Width and Height fields in the Image Size options.
4. Select Forever from the ‘Looping Options’ menu.
Click the Preview... button in the lower left corner of the Export window to preview your GIF in a web browser.
Click Save... and select a destination for your animated GIF file.
Now you have an Animation, I hope. If not, I am very sorry. Good luck!
Please let me know how you get on. If you encounter any problems or have any suggestions, I would really value your feedback posts. Thanks 👍

Thanks to rai-smik for the feedback below:

Basic Moving Strawberry GIF - from rai-smik
Created following my Adobe Photoshop Tutorial

Tutorial Review
First of all, I have to say that writing my first Adobe Photoshop pixel animation tutorial was not easy. Trying to explain and write instructions for other people to follow was quite hard. I really had to stretch my brain to try and formulate a comprehensive guide that other people would be able to understand and follow. Using Tumblr for my skill-share was a brilliant medium; it was easy to use and a great platform for sharing skills quickly.
So, after receiving clear feedback from rai-smik (as above) I am now able to reflect on how successful, or not, my skill share was.
I believe that I was able to convey all the necessary information to share my new skills in my tutorial, this is because the feedback from rai-smik reported a successful animation creation (bouncing strawberry GIF above) using my guide. The user said that they were able to understand my numbered instructional list, and they also found the tutorial language/tone simple and easy to understand. So, as the user was able to follow my step-by-step numbered list with no problems, and they managed to create their own GIF, I would say that my tutorial achieved what it was designed to do.
However, after reading my feedback, I realised that I should have taken screenshots in Photoshop of each step that I took to create my animated character, and I should have inserted the screenshots underneath, or above, its corresponding numbered instruction in my tutorial. It’s so obvious now that visual images should have been pasted in to complement the written instructions. I can’t believe that I overlooked such a simple thing. Next time I write a tutorial I will definitely insert screenshots to better convey my ideas to the audience.
Writing the tutorial also reinforced my own knowledge, and instilled a deeper understanding of the things that I had learned during the Photoshop training. I feel more confident about revisiting my new skills and moving forward with new projects. If I go wrong, I can always look back at my tutorial to remind me how to get it right. Also, now I know how to write a tutorial, I can apply this knowledge to other subjects and produce this kind of documentation when it is needed. It is a good skill to have and I know I will keep improving my technique.
Overall, I enjoyed writing my tutorial, it was a fun document to create. I had fun creating the jpeg that shows both the Photoshop toolbar and the drop-down menu. I also had fun searching for a thumbs-up GIF to add at the end of my document. It gave me the chance to look around Tumblr and see what’s going on out there. Mostly, I am so glad that someone was able to use my tutorial, understand it and get good results.
Summary: so, what did I learn from creating a tutorial? ✔✔✔✔✔✔✔
I learned how to share skills and knowledge through blogging, using Tumblr as a platform.
I learned that sharing skills reinforces learning.
I learned to hone my technical skills online and in programs.
I learned how to create a tutorial (transferable skills).
I learned how to write a review (transferable skills).
I learned how to add instructional screenshots (transferable skills).
I learned to consider my audience, beginners who might use my tutorial.
Critical Review - Skill-share (pixel animation tutorial)
Disappointingly, from creating my pixel animation tutorial, I learned that I am not as good as I would like to be at it, sharing skills that is, and I need more tutoring and practice. I also learned that I am not the best at writing a review. I tried so hard to create the tutorial, but I missed so many obvious factors (like lack of screenshots) that someone else who might want to learn how to use Photoshop (an absolute beginner) might not be able to follow my tutorial very well.
Summary: so, what do I need to improve? 🤦♀️
I need to learn how to explain myself better in writing; to convey better.
I need to include more detail and less waffle in what I am writing.
I need to practice and create more tutorials to improve.
I need to practice writing reviews to improve.
I need to include screenshots of every stage of animation.
I need to learn how to add instructional screenshots appropriately.
I need to be more critical of my own work.
I need to learn how to judge and edit my own work to get it right.
I learned that I need to get third-party feedback.
Considering my intended audience user-base (those who might use my tutorial); I wanted to share my new skills to try and help people like me, who lack education and access to good facilities. I was hoping that disadvantaged people, who are basic beginners, might be able to learn from an easy-to-follow tutorial, for anyone who is looking to start animating in Adobe Photoshop (for all ages). Beginners who might want to learn animation. I tried to use simple language and instructions. I believed that everything I explained, every instruction, was easy to understand. However, I now realise that my tutorial was not very useful for some people in society.
Crucially, one thing that I stupidly overlooked and have genuinely learned from, is that most disadvantaged people do not have Photoshop or access to Photoshop; I only know one person, in my whole association, that has access to Photoshop. I came to realise that once you’ve had access to something (like Photoshop) how easy it is to fall into the patronising bourgeois trap of “Let them Eat Cake” 🎂 -- so, that was very foolish of me! 😒😒😒
APOLOGY: the label ‘Disadvantaged’ is considered to be discriminatory. ‘So-called’ disadvantaged people find it insulting and patronising (I should know, I am labelled as disadvantaged).
“Once you label me, you negate me” - Søren Kierkegaard
This is a ‘Critical Review’ and I am criticising my own work and abilities. I apologise to any reader who is offended, it is not my intention to patronise, alienate or offend. 🤔
11 notes
·
View notes
Text
Sqribble Review | Create High-Quality eBooks Now
Sqribble Is Legal!
In-Depth Review
What I Like
I’ll start off by talking about the aspects of Sqribble that I like!
I can add content to my eBook without writing a single word

Creates AMAZING eBooks In 5 MINUTES, Get Sqribble Now!
I only had to select the niche, and the tool fills in the content on the chosen template. After this, I quickly scanned the preview, removed unwanted content, and added relevant content as required. It is a fantastic feature as it saved me a lot of effort and time.
The tool adds the content based on the URL I provided. This software also allowed me to extract content from my Word document and include it in the eBook, meaning I can use my library of niche articles as well.
Creates AMAZING eBooks In 5 MINUTES, Get Sqribble Now!
Creates AMAZING eBooks In 5 MINUTES, Get Sqribble Now!
It is a cloud-based tool, which allows you to create high-quality and professional-looking eBooks with the help of templates provided with the tool with just a few clicks of the mouse button.
It is the ideal solution for marketing professionals, freelancers, small and medium marketing agencies, and anyone else looking to create eye-grabbing eBooks quickly and effortlessly. You can save a lot of time as well as money by using it.
Creates AMAZING eBooks In 5 MINUTES, Get Sqribble Now!
As mentioned earlier, I had tried several similar tools, but Sqribble stands apart from the rest because of its cool features, not available on any other comparable program. This feature is a total game-changer and will save eBook creators from the hassle of typing the content into the software. Here is a list of things this amazing tool can do:
Creates AMAZING eBooks In 5 MINUTES, Get Sqribble Now!
• Drag and drop design
• Automatically generate a table of contents
• Automatic pagination
• Automatic headers and footers
• It allows the user to add their media. Upload your Word document and sit back and relax as the tool automatically extracts the content from your document and puts it into your new eBook
• Allows one to add or delete pages
• Has more than 300 Google fonts
• Automatic content addition feature that enables you to add content from files in your computer, from web pages, or even from the vast Sqribble library containing 1,000 instant niche articles, so that you do not have to write anything
• Boasts of 10 different eCovers that the user can easily customize
• Includes 50 eBook templates in 15 different niches, meaning that you will never have to waste time starting from scratch
• Creates content automatically
• It converts an eBook into an animated and interactive flipbook instantly. According to marketing professionals, interactive eBooks are much more attention-grabbing, making them better than flat eBooks when it comes to driving traffic to your website
Creates AMAZING eBooks In 5 MINUTES, Get Sqribble Now!
Create flipbooks effortlessly
Sqribble never ceases to amaze me because of its versatility and its capability to create other stuff apart from eBooks. It has the ability to convert flat books into interactive flipbooks. For the unanimated, flipbooks have the feel and look of a real book.
It consists of animated pages that turn like a real book with options to create a notion as if you are flipping the pages of a physical book. This added advantage puts Sqribble miles ahead of its competitors.
Product Overview
In essence, Sqribble is an online platform that allows you to create eBooks in PDF format. It offers various pre-designed eBooks you can customize to your own clients, products, or brands.
Creates AMAZING eBooks In 5 MINUTES, Get Sqribble Now!
The actual editing platform is sort of drag-and-drop but not quite. You are able to place text, image, and other elements on the pages and you have basic editing and customization options for them.
You are able to save your eBooks as PDF files or send them to clients directly through the online platform.

I purchased Sqribble a few weeks ago and have been testing it out both personally and at my full-time job. I’ll share my experiences throughout this review and try to provide some valuable insight for all of you reading this review.
During my use of Sqribble, I have found it to be fairly easy to use. I think it definitely has some limitations in terms of the breadth of design options available and has limited options for customization compared to other products like the Adobe suite or Canva.
All of that being said, if you’re looking for a more affordable, relatively simple platform that you can use to quickly throw together a decent eBook, I wouldn’t hesitate to recommend you try Sqribble out.
Pre-Designed eBook Formats
The fact that there are many pre-designed formats to choose from makes it pretty easy to get a good start on an e-book. There are a variety of color schemes and styles to choose from.
The pre-designed eBooks are based on different topics but they could all easily be used for any topic of eBook. I think it’s more based on how the ebook will be used. For example, a pre-designed eBook based on presenting numerical data will be much different from an eBook focused on telling a children’s story. There are pre-designed examples for these types and more.
Client Management
Sqribble makes managing and working with your clients a breeze by providing a designated Client management area. This area allows you to create multiple clients and assign different eBook designs to each of them. You are able to capture contact information, pricing information, and notes for each client.
Client Comments
Perhaps the most useful part of the client management system is the ability to share your eBook with a client and give them the ability to make comments on what you’ve produced. These comments are then available for you to see within your design panel so you can easily make changes based on their feedback!
This commenting system could save you and your client’s lots of time by eliminating the need for long phone calls or lengthy emails. Communication regarding the eBook you are creating can all be done right through the Sqribble dashboard.
Saving Prompts
Since Sqribble doesn’t constantly save after every edit (more on this in the “What I Don’t Like” section) it does provide regular prompts to save your work. I don’t know for sure, but it seems like the prompt pops up every five minutes or so.
For people like me who can work for hours without remembering to save my work, these prompts help me to prevent a potential disaster. Of course, I’m not sure why it just doesn’t save automatically like most online platforms I’ve worked with like Canva.
Pre-Set Color Palettes
Sqribble is marketed for those of us who want to be able to throw together a decent eBook without too much time and work put into it. On this note, they offer over twenty color palettes that you can easily apply to any eBook.

1 note
·
View note
Text
MDD410: Emerging Multimedias and Technologies Reflection
Introduction
Through my MDD410 course, I gained a lot of new insight on technologies that I didn’t even know existed or that people were bringing to fruition. Although my expectations of the course were incorrect, it certainly did not disappoint.
What did you expect to learn from MDD410 when you first signed up for the course?
When first signing up for the course, I expected to learn more about computer related technologies. This is probably because I’m biased and used to my computer oriented major, however, I soon realized that we would be venturing into technology in all realms (phones, video games, etc.) So, needless to say, I ended up learning about much more than what I had planned on. At times, this was overwhelmingly, for example with AR and VR I was not really familiar with the topic prior. I knew it existed of course but had no idea of the real capabilities that it had, which can be life changing in some cases.
What did you learn that was new or that you now view in a different way? What helped you to learn this?
One thing I learned about that previously I had no knowledge about was 3D printing. I had no idea that you could utilize Adobe programs in order to create a blueprint to be 3D printed. This caused me to view the world of 3D printing in a different way because before I felt that it must be so difficult and unobtainable for the average person to be able to work with. Upon creating my own 3D shape, though, I realized that probably so many programs out there exist to help you bring your ideas to life. If you have a concept, you can probably find a tool or program to help you build that blueprint.
Continuing on the topic of 3D printing, I learned about how many different uses there really are for 3D printing. Of course, in the present day, more and more people are purchasing 3D printers for their home. This is usually the only thing I ever thought of when thinking about 3D printing; the people who print things to sell or niche little devices that help out around the house (cellphone stands, coasters,etc). When joining the class discussion, though, it was brought to my attention that these devices can play a huge role in manufacturing. One person mentioned the possibility of printers being able to replicate materials that we get from animals or nature that isn’t always ethically sourced. I truly hadn’t thought about all the different materials these printers can work with because I’m used to just seeing plain, plastic objects. So for me, the week we discussed 3D printers was where I learned the most new information. I learned a lot from my classmates and the lesson/lab itself.
What is the key takeaway that you will retain from the course as you move forward into your career field?
As I move into my career field of Graphic Design, I will keep in mind that technology is ever evolving. The development of new applications, websites, and machines are not slowing down anytime soon. So, one important thing for me to remember is to always keep up with the latest editing programs. I focus primarily on the Adobe Creative Suite, but even these programs are constantly changing; case in point would be the fact that I didn’t know you could 3D model in using Adobe. The most important thing that I learned was that I will always need to keep myself up to speed on technology and how it will relate to my career in order for me to adapt and remain successful.
Summary
Overall, this course has been informational for me and I do see how it was a necessary piece to me earning my degree. Although I am not 100% sure what exact career field I will end up in, I do know that it will be rooted in technology and utilizing the internet, so I learned a lot of important things. I think it was great to hear the perspective of my fellow classmates on a lot of the topics that we learned about, such as privacy. I can only hope that moving forward in life I continue to be able to learn from my peers not only about the technologies they use in their day to day lives, but also their personal opinions on these have affected society.
1 note
·
View note
Photo
I am an antivirus program (2020)
> CHAPTER 2
The new human type cannot be properly understood without an awareness of what he is continuously exposed to from the world - Theodor Adorno. Minima Moralia, 1951
We can not change the medium as the medium is predicated on the message (use my square space code for a 10% discount)- we are fixed in this web 2.0 and the control of knowledge will be met with the streamlining of UI and UX design. Design tools like the adobe programs will continue to increase their premium and their monopoly hold on the design space - to be a designer is to be implicated with this process, regardless if you pirate software or notThis is where I raise flags against the tepid conglomeration of blog sites and web in general, the astroturfing of the internet has only amplified the feedback of Graphic Design. You’d typically call this commercial design. Commercial design fits the criteria of an evolving media world, “It is important to note that this ultimate stage of pictorialization was a reversal of pattern. The world of body and mind...was not photographical at all, but anonvisual set of relations”1. Commercial Design started to drive an efficiency science behind it’s aesthetic - you make the access mode immediate and your engagement success is far higher, and you do this through the pictogram, and when photography came about, that too was made into a design appendage. “To understand the medium of the photograph is quite impossible, then, without grasping its relations to other media, both old and new. For media, as extensions of our physical and nervous systems, constitute a world of biochemical interactions that must ever seek new equilibrium as new extensions occur.”1 This is potentially a valuable understanding of media, and thus design, presented by media theorist Marshall Mcluhan, commercial design (and all art and design in a sense) are schizophrenic presentations of the world, they accumulate meanings outside the presented scope of an advertisement, or typography - they link the relational experience of the mass media consumer, as Mcluhan states. However, this is not all, he states an ‘equilibrium as new extensions occur’ - in my context now this weighs with a great importance, we know the new extensions already, something that Mcluhan unfortunately didn’t get to experience fully, and that’s the web, the modern computer, the pocket mobile device. These are in their own rights mediums, your OS (operating system) is a computer language medium that dictates other program mediums, the access mode to the rest of the systems of design, websites contain live feeds and streams to distant realities, it’s all so lucid but at the same time it feels like an astral projection. At times this can feel nauseating, that collapsing feeling of ‘space’ and ‘time’. This presents a wider problem with modern design, technology has embedded itself into the core of the practice since the dawn of paper and pen, stone and chisel etc. The problem being that while technology has stopped gapped connectivity, it refuses to go further - refuses to return the creativity of a design practice unless commandeered. This has led to the necessity for the designer to code, and script, to kit bend and utilise AI - once again “fragmenting” the work role. “Under conditions of electric circuitry, all the fragmented job patterns tend to blend once more into involving and demanding roles or forms of work that more and more resemble teaching, learning, and “human” service, in the older sense of dedicated loyalty.” Graphic design namely has done well to adapt and reshape, showing its versatility in the age of digital design. Not only that, it hybridizes aesthetic models much like a fashion season generates new styles, which keeps design itself fresh and alive, while sometimes slipping into the contrived and over-saturated. But is the “human” service really what Graphic Design is becoming? It certainly hints to this with the proactive design studio model. Interaction and Bureaucracy, it’s an efficiency tactic. All design requires hierarchy even if that hierarchy is to not have one. I see the office space, I remember the spider plant, I see the shore line, I see the whitecaps. The workers space is a micro-territorial space of capital politics and a grab for faux socialism in most cases, in some, it is an honest attempt to form comradery - the cafeteria is an effective grounds to reinforce or detourne this thinking. People like artist Olafur Eliasson effectively install a commons space for the studio team to interact and communicate, job roles are made equal in that space. “The studio, as much as we don’t like it, means working in your own little departments, compartmentalised. And there are hierarchies even though everyone’s a part of the democracy. The kitchen is a nice leveller.” It’s a universal ideology that falls into a majority of Eliasson’s work that provides an effective future-proof for how the operations of studio practice should be carried out (see the Auteur myth). My cynicism is only symptomatic of the consumerist prerequisite that allows design to exist in the first place - a degree in the topic definitely is met with a careerist sentiment, to be financially viable within a milieu of art and design subjects. Graphic Design should not try to divorce itself from this grouping, it stands stronger with the complex wovings and multitudes that allow it to bloom as an individual practice that arranges the practice of others. The efforts here are a concern with the design practice no less, and how ethics and politics are sequestered by a shifting responsibility of effects, how and why Graphic design mutated into the corporate virus that it is now. ”All media work us over completely.”8 This is Mcluhan’s sentiment from his writings in the 60’s, and It stands up true to this day, more so than ever. Algoration (the use of data algorithms to curate a web feed) are notorious and globally implemented into most ‘social media’, but outside social media, it’s used as predictive data. This is the “reversal pattern”, Graphic Design puts a face to this slippery coded underbelly. The automation of design media has become an efficient business strategy to overmine its user base data, and subsequently requires illustration. To be concise, the study of the Graphic Designer is in part the study of Media, the study of media is the lens of relational activities and connectivity. And this is the permitted virus. Adversely, the antivirus program is a research protocol invested in studying the autonomy available to a Graphic Designer, and an extended hand to all fragmented sectors that require a similar reclamation. Language dictates media – media manufactures consent, therefore language manufactures consent. A small quibble no less, that the Graphic Designer goes to bed with media every day. And in the morning they arise with vast spawns of editorials, emailing lists, content posts - lots of fucking content posts by content creatures. The homogeneous sprawl of media is a compounded expository of new design conditions. “Today, the mass audience can be used as a creative, participating force. It is, instead, merely given packages of passive entertainment.”8 The passive entertainment is reflexive of its audience, an audience that is content on not being challenged when engaging and consuming media, not being challenged when creating and releasing it - the language logic is a false preposition - things don’t have to occur in the forefront of our percepts, media can be a stealth operation for critical theory or a dog whistle for nazis. Even a glass of milk is steeped in meaning. “The photograph is just as useful for collective, as for individual, postures and gestures, whereas written and printed language is biased toward the private and individual(s) posture.”1 Mcluhan and designer Rapheal Roake seem to fit perfectly in collusion with one another here, “All design is a political act”, this fits Mcluhan’s collective principle for the photograph precisely, as this explicitly gives backing to the relational dynamics of media itself, it sits in the collective sphere - the global village. It all begins to feel like a fever dream, the spectres of Helvetica, Comic sans and Papyrus jumping on your chest as you’re paralysed in a waking dream. Blink and you’ll miss the horses head 144hz refresh rate. The grid settings of your life are closing in tighter and tighter as you cant kern in a moment for peace, please adobe I’m plugged in to your creative cloud let me use my kettle already, yes dear, they’re wacom tablet plates, we threw out the cutlery and replaced them for tote bags and ironic panel hats. The decoherence of the 21st century is here and it’s got anthropocene smeared all over its lips. Everyone wants to fuck their OLED displays, the screen is constantly flirting with me, it bulges and writhes along with it’s circuitry like an obscene Cronenburg slide show, and with a tilt of the hinge, it rips my hands straight off the bone. It’s simultaneously psychosexual and completely meaningless, but there doesn’t seem to be any Big Other alternative, can you see the demons wearing the guise of post-modernity, and where they emit a solar flare? Just tryna game the system can’t you see, if I shake it at just the right moment, at the right angle, I’ll get an additional diet coke. You don’t understand how fucking much I like diet coke. A man who finds himself among others drinking diet coke is irritated because he does not know why he is not one of the others drinking diet coke. I have graphic design Stockholm syndrome, what do you mean you don’t know who Gerrit Noordzij is? At this point going outside will trigger my flight or fight response, I’m afraid of being swooped by seagulls while I’m bound on a rock, I sleep in a bed with a faraday blanket, I’m absolutely glowing, washed in sunlight. “As for the anticipation of reality by images, the precession of images and media in relation to events, such that the connection between cause and effect becomes scrambled and it becomes impossible to tell which is the effect of the other” These collective postures translate into all modern media and are littered with effects. One is singular and rhizomatic in any given instance of engagement towards media and the invisible hand of the ‘designer’. And on the contrary the medium is an assemblage of arborescence and is later politicised in the factory line assembly - a by-product of ‘essential’ capital labor. The capital fiction is overwritten by the post-market mythos of a company and it’s figureheads, it’s in-house publishing team use individual members to feature in nice magazines. Effects, we are overcome by so many different effects daily, to the extent that we become desensitized to the potential the subsequent causes and effects, modern reality makes sure to compound these consequences of media to a sensory overload of hysteria, the neurotic ones take to pinterest to organise themselves. We like to order things, It gives clarity and comfort within the dysphoria and entropy of our lives, pinterest, tumblr, are.na, instagram are all negentropical solutions in an overstimulated digital environment. “Instant communication insures that all factors of the environment and of experience coexist in a state of active interplay.”8 To understand this I need to clarify that the medium, the message, the photograph and all subsets of visual and nonvisual information are communication - it goes without saying - but this establishes the politicised and astroturfed space of Graphic Design, a designer is expected to make commercially viable work to thrive, and usually this is achieved by co-opting styles to any degree appropriate to a brief. This results is the parody, the hyperstition and hyperobject - an overly ironic and self aware ventilation apparatus that keeps the gimmicks of Graphic Design alive. The overtures of a design piece can appear stark placid and regurgitated. It’s very much easy to default to a ctrl-c, ctrl-v automation process. Reinforced no less by an autodidact push of some educational institutions - more concerned with juggling design briefs than focusing their teachings on a core design system (despite their ever love for the Bauhaus - yes huni the library is open). Of course, with the new emphasis on a technology dominated world we are expected to rely and reinforce the techno-dependent designer (work smart not hard). And we are yet to catch up to this mutation in design, where design was once a phylogeny of different features that collected to assume a physical medium, centrered on type, constrained by fibres and ink and oil - these components have congealed onto the Macbook, the ergonomics of physical/digital unbound the Designer from the difficulties of a physical medium. So why do we remain in the realm of rehashing typefaces and conventional media, why are we tied down to the revolving doors of design trends - surely now than ever we have all the components, all the tools to produce new design movements, this can’t keep up “When the circuit learns your job, what are you going to do?”8
1 note
·
View note
Text
Become a Photoshop Expert in 10 Steps
Become A Photoshop Expert In 10 Steps | PS Actions
Being Photoshop users we have to realize everyone that uses Photoshop actions, nobody really knows everything that Photoshop can do. This is amazing and helpful for those how to try to find something new in Photoshop or want to become an expert in Photoshop Actions. Further, if you are a user of Photoshop you should try to learn most of it and keep learning. According to my personal experience, I will recommend the following habits if you want to become a Photoshop Expert.
With the help of this article, we will explain how to become an expert in Photoshop:
Own the Latest Version of Photoshop:
If you don’t have your own copy at home then it’s pretty hard to really experiment with Photoshop. Having the latest version of Photoshop is important too much. Because the latest features usually either make your job easier or give you those facilities that didn’t even exist in prior. According to our experience, we will recommend you try to purchase your own copy because with this you can enjoy lots of features during the creation of photoshop actions for photographpers. So, if you are a teacher or student who is not using Photoshop for commercial purposes, with these professions Adobe allowed you to purchase the educational version at half-price. Further, you can usually purchase this version with all other complete features. When you will buy it then adobe will be allowed you to run your Photoshop software on two systems.
Make Mistakes:
We are sure that you will be fully aware of the quote of mistakes make perfect. Without a mistake, you can’t learn anything or can’t get any expertise. So, Experiment and play with the mistake is the key to learning something beyond the basics. Try out all features of Photoshop tools and filters, and see what they do with different settings. With this technique, you really will learn Photoshop. Take a bunch of photos from your computer or from the camera and apply some tips on those images. For example, you can see how blend modes change an overall image as layers are moved around. You can try all of the layer adjustments, and every filter combined with another filter
Take a Class:
To be honest, we have an awful Photoshop expert at InventActions. He did little beyond schedule what we were supposed to complete in the article. We were stopped going at one point. We had learned how not to teach, and five years later we were teaching Photoshop. What a good expert can do is give us assignments and said never dreamed just do. More importantly, a good instructor can give your personal guide when you don’t even realize you made a mistake, or there’s a typo in the textbook, or you accidentally skipped something, and something goes wrong. Finally, a good Adobe or illustrator will give you projects to do that give you real-world scenarios and specifications.
Go to Seminars:
There are many firms that arrange seminars all over the world in special terms, so try to find any seminar related to Photoshop. We are sure you will much more from this technique and further you will increase your professional links. These seminars have to increase professional creativity and efficiency in Photoshop beyond belief. So join any seminars learn to enjoy and build the relationship. Go to one of these seminars if you can, or find something comparable in your area.
Read Photoshop Magazines:
A lot of professional Photoshop experts publish their magazines and share their experiences, research, and expertise. Like, you can read NAPP magazines that are best for Photoshop users and it comes to American Photoshop publications. You can get it from the book store at just $10 and can increase your exposure related to Photoshop. You can become a member of NAAP and can access to online tutorials. This is one of the best learning sources for photographers and designers. If you want to explore further magazines then Layers is another best choice for you. They also offer the latest reviews, tips, and techniques about the latest design products. They have different types of tutorials related to the design of adobe, illustrator, flash, InDesign, and Dreamweaver.
Read Photoshop Books:
This is another best idea for those who want to increase their professional skills, you can find out hundreds of books that are specially published in Photoshop. But before purchasing any Photoshop book you should be clear about what you want to learn. And get an overview of the content of books, images, and other data. Then feel about the book, is it those that you really want to read. Try to find a book that makes you feel like you can create those images that are mention in this book. Decide what work will remain best for you and look at those books that are written in the same way.
Search Online Tutorials:
Being a professional Photoshop expert we love doing online tutorials. Some good places to find Photoshop tutorials are available on YouTube. Many experts share their ideas and skills on their YouTube channels. We are sure after a little bit of research you will find any best online tutorial that will help you a lot. Try to look for any best tutorial that provides enough images, proofread their work, and don’t leave steps out. With the help of these, you will be able to create an awesome result that will look much like. As with tutorials, your skill level will increase without any doubt. So, now push yourself to do more challenging stuff than you’re used to.
Be a Community Member:
Community membership means you want to excel in Photoshop. You can excel because it’s a modern age of technology and the world has become a global village. There are hundreds of forums, websites that connects professional together and try to build professional relations. You can take benefits to join their community, discuss with them ask the question and enhance your creativity. Recently our Photoshop team also hangs out on Twitter and following a large number of fellow graphics and photographers. They are always feeding new links to incredible online resources. But we found a solution in the form of InventActions blog. Our team research and write different types of articles to share their ideas through the blog. Our team is also a member of ADAC and also we share our ideas with these community members. You can also join them, one of the best ideas and further Real-world design club is also a great opportunity to learn all about design in addition to some of the business aspects of freelancing. More importantly, you can come away inspired with fresh ideas by looking at the works of others.
some examples and work here you can check here, https://www.fiverr.com/users/ajlal_graphic/manage_gigs
Learn Other Adobe Programs Too:
There are many times when a Photoshop project is enhanced by the contributions of artwork done in Illustrator, for example. Learn how to save your work for the press using Acrobat. Learn how to create vector artwork in Illustrator and import the paths into Photoshop. Learn how to place your Photoshop files into InDesign. Learn how various Photoshop plugins can expand your design horizons or make your work easier. These are but a few examples. A thorough understanding of Photoshop must include an understanding of how well it plays with others.
Teach Photoshop:
Teaching Photoshop helped me develop my expertise in ways that no other experience can. When you have to communicate how to do something to someone else, you come to understand it in a way that sets it in concrete in your mind. I often get my students to find something new to learn, and then have them turn around and teach it to another student. And when both students make mistakes during this teaching process, they both learn more. Writing tutorials – and finding out if someone can follow them – takes this concept step further. I wasn’t a Photoshop expert when I started teaching Photoshop. I am now, thanks in part to having taught it.
Further:
you can also check some fantastic work here
1 note
·
View note
Text
Summation for Emerging Multimedia Technologies
Sometimes I ask myself why I’m back in school. I’ve been working in this industry for over 25 years and that should be enough. The fact is that you never have enough experience or training to fully master digital designing and development because it is constantly growing with emerging technology.
When signing up to this class, I truly had no preconceived notions of the details. I entered the course with the same mindset I use for all classes at DeVry, no expectations, because I realize no two professors approach teaching in the same manner. Some may adhere closely to the syllabus while others may deviate due to the course materials becoming antiquated, which can happen very quickly when discussing technology advancements. I knew we would discuss and most likely utilize some of these advanced programs, or at least learn about the status of its research. I did expect to discuss AR and VR technology, mobile apps, and social media; however, some of our weekly discussions surprised me and had me think more critically about how much of my own privacy I give up as I introduce new technology into my daily tasks.
Weeks one and five introduced me to capabilities I didn’t know Google could provide; however, as we learned to use these tools and develop projects for class, I got ideas on how to utilize these tools after this course. With the Google maps, I envision recording our family trips to high end restaurants such as Jaleo, Morimoto Asia, and Art Smith’s Homecomin. We can create a walking tour and, with each spot we visit, my family and I can upload our foodie photography while giving a summary of the meals. This would be a useful tool that I could share with my fellow food allergy friends because they can then plot out their vacations and have that first hand knowledge from someone they trust.
Professionally, Google Drawing grants some wonderful abilities for me to collaborate with my colleagues in a visual manner. Both company employees and external contractors typically have a Google account and, thus, can access a shared “playground” area where we will share concepts for new layouts and designs. At this time, there is no Microsoft equivalent for this type of collaborative work and therefore Google would be a great resolution.
Weeks three and four, involving QR codes and 3D printing, are technology that I’m familiar with in theory but never actually sat down and tested in Adobe. I enjoyed learning how to develop QR codes using InDesign, and the next time I’m asked to develop materials for company summits or meetings, I think I will recommend using them to create a more interactive occasion by linking to videos or other online materials. The 3D printing capabilities of Photoshop is also very interesting but a little unnerving because of the security factors and terrorism. As someone who suffered a loss during 9/11, I do tend to view some advances in technology from the negative aspect, and the idea of people creating weapons with 3D technology scares me. On the more positive side of this technology, I’ve also read how 3D printing of bones help a person to regrow and gain the ability to walk or move their arms again. Thus, I feel this advancement is a double edged sword and we should all keep a close eye on how it is utilized.

Pool, J. (2019). AR concept of a windshield map plus environment status. Manipulated with Photoshop CC. Personal photography by author.
My favorite week was when we developed our own version of an AR screen and explained how it would work. This is a fun advancement that would definitely interest me in the future because I like the idea of being able to access “how-to” videos and/or knowledge while I am doing something such as cooking a traditional Shepard’s pie or folding origami. To load a tutorial into a pair of glasses, put them on and then accomplish a task is an amazing method of training people. For the present day though, I feel the weeks we created customized app designs and developed Tumblr blogs is most likely the future for web designers and developers. The typical website design is no longer going to be our focus, rather, we need to concentrate on the UX/UI designing of apps as well as researching the perfect timing and wording of social media posts for a company. These are the new tools of collaboration and publicity, and every company out there trying to convey themselves to the customer base needs to embrace these tools of the internet. That is where we, as digital designers, can help them build and populate company platforms and assist in creating applications or social media campaigns.
Of course, for me, the greatest takeaway from any class is the discussions we have on the boards. I appreciate varying opinions because they allow me to see these topics from another perspective. I’m also able to engage in polite debate or bring my own experiences into the conversation which continues to evolve during the discussion. It is the ability to discuss these topics openly and without hostility that helps us grow and progress into skilled digital designers that companies want to hire.
1 note
·
View note
Text
Photoshop CC for Beginners : Adobe Photoshop Course

This Adobe Photoshop CC course will teach you the basics of Photoshop for web design, graphic design, photography & more. Photoshop CC for Beginners : Adobe Photoshop Course
What you’ll learn:
You will have expert level knowledge of Adobe Photoshop CC in this course, whether you are a beginner, intermediate or have no previous knowledge of Photoshop. You will create a real world project to give you a general understanding of Photoshop and the different functions that you can do with it.You will be given a major overview of all of Photoshop's tools, filters, features, and workspace so that you can quickly begin working on your next project.You will achieve the experience and knowledge to take your Photoshop skills into your career, job, or freelance lifestyle at your own pace.Graphic designers, web designers, photographers, marketers, and whatever other industry you are in will be able to find useful information in this course.You will learn Photoshop's workspace and how you can edit it to your own workflow.You will learn how to work with images in Photoshop and edit them appropriately to your project.You will learn all of Photoshop's selection tools and how they can assist you as you edit.You will learn about layers and how they have revolutionized the way you can work in Photoshop.You will learn every type of tool available in Photoshop and how to use the most common tools.You will learn about type, fonts, and typography inside of Photoshop and how they function.You will learn the importance of color and even be given a brief lesson on color design theory.You will learn how to use alignment, guides, and grids inside of Photoshop.You will learn about all of Photoshop's many filters and features available to you.When you are finished, you will have a solid understanding of the Adobe Photoshop CC software.
Requirements:
This course is for beginners or anyone who does not have experience with Adobe Photoshop CC and wants to learn how to use the program. This course is not intended for advanced users of Photoshop, though the course can be used as a reference guide to find the exact information on any feature that you'd like.You will need to have an active Adobe CC subscription and the newest version of Photoshop installed on your computer. This course does not go over the installation of Adobe Photoshop CC. (Photoshop CC 2018 is used in the teaching of this course.)You will need to have a Mac or PC with at least the minimum requirements for Adobe Photoshop CC. Information can be found on the Adobe website.You will need to have a working keyboard, mouse, and/or tablet to use Photoshop. Touch screens and other pressure sensitive devices will work, but are not covered in this course.Project files are available for download for each lecture. Make sure you download the appropriate files if you would like to follow alongside the course.
Photoshop CC for Beginners : Adobe Photoshop Course Description:
Learn Adobe Photoshop CC in this New Course! Many people try to learn Photoshop but struggle because the program is so vast. Most quit before they even get started. :( That's because they've never been taught the program in a step-by-step, easy to learn manner. But that isn't you now, is it? You have found the perfect course for learning Photoshop. It doesn't matter if you have no experience at all, this course was designed to teach you Photoshop in the most effective means necessary. With over 15 hours of video and over 100 project files, this Photoshop course is JAM PACKED with information to help you learn this awesome program! The videos build on one another so that as you work through this course, you will understand more and more! Pretty sweet, huh? :) Not only that, but this course is also designed so that if you already know some Photoshop and just need help with a specific tool or feature, you can skip directly to that topic! So who can benefit from using Photoshop? Adobe Photoshop CC is useful for a lot of careers, industries, and hobbies. It doesn't matter if it's photography, graphic design, web design, social media, user interface design, advertising, painting, printing, or video/animation. This course will cover tools that can be used in any niche! Each section goes into specific detail of the feature or tool being shown so that you will feel comfortable using them on your own. This course will cover: The Basics Photoshop's Workspace Images Editing Selecting Layers Masks Tools Type Color Alignment Filters and much, much more! Don't forget all of those juicey project files! This course has over 100 project files for each individual lecture for you to use and follow along with. From the basic to the advanced, these files will at least help get you started so that as you watch each video, you can work alongside the instructor. What are OTHERS saying about this instructor's courses? "This course is amazing. Learning photoshop with this guy is easy ;-) Thank you so much. " 5/5 Stars - Robert Fersti "Great course that outlines several fundamentals of Graphic Design. Coming from a web designing background, I found a lot of the basics applied here as well. But, the course builds on that and gives you so many pointers on how to capture, guide and hold your audience's attention. I think, in addition to promotional graphics, the ideas explained can be readily applied to designing hero image layouts for landing pages of your websites as well." 5/5 Stars - Ravi KT (on Canva : Graphic Design Theory course) "This course is really informative, up to date, and engaging. Phil and Jeremy keep up to take with the posting of their students and provide reliable feedback. They have inspired me to keep pushing myself forward with my art, and graphic design. I would tell anyone (from beginner to advance) who uses photoshop / or would like to know more about it, to take this course. Its worth it!" 5/5 Stars - Betheny Powell (on Photoshop for Entrepreneurs course) People from around the world are learning valuable skills and applying them to their everyday lives. Don't be the one left out. You can absolutely learn this program and by taking this course the instructor will be with you every step of the way. Other great stuff you might want to know.. Not only will you get over 15 hours of video content and lessons, 100 project files, and a new life skill, you will also have direct communication with the instructor to help you along. This includes direct messages, discussions, and specialized projects in the course that will allow you to interact with the instructor and others. Feeling lost? Don't worry, we are here for you! As they say, "Come for the course, stay for the community." Well, that's not the exact phrase, but you get what I mean. :) What else is there to know? What else? What else?! Well there is that little 30 day money back guarantee thing. That basically means that if you don't enjoy this course for any reason at all, you can get a full refund up to thirty days since the time you purchase it. It's a win-win situation! and I applaud winners. So what are you waiting for?! The time is now to stop procrastinating and begin learning Photoshop so that you can take full advantage of everything that it has to offer! Enroll now in this course and get started! Who this course is for: This course is specifically designed for beginners or anyone else who doesn't know how to use Adobe Photoshop CC but would like to learn. This course can be viewed one video after another, or you can skip around to the sections that you need. Advanced features, special projects, and design theory WILL NOT be taught in this course. Graphic Designers Web Designers Game Designers Photographers Marketers Social Media Experts UI / UX Designers Product Designers Architects 3D Artists Beauty Artists Paint Artists Entrepreneurs and anyone else who wants to learn Photoshop. THAT'S YOU! :)
Who is the target audience?
This course is specifically designed for beginners or anyone else who doesn't know how to use Adobe Photoshop CC but would like to learn. This course can be viewed one video after another, or you can skip around to the sections that you need. Advanced features, special projects, and design theory WILL NOT be taught in this course.Graphic DesignersWeb DesignersGame DesignersPhotographersMarketersSocial Media ExpertsUI / UX DesignersProduct DesignersArchitects3D ArtistsBeauty ArtistsPaint ArtistsEntrepreneursand anyone else who wants to learn Photoshop. THAT'S YOU! :)
Course content of Photoshop CC for Beginners : Adobe Photoshop Course:
Total Lecture:140
Introduction
How to Create a Polaroid Effect in Adobe Photoshop CC 2018
Upload Your Polaroid Photograph!
Welcome to This Section on the Basics of Adobe Photoshop CC 2018
Getting Started with Photoshop
Overview of the Photoshop Interface
Changing the Photoshop Workspace
Navigating the Document Window
Using the Tools Panel in Photoshop
Undo, Redo and the History Panel
Understanding How Layers Work in Photoshop
Saving Your Files in Photoshop
Resizing an Image in Photoshop
Making Selections with Photoshop
Using Brushes inside Photoshop
Creating Shapes and the Pen Tool
Transforming Selections, Shapes and Images
Text and Typography in Photoshop
Working with Color inside Photoshop
Other Cool Features of Adobe Photoshop
Resources for You to Use in Your Projects
Welcome to This Section on Understanding the Photoshop Workspace
Resetting Photoshop to the Factory Default
Setting Preferences with Photoshop
Creating a Custom Workspace
Starting with a New Document
Using a Photoshop Template
Opening Files in Photoshop
Closing and Saving Files
Common File Types
Exporting Files from Photoshop
Welcome to This Section on Working with Images in Photoshop
Image Modes and Channels
Changing the Image Size
Adjusting the Canvas Size
Cropping an Image in Photoshop
How to Trim an Image with Photoshop
Rotating an Image in Photoshop
Straighten an Image with the Ruler
Adjusting Brightness and Contrast
Using Levels with Your Images
How Curves Work in Photoshop
Changing the Image Exposure
Adding and Removing Vibrance
Hue and Saturation Adjustments
Having Proper Color Balance
Black and White Imagery
Applying Photo Filters in Photoshop
Invert, Desaturate and Equalize
Adjusting the Threshold of Your Image
Overlaying Gradient Maps
Selecting Specific Colors
Working with Shadows and Highlights
Replacing Colors in Photoshop
Welcome to This Section on Making Edits in Photoshop Projects and Documents
Fixing Mistakes in Photoshop
Cut, Copy, Paste and Clear
Fill and Stroke Selections
Transform and Free Transform
Content-Aware Scale
Puppet Warp
Perspective Warp
Welcome to This Section on Selection Options in Adobe Photoshop CC
Select All, Deselect, and Reselect
Selecting the Inverse of an Image
Using a Color Range for Selection
Selecting by a Focus Area
Subject Selecting
Quick Mask Mode and Mask Selecting
Modifying a Selection
Saving and Loading Selections
Welcome to This Section on Photoshop Layers
Understanding How Layers Work in Photoshop
Creating and Deleting Layers
How to Select Layers in Photoshop
Layer Groups and Why They Are Important
Merging and Flattening Layers
Adding Layer Styles in Photoshop
Using Masks with Layers
Clipping Masks
Working with Layer Adjustments
Blending Modes with Photoshop
Additional Layer Options
Exporting Layers in Photoshops
Converting Layers to Smart Objects
Artboards and Layers
Welcome to This Section on the Many Adobe Photoshop Tools
Working with Tools in Photoshop
The Move Tool
The Artboard Tool
The Marquee Tools
The Lasso Tools
Quick Selection and the Magic Wand
The Crop Tools
The Slice Tools
Eyedropper and Color Sampler Tools
Ruler, Note, and Count Tools
The Healing Brush Tools
The Patch Tool
The Content Aware Move Tool
The Red Eye Tool
The Brush Tool
The Pencil Tool
Color Replacement and Mixer Brush Tools
The Stamp Tools
The History Brush Tools
The Eraser Tools
The Gradient Tool
The Paint Bucket Tool
Blur, Sharpen, and Smudge Tools
Dodge, Burn, and Sponge Tools
The Pen Tool and Selection Tools
The Type Tools
The Shape Tools
The Hand, Rotate, and Zoom Tools
Welcome to This Section on Creating Typography and Using Fonts in Photoshop
Using Type and Fonts in Photoshop
Adding Type inside of Photoshop
Working with Text Layers
Characters and Fonts in Photoshop
Creating Paragraphs and Content
Character and Paragraph Styles
Glyphs and How You Can Use Them
Extruding Type to 3D
Text and Work Paths
Convert Text to a Shape
Warping Text in Photoshop
Match Fonts from Photographs
Other Type Options in Photoshop
Welcome to This Section on Understanding the Importance of Color
Working with Color in Photoshop
Color and Swatches
Using Gradients inside Photoshop
Adobe Color Themes
A Little Bit About Color Theory
3 more sections
Photoshop CC for Beginners : Adobe Photoshop Course course
Read the full article
2 notes
·
View notes
Text
A Beautiful Journey
How has each course contributed to your personal and professional development as an instructional designer?
Each course has contributed to my personal and professional development by dispelling some of the things I thought I knew about instructional design. For one I believed that instructional design was just a manual that is read or seen on screen. These past twelve months have demonstrated me how wrong I was in assuming that notion.
1. Mastery: Personal Development and Leadership impressed upon me to recognize my weaknesses and discover my Grit. Personally, in doing so I expanded my mind to self-discovery and inviting mentors into my life to support me along the way. Professionally it encouraged me to forge relationships with more experienced people in this field to build my talent.
2. Strategies for Learner Engagement has convinced me to comprehend the fact that not every learner learns in the same way. Professionally I am in a more prominent position to develop more creative ways to deliver training materials that suit various learners but still yield the same intended outcomes. Personally, I will demonstrate more diverse ways of thinking when it comes to the learning needs of others who do not fall into the same generic categories.
3. Visual and Verbal Communication in Instructional Design has revealed to me the time and consideration it takes to develop extremely effective communications in those two areas. Professionally I will develop a style that is my own while staying consistent within the rules of visual and verbal communication. Personally, I am gaining more sensitivity towards other cultures and how they may perceive certain colors and phrases so as not to outrage them personally.
4. Corporate Training and Motivational Development directed me on how to always consider the customer's needs, which may expand more considerably than pre-written company provided materials. Professionally I am capable of developing an effective Training Needs Analysis based on interactions with company individuals. Personally, I can establish an emotional trust with the company because they will know I maintain their most beneficial interest in mind.
5. Instructional Design and Evaluation really got to the essence of why I undertook this journey. It encouraged me to comprehend the very fundamentals of instructional design, which include things like choosing a design model and selecting the target audience. Professionally I am currently capable to develop a training plan using the ADDIE approach proficiently. Personally, I am experienced to comprehend which approach is best to implement based on my evaluation of the target audience’s state of mind.
6. Digital Media and Learning Applications directed me on how to utilize digital media as an effective learning tool. Furthermore, implementing various learning styles that will contribute to the desired outcomes as well. Professionally I can currently develop summative and formative assessments to measure learning outcomes. Personally, I can appreciate the value or lack of in most digital media I consume on a daily basis. Therefore providing me with the choice in what I learn.
7. Music and Audio for Instructional Design introduced the concept of how audio can remain an effective tool for learning. Curtis Carter’s article really shone some light on the concept with his four design principles. Professionally, I am capable of delivering audio instructions and storytelling in a compelling and entertaining way. Personally, I have found a storytelling style that I feel comfortable offering to other projects.
8. Filmmaking Principles for Instructional Design demonstrated to me the power of storytelling when making instructional videos. Moreover the skill it requires to write a compelling story to narrate. Professionally I am capable of writing and storytelling with provided assets. Additionally, I am capable of writing, storyboarding and narrating a fully self-produced video. Personally, I retain the value of lighting and camera positions to compose unique shots.
9. Game Strategies and Motivation introduced robust creative ways of learning through gamification and game-based learning. This class was extremely enjoyable because it related to how much of modern society learns today through video games and social media. Professionally I am capable of developing rapid prototypes to demonstrate how the game functions. I am equally capable of developing game-based learning tools based on specific learning needs. Personally, I will be experienced to identify the target audience’s learning needs by having fun when designing these learning games.
10. Learning Management Systems and Organization presents itself as the most significant phase of instructional designs. This is when the instructional designer gets to decide how the curriculum gets distributed to the learners. Professionally I am prepared to identify and select from the various choices LMS’s have to offer. Furthermore, I can identify the benefits and concerns each has to offer. Personally, I will utilize my graphic design and coding experience to customize the LMS.
11. Media Asset Creation helped causes the other entire elements like the quizzes and role-playing games together in the Capstone project. They, in addition, presented it with a polished look along with a direct connection to the theme. Professionally I am currently capable of producing and editing instructional videos that include narration and music. In addition to creating a storyboard, script and shot list of the videos. Personally, I learned how to stay self-motivated by experimenting with contrasting filming styles and concepts. Last, staying on task each week with my improved time-management skills.
12. Final Instructional Design & Technology has demonstrated to me the importance of representing my work visually with a quality demo reel. Equally adopting all the techniques, I have learned and made the demo reel entertaining enough to inspire people to visit my website to view my portfolio in detail.
How well were you able to utilize the concepts and techniques you learned from the program (theories, systems design, interface styling, and the creation of multimedia content) as you designed, developed, and implemented your Capstone Project?
All of the concepts and techniques provided to us were definitely used by myself for the Capstone Project. The four design principles in audio instruction were instrumental to me in reliably delivering my character narrations. Especially the first design principle called Selecting a Narrative Format. It was this one that made my narrations shine because I discovered how to deliver my narrations through dramatic and personal narratives.
The creation of my multimedia content revealed my retention of creating storyboards and writing scripts that considered the learning styles of the target audience as well as teaching them. The more feedback I favorably received for my videos, the more creative ideas flowed naturally into my creative processes. One of the most valuable techniques was properly utilizing the three-second rule in the videos. I consciously made sure to not focus on static images or specific camera angles for no longer than three seconds. Personally, the Capstone Project represents a tremendous experience when it arrived time to develop the demo reel.
Last, learning how to create interactive quizzes utilizing web coding helped design a more customized look. The techniques displayed in the Digital Media and Learning Applications course were foundational in creating quizzes that adhered to the key theme. By going back and revisiting some of these courses, it will help solidify my comprehension of these techniques. Moving forward I will lean on this training periodically and its methods to cement my understanding of instructional design.
Describe your most outstanding personal triumph in each course.
I found personal triumph in each course not because of the grade but because of life lessons I walk away with. This journey has gone from a financial endeavor to an academic achievement to a personal investment. Each one has its rewards and more importantly each has affected me personally.
1. Mastery: Personal Development and Leadership's biggest triumph came from reading Robert Greene’s Mastery. In many ways, it has disciplined me about this journey and myself and how less evolved minds lead to complacency and conformity.
2. Strategies for Learner Engagement's biggest triumph came from comprehending how I must relate to individual learners as much as entire groups. Understanding the emotional value between the audience and I can offer a much stronger trust and engagement.
3. Visual and Verbal Communication in Instructional Design's biggest triumph comes from being able to correctly perform research and designing credible infographics. Research has not always been my strong suit, but I persevered and learned to do it the correct way. Not to mention showcase my graphic design skills.
4. Corporate Training and Motivational Development's biggest triumph come from being able to design my first training tool. To witness it from conception to functional made me very proud of myself. Furthermore, see a future for me as an instructional designer. It also was the first time I used Adobe XD.
5. Instructional Design and Evaluation's biggest triumph comes from composing a Training Needs Analysis. I was having trouble comprehending this method in the course earlier but stayed inquisitive and determined. At the end of week four, my comprehension grew and was able to write a professional Training Needs Analysis.
6. Digital Media and Learning Applications biggest triumph come from being able to aid my peers in completing the interactive quiz assignments. With my knowledge of code writing, I was experienced in determining the cause of their issues and provide solutions. It was the first time I was effective in utilizing instructional training in real-time.
7. Music and Audio for Instructional Design's biggest triumph come from my finding out about talent I did not know I had in performing character voices. The result was some of my most competent work during these 12 months. Moreover, I have discovered a tool that I can incorporate into my design style and offer clients.
8. Filmmaking Principles for Instructional Design's biggest triumph comes of being able to set up lighting to film a professional instructional video. This skill will be invaluable as I can offer my video production skills as one of my instructional design services.
9. Game Strategies and Motivation's biggest triumph come from being able to highlight a current problem in society. Next, demonstrate a way to confront the issue in an entertaining fashion. The game-based tool utilized is informative and motivational to the intended target audience.
10. Learning Management Systems and Organization's biggest triumph comes from learning how to input and customize Canvas LMS. I was a little fearful of tackling this program because I have solely dealt with one LMS before. The materials provided in the course were enormously valuable and in the end, I currently know how to handle two LMS’s.
11. Media Asset Creation's biggest triumph was fulfilling my Design Brief schedule. My media assets contained three lengthy instructional videos that required storyboards, scripts, and narrations. Leaning on the first eleven months of learning, I was capable of employing every technique and method I knew and delivered quality work on time. I am enormously satisfied with the exhausting work I offered in this course.
12. Final Instructional Design & Technology biggest triumph comes from creating a demo reel that my instructor found entertaining and of excellent quality. This was the biggest boost I could have received in the last month of this journey.
1 note
·
View note
Text
Creative Resources 7/9/2019
(This column is posted at www.StevenSavage.com and Steve's Tumblr. Find out more at my newsletter.)
I haven't posted one of these in a few months, so here's the latest roundup of creative resources! I've added a few here and there, plus some game development tools.
Art Sources
Free
Pixabay - A source for art that is free as well as royalty-free. There's a lot here, and much of it is professional.
Unsplash - A source for photos that are free as well as royalty-free. The quality is very high.
Royalty Free
Canstockphoto - A great source for royalty-free art, photos, and more. Has a subscription system and a pay-more-get-more credit system.
Shutterstock - The classic source for royalty-free art, photos, and more. Has both monthly and specific purchases available.
The Noun Project - A fee or membership-based site for downloading a huge selection of royalty free icons! Once you pay for it or download it, it's royalty-free! Useful for all sorts of projects
Book Covers
Premade
Go On Write - Premade covers for books - pick one that looks right and the artist will change the title and author appropriately. A great bargain, and even has series of covers at discount! Will do custom work to.
Services
Paper and Sage - A reliable source of both premade and custom book covers.
Tools
3D Book Cover Design - Makes 3D Mockups of book covers.
Canva - Book cover creator, though you will want to provide your own art if you don't want to pay for rights to their stock photo. Also has other services.
Book Reviewers
Review Sources
Midwest book review - Will review books for free, but it's a matter of choice.
Self Publishing Review - A classic paid review service (where a pool of reviewers is available) for books. Not always a guarantee of the best reviews of course, so you take your risks . .
The Indie Review - A large, constantly-updated list of indie book reviewers.
Color Tools
Collections
Color Tools - Plenty of useful online color tools.
HTML Color Codes - Useful color tools, with a focus on web-focused colors.
Material Palette - Useful tools for desginging palettes, finding icons, and locating specific colors
Color Schemes
Color At Adobe - A color theme creator that lets you create schemes, or even get one from a picture, and has a powerful interface.
Color Calculator - A color scheme creator that also has useful advice and guides.
Colormind - A color theme creator that creates schemes with simple clicking, or get one from a photo.
Colors at Halfpixel - A simple palette creator (with a mobile option) with intuitive controls.
Coolors - A useful and powerful color palette creator that's easy to use and powerful.
Huesnap - A palette repository and creation tool
Contact Management
Mailing Lists
Mailchimp - Mailchimp may have some restrictions, but it's the go-to for easy mailing list management, which is perfect for authors and artists. It also integrates well with other tools.
Professional
LinkedIn - The classic business networking site, and pretty unavoidable for most professionals.
Game Creation
General
Game Maker Studio - A powerful game creation tool, with free and paid options
Unity - A popular, well-supported game creation tool, not only popular, but one with many tutorials available.
Interactive Fiction - Graphics
Ren'py - A powerful game creation tool with an inclination to visual novels and life-sim, and capable of powerful customization.
Interactive Fiction - Text
Choicescript - A choice-based game system, both for fun and used commercially.
Twine - A web-based Interactive Fiction development tool with multiple options.
RPGs
RPG Maker - Game creation tools - the original was RPG focused, but the company has also expanded into Visual Novels.
Generators
Generator Sites
Chaotic Shiniy - A diverse source of generators in a variety of styles.
Darkest of Nights - Fantasy-oriented generators.
Donjon - Generators for a variety of genres and game systems, some of which provide graphics as well!
Dropping-the-form - Generators for various settings.
DunGen - A powerful dungeon generation tool!
Eposic - Generators - among other imaginative efforts.
Fantasy Name Generators - And there are a LOT of them here. About anything you could want, and a few you didn't know you needed.
Feath - Generators of various types, conveniently categorized.
Generator Blog - Links out to many other generators.
Generatorland - Lots of generators and generator tools.
Mithril and mages - Generators for a variety of genres.
Name Pistol - Band name generators.
RanGen - Random generators, from fantasy to helpful writing tools.
Serendipity - A generator site with some setting and name generators.
Seventh Sanctum - A gigantic collection of generators founded in 1999, with a focus on writing and RPGs.
Springhole.net - A site of generators and other creative tools.
Squid.org - Home of a complex name generator with many, many options.
The Force - A powerful name generator with multiple options.
Graphics
Graphic Tools
Art Rage - A painting-oriented digital art program supporting many operating systems, tools, and formats.
Clip Studio - A comics, painting, and illustration tool with many options and features
Mediabang - A comic and painting application that's free and multiplatform!
Paintstorm - A low-cost digital painting program with many advanced features.
Graphic Tools - Free
Gimp - Aka The GNU Image Manipulation Program. A free, open source graphic tool that will take care of almost all of your graphic needs (barring a few limits like CYMK conversion and the like).
Krita - A free graphic tool focused on professional workflows.
Made With Mischief - A quick, free sketching and brainstorming tool.
Sketchbook - A free sketching program.
Graphic Tools - Painting
BlackInk - A painting program, focusing on stylistic work as opposed to realistic
Mac
Pixemlator - A low-cost alternative to Photoshop for Mac, with lots of compatibility options
Helpful Tools
Relaxing Backgrounds
4 Ever Transit Authority - Ride the bus through randomly generated art deco cities. A great program to run in the background or on your TV or monitor to relax you while you create.
Anomolies - A relaxing background display/artgame that creates surreal spacescapes, often with strange nebulas and sites that resembe anything from devices to lights to disturbing lifeforms.
Becalm - A relaxing journey via sailboat through surreal worlds with a relaxing soundtrack and audio. Can be run for a few minutes or in a loop and you can switch between multiple settings.
Panoramical - Available on Itch.io And Steam. Panoramical is an audio/visual remixer where you can tweak settings in multiple environments, turning them into audio/visual displays. Find your favorite setting, leave it on, and relax.
Station To Station - A simulated train ride through imaginary environments. Run it in the background or through your television while you create to help relax you
Portfolios
Services
Adobe Portfolio - The popular porftolio site - that comes with many Adobe subscriptions.
Artstation - Multimedia-focused portfolio and blog platform
Format - A portfolio site with store services as well.
RPG Resources
Random Charts
Chartopia - A site with a huge and expanding amount of charts for RPGs, easily sortable and classified.
Self-Publishing
Audiobooks
ACX - Amazon's self-publishing audio platform
Audible - Another amazon audiobook publishing platform
Findaway - A wide-ranging audiobook distribution service.
Cards
Drive Thru Cards - Self-publishing for card games, both physical and downloads.
eBook
Itch.io - Itch.io doesn't just do games - it also allows for people to publish books, and is very open-minded.
Kobo Writing Life - Distribute your eBook via Kobo
Nook Press - Distribute your eBook via Nook
eBook-Multiple
Draft2Digital - A service that distributes to multiple eBook platforms.
Smashwords - A wide-ranging ebook distribution service.
Physical And Ebook
Ingram Spark - Ingram's eBook and physical book publishing platform. Wide reach, but may require some setup fees and has some limitations.
KDP - Amazon's full-service print and Kindle publishing service. Warning, the eBook distribution is only through Amazon.
Lulu.com - A print and eBook creation and distribution service.
RPGs
Drive Thru RPG - Self-publishing for RPGs, both downloadable and in print. Also supports related merch like calendars.
Video Games
Itch.io - Itch.io is a supportive, indie-oriented game store site. It also has a lot of self-published resources for game development, as well as supporting books of all kind.
Website Creation
Services
Squarespace - The popular website creator with many options.
Weebly - Easy and simple to use website, blogs, and stores.
Wix - A simple And effective website source, though paid options are reccomended.
Wordpress.com - The classic site, with free and paid options. Obviously blog-focused.
Writing Research
Maps
Old Maps Online - A way to find and view old maps of the world. Great for research and imagining.
Writing Tools
Ebook Creation
Calibre - A free ebook creation tool.
Jutoh - Not only converts your book to various ebook formats, it's a powerful enough tool that you could even write books in it.
Word Processing
LibreOffice - A full, free, open source office suite. Beyond the free price, it's fantastic ad using ODT format and creating PDFs.
Word Tools
Describing Words - Ideas for how to describe a given word.
Dictionary.com - The classic online dictionary.
Related Words - Helps find words similar to or related to one you're using.
Rhyme Zone - A tool to help you find rhyming words.
Thesaurus.Com - The classic online thesaurus, with plenty of useful options and displays
Wordsworth - A tool to see if words you're using fit the time period you're writing
Writing
Scriviner - A writing tool that combines note taking, tracking, and writing into one application.
Writing Checking
Grammarly - A pricey but powerful service and software for checking grammar, spelling, and even plagarism if you need. There are free, limited options.
Hemmingway - A grammar checking tool with both web and desktop versions.
Pro Writing Aid - A subscription-based writing checker service/tool.
Steven Savage
www.StevenSavage.com
www.InformoTron.com
1 note
·
View note
Text
How To Get Started with Adobe Things Beginners Want to Know How To Do
hello and welcome to Adobe XD and the
things that beginners want to know how
to do so my name is Terry white and I'm
the worldwide design and photography
evangelist for Adobe it's my pleasure to
walk you through this amazing best ecommerce development company bhubaneswar
application so with that said let's dive
right in so I've got Adobe XD running so
by the way Adobe XD stands for
experience design it's for UI user
interface and UX user experience
designers it's a prototyping tool that's
really what it's all about so I've got
XD open of course it shows my recent
files what you're going to get to that
in a minute
but it also shows me some presets some
templates I can begin with so if I want
to begin on mobile I can choose the
various iOS and Android devices I want
to begin on tablets I can choose those
I'm building a prototype of a website I
get the most common sizes there and of
course if I want to make my own custom
size no problem just put it in so if
you're designing a UI or user experience
for some device or a new invention this
would be the place to start now before
we get going I just want to let you know
something that I've downloaded since the
UI on designs that I will do for the
most part will be for iOS devices
Apple's devices I did download the Apple
UI
kit so they have one specifically for
Adobe XD we'll see that in a few minutes
and of course they've got one for Google
and Microsoft Windows and various
wireframes and more UI kits more more
more alright so with that said I'm just
gonna pop over and my current device is
an iPhone soon as I choose that as my
my template or preset it begins giving
me the first thing the first look at
Adobe XD so the first thing we see is
the artboard it's showing me an iPhone
size blank artboard and this would be
very similar to working with our boards
and illustrator and Photoshop which
we're gonna get to that soon - you also
have some basic drawing tools here now
this is not meant to replace illustrator
and of course you can draw an
illustrator if there's something
are complex that you want to draw and
copy and paste those in as vectors and
SVG or you can place them in using the
import command so this is just for the
things that you want to do quickly right
here while you're in XD but if you want
a better drawing experience that's what
other straight is for and just like if
you want better photo editing that's
what Photoshop is for you could bring
those elements in as well so we got the
standard panels over here I've got the
layers panel open I'm gonna close that
for now there's also an assets panel I'm
gonna close that for now because we're
gonna get to that in just a minute over
on the right hand side we've got the
contextual panel form basically like a
youtube
properties panel for making all your
adjustments then you've got all your
previewing and sharing options at the
top here so of course you've got the
basic menus including the export menu
for exporting your assets out we're
gonna get to that at the end and let's
go ahead and dive in and get started so
for example let's say I want it to have
a different background on my art board
so I can either a draw a background or
be simply select the background that's
already there the art board itself and
give it a different color so I can make
this any color I want or I can of course
draw a frame and put something in it now
you also have access to your art farm
sorry or cc libraries so if I bring up
my CC libraries I have access to all my
CC libraries if I want to bring in
something from Adobe stock I can bring
in various stock images like these kids
and just drop them right in and they
come right in link to that library of
course I can scale
look no Shift key it will scale
proportionally by default which is a
great thing and of course I can move
that around that image hasn't been
licensed yet but I can of course get it
and play with it and see what I want now
I also have the ability to work with
text so if I wanted to put some text on
the page that simply said learn I'm
gonna Center that so I do a few things
here we're gonna learn
Adobe XD and of course I can select that
text I can make it whatever color I want
some of the libraries out of the way get
to the fill color here so I want that to
be a lighter color and if I want that to
be a different font this shouldn't be
surprising this is kind of vector
editing so let me get to one of my
favorite saying serif fonts which is
ephra and of course it comes in
different styles so we're doing Ephrem
medium there and now what I want to do
is draw the element that I want to be my
icon so I've got my Dobie XD I can move
that around get that centered right on
the output artboard itself and now I'm
just going to go ahead and draw a basic
rectangle something we've been doing in
drawing programs since the beginning of
time and of course I've got the ability
just like an illustrator to make instant
rounded corners so this is great if
you're trying to make buttons or thing
or UI elements search boxes things like
that I could undo that and of course you
might say well wait where's the direct
selection tool how do I get to the
individual points or paths so I can do
it a couple ways I can double click on
the object that will drill down into it
I can also hold down my command key Mac
PC ctrl key to get to the options for
direct select as well so I'm just going
to grab those two points and pull them
up a little bit now sadly in this
version there is no there's no flip I'm
gonna flip that horizontally actually I
want to duplicate it first then flip it
horizontally so I'm gonna go ahead and
duplicate it same way I always do and I
hold down my option or Alt key and drag
it over and if I held down the shift key
in addition it would bring it over
perfectly straight now I'm gonna go
ahead and just flip it over manually
because I've made an equal distance it
will flip over nicely I can hold down my
shift key then and get that just the way
I want all right so we're beginning to
make our icon of a book I'm gonna grab
the pen tool one more time I'm just
gonna go ahead and come in here click
and click and down to the center there
and click and click one more time and
that is it for that object as well so
we'll go ahead and select that object
and we'll
give that object a fill of all right
here's a fill of white there we go
and same thing I need a duplicate of
that so I'm just going to hold down my
option key to start dragging it and
making the duplicate hold down my shift
key to keep it perfectly straight and
once I get it on the exact edge I'll
just flip it over and then of course
move it into place
and that becomes our book icon now I'm
gonna go ahead and select all these
pieces and then of course I get that
right in the center as well so now
together all of this is by learn XD icon
of course I can increase the point size
of that a bit let's go ahead and try it
point maybe not point how about
point that's better and let's select all
of that together so I'm just gonna go
ahead and drag select all of that and
I'm going to scale it down a bit just
scale the whole thing it's a little too
big and again we'll get it in the center
and one of the things that I want to
point out is that when I go to the
assets panel here I have the ability to
add colors to add character styles to
add symbols and these are great when you
want to reuse them we're gonna use them
a little bit later on I'm gonna go ahead
and click at this as a symbol now what's
a symbol and why does that matter I'm
going to close the libraries for now I'm
kind of done with it for this few
seconds and let's say I go ahead and add
some more artboards so I'll grab my
artboard tool I just click boom there's
another one artboard number two you can
you can name those too you don't have to
call them two three four and five
because that will be getting become
confusing so at any time if you want to
double click and change the name and say
maybe this that was the welcome screen
this is the search screen maybe so forth
and so on basically you're designing the
user interface for whatever comes next
so that's on page one or welcome or the
home screen whatever you want to call it
of the app we'll call it home and then
on page would be the search and I
would begin building out the search but
I want that same I want that same
element so let's go ahead and do a
couple things here we can make this a
the same fill color we can actually
the eyedropper and sample that get the
exact same color and by the way you also
I should have done it this way let's get
and get rid of this artboard let's get
rid of this artboard you also have
command D for duplicate control D on
Windows for duplicate that way I get the
exact same art for color and everything
I have to do that over and over now I'm
gonna go ahead and just go option drag
these books and let's say that I want to
put this on this page I want to put it
on this page or this artboard
and so forth and so on now of course
this is no different than duplicating
anything in any program you can just
drag and drop out hold on your option
key make your duplicates get them
anywhere you want but what if you need
it to update it when you're doing UI and
UX design you're often drawing buttons
that are replicated throughout the
entire user interface like the home
button or the start button or the search
button or the whatever button it is
especially on website you have the same
buttons on every page if you make a
change the last thing you want to have
to do is go duplicate all of that stuff
and resize it and get it everywhere you
want it to go again so what I can do
because this is a symbol it treats it as
a single object but if I double click on
it I can drill down into it and for
example let's say I change the color of
the right side of the book to be read
and as you can see it instantly
replicated that across all instances of
that symbol so you can use symbols for
things that you're going to repeat
throughout your UI UX design and easily
and quickly update them just by making a
change to the symbol itself and it will
replicate throughout now if you don't
want it to be a symbol don't make it a
symbol then that element won't change
ok so let's recap so far so of the
things what we're doing right now is
navigating the app we're also did number
which is creating artboards now part
of number is also the ability to
create a scrolling artboard so for
example if I were to double click on
this artboard the minute I pulled down
ask the original size that means that I
want this artboard to be longer because
on this screen of my app or my website
or whatever it is I'm designing the
content is more than one screen more
than one page more than one display so
just by making the artboard longer
you've automatically made it a scrolling
artboard and this is determining how
much will show on that screen before it
starts to you know fall off onto the
screen where they have to scroll so
that's easy to make a scrolling artboard
just extend the artboard that you need
to be able to scroll and you can just
start putting content past the scroll
line for example like that I just
duplicated this photo so they wouldn't
see that photo initially until they
scroll down okay so we've done number
three drawing importing images text you
can import images also from your library
or from the file menu so you can just go
to file and import number four we've
also talked about the assets panel and
the Styles panel we're getting through
this pretty quickly number five let's
talk about preview so there's a couple
ways to preview your application I'm
gonna bring up my iOS device here as
well but if you first of all you can go
to your window menu and just simply hit
preview and that will preview the
artboard you're on so in other words
that gave me the scrolling artboard that
I just saw there also if you let me go
back to that artboard just for a second
if you have a mobile device that
supports the Adobe XD app so I'm just
going to go to my Adobe folder here I'm
gonna scroll over and launch the Adobe
XD app now the Adobe XD app lets me see
my XD files one of two ways either XD
documents that i've saved to my Creative
Cloud folder I have a couple there that
show up in their Creative Cloud folder
even if they were buried inside of a
folder it found them and of course then
I have a live preview live preview
requires you to be plugged in in other
words when I bring up live preview that
shows me exactly what I'm working on in
XD at any given time
so if I were to click that or not clip
here I can scroll it on my phone
so just scrolling that artboard on my
phone shows it if I make any changes or
switch to a different artboard it shows
me that artboard live on my mobile
device so that is the live preview on
mobile if you just want to test things
and speaking of testing we're going to
get to the interactivity in just a few
minutes all right so with that said we
kind of quickly learn a lot of basics
right off the bat you can make
additional artboards your our ports can
by the way they don't have to be the
same size that we talked about before so
if you go the artboard tool you'll see
that you can bring in different
artboards of different sizes in the same
document they don't all have to be the
same screen size so maybe you're showing
how it would look on a phone how it
would look on a tablet how it would look
on the web if you needed to make that
type of UI and of course you can make
your own custom sizes as well so just
like illustrator can have multiple
artboards and Photoshop can have
multiple artboards of different sizes so
can Adobe XD alright so let's get to
number and before I can get to number
I've got to bring up another document
this document kind of cute it's basic we
haven't done a lot with it but we're
gonna bring up a document now that has a
little bit more going on so I've got an
open recent and I open up an app design
calcia and this is design designed by a
surge vassal as the person who created
all this and that's great I purposely
got rid of some of the content so I can
show you how you would rebuild it in
this app so I just hit the letter Z to
go to my zoom tool zoom into the app so
we can see it and it's very visually
rich nicely done lots of buttons lots of
icons we're gonna get to all of that in
just a second also you can see the
assets panel has quite a bit in it it's
got some colors in it it's got some
character styles in it and of course
it's got some great symbols in it as
well and of course if you want to do
your own drawing you can just like we
did before so if I go to my pin tool and
I say hey this needs a button on it
start the button right there I'm just
gonna make it a little slant everything
in this app is kind of designed in a
slant which is kind of cool that's good
and just again move this over I could
have drawn a rectangle and just resize
it that way as well now I can go ahead
and just fill that with whatever color I
want
let's click out of it to it again there
we go and we're gonna fill that with a
color and we also want to sometimes
things are hidden like we can't see it
because it may not be in the front so
let's bring it to the front so we can
see it oh it's there we just don't have
the fill ah I see the fill isn't checked
it's picking up a car I wasn't checking
it so that's a beginner mistake
oh here we go we've got our object
filled with our red color and let's make
sure we got the right red on that object
let's click it one more time great and
now I'm gonna go and grab my type tool
and I'm gonna go ahead and just click
here right in the center and I'm gonna
type the words sign up all right and
same thing I want that to be centered at
set of justification but I didn't starts
in it so let me move it over to the
center I think thankfully for smart guys
that makes it easy I can of course pick
the color that I want and this is what
makes the Styles great if I just wanted
to make the color a big existing font
great but he's already got some great
Styles here to make it consistent with
the look and feel of the rest of the app
so just click the ACM Pro extended
condensed white -point and that gives
me exactly what I need all right the
next thing as I noticed that the symbols
are sometimes hard to it's hard to see
depending on what's on the background
there these little plus signs or buttons
this is a symbol by the way and I can
tell it's a symbol by just scrolling it
and finding the symbol now I also have
the ability to right-click and say
highlight on canvas show me all the
instances of a particular thing that's
in my assets panel which is also great
to have now for example if I select this
and just change the color it replica
it's through out and of course let me
undo that let me drill down onto it and
change the color so I don't change the
color of the plus sign as well alright
so now we've got the colors in place
we've got our symbols in place we got
everything in place except number six
number six let's do number six I'm gonna
go ahead and bring up my creative cloud
libraries one more time because I I took
the time to draw a shape the way I
wanted it to look so that I wouldn't
have to spend the time getting the size
and everything just right here
so this is the shape I want it's just a
simple rectangle similar to these that
are on an angle now it's in my library
if I drag it over it'll stay linked I
want to drag it over unlinked so I'm
gonna hold down my option or Alt key
when I drag it over from a library that
brings it in as a vector object that is
not linked to the original so now I get
rid of the libraries panel for now and I
can double click on this and voila it is
there it's got its vector capabilities I
can manipulate this any way I want now I
also want to bring in some images so I
can import them in but sometimes it's
easier for me to find what I'm looking
for just with a simple drag-and-drop so
for example if I'm looking for a
particular image like this one or Cuba
like this one I can drag it over and as
long as the object highlights in blue
like that that means it's going to go
inside that object and mask it to that
object that's great
alright so we're gonna do a couple
things we're going to bring in a photo
we're gonna use one of our symbols let's
do that as well let's bring up the
assets panel and once I bring up the
assets panel here's a symbol that I want
I'm just going to go ahead and drop that
on that's where I want that and then
last but not least I'm gonna go ahead
and grab the type tool I'm gonna come
down here and kind of line it up with
that and we're go ahead and type the
word Cuba and this time I don't want it
to be hold on let's undo that this time
I don't want it to be
just about our Center just about I
wanted to be left just about there we go
Cuba there we go and the same thing if I
want that Cuba to be consistent with the
rest I believe that is this one to be
consistent with the other ones that are
over here so great we got our plan your
escape page kind of looking great it's
got the elements I want on it but just
like this one I want it to be multiple
times down the page now of course I can
duplicate all these and then replace
them but there's a much better feature
inside of Adobe XD number six it's
called repeat grid I'm gonna go ahead
and select that one select that one
select this one so I got all three
object selected and over here in my
properties panel I've got the ability to
just simply click repeat grid now you'll
notice that gives me a handle on the
right and it also gives me a handle on
the bottom and as I pull this down let
me keep pulling it down let's extend it
beyond the canvas here and just keep
going as long as I want that will give
me a repetition of all of those elements
and it repeats them I also don't want
that much space in between them I want
it just basically I want them touching
so I just pull up on a spacer and get
those touching just the way I want now
okay so what did that really save me
Kamandi or option drag it just saved me
from having a duplicate on one by one or
manually there's a little bit more to it
than that if I go back out and grab the
images I really need which is all of
these then what I can do is take all of
those images and drop them into the
repeat grid and boom it populates each
of the grid grid squares if you want to
call me even looking at square with
those images now all I'd have to do is
go in and change the individual things
that are different so for example maybe
this one's Mexico I don't remember maybe
this one's we scroll down maybe this one
is USA or let's spell it out you know
States and the next one is whatever also
I noticed something else there was a
change there was a request let's zoom in
on this one symbol and we want to swap
this guy out with a different guy and
he's in my library so once again I go in
to show my Creative Cloud libraries and
this guy is the one that needs to be
replaced so I just drag him right in to
that same spot and boom it keeps the
same shape fills it in nicely and that
has replicated throughout the entire
design so everywhere oh not yet actually
it hasn't replicated through the entire
design because I haven't done this
I haven't right clicked on it and said
update all symbols now it's replicated
throughout the entire design so if I
were to zoom in on this one over here
it's got the new guy so that is the cool
part about working with symbols when you
need to make a change that you need to
replicate throughout the document you
can do it easily
okay now we've gotten to the most
important part what separates this from
doing this inside Photoshop or
illustrator because at this point
probably saying well I already know
Photoshop Illustrator I already know how
to do our quirks I can do all this in
Photoshop in Illustrator maybe not for
repeat grid maybe not symbols as easily
maybe not
scrolling artboards maybe not previewing
on your device but let's say you could
draw it all you can create it all what
separates Adobe XD in a big way from
Photoshop and illustrator is the
prototyping so for example you notice
that we were in design mode the entire
time we were working in design mode up
here next to it is prototype and
prototype lets you do your wiring
basically wiring things together where
they should go so for example what
happens when someone clicks sign up well
you knows now when I click sign up
there's this little pull whip from it so
I can pull the whip over to this
artboard
and from this artboard it goes to home
empty when the person clicks on
and I can of course choose whether or
not what kind of transition is gonna
have dissolve slide left slide right so
forth and so on so lift for example
let's do a slide left all right so now
that we've got that you can also and now
most of these are already wired up to
where they go but I noticed that the
back buttons on some of these have not
been wired up so for example for this
one this back button this should go if I
just click on it I can choose the
artboard it should go to home back to
home empty same thing here this one
should go to save trip so I can either
wire it myself or just choose it from
the menu this one should go to chat so I
can just drag it over and now it goes to
chat so any way that you want to wire
your buttons up you can do that and you
can make it like a hidden button it will
always take the person home or a real
button that always takes the person home
it is totally up to you so wiring is
just that easy you decide basically the
interaction that will happen when people
walk through your design all right so
I'm going to close the assets panel for
now just get it out of our way and okay
well we already know we can preview on
the phone we can also preview here in
the app so I can say preview and now I
can click my sign up cool I can click my
plus sign sweet I can go to next I'm
going back now oh yeah that works great
okay so preview in here is great but one
of the other things that you can do and
maybe you didn't notice that and it's
kind of telling me things here maybe you
didn't notice that is that when we were
in preview there's a record button so if
you wanted to actually record a little
video of how you should walk through the
app you can click record and now you
even get a little icon showing people or
a little indicator showing people where
you're clicking and that will make a
movie of you walking through the app
it's showing people what happens when
they click where of course at any given
time you can stop that will allow you to
save your video as a movie for
out to your hard drive and then you can
share that movie file speaking of
sharing let's let's go ahead and we
might need to save this let's save this
out as our work in progress let's call
this our whip work in progress we'll
save this one out and now when I go to
share I can publish a prototype which XD
has always been able to do what's in
beta is program publishing the design
specs so when I say publish the design
specs and create a public link what that
will do is generate basically an
overview of the entire app the specs for
it so that if I was giving this to an
app designer and I needed to give them
the overall look or giving it to my
client and need to show them the overall
look they would be able to do it so now
it's uploading this as well and
uploading the x images so that it will
work on high DPI devices it also is
hosting this as part of your Creative
Cloud account you'll get a link that you
can copy and bring that up in a browser
so people can so you can see what it
looks like
alright so let's let's go ahead and open
the link I'll bring up my browser and
show it to me and this is what the
design spec looks like so again it just
gives them that view of the overall
project of what the project is looking
like what you should be able to do is
even some instructions on how to
manipulate it now let's go back to XD
because while the design specs are
basically in beta let me close that one
more time the big thing is giving
someone the ability to actually walk
through the app without you having to
send them a movie without you having to
do it for them or having them at your
computer so they're going to share one
more time I've also got the ability to
publish a prototype and so I can allow
for comments I can open it fullscreen
I can show the hot spot pink or hints
and brand new I can even require a
password so if I wanted to make sure
that no one sees this without the
password I can require a password too so
that's also a fairly new feature
so let's go ahead and publish this out
again it's going to build it all this
time it's building it not just as an
overview but it's actually building the
walkthrough experience as an html web
page so they will be able to click their
way through your app just like I did a
few minutes ago when I recorded it and I
was showing it here on my local computer
so that would be that would be the https://xuguru.blogspot.com/2019/06/how-to-make-super-fast-way-to-create.html
workflow you design you get everything
looking the way you want you add in all
the wiring and the interactivity in the
prototyping stage you test it you
preview it so you can make sure it all
works on your end then you share it to
whoever needs to look at it and now when
I say open that link instead of seeing
the whole thing I just see the homepage
because that's where I am so now I can
click my way through it I can go to the
different pages I can click Next I can
click back I can click Next again next
again I can walk my way through the
entire app and I can send that link to
anyone on the web on any device that is
how Adobe XD works now last but not
least and by the way so we did number
repeat grid we need number prototyping
and wiring we did number sharing web
design specs we did we didn't do number
let's do number is the ability to
export your assets so let's say export
all the artboards you can export for
design web iOS or Android so you can
give your developer or give the person
that's gonna you're gonna hand this off
to a great starting point so that's one
way that you can get this content to
them you can show them the web link so
they see how it's all supposed to work
and then you actually export the assets
for them to be able to use alright
that's number nine now number ten is a
biggie it's brand new and I'd kept
teasing about this earlier I said
Photoshop and illustrator before we get
to that let me show one thing I didn't
show yet and that is open your UI kits
so I have the Apple UI kit I already had
it downloaded this is going to take me
to the spot to where I can download it
and by the way you can download
for Adobe XD but I already have it
downloaded let me show you where it is I
saved it on my hard drive
maybe I saved it let's see it is here I
saved it here
it is in my iOS XD there we go
and for example I can open up those UI
elements and it opens it up as an XD
file so anything that you need you can
copy and paste right out of here so you
zoom in so that you're not having to
build all this stuff from scratch so if
you needed a search box if you needed a
results box if you needed an icon if you
needed the battery indicator if you
needed a home screen this is all here
designed in an XD format that is usable
so you can click on any of this you
could drill down on to it you can edit
it you can change any part of it you
want copy and paste it into your design
I just wanted to show that before I
forgot all right but that's not the big
one the big one is this let me pop back
to my operating system one more time and
let me let's just go back out of this
one more time and now let's go into I've
got a folder here called prism site
design and this is a photoshop file so
this was done years ago is done in
in photoshop and it was designed to mock
up a website and that's great but in
photoshop as you know it would be static
it's just images there's nothing I can
do with it there's no interactivity
there's no prototyping there's no
showing someone what this looks like and
up until recently if I wonder have them
see this as an X T file and I have to
rebuild it from scratch that all just
went away I can right-click on this now
and I can say open with Adobe XD when I
say open with Adobe XD it will take my
Photoshop file all those artboards and
convert them into an XD project so if
you do prefer to do all your work in
Photoshop but then you want to take
advantage of XD and do all your wiring
and do that
anything else and edit and finisher
edits here you can now go on to
prototype mode and yep got it
go to prototype mode let me zoom out a
bit and I could now start wiring this
stuff together just even though this is
like a one-page site but I can start
hiring this stuff together just like I
would for any other app or any other
website that I designed from scratch so
that is it that is Adobe XD things
that beginners want to know how to do
and I know I kind of went through a lot
of things some things kind of quickly
but that's the beauty of the web is you
can re-watch this and you can slow it
down you can do it step by step and
follow along so Adobe XD is awesome for
prototyping for building this content
and showing people the idea before you
invest the time the actual coding of
your apps or coding of your websites and
building it up and then of course once
you're here you can always export this
stuff out to actually be used as part of
the final design so with that said
thanks for watching and we will catch
you on the next one bye everybody
1 note
·
View note
Last Seen Blogs

prokhorvlg
prokhorVLG

trulylino
alice :)

2sxe4u
I hate being the dip guy
2sxe4u
I hate being the dip guy

butler-on-beale-street
I ain't no saint.