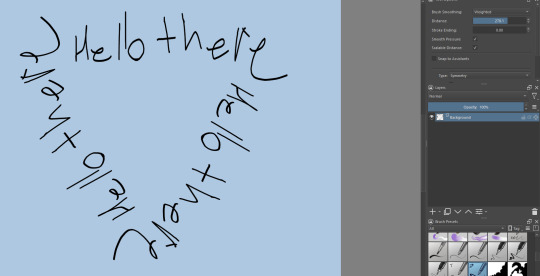
#[this thing crashed krita]
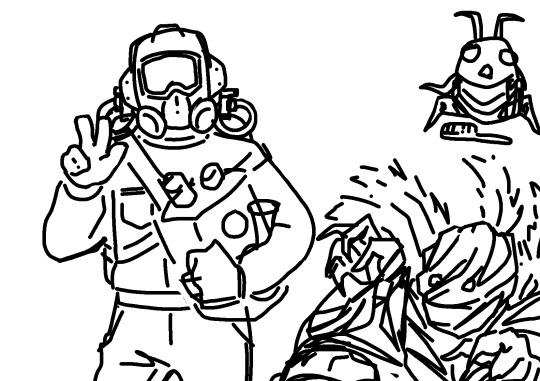
Text
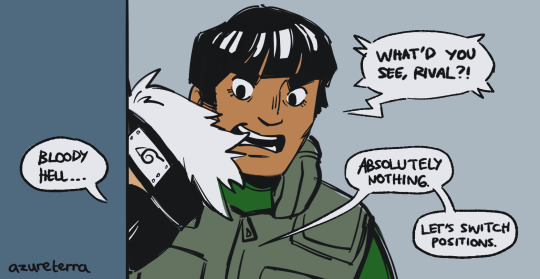
that one panel
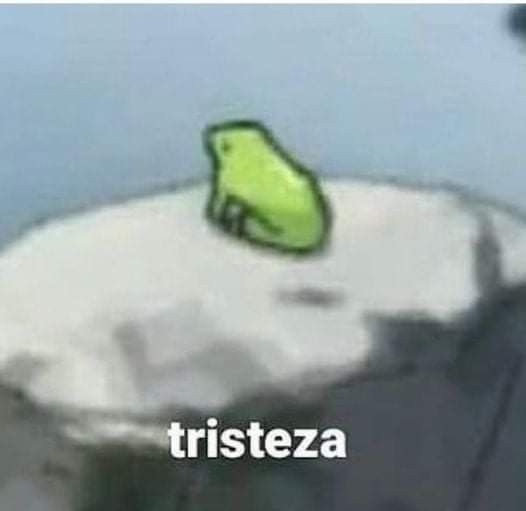
#naruto shippuden#kakagai#kakashi hatake#maito gai#[I wanna tag the reference but I'm shy]#[this thing crashed krita]#[blame this on my partner cause they're funnier than me]#terra scribbles
533 notes
·
View notes
Text
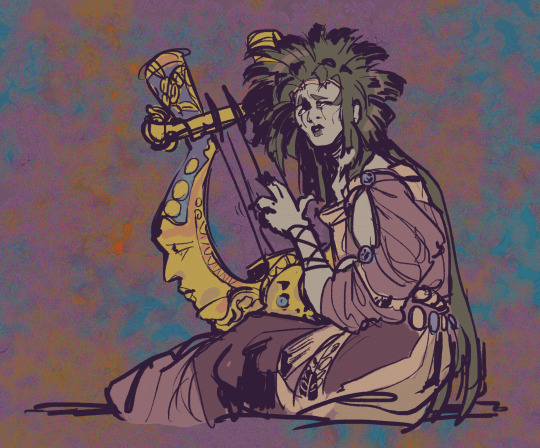
orpheus talksprite practice doodle accidentally went sick as hell o7
#tmos has art#hades game#orpheus#that background i gave this crashed krita btw. apparently the poor thing doesnt like when i tell it to sharpen a layer like 10x in a row <3#anyways YES playing hades 2 got me feeling nostalgic for the song good riddance from original hades can you blame me
131 notes
·
View notes
Text


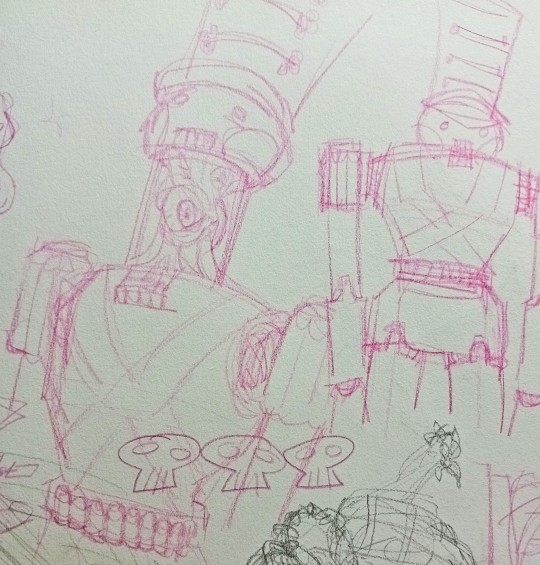
im thinking about tragedy maskeds,,,,,, inspired by this post :D some silly doodles below

mostly older ones though
#lethal company#i am too shy to @ u if u see this but waaabi love these hcs so much 😭😭 thinking abt drawing other hcs if thats ok#tragedy maskeds should def be a thing in game zeekers let us cook#i like to think theyre the ones who hide and ambush in the ship while comedies are the ones chasing#im working on another masked thing but krita keeps crashing on me so idk when or if ill finish it 😔
182 notes
·
View notes
Text
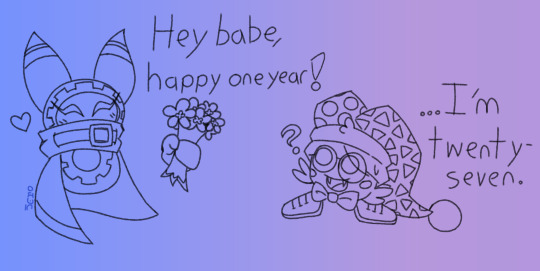
Happy twenty-seventh anniversary to one of my favorite games
#Two art posts in one day? What sorcery is this#…It’s still the twenty first where I am!!#Also don’t look too closely at some of the details (cough *hands* cough); krita crashed partway through and I had to redo things 😂#I’m experimenting a bit with how I draw Magolor! Usually I draw him closer to canon#kirby#magolor#marx#marxolor#zero draws
129 notes
·
View notes
Text
Still getting the hang of this style
Sabrina belongs to @sadsoftserve

really happy to finally draw her, been meaning to for awhile I just couldn't stand drawing on my old tablet for more than 5 minutes.
might redo this in the morning its like 1:30 in the morning and not my best, but I had fun drawing her
#gen art#sabrina ashling#not my oc#also krita almost crashed like 10 times while drawing this because i somehow broke the handwriting to text thing#i wasnt even trying to use it it just kept popping up and almost crashing the app
17 notes
·
View notes
Photo
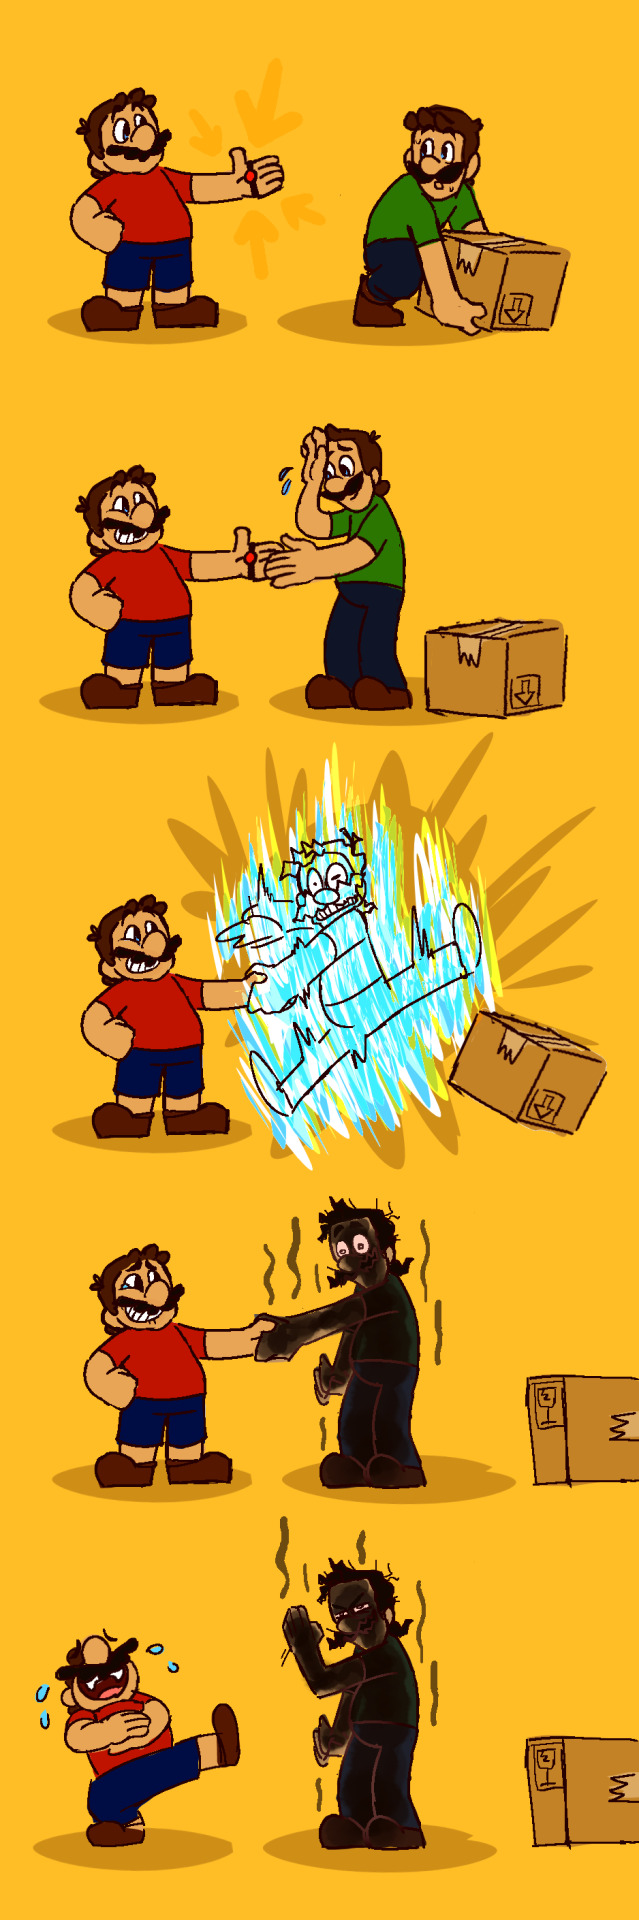
april FOOL.
#mario#luigi#super mario#april fools#ilove the bastards#idk if this needs saying but this is not mario being evil and abusive its him being an older brother#we need more content of them being annoying#also i will actually make a legit part 2 dw#i have a whole mini comic thing planned#but today im a tire#also krita crashed when i was 90% done with this one so that bummed me dsgflsd#oh well! theres always tomorrow me to task with things#im going snork mimimi see you i love youuuuuuuu <33333333333#alpacas originals
42 notes
·
View notes
Text
Crazy to think about how, when I was 12, digital art of my characters seemed like only a fantasy thing and now I have a drawing tab, a free to use competent drawing software and about 5 years of practice and I use it all for this:
#thing I doodled#le meme/joke/shitpost#semi competent. if I didn't autosave every 1 minute Krita would destroy so many drawings with its random ass crashes.
3 notes
·
View notes
Photo

I just need people to know he calls you a little noodle. it’s amazing and he’s right I am a little noodle.
#pokemon legends arceus#warden melli#pokemon legends akari#pokemon akari#i cant believe i forgot to post this#mine#this is the first thing ive 'completed' in awhile#i never really actually finished it bc i use krita#and if you also use krita you know how crash-prone it is#so every time i would try to save the finished work#and i mean EVERY TIME WITHOUT FAIL#it would crash and i would lose it and need to do it all over again#and when it finally started working again i was at my wit's end#so here you go#pokemon
34 notes
·
View notes
Text


my brain started hating these shorts as soon as i started trying to shade them or day 2 and 3 of drawing in krita and now i like it plenty
#i did go hard on shirt and hair for no reason tho#also i would love my krita being in english but that literally crashes it#artists on tumblr#my art#digital art#original character#my ocs#art#i dunno why but this hair reminds me of land of lustrous(is this even how you write it) gem hair from afar#thats one layer btw with no effects#i never painted skin and clothes like that in my life trust me#also im in love with grainy chalk brush#when i try new things i just draw from my pinterest folders i think you noticed#yes this is screenshot from tumblr i found on pinterest moving on-
2 notes
·
View notes
Text
#not tagging bc then people will be blocking me for real#i was doing the shuffle song thing and i'm weak for this song#i wanted to do a larger edit but i want to make separated posts#but also it's a miracle krita didn't crashed. very happy this time updating the kernel only fucked up minor stuff#so cw before googling the song this edit takes that rape by proxy post as canon and if you listen to the song it's whats implied#song : romance by ex:re#also let's not take the whole song as subtext but i think this verse carries the point well
2 notes
·
View notes
Text
Krita has failed me yet again (;-;)
Another artwork into the abyss it goes
🕳☆ミ
3 notes
·
View notes
Text

Inktober Day Three: Pine + Ghost
Pine: steadiness, strength, persistence, eternity
#my art#inktober2022#inktober day 3#planttober2022#monstertober2022#ooh I'm caught up#time to disappear mysteriously#idk which program to use on my tablet yet so it's been fun using the free versions of like. everything lmao#for days 1 - 3 i used infinite painter and i like this one#doesn't crash when i save a png and easy for simple things like these#but krita lets me fill color with an eraser and man that is hard to top#also i listened to#ghost duet#while drawing this lol
9 notes
·
View notes
Text
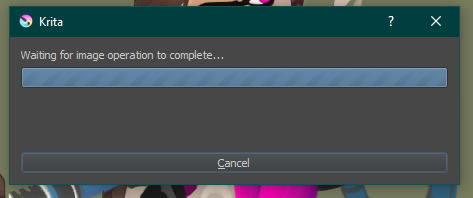
It's been loading for 4 hours do you think my image operation is complete yet
#m scribbles#listen LISTEN#It's a thing about my art! I can put it in my art tag if I want#I don't even know what my image operation is. Krita just does this to me for any reason it wants#The last thing I did was. hm lets see. hide and then unhide the layer I had his neck symbol on!#by neck symbol I mean I thought it'd be funny to replace the word error on his HEV suit with the gmod crash screen#but now Krita's crashed and I don't remember the last time I saved so who's the real loser?#< again I'm joking. I'm ok! I save frequently enough that it's hardly a concern. but I also force saved a new backup to play it safe!
1 note
·
View note
Text
why krita why
#monke.maks#unhinged rant incoming#krita is so confusing for my boomer ass#i thought i lost all my progress not one but two times#first time was kinda silly and was resolved quickly#basically i had created a new tab w compressed layers and i didnt know it was a separate tab#so i got kinda sad thinking i was gonna have to redraw it#i even talked to some friends online abt it and man was it embarrassing when i realized what had happened#i was all like 'nooo my progress boohoo'#a couple minutes later#'hey so actually everythings fine and krita's layout is confusing asf. woopsies'#and TODAY#i opened my laptop after it had died to discover my autosave file for a drawing i had spent hours on was gone#OR SO I THOUGHT#BECAUSE I COULDNT FIND THE FILE AT FIRST#AND EVERYWHERE ONLINE WAS LIKE 'yeah lol rip your progress those autosave files are gone with the wind. six feet under. peaced out'#TURNS OUT I WAS LOOKING IN THE WRONG PLACE#and there was nothing online talking abt if your laptop died#just if you had crashed/exited normally#so i spent a good few hours just working up to redoing the entire fucking thing#BUT THEN I LOOKED SOMEWHERE ELSE AND-#*sputters autismly*#why is krita's layout so confusing#and even worse is that most of the info online abt it is even more confusing#if this happens a third time istfg i will atomize someones skull in mild annoyance#i can handle the actual inconvienience of thinking i lost something#i just cant handle the embarrasement of crying (/hyp) to my friends abt it then being like heyyy. guess what? clown moment amiright#ugh anyway thanks for reading my dumass rant abt very first-world problems#i barely edited the whole thing so heres to hoping its like#legible and stuff
0 notes
Text
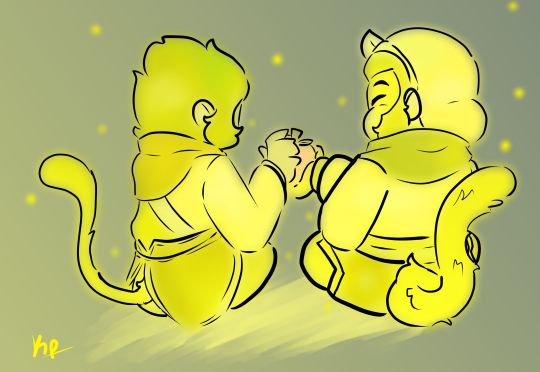
This drawing crashed Krita istg-
Anyway, this is the last piece I had to do for the thing I was working on. The video I was making didn't turn out great but I do like how the art turned out.
#lego monkie kid#art#lmk#digital art#fanart#artists on tumblr#drawing#doodles#monkie kid#macaque#lmk macaque#six eared macaque#jttw six eared macaque#lego macaque#lego monkey kid macaque#lego monkie kid macaque#lmk six eared macaque#macaque fanart#macaque lmk#macaque x wukong#monkie kid macaque#sun wukong x macaque#the six eared macaque#lmk sun wukong#shadowpeach#lmk wukong
201 notes
·
View notes
Text
Krita tutorial the way I know it.
Basics: What is where.
Gimmicks.
Specific advice on specific tools.
Basics: What is where.

Upon opening the program this is what you're met with. First of all, must comment: The layout is HEAVILY editable so you can just drag menus anywhere you want, even leave them floating amidst the sheet you're drawing on.
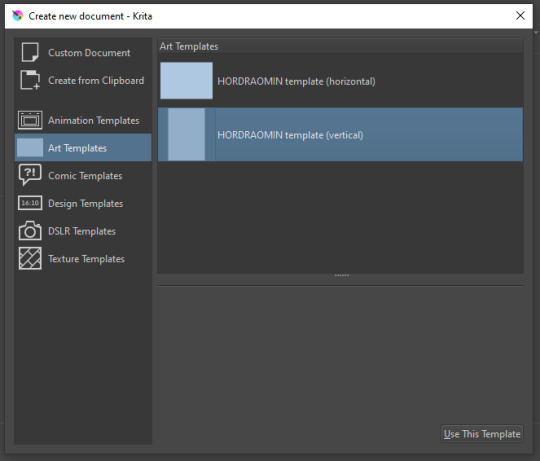
You can create custom art templates, I have two o'mine here as both have my signature background color.
As well, you can edit the custom document settings, as in what size you want it, what resolution, even the initial content of the image. As well you can create from clipboard: Just copy some image from your browser and Krita will recognize it (useful for making meme edits lol).
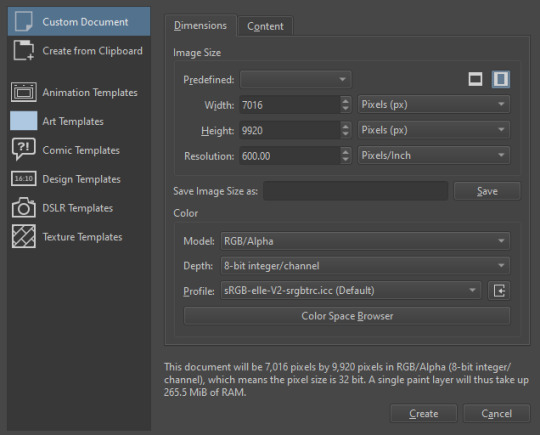

Now, once you have your file, I will show you what is where.
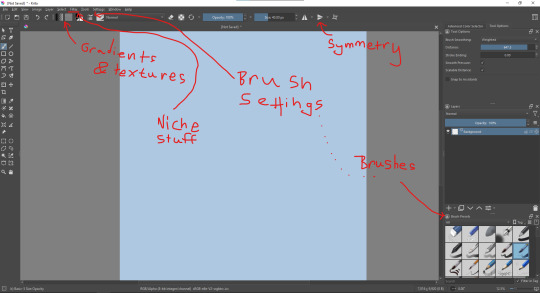
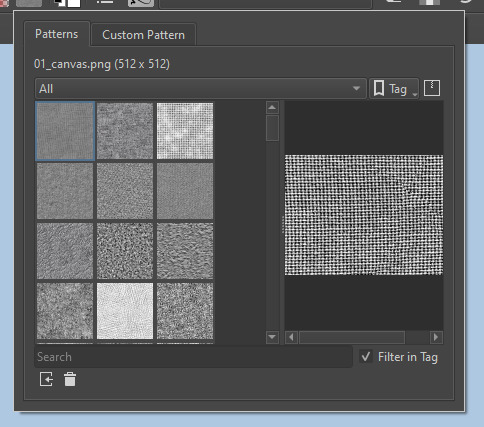
Brushes:
Brushes are easy to edit and there are tons of free bundles to download online. I myself only got one bundle, Jackpack (bit hard to find now due to original source being lost, it is still available but bit tricky to come by).
There. Are. Tons.

Some of these are my custom brushes for calligraphy in neography, you might even guess which ones. You can edit existing brushes, make new ones from the ones you've edited without changing the original, and all sorts of stuff (more below in the third chapter).
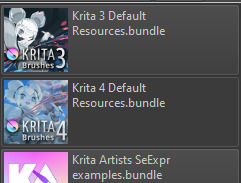
There are numerous packages of brushes once you enter Krita, but only one/two are available when you first open it. To unlock them all, click here:

And make sure all bundles are dark gray in color (example of both dark and light below).
Now Tools Options: those will pop up depending on what tool you're using.
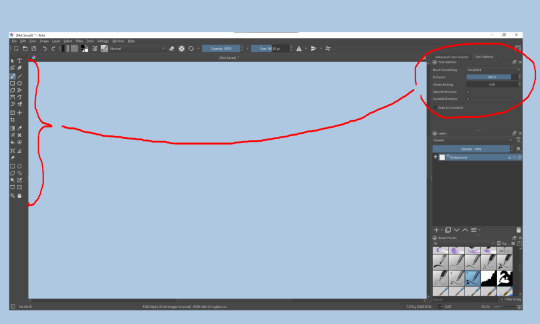
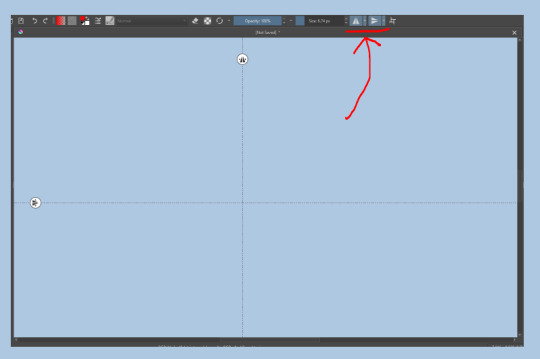
Symmetry: Fun stuff. You can drag the lines depending on how you need them and then center them back to the center of the screen if needed.
Gradients and Textures also have their tools options, you can play with those to get the feeling what they can do (more in third chapter).

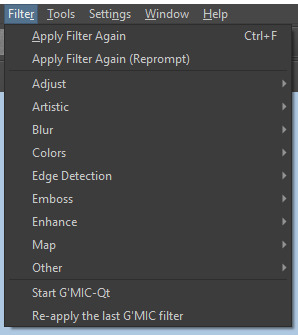
The Filters tab is useful too. Blurring, motion blurring, color mapping, artistic filters and all that: Quite fun.
Gimmicks.
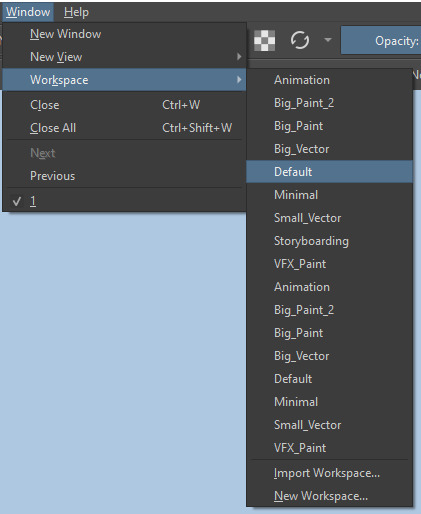
Krita allows you to customize your workspace freely. Floating menus, tabs, anything you want. It has quite many drivers at that-
To access the workspace templates, go to Window and choose Workspace.
Krita allows for copy-pasting any image onto the sheet. Though, for me it sometimes crashes if I accidentally copy-paste text into it without choosing the Text tool first.
The software allows for both raster and vector work. It is basically Photoshop sharpened to be used by artists primarily.
There are some interesting mechanics regarding the Eraser (default bind E).

You can use it with any brush, allowing for textured erasure/quick work. Good for sketching.
You can use it on gradients (given there's a transparent point on the gradient preset).
There's a Multibrush tool:

People say Krita is good for animation but my brain can't wrap around it yet honestly @~@.
The keybinds:
B - Brush tool.
E - Erase tool option.
M - Mirror (useful for checking accuracy from a new angle).
Ctrl - Color pick (when used with brush or other color-using tools).
Shift+L.Mouse+drag - Changes the size of the brush by dragging left and right.
Ctrl+E - Merge layer with the one below.
Ctrl+G - Group selected layers.
Ctrl+A - Select whole sheet.
Ctrl+Shift+A - Deselect everything.
F - Bucket tool.
G - Gradient tool.
Ctrl+S - Save document.
Ctrl+Shift+S - Save As document.
Ctrl+N - New document.
Ctrl+O - Open document (will be seen in a new tab on top of the sheet).
Ctrl+C - Copy selected layer or selection.
Ctrl+X - Cut selected layer or selection.
Ctrl+V - Paste copied/cut layer or selection.
Q - Multibrush tool.
R.Mouse - Interesting thing: Opens up a quick selector for brushes and colors you've already used in the piece.
1 - Zoom 100%.
2 - Zoom to fit the piece vertically.
3 - Zoom to fit the piece horizontally.
4, 5, 6 - Turn 15 degrees (4 and 6) or undo the turning whatsoever (5).
Ctrl+I - Negative filter applied to layer.
Ctrl+U - Color editing on the layer.
Ctrl+Y - Soft proofing mode (for color mistakes and stuff like that, mostly annoying for me tbh).
Ctrl+T - Transform selection/layer.
Ctrl+R - Square select tool.
Ctrl+J - Lasso select tool.
Honestly you can just hover your mouse over tools and see their shortcut binds, as well. Or edit them in Settings.
Specific advice on specific tools.
Brush:
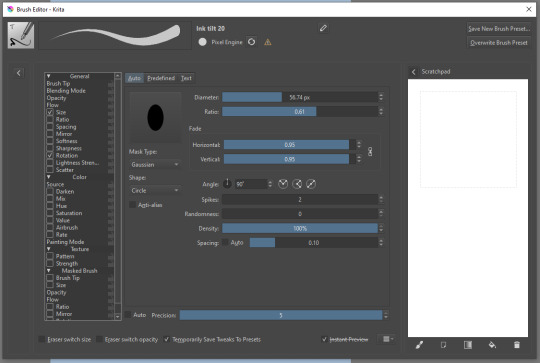
Brush editor is a great tool for making custom brushes, and it even has a sratchpad to test them out. Lots of settings, but no need to be afraid; Most of them you might never use on purpose.
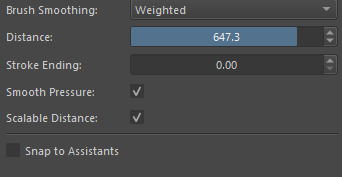
Use Brush Smoothing for great and pretty lines in lining pieces or making calligraphy.
Gradient:
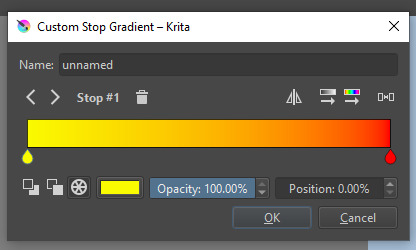
The four icons to the right top are:
Mirror gradient.
Arrange by lightness value.
Arrange by color value.
Space the stops evenly.
Click the gradient to add a new stop. The three things to the left are:
Make the stop use Primary Color.
Make the stop use Secondary Color.
Make the stop use a fixed color.
239 notes
·
View notes
Last Seen Blogs

twovampswalkintoa
Two Vampires Walk Into A
fireloom
Loom

lspingles
looking in the mirror

chiquitin54-blog
Sin título

blackworld405-blog
Iara