
lookingstunninginlovelyclothes
I can dream and I can sew so...
Inspo/Memo for Clothes I Wanna Wear/Make
1113 posts
Don't wanna be here? Send us removal request.
Last Seen Blogs

squishe-fiasco
Coming to you live from a spice rack

deepdragons
bg3 and dnd

fazzlisbeth
Fazz ファザ

latenitelibrary-olderwomen
Untitled
Photo


♡ Astronaut Jolene the Cow Earrings by Basura Gang ♡
83 notes
·
View notes
Text
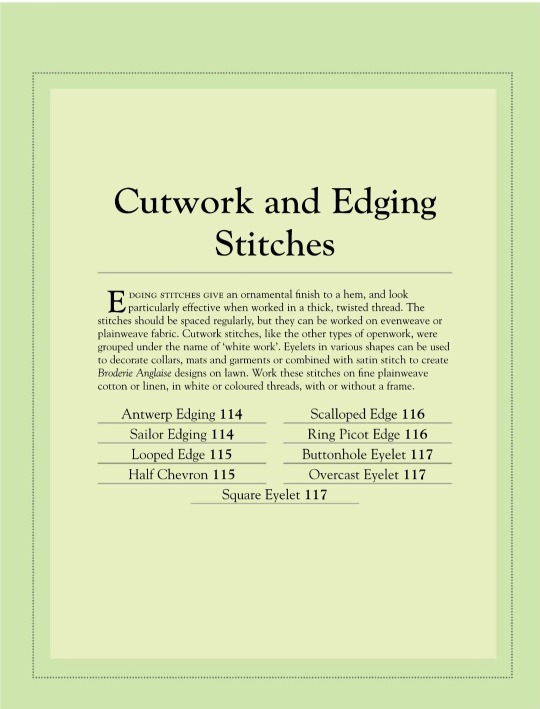
Oh hey, do you know what time it is? It is highly specific resource time!
Today we have the Royal School of Needlework Stitch Bank! There are HUNDREDS of stitch types in the RSN Stitch Bank.
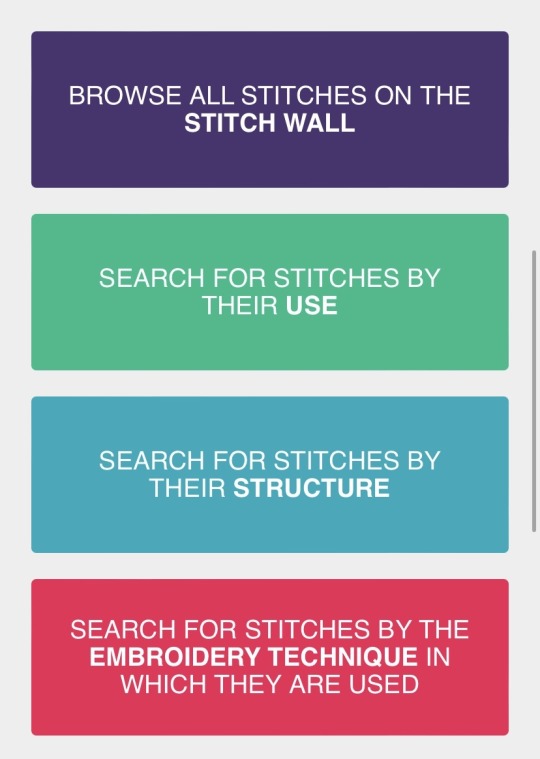
And more added regularly, let’s look at a recent addition
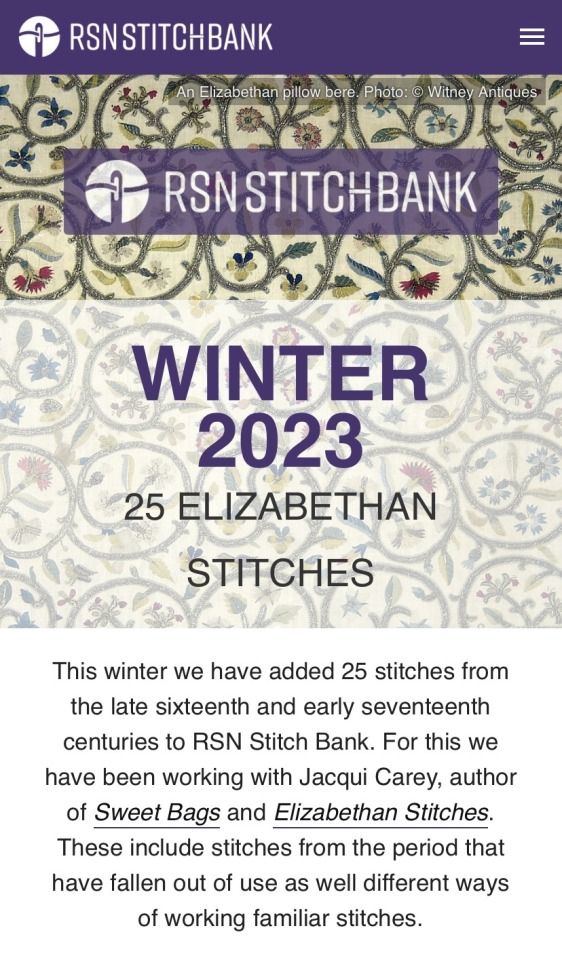
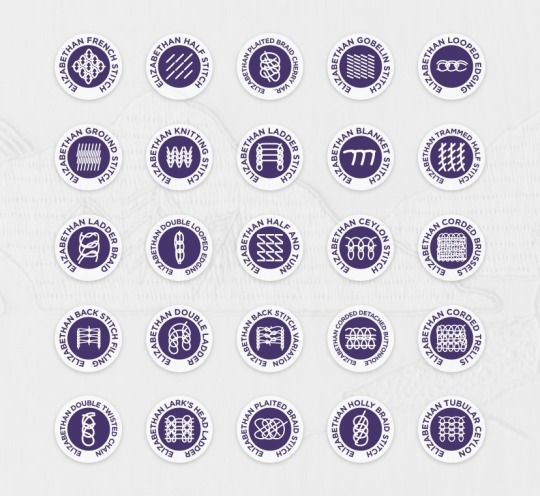
I picked the first one in the 25 recently added Elizabethan stitches, the Elizabethan French Stitch

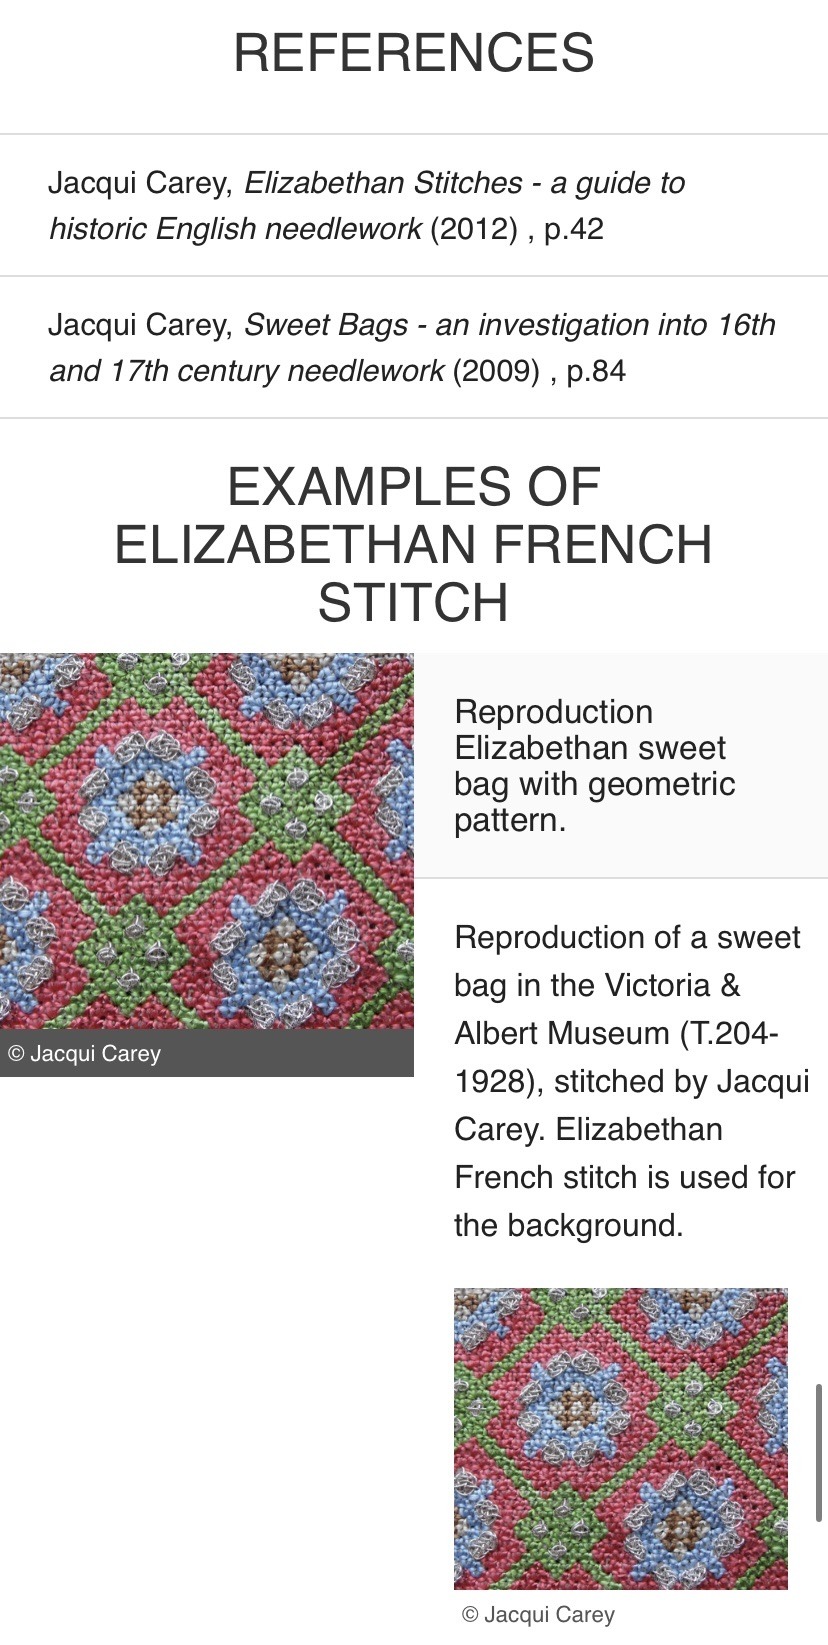
The stitch bank provides written and photo tutorials as well as a video option to learn to do it yourself. There are examples of the stitch in use, resources, references, everything but a needle and thread!
rsnstitchbank.org
13K notes
·
View notes
Photo
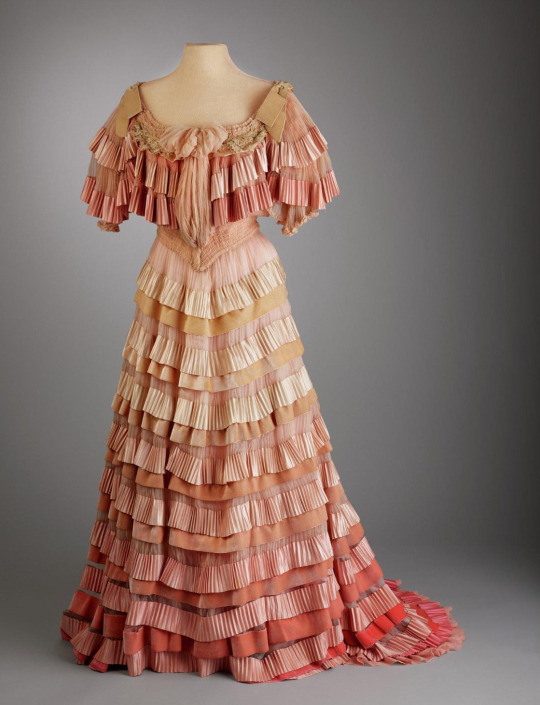
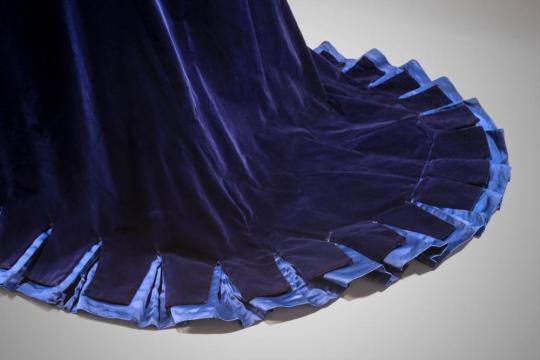
Afternoon or evening dress, 1903-04
From the Hillwood Museum
746 notes
·
View notes
Text
I’m gonna teach you to fix your dang pants
Alright are you DUMMY THICC with POWERFUL THIGHS that keep DESTROYING YOUR JEANS? Are you super fucking broke and can’t afford new clothes? Would you rather not contribute to disposable fashion, one of the MOST UNETHICAL industries of the modern age, on which I have many thoughts? I’m here to show you how to keep your pants on unnatural life support until they literally disintegrate off your legs.
You’ll need some basic sewing skills and supplies. If you don’t have a sewing machine, jump to the end, I’ll add an epilogue just for you.
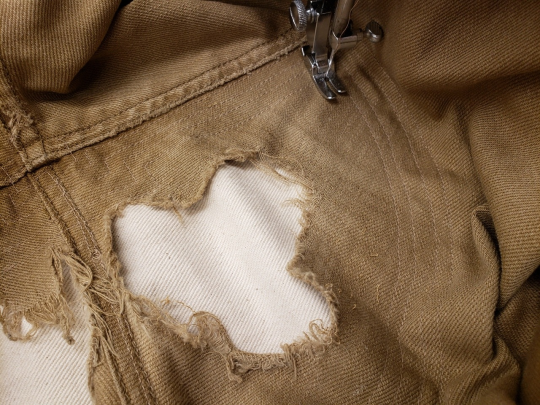
Step one: look at this disgrace. How did this even happen. What was I doing.
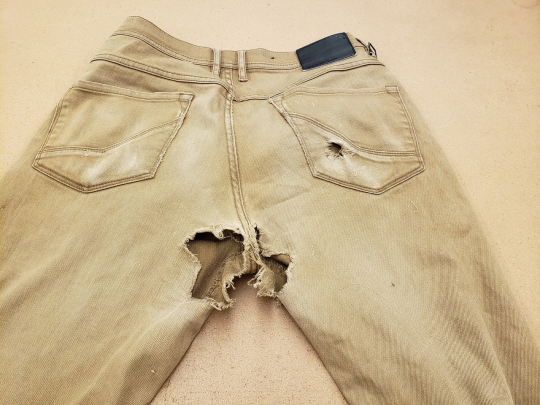
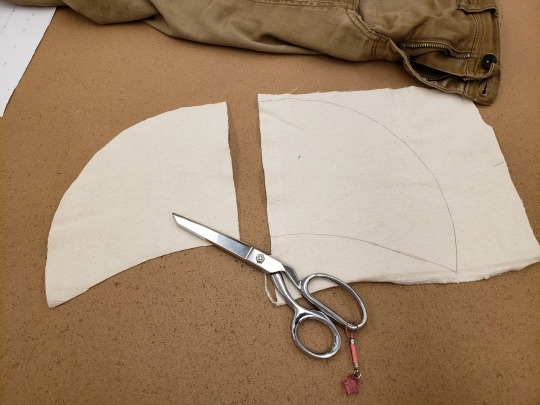
Now you don’t need to do this next bit, especially if it’s a less extensive repair, but I’m going to show you how to make a nice pattern for this, if you like nice patterns.
Turn one leg inside out and put it into the other, so you can see the tear.
Put a piece of paper on the area and trace around the hole - it’ll take some guesswork, but you can figure it out. You want it big enough to cover the hole, and extending far enough from it that you aren’t just sewing into places where the fabric is worn super thing. I like to stop at the crotch and inner leg seams, both because the pants are shaped there so it’s hard to get a patch to span it without something puckering, and because it’s a good sturdy anchor to sew to. Mine looks like this. Yours will…probably be smaller.

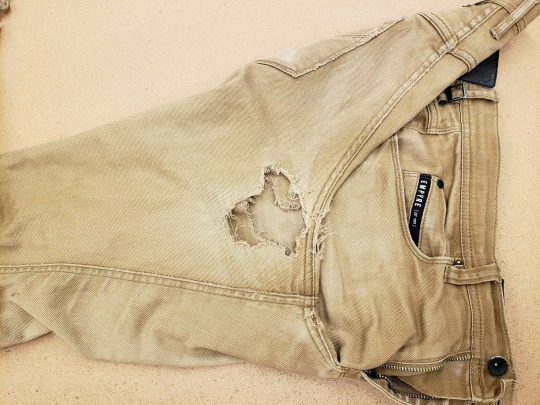
Now cut that shape out of some fabric. I cut two, because I have similarly shaped holes on both sides. You do NOT need to add seam allowance. For the fabric, I recommend cotton twill or canvas (not treated canvas, you don’t want anything plasticky on your crotch). Twill is what most casual pants are made of (denim is a kind of twill). Canvas is the same but heavier. You’ll want something that roughly matches the color of your pants, obviously. I did not have this. I decided I do not care. My pants will look DUMB but I am a GOBLIN.
I serged the edges of mine (because I’m the kind of goblin with a SERGER but not TAN FABRIC?? apparently) but that’s not necessary. Turn your pants inside out and pin the patch in (one at a time, if you’re doing multiple). Make sure the patch lies completely flat against the pants fabric, and isn’t bunching or bubbling.

Now shove it under the sewing machine and stitch around the edge. I recommend sewing right on top of the existing seams where you can, since the pants are sturdy there. The tricky thing is not accidentally catching other parts of the pants while you’re sewing around the patch, but you can do it, I believe in you. If you mess up, just seam rip that bit and try again.

Once the patch(es) are in, turn them right side out. The holes are covered, but there’s a bunch of loose, ragged fabric flapping around that’s just going to keep getting shredded.

So take it back to the sewing machine, and just…sew everywhere. Start at the edge and make a big spiral to the center. Or make a bunch of parallel lines. Or start wherever you want and just go wild. But fill the patch with stitching everywhere there are two layers of fabric.
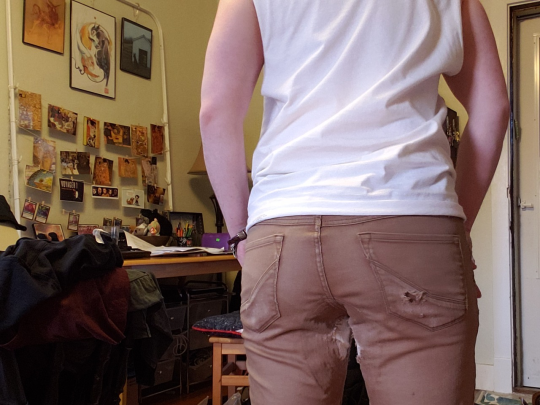
This not only keeps the layers together but REINFORCES them, so your sad pants will be STRONGER THAN EVER. It’ll look like this, and you’ll be like “ew, everybody’s going to see my butt stitching.”

But they won’t. Trust me. They won’t. Because it’s all up in your butt crack, and if they’re looking close enough you’re legally allowed to kick them. Even with my dumbass fabric choices, you can’t see it at all from the front (enjoy weird blurry shot of my crotch).

And you can barely see it from the back.
AND NOW YOU CAN WEAR YOU FAVORITE PANTS, AND NEVER BUY NEW CLOTHES EVER AGAIN. I think I’ve done this to EVERY pair of pants I wear on a regular basis. Some MULTIPLE TIMES.
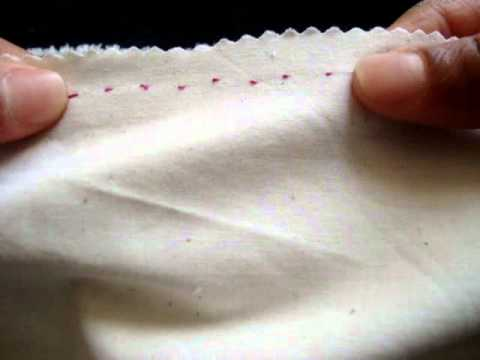
My note for people without a sewing machine: you can do this by hand, it’ll just take longer. Use sturdy thread and sew with a prick stitch (or pick stitch, depending on who you ask). That means that when the thread is on the outside of the fabric, make the stitches absolutely tiny. That leaves less surface area to be abraided by the aforementioned slapping of your thighs. It also looks nicer - so I would do that if you’re fixing some really nice dress pants whether you’ve got a sewing machine or not. This is what a prick stitch looks like on the outside.
If you’re doing it by hand, and if you want extra reinforcement, I’d also recommend getting some Heat ‘n Bond (or Wonder Under, etc, there are a few different brands, any permanent iron-on adhesive will work) and affixing the patches with that first. I only didn’t do that because I don’t have any. I would not recommend putting the patches in ONLY with iron-on adhesive, even though the manufacturers say it will work. It’s not strong enough for your powerful thighs.
Now go. Stop buying pants. End the disposable fashion machine. The revolution starts with your ass.
19K notes
·
View notes
Text
46K notes
·
View notes
Text
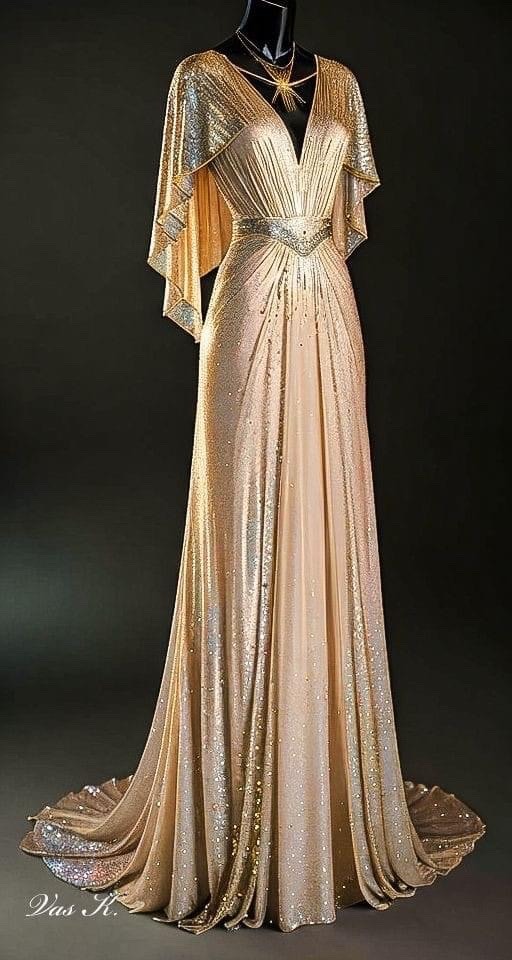
Dress from the Art Deco era.
14K notes
·
View notes
Text

Christian Dior Haute Couture Spr/Sum 2007
3K notes
·
View notes
Text
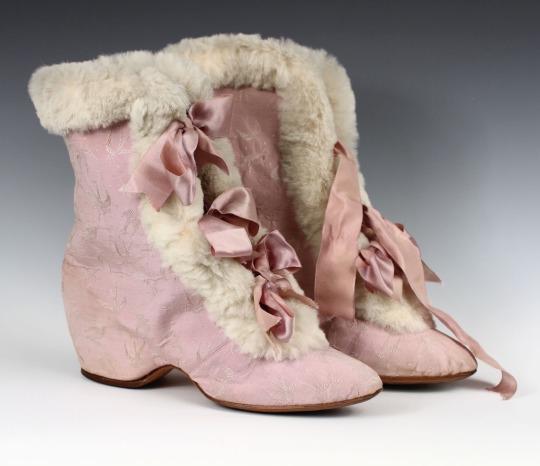
Pink Silk Carriage Boots, 1890-1895.
By Marshall Field, Inc.
Albany Institute of History & Art.
1K notes
·
View notes
Text
Perhaps it's time to get back into dress making
109 notes
·
View notes
Text
Because my Fall Project (TM) deserves it's own post showing it off, please enjoy this post that is just the final product of my VERY BEAUTIFUL witchy moth outfit! If you want to see the giant making-of thread it's all here!
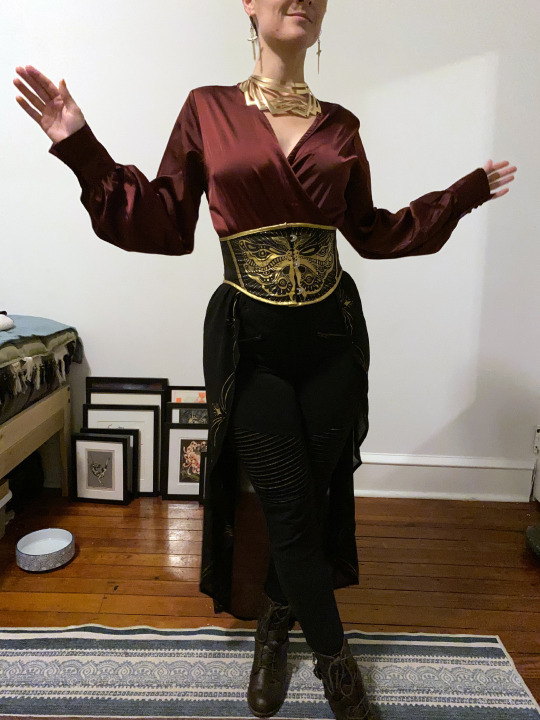
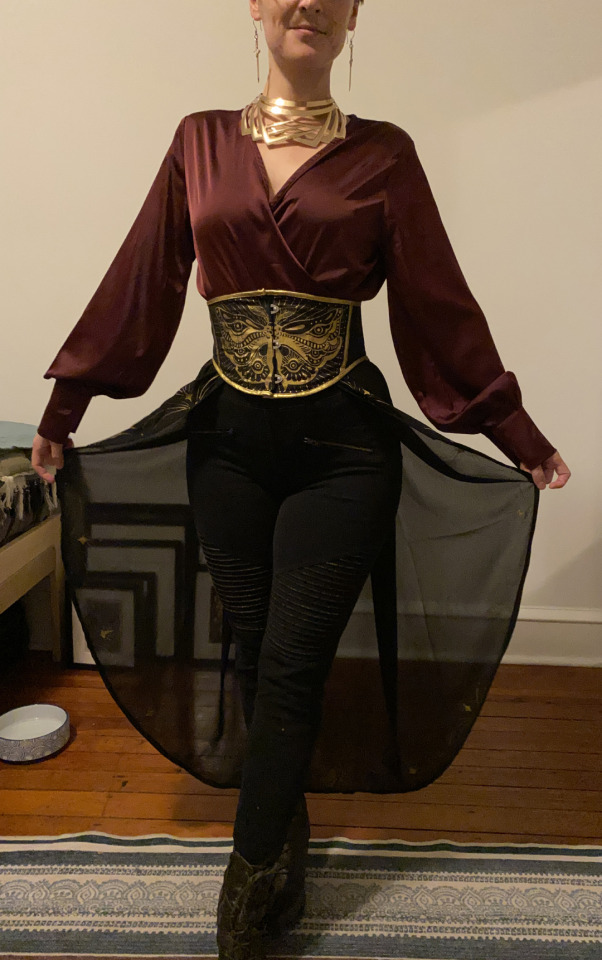

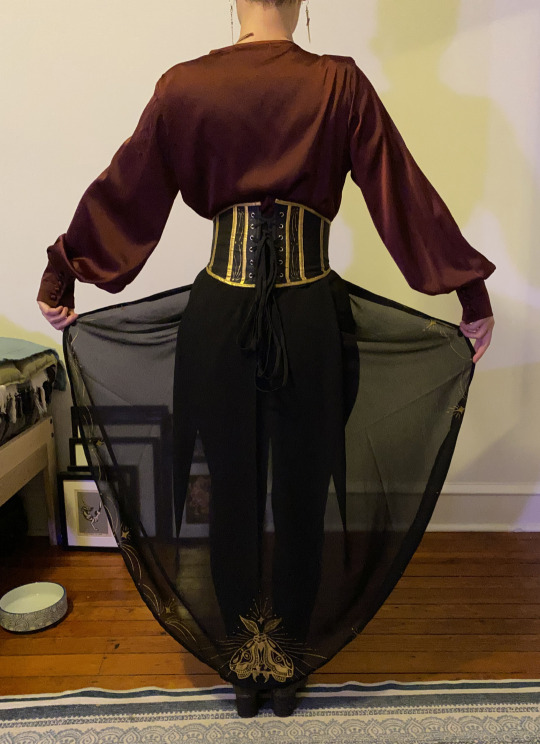
I uh, was enjoying myself too much at the party to get any good photos of the outfit on the day I wore it, though.
But uh. THE END. END OF PROJECT. You're welcome
1K notes
·
View notes
Text
Calling all chronic creatives - here's how to up your crochet game!
I'm an avid crocheter, but holding the hook for long periods of time became exhausting and painful. Being chronically ill, losing the ability to enjoy my hobbies was tough for me accept.
My husband took me to the craft store and we purchased a ergonomic crochet handle. This handle needed to fit my criteria;
able to hold a variety of hook sizes
hold up to high tension crochet projects (I do a lot of amigurumi crochet, which you need to complete with tight tension)
reduce my wrist/hand pain
reduce the amount of grip strength needed to hold the hook to avoid fatigue
This ergonomic crochet handle *seemed* to tick all these boxes. It was quite an expensive purchase and to be honest, I was disappointed in it in all aspects.
The purchased handle uses small rubber stoppers to hold the crochet hook in place, but as you are crocheting the hook works loose and spins around inside it. The handle itself was too small, making it painful to hold. I had to use a lot of grip strength to keep it in my hand, which is what I was trying to avoid by purchasing the darn thing. The little knobbly bit at the end really dug into my hand and hurt. It was so annoying to use and I gave up on it altogether after three days of using it (not to mention one of the rubber pieces broke apart within hours).
I expressed my disappointment to my husband, and he decided to come to my rescue! Over the course of a week, he designed me his own ergonomic crochet handle in a computer program called CAD. He then printed it out using his 3D printer. I can't even begin to tell you how much I love this new handle - its a game changer!
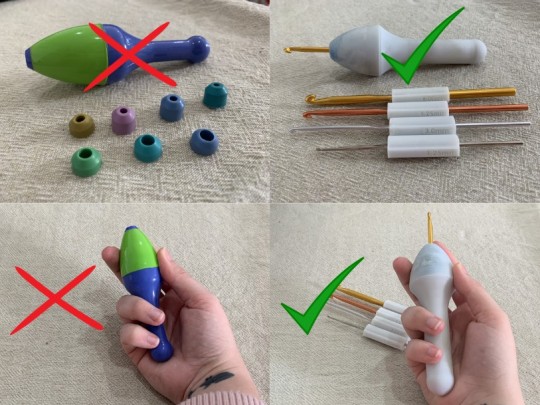
During the design process, he took into consideration all of my complaints about the disappointing handle and my criteria that I had listed. The handle he designed is bigger, so it uses less grip strength to hold it in place which also reduces my pain.
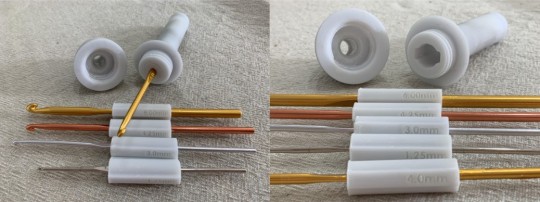
Instead of using rubber stoppers like the other handle, he designed a 'lock and key' system for keeping the crochet hooks in place and it works fabulously! The hook never moves and I'm really rough with my crochet hooks. It holds up to my high tension crochet projects and I have completed many amigurumi with it, even small, intricate items. Since it is designed with the lock and key system, my husband was easily able to print different keys to be able to hold multiple sizes. I've got keys ranging from 1.25mm all the way up to 6mm!
I can now crochet for hours on end and I swear my crochet skills have gotten so much better.
After expressing my delight at the crochet handle my husband designed for me, both him and I want others to be able to experience the freedom that I now have when crocheting. With chronic illnesses, its important for you to be able to continue with your passions as much as possible, so we have decided to make this crochet handle a sellable physical item for others to enjoy.
Here's the link to purchase one if you would like to give it a go!
Each crochet handle will come with the hook sizes;
1.25mm
2mm
3mm
4mm
4.25mm
5mm
6mm
If you want other hook sizes, send us a message and we can design one.
The cost of the handle and keys covers the cost of the 3D printing material, we are not making a profit off of this because we want as many people suffering from chronic illness to be able to enjoy crocheting again. We are happy to post internationally as we are based in New Zealand, send us a message before purchasing so that I can get you the cost of shipping.
I hope you will love this crochet handle and hook set as much as I have!
11K notes
·
View notes
Text

In the parlor of my dreams || IG
465 notes
·
View notes


Text
繕い (;゚Д゚) ナントォ
Mending a sweater
(Reddit:r/oddlysatisfying u/thegupeeman)
43K notes
·
View notes
Text
As a reminder, the plus size lolita archive has been created to help plus size Lolita’s find brand that fits! If you are struggling to find a piece or wondering if it fits, please don’t hesitate to scroll through this list!
P.S., please send some love + tips to all the helpers on this, this took hundreds of hours to research and compile.
I really hope this list is helpful 🎀

441 notes
·
View notes
Text


Dress by the House of Worth, 1877
From MFA Boston
2K notes
·
View notes
Text

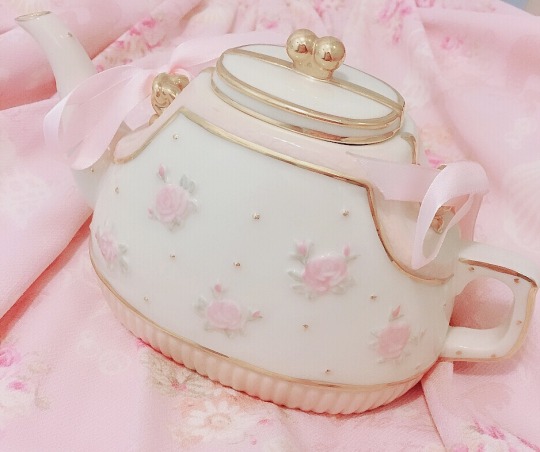
Purse shaped teapot ♡
6K notes
·
View notes