heckcareoxytwit
Always a Lost Cause
She/They. Singaporean. Asexual. My interests are Marvel comics, Digimon anime, animals, trivial knowledge and reference stuff. OxyMitch is no more, now I am the All-New All-Different Mitch...oh heck, I am a Lost Cause and this blog is a back-up. Expect lots of reblogs.
20692 posts
Don't wanna be here? Send us removal request.
Last Seen Blogs


babygirl-247
Untitled

hereforajohnnyknoxvillefanfic
... And then I stayed for more.

wonderseeker
wonder seeker

timottea
I only know where I am
Photo
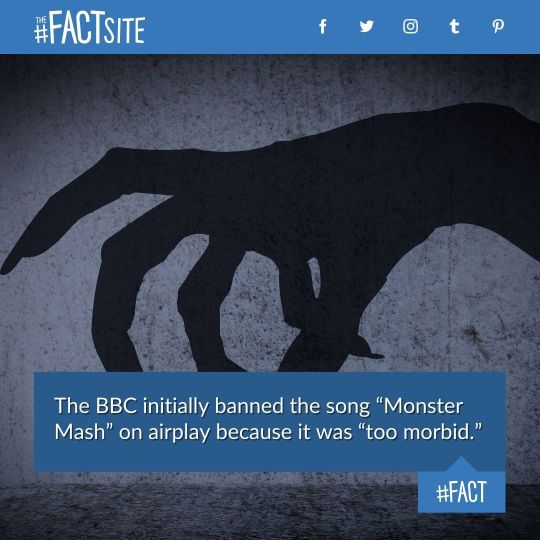
The BBC initially banned the song “Monster Mash” on airplay because it was “too morbid.” #FACT
3 notes
·
View notes
Photo

April 27th is…
Marine Mammal Rescue Day - Being good stewards of the planet should include the biggest part of it, the ocean and its inhabitants. The actions (and inaction) of humans have polluted and toxified the ocean. Overall climate change has warmed the oceans and altered the patterns were fish swim. Young marine mammals are frequently not strong enough to go far and deep enough to go after the fish they need. Illegal fishing gear, pollution, and litter hurt all manner of aquatic life.
Morse Code Day - It has been designed to pay tribute to this traditional form of communication. This is a telecommunications method that was used for encoding text characters. It involves using standardized sequences of two different signal durations. These were called dits and dahs or dots and dashes. The name “morse code” has been inspired by the inventor of the telegraph; Samuel Morse.
Prime Rib Day - Prime rib is best cooked on a low, slow heat, with the meat standing on the bones, so that it does not touch the roasting pan, thus ensuring its succulence. The top of the rib bones can be removed to make carving easier.
Tell A Story Day - The aim of the day to get participants telling, sharing, and listening to each others stories. It is a celebration of the art of oral storytelling in all of its many forms, whether it be fiction or non-fiction, a tall tale, or folklore. The stories may be told from memory or from a book.
World Tapir Day - It was established with the intent of protecting all the members of this endangered species from extinction, that they might still be here for our children. The areas they inhabit are either forest or jungle, which makes them particularly vulnerable to deforestation, especially as large herbivores. But the dangers of their extinction goes even further than just the loss of another unique species, the loss of the Tapir could in fact endanger the entire remaining forests. As part of their natural habits, they also serve to disperse seeds throughout the jungle, and are one of the oldest species found in these areas.
23 notes
·
View notes
Photo

365 Marvel Villain paper cut-outs - one villain, every day, all year.
April 27th - Corvus Glaive
An alien from an unspecified world, Corvus Glaive was recruited to lead Thanos’ Black Order and has acted as the mad titan’s envoy and first lieutenant in his more recent campaigns. Corvus possesses enhanced strength and agility and is a near peerless combatant. He is equipped with a glaive that he wields with great proficiency; whose blade can slice through any matter in the known universe. Corvus possesses a strong connection to this weapon and it affords him a degree of immortality. Corvus has perished in action on a number of occasions and yet the glaive constantly resurrects him. Following Thanos’ most recent death, Corvus has led the Black Order on a quest to bring back their master. He is married to Proxima Midnight. A version of Corvus Glaive appeared in the movies Avengers: Infinity War and Endgame portrayed by actor Michael James Shaw. Corvus first appeared in Infinity: Free Comic Book Day, 2013.
20 notes
·
View notes
Photo

A bit of April 27th history…
1773 - British parliament pass Tea Act
1865 - Steamboat SS Sultana (pictured) explodes on the Mississippi River killing up to 1800, greatest maritime disaster in US history - most were paroled Union POWs on their way home
1940 - Himmler orders establishment of Auschwitz Concentration Camp
1965 - RC Duncan patents Pampers disposable diapers
1989 - Beijing students take over Tiananmon Square in China
7 notes
·
View notes
Photo

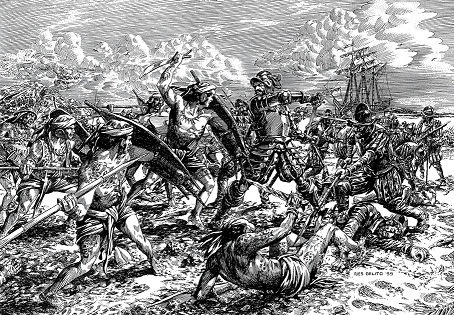
On this day, 27 April 1763, Native American Odawa leader Pontiac spoke at a council meeting of Odawa, Wyandot and Potawatomi tribes to try to encourage others to join him in attacking the British military outpost Fort Detroit. It was an early episode in what became known as Pontiac’s war, when a loose confederation of Indigenous nations in what is now Michigan, Illinois and Ohio, came together to try to drive out British colonists.
In contrast to French colonists who formed alliances with Native American tribes and gave gifts, the British ceased gifting and treated Indigenous peoples as conquered subjects, driving resentment. Eventually, members of over a dozen tribes including the Miami, Seneca, Lenape, Huron and others joined forces and began attacking British forts. Over the next three years Native American forces successfully seized or destroyed several British forts.
Despite British forces having superior weaponry, and at least attempting to use smallpox as a weapon to decimate the Indigenous nations, they could not defeat them outright. Therefore colonial authorities were forced to make concessions, creating a large “Indian Reserve” which colonists were forbidden to trespass on, and recognising certain Native American land rights. This caused resentment amongst the local colonists, and fuelled white support for independence from Britain.
Learn more about Indigenous resistance in the Americas in this book: https://shop.workingclasshistory.com/collections/books/products/500-years-of-indigenous-resistance-gord-hill https://www.facebook.com/workingclasshistory/photos/a.296224173896073/1974134702771670/?type=3
108 notes
·
View notes
Photo
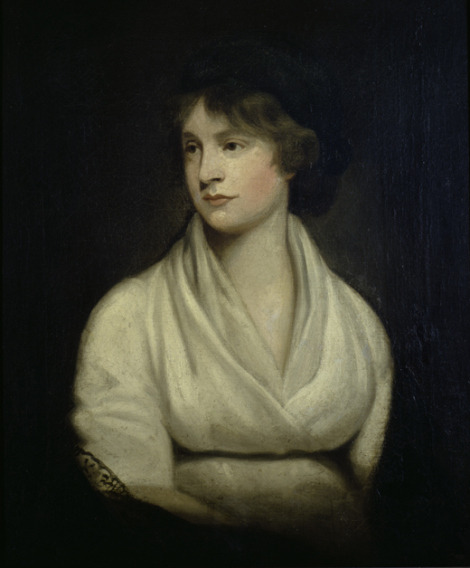
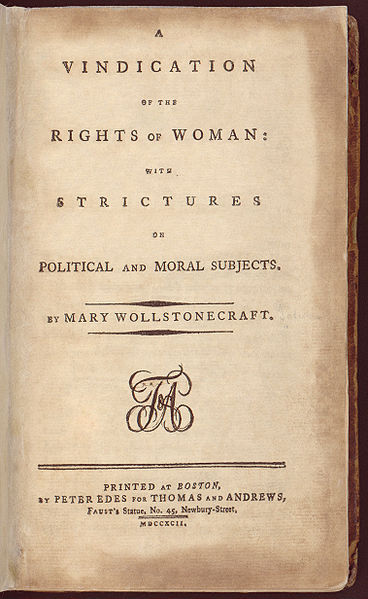
April 27th 1759: Mary Wollstonecraft born
On this day in 1759, the British women’s rights advocate Mary Wollstonecraft was born in London. She was also a writer and is best known for her 1792 work ‘A Vindication of the Rights of Woman’ in which she argues that women are not naturally inferior to men and argues the importance of female education. She died aged 38 after giving birth to her second daughter, Mary Wollstonecraft Godwin (later became Mary Shelley), who went on to write 'Frankenstein’. Wollstonecraft is remembered as a leading feminist philosopher.
322 notes
·
View notes
Photo


April 27th 1810: Beethoven composes Für Elise
On this day in 1810, the famous German composer Ludwig van Beethoven composed his piano piece Für Elise (in English: For Elise). The piece was not published until 1867, long after Beethoven’s death as the manuscript had been lost. It is now one of the most famous piano pieces of all time and one of Beethoven’s best known works.
(listen here)
202 notes
·
View notes
Photo

April 27th 1521: Ferdinand Magellan killed
On this day in 1521, the Portugese explorer Ferdinand Magellan was killed in the Philippines. Born to a noble family in 1480, Magellan was orphaned at a young age and sent to become a court page in Lisbon. In his twenties, Magellan joined the explorations of the Portugese fleet in India and Africa, and took part in combat with rival naval powers. Magellan returned to Lisbon in 1512, but came into conflict with Portugese king after he was accused of illegal trading. He therefore moved to Spain in 1517 to seek support for an expedition to find the quickest route to the spice-rich Moluccas islands in Indonesia. The Spanish king, hoping to profit from the lucrative spice trade, agreed, and Magellan departed with five vessels in September 1519. As the Portugese controlled the eastern route, Magellan traveled westwards across the Atlantic Ocean, around South America, and across the Pacific. Despite facing a mutinous crew and poor weather, Magellan succesfully crossed the ocean and navigated the now-named Strait of Magellan at the southern point of South America. From there the expedition - whose supplies and crew were rapidly dwindling - sailed onto the Pacific Ocean. Magellan became the first European to cross the Pacific when his expedition reached Guam in March 1521. The expedition moved on to the Philippines, where the Europeans became involved in a war between rival chieftains. Magellan was killed in the conflict, at the Battle of Mactan, on April 27th 1521. One ship from the original five continued on to the Spice Islands, and returned to Spain in September 1522 with just 18 members of the original crew of 270. This expedition is often considered the first circumnavigation of the globe. While he did not live to see the completion of his expedition, Magellan made a vast contribution to European knowledge of the world and its oceans.
274 notes
·
View notes
Photo
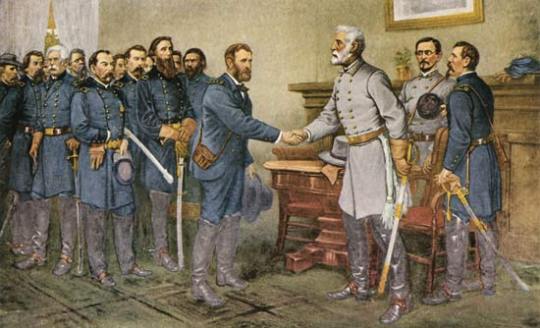
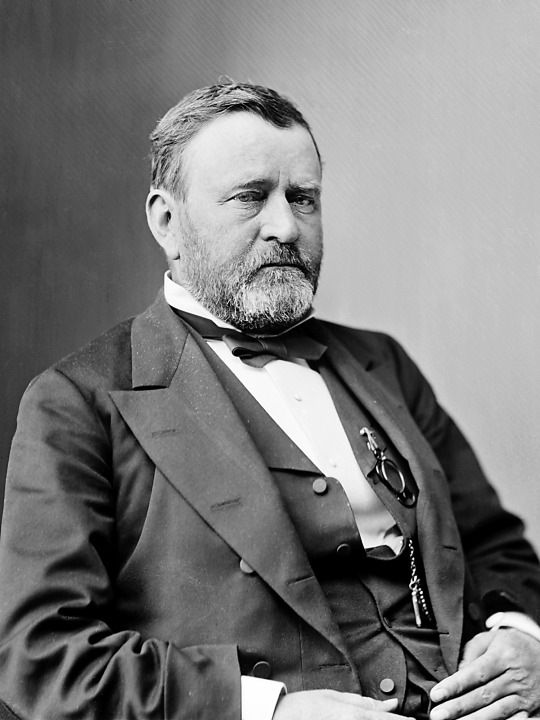


April 27th 1822: Ulysses S. Grant born
On this day in 1822, future eighteenth President Ulysses S. Grant was born in Point Pleasant, Ohio. Born Hiram Ulysses Grant, he joined West Point military academy aged seventeen; a clerical error listed him as Ulysses S. (Simpson - his mother’s maiden name) Grant, and fearing rejection from the illustrious academy accepted the new name. He had an undistinguished career at the school, and was not enthusiastic about a life in the military. Grant served in the Mexican-American War under future president General Zachary Taylor, though he had a moral opposition to the war he saw as being fought to gain new territory for the expansion of slavery. Struggling with alcoholism, Grant left the military for several years, but fared poorly in private sector ventures. Upon Southern secession and the subsequent Confederate attack on Fort Sumter, Grant was inspired to defend the Union and returned to the army. He won numerous victories and quickly became one of the most respected generals on the Union side, rising to the leadership of the Union forces. It was to Grant that Confederate General Robert E. Lee surrendered at Appomattox Court House, Virginia, on April 9th, 1865. Grant was a popular figure in the Union, and during the presidency of the unpopular President Andrew Johnson, many Republicans saw Grant as their only viable option for a successor. Indeed, Grant was elected president in 1868, though his tenure was mired in scandal. Allegations of corruption plagued the Grant administration, and his use of federal troops to suppress the Ku Klux Klan and efforts to annex Santo Domingo in the early 1870s proved unpopular. In the 1872 election, Grant faced a challenge from dissidents in his own party - the Liberal Republicans - who allied with the Democrats and nominated editor Horace Greeley for president. Grant won another term, but the next election proved another defeat for his policy, as the disputed results ended in a Republican victory, but at the expense of the end of Reconstruction. Post-presidency, Grant published successful memoirs, and died in 1885 aged sixty-three.
176 notes
·
View notes
Photo
365 Marvel Comics Paper Cut-Out SuperHeroes - One Hero, Every Day, All Year…
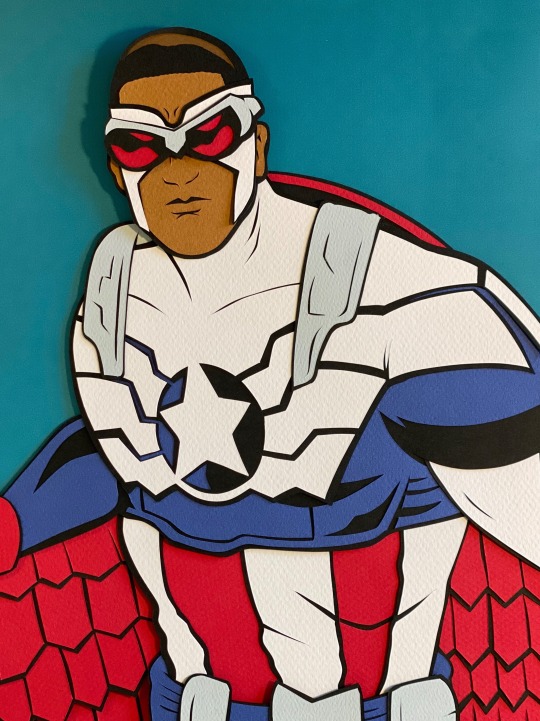
April 27th - Captain America / Sam Wilson
Samuel Thomas Wilson grew up in the Harlem neighborhood of New York City. As a young adult, he became a social worker and community organizer. He had a special affinity for birds and very much wanted to try his hand at being a falconer. As such he booked a vacation where he traveled to a remote island in search of a falcon chick who he could train.
As it turned out, this particular island had become overrun by the evil organization known as The Exiles, a paramilitary group of neo-nazis who followed The Red Skull. Captain America had also come to the island in pursuit of The Exiles. He and Sam Wilson ended up teaming up so to defeat these villains. Cap felt that the native residents of the island would benefit from a symbol to rally behind. To this end, Cap had Wilson wear a falcon-inspired costume and trained the young man in advanced combat. Wilson became ‘The Falcon’ and proved a hugely apt pupil; the pair ended up making short work of the Exiles, defeating the villains and expelling them form the isle.
The Falcon and Cap’s teamwork together proved so effective that Cap asked Wilson to continue on as his partner in crime fighting. At the same time, Wilson had come across an adolescent falcon who he named ‘Redwing.’ Training did not appear necessary as Sam and Redwing seemed to share a psychic bond. Soon Sam found that he could see what Redwing saw and, overtime, this power expanded so that Sam could commune with all birds in a large vicinity around him. The source of his power remains mysterious. The Red Skull suggested he was the one who granted The Falcon these powers, but this is likely one of The Skull’s many lies and it is more probable that Wilson possesses an inborn power not unlike those possessed by Mutants.
The Falcon continued on as Captain America’s partner for many missions. He even temporarily worse Captain America costume and shield during a time in which Steve Rogers was believed to have been killed in action.
Later, again as the Falcon, Wilson received assistance from the Black Panther, who created a specialized harness for Wilson that enables him to fly at high speeds and with great dexterity and maneuverability.
Shortly thereafter, The Falcon was recruited as a member of The Avengers and served alongside Earth’s Mightiest Heroes. The Falcon sided with Cap during the Superhero Civil War. Following this event and the apparent assassination of Steve Rogers, The Falcon aided Bucky Barnes in his efforts to step into Steve’s shoes and act as the new Captain America. The Falcon, Bucky and the Avengers were later involved in a mission that resulted in the return of Steve Rogers who, shortly thereafter, resumed the mantle of Captain America.
Some time later, Steve was sidelined once again when the formula that had kept him young stopped working. This time it was Sam who was asked to wield the shield as the new Captain America. He reluctantly accepted and proved a more than capable replacement, despite the fact that there were a number of loud, bigoted critics who took exception to a Black man assuming the role of the Sentinel of Liberty. It proved an incredible challenge to Wilson in that he was forced to contend with racism and difficult social political matters alongside costume super villains and evil scientists.
Wilson returned to his role as The Falcon once Roger’s regained his youth, yet donned the shield, stars and stripes once more during the Secret Empire event. More recently, Wilson and Rogers have decided that they would both act as Captain America, sharing the mantle as well as the burden of being the symbol of a nation still striving to attain greatness.
Sam Wilson has featured prominently in the Marvel cinematic Universe as both The Falcon as well as Captain America, portrayed in both instances by actor Anthony ‘cut the check’ Mackie.
The hero first appeared in the pages of Captain America Vol. 1 #117 (1969).
#All New Captain America#Sam Wilson#samuel wilson#captain falcon#Falcon Cap#Avengers#The Avengers#marvel profiles#marvel
71 notes
·
View notes
Text
Worldbuilding Development Prompt: Folklore
What folklore exists within the different cultures of your world?
How are these stories passed down - through the spoken or written word? Is there a specific person in each area, be they a storyteller or a scribe or a shaman, who ensures the continued telling of these tales? If so, what is their reputation amongst their people and outside of their own culture?
How have these stories influenced the culture? Have they inspired people to dress certain ways, to become skinnier or heavier, slender or muscular? Have they uplifted weary hearts or seeded skepticism deep in people’s souls? Have they caused the people to have a different perspective of commonplace things than those beyond their home would have?
What stories are told worldwide, regardless of religion, race or culture? Even if these stories are told, does one’s understanding of them differ from place to place? For example, a story of a knight who saved a princess from a dragon could inspire a group of soldiers while grieving a congregation of dragon worshippers.
48 notes
·
View notes
Photo


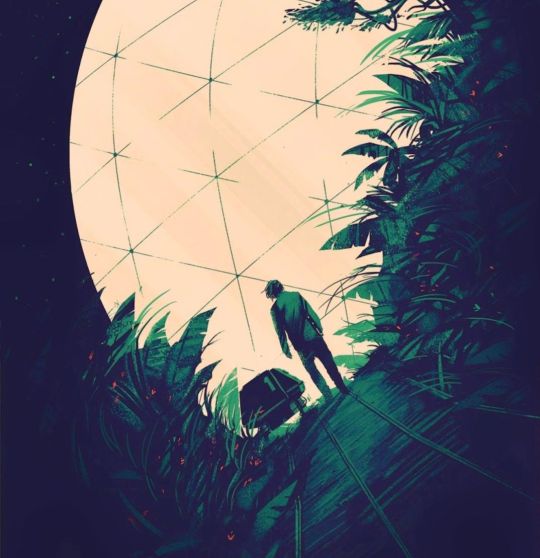

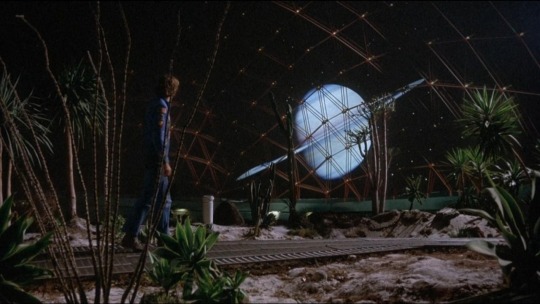
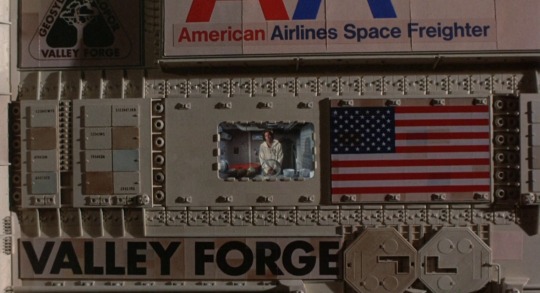
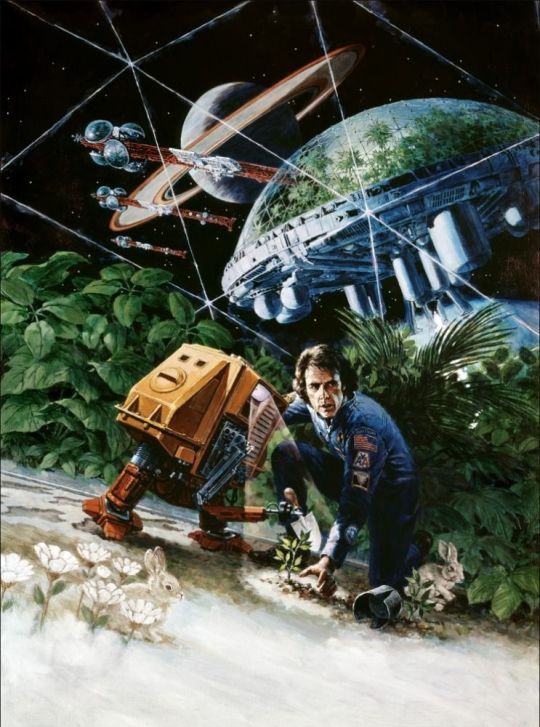
SUBLIME CINEMA #324 - SILENT RUNNING
The famed effects specialist Douglas Trumbull, most renowned for the whacked out 2001 and Blade Runner visuals, tried his hand at directing his first science fiction vehicle back in the 70s with Silent Running. It aimed high and noble, and has gained a cult following and newfound appreciation for its environmental themes and retro utopian visuals. And - Bruce Dern.
1K notes
·
View notes
Text
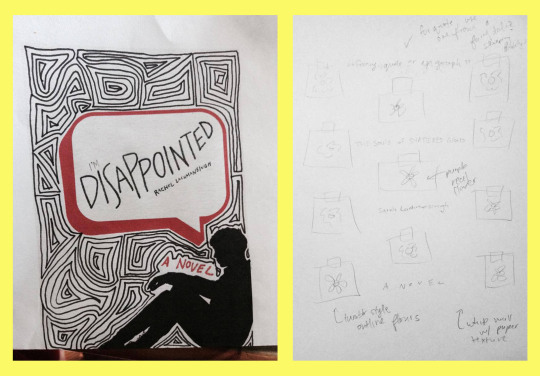
How I make book covers + tips for you!
Hey people of Earth!
Around this time last year, I mentioned I would have a video up on how I make book covers/cover making tips, and to summarize: I did not do the thing, and this year old script is still sitting in my drafts.
SO, I thought I’d kill two birds with one stone and post a written version of these tips! Going to get straight into this because I imagine this will be rather long!
This post will be divided into 6 parts: finding inspiration, concept art, incorporating elements of design, composition, tools and software, and resources. Feel free to skip around to whatever section interests you most!
***Before we get started, really quick disclaimer. I am in no way a professional cover designer. Cover design is merely something I picked up on my own, and I don’t have any formal education/credentials in graphic design. So of course take my advice with that in mind. These are also just my personal thoughts and opinions. So take everything with a grain of salt!
1. Finding Inspiration

What’s the deal?
A really great way to start out in design
Finding cover designs or designers you admire may help you see what works technically
Helps nail down a style you like
In turn, can help you find your cover design style
What should you do?
Look at covers in your genre!
Whenever I design a cover, I take a scroll through Goodreads to pick up some inspiration in designs I personally love
I also love walking around my bookstore and taking a look at physical copies
Find a cover design you like, and point out the specific reasons you like it
Example:
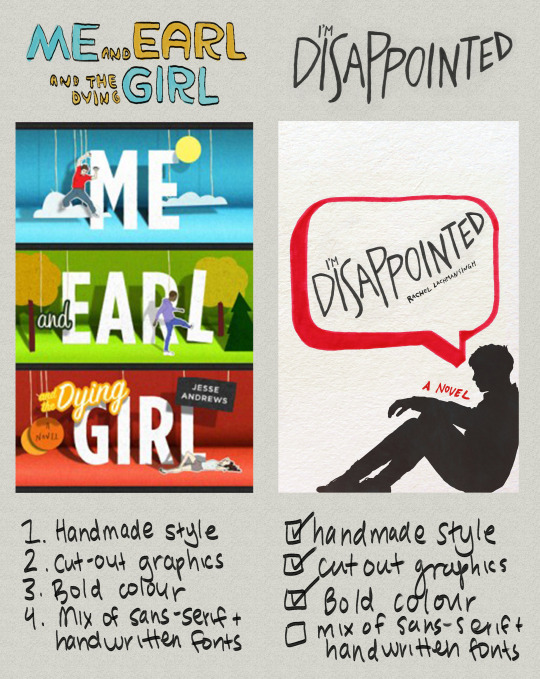
Me and Earl and the Dying Girl was actually not an inspo cover for this edition of I’M DISAPPOINTED, but as you can see, things I liked from it spilled over into my own design. By pointing out aspects of graphic design you like, you’ll better be able to understand your style as a cover artist.
Some personal thoughts:
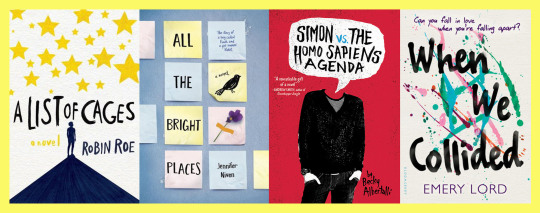
I like covers that include a textured backgrounds, as seen in the collage below:
So for the I’M DISAPPOINTED cover above, I included a textured background. I also love handwritten fonts/lettering, which I include in almost all of my book covers.
What I did:
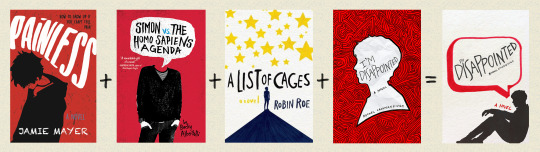
Off-white colour from A List of Cages and Holding Up The Universe
Silhouette from Painless and previous cover design of I’m Disappointed
Speech bubble from Simon VS the Homo Sapiens Agenda and Say What You Will
Marker texture from A List of Cages
Obviously my thought process wasn’t to put 4 covers in a blender and thus create my product, ha, this is just an example for the ease of understanding!
2. Concept art

What’s the deal?
Coming up with concept art is a super important part of designing a successful book cover.
Acts as the skeleton of your book cover
Your book cover’s roadmap
Saves time/effort
Similar to an outline for a novel.
Can be a very quick sketch, or full fledged design
I like keeping my concept art quick, but if this is your first cover, making a more detailed mockup can help.
What should you do?
Sketch out book cover ideas once you get them/take notes of concepts you’d like to explore
If you can’t come up with concepts, take a look at your inspiration folder and pull concepts/ideas from covers you love
This does not mean copying another book cover (this is notttt a good idea!). BUT, pulling inspiration from elements you like on a cover can be helpful in generating your own concepts
You don’t have to come up with concept art (sometimes winging it works!) but I do recommend jotting notes down, and drawing out loose sketches when applicable!
Keep a list of ideas for book covers as you accumulate them (almost like a little vault of concepts lol) and reference them in the future!
Take a look at as many book covers as you can and make a list of elements you like and don’t like
This is one of the easiest ways to accumulate ideas/concepts!
Example:
^^^ Concept art for two book covers
Likes and dislikes in book covers:
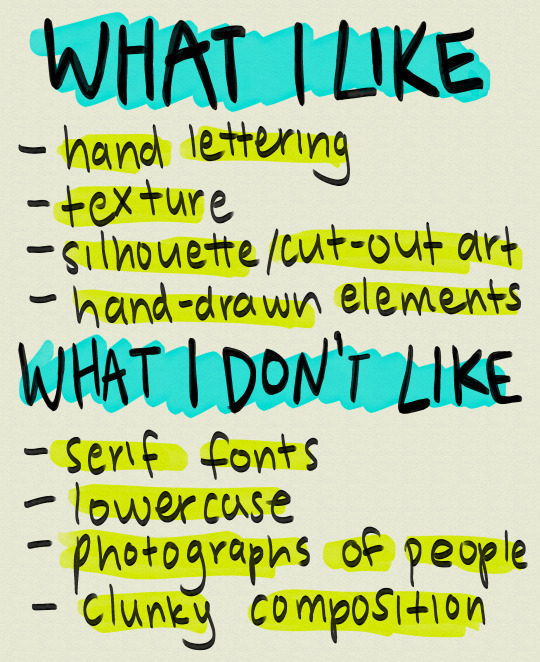
Of course this list is not my be all and end all (nor should it be), and obviously, I still use these things (besides clunky composition I hope!) in some designs!
3. Incorporating the elements of design

What’s the deal?
There are 7 elements of design: line, shape, texture, form, space, value, and colour.
These sometimes vary depending on where you look, but this is what I was taught, so I’m going to be working off that!
Examples:
I’m going to go through them really quickly via an assignment I did for my comm tech class
Keep in mind this assignment is 2 years old and is only meant to give you an idea of what these elements are
1. Line

Line is probably the most important element of design as every piece of art starts with one.
There are various types of lines. You can have curved lines, straight lines, vertical lines, horizontal lines and so on.
2. Shape

You can have more mathematical, geometric shapes, or more abstract, free form shapes.
3. Texture

Texture is the feel of a particular surface.
Texture in my opinion is one of the most important elements when it comes to graphic design, especially book covers.
My favourite thing to see in book covers is texture, whether that be paper textures like construction paper, crumpled paper, wallpaper, lace, wall textures, paint textures, or marker textures
Texture adds depth to designs, and if there’s any element of design you focus on in this post, I’d highly recommend it be this one.
(i’m biased but still)
4. Form

Form is almost like shape, except instead of flat objects, we’re dealing with 3-dimensional objects.
I don’t often use it in my covers since I like drawings and flat shapes in my designs, but if you want to include objects on your cover, or any sort of 3D shape, this would be form.
5. Space
The distance around an object, to put it simply
Space in covers can help emphasize what’s important, and what is less important, or can draw attention to a particular piece of your design.
Examples of space:
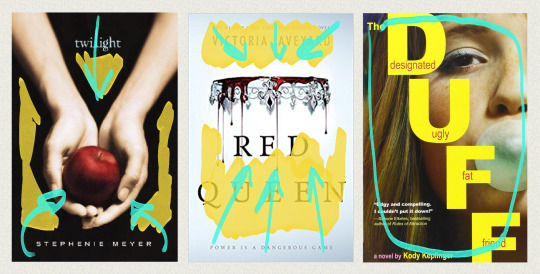
Colour coding: yellow = space, teal = focal point/movement of viewer’s eye
In Twilight, the black space helps emphasize the main image, the hands holding the apple.
This also occurs in the Red Queen book covers. The empty space around the crown draws attention immediately to the focal point
You can also lack space. In The Duff, the girl’s face is the only thing you can see on the cover.
6. Value

Is determined by how much light or dark is incorporated into design.
Example of value:

A great example of value in book covers is on Alexandra Bracken’s Passenger. As you can see, the green at the top fades down in a gradient as more white is added to the centre.
7. Colour

Light reflecting off objects
Can make certain elements of your design stand out
Why should you incorporate the elements of design into your designs?
Adds layers of depth to your work
Thus can take your cover-making skills to another level
Can help in producing ideas
4. Composition:

What’s the deal?
In my opinion, can make or break a design
Can mean clutter of things, OR too much or too little space between elements
Title placement
Composition is sometimes subjective from design to design
What you can do:
Pay close attention to detail and spacing
Look out for natural shapes in your design you can fit elements into
Watch the linked video from Mango Street (one of my favourite photography channels) on composition
While photography and design are two different things, the tips in this video can also be applied to various ideas in design such as headroom and leading lines
youtube
Examples:
*Before I get into this, I want to make it clear that these examples are exaggerations for the purpose of showing you good and bad composition. If you make these mistakes, that doesn’t mean your design is bad, and again, I’m no professional. This comes from what I believe could be considered bad composition, but trust your gut.
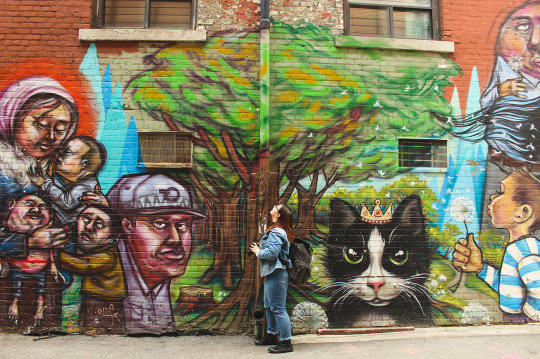
Example 1: Stick People

doesn’t effectively use space
no headroom for text
text is covering 200 element (looks very clunky)
text is cut off
No focal point
Can’t read the title
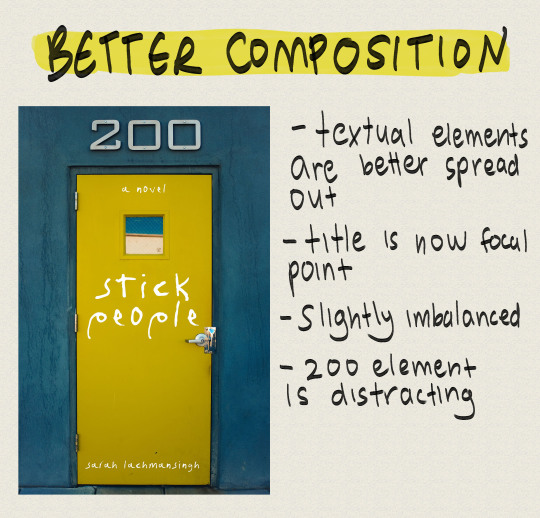
Textual elements are better spread out
Title is now focal point
Slightly imbalanced
200 element is distracting
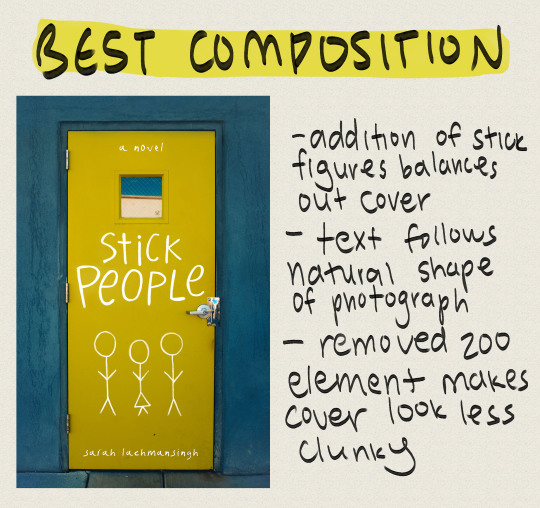
Addition of stick figures balances out cover
Text follows natural shape of photograph
Removed 200 element makes cover look less clunky
Example 2: Sixteen Cents
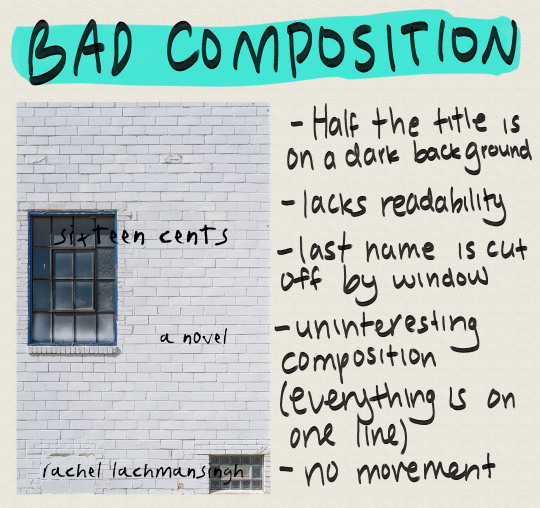
Half the title is on a dark background
Lacks readability
Last name is cut off by window
Uninteresting composition (everything is on one line)
No movement
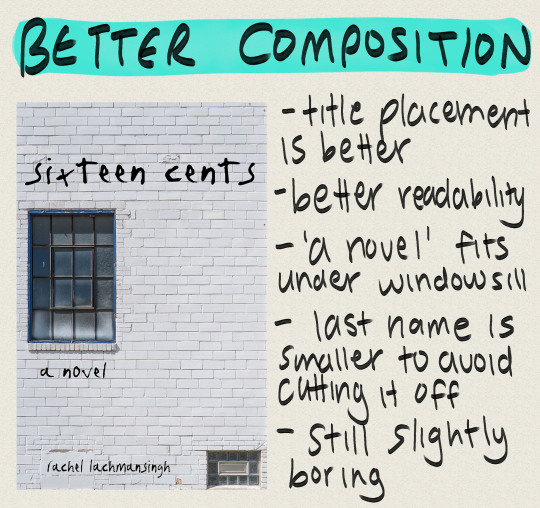
Title placement is better
Better readability
‘A novel’ fits under windowsill
Last name is smaller to avoid cutting it off
Still slightly boring
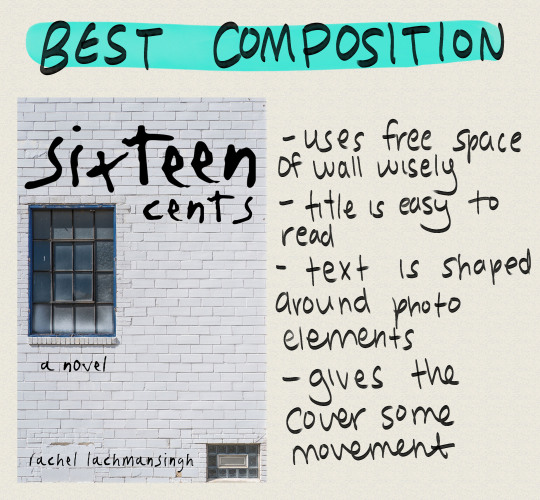
Uses free space of wall wisely
Title is easy to read
Text is shaped around photo elements
Gives the cover some movement
Example 3: Fostered
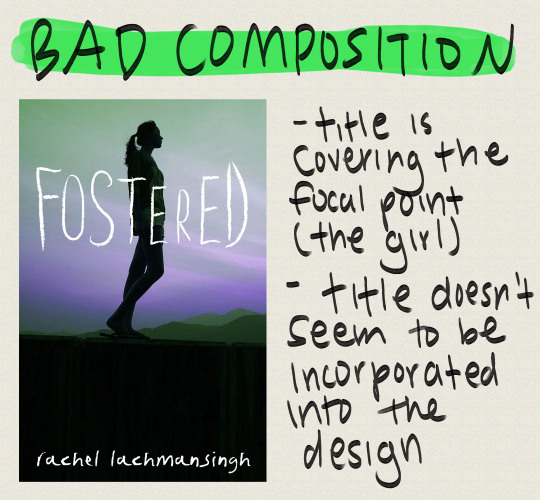
Title is covering the focal point (the girl)
Title doesn’t seem to be incorporated into the design
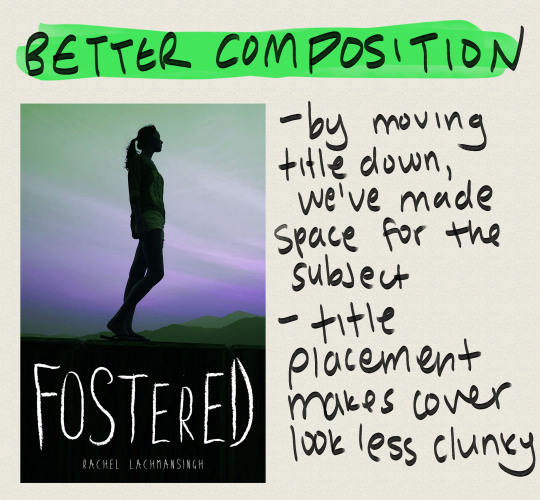
By moving title down, we’ve made space for the subject
Title placement makes cover look less clunky
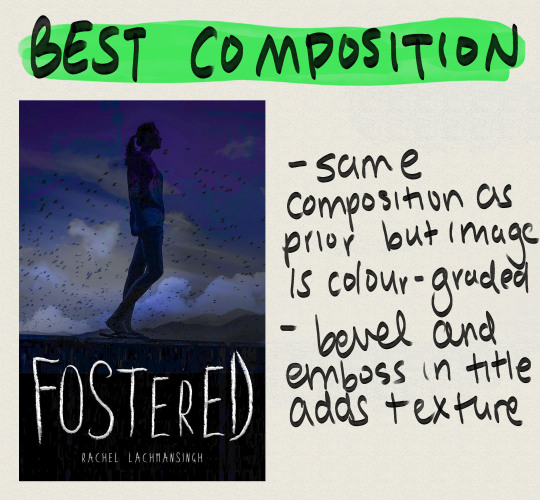
Same composition as prior but image is colour-graded
Embossed title adds texture/depth
I’ve mentioned this a few times in this post: focal point. What is it?
FOCAL POINT:
Is defined as the main attraction of your book cover
This is where you want your readers’ eyes to focus
Focal points can sometimes define themselves in areas where more contrast happens to be
Doesn’t have to be the centre of the page.
Keep focal point in mind for composition because if you put it in the wrong spot, you could end up drawing your readers’ attention to the wrong area of the cover.
The point of most interest in a cover is the focal point, so if you want a particular subject of your book cover, such as a person, to stand out make sure you don’t make the other areas of the cover too high contrast or busy.
Framing subjects also helps, so be creative!
The human eye tends to focus on areas with increased contrast so keep this in mind
Examples:
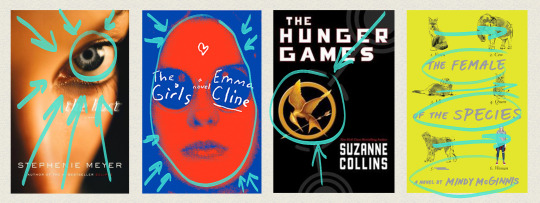
The Host
The camera has focused on the eye of the model, with the nose bridge and forehead shadowing each corner of the cover
Helps lead eye to focal point (the eye)
The Girls
Blue around the edges encircles the focal point (the girl), leading the viewer’s eye directly to her
Girl is also scarlet in colour, contrasting the background
The Hunger Games
Grey outlines on the cover lead straight to the mockingjay
Mockingjay is bright gold in comparison to the black background
Creates contrast, thus viewer’s eye is lead there
The Female of the Species
‘Straight’ composition
No particular focal point, viewer’s eye instead moves horizontally across the design
What should you do?
Use the natural shapes and outlines in your design/photo to fill your cover
Use your space wisely (see examples above)
Use leading lines to draw attention to your focal point
Manipulate text to fill empty spaces
5. Tools and software

You do not need Photoshop to make a good book cover
I made my first book covers in GIMP, a free image manipulation program (kinda like Photoshop’s little brother)
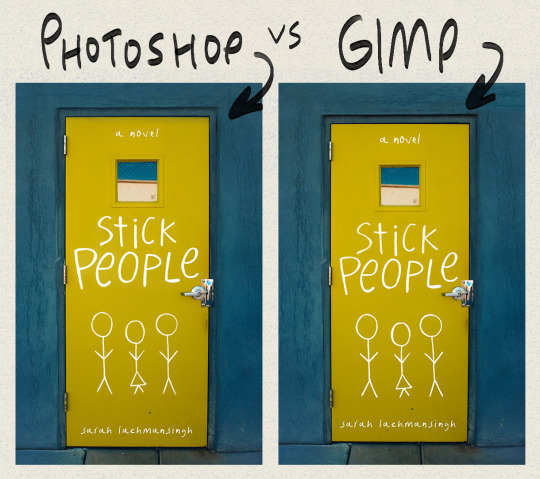
This is the stick people cover I made in photoshop, and the same cover made in GIMP.
Other tools you may want to use are CreateSpace’s cover templates.
You can find these through CreateSpace OR Bookow (my personal fave)
OPTIONAL (what I use):
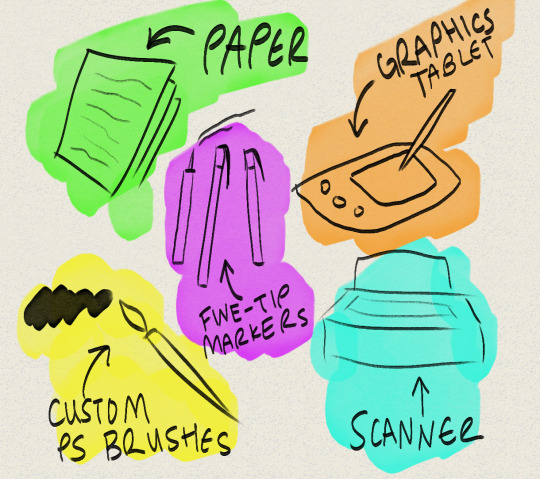
Graphics tablet
I use the Huion H610 which I really enjoy!
I use this to hand letter, draw silhouettes, create concept art, and so on
Paper and my Faber Castell India Ink Artist Pens.
These are fine tip markers, and are what I used to create the text on I’m Disappointed
Thin sharpies and pens will also do the job, and you can always clean any mistakes up in photoshop or gimp.
A scanner so I can transfer what I’ve hand drawn onto my computer
If you don’t have a scanner you can take a clear photograph on a camera or phone
I also use a few custom marker brushes that now come with the 2018 version of Photoshop
The main one I use is Kyle’s AM - Watercolour Paper from the art markers set (you have to load these into Photoshop, but if you have PS 2018, you should have access to ‘em).
(I’ve lettered everything in this post with that brush)
6. Resources

Here’s a list of amazing resources you might need when making your own book covers!
1. Stock image websites
Check out THIS post for a master list of my favourite stock photo websites!
Stocksnap.io
Unsplash.com
Pixabay.com
2. Dafont
Is my main source for finding fonts
3. Goodreads
A huge resource I use to find cover inspiration
I’ll often browse the new releases section to look at new covers and so on
Easy way to narrow down the genre of cover you’re looking for, as well as the age category
4. Keyboard shortcuts
Check out a masterlist for Photoshop HERE
GIMP masterlist HERE
Makes workflow super efficient
My fave I highly recommend in Photoshop is ctrl > shift > alt > e (merge all layers into new layer)
I’ve made TWO custom shortcuts: ctrl > shift > o is now open as layer, and ctrl > shift > alt > r is now rasterize layer (these save so much time!)
So to conclude this post, I’m going to list out some of my favourite tips when it comes to cover making (sort of a reiteration of this post)
Add texture!
Texture is a super easy way to add dimension to your book cover
Try lettering with a paper and marker when starting out
I find this a lot easier than digital lettering!
Google is your friendddd
If you can’t figure out how to do something in Photoshop or GIMP, the internet is a vast depository of information!
Pay attention to detail
Cover design is alllll about the small details. Making sure you’ve centred something properly can seriously help in making your cover go from amateur to whoaaa who made thatttt
Get a second opinion
Been looking at your screen for 8 hours straight? Ask someone you know what they think of your design! I find this has sparked a lot of secondhand ideas!
If it doesn’t work out, doesn’t mean it was a fail
If a particular concept just doesn’t work, don’t worry! As you practice you’ll get better, and you can always revisit the concept for another novel!
EDIT: a really great suggestion from @sarahkelsiwrites: print out your design if you need a fresh perspective! You’d be surprised by what you notice on screen VS off!
So that’s it for this post! I hope this was helpful for some of you guys, I know it was looooong overdue. If it helped you out, let me know, and if you have any questions, feel free to send ‘em my way! :))
–Rachel
13K notes
·
View notes


Text
Character mannerisms to consider!
Mannerisms, in this case, are the little details that are unique to each character of your story! These are perfect ways help the reader know more about your character’s personality without needing to read through multiple sentences of description or dialogue. Mannerisms also become incredibly useful when you need to convey things like social status, upbringing, mental health status and how they interact with the world/people around them.
There are hundreds of unique ways to use mannerisms, for example linking one character to another despite their lack of interaction in the story. The dialogue and description might point to Character A having never met Character B, but they might share the same mannerisms, which would hint to some kind of past link between the pair.
How much space do they take up? Do they spread out when they sit or stay curled-up? Do they flail their arms to gesture? Do they speak loudly or quietly? Who listens when they speak up? Do they make a sound when they move?
How does your character sleep? What position? Do they sleep restlessly or soundly? Do they prefer covers, or do they sleep without?
How does your character greet people? Are they welcoming or reserved? How genuine are they being?
How much do they mirror others? Do they mirror everyone? (Mirroring is a subconscious behaviour where two+ people in a conversation will copy one another’s body language. This usually means there is a connection of some kind being made. Lack of / exaggerated mirroring might indicate towards a mental disorder or other (ex: personality disorder, neurodiversity, anxiety etc)
Which part of their body is the most expressive? Does your character use their hands a lot or do they tuck them away? Do they need movement to ground themselves (swaying, rocking, fidgetting…)?
Who would your character turn to in a group of people for comfort? Would they acknowledge that person more? Would they engage in a conversation with only them or would they just glance their way?
Do they have a re-occuring habit to indicate a mood? Do they crack their knuckles when excited? Do they bite their lip ring when angry? Do they look at their hands when sad?
How do they gesture? Do they speak with their hands? Do they point, nod or use their eyes to show something? Which movements are conscious, and which aren’t?
Do they have a comfort item or person? Is there something they always think of? Is there something they hold with care? How much do they value that thing more than others?
How would they react to another person’s misfortune? Would their eyes light up? Would their heart hurt? How genuine would they feel? How genuine would they act?
Is there anything that makes them OOC (out of character)? (This is a good thing! One tiny OOC aspect can make a huge impact on that character) Perhaps they’re cruel but love cats? Perhaps they’re known for being the kindest but smile when they think of something tragic? How often do they act strangely? Do they do it in front of anyone? Do their actions indicate this or solely their thoughts?
I hope this helps you develop your characters! If you have anything to add, feel free to do so!
7K notes
·
View notes
Note
Hi. I'm writing a fantasy story. So the royal family has twins(a boy and a girl). When they are older, the king and queen dies. I've researched about it and it says the older twin should be next in line.The thing is, prince is the older twin but the princess has to have the throne so that i can go further with the plot. Should i make them duel and make the princess win so she can be the queen? Idk what should i do?
Twin Royal Heirs in Fantasy
With twins as royal heirs, it isn’t really an issue of “older” versus “younger,” because we’re talking about a difference of minutes or hours in age. It’s really more an issue of who was born first and who was born second. So, unless there’s some other reason why it’s important that the prince was born first, or unless you want there to be a big dispute over the throne, I would just go ahead and have the princess be born first rather than complicate things unnecessarily.
If you want there to be a dispute over the throne, having the prince and princess duel for the throne is an option, but it certainly isn’t your only option. Here are some other possibilities:
1. Coup D'état by Popularity
When the crown prince is a twin, one thing that can happen is that over the years as the twins grow up, the nobles of the court and privy council begin to favor one over the other for various reasons, and maybe the ones who favor the princess secretly think she would make the better ruler. In this case, they could conceivably just petition the king and queen to change their heir, thus avoiding an actual coup or any big drama. Or, maybe they don’t (or they do but the king and queen refuse), in which case they may secretly gather an army over a period of time and meet the prince/new king’s army in battle, ultimately handing the throne over to the princess when they win. Alternatively, they may find some way to assassinate the prince/king and make it look like an accident, poison the prince/king and make it look like he became gravely ill and dies, or abduct the king to a far off place and make it look like he gave up the throne and went on some sort of wild pilgrimage or journey. The drawback to this option is it may over complicate your existing plot.
2. Coup D'état by Disqualification
One thing that is nice about having “an heir and a spare” is that when it comes time for the heir to inherit the throne, if the heir is completely unqualified or does something that makes them unfit for the throne, it’s easy enough to depose them in favor of the more favorable heir. In this case, there doesn’t have to a war, assassination, poisoning, or abduction, because everyone is in agreement–the privy council, the nobles of the kingdom, the people–they all want the unfit heir out of there, and there’s no one to put up a fight. In this case, the heir may be guilty of a terrible crime, may simply be unfit to rule for whatever reason (maybe they suffer from what we know as massive depression), may be considered a heretic for not being an adherent to the kingdom’s favored religion, or maybe they ran off and married a peasant and refuses to divorce them.
3. Dethroned by Death
If you can do without the prince in the story, you might consider him dying shortly after he inherits the throne. In medieval Europe, there were rapidly spreading illnesses like the plague, the sweating sickness, and various other fevers and bacterial infections that often caused death. While royals were often insulated from these diseases, which usually spread among the peasants in cities and surrounding villages, they were certainly not immune. In fact, Henry VIII’s older brother, Arthur, died of the disease as a teenager. You could also go the route of having the prince die in an accident or die of an injury related to an accident, as in on horseback or perhaps a serious fall.) Or perhaps the prince is attacked by thieves or assassins while riding through the forest one day. There are lots of possibilities.
4. Abdication of the Throne
Another possibility is that the prince simply doesn’t want to be king, and because his sister can simply be queen instead, he has the ability to just give up the throne to her. If he has a lot of support from his council and court, there might be a lot of push back, especially if they aren’t fans of the princess as a potential ruler. But, ultimately, they probably can’t force him to be king.
I hope one of these options will work for you!
————————————————————————————————-Have a question? My inbox is always open, but make sure to check through my FAQ and post master lists first to see if I’ve already answered a similar question. :)
104 notes
·
View notes