ciocelle
Cio's Art Blog
hi, name's cio! - 19 multifandom artist
Art Tag
Twitter
194 posts
Don't wanna be here? Send us removal request.
Last Seen Blogs

sublimepoetrystudent-univer-blog
Untitled

discoveblue
DISCOVEBLUE
itsjesthomas
"... for you are my solace."
nbj12
House of Random

3zalklam
مُحَمّدْ
Video
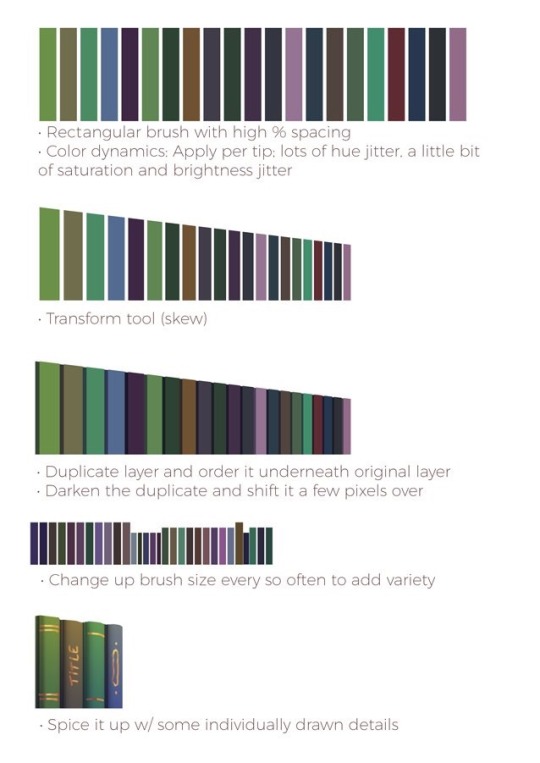
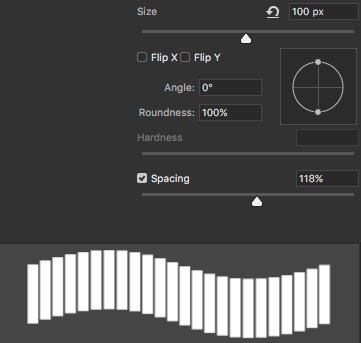
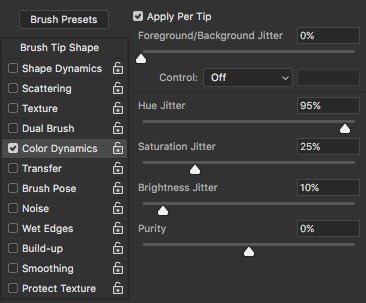
made this little process video over on tiktok since I got so many kind comments about the lighting/shading on these pieces! A surprisingly simple but effective setup 😎🏴☠️
6K notes
·
View notes
Note
Hey! I really adore your last sea fairy drawing, do you have any tips on where to start learning how to digitally paint?? Thanks so much!
a note to everyone who’s reading this post : im by no means a master at anything. just a fellow artist here. there will also be spelling mistakes that i didnt notice probably. or words that i forgot to erase while rewriting stuff.
OHHH ANON im gonna probably make a really big post with lots of things so i hope youll bear with me, thanks
its kind of a hard question
not gonna lie i started painting again only very recently after a veryy long time
i was trying for a very long time to figure out what was wrong with all my previous paintings. and. i guess that made me realize that for digital painting you need the same principles as cel shading itself that i usually do and any other ways (weird, right? i should’ve realized this sooner but im a boo boo the fool)
- Color, Value, and Saturation
-inspiration by looking at other people’s works
(inspiration isnt infinite for anyone. like a battery you need to recharge yourself just like everybody since we’re all just humans. make a folder with your favorite drawings to be able to quickly access inspiration material. i have a big ass inspiration folder myself)
(”but what if i copy?” no one is 100% original. people repeat same ideas over and over, believe me. besides copying art masters is a nice way to learn something new, you just need to analyze what made their art so great. copying like an artist and stealing work are different things.
besides youll never be able to 100% copy someone especially if you have several inspirations you’re mixing together if you want to actually make your own thing.)
-silhouettes
-flow, rhythm
-knowing how to simplify things
(dont get too deep in details when you start, make sure the general idea works. i do that by zooming out the drawing. in some programs you can make a new window with your drawing that you can have zoomed out constantly)
-references. yeah
- there can also be many other small things like edges (hard and soft), different lightings and how they differ and others but you can learn them a bit later if you think all previous things are too much)
if you know this, believe me, you’ll spend less time wondering like me “where did i go wrong?”. i WANTED to try painting in the past years but i didnt know what i was doing.
- remember that there are no hard rules in drawing. yes there ARE tricks to make your art more appealing to the general viewers and some general theories about drawing that you NEED to know to make sure you are making consious decisions with your art.
but if you personally want to show a middle finger to some “””rules”””? you can. you absolutely can. you have the power. you can have anything you want when it comes to how you work!


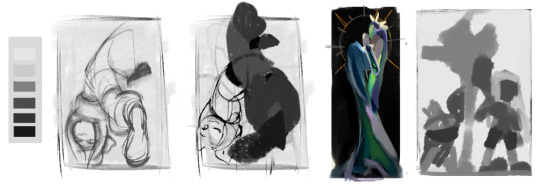
heres my old work.
i make saturation -100 on the right to check values on works.
(if you work in clip studio or photoshop you can use correction layers to instantly check values when you work, like i did in my sea fairy speedpaint)
and im instantly hit with the fact that theres no atmosphere, no depth, no main point to focus on.i MAYBE checked on the values back then, but i ignored them (”wow who needs to know what it looks like in grayscale”). color pallete could be made more interesting too. theres nothing appealing.
i have some more paintings, but the problems are pretty much the same. i didnt know how to start, i didnt know what am i doing, etc. but its ok. we all figure things out as we go.

heres what my process is like now based on my recent paintings.
you can start with nothing, but if you want to, you can have a plan.

i didnt have a color idea when i started working on the colors (only lineart), so did lots of color dumping on the same layer to figure out the atmosphere of the finished piece and only polished it later.

it isnt the exact picture from my process, but its similar to what i did.
sometimes its nice to get random, so i mixed some random images together and started working out the colors on top of them. it gives you a START if you’re afraid of doing anything in the beginning like me.
at least that how i do it sometimes (i first saw it when i was watching speedpaints of backgrounds, artists were mixing different images together), you can have an entirely different progress yourself. the method i did doesnt suit everybody but maybe youll like it if youll try it. (try different things to find what clicks with you)
(a picture from my actual progress, but after i figured out the colors i wanted.)
i constantly check how it looks like in black & white to make sure it works alright.
i zoom out the thing to make sure it works.(right corner) if it aint working from such distance, it probably aint working when i zoom in.
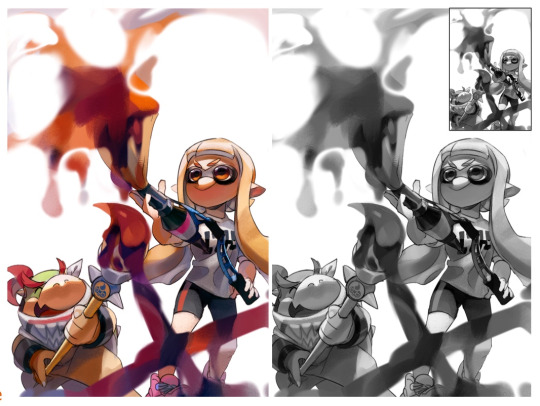
and again, i was checking a lot how it looks in black and white. probably could’ve done things a bit better with this one in some places, but oh well. it looks pretty ok anyways and i did most of the things i wanted to do so im not disappointed.
(its ok if painting something is going well you can go back to it later and repaint it. not being afraid to go back to square one is something i need too.
its what i did with bowser jr in that pic since painting him wasnt going too well)

my sea fairy piece is pretty similar. this time i did the general color sketch! (i had a very clear idea of what i wanted the colors to be. i got an idea while watching bob ross’ seaside harmony painting episode) i liked it so much i decided to make a full piece based on it.

now the sketches for this werent exactly small but i did actually do them with my screen zoomed out a bit so i dont, again, get worked up with details.
most of my process you can see in the speedpaint.
messy color analysis of my sea fairy piece:


its simple and nice in my opinion.

my painting process isnt always as neat (lol) and clear as above
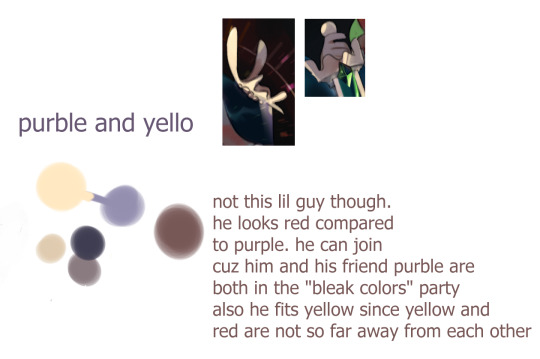
sometimes i just go and do whatever and maybe use basic principles. heres my color practice with wizard cookie

(again, purple and yellow, they’re just the main colors in this one. azure color is the brightest part and its yellow and purple that create the relationship here imo.)

i honestly use only a few brushes im comfortable with, usually. i use what feels comfortable the most for almost everything

things that you could check out;
Color and Light: A Guide for the Realist Painter (James Gurney)
Schoolism - Digital Painting with Craig Mullins (love these)
Schoolism - Designing with Color and Light with Nathan Fowkes (this 2)
(im a lucky poor bastard who torrented their schoolism classes www)
Marco Bucci - Painting Tutorials / Demos
“Simple value mistakes students make”
Art Fundamentals: Values
Art Fundamentals: Color Theory
Sketching
and i love this artist so im gonna dump their things here - 1 ; 2 ; 3
“flow and rhythm”
“lighting”
“choosing colors”
“placing figures in space”
a series of composition tips
Full Landscape Painting Master Study - Mindset & Technique - Things You Never See in Art Tutorials
Lighting 101: Direction of Light(its mostly about filmmaking but it could be useful)
DIGITAL PAINTING: Understanding values
3 Tips for Digital Painting Beginners
How I Make A Landscape: Concept Art Process

take your time with everything, dont overwhelm yourself and blame yourself for not getting things right away
thats all i can offer bye hope this was an ok answer xoxo
699 notes
·
View notes
Note
Hey! I really adore your last sea fairy drawing, do you have any tips on where to start learning how to digitally paint?? Thanks so much!
a note to everyone who’s reading this post : im by no means a master at anything. just a fellow artist here. there will also be spelling mistakes that i didnt notice probably. or words that i forgot to erase while rewriting stuff.
OHHH ANON im gonna probably make a really big post with lots of things so i hope youll bear with me, thanks
its kind of a hard question
not gonna lie i started painting again only very recently after a veryy long time
i was trying for a very long time to figure out what was wrong with all my previous paintings. and. i guess that made me realize that for digital painting you need the same principles as cel shading itself that i usually do and any other ways (weird, right? i should’ve realized this sooner but im a boo boo the fool)
- Color, Value, and Saturation
-inspiration by looking at other people’s works
(inspiration isnt infinite for anyone. like a battery you need to recharge yourself just like everybody since we’re all just humans. make a folder with your favorite drawings to be able to quickly access inspiration material. i have a big ass inspiration folder myself)
(”but what if i copy?” no one is 100% original. people repeat same ideas over and over, believe me. besides copying art masters is a nice way to learn something new, you just need to analyze what made their art so great. copying like an artist and stealing work are different things.
besides youll never be able to 100% copy someone especially if you have several inspirations you’re mixing together if you want to actually make your own thing.)
-silhouettes
-flow, rhythm
-knowing how to simplify things
(dont get too deep in details when you start, make sure the general idea works. i do that by zooming out the drawing. in some programs you can make a new window with your drawing that you can have zoomed out constantly)
-references. yeah
- there can also be many other small things like edges (hard and soft), different lightings and how they differ and others but you can learn them a bit later if you think all previous things are too much)
if you know this, believe me, you’ll spend less time wondering like me “where did i go wrong?”. i WANTED to try painting in the past years but i didnt know what i was doing.
- remember that there are no hard rules in drawing. yes there ARE tricks to make your art more appealing to the general viewers and some general theories about drawing that you NEED to know to make sure you are making consious decisions with your art.
but if you personally want to show a middle finger to some “””rules”””? you can. you absolutely can. you have the power. you can have anything you want when it comes to how you work!
heres my old work.
i make saturation -100 on the right to check values on works.
(if you work in clip studio or photoshop you can use correction layers to instantly check values when you work, like i did in my sea fairy speedpaint)
and im instantly hit with the fact that theres no atmosphere, no depth, no main point to focus on.i MAYBE checked on the values back then, but i ignored them (”wow who needs to know what it looks like in grayscale”). color pallete could be made more interesting too. theres nothing appealing.
i have some more paintings, but the problems are pretty much the same. i didnt know how to start, i didnt know what am i doing, etc. but its ok. we all figure things out as we go.
heres what my process is like now based on my recent paintings.
you can start with nothing, but if you want to, you can have a plan.
i didnt have a color idea when i started working on the colors (only lineart), so did lots of color dumping on the same layer to figure out the atmosphere of the finished piece and only polished it later.
it isnt the exact picture from my process, but its similar to what i did.
sometimes its nice to get random, so i mixed some random images together and started working out the colors on top of them. it gives you a START if you’re afraid of doing anything in the beginning like me.
at least that how i do it sometimes (i first saw it when i was watching speedpaints of backgrounds, artists were mixing different images together), you can have an entirely different progress yourself. the method i did doesnt suit everybody but maybe youll like it if youll try it. (try different things to find what clicks with you)
(a picture from my actual progress, but after i figured out the colors i wanted.)
i constantly check how it looks like in black & white to make sure it works alright.
i zoom out the thing to make sure it works.(right corner) if it aint working from such distance, it probably aint working when i zoom in.
and again, i was checking a lot how it looks in black and white. probably could’ve done things a bit better with this one in some places, but oh well. it looks pretty ok anyways and i did most of the things i wanted to do so im not disappointed.
(its ok if painting something is going well you can go back to it later and repaint it. not being afraid to go back to square one is something i need too.
its what i did with bowser jr in that pic since painting him wasnt going too well)
my sea fairy piece is pretty similar. this time i did the general color sketch! (i had a very clear idea of what i wanted the colors to be. i got an idea while watching bob ross’ seaside harmony painting episode) i liked it so much i decided to make a full piece based on it.
now the sketches for this werent exactly small but i did actually do them with my screen zoomed out a bit so i dont, again, get worked up with details.
most of my process you can see in the speedpaint.
messy color analysis of my sea fairy piece:
its simple and nice in my opinion.
my painting process isnt always as neat (lol) and clear as above
sometimes i just go and do whatever and maybe use basic principles. heres my color practice with wizard cookie
(again, purple and yellow, they’re just the main colors in this one. azure color is the brightest part and its yellow and purple that create the relationship here imo.)
i honestly use only a few brushes im comfortable with, usually. i use what feels comfortable the most for almost everything
things that you could check out;
Color and Light: A Guide for the Realist Painter (James Gurney)
Schoolism - Digital Painting with Craig Mullins (love these)
Schoolism - Designing with Color and Light with Nathan Fowkes (this 2)
(im a lucky poor bastard who torrented their schoolism classes www)
Marco Bucci - Painting Tutorials / Demos
“Simple value mistakes students make”
Art Fundamentals: Values
Art Fundamentals: Color Theory
Sketching
and i love this artist so im gonna dump their things here - 1 ; 2 ; 3
“flow and rhythm”
“lighting”
“choosing colors”
“placing figures in space”
a series of composition tips
Full Landscape Painting Master Study - Mindset & Technique - Things You Never See in Art Tutorials
Lighting 101: Direction of Light(its mostly about filmmaking but it could be useful)
DIGITAL PAINTING: Understanding values
3 Tips for Digital Painting Beginners
How I Make A Landscape: Concept Art Process
take your time with everything, dont overwhelm yourself and blame yourself for not getting things right away
thats all i can offer bye hope this was an ok answer xoxo
699 notes
·
View notes
Text
Redrew one of Noelle's sprites!
121 notes
·
View notes
Photo
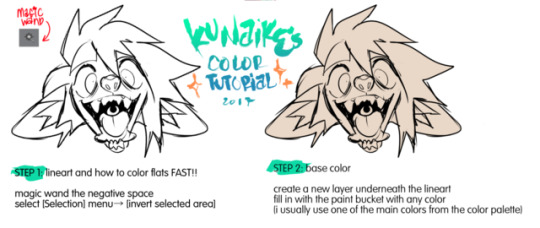


cross posting this from my twitter!
i finally got around to showing my coloring process so i hope this will help anyone out! this was made in clip studio paint but you can do everything shown here in sai or photoshop as well
780 notes
·
View notes
Text
Ten questions to ask a friend who just read your novel
Here are ten questions to ask that will not put your friend in a tough spot, but will still give you some useful input on your novel:
1. At what point did you feel like “Ah, now the story has really begun!”
2. What were the points where you found yourself skimming?
3. Which setting in the book was clearest to you as you were reading it? Which do you remember the best?
4. Which character would you most like to meet and get to know?
5. What was the most suspenseful moment in the book?
6. If you had to pick one character to get rid of, who would you axe?
7. Was there a situation in the novel that reminded you of something in your own life?
8. Where did you stop reading, the first time you cracked open the manuscript? (Can show you where your first dull part is, and help you fix your pacing.)
9. What was the last book you read, before this? And what did you think of it? (This can put their comments in context in surprising ways, when you find out what their general interests are. It might surprise you.)
10. Finish this sentence: “I kept reading because…”
Your friend is probably still going to tell you, “It was good!” However, if you can ask any specific questions, and read between the lines, you can still get some helpful information out of even the most well-meaning reader.
Source: Examiner
50K notes
·
View notes
Photo
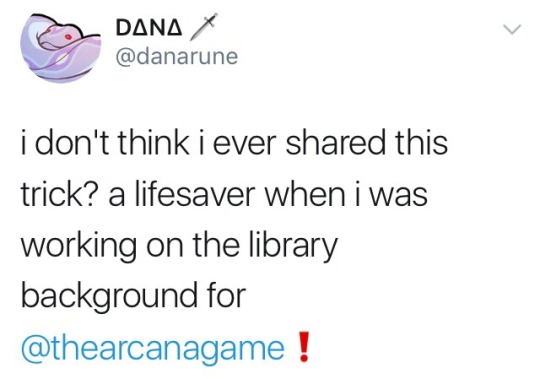

Library books art hack by @danarune on Twitter
132K notes
·
View notes
Photo


Was getting some of my images ready to be made into prints today so I thought I’d make a guide for anyone else interested in making prints of their work :D
28K notes
·
View notes
Note
how do you choose colors? they look so nice ... :0
(hmm now that im putting this all into words. its very complicated.. I feel like there is so much more to say under each section :--o)
and I also just started doing this technique very recently, its usually a bit different but this one is fun to share. Please note that this is just my personal method and may not apply to everyone. The effect of this method specifically tend to make things look super dramatic and artistic which should be applied situationally.
The first step is just lay out out the base colours. Theres already a lot to this step since its not the point of this showcase its just one step (gold is the main colour here so the green of the stem is yellowish in order for it to blend better with the petals and ground. The light in the BG is bluish so that it contrasts w the warm colours. this ends up resembling one of those Y palettes you see in tutorials. Its very intuitive at this point for me. and I just slapped a multiply shading layer because i wanted to. )

Next I would Identify the focal point. where do I want people to look when they first see this image? Here it is the area near Floweys face. In order to draw attention there, I select the colour chunks near his face and use an airbrush to replace it with a more saturated colour. And as you may notice I also painted the surrounding area on the ground with a more grayish colour.

Now Ill do the similar thing except with tone. Ill turn the image greyscale and try and figure out if there is anything hindering the subjects ability to stand out. (theres a couple ways to do this that i forget... But setting a white layer to Color Mode will do the trick).
I want Floweys head to be more visible against the background so I change it to a darker colour. I make the base of the shadow darker to merge it with the stem and make it less distracting. I make the top of the stem darker so that its visible against the BG. I make Floweys face brighter to highlight it.


(B&W and Coloured version of the Before -> After)
This last part is kind of silly and its just when I start beating the art with a stick. I will create a layer with a random colour and put it on every different blending mode to see what happens. I will send it to myself back and forth between devices to spot errors and put phone filters on it. Ill use the “auto color” option in photoshop to see what happens. And I will mix and match all of these to see if I can get a better result. Sometimes it does nothing and sometimes it helps a lot haha. Here is the final pic.

293 notes
·
View notes


Note
Hey, if you're still willing to make it, I'd be interested in the RPGmaker MV tutorial (please)! (Always been curious to use it, but I know absolutely nothing about game dev...)
OK OK OK SO.
This tutorial technically applies to all RPGmaker versions, but I’m using MV so maybe it doesnt apply 1 to 1. I have MV because I got it when it was on sale, but as a rule I think you should get the newest one (right now it’s MZ)!
RPGmaker actually has a tutorial that’s inside the software itself! I highly recommend going through it and making a test project to remember the different things... But mostly imo as long as you understand switches and variables you’re all good. This tutorial will probably make WAY more sense if you went thru the tutorial already.
(also this is... less a tutorial and more “things i wish someone wouldve written down in an easier spot to find” lol)
A QUICK EXPLANATION ON SWITCHES AND VARIABLES
To take START AGAIN as an example, when you use a crest and the tears disappear, using the crest makes the “Tears1Gone” switch go from OFF to ON. The tears themselves have a second page where if Tears1Gone is ON, then the tears aren’t here anymore.
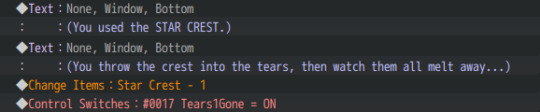

For variables, they can be anything but i only used them as numbers. So for the barrels, every loop the “BarrelCheck” variable starts at 0, and every time you check a barrel the “BarrelCheck” variable goes up by one. If you check barrels a lot there’s different events, like siffrin thinking that the people of the house must rly like nuts, right? For that, I have a conditional branch that pretty much goes “if BarrelCheck=5, then event is “wow they rly like nuts”“, “if BarrelCheck=12 then another event happens”, “else just the usual dialogue.”
Here’s a tiny bit of how it looks like in practice! The tutorial might explain it better. It took me a little bit to understand how to even use it lol

as for event pages also: REMEMBER PAGE PRIORITY GOES FROM LEFT (least priority) TO RIGHT (the prioritest). So if an event you’ve added doesn’t start it may be because the page order you made is wrong.
OK NOW THE PARTS THE TUTORIAL DOESNT TELL YOU
P L U G I N S. USE THEM. THEY WILL SAVE YOU SO MUCH TIME.
Plugins are pretty much little bits of programming that you can add to your project to change your game. It’s pretty useful if you know how to program, but if you’re like me, it is REALLY USEFUL because there’s a lot of really talented people doing some great plugins out there. (iirc rpgmaker ace uses “scripts” instead of plugins.) Plugins in MV are .js files! To add them to your game, drop the js file into your project’s folder>js, and then in rpgmaker go to tools>plugin manager, and select the file through here. I am writing this down because it took me a good long while to find out.
As for great plugins, i CANNOT recommend yanfly’s enough. They have a bundle of their whole library for 30$ and imo it is a MUST BUY. Other notable plugin makers are GALV, Himeworks and moghunter. Also if you got rpgmaker’s dlc there’s plugins in your rpgmaker local folder. Took me months to even realize.
A few more things about plugins:
-if you use a plugin, CREDIT THE MAKER!!! I recommend making a list of the plugins youre using along with the creator’s terms of use-- some might be fine with just being credited, but some might ask for you to contact them first. Some of those plugins might be a few years old and you might not be able to contact the creator-- on my end I tried to leave a comment somewhere on their website at least.
-some dont play nice with one another and might create bugs! Sometimes it’s just a matter of reordering them in the plugin manager (higher plugins take priority or smg? usually plugins tell you where to place them, like “put this one at the top so it doesnt break stuff”).
-usually if i had like something i wanted to do in rpgmaker (like... having a visible hp bar for enemies) i’d just type “hp bar enemies rpgmaker” on google and it usually did the trick. rpgmakercentral is a great ressource
-If you get a bug theres a 90% chance it’s because of your plugins. In that case the fastest way to find out which one is to turn off all your plugins and turn them on one by one until the bug happens. then you have found The Culprit and can act appropriately
MEMORY
Um when youre maybe 40% done you should play your game with the task manager open so you can see how much memory your game uses. As a reference I think mine runs around 300-500MB, which is fine and works on most computers. (i think omori is 600MB?) You should do this just in case because you might find out your game runs at upwards of, uh, 3 gigabites of memory or something. It is absolutely not something that happened to me. No siree. It definitely hasnt happened because I added a glitch animation effect to every single torch in the game and it caused the game to leak memory like crazy. anyway. check the memory at some point
PIXEL ART
pixel art and tilesets in rpgmaker is hell i have blocked it out. Look it up yourself and struggle along. Using the already existing tilesets as a base was very useful. Or just buy some tilesets online and save yourself time
SKILLS AND GAME BALANCING AND STUFF
heres a few ressources i found useful~
-damage formulas 101
-skills: what you’re doing wrong
-making a balanced game
-how to balance an RPG: or, how to not make your game feel completely broken, unless that's how you want it to feel
-yanfly’s “let’s make a game” comics
-studio zevere’s map design timelapse
-another map design timelapse
CREDITING
Credit every ressource that isn’t yours. Can be from icons you found on itchio to plugins to sound effects you found on a website. The standard seems to be credits inside the game (whether as a choice in the menu or at the end), and a credits text file inside your game folder. I personally added each person’s website so if you need ressources just look there lol
EXPORTING THE GAME
dont fucking export as mac don’t do it it’s hell if you have a mac and its actually impossible to export to mac if you have a pc. I got lucky enough to have a friend who both possessed a mac AND rpgmaker MV. But it still has problems and even some industry ppl told me “lmao you made a mac version I would NEVER” so just save yourself time and don’t export to mac. Exporting to PC is pretty self explanatory
THE CREATOR BRAIN ZONE
Making a game is hard. But it can also be extremely fun. But also it’s haaaaaard!!! How do I even make a gaaaaaame!!!
Play games that you love again. Take notes. Notice the very small parts about a game that make it incredibly easier to play. Add that to your game. As an example: i played the great ace attorney as I was making the prologue. AND. did you know the dialogue in ace attorney has a very slight pause at every comma or semi colon, and a longer pause after periods or exclamation points and stuff. Did you notice. Are you losing your goshdarn mind over it now. Well someone made a plugin to reproduce that so go say thanks
also you WILL hate your game at some point. and at that point you gotta push through it and tell yourself “well. if i hate it. maybe i should just. make it better” and add like a cheesy scene about people eating snacks. works every time
anyway in general just analyze why you love/hate video games and add that to your game. just be extremely annoying about it. Like i just LOVE flavor text in games so I added it EVERYWHERE. Did i get worried it was gonna get annoying? Yes. Did a lot of people really like the flavor text anyway? Also yes. Make a game you’d love to play and it might click with people. Also what would be the point of making a game you don’t like to play??? NONE!!! SO BE AS SELF-INDULGENT AS POSSIBLE, GODDAMMIT!!!!!!!
also make a devlog post every two weeks with what you did in the last few days so you can see how far you’ve come later lol
thats it thank you i hope this was somewhat useful
893 notes
·
View notes
Text

Megumi and Nue
15 notes
·
View notes
Text

My demon boy OC and some pixel art practice with him!
#art tag#ciocelle#digital art#digital painting#illustration#oc#ocs#character design#dotsu#my trash tier summon is humanitys last hope#mttsihlh#sketches#pixel#pixel art#webcomic
2 notes
·
View notes
Text
everyone in ksbd, including the lore text: okay so that whole thing about how royalty is a continuous cutting motion is more of a metaphor or parable than a literal statement. the important thing to take away is that through decisive, determined action, one can and must shape themself and the world around th
jagganoth: SORRY, WHAT WAS THAT? I CAN'T HEAR YOU OVER THE SOUND OF MY HUGE FUCKING GREATSWORD RENDING THE SHIT OUT OF SPACETIME
153 notes
·
View notes
Photo

OC sketch dump!
#art tag#ciocelle#digital art#digital painting#illustration#AlternativeMoon#OC#ocs#character design#Eden AM#Adrianne AM#webcomic#sketches
0 notes
Photo

Recently caught up on My Hero, so here’s some Toga
22 notes
·
View notes
Note
you said i could ask more, and that i shall! how do you decide on room composition? we have seen a few recurring places, but especially with new settings (like the current setting of the opera house) do you have a floor plan or anything of the like? your spaces always feel *lived in*, rather than just a box for the characters to be in, which is so so cool! :D
Yooo what a great question, and thank you for the kind words!
I used to be super scared of drawing environments, but that (mostly) changed when I started getting a grip on how to use Google SketchUp. It’s a 3D modelling software that I use together with the website 3D Warehouse, where people can post models they make. Basically, I create a 3D environment for any location that appears often, is very complicated, or needs to be shown from various angles.
This process mostly involves finding existing models on 3D Warehouse and modifying them, combining them or otherwise editing them until they’re something new. People tend to see this kinda method as ‘cheating’, I think, but it’s undeniable that practice and skill are required for your models to actually look good, both by themselves and on the page.
So for example, this is what the Shadery model looked like around 2015:

And this is what it looks like now:
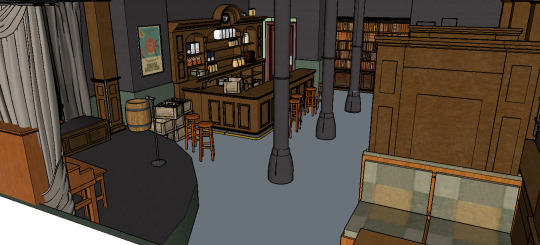
This model in particular took me ages to put together, but I felt that it was worth it because the Shadery is such a central location in the comic, and as a rule I tend not to change it until the act is over and I can justify the change with ‘some time passed and they renovated’, or something like that.
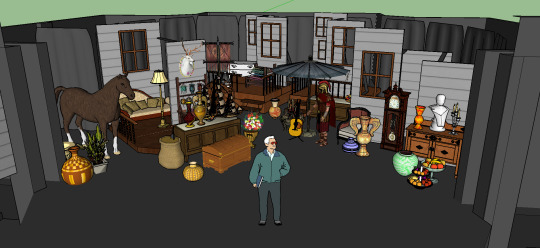
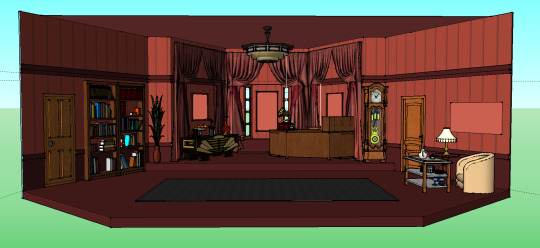
Now that I’m more comfortable with 3D modeling (as you can see from the comparison, yikes) I’ve started playing around with more creative decisions and taking some artistic liberties. An example of this would be the environments for the current opera heist - all of which are based on, and designed as, theatre sets:
Aida Laghari’s dressing room (the old man has been nicknamed Ezra and is usually around for scale):

Prop storage room:
Adelvirt Faunet’s office:
I hope this answers your question! I personally really enjoy putting models like these together, and I believe it is a sort of art in itself. It definitely helped me get over my fear of drawing backgrounds, so I recommend it if you’re struggling!
-Alex
45 notes
·
View notes