charliecraftsthings
Charlie Crafts Things
Awesome crocheted hats, amigurumi, and garments; project bags; calligraphy; wire and bead jewellery.
Sometimes other stuff, too.
254 posts
Don't wanna be here? Send us removal request.
Last Seen Blogs
tolive-forever
indigo

nothenemy-blog
For the weight conscious
howtfdidthishappen
Art Things


ace-and-the-rpg-horrors
my personality is pandemonium
Text

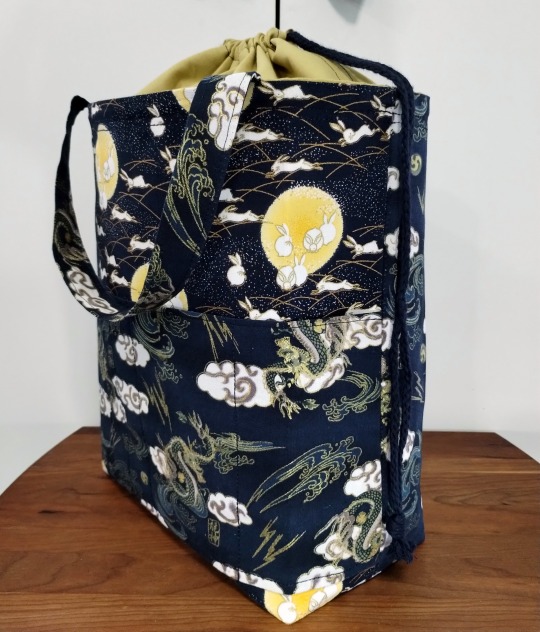
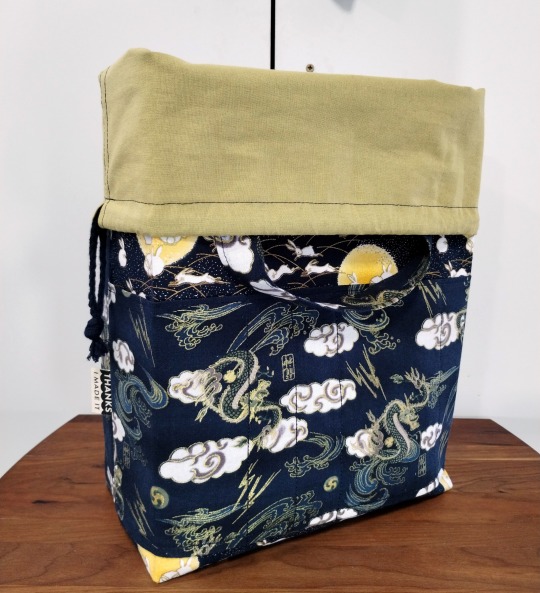

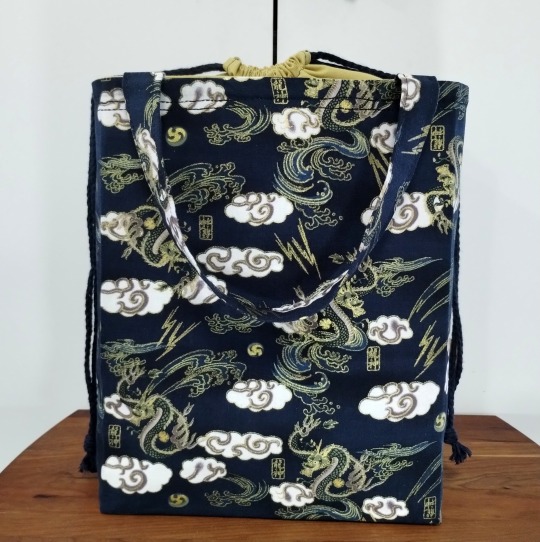
I found these Chinese prints of dragons and rabbits, and knew I had to combine them somehow in a bag!
I wanted to have the symbolism of Dragon overtaking Rabbit, but I'm not sure that came through (the dragon print pocket over the rabbit print background). The whole design is rather busy. I may try to do this again, but choose some solid fabrics to increase the contrast.
Pattern: “Marta” drawstring bag by BurgioPatterns, made in the larger size.
#sewing#project bag#Marta drawstring bag#sewing finished object#drawstring bag#machine sewing#bag 10#crochet project bag#knitting project bag#Year of the Dragon#Chinese New Year#Chinese Zodiac
0 notes
Text
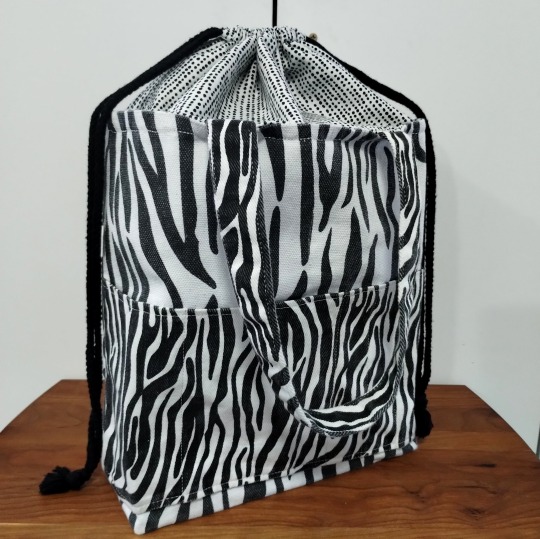
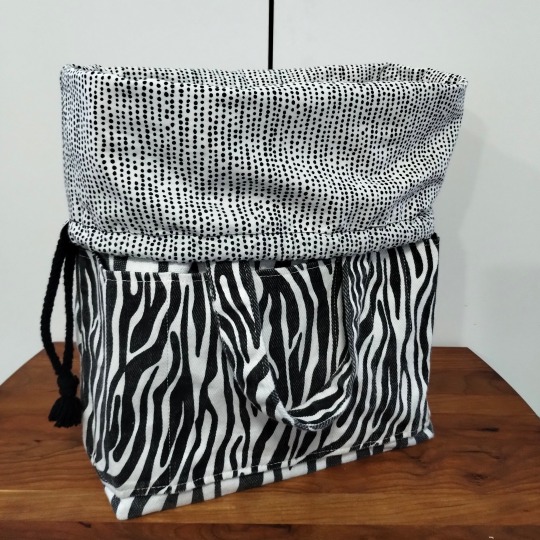
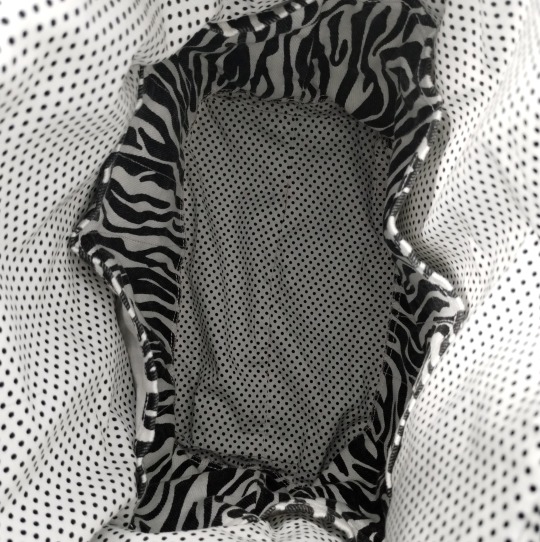
Latest "Marta" drawstring bag, in a zebra print fabric for my best friend who is a zebra spoonie.
I wanted to attach some spoon charms somehow, but I'm not sure how to do so in a way that makes sense? Maybe if I add a ribbon and lobster clasp (for keeping a pair of scissors), I can attach a spoon charm somehow there...
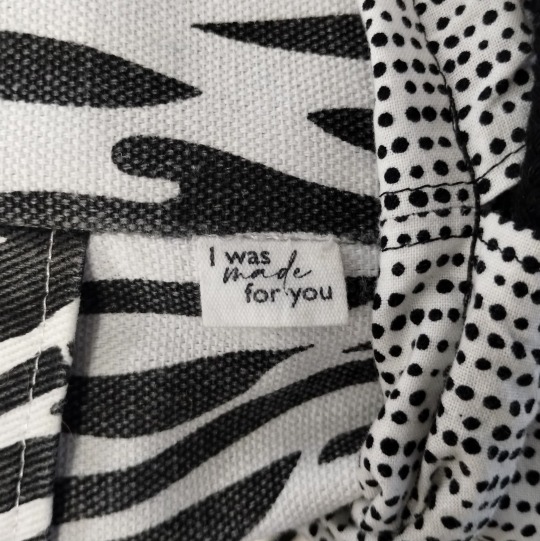
The label (by Intensely Distracted) reads "I was made for you," on the front, and, "and only you," on the back--which I didn't realise when I attached it. (Had I noticed this, I would have attached it under the pocket--I'm not keen on the exclusivity of this statement.)
Looking at all these black and white fabrics made me a little dizzy! But I think the bag turned out quite nicely.
#sewing#project bag#Marta drawstring bag#sewing finished object#drawstring bag#machine sewing#bag 9#crochet project bag#knitting project bag#zebra spoonie#zebra pattern#zebra fabric#zebra bag
1 note
·
View note
Text
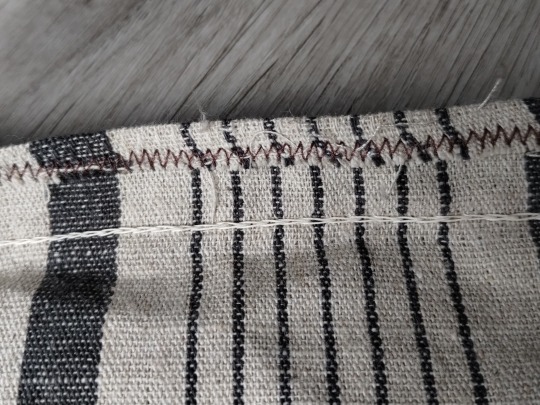
I'm learning to machine-sew jersey knit fabric. I hate it.
Below is a zig-zag stitch on woven (light fabric) and again on jersey knit (darker fabric). Look at all those skipped stitches (the horizontal lines)!

I heard that using a strip of tissue paper can help, so I tried it:

It helped a bit!
I ended up making some "t-shirt yarn" by cutting my scraps into strips, then sewing the strips together:
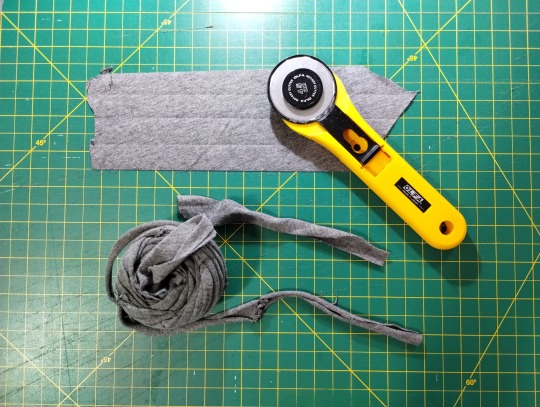

Making t-shirt yarn and crocheting with it has got to be one of the least efficient hobbies out there.
#machine sewing#sewing knit#t shirt yarn#sewing apparel#sewing garments#sewing jersey#tshirt yarn#crochet#crocheting#least efficient hobby
2 notes
·
View notes
Text

Last month, I applied to sell work at the Manitoba Crafts Museum and Library (Centre for Craft) museum shop! This was my first time applying as a vendor, and I was pleasantly surprised at how well it went! The centre accepted eight of my pieces to sell in the shop!
You can find my work under the "Textiles" section, or by searching for "Charlie" :)
(Note: I did not take these product photos.)
#for sale#crochet#hats#accessories#crocheted hat#crocheted cowl#witch hat#toque#neckwarmer#Manitoba Crafts Museum#Centre for Craft#made in manitoba
2 notes
·
View notes
Text
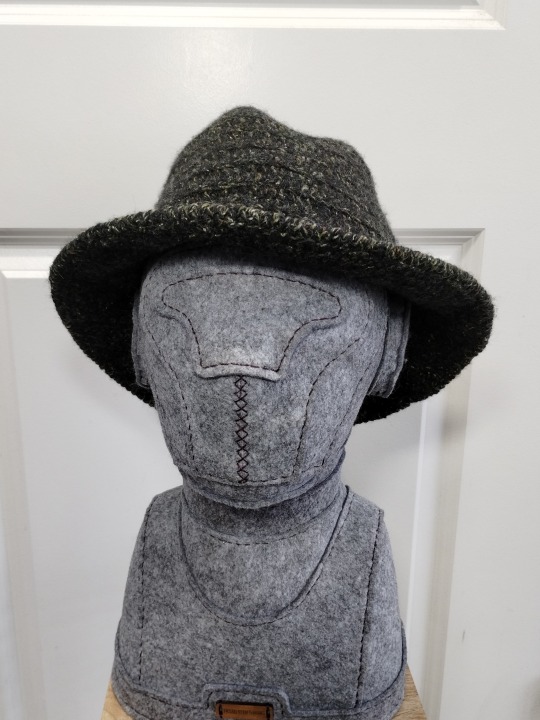
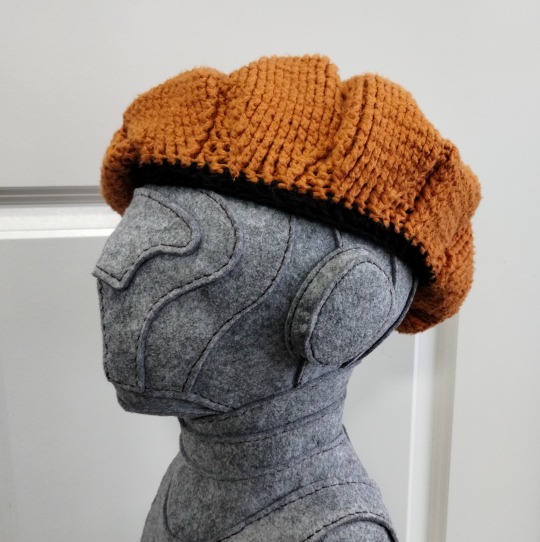
Another Hats Appreciation Post
Here is my mannequin head showing off some more hats I've made! Some of these will be available for sale at the Centre for Craft shop shortly!
Woolly witch hat:


Various berets/tams:


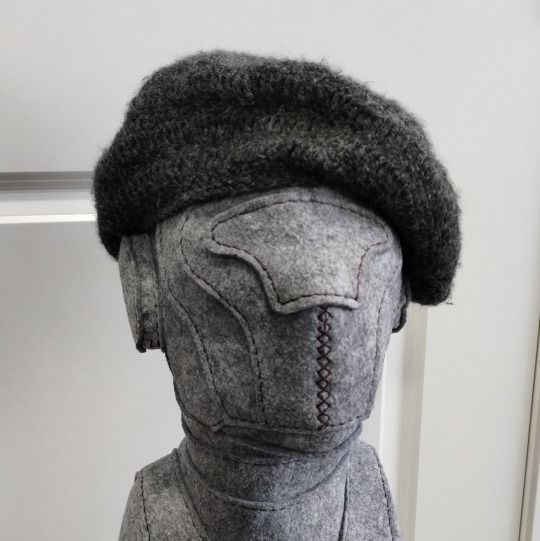


Felted rain cloche with pointed tip:

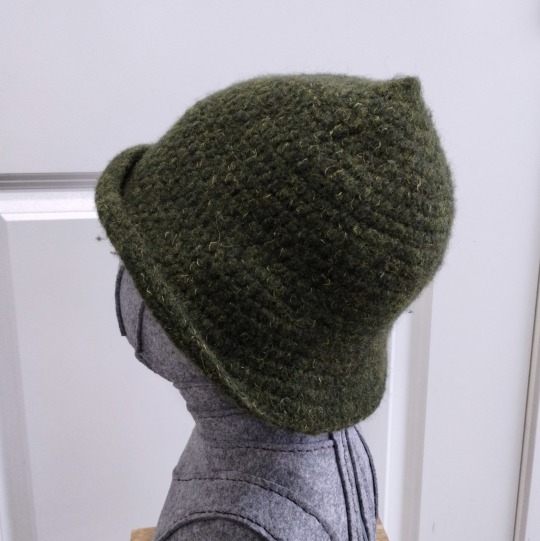
And a dual-layer lightly-felted neck warmer:
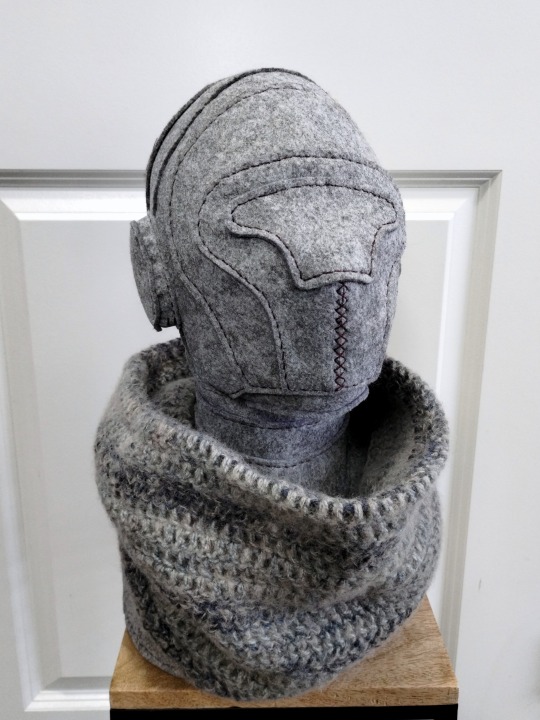

#crochet#mannequin head#crocheted hat#crocheted hats#for sale#felted crocheted hat#beret#berets#tam#tams#accessories#hat appreciation post#cloche#rain hat#neck warmer#neckwarmer#neck cowl
2 notes
·
View notes
Text
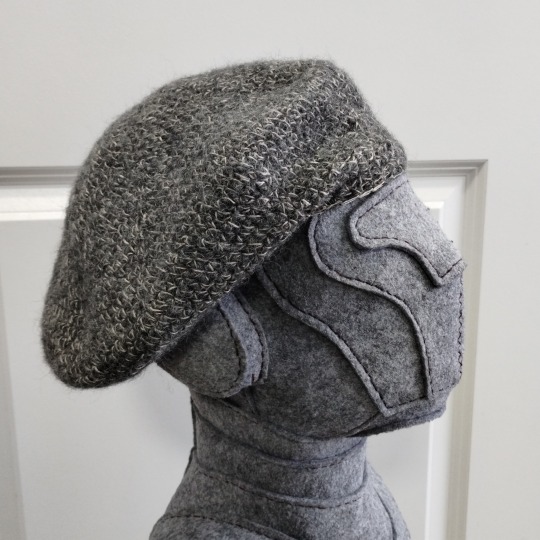
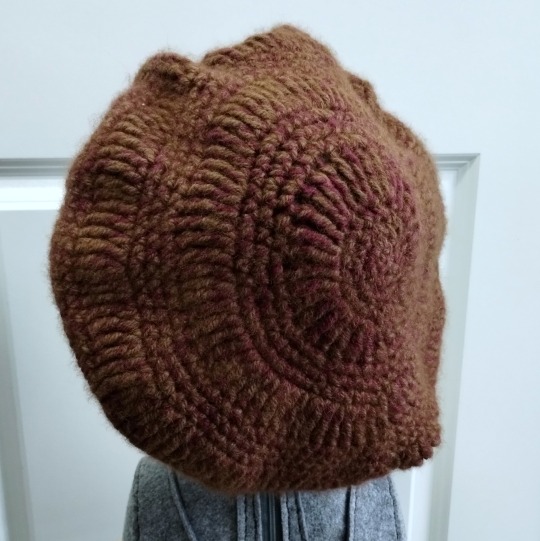
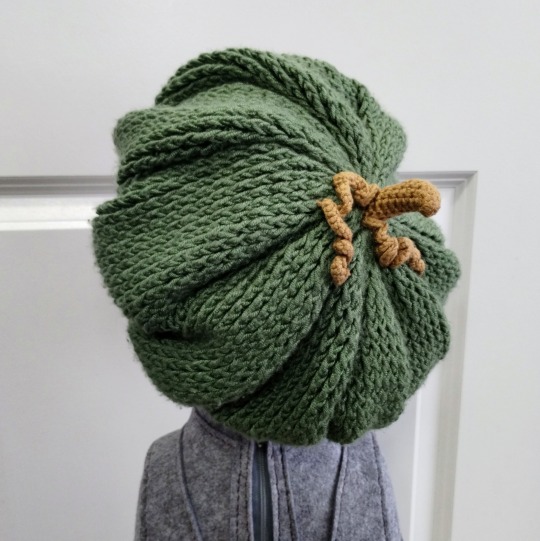
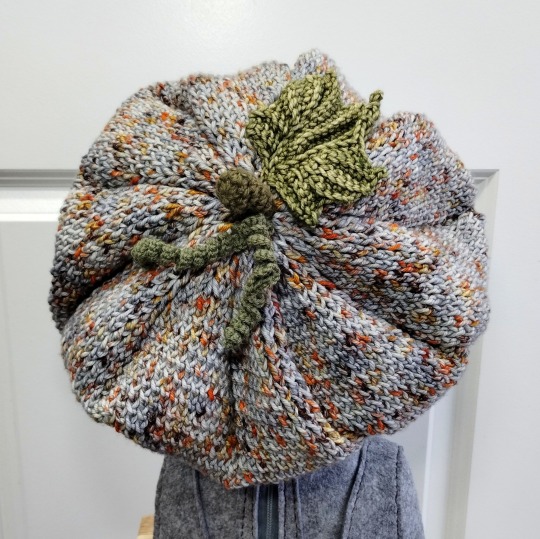
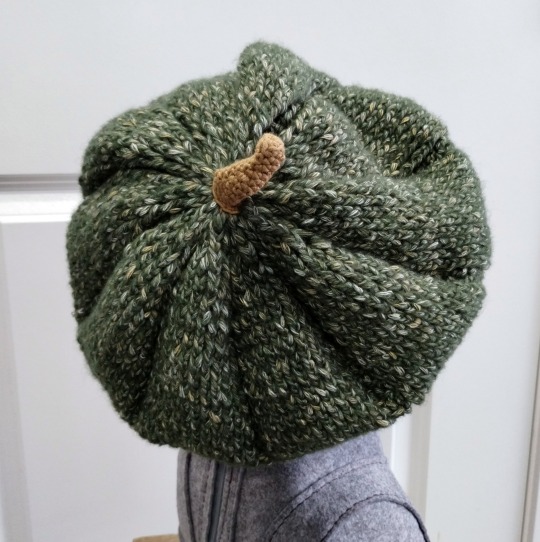
Pumpkin Berets Appreciation Post
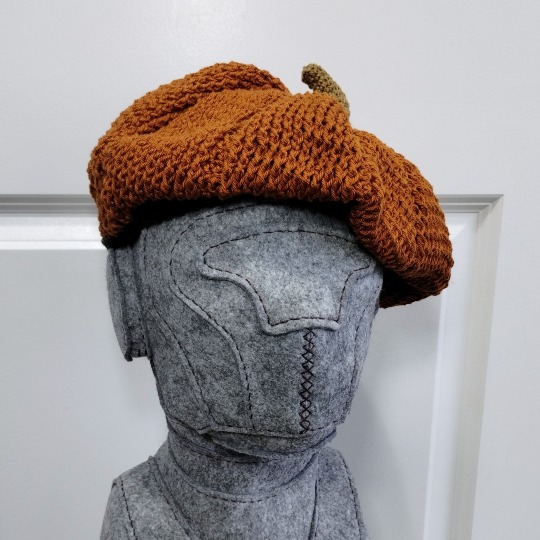


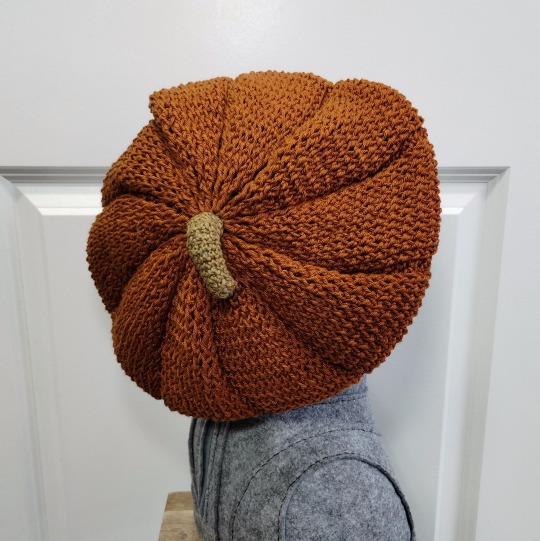
I recently took more photos of my crochet work as part of an application. I'm so pleased to be able to put this mannequin head to use! Some of these are for sale; contact me for more information.
Here's an older green pumpkin beret:


Newer grey-mix pumpkin beret:


Orange cotton pumpkin beret:


Green-tweed pumpkin beret:

#pumpkin beret#crochet#mannequin head#hat#for sale#crocheted hat#crochet beret#crocheted hats#hats#beret#berets#pumpkin everything#pumpkin hat#pumpkin hats#hat appreciation post#pumpkin appreciation post#pumpkin beret appreciation post
3 notes
·
View notes
Text

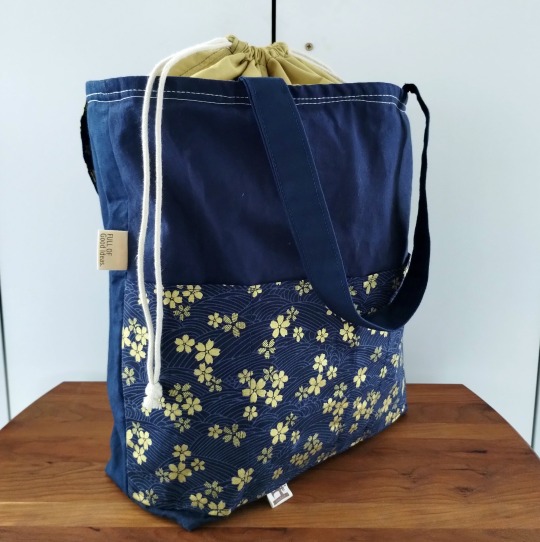


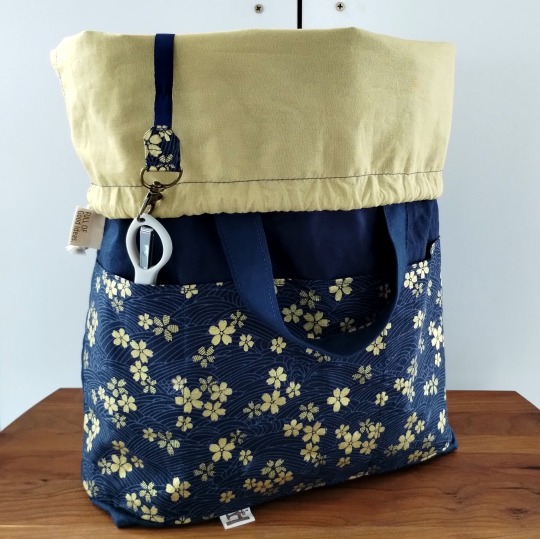
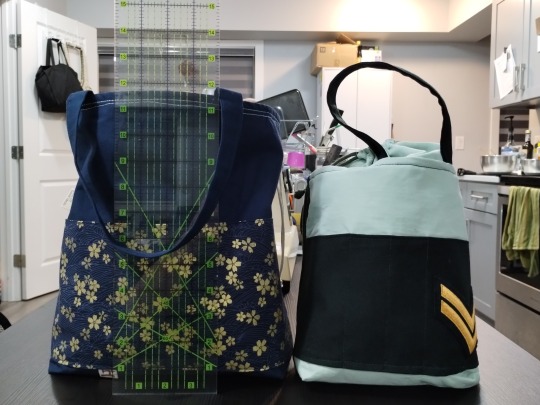
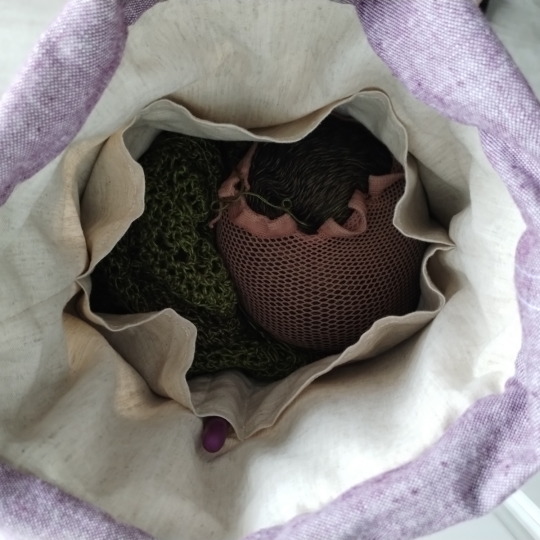
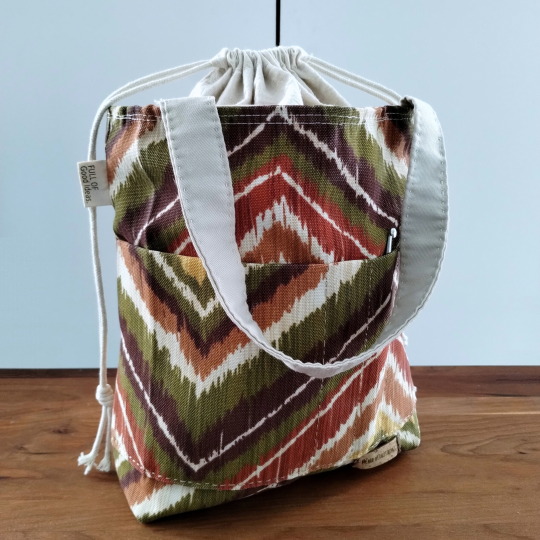
"Marta" drawstring bag (pattern by BurgioPatterns) in the larger size.
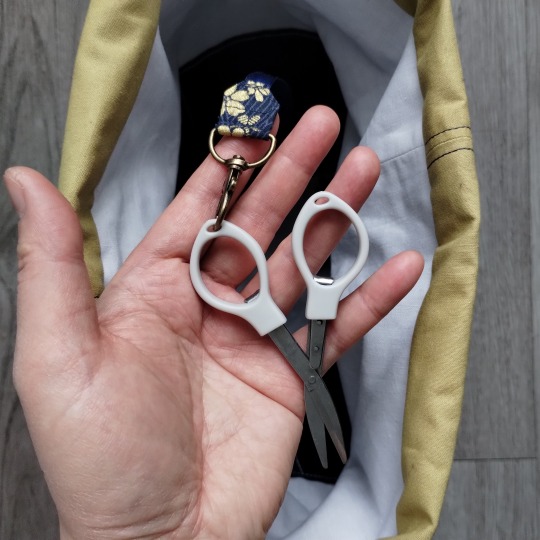
I'm extremely pleased with the fabrics I chose for this bag, and how they worked together. The main body is navy blue; accent pocket is a Japanese metallic bronze floral and blue wave print; drawstring channel is a sort of yellow that closely imitates the metallic print. On the side with the pocket, the handle is plain navy; on the other side, the handle uses the accent print. Inside, the lining is white, with the same navy for pockets. I also included a lobster clasp lanyard, to hold a pair of folding scissors.
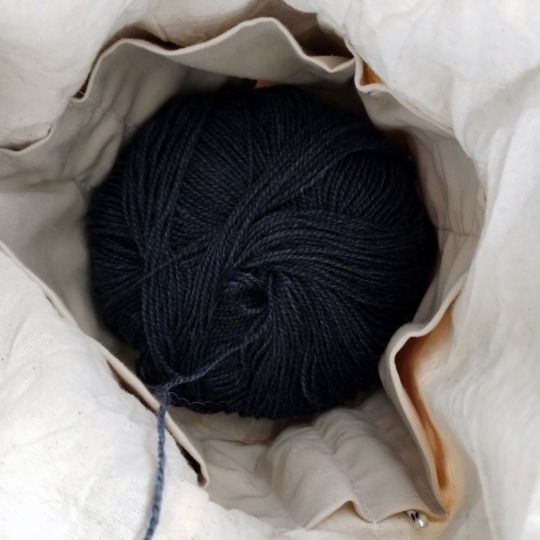
This bag is large enough for a me-sized sweater project. It comfortably holds this me-sized sport-weight sweater, for example:

I could probably fit a sweater, yarn, and tools in it. I'm not entirely convinced it could hold my partner's sweater, but he wears a 2XL-Tall.
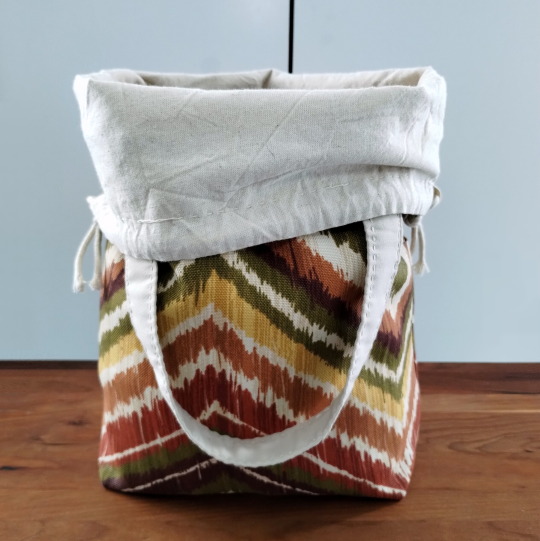
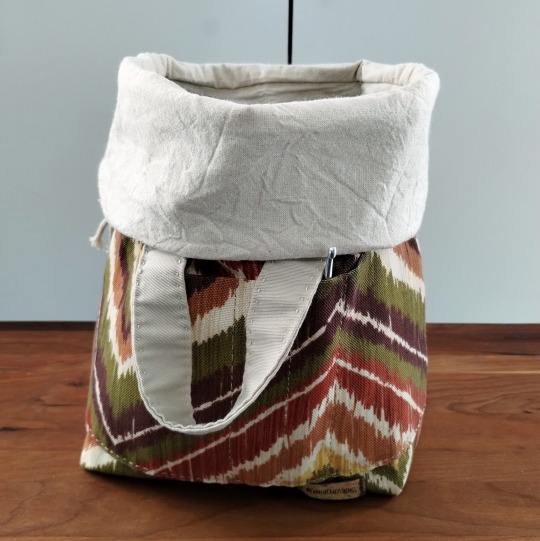
Size comparison with the Small after the break.
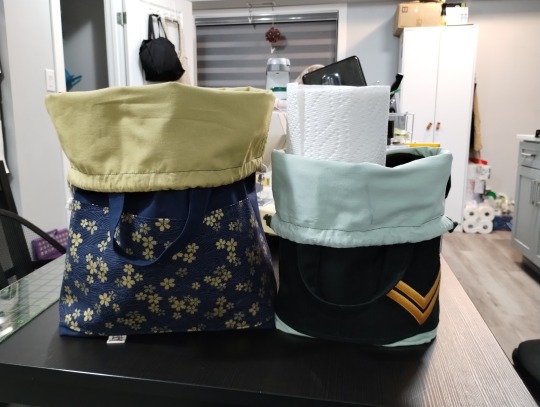
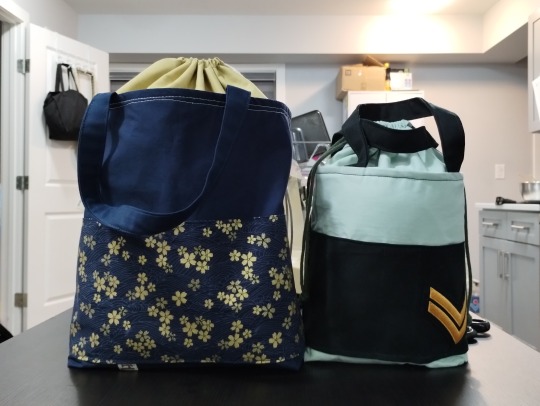
The Large could probably fit two paper towel rolls and close; the Small is wide enough for one inside, but not tall enough to close.
I'd say the Small is suitable for smaller projects that use 1-2 balls of yarn (eg: hats, socks, small shawls).
#sewing#project bag#Marta drawstring bag#sewing finished object#drawstring bag#machine sewing#bag 8#metallic fabric#Japanese fabric#crochet project bag#knitting project bag
1 note
·
View note
Text
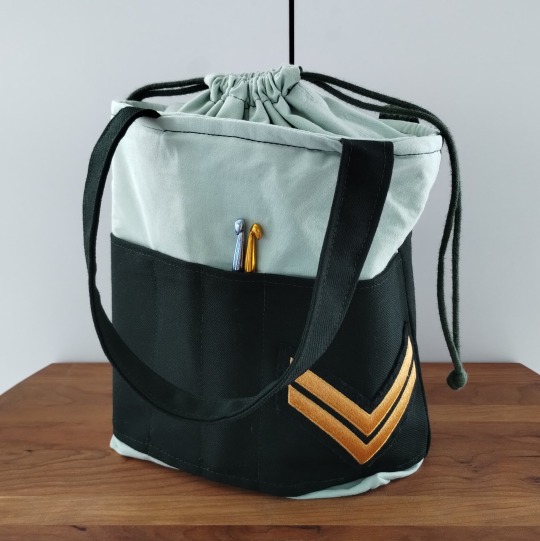
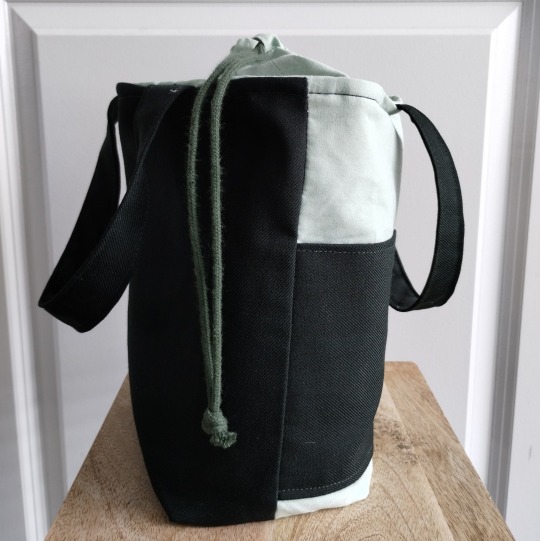
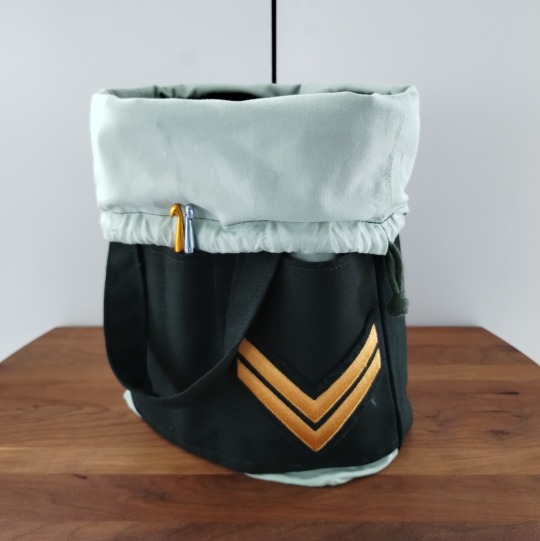
"Marta" drawstring bag (pattern by BurgioPatterns) in the smaller size.
Fabrics were (mostly) taken from parts of my old uniforms that I was allowed to keep: dark wool suiting, light green poly-cotton shirting, and the olive green cotton-poly jersey knit.
(The yellow-green cotton used on the interior pockets were purchased. But as I ironed it, I detected a familiar scent: this is what my rucksack smelled like! I always assumed it was just the smell of use: of sweat and the elements. But maybe it's just what the dye smells like! This association was not intentional!)
Drawstring is from salvaged paracord; tag is from pants that didn't fit me; rank insigna is for Corporal.
I released from the Canadian Armed Forces last year, after about 15 years in the Army Reserve. I made this bag partly as a keepsake, and a way to turn my retired uniform into something I will continue using.
#sewing#project bag#Marta drawstring bag#upcycled#sewing finished object#drawstring bag#machine sewing#bag 7#Army bag#upcycle#upcycled fabric#smells like rucksack#two hooks
1 note
·
View note
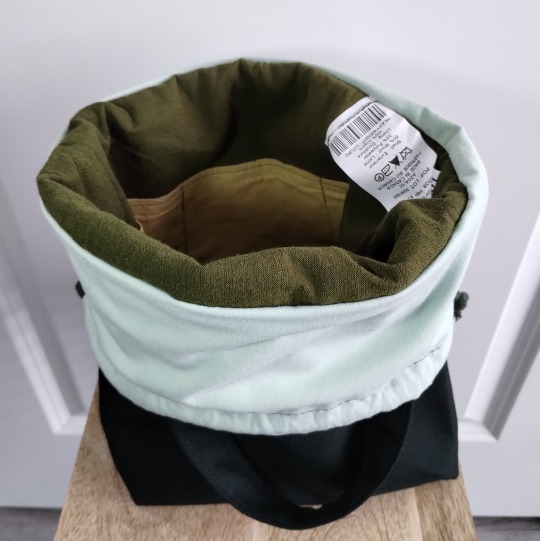
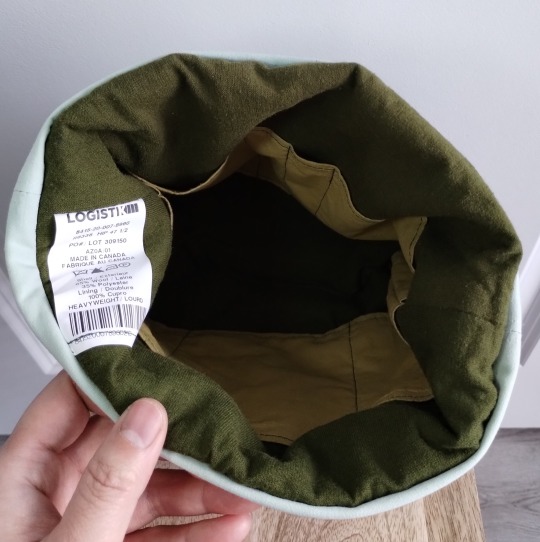
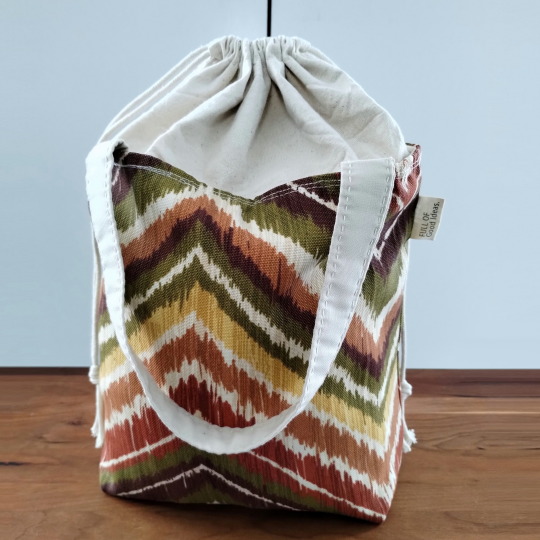
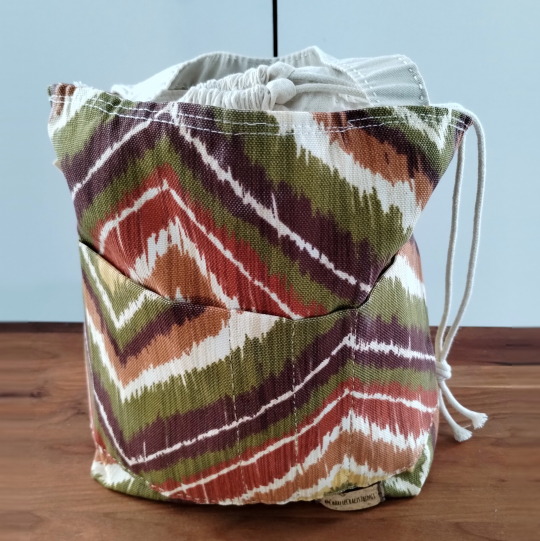
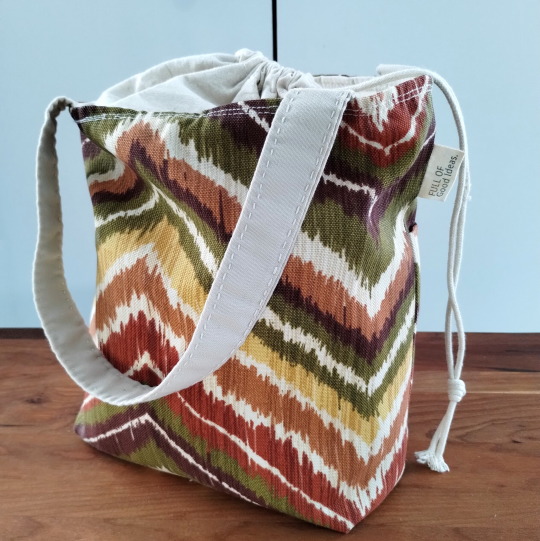
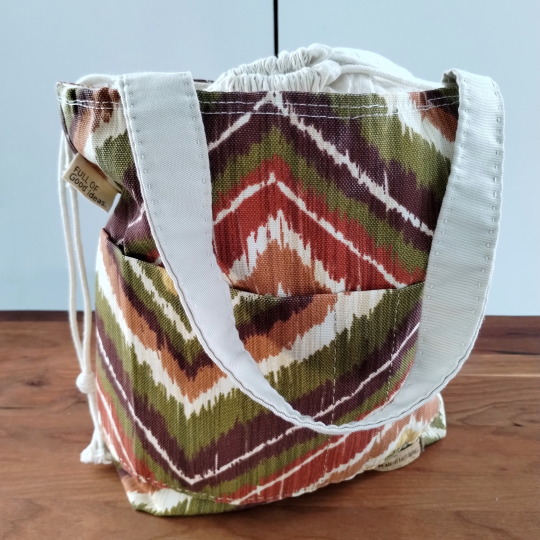
Text

"Marta" drawstring bag (pattern by BurgioPatterns) in the smaller size.
Tag on the side reads "Full of Good Ideas" (by Winnipeg Sews).
Most of this bag was painstakingly bussed between home and the downtown library's makerspace (IdeaMILL) so I could use their sewing machines. I eagerly watched YouTube videos on the long bus ride, learning how to thread the machine, adjust stitch length, etc. This was also my first time using fusible interfacing!
Things don't line up perfectly, some topstitching is absent because I forgot about it, and other imperfections... but I love it anyway!
#sewing#Marta drawstring bag#project bag#drawstring bag#machine sewing#bag 6#sewing finished object#purple#crocheting
3 notes
·
View notes
Text
My very dear friend loaned me her family's sewing machine. I have been using it every day since!
Getting it set up took only a little fiddling around, looking up manuals, and a sprinkling of YouTube autodidactism to solve my thread tension issues. But I got it working and have made several mediocre projects already! I even managed to make some good projects, too! But you'll see soon!

I am absolutely delighted to have a sewing machine in my home, and not have to bus to the library to sew!
4 notes
·
View notes
Text


Progress on my partner's sweater, Feb 2024.
The sleeves are nearly done.
I enjoying working sleeves first, especially when shaping/sizing for someone else! I can get all the fiddly measuring done, before moving onto the extremely repetitive body.
#DIL4#crochet#crocheting#sweater#pullover#done in love pullover#pullover wip#crochet wip#love sweater#crochet WIP#sweater gift
2 notes
·
View notes
Text
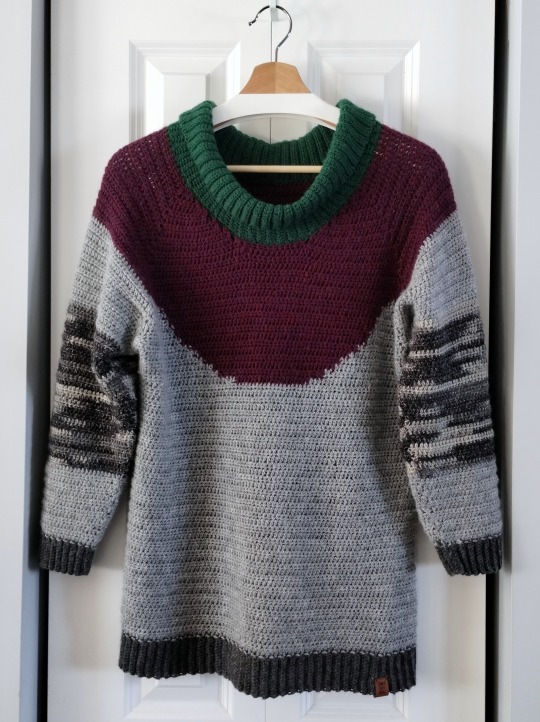
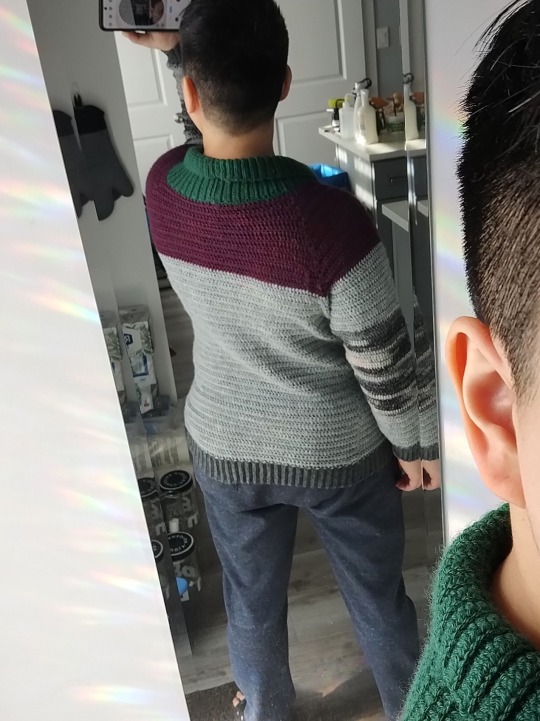

Pigeon Pullover, completed!
I am very pleased with how this turned out! It's very comfortable--I had worried about the mock neck getting in the way (which has been my experience with other garments), but this wasn't a problem! It's also just warm enough to keep off a chill, but cool enough I'm not overheating, even with a t-shirt underneath.
The self-striping sock yarn used to make the chequered wing pattern is toothier than the solid-coloured yarns. It's noticeable, but I don't think it's an issue.
Things I'd change next time:
figure out how to make a tighter mock neck
start the chequering sooner (higher)
round the purple yoke more; possibly start it sooner (end it higher)
Can't wait for Pigeon Pullover version 2!
#crochet#pigeon pullover#sweater#pigeon#crocheted sweater#pigeon sweater#Done In Love Pullover#DIL#crocheting#Done In Love#Doneinlovepullover#garments#all the sweaters#pullover#crochet sweater#birdbrain#birb sweater#finished object#mock neck
14 notes
·
View notes
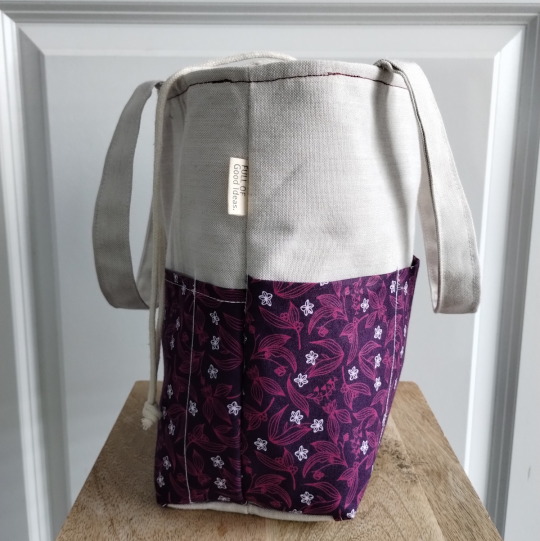
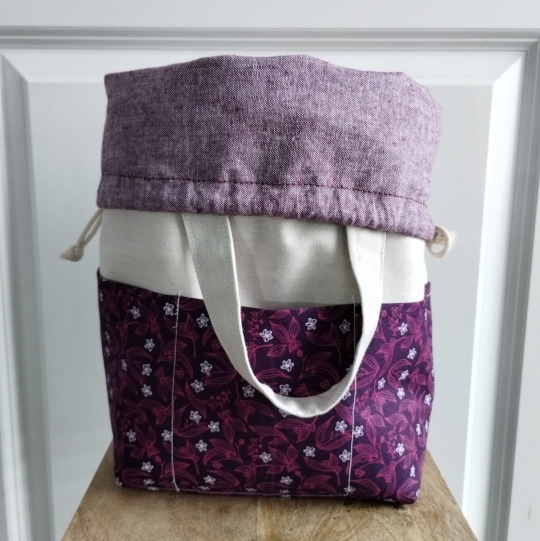
Text
"Marta" drawstring bag (pattern by BurgioPatterns) in the smaller size.
Fabrics were the cheapest I could find at the store: mostly bolt ends and muslin. The exterior fabric is some kind of synthetic (or blend) upholstery fabric.
Side label ("Full of Good Ideas") by Winnipeg Sews. Bottom label reads "@CharlieCraftsThings" (Instagram))
I probably started this bag in Spring of 2023, hand-sewing about 80% of it. I was almost finished--at the part where I attach the lining to the exterior--when I just got tired of hand-sewing! (To be fair, I was hand-sewing a lot of project bags by then!)
...Or maybe I stopped because the topology of turning the bag inside-out evaded me at the time... I strongly believe more sewists should teach topology, and/or more topologists should do sewing.
In any case, I procrastinated finishing the bag until very recently, when I used a sewing machine for the first time!
Finishing this bag went very quickly with a machine--though not necessarily tidily. There are puckers where the feed was irregular (or maybe I didn't measure things properly so the lining was a different size than the exterior), and my stitches aren't straight. But it's pretty not-bad for my first time at it!
I'm already working on a second. And a third. ...and maybe a fourth.
#sewing#finished object#project bag#drawstring bag#hand sewing#hand stitched#machine sewing#Marta drawstring bag#bag 5#sewing finished object
2 notes
·
View notes
Text


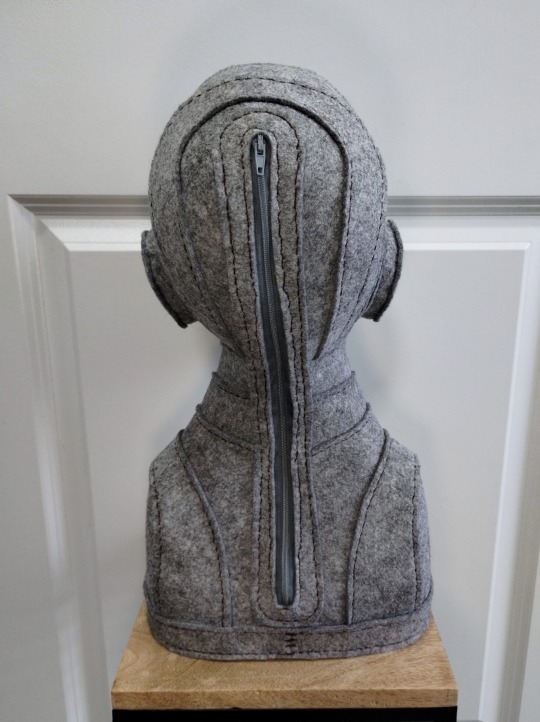


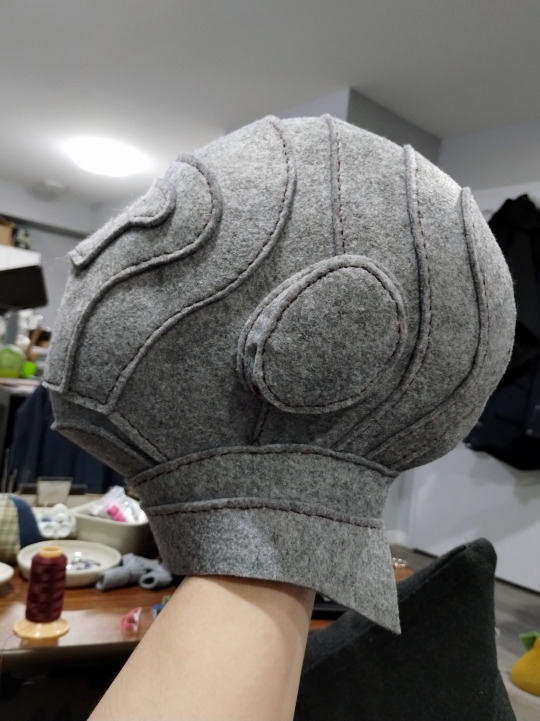
Mannequin head v1: construction finished!
I used Mod Podge for Fabric in a thin coat all over the exterior, and a thicker coat for areas that needed extra support (like the base). I also tried "Stiffen Stuff" fabric spray, but I'm not sure I noticed a difference (maybe I need to use more).
All that's left is to decide how I want to stuff the head. It takes quite a lot of stuffing, and I'm not thrilled about the idea of buying polyester fill, or even kapok or cotton. I've got lots of fabric scraps however!
I think I'll also make a little pillow full of rocks or something to weigh down the bottom.
The process of making this mannequin head was mostly enjoyable--though punching stiching holes in felt is the worst. I think chain stitching was a good compromise between the functionality and appearance of saddle stitch; but with less arse (and only one needle).
Overall, I'm very pleased with how this turned out! I may make another, for fun and/or practice. But I think I'm ready to try it with leather--after I get a second leather needle!
4 notes
·
View notes
Text

Pigeon pullover update.
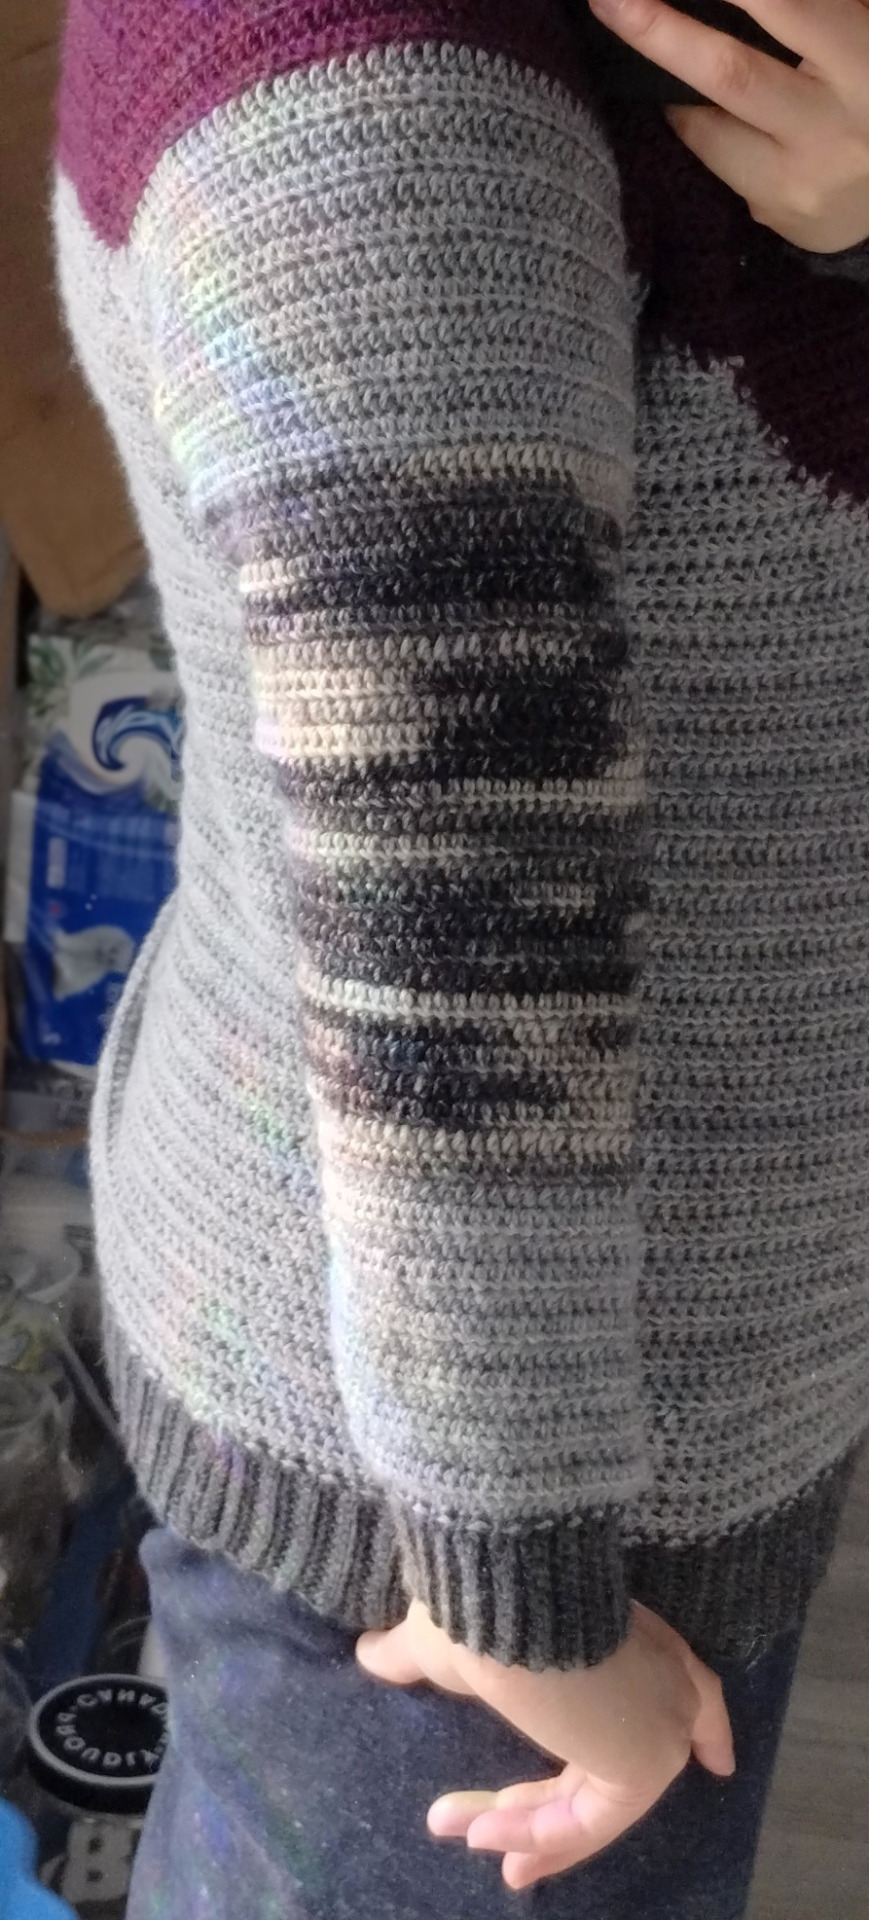
I decided to work sleeves first, in order to take advantage of a sale at my local yarn shop. I opted to use a self-striping sock yarn to imitate the chequered wing plumage:

It's not perfect, but I think it gives the impression without requiring a lot of effort on my part. So I think that's a win.
The greys aren't an exact match, and the yarns feel very different from each other. I'm not yet sure how I feel about this.

I also decided to round out the purple area on the front of the sweater:

The raglan construction makes a very rectangular yoke, which I hoped to avoid on the front. But I left the colour transition straight on the back in order to minimise the number of active yarn balls I needed at once (ie: laziness). But again: I think it's a good solution.
I am very excited to wear this in public and get odd looks from passersby!
#crochet#pigeon pullover#sweater#pigeon#crocheted sweater#pigeon sweater#Done In Love Pullover#DIL#crocheting#crochet WIP#Done In Love#Doneinlovepullover#garments#all the sweaters#pullover#WIP#crochet sweater#birdbrain#birb sweater
20 notes
·
View notes
Text
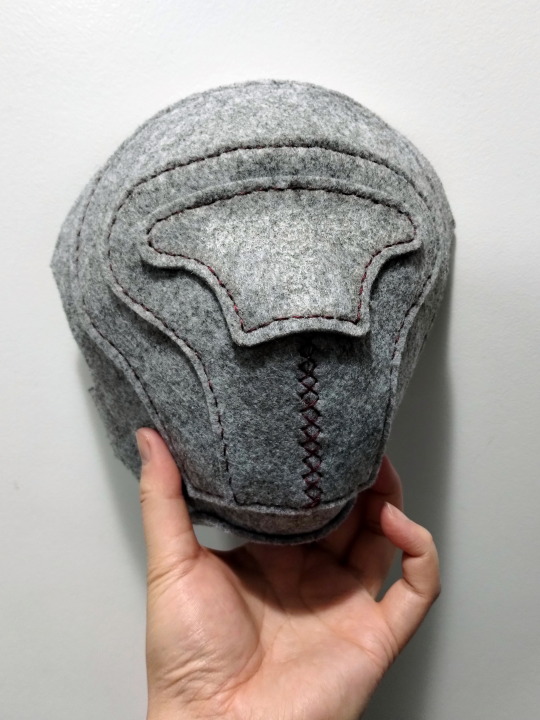
Mannequin head progress: it's starting to look like something!
Original pattern is for leatherwork, by DieselpunkRo. I'm using medium weight felt because it's what I have. It does not behave like leather, and I shouldn't be at all surprised.
1 note
·
View note
Text
I used a sewing machine for the first time! Wow! It's so fast!!
The brown thread was machine sewn, and the lighter thread was hand sewn. I'd been putting off this project for months because I made a mistake and didn't want to rip out all my stitches, just to hand-sew them again. But it went so fast with a machine!
2 notes
·
View notes