
Last Seen Blogs

starmkr
Waiting...

jokerslegos
🦇♥️🃏

onlyfreds
"Dear reader"
jokerslegos
🦇♥️🃏

trashmouth-critter
Trashmouth Art
Text
How to make hot pepper chicken curry Sri Lankan style.
Sri Lankan Traditional Farmers Lunch with Hot & Spicey Chicken 🍗 Curry. Mouthwatering smell and very delicious 😋
Using pepper as the key ingredient and Sri Lankan curry powders, here’s how you make a delicious black pepper chicken curry with a thick coconut sauce.

When you get tired of cooking a really spicy Sri Lankan chicken curry using red chillies and need a change in taste then this black pepper chicken curry will make a difference.
🔵 Ingredients to cook black pepper chicken curry.
1kg of chicken
3 tablespoons of tamarind juice(1 tablespoon of tamarind soaked in 1/4 water for 5 minutes)
5 tablespoons of oil
curry leaves(substitute with a bay leaf
1 tablespoon of garlic and ginger paste
1″ cinnamon piece ⭐
3 cardamom pods
1 large onion sliced fine
3 whole green chillies⭐
1 medium-sized tomato sliced into four
1 teaspoon of turmeric powder
2 teaspoon cumin powder & coriander powder
4 tablespoons of hot black pepper⭐
(start with 1 tablespoon and add more as per your taste)
Salt to season
1 cup of coconut milk
🔵 Method
Wash, clean and place the chicken parts in a bowl.
Add one 1/2 teaspoon of salt, and tamarind juice(3 tbsps), mix and let it marinate for 15 minutes.
Over medium heat, place a cooking pan and pour in the oil.
Once the oil heats(1 minute), add the curry leaves, pandan leaf, cardamom, and cinnamon followed by ginger-garlic paste.
Cook for 2 minutes and then add the onions, green chilllies and tomatoes.
Sautee the ingredients over low-medium heat until onions and tomatoes turn soft. 5-7 minutes.
Reduce heat and add the chicken(with the marinade)to the cooking pan.
Cook until the tamarind juice is absorbed. let the chicken brown with a little added oil.
Frequently mix the chicken with the spices to avoid the chicken parts sticking to the pan.
Add turmeric, cumin, coriander, and pepper over the chicken while the heat is low.
Mix all the ingredients in the pan for 3-5 minutes while cooking the meat with the spices.
adding black pepper and spices to cook the black pepper chicken curry. Cover and let the curry simmer for 5-7 minutes until there is no liquid left
If you prefer to fry the chicken at this stage, add 2 tablespoons of oil and let the chicken brown slightly OR continue to cook until all liquid evaporates and proceed to the next stage.
Pour in the coconut milk, reduce heat, season with salt if necessary then cover and simmer until gravy thickens and takes on a darker hue.15-25 minutes.
adding coconut milk to cook the black pepper chicken curry.
Serve warm with your favourite rice and curry dishes.
💚 black pepper chicken curry cooked and ready👍
More⬇️ Visit
👤 Wood mdad™ - plant based food recipe 💙🧡❤️
#plant based
#woodworking
#waightloss
#food
#asian
#recipe
0 notes
Text
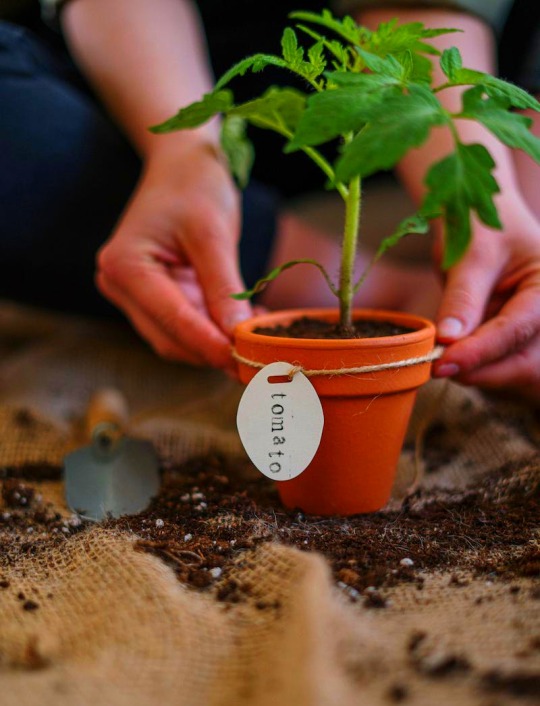
Brilliant Tips for the Best Tomato Harvest Ever🍅
Wood mdad™ 👤
🍅 Tomatoes have to be the most versatile fruit out there. It makes a great raw addition to any salad and may also be used in pasta, soups, sauces, and stews. And if you consume a lot of tomatoes, the prices might rapidly pile up. As a result, it may be tempting to start growing tomatoes in your own garden to supplement your diet. Growing tomatoes at home may be a delightful activity that also enhances your dining experience. But that doesn't mean it's always simple, and there's nothing more disheartening than a poor tomato crop.

Any gardener, no matter how skilled, can tell you that raising tomatoes can be both a tough and gratifying project. Tomatoes are a common sight in many home gardens across the world, bursting with flavor and packed with nutrients. But as every passionate gardener knows, raising tomatoes has its own challenges, like managing pests and preparing the soil. Gardeners must use a range of strategies to make sure their tomato plants thrive and produce a tasty crop if they hope to reap a plentiful harvest.
🔵Learn with wood mdad™ visit us ! 👤
🔴 Choose wisely.
The first step toward tomato-growing success is selecting the correct tomatoes for you. Do some study to determine which kind will best suit your local climate and soil type, as well as the size and flavor of tomato you love to consume.
The correct position Tomato plants prefer warm and sunny conditions for optimal growth. Inspect your garden to see which places receive the most continuous direct sunlight, and aim to concentrate your tomato harvests there. If you are concerned about the warmth, you can shield your seedlings with plastic sheets.

🔴Preparatory work Before you add your tomato seedlings, make sure your beds are ideal for their growth. Make sure the soil is nutrient-dense and filled with high-quality compost. You should also ensure that each of your plants has enough area to grow properly.
🔴 Plant deep and sideways.
The way tomato roots grow means that the deeper you can plant them, the better. Roots can grow anywhere along their stems, so the deeper you plant your seedling, the more solid and tough it will be. Furthermore, many gardeners support sideways planting, which covers the leaves to allow for maximum root growth.
🔴 Consider support.
Even if you plant your tomatoes deeply enough, you will most likely need to provide some support for them. You can use a fence or wall to grow your plants vertically, or you can construct ready-made trellises to give your tomatoes something to cling to.
Click more⬇️
1 note
·
View note
Text
Embracing the Art of Wood Craft: From Hobby to Masterpiece
Wood mdad™
Wood craft is a timeless art form that allows individuals to unleash their creativity through the manipulation of wood into unique and stunning creations. Whether you are a seasoned woodworker or just starting your journey in this craft, there is something truly special about the process of transforming raw wood into a work of art.

Woodworking, a timeless craft that has captivated artisans and enthusiasts for generations, offers a journey rich in creativity, skill development, and the satisfaction of transforming raw materials into works of art. In this blog post, we'll explore the journey from woodworking hobbyist to master craftsman, delving into the nuances of technique, inspiration, and the joy of creation.
Woodworking, with its roots deeply embedded in human history, beckons both beginners and seasoned artisans alike to pick up tools and unleash their creativity upon raw timber. From the humble beginnings of whittling sticks to the intricate designs of fine furniture, the art of wood craft offers a canvas as vast as the imagination.

The Beauty of Working with Wood
Working with wood offers a sense of satisfaction that is unmatched by any other medium. The natural beauty of wood grain, the texture of the material, and the earthy aroma that fills the air as you work are all part of the experience. Every piece of wood tells a story, and as a wood crafter, you have the opportunity to bring that story to life through your creations.
Tools of the Trade
To fully immerse yourself in the world of wood craft, it is essential to familiarize yourself with the basic tools of the trade. From simple hand tools like chisels and mallets to more complex power tools such as saws and sanders, having the right tools at your disposal can make all the difference in the quality of your work.
Techniques and Skills
Mastering the art of wood craft requires a combination of patience, practice, and a willingness to learn new techniques. Whether you are interested in traditional woodworking methods or modern woodworking trends, there is a wide range of skills to explore, from carving and joinery to wood turning and finishing.
Learn more visit wood mdad™
https://woodmdad.blogspot.com/?m=1
Finding Inspiration in Nature
Nature is a limitless source of inspiration for wood crafters. From the intricate patterns found in tree bark to the graceful curves of a leaf, the beauty of the natural world can be translated into your wood creations. Take a walk in the woods, observe the details of the world around you, and let nature guide your creative process.
Conclusion
Wood craft is more than just a hobby; it is a journey of self-expression and creativity. Whether you are creating a simple furniture piece for your home or a complex sculpture for display, the art of wood craft allows you to unleash your imagination and create something truly unique. Embrace the beauty of working with wood, hone your skills, and let your creativity soar in this captivating craft.

The Joy of Getting Started
For many, woodworking begins as a simple curiosity or a desire to create something tangible with their hands. Armed with basic tools and a piece of wood, beginners embark on a journey of exploration, learning the fundamentals of shaping, carving, and joining. Whether it's crafting a rustic shelf or a hand-carved spoon, the initial steps into woodworking are marked by a sense of discovery and the thrill of turning an idea into reality.
Learning and Growth
As novice woodworkers hone their skills, they delve deeper into the craft, soaking up knowledge from books, online resources, and experienced mentors. From understanding wood grain and selecting the right tools to mastering joinery techniques and finishing methods, the learning curve in woodworking is both challenging and rewarding. Mistakes become valuable lessons, guiding artisans toward greater precision and craftsmanship with each project completed.
Learn more visit wood mdad™
https://woodmdad.blogspot.com/?m=1 ⬇️

Finding Inspiration
Woodworking is as much about creativity as it is about technique. From the natural beauty of the wood itself to the world around us, inspiration can be found in myriad forms. Whether it's the graceful curve of a tree branch or the geometric patterns of architecture, the discerning eye of a woodworker sees potential in every grain and knot. Drawing inspiration from traditional designs, personal experiences, or contemporary trends, artisans infuse their creations with a unique identity that reflects their passion and vision.
Mastering the Craft
As woodworkers progress along their journey, they evolve from amateurs to artisans, refining their skills and developing a signature style. Mastery in woodworking is not merely about technical proficiency but also about a deep understanding of the material and a commitment to excellence. From intricate marquetry and sculptural forms to heirloom-quality furniture and architectural marvels, master craftsmen push the boundaries of what is possible with wood, elevating the craft to an art form.
The Joy of Creation
At the heart of woodworking lies the joy of creation—the satisfaction of transforming raw materials into something beautiful and enduring. Whether it's a simple gift for a loved one or a masterpiece destined for a gallery, each project carries with it the pride of craftsmanship and the satisfaction of knowing that a piece of oneself has been imbued into the finished work. In a world of mass-produced goods, woodworking offers a refuge for those who seek authenticity, craftsmanship, and the timeless beauty of handcrafted creations.
Conclusion
In the art of wood craft, the journey from hobbyist to masterpiece is a testament to the enduring allure of creativity, skill, and craftsmanship. Whether one's passion lies in carving, turning, joinery, or marquetry, woodworking offers a path of self-discovery and expression unlike any other. So, pick up your tools, unleash your imagination, and let the beauty of wood inspire you on your journey to creating something truly extraordinary.
Learn more with wood mdad™

#woodmdad#basicwoodworking#wood#woodworkingidea#woodworkingprojects#woodworkingtips#woodhabit#kindofwood#woodworkingtool#plants
0 notes
Text

Planning Your Mini Garden Space and Creating
Your Own Oasis:
A Step-by-Step Guide to Growing a Mini Garden Initiating a tiny garden in your backyard requires careful site selection before you can start planting your green haven.
Think about how much sunlight the area gets, how easily it can be maintained, and how accessible it is for watering.
🌿Choosing the Right Plants
Selecting the right plants is crucial for the success of your mini garden. Opt for plants that thrive in your local climate and consider the size of the plants when fully grown. Mix and match different varieties to add texture and color to your mini garden.
🌿Building Your Mini Garden Bed
Once you've chosen the plants, it's time to create the mini garden bed. You can use various containers such as pots, crates, or even repurposed items like old tires or barrels. Ensure proper drainage to prevent root rot and choose a high-quality potting mix for optimal plant growth.
🌿Planting and Arranging Your Mini Garden
When planting your mini garden, arrange the plants in a visually appealing manner, keeping in mind the growth patterns and space requirements of each plant. Consider adding decorative elements such as miniature furniture or fairy lights to enhance the charm of your mini garden.
🌿Caring for Your Mini Garden
Regular maintenance is key to keeping your mini garden flourishing. Water your plants as needed, keeping in mind the specific requirements of each plant. Remove any weeds promptly and fertilize your plants to promote healthy growth.
🌿Enjoying Your Mini Garden Oasis
Sit back, relax, and bask in the beauty of your mini garden oasis. Take time to appreciate the natural beauty that surrounds you and relish in the tranquility that your mini garden brings to your backyard.
In conclusion, creating a mini garden in your backyard is a rewarding and fulfilling project that allows you to unleash your creativity and connect with nature. Follow these steps to bring your mini garden oasis to life and enjoy a little slice of paradise right in your own backyard.
#basicwoodworking#garden knowledge#garden of hope#garden decor#plants#garden#wildflowers#flowers#greenery#botanical garden
1 note
·
View note
Text
garden
How to Garden

Finding moments of peace can seem like a luxury in the busyness of modern life. But in the middle of all the commotion, there's a haven called the garden that calls us to slow down, re-establish a connection with nature, and nurture calm.
Gardening is more than simply a pastime; it's a healing experience that uplifts and nurtures the spirit. We are reminded of the simple joys in life when we dig our hands into the dirt: the earthy smell of newly turned soil, the soft rustle of leaves in the breeze, and the brilliant colors of flowering flowers.
Seeing a seedling emerge from the earth and develop into a healthy plant has a certain charm to it. It serves as a reminder of the circle of life and the value of nurturing and patience. Gardening teaches us the importance of persistence and dedication in a society that frequently wants quick pleasure.
Taking care of a garden also offers a much-needed diversion from the nonstop stimulation of computers and gadgets. It provides an opportunity to switch off, relax, and get back in touch with nature. Gardening promotes mindfulness and being present in the moment, whether it is by planting seeds, pulling weeds, or just relaxing among the greenery and taking in the sounds of nature.
In addition to its healing properties, gardening cultivates environmental stewardship. We are essential to maintaining ecosystems and promoting biodiversity because we provide habitat for bees, butterflies, and other pollinators. Furthermore, we can embrace sustainable living practices and lessen our carbon footprint by cultivating our own fruits, veggies, and herbs.
The garden serves as a haven for the mind, body, and soul—it's more than just a piece of land. There, we can disconnect from the outside world, re-establish a connection with the cycles of the natural world, and find comfort in the humble act of cultivating beauty. Thus, whether you own a few pots on a balcony or acres of land,
More⬇️
https://woodmdad.blogspot.com/2024/02/how-to-garden.html
#garden#plants#my garden#garden of love#flowers#grasses#greenery#ava gardner#garden of hope#garden design#garden decor#garden of life#garden of eden#Garden knowledge
1 note
·
View note
Text
Wood working business / woodworking entrepreneurs
🌿Entrepreneurs in the woodworking industry
Frequently, a do-it-yourself woodworking project blossoms into a successful craft enterprise. Customers' interest in woodworking has grown due to the growing desire for well constructed, handcrafted goods.

There are many ways to turn a simple woodworking project into a successful business; we'll lead you through the top woodworking projects that sell. Wood crafts can be utilized for gifts and home decor.
🔴 Is It Possible to Earn Money Woodworking?
If you know the fundamentals of woodworking, you can turn your projects into a profitable endeavor. Additionally, there are more opportunities to expand your firm as you get experience and take on more challenging assignments.
🔴 How to Start a Business in Woodworking
In addition to being a fantastic pastime, woodworking can be a successful business. Here are some actions you can do if you want to launch a woodworking business:
Improve your woodworking abilities. The most crucial step is this one. To succeed, you must be able to produce woodwork of a high caliber. You can improve your carpentry abilities in a variety of methods, including by attending classes, reading books, and viewing online tutorials.
Determine your specialty. Which kind of woodworking are you interested in specializing in? Do you wish to create toys, home decor, furniture, or something else entirely? Once you've identified your niche, you can begin focusing your marketing efforts on prospective clients.
Make a plan for your business.
Learn ↘️
https://woodmdad.blogspot.com/p/book.html
🔴Deals for Small Businesses
🌿Begin modestly.
Avoid trying to take on too much at once. Concentrate on a small number of goods or services at first, then expand your company from there.
🌿Have patience.
Establishing a profitable woodworking business takes time. If you don’t notice results right away, don’t give up.
Enjoy yourselves! As enjoyable as woodworking is, be sure it's a hobby you're into. It will be hard to succeed if you're not enjoying yourself.
🌿Advantages of Starting a Woodworking Business
The woodworking industry presents a multitude of noteworthy advantages, rendering it a compelling choice for both experienced artisans and beginners. Above all, woodworking as a business offers the chance for ingenuity and originality.
A woodworker's workshop produces one-of-a-kind, handcrafted objects that appeal to a specialized clientele that values the uniqueness and craftsmanship involved in custom-made items.
Furthermore, woodworking is flexible; a wide variety of goods, from toys and culinary utensils to furniture and home décor, may be made with it. Because of the variety of goods that can be made, woodworkers are able to adjust to changing consumer wants and market trends.
With consumers ready to pay more for handcrafted wood products, this business can have a large profit margin. The main investment in woodworking is in the tools and skill set because the raw materials used, mostly wood, are reasonably priced.
A woodworker can create things that sell for a good price once they have acquired a collection of premium tools and developed their craft. Another important benefit of the business is its scalability; it may be started modestly, maybe as a side project, and expanded as demand grows.
Furthermore, having a woodworking business offers a great way to achieve job satisfaction and self-fulfillment.
More⬇️
#woodworkingidea#basicwoodworking#woodworkingprojects#wood#woodmdad#woodworkingtool#woodhabit#woodworkingtips#kindofwood
0 notes
Text
how to make easy , wood coaster
🔴 How to Make Easy, Wood Coasters
The majority of us only give coasters any thought when we are reminded how ineffective we have been with them. However, that may be the result of the dull and uninspired nature of many coasters. You can do this simple woodworking project in a few hours, and making coasters out of well-seasoned logs will almost certainly make you remember to use one the next time you place a drink down on more delicate furniture. The ability to experiment is one of the best things about making your own wood coasters. You can do almost anything with colored epoxy resins and wood-burning processes. Now let's get going.

🔴 Materials Required:
miter saw
Stiff brush
seasoned log with a diameter of about 3.5 to 4 inches
Gritted surface
Stain, shellac, varnish, or mineral oil of your choice
⬇️ Visit us…. ✍️ Wood mdad™
🔴Choose and Prepare Your Wood
dried log of a tree.
Pick well-seasoned wood; if not, it may continue to dry and break after you've constructed your coasters, which is something you don't want. Most wood takes around six months to season in a dry, well-ventilated area.
You are free to select whatever kind of wood you desire. Hardwoods such as oak, mahogany, hickory, maple, and alder will look more elegant and maybe be more durable than softwoods like fir, cedar, and pine, which frequently give a rustic appearance. A foot or more in length, 3.5 to 4" in diameter, and somewhat straight logs are what you want to find.
Using a stiff brush, clean the log.
After choosing your log, brush out any loose bark and extra dirt using a strong brush. You can use a hatchet, hand plane, or chisel to remove your bark entirely if you wish to.
🔴 cut Your Coasters
Using a power miter saw or any other preferred saw, cut a coaster.
While a handsaw can be used to create your wood coasters, a power miter saw greatly simplifies the process. To get started, trim the end off so that you have a perfectly level surface.
Size of coaster: 1/2–3/4.
Next, make your first coaster circle, about 1/2 to 3/4" thick, using your miter saw. Clamp a scrap piece of wood to the base of your saw and use it as a guide to cut consecutive coasters to ensure consistency. Cut whichever many coasters you would like. At least four coasters are included in most sets.
🔴 Use a palm sander to finish and sand the coasters.
To get the desired level of smoothness, sand your coasters by hand or using a palm sander, starting with a coarse grit (such as 120) and working your way up to finer grits.
Sand from the wooden coaster.
Sand off any excess loose bark at this time, and use it as an ideal opportunity to add finishing touches like smoothing the edges.
wooden coaster being cleaned using a microfiber towel.
After sanding, use a microfiber cloth to dust your coasters and then stain, mineral oil, shellac, or paint them as desired. Wood that has been sealed on both sides will be shielded from condensation from chilly glasses and will not dry out too much, which could lead to cracking.
⬇️ Visit us…. ✍️ Wood mdad™
🔵 Wood mdad™ 💚 any support pls contact [email protected] .
Good day!
2023 All Rights Reserved - woodmdad™
#woodmdad#woodworkingidea#woodworkingprojects#basicwoodworking#wood#woodworkingtips#kindofwood#typeofwood#woodhabit#woodworkingtool#diy projects#Wood diy
0 notes
Text
Halloween Wood Crafts You Can Make Yourself

With Halloween quickly approaching, there's no better way to embrace the spookiness of the season than by using wood to create some crafts. These ten inventive Halloween wood crafts will give a spooky, magical feel to your home, regardless of your level of competence in woodworking or desire to do DIY projects. Let's get going!
🔵**Luminary of the Haunted House:** - Make a wooden luminary that, when a tea light is inserted, transforms into a scary home silhouette. It makes a captivating focal point for your Halloween festivities.
🔘 **Wooden Pumpkins:** - Make wooden pumpkins of different sizes, paint them in eye-catching Halloween hues, and adorn them with distinct faces. Your patch of pumpkins will be genuinely unique.
🔘 **Sign for Broom Parking:** - A wooden board with a "Broom Parking Only" sign attached and a broomstick holder would add a whimsical touch. It's ideal for your design with a witch motif.
🔵 **Halloween Signs:** - Personalize wooden signs with spooky phrases like "Witch's Brew" or "Beware of Spiders." These messages help to establish the tone for your Halloween celebrations.
🔵 **Oversized Candy Corn Decor:** - Paint wooden blocks the traditional colors of candy corn to create enormous candy corn decorations. They provide your decor a splash of color.
🔵 **Spooky Silhouettes:** - Draw eerie silhouettes on wooden boards of witches, ghosts, or black cats. You can really frighten your windows with these.
🔵 **Wooden Ghosts:** - Cut out wooden ghost forms, coat them with white paint, and embellish them with cute expressions. You can put these amiable spirits outside or indoors.
🔵 **Bat Cutouts:** Craft wooden bat silhouettes in multiple dimensions and suspend them from the ceiling. They give your room an air of intrigue.
🔵 **Pallet Pumpkins:** - Craft rustic pumpkin decorations out of repurposed wooden pallets. Add wooden stems and faces, paint them orange, and stack them.
🔵 **Spiderweb Coasters:** - Paint dark, ominous colors and carve elaborate spiderweb patterns onto wooden coasters. These coasters give your table setting a hint of spookiness.
These easy Halloween wood crafts will help you turn regular wood into amazing Halloween enchantment. Gather your supplies, let your imagination run wild, and go on a crafting project that will make your house the talk of the neighborhood.
Best feature? By adding your own touches, you can make your Halloween décor genuinely one-of-a-kind. So gather your woodworking supplies, start a Halloween craft, and be creative. Your house will be outfitted to slay the spookiness of the coming season
Happy haunting!
#Woodmdad
Visit
0 notes
Text
🔴 Great Ideas for DIY Halloween Wood Crafts
"Enter the realm of DIY Halloween wood crafts and let your imagination run wild with these spooky and wacky ideas. This Halloween, your home and visitors will be enchanted and delighted by our assortment of handcrafted wooden decorations.

Our crafts cover the full range of creepy and festive, from eerie haunted houses that come to life with a brushstroke to grinny wooden pumpkins that radiate Halloween pleasure. Create your own ghostly welcome sign to welcome guests or carve hilarious epitaphs into gravestones for a bit of cemetery humor.
Decorate your home or front porch with ghoulish wooden figurines and witches' broomsticks to evoke the mood of the season. Our wooden crafts offer the ideal blank canvas for your artistic ideas, whether you're going for a spooky mansion or a more playful Halloween atmosphere.
Build a life-size skeleton yourself for a spooky yard display, or hang elaborate wooden webs to capture people's imaginations. Not to mention the traditional candy corn decorations and homemade Halloween signs that perfectly encapsulate this lovely season. You have the ability to make your area into a spooky fantasy with these easy DIY Halloween wood projects. Enjoy the creative process and spread the Halloween spirit with your original works of art. Happy crafting and a boo-tiful Halloween!"
🔵Pumpkin Pallet
Spray orange paint onto your pallet. For the bottom of your hat, fasten a piece of wood and spray-paint it black. Add a flower to the corner of its cap after adhering a wood nose and eyes.
Supplies
Pallet
Black and orange spray paint
The nose's wooden craft shapes
Glue sticks and hot glue
massive flowers
Display Pallets
Make careful you cover the sides of the pallet with stones to make the red fairy light effect stand out more at night.
🔵Halloween crew, the short
Start by painting your blocks, then give them time to dry. The ghost and jack-o-lantern faces can then be painted on, and Boo can be written in black paint on the block.
4 x 4 wood blocks in various lengths are provided.
colored orange
Dark paint
Plaster in the color white
Wood Pallet O'Lantern, Jack
The building of these pallet Jack o' Lanterns will be simple for you if you are skilled with tools.
🔵wood cat
You can simply paint the ears onto the boards of wood if you don't feel comfortable cutting them.
🔵Funny Horrors
Cut a 2x4 into five pieces if you want to duplicate this project. Paint the wood a bright lime green color or any colore and add some outside black vinyl for the hair on Dracula. Add facial details to his.
Take a piece of basic wood and attach a black vinyl strip to it to make the mummy. Utilize some yellow or colore exterior vinyl and use a punch to create circles out of it. After that, add some dark circles around the eyes. For the mummy effect, you may now use hot glue to wrap gauze around this.
🔵Wooden Monster Friends
Old fences are great material for Halloween decorations
0 notes
Text
waight loss recipes wood based
🔴Healthy food recipes plants based
BOOK - WOOD MDAD™️
Discover the ultimate guide to achieving your weight loss goals with our 'Weight Loss Food Book.' This comprehensive resource is your roadmap to a healthier, slimmer you. Inside, you'll find a treasure trove of delicious, nutritious recipes meticulously designed to support your weight loss journey.

satisfying breakfast options to mouthwatering lunches and dinners, our book provides a diverse range of meals that not only help you shed those extra pounds but also keep you energized and satisfied. We've included expert tips, portion control guidance, and meal plans to make your path to a healthier you smoother and more enjoyable.
Say goodbye to restrictive diets and hello to a sustainable, enjoyable approach to weight loss. The 'Weight Loss Food Book' is your trusted companion on the road to a fitter, happier, and healthier you."
#woodmdad#basicwoodworking#food#woodworkingprojects#reading#book review#book recommendations#Book & video
0 notes
Text
pineapple with black pepper & salt
🔴 Pineapple with Black Pepper
This very simple recipe is not Hawaiian but it is so good as part of a luau that I almost always serve it. It is important to use the best black pepper you can, crushed at the very last minute.

🔵INGREDIENTS
1 large ripe pineapple,
preferably white salt
1 tablespoon black peppercorns, coarsely crushed
DIRECTIONS
Place the pineapple horizontally on your work surface. Use a heavy, sharp knife to cut it in half lengthwise, cutting through the crown as well as the fruit itself.
Cut each half of the pineapple in half again, lengthwise. Use a paring knife to cut out the core at the top of each quarter, inserting the knife at one end and pulling it along to the other. Lift off and discard the core.
Using a sharp, somewhat flexible knife, cut each quarter wedge of flesh away from the skin; leave it in place. Cut each wedge into slices and about 3/4-inch thick, being sure not to cut through the skin.
Set the wedges in their skins on a serving platter. Using your fingers and holding your hand several inches above each wedge, shower the pineapple with a generous pinch of salt, followed by a heavier sprinkling of black pepper. Cover lightly with plastic wrap and chill for 30 minutes before serving.
Enjoy 💚
🔴 Health food recipes plants based | wood based recipe
Waight loss,
Wood working knowledge,
@wood mdad™️
💚"Welcome to @wood_mdad™️, where the artistry of woodworking converges with plant-based wellness, weight loss, and sustainable living. Our journey starts in the middle of the woods, where we celebrate the art of woodworking, from choosing the best wood to crafting beautiful sculptures.
we invite you to savor our collection of plant-based recipes, thoughtfully crafted to delight your palate while promoting health and aiding in weight loss. We're more than a blog; we're a community dedicated to your well-being.
Join us on this transforming journey where woodworking and wellness intersect, sustainable living flourishes,and the serenity of nature inspires. , @wood_mdadTM is your roadmap to a peaceful, full life." Wood mdad™️
@wood mdad™️
All rights reseved !
0 notes
Text
Health food recipes plants based |wood based recipe | wood mdad™️
"Welcome to @wood_mdad™️, where the artistry of woodworking converges with plant-based wellness, weight loss, and sustainable living. Our journey starts in the middle of the woods, where we celebrate the art of woodworking, from choosing the best wood to crafting beautiful sculptures.
we invite you to savor our collection of plant-based recipes, thoughtfully crafted to delight your palate while promoting health and aiding in weight loss. We're more than a blog; we're a community dedicated to your well-being.
Join us on this transforming journey where woodworking and wellness intersect, sustainable living flourishes,and the serenity of nature inspires. , @wood_mdadTM is your roadmap to a peaceful, full life."
https://woodmdad.blogspot.com/p/food.html

0 notes
Text
CINNAMON ROLL | Healthy food | wood mdad™️ 🍮️
🔴 CINNAMON ROLL | Healthy food | wood mdad™️ 🍮️
An EASY recipe for Homemade Cinnamon Rolls! The rolls are melt-in-your-mouth soft with a buttery cinnamon filling and topped with the best homemade frosting.

You cannot beat the aroma ☄️ of freshly baked cinnamon rolls in the home.
🔵 Ingredients ⏳
For Yeast Water •½ cup warm water, •1 tbsp of active dry yeast and, •1 tsp sugar.
Dough: 2 tbsp vegetable oil, plus more for brushing • ½ cup water/plant based milk, at room temp • 2 tbsp cup sugar • 1 teaspoon salt • 2¾ cups all-purpose flour, plus more for kneading.
Filling: ½ cup white sugar, you can use brown sugar if you have • 1½ tbsp cinnamon powder.
Glaze:• ½ cups powdered sugar • 3 to 4 tbsp water •½ teaspoon vanilla extract.
🔵Instructions-
⭕Yeast water: •Grease the baking dish. In a small bowl, stir together the water, yeast, & sugar. Set aside for 5 minutes, or until the yeast is foamy.
⭕Dough: In a medium bowl, mix the vegetable oil, water, sugar, & salt together. Stir the yeast mixture. Place the flour in a large bowl, & add the yeast mixture & stir well into a sticky mixture. Use your hands to roughly knead the mixture, then turn it out onto a floured surface. Knead for 3 to 4 minutes until smooth, sprinkle with more flour if needed, & mould it into a round shape.

Brush a large bowl with vegetable oil & place the dough inside. Cover with damp cloth & set aside in a warm place to rise it until doubled in size, about 60 minutes.
⭕Filling: In a small bowl, mix the sugar & cinnamon. Punch down dough & roll out on a floured surface into a 20x14-inch rectangle. Brush with 2 tablespoons vegetable oil & sprinkle the cinnamon sugar within the edges. •Starting at one of the edges, roll it tightly into a log, then slice into 10 rolls. Place the rolls into the baking dish cut-side up, cover, & let em rise for 1 hour.
⭕Bake: Preheat the oven to 250°C. •Bake the rolls at 180°C for 25 to 30 minutes or until lightly golden on top.
⭕Glaze: In a medium bowl, whisk together the powdered sugar, 3 tablespoons of water, & vanilla until smooth. If it’s too thick, add more liquid.
⭕Remove the rolls from the oven & allow em to cool for 10 minutes, then drizzle the glaze on top & serve.
https://woodmdad.blogspot.com/p/cinnamon-roll-healthy-food-wood-mdad.html
#cinnamon#cinnamon roll#recipe#woodworkingprojects#woodworkingidea#basicwoodworking#woodmdad#wood#waightloss#healthy eating#Ceylon cinnamon#woodworkingtips
0 notes
Text
5 Steps to Learn Woodworking | woodworking skills | woodworking free | beginner

🌳“Give me six hours to chop down a tree and I will spend the first four sharpening the axe.” -Abraham Lincoln👤
Woodworking is a timeless craft that allows individuals to transform raw pieces of lumber into functional and artistic creations. Whether you're dreaming of crafting your own furniture, building custom cabinets, or simply honing your woodworking skills as a hobby, embarking on this journey begins with a solid foundation.
In this comprehensive guide, we'll walk you through five essential steps to learn woodworking. From understanding the fundamentals of wood selection to mastering the art of safe tool usage, these steps will empower you to embark on your woodworking adventure with confidence and creativity.
here are easy and first 05 steps to get you started.
🔘Read books about woodworking
🔴Take a few courses (online or in-person)
🔵Watch videos
🔴Get tools
🔵Purchase material
And more..!
steps in more detail below.
Remember : The order of these steps is important.
You don’t want to purchase tools or materials before you’ve studied and found out what you need.
tempting to rush out and buy gadgets,
but without proper planning, you’ll get easily frustrated.
🔴 Read Woodworking Books
Books are a great way to get detailed and, usually, reliable information. You may want to purchase several books to have them as a reference; however, you can always check some out at a library.
🌿Start with the Basics
Begin by understanding the fundamental concepts of woodworking, including different types of wood, grain patterns, and the properties of various wood species.
🌿Tool Knowledge
Learn about the different woodworking tools and their uses. This includes hand tools like chisels and planes, as well as power tools like circular saws and routers.
🌿 Safety Precautions
Study safety guidelines thoroughly to ensure you know how to use tools safely. This includes wearing appropriate safety gear and keeping your workspace well-ventilated.
@
#wood#basicwoodworking#woodworkingidea#woodworkingprojects#typeofwood#kindofwood#woodmdad#wood crafts#wooden#natalie wood#woods and fields
1 note
·
View note
Text
Is Woodworking Hard to Learn? Explained @ wood mdad.
Is Woodworking Hard to Learn? Explained @ wood mdad.

Both a satisfying hobby and a profession, woodworking. But many people think it's impossible to become a skilled carpenter or that you need some specialized skills.
So, is Woodworking Hard to Learn?
Although woodworking is not difficult to learn, becoming a master requires dedication. If you are enthusiastic about building projects, you will overcome any obstacle in your way. Keep in mind three things for success: perseverance, patience, and passion.
💚passion
You should be passionate about everything you do in life, whether it be at work, on the side, or while playing sports. You can accomplish anything you set your mind to with the support of passion, which is fed by energy, motivation, and a laser-like focus on getting things done.

Do you want to work with wood?
The same may be said about passion. You can fly to roads if you have enough of it.
However, you will struggle if you aren't passion about woodworking or don't enjoy the process. If your primary goal is to complete something for others to appreciate, you'll get upset when difficulties come up.
However, you're more likely to acquire the finished item if you appreciate the process of making something out of a pile of wood.
💚 be patience
Beyond only being kind to people, patience is crucial in life. It benefits your interpersonal relationships and aids in the long-term maintenance of these ties. Being patient allows you to control your emotions and maintain a strong sense of well-being.

In woodworking, patience is a great asset. You need to have patience with yourself, the tools, and the subject, especially when you're learning.
It takes only one fly to kill two when you're patient. First off, it stops you from making careless errors. Second, it enables you to continue even after making mistakes.
When things get tough, if you have a short fuse and expect everything to work out the first time, you'll give up.
💚Perseverance
The act of persistently pursuing a goal or objective despite challenges, hurdles, or disappointments is referred to as perseverance. In order to succeed or accomplish a desired objective, it takes the determination to keep pushing forward, adapt, and overcome obstacles. Even in the face of difficulty, perseverance frequently involves resilience, patience, and a strong belief in one's capabilities and aspirations. It's a quality that can help one develop personally and attain noteworthy goals.

You put others first and are driven to fulfill your objectives and aspirations, but what happens if you don't succeed? Despite your best efforts and continued devotion for the objective, you were unable to succeed. Persistence is useful in situations like that.
You must decide whether you're going to finish any assignment, hike, job, or interest before starting it. This is important. If you think you'll give up when things become tough, that's exactly what you'll do.
Before you start making wood, make the decision to endure.
More ⬇️
thankyou @woodmdad
1 note
·
View note
Text
wood working safty rules
💚Safety Guidelines for Woodworkers That Everyone Should Be Aware Of
If you follow a few simple woodworking safety guidelines, woodworking may be a secure and pleasurable hobby or profession. The rules are all common sense concepts, but if you don't abide by them, your risk of getting hurt while using your tools will be significantly increased. An attitude of "it won't happen to me" or a hurry-up mentality are inappropriate in the wood shop. Your woodworking endeavors will be considerably safer and more fun if you make these 10 rules a habit.
#basicwoodworking#kindofwood#woodworkingprojects#woodmdad#wood#woodhabit#typeofwood#woodworkingidea#woodworkingtips#woodworkingtool
0 notes
Text
Bird House Plans | wood working as a hobby | mind relex bird sound | wood mdad
A weekend woodworking project that you may complete with young children is building a birdhouse. Watch this video and adhere to the instructions to make a simple birdhouse out of scrap wood.
A beginner can complete the enjoyable undertaking of building a bird house in a few of hours. Build your own one-board wooden bird house by following these easy steps and our free, basic bird house blueprint.
#wood#woodmdad#basicwoodworking#woodworkingidea#woodworkingprojects#woodworkingtips#typeofwood#woodhabit#kindofwood#woodworkingtool#birdhouse#diy
3 notes
·
View notes