usw-nuke
Nuke Help - USW VFX/MGFX
Pointers, reminders and tips in Nuke for VFX and MGFX students of USW.
3 posts
Don't wanna be here? Send us removal request.
Last Seen Blogs

infodumpingaboutnature
Info-Dumping About Nature

diaryofahealingbxtch
brain mush

greater-than-the-sword
Stubborn Idealism
slaaneshfic
Uma Breakdown's PhD admin dump

humanteethmarksonhumanbone
gay people?? in MY windows NT 4.0??
Text
Screenshots of setups within Nuke
Hopefully helpful as a reminder/refresher of how to setup various operations in Nuke.
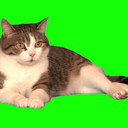
Keying with a log2lin

Cleanup - Tracker removal from plate, using tracking and frameholds
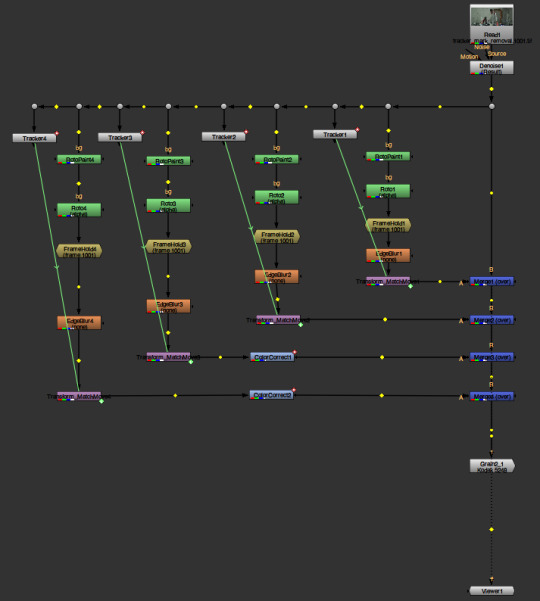
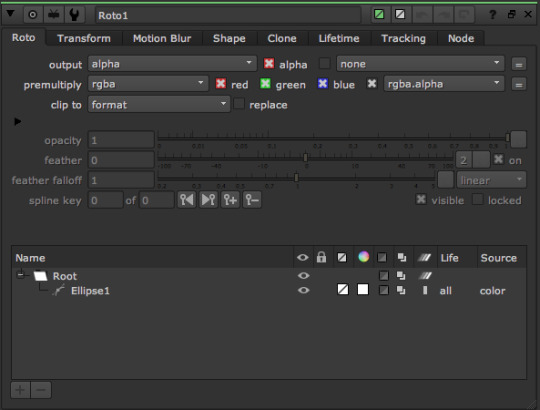
And the roto settings as seen in the script above ...
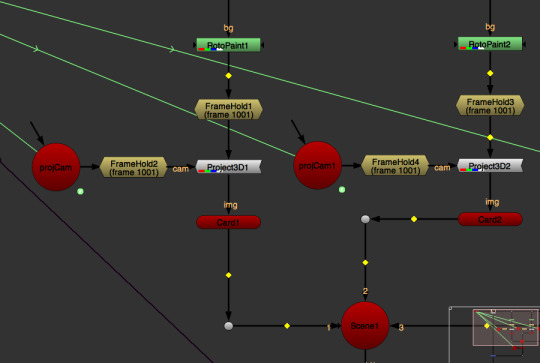
Projection Mapping
Using Projection mapping to get rid of tracker marks seen on doors.
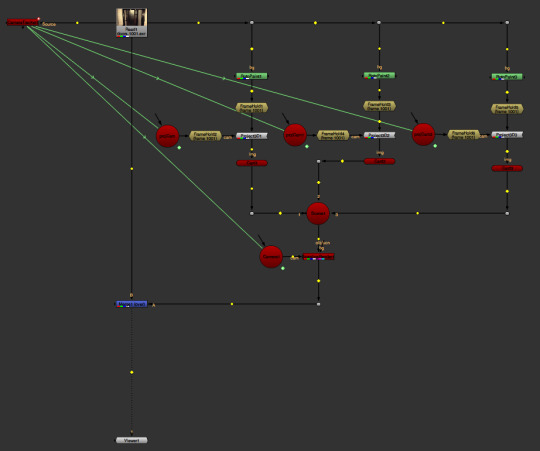
A close-up of two of those setups ...
Rotoscoping and premulting it directly within the node - ready to merge and comp straight away

Rotoscoping and using it with a Copy node to apply it to something else ...
The checkerboard represents whatever you might want to roto ... a plate, a particular element, etc.

0 notes
Text
PANIC! - FAQs, help, and suggestions
‘Read more’ for a list of 'help!' scenarios I commonly get asked about, or see you guys encounter in lectures and tutorials. Hope this helps fix some 'panic' moments …
Help! My viewer is stuck in white, or black and white -
Check that you haven't gone into an R, G, B or A channel by hitting one of those keys over the viewer. Simply hit one of those keys again until it goes back to normal, or as expected.
Everything seems really dark/really bright …
Check that you haven't got either the f stop or the Y gamma/gain sliders on anything other than normal above the viewer. If the value next to them is red, click on the Y or the f stop to send it back to normal.
My viewer doesn't seem to be updating or seems to be frozen - or, I'm making changes and I can't see them working?
Make sure you are actually viewing the node you are working on, by clicking on it once and hitting a number on the keyboard.
Also make sure that you can't see a bright red pause icon above the viewer (two red lines). If it is red rather than greyed out, you have paused your viewer's updating process. Simply hit 'P' whilst hovering over the viewer, or click it again to turn it back to grey.
I'm using a rotopaint node but it's not working?
Make sure you are viewing it by clicking on it and hitting a number on the keyboard. If it still doesn't work, try deleting it and making a new one, as weird things do occasionally happen.
If you've painted and you can't see it, also check you are viewing the frame that you are painting onto.
When I bring in an element, it's the wrong size/it creates a tearing effect/lines appear across the screen?
Check that the format or size of the element matches your project settings. Otherwise you need to apply a reformat node to it.
My roto/rotopaint/tracker/transform doesn't line up with the rest of my comp?
Check your project settings, and ensure they match the plate you are working with. If you can still see drift, check you have set up your reference frame correctly.
When I merge my cleanup back over the top of the plate, I can see edges/it brightens up/it's semi transparent, not solid?
Double click the read node for the plate you are merging over the top of and enable 'auto alpha'.
My render says it's going to take hours/my script is really slow …
If you have lots of cleanup in your script, try and write out the plate with your cleanup applied, and use that instead as a backplate - it does take a lot of render time and thinking time for Nuke to process all that paint work again and again.
Are you working with a 4k plate? Do you really have to? If you're outputting in 1920*1080, then read in a 1920*1080 plate to work with and stick to it. Proxies and reformats might work initially, but they will really take up time later on. (Besides, as much as TV salesmen will try to persuade you otherwise, 4k might look pretty but it hasn't really taken off quite yet …)
Clean out your cache consistently - choose Cache from the top menu, and clear all, regularly.
If you've got lots of Reformat nodes in your script, see if you can't just re-export the file at the right size, or write out that reformat node result to make your element the same size as your project settings. Nuke having to recalculate that resize option again and again will take up time.
Sometimes, just rebooting your computer and restarting the render does help.
When I open up node properties, the window pops out?
Choose workspace from the top menu, and then Reset Workspace.
0 notes
Text
A - Z
A list, in alphabetical order, of the majority of nodes or principles you will be using within Nuke, along with hints and tips on how to use them best.
Alpha
Information that tells Nuke how much or how little of an element should be output or shown.
An alpha can be created by rendering something out with an alpha channel. It can also be created through keying, Rotoscoping or with rotopaint.
You can see an Alpha channel by hitting 'A' on the keyboard whilst hovering over the viewer.
You can limit an element to solely outputting alpha information, or even remove an alpha channel, with a shuffle node.
Black = 0, nothing, 0%. White = 1, 100%, everything retained. Everything in between - some transparency.
How does an Alpha work? See - Premult.
Blur
If you wish to add some natural looking blur or depth of field to an element, then use Defocus or adjust the depth of field on a camera within a 3D scene, rather than the Blur node.
You can use a Blur node with a roto node if you want to soften up a shape.
Copy
A copy node is one of the main advantages of Nuke.
It lets us take alpha information from just about anywhere within our script, and apply it to something else. For instance, when keying, if we have applied a log2lin node to obtain a better key, we need to route our key back to the original footage with all that lovely, flat information shot as intended when originally shot within the greenscreen.
The A input needs to be plugged into the alpha, and the B input needs to be plugged into the backplate - or whatever you wish to apply that alpha to.
You need a Premult to finish the operation off - or else the alpha information and whatever you wish to apply it to will be left in two separate universes, never to be united - until you apply that Premult!
ColourCorrect
Use a ColourCorrect node to adjust the shadows, midtones and highlights of your element you wish to comp, to the shadows, midtones and highlights of whatever you wish to comp it into.
You can do this within the master settings, with contrast, gamma, gain … however, do not touch offset.
You can also adjust the colour and saturation of the element by clicking into the Hue ball to the right of the Saturation setting. If this is a little too subtle for you, you can always try a HueCorrect for a stronger approach.
Disable/Enable
You can disable or enable nodes by clicking on them and hitting 'D' on the keyboard. Useful for when you want to compare with or without a particular effect.
Dilate/Erode
If you wish to adjust and refine the edges of an element, you can apply an Erode node. Erode (fast) is probably your best shout, but be careful - it can occasionally damage the internal area of the alpha as well as the edges. It's possibly best applied as part of a Copy process.
Despill - See HueCorrect
See HueCorrect below - Getting rid of spill on a greenscreen plate - don't rely on plugins, as these will not always be an option for you within the industry. It's also not good to click a button mindlessly within a plugin and not understand how or why it's working within your script, as this makes troubleshooting harder later on.
Edge Blur
Can help soften up things like a harsh key edge, or a hard roto edge. Quite nicely mimics the natural falloff and blend of pixels found in original footage.
Edge Detect
A useful little node that can find and output the edge of an element. Have a look through the filters to see which works best for you. Useful if you want to create your own lightwrap, or blend a backplate into your key to help things out. Will need a Grade node directly after it to help refine the node's edge finding, as it doesn't always see the edge straight away.
Edge refining in Keying -
http://franzbrandstaetter.com/?p=452
An excellent bonus tutorial that does help if your key has some nasty edges and is a pretty reasonable and easy way of fixing things.
Framehold
Can be used to freeze the animation or playback of anything - a rotopaint or roto patch, footage, or even a camera or geo in 3D.
Grain
When denoising footage, grain needs to be reapplied at the very end of your script, right before the Write node.
You can adjust the red, green and blue values to match the original plate within size, irregularity and intensity. You can be more specific and match it by channel also, by looking at the R, G and B channels individually.
Don't forget to uncheck 'Apply only through alpha' to ensure it is evenly applied to the whole comp.
Grade
A grade node can be used to match one element to another - by clicking into the colour selection box of the blackpoint and command-clicking to choose the darkest point of the element you wish to match to (Identical process to choosing the green tone you wish to key in keylight). You can then command-click to choose the darkest point of your element in the 'lift' colour selection box to match to it.
The whitepoint and gain can be used in the same way to match the highlights or whitepoints.
You can also use a Grade node to refine an alpha, under whitepoint and blackpoint. Ensure you change the 'channels' option to alpha.
HueCorrect
Huecorrect is a great way of manually dealing with spill. With the huecorrect node open, command-click into any colour within your viewer, and watch as the graph moves around to show you where a particular tone lives on the colour spectrum (yellow vertical line) and the value (horizontal grey line).
Command-click to target the colour you wish to get rid of - let's say green - and then click the green channel within Huecorrect once the graph has frozen to indicate the tone and value of the colour.
Line up one of the dots vertically with the yellow line, and then drag downwards - carefully - to reduce the value of the chosen colour.
This may cause breaking or noise in other areas of the plate, so if you wish to be really careful, roto only the bits you wish to affect, and plug the roto node into the Huecorrect node via the mask input.
Keylight
Important things to remember when using Keylight -
1. Breakup your key into as many parts as possible. Key a few different parts of your footage at first, see where keys easily, and see what will need more work - and mask accordingly.
2. Your clip black and clip white values need to be adjusted as little as possible. Your clip black ideally should not go above 0.1, and your clip white ideally should not go below 0.8 (0.9 at best).
3. Use the Y gamma slider to help see where the grey values are, that need to be gotten rid of. Push it up to 2 for clip black, and down to 0.2 for clip white.
4. Ideally always, but especially if you key using log2lin, the key needs to be applied back to the original footage. See Copy for a reminder.
LightWrap
This node helps replicate the effect of light from the backplate affecting the edges of your keyed element or any other element you are comping in.
A is what you want to apply the lightwrap to, and B is where you want the light to come from.
Don't forget that you can apply things like Glow or Transform into the B line between the lightwrap and the element you're taking light from, to make the backplate blurrier, bigger, or adjust its position to apply lightwrap more effectively and realistically to your element.
Log2Lin
When shooting in log in the greenscreen, it gives a 'flatter' look, and retains far more information within the footage, allowing us to really push colour correct and comp the element more effectively.
We can also apply a log2lin node to footage to convert it back to linear. This results in footage with more vivid colours, and higher contrast, making keying far easier. Log footage, as it is naturally flat and dull, can have greens that are difficult to key or for Keylight to recognise.
Don't forget to apply your key back to the original footage - See Copy for a reminder.
Multiply[Math]
A common question is, how do we affect the opacity of something in Nuke, like we can in After Effects? Welp, here's your best node for that. Attach a multiply node to an element. Bringing it down towards 0 will make the element disappear, as we are multiplying by 0 or a value lower than 1.
Pushing the value up above 1 will multiply the alpha information, making something stronger or more vivid.
You can keyframe a multiply node if you want to make something appear or disappear over time.
Noise
The noise node is handy to play around with if you wish to create a soft effect like clouds, haze, atmospherics, or to make something appear/disappear with some more creative control.
Plugins
Use responsibly, if you must … and bear in mind you will most likely not be able to use them within industry.
Never produce something using a plugin that you can't produce yourself, or it could be embarrassing if you get hired to produce that particular effect.
For plugins in general that appear to fix things like spill etc., I quote Mr. Weasley, in the Chamber of Secrets - "Ginny! Haven't I taught you anything? What have I always told you? Never trust anything that can think for itself if you can't see where it keeps its brain…"
Premult
A premult node essentially completes the mathematical operation of a Copy node - or, it directly applies alpha information to an element.
The way it works is like so - Alpha information consists of values of 1 (bright white), 0 (black) or anything in-between (grey, will be semi transparent).
If you imagine that we then put the alpha directly over the top of the plate we wish to apply it to, like two pieces of paper overlaid ontop of each other - The premult applies this alpha information to the RGB values directly underneath it.
So for instance, when keying, we choose all the green and we make an alpha with black - or a value of 0 - in all these areas of green. Everything else is white, or 1.
When this is applied to the greenscreen plate, Nuke gets rid of all the green, as the premult tells it to apply a value of 0 to all the areas of green. But everything else is retained, as it has a value of 1. And that's how the keying process, and premulting, essentially works.
You could use a Premult after a Copy, or after a roto node.
Project Settings
Always ensure that your project settings are set to the size of the plate you are working on - or things like roto, rotopaint, transform or even tracking will not appear to line up.
Sometimes this can be fixed later, but mostly it can be catastrophic and will mean parts of a script have to be redone. So please do ensure this is set correctly as soon as you create a script.
Roto
Important rules when Rotoscoping:
1. Use as few points as possible.
2. Find a sensible place to start Rotoscoping from. Watch the plate a few times first and get a feel for how things animate and move.
3. Break up an element into as many pieces as you can, don't fight to retain too much within one mask.
4. Rather than feather within the roto node, use a blur or an edge blur after it.
Rotopaint
Important things to remember when using the Rotopaint node:
1. Try and have one rotopaint node per patch when cleaning up. This makes it easier to control later on, especially if you end up having to change the shape or animation of a patch, or revisit it.
2. ALWAYS VIEW THE ROTOPAINT NODE WHILST WORKING ON IT. Or you will see nothing, nada, zilch! This is the most common issue or problem that comes up. Get into the habit of creating a rotopaint node and viewing it straight away.
3. Keep your opacity very low, around 0.1, when cloning. This helps you to blend.
4. Use the line between your source and the paint area to help you line up elements with straight edges, like doorways or corners.
5. Check out Blackboard for a tutorial on removing tracker markers.
6. Sometimes footage is fast enough and varies enough frame by frame that you can get away with cloning something out frame by frame…sometimes.
Reformat
Let's say you are working on a plate of 1920*1080, and your project settings are correspondingly 1920*1080. If you bring in a 4k element, or an element of any other size, you will need to apply a reformat node to it, or you will see a 'tearing' effect.
Reformatting can be used to change the size of an element if needed, but it can be very slow. Don't work on a 4k plate and reformat it to 1920*1080 if you are eventually writing out a 1920*1080 comp for example - just work on a 1920*1080 plate!
Shuffle
We can use a Shuffle node to output a single channel of information from an element - e.g., just the alpha information, or we can use one to output just R, G, or B if we want to key using a particular channel.
Scanline Render
A scanline render performs the pretty cool task of taking everything in a 3D scene and converting it back into a 2D element for use, so we can comp everything in that 3D scene back over our 2D plate.
If you ever see pixellation or strange quality issues in a scanline render, try changing the filter.
Switch
A switch can be used to swap between two elements, nodes or parts of a script. Simply keyframe a switch between input 1 and input 0. Be careful, this isn't always a smooth transition.
Tracker - 2D
Important things to remember -
1. The inside area of the tracker box is what you want to track.
2. The outside area of the tracker box is where you want it to search.
3. Always set a reference frame for the frame where you have deliberately lined up things correctly.
4. You can export multiple things from a Tracker - like a transform node, a corner pin …
Tracker - 3D
Important things to remember -
1. Try and tell the tracker as much as you can about the camera … but sometimes, Nuke can do just as well without it. Always be prepared to try different things if the first way didn't work.
2. Nuke recognises floor planes really well as, well, flat floor planes, but it doesn't do so well with vertical planes. When producing a Card from chosen points in the scene, you may need to zero out all the rotational values.
3. Always preview features and set them as high as possible - around 500 is normally good. (In the Settings panel)4. You can use a colourcorrect and a sharpen before the cameraTracker node to help it identify things within the plate a little better, by darkening it up or lightening it, increasing contrast, etc.
Write
We use the Write node to render out from Nuke. The write node will actually do you a lot of favours if you tell it what you want to do directly.
If you want to write out a basic .mov - simply click the folder icon next to file, click and navigate to where you want to save it, and then add the name of the file at the very end of the path it will have created for you. Finish with .mov, and the Write node should fill in the rest.
If you want to write out an .exr sequence - as above, but instead of .mov, write .####.exr. Always use four #'s or frame pads.
0 notes