#tutorials for downloading hq clips are helpful for video edits too
Text
about to learn how to make gifs just for murder at the end tbh
#sunny txt#tutorials for downloading hq clips are helpful for video edits too#but who has the time YKWIM?#<—— man who finally has interest in fandom contribution beyond fanart in 2023
1 note
·
View note
Text

For this gif tutorial I’m going to try to keep it as basic as possible, I may add a few tips for coloring at the end, but for the most part this is going to be how I make my basic gif. Also I’m not going to use my vapoursynth to process the video beforehand, just because I know not everyone uses it and it’s harder to learn. This is going to be just a downloaded mp4 video through the gif process. Don’t let the idea that this is a BASIC TUTORIAL fool you, I’m going to try to teach you a lot of things. It’s gonna get wordy, but i will try my hardest to keep the process easy. I’m just going to explain what things do instead of having you just copy + paste my method and not know what it means. okay? okay.
Before we start though, if you plan of giffing live stages you either need to accept the they will not be super crisp and clear OR learn how to use avisynth/vapoursynth to resize the videos without quality loss.
If you just want to gif music videos or variety shows then this should still give you HQ gifs.
Other notes:
try to ONLY use 1080p and up video if possible, maybe 720p if you’re really desperate, but anything under that... it’s not going to look good at all, so try to avoid using them.
The Photoshop I am using is PS 2020, so all my screenshots will be from that version and with my weird set up. But I’ve been using pretty much the same method since cc 2015 so other than the fact that some placements and names are tweaked, it’s the same. (If you can’t find something on your version shoot me an ask and I’ll try to help! And asks I get on this tutorial I’ll link HERE for future reference)
CUTTING VIDEO
To cut videos I’ll just use my quicktime player.
I use edit > trim to select the portion of the video I plan to gif and save that as it’s own new mov file.
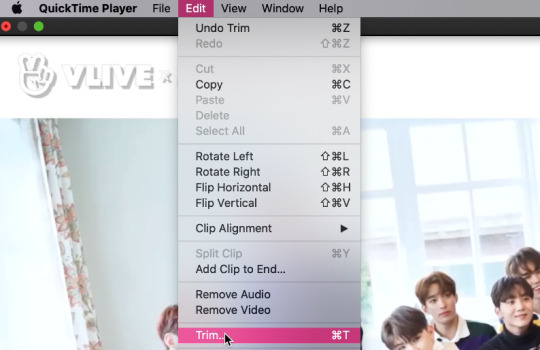
which pops up this tab

that you just slide until the part you want to gif is selected

then just save it as a new video and your done with part 1
ENTER PHOTOSHOP
Now what we’ll do is open our photoshop and import that clip into layers
FILE > IMPORT > VIDEO FRAMES TO LAYERS and select your video.
A small pop up will appear to show the clip you’re opening, you can trim it further here or just keep going by clicking okay
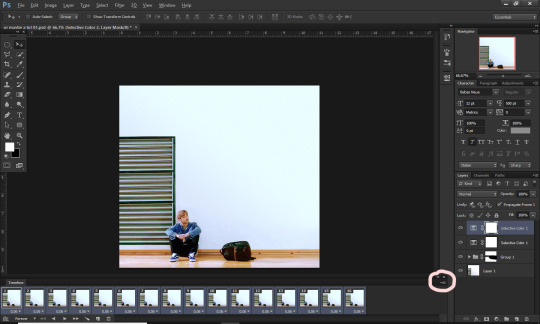
my setup is weird for drawing BUT you should have it looking remotely like this:

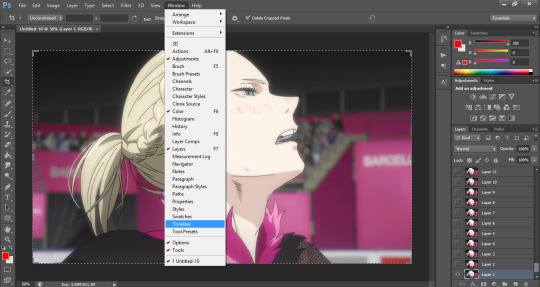
The things you will DEFINITELY need to see are TIMELINE, LAYERS, ADJUSTMENTS. If you don’t have these sections you can add them to your screen by clicking on the WINDOW tab at the very top menu bar and clicking on them

LAYERS - this is pretty self explanatory but each row is a layer in the gif. the more layers the bigger the gif will end up, the longer it plays. So bigger clips will have more layers and end up as larger gifs in the end.

TIMELINE - This is where you can edit the gifs timing (make it faster or slower)
We’ll be doing a bit of work with it so it’s important to know it well
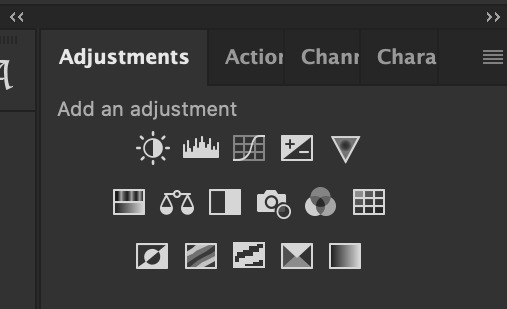
ADJUSTMENTS - Best friend and worst nightmare. this is where ALL the tedious recoloring is done. VERY rarely would you not use these. 99.9% of kpop things are filmed through a green or blue lense so you’ll want to fix that to not have ghost idols
So, Let’s make a gif
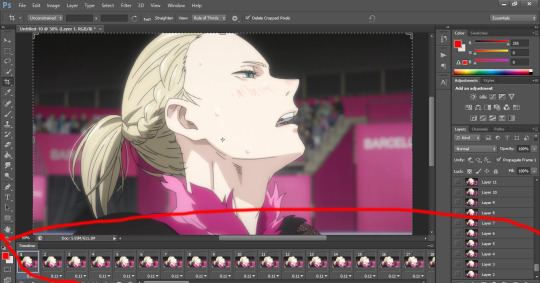
Step 1 - In the top right corner of your timeline is a set of lines, click there and then click SELECT ALL FRAMES

under each frame is a time stamp (this video’s is 0.04) this decides how fast each clip goes by, or how quickly the gif moves. Personally I prefer slower gifs, but I say anywhere between 0.04-0.06 is a decent speed.
Step 2 - with all the frames selected, click on the small down arrow next to any of the frames and change the speed to your liking. (I’m going to use .06)
Step 3 - in that same tab of lines we’ll now click CONVERT TO VIDEO TIMELINE, which will change our Timeline to look like this:

Step 4 - Back in our very TOP menu we’ll click SELECT > ALL LAYERS, then on the TOP menu click FILTER > CONVERT FOR SMART FILTERS (this might take your computer a minute since our File is still pretty large.) Now our Time line will look like this:

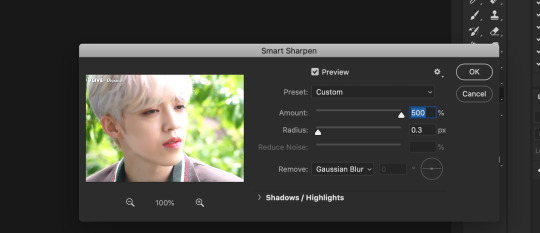
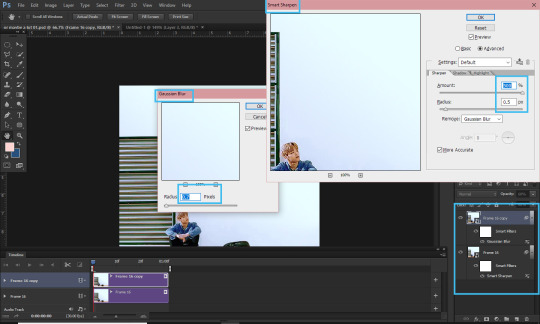
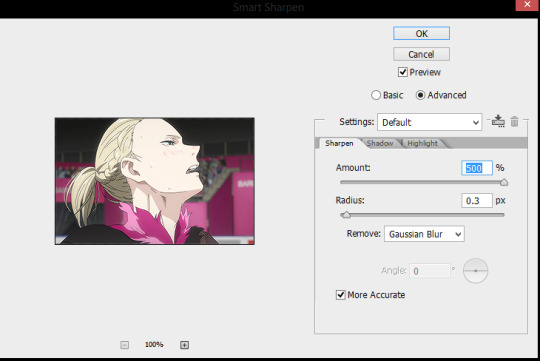
Step 5 - Sharpening
This one is VERY MUCH something you’re going to have to play with to get your settings to be how you like them. It’s also where I’d use topaz adjustments, BUT since I said we’re doing basic PS gif we’re just going to be using smart sharpening. SO:
in the TOP munu again, click FILTER > SHARPEN > SMART SHARPEN
A pop up window will appear and you can edit the settings to your liking. Mine:
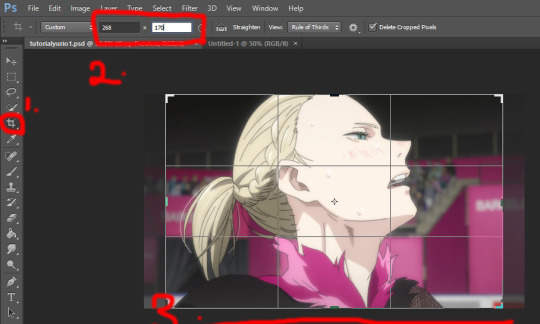
Step 6 - Resize your gif or crop it to tumblrs standards: big singal gifs have a 540px width || Two gifs use 268px || and three gifs use 177/178px
To do this we’ll use the crop tool and type in our dimensions in the menu bar:

and then crop to your liking. (this doesnt resize the gif it just crops to the correct ratio so we still have to shrink the gif)
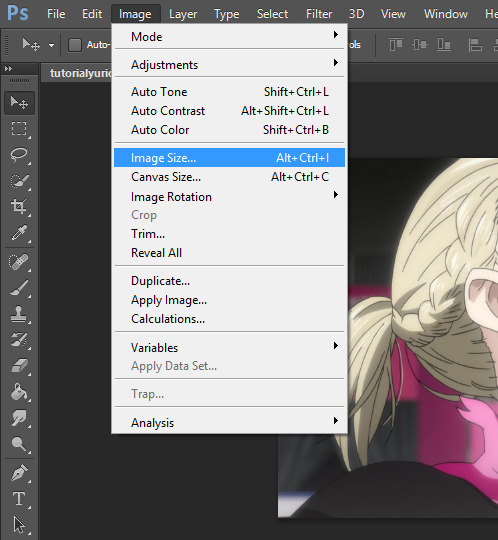
Next, we’ll resize the gif to that size in the TOP menu click IMAGE > IMAGE SIZE a pop up menu will appear and you’ll type in your resize ratio and click enter.
Now technically thats a gif. it’s TECHNICALLY done. but mine is white washed and there are words on it that I dont want so onto the coloring and blurring.
First I’m going to show you how I blur text on gifs. because text is EVERYWHERE in kpop content and it’s hideous and I hate it. so lets kill it.
BLURRING LETTERING
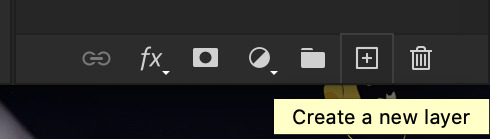
First we’re going to add a new blank layer to our LAYER TAB by clicking the little box with the + inside at the bottom
Sometimes doing this can mess up the timeline’s selection but its SUPER easy to fix so lets do that.
So in our timeline we have these two bars on each side that select what part of the gif will play. this is also where you can readjust your gif if it has extra frames at the end, or it ends up being too large and you have to make the gif smaller to save it. Just click and drag the bars back to where our gif actually ends, and all is fixed!

Now on our new layer we’re gonna take a paint brush (one of the ones with a lot of fade NOT the solid circle ) and paint over where the words are like so:

MAKE SURE ITS ON OUR BLANK LAYER AND NOT THE GIF LAYER!!
I know it looks stupid but trust me okay.
Now in your LAYER tab we’re going to duplicate our gif layer by right clicking on it and selecting duplicate.
Then we’re going to drag the new gif layer so that it’s above the paint layer in our LAYER tab :
Now, right click on the top gif layer and select CREATE CLIPPING MASK. it should put a little down arrow to the left of the picture, toward the paint layer. This means the gif is ONLY visible where that paint is now.
So we’re going to click on FILTER in the TOP menu again (while we still have that top gif selected!) and Go to BLUR > GAUSSIAN BLUR. a pop up menu will appear and you can just drag the radius until the text is as blurry as you want it to be. (also IF you missed part of the text, you can just go add more paint to your paint layer and it will blur wherever you paint!)
so now my gif is like so:
So now we’ll color him, because he’s pretty washed out.
ADJUSTMENTS
This is where I’m going to be the least specific about what I do and more about what tools do, so that you can learn how to color things the way you like them!
The Adjustment tab on Photoshop has 16 options but I’m really only going to talk about 6 of them. We’ll do it in order though. All the actual adjustment tools will open in the PROPERTIES tab
Brightness / Contrast - Pretty self explanatory, but definitely should be toward the end of your coloring, as if can effect the quality a lot. Small adjustments do A LOT so don’t go crazy,
Levels - Levels is all about the balance of how dar or light your gifs will be if you adjust in the RGB layer it will adjust for the entire image, but if you change the selection to RED/GREEN/BLUE it will adjust just those colors hues. Also there are three small droppers to the left of the graph. using those you can select which part of the gif you want the image to recognize as the lightest/darkest part of the gif, and the tool will adjust the gifs coloring to that point. ( play with those droppers! magic happens i swear!)
Curves - Kind of like levels but instead of how light or dark the entire image is it works more on contrast. REALLY play with the curves options, i’m sure most things you can do with other tools can also just be done in curves if you’re patient enough to learn
Vibrance / Saturation - Vibrance will make duller parts of an image higher contract and brighter and saturation will make everything a more neon shade. or in reverse lowering vibrance will dull out the things that were already neutral and saturation will dull out the more vibrant parts of the image (usually reds)
Color Balance - Good for fixing tones. so if a live stage is SUPER BLUE!!!!! you can readjust and calm down the blues to dull them out or get rid of them completely. Again play with this its insane what it can do
Selective Color - adjusts the different colors in your image without touching the other colors. if you wanna touch the reds, make them pinker but not change the blues and greens, you do it here
If you want MORE drawn out explanations of what each of the 16 adjustment layers do here and here are actual articles you can look at. But it’s all about practice. playing with all the adjustments alone and together. Finding out what you like to do!
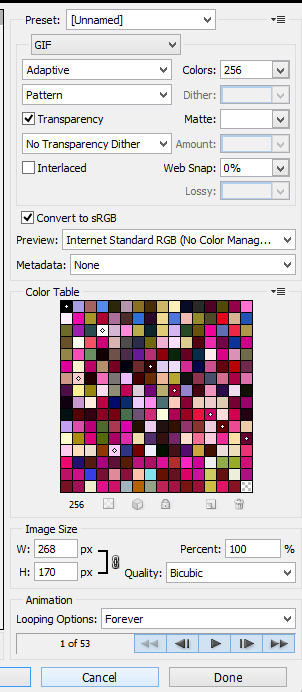
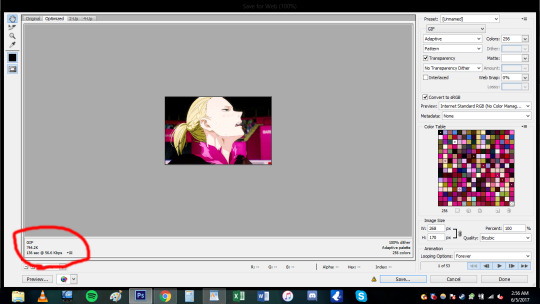
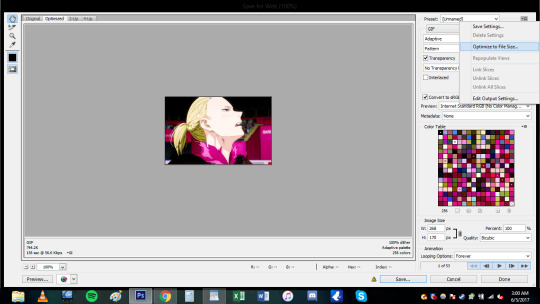
Now when you gif is ALLLLL colored and you’re ready to save it we do FILE > EXPORT > SAVE FOR THE WEB and a whole new window of options pops up. I’ll give you two examples of how to play with those options and then we’re done!

keep in MIND tumblr’s gif limit is 10MB which is pretty huge now, but still watch your gif size!!!!
AND SAVE your done!

I hope this was helpful! Let me know if you have any questions,again I’ll have an ask tag for it and it’ll get linked HERE if people end up needing help!
Happy giffing!!!
#drm.pst#drm.txt#Gif tutorial#this is LONG okay please be aware of that before you open it#als i did NOT reread it because it took me 3 hours to type out so it's probably a grammatic nightmare#BUT i'm JUST under a new milestone so i'm gifting this early because i had the patience to do it today lmao
98 notes
·
View notes
Note
hello!! your gifs are always so well made and hq!! may for a in-depth tutorial? and also what ps version do you use ^^ thank u ❤️
Ahhhh thank you, and I’m not quite sure how in depth you want but I’ll try! :D & I use Photoshop CS6 (but a lot of other programs are used in the process). Everything will be under the cut ♡
*I do have to warn you, I’m pretty sure my process is a little more time consuming and different programs are used compared to other gifmakers because my Photoshop doesn’t load videos directly and I’m only an amateur gifmaker so I’m still learning :)
1. Download the video in HQ! Honestly I find online video downloaders to be fine, they don’t decrease quality much. I use flvto.com or this program for Youtube videos and this site for VLives.
2. Then, I clip the parts of the video that I want to gif (as well as crop while I’m at it just in case I can’t crop correctly in Avisynth or PS// I use the panning tool if people move out of the frame or something). I use a video editor called Sony Vegas but honestly, iMovie or Windows Live Movie Maker works just as fine. Make sure to render in the highest quality setting!
Tip: I don’t know if other video editing programs have this, but on Sony Vegas, make sure to disable resample when rendering! To do this: right click on your clip > Switches > Disable Resample.
Resampling is needed whenever frames need to be synthesized due to mismatched frame ratesDisable resample prevents frames from being blended when the source and render frame rates differ, so frames are either dropped or duped (at least that’s what I got on online places since I’m not quite sure how to explain it, I just know there’s a difference in playback).
3. Now it’s Avisynth! It’s only compatible for Windows, so sorry if you’re a Mac user and you’re looking at this tutorial for reference (however I’m sure this other program called Vapoursynth is compatible with Macs! I just don’t use it).
Anyways, I used this tutorial to install Avisynth and learn the basics (I’m still learning so I can’t help you too much with this area of the tutorial if you have other questions. But I also go back to this tutorial when I get confused about something).
Here, I just resize with this chart in mind:
Also I set the Preprocessor to debilinear!
4. After Avisynth, I have to convert the video into frames since my ps can’t load videos. I use this program to do it. Make sure to check the “every frame” option!!!
All my files are on the desktop so I could find it easier by the way because I end up with 2 video files and a folder full of frames each gifset.
5. Once I load the frames into PS (and set my frame rate to either 0.04 seconds or 0.05 or 0.06), it’s coloring time!! Just mess around with the adjustment layers. I often use Selective Color, Levels, and Curves but Color Balance and Brightness/Contrast are easy for beginners!
I often times color on the frame animation timeline rather than the video timeline but honestly you can color at anytime.
And I find that reaaaallly contrasting the gif makes the overall look much cleaner and crisper (especially if you don’t want to go through the hassle of Topaz). Upping the Vibrance just a little bit makes the gif more colorful as well, since I feel like the color gets washed out a bit when you export the gif.
6. After I color, click on the button circled in the photo and click Flatten Frames into Layers.
7. Convert back to the Video Timeline and select all those flatten frames. After highlighting all the frames on the Layers panel not the Video Timeline, go to Filter > Convert for Smart Filters. That’s how you start to sharpen your gifs.
8. Sharpening: I used to do the thing where I duplicate the smart object and Gaussian Blur + Sharpen and I still sometimes do with only HQ videos.
These are my settings (make sure your blur layer is on top and set the opacity/fill lower. I use 60% most of the time.
Now, I go through the pain that is Topaz:) Topaz is a bunch of plugin filters that you have to download and install and it takes FOREVER and I only started using it but basically I do Topaz Denoise, Topaz Clean, and then Smart Sharpen.
These are my settings and the Smart Sharpen depends on the gif but the Amount is still at 500 and the Radius usually just ranges between 0.2 and 0.5.
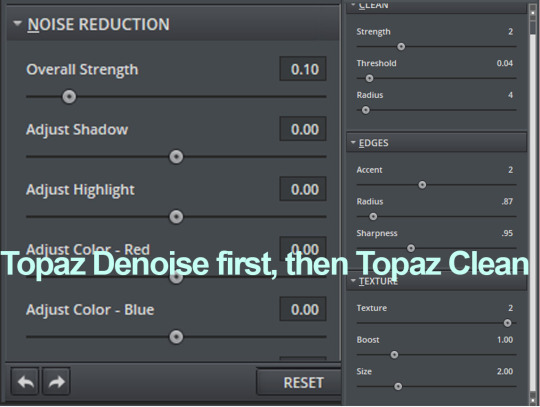
I’m still an amateur so I really have no idea how to use Topaz correctly haha.
9. NOW YOU’RE NOT DONE YET UNFORTUNATELY ;___; You have to click those three lined bars at the edge of the timeline again > Convert Frames > Flatten Frames Into Clips. Here’s a tutorial with pictures!!
10. When that’s done, convert it BACK into the Frame Animation Timeline (video tutorial), find those small, three lined bars again on the right side and Make Frames From Layers.
For some reason, Topaz converts one extra frame from the gif from wherever you were on the timeline so remember to delete the first frame after converting it back!
11. Set your frame delay rate.
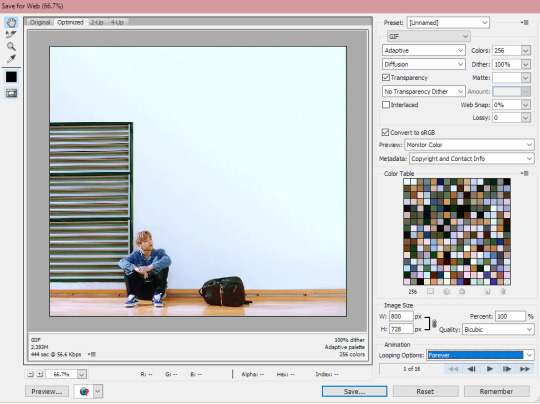
12. File > Save for Web AND YOU’RE DONE YAAAY
These are my settings! MAKE SURE YOUR GIF IS UNDER 3MB OR TUMBLR WON’T LOAD IT!
I HOPED THIS HELPED? :DD This is the first time I made a tutorial so if you need any clarifications, feel free to ask!
#I really hope I didn't forget anything ahhh#this is how i make my gifs >//< so tbh they're not as hq as others but .. :)#gif tutorial#ask#anon#i hoped you understand this~~~
39 notes
·
View notes
Text
Updated gif-making tutorial:
making and using actions to make hq gifs quickly and efficiently, watermarking, adding text/subtitle, sharpening, coloring for natural base coloring on videos
I do not use .ts files for kpop performances (just .mp4 720 or 1080), nor do I use topaz to sharpen.
You will need:
A computer (I use a PC so the hot keys i’ve listed aren’t the same as on macs)
A video editing program that can split your video into smaller sections (DVDvideosoft’s free studio is what I use, but anything similar will do)
Photoshop CS6 extended or a more recent version (you need to have the video timeline function)
a half hour or an hour to make your first set with all the actions specific to your blog url, afterwards full 4-8 piece gifsets should take around 15 minutes or less to make (if your computer is cooperating lol)
We will make actions to:
watermark
convert to timeline and smart object
add a text box with stroke and drop shadow for both 268px and 540px wide gifs for w/e font you want to use
video used // link to finished gifset // there are some images to help in the tutorial, you can ask if you have any questions!!
Result:

my sharpening action (directions in tutorial)
download
Full tutorial under the cut
after the first run of the tutorial where you make your actions, your process should be:
Cut your video into a clip short enough to import into photoshop
Import your frames
Split your frames into multiple documents, one for each gif in the set
crop and resize your gifs
Color your gifs
watermark (action)
convert to video timeline and smart object (action)
add text (action)
sharpen (action)
save for web
1. Cut your video into a clip short enough to import into photoshop:
For most youtube videos which are either 24fps or 29fps you can import up to 15 seconds at a time, for those that are 60fps the limit is around 7 seconds
2. Import your frames:
If you’re making gifs from a performance or a short drama scene, it’s faster to import all of your frames onto one document at once and then copy the frames on to multiple separate documents for the multiple gifs in the set
file -> import -> video frames to layers
make sure that the “Make Frame Animation” option is checked
3. Split your frames into multiple documents, one for each gif in the set
select the frames you want for your first gif (click first frame you want -> hold shift and click the last frame you want)
copy frames (go to the drop down menu for the timeline window -> copy frames)
duplicate any layer from the first document onto a new separate document (right click any layer -> duplicate layer -> document: new -> name the document “[your gifset name] [gif number]”
create frame animation on your new document (timeline window -> create frame animation) (if it says create video timeline instead, use the dropdown menu next to the button to change it to frame animation)
paste the frames onto this new document (timeline drop down menu -> paste frames -> replace frames)
change your frames’ timing (select all frames -> click the time under one of the individual frames -> other -> put your time) for 24 or 29 fps video I use .06; for 60fps I use .03
delete the frames from the original document, repeat for the next gif within the remaining frames on your original document

4. crop and resize your gifs
select the crop tool
chose your dimensions
crop all your gifs to the same dimension ratio
resize your gifs (ctrl + alt + i) for 3 columns it’s 177,178,177; for 2 columns it’s 268px, for 1 column it’s 540px
5. Color your gifs
I usually color to make everything as neutral as possible before doing anything specific so this is just telling how to make a neutral coloring.
make a curves layer on top of all your other layers (layer -> new adjustment layer -> curves)
color adjust for black click the black eyedropper on the curves layer and then find a spot on your gif that should be black and click it (if it becomes too dark, hold alt and click on a spot that comes up black until most of the image is now white) (image below)
color adjust for white do the same with the white eyedropper (if it’s too light, hold alt and click the white areas until the image is mostly black) (adobe’s tutorial to help you out if you need)
make a brightness/contrast layer (layer -> new adjustment layer -> brightness contrast) and add a little bit more contrast depending on your image
add vibrance (layer -> new adjustment layer -> vibrance/saturation) boost the vibrance slightly
(personal taste to make skin tone clearer and the whites of eyes brighter) make midtones warmer; highlights and shadows cooler (layer -> new adjustment layer -> color balance -> adjust layer according to your image)
brighten highlights and darken shadows (layer -> new adjustment layer -> selective color -> blacks: add black -> whites: subtract black)
group all your coloring layers together (select your coloring layers -> create group -> leave the name as “group 1″)
duplicate this group onto all of your open gif documents (right click -> duplicate group -> document: [your next gif file name] -> repeat for all)

6. watermark + recording your watermark action
people on tumblr suck, people on the internet suck, people on other websites suck, weheartit sucks, etc...... you want to have your url on the things you make so people don’t steal your work right?!! we’re gonna watermark EVERYTHING we make ever
(this is going to be the first action we make!! woo hoo!! you don’t want to have to be remaking this layer every time you make gifs do you)
making the action:
open your actions window (window -> actions)
create new actions set (click the icon that looks like a folder on the actions window -> name this set “gifs” or something else you’ll remember)
make sure you’re not on the first frame of your animation, any other will do
record new action (hit the circular icon on the actions menu -> name this action “watermark”)
select first frame of animation
create new text layer at the top left corner (click the text tool -> click the top left corner of your canvas)
type your url in an nice and easy to read font (I use myriad pro semibold italic at 9px height)
click the check on the text editing panel to finish making the layer
change the opacity to 30% in the layers panel
stop recording the action (click the square on the actions window)

using the action:
click the “watermark” action in your “gifs” action set
make sure you’ve selected your top layer (which should be your color group)
click the play button in the actions window (now your watermark is on your first gif)
duplicate this layer onto the rest of your gifs, always as the top layer
7: convert to timeline and smart object (action)
we’re gonna be making another action to this (yay less work for future us)
making the action:
before you make the action make sure you’re not on your first frame
record a new action, name it convert
select all layers (ctrl + alt + a)
deselect your watermark layer (ctrl + click the text layer named [your url])
select your first frame
convert to timeline (click the convert to video timeline icon at the bottom of the timeline window)
convert to smart object (right click your layers -> convert to smart object)
stop recording, you should be left with a timeline animation with two layers, one is the animation smart object which will now be named “group 1″ and the other is your watermark layer on top

using the action:
play the action (that’s all)
you should be left with a timeline animation with two layers, one is the animation smart object which will now be named “group 1″ and the other is your watermark layer on top
do this on every document for your gif set
8. adding text (action)
make the action for 268px gifs:
on a 268px wide document with a video timeline make a guide at 134px vertical (view -> new guide -> “134px” vertical)
start recording the action, name it “text 268″
create a new text layer on the guide at the top of the box, centered text, 12point font (I use myriad pro semibold italic with tracking at 50)
double click the layer, add stroke at 2px, add drop shadow
stop recording
make the action for 540 px gifs:
on a 540px wide document with a video timeline make a guide at 270px vertical (view -> new guide -> “270px” vertical)
start recording the action, name it “text 540″
create a new text layer on the guide at the top of the box, centered text, 12point font (I use myriad pro semibold italic with tracking at 50)
double click the layer, add stroke at 2px, add drop shadow
stop recording
using the actions:
use the appropriate sized action for what you’re making, play the action after steps 1-7 of your gif are done
use your text tool to put in the text for your gif
hold shift and click to slide the subtitle to the spot you want either at the top or bottom of your gif while keeping it centered
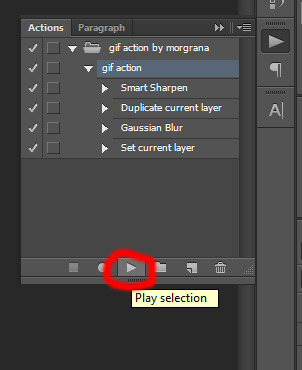
9: sharpening:
everyone sharpens differently, so you might want to change this up a bit and make a new sharpen action on your own, but this is mine [download]
there’s a low opacity motion blur layer in there so it adds a bit of softness to the edges
to use the one that I included a download of, select the smart object named “group 1″, return to the start of your video timeline, play the action on all the documents for your gifs
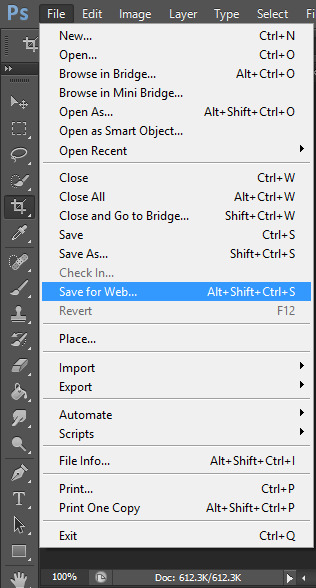
10. save for web
file -> save for web
set looping to forever
save all the gifs
these are my settings:

and you’re done!!!! boom post your super nice gifset with your watermarks so no one will steal it and it’s urs and u love it!!! yay!
#photoshop tutorial#itsphotoshop#yeahps#completeresources#gif tutorial#*tutorial#i'll make a quick template gif tutorial next week#and then one for my basic gfx bc ppl occasionally ask when i'm not being a lazy butt to make them LOL#ceohan
25 notes
·
View notes
Text
I ’m making a tutorial for @victuuri-moonandsun on how I downloaded the YOI episodes and how to make a basic gif. I decided just to make a tutorial for everyone else who wants to learn? I’m like hella basic at making gifs so ill be providing resources in hopes it will help!
The tutorial includes:
How to download
Capturing Method: VLC vs KMPlayer
Importing + Making the gif (Timing, Cropping, Sharpening, Saving)
Ill teach u how to go from:

to this:

+ A shit ton of screencaps to make up for the fact i’m bad at explanation.
++ what is grammar n spelling?
+++ cursing a lot of it
its like legit 3 am and this tutorial is so bad good luck
You will need:
Vuze
Photoshop (I use CS6)
VLC Player or KMPlayer (I will later discuss the difference usage of these programs)
I. Downloading
Sup yo! Okay let’s start with downloading the actual episodes! I usually use torrents when i’m downloading the episodes. This is what Vuze is for. Like most things u wanna be careful when you download shit off the internet but idgaf i’ve been downloading shit off the interwebs for a while.
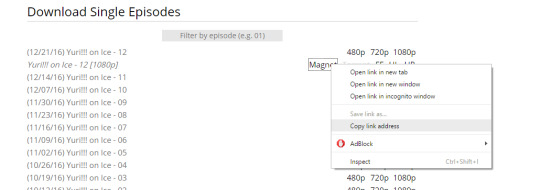
So you wanna either google “yuri on ice 1080p torrent”, but im gonna use HorribleSubs for my example. You wanna make sure you download the 1080p version of the episodes so you can have the clearest/more HQ gifs.
If you’re using the horriblesubs site then you wanna click on “1080p” for whatever episode you want and right click the magnet link.
Yay! Now we gonna wanna open Vuze. First you gonna want to click the “add” folder > Add Magnet > Paste URL > Then hit okay.
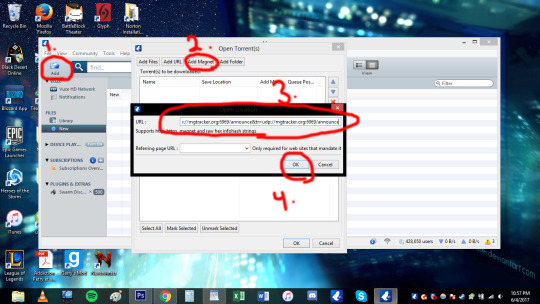
Okay. So once you hit ok this should pop up:
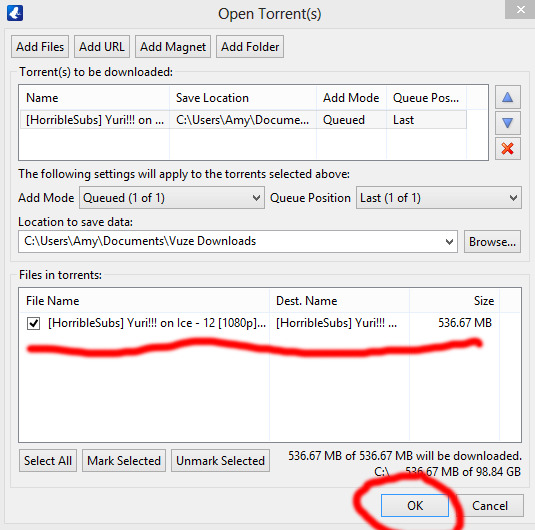
Then hit ok again! You can also change where you wanna save it at this stage too. Okay now your file is downloading and now we wait! The more seeds the faster the download.

Once the file is done downloading we can move on to actually capturing for gif making.
II. Capturing:
OKay. SO I personally use the VLC capturing way because it’s easier for me. With VLC you;re basically recording the scene you want so you can import it into Photoshop. With the KMPlayer you’re taking a shit ton of sceencaps and you’re importing each image into Photoshop. I used both methods and they both get the job done. The only time i use KMPlayer is when VLC is acting wonky. Ill show the VLC method first then the KMPlayer (cringes).
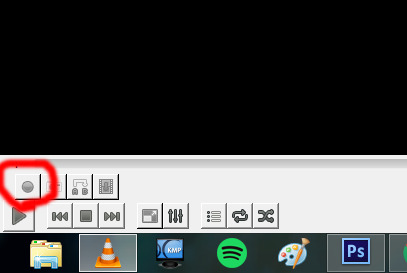
Yay VLC. My fav bby right here. OKay So you’re gonna wanna open that shit up. Okay, so the first thing you wanna do when you open the program is go to view > advance controls. This gives you the option to record!

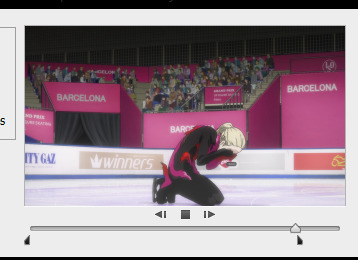
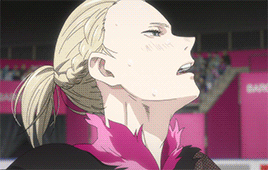
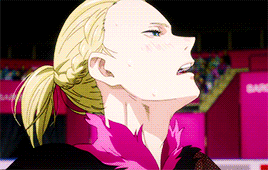
Hell yeah bro now we in business. Okay you’re gonna wanna open the episode you wanna be gif-ing. Since I showed how to download episode 12 i’m just gonna use episode 12 for this too cause fuck it man. You’re gonna wanna decide what scene you’re gonna want to make a gif of. I think for the purpose of the tutorial i’m just gonna do the scene where yurio finishes his program and creys cause hella yeha bro.
okay so for myself, i tend to start recording couple seconds (like 5-10 *my computer is really wonky ) before the actual scene because I want to make sure I record the whole scene without cutting anything out.
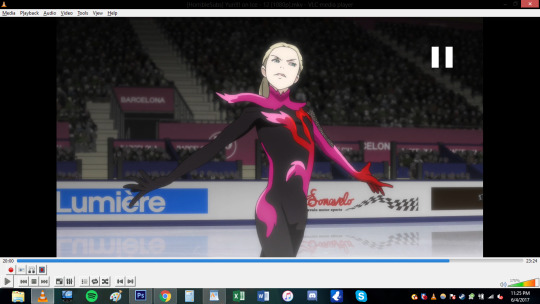
You also notice that the record button is red now. So you’re basically just gonna click it once and let it record until you want it to stop!
Where i began to record (actual a couple secs before becuz i forgot to screencap):
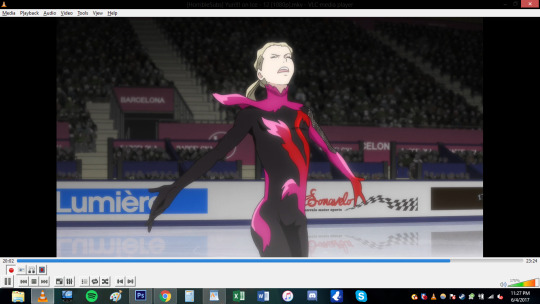
Where I ended:
***note: Notice how the record button changes while you’re recording vs not recording! (i’ve done the dumb thing where i forgot to stop recording and watched the rest of the episode .-. )
Now that short clip will be saved. my video was saved in my video file im sure you can change where you want it saved but idk how. This is where it is saved on my computer. Probably can search “vlc” on your computer if it is absolutely lost (sorry I can’t help much in finding the file).

Basically after this step you’re done deezy. You can skip the KMPlayer and go directly to the gif making portion of this shit tutorial.
OKAY FOLKS HERE’S THE KMPLAYER TUTORIAL ON HOW TO DO GIFS HAHAHAhahaha *sobbing*
I need to explain this program a bit more. So unlike VLC you’re not recording or anything like that. This captures screencaps into jpg or png files. When you do the VLC method, photoshop will make the screencaps for u. This method you’re gonna have to load the each photo (This usually takes photoshop longer to load for me, but than again my computer is old as shit so it may not matter to you).
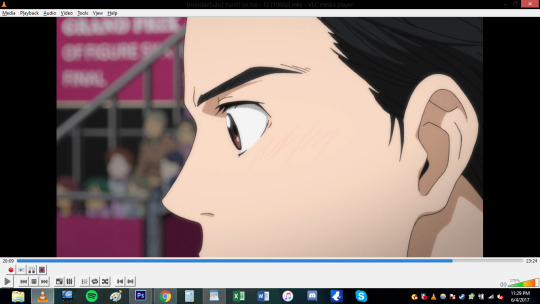
OKay u gonna wanna open that satan spawn and open the episode u wanna do. Again here im gonna do the same scene cause yeah. Basically just go to the scene you want.

Okay here the annoying shit happens. SO unlike VLC for me, I don’t have to a big gap of recording time. I can get closer to the actual scene and want and start capturing (ctrl+G).

When you hit ctrl+G, this window pops up and this where all the settings happen. 1. You decided where you all the pictures will be saved! 2. You can pic the image quality. I go for JPG because my computer just cant handle doing png. If you’re computer can do the png go for it. 3.) Seconds refers to how long you want the program to capture for. I just put 5 seconds to make sure i get the whole scene. You also want the images to be in the original size. 4.) I WILL DISCUSS THE TIMING THING MORE INDEPTH LATER, but for the time being i’ll do every 1 frame.
When you click start on the small window your video has to be playing to actually capture. I just hit start and hhit play cuz fuck it.
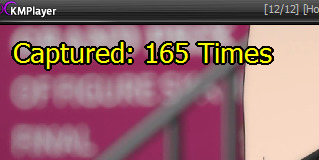
When the program finish capturing this will pop up in the corner. *note: I ended up doing 10 seconds because my computer hates me. So there’s a lot more caps than i needed. this is what you end up with!

A shit ton of fucking photos! YOU READy TO GO TO PHOTOSHOP.
III. IMPORTING-VLC
*if you need help downloading photoshop send me an ask and ill try my best to help you. I downloaded ps cs6 a long time ago and the link i used to download it doesn't exist anymore.
THis step is gonna be different depending on what method you used for the capturing. I’m going to begin with the VLC method. So you’re gonna wanna go to file > importing > video frame to layers.

Find the clip file and hit open. a window will open and now you can select what part of the video you want to actually gif! the two point thingies on the bottom are adjustable. FOr example maybe you recorded too much in the beginning? drag the 1st arrow thing to where you want the gif to start. Same with if you recorded to much at the tale end of the video. You can adjust the right one.
Make sure to have frame animation box is check.
And now we’re at the frames part.This is where I feel conflicted and you will see why when I get to the timing part of the video. (I use to make a lot of gifs for real action tv shows and this is the first anime I ever edited and I just feel like i haven’t found the best timing yet?). For this screencape i left the limit box and just do every frame.

So my video was too long at the end and decided to cut that unwanted shit out. (you can hit the play button just to make sure you’re happy with what you got. Hit ok when u done deezy
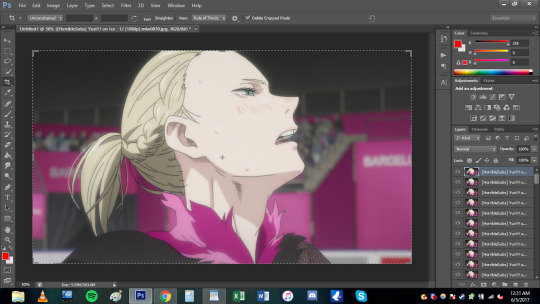
THEN BOOM THIS IS WHAT IT LOOKS LIKE. THAT BOOTIFUL ASS YURIO’S FACE HELL yeAH. Okay. So on the right hand side you have all your layers. but we missing the timeline bro. SO you go to window> timeline
DAMN LOOK AT YOU YOU’RE READY TO MAKE A GIF. You can skip ahead and learn about timing. Keep reading for the KMPLAYER way.
III. IMPORTING- KMPLAYER
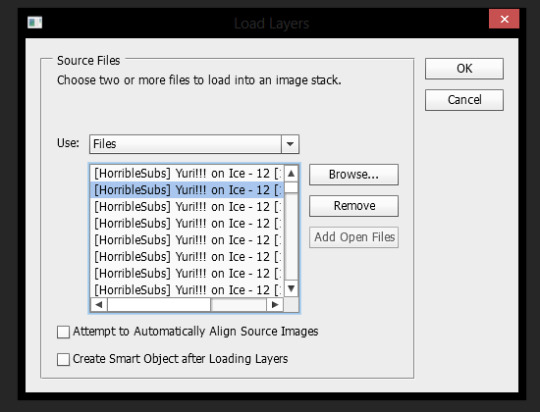
oKAY. You’re gonna wanna go to file> scripts > load files to stacks
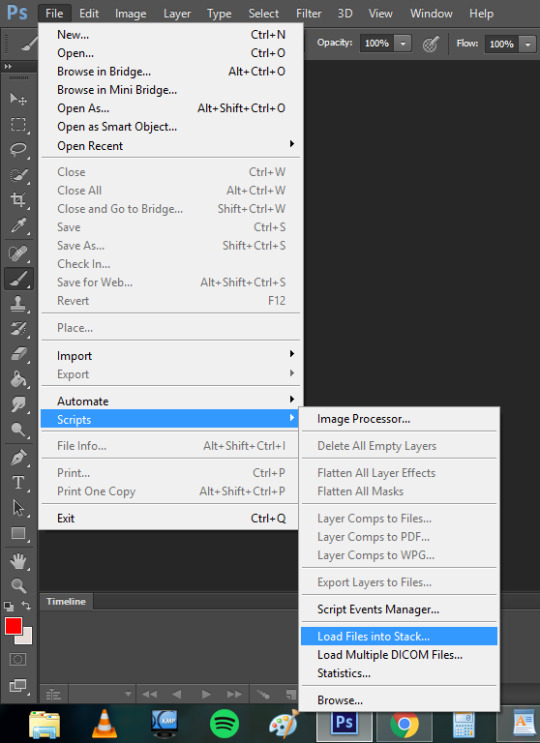
A window will pop up and basically you’re gonna select all the screencaps you want for the gif and hit okay.
This shit takes my compouter f o r e v e r (compared to the VLC method.) to load and even longer afterwards when it’s being uploaded as layers. This method took my computer to load the files 3 minutes compared to the 5 seconds the VLC method took me. Like i’ve mentioned before it might just be my ancient ass computer’s fault. But this it what it looks like when it’s done loading
Okay you;re gonna wanna do the same step as VLC to create the timeline (Window>timeline).

But because this was loaded in differently the the stacks will not automatically have frames. You’re gonna want to click create timeline and you will notice you have one frame only.
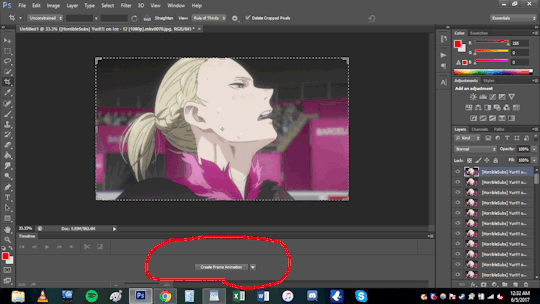
So on the top right corner of the timeline you will have the option to make the layers into frames.
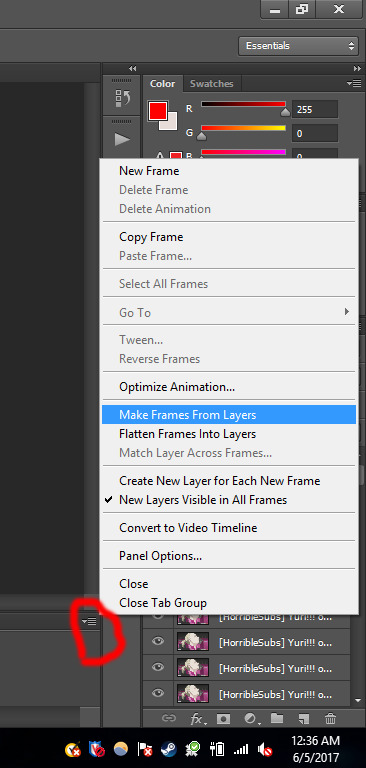
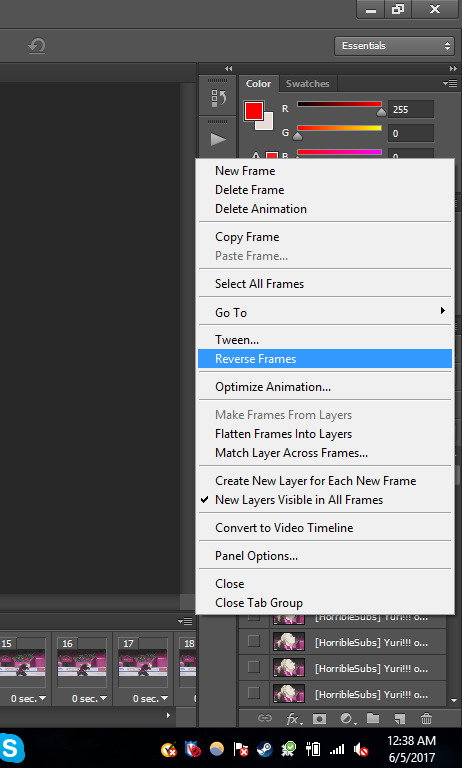
Now you maybe noticed that the frames are fucking backwards son like wtf man. a simple fix to that! in the list of options where you made the frames from layers, you can reverse the frames.
NOW YOU’RE DONE DEEZY. WE CAN MOVE ONE.
IV. TIMING
OKay this gets really iffy for me. I’ll just basically show you the times I use and what it may look if you capture every frame of you choose to do every 2 times (anything else isn’t recommended). In this section it’s what I use and probably not the best, but you can play around with photoshop and you can do whatever the fuck you want yo!
Anyways as you can imagine if you decide to do every frame youre gonna get a shit ton of layers(i’m gonna be working with the vlc method from this point on. any kmplayer question can be sent my way!). But it may look smoother! *will make a note on this*. Downside, the file is prob gonna be WAY bigger.
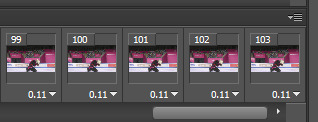
For ex: Every frame. 103 FRAMES FUCK MAN.
Every 2 frames: 53 frames
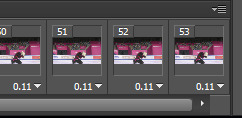
So it’s basically about half cuz u know math
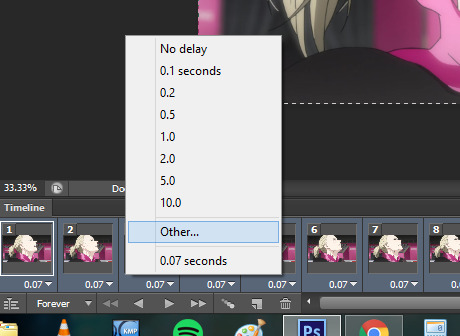
OKay. so when i do gifs I usually set the time to “0.06″ but I put “0.07
for every 2 frames. To change the timing make sure you have all the frames selected (click the first frame then go to the last frame and Shift+click it). Now that all the frames are highlighted you want to hit the down arrow and click other. This is where you set the time and hit okay.
every frame @ 0.06 (No cropping/no coloring/no sharpening)

every 2 frames @ 0.07

So it’s really personal preference. I just have it so ingrained to do every frame at 0.06 since i started making gifs years ago, but i feel like the every 2 frames at 0.07 looks smoother for anime? Really guys experiment and see what you like better!
V. CROPPING
Yay lets get to cropping! These are the current dimensions for tumblr
one picture/gif: 540px width
two pictures/gifs: 268px
three pictures/gifs: 177px, 178px (middle), 177px
spaces: 4px
-itsphotoshop
I always crop my gifs. I just think they look nicer when they’re crop.To start cropping you either wanna hit “C” on your keyboard or clip the crop tool. Afterwards you can put a value of the dimensions (i tend to do 268x165 or 268x170 when I to he gifset with 8 different gifs). Now you can drag the box over the gif to position it where exactly you want the focus to be. You either double click the box or hit enter when you wanna crop.
You might not want to have it dead center. so yeah this what it looks like if you just dragged it:
Damn yurio is looking good dead in center, but you noticed the 2nd half yurio isn’t in the middle no more. When you’re cropping you wanna keep this in mind. (you can always make two separate gif to have it all centered but i can make a dif tutorial for that).
This what it looks like if i decided to keep the cropping in the center:

Overall both scenes are more centered.
BUT WHAT IFF YOU JUST WANNA ZOOM IN ONTO YURIO’S FACE?? i got chu bro. I’m goning to delete the 2nd half of the gif for the purpose of this example. So what you’re gonan want to do is drag a side of the square until you’re happy with what you want.

Here i just dragged the bottom. Since I have my measure inplace from before, no matter what side i drag it it’s always gonna be the same ratio of 268x170 so no need to worry !
Regular crop:
Crop to zoom in on the face:
THE MORE YOU KNOW ABOUT CROPPING :D!!!
OKay. Once you’re done cropping you’re gonna want to resize that!
I’m going back to the original gif with both scenes.
To resize an image you either can hol the CTRL+ALT+i or go to image>image size
a window will pop up and youll type in what size you wanted. Because i had the dimensions typed in while i was cropping it will basically do the ratio for u

the original size was 1702x1080. Once i typed 268, the program kept the ratio and changed the height. SORRY IM NOT EXPLAINING THIS WELL I REALLY DONT KNOW HOW.
We went from this:
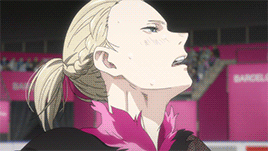
to this:

it’s not a HUGE change but there is a change!
VI. Coloring *bonus
I have no authority on color tbh It takes me to forever to color shit and i’m h o r r i b l e at it. so i aint gonna discuss this much but here what coloring can do for u!
original:
to this garbage:
I don’t really like it but i just did it quickly for the sake of this tutorial.
If you wanted an idea of what I did

The best way I learned to color was from PSDs others made or just fucking around in PS. Here are some resources:
PSDs: x x x
Tutorials: x x
VII: Sharpening:
Oh man okay so i use an action for my gifs but the thing is i downloaded a long ass time ago. It may be this, but im not entirely sure. This hella easy yo!
so you wanna select all the layers:

then you wanna convert the frame animation to a timeline (make sure you changed the time you want the frames to be before you convert!)

You will notice the frames changed on the bottom. Now you wanna go to filter>convert to smart layer

Now you only have one layer!
With this one magic layer you can sharpen all your goddamn layers all at once.
If you don’t have the action you can do the basic sharpening. Okay now go back to the filter tab>Sharpen>smart sharpen. I have use this option in YEARS but i believe the kinda go too was this:
and hit okay!
Before sharpening:

After sharpening:

the lines are more defined in the 2nd gif, If you were able to download the action this is how you use it.
GO to Windows> actions.

WHere the red circle you click, and find the option for load actions. Once you load it you wanna make sure you selected the smart layer and hit th eplay button and the action should sharpen it for u
BOOM. your gif is sharpen. So lts compare all three now.
No sharpening:

Smart sharpening only:

Action (Smart sharpening + blur)

I like the action th most because it’s not as intense as the smart sharpening only. WOW U FINISH A GIF CONGRATULATIONS NOW YOU WANNA SHOW THIS BABY TO THE WHOLE WORLD RIGHT? WELL IMMA SHOW U HOW,
VIII. SAVING THAT SON OF A BTICH
So basically you either hold alt+ctrl+shift+S or file>save as for web
and a window aPPEARS. These are the settings i use to save:
BE CAUTIOUS OF THE SIZE OF THE GIFS: I BELIEVE THE MAX SIZE IS 2MB

this gif is under 1mb so im safe yo! Some tips if gif is too large is to add a selective layer>black> then +5-10
another tip is to use optimize tool if yOU HAVE TO: go to the top right corner

now u done deezy
u save that shit
and cry
send me an ask if you need shit cleared up.
125 notes
·
View notes
Last Seen Blogs

aliciasilvastuff
"Un rincón del Paraíso"
dalokohska
dalokohska
nitwentyone
ni21
wundertute
Wundertüte

hazssafehaven
Haz's Safe Haven