#polymodeling
Text
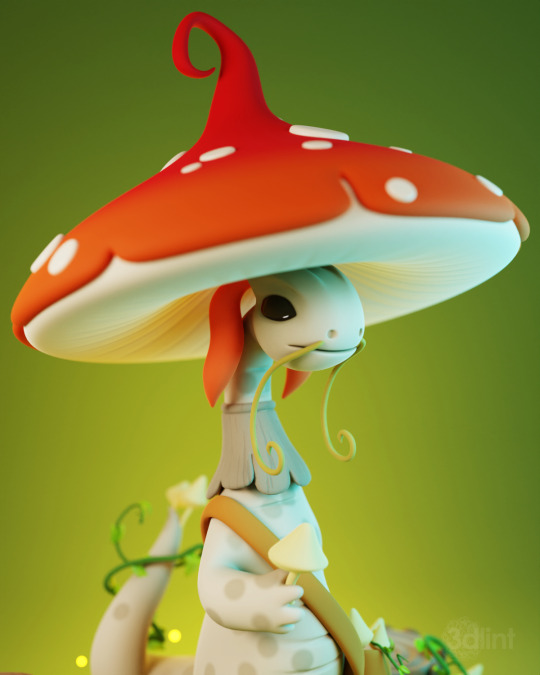
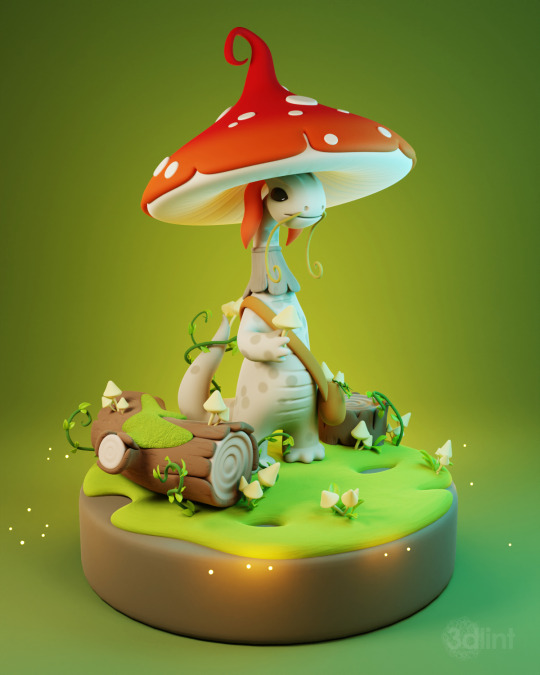
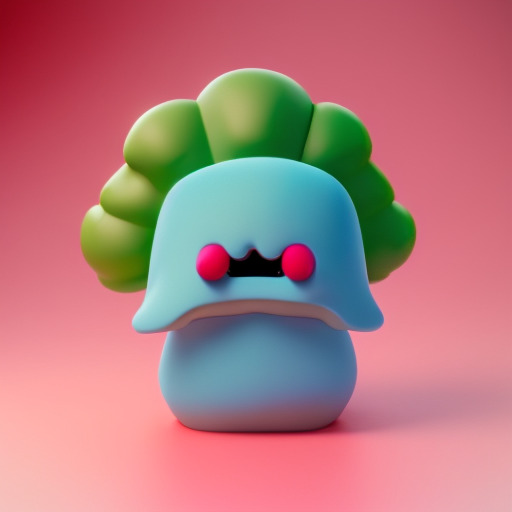
Mushroom Dragon 🍄🐉
Another one in my year of the dragon series, I present to you the lovely mushroom dragon! I’ve always enjoyed the forest fantasy creatures so this was a special treat to set up. Made with Blender/Cycles, hope you like him.

Wireframe:

Camera animation:
youtube
Thank you for taking a look and have a great week!
#youtube#3d#3d modeling#art#artwork#b3d#blender3d#lowpoly#stylized#polymodeling#dragon#dragon love#dragon art#nature#forest#fantasy#fantasy art#cartoon#3d animation#mushroom#fungi#mushroom art
84 notes
·
View notes
Photo


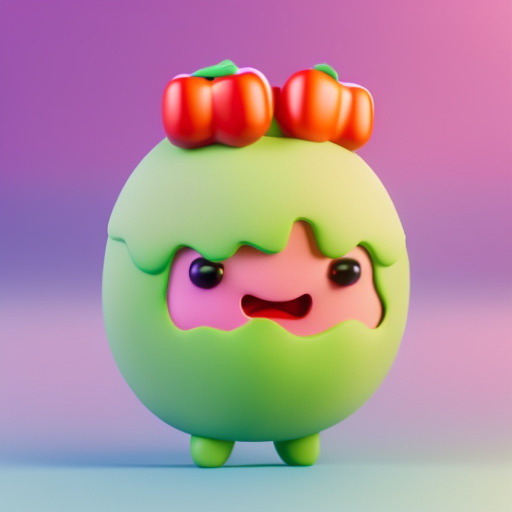
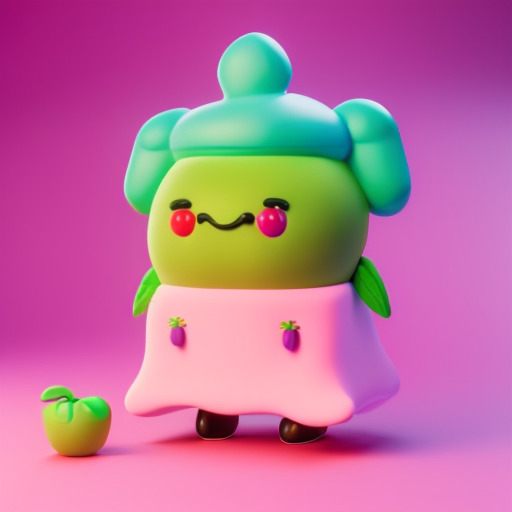
Anthropomorphic Fruit & Vegetables
0 notes
Text
Road to 3D- Sam Manson (Part 2):
Character Modeling


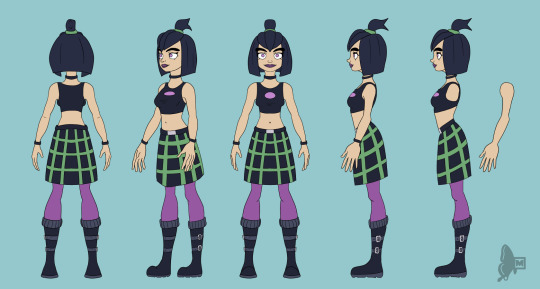
Part 1: Model Sheet
Welcome to the second and final part of this project. Since people have asked how I do my models, I decided to make a write-up on how I approach these things using the example of a model of Sam Manson. The first part focused on how I make a model sheet fo a 3d model the second part focus just on the modeling. There are many more things about how to create a fully realized 3d character that I could make whole other chapters for, like UV unwrapping, texturing, shading and rigging, but I don't have enough knowledge past the fundamentals on these topics that could warrant their own seperate posts.
Additional stuff before I continue:
I use Blender for all my model
This not a beginners guide or something similar, it would be helpful to already know the general workflow of a modeling, how to use Blender and know different terminology like edgeflow, retopology etc.
If you are a beginner and want to learn more about character modeling I recommend the videoseries "Modeling for Animation" by Dikko on Youtube
Maybe I make some reference some tricks from this videoseries
That's it, let's go!


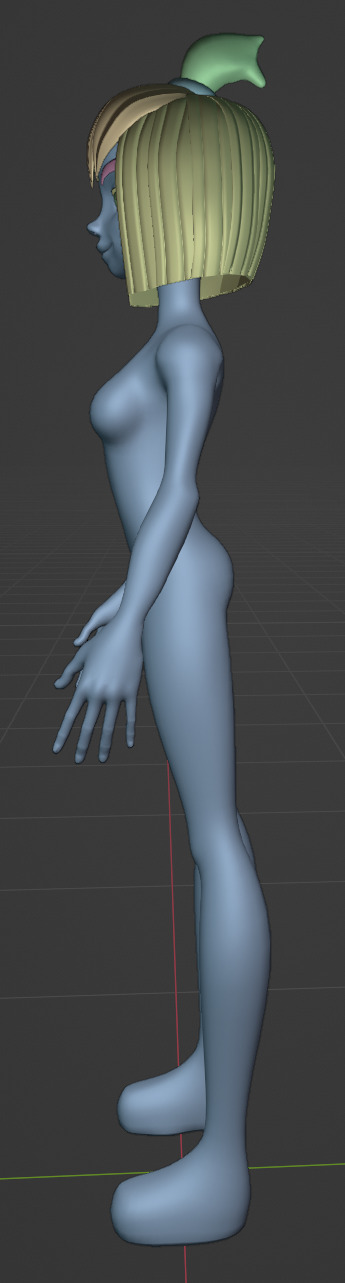
My first step is always the block-out phase. The block-out phase is what the construction lines and the first sketch in a drawing are. I align the frontview and sideview from the model sheet I made in part 1 with the z-axis (the blue line in the images above) and roughly shape out the forms with primitive forms. For this I mostly use a cube with a subdivide modifier.
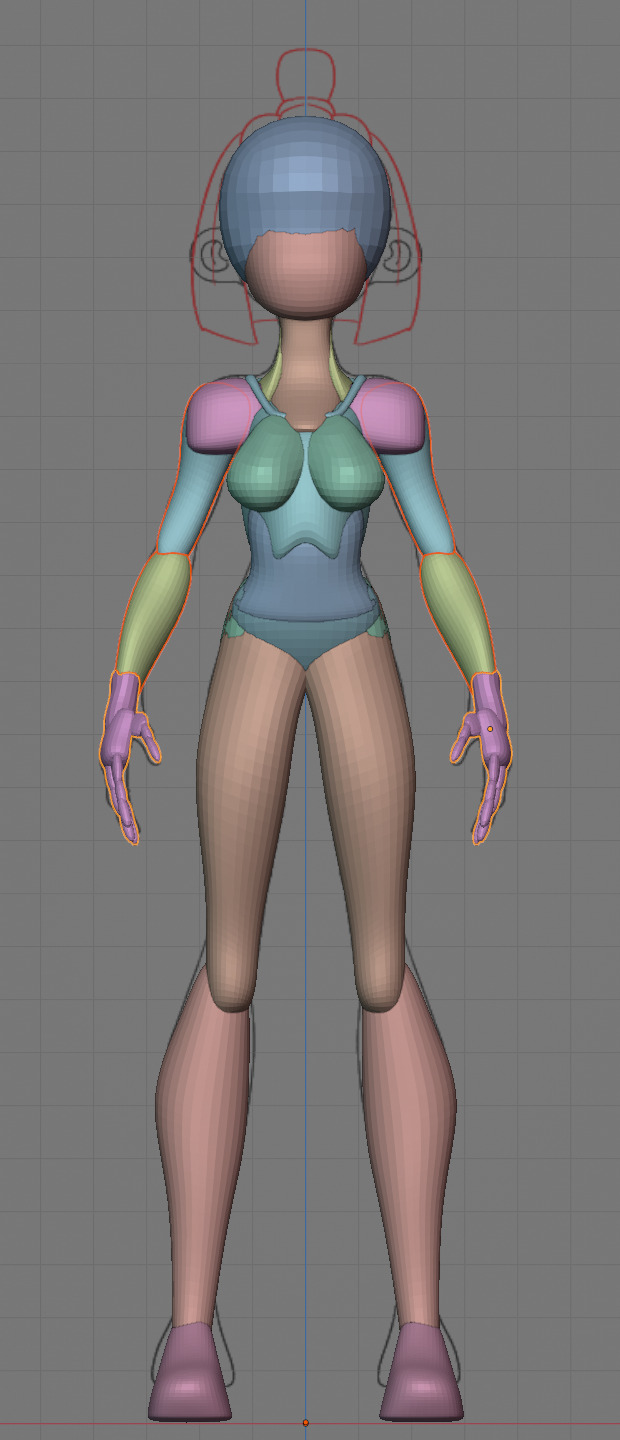


Having a modelsheet without the clothes obscuring the body makes it much easier the get the form right. The block-out phase is one of the most important steps, if it looks good than I have practically half the work done. This is also a good opportunity to practice anatomy.
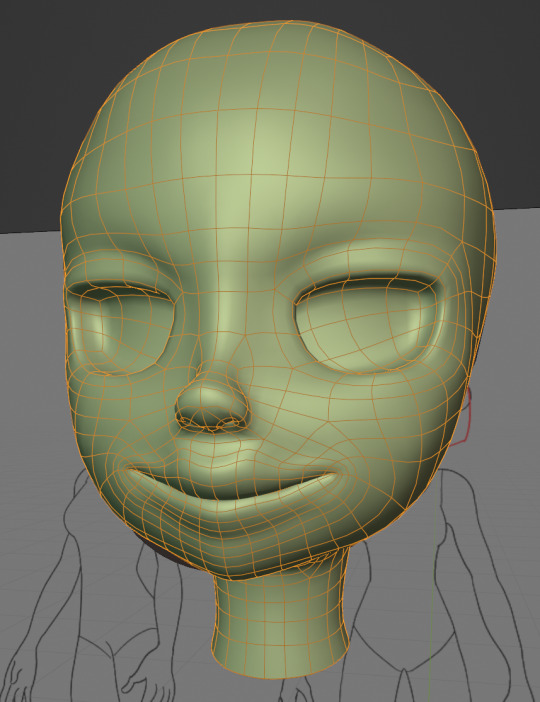

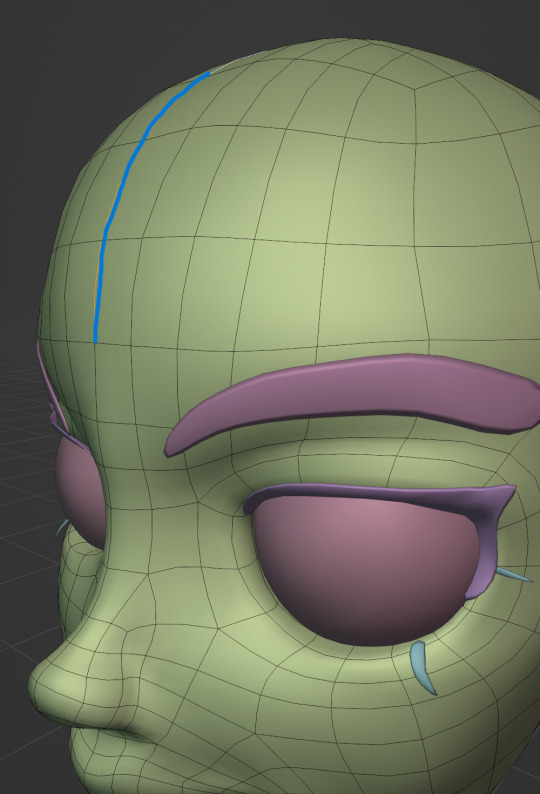
After this stage I continue with the head. First of all, don't forget to add the mirror modifier so I just need to model half of the model. There are different methods to approach modeling the head, like sculpt the head first, retopologize and than bake all the deatails onto the retopologized head. I actually prefer to polymodel the head especially when I have a good model sheet. I practially trace the lineart from the model sheet by extruding vertices, once from the frontview and once from the sideview. The most important points are the form of the eyes, the mouth, the form of the face and the jawline. The head block-out is used as an anchor point for the shrinkwrap modifier so that the traced forms actually look like they belong to a 3d form and not 2d lines floating space. From this point on it's just connecting everything, pull and push vertices so it looks like a 3d head and make sure the edgeflow is good. (It's also helpful to know how the planes of the head look like) After that I add the eyelashes, eyebrow, eyes and the ears, now it looks like something!
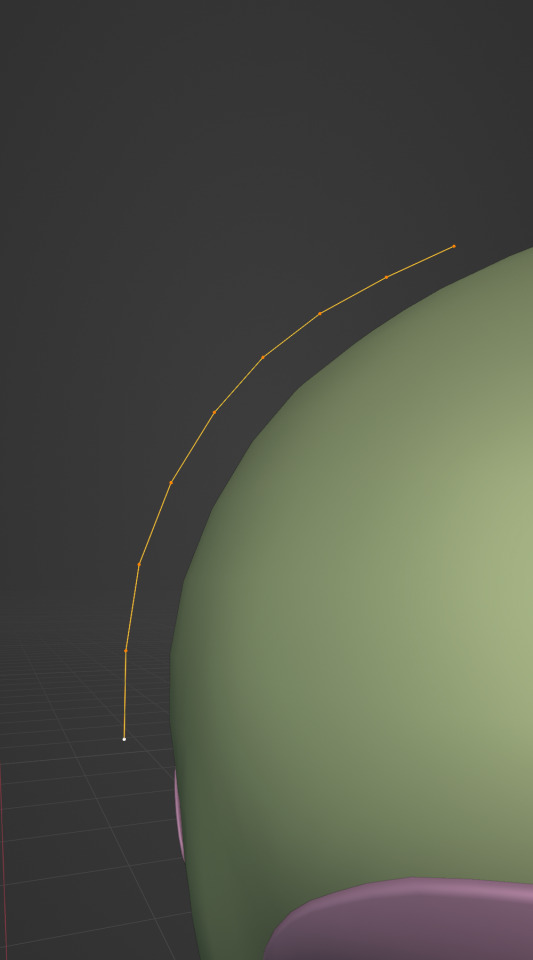
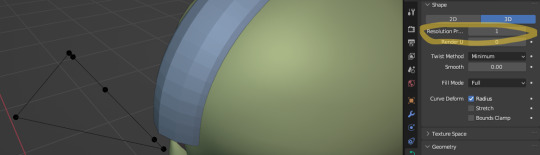
Now comes the hair. For the hair I used the "curve trick" like mentioned in the video series I recommended. Here is a tip to save time: I choose some edges from the head, duplicate and seperate it from the mesh. I convert this seperated line into a curve and choose a beziercircle as a bevel geometry. This is now the perfect foundation to model the hair further. One thing I needed a long time to notice: To get the beziercircle to a perfect square or in this case a triangle lower the Resolution U to 1 in the shape options. Now I just convert the curves into a mesh and add details and the head is done!
With the head finished I continue with the body. Remember how I wrote with a good block-out half of the work ist finished? Well, for this step I practically just use the smooth brush in sculpt mode and smooth everything out so everything looks connected. Then I retopologize the body and that's it. Well, ok there is a little bit more to it: Before smoothing things out I join the block-out part to a single mesh and remesh it with the remash modifier expept for the hands. I prefer to polymodel the hands seperatly without worrying about the rest of the body because they are difficult to model. I reattach them later. Speaking of reattaching, I make sure that the connection points have the same number of vertices while I retopologize/polymodel. To ensure that, I often use the following trick visualized with a simple example ( which is also described in the video series):
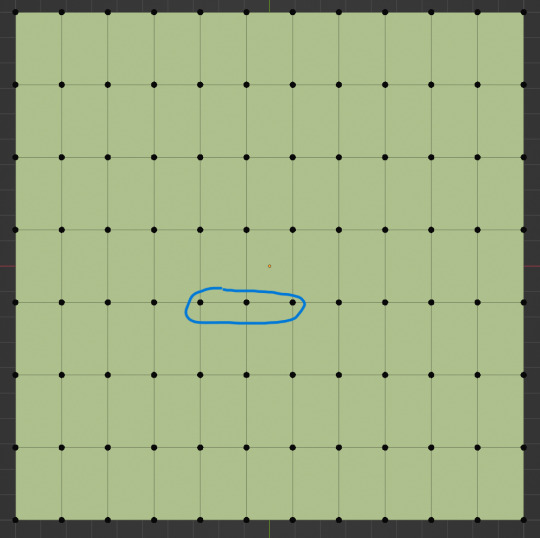
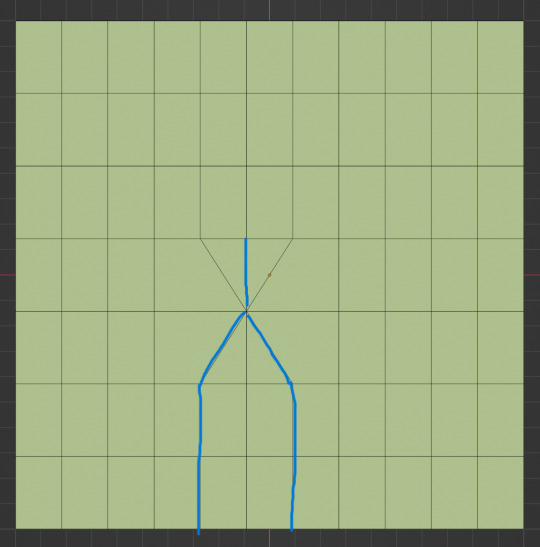

I want to reduce the amount of edges at the bottom of this plane, for this I merge 3 vertices from the middle into 1 vertice seen in the left image. After that I can select the blue marked edges from the center image and dissolve them. The result, which you can see on the right, is a nice clean edgeflow with a reduction in the number of edges.

After modeling every part I attach them together and I have a finished bodymesh the work with.

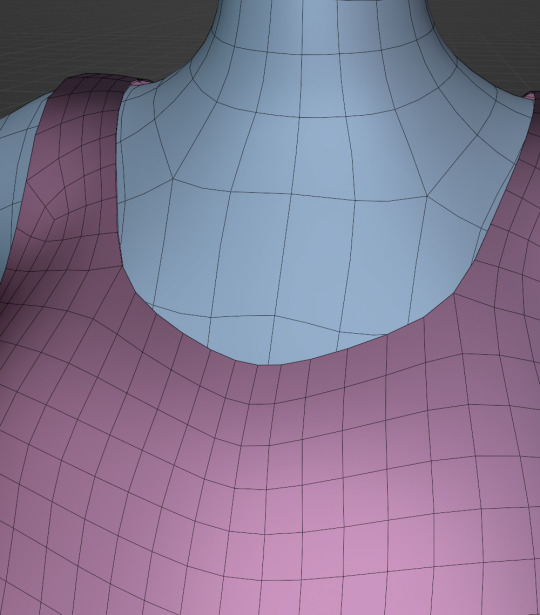
Now onto the clothes, for this I use the model sheet with clothes as reference. Having a retopologized body makes it easier to model simple stuff like e.g. Sam's shirt. On the left image the marked faces of the the bodymesh already looks like a shirt. I just need to duplicate and seperate this area, clean it up a little and the shirt is basically finished. The more complex stuff like the boots I need to polymodel around the bodymesh.
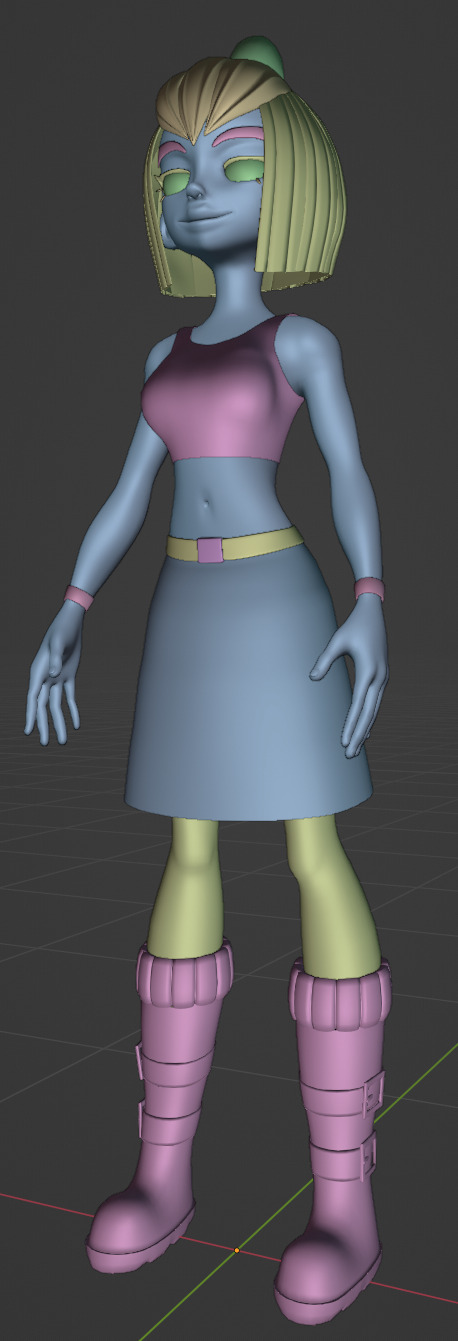

With that the modeling part is done! Now comes the things I said above: uv unwrapping, texture painting, rigging and shading. These are whole other topics I cannot go deeper because I'm still learning how to do these things but I hope my little write-up about how I appoach character modeling was enough to learn one thing or two.
Thank you for your time and thank for reading!
#3d modeling process#3d model#blender#danny phantom#sam manson#long post#my animation#my art#art resources
225 notes
·
View notes
Text
I swear im gonna force myself to sit down and learn polymodeling in z*brush today \o/
8 notes
·
View notes
Photo
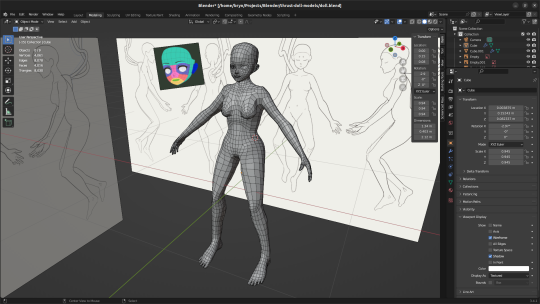

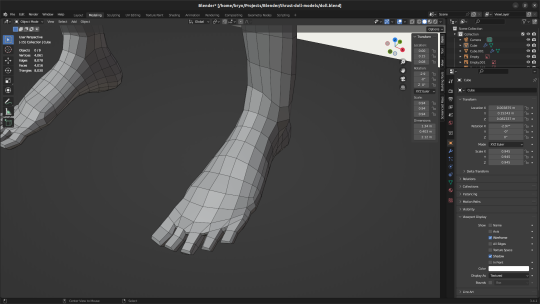

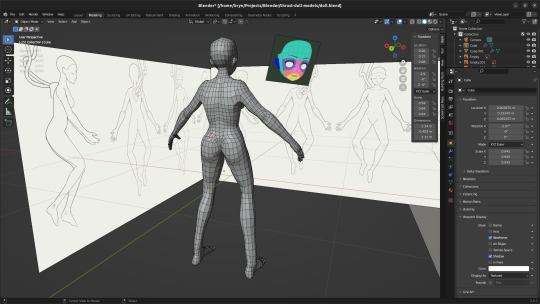
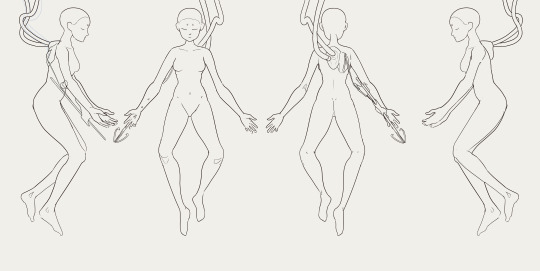
canmom vs human body: round 3. no base sculpt, just polymodelling and sculpting as I went. I leaned heavily on this series on model topology by youtuber Dikko. It’s really good to feel like I’ve improved a ton at this.
This is the base character model for the game I’m working on, THRUST//DOLL - now I need to make all variety of replacement parts, digitigrade legs and grappling hooks and thrusters and so on. The next step is to rig her up and get her into Unity.
12 notes
·
View notes
Text
feeling the urge to create some things but also feeling like going from working in blender (been learning to polymodel and dabbling in sculpting) to working in milkshape is gonna be a pain. do I even remember how to do these things?
#pheeb's ramble#life is not great rn#all my old distractions are dropping in to help#that includes making sims cc‚ it seems#just thought of a few shoe swaps that could look good#some old projects I started but never finished or shared
2 notes
·
View notes
Text
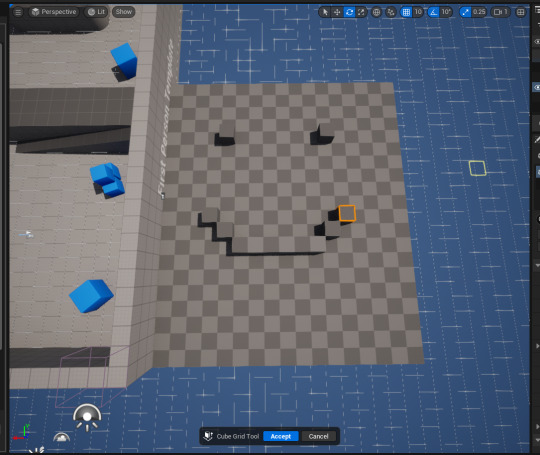
Making a maze with the cube grid tool

Here's a lil maze thing i made using the cube grid tool.
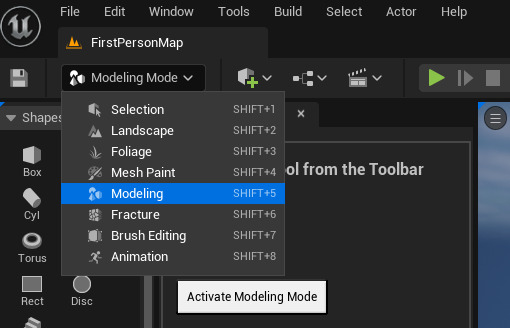
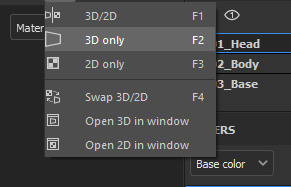
To access this tool you need to go up here and select "Modeling Mode":

Then under the PolyModel tab, select CubeGr:

You'll now be able to build out of cubes! You highlight an area to place cubes, then press q to push forwards, and press e to pull backwards (Alternatively you can use the options under the actions tab):

1 note
·
View note
Text
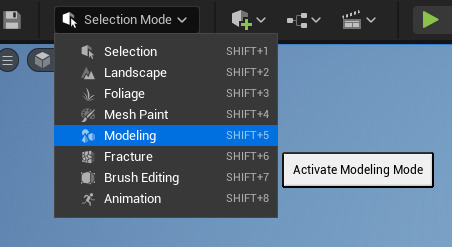
Using the Cube Grid to Grey-Box
To use the cube grid to grey-box in Unreal Engine you must navigate to the top of the screen where it says "Selection Mode", drop-down the menu and click on "Modeling".
From the new menu that just appeared; navigate to the PolyModel tab and find CubeGr (this is the cube grid :OOOO).
This gives you a grid of cubes (no way really???) that you can use to extrude and manipulate your map in a neat and tidy grid.

The controls are relatively simple, pull extrudes from the area you have selected, push well... pushes it back into the selected area and flip does what it says on the tin.
After you have finished grey boxing or you want to make a new layer, click accept at the bottom of the screen and deselect the new cube object. (if you want to make a new layer simple just use the CubeGr while nothing is selected.)
0 notes
Text
Modeling Mode for PolyModel!

Change to Modeling Mode, scroll down to polymodel and click cube grid.
You can then click on a square and click pull push or do the reverse which allows you to create a nice 3D object that is built to your liking.
Make sure you click accept on an individual asset so that when you make a new asset it doesn't see it as one entire block which makes things difficult.
1 note
·
View note
Text
Advanced Modelling Techniques
1.Polygon Modelling
This modelling techniques is using Polygon 3D objects to create a desired model. It uses faces, edges, and vertices in modelling (Autodesk, 2024). The model will use the poly modelling tools of edge loop, multi-cut
I will use the Polymodelling techqnique to make the whole ‘Harbie’ house structure. I will also use an edge loop in adding subdivisions and then beveling the edges to make a smoother transition when smoothing out the model. I will use the boolean technique or the extrude to make holes for the windows and doorways.
For the surrounding trees and terrain, I will first make the polygon and adjust the vertices to reference the orthographic drawing. I will then test with the smooth command the subdivided object for any adjustments. I will use the fur shader for the trees and the surface shader for illumination.
2. Shading
Surface shading is the process in Maya when you combine the material and then add the texture in the hyper shader (Autodesk, 2024).
Using color , hair texture and shine for the shadings of the trees, house and grass will add depth to the scene. I will also UV mapping to align the texture to the surface if I use and image texture as reference.
3. Rendering
Photorealistic rendering is part of the 3D Visualization process in creating realistic output. I will try to use the IPR (Interactive Photorealistic Rendering) to have interactive changes while I am adjusting the Render setting.
4. Key Frame Animation
I will use the process of key frame animation to create scenes for the model. The scene would start from far away view from the side then walking in like a walkthrough towards the top of the house, then zoom out again to marvel on the house unusual design.
youtube
0 notes
Text
Stylized Walkman made for the weekly challenge at Polygon Runway Discord, on the theme "Retro Music". Made with Blender/Cycles.


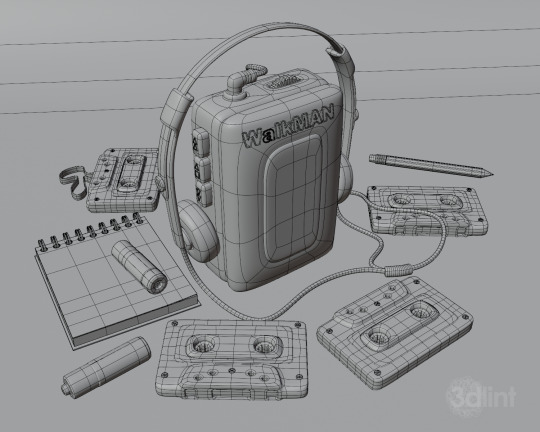
#3d#3d modeling#art#artwork#b3d#blender3d#lowpoly#stylized#polymodeling#youtube#walkman#cassette#cassette tape#90s#80s#80s aesthetic#80s music#retro
33 notes
·
View notes
Text
7/6/23 wed substance painter we had a overview of the tools and their functionsi got to texture a penguin pokemon by baking a high resolution model onto a low polymodel we downloaded the 2 linked resorces then in substance we clicked file then new- then clicked 2000 for resolution and just the first asm- then clicked select and the one file we placed. clicking alt drag drags the 3d model

we are on the 3d only for the visual representation for the eyes we selected the symetry tool and painted in the work fill layer with a black mask to not have things on the original copy be permanent. worked with emessive for the highlights and dints from the pasted high resolutioned model. i still stand around the comfort zone of the art and i should be exagerating the work. changed to a purple only needing to change the colour red and yellow layer. make layer creare add fill layer then paste texture want on tab addinge mask allows us to paint into the black mask

to bring your own patern in radial symetryn anchor points stencil is avaliable above grayscale on black mask hold s down and click or drag drags the stencil bigger aswell rotate. to create dints or rised surfce effect we click add fill layer then click mask black and then draw on it and then click on first white layer then tick off all elemens except height click into the stencil and then colour in and select of boxes and pull hieght bar up or down. to link anchor points you create the squiggle or indent after all the steps ive typed fill layer black mask then draw go and turn off your things but keep height then click to create as anchor point this is the thing you want to influence from the texture. then create new fill layer then black mask then apply a texture onto the item not layers. with right click add generator that will aplly it to then click on your genertor texture scroll down to micro height click to click anchor points and clicked on the one you have ready created scroll to micro details and turn false to true. then that. make sure theres colour on the white pacing diffferent colour image down below. image on right shows texture after indent work


0 notes
Text
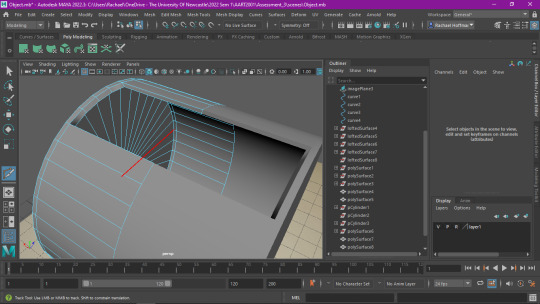
Week 12
Began work on the object model, modelling the whistle shown in the previous week. I started over about 5 times on this due to not knowing how to begin, as I wanted to use NURBs to get smoother curves but haven’t really explored the abilities of NURBs curves before.

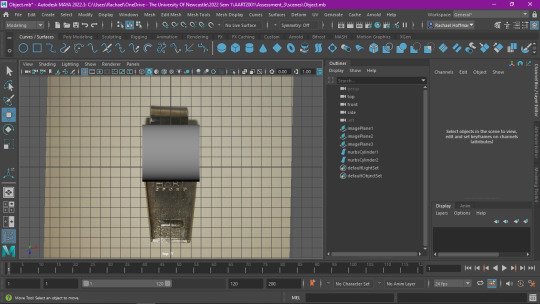
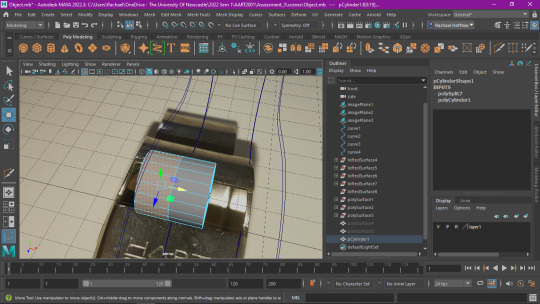
I tried beginning with the central cylinder of the whistle a few times, once even just using polymodelling, and I found that due to the thinness of the whistle I had trouble picturing the inside of it, hence the weird tube i began with.
I eventually abandoned this approach and started over once more, this time drawing the curves for the base of the whistle and lofting the surfaces between them

0 notes
Text
im finally getting the hang of z*modeler, its becoming more natural, im gonna have to start looking up tutorials on how to make it more efficient. but like the basics are down. and im starting to experiment on creating organic shapes and i kinda like it. the ability to easily sculpt in a way ma*ya doesnt let you in addition to the polymodeling is very powerful. my one complaint is that sometimes adjusting geo can be tricky, but im picking up on the tricks gradually.
#journal shit#i only work on it for a few hrs a day after the applications are done so this is going very slow#but i also felt like im climbing a mountain of intimidation :( slow is necessary#its so silly i shouldn't be nervous about sculpting things
4 notes
·
View notes
Photo

Learned how to do a packshot! Guess that's what this is called...? #c4d #cinema4d #redshift #redshiftrender #c4dtraining #motiondesignschool #c4djourney #onlinecourse #c4donlineclass #quarantinetraining #mograph #mographstudent #polymodeling #packshot https://www.instagram.com/p/CDxWF_2puWK/?igshid=9nxidps15rgo
#c4d#cinema4d#redshift#redshiftrender#c4dtraining#motiondesignschool#c4djourney#onlinecourse#c4donlineclass#quarantinetraining#mograph#mographstudent#polymodeling#packshot
0 notes
Photo
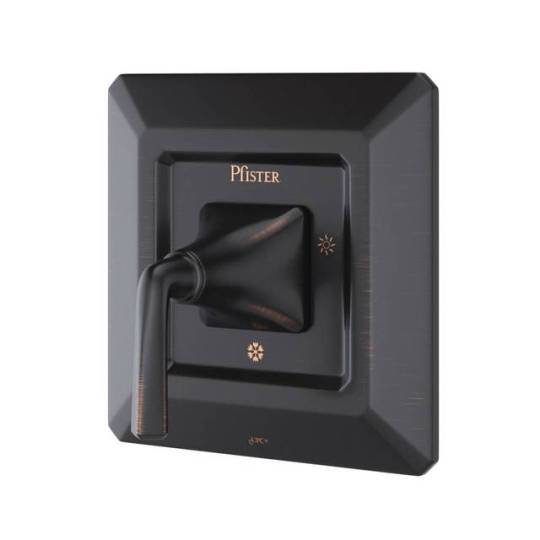
Закончил работу над очередной моделью сантехники #pfister для каталога, на этот раз это регулятор душа в отделке #tuscanbronze #3dmodel #3dsmax #coronarender #polymodeling #mudbox #photoshop (at Городок З-да Ор)
1 note
·
View note
Last Seen Blogs

justaproanna
pro anna

rifondazione
Partito della Rifondazione Comunista
anawkwardlady
You love blood too much, but not like I do.


face-shot
game play