#morncrist
Text
Train Heartnet’s gun: Hades

heyyy guess what it’s time for another prop build.
This is a prop I made of Train Heartnet’s gun “Hades” from the manga/anime Black Cat.
(details under the cut)
Materials I used were a piece of an eva foam floor mat, 3mm craft foam, a cardboard tube, Model Magic, high-temp hot glue, Barge contact cement, wire, embroidery floss and cording, a rubber o-ring, a bit of a boba (bubble tea) straw, pva glue, Rustoleum flexi-dip/peel-coat, acrylic paints, and a semi-gloss aerosol top coat.
Tools used were a rotary tool, a heat gun, a utility knife to cut the foam, wire cutters and pliers to cut and shape the wire, sandpaper, and a high temperature hot glue gun.

I started out with a pattern I made by splicing two manga images together, and then putting it into inkscape to make it scaleable.

I then printed it off, and cut out the main pieces for the body out of eva foam floor mats. I tried to take down some of the texture just by hand sanding, then applied contact cement (I use Barge because it seems to work well with eva foam) and glued the two sides together, making sure to apply enough pressure so that the texture wouldn’t cause gaps at the seam.

After sitting overnight to ensure it was properly glued, I used the sanding drum on my rotary tool to carve out the depressed area around the barrel, round off and even out the edges, and make the handle more conformed to fit in my hand. After using the coarse sanding drum, I used a finer bit to try smooth out the carved parts. I ran a heat gun over it multiple times to get rid of as much fuzziness as I could that resulted from the sanding.
The chamber right above is a cardboard tube from a tensor bandage that I cut to length, and then glued two layers of craft foam to: one layer to make it the correct size and another layer to create the depressions/raised parts of the chamber. I covered the end that would be showing with a circle of craft foam. (I ended up cutting off that extra bit on the right side of the tube, as it was not necessary in my build).

I then cut out the hole for the chamber, and test-fit the chamber to make sure it was the right size.

The gold detailing I drew out, while checking my reference, and then went over with hot glue. It was somewhat tedious to do and didn’t give a very exact pattern, but I figured it would turn out better than carving it or making it out of foam cut-outs. I also gouged out a bit of a hole where the barrel would be at the end of the gun. I then ran a heat gun over it to get rid of any glue strings.
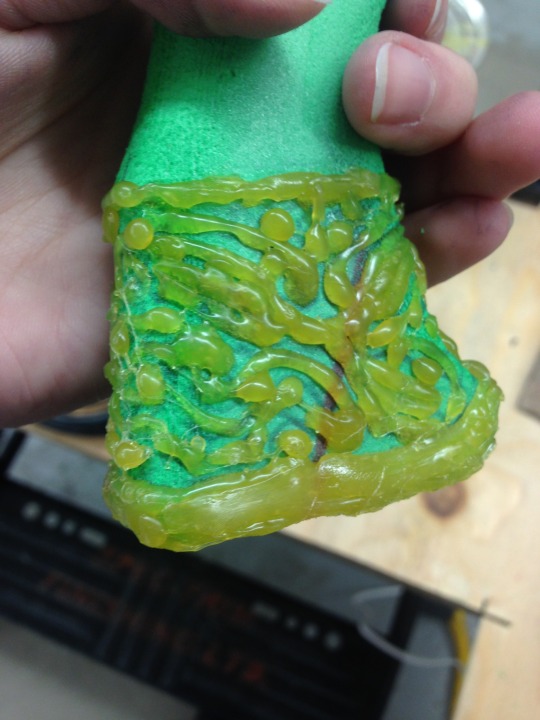

(just some better pictures of the hot glue “detailing”)

I then drew on the “XIII” that appears on either side of the gun, and cut some grooves which I then opened up with a heat gun. In hindsight, I probably cut them too deep, which ended up causing some problems when painting.

For the barrel, I glued on the o-ring with some hot glue to fill in the gaps. The hot glue didn’t actually stick very well, so I then used contact cement to ensure it wouldn’t fall off. I also cut off a bit of boba straw, and glued it into the barrel to add more structural stability.
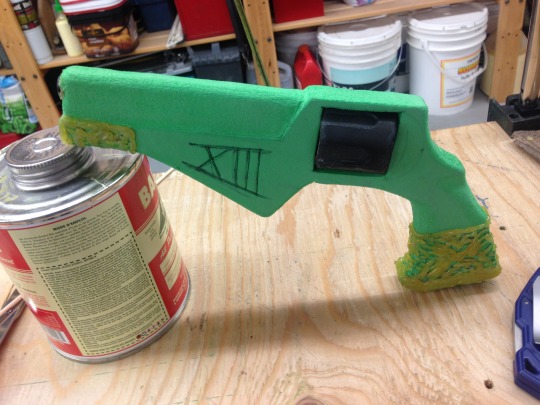
I then glued in the chamber with contact cement, and ended up having to add some foam shims to ensure a tight fit, as the hole I cut for the chamber wasn’t exact.

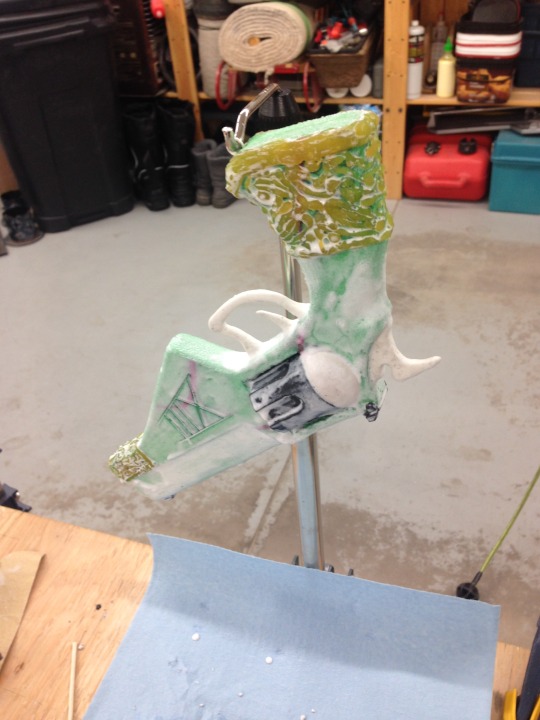
For the smaller parts I used both craft foam and Model Magic formed around wire. The sights were a couple layers of craft foam that were cut at an angle and then stacked together and glued on.
The hammer, trigger and trigger guard were made by bending wire into the required shape, gluing it into the body of the gun, and then smoothing Model Magic over it. The round parts beside the chamber were also Model Magic that I shaped, glued down with contact cement, and then refined once they were on the body of the gun.
I found Model Magic quite difficult to work with, however since it is water based, I found that you can smooth it and make it easier to shape with water. Just be careful because using more water will also make it more likely to crack when it dries.
(the white dust on the barrel in this picture is from trying to fill some divots with a drywall filler, but it didn’t really adhere to the foam so it ended up just making a mess)

To make the tassels, I followed this video. I then took some cord and looped it through the top of the tassel, and glued it in place. I wrapped the folded part with some red wire to make sure it wouldn’t fall apart.
Once the Model Magic was dry, I added a wire loop for the tassels to tie to, and then began sealing. I thoroughly heat sealed the entire prop with a heat gun and then brushed on a couple coats of pva glue (white school glue), as I found that it helps to hide the texture from sanding, adds a bit more durability, and doesn’t have any weird reactions with the flexi-dip (I’ve had times where it wouldn’t stick to hot glue). Make sure each coat is fully dry before starting a new coat.

Once the glue coat was dry, I sanded it to get rid of any unwanted textures. I then sprayed multiple coats of flexi-dip and peel coat, starting with thin layers, and working up to thicker layers, but not so thick as to cause dripping. (no reason for using both, I just couldn’t find flexi-dip at the closest hardware store, and peel coat is made by the same company, and pretty much acted the same anyway).

After the peel coat was dry, I masked off the areas I needed to paint, and then painted the silver and gold parts by hand with acrylic paint., as well as did any touch-ups/fixing with black acrylic paint. It took several coats just to get the paint opaque enough to minimize the look of brush strokes. I then dry brushed some silver paint on the black parts, and some black/brown paint on the silver and gold parts to weather it. After the acrylics, I sprayed it thoroughly with a semi-gloss top coat.
I then looped on the tassel, and Hades was finished!
I don’t have any pictures, but the holster was made by first making a paper pattern around the gun, testing the paper pattern with craft foam, and then transferring the pattern to a piece of leather.
The leather was dampened, cut out, and then gently formed around the gun. I then glued the edges where I would be stitching the holster with Barge. Because I don’t have proper tools to punch holes in leather, especially leather that thick, I used a drill to drill holes for sewing.
Using a saddle stitch and waxed thread, I stitched the edge of the holster. Once the leather was dry, I burnished the edges, and oiled it with two coats of extra virgin olive oil (just the kind you can find in the grocery store), and then once that was dry, finished it with a type of shoe finish that had beeswax in it.
The straps are nylon webbing that I threaded through slits I cut in the back of the holster, and then sewed buckles to.
This was my first time working with leather so I am by no means an expert. I recommend checking out videos on youtube, as there are many about leather working on there.
(Also most conventions require you to have an orange tip for your prop guns. I used a straight pin that you would use for sewing, glued an orange bead to it, and then stuck it in the end of the barrel.)
#cosplay#train heartnet#train heartnet cosplay#train heartnet gun#train heartnet hades#black cat manga#black cat anime#prop making#morncrist#leatherwork#prop build#build guide#chasma cos
43 notes
·
View notes
Text
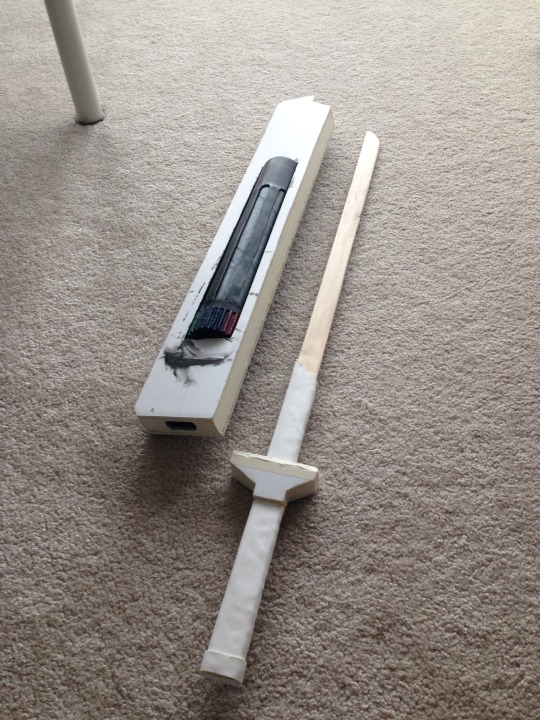
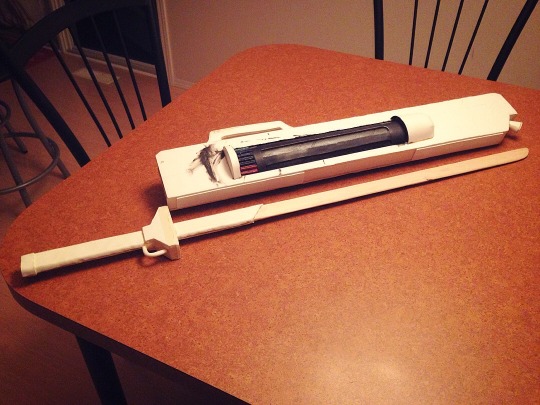
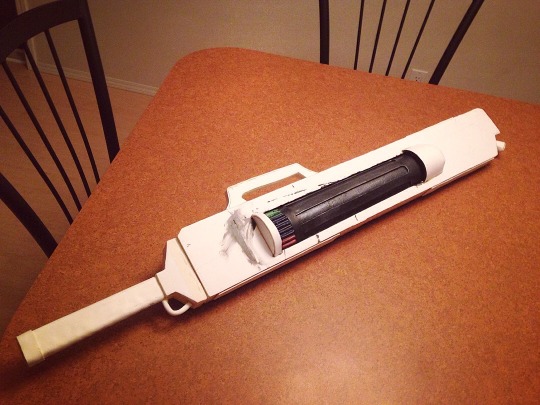
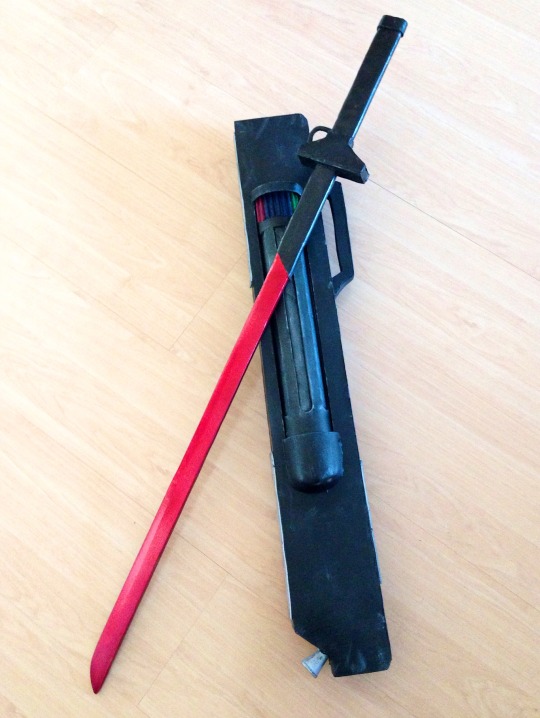
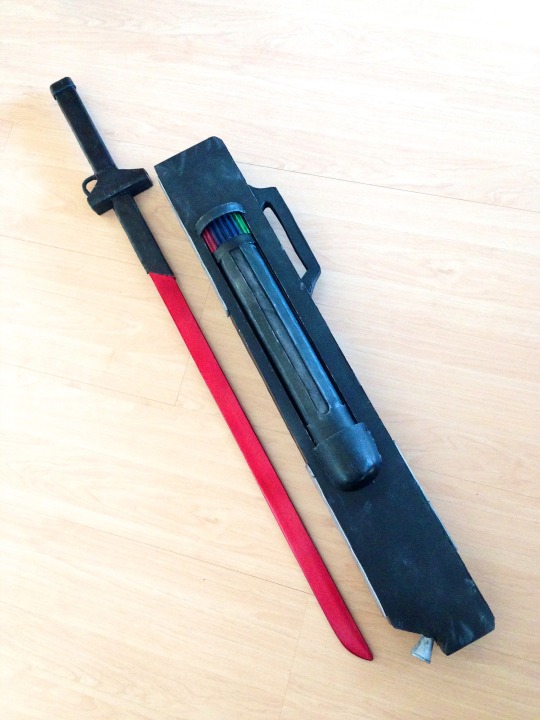
Raven Branwen’s Sword: Omen
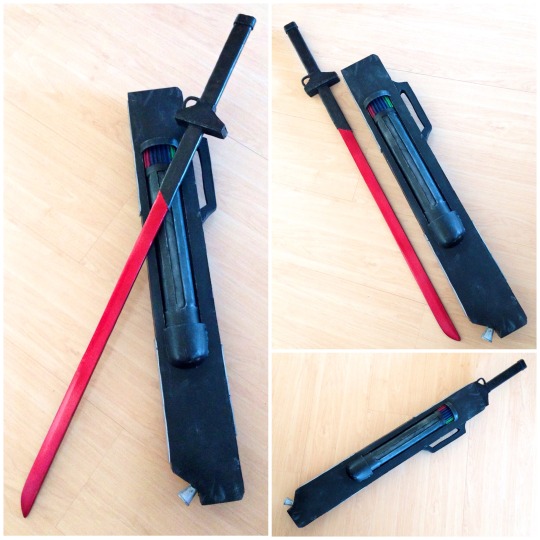
So I’ve finally got around to posting how I made an Omen prop for my Raven Branwen cosplay (from RWBY)
Details under the cut! (will be fairly long and pic-heavy)
For materials I used foam core, paper towel rolls, corrugated cardboard, 3mm craft foam, a length of baseboard, jewellery wire, masking tape, high-temperature hot glue, plasti-dip/flexidip, metallic red and silver spray paint, a semi-gloss clear sealer and various colours of acrylic paint for details and weathering.
Tools used were a high-temperature hot glue gun, a belt sander, a heat gun, a utility knife to cut the foam core, and a scalpel to cut the craft foam.
All craft foam used in this project is 3mm thick, and all glue is high-temp hot glue.

I started out with a screenshot taken from RWBY that I (tried) to edit into a semi-decent profile for Raven’s weapon. I then scaled it up to the size I wanted it to be in real life and printed it out to use as a proportion guide.
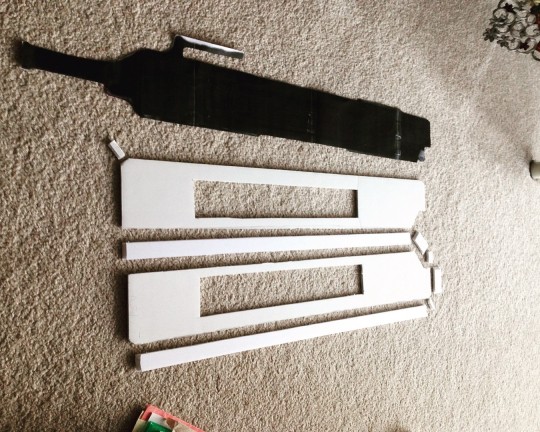
I then traced the pattern out onto foam core (foam board) and cut out all the pieces, angling (beveling) any edges so I would have a “seamless” fit when assembled. I then test fit the pieces together with some masking tape to make sure everything lined up correctly. I then glued one side together with high-temp hot glue, while leaving one face off so I could later add in the “rotary chamber” part, as well as taped any open foam edges with masking tape.
(sorry for the tall pictures)
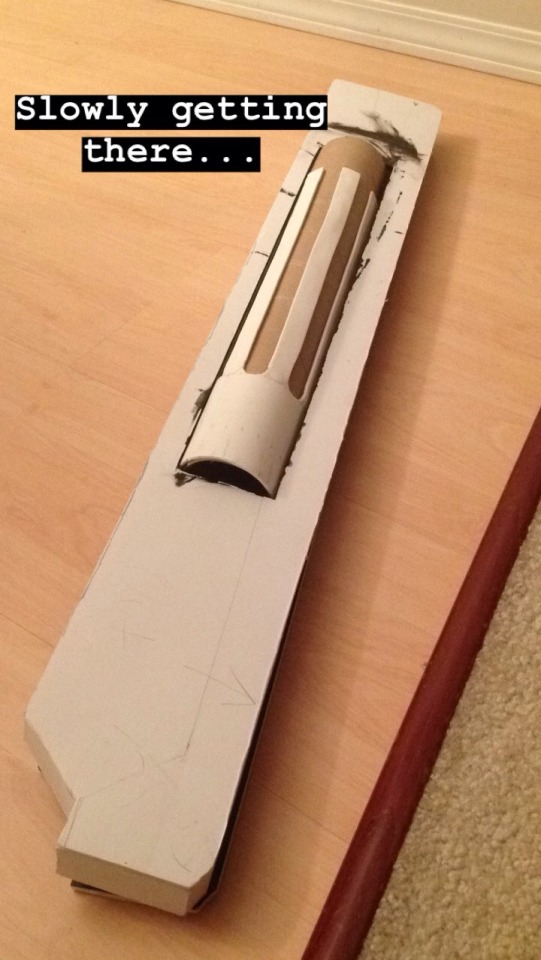
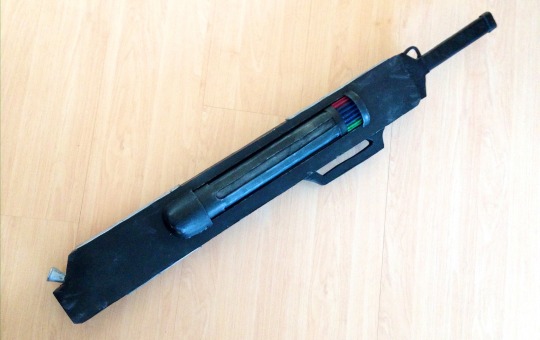
For the rotary part, a pop can ended up being the perfect reference size, so I took two paper towel rolls, cut them to the correct length, and then cut a slit down one side of each of the paper towel rolls, so I could interlock them. I taped them together and slid a pop can through to make sure I had the correct circumference, and then Very Carefully glued them together with hot glue to make a single cylinder.
I then measured out where I wanted the dips to be on the rotary chamber, and cut out some 3mm craft foam and glued that on with hot glue. The dust cartridge part (the coloured part on the chamber in the next photo) is a strip of corrugated cardboard with the top layer of paper cut off so you could see the corrugations.
I then sealed the rotary part with plasti-dip, and then painted the dust cartridge part with acrylic paint and dry-brushed silver paint on the edges to weather it.
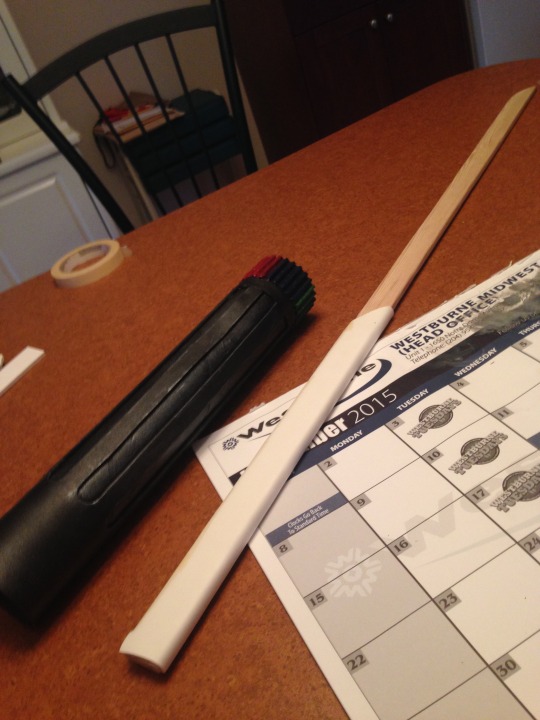
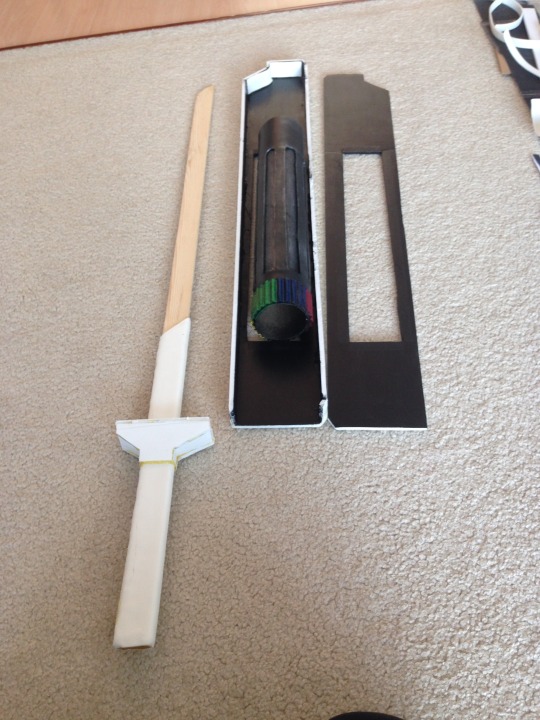
The blade is made from a piece of baseboard I got from a local hardware store. I used a belt sander clamped into a workbench to sand down the baseboard until I got the blade shape that I wanted.
I then measured and cut out some 3mm craft foam, test-fit it around the wood using masking tape, and then glued it (with hot glue) around where I wanted the hilt to be.
(I painted the inside of the sheath black just in case you would be able to see inside but it turned out that it probably wouldn’t have mattered much)
The hilt was measured and patterned out in relation to the sheath, so that the faces would match when the sword is sheathed. I cut out each panel out of foam core, and then test fit the pieces together with masking tape, angling any edges that needed to be angled to achieve a nice fit. I then glued it together with hot glue.
By this point the rotary piece was fully dry, so I was able to glue it in place inside the sheath, and then glue the other side of the sheath closed. I also finished off the pommel on the hilt of the blade. On both the sheath and the cross-guard I taped any edges where the foam from the foam core was showing with masking tape.
Adding the finishing pieces. The “trigger” part on the hilt of the blade is a piece of thick jewellery wire covered in craft foam, and then poked into the cross-guard and glued in place.
The handle on the sheath is 3 pieces of foam core cut out and stacked together. I covered the top of the handle with a piece of craft foam, and the bottom with masking tape. It was then glued on with hot glue.
The flat end covers for the rotary chamber are an almost-semi-circle piece of foam core with a strip of craft foam and glued in place. The curved end caps were a bit more difficult. I used the top of a plastic toy baseball bat I found (that just happened to be the perfect size) to pattern out a rounded end cap. I then cut the pattern out of craft foam, and glued it together, and then glued it to the sheath.
The little cone shaped part on the end is some craft foam shaped into a cone with a circle foam core glued onto the end, filled with hot glue, and then glued on.
The rectangular panels on the top and bottom of the sheath are strips of craft foam that are glued on.
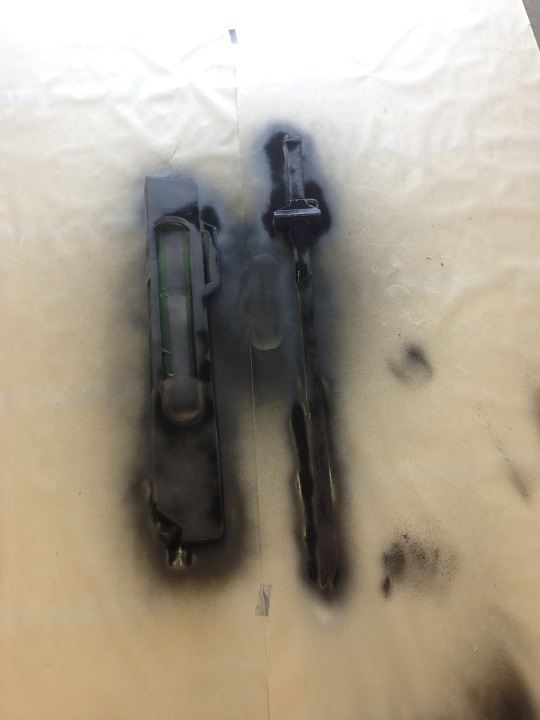
(I don’t have as many photos of the painting process, as I was a little rushed while doing this part especially)
Time for sealing! After heat sealing the foam parts with a heat gun, I masked off the rotary part since it was already painted, and then sprayed everything with multiple layers of FlexiDip, which I ended up not liking how it was reacting to some parts of the build, so I then switched to plasti-dip.
Once everything was sealed, I very lightly misted the black sheath and hilt of the sword with silver spray paint. I then masked off the hilt of the sword, and painted the blade with the red metallic spray paint. I also masked off the sheath and painted the panels on the top and bottom and the little cone on the end with silver metallic spray paint.
After the paint dried, I weathered the sheath and hilt with silver acrylic paint on the black parts, and black acrylic paint on the silver parts. Then I gave everything a couple coats of clear coat.
Overall I took me about a week to make this, mostly because I left it until the week before the convention to finish it. Here’s some more photos:
#raven branwen#raven branwen rwby#raven branwen cosplay#rwby#rwby cosplay#prop making#prop#rwby prop#cosplay#raven branwen prop#raven branwen weapon#sword#morncrist#prop build#build guide#chasma cos
369 notes
·
View notes
Photo


so finally went out and took pics in the cold and froze my hands
#cosplay#nightingale#nightingale armor#nightingale cosplay#nightingale sword#skyrim#skyrim cosplay#tes#tes skyrim#tes cosplay#the elder scrolls#armor#morncrist#chasma cos
8 notes
·
View notes
Photo

more work from my drawing class
13 notes
·
View notes
Text


Some decent pics of my Nightingale cosplay for once..
Photos taken by Case and Point Photography, cosplay and editing by me.
#nightingale#cosplay#skyrim#tes#skyrim cosplay#nightingale cosplay#nightingale sword#nightingale armor#elder scrolls#prop making#prop#armor#morncrist#chasma cos
49 notes
·
View notes
Photo

mood
9 notes
·
View notes
Text

tree time ~
study for a larger project
2 notes
·
View notes
Photo


Some quick Raven selfies
100 notes
·
View notes
Photo


Some pics of my Raven cosplay. Not finished just yet,,, but soon
#raven branwen#raven#rwby#rwby cosplay#raven branwen cosplay#cosplay#raven branwen rwby#morncrist#chasma cos
86 notes
·
View notes
Photo


lake deer ~
#wow i finally drew something its only been months#I changed the size but it still looks blurry on Tumblr :(#deer#lake#forest#nature#landscape#art#drawing#ink#my art#morncrist
4 notes
·
View notes
Photo

church grim
15 notes
·
View notes
Text
Hhhhhhmmmm so I made an art/cosplay -specific instagram
Go follow it ya want to
#update#ill add the link to my blog later when im on my actual computer#dunno if ill keep the insta but its here for now anyway#morncrist#chasma cos
2 notes
·
View notes
Photo

My prof made me draw this upside down
2 notes
·
View notes
Photo

Inktober day 3 - Don't forget
#hhhhhhhh what are backgrounds#how do I use markers#my art#fma#don't forget#fullmetal alchemist#inktober#inktober2017#morncrist
8 notes
·
View notes
Photo

Inktober Day 1 - The Old Man
1 note
·
View note
Photo

I’m dying squirtle
#I gotta finish the entire set in 4 days aaaaaaaaaaaaaaa#nightingale armor#cosplay#skyrim#tes#wip#morncrist
2 notes
·
View notes
Last Seen Blogs

onlyblakewater
Blake Waters

incoendoxx-blog
Down the redemption road

clarodespertar
Claro Despertar

expressmelbournetowing-blog
Express Melbourne Towing

heartbxdysoul
megan