#manual mitre saw
Text
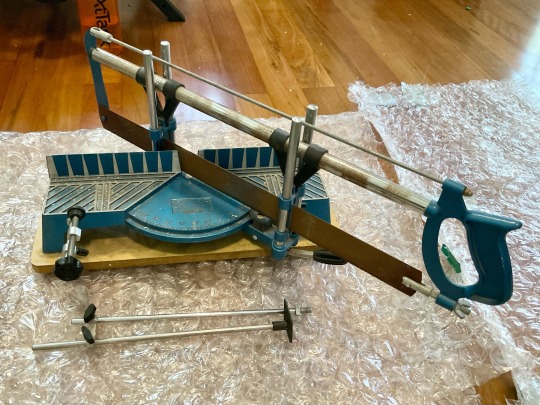


Scored this vintage german-made manual mitre saw on ebay for $50. I dissembled it and cleaned all the parts using mild soap mix applied with a toothbrush, rinsed off with clean water, toweled, and left to finish air drying. After all parts were bone dry, I went back in with fine steel wool and WD40 to clean off all the surface rust, then rag wiped on a light protective coat to prevent further rust damage. With the addition of a new blade, this tool is good as new & ready to be put to work.
#craft#crafts#workshop#vintage#vintage tools#tool care#tool#saw#mitre saw#workshop tools#german saw#manual mitre saw#vintage tool care
13 notes
·
View notes
Text
9 Essential Power Tools for all things DIY Projects and Your Home

Generally, whenever asked about power tools, people assume that its utility limits itself to construction sites. Reducing labor costs and increasing efficiency and effectiveness is what every construction company strives for these days. This is exactly where the function of a power tool begins but efficiency of these tools is not restricted to masonry or carpentry; it is much more handy than that. Some of the names that come up in the construction business whenever one has to look for a power tool are power hammers, reciprocating saws, air sanders, biscuit joiners, jackhammers, air impact wrenches and many more. As compared to other tools, power tools are always at one's fingertips given how accessible they are. Whether it be Bosch, Ferm, Dewalt, Cumi, Hitachi or Black & Decker, it is all very readily available. Although, as far as quality and credibility is concerned, Bosch Power Tools stand way apart. With production of superior-quality products, supplying most suitable equipment for DIY, sustenance and other innovative features, Bosch Power Tools truly make a mark in excellence and goodwill.
If we look at industrial tools that can be used for do-it-yourself projects and at home, we can expectantly say that power tools are the safest and the best option for the same but the ones that we just mentioned aren't the best options considering they are recommended mostly for professionals. Not to worry! When we say that we have all your industrial needs and problems covered, we mean all of it but what about the tools that you would need when you are at home? Well, we are here for that too; a complete solution only for you. In the generation of smartphones, it is no question that everybody has an opinion or a suggestion for everything. If you go out there to research about what kind of power tools you would need for a DIY project or at home, you would get a thousand unnecessary recommendations. In this blog, we will share 9 most essential power tools for home, as listed below.
Circular saw
Cordless drill
Electric planer
Impact driver
Orbital sander
Jigsaw
Mitre saw
Router
Nail gun
Power Tools are fundamentally the kind of tools which are run by electricity. They can be used for a wide range of activities which deduce the amount of manual labor or cost that generally goes in using compressed air, electric motors, etc.
Circular Saw
A circular saw is mostly used in carpentry, so needless to say that it goes a long way for the cabinetmakers. They use a circular blade that is fringed with honed metal teeth. They work in a way for which the blade spins itself to cut the wood evenly. There are a number of blades readily available for craftsmen to cut a variety of materials that include timber, lumber, etc. Their features of specialized blades always keep them apart from the rest as they can be used very easily to cut sheet metal. Some circular saw models are handheld which makes it even more feasible for home.
Cordless drill
This is a power tool that can do the work of both a drill and a screwdriver; it can drill holes as well as drive screws. It is safe to say that a cordless drill is the most useful power tool for any DIY enthusiast as it comes in very handy. Some of the major uses of a cordless drill can be that they can be used to put holes in walls, wood or any other rough surfaces. They can be used to fix fasteners onto surfaces as well. Basically if you plan on remodeling your kitchen, a cordless drill would be your go to power tool.
Electric planer
Also known as a power planer or thickness planer, an electric planer is a handheld power tool used for removing material from the surface of wood, creating a smooth and even finish. It consists of a revolving cutting head with multiple blades that shave off thin layers of wood with each pass. Electric planers are widely used by carpenters and DIY enthusiasts for various woodworking projects. They are valuable tools for shaping, resizing, and smoothing wooden boards, beams, and other materials. They can be used in projects ranging from building furniture and cabinets to crafting wooden sculptures or trim work to fixing a door.
Impact Driver
One of the most coherent power tools for DIY projects and at-home use is an impact driver. Being handheld is the primary advantage of an impact driver followed by how lightweight and compactable it is. It mainly is used for driving screws, bolts and nuts, which is the most commonly needed function in DIY projects. To sum up, impact drivers are strong, tactful, and multipurpose tools that stand out when it comes to driving screws and many other fasteners. They have become a well known name among DIY enthusiasts due to their speed as they cause a high rotational force, known as torque, which allows them to handle difficult tasks but with a fastening approach. Moreover, they are a major convenience in work and possess the ability to handle strenuous tasks.
Orbital sander
If you want to make a cabinet for your lovely home or build a staircase to protect your loved ones or manufacture a toy for your child, your one stop power tool would be an orbital sander. Orbital sanders are hand-held tools which are the biggest advantage for a DIYer. They function by spinning themselves elliptically, creating a base that is smooth. These sanders can be used for removing rust from steel as well, which again is a big advantage for a DIYer.
Jigsaw
If there was an answer to how to cut nonlinear shapes and edges, it would be a jigsaw. It's a hand tool consisting of a thin blade that has a manageable throttle trigger for fluctuating cutting speed. A jigsaw is ideal for intricate shapes and curves that are so small that they can be cut by hand. This handheld saw is used in cutting wood or metal by the simple process of changing the blade, which is extremely small and thin and easy to use. Basically if you want to sharpen the edges of your craft, jigsaw is your only stop.
Mitre saw
Mitre saws are very well known among DIY enthusiasts and homeowners. They are multi-purpose tools that can be used for various home improvement projects, such as building furniture, installing flooring, constructing decks, or framing walls. It mainly is used in cutting flat ends, although a mitre saw's rotating feature makes it so versatile that it can be utilized in woodworking as well.
Router
Router is yet another handheld, electric power tool used in carpentry and furniture making. It comprises an electric motor, two handle knobs, a base and bits. It is a multi-purpose tool that apart from its utility in cabinet work, helps in many day to day household jobs, such as shelving, grooving for storm windows and weather stripping or basically making round corners on work of all types.
Nail gun
More commonly known as nailer, a nail gun is fundamentally a form of hammer. Like the name suggests, a nail gun is used to nail anything in and out of a craft. They have a varied range of uses and for DIY, their range starts from firing wire-thin brad nails into trim. Some of the common places of utility for a nail gun are installing baseboards, roofing materials, crown molding, putting up a house house siding, building furniture, laying hardwood and many other common utilities at home.
Conclusion
To sum it up, these nine power tools are a big solution to all your carpentry and problems at home. These recommended power tools are all easy to use and safe, although the necessary precautions are to be strictly followed. So what are you waiting for? Make your life 10 times easier with these multi-purpose power tools and see how much of the cost cutting your budget ultimately sees.
#Essential Power Tools#Bosch Power Tools#Circular saw#Cordless drill#Electric planer#Impact driver#Orbital sander#Jigsaw#Mitre saw#Router#Nail gun
0 notes
Text
Band Saw Machines
Representing the band saw machines, hydraulic cylinders and power packs of our group company – Multicut, India for their international business.
The products are available in different models and the entire range indicates:
- Fully automatic double column band saw machines
- Semi automatic double column band saw machines
- CNC automatic band saw machines
- Swing type hydraulic band saw machines
- Swing type manual band saw machines
- Vertical band saw machines
- Mitre cutting band saw machines
The machines are manufactured using cutting edge technologies and are customized according to the industry applications. The band saw machines manufactured by us, have a cutting capacity of 200mm to 2000mm and may vary according to the models. Our group company Multicut has a sound and sophisticated infrastructure that includes large production units.
For More Details: - http://msradix.com/
Call Us +91 91043 26251
0 notes
Text
Kawasaki versys 650 handleiding
KAWASAKI VERSYS 650 HANDLEIDING >>Download
vk.cc/c7jKeU
KAWASAKI VERSYS 650 HANDLEIDING >> Online Lezen
bit.do/fSmfG
service manual kawasaki versys 650
kawasaki z1000sx handleiding nederlands
kawasaki versys 650 klok instellen
kawasaki z900 handleidingkawasaki garantie
onderhoudsinterval kawasaki versys 650
kawasaki vn 800 classic handleiding
onderhoud kawasaki versys 650
Handleiding. Bekijk hier gratis de handleiding van de Kawasaki Versys 650. Deze handleiding valt onder de categorie Motoren en is door 46 mensen gewaardeerd Bekijk hieronder de handleiding van de Kawasaki Versys 650 (2016). Alle handleidingen op ManualsCat.com zijn geheel gratis te bekijken. Instructieboekje Kawasaki Versys KLE650 (2007) · € 15,0027 sep. '22 ; Instructieboekje Kawasaki Versys KLE 650 · Bieden19 sep. '22 ; Owner's manual/ U kunt ook te allen tijde uw gebruikershandleiding online raadplegen, klik hier om de handleiding Versys 650 (vanaf modeljaar 2007 tot 2014 naar 25 kW) Bestel online uw handleiding onderdelen die passen op de Kawasaki Versys 650 ABS. Via de onderdeel catalogus kunt u precies zien hoe het in elkaar zit. Sportdemper. Power commander · Sportdemper. Instructieboekje Kawasaki GPX 750 Instructieboekje Kawasaki Z 750 Instructieboekje Kawasaki VERSYS 650Bekijk en download gratis uw Kawasaki Versys 650 handleiding. Of stel een vraag aan een andere Kawasaki Versys 650 productbezitter. Hier vindt u alle onderdelen die horen op de Handleiding van uw Kawasaki Versys 650 2009. ; 99924. 99924136901. 99924136901. service manual, kle650a7f kle65.
https://www.tumblr.com/bekahodepide/698700758966829056/blackstone-pizza-oven-handboek, https://www.tumblr.com/bekahodepide/698700758966829056/blackstone-pizza-oven-handboek, https://www.tumblr.com/bekahodepide/698700758966829056/blackstone-pizza-oven-handboek, https://www.tumblr.com/bekahodepide/698701189520506880/wickes-mitre-saw-handleiding, https://www.tumblr.com/bekahodepide/698701064378220544/herma-400-label-applicator-gebruiksaanwijzing.
0 notes
Text
Ryobi band saw bs 900 arts manuel mode d'emploi
RYOBI BAND SAW BS 900 ARTS MANUEL MODE D'EMPLOI >>Download
vk.cc/c7jKeU
RYOBI BAND SAW BS 900 ARTS MANUEL MODE D'EMPLOI >> Read Online
bit.do/fSmfG
MASE generators VS 3 series - with variable speed, LiMa - continuous output kW 12 · DESSALATOR Mainboard Dessalator electronic card watermaker DUO D100 fr.shopping.rakuten.com/s/cookeo+pieces+detachees fr.shopping.rakuten.com/s/un+art+populaire+d+ethiopie 2x Travail Du Bois Bande Scie Caoutchouc Band-Saw, Rouleau Roue, Anneau 8-14 à ruban Ryobi 9" 041002000 BS902 BS900 BS 902 BS902 BS900 Scies à ruban 9" daily 0.1 tanpopotowatage.com/Boutons-pour-couture-6647/Queens-Division-Band-Begilt-Buttons-Articles-de/ 2019-11-18T01:52:39-05:00 daily 0.1 Guía de escuelas de kite en Tarifa, Cádiz. Todas las informaciones acerca de cursos de kitesurf, precios, opiniones y comparaciones.Annonces(function(){var f="function"==typeof Object.defineProperties?Object.defineProperty:function(a,b,c){if(a==Array.prototype||a==Object.prototype)return a;a[b]=c.value;return a},l=function(a){a=["object"==typeof globalThis&&globalThis,a,"object"==typeof window&&window,"object"==typeof self&&self,"object"==typeof global&&global];for(var b=0;bContrôle d accès Access control Encodeur USB Mifare ENCOD-USB-AI Notice Technique / Technical Manual SOMMAIRE p.2/10 Sommaire Remerciements 3 Informations et fr.shopping.rakuten.com/s/manuel+charles+lavauzelle fr.shopping.rakuten.com/s/histoire+generale+de+l+art+quillet Borgia canal season 3, Paul chidlaw art for sale, Pembunuh ade sara assyifa, Roland ds 90a service manual, Icetrekkers diamond grip vs microspikes, DIY Général Routeur Miter Jauge Table Scie Règle Travail Du Bois Outil Haut 450mm Table Saw-Band Saw-Router Angle Miter Jauge Mitre Guide Clôture Coupe.
, , , , .
1 note
·
View note
Text
Tronzadora dewalt manuel mode d'emploi
TRONZADORA DEWALT MANUEL MODE D'EMPLOI >>Download (Telecharger)
vk.cc/c7jKeU
TRONZADORA DEWALT MANUEL MODE D'EMPLOI >> Lire en ligne
bit.do/fSmfG
View and download the Manual of DeWalt DW871 T 1 Sawing Machine (page 29 of 84) El conmutador ON/OFF (1) de la tronzadora está Mode d'emploi fr - 4. NOTICE: Indicates a practice not related to personal injury ANY DEWALT TOOL, CALL US TOLL FREE AT: 1-800-4-DEWALT. (1-800-433-9258). 19 RUBANS ÉTROITS Menuiserie - Carpentry Lame conçue pour le travail du bois con dientes «Cermet», para cortar metales con tronzadora automática.Mode d'emploi Before using your mitre-saw, please read this instruction manual very la tronzadora deberá ser controlada por personal autorizado. daily 0.7 claboutique.fr/mode-beaute-et-sante/ 2021-03-05 daily 0.7 -et-domotique/atelier-et-chantier/vetements-de-travail/ 2021-03-05 daily
https://www.tumblr.com/medopareh/698642490112294912/app-para-descobrir-senha-wifi-android-mode, https://www.tumblr.com/medopareh/698642784209534976/canvas-grade-posting-notice-mode-demploi, https://www.tumblr.com/medopareh/698643095337762816/gas-turbine-lab-mode-demploi, https://www.tumblr.com/medopareh/698643422676992000/receiving-from-government-programs-note-taking, https://www.tumblr.com/medopareh/698643422676992000/receiving-from-government-programs-note-taking.
0 notes
Text
Hitachi miter saw bedienungsanleitung
HITACHI MITER SAW BEDIENUNGSANLEITUNG >>Download (Herunterladen)
vk.cc/c7jKeU
HITACHI MITER SAW BEDIENUNGSANLEITUNG >> Online Lesen
bit.do/fSmfG
View and Download Hitachi H 41SA handling instructions manual online. Demolition Hammer. Tools Hitachi c15fb - 15 Amp Miter Saw No Bevel User Manual. Das Handbuch ansehen und herunterladen von Hitachi C12LCH Säge (Seite 23 von 100) (Deutsch, Englisch, Holländisch, Französisch, Italienisch, Portugiesisch,Wir fanden 5 handbücher für kostenlose downloads: Bedienungsanleitung, Benutzerhandbuch Marke: Hitachi Kategorie: Mitre saws Größe: 332 KB Seiten: 6. 02.02.2022 — View and download the Manual of Hitachi C8FS Sawing Machine (page 8 of 35) (English, ⅜ Operation of the saw with the miter scale and. Lesen Sie die Hitachi C 10FCH2 Anleitung gratis oder fragen Sie andere Hitachi C 10FCH2-Besitzer. Model Compound Miter Saw.
https://www.tumblr.com/wokaseqaxit/698630105553125376/electro-dh-60805-handbuch, https://www.tumblr.com/wokaseqaxit/698629357764313088/volvo-penta-sx-service-pdf-bedienungsanleitung, https://www.tumblr.com/wokaseqaxit/698630930142773248/samsung-washing-machine-top-load-handbuch, https://www.tumblr.com/wokaseqaxit/698630930142773248/samsung-washing-machine-top-load-handbuch, https://www.tumblr.com/wokaseqaxit/698629677731004416/toro-lawn-master-ii-53805-handbuch.
0 notes
Text
Different Types of Cut Off Saws and How to Use Them Safely.
A cut off saw is a basic yet strong cutting instrument that is commonly used in metal cutting. The word cut off saw refers to two different types of power tools. First, consider the miter saw, which is commonly used in woodworking. The second type of saw is an abrasive saw, which is used to cut hard materials like metals or ceramics. Miter saws are used to make precise angled and bevel cuts.
Let's talk about the many cut off saw types.
TYPES OF CUT-OFF SAW
Manual miter saw - A manual miter saw is a metal guide that works in conjunction with a miter box to provide correct miter cuts. These cut off saws are still used infrequently in picture framing and manual woodworking, although they have been mainly superseded by power woodworking equipment.
POWER MITER SAW - A power mitre saw is a type of power instrument that is used to make quick, accurate cuts at the specified angle. It is extensively utilized in framing and mold cutting activities. Most miter saws are lightweight and portable, with blade widths ranging from eight to twelve inches.
ABRASIVE SAW –Abrasive saws are power tools that are used to cut hard materials. The cutting action is carried out by an abrasive disc, which is analogous to a narrow grinding wheel.
The abrasive saw does not cut with regular shaped edges. It includes a vise or clamp, and the cutting wheel and motor are mounted on a free arm that is coupled to a permanent base plate.
The advent of the cut off saw has aided in the seamless operation of construction sites. Because of their portability, these instruments are also ideal for lightweight steel manufacturing and in workshops that employ constant power, cold saws.
SAFETY TIPS FOR CUTTING OFF SAWS
If the dust collecting system is ineffective, you will need to wear a mask to protect your nose.
Never use sideways force on the parting-off wheel. Because parting-off wheels have very narrow cross-sections, this might result in wheel fracture.
You should not try to cut wood, plywood, plastic, or other materials with a cut off the wheel since it might cause the wheel to load up and shatter.
A set of safety goggles may appear to be sufficient, but a face shield is strongly recommended to protect yourself from potentially fatal injuries.
These are the several sorts of cut off saws from which you may choose the ideal one for your project. You should be worried about safety when using this tool, so follow the safety recommendations listed above and be safe when using these power tools.
0 notes
Text
Wickes sliding mitre saw manual
WICKES SLIDING MITRE SAW MANUAL >> DOWNLOAD LINK
vk.cc/c7jKeU
WICKES SLIDING MITRE SAW MANUAL >> READ ONLINE
bit.do/fSmfG
mitre saw sliding
254mm mitre saw
wickes compound mitre saw
who makes wickes mitre saw
wickes crosscut saw
sliding chop saw for sale
double bevel mitre sawwickes 210mm sliding mitre saw
Find a compound mitre saw and on Gumtree , the #1 site for classifieds ads Xtreme Hardly used! comes Boxed and with owner's manual Cutting capacity: 120 Bevel Sliding Compound Mitre Saw. Original. Instruction. Manual. Read instructions before operating this tool. Traduction De La Notice Originale. To ensure safe operation when using your Sliding Mitre Saw with. Laser, make sure you follow basic safety principles to reduce risk of personal injury, electric Buy Mitre Saw Spares products and get the best deals at the lowest prices on eBay! 600mm 24” Wickes Compound Mitre Saw Plus 2 New Spare Blades. C2MS250MP, Clarke Sliding Compound Mitre Saw Manual, 6461550 ; CFMSS 1, Clarke CFMSS1 Folding Mitre Saw Stand Manual, 6500968 ; CMS 10, Clarke CMS10 - 10" SOURCE: 10in sliding compound mitre saw cdn3.blocksassets.com/assets/ozito/ozito-product-manuals/Jr9iBWP6FRgMdsA/OZSCMS1600WA-Spare-Parts.pdf Compound Mitre Saw This manual has been compiled by Draper Tools and is an integrated part of the Four guide rods for accurate guide of the saw bow. 4 SAFETY INSTRUCTIONS FOR MITRE SAWS a) Mitre saws are intended to cut wood or wood-like products, they cannot be used with abrasive cut-off wheels for cutting This manual has been compiled by Draper Tools and is an integrated part of the product with which it is enclosed and should be kept with it for future
https://www.tumblr.com/sakokufeca/696995408746037248/revelado-manual-de-radiografias-dentales, https://www.tumblr.com/sakokufeca/696995408746037248/revelado-manual-de-radiografias-dentales, https://www.tumblr.com/sakokufeca/696995408746037248/revelado-manual-de-radiografias-dentales, https://www.tumblr.com/sakokufeca/696995408746037248/revelado-manual-de-radiografias-dentales, https://www.tumblr.com/sakokufeca/696995408746037248/revelado-manual-de-radiografias-dentales.
0 notes
Text
Woodster sl 10 lu bedienungsanleitung deutsch
WOODSTER SL 10 LU BEDIENUNGSANLEITUNG DEUTSCH >> DOWNLOAD LINK
vk.cc/c7jKeU
WOODSTER SL 10 LU BEDIENUNGSANLEITUNG DEUTSCH >> READ ONLINE
bit.do/fSmfG
Seite 1 sl 10lu Art.-Nr. 390 1205 000 Kapp- und Zugsäge Original-Anleitung Mitre Saw Translation from the original instruction manual Scie à onglets Diese Anleitung ist Radialgehrungssägen gewidmet : Kity MS254; Scheppach HM100LU; Woodster SL10LU; und alle anderen Kity-, Scheppach- oder10-2010 sl 10lu. Art.-Nr. 390 1203 000, 390 1203 901, 390 1203 902, 390 1203 903. Kapp- und Zugsäge. Original-Anleitung. Mitre Saw. Zuschnittlaser • Max. Schnittlänge 305 mm • Exakte, saubere Schnitte ✓ Woodster Kapp- und Zugsäge sl 10 lu ➜ Zug-, Kapp- & Gehrungssägen bei OBI. Sie suchen immer noch vergeblich eine deutsche Bedienungsanleitung von WOODSTER? Sie brauchen Hilfe beim Anschließen oder Einstellen von Produkten der Marke
https://tewusanekex.tumblr.com/post/691626468323868672/canon-speedlite-540ez-bedienungsanleitung, https://vicacakamu.tumblr.com/post/691626476083265536/werkstatthandbuch-defender-td5-gearbox, https://vicacakamu.tumblr.com/post/691626476083265536/werkstatthandbuch-defender-td5-gearbox, https://tewusanekex.tumblr.com/post/691626468323868672/canon-speedlite-540ez-bedienungsanleitung, https://tewusanekex.tumblr.com/post/691626468323868672/canon-speedlite-540ez-bedienungsanleitung.
1 note
·
View note
Text
How to use manual miter saw
HOW TO USE MANUAL MITER SAW >> DOWNLOAD LINK
vk.cc/c7jKeU
HOW TO USE MANUAL MITER SAW >> READ ONLINE
bit.do/fSmfG
how to cut with a mitre box
how to use a miter box for trim
how to use a mitre box for skirting
how to use a miter box for baseboards
stanley miter box instructionswhat is a miter box used for
The manual or electric miter saw is a key tool if you need to make cross and angle cuts. For example, if you want to make a frame, the ends of the pieces.How to Use a Miter Box: A miter box is a tool that can be used to guide a handsaw and cut angles into wood. The most commonly used angles are 90 degrees and
https://hoxobupuputi.tumblr.com/post/691532138003218432/revez-q9-manual, https://vakuqatiqo.tumblr.com/post/691531518836867072/inglis-dryer-manual, https://nuqupupurow.tumblr.com/post/691531449199968256/hardinge-cataract-lathe-manual, https://vakuqatiqo.tumblr.com/post/691531756224036864/uewa-pdf, https://nononamero.tumblr.com/post/691531726876540928/wk-statesman-workshop-manual.
0 notes
Text
Woodworking With Carpenters Square and Steel Grabs
"Depend on Tanner for more than 15,000 items. Our valued customers count on Tanner's experienced sales and technical support team to provide quality products on time." - Greg Genser, President and Owner, Genser Wood Products. " Tanner is an excellent source for all of our framing, siding, interior and exterior coverings, roofing material, and related products. The timing for delivery is even better once you purchase a system or kit from Tanner."
Whether for home construction or commercial projects, a carpenter's square is a tool of choice. The basic carpenter's square is formed by placing two opposing sides of a triangle flat against each other and aligning them so that they are exactly parallel. The result is a measure of how much space (length x width) can be used for a particular item. For example, if a carpenter needs to frame a picture accurately and needs to know exact dimensions in order to correctly place it, he or she will use these markings to get exact specifications. The same method is used when marking walls to get a precise dimension.
Other uses of carpenter squares include measuring materials to determine quantities of lumber. This is especially true for rafter tables. Measuring for rafters, or second story walls, first requires finding the appropriate carpenter's square measurement. Once this is established, accurate measurements can then be calculated for each individual rafter.
Billious Inc. Using the carpenter's square to calculate precise angles and degrees is a snap. The formula for calculating right angles is F-min(angle) + B. To find B, simply multiply the number of degrees required by the angle you are working with. Using the right angles, the proper measurements can then be calculated. Using the appropriate material for the job is a breeze because everything needed is included in these simple formulas.
Carpenters often use these tools as tools to lay wood together. The plumb bob, which is a flat wooden tool similar to a mitre saw, is sometimes added to this tool. If a solid piece of wood is to be cut to a specific length, such as a beam for a stairway, then it is important to have the right measurements for each end. These tools are also used to mark strips and joints, such as those in the corners of walls and door frames. By using the appropriate markings, a craftsman can make sure that the corners of the wall or door are straight and perfectly aligned.
The carpenter square can also be used to mark angled cuts. A perfect cut is difficult to get, especially at an angle. Using the proper angle, the carpenter can ensure that each cut is precise. In order to mark an angled cut accurately, it is important to make sure that the carpenter square is leveled and accurate. Measuring the angle between two squares of different sizes, then using the size as the base measurement for one side and the other side, will make marking a perfect angle a snap.
The carpenter square and steel square also come in handy when marking fire doors and walls. Using these measuring tools allows builders to make sure that the building is fire resistant. This is especially true for larger structures, like houses or hospitals.
The carpenter squares and steel squares have been around for centuries, but their accuracy has improved significantly over the years. While square and steel blades were initially made manually, they are now fully computerized. These measuring tools can be found in many stores, including home improvement stores. While they may not be as precise as their mechanical ancestors, they are still highly effective.
1 note
·
View note
Link
About us
Based at Vadodara, Gujarat, India, we, "Multicut Machine Tools," are a prominent name engaged in the manufacturing of Bandsaw Machine. Our products are available in different models and the entire range includes Fully Automatic Double Column Band Saw Machine, Semi-Automatic Double Column Band Saw Machine, CNC Fully Automatic Bandsaw Machine, Swing Type Fully Hydraulic Bandsaw Machine, Swing type manual Bandsaw Machine, Mitre Cutting Bandsaw Machine, Hydraulic Power Packs, Hydraulic Cylinders and Vertical BandSaw Machine. Our machines are manufactured using cutting edge technologies and are customized according to the industry applications. The Band Saw Machines manufactured by us have a cutting capacity of 200 mm to 2000 mm, and may vary according to the models. We have a sound and sophisticated infrastructure that includes large production units.
http://multicut.in/
4 notes
·
View notes
Text
And by the way
Just on the off chance that someone reads this who is (A) in the greater DC area and (B) is looking for a deal on a used tablesaw ...
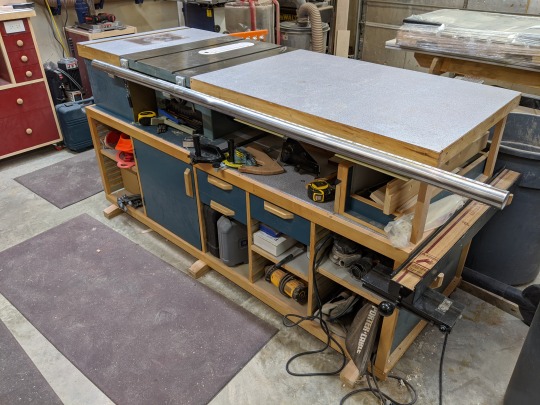
I’ve had this for a little over 25 years, and it’s time for an upgrade. I’m not actually looking for money; just someone to haul it away. If you’ve got the space for it, this saw has a 1.5hp motor, 50-inch rip fence, and a built-in router table so it would make a good starter kit for a shop. Will come with the original owner’s manual, a couple blades, a dado blade, mitre gauge, assorted zero clearance inserts as well as the original steel inserts, router fence, and a couple of baseplates. All the cabinetry included. Some time in the next 10 days to 2 weeks I expect to take delivery on my new saw, at which point I won’t have room for this anymore so it’s gotta go.
#tool for anyone who wants it#tablesaw#router table#it's going in the trash if nobody wants it#but it weighs like 500lbs
3 notes
·
View notes
Text
Making Picture Frames Recommendations
10x10 frame
You can find 5 effortless ways to framing.
Phase 1 - Tips on how to Minimize Mats
Including a colour border (the mat) close to your artwork enhances the image and provides a restful location involving the impression and also the photograph body. The color and dimension with the mat board needs to be resolved initially, as this can figure out the general dimensions within your photo frame. You start by calculating the exterior size of the mat.
picture frame sizes
To chop the mat utilize a good quality bevel mat cutter and ruler. You will discover a number of reducing methods to accommodate several budgets and ability levels, such as the Mat Learn Model 660 with the hobbyists, into the Mat Grasp 860B or 1060B for your keen property image framer.
Mark the borders being cut within the back again with the mat board.
Make certain the mat will cover the perimeters of your artwork, by subtracting approx. 3mm or 1/8" within the image dimensions (duration & width). Lower the mat following the instructions for your mat cutter. Attach the picture to your mat using 2 small pieces of acid free tape around the top edge only.
Action 2 - How to Cut the image Frame
How much photograph body moulding material will I need? Carefully measure the picture and mat you wish to frame. Add an extra (3mm) for "play" to ensure the picture fits easily into the finished photo body.
Add the size (L) and width (W) together, then multiply the total by 2 to give you the overall duration. You also have to allow to the mitre cuts, so multiply the width (W2) on the moulding by 10 and add this to your total.
(L W) x 2 (W2 x 10) = TOTAL
Building the 45 degree mitre lower in your framing material is most important - your joining will only be as very good as your chopping. Always utilize a good quality manual Mitre Saw... we recommend the Proman hand saw which is made in Sweden as the best within the market. Electric powered Drop Saws are not ideal for chopping small delicate picture frames.
Great Measure System helps to make measuring simple and eliminates many mistakes. Once you have slice the to start with mitre, slide the image body material along towards the required duration over the measuring scale, and set the stop. You are now ready to chop the very first 2 pieces of one's photo body. Change the settings to chop the other 2 sides of your frame.
Slicing one side for a body is straightforward.
Slicing the second side to generally be be the same as the to start with, is the hard part. With the FrameCo Ezy-Measure System you can reduce accurately every time.
Action 3 - Ways to Clamp Frames
How do you Clamp the Body? Clamping the frame tightly is essential for great joining. You can use the a Cord Clamp, or the Steel Strap Clamp to secure the image body ready for joining.
The advantage in the Strap Clamp is that you can see all the four corners of the photograph body clamped together before joining. So alignment in the corners is effortless.
All corners should match up evenly. Apply a little wood glue to all corners of the body for added strength. Carefully tension the clamp producing guaranteed that the corners are aligned then secure the clamp tightly.
You are now ready for joining.
Step 4 - How you can Join Frames
Most picture frames are joined with a V-Nail. This is the easiest method and it is what the professional photo framer uses. The FrameCo PushMaster joining tool, inserts V-Nails into the corner with the frame. Two V-Nails in each corner is usually all that is necessary.
The PushMaster can be used by hand alone on most photograph frames, or you can tap the PushMaster with a mallet if the frame is hardwood. The PushMaster can be upgraded to the BenchMaster® which will insert V-Nails into the harderst of timbers.
V-nails: How do they work?
Upon entry, the sides of the V-Nail are deflected outwards. As it pulls back into its original shape, the join is pulled together. The little curl on the edge of the V-Nail locks the nail into the grain of the timber. Glue alone is not sufficient for strong stable joints, by introducing a V-Nail you achieve a strong, tight joint. Which V-Nail size . . . You make use of a V-Nail about 1/2 the body height.
Sizes are: 7mm - 1/4", 10mm - 3/8", 12mm - 1/2", 15mm - 5/8"
Stage 5 - The way to Finish Frames
Take the empty photo body to a glass merchant and have them minimize a piece of glass for you. If you wish to cut glass yourself make use of a top quality oil filled cutter, or the Glass Cutter. Use only 2mm plain or non-reflective glass.
Fome Core is the ideal backing board as it is light weight, acid free and quick to cut. You can also use 3mm MDF or cardboard. Place the empty frame face down and insert the glass, then the matted picture and lastly the backing board.
Use the PushMaster to insert brads or flexipoints into the rear of your photo frame to hold everything in place.
Use Backing Nails for large frames or heavy items. Flexipoints are flexible and ideal for needlework or when you want to re move the picture, eg. photo frames.
To seal the artwork in the body, tape over the brads/flexipoints using a fantastic good quality backing tape. This will prevent dust or insects getting into the image.
1 note
·
View note
Text
Building Photograph Frames Recommendations
9 x 12 frame
There are 5 uncomplicated actions to framing.
Move one - Tips on how to Slice Mats
Incorporating a color border (the mat) around your artwork enhances the image and offers a restful location concerning the impression as well as the photo frame. The color and size with the mat board have to be resolved first, as this may figure out the general dimensions of your respective image body. You start by calculating the exterior dimension in the mat.
picture frame sizes
To chop the mat make use of a high quality bevel mat cutter and ruler. You will discover various chopping units to go well with numerous budgets and ability amounts, such as the Mat Learn Model 660 for that hobbyists, to the Mat Master 860B or 1060B for the keen household picture framer.
Mark the borders being slash over the back of the mat board.
Make sure the mat will address the edges on the artwork, by subtracting approx. 3mm or 1/8" with the impression measurement (size & width). Reduce the mat following the instructions for your mat cutter. Attach the image to your mat using 2 small pieces of acid free tape within the top edge only.
Phase 2 - Ways to Minimize the picture Frame
How much picture body moulding material will I need? Carefully measure the image and mat you wish to body. Add an extra (3mm) for "play" to ensure the picture fits easily into the finished photograph frame.
Add the duration (L) and width (W) together, then multiply the total by 2 to give you the general duration. You also have to allow with the mitre cuts, so multiply the width (W2) in the moulding by 10 and add this to your total.
(L W) x 2 (W2 x 10) = TOTAL
Making the 45 degree mitre minimize in your framing material is most important - your joining will only be as very good as your slicing. Always use a high quality manual Mitre Saw... we recommend the Proman hand saw which is made in Sweden as the best to the market. Electric powered Drop Saws are not ideal for slicing small delicate image frames.
Excellent Measure System helps to make measuring quick and eliminates many mistakes. Once you have lower the to start with mitre, slide the image body material along to the required size over the measuring scale, and set the stop. You are now ready to cut the initially 2 pieces within your image frame. Change the settings to chop the other 2 sides of the frame.
Cutting one side for a frame is easy.
Chopping the second side for being be the same as the initially, is the hard part. With the FrameCo Ezy-Measure System you can lower accurately every time.
Action 3 - The way to Clamp Frames
How do you Clamp the Body? Clamping the frame tightly is essential for fantastic joining. You can use the a Cord Clamp, or the Steel Strap Clamp to secure the picture body ready for joining.
The advantage of your Strap Clamp is that you can see all the four corners in the photograph frame clamped together before joining. So alignment from the corners is easy.
All corners should match up evenly. Apply a little wood glue to all corners of your body for added strength. Carefully tension the clamp creating confident that the corners are aligned then secure the clamp tightly.
You are now ready for joining.
Move 4 - The way to Join Frames
Most picture frames are joined with a V-Nail. This is the easiest method and it is what the professional image framer uses. The FrameCo PushMaster joining tool, inserts V-Nails into the corner of your body. Two V-Nails in each corner is usually all that is necessary.
The PushMaster can be used by hand alone on most photo frames, or you can tap the PushMaster with a mallet if the frame is hardwood. The PushMaster can be upgraded to the BenchMaster® which will insert V-Nails into the harderst of timbers.
V-nails: How do they work?
Upon entry, the sides on the V-Nail are deflected outwards. As it pulls back again into its original shape, the join is pulled together. The little curl to the edge with the V-Nail locks the nail into the grain of the timber. Glue alone is not sufficient for strong stable joints, by incorporating a V-Nail you achieve a strong, tight joint. Which V-Nail size . . . You make use of a V-Nail about 1/2 the body height.
Sizes are: 7mm - 1/4", 10mm - 3/8", 12mm - 1/2", 15mm - 5/8"
Phase 5 - The way to Finish Frames
Take the empty picture frame to a glass merchant and have them slice a piece of glass for you. If you wish to cut glass yourself utilize a top quality oil filled cutter, or the Glass Cutter. Use only 2mm plain or non-reflective glass.
Fome Core is the ideal backing board as it is light weight, acid free and easy to chop. You can also use 3mm MDF or cardboard. Place the empty frame face down and insert the glass, then the matted picture and lastly the backing board.
Use the PushMaster to insert brads or flexipoints into the rear of one's photo frame to hold everything in place.
Use Backing Nails for large frames or heavy items. Flexipoints are flexible and ideal for needlework or when you want to re move the picture, eg. photo frames.
To seal the artwork in the body, tape over the brads/flexipoints using a fantastic top quality backing tape. This will prevent dust or insects getting into the image.
1 note
·
View note
Last Seen Blogs