#let me know if you want me to link to any other specific qs
Note
idk if it’s still open but 16, 20, and 25 for the ask game?
hiiiiiiiii thank you for these :)
16. Do you research for your fics? If so, how deep of a rabbit hole have you gone down by accident when researching?
I tend to do a lot of research for my fics, whether its the source material or otherwise. In terms of rabbit holes, I feel like the worst I've done is when I get obsessed with the logic of travel. If you see a coordinate in my fic, it's a real place. If I said it took x amount of time to get there by helicopter from y place, it did. I checked. I don't know why I bother with this but it drives me crazy if I don't. A funnier search would be when I was looking for references of wounds post-strangulation and all I could get were domestic violence hotlines. such is the life of a writer, as I'm sure you understand hahaha
20. What’s your favorite part about the fanfiction writing process?
Either daydreaming the fic up while listening to music, or getting feedback after a chapter is published. Anything in between feels like absolute hell T_T but it's so worth it. Also just thinking and talking about my OCs in general makes my brain go brrrrrrrrrrakjsdk
25. Do you listen to music as you write? If possible, link your writing playlist.
Oh :) I guess I sort of answered this one in the previous question. I do listen to music when I write, and it's a large part of the process even before my hands hit the keys. I make fic playlists, so I only have ones going for 'nostalgia' right now (they are character specific) . I will link them below if you're interested. Anytime anyone wants to geek out about fics and music I am so down so let me know if you end up listening hehehe :3
togami (I think I've listened to the first song here more than any other song on Spotify, I can't stress how important this one was for my writing LMAO):
komaeda:
mori:
thank you for the Qs this is overwhelmingly fun for me LOL
#ask game#THANK YOUUUUUUU SO MUCH#if anyone listens to my fic playlists I will die of happiness#if you don't that's okay too
3 notes
·
View notes
Text
Masterpost
The Blurb:
It’s a story about a world full of heroes with odd and amazing powers! But… you’re not one of them. You don’t have powers, and you don’t plan to go and fight crime. No, you’re just a model, everyday citizen. A reporter, in fact, tied into the events of heroes but never really a part of them…
Except for one (well, two, but thats already said and done), little exception.
You work for The Nickelport Rust, a controversial paper known for one reason and one reason only.
Unmasking heroes.
_________
The Demo
Here!
Url: https://dashingdon.com/play/definitelynotrena/model-citizens-unmasked/mygame/
_________
The Characters
Characters Page (Has everyones genders, sexualities, and personalities. Includes minor characters)
Asks with everyone tagged
Finley Burke
Tag, Appearance
Rafael Darzi
Tag, Appearance
Jacob Greenhill
Tag, Appearance
Lucille “Lucy” Pinchette
Tag, Appearance
Yolanda Waltz
Tag, Appearance
Eileen Abney
Tag, Appearance
The Informant
Tag, Appearance
Ricky Dempsey
Tag, Appearance
Vera / Vega / Vincent Bayer
Tag, Appearance
Erin Liu
Tag, Tag (before their name reveal)*, Appearance
Other specific Qs:
Where do the ROs live?
What about the MCs family?
*(there’s no link here yet because apparently I did not possess the foresight to actually tag the Qs with them as 10 before their name reveal so... that’s gonna take a hot second gimme a minute)
(Will also get the appearances up soon, too, having trouble finding the specific post with their appearances)
_________
Sketch Sunday, Fun Fact Friday, and Other Fun Things
Sketch Sunday Tag
Fun Fact Friday Tag
Short Stories Tag
_________
Other Social Media
Linktree
Redbubble
Itch.io
Twitter
Discord
_________
FAQ
When will the next update be out?
I don’t know the specific date and I’ll be honest I also don’t like giving specific dates because then if I break them that’s Bad.
I do have a general goal and I’ll be happy to tell you my general goal but also keep in mind that, as always, Model Citizens: Unmasked is something written for fun and put up so others can have fun with it, too. While I wholly intend to see this project through to the end no matter what, I also intend to keep it as something I do for fun and relaxation, which does mean progress can slow if other priorities take precedence.
But all that aside--
Current General Goal for Next Update:
-- (i’ve been in a truman show style series of strange but minor misfortunes so its gonna take a hot sec to get that settled, sorry!) --
What will the next update be?
More stuff in the interview! Two main goals:
Adding more questions
I’m going to add some more basic questions to either make Yolanda more or less suspicious. So far not a lot of people have been kicked out of the interview and that’s good because it means I have more space to play around with the results of her suspicion.
To also go with this:
Upping the number of questions you can ask.
With the addition of questions you can ask I’m going to up the inquiry limit before you get kicked out of the interview. This will give you more room to pick and choose what’s important, I hope (allowing you to choose ones that aren’t as important to your article but could be a chance to curry favor / lower suspicion with her / just get to know Yolanda more, or stick to purely info gathering)
This will be a shorter update, and thus also come along quicker (not another year-long gap, aha) and hopefully with the higher inquiry limit and the extra questions make some secret scenes (getting kicked out and her romance, for example) more accessible in general.
Thanks for sticking around and your continued support!
Have you dropped this project? / Why is it so slow?
I know I kinda ramble-answered this in the first q but it’s my policy to be upfront and honest with the state of my priorities and this project:
Model Citizens: Unmasked is not dropped.
Model Citizens: Unmasked has always been for fun. This does mean it’s not going to be my number one priority most of the time-- however it also means I have zero qualms about taking all the time I need to do everything I want with it.
Model Citizens: Unmasked is going to be a very large undertaking. But that’s okay! Part of the reason I want to keep it as something I do for fun and relaxation and put up so others can relax and have fun with it is so that I don’t have to trim it back. I can let this story run wild and have three totally different paths for one scene because I’m not holding myself to a deadline or an expectation of word length or writing time or whatever. I can let myself go wild with 10 different ROs and their own storylines because I don’t care how long it takes to write them.
I just wanna write them, so I will.
What’s the Current Word Count?
According to google docs: 350,000 words*
*(rounded to the nearest 1,000 // including code (including that horribly messed up coding I have in chapter one, so once that’s fixed it might easily knock another 1-2K words off of that.)
(Send me some qs youd like in the FAQ if you want)
_________
General Content Warnings:
Drugs and alcohol, violence (in terms of fights, both physical and using weapons) / fantasy violence (in terms of powers), romantic content (nothing explicit).
If there’s anything else, let me know. Nothing should go into graphic detail, but they exist and there is some level of detail of each. So take care of yourselves!
Have a lovely day!
#masterpost#model citizens unmasked#am i doing it right#god only knows#bow howdy do i sure hope so though#let me know if you want me to link to any other specific qs#interactive fiction#choice of games
264 notes
·
View notes
Text
story process challenge
i was tagged by @xldkx to do this challenge, created by @herpixels , like a month? a month and a half? ago and it’s been sitting half finished in my drafts for nearly as long. *sigh* (regardless, i love stuff like this so even if it takes me forever to get to it, i appreciate the tags! 💕).
i decided to answer all the qs because it took me damn long enough to get to this, so i might as well put some extra elbow grease into it (plus it was fun!). btw it’s all going under a cut b/c it is long. i apologize in advance.
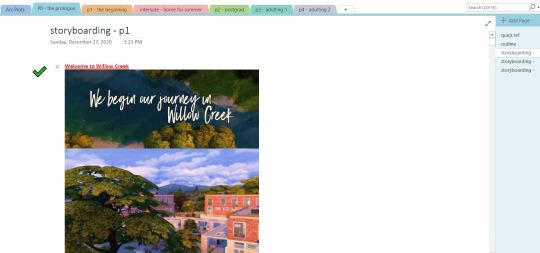
1. My Writing Process - used to be a hot damn mess. literally word docs strewn throughout my pc. However, I recently switched to using Onenote (it’s what i use to organize my d&d campaign notes) and hoo-boy is it so much nicer. this is how it’s set up and it’s honestly night and day. i can have a page with outlines, a page to organize & order screenshots, and a separate page for drafting text, and i can easily toggle though them without having to switch windows? a big thumbs up from me.
When it comes to actual writing- I used to write my drafts in novel format, which i enjoyed but it made “converting” them into tumblr posts time consuming and frustrating. I ended up scrapping most of the text in the process, retaining pretty much only the dialogue.
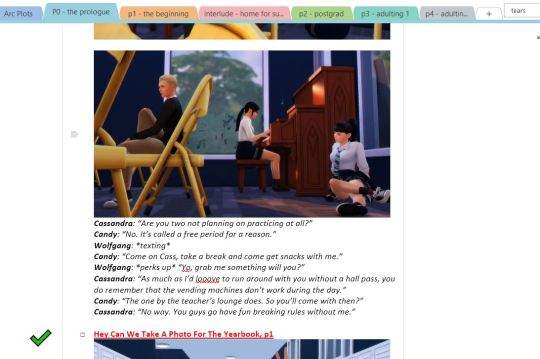
Anyway, nowadays I write in more of a screenplay format: dialogue only + key scene information with the occasional note to self.
I do keep a master “arcs” page with key events and each individual character’s arc from beginning to end and secondary “outline” pages with slightly more detailed outline for each leg of the project. No screencaps b/c spoilers galore!
My typical work flow process for a scene goes: (1) brainstorm scene ideas, (2) take screenshots, (3) organize screenshots into a rough storyboard, (4) add 1st draft of text, (5) edit photos, (6) edit text, (7) upload to "drafts” here on tumblr, (8) let sit for a bit (9) take a final look at things/proofread and edit as needed. It may sound counterintuitive, but i find it much easier to write dialogue for a set of images rather than attempt to take images based on prewritten text. I feel more comfortable editing and tweaking tone and content in the text this way. Otherwise, I get frustrated when I “can’t” shoot a scene exactly as it appeared in my head.
2. How I build my scenes - A lot of what i do is rooted in gameplay, therefore my sets are usually (a) play-tested and (b) not super pretty. I’ve certainly improved at decorating & building over the years but more often than not I download lots off tumblr and the gallery because I don’t have the patience, aptitude, or time to build all of my own sets. That being said, I frequently gut builds only to build a number of completely unrelated mini sets inside to reduce the number of times i have to replace lots. I also keep a list of “important locations” and where certain characters live / will move to, to help keep this all straight as there aren’t nearly enough lots per neighborhood or even per world in this damn game...
my least favorite part of scene building is actually decorating. lol. Don’t get me wrong, I love clutter. I honestly do. but fuck me if i expect myself to spend hours meticulously decorating a set, spend another 3 hours toggling back and forth b/w BB & live modes adjusting things to get rid of the damn routing errors. (yeah, yeah, i know i could ignore them, they’re not important, especially in those scenarios where i’m using a set for screenshots and nothing else, but idk. it really grinds my gears.) and then have to replace the lot like a week later because there aren’t enough lots in the game. *sigh*
3. CC/Pose Making - i do not consider myself to be a cc creator nor a pose maker but i do dabble occasionally. And to be completely honest i’d much rather spend my time doing other stuff, so it’s not high on my list of priorities atm. plus there are so many talented cc creators in this community; i can usually get by with what’s already out there.
4. Getting in the zone - Honestly, I do a lot of brainstorming for plot & dialogue in the shower. I don’t have any particular playlists to get me “in the writing mood” but I do enjoy listening to music as I work. Either instrumental stuff or simply artists/songs I like. If something just so happens to “fit” a scene I’m working on, one i’ve got planned, or even just gives me vibes for a certain character or group, I add a quick note to the top of said scene’s draft. Most of the time I stick it in the recesses of my brain and add a quick link when I finally get to the point of posting the draft to tumblr. For whatever reason, when I have one of those “oh this song is perfect for X” moments it’s essentially ingrained in my mind for the rest of eternity.
5. The screenshot folder - this will most likely give some of you out there major anxiety. but i swear it’s an organized chaos. :)
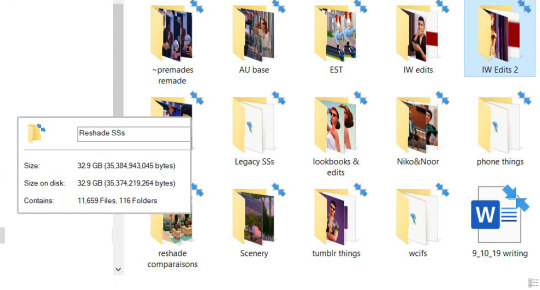
yep. 32.9gb of screenshots & related things...
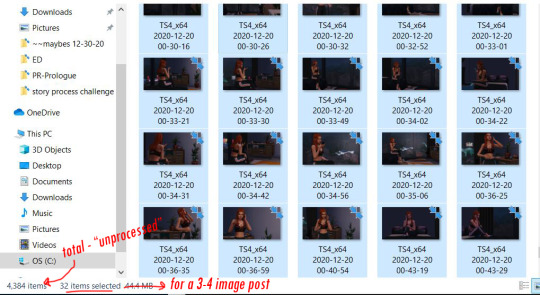
So with the raws from a single random scene selected, you can see i take roughly 10 screenshots per image posted. not terrible i guess but i’m working on it. Typically I take screenshots and once I’m done editing a scene I’ll move them from the general folder to a more specific project folder.
6. Captions - I’ll answer this in three parts:
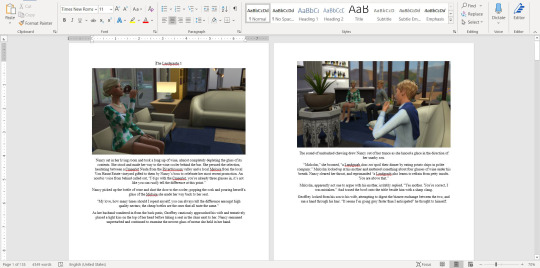
for my townie story. not really. I prefer using the text box. I tend to write (& re-write) the dialogue for each one of these scenes several times over as I add more “scenes” into my drafts. It would be incredibly inefficient, time consuming, and would waste a lot more space on my pc to have to save .psds of each image just so i could edit dialogue when I decide: “oh hey maybe so and so needs to bring up X in this scene” and then change my mind an hour later.
for niko, noor, & co. I’m a text on image type gal here. don’t really know why, but it gives the project a different energy. ironically it makes it feel more laid-back to me. which i guess makes sense, it’s a much more light-hearted “story” than my townie project. which is, imo, very soapy haha.
for legacy stuff. all text goes below the images in the text box. reasoning: it’s gameplay, I don’t brainstorm, outline, or pre-write for this. I play the game, take screenshots, plug ‘em into my drafts and write some commentary / dialogue to go along with it.
7. Editing - i am a creature of habit and have not majorly changed my editing process in probably a year and a half (when I began using reshade and had to adjust my color correcting psd). it’s a super basic system:
drag & drop my “color correction” psd.
run actions in ps. (i made my own “all-in-one” actions to really streamline the process; i have different “actions sets” for my premades’ story and for other things that get posted to tumblr. even if no one else notices it, i like the little details that keep my projects separate and “identifiable”.
voila. all set to upload.
sometimes i crop images, add “text effects”, or do more in depth editing (i.e. editing a phone screen or adding rain etc.) but overall i try and keep it simple for myself.
8. Throwback - i posted an image of one of the first (but never posted) scenes I’d written for my townie project up above. but as for how would i redo a scene i’d already posted. well i’m currently re-doing my townie story so i guess i’ll just say you’ll see how it’s redone when i get to part 1! 😉
anyway, no tags because i’m so embarrassingly late to this party but if you hadn’t gotten around to this tag, wanted to do it but didn’t get a tag, or started it and left it to sit and now you’re thinking “oh god that was months ago should i even post this anymore?!?” consider yourself tagged by me and go ahead and post it for all to see!
#tag train#story process challenge#it's long. it's rambly. but that's me.#this one was a challenge! a challenge but fun.
6 notes
·
View notes
Text
#2 / what’s the difference between applying through NC and GSP?
When you apply to UWC, you can choose to apply through a National Committee (NC) or through Global Selection Programme (GSP). Here I’ll outline the main differences and misconceptions about them. (Warning: kinda long but definitely informative post under the cut)
The written application:
Similarities - GSP and most, if not all, NCs require you to write a written application on a website called fluidreview (don’t worry, there’s a direct link on your NC’s/the UWC website to where you can access this). This application usually includes personal information, some references, a series of essay-type questions and your school grades. The essay-type Qs are there to find out what you’re like, what you’re into and your beliefs, as well as how these things correspond with UWC values. There’s usually a pretty tight word limit. You often also pay an application fee at this stage.
Differences - In GSP at this stage you also choose which colleges you’re interested in. They list all available colleges (not RBC and SEA this year) and the annual fees for each. You could pick all of them if you wanted, and they recommend you pick at least 2, so most people I spoke to picked 3-6.
The interview:
Similarities - Every NC does this slightly differently, but you’re usually offered an interview a few weeks after the written app deadline. Some countries do phone/skype ones first, some have a whole weekend of interviews and activities, some split it up so you do an activities day and then get invited back to complete an interview, and some do it all in one day. The activities are there to help everyone get to know each other, help you loosen up, see how you work with others and stuff like that. The interviews are more personal and can include a whole bunch of things. In a lot of NCs and the GSP you also have to prepare something to present. E.g. in the GB NC, you present to a group but in the GSP you present to 2 selectors, but in all cases, they make sure you’re happy and comfortable.
Differences - In GSP your interview probably won’t be in your country, there are interview locations across the world and you express which location would be easiest for you to get to, but all are near big transport hubs (e.g. mine was in Frankfurt, really near the airport). In NC, the interview days usually take place in a big city in your country or actually at the UWC campus in your country, if there is one. Also, in GSP the interview day is just 1 day. At ours, we first completed a mental health questionnaire, then did some group activities until lunch, then had two interviews, one being our presentation and the other being questions after lunch. We also had to confirm our college choices, in case your preferences changed. At some NCs, if English isn’t an official language of your country, you may be required to prove your competence in English and also complete an academic/logic test.
The waiting… :
There are a lot of differences from NC to NC in terms of when and for how long the written applications are open, how long until you are offered an interview, when the interview is and how long after that you’re offered a space. For most, written applications open in the summer and close in autumn/winter, then have the interview in winter/early spring, and offer places in spring. Most NCs send out emails/calls about whether or not you got an interview at the same time for everyone, so everyone finds out on the same day. The same for offering places, but again this is quite changeable from NC to NC.
In GSP, the applications open in May and close about a week before the final interview in February (but, for example, if you live in Canada and the final interview weekend is in Bangkok, you probably want to apply before then so you can do your interview somewhere closer). Once you’ve submitted your written app, you will find out if you have been offered an interview within 2 weeks. In this way the interview spots are offered on a rolling basis. When it comes to finding out about places, it was quite varied. Some people from my selection weekend found out under 2 weeks after the interview weekend, and not long after that I was told I would have to wait. I was then offered a space another week and a half after that. I think this will change though, as many people let the GSP selection team know that this was a super stressful experience as we were all still in touch so found out about other people’s successes whilst we were still waiting. They seemed to have the most spaces to fill at AC, Mostar, USA, Maastricht, and Dilijan so these spaces were offered quickly, but they had fewer spaces to offer at schools like RCN, Pearson and ISAK so they waited until all this batch of interview weekends were done to decide who would go there. These were all just nominations though, and although nominations are rarely rejected, you had to wait another week or more until your college accepted your place officially. For me, I submitted my application in late September, was offered an interview in early October, had my interview in early November, was offered a place in late November and received confirmation from the college not long after that.
Funding:
In NCs, lots of scholarships are offered. Many offer a lot of full-ride scholarships, meaning everything to do with school and housing is paid for, and they can cover transport too. Some offer fewer scholarships though. In general, they really try to make sure that anyone who they think deserves to be at a UWC can be.
In GSP, you have to pay for all of it yourself, there are no scholarships whatsoever. The price from school to school vary a ton, for example, Mostar costs around £12,000 a year whilst ISAK costs around £70,000*(edit I meant £70,000 for 2 years, it's actually currently around £33,000 a year which is the same as AC, some others, I think SEA and changshu cost more).
Other things:
Is it easier to get in through NC or GSP? If you are seen to be a really good fit for UWC, you will go through no matter which way you apply. I must say though, the GSP took very few people for interview (apparently from 1k+ written apps, only about 150 got through to the interview stage), but then a lot of people I talked to there seem to have got in. For example, out of 27 people who were at my interview day, 15+ have definitely been offered place, and I haven’t kept in contact with everyone who was there.
Do you still get to do the pre-departure activities if you apply via GSP? Yes! Once you are offered a space via GSP, you are put in touch with your country’s NC and they will let you know about any meetings, social media or orientation events they’re hosting.
Should I apply through NC or GSP? You could apply to GSP if you can afford it. Other than that, the other pros are that if you live outside the country where your NC is it could be easier to interview, you can find out a lot earlier, so if you’re applying to other schools or have exams then you can plan around that, and you can express preference for specific colleges, whereas a lot of NCs don’t do that. For example, if you really want to go to AC and you can afford it but only 1 person from your NC gets sent there every year, you may have a better chance of being nominated to there through GSP.
For me, what mainly drew me to GSP was the fact that I really wanted to go to ISAK and no one from the UK has been sent there and they’re not sending anyone there this year either, so this was my only chance. I also preferred to know if I was going before I did my GCSEs and had to submit my A-level choices at my current school.
I hope this helps someone! Feel free to message me about anything
Kyria
11 notes
·
View notes
Text
Doin’ Us Proud
Let’s talk about gays, baby.
I’ve actually been wanting to write about the gay men in my life for quite a while now, but I have this weird fear of talking about gay men and gay people in general in a way that sounds like I’m fetishizing them. I’m always quick to boil when I hear people (usually sheltered, tone-deaf suburban women) say shit like, “OMG I love gay guys!” Or describe any gay guy they know as “fabulous.” Ugh. I don’t want to be lumped into that category. But at the same time, some of the people I love and will love most in my life are gay men. My best friends in the whole world are gay, and while its not their gayness that makes me love them, it’s certainly informed the men they’ve grown to be and goddamn it I want to give a shout out to it.
My heart has always gone out to all gay people for the treatment they endure. For the permanent guard they have to keep up against any ignorant shithead they might have to encounter on any given day. Over something so fucking personal too. That has continued to blow my mind ever since I found out what it meant to be gay. I never understood why people got so upset about what turned people on. If it isn’t hurting anyone then like why the fuck are you even thinking about what someone else does in their bedroom? The prejudice people hold against gay people is so obviously connected to their own fucked up feelings about sex. It’s laughable to me but no fucking joke to the gay people who have to put up with this bullshit their whole lives. Can’t imagine the quiet strength it must take.
While I love all the Ls and Bs and Qs and Ts, I do have a soft spot for gay men specifically, which is directly linked to my soft spot for all men. It’s always bothered me how many men are taught not to express their sensitivity or talk about their emotions. Gay men on the other hand, in accepting cultures, are welcomed by society to step out of the tough guy mold and express their sensitive, emotionally vulnerable side. Gay men aren’t expected to fulfill the emotionally stoic tough guy stereotype as much as straight guys are. Honestly I think the way society forces men to suppress their emotions is one of the most damaging trends in our culture, and I’m grateful to gay men for being able to show us all what it looks like when a man isn’t afraid of expressing his softer side. And I guess that’s my sweeping generalization. I don’t love gay men because they’re all “fabulooooous” or because they’re like some fucking cultural novelty. I love them because they show us what so many men don’t feel they get to show the world.
Most of all I appreciate all gay people because they teach the rest of us what it means to BE who the fuck you are. Other than those tragic souls who choose to hide in the closet their whole lives, most gay people are faced with a choice at some point in their lives (NOT the choice to be gay, haha); that choice is to hide their identity from people, or own who the fuck they are and apologize to no one. Most (I would hope) choose the latter, and what happens after gay people make that choice is so fucking beautiful. They fucking blossom. They stop living in fear of what other people think and they just live OUT. All out. We straight people live in a pretty comfortable bubble when it comes to prejudice but make no mistake we’ve got our own closets to hide in. Everyone has certain aspects of themselves they’re too shy to show the world, and gay people are just such an inspiring reminder that you can’t fucking live like that. It’s all out or nothing.
1 note
·
View note
Text
Walt Disney World Dining Guide

For many Guests, Dining at Disney is a huge part of their trip. For others, it is purely a necessity. My family and I fall in the middle of those two groups. There are some restaurants that we could eat at on every single trip, like ‘Ohana and Flame Tree Barbeque, yet many meals are a more forgettable experience and just necessity. Regardless of what camp you find yourself or your group in, the options around Walt Disney World are almost limitless. There are literally hundreds of food options, so it certainly can be overwhelming and a lot to know!
To help you figure out what is going to be best for your trip we’re here with all kinds of information, terms, and tips to get you through it all.
Disney Restaurant Categories and Other Terminology
As mentioned in our Resort Guide, Disney loves to categorize things. Their food is no different.
Table Service: These restaurants are what most people typically think of when you discuss dining out. You’ll be seated at a table with a waiter or waitress coming by and serving you there. This category also includes buffets/family style, character meals, and dinner shows.
Counter or Quick Service: These locations operate similarly to a fast food restaurant outside of the parks. You’ll order at a counter and then wait to be served there. The only exception for this is breakfast and lunch at Be Our Guest. Whether you order ahead on the app or as you enter, you’ll be served at your table.
Signature Dining: These are the most expensive and typically considered best table service restaurants at Walt Disney World. They’re typically a bit more upscale than most table service restaurants making them natural choices for celebrating special occasions.
Dinner Shows: There are currently only 2 dinner shows; Spirit of Aloha at Polynesian Resort and Hoop-Dee-Doo Revue at Fort Wilderness Campsites. Both offer all-you-care-to-enjoy family-style servings with drinks, including beer and wine. There are multiple categories of seating with commensurate pricing. The shows also tend to be popular with reservations quickly filling.
Carts and Kiosks: Beyond the restaurants, you’ll find these dotted across the parks serving favorites like Mickey Pretzels, Churros, Popcorn, and Turkey legs. During one of the many festivals at Epcot, you’ll also find specialty food booths serving all manner of delectable foods.
Dining Plan: This is the Disney version of a pre-paid meal plan. The level of the plan you purchase or possibly receive as part of a limited-time promotion will determine the number of credits that you receive. Those credits may be used for Counter Service, Table Service, or Snacks at the various locations. There is extensive debate amongst Guests whether the plan is worthwhile or not. As with so many things it ultimately comes down to how you see the value and want to vacation. We’ll be sharing an article focused on this soon. Be sure to check back.
Mobile Ordering: This is a function found within the My Disney Experience App and allows you to essentially pre-order your meal before even arriving at most Counter Service locations. You’ll submit your order and prepay using either dining plan credits or a credit card. Then when you arrive at the location tap the “I’m here” button and then you’ll be notified when your order is ready. This is incredibly handy when seating is difficult or you’re part of a large party.
Advanced Dining Reservations (ADR): Disney’s version of a dining reservation to secure your party a table at some of Disney’s most popular restaurants. Guests can make ADRs at the 180-day mark of their check-in date, starting at 6 AM EST online and 7 AM over the phone and can book them for up to 10 days past their check-in date. Use our reservation calculator to determine what that date is. For some of the most sought-after locations, availability disappears quickly.

So… now what?
Now that we’ve thrown a bunch of terminology at you we can get into what it means to you. We’re not going to go into any detail on the Counter Service, Kiosks, Mobile Ordering, or Dining Plan in this article. We’re going to focus on the ADRs and associated restaurants and implications of them.
The budget is often front of mind, so we’ll start there to get it out of the way. The truth is, cost from one person to the next will vary greatly. It really depends on where and what you’re eating. Primarily QS meals or kiosks will be less expensive than nothing but TS meals. Still, we’re often asked how much to budget for a trip. If you elect to buy the dining plan, this is simplified, and you’ll need a minimal budget for a few items that may not be included with your plan. But assuming you’re not going that route, here are some general prices to use. Adults can plan to spend about $20 per Quick-Service meal, about $40 per Table Service, and roughly $80 per Signature or Character Dining meal. Children (which Disney defines as ages 3-9) will typically be about half that cost. If you’d like to be more exact, Disney lists all of their menus and prices on their website.
We’re going to assume that you have already created your My Disney Experience (MDE) account. If not, go here to the My Disney Experience website.

Plan before ADR or ADR before Plan?
In our Planning Timeline, we’ve outlined key milestones for planning your trip. Dining reservations take place significantly earlier than FP+ and potentially earlier than you have park tickets or even a room reserved. Depending on your vacation style, you could let destiny determine your plans and just roll with whatever is available. This is a fine approach and can still be quite fun. If you want to be a bit more proactive, we can get into a bit of a chicken or the egg discussion. Will you plan out your days in the park and/or tickets (days and/or Hopper) based on the ADRs you’re able to get? Or, do you want to plan your park days, hoping for FP+, and target your ADRs around that? There isn’t an absolute correct answer here. What is your preference?
My personal preference is to generally go with ADRs first. One part because they happen earlier in the timeline and, to me, it seems simpler to just address things in sequence. Also, one part that ADRs for certain restaurants (we have a list of highly popular ones down below) are incredibly difficult to get. While some attraction’s FP+ are also certainly high in demand, ultimately there is more opportunity for the attractions. Whether it be days, rope dropping a park to reduce wait, catching it at the end of a night, or just accepting an extended wait in line. Regardless of approach, attractions have more capacity, thus more opportunity. Dining is limited, sometimes higher demand, increasing the scarcity.
Still, it is good to at least have a general idea of your other plans. Also, there is an advantage to having your resort stay booked and linked to your MDE. Your ADR window opens at 180 days until check-in and is also open for your entire stay, up to 10 days after check-in. This essentially creates a 190-day window for you if you’re staying 10 days on the property. This creates a huge advantage for getting some of these reservations.
This is also a good time to explain that ADRs don’t operate the way a typical reservation might at home. Disney doesn’t reserve specific tables for specific times. In practice, it is best to think of these as times that you’re placing your name on a waitlist. You’re likely to still wait, usually about 10 to 20 minutes, after arriving at the restaurant.
Booking Your Disney Restaurant Reservations
Because of how the reservation windows operate we generally suggest you start from check-out and move towards check-in with your reservations (this is also a good approach for your FP+). You’ll have overlap with fewer people at the close of your ADR window than you will at the opening. No worries though, that’s what we’re here for. As one of the free services we provide, we’ll be happy to take care of these reservations for you! No need for you to be awake and on the computer or phone at 6 AM the day your reservation window starts. Let us do it for you!

High Popularity ADR: In our experience, there are certain dining reservations and activities that reach capacity quickly. If you’re wanting to experience any of these, listed below, we strongly suggest you make them a priority at the opening of your 180-day window.
Beaches and Cream (Beach Club Resort)Be Our Guest Restaurant (Magic Kingdom)Bibbidi Bobbidi Boutique (Disney Springs, Magic Kingdom, and Grand Floridian)California Grill (Contemporary Resort)Chef Mickey’s (Contemporary Resort)Chef’s Table at Victoria and Albert’s (Grand Floridian)Cinderella’s Royal Table (Magic Kingdom)Hoop-Dee-Doo Musical Revue (Fort Wilderness Campsites)Le Cellier (Epcot at Canada)Oga’s Cantina (Hollywood Studios)‘Ohana (Polynesian Resort)Princess Storybook Dining at Akershus Royal Banquet Hall (Epcot at Norway)Story Book Dining at Artist Point with Snow White (Wilderness Lodge)Bon Voyage Breakfast, Trattoria al Forno (Boardwalk)
Current Signature Restaurants are: Be Our Guest (dinner service only), The BOATHOUSE, California Grill, Cinderella's Royal Table, Citricos, Flying Fish, Hollywood Brown Derby, Jaleo by Jose Andres, Jiko, Le Cellier, Monsieur Paul, Morimoto Asia, Narcoossee's, Paddlefish, STK Orlando, Takumi-Tei, Tiffins, Topolino's Terrace (dinner service only), Victoria & Alberts, and Yachtsman Steakhouse
Overwhelmed Yet? Let Us Help YOU!
Heyday Travel Company can plan a Disney vacation that’s perfect for you. We are a free Disney travel planner with expert knowledge of the entire Disney catalog and Universal Parks destinations. No matter where you want to go, our experienced team is excited to help you make it happen. We provide our service at no charge, so you’ll only have to pay for the vacation itself. If you want help planning a Disney trip that’ll make your dreams come true while also fitting your budget, let’s talk!
Fill Out Our Form To Start Planning Your Perfect Disney Vacation!
Read the full article
#DisneyDiningGuide#DisneyRestaurantGuide#DisneyRestaurants#WaltDisneyWorldDiningGuide#WaltDisneyWorldRestaurants
0 notes
Note
A giffing tutorial would be great! I'm not at home atm and its been a while since i tried giffing so i dont have any specific qs to ask yet but i think i struggled with how to put them into frames? I think they sometimes froze and wouldnt move haha but yeah thx for much for the links and advice! I also rly struggled with finding good basic tuts so thats why i came to ask ^^
PLEASE DO A TUTORIAL ON GIFFING BC I SUCK AT IT SO MUCH PLEASE
fkdsjlfds alright!!! hopefully this is able to help u guys i know im not the best at explaining this but hopefully this will give you an idea :-) im going to do it using only photoshop (no kmplayer/vlc or any other software) and i use photoshop cs5 so depending on what version u have things might look a little different but it’ll be the same concepts!! anyway here’s a crash course in making a gif for the first time
1. get the video!!
this seems like a simple step i know but if u wanna just use photoshop and not any other software as well it’s a LOT easier if you download a shortened clip of the gif! usually i download clips between 3-10 seconds long in order to make sure i get the whole scene i want. the two best websites to trim and download into an mp4 in one step are clipconverter and video-download, they both work for youtube videos and vlive and a lot of major video websites! and of course downloading the highest quality of video available (preferably 1080p or 720p) will make your gifs look nicer
2. importing it into photoshop
file > import > video frames to layers ! i believe u need quicktime installed for this to work properly!

since your clip is already pretty short, you should be ok by just keeping it from beginning to end! if for some reason you were unable to shorten it or if you want to shorten it even more, you can select the range. dont limit the frames though! it will make the gif look choppy and less fluid!
3. adjust frames/timing
you should now see all of your frames in the animation bar at the bottom (if u dont see an animation bar go to window > animation and make sure its checked) and all of the frames as their own layers off to the right! on some part of the animation toolbar you should see something that looks like this:

when you click on the four lines with the arrow, you should see a list of options! play through the frames you have and determine if you need to delete any of them at the beginning or end and u can do so by selecting the frames u wanna delete and under those options select delete frames. once u have just the frames you want for the gif, select all frames and then on any frame click on that 0.04 with the arrow and for the delay, select “Other” and put in 0.05s (or whatever value u want but usually 0.05s looks the best once you save it!)
4. cropping

you can adjust the cropping size options at the top (it will look Something like this but it’ll depend on your version of photoshop!)

the width dimensions for tumblr are 540px for one gif, 268px 268px for two gifs next to each other and i Believe 177px 178px 177px for three gifs next to each other! so here i’ll assume i’m doing a 268px width gif and you can set the height to whatever you’d like. if you set the resolution to 1px/cm like it shows right there, it’ll automatically crop and resize the gif for you!
so at this point with the cropping and timing it’ll look something like this:

5. convert to smart object + sharpening
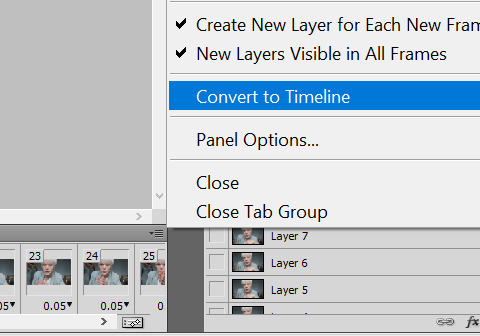
this might be where u had a problem with the frames freezing? so first using that menu in the animation toolbar convert to timeline animation! then, after this, select all of your layers on the righthand side and then right click convert to smart object!
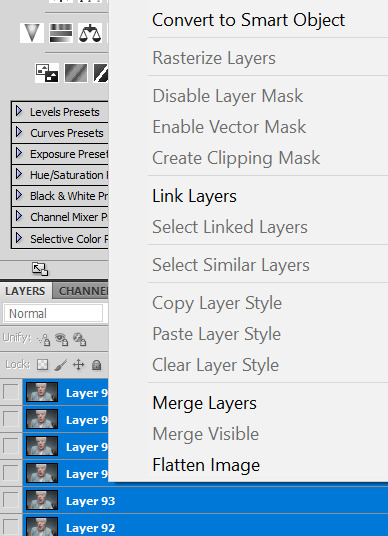
after u convevrt to smart object it should only show as one layer! u should still be able to preview and play through the gif, if it’s frozen then u messed something up with the timeline animation part! so to sharpen here were the settings i used to use:
filter > sharpen > smart sharpen

a lot of people use 500% and 0.3px … personally i never liked that but its up to u to play around with it!!
here’s what the gif looks like after this:

if you compare this to the one above this one looks much nicer!
6. coloring
ok honestly i dont even Know enough to give u a coloring tutorial but that’s pretty much the only step remaining for ur basic gifmaking! honestly a lot of the time i only use brightness/contrast and color balance unless im trying to make a compilation set where everything looks super different but it’s mostly up to u to try different things out and see what looks good :-) or! you can find psds online where other people have shared their coloring settings!
7. saving settings
honestly the only important thing is that ur gif Has to be under 3 mb or it won’t play right on tumblr! other than that u dont really have to worry about anything here as long as your settings look something like this
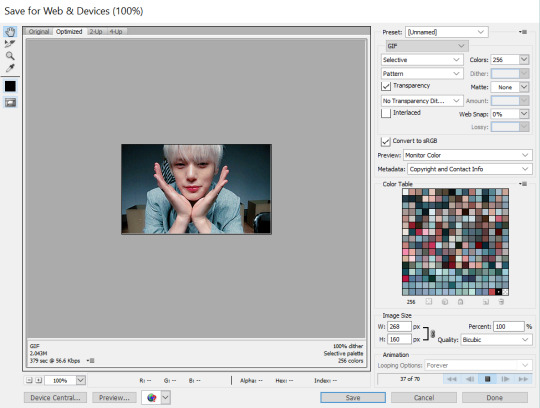
and then ur done! u have a gif! :-D

i know i use a lot of words fdmsfds but trust me once you’re able to get through it once you’ll be able to go through the whole process in minutes!! and there are lots of other ways to go about these methods as well (tbh i dont even really do this anymore) but this is a good starting point and as u can see the gifs look pretty nice (in my . humble opinion)
happy gifmaking !!! and again if u had any more questions about this or anything else let me know!!
#Anonymous#JFKDLSMFDSFDS why is this so long i barely even said anything.\#this is so funny i really dont know how to do tutorials
20 notes
·
View notes
Text
How I Used Facebook Lead Ads to Create a Quiz
One of my favorite things to do is solve problems by using a tool in ways it wasn’t meant to be used. In this post, I will outline how I did that by using Facebook lead ads to create a quiz.
First, credit goes to Lucas Elliott of our team. A few weeks ago, I talked about using quizzes as a lead magnet. Lucas suggested creating a quiz with a Facebook lead ad. I balked, knowing that it wouldn’t be as dynamic as what I wanted to do.
A few weeks later, I was inspired to try it out. Now I feel crazy for not trying it sooner.
Ultimately, I warmed to the idea because this would be one of a few strategies involving quizzes. While the Facebook lead ad may not function the way a quiz would on my website, the benefits of experimenting with this would be huge.
So, let’s take a closer look at the thought process, creation, and results. Why quizzes in the first place? How did I set this up? What kinds of results am I seeing?
Background: Why Quizzes?
My email list is the backbone of my business. When it comes to generating revenue, it’s my list that is responsible for much of it.
In many ways, I use Facebook ads backwards compared to most advertisers. I spend most of my budget promoting content (building a remarketing audience) and growing my email list. While I do run ads to promote products, my email marketing is then mostly responsible for the heavy lifting.
During the past couple of years, my primary list builder has been a monthly webinar. But even if the content is largely the same from month-to-month, it takes a great deal of effort to do this.
That’s why I stopped my monthly webinar after April’s edition. As a result, the growth of my list — though you could still register generally to my newsletter — lurched to a stop.
And that, of course, is a problem. I need a fresh, active list to help drive revenue. When list growth stops, revenue is at risk.
And so, I finally restarted my monthly webinar, albeit temporarily, in November. I’ll run it at least one more time, if not two. In the meantime, I’m on a mission to find a more manageable replacement.
I’ve thought of turning my webinar content into a video series. But I also decided I’d experiment with quizzes.
I learned a year ago with my 30-question quiz how engaging they can be. But what if I had more than one quiz? What if they were all 5-10 questions? And on a specific topic? I could create dozens of them.
So, the first thing I did was find a quiz software (I chose TypeForm). I would use a single quiz to invite people in. If you wanted access to the (eventual) quiz library, you’d need to register.
Here’s that quiz…
(function() { var qs,js,q,s,d=document, gi=d.getElementById, ce=d.createElement, gt=d.getElementsByTagName, id="typef_orm", b="https://embed.typeform.com/"; if(!gi.call(d,id)) { js=ce.call(d,"script"); js.id=id; js.src=b+"embed.js"; q=gt.call(d,"script")[0]; q.parentNode.insertBefore(js,q) } })()
Strategy: Lead Ads and Quizzes
Okay, so what do quizzes have to do with Facebook lead ads? Can I use them to drive registrations to the quiz library? Or could I create a quiz directly within a lead ad form?
Why not both?
Lead ad forms allow the flexibility of creating custom questions. I can, then, add my questions to the form itself. And if you want to see the answers — and participate in future quizzes — you provide your contact information to subscribe.
The hope is that this form will be engaging enough to get people through a nine-question quiz (I’d use nine of the 10 questions from the embedded quiz above, removing one with long answers).
My Facebook Lead Ad Quiz
To kick off this experiment, I created a VERY simple ad. I find that simple is the key to any experiment since it limits or eliminates delays.
If you click on my ad, the form opens. You can scroll through all nine questions before entering your contact info and submitting (click the image to get a close-up view)…
After submitting, you are presented with a thank-you screen within the form…
If you close the form, you’ll still receive an email from me with your answers as well as the correct answers (more on that later). If you want, you can click on the “See the Answers” button and you’ll be redirected to a page on my website with an explanation of all 10 answers.
Set Up a Lead Ads Quiz: Campaign
So, let’s walk through, step-by-step, how I did this — and how you might be able to do something similar.
First, make sure to use the Lead Generation campaign objective…
Set Up a Lead Ads Quiz: Ad
Create the copy with text, headline, and news feed description. You can now use a square image to take up more vertical real estate in the news feed. Facebook recommends a 1080x1080px image.
For the call-to-action button, there aren’t great options for a quiz, unfortunately. I went with “Learn More.”
Set Up a Lead Ads Quiz: Form
When creating the form, I used the “More Volume” form type.
I don’t know that it matters much in this case given anyone who submits the quiz will have to go to a lot of effort. But feel free to experiment.
I added an intro that included a shorter (1200x628px) image and a prompt to provide contact info at the bottom so that I can send the answers.
Within the “Questions” area, first I added a simple headline (“Ready? Let’s go…”) and selected the contact info I would need. In this case, I asked for first name, last name, and email address.
Next, I created custom questions. These would be the actual questions for the quiz. I chose to use multiple choice questions.
Here’s how it looks as I added my questions…
After updating the privacy policy, I created a thank-you screen.
Note that I have given people the option of viewing all of the answers on a new page I created on my website. You can send people wherever you want here.
Targeting
Whom you target with these ads is completely up to you. But something that can apply universally is how you exclude.
In my initial test, I targeted people who are in the top 5% of those who spent the most time on my website during the past 180 days.
After a successful initial test in the US, I created new ad sets for audiences in other countries. Another day later, I would create ad sets targeting lookalike audiences.
But again, you shouldn’t necessarily copy that targeting approach. The people you target depends on the resources available to you.
Exclusions
What is mostly universal, though, is the group of people you should consider excluding.
In my case, I am excluding the following groups of people:
Subscribed to Quiz Library (Website Custom Audience thank-you page)
Subscribed to Quiz Library (Email Custom Audience)
Subscribed to Quiz Library (Submitted Lead Ad Form)
Opened (but may not have submitted) form within past 14 days
Some explanations may be in order…
Notice that I’ve excluded the people who have subscribed to my quiz library in three different ways. The reason for this is that no one way will capture everyone.
Recall that some people could register via the form on my website while others do from the lead ad form. By excluding all three methods, there’s a better chance that I avoid targeting people who are already registered (though never guaranteed).
Finally, I have excluded those who simply OPENED the form during the past 14 days. This way, I cut out those who poked around but maybe didn’t submit — at least for the time being. I’ll hit them again in a couple of weeks. This is a way to control frequency to a point.
Another approach I like to take, but didn’t here, is using video instead of a static image. If you do that, I would also consider creating an audience of people who already watched the video (or a portion of the video) and exclude those people (either using the 14-day method or longer). Once again, this is a way to manage frequency.
My Quiz Automation
First, know that people who complete your Facebook lead ad forms aren’t automatically added to your email list without some third-party automation. I use Zapier for this (not an affiliate link).
I create a Zap with a trigger of those who submitted my lead ad form.
I use Infusionsoft as my CRM. The first action, then, is to tag the new contact in Infusionsoft.
I then create another action of sending a Zapier email.
While I can also just rely on my email campaign in Infusionsoft, there’s a special trick that you can pull off in this Zapier email. Since it’s connected to your lead ad form, you can pull in the exact answers. That can allow you to craft a more personal email.
For mine, I list out the question, the answer you provided, and my explanation of the answer. Here is what it looks like through the first couple of questions…
I’m sure there are ways to feed this info into your Infusionsoft contact and then craft a personalized email from there as well. But again, I opted for simplicity (Infusionsoft is always a beast).
And that’s it!
Early Returns
I’ve been pretty amazed by the early results. For the first four days of this campaign, I generated 61 leads at $.66 per lead. Keep in mind that the audience I was targeting was very small (top 5% of website visitors from the US who spent the most time on my website during the past 180 days).
There are a couple of reasons why this cost per lead is impressive. First, all of the registrants are in the United States, typically the most costly country for a lead. These results aren’t being puffed up by a cheap country.
Second, it takes a significant amount of work to complete this form. Normally, we’re told to limit the amount of information we request in a form. The more form questions, the higher the quality of the lead — though more costly.
So, this is certainly a good start. I then created two more ad sets…
Ad Set #2: WCA Top 5% Time on Website (UK, Canada, Australia)
Ad Set #3: WCA Top 5% Time on Website (Tier 2 Countries with higher CPM)
I combine countries in this case due to budget and sample size. For more info on how I determine countries to target and the budget, check out this recent blog post.
The results? So far, another 61 leads for $.36 per lead.
Look, these are small sample size results, and the costs are bound to increase in the coming days as I exhaust my audiences. But this is seriously encouraging stuff given 1) The typical cost per lead, and 2) The amount of effort that goes into completing this form.
I created three more ad sets today based on the same countries but using lookalike audiences. It’s still very early, of course. While the costs are higher (not surprisingly when targeting a cold audience), we’re still looking at cost per lead from $.72 to $2.40, depending on the ad set.
Not bad!
Your Turn
This is one of many examples of using tools in ways that may not have been intended. I’m encouraged by the results so far.
Have you ever used Facebook lead ads in this way? What types of results have you seen?
Let me know in the comments below!
The post How I Used Facebook Lead Ads to Create a Quiz appeared first on Jon Loomer Digital.
0 notes
Text
How I Used Facebook Lead Ads to Create a Quiz
One of my favorite things to do is solve problems by using a tool in ways it wasn’t meant to be used. In this post, I will outline how I did that by using Facebook lead ads to create a quiz.
First, credit goes to Lucas Elliott of our team. A few weeks ago, I talked about using quizzes as a lead magnet. Lucas suggested creating a quiz with a Facebook lead ad. I balked, knowing that it wouldn’t be as dynamic as what I wanted to do.
A few weeks later, I was inspired to try it out. Now I feel crazy for not trying it sooner.
Ultimately, I warmed to the idea because this would be one of a few strategies involving quizzes. While the Facebook lead ad may not function the way a quiz would on my website, the benefits of experimenting with this would be huge.
So, let’s take a closer look at the thought process, creation, and results. Why quizzes in the first place? How did I set this up? What kinds of results am I seeing?
Background: Why Quizzes?
My email list is the backbone of my business. When it comes to generating revenue, it’s my list that is responsible for much of it.
In many ways, I use Facebook ads backwards compared to most advertisers. I spend most of my budget promoting content (building a remarketing audience) and growing my email list. While I do run ads to promote products, my email marketing is then mostly responsible for the heavy lifting.
During the past couple of years, my primary list builder has been a monthly webinar. But even if the content is largely the same from month-to-month, it takes a great deal of effort to do this.
That’s why I stopped my monthly webinar after April’s edition. As a result, the growth of my list — though you could still register generally to my newsletter — lurched to a stop.
And that, of course, is a problem. I need a fresh, active list to help drive revenue. When list growth stops, revenue is at risk.
And so, I finally restarted my monthly webinar, albeit temporarily, in November. I’ll run it at least one more time, if not two. In the meantime, I’m on a mission to find a more manageable replacement.
I’ve thought of turning my webinar content into a video series. But I also decided I’d experiment with quizzes.
I learned a year ago with my 30-question quiz how engaging they can be. But what if I had more than one quiz? What if they were all 5-10 questions? And on a specific topic? I could create dozens of them.
So, the first thing I did was find a quiz software (I chose TypeForm). I would use a single quiz to invite people in. If you wanted access to the (eventual) quiz library, you’d need to register.
Here’s that quiz…
(function() { var qs,js,q,s,d=document, gi=d.getElementById, ce=d.createElement, gt=d.getElementsByTagName, id="typef_orm", b="https://embed.typeform.com/"; if(!gi.call(d,id)) { js=ce.call(d,"script"); js.id=id; js.src=b+"embed.js"; q=gt.call(d,"script")[0]; q.parentNode.insertBefore(js,q) } })()
Strategy: Lead Ads and Quizzes
Okay, so what do quizzes have to do with Facebook lead ads? Can I use them to drive registrations to the quiz library? Or could I create a quiz directly within a lead ad form?
Why not both?
Lead ad forms allow the flexibility of creating custom questions. I can, then, add my questions to the form itself. And if you want to see the answers — and participate in future quizzes — you provide your contact information to subscribe.
The hope is that this form will be engaging enough to get people through a nine-question quiz (I’d use nine of the 10 questions from the embedded quiz above, removing one with long answers).
My Facebook Lead Ad Quiz
To kick off this experiment, I created a VERY simple ad. I find that simple is the key to any experiment since it limits or eliminates delays.
If you click on my ad, the form opens. You can scroll through all nine questions before entering your contact info and submitting (click the image to get a close-up view)…
After submitting, you are presented with a thank-you screen within the form…
If you close the form, you’ll still receive an email from me with your answers as well as the correct answers (more on that later). If you want, you can click on the “See the Answers” button and you’ll be redirected to a page on my website with an explanation of all 10 answers.
Set Up a Lead Ads Quiz: Campaign
So, let’s walk through, step-by-step, how I did this — and how you might be able to do something similar.
First, make sure to use the Lead Generation campaign objective…
Set Up a Lead Ads Quiz: Ad
Create the copy with text, headline, and news feed description. You can now use a square image to take up more vertical real estate in the news feed. Facebook recommends a 1080x1080px image.
For the call-to-action button, there aren’t great options for a quiz, unfortunately. I went with “Learn More.”
Set Up a Lead Ads Quiz: Form
When creating the form, I used the “More Volume” form type.
I don’t know that it matters much in this case given anyone who submits the quiz will have to go to a lot of effort. But feel free to experiment.
I added an intro that included a shorter (1200x628px) image and a prompt to provide contact info at the bottom so that I can send the answers.
Within the “Questions” area, first I added a simple headline (“Ready? Let’s go…”) and selected the contact info I would need. In this case, I asked for first name, last name, and email address.
Next, I created custom questions. These would be the actual questions for the quiz. I chose to use multiple choice questions.
Here’s how it looks as I added my questions…
After updating the privacy policy, I created a thank-you screen.
Note that I have given people the option of viewing all of the answers on a new page I created on my website. You can send people wherever you want here.
Targeting
Whom you target with these ads is completely up to you. But something that can apply universally is how you exclude.
In my initial test, I targeted people who are in the top 5% of those who spent the most time on my website during the past 180 days.
After a successful initial test in the US, I created new ad sets for audiences in other countries. Another day later, I would create ad sets targeting lookalike audiences.
But again, you shouldn’t necessarily copy that targeting approach. The people you target depends on the resources available to you.
Exclusions
What is mostly universal, though, is the group of people you should consider excluding.
In my case, I am excluding the following groups of people:
Subscribed to Quiz Library (Website Custom Audience thank-you page)
Subscribed to Quiz Library (Email Custom Audience)
Subscribed to Quiz Library (Submitted Lead Ad Form)
Opened (but may not have submitted) form within past 14 days
Some explanations may be in order…
Notice that I’ve excluded the people who have subscribed to my quiz library in three different ways. The reason for this is that no one way will capture everyone.
Recall that some people could register via the form on my website while others do from the lead ad form. By excluding all three methods, there’s a better chance that I avoid targeting people who are already registered (though never guaranteed).
Finally, I have excluded those who simply OPENED the form during the past 14 days. This way, I cut out those who poked around but maybe didn’t submit — at least for the time being. I’ll hit them again in a couple of weeks. This is a way to control frequency to a point.
Another approach I like to take, but didn’t here, is using video instead of a static image. If you do that, I would also consider creating an audience of people who already watched the video (or a portion of the video) and exclude those people (either using the 14-day method or longer). Once again, this is a way to manage frequency.
My Quiz Automation
First, know that people who complete your Facebook lead ad forms aren’t automatically added to your email list without some third-party automation. I use Zapier for this (not an affiliate link).
I create a Zap with a trigger of those who submitted my lead ad form.
I use Infusionsoft as my CRM. The first action, then, is to tag the new contact in Infusionsoft.
I then create another action of sending a Zapier email.
While I can also just rely on my email campaign in Infusionsoft, there’s a special trick that you can pull off in this Zapier email. Since it’s connected to your lead ad form, you can pull in the exact answers. That can allow you to craft a more personal email.
For mine, I list out the question, the answer you provided, and my explanation of the answer. Here is what it looks like through the first couple of questions…
I’m sure there are ways to feed this info into your Infusionsoft contact and then craft a personalized email from there as well. But again, I opted for simplicity (Infusionsoft is always a beast).
And that’s it!
Early Returns
I’ve been pretty amazed by the early results. For the first four days of this campaign, I generated 61 leads at $.66 per lead. Keep in mind that the audience I was targeting was very small (top 5% of website visitors from the US who spent the most time on my website during the past 180 days).
There are a couple of reasons why this cost per lead is impressive. First, all of the registrants are in the United States, typically the most costly country for a lead. These results aren’t being puffed up by a cheap country.
Second, it takes a significant amount of work to complete this form. Normally, we’re told to limit the amount of information we request in a form. The more form questions, the higher the quality of the lead — though more costly.
So, this is certainly a good start. I then created two more ad sets…
Ad Set #2: WCA Top 5% Time on Website (UK, Canada, Australia)
Ad Set #3: WCA Top 5% Time on Website (Tier 2 Countries with higher CPM)
I combine countries in this case due to budget and sample size. For more info on how I determine countries to target and the budget, check out this recent blog post.
The results? So far, another 61 leads for $.36 per lead.
Look, these are small sample size results, and the costs are bound to increase in the coming days as I exhaust my audiences. But this is seriously encouraging stuff given 1) The typical cost per lead, and 2) The amount of effort that goes into completing this form.
I created three more ad sets today based on the same countries but using lookalike audiences. It’s still very early, of course. While the costs are higher (not surprisingly when targeting a cold audience), we’re still looking at cost per lead from $.72 to $2.40, depending on the ad set.
Not bad!
Your Turn
This is one of many examples of using tools in ways that may not have been intended. I’m encouraged by the results so far.
Have you ever used Facebook lead ads in this way? What types of results have you seen?
Let me know in the comments below!
The post How I Used Facebook Lead Ads to Create a Quiz appeared first on Jon Loomer Digital.
from Jon Loomer Digital https://www.jonloomer.com/2018/11/15/facebook-lead-ads-create-a-quiz/
0 notes
Link
Disclaimer: I've written a full blog post outlining the process to get published within 17 different major website online. The post is over 2,00 words long so I've summarized a few that are more relevant for startups here (as per rule 6 of the guidelines). The link to the full post is here.First of all, here's a little context before I dive into the process for each website...I've written for a ton of different publications online, as well as contributing directly to them (this includes the likes of the BBC, The Guardian, Forbes, Entrepreneur, Fast Company and many more). For a lot of startups, one feature or mention on a site like these can result in thousands of visitors to their website and a bunch of new customers - not to mention the added PR benefits.All that said, it's tough to get in front of the editors for these websites. Most advice I see online tells you to just find an editor on Twitter and pitch them directly, but in all honesty, this rarely works. There's a formal process for most major publications that you have to follow. I've shared these processes for you, along with tips for each site to increase your chances of success.TechCrunchThere's basically two core ways that you'll get featured in TechCrunch. The first is to actually produce some editorial for them and the second is to have your startup covered - timing is key for both situations. Let's start with getting an article published in TechCrunch:Go through the TechCrunch editorial calendar and find out which topics they're covering in the coming months. It's critically important that you only pitch an idea to them when they're covering that topic.At the bottom of this page you can submit your pitch using the form - you'll need to submit the finished draft of the article within the form.If you have a topical idea then submit it via the form on their "Got Tips" page. You'll need a headline and a few paragraphs explaining your idea.You can also email them directly at [email protected] if you have a news-lead story.If you're looking more for a feature on your startup then you'll want to do the following:Approach TechCrunch as early as possible before you've been covered by other outlets (via this email: [email protected]).Make sure you give TechCrunch an idea of launch timelines in advance.Tell them what's special about your business.If possible (and relevant), give them private beta access to your product.Get across your personality within the pitch but also keep it brief.Fast CompanyHere's how to get an article published on Fast Company:Pitch your article by sending a full draft of it through to a specific section editor. You can find a full list of them here.Their email addresses follow the pattern of [email protected], for example, "[email protected]".For the Leadership column, you'll want to contact Rich Bellis. Do make sure you send a full article though, they don't take synopsis pitches.Don't submit an article that's longer than 1,000 words. Aim for the 600-800 word mark.Your article has to be exclusive to Fast Company for the first 24 hours. From there you can go and publish it elsewhere.With Fast Company, the editors tend to be ok with you following up with them if you haven't heard anything in a few days so I'd recommend doing this. Here's an example of an article that I've written on Fast Company so tat you can follow this as a guide.ForbesHere's how you can get an article published in Forbes:Submit a finished article through to [email protected]. As they state on their submissions page, they won't accept idea pitches.You have to submit an exclusive to Forbes, i.e. you can't publish it elsewhere.There's aren't guidelines on the length of the article but you should bear in mind that longer articles take longer to review.It takes at least five business days to review our article. If you don't hear back after the five working days, you may want to pitch it elsewhere.You can also use this form to apply to become an ongoing contributor (you'll need to produce 1 article per week for Forbes).Hope this helpsIf you have any Qs then let me know in the comments section below. Will try to check back throughout the next few days.
0 notes
Last Seen Blogs


howeveragain
Howeveragain

vi-138
Luzki

doitlikegranger
Do it Like Granger

sodapopbuoy
☆LIKE A PISTON IN MY CHEST!☆