#i wanted to include the other members but... the panoramic lens they used
Photo


yibo & sleeping in the dark 🥺
20/? random yibo gifs
#yibo#wang yibo#王一博#gif: yibo#r: yibo#babyibo 🥺🥺#this vid quality almost stopped me from giffing this but yiboooo )): he's so cute#i wanted to include the other members but... the panoramic lens they used#mine
418 notes
·
View notes
Text
Best Suggestions to Improve your Snapshots using an Android Mobile Phone
We are at that point of the season yet again when you’re working your mobile phone overtime wanting to keep up with all the experiences of christmas celebrations, family members get-togethers, and pets you’ve wrangled into joyful attires. If you’re handling the best and newest Android cell phones, including the Pixel 3 or Samsung Note 9, in that case one of the finest cameras available is already in your possession.
And yet regardless of the power of your sophisticated cell phone, plainly aiming and taking shots at the backdrop is not the approach to record enduring remembrances. The same concepts affect smart phone photography because they do studio picture taking: a little staging will go a long way. Take a beat before striking the shutter button and start using one or more of the next points to help make your android-shot photos start looking their best.
You’ve heard this before, but it needs repeating because it makes an unimaginable impact: make sure the camera is still when you’re taking a photograph. I can’t tell you just how many times I have clicked and walked to stay with an organization or something of the sort, only to be disappointed later on by blurry outcomes. Your Android cellphone could be super fast at setting up the camera software (double-press the energy button of all to instantly fire it up), but it can’t constitute the photo if you aren’t calm while acquiring it. It is often a good idea to enter the tradition of checking on what you just snapped just before going on.
You might not really demand a tripod in this day and age to take a still image, though it really does help generate the most effective outcomes. Additionally, there are mobile phone video camera brackets for typical-sized tripods if you’re currently tricked out in surveillance camera equipment. Alternately, specialized items are amazing for taking family photographs. Leaning the phone against a wall structure or an object can be another trick of the trade in cases where you are in a hole.
How to Get the Optimal Image Editing and Enhancing App

Android software programs are definitely powerful enough to take care of handling RAW picture types of file produced by DSLRs, so many of them may surely deal with editing a photo taken by a android cellphone. Free software like Snapseed, Polarr 2, and Lightroom will charm to beginners and those who are the “friends and family photographer.” For those who opt for the appearance of filtered photos, applications like VSCO offer over 100 types of shaded flair, as well as a Color Story, which includes some of the best filters for presenting to an Instagram target audience. Both apps are free to use, though they offer in-app buys to unlock some of the more popular aesthetics. If you’d rather not pay very much to make your photos appeared aged, KujiCam is normally unrepentantly fun to make use of, and your digital photographs can look like these were taken in another period. If you do mess up a photo and the instance has taken and passed, use an app like TouchRetouch to move in and clear away an out-of-place fingertip in the uppermost corner.
Do not leave out the enhancing specs your smart phone does natively. Google Photos comes pre-installed on almost every modern Android device and will be offering quick editing equipment, including a handful of colored picture filters, a crop option, and the ability to alter basic components just like the color hue and publicity. (Google Photos also offers automatic back-up for your photos and video clips, so make sure to take benefit of that, lest you lose all your special stories the next time your mobile phone drowns in a pool.) LG And Samsung’s respective gallery applications equally include light editing and enhancing options along similar lines. In the case you’re feeling bold, you might even like a few of the digital “stickers” included on Samsung’s Galaxy and Note smartphones.
I love just a little sexy light. A dozen candle lights and a few dimmed lamps will be the perfect method to transmission to your friends that your abode is usually a pleasant one. This sort of lighting is very bad for images, nevertheless, and even though your phone’s manufacturer promised you some of the best low-light photographs, romantic parties aren't the place to test out this claim.
Don’t be hesitant to include a small amount of light in cases where the backdrop calls for it. You don’t need to get anything extra; simply take off the top on a nearby lamp or other comparative and place it in front of your subjects, beside you if you’re the shooter. Also, avoid above your head lighting. Just as much as recessed lighting looks great in person, it’s not good on camera. (There is a justification why stars wear sun shades when they are indoors, where there is often overhead light.) This same lamp cheat helps diffuse these kinds of lighting situations and will make everybody in the picture look warm and alive. Your mobile phone’s flash can perform the same in a pinch, though avoid using it as your primary light resource, as it could make your get-together appear beaten up. As an alternative, you can use a friend’s smart phone flashlight as a directional light beam of kind by shining it at the position you wish people’s faces to become illuminated. It can donate to some actually neat lighting effects.
Are you one of the lucky ones to find the Pixel 3’s Night time Sight upgrade? Be certain you are using it when the circumstance requires it, for example inside museums or faintly-lit historical buildings in the community. The feature is just around the corner to earlier Pixel products and is available in the default Google Android camera application, from the same screen where you may change between panorama setting and the like.
On LG and Samsung phones, a similar functionality is hidden in the Expert or Manual modes. In this instance, you will have to do a bit of adjusting to the camera configurations to get the type of picture you want. You do not have to be a camera pro to gain access to this, as most companies offer live previews so that you can see what the result can look like after a little of adjusting. For best outcomes, keep just about everything on Automatic aside from the shutter speed, that is where you will start to see the genuine difference in how much light camera can consume. And of course, don’t forget to lean it against something as the shutter is open up or you will end up with a blurry picture.
Face mode is one of those defacto regular capabilities that now comes added with every advanced smartphone. It is like panoramic mode, only that you are more likely to work with it often since it gets pictures a lttle bit of a high tech look. You don’t have to use it to shot photos of people, either. It works just as well for animals, flowers, or any additional interesting object.
My favorite thing to carry out with Portrait mode, if I’m taking a selfie or snapping a photo with cousins I haven’t seen in more than 10 years, is to use it against a plain background. A bare wall is fantastic for headshots, while a flowery wall adds a little of flair. I really like the fake “studio appearance” of these types of photographs, and you will get inspired utilizing the lamp-light technique in a tv room. If done precisely, the result of your Portrait mode could look as preened and refined as though taken on school photo day, and they can also be photos worthy enough to slap onto a bundle of christmas cards in the next year.
Lastly and certainly the most self evident piece of assistance on any list in this article, do not neglect to wipe your photo camera lens prior to shooting a picture. The smartphone is perfectly capable at this stage in the game to shoot a high-quality picture of the everyday people you like, nonetheless it will not mean much if the camera lens is messy with finger oil and various other different debris. Even if you have a case on with a photo camera cover, clean that part clean inside and out to make sure that your shots continue to be untainted.
In case your only camera is your phone, it is best to keep either a microfiber towel or a pack of lens-cleaning wipes. Buy them in bulk and store them everywhere: in pretty much every travelling bag you use and every single family car you drive in. Photos are solely worth a thousand words if they’re exceptional, and so long as you spent upwards of this great deal on a brand new phone, therefore it should probably create photo frame-worthy photographs.
0 notes
Text
Uncover Digital Photography Best Tips using your Android Cell phone
Finally, that instance of the year again when you are operating your cellphone overtime wanting to maintain up with all the memories of getaway parties, family members get-togethers, and pets you’ve wrangled into festive outfits. If you’re using the most advanced Android mobile phones, including the Galaxy S9 or Google Pixel 3, well then one of the best cameras in the marketplace is already in your pocket.
Then again regardless of the prowess of the high-end smart phone, plainly aiming and shooting at the picture is not the way to shoot enduring memories. The exact requirements affect smartphones photography because they do studio picture taking: a modest amount of staging will go a long way. Have a beat before striking the shutter key and implement a number of of the following guidelines to help to make your android-snapped photographs appear their best.
You’ve seen this before, but it needs reiterating because it makes an unimaginable impact: make sure the photo camera is still when you’re capturing a photograph. I can’t let you know total number of instances I’ve snapped and walked to keep up with an organization or something of the type, only to be dismayed down the road by fuzzy results. The Android phone may be really fast at starting up the camera app (double-press the power button on most to instantly fire it up), but it can’t make up the photo if you aren’t still while taking the picture. It is usually smart to get into the habit of looking into what you currently shot prior to moving forward.
You would not really need a tripod in this point in time to take a still photo, though it certainly will help elicit the most desirable results. Additionally, there are smart phone camera brackets for standard-sized tripods if you’re already tricked out in surveillance camera equipment. Also consider, specialized products are great for taking family snapshots. Angling the cellphone against a wall structure or an object is also another technique of the trade when you are in a hole.
Android Phone's Top Rated Photography Applications
Android programs are definitely robust enough to take care of digesting RAW picture formats made by DSLRs, so many of them can certainly handle croping and editing a photo taken by a smartphone. Free software programs like Snapseed, Polarr 2, and Adobe Lightroom will appeal to tinkerers and the ones who like to be the “family and friends photographer.” For those who opt for the look of filtered pictures, software programs like VSCO offer over 100 kinds of colored flair, as well as a Color Story, which has the best filters for offering to an Instagram audience. Both apps are free to use, though they offer in-app purchases to unlock some of the popular aesthetics. If you’d rather not pay very much to make your photos looked aged, KujiCam is certainly unrepentantly fun to make use of, and your digital photos will look like they were taken in another era. In the event that you do screw up a snapshot and the point in time has elapsed, try using an app like TouchRetouch to go in and clear away an out-of-place fingertip in the uppermost corner.
Don’t leave out the editing features your phone does originally. Google Photos comes pre-installed on nearly every modern Android gadget and offers quick editing equipment, including a small number of colored photo filters, a crop option, and the capability to alter basic elements just like the color hue and exposure. (Google Photos offers automatic backup for your photos and video clips, so be certain to take advantage of that, however you remove all of your special experiences next time your phone drowns in a pool.) Samsung and LG’s respective photo gallery programs also deliver light editing options along similar lines. In the event you are feeling audacious, you may even like some of the digital “stickers” included on Samsung’s Galaxy and Note cellphones.
I prefer a little sultry lighting. A dozen candle lights and a few dimmed lamps are the perfect way to transmission to your friends and family that the abode is definitely a warm one. This sort of lighting is poor for images, nevertheless, and even though your cellphone’s manufacturer guaranteed you the best low-light pictures, lovely gatherings are not the place to try out this assertion.
Don’t be shy to include a small amount of light in the event the mood calls for it. You may not need to pay for extra things; just remove the top on a close by light fixture or other comparative and place it in front of your subjects, beside you if you are the shooter. Also, avoid overhead lighting. As much as recessed lighting looks great in person, it’s not good on photo camera. (There’s a reason why actresses wear sun shades the instant they are inside, where there is frequently overhead light.) This same lamp technique helps diffuse these sorts of lighting situations and would make everyone in the photography seem warm and alive. Your cell phone’s flash can do the same in a bit, yet stay away from it as most of your light supply, as it can make your get-together look washed out. Alternatively, you might use a relative’s cell phone flashlight as a directional light beam of kind by pointing it at the position you wish people’s faces to end up being lit. It can donate to some actually professional lighting effects.
Do you believe you are one of the many happy ones to find the Pixel 3’s Night Sight update? Be sure you are employing it when the situation calls for it, like inside restaurants or faintly-lit traditional buildings. This functionality is coming soon to outdated Pixel devices and is available in the default Android photo camera app, from the same screen where you may swap between panoramic mode and so on.
On Samsung and LG cell phones, a similar option is buried in the Professional or Manual modes. In this case, you’ll want to do a bit of adjusting to the camera settings to get the type of picture you want. You do not have to be a camera professional to gain access to this, because so many manufacturers present live previews so you can see what the result can look like after a little of adjusting. For ideal results, keep all of it on Automatic aside from the shutter speed, that’s where you’ll start to see the real difference in just how much light camera can take in. And of course, don’t forget to lean it against something as the shutter is open up or you’ll end up with a blurry picture.
Portrait mode is one of those defacto common capabilities that now comes offered with every modern smart phone. It’s like panorama setting, except that you’re more likely to work with it more regularly since it gives pictures a little of a high tech appearance. You don’t need to utilize it to shot photos of individuals, either. This works equally well for animals, house plants, or any various other curious target.
My favorite activity to carry out with Portrait setting, maybe I’m having a selfie or snapping a photo with friends I have not heard of in over 10 years, is to use it next to a plain background. A bare wall is fantastic for headshots, while a patterned wall adds a bit of sparkle. I love the fake “studio appearance” of the types of images, and you could get very creative utilizing the lamp-light trick in a living room. If carried out right, the consequence of your Portrait mode could look as preened and sleek as though taken on school photo day, and they could even be photographs deserving enough to put over a bundle of holiday cards in the next year.
Finally and in fact the most plain piece of knowledge on the list right here, you should not forget to clean your photo camera lens before capturing a shot. The android is entirely able at this time in the process to capture a high-quality picture of the persons you appreciate, nonetheless it will not mean much if the lens is messy with finger dirt and several other different dust. Even though you possess a case on with a photo camera covering, clean that section clean inside and out to guarantee that your photos remain perfect.
In the event your mobile phone is your only camera, it is best to keep the microfiber cloth or a bunch of camera-cleaning wipes. Get them in bulk and place them almost everywhere: in each and every container you utilize and every family car you drive in. Pictures are typically worth a million words if these are discernible, and in the event you put into it upwards of this much on a new phone, then it should produce photo frame-worthy pics.
0 notes
Text
Let’s Talk About Ethics: Worldviews, Justice, and Education
Environmental ethics and philosophy are a great portion of environmental studies. Science would have no significant call to action for humans if we didn’t have a sense of right and wrong.
There are a few basic environmental worldviews that inform individuals beliefs on environmental issues. Human-centered (anthropocentric) environmental worldviews are primarily concerned with the needs and desires of humans. One such view is called the planetary management worldview, which holds humans as the hierarchically highest species, giving them the ability to manage the Earth however they see fit for their own personal requirements; the value of other species comes from how valuable they are to humans. There are three major variations: the no-problem school, the free-market school, and the spaceship-earth school. The first believes that environmental issues are solved through economic, managetary, and technological improvements. The second holds that a free-market global economy is the best thing for the environment, with minimal interference from the government. The third, and perhaps most abstract, views the Earth as a spaceship, that is, it is a complex machine that we can control.
A second anthropocentric view is the stewardship worldview, which declares that humans have an ethical responsibility, or obligation (depending on the strength of the view), to take care of the Earth. Some find this foolish because they believe it’s not the Earth that needs saving, humans do.
Some dismiss these worldviews all together because they assume that we have the knowledge and power to be effective stewards of the Earth. As it is now, the way we are “managing” the Earth is only benefiting us, and not even in the long-term. There is no evidence to support the idea of us successfully managing the Earth. Critiques of the global free-market point out that “we cannot have an unlimited economic growth and consumption on a finite planet with ecological limits or boundaries” [1]. Finally, the spaceship concept may be interesting but is far too oversimplifying and misleading.
Life-centered, or earth-centered, worldviews expand the boundaries of what life forms should be valued beyond humans. The environmental wisdom worldview believes that we should study nature and use it to guide us in living more sustainably, that we are a part of the community of life that sustains us and all other species, and that we are not in charge of the world. Research shows that becoming more environmentally literate is an important factor in environmental change.

Figure 1. A Guide to Environmental Literacy. (Miller, G. Tyler. Living in the Environment. National Geographic Learning/Cengage Learning, 2018.)
Research also shows, however, that education is not enough. We ought to foster a true ecological, aesthetic, and spiritual appreciation for nature, which happens primarily through experience in nature. Furthermore, an important factor in living more sustainably is consuming less. Not only does this benefit the environment, but it also combats the ethically questionable concepts of materialism and consumerism, and the idea that things can bring happiness. Research shows that people actually crave community, not stuff.
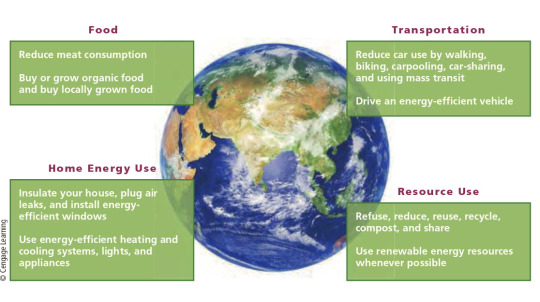
Figure 2. Ways to Live More Sustainably. (Miller, G. Tyler. Living in the Environment. National Geographic Learning/Cengage Learning, 2018, 693)
We also need to avoid two common views that lead to no effective change: gloom-and-doom pessimism and blind technological optimism. The first views the situation as too dire to combat, while the second puts too much hope in technology saving us without us putting in the work.
Environmental justice examines environmentalism through the lens of social justice. It recognizes that environmental issues aren’t purely natural, they are distributive, participatory, political, and cultural. It is an interdisciplinary field that combines humanities and hard sciences. In the U.S., the environmental justice movement rose as it became clear that “a disproportionate burden of environmental harms was falling on African Americans, Latino/a Americans, Native Americans, Asian Americans, the working class, and the poor” [2]. Beyond the U.S., environmental justice extends to issues of colonialism, the global environmental commons, and the effects of the corporate globalization.
I believe that a complete view of environmentalism must include environmental justice. Environmental issues are inherently linked to issues of wealth disparity, racism, and colonialism. Therefore, environmental solutions need to recognize the disproportionate effects of climate change in order to bring true, comprehensive change. For example, we must recognize that low-income communities and communities of color suffer more from being located near industrial plants or waste disposal sites than wealthier communities who have the resources to influence the location of those sites, or to choose to live elsewhere.
Intergenerational justice is the idea that current generations have obligations to past or future generations. Applied to environmentalism, it holds that those living now have a responsibility to preserve ecosystems and conserve resources for the next generations. While I think the idea of protecting Earth for future generations is not harmful in itself, I think it has the tendency to fall into anthropocentrism and therefore fails to address the issue comprehensively. Yet again, the focus is only on humans and not on the millions of other species that we are affecting through our environmental havoc. While it might be successful in inspiring care for the environment since it appeals to pride, it truly only reflects a care for ourselves, which I consider a failure.
Environmental citizenship is the idea that humans are a part of a larger ecosystem and that our future is dependent on each individual accepting the challenge and acting for change. Instead of human domination of the environment, humans are seen as members of the environment. It appeals to a sense of ethics similar to Aristotle’s virtue ethics. It internationalizes the concept of stewardship as it is more religiously neutral, and even clarifies the misunderstanding of human dominion for domination in Judeo-Christian traditions. While environmental citizenship is difficult to pin down, its general principle is helpful in educating and creating change due to its neutrality. Growing up in a primarily Christian community, I am far too familiar with the confusion of human dominion for human domination. I think that religiously neutral stances of environmentalism could be helpful in bringing about comprehensive and international change.
Another important idea is biophilia, an “innately emotional affiliation of human beings to other living organisms” [3]. There is research supporting the idea that the brain “has an evolved intelligence that grew out of the need for detailed information about nature” [4]. Nature also provides many benefits to human health and well-being, through direct contact, indirect contact, and simulations such as photographs. Windows, trees, and gardens are just a few elements of nature that have been shown to improve human behavior. However, it is also important to note how human attraction to nature has led to unsustainable practices, such as building hotels in the forest for panoramic views. Far too often our appreciation of nature is harmful to it.
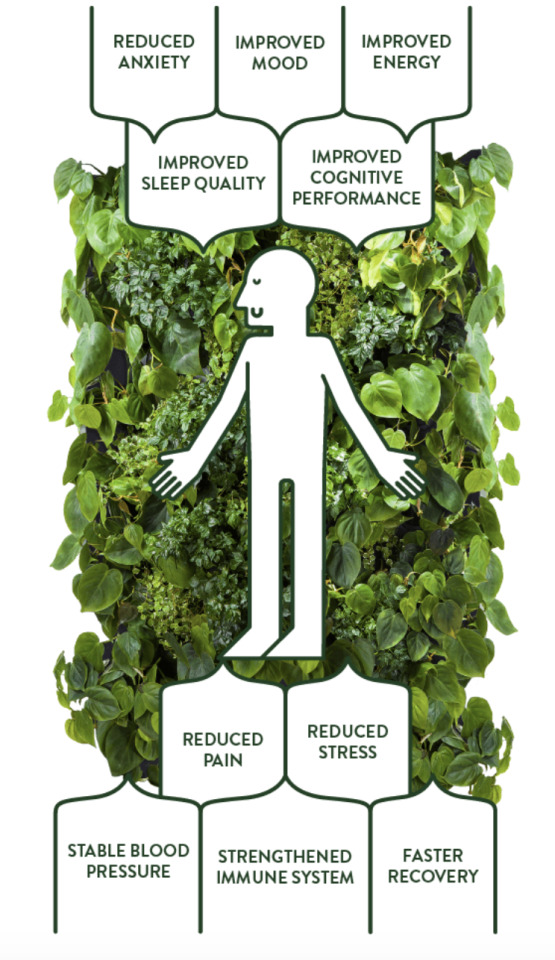
Figure 3. How exposure to natural elements is known to improve health and well-being. (Heiskanen, Siru. “Biophilia - The Love of Life and All Living Systems.” NAAVA. September 11, 2017. Accessed February 17, 2020. https://www.naava.io/editorial/biophilia-love-of-life)
Last Child in the Woods is a book about emerging research that shows how important exposure to nature is for healthy childhood development. Author Richard Louv comments on today’s “nature-deficit disorder” in children which could have ties to the rising rates of obesity, attention disorders, and depression. The book began the No Child Left Inside movement, focused on creating increased interest in children’s environmental awareness. The movement has impacted legislation and been endorsed by 58 organizations. In Milwaukee, WI, Riverside Park was once a place of crime and pollution, but after the introduction of an outdoor-education program and removal of a dam, the park has been restored. As one puts it, “nature was not the problem; it was the solution” [5]. The movement brings people together through agreement on one basic principle: “no one among us wants to be a member of the last generation to pass on to our children the joy of playing outside in nature” [6].
Finally, with all of this research and talk of the importance of education comes an important disclaimer: education does not guarantee decency. In fact, a large portion of damage is done by highly educated individuals. All of that to say, it’s not only a matter of educating, but a matter of how we educate.
Word Count: 1309
Question: What system of environmental ethics is most successful in creating change? Does it differ person-to-person?
[1] Miller, G. Tyler. Living in the Environment. 19th ed. (Boston: Cengage Learning, 2018) 684.
[2] Figueroa, Robert Melchior. “Environmental Justice.” Encyclopedia of Environmental Ethics and Philosophy. 342. https://drive.google.com/file/d/0BzKbjVLpnX0RczhaLWFEMFJWbjg/view
[3] Heerwagen, Judith. “Biophilia.” Encyclopedia of Environmental Ethics and Philosophy. 109. https://drive.google.com/file/d/0BzKbjVLpnX0RQ2p3dlZ3UGlMNVk/view
[4] Heerwagen, 110.
[5] Louv, Richard. “Children and Nature Movement.” Richard Louv. 2008. http://richardlouv.com/books/last-child/children-nature-movement/
[6] Louv, 2008.
0 notes
Text
CINE1102: Portfolio
Introduction:
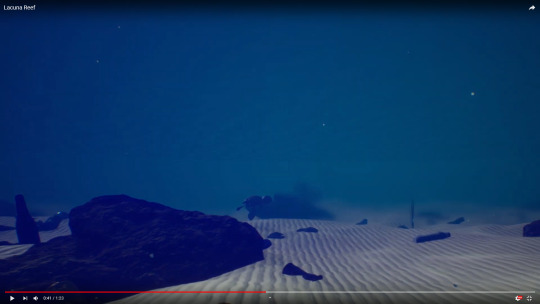
This report analyses the research, design and development I have made and used to contribute to our Animation project. Our animation is about the impact that pollution has on our oceans and is meant to raise awareness about the damage plastic causes to ocean life.
This report features four parts; the ILP document, research, evaluation and finally, the portfolio.
The independent learning plan (ILP) contains my roles, learning outcomes, mark breakdown and milestone development.
The research section studies the secondary research, how I applied that research, reasons why I made the different design decisions and how it led to the final product.
The evaluation is a run-through of our ideas, how the animation production went, how the group worked, the problems that arose and how we solved them and finally, any improvements that I think I could’ve made in my work.
The portfolio showcases the post-processing volume and its components, fluid dynamics/water physics, caustics, cinematics and the final animation.
Roles:
Raimon Wenz – Unreal Engine Developer/Cinematics
Maninderpal Rajbansh – Pre-Production Artist/Animation Director
Benedict Kpaku – Character Artist/Animator
Eduardo Gal – Secondary Character Artist/Story Designer
Maris Zaharevics – Environment Artist/Designer
Darren Pagado – FX Artist/Lighting
Samuel Fagboyegun – Sound Designer
Callum Watt – Prop Artist
Individual Learning Plan
[Updated: 19/05/19] - I made a slight change in my mark breakdown scheme; the caustic lighting marks have been reduced to 10% and the cinematics were increased to 25%, but the rest of my ILP has stayed unchanged.
Overview
After I graduate, I mainly want to work on creating 3D models and since I started the course, it’s what I’ve always wanted/planned on doing. But after working on Unreal Engine last year in Games Design Principles, I was very interested in this software and am strongly considering working for a company (probably a studio that made games) that needed someone who knows how to use UE4, so the role that I have chosen for this project is to be the Unreal Engine Developer.
“Unreal Engine Developer” is too broad a term when talking about specific roles in the group, so I divided that into the primary roles and secondary roles; my primary roles are creating the fluid dynamics, post-processing volume and cinematics while my secondary roles are creating the caustic lighting and building the scene/combining projects into one project in UE4.
Since I am the UE developer, the main software I will be using is Unreal Engine 4 to create this underwater scene and probably won’t need to use any other software throughout this project. But I may need to create my own textures for the water plane and caustics materials instead of using the free ones provided by Epic Games on the Marketplace, so if I do that, then I will need to use either Photoshop or Substance Designer to create them.
All these roles require both a good understanding of Unreal Engine and oceans in real life, so I would need to study and do a lot of research on how all these different pieces work and fit together in order to create an accurate and realistic underwater scene, which will be done mostly through watching tutorials on YouTube or Pluralsight.
Roles and Learning Outcomes
My primary roles are to work on the fluid dynamics (creating water planes that represent ocean waves and making use of Gerstner Waves to simulate a more realistic ocean), post-processing (volume box that gives the screen a blue hue to simulate water, as well as having other nice effects such as depth of field, specular bloom, ambient occlusion, lens flares and more)and the cinematics (camera movements and positioning using either the Matinee tool or the Sequencer tool in UE4), while my secondary roles include creating the caustics (light rays reflecting or refracting from a curved surface that appear on the sand/ocean floor) and finally, being the UE4 scene builder (combining everyone’s work and putting them all into one project in Unreal and ensuring that everything fits together and that there are no bugs once everything has been merged, as well as creating any needed blueprints).
CINE1102 Learning Outcomes:
1. Relate disparate areas of practice together into a cognate form
2. Manage the production of a short animation
3. Experiment, using research, with advanced animation concepts
4. Demonstrate skills in advanced animation techniques (motion capture, physical simulations, dynamics etc),
5. Evaluate their work based on professional industry standard outputs and expectations
My in-depth research into the other fields (especially the one about Gerstner Waves) meet LO1 because it applies Mathematics and Physics into my field, which is Art and it puts all these into a cognate form because the equations that were used in those other fields could be directly translated and applied into Unreal’s blueprints to create the Gerstner Waves.
LO2 is met through one of my secondary roles, which is the UE4 scene builder; this learning outcome is met because doing this role would requires me to manage the pipeline in Unreal Engine by asking and checking my peers for their separate work and then combining all those into one project seamlessly.
I have met the third and fourth learning outcomes by researching about fluid dynamics/water simulations and looking at how they move in real life and trying to recreate those movements through an animation in Unreal. I also applied that research into my projects by creating multiple prototypes (while documenting each one through screenshots/screen recordings) and adding improvements in each version as I learn more and expand my knowledge on the subject as time goes by.
LO5 will be met once the we have put all the pieces together and made any final touches to make it up to par with industry standards but overall, I am very happy with my progress and of course the whole group’s progress so far. At this rate, we would be able to create an amazing final animation with a more realistic underwater scene and characters and will be looking forward to the final piece.
Mark Breakdown
I want to be marked on all five of my roles and will specify exactly what part of that role I would like to be marked on to avoid any confusion. They all have different weightings and purposes towards the final piece, but I want all of them to be marked based on the accuracy and realism of their look and feel in creating an underwater scene and I want them to be as natural and as close to the real thing as possible.
Fluid Dynamics/Water Physics – 30%
The main factor that I want to contribute towards my work will be the water plane that represents ocean waves, which will be by creating Gerstner Waves, which I have shown and explained in depth in my research portfolio. I want to be marked on the waves’ movements and aesthetics; I want the waves to move like real waves and I want there to be variation (speed/height) depending on the scene i.e. calm waves during a sad scene and perhaps raging waves during a tense moment in the story.
Post-Processing Volume – 25%
I want to be marked on the different elements that are contained within the PP volume, which are the depth of field, specular bloom, ambient occlusion, lens flares, vignette blur, screen distortion and most importantly, the colour of the volume that gives it the blue hue to replicate the colour of the ocean when viewed from underwater.
Cinematics – 25%
For cinematics, I want to be marked based on the fluidity of the camera movements, positioning and any camera cuts from scene to scene.
Caustic Lighting – 10%
As mentioned previously, caustics are the light rays reflecting or refracting from a curved surface that appear on the sand/ocean floor, so I want to be marked on how they look as well as how they move and whether they look and feel natural compared to the real thing.
Combined Final Scene – 10%
This final part refers to the look of the final scene and how well and seamless I have combined everyone’s work together into one project in Unreal, therefore everything should look like they were all made together and be the same scale and not separate i.e. no piece stands out in a negative way/be out of place and they should all help contribute into creating the simulation of an underwater scene.
Milestone Development
For future work, my next step is to add the initial assets created by my group members, mainly the god rays/particle effects that Darren created as well as building the environment by adding corals/rocks that Maris created. We may also consider creating a GitHub repository in a couple of weeks as by then, my other group mates would’ve made much more content, which they may want to add into the project themselves but then be adjusted by me later on to make sure everything fits together perfectly. I plan on finishing this on December.
Aside from that, I will need to investigate perhaps adding a fisheye lens and whether this effect is achievable in Unreal Engine; a fisheye lens is an ultra wide-angle lens that creates this strong distortion that is intended to produce a panoramic image. I got this idea from the image above between my screenshot and the image I found online where the online image has this slight curvature whereas mine is flat and I think adding a fisheye lens would help further improve the illusion of having a camera underwater. I also plan on finishing this on December, since I expect this to be a quick addition.
I will also need to do more research on my own work to see if there are any other effects, I could add to improve my work and add more realism to create an even more convincing water simulation. The main thing I plan on doing research on is the Gerstner waves, which I discussed in depth earlier in the “Gerstner Waves” section. I plan on finishing this on January/February.
I also plan on adjusting the caustics and trying to achieve the same quality as Timothy Cole’s caustics, which I talked about earlier and will be looking around to see if there are better alternatives to what I have now. This should be finished on January too.
I will be paying close attention to the release of Unreal Engine v4.22 and for the addition of RTX support on Unreal Engine since its release is rumoured to be by the end of the year, although realistically, I wouldn’t expect it to be released until January/February next year. Once RTX support is released in 4.22, I will be installing the new version of UE4 and copy and transfer our underwater scene that we have now onto it and will be testing out the ray tracing and comparing it with our current scene in UE4 4.20 and see if there is any major difference between the two versions. If there no difference or only a small difference, then I will be keeping the current scene in version 4.20 since it won’t be worth it to spend time transferring and potentially fixing any possible bugs or incompatibility issues that may arise when using the new version of UE4 but if there is a big, noticeable difference, then I will be transferring everything onto the newer version of Unreal and fix any incompatibility issues that may come up due to them being made in an older version of Unreal. If I do go through with the transfers and the fixes for the new version, then I predict that this might take some time and may take 1-2 months to fix/finish, depending on the issues (if there are any), which will be February/March (assuming that RTX support is released in late December/early January). Although not as important as the other factors, it would still be nice to implement ray tracing into our animation for the added ‘eye candy’.
Once the animators and modellers have finished their models/animations and are ready to export as an .fbx, I will be working on implementing them into my project and putting everything together and once everything is in place, I will need to check for any errors such as missing textures or buggy animations and if I find any, I will need to try fix them and let my peers know as they may have exported it wrong or didn’t include textures, etc. Once everything is imported in Unreal and ready with no problems present, I will be ready to create the cinematics for our project and work on the camera placements/movements and ensure that we get the perfect angles for each shot of the scene and make sure that it’s appropriate for the emotions of the scene i.e. during the sad scene at the start, camera movements should be slow. I predict that these will be done by March/April, depending on the speed/workflow of the animators/modellers and any potential problems that may arise, such as the errors that I previously stated.
The deadline for this animation is on the 20th of May so I expect everything to be ready and for May, I plan on only doing the final touches to our animation, so I will be refining everything, like the values of parameters in nodes or adjusting the direction of a light slightly or fixing any last-minute problems that may come up. Once everything is finished and is of good quality and everyone is happy with how it looks, it will be time to render out the animation and export it, which shouldn’t take more than a few hours since it’s only a short animation and because Unreal renders out animations quick. After the animation has been rendered, the VFX guys (Paul, Darren, Ben) may plan on doing some final touches in Nuke for post-production and apply some minor, final changes to the animation and again, render and export it afterwards for submission.
Portfolio
Fluid Dynamics/Water Physics [30%]
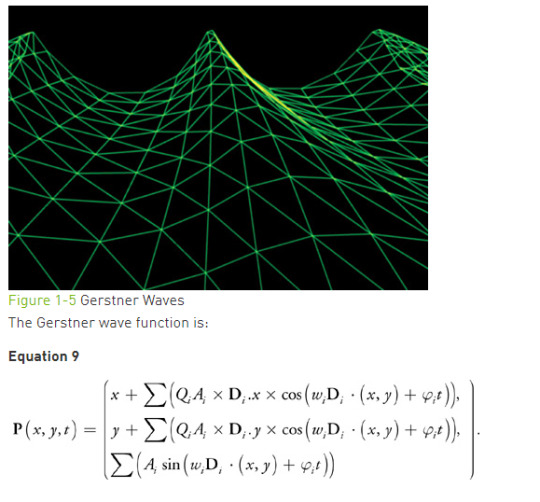
Gerstner Waves
“In fluid dynamics, a trochoidal wave or Gerstner wave is an exact solution of the Euler equations for periodic surface gravity waves. It describes a progressive wave of permanent form on the surface of an incompressible fluid of infinite depth.”
Version 1

This is the basic water plane I had in the previous portfolio and it was just a Sine wave - its movements were just it going up and down as well as a panning texture.
Version 2


The water plane’s waves above moves from left to right, which means it moves more dynamically now and is starting to become a Gerstner wave.
Version 3

This is the blueprint for the Gersnter function and this material will be referenced by the Gerstner wave material throughout and it makes editing values easier as you only need to adjust the parameters (small green boxes) in the screenshot below instead of going through lots of nodes to make a small change above. The main benefit of referencing a material function (especially one that uses this many parameters) is to streamline the adjustments of values and to make this easier and quicker for me.

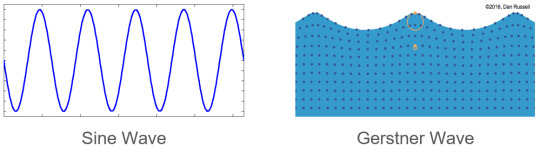
Sine Wave & Gerstner Wave Comparison
(Hailey Williams, 2017)
youtube
I created a comparison video to show the difference between a Sine wave and a Gerstner wave. The video clearly shows a big difference between the two waves and the motion of the waves from the Gerstner waves are closer to that of waves in real life, which is why I’ve been striving to achieve this effect since the beginning and didn’t want to settle with having a simple wave despite finishing the Sine wave ahead of schedule.
The Sine waves only have a simple up and down movement of the plane but the water itself looks very stiff as the plane never bends in any area, making it look very unrealistic whereas the Gerstner wave on the right has “bumps” and the plane isn’t just a flat and stiff model going up and down, but instead moves in all three axes, making it have more dynamic movements thus helping it look more believable and realistic.
The final version of the waves looks like the one on the right, except of course for the change in opacity as if I recorded the translucent plane, it wouldn’t be very visible here and will be hard to notice.
Mathematical Equation Breakdown
Since the Gerstner wave is the component that I spent most of my time on during this project, I will be going to extra detail about it, especially since there is a lot of Math and Blueprints involved and will be going through each section/node of the equation/Blueprints one by one.
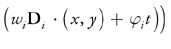
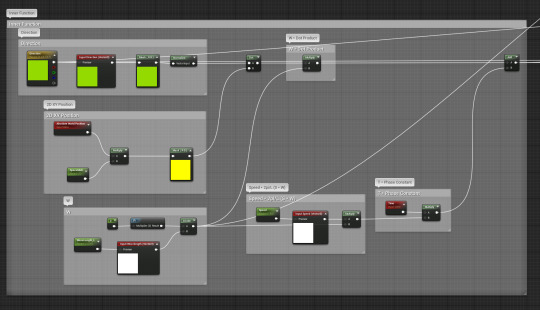
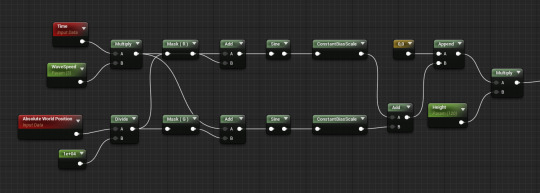
(Finch and Worlds, 2007)


This is the complete equation shown in Blueprint form that shows the full blueprints in the Gerstner Wave Function (separate from the actual Material) which is referenced by the main Gerstner Wave material (later moved/combined to the Water Plane material). The nodes in the blueprint have been labelled according to their mathematical counterpart using the Comment node.
Key Terms
Dᵢ (Direction) – The Direction determines which way the waves are moving and is controlled by the values in the RGB (Red, Green, Blue) masks.
Wᵢ (Wavelength) – The Wavelength determines how big the gap between each wave is and how far apart each waves appear.
ഴᵢt (Speed) – The Speed determines how fast the waves move.
Qᵢ (Steepness) – The Steepness determines how steep the crests of the wave will be.
Aᵢ (Amplitude) – The Amplitude determines how high or low the waves will be.
This section is the inner function and is used to multiply to the rest of the equation in the X and Y axis. It contains the direction (which way the wave flows), the wavelength (size of the gap between each wave), speed (speed of the waves) and time (how often waves are made).

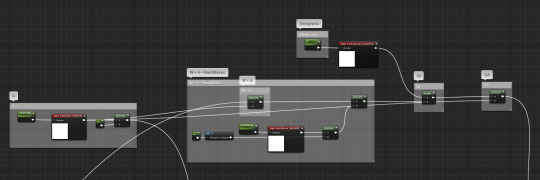
The steepness and amplitude control the steepness of the crests of the waves and the height of the waves respectively. and are combined together using the multiply node, to represent the X in the equation snippet above.


The X and Y were simply just mask nodes (R [red] for X and G [green] for Y) and both left sides are connected to the Direction node from the Inner Function above and the right nodes are multiplied together to make a float to be then connected to the final output.
Blueprint Breakdown
World Displacement (Gerstner Waves)
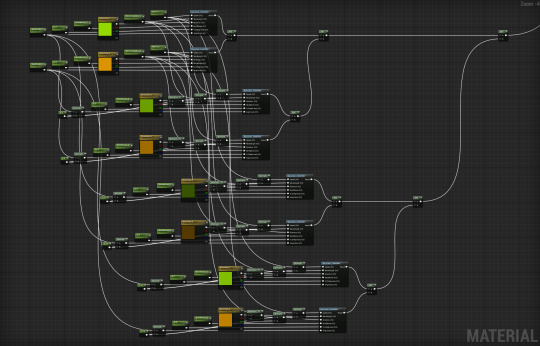
The World Displacement node is responsible for simulating Gerstner Waves; it uses multiple Gerstner Function and while they all look similar (except for the colours) from afar, if examined up close, each one actually has slight variations in the value of e.g. the number of waves or direction. This was duplicated and edited repeatedly four times (two functions for each wave group) because it gives the waves slight differences between each cycle.
Real waves rarely behave the exact same way each time (slight variations between them such as different heights, speed, etc), so by creating multiple functions, I am recreating this “chaos” and giving the waves alterations.
World Position Offset
The World Position Offset node is what makes the plane go up and down - but not to be confused with the wave up and down movement as this is just a basic movement that makes the whole plane change in Z axis whereas the Gerstner waves affect all three axis.
Its equivalent in real life would be the shoreline of e.g. a beach; water pulls and pushes towards the sand in a beach and the World Position Offset imitates this, just without the shore.
Normal

The Normal node gives the water plane the actual wave pattern that you see in the scene - without it, the water plane would simply be a basic shade of whatever colour is set in the Base Colour node.. The pattern it displays would depend on what texture in set in the texture sample (purple boxes) and I added a panner node to these so that they wouldn’t just be stagnant as waves are constantly moving and having a pattern that doesn’t move in any way would look very unrealistic.
Base Colour

This section gives the water plane its blue colour which is blended together in the Lerp node. Two hues of blue are used here, one being darker/lighter than the other and this was done to give variation between the wave colour and the lighter colour serves as a ‘highlight’ and provides colour to the darker hue. That same lighter colour is the one that appears at the “tip” of each wave peak, which is seen in some of the screenshots/videos present in this document.
If you’ll notice, it has the same nodes in the left half of the screenshot as the nodes used in the Normal node. This is because they share the nodes from the Normal node; aside from being connected directly to the Normal slot in the parent node, it is also connected to the Normal slot in the Fresnel node of the Base Colour - its purpose is to provide the Lerp with an Alpha node.
Opacity

The Opacity node changes the transparency of the water plane and helps it blend more with the scene. Water in real life is transparent (varying transparencies depending on type, location, content, etc), so I made sure that I didn’t forget to make mine transparent too. This is a very important part of the water plane because if I left this left and set the water plane to opaque, the directional light from the sun would not be able to pass through and therefore cast a big shadow below the plane, therefore making the whole scene unlit.
I came back to this and added the RadialGradientExponential node towards the end of the project because I noticed that the wave horizon looked very flat once inside the scene and since planes are unaffected by the Depth of Field, the plane edges looked strong and had to be toned down a bit. This was my solution to that problem and aside from giving it a very slight blur, it also doubles by turning the rectangular plane into a circular one - this gave the plane horizon a slight curve when viewed from inside the scene.
Roughness

The Roughness node and its elements adds a subtle effect that makes the texture, which makes it move softly along the water plane and give it some variation and also blends patches of waveform together with the Lerp node at the end. Essentially, the Roughness node makes the water very slightly murkier.
Post-Processing [25%]
Depth of Field
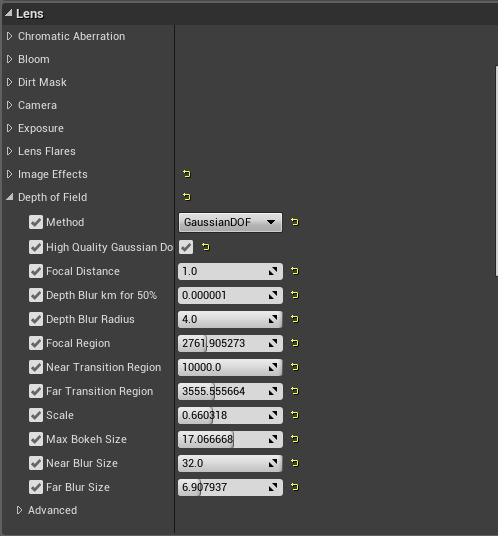
Instead of binding the depth of field to the post process volume, I moved it to the cameras instead as they had the same option and seemed to work better after a few test runs.

This was one of the screenshots from the testing phase and although present, the depth of field strength was a bit weak and barely blurred the furthest coral on the right.

After playing around with different values, I was able to achieve the nice depth of field effect seen above, which the team was really wanted to have in place since we started the project as it helped build the atmosphere.
You may notice that the newspaper on the right is too clear despite being fairly far away - this is because the depth of field doesn’t seem to affect planes whatsoever (occurred in both the camera and post process depth of field), so there wasn’t really anything I could do about it except lower the opacity of the water plane so that it isn’t as strong, but obviously could not repeat this same step for the newspaper as the newspaper is opaque whereas the waves/water plane is translucent/see-through.
Underwater Colour/Hue

This was the underwater scene that I had showcased and presented in class (which was also posted in the previous portfolio) and I really liked the scene so far and so did the group, but we thought that the scene was too blue - since the story was about pollution, the screenshot above shows a hue of blue that you would normally see in a healthy ocean environment, so the plan was to make the ocean murkier and reduce the saturation to make the blue greyer and thus seem more fitting to a dirtier environment.
Another problem with this colour was that the hue was too strong, especially on the sand. Everything in the scene look blue and the sand should not be blue, but yellow/white-ish. The texture of the sand was of normal sand colour, so the issue was the post process volume colour, which had to be changed to make the sand pop out more and have its natural colour.
youtube
After some adjustments, I was able to import some assets from Maris and Darren to create a test scene as well as add depth of field and as seen above, the water hue is less powerful and the sand is now its normal colour instead of being blue and the water is also murkier and dirtier now, as an effect of the pollution and was made by adding atmospheric fog and exponential height fog into the scene.

It may not be noticeable, but in this scene, the water is much murkier and looks more green. This was a design choice for me as at the start of the animation, the characters are in an open, deeper space, so in real life, the ocean would be much bluer there but as the animation progresses and more pollution is seen on screen, the colour becomes less blue and headed towards green, which is an effect of the pollution (more pollution = dirtier water) and at the final scene (screenshot above), the water is dirtiest as this is the area where the largest concentration of pollution is present in the animation, so I wanted the water colour to reflect that.
Cinematics [25%]

The cinematics involve all the camera movements, transitions, blurs and any other camera effects used which were made using the Matinee tool in Unreal.
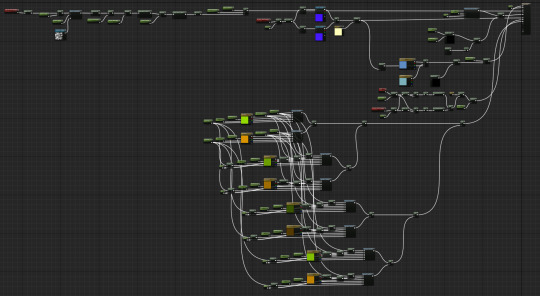
The screenshot above shows all the different component in a single Matinee Actor in the scene - each bound to different assets and each having different purposes. For example; the very top of the Matinee shows the Director Group and what that does is control which camera in the scene the Matinee follows, so this tab is responsible for the camera jumps and the specific time it jumps and specific camera it jumps to were all set by me and they were used mainly as a transition tool to go from one scene in the story to the next.
Most of the Matinee tool was pretty straight forward. The movement tracks (e.g. camera moves from point A to point B) were easy to do as they simply required me to pick a time frame in the Matinee, add a keyframe and then set values on the XYZ axis or manually move the object in the scene to determine the next location of the component.

The hard part was working with the imported Alembic animations that the 3D artists made as they all have set times on when the animation plays and how long it plays for. Some animations didn’t loop seamlessly too (issues with the import to UE4), so I had to find a clever way to work around these issues. A good example of this being accomplished is in the two screenshots above where the turtle is swimming just above the ocean floor; the issue I had here was that for this specific animation, the loop wasn’t seamless and looked “jumpy”, towards the end/start, so my fix was to have two separate models playing the animation once which will have a clean motion instead of one model with a looped animation with a clunky loop. I swapped the two models by routing the turtle behind the large rock in the middle of the screen and once the turtle from the first screenshot gets behind it, its animation stops and its visibility also goes down to 0, preventing it from being seen sitting idly as the camera pans to the right. The second turtle model (same animation) then appears (visibility goes from 0 to 1) and swims normally to the next destination, which I tried to match the speed and trajectory of the first turtle by to make the swap unnoticeable.
Caustics [10%]
To create my caustics, I watched a few different tutorials; each one using different techniques. I have four iterations of caustics and each one has improvements and looks better as it progresses.
The first and second versions were created last December and was included in my research portfolio but will be adding them here (along with the blueprints and accompanying comments/text) as well to show my progression from those versions to my latest one.
Version 1
“As you can see, it doesn’t look natural due to its jumpy movements, which isn’t what I wanted at all since I was imagining something that was more flowy, so I looked around for more tutorials and continued watching more tutorials of Matt Taylor as I already watched his first tutorial of a 3-part tutorial for creating an underwater scene (link: https://www.youtube.com/watch?v=W8u7GONZzoY).”
Version 2

“This tutorial had a much simpler code, yet it was more effective than the previous one and it is a lot smoother and more natural, which I am happy with. I have been tweaking with the values of the caustics too just like I do with every other tutorial-based material I have created to suit my scene better and the main value that I’ve been changing is the contrast and disturbance since these two parameter nodes control how “bright” the caustics are and in the image above, I think it looks a bit too “faded” and slightly unnoticeable but I concluded that it may have been due to the texture of the landscape that was causing that look and I was right because the caustics look a lot better in the improved version, which you can see later in the “Version II” section, especially in the screenshot that’s zoomed in on the sand.”
Version 3

I made a few improvements on the second version as the caustics there were too wide and felt like it could use a lot more improvement, so I tweaked some of the values of the parameters in the blueprint above to achieve the caustics present in the screenshot above.
Version 4
The caustics still felt like they were too thick to me despite the changes made, so I decided that instead of just playing around with the values and achieving a similar result, I would try a different approach and start fresh.

(Timothy Cole, 2017)
“While doing more research and looking for inspirations and tutorials for better caustics, I came across this beautiful setup made by Timothy Cole; he created this in UE4 using materials just like I did, but his looks much better and although he doesn’t provide a step-by-step tutorial on how he created this, I will strive to replicate caustics of this quality.”

“I cheated and broke this light up into 3 lights, slightly offset from each other. Each one has the same material function, but are coloured red green and blue.”
(Timothy Cole, 2017)
“His article included a video showing the caustics in motion and the movements were pretty similar to mine, but what makes his the better than mine is that his includes the minor details such as the small rainbow coloured effects that are next to the white light and I would like to mimic that same spectrum breakup and his article says how he did this, so I will be doing that same method.”
I looked back to this example from my previous research portfolio and really wanted to achieve something similar, so I used the same method he did and used a spotlight (the previous version of caustics used a decal actor instead and worked similarly to a volume box).

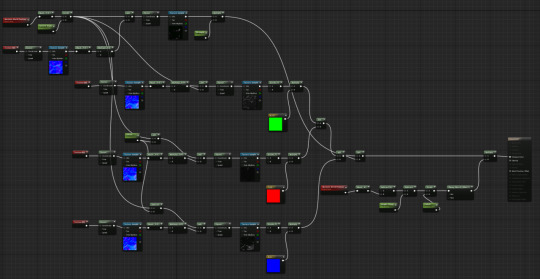
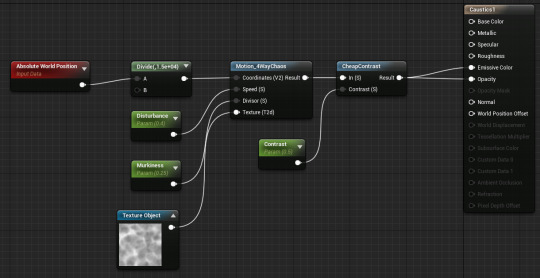
These are the new blueprints that I have used for the fourth and final version of the caustics.


I successfully recreated the caustics that Cole showcased and also added the RGB colour into the mix to simulate the light spectrum/prism of the sunrays piercing the water, which greatly improved its appearance and again, helped with the realism of the scene.
Like Cole, I also duplicated the spotlights (three in each group) and changed the colour of each to blue/green/red (one per group) and moved them very slightly so that the effect is clearly shown on screen.
Animation
youtube
Evaluation
Ideas
The idea we have agreed on revolves around pollution in the ocean caused by plastic; we wanted to create something that had meaning is a serious topic because our goal in this project is to not only create a beautiful animation, but also to raise awareness on what plastic is doing to our oceans.
Production
Production during this project went quite smoothly most of the time. We did have some bumps during the early/middle stages of the project due to a conflict between members on which story fits better, how it should look, etc - mostly about the design choices but once everything has been settled, our workflow improved.
Group Work
I worked closely with most of my group members while working on this project - mainly Paul for the storyboard/animation timing, Maris for the environment building and Darren for the lighting/FX blueprints/settings, but especially Darren because aside from me, he will also be working purely inside Unreal Engine, unlike the others who will be using external packages such as Blender, Maya, Photoshop, etc.
In all my group projects that I have participated in, this was probably the one where I needed to communicate the most with other group members since I am the person who is in charge of putting everything together in Unreal, because it is important for me to know how each of their components will look so that I will be able to determine whether they fit into my scene and if they don’t then I can adjust the settings values/scale/placement/etc to make them more suitable and more compatible/seamless with the rest of the UE4 project.
Someone suggested to use Github to improve our workflow and make uploading/downloading the files easier and quicker (compared to something like Basecamp) due to the large file sizes involved in Unreal Projects (final size at the end of the project was ~3.75 GB). I believe Ed set up the Github repository and during our group meeting via phone call on Discord, I suggested that we use Sourcetree to manage their gits because I have used it in another project this year and has worked really well for me. Some members tried it but most had issues getting it running, which I tried to help them with and even recorded a “How To” video and sent it to them showing a run-through of the basics but at the end, we decided not to continue using Github because some members wanted to try another method as they weren’t too keen on anything git related as they have never used it before.
We moved on to using Google Drive, which we were all familiar with (so no issues there about how it works) and managed our Unreal files there while using Basecamp for smaller files like individual .fbx files or images. Switching to Google Drive also allowed us to access the files in university straight away whereas Sourcetree wasn’t available in Room 2001 and required an admin login to be able to install it. This resulted in the group coming into uni regularly and working together as a group, discussing game ideas, issues, suggestions, etc. It improved our productivity and made us output more work compared to each of us using our own individual computers at home.
Problems and Solutions
We only encountered a few problems throughout the project, which I have discussed in the ‘Production’ section above above the idea conflicts but only had minor problems thereafter. This was the case until (mostly) everyone was ready to import their work into my project in Unreal; we encountered a lot of problems in this stage near the end of the project - them mainly being the lighting build and errors in the baked animations (alembic files).
Lighting: Problems
I am not too clear on this problem as the members who were working on it didn’t know what happened or how to fix it but towards the middle-end of our project, we had some lighting issues where if you build the lighting in Unreal, some shadows showed up as black squares on certain angles but normal on other angles too.This shouldn’t be present in our end product as that would stand out very quickly and take away the attention of the audience from watching and enjoying our animation and instead focus on the anomalies occurring.
This problem confused me because last year when I built the project from scratch and showcased it in my previous post, I had no issues whatsoever with the lighting and was able to build the lights quickly without it causing any issues. This has also never happened to me before when I was using Unreal so my best guess is what happened is that a member accidentally changed a setting or parameter somewhere in one of the main lights in the scene or even the project settings and caused the build to not work as its supposed to.
Lighting: Solutions
As I was unsure of what caused the problem, I also was unsure of how to fix it. I consulted Darren on this as he was in charge of lighting but he was also unsure on how to fix it. We tried deleting all the lights and adding them one by one again but the issue persisted so we concluded that it must’ve been related to the project settings.
Normally, if this were the case where my project had an “unfixable” problem, I would’ve just restarted the Unreal project by creating an empty new one and migrating everything from the buggy project to the newly made one and making the necessary adjustments when importing assets e.g. reselecting/readding textures to the texture samples in the Material Blueprint. I created a fresh new project last December in fact but however, I couldn’t do this again this time as it was far too late and deep into the project to do that.
Our “solution” to this problem was to just leave the lights unbuilt as we agreed that the scene still looked nice and didn’t really notice much of a difference. The quality of the lights were still high and Darren was still happy on how his lights and fog looked despite this, so we left it unbuilt.
Baked Animations: Problems
Members who have exported baked animations in the Alembic file format have had issues when importing them into Unreal Engine; some animations/meshes were broken (e.g. missing turtle body parts) while some animations weren’t playing correctly. Ben was the main artist who had problems importing his assets because not only does it take a long time to import .abc files (~30 minutes-1 hour depending on the object), he encountered multiple problems with how his turtle looked and moved; in some of his uploads, the eye balls were misplaced and were now under his mouth, in another import, his turtle was missing its mouth.
Baked Animations: Solutions
Our solution was to first import the .abc file into a fresh, blank Unreal project and then once imported, copy the .uasset file from the folder and then drag it into the designated folder in the main project. This solved the time/waiting issue as while I was waiting for the Alembic file to import, I couldn’t work on the file at the same time as it might mess up the save file on the drive due to conflicts.
Ben later figured out how to import his meshes correctly and get their animations to play properly by doing a trial and error of importing his assets into a blank Unreal project and seeing what works and what doesn’t.
Improvements
The main improvement that I want to make in this project is the water plane; although the Gerstner waves already look good at the moment, I still think that it could be improved greatly based on the other examples I have seen e.g. https://www.youtube.com/watch?v=OQ3D0Q5BlOs | https://www.youtube.com/watch?v=2xtcQgeyRcU. In the future, if I were to work on something similar to this again, I will be aiming to have more realistic features added to the waves such as seafoam like in the examples above.
Reference
Cole, T. (2017). Working with Underwater Caustics in Real-Time. [online] 80.lv. Available at: https://80.lv/articles/working-with-underwater-caustics-in-real-time/ [Accessed 16 Nov. 2018].
DokipenTech (2016). Unreal Engine 4 Gerstner Waves Livestream. [video] Available at: https://www.youtube.com/watch?v=_y7Z0MbGOMw [Accessed 16 Nov. 2018].
Finch, M. and Worlds, C. (2007). Effective Water Simulation from Physical Models. [online] NVIDIA Developer. Available at: https://developer.nvidia.com/gpugems/GPUGems/gpugems_ch01.html [Accessed 16 Nov. 2018].
Williams, H. (2017). Tutorial: Ocean Shader with Gerstner Waves. [online] 80 Level. Available at: https://80.lv/articles/tutorial-ocean-shader-with-gerstner-waves/ [Accessed 16 Nov. 2018].
0 notes
Text
6 Secrets for Taking Unique Photos in Tourist Hot Spots
There's more to shooting major cities than typical tourist destinations. Learn how to find the hidden corners of popular locations with tips from these six experienced travel photographers.
In the late 19th century, photographers like Francis Bedford, Solomon Nunes Carvalho, and Francis Frith showed us the world. Through their images, the public was able to see the Egyptian pyramids, the churches of Jerusalem, and the plains of the American West for the first time. In the last 100-plus years, travelers with cameras have revealed extraordinary places and shared the stories of countless people. Today, we can access faraway cities with the click of a button, and few locations remain unphotographed.
The digital era forever changed the way we travel. For professional photographers and tourists alike, photography has become an indispensable part of the way we experience new places and cultures. On Instagram, popular hashtags like #wanderlust, #instatravel, #travelstories, #travelmemories, #travelgram, and more bring up millions of photographs from people around the world.
We wanted to know exactly what it takes to find a unique point of view in 2019, so we asked six travel photographers to tell us about how they find hidden gems in big tourist cities. Below, they take us on a journey to Dubai, Venice, Russia, Prague, Munich, and the “Blue City” of Morocco, revealing unexpected street corners and out-of-the-way treasures.
1. “When I'm on location, I always ask a receptionist at the hotel for recommendations.”
Shahid Khan
Image by Shahid Khan. Gear: Nikon D750 camera, Nikon 24-120 f/4 lens. Settings: Focal length 82mm; exposure 1/640 sec; f8; ISO 400.
What's the story behind this photo?
While in Dubai, I took advantage of a day pass and used it on the metro to go from one end of the line to the other end. While passing through the downtown area, I saw the high-rise buildings on both sides of the metro line, and it looked like a scene from a sci-fi movie. I set my camera on a faster shutter speed to avoid any camera shake. The good thing about the metro in Dubai is that it's driverless, so with a little effort, I got a spot at the front and had an uninterrupted view.
Image by Shahid Khan.
Pro Tip
Obviously, the first point of contact is Google. An image search will show you the main landmarks and the popular points of view. I usually scroll down a bit to see images other than the major landmarks and note down the names of the locations that interest me. My second choice is Flickr. The good thing about Flickr is that you can get in touch with local photographers for tips, and the trick is to contact at least five photographers so you get a response from at least one or two.
When I'm on location, I always ask a receptionist at the hotel for recommendations. I've gotten great recommendations from receptionists and waiters alike. I always visit the information center, if there is one in town, and I get ahold of all the pamphlets I can. They will sometimes have information about hidden landmarks or free walks. When I am in a city for a bit longer, I always take time to roam aimlessly by foot or on public transport.
Instagram | Website
2. “I read tourist guides and blogs by locals, and I learn about how this city has been depicted by artists in the past.”
kavalenkava
Image by kavalenkava. Gear: Canon EOS 5D Mark III camera; Canon EF 70-200mm f/4L IS USM lens. Settings: Focal length 97mm; Exposure 0.3 sec; f8.0; ISO 200.
What's the story behind this photo?
This is one of my favorite Prague views, seen from one of the Prague towers, located a distance away from the usual tourist routes. There were no sightseeing groups or signs advertising this spot, and at first, it was unclear whether or not it was possible to climb the tower. After a while, we found an inconspicuous door, and it turned out that you can climb the tower for a small fee. There were few visitors, which allowed us to take photos before and after sunset and to use a tripod.
This view is much more interesting than the well-known views from Old Town Square, and it includes the most famous sites: the Church of Our Lady of Tyn and Prague Castle, as well as the rooftops of the old city. I took this photo at sunset, when the yellow and red colors of the sun combined with the illumination of the buildings. The city looked like a magic box.
Image by kavalenkava.
Pro Tip
I begin my search for “hidden gems” long before planning a trip. I follow a variety of Instagram accounts and blogs, study popular photos on Shutterstock, save interesting photos and drawings, and sort them by country and city.
I then get acquainted with the history of the city itself in order to understand what matters to its inhabitants. I read tourist guides and blogs by locals, and I learn about how this city has been depicted by artists in the past. I mark the attractions that interest me on an online map, and I look for places that offer an overhead view of the city, including bell towers in churches, shopping centers, or restaurants with panoramic terraces.
From there, I wander around the main sights. I go far from the central tourist routes because the most beautiful views can often be found at a distance. If there is a hill or a mountain in the city, I will definitely be there. Sometimes, locals will offer to show you interesting places when they find out that you are a photographer. Do not hesitate to ask tourist office staff members, hotel administrators, and even souvenir merchants for advice.
Choose a hotel room or apartment based on the view, or hop onto social networks and look for people who would be happy to take you to their balcony or roof. Also, many hotels will have restaurants with terraces on the roof; in that case, you can go have lunch and get an exclusive shot at the same time.
But my most important tip for finding real gems when traveling to new places is simple: If you see something interesting, take your photo right away. You may not get a second chance. Often, when people see an interesting place, they might say to themselves, “I am tired now. I'll rest and come back later” or “Today is only the first day, I will pass this spot a hundred times.” But the truth is that you might never get a chance to return.
Instagram
3. “Using sites like Flickr, 500px, or even Google Images will help you find new perspectives or locations.”
DaLiu
Image by DaLiu. Gear: Canon 5D Mark IV camera, Canon EF 16-35mm f/4 IS USM lens. Settings: Focal length 16mm; exposure 1/160 sec; f8; ISO 100.
What's the story behind this photo?
The first time I visited Venice, I had only half a day in the city, and it was overloaded with tourists, so last year, my wife and I decided to go in January to avoid the crowds. I started searching for iconic locations in Venice, and, of course, everything was obvious. I had the almost impossible task of finding beautiful and unknown spots, but at some point, I found a picture on 500px with a building in Venice surrounded by canals all the way around.
It was an interesting view, but, of course, the author of the photo hadn't specified the location of the building, so I started to think about how I could find it. Luckily, the old city of Venice is not big, so it took me some time, but in the end I did manage to find it on Google Maps.
DaLiu
DaLiu
DaLiu
Pictured: [1] DaLiu [2] DaLiu [3] DaLiu
Pro Tip
When I start planning a trip to a new city, I do a lot of background work beforehand. I look for photos online to see all the iconic spots, and after that, I dig deeper on the internet to find lesser-known locations. Using sites like Flickr, 500px, or even Google Images will help you find new perspectives or locations. Where possible, try Street View on Google Maps, and search for articles online about the city you're visiting.
In most cases, this kind of preparation will give you something, even if it's not totally unique. You just need to be patient and put in the time needed for scouting new shots. I usually try to find these areas before I leave for any trip. It'll save you a lot of time, and, in many cases, even the locals won't be able to help you to find exact locations.
Other than that, the best tip or trick I can give is to walk around outside of the most popular locations and explore the city. Once you find something unique and photogenic, make a plan. Check to see if it'll look best at sunset, sunrise, or even midday, and then come back at the right time for your shoot.
Instagram
4. “When you go to those famous places, talk to the locals. They always give a ton of tips about the city.”
Burak Budak
Image by Burak Budak. Gear: Nikon d7100 camera, Tokina 11-16 dxII lens. Settings: Focal length 11mm; exposure 1/250 sec; f4.5; ISO 200.
What's the story behind this photo?
When I was in Chefchaouen, Morocco, everything was all about the famous blue houses and streets. But when I started to talk with the locals, they told me that there is also an amazing natural waterfall. I rented a car and made the trip with a few friends from my hostel. It was hard to get there, but it was worth it.
Image by Burak Budak.
Pro Tip
When I travel to different countries, I always try to find a local photographer, and, if possible, we travel together in the city. They always know where to go and, of course, where to eat. Before my trips, the first thing I do is check blogs about the city. If you want to find secret places in a big city, you need to know the famous places first. When you go to those famous places, talk to the locals. They always give a ton of tips about the city.
Couchsurfing is another resource I use. I let people in the area know what I'm doing and what I'm looking for, and I ask questions. I find a lot of places that way. The most important thing to remember is that you need to walk a lot. Walking and waiting are key.
Instagram | Twitter | Website
5. “Look for movement, and either freeze it or show it with a slow shutter speed. Your creativity is what will make your photos special.”
Christophe Faugere
Image by Christophe Faugere. Gear: Canon 5D Mark II camera, 16-35mm F2.8 II lens. Settings: Exposure 13 sec; f13; ISO 50 (I used several shots to add car lights).
What's the story behind this photo?
I was walking-running, in fact-between several landmarks at the blue hour when I crossed a street near Saint Isaac's Cathedral in St Petersburg, Russia. The Cathedral was not very close, but the cars passing by had lights on, and the lights of the city matched the sky. I just stopped there and took some shots. This one has quickly become my best-seller.
Image by Christophe Faugere.
Pro Tip
My first tip is to use your feet. Before leaving for a photo trip, I try to do minimal research on Google. I don't want to miss the landmarks because those photos are what I'm going to sell. I'll usually be at those spots for sunset (or sunrise), but, apart from that, I just walk a lot. Walking from one spot to another, slowly, will enable you to find unknown places.
But honestly, nowadays, there are hundreds of thousands of photographers all around the world. It's never as easy as asking the local people to tell you where to find the perfect hidden gem. It's impossible to find a place that has not been shot before, so my second tip would just be to open your eyes. Look up and down. Look for shapes, reflections, and good light. Look for a mood-a rainy day can be great in B&W, for example. Look for movement, and either freeze it or show it with a slow shutter speed. Your creativity is what will make your photos special.
Instagram | Website
6. “Do not follow the crowd. Turn off the tourist route and stroll through the streets.”
badahos
Image by badahos. Gear: Fujifilm X-T20 camera, Fujifilm Fujinon XF 18-55mm f/2.8-4 OIS lens. Settings: Focal length 18mm; exposure 1/140 sec; f4.0; ISO 200..
What's the story behind this photo?
I took this photo in Munich. It had just rained, and people were hiding in restaurants and hotels. A big city after the rain always has a special atmosphere. I decided to walk around the small streets when suddenly, I noticed my lace was untied. I sat down to tie it, and after that, I looked up and saw the reflection of the street in a puddle. I immediately took a few photos. Then using Photoshop, I flipped and edited this photo for a more dramatic effect. You never know where a good shot awaits you.
badahos
badahos
Pictured: [1] badahos [2] badahos
Pro Tip
Always look through Google Maps before your journey. You can see the streets and find interesting places that way. Mark the spots you want to visit and things you want to see. Spend time walking around the city, and don't hurry. Stop and look around; even in the most ordinary places, you can find an interesting shot. After standing for just five minutes in one place, everything can change: the lighting, the weather, and the situation. If you find an interesting place during the day, return there at night and take another photo.
Do not follow the crowd. Turn off the tourist route and stroll through the streets. Small, non-touristic streets are always imbued with local colors, and you can find unexpected moments there. Do not carry a lot of equipment with you. It will draw attention, and you will get tired easily. Enjoy the process!
Instagram | Website
Top Image by DaLiu
The post 6 Secrets for Taking Unique Photos in Tourist Hot Spots appeared first on The Shutterstock Blog.
0 notes
Text
ON1 Announced Photo RAW 2018 Today. And It's Awesome.
ON1 was not kidding about big news today. The veil has been pulled off of ON1 Photo RAW 2018. And it's awesome. ON1 reports the public beta is coming October 6th. The full release is slated for the end of October. What about pricing? I have the details from the press release at the bottom of this post, along with the full list of features.
ON1 has packed a lot into this release. There are big features like panoramic merge and HDR tone mapping. There are welcomed additions like photo versions and Local Adjustment improvements. There are nuanced changes to the user interface for a better editing experience. There are tremendous masking improvements!
ON1 was gracious enough to let me play with a build for the last few. I really wanted to share with you more than just the list of features. I want to share some hands-on first impressions of Photo RAW 2018. So... I'm going to focus on the three features I'm the most excited about.
1. Masking Is Better
Photo RAW 2018 takes its already great masking tools up a notch. The masking improvements alone are worth the upgrade to me. First is the return of old favorites, the Blur and Chisel tools. Long time ON1 users know these tools from the Layers module. Now they are full members of non-destructive workflow in Develop & Effects. What do these tools do? The Chisel Tool shaves pixels at the edges of masks, which is excellent for fine tuning the mask at hard edges. The Blur Tool softens the edge transition of a mask.
What's even better is improved masking controls. Luminosity masks are easier to create now - there is a Lumen button in the masking area of Effects filters and Local Adjustments. The knockout punch are the new slider controls to fine tune masks:
Density: The overall strength of the mask. If you want to mask a complex area at partial strength, do it at 100% with the Perfect Brush. Then, dial back the density.
Feather: Soften the transition of all your masking brush strokes with a single slider.
Levels: Like an old school levels control, but for the mask. You can define what's considered deep shadows, bright highlights, and the transition between them. It's great for fine tuning luminosity masks.
Window: Fine tune the tonal range of a mask by shrinking the tonal "window" the mask effects. This is another control perfect for luminosity masks. If you've been waiting for controls to home in on very specific tonal zones, here ya go.
The Levels and Window sliders give results similar to the blending options - and those still work, too, by the way! I think the Window control makes it easier because you can visualize the adjusted luminosity mask with the mask overlays.
Oh... and if that wasn't enough, filters and local adjustments also now have a color picker so you can quickly generate tone-based masks. I know I will be enjoying these features a lot.
If you have been enjoying my Mastering Light & Shadow In ON1 Photo course, you can bet there will be an update to the course. Once Photo RAW 2018 is released, I plan to add several videos to the course. And yes, the additional videos will be FREE updates to you. In fact, I've already added one bonus video since I released the course.
2. Panoramic Merge
Panoramic merge, Scott? Really? Don't you have this in Lightroom? I do. However, Lightroom isn't the fastest runner on the track. I'm shooting many more panoramas since investing in a leveling base. Previewing a pano quickly saves time. The screen shot here is a 7 panel merge of 36MP frames from an A7R. The preview took about 3 seconds to appear. That lets me quickly decide whether or not to proceed with stitching. After all, stitching together monster panos will take time.
The merge preview offers controls to crop or warp fill the edges (or do nothing). I like the option of sending the resulting merge to Develop or Effects for further processing. You can also use the Add Panoramic Metadata so shared to sites like Facebook let a user pan around the scene.
3. One Photo, Many Versions
I think we all try out various treatments and styles on our photos. Versions make this easier - and it saves space. Versions in ON1 work like virtual copies in Lightroom or Versions in Aperture. In a non-destructive workflow, changes to your photo are tracked as instructions against your original image. When you view a photo in Browse, Photo RAW replays those instructions against your unmodified original photo and displays the results.
Versions allow you to have multiple sets of instructions for the same, single original photo. Creating versions is very fast - you are only copying the settings, not duplicating the original photo. That also means you're not eating up megabytes of disk space with each variation of your photo. As a photo educator, I find this especially useful. When teaching in workshops and private lessons, it is much easier to play "what-if" games and explore ideas with a minimal impact to workflow.
So again, the beta is coming October 6th. I encourage you to try it out.
Excerpts from the press release:
New Features & Improvements in ON1 Photo RAW 2018
ON1 HDR – Create stunning HDR photos that merge all tonality from a bracket of photos in a fraction of the time (test results have shown up to seven times faster than other HDR apps). Automatically aligns photos and removes ghosting from motion between exposures. Includes full non-destructive editing with natural results and can be turned up to 11 for a surreal look.
Pano Stitching – Combine multiple photos into a single panoramic or matrix photo. Automatically aligns photos, even if they are not shot on a tripod, and blends them together seamlessly. An option to embed panoramic metadata for Facebook panning is also available.
Global Mask Editing Tools – These include new mask Density and Feather sliders to allow for changing the density or opacity of masks as well as blur masks for softening.
Luminosity Mask Updates – Adjust the levels of a mask to increase the contrast or brightness as well as set a tonal window to only affect a certain zone. These updates allow users to target just the area they want, based on the photo.
Color Range Masks – Create a mask from a color range selection.
Blur and Chisel Mask Tools – In ON1 Effects, the Blur and Chisel mask tools are now included. The blur tool is perfect for softening or feathering a mask selectively. The Chisel tool lets the user push or pull the edge selectively, to remove halos. All of these new masking options are re-editable and non- destructive.
Versions — Versions are virtual copies of the same photo. Each version created can include non-destructive settings, including crop, retouching and adjustments. Versions work just like any other photo without taking up more space on your computer.
Updated UI — Clean and modern UI where your photo is the center of attention. Custom name filters and layers to easier keep track of work. Also select your own UI accent color.
Paint with Color Brush — Painting with color can be a solid color, perfect for skin smoothing and making annotation layers, or paint with just the color and leave the underlying luminosity in place to change the color of objects like eyes.
Selectively Add or Remove Noise — Brush away noise in areas like skies or add noise for an artistic effect.
ON1 Photo for Mobile — Take the best shots with you on the go with the free ON1 Photo for Mobile app. It’s a great way to share portfolios. It can also sync new photos taken on phones back to the desktop so those photos are ready for editing.
Additional Camera & Lens Support — Added support for the Nikon D850, Olympus EM-10 III and Panasonic DMC-G85, plus a ton of new lenses.
Pricing & Availability
ON1 Photo RAW 2018 will be available for download as a free public beta on October 6th from the ON1 website. Previous owners of any ON1 app (or ON1 plug-in) can upgrade for just $79.99, regularly $99.99. Those who don’t own an ON1 app can pre-order for $119.99.
For a limited time, ON1 Photo RAW 2018 is bundled with some excellent bonus materials which will include: Three ON1 Photo RAW 2018 Courses by Product Director Dan Harlacher, and all of their 2017 and 2018 Loyalty Rewards. A single purchase of ON1 Photo RAW 2018 works with both Mac and Windows and includes activation on up to five computers. The full release of ON1 Photo RAW 2018 is currently scheduled for the end of October. ON1 will also be releasing another update to the previous version, ON1 Photo RAW 2017, later this year. This update will include support for new cameras, lenses, and bug fixes.
0 notes
Text
Here is a collection of pictures and comments from Science Teacher members of the NSTA (National Science Teachers Association) who viewed the August 21st total solar eclipse from different locations across the United States of America. The State where the picture(s) was/were taken is abbreviated to be part of the picture name – so you could scroll down to the bottom of the picture to see that.
The caption below a picture starts the sequence of pictures from each teacher. Clicking on any picture will open it into a slide show where you can move forward or backward through the various pictures.
From Ryan Westberry: Here’s a video I made after watching the totality in Wyoming at Green River Lakes just off the center line. I sent my drone up really high to capture the landscape while also filming our reactions on the surface- and set it all to music.
I did edit the language in the beginning of totality (overcome by that moment) but there are some “Oh S^*t” toward the end that need to be known if anyone plans on showing it. (I’m not promoting that.) I’m just wanting to share in the emotion (I was literally shaking and had tears of joy) and magnitude of watching the event and the love of the science. 🙂
Here is one of the 360o videos I made while the school yard was filling up with families and the students.
If you are wondering what do with any eclipse glasses perhaps donate them to the Eclipse Glasses Donation Program – organized by Astronomers Without Borders.
#gallery-0-5 { margin: auto; } #gallery-0-5 .gallery-item { float: left; margin-top: 10px; text-align: center; width: 25%; } #gallery-0-5 img { border: 2px solid #cfcfcf; } #gallery-0-5 .gallery-caption { margin-left: 0; } /* see gallery_shortcode() in wp-includes/media.php */
Missouri: Briarcliff Elementary School students.
Missouri: Waiting patiently for the start.
Missouri: Briarcliff students getting ready
Wyoming: Drove out with my sister to Grand Island, NE from Wisconsin. I was concerned about cloud cover in Nebraska, so we got up at 4am on the morning 21st to drive for clear skies further west. Ended up in Fort Laramie, WY with beautiful weather. I know that my pictures aren’t nearly as neat or crisp as others, but this was my experience with this rare event. Took the eclipse image through the lens of my solar scope, along with another shot with my sister. On a side note, sure, the eclipse was pretty neat, but what affected me more was knowing that nearly everyone on the road during those couple days were there for the eclipse. It was this thought that made wading through traffic on the way back much easier for me. Being out it Wyoming, on the long windy and rolling hills, cars like ants crawling through the distance, I couldn’t help but think of myself as part of a convoy, similar to the Oregon Trail. Yet, instead of wagons, it was SUVs coming all the way from New York to Manitoba. I know I’m sounding a little poetic here, but this impacted me more than the eclipse itself.
Wyoming:
Wyoming: I drove 6,000 miles in total, from CT to Wyoming to see the eclipse in Jackson Hole with another teacher friend who flew from CT (I also went to a number of parks and monuments… a wonderful trip in total). But the highlight was totality. My friend brought two solar telescopes with her and we were able to see the details of the entire eclipse, complete with sun spots. As it neared totality, the birds all started calling and flying madly, then settled down and became silent as though it were night. A cat came walking out in the street, clearly unnerved — its tail was all puffed up and it kept looking around as if very confused and worried. And it got quite chilly. Jackson is at about 8,000′ and I had to go get a jacket — I’d say the temperature dropped at least 25 degrees. Altogether, stunning. So glad I made the trip.
Texas: South Texas only had a 50% version of the eclipse. We took a couple of Sunspotters out in front of our main office along with a handful of the glasses and some punched tag board. Our sky cleared up only a few minutes before the maximum coverage–it rained briefly at the beginning of the eclipse event and you can see the clouds in one of the views attached. While I really enjoyed seeing the eclipse through various viewers, what was really cool was our finance and other non-science staff who stopped by as they came back from lunch and looked at the image on the Sunspotters and took selfies or got us to take pictures of them with the images. Observing the staff go from nonchalant to kids again was great!
Texas:
Texas:
Texas:
Texas: Much better images than mine, but we only had 61% where I am. I did especially enjoy the tree shadows.
Texas:
South Carolina: We were on a boat in the middle of Charleston Harbor, anchored off of a small island that is a bird sanctuary. As soon as totality hit, all of the birds took off at once. It was very cloudy so it didn’t get as dark as we expected…reflection? We could see the “sunset” all around. I’m already making plans for 2024!
South Carolina: Thanks for starting this topic and for all the great images from people’s experiences! I drove to SC from NH to explore data collection in light intensity and temperature readings on land cover with small sensors that the teachers have been using on classroom phenomenon. We set up a cross the totality path with people willing to carry along the same sensors set at the same timing. Weather was especially helpful, adding tension by sending in one fat cloud that the sun escaped just at the last minute before the total event! I use an old digital camera that posts the date and time on the image and the picture below verified how close we came to missing the “main event”. Total started at 2:41. While these photos are not classic, thinking about evidence and alignment with data their importance to alignment with the data capture was essential. I felt connected to those watching but also to those who carried along the data loggers and shared the further project. Will take me some time to explore them and share with the teachers and sites in partial locations also using the same loggers.
South Carolina:
Oregon: I was lucky to have a sister in Oregon who arranged for us to stay with friends in Sisters, Oregon, just at the edge of being able to see the totality. My spouse and adult daughter came with me, happily. Surprisingly the traffic was very light, and thanks to firefighters there was very little smoke in the air. Plans were in place with glasses, colander, and champagne. Using the glasses (thank you NASA) we saw the totality, less than 1 minute, noted the change in light, birds quieting and temperature dropping. Knowing that the “cosmic coincidence” of Sun and Moon sizes and distance from the Earth makes our planet the only one in our solar system that experiences a total solar eclipse and seeing it in a community of science-interested people made it even more special. (We also saw new-to-me birds: White-headed woodpeckers, Mountain chickadee, Pygmy nuthatch.) On the NSTA Early Years blog, a preschool teacher posted about the preparation her class went through, their experience, and the follow-up questions they are investigating. http://nstacommunities.org/blog/2017/08/30/eclipse-report-from-preschool/
Oregon:
Oregon:
Oregon: Jordan Makower
Oregon:
New Jersey: We took the first picture the night before the eclipse over the Barnegat Bay in NJ. The second pic is from the beach with an iPhone in Lavallette, NJ
New Jersey:
Nebraska: This was my first eclipse as well. We had about 2 1/2 minutes in the heart of Nebraska’s beautiful Sand Hills just north of where I live. I did not attempt to photograph it…I left that to professionals. I couldn’t, however, resist taking this panoramic image during totality and managed to catch my daughter’s silhouette. It was partly cloudy that day as you can tell in the photo, but our view of the eclipse was completely clear during totality. It was an amazing experience. Absolutely breathtaking and beautiful!
Missouri: My viewing location was with 350 elementary school kiddos, staff, and parents. We had 80 seconds of totality but clouds covered the sky during totality with a few breaks giving everyone a chance to cheer but not for long. Rain started a few minutes later so from where I was we saw the first half only. My 4th total eclipse and still blown away.
Missouri: Sunspots!
Missouri: That’s the star Regulus in Leo the Lion to the left.
Louisiana: Taken in New Iberia, Louisiana by one of my students. We had a 73% eclipse. 🙂
Kentucky: It is also great for making projections on t-shirts. Family tradition since 1994.
Kentucky: I was in Hopkinsville, KY with the 2 minutes 40 seconds. This is my second total eclipse. I also have 2 annual too. I projected the image from my old astroscan on a piece of foam core board. Great little telescope. The crowd got to see the sunspots.
Kentucky: I was in Dawson Springs, KY where totality was 2 minutes 32 seconds. This was my first total eclipse, and it was an amazing experience. Here are the photos. My two pictures of totality were not the best because I did not want to take the time to change the settings on my camera. One question: at the start and end of totality, I heard a sound similar to thunder or fireworks. Any idea what that was?
Kentucky:
Kentucky:
Kentucky: Great pictures from Hopkinsville, Kentukcy. The traffic was a nightmare from Hopkinsville to Cincinnati. Enjoy!
Kentucky:
Missouri: I was about 30 miles east and few miles south of you. The clouds cleared just in time. It was beautiful. One thing that really surprised me was how much light there was when the sun was almost totally eclipsed. Before totality, when there was just a small sliver of the sun visible, it was still pretty light. It was not until totality that is got “dark”. I assumed it was going to gradually get darker and darker leading up to totality. It did not work that way. Those of us that saw totality are likely making plans for the next one in the U.S. in 2024. Those that did not see totality really need to try to see it once. It is amazing and indescribable.
Illinois: We had teacher’s institute on Monday (students didn’t start til Wednesday). I convinced our principal to do an activity in the afternoon and we went outside as a staff. We are 180 miles north of Carbondale and experienced 90% coverage. I had eclipse glasses and pinhole viewers available, along with a telescope with solar filter. I also equiped our staff with UV bead braclets to observe changes in UV exposure. We were also able to experience the eclipse shadows caused by the light filtering through the trees. We had a blast and even got coverage in the local paper. The neatest part was seeing our staff really get into it. I’ll attach photos, but if you can’t get them they can also be viewed via our twitter account GRS_Science My brother was in Nashville and got to experience totality. He sent me photos a co-worker of his took and I was able to share those with my classes on Wednesday. I also had a few students that were able experience it first hand. My 3rd partial solar eclipse…never gets old!
Illinois:
Illinois:
Illinois:
Illinois:
Idaho: My daughter got a nice panorama of the 360° sunset. Photo by Kiana Duggan-Haas.
Idaho: I watched from a ridgetop just outside of Victor, Idaho with the Tetons in the background, at the Pine Creek Campground. Here’s a Google Street View Panorama of us and our site, taken before totality. I was with my two daughters (13 & 16) a couple of high school friends and their families, my cousin and her family, and another family who is friends with one of my high school buds and a few friends and family of these folks. Also on our ridgetop were another 15 or so people, including three planetary scientists from the USGS, a cinematographer and some others. Below are a few pics from our group. Our temperature change was substantial, though we didn’t have thermometers. I’d guess there was a swing of 20° F. We were at something like 8,000 feet in elevation. Totality was chilly, but brief. One thing that didn’t photograph well and I’ve not seen mentioned above are the shadow bands. They look something like the bands on the bottom of a pool on a sunny day and are caused by diffraction of the sun’s light when it’s just a sliver – immediately before and after totality. We’d laid down a white sheet to see them, and they were definitely there, I think wavering more quickly than the bands on the bottom of a pool. They were also pretty faint. I’ll note that the difference between totality and 98% of totality is quite impressive. I heard someone compare the difference to the difference between going 98% of the way to Disneyland vs. actually going to Disneyland. I’m not a Disney guy, so my analogy is that it’s like comparing getting 98% of the way to a climax to actually getting to a climax (you know, of your favorite book or whatever). The plans for this trip had been in the works since my first total solar eclipse viewed from the southern tip of Mexico’s Baja Peninsula in 1991. More about that trip here (it’s my contribution to the My Earth Educator Story Project). One of the friends I saw that with was one of the high school friends who was with us this time – in fact, he was the lead organizer. I anxiously await my third eclipse when totality passes over my house on April 8, 2024. (Though April in Buffalo offers nothing like a guarantee of clear skies).
Idaho: I was at the base of Borah Pk, tallest mountain in Idaho near MacKay. We had an incredible total eclipse with clear skies. The temperature dropped 10 degrees, the birds were quiet and not flying. I was with a few friends but there was reported about 1000 people who started climbing Borah Peak around midnight! Attached are a few of my husband’s pictures.
Idaho:
Idaho: This is what it looked like, more or less, to my naked eye. Photo by Andy Frank.
Idaho: My first eclipse. We had a total of 2 minutes 2 seconds in Garden Valley Schools, Garden Valley, Idaho, Couldn’t have asked for a more beautiful day. We also had Dr. Joe Llama from the Lowell Observatory in Flagstaff talking us through what we were about to see. This is the one and only picture I took. It was amazing.
Georgia: Here is the temperature data recorded at a high school about 20 minutes north of Athens, GA We were at 99.7% totality.
Click here to go to the Qué tal in the Current Skies web site for monthly observing information, or here to return to bobs-spaces.
Teacher Eclipse Pictures Here is a collection of pictures and comments from Science Teacher members of the NSTA (National Science Teachers Association)
#astronomy#astrophotography#jupiter#leo the lion#mars#Mercury#moon#national science teachers association#nsta#observing#orbit around the sun#planets#Regulus#science#solar eclipse
0 notes
Text
With “Icons,” Legion M Is Creating Pop-Culture Time Capsules And Pushing VR's Limits: A tangle of cables slithers from a monitoring station in the garage of a house atop Hollywood's Sunset Strip, up a narrow staircase brimming with artifacts and tchotchkes from an adventured life, and into a room overtaken by stereoscopic cameras, ambisonic sound equipment, and GoPro arrays. The focus of all this technology: 94-year-old comic legend Stan Lee—co-creator of the Marvel Universe including Spider-Man, The X Men, and Iron Man, among numerous others—and his interviewer, director, and professional fanboy Kevin Smith, discussing Lee's life, career, and marriage in an intimate setting at Lee's home. Kevin Smith and Stan Lee[Photos: Adam Kent, courtesy of Legion M] It's the first step in a journey of firsts. The inaugural shoot of Icons: Face to Face, the first project from Legion M, the first that raises money through equity crowdfunding and gives contributors creative input and profit sharing. It's also the first use of a new configuration of virtual reality technology that captures its subjects at a fidelity never before used in VR. In fact, no VR headgear—or movie projector display for that matter—exists yet to play back the footage in its fullest level of detail. But it's likely to in the future, which is the point of this project. “We had an idea for an intimate interview with iconic people from today's pop culture and entertainment, maybe doing new Icons every month,” says Legion M cofounder and president Jeff Annison. “But we want it to be able to stand the test of time, not just culturally, but technologically, to survive as a historical record. Most VR footage today is disposable. We wanted something that could keep up with advancements in state of the art.” Their vision required hurdling two crucial technical challenges: placing the camera closer to its subjects than previously attempted in VR without optical distortion or destroying the three-dimensional perception, and recording at a resolution that abuts the edge of human perception. “This is a pioneering effort in VR,” says Annison. While high-profile individuals have been interviewed in this format in the past, “no one has shot them as close and in the resolution as we have.” Launched last March, Legion M opened its doors to non-accredited investors last summer, subsequently raising $1.2 million, part of which has gone toward stakes in such projects as the upcoming films Colossal (releasing April 7) and The Field Guide to Evil, and the digital TV series Pitch Elevator. It recently opened a second investing round that will allow it to raise up to $50 million (you can buy stock here). The Icons pilot is Legion's first solely produced endeavor, though the company hopes to find producing partners for a subsequent series. Kevin Smith[Photos: Adam Kent, courtesy of Legion M] Idea-Driven Technology The Icons experiment was a case of an interview driving the technology. The idea began germinating last summer when Legion M's Annison, cofounder/CEO Paul Scanlan, content acquisition head Terri Lubaroff, and content development head David Baxter began talking to VR companies about creating a more intimate viewing experience than had previously been done—enabling viewers to feel as though they were sitting with prominent individuals as they talked about their lives, dreams, regrets, what drives them, and visions for the future—and ensuring the footage's adaptability to future display methods. But it didn't begin to coalesce until they found a prominent individual who didn't mind being a guinea pig in a grand technological experiment. “We had this idea of trying to put you in the room with these legendary icons. And we got Stan on board—miraculously,” says Annison. “We pitched him this idea, and he really liked our model of a company owned by fans instead of a corporate conglomerate. In fact he said, ‘It's such a good idea, I wish I'd thought of it myself!'” Lee, in turn, chose Smith to interview him. “That was part of our idea for the series,” says Annison. “We wanted our interviewees to be completely at ease and open up. That's why we did it at his house instead of a studio. Kevin has interviewed Stan probably a dozen times. He knew Stan, which questions to ask, and which had never been asked.” Ones that could meaningfully meander from Lee's childhood in 1920s and '30s New York, to creating Marvel comics, to his 70-year marriage, with his wife, Joanie, fielding questions as well. Lee's age further pressed the need for a record that could adapt well to evolving display technology. “It was daunting. This was a once-in-a-lifetime opportunity to get Stan at his house,” Annison adds. “We wanted to give people a hundred years from now the opportunity to sit down and spend an hour with him. That drove us to new technology, to do something that's never been done before.” The Legion M team spent the fall surveying state-of-the-art systems and opting for a 360-degree capture approach after educating themselves on types of VR. It found a technology partner in VR Playhouse, a Los Angeles boutique studio founded by Ian Forester specializing in VR, AR, and 360-degree production. It experimented for three months before arriving at a solution for a late January shoot. Kevin Smith and Stan Lee[Photos: Adam Kent, courtesy of Legion M] Pushing the VR Boundaries The two main challenges were getting the camera close enough to the subjects to “feel” like real life, and capture that experience at fidelity that could stand the test of time. That starts with resolution, but you also need to consider things like frame rate, color depth, and dynamic range. Camera proximity. Most professional-grade 360-degree VR videos use the Jaunt One or Google Odyssey, the latter a stereoscopic panoramic capture array of 16 GoPro cameras positioned 6 to 10 feet from the subject. Forester's team rigged a camera system that shot from 2.5 feet away. Moving the camera had more to do with the aesthetic than longevity. Shooting from 10 feet “is not an intimate conversation with Stan; that's Stan standing up and lecturing you,” says Annison. “VR Playhouse had to experiment to determine how close we could get before the optical distortion went crazy, the lenses couldn't handle it, the 3D broke down, or it didn't allow us to capture the full 360. There's a lot of science that goes into it. And it gets more complicated when you're filming it in stereo.” Resolution. In VR, visual resolution is measured by the number of pixels per degree of viewing angle. Most VR headsets display 8-12. But Legion M was gunning for the edge of human perception—the point beyond which the human eye can no longer distinguish further clarity—which is 75 pixels per degree. VR Playhouse got it up to 72. By capturing at that resolution, the footage should remain sharp as display technology improves. And if displays eventually exceed that resolution, it won't matter because the human eye can't perceive it (at least until robotic implants are invented.) “When you put on your VR headsets [today], it's like being immersed in 1994 television. It's not that sharp,” says Annison. “You can see compression artifacts (media distortion) and pixilation. It's like that because of bottlenecks in displays, computer processing, file sizes, streaming, etc. But VR is in its infancy. All of these technological bottlenecks are going to go away in 5 to 10 years. We wanted to make sure that what we captured was completely future-proofed.” The data captured for the Icons pilot is over 1,700 times bigger than an HDTV file. So, while it can be viewed in less detail in 2D and on different platforms, “there isn't a TV, headset, or movie projector that exists today that can display it in the full resolution that we got,” says Annison. The Solution. VR Playhouse recombined off-the-shelf components, experimenting with different camera and lens combinations before getting the desired effect with two 8K RED Digital cameras and ARRI Zeiss 8mm Ultra Prime rectilinear lenses for each eye. The depth of field was so shallow that the subjects' arm movements had to confine to a very narrow area. “It was a real challenge to find cameras,” says Annison. “8K cameras are around, but 8K that can handle 60 frames per second had only been out for a couple months. We had to call every camera rental place in town! When we got them–one of them only had three hours of use prior to us.” After the live shoot concluded, the crew rotated the RED cameras to capture the rest of the room, to subsequently composite for a 360-degree effect. (They used an Odyssey concurrently for reference footage and comparison.) The producers are finding their way creatively as well, exploring more of a sweeping narrative arc about their subjects' overall lives than honing in on most notable aspects, as traditional interviews might. “We want something to stand the test of time–it's just a different lens than people are used to today,” says Annison. “We asked our shareholders, ‘If you could step back in time to interview William Shakespeare, what would you want to ask him?' and used a lot of their questions. We don't just have Stan talking about his days at Marvel creating Spider-Man, we also have him talking about the day he met the love of his life, how he narrowly avoided going to the front lines in World War II, and telling us about the worst day of his life, and how he got through it.” Stan Lee[Photos: Adam Kent, courtesy of Legion M] Next Steps Legion M hopes to find producing partners to do more Icons interviews, given the expense. Even though VR Playhouse provided below-market rates, and some the 25 crew members volunteered, the 12-hour shoot still cost $40,000 with post-production expected to run upwards of $120,000. So far, Pacific Rim and Pan's Labyrinth director Guillermo del Toro has agreed to do an episode, and the company has routes to Stephen Hawking and Barack Obama. “Once we've seen the results with Stan, what worked and what didn't, we'll be better able to talk,” says Annison. “But our goal is to find partners go to the next level, because we're a relatively small company.” Ultimately, Legion M and VR Playhouse envision a valuable library of interviews that can exist on current VR and traditional platforms, but keep pace as projection methods advance. “Part of what's compelling us to do this is that we have so many icons who are leaving,” says Scanlan. “2016 was a traumatic year. We lost a lot of celebrities and icons we didn't expect to lose, and we want to capture these moments as soon as possible to have these lasting memories.” http://bit.ly/2oalQW3
0 notes
Last Seen Blogs

insertdomain
insertDomain

minimemes
MiniMemes

ladyboytoday-blog
Untitled

mercury-cats
Killer Queen

bugcollect
BUG