#i feel like i should have a cm meta tag but i feel like its too fucking late
Note
I would love to hear your thoughts about Hotch and fire because I never really noticed it but when you point it out it does stand out as something he gets VERY affected by very quickly
its not the most obvious pattern, which is par for the course when it comes to anything relating to hotch’s past. but i think its sooo interesting that hotch seems to be on edge/more emotional when they deal with cases involving fire. in ashes and dust he seems particularly moved talking to the burn victim and insists on being the one to speak to her; in house on fire he averts his eyes from the burnt corpses and has a shorter temper; in devil’s night he’s antsy the whole case and makes brash decisions (like running into a burning building???)

its subtle changes, so subtle that im not entirely convinced im not just hallucinating it all, but it seems like there’s something there. especially during the final confrontation with the unsubs in each of those episodes: the steel-faced hotch is gone, and he seems incapable of hiding his fear. in devil’s night he has a hard time looking away from the unsub’s lighter; in house on fire he keeps glancing down at the spilled gasoline. if it was anyone else i wouldnt pay any mind, but hotch is known for staring down death (like with foyet). he’s.. uncharacteristically emotional

i feel like something must have happened. even gideon—who has better insight on hotch’s past than anyone—seems concerned when hotch volunteers to go to the burn ward or gets distracted looking at a child’s burnt shoe on the ground. the way hotch lingers on the picture of the mother with her son… something mustve happened in the past for him to take this so personally

im not sure what it is. again, we dont really know anything about hotch’s background (and what we do know is frequently contradicted a couple seasons later—like the way his father died) so its not like we have a lot to work with. simply because of his interaction with charlotte cutler, i think it might have something to do with his mom? we dont know anything about her outside other than her attending mary baldwin. there are just so many unknown variables and oddly intimate moments of connection he has with various abused-sons throughout the seasons

was he in a fire growing up? was his mother? maybe his mom was inside and he stood helpless on the outside, unable to save her? was it an arsonist? was it his father? or was it his mother herself—tired of her life and trying to tear it all down with her? was it all just a horrible accident? was it before or after his father’s death? was his mom dying the final push for hotch to stand up to his father?
there are just… so many questions. so many possibilities. but, whatever happened, hotch is definitely afraid of fire.
#r there too many links? i wanted to cite my sources lol#asks#aaron hotchner#i feel like i should have a cm meta tag but i feel like its too fucking late#anyway.#my personal fav potential backstory is his mom going crazy#full on wander the halls; yellow wallpaper; haunting of hill house crazy lady long white dress mom shit#and--wanting to spare her sons from suffering any further--sets the house ablaze; not realizing no one else is inside#(or maybe baby sean is inside and he's the only hotch can get out?)#if it happened before his dad's death then i think this moment drove hotch to finally kill him#if it happened after his dad's death.. it means his mom is Way Crazier than we thought#and i think it'd be fun if it was shortly after hotch started going through puberty#so he's getting taller and he's starting to look more like his father#and his mom (unable to come to terms with her husband's death--unable to come to terms w her son killing her husband) rejects that reality#she gets confused and think aaron is the one who died. and when aaron tries to approach her she recoils as tho he was his father#he gets Freaked the Fuck Out by that#then goes to get groceries or some shit and when he comes back the house is in flames#smth like that#very emo very wattpad#but its MY headcanon i can be cringe if i want
126 notes
·
View notes
Text
v3′s art is comically terrible for a professionally distributed game in a series: a compilation
in this not-essay I will list all of the mistakes and problems I have spotted in v3′s art. don’t worry, it’s entirely for fun and I’m doing this on a whim, so please feel free to not take this seriously but also it’s hilarious and embarrassing how ridiculous this is like what happened did they speedrun the whole production or what
see, there are some things you can take as meta like “they made it bad on purpose to allude to the downfall of tv shows that have been on air for much too long” but I have a very strong feeling this is not the case due to the nature of some of these errors
disclaimer, the more I study this art, the more I fear that the artists were underpaid and underslept, so if this is in fact the case, I am so sorry to all of them but also I’m going to make fun of the art anyway
anyway let’s get started!

if you study this image for longer than 5 seconds, you will see that kaede is the only one fully shaded and keebo is literally just his normal sprite pasted into the image. every other character is just an ordinary ref, hence most of them facing the exact same direction with neutral expressions on their faces. it looks like a bad edit, and is probably one of the worst pieces of art in the game. it kind of gets better from here on, but my roasting will not.
with that out of the way, here’s the problem that officially bothers me the most and clarifies my viewpoint of “this is not meta and an actual lack of company communication”

this freaking cg, which seems normal at a glance, but some wiseass was like “oh, kaede is a girl, so obviously she’s going to be shorter than the Male Protagonist™” ah, that’s funny. because if you look at the character bios, kaede is, in fact, one inch taller than shuichi and not like 6 inches shorter as she is shown here.
also shuichi’s shoulder is disproportionate and horrendous and he looks vaguely like a jojo character, but I wasn’t even thinking about that until right now.
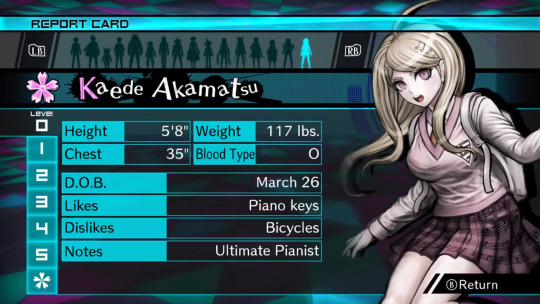
thanks guys, 50% of the fandom who has never bothered to check these bios thinks that kaede is like 5′3 (did the developers really put so little thought into her to the point where drawing her correctly in the game didn’t even matter??)
also I would like to point out that, even though this isn’t related to the art itself, yes, a character kaede’s size being only 117 lbs is unfeasible, but this applies to literally every character in danganronpa ever and it’s not new news that it’s unrealistic
update: someone in the tags informed me that in versions of the game that use centimeters, like the japanese version, kaede is actually shorter than shuichi, which just adds another thing to the list of weird decisions the localization team made for no reason. that said, after confirming this, kaede is 167 cm in the original, while shuichi is 171 cm, which are approximately 5′6 and 5′7 respectively, but one inch is still nowhere near as drastic as it is depicted above. (in spite of this, I would rather depict kaede as slightly taller, so I’m probably going to keep doing that.)
the journey continues!


bro if you want kaede to have shoulder length hair then stick to it to begin with

you can pretend this is at an angle all you want but they definitely committed the shorter kaede sin a second time
wait a goddamn second.

DO YOU SEE THIS
no………… it wasn’t kaede who shrank. it was shuichi who got taller

speaking of which, can we talk about how shady the perspective is in this elevator pic? look at shuichi and kokichi in comparison to kaede. kokichi, who is canonically 7 inches (edit: or 5, if you’re loyal to the original) shorter than kaede, looks taller than kaede. he’s growing too. what steroids are these gays taking

running into the room, electric boogaloo: I don’t think tsumugi is supposed to be the same height as kokichi

gonta… gonta you’re lookin a bit like a jojo character there

I love how kaito’s head looks kind of like it was pasted onto his body. why is he the same size as shuichi? shouldn’t he be high school bully size or something? his torso is teensy

ah yes, white angie.

I love this cg but why is shuichi’s right hand so much bigger than his left hand

I also love how this cg looks like they literally took pictures of trees and pasted them into the background, especially on the left. the shadows are so weird, especially closer to the ceiling, it’s difficult for me to believe they didn’t do exactly that.

return of Enlarged shuichi

puberty update: kokichi is now taller than shuichi in spite of shuichi never missing leg day. what crimes will he commit

I have to mention it, guys. this has to be one of the worst danganronpa cgs. kokichi’s facial proportions look atrocious. look at the way his face sticks out like his jaw is in the wrong place. his scarf is a pasted texture. that’s it. this moment was so iconic but the cg just looks so… so… off. like something is terribly wrong, but you can’t put your finger on it.
you know what? let’s get into that ‘pasted texture’ thing.

let’s imagine you’re an artist working on a professional game. you’re assigned to draw cgs of kokichi ouma, who has a checkered scarf from hell. sure, it will be terrible to draw, but you only have to draw it once at a time! plus, perspective is pretty important, right? can you be bothered? nah, actually. let’s just copy paste a checkered pattern into the cg, because I’m sure nobody will notice. it’ll blend right in with the other cgs that someone actually put effort into drawing his scarf in, right?


no. the answer is no and I very much noticed. this genuinely looks terrible and I would understand taking a shortcut like that in fanart or even an indie game but this is a full price pc and console distributed game
(an addition: look at kokichi’s TINY HANDS in that last one)

meanwhile, they straight up forgot to color in kokichi’s scarf in this cg.

dude. I forgot about whatever the hell this cg was. anyway look at keebo please just look at him

lovin kaito’s baby arms
real talk, maybe you could argue that he’s missing muscle because he’s deathly sick, but most of his cgs don’t line up with this, and his arms just look disproportionate to his torso size (granted this is a consistent problem across all danganronpa games and a lot of characters have this weird problem, like hajime, but also kaito is bigger than hajime so I kind of have higher expectations of him) maybe it’s his stupid goatee and the way he reminds me of yasuhiro?? it creates this illusion that he’s older than he is and so I keep expecting him to look more like an adult
oh, also rantaro is missing some of his accessories in that video he made–you know the one–but I don’t wanna go back and screenshot it
also you may have noticed that I’m skipping all of the monokub cgs because I literally do not care about them and I’m not even bothering to check and see if they have artistic mistakes in them

JIMMY NEUTRON???

hey um uh kaito you seem to be missing your neck


hey guys do you like my pregame fanart
so, that done, the sprites are also pretty terrible at times. they’re not as interesting to go through, however, and downloading the full sprite sets for every character and studying every single one of them will drive me insane, so I’ll just sum some of the ones I noticed up. I made things for kaede and shuichi before deciding I wasn’t going to get into it, so here are these.


that said, other mistakes include kokichi missing his purple highlights in all of the sprites encompassing a specific pose, stray pixels all over the place on everyone, and everyone also has heavily inconsistent shading, but literally all I think about is how pregame shuichi is unshaded and two of kaede’s pregame sprites have glaring outfit change mistakes in them
anyway, thank you for taking the time to read my ridiculous ramble. in all seriousness, there’s this looming presence of some lack of communication in the development team, like with all the art and design inconsistencies, pieces and sprites that look rushed, stray pixels, and missing basic proportional stuff. these are the kinds of things that you supposedly have to pretty much have in the bag in order to get jobs in professional businesses, so it’s really weird to me that this game suffers from so many of these problems. it’s like they tried to make the art so much more crisp than the other games, but it fell on its face as they realized it was going to take longer to draw everything and they started to rush. it’s weird, because the coloring itself looks normal–it’s just sloppily drawn, and the proportions are a mess once put into the context of perspective. many of the cgs look like they were drawn by different people, and I’m still not over the fact that half of kokichi’s cgs have his scarf pasted in as a texture.
the moral of the story is that if you’re selling a game at full price that also happens to be in a series that has had 3 very good games in it already the stakes should probably be higher than this. v3 has been out for more than 3 years and it’s still $40 (did it cost more than that before? I sure hope not), and the overarching quality of the game is just not as high as the other games. I’m not saying that the other games don’t have any problems with their art at all, they’re just not as glaringly obvious and every artistic choice in those games feels intentional.
regardless, I had a blast roasting the art at 2am, so maybe you got a kick out of all this chaos.
#god I keep telling myself I'm gonna stop rambling about v3#v3 spoilers#drv3 spoilers#ndrv3#random stuff#but making this… it sounded so fun#danganronpa
658 notes
·
View notes
Text
TubeBuddy review (tubebuddy for youtube)

What is TubeBuddy:
If you want to make money on YouTube, then you’ve to treat your channel like a business. You’ve to commit to the growth of your channel’s views and subscribers. For achieving the same, Chrome extensions such as TubeBuddy can be quite handy.
Touting themselves as a “video optimization and management toolkit”, TubeBuddy promises to streamline your YouTube journey.
TubeBuddy Pricing:
TubBuddy offers unrestricted usage of its mobile app only to paying users. Here are details of its three tiers:

sign up TubeBuddy today for 100% free click here
1) “Pro” plan costs $9 per month, and the company offers a 50% discount to channels with less than 1000 subscribers.
· 2) “Star” plan is priced at $19 per month and comes with advanced scheduling, monetization, and productivity tools besides the Pro tools.
· 3) The “Legend” plan — priced at $49 per month — is the highest tier and comes with the full suite of features TubeBuddy has to offer. You can A/B test your videos, perform competitor analysis, track your search ranks, and more.
If you want to manage more than 20 channels, then the company also offers enterprise plans.
TubeBuddy knowladge base:
For many of their features, TubeBuddy has done a great job at giving an overview, demonstrating their functioning in a “how-to” video, and sharing a few other tips.
But some features, like “Tag Rankings” in the screenshot below, don’t have such a tutorial. But they present a YouTube search query link (with “Click here” as the anchor text) for you to find tutorials by TubeBuddy customers.
TubeBuddy Top Tools:
Once you’ve installed TubeBuddy on Chrome (or your browser) and allowed it to gather your channel’s data, you’ll be able to access its top functionalities. The product offers numerous YouTube tools for video SEO, promotion, data & research, bulk processing, and productivity. But I’m only touching on a few of the best ones below:
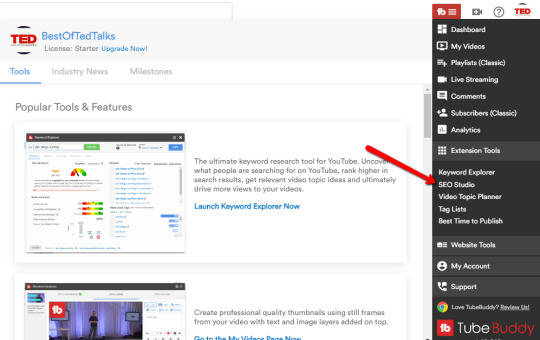
Keyword Explorer
YouTube is a top search engine people rely on for finding information and solutions to their problems. If you can find the keywords worth targeting for your channel (dependent on its size and authority), you can rank in YouTube search and drive evergreen video views.

The “keyword explorer” is a handy tool in the Tag Explorer in the main TubeBuddy menu. You can plug a keyword and get an Overall Score specific to your channel (Weighted) and a general one based on the search volume as well as competition for the keyword (Unweighted). Here’s the analysis for the keyword “harry potter"
Suggested Tags
The next bit of video SEO features I like on TubeBuddy is its Recommended Tags. You’ll find this feature in the video edit screen of your channel (the “Video details” section) when you’re preparing it for publishing. Based on the tags you choose for your video, this tool will suggest related tags. Look at the feature in action for a short film I published on my YouTube channel.

As visible, you can sort the mammoth number of tags by relevance, keyword score, or search traffic. Feel free to explore tags by sorting through all of these parameters, but use only the most relevant ones in your video. Because if you don’t match the user intent for a search query, your watch time and rankings will tank anyway.
Video A/B Tests
While you can’t test the actual content of your video, TubeBuddy makes it possible to test its packaging — your thumbnail, title, tags, and meta description. In the fierce competition on the video platform, such A/B tests could prove useful in driving more clicks, more views, and helping your search rankings.
If you’re unsure of which videos warrant such a test, then the software can find videos with a low CTR so you can perform a thumbnail test. Its Metadata test lets you test multiple aspects (thumbnail, title, tags, and description) simultaneously and will make sense for those videos that aren’t getting any traction right now.
The feature is the hallmark of the product, but it’s only available in its highest price tier. You can consider a free TubeBuddy trial of 30 days if you want to try A/B tests.
Videolytics
When you watch a video on YouTube, TubeBuddy shows its Videolytics panel on the right side with a set of useful stats. It gives an overall summary of the video’s performance, the tags used, SEO, social, and channel stats.
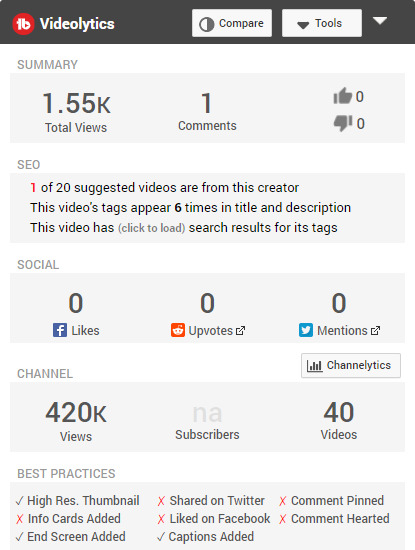
You can click on the blue “Show Search Rankings” button to see where the video ranks in YouTube search results for its used tags.
It can be quite handy for a side-by-side comparison with your competitors, or even your own channel. Here’s a comparison of a random video on the T-Series channel (biggest one on YouTube) alongside the most popular one.
Productivity Suite
There are a bunch of repetitive actions recommended for every YouTube video you publish — adding cards, setting end screens, responding to comments, and the like. TubeBuddy offers a range of productivity tools to take care of such tedious tasks.
With its “Upload Checklist”, that appears on the right hand side while uploading a video, an automated best practices test is performed to ensure you comply with YouTube’s guidelines.
Bulk Processing
Copying, adding, deleting, or updating cards and end screens on your channel can be a huge time killer, especially for larger channels. So should you let go of promoting your new videos from the end screens and cards in your previous popular ones? Not so fast.
TubeBuddy offers a set of bulk processing tools that are accessible from your “Channel videos” page.
Promotion ToolsPost
publishing your video, promoting it on social media, your website, and adding it to your email signature can help its visibility. TubeBuddy offers “Promo materials” with direct links to your latest videos and its embed code, and links to your channel, thumbnail, and channel art. You can access them by logging in to TubeBuddy.com/account.Earlier Tubebuddy used to provide shortened links but with Google discontinuing this service, analytics for them are no longer available. There’s a “share tracker” to share your videos on multiple social media platforms and publish YouTube videos natively on Facebook. But I like the “Vid2Vid promotion” feature the best. Accessible from the TubeBuddy menu in the “Promote” tab, it lets you promote one of your videos in the description of all the others. Getting more views on your latest upload from older videos or on an older video whose subject is currently trending gets simpler.
Tags, Keywords, And Translation Features
While I’ve already illustrated a few YouTube SEO tools available on the Chrome extension, let me show you a few others. The SEO Studio, accessible under the TubeBuddy menu from the Extensions tab, works much like the Yoast SEO plugin — relatable for creators who regularly publish textual content with WordPress as their CMS.
It lets you optimize your video metadata so that you maximize your chances of ranking in search results. As visible in the screenshot below, you get recommendations to improve your TubeBuddy SEO Score based on the target keyword you plug into it.
There are a few other tag, search, and keyword related tools. Among other tasks, they let you track your rankings, view, copy, and store a video’s tags, see tag suggestions in real-time, and the like.
I want to specifically highlight the video metadata translation features. If you have a global audience, then adding titles, descriptions, and tags in the native languages of your second biggest audience could increase your viewership.
You’ll find the “Tag Translator” on the video edit screen under the Video SEO tools.
And the automatic translator (available only on “legend” or a higher license) is available from the Subtitles panel when you edit a video.
To use the tag translator, click on the “Translate” button from the tag tools available when you’re on the edit video screen. TubeBuddy shows the top languages spoken by your audience and once you pick the language you want to translate to, it generates tags in that one.

You can also stay efficient by applying the same set of end screen elements to all of your new video uploads with TubeBuddy’s end screen template. To implement it, head over to the end screen page of the video that you want to set as the template and check the box shown in the screenshot below.
If you’re watching a video on your channel or one where data is public, the Videolytics panel also shows watch time, engagement, and other related stats.
At the top of the panel, there’s also an option to compare a video with the channel’s most popular one or to any other specific video on YouTube.
Other Tools
While we’ve covered the majority of TubeBuddy’s top features, I want to show you around a few other handy tools.
Quick Links and Quick-Edit
Navigating YouTube could become tedious requiring multiple clicks. The funny part is you need to visit the same places on your channel most times. The “Quick Links” panel in TubeBuddy makes your job — to visit your analytics reports, cards menu, and the like — much easier.
Thumbnail Generator
I recommend Canva for designing custom thumbnails for your videos. But if you’re in a hurry, TubeBuddy lets you choose a still frame from your video for creating the same. You can choose a solid color as the background or upload an existing image on your computer as well.
Once you’ve chosen an image, you can layer it with emojis, text, shapes, a logo, and another image. Saving a layer as a template to create consistent branding across your channel is also possible.
Mobile Apps
TubeBuddy is also avalable for android and ios.

The Mobile App is 100% free to download and use. There are some features that may be limited unless you have access to TubeBuddy Mobile Unlimited.
Member Perks
MEMBER PERKS, Free, Pro/Star/Legend. TubeBuddy Mobile icon. Channel Management and ... Starter Kit icon. Content Ideas, Thumbnails, End Screen and etc.
Customer Support:
Here’s the TubeBuddy playlist with close to 100 YouTube video tutorials showing its features in action. Besides these, there’s a dedicated knowledge base accessible from Support >> General Support at the top of your TubeBuddy profile.
#youtube#tubebuddy#grow on youtube#youtube chanel#tubebuddy review#youtube seo#social midea#youtube growth#tubebuddy vs vidiq#fast grow on youtube
2 notes
·
View notes
Text
Wordpress vs. WIX
I have been using WIX for the last 7 years. I used WIX to build my own company website which is actually getting slightly outdated. The annual fees are pretty high (but then again it is my shopfront) and I like how easy it is to manage. What bothers me is that the content is lost should I decide to discontinue my plan with WIX. I think wordpress is definitely the way forward with me. I am still not feeling hugely confident with HTML and CSS so I am hoping that Wordpress will be slightly more user friendly for me.

Iv carried out a little research and I have discovered the following:
Ease of use:
WIX is extremely easy to use due to the drag and drop editor within the templates. Its very easy to add elements and move things around. Many beginners would find this feature a blessing as it saves them from dealing with code.
While Wordpress has a whole host of amazing templates, you need some technical knowledge in order to be able to set up the site and add extensions & plug-ins. The Gutenberg editor is great to add blocks of moveable content but its definitely more difficult to us for the novice.
WINNER: WIX
SEO:
WIX offer great options to allow you to expand your search engine optimisation - you can edit the page titles, URL and image alt texts. The Wix SEO Wiz asks you a few simple questions about your site and creates a personalized SEO Plan for you.
Wordpress have a better offering - there are amazing plug-ins available can really enhance to optimize content, meta tags, keyword focus and much more (eg. yoast seo and google analyticator). There isn't a better platform than WordPress when it comes to SEO optimization.
WINNER: WORDPRESS
Blogging:
While WIX will allow you to upload regular content, you are limited with the layout of your posts along with editing capabilities. It has all the basic blogging features you’ll commonly use. For example, categories and tags, photos and videos, archives, etc. Wix blogs have slower commenting and are more difficult to handle than WordPress blogs. Many users end up downloading third-party commenting systems such as Facebook or Disqus, which both require users to register. It also lacks a number of functions, such as the ability to backdate posts, create private posts, and more.
WordPress began as a blogging platform and has since developed into a full-fledged website builder.It now controls approximately 40% of all websites on the internet. It has all of the blogging features you'll need, including a native commenting framework and all of the other advanced features Wix lacks. Wordpress allows you to add tags, categories and RSS. Wordpress also allows for extensive plug-ins to support blogging
WINNER: WORDPRESS
Cost:
Wix offers a basic website builder for free however this plan will have branded ads featured on your website and also you will need to use a custom domain name eg. username.wix.com/sitename. Apart from that, the basic plan does not offer necessary add-ons such as Google Analytics, Favicons, eCommerce, etc. If you prefer to have your own domain name and a site without ads, you need to sign up for one of their plans. These cost between €12-21 with a monthly plan.
Regardless of which plan you select, this price does not include any Wix apps which you may choose to use on your website later.
Wordress is open source, which means that anybody can use it for free. You are just required to have your own domain and web hosting to install it. There are many free themes and plug-ins, it can be tempting to choose the paid option so costs can easily increase.
WINNER: WORDPRESS
CLEAR WINNER: WORDPRESS
Through my research, I have noted the following. If I want an e-commerce site, Wordpress is the way to go. I have experimented with the WIX apps and they tend to work out extremely expensive. From what I gather Wordpress offers WooCommerce which is free and suitable to create an online store. This is something I will experiment with in the next few months.
There are other categories not covered above:
Design Options (Wordpress)
Plug-Ins/Apps (Wordpress)
Data Portability (Wordpress)
https://www.wpbeginner.com/opinion/wix-vs-wordpress-which-one-is-better-pros-and-cons/#designoptions
https://www.arcstone.com/blog/pros-and-cons-of-wordpress-cms
https://youtu.be/z_XaTeO-zMk
0 notes
Text
8 React.js Project Ideas to Help You Start Learning by Doing
One of the best ways to learn is by doing. But often developers struggle with the big question "what should I build?"
Here are 8 project ideas, complete with project briefs and layout ideas, to get you started learning by doing.
This is a preview of the free ebook 50 Projects for React & the Static Web. You can find the full 50 project ideas including these 8 at 50reactprojects.com.
Map Statistics Dashboard
Category: Business & Real-World
Create a map dashboard that shows statistics and geographic information about COVID-19.
Brief
Dealing with a global pandemic means that viruses like the Coronavirus impact the world differently based on geographic location.
Having a map with a breakdown of each country’s statistics is a useful way of being able to determine things like which countries have been impacted the most.
Level 1
The easiest way to see statistics country to country is to have a map that you can browse with each country’s statistics available next to that country.
Create a mapping app that uses the disease.sh Coronavirus API to add markers to the map for each country along with the number of COVID-19 cases.
Level 2
While having the statistics for each country is helpful, it might be useful to be able to compare those statistics to the number of cases in the entire world.
Add a statistics dashboard that shows the number of COVID-19 cases around the world as well as any other useful statistics from the API.
Level 3
Getting current statistics is a good way to understand the current state of the world, but how does that compare historically?
Use the historical data API to show graphs on the dashboard that provide context to the growth and spread of the virus.
To Do
Create a new map app
Fetch API countries data
Add markers to map
Add statistics to markers
Fetch API global data
Create a stats dashboard
Add global stats
Fetch API historical data
Add graphs to map
Tutorials
Inspiration
Layout Idea

Map Statistics Dashboard Layout Idea
Musical Instrument
Category: Fun & Interesting
Create an interactive piano that you can use to play music with your keyboard.
Brief
Not everyone has the luxury of owning a musical instrument, but maybe those people have a laptop, phone, or tablet. Having a piano is a powerful way to let people play music even if they didn’t have the opportunity before.
Level 1
Using the browser and web audio APIs, we can create sounds that, when put together, can actually sound like music.
Create a set of buttons that play notes of a scale when clicked.
Level 2
While not everyone’s played an instrument before, the concept and interface of an instrument like a piano is generally more intuitive than a bunch of buttons.
Create a piano layout using buttons that work by either clicking the button or using the physical keyboard.
Level 3
We might have limited space in the browser, but there’s a wide range of notes, scales, and sounds an electric keyboard might be able to make with some added effects.
Create effect toggles that change the sound of the notes when toggled on.
To Do
Create buttons
Play sound when clicked
Arrange notes in a scale
Create piano layout
Set keyboard events
Create effects layout
Toggle audio effects
Tutorials
Inspiration
Layout Idea
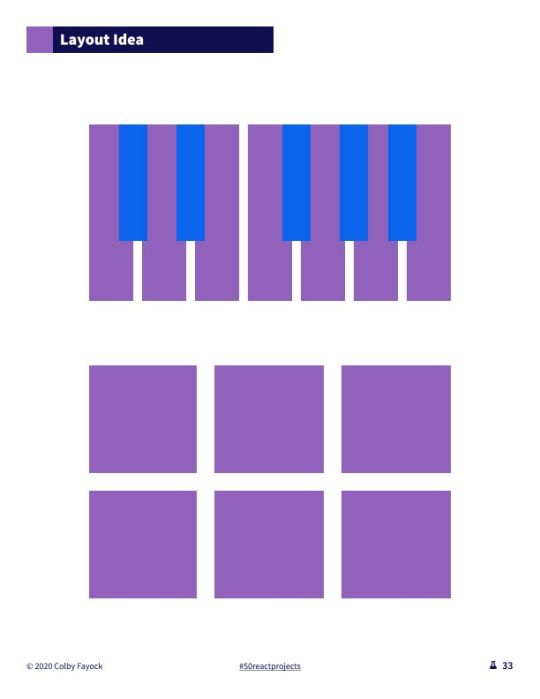
Musical Instrument Layout Idea
Blog
Category: Personal & Portfolio
Create a blog that you can use to share your career experiences and projects.
Brief
With any career, having a blog to share your experiences is a good way let people know what you’re working on and help others learn from your experiences.
It’s also a way to reinforce what you’ve learned so you can reference it in the future.
Level 1
To be able to share your experiences, you need a website structure that will allow you to create new content and manage existing content.
One way to do this is by creating markdown files that your website sources to create new pages and display the posts.
Create a blog using markdown files as the content source.
Level 2
Having your content in markdown files is a good way to manage static content, but you might not want to have to edit code every time you write or edit a post.
Integrate a content management system that allows you to add new content or edit existing with a nice user interface.
Level 3
If you’re sharing code on your blog, HTML natively supports the code and pre tags that help you format code in a readable way. But that doesn’t include syntax highlighting that helps improve readability.
Integrate a syntax highlighter that makes code blocks more readable.
To Do
Create a blog
Add first static content
Source static content
Integrate CMS
Add code to content
Add syntax highlighting
Tutorials
Inspiration
Layout Idea
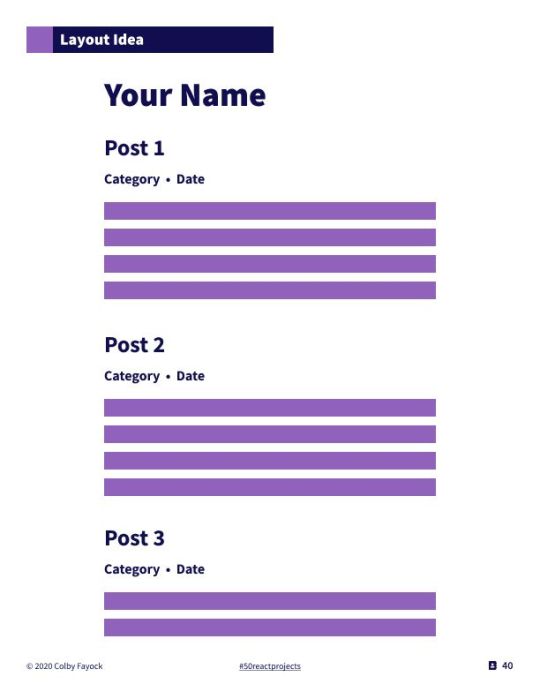
Blog Layout Idea
Notebook
Category: Productivity
Create a notebook app to add, manage, and organize a group of notes.
Brief
Taking notes is a great way to make sure we keep track of our thoughts or remember the important takeaways from a meeting. Being able to easily manage them and organize them is important for finding them later!
Level 1
The first requirement of a notebook is being able to take notes. This can be pretty simple to start, where really you need some sort of input that collects what you write and stores it somewhere for later.
Create a form to add new notes and view them in a list.
Level 2
In order to find your notes later, you want some way of organizing those notes and a way to look them up. That includes adding categories or a tagging system as well as a UI to make searches from.
Add the ability to tag or categorize notes and an input to search through them.
Level 3
Whether we realize it or not, we can find connections between our thoughts and more importantly our notes, where we can take advantage of that network of thoughts for our notebook.
Add Roam Research-inpsired linking of notes to create a network of thoughts.
To Do
Create a form
Store new notes
List notes
Add tags or categories
Add note search
Add note network
Tutorials
Inspiration
Layout Idea
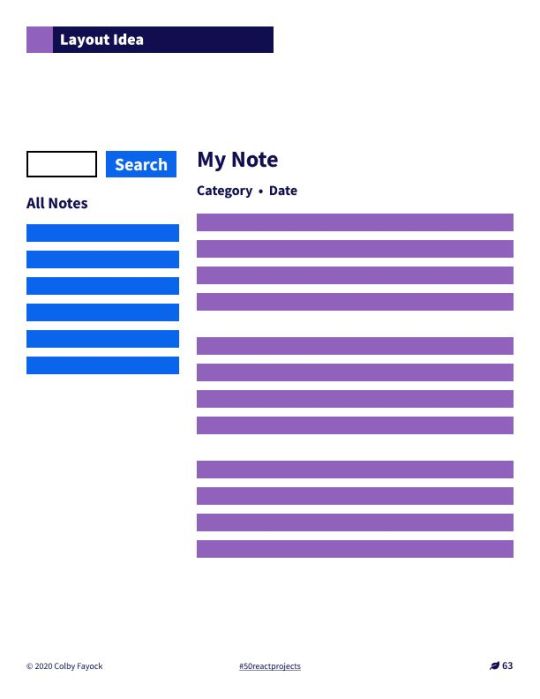
Notebook Layout Idea
Space Invaders
Category: Puzzles & Games
Create a space invaders spacecraft shooter game to shoot multiple waves of enemy ships.
Brief
Space Invaders is an arcade classic that puts you in a spacecraft up against an alien invasion. As you try to shoot them down, they’re firing back, and you only have a limited amount of protection before you’re open to being hit.
Level 1
The core part of the game is that you’re moving around a spacecraft trying to hit a bunch of aliens with your weapons. While there’s one of you, there’s many of them.
Create a spacecraft that can move around and shoot aliens that are not moving.
Level 2
What makes the game tricky, is that the aliens are constantly moving. Every time they hit the edge of the play area, they drop down and speed up, getting closer to your ship.
Add movement to the aliens going side to side on the play area. Every time the aliens reach one side they should drop down a level. They should also speed up at certain intervals.
Level 3
You’re on your own, but luckily you can get some protection. You have shields that you can hide behind that help protect you while they last.
Create several shields in front of the player spacecraft that can take a limited amount of damage.
To Do
Create a new game
Create static aliens
Create a player spacecraft
Add spacecraft controls
Add spacecraft weapon
Configure alien damage
Make aliens shoot back
Make aliens move
Add alien intervals
Add shields
Tutorials
Inspiration
Layout Idea
Space Invaders Layout Idea
Framework Theme
Category: Tools & Libraries
Create a Gatsby theme that sets up a project with the Tailwind CSS framework.
Brief
As developers, we commonly have to do a bunch of similar steps any time we create a new project. But tools like themes let us abstract those steps and package them in an easy to use way that can work for any new project.
Level 1
Gatsby themes are a plugin-like system where we can take advantage of the Gatsby pipeline to share functionality as a package on npm.
This opens the door to really doing anything we would do in a Gatsby site, but making it reusable to any Gatsby site.
Create a new Gatsby theme that, when used, creates a new a style guide page on any project it’s added to.
Level 2
The goal of themes isn’t just to create pages, but to add functionality that makes us productive. This includes things like frameworks and project configurations.
Add a CSS framework to the Gatsby theme that lets the project it’s added to use that framework.
Level 3
Sometimes themes are better only as tools, sometimes it’s helpful to be opinionated. One way to add useful functionality to a CSS framework is to create stock components.
Create reusable React components using the CSS framework that can be used in the project the theme’s added to.
To Do
Create a new theme
Add to example project
Create new style page
Add CSS framework
Use CSS in example
Create components
Use components
Tutorials
Inspiration
Layout Idea

Framework Theme Layout Idea
Webmentions
Category: Project Add-Ons
Add webmentions integration to a website that shows Twitter interactions with the website.
Brief
Social interaction is an impactful way to bring more of an audience and conversation to topics we write about.
Having something on a website shows that interaction can be helpful to both inspire people to want to get involved or let people feel like they can be part of it.
Level 1
In order to make use of Webmentions, a website needs to be configured with meta tags to provide information.
Add the proper meta tags to a website and validate its use with webmention.io.
Level 2
The Webmentions API is a way to programmatically see connections in social interactions from a URL of your website. It lets you get the type of interaction and even the person’s profile avatar.
Connect a website to Webmentions and add a list of social interactions to blog post pages.
Level 3
Now that the website is showing all of the interactions, there should be an easy way to join the conversation.
Add a social link that, when clicked, creates a tweet with a link to the page.
To Do
Add meta tags to website
Validate meta tags
Connect to Webmention
Connect social to Bridgy
List interactions
Add tweet button
Tutorials
Inspiration
Layout Idea
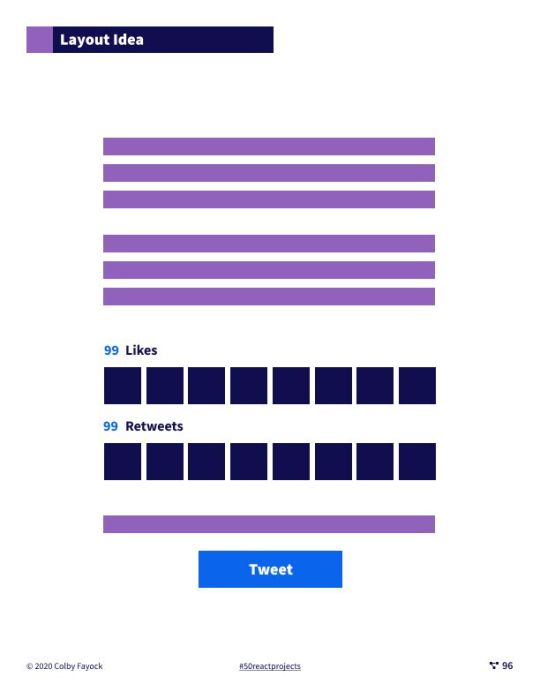
Webmentions Layout Idea
Product Hunt
Category: Clones
Create a Product Hunt clone that lets people post a new product with ratings.
Brief
We all live for products, whether it’s our mobile phones or the apps we use on our laptops.
While there are tons of products in the world, it can be hard to navigate through the good and the bad. Tools like Product Hunt provide a platform to learn about new tools and get reactions and reviews from others.
Level 1
The most important part about learning about new products is the product itself. We want to know what the product is, what it looks like, and how it works.
Create a page that lets you add a new product to a website with a title, picture, and description.
Level 2
When learning about products, reviews are a way we can trust a product before we purchase it. It helps us gain confidence in what we’re about to spend our money or time on.
Add the ability for people to add reviews about each product.
Level 3
People love products, so there are tons of them in the world. There are way too many to try to sort through manually, so we need a mechanism to search and browse with.
Add the ability to search products and browse by category.
To Do
Create product website
Create database
Add product form
Add product to database
Request product for page
Add review form
Add reviews to database
Add reviews to product
Add product search
Add product categories
Tutorials
Layout Idea

Product Hunt Layout Idea
More Projects
If you want more project ideas, check out 50 Projects for React & the Static web!

0 notes
Text
How to Make a Simple CMS With Cloudflare, GitHub Actions and Metalsmith
Let’s build ourselves a CMS. But rather than build out a UI, we’re going to get that UI for free in the form of GitHub itself! We’ll be leveraging GitHub as the way to manage the content for our static site generator (it could be any static site generator). Here’s the gist of it: GitHub is going to be the place to manage, version control, and store files, and also be the place we’ll do our content editing. When edits occur, a series of automations will test, verify, and ultimately deploy our content to Cloudflare.
You can find the completed code for the project is available on GitHub. I power my own website, jonpauluritis.com, this exact way.
What does the full stack look like?
Here’s the tech stack we’ll be working with in this article:
Any Markdown Editor (Optional. e.g Typora.io)
A Static Site Generator (e.g. Metalsmith)
Github w/ Github Actions (CICD and Deployment)
Cloudflare Workers
Why should you care about about this setup? This setup is potentially the leanest, fastest, cheapest (~$5/month), and easiest way to manage a website (or Jamstack site). It’s awesome both from a technical side and from a user experience perspective. This setup is so awesome I literally went out and bought stock in Microsoft and Cloudflare.
But before we start…
I’m not going to walk you through setting up accounts on these services, I’m sure you can do that yourself. Here are the accounts you need to setup:
GitHub (Sign up for GitHub Actions.)
Cloudflare Workers Sites (This is the one that costs $5/month.)
I would also recommend Typora for an amazing Markdown writing experience, but Markdown editors are a very personal thing, so use which editor feels right for you.
Project structure
To give you a sense of where we’re headed, here’s the structure of the completed project:
├── build.js ├── .github/workflows │ ├── deploy.yml │ └── nodejs.js ├── layouts │ ├── about.hbs │ ├── article.hbs │ ├── index.hbs │ └── partials │ └── navigation.hbs ├── package-lock.json ├── package.json ├── public ├── src │ ├── about.md │ ├── articles │ │ ├── post1.md │ │ └── post2.md │ └── index.md ├── workers-site └── wrangler.toml
Step 1: Command line stuff
In a terminal, change directory to wherever you keep these sorts of projects and type this:
$ mkdir cms && cd cms && npm init -y
That will create a new directory, move into it, and initialize the use of npm.
The next thing we want to do is stand on the shoulders of giants. We’ll be using a number of npm packages that help us do things, the meat of which is using the static site generator Metalsmith:
$ npm install --save-dev metalsmith metalsmith-markdown metalsmith-layouts metalsmith-collections metalsmith-permalinks handlebars jstransformer-handlebars
Along with Metalsmith, there are a couple of other useful bits and bobs. Why Metalsmith? Let’s talk about that.
Step 2: Metalsmith
I’ve been trying out static site generators for 2-3 years now, and I still haven’t found “the one.” All of the big names — like Eleventy, Gatsby, Hugo, Jekyll, Hexo, and Vuepress — are totally badass but I can’t get past Metalsmith’s simplicity and extensibility.
As an example, this will code will actually build you a site:
// EXAMPLE... NOT WHAT WE ARE USING FOR THIS TUTORIAL Metalsmith(__dirname) .source('src') .destination('dest') .use(markdown()) .use(layouts()) .build((err) => if (err) throw err);
Pretty cool right?
For sake of brevity, type this into the terminal and we’ll scaffold out some structure and files to start with.
First, make the directories:
$ mkdir -p src/articles && mkdir -p layouts/partials
Then, create the build file:
$ touch build.js
Next, we’ll create some layout files:
$ touch layouts/index.hbs && touch layouts/about.hbs && touch layouts/article.hbs && touch layouts/partials/navigation.hbt
And, finally, we’ll set up our content resources:
$ touch src/index.md && touch src/about.md && touch src/articles/post1.md && touch src/articles/post1.md touch src/articles/post2.md
The project folder should look something like this:
├── build.js ├── layouts │ ├── about.hbs │ ├── article.hbs │ ├── index.hbs │ └── partials │ └── navigation.hbs ├── package-lock.json ├── package.json └── src ├── about.md ├── articles │ ├── post1.md │ └── post2.md └── index.md
Step 3: Let’s add some code
To save space (and time), you can use the commands below to create the content for our fictional website. Feel free to hop into “articles” and create your own blog posts. The key is that the posts need some meta data (also called “Front Matter”) to be able to generate properly. The files you would want to edit are index.md, post1.md and post2.md.
The meta data should look something like this:
--- title: 'Post1' layout: article.hbs --- ## Post content here....
Or, if you’re lazy like me, use these terminal commands to add mock content from GitHub Gists to your site:
$ curl https://gist.githubusercontent.com/jppope/35dd682f962e311241d2f502e3d8fa25/raw/ec9991fb2d5d2c2095ea9d9161f33290e7d9bb9e/index.md > src/index.md $ curl https://gist.githubusercontent.com/jppope/2f6b3a602a3654b334c4d8df047db846/raw/88d90cec62be6ad0b3ee113ad0e1179dfbbb132b/about.md > src/about.md $ curl https://gist.githubusercontent.com/jppope/98a31761a9e086604897e115548829c4/raw/6fc1a538e62c237f5de01a926865568926f545e1/post1.md > src/articles/post1.md $ curl https://gist.githubusercontent.com/jppope/b686802621853a94a8a7695eb2bc4c84/raw/9dc07085d56953a718aeca40a3f71319d14410e7/post2.md > src/articles/post2.md
Next, we’ll be creating our layouts and partial layouts (“partials”). We’re going to use Handlebars.js for our templating language in this tutorial, but you can use whatever templating language floats your boat. Metalsmith can work with pretty much all of them, and I don’t have any strong opinions about templating languages.
Build the index layout
<!DOCTYPE html> <html lang="en"> <head> <style> /* Keeping it simple for the tutorial */ body { font-family: 'Avenir', Helvetica, Arial, sans-serif; -webkit-font-smoothing: antialiased; -moz-osx-font-smoothing: grayscale; text-align: center; color: #2c3e50; margin-top: 60px; } .navigation { display: flex; justify-content: center; margin: 2rem 1rem; } .button { margin: 1rem; border: solid 1px #ccc; border-radius: 4px; padding: 0.5rem 1rem; text-decoration: none; } </style> </head> <body> <div> <a href=""><h3></h3></a> <p></p> </div> </body> </html>
A couple of notes:
Our “navigation” hasn’t been defined yet, but will ultimately replace the area where resides.
will iterate through the “collection” of articles that metalsmith will generate during its build process.
Metalsmith has lots of plugins you can use for things like stylesheets, tags, etc., but that’s not what this tutorial is about, so we’ll leave that for you to explore.
Build the About page
Add the following to your about.hbs page:
<!DOCTYPE html> <html lang="en"> <head> <style> /* Keeping it simple for the tutorial */ body { font-family: 'Avenir', Helvetica, Arial, sans-serif; -webkit-font-smoothing: antialiased; -moz-osx-font-smoothing: grayscale; text-align: center; color: #2c3e50; margin-top: 60px; } .navigation { display: flex; justify-content: center; margin: 2rem 1rem; } .button { margin: 1rem; border: solid 1px #ccc; border-radius: 4px; padding: 0.5rem 1rem; text-decoration: none; } </style> </head> <body> <div> } </div> </body> </html>
Build the Articles layout
<!DOCTYPE html> <html lang="en"> <head> <style> /* Keeping it simple for the tutorial */ body { font-family: 'Avenir', Helvetica, Arial, sans-serif; -webkit-font-smoothing: antialiased; -moz-osx-font-smoothing: grayscale; text-align: center; color: #2c3e50; margin-top: 60px; } .navigation { display: flex; justify-content: center; margin: 2rem 1rem; } .button { margin: 1rem; border: solid 1px #ccc; border-radius: 4px; padding: 0.5rem 1rem; text-decoration: none; } </style> </head> <body> <div> } </div> </body> </html>
You may have noticed that this is the exact same layout as the About page. It is. I just wanted to cover how to add additional pages so you’d know how to do that. If you want this one to be different, go for it.
Add navigation
Add the following to the layouts/partials/navigation.hbs file
<div class="navigation"> <div> <a class="button" href="/">Home</a> <a class="button" href="/about">About</a> </div> </div>
Sure there’s not much to it… but this really isn’t supposed to be a Metalsmith/SSG tutorial. ¯\_(ツ)_/¯
Step 4: The Build file
The heart and soul of Metalsmith is the build file. For sake of thoroughness, I’m going to go through it line-by-line.
We start by importing the dependencies
Quick note: Metalsmith was created in 2014, and the predominant module system at the time was common.js , so I’m going to stick with require statements as opposed to ES modules. It’s also worth noting that most of the other tutorials are using require statements as well, so skipping a build step with Babel will just make life a little less complex here.
// What we use to glue everything together const Metalsmith = require('metalsmith');
// compile from markdown (you can use targets as well) const markdown = require('metalsmith-markdown');
// compiles layouts const layouts = require('metalsmith-layouts');
// used to build collections of articles const collections = require('metalsmith-collections');
// permalinks to clean up routes const permalinks = require('metalsmith-permalinks');
// templating const handlebars = require('handlebars');
// register the navigation const fs = require('fs'); handlebars.registerPartial('navigation', fs.readFileSync(__dirname + '/layouts/partials/navigation.hbt').toString());
// NOTE: Uncomment if you want a server for development // const serve = require('metalsmith-serve'); // const watch = require('metalsmith-watch');
Next, we’ll be including Metalsmith and telling it where to find its compile targets:
// Metalsmith Metalsmith(__dirname) // where your markdown files are .source('src') // where you want the compliled files to be rendered .destination('public')
So far, so good. After we have the source and target set, we’re going to set up the markdown rendering, the layouts rendering, and let Metalsmith know to use “Collections.” These are a way to group files together. An easy example would be something like “blog posts” but it could really be anything, say recipes, whiskey reviews, or whatever. In the above example, we’re calling the collection “articles.”
// previous code would go here
// collections create groups of similar content .use(collections({ articles: { pattern: 'articles/*.md', }, })) // compile from markdown .use(markdown()) // nicer looking links .use(permalinks({ pattern: ':collection/:title' })) // build layouts using handlebars templates // also tell metalsmith where to find the raw input .use(layouts({ engine: 'handlebars', directory: './layouts', default: 'article.html', pattern: ["*/*/*html", "*/*html", "*html"], partials: { navigation: 'partials/navigation', } }))
// NOTE: Uncomment if you want a server for development // .use(serve({ // port: 8081, // verbose: true // })) // .use(watch({ // paths: { // "${source}/**/*": true, // "layouts/**/*": "**/*", // } // }))
Next, we’re adding the markdown plugin, so we can use markdown for content to compile to HTML.
From there, we’re using the layouts plugin to wrap our raw content in the layout we define in the layouts folder. You can read more about the nuts and bolts of this on the official plugin site but the result is that we can use } in a template and it will just work.
The last addition to our tiny little build script will be the build method:
// Everything else would be above this .build(function(err) { if (err) { console.error(err) } else { console.log('build completed!'); } });
Putting everything together, we should get a build script that looks like this:
const Metalsmith = require('metalsmith'); const markdown = require('metalsmith-markdown'); const layouts = require('metalsmith-layouts'); const collections = require('metalsmith-collections'); const permalinks = require('metalsmith-permalinks'); const handlebars = require('handlebars'); const fs = require('fs');
// Navigation handlebars.registerPartial('navigation', fs.readFileSync(__dirname + '/layouts/partials/navigation.hbt').toString());
Metalsmith(__dirname) .source('src') .destination('public') .use(collections({ articles: { pattern: 'articles/*.md', }, })) .use(markdown()) .use(permalinks({ pattern: ':collection/:title' })) .use(layouts({ engine: 'handlebars', directory: './layouts', default: 'article.html', pattern: ["*/*/*html", "*/*html", "*html"], partials: { navigation: 'partials/navigation', } })) .build(function (err) { if (err) { console.error(err) } else { console.log('build completed!'); } });
I’m a sucker for simple and clean and, in my humble opinion, it doesn’t get any simpler or cleaner than a Metalsmith build. We just need to make one quick update to the package.json file and we’ll be able to give this a run:
"name": "buffaloTraceRoute", "version": "1.0.0", "description": "", "main": "index.js", "scripts": { "build": "node build.js", "test": "echo \"No Tests Yet!\" " }, "keywords": [], "author": "Your Name", "license": "ISC", "devDependencies": { // these should be the current versions // also... comments aren't allowed in JSON } }
If you want to see your handy work, you can uncomment the parts of the build file that will let you serve your project and do things like run npm run build. Just make sure you remove this code before deploying.
Working with Cloudflare
Next, we’re going to work with Cloudflare to get access to their Cloudflare Workers. This is where the $5/month cost comes into play.
Now, you might be asking: “OK, but why Cloudflare? What about using something free like GutHub Pages or Netlify?” It’s a good question. There are lots of ways to deploy a static site, so why choose one method over another?
Well, Cloudflare has a few things going for it…
Speed and performance
One of the biggest reasons to switch to a static site generator is to improve your website performance. Using Cloudflare Workers Site can improve your performance even more.
Here’s a graph that shows Cloudflare compared to two competing alternatives:
Courtesy of Cloudflare
The simple reason why Cloudflare is the fastest: a site is deployed to 190+ data centers around the world. This reduces latency since users will be served the assets from a location that’s physically closer to them.
Simplicity
Admittedly, the initial configuration of Cloudflare Workers may be a little tricky if you don’t know how to setup environmental variables. But after you setup the basic configurations for your computer, deploying to Cloudflare is as simple as wrangler publish from the site directory. This tutorial is focused on the CI/CD aspect of deploying to Cloudflare which is a little more involved, but it’s still incredibly simple compared to most other deployment processes.
(It’s worth mentioning GitHub Pages, Netlify are also killing it in this area. The developer experience of all three companies is amazing.)
More bang for the buck
While Github Pages and Netlify both have free tiers, your usage is (soft) limited to 100GB of bandwidth a month. Don’t get me wrong, that’s a super generous limit. But after that you’re out of luck. GitHub Pages doesn’t offer anything more than that and Netlify jumps up to $45/month, making Cloudflare’s $5/month price tag very reasonable.
ServiceFree Tier BandwidthPaid Tier PricePaid Tier Requests / BandwidthGitHub Pages100GBN/AN/ANetlify100GB$45~150K / 400 GBCloudflare Workers Sitesnone$510MM / unlimited
Calculations assume a 3MB average website. Cloudflare has additional limits on CPU use. GitHub Pages should not be used for sites that have credit card transactions.
Sure, there’s no free tier for Cloudflare, but $5 for 10 million requests is a steal. I would also be remise if I didn’t mention that GitHub Pages has had a few outages over the last year. That’s totally fine in my book a demo site, but it would be bad news for a business.
Cloudflare offers a ton of additional features for that worth briefly mentioning: free SSL certificates, free (and easy) DNS routing, a custom Workers Sites domain name for your projects (which is great for staging), unlimited environments (e.g. staging), and registering a domain name at cost (as opposed to the markup pricing imposed by other registrars).
Deploying to Cloudflare
Cloudflare provides some great tutorials for how to use their Cloudflare Workers product. We’ll cover the highlights here.
First, make sure the Cloudflare CLI, Wrangler, is installed:
$ npm i @cloudflare/wrangler -g
Next, we’re going to add Cloudflare Sites to the project, like this:
wrangler init --site cms
Assuming I didn’t mess up and forget about a step, here’s what we should have in the terminal at this point:
⬇️ Installing cargo-generate... 🔧 Creating project called `workers-site`... ✨ Done! New project created /Users/<User>/Code/cms/workers-site ✨ Succesfully scaffolded workers site ✨ Succesfully created a `wrangler.toml`
There should also be a generated folder in the project root called /workers-site as well as a config file called wrangler.toml — this is where the magic resides.
name = "cms" type = "webpack" account_id = "" workers_dev = true route = "" zone_id = ""
[site] bucket = "" entry-point = "workers-site"
You might have already guessed what comes next… we need to add some info to the config file! The first key/value pair we’re going to update is the bucket property.
bucket = "./public"
Next, we need to get the Account ID and Zone ID (i.e. the route for your domain name). You can find them in your Cloudflare account all the way at the bottom of the dashboard for your domain:
Stop! Before going any further, don’t forget to click the “Get your API token” button to grab the last config piece that we’ll need. Save it on a notepad or somewhere handy because we’ll need it for the next section.
Phew! Alright, the next task is to add the Account ID and Zone ID we just grabbed to the .toml file:
name = "buffalo-traceroute" type = "webpack" account_id = "d7313702f333457f84f3c648e9d652ff" # Fake... use your account_id workers_dev = true # route = "example.com/*" # zone_id = "805b078ca1294617aead2a1d2a1830b9" # Fake... use your zone_id
[site] bucket = "./public" entry-point = "workers-site" (Again, those IDs are fake.)
Again, those IDs are fake. You may be asked to set up credentials on your computer. If that’s the case, run wrangler config in the terminal.
GitHub Actions
The last piece of the puzzle is to configure GitHub to do automatic deployments for us. Having done previous forays into CI/CD setups, I was ready for the worst on this one but, amazingly, GitHub Actions is very simple for this sort of setup.
So how does this work?
First, let’s make sure that out GitHub account has GitHub Actions activated. It’s technically in beta right now, but I haven’t run into any issues with that so far.
Next, we need to create a repository in GitHub and upload our code to it. Start by going to GitHub and creating a repository.

This tutorial isn’t meant to cover the finer points of Git and/or GitHub, but there’s a great introduction. Or, copy and paste the following commands while in the root directory of the project:
# run commands one after the other $ git init $ touch .gitignore && echo 'node_modules' > .gitignore $ git add . $ git commit -m 'first commit' $ git remote add origin https://github.com/{username}/{repo name} $ git push -u origin master
That should add the project to GitHub. I say that with a little hesitance but this is where everything tends to blow up for me. For example, put too many commands into the terminal and suddenly GitHub has an outage, or the terminal unable to location the path for Python. Tread carefully!
Assuming we’re past that part, our next task is to activate Github Actions and create a directory called .github/workflows in the root of the project directory. (GitHub can also do this automatically by adding the “node” workflow when activating actions. At the time of writing, adding a GitHub Actions Workflow is part of GitHub’s user interface.)
Once we have the directory in the project root, we can add the final two files. Each file is going to handle a different workflow:
A workflow to check that updates can be merged (i.e. the “CI” in CI/CD)
A workflow to deploy changes once they have been merged into master (i.e. the “CD” in CI/CD)
# integration.yml name: Integration
on: pull_request: branches: [ master ]
jobs: build: runs-on: ubuntu-latest strategy: matrix: node-version: [10.x, 12.x] steps: - uses: actions/checkout@v2 - name: Use Node.js $ uses: actions/setup-node@v1 with: node-version: $ - run: npm ci - run: npm run build --if-present - run: npm test env: CI: true
This is a straightforward workflow. So straightforward, in fact, that I copied it straight from the official GitHub Actions docs and barely modified it. Let’s go through what is actually happening in there:
on: Run this workflow only when a pull request is created for the master branch
jobs: Run the below steps for two-node environments (e.g. Node 10, and Node 12 — Node 12 is currently the recommended version). This will build, if a build script is defined. It will also run tests if a test script is defined.
The second file is our deployment script and is a little more involved.
# deploy.yml name: Deploy
on: push: branches: - master
jobs: deploy: runs-on: ubuntu-latest name: Deploy strategy: matrix: node-version: [10.x]
steps: - uses: actions/checkout@v2 - name: Use Node.js $ uses: actions/setup-node@v1 with: node-version: $ - run: npm install - uses: actions/checkout@master - name: Build site run: "npm run build" - name: Publish uses: cloudflare/[email protected] with: apiToken: $
Important! Remember that Cloudflare API token I mentioned way earlier? Now is the time to use it. Go to the project settings and add a secret. Name the secret CF_API_TOKEN and add the API token.
Let’s go through whats going on in this script:
on: Run the steps when code is merged into the master branch
steps: Use Nodejs to install all dependencies, use Nodejs to build the site, then use Cloudflare Wrangler to publish the site
Here’s a quick recap of what the project should look like before running a build (sans node_modules):
├── build.js ├── dist │ └── worker.js ├── layouts │ ├── about.hbs │ ├── article.hbs │ ├── index.hbs │ └── partials │ └── navigation.hbs ├── package-lock.json ├── package.json ├── public ├── src │ ├── about.md │ ├── articles │ │ ├── post1.md │ │ └── post2.md │ └── index.md ├── workers-site │ ├── index.js │ ├── package-lock.json │ ├── package.json │ └── worker │ └── script.js └── wrangler.toml
A GitHub-based CMS
Okay, so I made it this far… I was promised a CMS? Where is the database and my GUI that I log into and stuff?
Don’t worry, you are at the finish line! GitHub is your CMS now and here’s how it works:
Write a markdown file (with front matter).
Open up GitHub and go to the project repository.
Click into the “Articles” directory, and upload the new article. GitHub will ask whether a new branch should be created along with a pull request. The answer is yes.
After the integration is verified, the pull request can be merged, which triggers deployment.
Sit back, relax and wait 10 seconds… the content is being deployed to 164 data centers worldwide.
Congrats! You now have a minimal Git-based CMS that basically anyone can use.
Troubleshooting notes
Metalsmith layouts can sometimes be kinda tricky. Try adding this debug line before the build step to have it kick out something useful: DEBUG=metalsmith-layouts npm run build
Occasionally, Github actions needed me to add node_modules to the commit so it could deploy… this was strange to me (and not a recommended practice) but fixed the deployment.
Please let me know if you run into any trouble and we can add it to this list!
The post How to Make a Simple CMS With Cloudflare, GitHub Actions and Metalsmith appeared first on CSS-Tricks.
How to Make a Simple CMS With Cloudflare, GitHub Actions and Metalsmith published first on https://deskbysnafu.tumblr.com/
0 notes
Text
How to Make a Simple CMS With Cloudflare, GitHub Actions and Metalsmith
Let’s build ourselves a CMS. But rather than build out a UI, we’re going to get that UI for free in the form of GitHub itself! We’ll be leveraging GitHub as the way to manage the content for our static site generator (it could be any static site generator). Here’s the gist of it: GitHub is going to be the place to manage, version control, and store files, and also be the place we’ll do our content editing. When edits occur, a series of automations will test, verify, and ultimately deploy our content to Cloudflare.
You can find the completed code for the project is available on GitHub. I power my own website, jonpauluritis.com, this exact way.
What does the full stack look like?
Here’s the tech stack we’ll be working with in this article:
Any Markdown Editor (Optional. e.g Typora.io)
A Static Site Generator (e.g. Metalsmith)
Github w/ Github Actions (CICD and Deployment)
Cloudflare Workers
Why should you care about about this setup? This setup is potentially the leanest, fastest, cheapest (~$5/month), and easiest way to manage a website (or Jamstack site). It’s awesome both from a technical side and from a user experience perspective. This setup is so awesome I literally went out and bought stock in Microsoft and Cloudflare.
But before we start…
I’m not going to walk you through setting up accounts on these services, I’m sure you can do that yourself. Here are the accounts you need to setup:
GitHub (Sign up for GitHub Actions.)
Cloudflare Workers Sites (This is the one that costs $5/month.)
I would also recommend Typora for an amazing Markdown writing experience, but Markdown editors are a very personal thing, so use which editor feels right for you.
Project structure
To give you a sense of where we’re headed, here’s the structure of the completed project:
├── build.js ├── .github/workflows │ ├── deploy.yml │ └── nodejs.js ├── layouts │ ├── about.hbs │ ├── article.hbs │ ├── index.hbs │ └── partials │ └── navigation.hbs ├── package-lock.json ├── package.json ├── public ├── src │ ├── about.md │ ├── articles │ │ ├── post1.md │ │ └── post2.md │ └── index.md ├── workers-site └── wrangler.toml
Step 1: Command line stuff
In a terminal, change directory to wherever you keep these sorts of projects and type this:
$ mkdir cms && cd cms && npm init -y
That will create a new directory, move into it, and initialize the use of npm.
The next thing we want to do is stand on the shoulders of giants. We’ll be using a number of npm packages that help us do things, the meat of which is using the static site generator Metalsmith:
$ npm install --save-dev metalsmith metalsmith-markdown metalsmith-layouts metalsmith-collections metalsmith-permalinks handlebars jstransformer-handlebars
Along with Metalsmith, there are a couple of other useful bits and bobs. Why Metalsmith? Let’s talk about that.
Step 2: Metalsmith
I’ve been trying out static site generators for 2-3 years now, and I still haven’t found “the one.” All of the big names — like Eleventy, Gatsby, Hugo, Jekyll, Hexo, and Vuepress — are totally badass but I can’t get past Metalsmith’s simplicity and extensibility.
As an example, this will code will actually build you a site:
// EXAMPLE... NOT WHAT WE ARE USING FOR THIS TUTORIAL Metalsmith(__dirname) .source('src') .destination('dest') .use(markdown()) .use(layouts()) .build((err) => if (err) throw err);
Pretty cool right?
For sake of brevity, type this into the terminal and we’ll scaffold out some structure and files to start with.
First, make the directories:
$ mkdir -p src/articles && mkdir -p layouts/partials
Then, create the build file:
$ touch build.js
Next, we’ll create some layout files:
$ touch layouts/index.hbs && touch layouts/about.hbs && touch layouts/article.hbs && touch layouts/partials/navigation.hbt
And, finally, we’ll set up our content resources:
$ touch src/index.md && touch src/about.md && touch src/articles/post1.md && touch src/articles/post1.md touch src/articles/post2.md
The project folder should look something like this:
├── build.js ├── layouts │ ├── about.hbs │ ├── article.hbs │ ├── index.hbs │ └── partials │ └── navigation.hbs ├── package-lock.json ├── package.json └── src ├── about.md ├── articles │ ├── post1.md │ └── post2.md └── index.md
Step 3: Let’s add some code
To save space (and time), you can use the commands below to create the content for our fictional website. Feel free to hop into “articles” and create your own blog posts. The key is that the posts need some meta data (also called “Front Matter”) to be able to generate properly. The files you would want to edit are index.md, post1.md and post2.md.
The meta data should look something like this:
--- title: 'Post1' layout: article.hbs --- ## Post content here....
Or, if you’re lazy like me, use these terminal commands to add mock content from GitHub Gists to your site:
$ curl https://gist.githubusercontent.com/jppope/35dd682f962e311241d2f502e3d8fa25/raw/ec9991fb2d5d2c2095ea9d9161f33290e7d9bb9e/index.md > src/index.md $ curl https://gist.githubusercontent.com/jppope/2f6b3a602a3654b334c4d8df047db846/raw/88d90cec62be6ad0b3ee113ad0e1179dfbbb132b/about.md > src/about.md $ curl https://gist.githubusercontent.com/jppope/98a31761a9e086604897e115548829c4/raw/6fc1a538e62c237f5de01a926865568926f545e1/post1.md > src/articles/post1.md $ curl https://gist.githubusercontent.com/jppope/b686802621853a94a8a7695eb2bc4c84/raw/9dc07085d56953a718aeca40a3f71319d14410e7/post2.md > src/articles/post2.md
Next, we’ll be creating our layouts and partial layouts (“partials”). We’re going to use Handlebars.js for our templating language in this tutorial, but you can use whatever templating language floats your boat. Metalsmith can work with pretty much all of them, and I don’t have any strong opinions about templating languages.
Build the index layout
<!DOCTYPE html> <html lang="en"> <head> <style> /* Keeping it simple for the tutorial */ body { font-family: 'Avenir', Helvetica, Arial, sans-serif; -webkit-font-smoothing: antialiased; -moz-osx-font-smoothing: grayscale; text-align: center; color: #2c3e50; margin-top: 60px; } .navigation { display: flex; justify-content: center; margin: 2rem 1rem; } .button { margin: 1rem; border: solid 1px #ccc; border-radius: 4px; padding: 0.5rem 1rem; text-decoration: none; } </style> </head> <body> <div> <a href=""><h3></h3></a> <p></p> </div> </body> </html>
A couple of notes:
Our “navigation” hasn’t been defined yet, but will ultimately replace the area where resides.
will iterate through the “collection” of articles that metalsmith will generate during its build process.
Metalsmith has lots of plugins you can use for things like stylesheets, tags, etc., but that’s not what this tutorial is about, so we’ll leave that for you to explore.
Build the About page
Add the following to your about.hbs page:
<!DOCTYPE html> <html lang="en"> <head> <style> /* Keeping it simple for the tutorial */ body { font-family: 'Avenir', Helvetica, Arial, sans-serif; -webkit-font-smoothing: antialiased; -moz-osx-font-smoothing: grayscale; text-align: center; color: #2c3e50; margin-top: 60px; } .navigation { display: flex; justify-content: center; margin: 2rem 1rem; } .button { margin: 1rem; border: solid 1px #ccc; border-radius: 4px; padding: 0.5rem 1rem; text-decoration: none; } </style> </head> <body> <div> } </div> </body> </html>
Build the Articles layout
<!DOCTYPE html> <html lang="en"> <head> <style> /* Keeping it simple for the tutorial */ body { font-family: 'Avenir', Helvetica, Arial, sans-serif; -webkit-font-smoothing: antialiased; -moz-osx-font-smoothing: grayscale; text-align: center; color: #2c3e50; margin-top: 60px; } .navigation { display: flex; justify-content: center; margin: 2rem 1rem; } .button { margin: 1rem; border: solid 1px #ccc; border-radius: 4px; padding: 0.5rem 1rem; text-decoration: none; } </style> </head> <body> <div> } </div> </body> </html>
You may have noticed that this is the exact same layout as the About page. It is. I just wanted to cover how to add additional pages so you’d know how to do that. If you want this one to be different, go for it.
Add navigation
Add the following to the layouts/partials/navigation.hbs file
<div class="navigation"> <div> <a class="button" href="/">Home</a> <a class="button" href="/about">About</a> </div> </div>
Sure there’s not much to it… but this really isn’t supposed to be a Metalsmith/SSG tutorial. ¯\_(ツ)_/¯
Step 4: The Build file
The heart and soul of Metalsmith is the build file. For sake of thoroughness, I’m going to go through it line-by-line.
We start by importing the dependencies
Quick note: Metalsmith was created in 2014, and the predominant module system at the time was common.js , so I’m going to stick with require statements as opposed to ES modules. It’s also worth noting that most of the other tutorials are using require statements as well, so skipping a build step with Babel will just make life a little less complex here.
// What we use to glue everything together const Metalsmith = require('metalsmith');
// compile from markdown (you can use targets as well) const markdown = require('metalsmith-markdown');
// compiles layouts const layouts = require('metalsmith-layouts');
// used to build collections of articles const collections = require('metalsmith-collections');
// permalinks to clean up routes const permalinks = require('metalsmith-permalinks');
// templating const handlebars = require('handlebars');
// register the navigation const fs = require('fs'); handlebars.registerPartial('navigation', fs.readFileSync(__dirname + '/layouts/partials/navigation.hbt').toString());
// NOTE: Uncomment if you want a server for development // const serve = require('metalsmith-serve'); // const watch = require('metalsmith-watch');
Next, we’ll be including Metalsmith and telling it where to find its compile targets:
// Metalsmith Metalsmith(__dirname) // where your markdown files are .source('src') // where you want the compliled files to be rendered .destination('public')
So far, so good. After we have the source and target set, we’re going to set up the markdown rendering, the layouts rendering, and let Metalsmith know to use “Collections.” These are a way to group files together. An easy example would be something like “blog posts” but it could really be anything, say recipes, whiskey reviews, or whatever. In the above example, we’re calling the collection “articles.”
// previous code would go here
// collections create groups of similar content .use(collections({ articles: { pattern: 'articles/*.md', }, })) // compile from markdown .use(markdown()) // nicer looking links .use(permalinks({ pattern: ':collection/:title' })) // build layouts using handlebars templates // also tell metalsmith where to find the raw input .use(layouts({ engine: 'handlebars', directory: './layouts', default: 'article.html', pattern: ["*/*/*html", "*/*html", "*html"], partials: { navigation: 'partials/navigation', } }))
// NOTE: Uncomment if you want a server for development // .use(serve({ // port: 8081, // verbose: true // })) // .use(watch({ // paths: { // "${source}/**/*": true, // "layouts/**/*": "**/*", // } // }))
Next, we’re adding the markdown plugin, so we can use markdown for content to compile to HTML.
From there, we’re using the layouts plugin to wrap our raw content in the layout we define in the layouts folder. You can read more about the nuts and bolts of this on the official plugin site but the result is that we can use } in a template and it will just work.
The last addition to our tiny little build script will be the build method:
// Everything else would be above this .build(function(err) { if (err) { console.error(err) } else { console.log('build completed!'); } });
Putting everything together, we should get a build script that looks like this:
const Metalsmith = require('metalsmith'); const markdown = require('metalsmith-markdown'); const layouts = require('metalsmith-layouts'); const collections = require('metalsmith-collections'); const permalinks = require('metalsmith-permalinks'); const handlebars = require('handlebars'); const fs = require('fs');
// Navigation handlebars.registerPartial('navigation', fs.readFileSync(__dirname + '/layouts/partials/navigation.hbt').toString());
Metalsmith(__dirname) .source('src') .destination('public') .use(collections({ articles: { pattern: 'articles/*.md', }, })) .use(markdown()) .use(permalinks({ pattern: ':collection/:title' })) .use(layouts({ engine: 'handlebars', directory: './layouts', default: 'article.html', pattern: ["*/*/*html", "*/*html", "*html"], partials: { navigation: 'partials/navigation', } })) .build(function (err) { if (err) { console.error(err) } else { console.log('build completed!'); } });
I’m a sucker for simple and clean and, in my humble opinion, it doesn’t get any simpler or cleaner than a Metalsmith build. We just need to make one quick update to the package.json file and we’ll be able to give this a run:
"name": "buffaloTraceRoute", "version": "1.0.0", "description": "", "main": "index.js", "scripts": { "build": "node build.js", "test": "echo \"No Tests Yet!\" " }, "keywords": [], "author": "Your Name", "license": "ISC", "devDependencies": { // these should be the current versions // also... comments aren't allowed in JSON } }
If you want to see your handy work, you can uncomment the parts of the build file that will let you serve your project and do things like run npm run build. Just make sure you remove this code before deploying.
Working with Cloudflare
Next, we’re going to work with Cloudflare to get access to their Cloudflare Workers. This is where the $5/month cost comes into play.
Now, you might be asking: “OK, but why Cloudflare? What about using something free like GutHub Pages or Netlify?” It’s a good question. There are lots of ways to deploy a static site, so why choose one method over another?
Well, Cloudflare has a few things going for it…
Speed and performance
One of the biggest reasons to switch to a static site generator is to improve your website performance. Using Cloudflare Workers Site can improve your performance even more.
Here’s a graph that shows Cloudflare compared to two competing alternatives:

Courtesy of Cloudflare
The simple reason why Cloudflare is the fastest: a site is deployed to 190+ data centers around the world. This reduces latency since users will be served the assets from a location that’s physically closer to them.
Simplicity
Admittedly, the initial configuration of Cloudflare Workers may be a little tricky if you don’t know how to setup environmental variables. But after you setup the basic configurations for your computer, deploying to Cloudflare is as simple as wrangler publish from the site directory. This tutorial is focused on the CI/CD aspect of deploying to Cloudflare which is a little more involved, but it’s still incredibly simple compared to most other deployment processes.
(It’s worth mentioning GitHub Pages, Netlify are also killing it in this area. The developer experience of all three companies is amazing.)
More bang for the buck
While Github Pages and Netlify both have free tiers, your usage is (soft) limited to 100GB of bandwidth a month. Don’t get me wrong, that’s a super generous limit. But after that you’re out of luck. GitHub Pages doesn’t offer anything more than that and Netlify jumps up to $45/month, making Cloudflare’s $5/month price tag very reasonable.
Service Free Tier Bandwidth Paid Tier Price Paid Tier Requests / Bandwidth GitHub Pages 100GB N/A N/A Netlify 100GB $45 ~150K / 400 GB Cloudflare Workers Sites none $5 10MM / unlimited
Calculations assume a 3MB average website. Cloudflare has additional limits on CPU use. GitHub Pages should not be used for sites that have credit card transactions.
Sure, there’s no free tier for Cloudflare, but $5 for 10 million requests is a steal. I would also be remise if I didn’t mention that GitHub Pages has had a few outages over the last year. That’s totally fine in my book a demo site, but it would be bad news for a business.
Cloudflare offers a ton of additional features for that worth briefly mentioning: free SSL certificates, free (and easy) DNS routing, a custom Workers Sites domain name for your projects (which is great for staging), unlimited environments (e.g. staging), and registering a domain name at cost (as opposed to the markup pricing imposed by other registrars).
Deploying to Cloudflare
Cloudflare provides some great tutorials for how to use their Cloudflare Workers product. We’ll cover the highlights here.
First, make sure the Cloudflare CLI, Wrangler, is installed:
$ npm i @cloudflare/wrangler -g
Next, we’re going to add Cloudflare Sites to the project, like this:
wrangler init --site cms
Assuming I didn’t mess up and forget about a step, here’s what we should have in the terminal at this point:
⬇ Installing cargo-generate... 🔧 Creating project called `workers-site`... ✨ Done! New project created /Users/<User>/Code/cms/workers-site ✨ Succesfully scaffolded workers site ✨ Succesfully created a `wrangler.toml`
There should also be a generated folder in the project root called /workers-site as well as a config file called wrangler.toml — this is where the magic resides.
name = "cms" type = "webpack" account_id = "" workers_dev = true route = "" zone_id = ""
[site] bucket = "" entry-point = "workers-site"
You might have already guessed what comes next… we need to add some info to the config file! The first key/value pair we’re going to update is the bucket property.
bucket = "./public"
Next, we need to get the Account ID and Zone ID (i.e. the route for your domain name). You can find them in your Cloudflare account all the way at the bottom of the dashboard for your domain:
Stop! Before going any further, don’t forget to click the “Get your API token” button to grab the last config piece that we’ll need. Save it on a notepad or somewhere handy because we’ll need it for the next section.
Phew! Alright, the next task is to add the Account ID and Zone ID we just grabbed to the .toml file:
name = "buffalo-traceroute" type = "webpack" account_id = "d7313702f333457f84f3c648e9d652ff" # Fake... use your account_id workers_dev = true # route = "example.com/*" # zone_id = "805b078ca1294617aead2a1d2a1830b9" # Fake... use your zone_id
[site] bucket = "./public" entry-point = "workers-site" (Again, those IDs are fake.)
Again, those IDs are fake. You may be asked to set up credentials on your computer. If that’s the case, run wrangler config in the terminal.
GitHub Actions
The last piece of the puzzle is to configure GitHub to do automatic deployments for us. Having done previous forays into CI/CD setups, I was ready for the worst on this one but, amazingly, GitHub Actions is very simple for this sort of setup.
So how does this work?
First, let’s make sure that out GitHub account has GitHub Actions activated. It’s technically in beta right now, but I haven’t run into any issues with that so far.
Next, we need to create a repository in GitHub and upload our code to it. Start by going to GitHub and creating a repository.
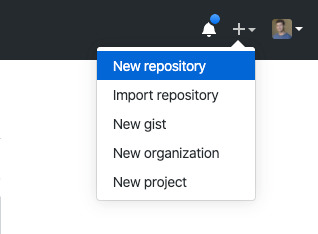
This tutorial isn’t meant to cover the finer points of Git and/or GitHub, but there’s a great introduction. Or, copy and paste the following commands while in the root directory of the project:
# run commands one after the other $ git init $ touch .gitignore && echo 'node_modules' > .gitignore $ git add . $ git commit -m 'first commit' $ git remote add origin https://github.com/{username}/{repo name} $ git push -u origin master
That should add the project to GitHub. I say that with a little hesitance but this is where everything tends to blow up for me. For example, put too many commands into the terminal and suddenly GitHub has an outage, or the terminal unable to location the path for Python. Tread carefully!
Assuming we’re past that part, our next task is to activate Github Actions and create a directory called .github/workflows in the root of the project directory. (GitHub can also do this automatically by adding the “node” workflow when activating actions. At the time of writing, adding a GitHub Actions Workflow is part of GitHub’s user interface.)
Once we have the directory in the project root, we can add the final two files. Each file is going to handle a different workflow:
A workflow to check that updates can be merged (i.e. the “CI” in CI/CD)
A workflow to deploy changes once they have been merged into master (i.e. the “CD” in CI/CD)
# integration.yml name: Integration
on: pull_request: branches: [ master ]
jobs: build: runs-on: ubuntu-latest strategy: matrix: node-version: [10.x, 12.x] steps: - uses: actions/checkout@v2 - name: Use Node.js $ uses: actions/setup-node@v1 with: node-version: $ - run: npm ci - run: npm run build --if-present - run: npm test env: CI: true
This is a straightforward workflow. So straightforward, in fact, that I copied it straight from the official GitHub Actions docs and barely modified it. Let’s go through what is actually happening in there:
on: Run this workflow only when a pull request is created for the master branch
jobs: Run the below steps for two-node environments (e.g. Node 10, and Node 12 — Node 12 is currently the recommended version). This will build, if a build script is defined. It will also run tests if a test script is defined.
The second file is our deployment script and is a little more involved.
# deploy.yml name: Deploy
on: push: branches: - master
jobs: deploy: runs-on: ubuntu-latest name: Deploy strategy: matrix: node-version: [10.x]
steps: - uses: actions/checkout@v2 - name: Use Node.js $ uses: actions/setup-node@v1 with: node-version: $ - run: npm install - uses: actions/checkout@master - name: Build site run: "npm run build" - name: Publish uses: cloudflare/[email protected] with: apiToken: $
Important! Remember that Cloudflare API token I mentioned way earlier? Now is the time to use it. Go to the project settings and add a secret. Name the secret CF_API_TOKEN and add the API token.
Let’s go through whats going on in this script:
on: Run the steps when code is merged into the master branch
steps: Use Nodejs to install all dependencies, use Nodejs to build the site, then use Cloudflare Wrangler to publish the site
Here’s a quick recap of what the project should look like before running a build (sans node_modules):
├── build.js ├── dist │ └── worker.js ├── layouts │ ├── about.hbs │ ├── article.hbs │ ├── index.hbs │ └── partials │ └── navigation.hbs ├── package-lock.json ├── package.json ├── public ├── src │ ├── about.md │ ├── articles │ │ ├── post1.md │ │ └── post2.md │ └── index.md ├── workers-site │ ├── index.js │ ├── package-lock.json │ ├── package.json │ └── worker │ └── script.js └── wrangler.toml
A GitHub-based CMS
Okay, so I made it this far… I was promised a CMS? Where is the database and my GUI that I log into and stuff?
Don’t worry, you are at the finish line! GitHub is your CMS now and here’s how it works:
Write a markdown file (with front matter).
Open up GitHub and go to the project repository.
Click into the “Articles” directory, and upload the new article. GitHub will ask whether a new branch should be created along with a pull request. The answer is yes.
After the integration is verified, the pull request can be merged, which triggers deployment.
Sit back, relax and wait 10 seconds… the content is being deployed to 164 data centers worldwide.
Congrats! You now have a minimal Git-based CMS that basically anyone can use.
Troubleshooting notes
Metalsmith layouts can sometimes be kinda tricky. Try adding this debug line before the build step to have it kick out something useful: DEBUG=metalsmith-layouts npm run build
Occasionally, Github actions needed me to add node_modules to the commit so it could deploy… this was strange to me (and not a recommended practice) but fixed the deployment.
Please let me know if you run into any trouble and we can add it to this list!
The post How to Make a Simple CMS With Cloudflare, GitHub Actions and Metalsmith appeared first on CSS-Tricks.
source https://css-tricks.com/how-to-make-a-simple-cms-with-cloudflare-github-actions-and-metalsmith/
from WordPress https://ift.tt/3bAGXVM
via IFTTT
0 notes
Text
5 basic strides to the website architecture process
Website specialists frequently consider the website composition process with an attention on specialized issues, for example, wireframes, code, and substance the board. In any case, incredible structure isn't about how you coordinate the online life fastens or even smooth visuals. Incredible structure is in reality about having a site creation process that lines up with an overall system.
All around planned sites offer considerably more than just feel. They draw in guests and assist individuals with understanding the item, organization, and marking through an assortment of pointers, including visuals, content, and connections. That implies each component of your site needs to progress in the direction of a characterized objective.
Yet, how would you accomplish that amicable amalgamation of components? Through an all encompassing web design goa process that considers both structure and capacity.
For me, steps to structure a site requires 5 stages:
Objective ID: Where I work with the customer to figure out what objectives the new site needs to satisfy. I.e., what its motivation is.
Extension definition: Once we know the site's objectives, we can characterize the extent of the task. I.e., what website pages and highlights the webpage requires to satisfy the objective, and the timetable for building those out.
Sitemap and wireframe creation: With the degree all around characterized, we can begin diving into the sitemap, characterizing how the substance and highlights we characterized in scope definition will interrelate.
Content creation: Now that we have a greater image of the site as a top priority, we can begin making content for the individual pages, continually keeping site improvement (SEO) as a primary concern to help keep pages concentrated on a solitary point. It's fundamental that you have genuine substance to work with for our next stage:
Visual components: With the site engineering and some substance set up, we can begin taking a shot at the visual brand. Contingent upon the customer, this may as of now be very much characterized, yet you may likewise be characterizing the visual style starting from the earliest stage. Apparatuses like style tiles, moodboards, and component collections can help with this procedure.
Testing: By now, you have every one of your pages and characterized how they show to the site guest, so it's a great opportunity to ensure everything works. Join manual perusing of the site on an assortment of gadgets with mechanized site crawlers to distinguish everything from client experience issues to basic broken connections.
Dispatch: Once everything's working perfectly, it's an ideal opportunity to design and execute your site dispatch! This ought to incorporate arranging both dispatch timing and correspondence systems — i.e., when will you dispatch and by what means will you let the world know? From that point forward, it's an ideal opportunity to break out the bubbly.
Since we've traces the procedure, how about we dive somewhat more profound into each progression.
The website architecture process in 5 basic advances
So as to configuration, construct, and dispatch your site, it's critical to follow these means:
1. Objective recognizable proof
Right now, the fashioner needs to recognize the ultimate objective of the web architecture, typically in close coordinated effort with the customer or different partners. Inquiries to investigate and reply right now the structure and site advancement process include:
Who is the site for?
What do they hope to discover or do there?
Is this current site's essential plan to advise, to sell (web based business, anybody?), or to divert?
Does the site need to unmistakably pass on a brand's center message, or is it part of a more extensive marking methodology with its own remarkable core interest?
What contender locales, assuming any, exist, and by what method should this site be propelled by/not quite the same as, those contenders?
This is the most significant piece of any web improvement process. On the off chance that these inquiries aren't all plainly replied in the concise, the entire undertaking can set off course.
It might be helpful to work out at least one plainly recognized objectives, or a one-section rundown of the normal points. This will assist with putting the plan on the correct way. Ensure you comprehend the site's intended interest group, and build up a working information on the challenge.
For additional on this structure stage, look at "The cutting edge website composition process: defining objectives."
Instruments for site objective ID arrange
Crowd personas
Inventive brief
Contender examinations
Brand traits
2. Extension definition
One of the most widely recognized and troublesome issues tormenting website architecture ventures is extension creep. The customer defines out in light of one objective, however this progressively extends, advances, or changes out and out during the plan procedure — and the before you know it, you're planning and building a site, yet in addition a web application, messages, and pop-up messages.
This isn't really an issue for fashioners, as it can regularly prompt more work. Be that as it may, if the expanded desires aren't coordinated by an expansion in spending plan or course of events, the undertaking can quickly turn out to be absolutely ridiculous.
A Gantt graph, which subtleties a sensible course of events for the task, including any significant milestones, can assist with defining limits and feasible cutoff times. This gives an important reference to the two creators and customers and helps keep everybody concentrated on the undertaking and objectives close by.
Devices for scope definition
An agreement
Gantt diagram (or other course of events representation)
3. Sitemap and wireframe creation
The sitemap gives the establishment to any very much planned site. It assists give with webbing creators an away from of the site's data engineering and clarifies the connections between the different pages and substance components.
Building a site without a sitemap resembles building a house without an outline. What's more, that once in a while ends up well.
The following stage is to discover some plan motivation and assemble a mockup of the wireframe. Wireframes give a structure to putting away the site's visual plan and substance components, and can help distinguish potential difficulties and holes with the sitemap.
Albeit a wireframe doesn't contain any last structure components, it acts as a guide for how the site will eventually look. It can likewise go about as motivation for the organizing of different components. A few architects utilize smooth instruments like Balsamiq or Webflow to make their wireframes. I for one prefer to return to rudiments and utilize the trusty ole paper and pencil.
Apparatuses for sitemapping and wireframing
Pen/pencil and paper
Balsamiq
Moqups
Sketch
Axure
Webflow
Slickplan
Writemaps
Mindnode
4. Content creation
When your site's structure is set up, you can begin with the most significant part of the site: the composed substance.
Content fills two fundamental needs:
Reason 1. Content drives commitment and activity
In the first place, content draws in perusers and drives them to take the activities important to satisfy a site's objectives. This is influenced by both the substance itself (the composition), and how it's displayed (the typography and auxiliary components).
Dull, dead, and overlong exposition once in a while saves guests' consideration for long. Short, smart, and interesting substance gets them and gets them to navigate to different pages. Regardless of whether your pages need a ton of substance — and regularly, they do — appropriately "piecing" that content by separating it into short sections enhanced by visuals can assist it with keeping a light, captivating feel.
Reason 2: SEO
Content likewise helps a site's perceivability for web crawlers. The act of creation and improving substance to rank well in search is known as site design improvement, or SEO.
Getting your catchphrases and key-expresses right is fundamental for the achievement of any site. I generally use Google Keyword Planner. This instrument shows the quest volume for potential objective catchphrases and expressions, so you can focus on what genuine people are looking on the web. While web crawlers are turning out to be increasingly astute, so should your substance procedures. Google Trends is likewise helpful for distinguishing terms individuals really use when they search.
My structure procedure centers around planning sites around SEO. Watchwords you need to rank for should be put in the title tag — the closer to the start, the better. Catchphrases ought to likewise show up in the H1 tag, meta portrayal, and body content.
Content that is elegantly composed, useful, and watchword rich is all the more handily got via web indexes, all of which assists with making the webpage simpler to discover.
Commonly, your customer will create the greater part of the substance, yet it's fundamental that you supply them with direction on what watchwords and expressions they ought to remember for the content.
Amazing substance creation instruments
Google Docs
Dropbox Paper
Jest
Accumulate Content
Webflow CMS (content administration framework)
Convenient SEO devices
Google Keyword Planner
Google Trends
Shouting Frog's SEO Spider
5. Visual components
At last, it's an ideal opportunity to make the visual style for the site. This piece of the structure procedure will frequently be formed by existing marking components, shading decisions, and logos, as stipulated by the customer. But on the other hand it's the phase of the website composition process here a decent website specialist can truly sparkle.
Pictures are taking on a more huge job in website composition now than any time in recent memory. Not exclusively do top notch pictures give a site an expert look and feel, however they additionally convey a message, are versatile well disposed, and help manufacture trust.
Visual substance is known to expand snaps, commitment, and income. In any case, more than that, individuals need to see pictures on a site. In addition to the fact that images make a page feel less bulky and simpler to process, yet they additionally upgrade the message in the content, and can even pass on crucial messages without individuals in any event, expecting to peruse.
I prescribe utilizing an expert picture taker to get the pictures right. Simply remember that gigantic, excellent pictures can genuinely hinder a site. I use Optimizilla to pack pictures without losing quality, saving money on page-load times. You'll additionally need to ensure your pictures are as responsive as your site.
The visual plan is an approach to convey and speak to the site's clients. Take care of business, and it can be decided with this site https://coderun.in/
0 notes
Text
20 must-know digital marketing definitions

There are many definitions and acronyms which people nowadays use very casually in conversations. If you aren’t sure what these really mean, you can feel left out and uncertain about the real meaning. Here are some of the most important and common definitions which I think are important to get to know with when the topic slips to digital marketing.
1. SEO – Search Engine Optimisation
With SEO you can make a world of difference in your digital marketing strategy and every small business just has got to have it. Basically, the meaning of it is the process of making changes to your website design and content in order to help it appear in the search engines. For example, you can use Google to help people find your content.
2. SEM – Search Engine Marketing
While good search engine optimization (SEO) might take time, search engine marketing (SEM) can help you save a lot of time. By search engine marketing you pay to show your ads to users who are actively searching for the keywords you are targeting. Using SEO and/or SEM you will end up getting a lot more leads and sales when you implement both of them.
3. CMS – Content Management System
In it’s simplest terms, a content management system is a generic term for an information system that serves the entire organization’s content management rather than focusing on just one particular area such as managing online services. CMS is the solution to the problem of managing large amounts of content. These information systems nowadays often function as web-based online tools, and well-known CMS tools include WordPress, Joomla, Weebly, and Wix.
4. META Description
The Meta description tag is a description of a single web (HTML) page and a summary which appears in the Google search results below the title tag. A maximum length of the Meta description is 154 characters and to make it the most attractive and interesting to the potential visitors, it should be a shortcut to the main content of the page which includes the main keywords.
5. CTR – Click-Through Rate
A click-through rate tells you the percentage of people who click on a specific link in a page, email or advertisement. A high click-through rate is a good indication that the ad is resonating with the target audience and it is interesting the right people. A high CTR is a great indication of getting more leads and sales, which lets you get closer to your goals.
6. CPA – Cost Per Action/Acquisition
CPA which stands for cost per action is also known as cost per acquisition. It is an online advertising pricing model where the advertiser pays for a specified action like the sale of a product, contact, click or form submit.
7. CPC – Cost Per Click
Like CPA, CPC is also a pricing model but which is used, for example, in search engine advertising and other online advertising. A price per click is a price you pay for one click on your ad. This is a more preferred type of paid inclusion for advertisers because they are only paying for when the desired outcome is achieved.
8. Keyword
A keyword is a word or phrase that the audience uses to search for relevant topics on search engines. It describes the content on a web page the best and when people use that keyword, search engines will match a page with an appropriate search query.
9. Organic Traffic
In digital advertising, the term ”organic traffic” is used for referring to the visitors that visit your website as a result of unpaid search results. It is the opposite of paid traffic, and they find your website after using a search engine like Google or Yahoo. One of the easiest ways to increase the organic traffic of your website is to publish regularly quality and relevant content on a blog.
10. Paid Traffic
Paid traffic involves paying someone else to provide it, for example buying display ads as well as traffic from pay per click advertising. One of the most popular ways to get visitors to a website is with paid traffic and it can be an extremely useful tool when used well. Even when your marketing focus is on social media and content creation, there are no entirely free ways to get traffic to your website, blog, etc.
11. Viral Marketing
In viral marketing, the advertising message goes very quickly from person to person. It is a relatively new marketing technique, and it spreads over the internet like a virus, that’s why it is also known by the name ”virus marketing”. It is a business strategy that uses existing social networks to promote a product.
12. Subscriber
A subscriber is a person who allows a company to send him/her messages most commonly through emails. When you have an e-commerce business, you might want to consider a subscription box where people can join your mailing list.
13. ROI – Return on Investment
Return on investment is not only used in marketing, but also in other parts of the business. It represents the financial benefit received from an investment, in other words, it’s a measure of what you get back compared to what you put in. To find it out, you can use a formula:
ROI=(Profit – Cost)/Cost
14. Landing Page
Basically, the landing page has one purpose, and that is to make a sale or capture a lead. When potential customers click an ad or post, the page they land after clicking is called a landing page. It’s not a home page for your site, and typically it doesn’t link to other pages on your site or have a navigation bar. The only goal a landing page should have is to get the potential customers to convert right there and then on that very moment when they are led to the landing page.
15. CPM – Cost Per Mille (Cost Per Thousand)
Cost per mille is mostly known in marketing as cost per thousand. It is a term that denotes the cost of displaying an advertisement one thousand times. It is especially helpful for e-commerce businesses and it is used in advertising settings such as podcasting, newspapers, television, radio, magazines and online advertising.
16. CR - Conversion Rate
A definition for conversion rate is the percentage of visitors who take the desired action, which can vary from site to site for example sales of products, membership registrations, newsletter subscriptions, software downloads, or any activity beyond simple page browsing.
17. CX – Customer Experience
CX is an aggregate of customer experience, which refers to a customer’s experience with a company or brand. With positive customer experience, you can make your customers happy, which most likely will lead to additional revenue.
18. CLV – Customer Lifetime Value (LTV)
Customer lifetime value, also known by aggregate LTV, is one of the most important metrics to measure at any growing company. It is the total net worth to a business of a customer over the whole period of their relationship. To measure the customer lifetime value, the simplest formula for measuring it is the average order total multiplied by the average number of purchases in a year and then multiplied by the average retention time in years.
19. B2B – Business to Business
Business-to-business (B2B) means commerce between two businesses. Transactions at the wholesale level are usually business-to-business. Simplest put, B2B –business sells products or services to other businesses. It is commerce between two or more businesses.
20. B2C – Business to Consumer
Unlike B2B, business to consumer refers to the transactions conducted directly between a company and consumers who are the end-users of its products or services.
Sources;
Business2community
WMEGroup
CMS
Meta
CTR
CPA&CPC
ROI
LandingPage
CPM
CR
CX
CLV
0 notes
Text
How To Use Advanced Custom Fields (ACF) in WordPress
Out of the box, WordPress is a really easy to use, simple blogging platform. What gives you the ability to turn WordPress into a full-on CMS (content management system) and run just about any type of website is its powerful and flexible plugin system. One of the best plugins to help you do that is Advanced Custom Fields (ACF).
ACF is without a doubt our most used plugin for WordPress sites. (If you’re interested in some other plugins we use all the time, check out our post about our top 10 WordPress plugins). I don’t think there’s a project I have worked on where Advanced Custom Fields isn’t installed. In case you hadn’t guessed from the name, ACF allows you to add custom data fields to just about any object in your WordPress install. This is great when you are building or customising a theme and need finer control over the data attached to each object (post, page etc) than simply the title and content.
We’re going to go through some of the field types here in a little detail. If you just want to see how to use ACF, you can skip to here.
Types of ACF Fields
Before we get started, let’s take a quick look at the types of field you can add to posts using ACF. There are a huge number of types of field you can add using ACF, and even more available through add-ons and extensions. The ACF documentation is a great resource for info on how to use it, and what fields are available. We’ll quickly look into some of the more commonly use field types.
Text
The text field is the most basic field you can add to a post with Advanced Custom Fields. It will accept a string of text or HTML, and can be configured to limit the length of the content, append or prepend text to the output and a few other features. You’ll use this field really often, so it’s worth being familiar with. The text field returns simply the text entered (with any modifications you have specified) and can be printed out to the screen.
Image
The image field is really easy to use and uses the built in WordPress media library functions and image selector. The image field can either return an array of image data, or the chosen image ID. The array of image data contains pretty much all the information that exists about the image, so it is really useful. Check the documentation for details on how to use it.
Gallery
The gallery field works in much the same way as the image field, but it lets you select multiple images to make up a gallery. You can change the order of the images to suit by dragging them into the order you like. My only complaint about the gallery field type is that it would be really helpful if you could add a caption to images that is not the same as the caption that is stored against the image in the media library. This would be useful if, for example, you wanted to use the same image in two galleries with a differing caption.
Link & Page Link
The link and page link field types are ways of linking to some other content. The link field is exactly the same as the link editor you use in the normal WordPress content editor and allows you to specify a URL, title and target. The page link field is slightly more restrictive and only allows you to select a page or post (or custom post type) from within your site and will return the URL for that.
Post Object
The post object field type allows you to select one or multiple posts and returns an array of all the post data. This is really useful in conjunction with a repeater field to do things like show some related posts.
Repeater
The repeater is one of a couple of field types that are reserved for users of the pro version of the plugin. It is one of the field types that I use most commonly, however, and is one of the reasons I think ACF pro is worth the purchase! The repeater basically allows you to have a group of fields that can be repeated multiple times. Let’s take my complaint about the gallery field type from above, where we’d like to have a gallery with a caption for each image. We could use a repeater which has an image field and a text field inside it. Then we can add rows to the repeater for each image and it’s caption in our gallery. This type of functionality is really great when you need to allow for repeatable content but you don’t necessarily know how much content there will be. If the concept is still a little unclear, read on to our example below.
Flexible Content
The flexible content field is another field, like the repeater, that is reserved to the pro version. I’m not going to go into too much detail here on the flexible content field, but it is really really powerful. It works a lot like the repeater field, except instead of each row being the same (e.g. image, text to use the example above) you can specify different presets that can be applied. For example I might have a row that is image & text, but the next row is a post object. It’s really useful, and can be great for building more complicated layouts like home or landing pages.
Get Started
Ok, that’s enough about the field types, let’s get straight into some examples of how to use them!
Install ACF
If you haven’t done so already, install the Advanced Custom Fields plugin. You can find it by heading into your WordPress admin, plugins, add plugin and search for ACF. Alternatively you can download it from https://ift.tt/1xnQFBZ however I highly recommend heading over to the ACF site and purchasing the pro version. Pricing is AU$25 for a single site or AU$100 for unlimited sites and it’s well worth it.
1. Getting Started + Basic: Text
We’ll start off with a really simple example to get going: adding a text field to a post. There are three parts to any ACF setup; 1) Configure your custom fields and settings in the admin panel, 2) set up your template (front end) to use your newly configured custom fields and 3) put some data in your custom fields. So we’ll start off at the beginning and configure some custom fields.
Start by logging in to your WordPress admin, then in the menu find Custom Fields and hit Add New in Field Groups. Custom fields are organised by group, and the rules for what post types etc to show the fields on are set per group. Once you’ve hit Add New you should see something like this.
Although not necessary, we’re going to start by setting a title.
Next, we’re going to add a field. Click Add Field, and set a the Field Label. In this case we’re going to create an Alternative Title for the page so that’s what we’ve called the field. Each field needs to have a unique slug, just like a post. ACF will create the slug for you from the label if it’s empty, so in this case ACF has given us “alternative_title” and we’re going to leave it that way. Finally we need to choose the Field Type. In this case we’re using a text field so go ahead and choose that (text should be the default option anyway).
There are quite a few other settings that we could set, such as some instructions that are shown to authors when setting the content, setting the field to required, setting a default value and so-on. For now we’re going to leave these as default, but feel free to have a look through and change any that you want.
Scroll down to the Location meta box. This is where we can set the rules that determine what post types, pages, etc that this field group will show up for. We want this field group to show up on normal posts, so we’re going to set Post Type equal to Post.
There is a final Settings meta box below that controls a few general settings for the field group, however for most cases the defaults will do. Leave the default settings here and hit Publish.
Next we need to set a value for our custom field so we can test. Find a post you can edit, and jump in to the editor. You should find a meta-box with the title of the field group you created in the previous step. We named ours “Test”. (We’re using WP5/Gutenberg so our meta-box is below the gutenberg editor area).
Enter a value for your Alternative Title and save your post. We’re done in WordPress for now, so fire up your favourite editor so we can edit theme files (or edit them via the WordPress appearance editor if you’re a savage like that…)
Which file to edit will depend on your theme. We want to edit the file that shows the single post title. In our case our theme uses single.php which then loads template-parts/content.php. The line we’re looking for is the_title which is the wordpress function that prints the post title. In our case our code looks like this;
<?php //template-parts/content.php ?> <article <?php post_class(); ?> id="post-<?php the_ID(); ?>"> <header class="entry-header"> <?php the_title( sprintf( '<h1 class="entry-title"><a href="%s" rel="bookmark">', esc_url( get_permalink() ) ), '</a></h1>' ); ?> </header><!-- .entry-header --> ... </article>
Let’s start very simply by refactoring this bit of code to make it accept our alternative title. We’re going to take the h1 and a tags and wrap them around the the_title call.
<article <?php post_class(); ?> id="post-<?php the_ID(); ?>"> <header class="entry-header"> <?php //Print the opening H1 and anchor echo sprintf( '<h1 class="entry-title"><a href="%s" rel="bookmark">', esc_url( get_permalink() )); //Print the title the_title( ); //CLose the anchor and H1 echo '</a></h1>' ?> </header><!-- .entry-header --> ... </article>
Ok, with that done, quickly view your post; it should all look the same. Check the source to make sure.
Now for the fun part, this is where we are actually going to use ACF. The primary function provided by ACF is get_field. Get field is a powerful and flexible function that takes one required parameter: the field slug. Using our example, we will call get_field(‘alternative_title’). We’re going to store the value returned from get_field in a variable called $alternative_title. Lastly we’ll check whether an alternative title has been set, and if so, print it. Otherwise we’ll print the original title.
<article <?php post_class(); ?> id="post-<?php the_ID(); ?>"> <header class="entry-header"> <?php //Get the alternative title $alternative_title = get_field('alternative_title'); //Print the opening H1 and anchor echo sprintf( '<h1 class="entry-title"><a href="%s" rel="bookmark">', esc_url( get_permalink() )); //Print the title if($alternative_title && !empty($alternative_title)) { //If the alternative title has been set, use that echo $alternative_title; } else { the_title( ); } //CLose the anchor and H1 echo '</a></h1>' ?> </header><!-- .entry-header --> ... </article>
And that’s it! Save your file, upload to your webserver (if running remotely), and refresh your post in the browser. You should see your alternative title in place of the post title.
2. Basic Image
Next we’re going to look at adding an image to a post. Note that realistically this is probably a waste of time as we could use the built in featured image, but just like the title, maybe we want an override for some reason.
Let’s start by configuring our custom field. Edit your field group and add a new field. We’re going to call it Alternative Image and set the slug to alternative_image. The important extra step here is to select Image for the field type.
There is one other configuration field of interest here, the Return Value. The text field type can only return text, so that’s easy. The image field can return an array, the original URL of the image, or the image ID. We’re going to use the array as that gives us the most flexibility. We could use the URL, however we lose the ability to use WordPress’ image sizes and can’t necessarily serve the best image to the user.
Click Update and save the field group. Next we need to set a value for the field so we can test. Jump back to your post editor (refresh it to see the new field if you already had it open).
Select an image to use by clicking Add Image and either uploading or selecting one from your media library. Once you’ve done that, save your post and jump back in to your editor. We need to again look for the file that outputs a single post. We’re going to print out the alternative image below the heading, but this time we’re going to ignore whether a featured image has been set. Start looking in single.php. Again, in my case, single.php loads template-parts/content.php so that’s where we’ll be working.
... </header><!-- .entry-header --> <a class="post-thumbnail" href="<?php the_permalink(); ?>" aria-hidden="true" tabindex="-1"> <?php the_post_thumbnail( 'post-thumbnail', array( 'alt' => the_title_attribute( array( 'echo' => false, ) ), ) ); ?> </a> <div class="entry-content"> ...
In our template, we’ve got an anchor that is wrapping the post thumbnail function. What we’re going to do is add our alternative image after this.
The simplest way to print out the image HTML (and use responsive images!) is to use WordPress’ built int wp_get_attachment_image. Fortunately ACF works really well with this.
... </header><!-- .entry-header --> <a class="post-thumbnail" href="<?php the_permalink(); ?>" aria-hidden="true" tabindex="-1"> <?php the_post_thumbnail( 'post-thumbnail', array( 'alt' => the_title_attribute( array( 'echo' => false, ) ), ) ); ?> </a> <?php //Get the image field $image = get_field('alternative_image'); $size = 'full'; // (thumbnail, medium, large, full or custom size) if( $image ) { //Print the image HTML (responsive) echo wp_get_attachment_image( $image['ID'], $size ); } ?> <div class="entry-content"> ...
Save your code, upload and refresh your post. You should see your alternative image! Easy as.
Summary
ACF can completely change the way WordPress can be used to manage website content. Hopefully this guide on how to use Advanced Custom Fields has helped you learn! The ACF website has some great examples on how to use the various field types, as well as a list of code examples, so don’t forget to check that out as well.
The post How To Use Advanced Custom Fields (ACF) in WordPress appeared first on The Coding Bus.
from WordPress https://ift.tt/32RRx8I
via IFTTT
0 notes
Text
rel=canonical: the ultimate guide
Joost de Valk
Joost de Valk is the founder and Chief Product Officer of Yoast. He’s a digital marketer, developer and an Open Source fanatic.
A canonical URL lets you tell search engines that certain similar URLs are actually the same. Because sometimes you have products or content that can be found on multiple URLs — or even multiple websites. By using canonical URLs (HTML link tags with the attribute rel=canonical) you can have these on your site without harming your rankings. In this ultimate guide, I’ll discuss what canonical URLs are, when to use them, and how to prevent or fix a few common mistakes!
Table of contents
What is the canonical link element?
The rel=canonical element, often called the “canonical link”, is an HTML element that helps webmasters prevent duplicate content issues. It does so by specifying the “canonical URL”, the “preferred” version of a web page – the original source, even. And this improves your site’s SEO.
The idea is simple. If you have several versions of the same content, you pick one “canonical” version and point the search engines at it. This solves the duplicate content problem where search engines don’t know which version to show in their results.
The SEO benefit of rel=canonical
Choosing a proper canonical URL for every set of similar URLs improves the SEO Company of your site. This is because the search engine knows which version is canonical, and can count all the links pointing at the different versions as links to the canonical version. In concept, setting a canonical is similar to a 301 redirect, only without the actual redirecting.
The history of rel=canonical
The canonical link element was introduced by Google, Bing, and Yahoo! in February 2009. If you’re interested in its history, I would recommend Matt Cutts’ post from 2009. This post gives you some background and links to different interesting articles. Or watch the video of Matt introducing the canonical link element. Because, although the idea is simple, the specifics of how to use it are often a bit more complex.
The process of canonicalization
Ironic side note
The term Canonical comes from the Roman Catholic tradition, where a list of sacred books was created and accepted as genuine and named the canonical Gospels of the New Testament. The irony is it took the Roman Catholic church about 300 years and numerous fights to come up with the canonical list, and they eventually chose four versions of the same story…
When you have several choices for a product’s URL, canonicalization is the process of picking one of them. Luckily, it will be obvious in many cases: one URL will be a better choice than others. But in some cases, it might not be as obvious. This is nothing to worry about. Even then it’s still pretty simple: just pick one! Not canonicalizing your URLs is always worse than canonicalizing your URLs.
How to set canonical URLs
Let’s assume you have two versions of the same page, each with exactly – 100% – the same content. The only difference is that they’re in separate sections of your site. And because of that the background color and the active menu item are different – but that’s it. Both versions have been linked to from other sites, so the content itself is clearly valuable. So which version should search engines show in results?
For example, these could be their URLs:
https://example.com/wordpress/SEO Company-plugin/
https://example.com/wordpress/plugins/SEO Company/
A correct example of using rel=canonical
The situation described above occurs fairly often, especially in a lot of e-commerce systems. A product can have several different URLs depending on how you got there. But this is exactly what rel=canonical was invented for. In this case, you would apply rel=canonical as follows:
Pick one of your two pages as the canonical version. This should be the version you think is the most important. If you don’t care, pick the one with the most links or visitors. When all these factors are equal, flip a coin. You just need to choose.
Add a rel=canonical link from the non-canonical page to the canonical one. So if we picked the shortest URL as our canonical URL, the other URL would link to the shortest URL in the <head> section of the page – like this:
<link rel="canonical" href="https://example.com/wordpress/SEO Company-plugin/" />
It’s as easy as that! Nothing more, nothing less.
What this does is “merge” the two pages into one from a search engine’s perspective. It’s a “soft redirect”, without actually redirecting the user. Links to both URLs now count as the single, canonical version of the URL.
Want to know more about the use of rel=canonical on category and product pages of your eCommerce site? I also discuss this topic in this Ask Yoast video.
Setting the canonical URL in Yoast SEO
Our Yoast SEO WordPress plugin lets you change the canonical URL of several page types in the plugin settings. You only need to do this if you want to change the canonical to something different from the current page’s URL. Yoast SEO Company already renders the correct canonical URL for almost any page type in a WordPress install.
For posts, pages, and custom post types, you can edit the canonical URL in the advanced tab of the Yoast SEO Company metabox:
Setting a canonical URL in Yoast SEO Company
For categories, tags and other taxonomy terms, you can change the canonical URL in the same place in the Yoast SEO Company metabox. If you have other advanced use cases, you can also use the wpSEO Company_canonical filter to change the Yoast SEO Company output.
When should you use canonical URLs?
Yoast Duplicate Post
Canonicals can help you out when your site benefits from similar content on different pages. Creating these pages can take up a lot of your time. If you’re looking for an easy way to duplicate posts or pages, Yoast Duplicate Post is the plugin for you!
This plugin can save you loads of time by copying things like the text, featured image, meta data, and SEO Company optimizations. That way you don’t have to start from scratch with every new page. Just don’t forget to set a canonical if your copied page is very similar to the original.
301 redirect or canonical
If you are unsure whether to do a 301 redirect or set a canonical, what should you do? The answer is simple: you should always do a redirect, unless there are technical reasons not to. If you can’t redirect because that would harm the user experience or be otherwise problematic, then set a canonical URL.
Should a page have a self-referencing canonical URL?
In the image above, we link the non-canonical page to the canonical version. But should a page set a rel=canonical for itself? This question is a much-debated topic amongst SEO Companys. At Yoast, we strongly recommend having a canonical link element on every page and Google has confirmed that’s best. That’s because most CMS’s will allow URL parameters without changing the content. So all of these URLs would show the same content:
https://example.com/wordpress/SEO Company-plugin/
https://example.com/wordpress/SEO Company-plugin/?isnt=it-awesome
https://example.com/wordpress/SEO Company-plugin/?cmpgn=twitter
https://example.com/wordpress/SEO Company-plugin/?cmpgn=Facebook
The issue is that if you don’t have a self-referencing canonical on the page that points to the cleanest version of the URL, you risk being hit by this. And if you don’t do it yourself, someone else could do it to you and cause a duplicate content issue. So adding a self-referencing canonical to URLs across your site is a good “defensive” SEO Company move. Luckily, our Yoast SEO Company plugin takes care of this for you.
Cross-domain canonical URLs
Perhaps you have the same piece of content on several domains. There are sites or blogs that republish articles from other websites on their own, as they feel the content is relevant for their users. In the past, we’ve had websites republishing articles from Yoast.com as well (with express permission).
But if you had looked at the HTML of every one of those articles you’d found a rel=canonical link pointing right back to our original article. This means all the links pointing to their version of the article count towards the ranking of our canonical version. They get to use our content to please their audience, and we get a clear benefit from it too. This way everybody wins!
Faulty canonical URLs: common issues
There are many examples out there of how a wrong rel=canonical implementation can lead to huge issues. I’ve seen several sites where the canonical on their homepage pointed at an article, only to see their home page disappear from search results. But that’s not all. There are other things you should never do with rel=canonical. Here are the most important ones:
Don’t canonicalize a paginated archive to page 1. The rel=canonical on page 2 should point to page 2. If you point it to page 1, search engines will actually not index the links on those deeper archive pages.
Make them 100% specific. For various reasons, many sites use protocol-relative links, meaning they leave the http / https bit from their URLs. Don’t do this for your canonicals. You have a preference, so show it.
Base your canonical on the request URL. If you use variables like the domain or request URL used to access the current page while generating your canonical, you’re doing it wrong. Your content should be aware of its own URLs. Otherwise, you could still have the same piece of content on – for instance – example.com and www.example.com and have each of them canonicalize to themselves.
Multiple rel=canonical links on a page cause havoc. When we encounter this in WordPress plugins, we try to reach out to the developer doing it and teach them not to, but it still happens. And when it does, the results are wholly unpredictable.
Read more: 6 common SEO mistakes and how to avoid them »
rel=canonical and social networks
Facebook and Twitter honor rel=canonical too, and this might lead to weird situations. If you share a URL on Facebook that has a canonical pointing elsewhere, Facebook will share the details from the canonical URL. In fact, if you add a ‘like’ button on a page that has a canonical pointing elsewhere, it will show the like count for the canonical URL, not for the current URL. Twitter works in the same way. So be aware of this when sharing URLs or when using these buttons.
Advanced uses of rel=canonical
Canonical link HTTP header
Google also supports a canonical link HTTP header. The header looks like this:
Link: <https://www.example.com/white-paper.pdf>; rel="canonical"
Canonical link HTTP headers can be very useful when canonicalizing files like PDFs, so it’s good to know that the option exists.
Using rel=canonical on not so similar pages
While I wouldn’t recommend this, you can use rel=canonical very aggressively. Google honors it to an almost ridiculous extent, where you can canonicalize a very different piece of content to another piece of content. However, if Google does catch you doing this, it will stop trusting your site’s canonicals and thus cause you more harm…
Using rel=canonical in combination with hreflang
We also talk about canonical in our ultimate guide to hreflang. That’s because it’s very important that when you use hreflang, each language’s canonical points to itself. Make sure that you understand how to use canonical well when you’re implementing hreflang, as otherwise, you might kill your entire hreflang implementation.
Conclusion: rel=canonical is a power tool
Rel=canonical is a powerful tool in an SEO Company’s toolbox. Especially for larger sites, the process of canonicalization can be very important and lead to major SEO Company improvements. But like with any power tool, you should use it wisely as it’s easy to cut yourself. I hope this guide has helped you gain an understanding of this powerful tool and how (and when) you can use it.
Keep reading: WordPress SEO: The definitive guide to higher rankings for WordPress sites »
SEO Company by DBL07.co
Via http://www.scpie.org/relcanonical-the-ultimate-guide/
source https://scpie.weebly.com/blog/relcanonical-the-ultimate-guide
0 notes
Text
rel=canonical: the ultimate guide
Joost de Valk
Joost de Valk is the founder and Chief Product Officer of Yoast. He’s a digital marketer, developer and an Open Source fanatic.
A canonical URL lets you tell search engines that certain similar URLs are actually the same. Because sometimes you have products or content that can be found on multiple URLs — or even multiple websites. By using canonical URLs (HTML link tags with the attribute rel=canonical) you can have these on your site without harming your rankings. In this ultimate guide, I’ll discuss what canonical URLs are, when to use them, and how to prevent or fix a few common mistakes!
Table of contents
What is the canonical link element?
The rel=canonical element, often called the “canonical link”, is an HTML element that helps webmasters prevent duplicate content issues. It does so by specifying the “canonical URL”, the “preferred” version of a web page – the original source, even. And this improves your site’s SEO.
The idea is simple. If you have several versions of the same content, you pick one “canonical” version and point the search engines at it. This solves the duplicate content problem where search engines don’t know which version to show in their results.
The SEO benefit of rel=canonical
Choosing a proper canonical URL for every set of similar URLs improves the SEO Company of your site. This is because the search engine knows which version is canonical, and can count all the links pointing at the different versions as links to the canonical version. In concept, setting a canonical is similar to a 301 redirect, only without the actual redirecting.
The history of rel=canonical
The canonical link element was introduced by Google, Bing, and Yahoo! in February 2009. If you’re interested in its history, I would recommend Matt Cutts’ post from 2009. This post gives you some background and links to different interesting articles. Or watch the video of Matt introducing the canonical link element. Because, although the idea is simple, the specifics of how to use it are often a bit more complex.
The process of canonicalization
Ironic side note
The term Canonical comes from the Roman Catholic tradition, where a list of sacred books was created and accepted as genuine and named the canonical Gospels of the New Testament. The irony is it took the Roman Catholic church about 300 years and numerous fights to come up with the canonical list, and they eventually chose four versions of the same story…
When you have several choices for a product’s URL, canonicalization is the process of picking one of them. Luckily, it will be obvious in many cases: one URL will be a better choice than others. But in some cases, it might not be as obvious. This is nothing to worry about. Even then it’s still pretty simple: just pick one! Not canonicalizing your URLs is always worse than canonicalizing your URLs.
How to set canonical URLs
Let’s assume you have two versions of the same page, each with exactly – 100% – the same content. The only difference is that they’re in separate sections of your site. And because of that the background color and the active menu item are different – but that’s it. Both versions have been linked to from other sites, so the content itself is clearly valuable. So which version should search engines show in results?
For example, these could be their URLs:
https://example.com/wordpress/SEO Company-plugin/
https://example.com/wordpress/plugins/SEO Company/
A correct example of using rel=canonical
The situation described above occurs fairly often, especially in a lot of e-commerce systems. A product can have several different URLs depending on how you got there. But this is exactly what rel=canonical was invented for. In this case, you would apply rel=canonical as follows:
Pick one of your two pages as the canonical version. This should be the version you think is the most important. If you don’t care, pick the one with the most links or visitors. When all these factors are equal, flip a coin. You just need to choose.
Add a rel=canonical link from the non-canonical page to the canonical one. So if we picked the shortest URL as our canonical URL, the other URL would link to the shortest URL in the <head> section of the page – like this:
<link rel="canonical" href="https://example.com/wordpress/SEO Company-plugin/" />
It’s as easy as that! Nothing more, nothing less.
What this does is “merge” the two pages into one from a search engine’s perspective. It’s a “soft redirect”, without actually redirecting the user. Links to both URLs now count as the single, canonical version of the URL.
Want to know more about the use of rel=canonical on category and product pages of your eCommerce site? I also discuss this topic in this Ask Yoast video.
Setting the canonical URL in Yoast SEO
Our Yoast SEO WordPress plugin lets you change the canonical URL of several page types in the plugin settings. You only need to do this if you want to change the canonical to something different from the current page’s URL. Yoast SEO Company already renders the correct canonical URL for almost any page type in a WordPress install.
For posts, pages, and custom post types, you can edit the canonical URL in the advanced tab of the Yoast SEO Company metabox:
Setting a canonical URL in Yoast SEO Company
For categories, tags and other taxonomy terms, you can change the canonical URL in the same place in the Yoast SEO Company metabox. If you have other advanced use cases, you can also use the wpSEO Company_canonical filter to change the Yoast SEO Company output.
When should you use canonical URLs?
Yoast Duplicate Post
Canonicals can help you out when your site benefits from similar content on different pages. Creating these pages can take up a lot of your time. If you’re looking for an easy way to duplicate posts or pages, Yoast Duplicate Post is the plugin for you!
This plugin can save you loads of time by copying things like the text, featured image, meta data, and SEO Company optimizations. That way you don’t have to start from scratch with every new page. Just don’t forget to set a canonical if your copied page is very similar to the original.
301 redirect or canonical
If you are unsure whether to do a 301 redirect or set a canonical, what should you do? The answer is simple: you should always do a redirect, unless there are technical reasons not to. If you can’t redirect because that would harm the user experience or be otherwise problematic, then set a canonical URL.
Should a page have a self-referencing canonical URL?
In the image above, we link the non-canonical page to the canonical version. But should a page set a rel=canonical for itself? This question is a much-debated topic amongst SEO Companys. At Yoast, we strongly recommend having a canonical link element on every page and Google has confirmed that’s best. That’s because most CMS’s will allow URL parameters without changing the content. So all of these URLs would show the same content:
https://example.com/wordpress/SEO Company-plugin/
https://example.com/wordpress/SEO Company-plugin/?isnt=it-awesome
https://example.com/wordpress/SEO Company-plugin/?cmpgn=twitter
https://example.com/wordpress/SEO Company-plugin/?cmpgn=Facebook
The issue is that if you don’t have a self-referencing canonical on the page that points to the cleanest version of the URL, you risk being hit by this. And if you don’t do it yourself, someone else could do it to you and cause a duplicate content issue. So adding a self-referencing canonical to URLs across your site is a good “defensive” SEO Company move. Luckily, our Yoast SEO Company plugin takes care of this for you.
Cross-domain canonical URLs
Perhaps you have the same piece of content on several domains. There are sites or blogs that republish articles from other websites on their own, as they feel the content is relevant for their users. In the past, we’ve had websites republishing articles from Yoast.com as well (with express permission).
But if you had looked at the HTML of every one of those articles you’d found a rel=canonical link pointing right back to our original article. This means all the links pointing to their version of the article count towards the ranking of our canonical version. They get to use our content to please their audience, and we get a clear benefit from it too. This way everybody wins!
Faulty canonical URLs: common issues
There are many examples out there of how a wrong rel=canonical implementation can lead to huge issues. I’ve seen several sites where the canonical on their homepage pointed at an article, only to see their home page disappear from search results. But that’s not all. There are other things you should never do with rel=canonical. Here are the most important ones:
Don’t canonicalize a paginated archive to page 1. The rel=canonical on page 2 should point to page 2. If you point it to page 1, search engines will actually not index the links on those deeper archive pages.
Make them 100% specific. For various reasons, many sites use protocol-relative links, meaning they leave the http / https bit from their URLs. Don’t do this for your canonicals. You have a preference, so show it.
Base your canonical on the request URL. If you use variables like the domain or request URL used to access the current page while generating your canonical, you’re doing it wrong. Your content should be aware of its own URLs. Otherwise, you could still have the same piece of content on – for instance – example.com and www.example.com and have each of them canonicalize to themselves.
Multiple rel=canonical links on a page cause havoc. When we encounter this in WordPress plugins, we try to reach out to the developer doing it and teach them not to, but it still happens. And when it does, the results are wholly unpredictable.
Read more: 6 common SEO mistakes and how to avoid them »
rel=canonical and social networks
Facebook and Twitter honor rel=canonical too, and this might lead to weird situations. If you share a URL on Facebook that has a canonical pointing elsewhere, Facebook will share the details from the canonical URL. In fact, if you add a ‘like’ button on a page that has a canonical pointing elsewhere, it will show the like count for the canonical URL, not for the current URL. Twitter works in the same way. So be aware of this when sharing URLs or when using these buttons.
Advanced uses of rel=canonical
Canonical link HTTP header
Google also supports a canonical link HTTP header. The header looks like this:
Link: <https://www.example.com/white-paper.pdf>; rel="canonical"
Canonical link HTTP headers can be very useful when canonicalizing files like PDFs, so it’s good to know that the option exists.
Using rel=canonical on not so similar pages
While I wouldn’t recommend this, you can use rel=canonical very aggressively. Google honors it to an almost ridiculous extent, where you can canonicalize a very different piece of content to another piece of content. However, if Google does catch you doing this, it will stop trusting your site’s canonicals and thus cause you more harm…
Using rel=canonical in combination with hreflang
We also talk about canonical in our ultimate guide to hreflang. That’s because it’s very important that when you use hreflang, each language’s canonical points to itself. Make sure that you understand how to use canonical well when you’re implementing hreflang, as otherwise, you might kill your entire hreflang implementation.
Conclusion: rel=canonical is a power tool
Rel=canonical is a powerful tool in an SEO Company’s toolbox. Especially for larger sites, the process of canonicalization can be very important and lead to major SEO Company improvements. But like with any power tool, you should use it wisely as it’s easy to cut yourself. I hope this guide has helped you gain an understanding of this powerful tool and how (and when) you can use it.
Keep reading: WordPress SEO: The definitive guide to higher rankings for WordPress sites »
SEO Company by DBL07.co
source http://www.scpie.org/relcanonical-the-ultimate-guide/
source https://scpie1.blogspot.com/2020/06/relcanonical-ultimate-guide.html
0 notes
Text
rel=canonical: the ultimate guide
Joost de Valk
Joost de Valk is the founder and Chief Product Officer of Yoast. He’s a digital marketer, developer and an Open Source fanatic.
A canonical URL lets you tell search engines that certain similar URLs are actually the same. Because sometimes you have products or content that can be found on multiple URLs — or even multiple websites. By using canonical URLs (HTML link tags with the attribute rel=canonical) you can have these on your site without harming your rankings. In this ultimate guide, I’ll discuss what canonical URLs are, when to use them, and how to prevent or fix a few common mistakes!
Table of contents
What is the canonical link element?
The rel=canonical element, often called the “canonical link”, is an HTML element that helps webmasters prevent duplicate content issues. It does so by specifying the “canonical URL”, the “preferred” version of a web page – the original source, even. And this improves your site’s SEO.
The idea is simple. If you have several versions of the same content, you pick one “canonical” version and point the search engines at it. This solves the duplicate content problem where search engines don’t know which version to show in their results.
The SEO benefit of rel=canonical
Choosing a proper canonical URL for every set of similar URLs improves the SEO Company of your site. This is because the search engine knows which version is canonical, and can count all the links pointing at the different versions as links to the canonical version. In concept, setting a canonical is similar to a 301 redirect, only without the actual redirecting.
The history of rel=canonical
The canonical link element was introduced by Google, Bing, and Yahoo! in February 2009. If you’re interested in its history, I would recommend Matt Cutts’ post from 2009. This post gives you some background and links to different interesting articles. Or watch the video of Matt introducing the canonical link element. Because, although the idea is simple, the specifics of how to use it are often a bit more complex.
The process of canonicalization
Ironic side note
The term Canonical comes from the Roman Catholic tradition, where a list of sacred books was created and accepted as genuine and named the canonical Gospels of the New Testament. The irony is it took the Roman Catholic church about 300 years and numerous fights to come up with the canonical list, and they eventually chose four versions of the same story…
When you have several choices for a product’s URL, canonicalization is the process of picking one of them. Luckily, it will be obvious in many cases: one URL will be a better choice than others. But in some cases, it might not be as obvious. This is nothing to worry about. Even then it’s still pretty simple: just pick one! Not canonicalizing your URLs is always worse than canonicalizing your URLs.
How to set canonical URLs
Let’s assume you have two versions of the same page, each with exactly – 100% – the same content. The only difference is that they’re in separate sections of your site. And because of that the background color and the active menu item are different – but that’s it. Both versions have been linked to from other sites, so the content itself is clearly valuable. So which version should search engines show in results?
For example, these could be their URLs:
https://example.com/wordpress/SEO Company-plugin/
https://example.com/wordpress/plugins/SEO Company/
A correct example of using rel=canonical
The situation described above occurs fairly often, especially in a lot of e-commerce systems. A product can have several different URLs depending on how you got there. But this is exactly what rel=canonical was invented for. In this case, you would apply rel=canonical as follows:
Pick one of your two pages as the canonical version. This should be the version you think is the most important. If you don’t care, pick the one with the most links or visitors. When all these factors are equal, flip a coin. You just need to choose.
Add a rel=canonical link from the non-canonical page to the canonical one. So if we picked the shortest URL as our canonical URL, the other URL would link to the shortest URL in the <head> section of the page – like this:
<link rel="canonical" href="https://example.com/wordpress/SEO Company-plugin/" />
It’s as easy as that! Nothing more, nothing less.
What this does is “merge” the two pages into one from a search engine’s perspective. It’s a “soft redirect”, without actually redirecting the user. Links to both URLs now count as the single, canonical version of the URL.
Want to know more about the use of rel=canonical on category and product pages of your eCommerce site? I also discuss this topic in this Ask Yoast video.
Setting the canonical URL in Yoast SEO
Our Yoast SEO WordPress plugin lets you change the canonical URL of several page types in the plugin settings. You only need to do this if you want to change the canonical to something different from the current page’s URL. Yoast SEO Company already renders the correct canonical URL for almost any page type in a WordPress install.
For posts, pages, and custom post types, you can edit the canonical URL in the advanced tab of the Yoast SEO Company metabox:
Setting a canonical URL in Yoast SEO Company
For categories, tags and other taxonomy terms, you can change the canonical URL in the same place in the Yoast SEO Company metabox. If you have other advanced use cases, you can also use the wpSEO Company_canonical filter to change the Yoast SEO Company output.
When should you use canonical URLs?
Yoast Duplicate Post
Canonicals can help you out when your site benefits from similar content on different pages. Creating these pages can take up a lot of your time. If you’re looking for an easy way to duplicate posts or pages, Yoast Duplicate Post is the plugin for you!
This plugin can save you loads of time by copying things like the text, featured image, meta data, and SEO Company optimizations. That way you don’t have to start from scratch with every new page. Just don’t forget to set a canonical if your copied page is very similar to the original.
301 redirect or canonical
If you are unsure whether to do a 301 redirect or set a canonical, what should you do? The answer is simple: you should always do a redirect, unless there are technical reasons not to. If you can’t redirect because that would harm the user experience or be otherwise problematic, then set a canonical URL.
Should a page have a self-referencing canonical URL?
In the image above, we link the non-canonical page to the canonical version. But should a page set a rel=canonical for itself? This question is a much-debated topic amongst SEO Companys. At Yoast, we strongly recommend having a canonical link element on every page and Google has confirmed that’s best. That’s because most CMS’s will allow URL parameters without changing the content. So all of these URLs would show the same content:
https://example.com/wordpress/SEO Company-plugin/
https://example.com/wordpress/SEO Company-plugin/?isnt=it-awesome
https://example.com/wordpress/SEO Company-plugin/?cmpgn=twitter
https://example.com/wordpress/SEO Company-plugin/?cmpgn=Facebook
The issue is that if you don’t have a self-referencing canonical on the page that points to the cleanest version of the URL, you risk being hit by this. And if you don’t do it yourself, someone else could do it to you and cause a duplicate content issue. So adding a self-referencing canonical to URLs across your site is a good “defensive” SEO Company move. Luckily, our Yoast SEO Company plugin takes care of this for you.
Cross-domain canonical URLs
Perhaps you have the same piece of content on several domains. There are sites or blogs that republish articles from other websites on their own, as they feel the content is relevant for their users. In the past, we’ve had websites republishing articles from Yoast.com as well (with express permission).
But if you had looked at the HTML of every one of those articles you’d found a rel=canonical link pointing right back to our original article. This means all the links pointing to their version of the article count towards the ranking of our canonical version. They get to use our content to please their audience, and we get a clear benefit from it too. This way everybody wins!
Faulty canonical URLs: common issues
There are many examples out there of how a wrong rel=canonical implementation can lead to huge issues. I’ve seen several sites where the canonical on their homepage pointed at an article, only to see their home page disappear from search results. But that’s not all. There are other things you should never do with rel=canonical. Here are the most important ones:
Don’t canonicalize a paginated archive to page 1. The rel=canonical on page 2 should point to page 2. If you point it to page 1, search engines will actually not index the links on those deeper archive pages.
Make them 100% specific. For various reasons, many sites use protocol-relative links, meaning they leave the http / https bit from their URLs. Don’t do this for your canonicals. You have a preference, so show it.
Base your canonical on the request URL. If you use variables like the domain or request URL used to access the current page while generating your canonical, you’re doing it wrong. Your content should be aware of its own URLs. Otherwise, you could still have the same piece of content on – for instance – example.com and www.example.com and have each of them canonicalize to themselves.
Multiple rel=canonical links on a page cause havoc. When we encounter this in WordPress plugins, we try to reach out to the developer doing it and teach them not to, but it still happens. And when it does, the results are wholly unpredictable.
Read more: 6 common SEO mistakes and how to avoid them »
rel=canonical and social networks
Facebook and Twitter honor rel=canonical too, and this might lead to weird situations. If you share a URL on Facebook that has a canonical pointing elsewhere, Facebook will share the details from the canonical URL. In fact, if you add a ‘like’ button on a page that has a canonical pointing elsewhere, it will show the like count for the canonical URL, not for the current URL. Twitter works in the same way. So be aware of this when sharing URLs or when using these buttons.
Advanced uses of rel=canonical
Canonical link HTTP header
Google also supports a canonical link HTTP header. The header looks like this:
Link: <https://www.example.com/white-paper.pdf>; rel="canonical"
Canonical link HTTP headers can be very useful when canonicalizing files like PDFs, so it’s good to know that the option exists.
Using rel=canonical on not so similar pages
While I wouldn’t recommend this, you can use rel=canonical very aggressively. Google honors it to an almost ridiculous extent, where you can canonicalize a very different piece of content to another piece of content. However, if Google does catch you doing this, it will stop trusting your site’s canonicals and thus cause you more harm…
Using rel=canonical in combination with hreflang
We also talk about canonical in our ultimate guide to hreflang. That’s because it’s very important that when you use hreflang, each language’s canonical points to itself. Make sure that you understand how to use canonical well when you’re implementing hreflang, as otherwise, you might kill your entire hreflang implementation.
Conclusion: rel=canonical is a power tool
Rel=canonical is a powerful tool in an SEO Company’s toolbox. Especially for larger sites, the process of canonicalization can be very important and lead to major SEO Company improvements. But like with any power tool, you should use it wisely as it’s easy to cut yourself. I hope this guide has helped you gain an understanding of this powerful tool and how (and when) you can use it.
Keep reading: WordPress SEO: The definitive guide to higher rankings for WordPress sites »
SEO Company by DBL07.co
source http://www.scpie.org/relcanonical-the-ultimate-guide/
source https://scpie.tumblr.com/post/621953893879971840
0 notes
Text
rel=canonical: the ultimate guide
Joost de Valk
Joost de Valk is the founder and Chief Product Officer of Yoast. He’s a digital marketer, developer and an Open Source fanatic.
A canonical URL lets you tell search engines that certain similar URLs are actually the same. Because sometimes you have products or content that can be found on multiple URLs — or even multiple websites. By using canonical URLs (HTML link tags with the attribute rel=canonical) you can have these on your site without harming your rankings. In this ultimate guide, I’ll discuss what canonical URLs are, when to use them, and how to prevent or fix a few common mistakes!
Table of contents
What is the canonical link element?
The rel=canonical element, often called the “canonical link”, is an HTML element that helps webmasters prevent duplicate content issues. It does so by specifying the “canonical URL”, the “preferred” version of a web page – the original source, even. And this improves your site’s SEO.
The idea is simple. If you have several versions of the same content, you pick one “canonical” version and point the search engines at it. This solves the duplicate content problem where search engines don’t know which version to show in their results.
The SEO benefit of rel=canonical
Choosing a proper canonical URL for every set of similar URLs improves the SEO Company of your site. This is because the search engine knows which version is canonical, and can count all the links pointing at the different versions as links to the canonical version. In concept, setting a canonical is similar to a 301 redirect, only without the actual redirecting.
The history of rel=canonical
The canonical link element was introduced by Google, Bing, and Yahoo! in February 2009. If you’re interested in its history, I would recommend Matt Cutts’ post from 2009. This post gives you some background and links to different interesting articles. Or watch the video of Matt introducing the canonical link element. Because, although the idea is simple, the specifics of how to use it are often a bit more complex.
The process of canonicalization
Ironic side note
The term Canonical comes from the Roman Catholic tradition, where a list of sacred books was created and accepted as genuine and named the canonical Gospels of the New Testament. The irony is it took the Roman Catholic church about 300 years and numerous fights to come up with the canonical list, and they eventually chose four versions of the same story…
When you have several choices for a product’s URL, canonicalization is the process of picking one of them. Luckily, it will be obvious in many cases: one URL will be a better choice than others. But in some cases, it might not be as obvious. This is nothing to worry about. Even then it’s still pretty simple: just pick one! Not canonicalizing your URLs is always worse than canonicalizing your URLs.
How to set canonical URLs
Let’s assume you have two versions of the same page, each with exactly – 100% – the same content. The only difference is that they’re in separate sections of your site. And because of that the background color and the active menu item are different – but that’s it. Both versions have been linked to from other sites, so the content itself is clearly valuable. So which version should search engines show in results?
For example, these could be their URLs:
https://example.com/wordpress/SEO Company-plugin/
https://example.com/wordpress/plugins/SEO Company/
A correct example of using rel=canonical
The situation described above occurs fairly often, especially in a lot of e-commerce systems. A product can have several different URLs depending on how you got there. But this is exactly what rel=canonical was invented for. In this case, you would apply rel=canonical as follows:
Pick one of your two pages as the canonical version. This should be the version you think is the most important. If you don’t care, pick the one with the most links or visitors. When all these factors are equal, flip a coin. You just need to choose.
Add a rel=canonical link from the non-canonical page to the canonical one. So if we picked the shortest URL as our canonical URL, the other URL would link to the shortest URL in the <head> section of the page – like this:
<link rel="canonical" href="https://example.com/wordpress/SEO Company-plugin/" />
It’s as easy as that! Nothing more, nothing less.
What this does is “merge” the two pages into one from a search engine’s perspective. It’s a “soft redirect”, without actually redirecting the user. Links to both URLs now count as the single, canonical version of the URL.
Want to know more about the use of rel=canonical on category and product pages of your eCommerce site? I also discuss this topic in this Ask Yoast video.
Setting the canonical URL in Yoast SEO
Our Yoast SEO WordPress plugin lets you change the canonical URL of several page types in the plugin settings. You only need to do this if you want to change the canonical to something different from the current page’s URL. Yoast SEO Company already renders the correct canonical URL for almost any page type in a WordPress install.
For posts, pages, and custom post types, you can edit the canonical URL in the advanced tab of the Yoast SEO Company metabox:
Setting a canonical URL in Yoast SEO Company
For categories, tags and other taxonomy terms, you can change the canonical URL in the same place in the Yoast SEO Company metabox. If you have other advanced use cases, you can also use the wpSEO Company_canonical filter to change the Yoast SEO Company output.
When should you use canonical URLs?
Yoast Duplicate Post
Canonicals can help you out when your site benefits from similar content on different pages. Creating these pages can take up a lot of your time. If you’re looking for an easy way to duplicate posts or pages, Yoast Duplicate Post is the plugin for you!
This plugin can save you loads of time by copying things like the text, featured image, meta data, and SEO Company optimizations. That way you don’t have to start from scratch with every new page. Just don’t forget to set a canonical if your copied page is very similar to the original.
301 redirect or canonical
If you are unsure whether to do a 301 redirect or set a canonical, what should you do? The answer is simple: you should always do a redirect, unless there are technical reasons not to. If you can’t redirect because that would harm the user experience or be otherwise problematic, then set a canonical URL.
Should a page have a self-referencing canonical URL?
In the image above, we link the non-canonical page to the canonical version. But should a page set a rel=canonical for itself? This question is a much-debated topic amongst SEO Companys. At Yoast, we strongly recommend having a canonical link element on every page and Google has confirmed that’s best. That’s because most CMS’s will allow URL parameters without changing the content. So all of these URLs would show the same content:
https://example.com/wordpress/SEO Company-plugin/
https://example.com/wordpress/SEO Company-plugin/?isnt=it-awesome
https://example.com/wordpress/SEO Company-plugin/?cmpgn=twitter
https://example.com/wordpress/SEO Company-plugin/?cmpgn=Facebook
The issue is that if you don’t have a self-referencing canonical on the page that points to the cleanest version of the URL, you risk being hit by this. And if you don’t do it yourself, someone else could do it to you and cause a duplicate content issue. So adding a self-referencing canonical to URLs across your site is a good “defensive” SEO Company move. Luckily, our Yoast SEO Company plugin takes care of this for you.
Cross-domain canonical URLs
Perhaps you have the same piece of content on several domains. There are sites or blogs that republish articles from other websites on their own, as they feel the content is relevant for their users. In the past, we’ve had websites republishing articles from Yoast.com as well (with express permission).
But if you had looked at the HTML of every one of those articles you’d found a rel=canonical link pointing right back to our original article. This means all the links pointing to their version of the article count towards the ranking of our canonical version. They get to use our content to please their audience, and we get a clear benefit from it too. This way everybody wins!
Faulty canonical URLs: common issues
There are many examples out there of how a wrong rel=canonical implementation can lead to huge issues. I’ve seen several sites where the canonical on their homepage pointed at an article, only to see their home page disappear from search results. But that’s not all. There are other things you should never do with rel=canonical. Here are the most important ones:
Don’t canonicalize a paginated archive to page 1. The rel=canonical on page 2 should point to page 2. If you point it to page 1, search engines will actually not index the links on those deeper archive pages.
Make them 100% specific. For various reasons, many sites use protocol-relative links, meaning they leave the http / https bit from their URLs. Don’t do this for your canonicals. You have a preference, so show it.
Base your canonical on the request URL. If you use variables like the domain or request URL used to access the current page while generating your canonical, you’re doing it wrong. Your content should be aware of its own URLs. Otherwise, you could still have the same piece of content on – for instance – example.com and www.example.com and have each of them canonicalize to themselves.
Multiple rel=canonical links on a page cause havoc. When we encounter this in WordPress plugins, we try to reach out to the developer doing it and teach them not to, but it still happens. And when it does, the results are wholly unpredictable.
Read more: 6 common SEO mistakes and how to avoid them »
rel=canonical and social networks
Facebook and Twitter honor rel=canonical too, and this might lead to weird situations. If you share a URL on Facebook that has a canonical pointing elsewhere, Facebook will share the details from the canonical URL. In fact, if you add a ‘like’ button on a page that has a canonical pointing elsewhere, it will show the like count for the canonical URL, not for the current URL. Twitter works in the same way. So be aware of this when sharing URLs or when using these buttons.
Advanced uses of rel=canonical
Canonical link HTTP header
Google also supports a canonical link HTTP header. The header looks like this:
Link: <https://www.example.com/white-paper.pdf>; rel="canonical"
Canonical link HTTP headers can be very useful when canonicalizing files like PDFs, so it’s good to know that the option exists.
Using rel=canonical on not so similar pages
While I wouldn’t recommend this, you can use rel=canonical very aggressively. Google honors it to an almost ridiculous extent, where you can canonicalize a very different piece of content to another piece of content. However, if Google does catch you doing this, it will stop trusting your site’s canonicals and thus cause you more harm…
Using rel=canonical in combination with hreflang
We also talk about canonical in our ultimate guide to hreflang. That’s because it’s very important that when you use hreflang, each language’s canonical points to itself. Make sure that you understand how to use canonical well when you’re implementing hreflang, as otherwise, you might kill your entire hreflang implementation.
Conclusion: rel=canonical is a power tool
Rel=canonical is a powerful tool in an SEO Company’s toolbox. Especially for larger sites, the process of canonicalization can be very important and lead to major SEO Company improvements. But like with any power tool, you should use it wisely as it’s easy to cut yourself. I hope this guide has helped you gain an understanding of this powerful tool and how (and when) you can use it.
Keep reading: WordPress SEO: The definitive guide to higher rankings for WordPress sites »
SEO Company by DBL07.co
source http://www.scpie.org/relcanonical-the-ultimate-guide/
0 notes
Text
Pitfalls and Opportunities of Any New Site Design
It’s not uncommon for businesses to redesign their website once in a while for one reason or another. But I have noticed that businesses rarely take into account just how important their new website design is going to be in fulfilling their overall digital marketing strategy.
A new website presents a significant opportunity for a business to grow their visibility or improve their brand awareness, however, if all critical factors have not been considered, more often than not your site will end up in a position worse than it started.
In this blog post, I will be looking at key factors you should consider in your digital marketing approach (both back-end and front-end) to successfully launch a new website and grow your business.
SEO is critical
Arguably SEO reaps the biggest reward for any new site development or migration, as long as this is done correctly. When designing/planning your new site it’s therefore critical to consider its build…
Perhaps the new site launch presents the perfect opportunity to fix that site speed that you may have not had the time and resources to fix for months. Or perhaps the new site may present an opportunity to overcome issues of content rendering.
In the examples highlighted above, we often see that sites have been held back due to the deployment of un-friendly JavaScript frameworks. Therefore now is the time to decide on the correct website build (for example deploying an HTML structure only or revisiting the Javascript framework on your existing site) as this will impact the total look, feel and crawl rate of any new site.
Also, consider if your new site will be used to consolidate additional sub-domains. Migrating domains is a great way to increase your visibility although how would this impact the new site? Does your top navigation or footer navigation now need to promote another one of your subdomains? Have you seen deep pages on your existing site underperforming? If so, maybe they may need to be re-surfaced higher in the top navigation? All of which impacts the design for your new site.
Perhaps you haven’t created a site yet? If that’s the case then you would still need navigation and site structure recommendations from a qualified SEO agency to inform where pages should be placed in the site structure and linked to in the navigation.
It’s also important to not complicate the navigation and remember that the key goal of your website is to satisfy your user. Without satisfying your user – They will not stay, let alone return, to your site.
Something else to consider is the back-end design of a website and the capability to update necessary on-page elements effectively. It is surprising how often I have come across a website that simply doesn’t have the functionality to input custom Meta descriptions, Alt tags and the like. These are some of the more simple elements of SEO; therefore it is essential at your CMS is also designed in a way to manage the SEO of your website effectively.
All sites must now rank effectively on mobile devices or else they will be penalised in search results, so ensure responsive design is built effectively to scale your content across all devices. With this in mind, its also important to ensure you have a range of page templates in place that when populated with copy, maintain the correct look and feel ensuring UX is never compromised.
Conversion Rate Optimisation (CRO) and UX testing
CRO and UX also play a critical role in your new website design as this can be the difference in keeping customers on your website or sending them away to never return again.
If you already have an existing site now is the time to take those critical learnings and transfer these across. For example, make sure you have deployed heatmaps or have carried out A/B testing on the current site so you understand what design elements work well and should be carried across to the new site design.
If you don’t have this luxury use the same methods, but deploy a staging site to a focus group that can provide feedback. Or alternatively, ensure your site has the capability to be redesigned easily after receiving initial insights from CRO and UX testing in its first few months of launch.
Also consider your brand values and make sure these are reflected within every aspect of your website to ensure your online brand image is not damaged. Make sure your website is designed in such a way to evoke the perception you desire. A user will view your site and, even subconsciously; develop perceptions about it so make sure your site reflects your brand. Imagine going to the Apple site – A brand focused on simplicity and beautiful aesthetics – and finding a site with confusing navigation and ugly typography. It wouldn’t exactly give you the best impression of their brand would it!?
Why is this also important for PPC?
PPC might not immediately come to mind as a core consideration in a redesign, however a well designed website, that is technically optimised, and has good UX, can reap PPC rewards by receiving higher quality scores leading to lower CPC’s.
For pages you target through PPC, it’s important that they convert so designing a the page with CRO in mind can play a key part in determining the success of your PPC campaign.
Consider how you will track analytics
Page builds can be done a number of different ways, for example these can take the form of one-page websites, or websites with various pages rolled into one. For example, on the homepage of a site you may click categories and be presented with information about each of the category (while the URL does not change), then you click on a category and the various products in that category appear (still the URL does not change).
It is therefore important to consider how this may affect the Analytics data you are able to collect. The design of your site may require various levels of customisation to your tracking. Advanced tracking will allow you to set up goals and funnels so that you can monitor the checkout process and optimise it where necessary. If you are unable to record this data because of the infrastructure of your website, then you are losing out on this valuable data.
Having the capability to implement advanced Analytics methods means less limitations on the designs available to you; however, be sensible if those capabilities cannot be achieved and consider this in your site structure.
Summary
So as you can see your approach to designing and structuring a new website should consider many factors if you are to retain or grow brand visibility.
It all starts with a website so when you’re in the design stage, make sure you get it right considering all points listed above and any other learnings you may have taken about previous site performance along the way.
The post Pitfalls and Opportunities of Any New Site Design appeared first on Koozai.com
Pitfalls and Opportunities of Any New Site Design published first on http://wascript.weebly.com/
0 notes
Text
Net Design & website positioning: All the things Designers Ought to Know
UX design and a stable website positioning technique go hand in hand.
Design is right here to spice up consumer experiences, encourage customers to spend extra time in your pages, and guarantee they don’t go away your website pissed off. This fashion, it minimizes bounce charges and turns your guests into leads and, in the end, gross sales.
Nonetheless, designing a spotless web site is pointless if it’s not seen on Google. That is the place website positioning shines. It will increase your website’s publicity within the SERPs, drives larger site visitors to it, and provides you the chance to please a customer together with your attractive web site design and high quality content material.
When merged collectively, net design and website positioning are indicators of your credibility and professionalism.
So, let’s see methods to mix them for a greater on-line efficiency.
The Fundamentals of Implementing website positioning and Net Design
On the earth of digital advertising and marketing, constructing your on-line presence on sturdy foundations is vital. If some fundamental points of your website are poorly managed, you can not count on your net design or website positioning to ship distinctive outcomes.
Listed here are key parts of any sturdy net design:
Selecting a Area Title
Stuffing your area with a bunch of key phrases gained’t assist. They appear spammy and will damage each your rankings and consumer expertise.
Do not forget that there are thousands and thousands of domains on the market. So, your aim is to make your area title catchy and memorable. It must be related to what you are promoting’ focus and be simple to spell and pronounce. To make your website simpler to search out, it’s all the time good to make use of your model title as your area title, too.
Investing within the Proper Internet hosting Supplier
Selecting the best internet hosting plan instantly impacts your web site pace, server efficiency, and uptime/downtime. These are all vital UX elements Google considers whereas indexing and rating your website.
Constructing Your Web site Utilizing a Dependable CMS
A stable CMS is one that’s simple to make use of and handle. It is best to be capable to design your website nonetheless you need, with out taking extra programs in net design. It must also assist you make your website mobile-friendly, add social media integrations effortlessly, and use varied content material administration instruments. The preferred CMS possibility is unquestionably WordPress, adopted by Joomla, Drupal, TYPO3, and Squarespace.
When choosing the proper CMS for what you are promoting, ask your self the way it will affect your on-line efficiency. For instance, does it permit you to customise your URLs? Are you able to make on-page adjustments with out altering the URL? Some techniques create meta tags (meta descriptions and title tags) routinely, so you need to test whether or not you may modify them.
The Hyperlink Between Net Design and Indexability
Did you now that Google crawls every web page of your website individually when indexing it? That’s why you might want to add inner hyperlinks to make these pages findable by engines like google. Most significantly, you might want to test whether or not all of your interlinks work.
Begin with the straightforward Google search. For instance, the website: operator will assist you see all of your pages which are listed. You could possibly additionally test robots.txt information (https//www.yourdomainname.com/robots.txt) to determine your website’s disallows. Certain, you may pace this course of up utilizing net crawlers like Screaming Frog or Google Search Console’s Index Standing that can do the job for you.
Key phrase Analysis and Meta Tags
On-page website positioning will be considered as a means of optimizing particular person pages on a website to rank larger. In brief, you might want to do detailed key phrases analysis and optimize your key web page parts for them.
A title is the primary aspect a customer sees within the SERPs. It must be inventive, intriguing, and genuine to face out from different leads to the SERPs. Above all watch your title size (it must be as much as 60 characters) and add your main key phrases to it naturally.
Meta descriptions inform a searcher what the web page is about. It’s fairly limited- you might want to use these 160 characters correctly to seize folks’s consideration and entice them to click on in your hyperlink.
Headings improve the readability of your textual content material, making it extra user-friendly. Use them to separate your content material into smaller chunks and assist guests discover the data they’re searching for simply.
Google nonetheless can’t perceive your visible content material. When optimizing your photographs, infographics, and picture captioning for visibility, be sure to have a transparent alt textual content that describes what the picture is about. Temporary descriptions together with your primary key phrases can be sufficient.
Data Structure and URLs
Which URL appears extra logical to you?
www.instance.com/providers/content-marketing/audits
www.instance.com/s456/s4/85
The primary one, I hope.
Effectively-optimized URLs inform customers what the web page is about and assist them discover the specified info or merchandise sooner. Identical to title tags and meta descriptions, they supply a wider context round your key phrases for each customers and engines like google. Exactly due to that, your URLs should be descriptive, quick, comprehensible, and optimized in your main key phrases.
Simplifying Web site Navigation
Navigation goes past a easy menu bar on the high of your website. When used correctly, it evokes folks to remain extra in your website and flick through it.
When constructing web site navigation, it’s vital to grasp the wants and expectations of your potential clients. Identical to at any bodily retailer, web site navigation ought to assist a possible buyer discover a product or content material sooner and information them by means of their purchaser journey in direction of finalizing a purchase order. If a buyer must waste their time pondering the place to click on, that’s a transparent signal you might want to enhance your navigation.
The Influence of Web page Load Pace on Rankings
Web page pace is without doubt one of the most vital rating elements. And, with the 2018 Pace Replace, it has develop into a notable rating sign for cellular gadgets, too.
Web page load instances are vital for reason- they affect consumer experiences and may end up in both larger conversions or bounce charges. Stats again me up on that. For instance, do you know that your guests count on your website to load in lower than 2 seconds? And, if it fails to take action, nearly half of them would depart it. Other than shedding potential leads and conversions, excessive bounce charges have a destructive affect in your on-line efficiency and rating in the long term.
For starters, use Google’s Web page Pace Insights to learn the way quick your pages are. Listed here are a number of steps to take to spice up your website pace, resembling:
Selecting the best internet hosting plan
Compressing your high-quality photographs
Utilizing browser caching
Eradicating auto-play content material
Decreasing the variety of plugins and popups
Investing in a dependable content material supply community (CDN)
Web site Responsiveness is the Cell-First Period
With the variety of cellular customers, cellular searches have additionally grown. For instance, do you know that 57% of all US on-line site visitors is generated by means of cellular gadgets?
And, in your cellular guests, their looking expertise determines whether or not they are going to purchase from you. Stats say that 52% of your potential clients would to not make a purchase order after a destructive cellular expertise.
Given these figures, it’s not shocking that Google is consistently striving to enhance cellular customers’ satisfaction and supply them with related outcomes. This 12 months, they lastly rolled out the Cell-First Index, that means that they’re now indexing a cellular model of your website.
And, to meets these requirements, you might want to make your website design extremely responsive.
What does this imply?
Use Google’s Cell-Pleasant Check to test how pleasant your pages are to cellular customers. When optimizing your website, take note of the general website’s usability, resembling its pace and web page format. How interesting is your website to cellular customers? Can they learn your content material and see your movies with out having to zoom and pinch frequently? What about your CTA’s and links- are they simple to faucet? Does your content material match the display dimension, regardless of its dimension? Are your types simple to fill out from cellular gadgets?
Placing it All Collectively
Even should you believed that website positioning and net design don’t have anything in widespread, I hope this text proves you incorrect. Your web site design impacts guests’ perceptions of your model, making it really feel skilled and authoritative. Above all, it impacts consumer experiences and impacts their engagement and buy choices. These are all elements Google takes into consideration when rating you.
Featured picture through DepositPhotos
Supply hyperlink
source https://webart-studio.com/net-design-website-positioning-all-the-things-designers-ought-to-know/
0 notes
Last Seen Blogs

linabtullgren-blog
Everything you need you already have.

hunksandm3n
MEN

lady-zalgressa
I am absolute trash for a flower

pazouzou
Je fangirl donc je vis

adrian-fahrenheit-tepes-alucard
𝐀𝐋𝐔𝐂𝐀𝐑𝐃