#i do it for every single piece of cc i download in order to keep my mods folder as small as possible
Text
just a reminder that i do look at my activity and see the tags yall use when u rb my stuff
#someone reblogged my jellybean hoodie with the tags 'i love simlish kpop cc but those s*z swatches are getting deleted'#which is like#it's fine to dislike a kpop group#(although i think this person is an anti which is just embarazzing to me)#and it's also 100% fine to delete swatches#i do it for every single piece of cc i download in order to keep my mods folder as small as possible#but saying that in the tags feels very weird and unnecessary to me#i know it's not directed at ME but it feels like it because i'm the one who spent time making those swatches lol#not to mention my friend who spent time making the simlish album covers which is way more work#AND my other friend who made the simlish maniac logo#maybe i'm overreacting and being too sensitive - given that this comment was not directed at me in any way#but it just annoyed me#that being said -- i do also see the positive comments and they make me super happy#so thank you to all the nice people and fuck you to this weirdo
16 notes
·
View notes
Note
Hey there! It is indeed very satisfiying to see CAS organized :O Could you share your process / sorting method? As I understand it I need to group all the stuff toghether in folders first. Do you dress up a sim with for example all your witch hats, search them in your folder and make a category out of it? That's how I thought I would do it but maybe you got a better way to do it :D (and if you want to have the CC sorted by creator do I need specific folders for tops, bottoms and full sets?)
Absolutely.
I dunno if there's an easier process or not, but I can tell you what I did.
I already had my Mods folder organized into folders and sub-folders, so for clothes and hair I just went into the respective folders and made a separate folder within for every creator, sorted alphabetically, then numbered them starting with 001. (In retrospect I should have started at like, 005 or something just to give myself a little wiggle room in case there was something I wanted to add at the top, but oh well.) Most CC has the creator's name in the filename, so that makes sorting it easy.
*** I number 001 instead of 01 or just 1 because when you open up your Mods folder in Sims4Studio to batch fix everything, it'll knock all your folders out of order unless there's three digits. Found that out the hard way. :T
I know the example in the tutorial didn't have their folders numbered and just has the creator name, but I'm not sure how they're managing that? I have all my folders numbered so I know what display index number I'm assigning them. (¤﹏¤) So ClumsyAlien hairs go in Mods -> Hair -> 005 ClumsyAlien, and I know when I batch fix it to set the CAS display index to 5. (And I'll know what to set the display index to for any new ClumsyAlien hairs I download in the future.)
*** On top of having folders for most creators I also have folders titled "A-C," "D-F," etc., for single pieces of CC that don't warrant their own creator folder. It keeps them loosely alphabetized. Like, if I only have a single shirt by Creator A and don't want to make an entire folder just for that, I can stick that shirt in folder A-C instead.
The way I have it, I have creator folders at the top -> misc. alphabetical folders below them. So that shirt by Creator A won't be at the top of my CAS catalogue, but it'll be at the start of my "miscellaneous section" beneath all the creator sections.
For hats (or any category where I sort by function instead of creator), I open up a blank Sim in CAS, put whatever CC I want grouped together on them, save, then open them up in Tray Importer and drag all that CC into its own folder. Number the folder and batch fix as usual.
The example in the tutorial had them breaking up clothing by top/bottom/etc., but I don't really see the need for that, so I didn't do it. ¯_(ツ)_/¯
*** When numbering folders/batch fixing, it's probably smarter to do every other number (001, 003, 005) so you can go back and add in more folders later, but I was not smart. :V I've already got a couple new creator folders tacked on at the very bottom, whoops.
It's a long and super tedious process (hence why I'm doing it in batches and not fixing everything at once), but man, it has been so worth it. I only have clothes, hair, hats, glasses, and shoes done so far, but even just having those organized has cut down on my time spent scrolling through CAS searching for a piece of CC.
42 notes
·
View notes
Text
Downtown Revamp - A complete overhaul of Downtown from The Sims 2 Nightlife
It’s finally here! This is going to be a long post, please read everything before you download, as there is quite a bit of information to go over! Let’s get started!
First, a picture of the finalized Downtown!
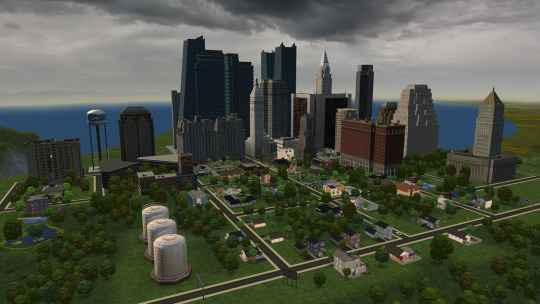
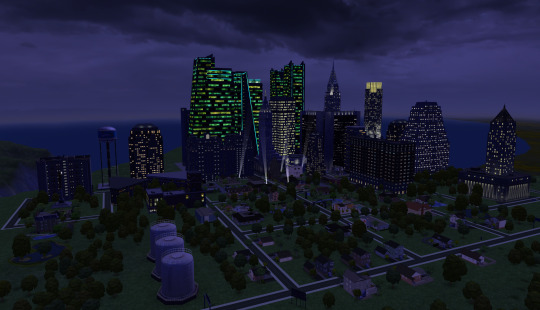
Click here for a relatively complete imgur album of all the lots!
*The pics are not in order. I seriously cannot be bothered going through 140 pictures. Sorry!
*Please note that some of the venues may look different in the final download than the pictures. This is because after building everything I went through and picked/replaced all of the CC that I felt wasn’t 100% necessary to use in the hood, thus some of the color schemes of the lots may differ, especially on interiors.
What is this?
If you haven’t been following me for the past few weeks, I took on a project to completely renovate all of Downtown from The Sims 2 Nightlife. This means all lots have been completely remodeled and updated. No more fugly Maxis lots! I had three main goals for this project - First, to update everything to look good and be fun to play, second to have each lot offer a unique “experience”, and third, to keep the original feeling of the lots in tact.
This comes in two versions - a Subhood version that you can add to your existing hoods, like you would with a traditional Downtown, and a Main Hood version, so you can play my updated Downtown as a main hood if you’d like!
General Information:
I renovated every single lot (except four lots which I removed from the hood, more on that later). Downtown had a special way of reusing the same idea for multiple different lots - I stopped counting how many dark vampy dance lounges with raised or lowered dance floors there were. Three freakin bowling alleys? As I mentioned earlier, I wanted each lot to have its own reason for you to come visit, and there were four lots that I ultimately felt offered nothing and wouldn’t be missed if they were taken out. The following lots are not in this Downtown:
Lost in Love Hedge Maze
P.U.R.E.
The Corner Shoppes
Comandgo Emporium
Aside from those four lots, every lot has been renovated - Including Residential lots!
This is not populated. There are no townies and/or Tricou ghosts.
There are a few unavoidable NPC’s that have spawned when I made this such as a busker and the New Year’s Toddler. There are also a few stray animals that decided to spawn, but those could not be avoided. All in all, don’t worry about this adding tons and tons of NPC’s to your game - I did my best to ensure the hood was empty.
This hood does include custom content. Sorry if you don’t play with it, but there’s just some things that I couldn’t go without. I tried to use only what I felt was necessary to make the hood look and play nicely.
This was built in the Ultimate Collection, so unfortunately I don’t know exactly what is “required”. Recommended at the very least to have NL, H&M, BV, FT, UNI, and AL.
Custom Content info & Download links/Instructions below the cut :)
UPDATE: You can now download all Downtownies (Except dead Tricou’s) easily to add to this hood! Check out the post and download here!
Custom Content:
Firstly, a HUGE thank you to all of the following CC creators who have so kindly allowed me to include their CC in a single download folder. Below are links to the individual pieces that were used, along with their creators blogs/profiles as well. There are also some important pieces of information and disclaimers about certain sets and defaults below. Please read everything before you bork up your game and blame me.
Custom Content used in this hood/Credits:
**You do NOT need to download the following items one by one. These are credits. All but ONE of them are included in a single download folder included with both hood versions**
*Those with a * next to their name are Default Replacements.
Pub Bottle Recolors and *Clothing Rack Defaults both by @withlovefromsimtown
Better Nightlife, Tarmac Hood Deco, and Matching Road Floor Tiles by @criquette-was-here
A few recolor sets from @cluedosims AKA @shastakiss
Community Phonebooth by nicvncnt
*Linden Trees, Seasonal AL Pond, Tower of Communism Skybox, and The Emerald City Skyscraper Set all by @lowedeus
Skyfix by @simnopke
Hood Deco Buildings by @dulcinean-alien
Criquette Horizons by @witheredlilies and @criquette-was-here
*Terrain Default Replacement by @dramallamadingdang
Invisible Driveway Recolor by Roddyalexio
*Invisible Stop Sign Default Replacement by Psychosims
4T2 City Living Murals by @moocha-muses
Simlish Neon Signs by @polllinationtech
Some (excluding the DFR) items from the Bespoke Build Set by @honeywell-mts
Public Bathroom Deco by @nekosayuri
Vampire Gravestones by @tony-veis
*Low Poly Tree Defaults and *Edited Defaults of Criquette’s Rural Road by @peppermint-ginger
I do not claim any of the included CC as my own. If I mistakenly included CC that you created and you do not want it included (Though I contacted those I was unsure about) please immediately reach out to me and I will remove them :)
Additional credit to the amazing and dear Mootilda for this extremely helpful tutorial :,)
Important CC Info:
DISCLAIMER: There are SOME default replacements in this CC folder. They have been marked in a separate folder with “-DFR” in front of their names. If you have your own defaults, simply do NOT add them to your downloads.
Note about Bespoke Set: This does NOT include all of the items in the Bespoke Build Set. If you already have it, do not add these
folders to your game. If you do have it and plan on getting the rest of the pack later on, just delete these two folders and install
those from MTS. The items included in this folder are the following:
Windows
Doors
Wall Coverings
Floor Edging
If you do not wish to use the entirety of BBS, then just use the items in the folders I have provided, as these are the ones
that are necessary in Downtown :) Thanks again Honeywell!
The Roads that I use in this hood do not have a grass median between the road and sidewalk. The way my DFR’s work is that that space needs to be filled in once the overlays are placed. If you do not use a DFR OR if you use something different, you may have to remove the filled in section. You’ll know what I mean when you load it up. Also, if you don’t use these defaults, there may be random rugs in the road, that is just the game replacing unavailable content.
If you don’t plan on using the Phone Booths that are included, you will want to go back through the lots and add back the EA default phone booths. I am not sure if your sims will be able to get back to their home lot if you don’t download the custom ones, since I deleted the original vanilla booths.
Excluded CC:
I used these recolors of Numenor’s stairs. You WILL need to download these (be sure to properly download them) as they are NOT included, since Numenor does not allow this.
CC Download Instructions:
CC is included with both versions of the hoods.
Instructions: Download the zip file for the hood version you want, unzip it with your preferred zipping program, and extract the contents into your downloads folder. Don’t forget to check your Default Replacements!
Download Instructions:
Instructions:
If you want the Subhood version - Download the DTWN Subhood zip, unzip with your preferred program, and extract it to the following folder, depending on which version of the game you have:
DELETE THE D001 Folder, or move it to a safe location. This is the original Downtown.
Ultimate Collection: C:\Program Files (x86)\Origin Games\The Sims 2 Ultimate Collection\Double Deluxe\EP2\TSData\Res\NeighborhoodTemplate
Disk: C:\Program Files\EA GAMES\The Sims 2 Nightlife\TSData\Res\NeighborhoodTemplate
Once this is installed, load up the hood that you wish to add the new Downtown subhood to, and add it as you would with the vanilla Downtown. Note that you will know it’s the right one as the thumbnail will be different.
If you want the Main Hood version - Download the DTWN Main Hood zip, unzip with your preferred program, and extract to the following folder, depending on which version of the game you have:
Ultimate Collection: Documents\EA Games\The Sims™ 2 Ultimate Collection\Neighborhoods
Disk: Documents\EA Games\The Sims 2\Neighborhoods
Hood Download Links:
*Links include CC
Main Hood
Subhood
If you have trouble downloading, let me know and I’ll throw in an alternate link :)
TOU: I guess I need my own TOU now. Please don’t be an asshole, don’t steal my lots or hood and claim it as your own. Use common sense. I am fine if you renovate one of my renovations and want to post it yourself, just give me credit and link to this original post. Also, do NOT redistribute the cc folder included. This is meant only for Downtown, only saying this as I wish for the creators to get all the credit.
Thank you all once more for your interest in the project! I can’t wait to see what you all do with this! Please feel free to tag me in screenshots, renos of my renos, etc...
Additional thanks to everyone at PleasantSims’ discord for the interest and motivation for this project, especially to Sabrina, Melting Magnetz, Crosimmer, Yeetus, and much more!
Keep an eye out for my next project. Thinking of moving on to Bluewater Village or a Vacation Hood!
Enjoy and have fun :D
- Mike
#sims 2#the sims#the sims 2#sims#simblr#sims 2 downtown#sims 2 hood#sims 2 cc#the sims 2 cc#s2cc#ts2cc#ts2mm#s2mm#sims 2 build#sims 2 lot#sims 2 neighborhood#sims 2 lots#sims build#dwtdtdowntown#tdwtdtdowntown#sims 2 custom content#i cant think of any more tags
587 notes
·
View notes
Text
gifmaking tutorial
As requested, here's a tutorial on how I make my gifs. Everyone's process is a little different, and mine changes from time to time, so it'll take some experimenting to find the settings that you like best. I’ll also link this tutorial here by Em, who is way more thorough than I’ll probably be, so check that out! The tutorial will be found in the read more below (apologies if it doesn’t work on mobile - this is a screenshot heavy piece of text).
My process uses Vapoursynth and Photoshop CS5 (I’m ancient I know!!). Avisynth is also another popular option if you already have that, but it’s been a while since I’ve used it. After the frames have been loaded into Photoshop, I then sharpen and colour my gifs before exporting. Some people will also use Topaz to clean up their gifs, but unfortunately that does not work well on my laptop. I use a Windows computer, so things may look slightly different if you’re using a Mac.
STEP ONE ⤅ Downloading your video
To start off, find the highest quality possible of the video that you want to gif from. If it’s a stage, I highly recommend using ts files, which are much better quality than the versions you’ll find on Youtube. Ts files can be found on a variety of website such as 4sashi, kpop24hours (requires membership) and on Twitter. Here is an additional resource for finding ts files and downloading videos. For non-stages, 1080p will work best, though 2k and 4k are absolutely lovely and I would highly recommend those if they’re available.
STEP TWO ⤅ Run your video through Vapoursynth
You can install Vapoursynth following this tutorial. Vapousynth is essentially a program that will crop and compress your video files without losing any quality. It also has built-in sharpen and denoise functions that can take over the functions of Topaz.
To start the process, you’ll drag your video onto the vapourscript and see a pop-up from Command Prompt. It will prompt you to enter two numbers: the first is the timestamp on the video for the start time for your gif (mine was at 3 min, 27 seconds). After pressing enter, it will then prompt you to enter the duration of the moment you want to gif (mine is 3 seconds). If you’re using Avisynth, the second prompt will be the second time stop (when you want the moment to end). I find that sometimes adding an extra second will help me capture the entire moment, but it’s up to your own discretion.

Once you press enter a third time, the command prompt will run and then a pop-up will appear on your browser. You can then adjust several settings, including gif size, preprocessor, denoise filters and sharpening. There’s a lot of freedom here to choose what you’d like to do.
In terms of gif size, you can pick any height that you think looks good but the widths that are optimized on Tumblr go as follows:
1 gif per row: 540px width
2 gifs per row: 268px width (I tend to use the default 350px for height when making these)
3 gifs per row: 178px width (it’s funky here because the middle gif is 178px while the two on the side are 177px each, so you have to crop off a pixel later)
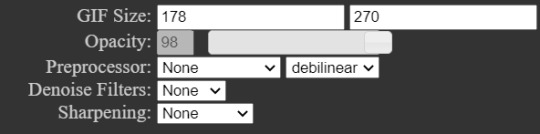
For the purposes of this tutorial, I’ll be making 178px gifs. The next option is preprocessor. This option will alter how the video renders. There are two main options - 30 or 60 - and this will refer the number of frames per second you’ll obtain. For live performance gifs, qtgmc 60 slow is generally the option I choose as it gives better quality frames (especially with a lot of movement) but you may find that qtgmc 30 slow is sufficient. For non ts files, I typically do not use any preprocessor settings.
Most of the time, I don’t use denoise or sharpening filters as I prefer to do my sharpening and denoise in Photoshop. When I do choose to use denoise and sharpening, these are the settings I use. I don’t have a particular reason, but just that I like the way the gifs look. You can experiment with the settings to see what you like, and it can also vary with the gif.

The difference between having those sharpening/denoise settings vs. doing it in Photoshop vs. no sharpening/denoise can also be seen with the three gifs below (note that I've coloured them, which we’ll get into a bit later). As you can probably tell, there’s not a HUGE difference in quality between the three because ts files tend to be already be very high quality but I would always recommend sharpening as it can make a very big difference in the quality of your gifs!

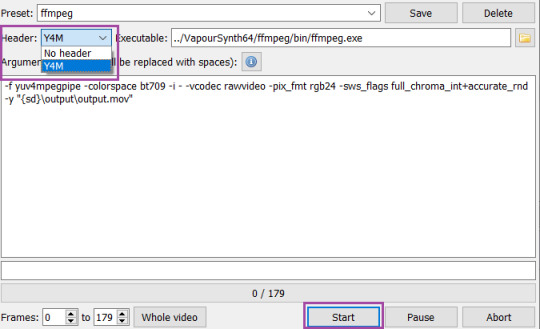
After choosing the settings you want, you’ll then paste them into the VapouSynth Editor (which should’ve automatically popped up at the same time as the browser setting adjuster). For the purposes of this tutorial, I have chosen not to sharpen and denoise. You will copy paste the code from the browser (found at the right side) into the editor. My code was 4 lines and goes in between the code from the 11th line and 22nd line (yours should as well, though the line numbers may not match up - just make sure they say the same thing!)

You’ll then want to hover on the script on the top bar and click on “Encode video”.
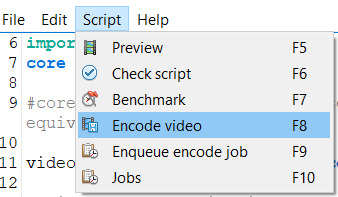
Once you click encode video, another box will pop up. Here, you’ll want to make one adjustment (shown in purple), before pressing start. At the header bar, you’ll want to exchange the preset “No header” for the Y4M option. After you’ve done that, you can press start found below (also highlighted in purple).
Congrats! You’ve finally finished processing your video!
STEP THREE ⤅ Make the gif in Photoshop
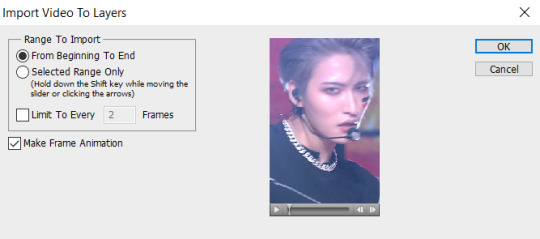
To important the frames into Photoshop, you’ll click File (top bar) > import > video frames to layers. Your output file from vapousynth should be found in the VapourSynth64Portable folder (based on where you first saved it) > gifs > output. Finally, click on the output.mov file to select it. You will then get a pop-up that looks like the following. I always keep these settings, though sometimes people will use limit to every 2 frames, but I find that will make your gifs look choppy.
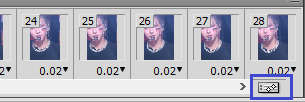
Based on the way your Photoshop layout is set up, the following steps may be found in different places than they’re found on my screen. You’ll want to have animation turned on (can be turned on under the windows dropdown menu, and just click on animation to turn on the frame view). If your bar is on the bottom of the screen, in the bottom right corner, you should press on the button (convert to timeline animation). I’ve highlighted the button in blue.
After converting to timeline, I select all the frames in the layers window (can also be turned on in the windows dropdown menu and selecting layers). Then, right click and and press convert to smart object. This will turn all your layers into a single object so you can edit all the layers at once rather than having to edit each layer separately.
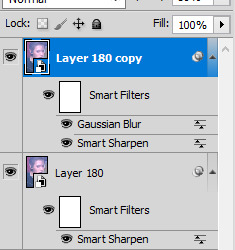
After your smart object is created, I like to sharpen. I have an action, but to recreate the same effect, you will need to (1) duplicate the smart object (right click on the smart object > duplicate layer) (2) smart sharpen both smart objects with the following settings and then (3) put a gaussian blur only on the top layer with 1.0px. Both smart sharpen and gaussian blur can be found under the filter dropdown menu (filter > sharpen > smart sharpen or filter > blur > gaussian blur).

Depending on the quality of the video, if I find the sharpening too strong, I will sometimes change the radius to 0.3 or 0.2 (a higher number = more sharpening). Finally, set the top layer to 50% opacity (I go anywhere from 35% to 50% depending on how “soft” I want the sharpening to look. A higher opacity for the top layer will create a softer look). When I finish this step, my layers will usually look like this. And good news: your basic gif is done!
STEP FOUR ⤅ Colouring
Before you save the gif, you may want to colour the gif to make the colours look the way you want. This step is super subjective and every CC will colour differently - it’s why it’s so fun to see multiple sets of the same moment giffed, because each CC will colour a little differently!
I’m not a colouring expert at all, but I’ll put a basic skeleton of the way I colour below and show you the difference between no colouring, a basic colouring, and a more complex colouring. Another fun thing about colouring is that it can also make your gif look much sharper and higher quality depending on what you do.
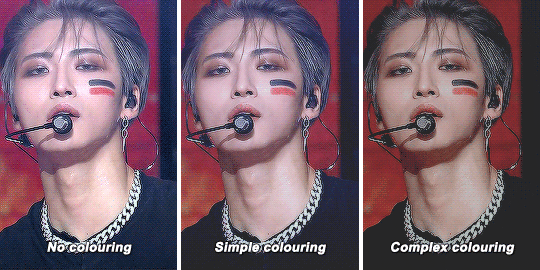
To access the possibilities for colouring, you’ll want to go the adjustments window (once again can be accessed in the window dropdown menu and selecting adjustments). As you can tell, there’s a ton of adjustment options, which may seem overwhelming. You should definitely experiment to find that looks best to you! I usually go in the following order: curves (red), colour balance (orange), hue/saturation (yellow), selective colour (green), levels (blue) and finally exposure (purple). I won’t attempt to explain what each one does (there’s tons of tutorials out there!), but note that sometimes you’ll want to use an adjustment more than once to get the effect you desire. Layering of multiple of these adjustment layers is what will create a more complex colouring that you will find you like more. I also haven’t mentioned some of the other options, but definitely explore them all to figure out what you like!
STEP FIVE⤅ Saving your gif!
We finally made it to the end! To save your gif, head into the file dropdown menu and select save for web and devices. There’s a lot settings you can fiddle around with here in order to save the best possible gif, but these are typically the settings I go with. The most important to note in the top right corner with selective and pattern selected (play around with those as you may find that the other settings will look better based on the gif!). Also make sure colors is at 256 (maximum) as having less than 256 colours can make your gif look patchy. At the bottom right, make sure you’ve selected looping options: forever to make sure the gif will loop. Finally, at the bottom left, you can see the size of the gif in megabytes. Note that Tumblr will allow gifs up to 10mb to be uploaded, but gifs will typically look best when under 3mb (though debatable).

Press save and you’re done! Note that sometimes after you’ve saved, the timing of the gif will be either too fast or slow. You may need to reopen the gif again and adjust the timing. I find that if you’re using 60fps, 0.02-0.03s generally looks best, while 0.04-0.05 will look best when using 30fps or with a preprocessor. Try them out and see what looks right to you.
Congrats on making it through this tutorial and taking the time to make gifs. Making gifs you find nice won’t always come easily or with the first try, but keep going and you’ll eventually find a way that works for you that you’ll be happy with. As always, if you have any questions, feel free to stop by and ask me and I’ll do my best to help. Almost every CC will be happy to share tips and advice as well, so don’t be afraid to reach out to the people whose gifs you love.
#gif tutorial#tutorial#mine#*tutorial#omg this took so long i hope this helps though anon!!#if there are any mistakes or grammar issues please let me know i'm too tired to read this over again LMAO#again everyone has different processes so this may not be something that works for you
100 notes
·
View notes
Text
Pc Games With Character Creation Offline

Games With Character Customization Pc
Steam Games With Character Creation
One of the things I love most in a RPG (Role-Playing Game) is the possibility of creating my own character with tons of different options and add-ons. I made a research yesterday and found some interesting PC Games I already knew about, adding them to the titles I have or plan to get with the best Character Customization. I’m going to list them here for you guys also attaching a few videos so that you can see directly how they work and what kind of possibilities they offer.
It’s the main reason I enjoy games like Skyrim and Fallout. But there seem to be so few good (single player) games with decent character creation - and not just picking from a few presets. The character creation in Dragon Age: inquisition was amazing (although I struggled to enjoy the game) as well as Saints Row (which I really enjoyed). Addicting Offline Co-op Games For PC You’ll Want To Play. Dennis Patrick / Features / Best Co-op PC Games, Co-op, Cooperative. Sonic the Hedgehog is a staple video game character. Best MMORPG with Character Creation. Final Fantasy 14 has one of the most complex and sophisticated character editors. In this game, you can change the smallest details using different sliders, pick a unique voice, or add unique tattoos, accessories and facial paint. What Are Best RPGs With Character Creation? Role-playing games let us live out some of our greatest fantasies like slaying dragons, saving the world and owning a house. Whether your main character is dead, alive, or somewhere in between, these games will let you adjust your appearance and abilities to however you see fit. I've always loved games that give you the option to create your character before you start in the world. I enjoy the game even more when it has role playing or social aspects added to it, allowing you interact with NPCs, or other players if the game has a multiplayer feature. Just character creation would interest me enough to check any game out.
Follow me under the cut if you’re curious!
I’ve been introduced to this type of creation with a game I still keep in my heart and consider one of the best of all times; The Sims 2. Seriously, I’ve created so many 3D characters that if I could win an award I’d have 200 on my shelf by now.
With that said, here you are my personal list of PC games with their awesome customization in no particular order:
I tried this game myself (the free beta that is) a few times in the past and I swear the CC included in it is currently one of my favorite. Without the complete pack I probably didn’t have a lot of additional options available in terms of clothes, makeup and hair, but what truly mesmerized me at the time was the shaping tool, not yet common in games when they released EVE. You can grab and drag different parts of the head and body, modeling unique characters every time.
2. Black Desert Online
This game has been released recently with two different packages and it seems to be quite a popular MMORPG (Massive(ly) Multiplayer Online Role-Playing Game) in Russia and Korea. I’m not surprised considering the quality this game seems to have and its customization is clearly no less. Just like EVE Online, Black Desert offers a good sculpt instrument to shape faces and bodies as much as you like, plus a beautiful variety of colors and combinations.
UPDATE: The game is also available on Steam!
This patch lets you play Legend of Zelda Spirit Tracks with mostly non-touch based controls. The new control bindings are Control Bindings: D-Pad=Run Y+Dpad=Walk B=Wide slash B+Dpad=Long slash Y+B=Spin Attack A=Interact A+Dpad=Roll. Legend of Zelda Spirit Tracks D-Pad Patch This patch implements non-touchscreen controls for essential actions in Legend of Zelda Spirit Tracks. Legend of zelda spirit tracks xenophobia patched rom.
3. Blade&Soul
This is another Asian MMORPG with the classical ‘Anime’ style, you cannot freely reshape the character’s structure, only pick one of the available presets and play around with the sliders to modify the whole body. Andy mckinney molly hatchet. Still, I honestly like the bright colors, the races/classes and the fact that you can actually recreate other existing characters using additional content (just like this guy did with Cloud from Final Fantasy VII).
4. BLESS Online
Yes, another Asian online title. Hey, it’s not my fault if they look so pretty! Bless is quite recent and not yet released in its final stage, but judging by how the CC works you have as much freedom as in EVE or Black Desert and the same unmistakable Fantasy touch.
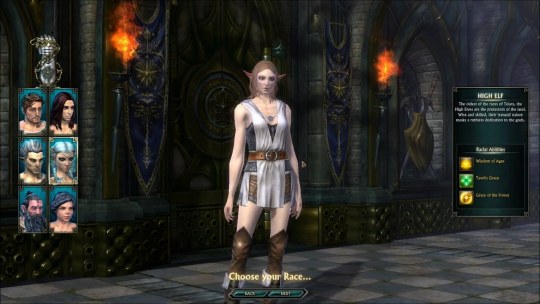
5. The Sims 4
Didn’t I mention The Sims 2? Well, looks like the latest title in the series has improved quite a lot in this area. The shaping/sculpting method is here as well, considering that we finally have more possibilities I certainly won’t complain!
Note: In this video I can see the woman has a few mods installed. If you decide to get this game (or even the previous chapters) I definitely suggest you to do the same if you don’t like the default character design.
6. Fallout 4
Another recent (and quite famous) game. Apparently you can only work on the face here, but once again we see the sculpt tool in action. Even if the hair options are a bit limited you can still customize your character and create unique features playing around with your cursor.
7. Dragon Age: Inquisition
Who knows me is well aware of the fact that I am completely OBSESSED with this game, thus I couldn’t really leave it out. The hair options are definitely questionable and just like in Fallout 4 you do not have any body morph nor slider to alter, but as you can see from this video example you are still able to personalize your Inquisitor in a good way, also using real people or other characters as reference. To be honest I like some of the default presets too, if you don’t like spending two hours working on a face (I do that all the time, but I am a basket case so please ignore my madness :P), you can pick those and get a good result nonetheless.
And don’t forget about mods! 😉
8. Skyrim (The Elder Scrolls V)
This one has been around for a very long time and it remains probably the top 1 Fantasy game out there. If you’re not into mods at all and want to keep your game vanilla be sure that the overall quality is not as improved as the current generation, you can see that from the low-res hair and general textures. The reason why I’m including this CC in the list anyway is because even if old, Skyrim looks quite good compared to other games where you only get 3/4 slider options.
9. APB Reloaded
The last game I’d like to mention (and I literally just discovered it) is this not so new title which has a kick-ass Character Creator. Not only it shows some quality graphics there, but the level of customization is unbelievable! You can make hair shorter, beards longer, create beautiful tattoos (and place or rotate them wherever you want!), add patterns to clothes and even get your personal car! 😀
Chose one serial + PILIH Salah satu WORKING 99% per 13 Januari 2013 1330-1971-4830-1762 1330-1912-2628-0850-0232-4869 1330-1148-0472-2735-6555-0617 1330-1544-4195-8131-3034-5634 1330-1886-0283-4688-9152-2034 1330-1118-3174-6558-8260-5378 OR 1330-1971-4830-5668-6067-1762 1330-1912-2628-0850-0 232-4869 1330-1148-0472-2735-6555-0617 1330-1544-4195-8131. The serial number for Adobe is available. This release was created for you, eager to use Adobe Cs6 master collection full and without limitations. Our intentions are not to harm Adobe software company but to give the possibility to those who can not pay for any piece of software out there. Adobe cs6 master collection activation key wondershare.
There are of course many other games with a Character Creator, but they all seem pretty similar or not good enough to be mentioned in my list.
What do you think about these? Let me know with a comment if you like!
Those late-night multiplayer sessions can be really fun sometimes. Surely, everything is better with friends, they say and you’ll agree with that at some point. However, after a long day of work and studying, I like to relax with offline games. Sometimes, it’s satisfying to let yourself indulge in a great single-player story and forget about any problems bothering you. So, if you are like me, then welcome to the club! Below is my list of 20 best offline games for PC and I hope you’ll enjoy them.
1. The Witcher 3: Wild Hunt
W2k16 pc download. Well, you’ve guessed it! The Witcher 3: Wild Hunt takes first place on the list with its epic setting, characters, gameplay, and those breathtaking visuals! It’s a compelling game that will offer you more than a hundred hours of non-filler gameplay, and there’s always something to explore. The game looks amazing, and the combat system is great. This open-world title is everything you need on your free days! Combine that with the great RPG elements and fun dialogues with NPCs, and you got yourself a pretty good offline game! Go and play it now, it’s a must-play.
2. Wolfenstein 2: The New Colossus
Wolfenstein series has been once again revived with Wolfenstein 2: The New Colossus. The positive reviews flashed all around the globe, and this game quickly became one of the best shooting games of 2017. B.J Blazkowicz is such a badass protagonist and the characters surrounding the game are interesting. You’ll quickly start to care about each and every one of them, making this game a worthy offline title. Bethesda said that they won’t be focusing on multiplayer, so they can bring an immersive single-player experience. Well, you nailed it, Bethesda; great job!
3. The Elder Scrolls V: Skyrim
Bethesda is one of my favorite companies when it comes to gaming, at least they were a few years back. A few years back, this masterpiece called The Elder Scrolls V: Skyrim was released and it took the Earth by storm! This offline open-world title offers hundreds of hours of exploration and you’ll probably never get bored of it! The combat system might be dated, but it’s damn fun to play and explore every corner of the game. After six years since its release, I’m still eager to give Skyrim another go. It’s that great!
4. Fallout 4
Games With Character Customization Pc
Fallout 4 is one of those top offline games that you either like or dislike. It’s a great single-player experience, as you explore a huge world of fictional city Commonwealth. I mean, the story here is scattered here and there, and our protagonist is in search of his abducted son. However, the game often steers away from that and let you have some freedom and exploration. It’s a fantastic reboot of the series, and it’s surely the best game in the franchise. If you are up for that Stalker-ish feeling, then give this a try!
5. Hitman (2016)
Hitman isn’t a strictly offline game, but I included it because it has a great single-player campaign. While the previous entry in the series Hitman: Absolution relied more on linear, claustrophobic, and confined experience, Hitman (2016) went in a different direction. Here, you’ll experience a vast, open-world with lots of stuff to do. The levels are not that numerous, but they are as big as hell! You can complete your missions in various ways and earn certain rewards and points for doing so. Hitman is a challenging stealth experience, but once Agent 47crawls under your skin, there’s no going back!
Steam Games With Character Creation
6. Nioh
Nioh is a less-known offline game released this year, and I feel like this game is very underrated. It’s a child of Dark Souls and Bloodborne series, which can tell you much about this game. It has a single, crushing, and unforgiving difficulty that will leave you begging for mercy. It’s hard, and you’ll need some blazing fast reflexes and huge gaming skills to finish it. There are more than twenty bosses in the game, and every single boss will kick your ass! Don’t expect to finish this game in a few days; you’ll need weeks to finish it and it will be painfully slow as the bosses shame you every little time… you helpless gamer!
7. Nier: Automata
Another underrated game – Nier: Automata. How could the gaming community overlook this game? Are you blind, or what? This game offers thirty hours of a pure, refined, and amazing experience! It’s a hack-and-slash title that mergers several genres with it. The open world in this game is huge, and the post-apocalyptic environment looks depressing and feels like a void. Nier also introduces RPG elements so you can now level yourself up, upgrade weapons, buy stuff, etc. On top of that, there are some 2D sections that feel like a great platformer, and that’ very unique! Nier: Automata is better than most AAA titles and costs double the less of that price, which is one more reason to get it.
8. Dark Souls 3
Dark Souls series got a fantastic reboot with Dark Souls 3. Just if it wasn’t enough for the previous games in the series, and now we got this punishing game. What can I say? Prepare to die a LOT in this game, as it’s created to kill you. I’m not joking, the whole game is against you, and you can’t do anything about that except fight like a lunatic. Even when you die, the enemies around you respawn and you must fight again and again, which is really frustrating. However, if you have the balls to play it, and manage to finish it, then you deserve a medal, Sir!
9. Bioshock Infinite
Bioshock Infinite is the newest installment in the Bioshock series. This cheap game can give you a huge value for your buck, especially when the Holidays come. I mean, for just a couple of bucks, you can get a fantastic FPS game, which campaign isn’t short and definitely isn’t boring! Bioshock Infinite continues its tradition with great shooting mechanics, various powerups, and that fast-paced shooting in a beautiful environment of the game. Get ready to cause mayhem!
10. Alien: Isolation
Alien: Isolation is that PC offline game that will haunt your dreams every time you try to sleep. It’s a horror game in which you try to stay in one piece and escape that damn space station called Sevastopol. Sounds similar? Well, that’s because the game is based on Alien (1979) movie, which was a very disturbing experience at the time. It’s an intense game that makes your palms sweat and your heart beating so fast that you’ll think it’s gonna come out of your chest! Try this horror if you dare, and watch yourself getting swallowed by the Alien, in a single bite!
11. Far Cry Primal
Elephants are cool, but mammoths are so badass! In Far Cry Primal, you can hunt mammoths and even ride them when you get to higher levels! How cool are you from zero to riding a mammoth? This beautiful-looking game is set 10,000 years BC and no, you aren’t going to shoot guns, but bash the hell out of your enemies. The arsenal of weapons might not be that huge, but the combat is great and requires more thinking, as the enemies are sometimes overwhelming and can easily kill you. If you have the luck to tame a sabertooth tiger, you may survive in this harsh world!
12. Resident Evil 7: Biohazard
There is something special about that claustrophobic feeling, especially when it comes to horror games that you can play without internet. That sense of dread and despair when you don’t have much space to move is priceless. Don’t think of me as a psycho, but I LOVE the horror genre! RE7: Biohazard is a game that caught my attention as soon as it was released. This bad boy will provide you with a horrific experience that will leave you scared to death! As the game plays from the first-person perspective, it’s much easier to get yourself immersed, but also scared.
13. Outlast 2
Outlast 2 is yet another offline horror experience, where the developers decided to leave your powerless. There aren’t weapons for you to use, and surely no means to defend yourself. So, what are you left with? Well, a camera and a journal should do the trick! The game does a damn fine job of melding the horror and the dread with stealth and great storytelling. In the end, you may feel a little let down by the ending, but I know you’ll enjoy it until the very end.
14. Dead Space 3
Cat et 2015a factory password generator. While the past games in the series focused more on that horror experience, Dead Space 3 is more of an action-horror game. Sure, there are Necromorphs and they are vicious and all, but the action part is more prominent. Needless to say that Dead Space 3 is an amazing game and I’m very sad that Visceral Games is closed by EA in October. This survival horror game is hugely underrated, but it’s awesome and I recommend you to play it. It’s just a couple of bucks for this experience, don’t be a niggard!
15. Portal 2
There’s something awesome when it comes to Source Engine. The games made with this engine looks amazing, yet they run smoothly. How did Valve manage to do that? Well, as I am not a game developer, don’t ask me! But ask me about Portal 2, which is Valve’s magnum opus, and a compelling puzzle game. The whole point of the game is to use a Portal gun in order to create portals and pass through them. However, the game isn’t that simple and requires some brain skill to finish it. Grab your Portal Gun, and let’s go on a venture!
16. Limbo
This 2D game is straight-up terrifying, dark, and misanthropic from the start to finish! In Limbo, you are a little boy that needs to survive this colorless world of the game as he overcomes various obstacles and escape scary monsters. I like the game’s artwork and the atmosphere is simply top-notch here if you like the dark ambient in the games. It’s a must-play for every offline Indie games lover!
17. S.T.A.L.K.E.R.: Call of Pripyat
Speaking of the atmosphere, very few great offline games can replicate the atmosphere as it is in S.T.A.L.K.E.R.: Call of Pripyat. That post-apocalyptic atmosphere of Pripyat looks great, and the game isn’t colorful, which is the whole point. Everything has that grey-ish tint, as this town suffered greatly when the Nuclear Powerplant in that area exploded. It’s based on a real-life event that occurred around 1989, which gives the game a certain weight and meaning.
18. Metal Gear Solid V: The Phantom Pain
With MGSV: The Phantom Pain, Hideo Kojima proved that he still has what it takes to create such immersive PC games without internet. This stealth game is challenging and full of stuff to do, due to its open-world nature. The characters are badass and the game feels somewhat dark, with a very serious tone. Oh, and not to forget that plot twist at the end that’s worth those thirty hours I’ve spent on this game!
19. SOMA
Horror fans will be pleased that I mentioned another horror title here. SOMA is an absolutely spooky and nerve-wracking experience! It creates that atmosphere that’s very unique, and with the story being told in the shape of various documents scattered through the game, it’s even more badass! You are all alone here and you’ll fight for your life, only to find out that you aren’t actually alive! A truly wonderful offline game for Windows.
20. Superhot
Superhot is a cartoonish-looking offline game that revolves around time. To make it simple, the time in the game moves when you move, so if you are standing still, nothing will happen. Vice Versa, if you are moving and shooting, then the enemies will do the same. It’s a lot of fun, but a lot of challenges too. I played it with some of my favorite death metal albums, just to ensure that I’m hardcore enough to beat it!
As we are approaching near the end of our journey through the offline PC games, I’m here to ask you a question. What is your favorite offline game for PC? I tried my best to count some of my favorite offline games, and although I’m maybe going to start a war for not including some of the games, I stand behind my words. Oh, and why don’t you tell me what game did I miss? Do you have any favorites besides these 20 games? Please, let me know, and don’t forget to do some gaming today!
3 notes
·
View notes
Text
UPDATED: Sims 3 Utilities for Macs
June 2021 Edit:
This post is the latest update I have about using Sims 3 utility programs on Macs. I made and shared these a long time ago, when I was still running Mojave. I have no idea if they work on Catalina or Big Sur, but there’s a good chance they won’t. As Mac OS has progressed and TS3 has stayed the same, it has been increasingly difficult to make the two play nicely together. At this point I just have my old 2015 MBP with a clean install of High Sierra for the sole purpose of playing TS3, and I don’t attempt anything with my newer Mac. I’m making this information available to anyone who still has any use for it. Good luck to you!
Description
This is a bundle of three Sims 3 utility programs for Macs: Multi Extractor, Dashboard, and s3pe. These programs can be used to manage and organize custom content by extracting .package files from Sims3Packs, scanning custom content for broken or conflicting content, and merging files in order to improve load time and game performance. I used WineBottler to make these programs into apps that will run natively on your Mac. You do not need Bootcamp, Mono, or any other program. Just unzip the linked file, and double click an app to open it.
These apps are not perfect, and I’m afraid it’s beyond my skillset to make them so. However, I have tested them with my own game and feel they are quite useful as-is, providing you have some patience and time to spare.
A long time ago, I wrote some guides about using Mono to run these programs. Those guides are outdated, and that method no longer works. These new apps are, to the best of my knowledge, the easiest way to use Multi Extractor, Dashboard, and s3pe on a Mac without the use of a Windows partition or purchasing apps. The download link is here because this is a long post, but I recommend you keep reading for the known issues and suggested workaround, and my tips for organizing your content and making the merging process as painless as possible.
DOWNLOAD HERE
Known Issues and Troubleshooting
I made these apps to be self-contained, such that you should not need any other programs to run them on your Mac. However, if for some reason you can’t open them, you could try downloading and installing WineBottler. If that doesn’t work, the only other possible solution I know of would be to update your OS to at least High Sierra (what I’m on as of making these programs). If all else fails, you might have to try using WineBottler to make them yourself.
I tested these apps with hundreds of custom content and decrapped Store packages for my own game. I experienced a lot of crashes, and it took quite a bit of time, patience, and trial and error, but after a few hours of tedious work I did successfully merge 3 GB of custom content into about a dozen merged packages. I feel that s3pe actually merges files a lot faster this way than it did in Mono, though it doesn’t handle big batches very well at all. Here are the issues I noticed in my testing:
Warning message on startup. You may see the message “This app is not optimized for your Mac and needs to be updated by its developer.” I don’t know how to stop the message or “optimize” the app. But it should still be usable.
s3pe crashes while merging files. I had a fair number of crashes; it’s inevitable and there isn’t always a predictable pattern. First try merging in smaller batches. Then try creating a new package instead of merging into an existing one. Also, it appears that certain individual files always cause s3pe to crash when trying to merge them. I haven’t noticed a pattern to this, and those files are not corrupt or broken. It helps to pay attention to the progress bar at the bottom of the window while files are merging, so you can see which file triggers the crash and remove it before trying again. More on this issue in the Suggested Workflow section.
s3pe crashes when creating a new package. Close the package you’re working on with File>Close before creating a new one.
Dashboard doesn’t show color-coded highlights. With the highlights missing, you can’t just quickly scroll and see issues at a glance. You need to look at the “Type” column. Corrupt or conflicting content will be noted there. Expand the column to see which package that item conflicts with.
Suggested Workflow
This section is mainly for people new to these programs, who have never used them to manage their custom content. I’ll explain what I do to organize and merge my own CC, and the procedure I used to make the merging process as efficient as possible given the risk of s3pe crashes. This process gives you neatly merged packages in the Mods/Packages folder, and organized individual files in another location on your computer as a reference to indicate which individual packages are in which merged files.
Extract any Sims3Packs with Multi Extractor. (Unlike with Mono, the Multi Extractor actually will put the packages into the specified folder.)
Put your individual .package files into folders named according to category, however you want to organize your content (I use categories like Build, Buy, Clothes, ShoesAccessories, Hair, and Makeup). Place these folders in Mods/Packages.
Use NameChanger to easily rename files in bulk: remove special characters like brackets and spaces, prepend creator names, etc.
Test everything in game. You may have to do this in batches, if you have enough individual files that your game won’t start up with everything in at once.
Create another folder somewhere else on your computer called CurrentCC. Create empty subfolders inside, each named according to the categories you decided on in step 2. I’ll use “Build” as an example from here.
Open Dashboard. Select File>Scan Folder, and select Mods/Packages. Dashboard will scan its subfolders. Look for corrupt or conflicting content (see above). Note that content from the same set will often be marked as “conflicting”; this is not an issue, as long as they are indeed part of the same set or collection. Remove corrupt content and fix true conflicts or duplicates.
Open two Finder windows/tabs. Create a subfolder called “1″ in CurrentCC/Build, and go there in one window. In the other, go to Mods/Packages/Build.
Open s3pe. Select File>New.
Select Resource>Import>as dbc. Navigate to Mods/Packages/Build. Hold shift and click to select the first twenty** files. Click OK.
When prompted, name the package Build1 and choose Mods/Packages as its location. Wait for all packages to merge. While merging, keep an eye on the progress bar at the bottom of the screen and try to notice which file s3pe is working on as it goes; I find it easiest to count the flashes of the blue progress bar. When s3pe crashes or gives you an error message, it might be helpful to know which particular file it tripped up on (if I saw the progress bar come up five times, I know it crashed on the fifth file I selected, sorted alphabetically). s3pe should auto save by default; after merging you can verify by making sure Save is greyed out in the File menu.
If the selected files merge successfully: Tab over to Finder and move the first twenty packages in Mods/Packages/Build to CurrentCC/Build/1. Copy Mods/Packages/Build1.package and paste into CurrentCC/Build/1.
If s3pe crashes or gives you an error message during merging: Copy Build1.package in CurrentCC/Build, paste into Mods/Packages/Build. Do not move any files out of Mods/Packages/Build. You have a few possible solutions: 1) Go back to step 9 and select fewer files this time,** or 2) go back to step 8 and create a Build2/3/4/etc., or 3) remove the specific file s3pe was dealing with when it crashed. Large categories, or categories like Hair with larger individual packages, will require more than one merged file. Create a folder “2″ in CurrentCC/Build, create a new package Build2, etc. You can even try merging the merged files together later. Important note: I noticed that certain files just don’t want to be merged. They cause s3pe to throw up an error message every time. I found it most efficient to just remove the problem files to separate, categorized folders in Mods/Packages. Try creating a new package for them or try adding them to one of the merged packages later. You could also just keep them unmerged indefinitely: I have about twenty files that caused crashes during the merging process, and since the hundreds of other pieces of CC were merged without issue, those handful of single unmerged files won’t be an issue in terms of game load times.
Repeat previous four steps as needed, until Mods/Packages/Build is empty. You can now delete CurrentCC/Build/1/Build1.package (and merged files in all successively numbered folders), because it is a duplicate of Mods/Packages/Build1.package. Repeat for all folders in Mods/Packages.
**About twenty at a time can work for small items like walls or patterns. You may need to do as few as ten or even five at a time for big items like hairs, and merging files into an existing package seems to go smoother when you do small batches around that size.
I know I should have made this sooner. Sorry about that. And I know at this point there aren’t many people who still play TS3 on a Mac, but I hope these programs are of some use to those Mac Simmers still out there. This post has included all the issues I noticed while testing, and all the workarounds I’ve figured out myself, but if you run into any issues feel free to send me a message and I’ll help as best I can. Good luck!
42 notes
·
View notes
Text
I Bought the New iPad Pro So You Don’t Have To
I’m no stranger to the iPad. In fact, it once caused me not to get a job at an Apple store shortly after college. I was asked in an interview, “What do you think of the new iPad,” and I answered honestly (mistake number one in a job interview I would learn).
“I’m not sure how I feel about it, it doesn’t really do what I would want it to do.”
I didn’t get a call back for a second interview. Little did I know this would be the start of my rocky relationships with tablets.
In 2012, I bought refurbished a 32GB “New iPad.” With its retina screen, I told myself it would be the perfect portfolio alternative, and I could make myself look so cool by bringing a digital device to a client meeting, instead of a printed book.
“Who prints photos anymore? Clients will see me as cutting edge!”
That device currently is sitting on the floor next to my bed, unable to be updated past iOS 9, with a dead battery. I rarely use it anymore because of how slow it has become. And it certainly didn’t win me any clients. I think I may have used it professionally once or twice to have someone digitally sign a contract or a model release.
When the first iPad Pro was released I found myself holding it and thinking, “Well…it sure is big,” before using the newly launched apple pencil to crudely draw a penis on it and handing it back to my friend. I still didn’t see a good use for what was essentially a laptop without a keyboard.
Flash forward to 2017, where I found myself standing at the counter at my local Apple store looking at the three size options in front of me for “Pro” level iPads. I was sold (or so I told myself). I just needed to know what size fits me best. After a few hours of going back and forth with the demo models, I eventually decided to walk away. It just didn’t hold up to the experience I was getting from my laptop.
When the 2018 Apple announcement of the new iPad Pro came through, I once again found myself enamored with the idea of getting a laptop replacement. I studied the keynote, watched every review video, and made an appointment with myself to visit the apple store as soon as possible to play with one myself.
The idea that now this tablet was “more powerful than most PC laptops” and (would be) capable of running a “full” version of Photoshop really intrigued me.
The Tech Specs
To be fair, a lot of this section is pulled directly from Apple’s sales literature on the new iPad, and I will try my best to keep things brief here. This isn’t anything you can’t find for yourself with a quick Google search.
Liquid Retina display
11 or 12.9-inch (diagonal) LED-backlit Multi‑Touch display with IPS technology
2732-by-2048-pixel resolution at 264 pixels per inch (ppi)
ProMotion technology
Wide color display (P3)
True Tone display
A12X Bionic chip with 64-bit architecture
Neural Engine
Embedded M12 coprocessor
USB-C
10 hour battery life
New Apple Pencil with magnetic charging
I sent this photo to several people who knew how much I was dreading this purchase.
After another agonizing hour going back and forth with price and specs, I decided to pull the trigger on the 12.9” model with 256GB of storage, with the new Apple Pencil. $1,380.24 retail after estimated Atlanta taxes.
To be fair, I had a friend hook me up with an Apple Friends and Family discount, which brought my price down to a little under $1200 after tax. Even with the discount, this is a pretty large chunk of change to throw down on something that I didn’t even know if it would fit into my workflow properly.
Once the device was delivered to me an hour later, I rushed home and completed the setup process and began playing with my new toy. I was determined to make it work for me.
Pros
Just about everything with the design of the device
The 12.9” screen is gorgeous and, combined with the True Tone Technology and night shift, I found it very easy to use in a variety of lighting conditions. Never did it blow out my eyes when used in the dark.
The new Apple Pencil is very responsive and feels great in hand. The new magnetic charging system makes it a great way to store and charge.
Battery life is pretty good. Apple rates it at 10 hours, and with moderate usage, I was able to only drop down to around 50% before it was time for bed.
The refresh rate still makes me very happy. It feels snappy when I swipe between pages on the home screen, or between pages in a book or magazine. I am impressed at how smooth everything is.
All of this packed into a device that is a great size that fits comfortably in my hands.
And I’ll be the first person to say I have tiny hands.
iOS 12
For the most part, I am very happy with the latest version of iOS. When used on the iPad Pro it does a great job at coming VERY close to a desktop-class OS. For the average user who is looking for a laptop replacement or substitute, it makes for a pretty good argument against competing products.
USB-C (Kinda)
Apple choosing to move to a standardized charging/syncing solution is super smart. No more proprietary cables (for the most part), and if you are ok with dongles of varying sorts you can basically connect this device to just about anything (even if that connection can’t exactly do anything…more on this later). Even though I didn’t get a chance to try it, the ability to mirror to a 5K display was an impressive demo.
Cons
Price
Let’s talk about the elephant in the room straight away. This thing is not cheap. And for a similar price point, you are already into 13” Macbook territory. This makes the decision much harder when comparing side by side. Yes, technically you get more storage with the iPad, and that new processor supposedly is nothing to laugh at. But what you lose is RAM, and a FULL operating system (And at least for me, Capture One).
USB-C
For all the great things that the iPad pro can do with its new port, there is one HUGE thing that it can’t do. At the time of this writing, the USB-C port cannot be used to interface directly with an external hard drive. This is a huge bummer because, in order to be competitive with a traditional laptop, I can’t really get around needing expandable storage.
But, you say, “The cloud! Can’t you use the cloud?” And my response to this is a decided “Yes and No.”
I downloaded the WD MyCloud app onto the iPad. It’s the same app that I use to manage my personal cloud from the go on my phone. And while I was able to eventually download a file into the iPad for editing, it was far from an elegant experience.
Wait…where are my thumbnails?
While iOS 12 can support plenty of different RAW files, it can only read them while in the Photos app, unless specifically coded into each individual app. Even in the Files app, you can’t see any thumbnails by default.
I sure do hope I remember that SPECIFIC file name for the file I want to edit.
Now, once you download the file to your device, you can see a thumbnail just fine.
Too bad I’d have to import all of these into my camera roll first before I can see them.
Now I suppose this could be solved by a product like a Gnarbox or the Lacie DJI Co-Pilot since they have a computer of sorts built in for processing (RAW previews), and generally can interface with other apps nicely. But by that point, you are spending ANOTHER $299-$499 on top of the storage you already spent which further makes the argument for a traditional laptop.
The one thing I didn’t try was Tethering.
But unless I’m using the Lightroom app I don’t think this will work for me as intended as well. From what I have seen, connecting a camera basically just opens up the photos app and downloads files from the SD card on the camera. Not a direct tethered shooting solution that I am used to from Capture One.
I suppose you could also use the USB-C SD card reader, but then you are once again having to load every file directly onto the internal storage of the iPad itself. And then moving them back off for long-term archiving brings up a whole other conversation.
I think that the lack of USB-C mass storage support is something that Apple could (and hopefully will) fix in an upcoming version of iOS. This two-way data movement and storage would change a LOT of my feelings about the iPad Pro as it stands today.
Lack of “Desktop Strength” photo editing solutions
This is one “con” where I think things are ALMOST there. A “full” version of Adobe Photoshop will be coming next year, but Lightroom CC already has a large user-base and supposedly does a pretty good job. I’m still not sold, I don’t like Adobe’s charge per month model. It’s just not for me. And all of it adds to the overall cost ($120 a year). There are some cheaper (and single purchase) options available, however.
Affinity Photo has long been the Photoshop analog that many photographers have fallen in love with. At the time of this writing, however, Affinity Photo hasn’t been updated in over a month, and likely hasn’t been optimized for these new processors yet. I fully believe that the next version of Affinity will work just fine and will be a very speedy piece of software.
But for me, I found it to be a touch clunky and certainly when I was doing some basic retouching there were several times I had to wait 15 seconds or so while the app crunched the data.
For those who aren’t familiar with the Affinity Photo UI
Affinity isn’t a bad option at all, and I think that part of my problems with it was just in learning a new piece of software. And once I got rolling I feel that things went rather smoothly. With the exception that it took me over an hour to retouch the above file, and even then I’m not 100% happy with the results. But I’ll let you guys judge for yourselves.
Backup and Archiving Workflow
My final gripe comes after you export the files out. By default, most of the apps I have played with wanted to export everything back into the camera roll of the iPad itself. Which then, of course, leads to duplicate files and space being eaten up by final deliverables.
I found a way to move things manually back to my WD Cloud, but it wasn’t elegant and took some experimenting with to move everything over. Then I was still left with having to delete the file manually to free up space on the device itself.
Conclusion
I like the 2018 iPad Pro, I really do. But I’m not IN LOVE with it.
Ok, I’m lying. I do love it. I think it’s designed well, I think the screen and pencil are both great, I think the audio on it is some of the best I have heard across any device. I like the idea of having iOS on a larger screen, that is still light enough to carry around one-handed. I like all of the potential that comes from multitasking.
From an Apple fanboy perspective, I really do love this device.
I even used the Squarespace blog app to type some of this post!
But from a photographer standpoint, it falls short. For me. My workflow just can’t accommodate the iPad Pro as it currently stands. But it’s so close!
With a few simple changes (USB-C Mass Storage, RAW Support in the Files app, and more Pro “Desktop Level” Apps from the likes of Adobe, Capture One, etc) all of which could potentially come at a software level without the need of additional hardware.
For day to day web surfing, email, notes, and other media consumption I love what has come from this latest generation of iPad. This makes me excited for what is to come with lower-spec devices that I would likely use more frequently.
I was at a meeting today and loved using the iPad to take notes on, and I loved being able to quickly surf the Web and find info I needed. I really want to have this device in my life, but unfortunately…I’m probably going to return it.
I’m going to give it through the weekend to grow on me a little more, maybe do some more playing around to see if I can better fit things into my life. But at this moment right now, I just can’t justify paying $1200 for something that I can already do (arguably better) on my already paid for MacBook Pro. Thankfully Apple has a 14-day return period, because I would hate to have to try and re-sell this on the open market.
Maybe I’ll just wait a while and snatch up one of these once they hit the Refurbished section of the Apple store, or maybe grab one of last year’s models at a killer deal.
Or there is always next year’s model…
About the author: Blake Griffin is a photographer based in Atlanta, Georgia. The opinions expressed in this article are solely those of the author. Griffin runs UNEXPhotography and has his Bachelors of Arts with a concentration in film and photography, from Montana State University – Bozeman. You can find more of his work on his website, Facebook, Twitter, and Instagram. This article was also published here.
source https://petapixel.com/2018/11/13/i-bought-the-new-ipad-pro-so-you-dont-have-to/
0 notes
Text
What credit score is needed to buy a car
Your credit score needs to be as high as possible before you buy a car — ideally this means more than 740.
A credit score this high puts you in prime position to get the best interest rates with the added benefit of not having to worry about whether or not your loan will get approved.
You can also save massive amounts of money on your car loan if you have your credit score in check.
How much can you save? Let’s assume you have a credit score of 600. If you improved your credit score by just 60 points, you can save over $2,500 on your car loan.
Surprise! It pays to have good credit.
Improving your credit score can seem very daunting though — especially if you have a really bad one (<600). If that sounds like you, don’t worry. We have a system that can help you improve your credit score and get you an awesome deal on your loan.
What is a credit score?
What credit score is needed to buy a car?
How to improve your credit score
Step 1: Delete your debt
Step 2: Keep your cards
Step 3: Decrease your credit rate
Step 4: Automate your finances
What is your credit score?
There are essentially two elements that make up your credit. They are:
Credit report. This is a comprehensive report that gives potential auto lenders basic information about you and your credit usage. This includes things like the number and type of accounts you have open, your payment history, and purchases you’ve made using credit.
Credit score. This is also known as your FICO score, as it was developed by the Fair Isaac Corporation. It’s a single number between 300 and 850 that tells lenders how risky you are to lend to. Auto lenders will look at this number, along with other pieces of info like your salary and age, and make a judgment on your interest rate and whether or not they’ll lend to you at all. That’s why it’s so important that you have as good of a credit score as possible.
Your score comes from the information found within your credit report.
The actual number is determined by the following information and their associated weight in relation to your score (credit score formula courtesy of Wells Fargo):
What your credit score is based on:
35% payment history. How reliable you are. Late payments hurt you.
30% amounts owed. How much you owe and how much credit you have available, or your “credit utilization rate.”
15% length of history. How long you’ve had credit. Older accounts are better because they show you’re reliable.
10% how many types of credit. If you have more lines of credit open, the better your score will be.
10% account inquiries. How many times you have or a lender has checked your credit background.
Your credit score will be within a range of 300 and 850. The range determines whether or not your score is solid — but a good rule of thumb is the higher your credit score, the better you’re off.
If you’re confused, don’t worry. Here’s a handy chart to help you figure out how good your credit score is.
It’s also ludicrously easy to find your credit score. In fact, you should do it after you read this article. I suggest starting at Credit Karma or Mint. They’ll find your credit score quickly after you enter in some basic information about yourself (e.g., name, birthdate, SSN).
What credit score is needed to buy a car?
Imagine you want to get a new car that costs $20,000. Your credit score is 680. Not bad but not spectacular either. You decide to put down $5,000 and take out a 48-month auto loan with a principal amount of $15,000. Take a look at how much your monthly payment would be.
48-month new car loan
FICO Score
APR
Monthly payment
Total interest paid
720 – 850
4.008%
$339
$1,259
690 – 719
5.387%
$348
$1,708
660 – 689
7.578%
$363
$2,435
620 – 659
10.411%
$383
$3,404
590 – 619
14.945%
$417
$5,018
500 – 589
15.922%
$425
$5,376
Source: MyFico.
Your monthly payment would be around $363 with a total of $2,435 in interest paid.
But do you know how much you could save if you took the time to improve your credit score from 680 to 720?
$1,176. That’s like getting 5.88% off the sticker price of $20,000.
For example, if your credit score was really bad (~500), you’d save $4,117 if you improved your credit score to 720.
You’d save even more if you’re taking out a used car loan, which typically has a higher interest rate than new ones. Check it out below.
48-month used car loan
FICO Score
APR
Monthly payment
Total interest paid
720 – 850
4.924%
$345
$1,556
690 – 719
6.6%
$356
$2,108
660 – 689
9.089%
$374
$2,948
620 – 659
11.509%
$391
$3,787
590 – 619
16.292%
$427
$5,513
500 – 589
17.549%
$437
$5,981
Source: MyFico.
Using the same principal amount as before ($15,000) we see that we stand to save $4,425 if we improved our credit score from 500 to 720. That’s a HUGE win.
How to improve your credit score
You need a good credit score to get a good interest rate on your loan. I won’t belabor the point.
So here are four things you can start doing today to get a great one:
Delete your debt
Keep your cards
Decrease your credit rate
Automate your finances
Step 1: Delete your debt
Debt is one of the most common factors contributing to a low credit score. It’s also one of the biggest barriers in the way of a Rich Life.
If you want to start earning, saving, and investing more, you need to be debt-free.
Luckily, we have plenty of resources to help get you there. Check them out below.
The five steps to get out of debt fast
Pay off your credit card IWT style
IWT debt calculator
If you want even more insights on getting out of debt, check out my (very) old video on negotiating your debt.
youtube
Step 2: Keep your cards
It’s easy to think that since credit cards are often the source of debt, they need to be canceled in order to get a hold of your finances. That is a myth. Pure and simple.
15% of your credit score is determined by your credit history. That means every credit card account you close is going to negatively impact your credit history.
It also affects your credit utilization rate, which is crucial to getting a great credit score (more on that later).
Of course, there are going to be times when you need to close a credit account. Maybe you can’t afford the yearly fees. Maybe the APR is too high. That’s fine … BUT if you’re planning on applying for a car loan, consider holding off on closing the account until AFTER you get the loan. You want as much credit as possible going into the application process.
Also be sure to put a recurring charge on the ones you don’t use that often. This shows that your card is active and keeps your credit history healthy.
Step 3: Decrease your credit rate
This is also known as the amount you owe, and it impacts 30% of your credit score.
Figuring out your credit utilization rate is simple:
(how much you owe) / (total credit available)
The lower this number is, the better it is for your credit score.
For example, let’s imagine you have $1,000 in debt on two different credit cards. Each card has a $2,500 credit limit. How much is your credit utilization rate?
$1,000 in debt / $5,000 of total credit = .20 or 20%
That means your credit utilization rate is 20%. However, if you closed one of those cards, your credit utilization rate would jump to 40%!
The lower your credit utilization rate is the better. That shows auto lenders that you don’t spend all of the money you have in your available credit — indicating you probably won’t default on your loan and they won’t lose money.
There are two ways to improve your credit rate:
Don’t carry a lot of debt on your credit cards.
Increase the amount of credit available to you.
We’ve already hit the first part — so let’s take a look at a script to help you negotiate your credit limit with your card company:
YOU: Hi, I’d like to request a credit increase. I currently have $5,000 available and I’d like $10,000.
CC REP: Uh … why?
YOU: I’ve been paying my bill in full for the last 18 months and I have some upcoming purchases. I’d like a credit limit of $10,000. Can you approve my request?
CC REP: Okay. I’ve put in a request for an increase. It should be activated in about seven days. Anything else I can do for you?
Use this script to get a credit limit increase every six to 12 months. Only do this if/when you’re out of debt though.
Step 4: Automate your finances
Ahhh automated finances. This is my system to help get you out of debt, save for any huge purchase, and invest passively.
And since 35% of your credit score is determined by your payment history, it’s important to automate your system so you pay your bill on time and in full each month.
For more information on how to automate your finances, check out my 12-minute video where I go through the exact process with you.
youtube
Get the first chapter of “I Will Teach You to Be Rich” for FREE
To help you even more, I’d like to offer you something: The first chapter of my New York Times best-seller, “I Will Teach You to Be Rich.”
It’s all about credit cards and it’ll help you tap into even more perks, max out your rewards, and beat the credit card companies at their own game.
I want you to have the tools and word-for-word scripts to fight back against the huge credit card companies. To download it free now, enter your name and email below.
What credit score is needed to buy a car is a post from: I Will Teach You To Be Rich.
from Finance https://www.iwillteachyoutoberich.com/blog/what-credit-score-is-needed-to-buy-a-car/
via http://www.rssmix.com/
0 notes
Text
What credit score is needed to buy a car
Your credit score needs to be as high as possible before you buy a car — ideally this means more than 740.
A credit score this high puts you in prime position to get the best interest rates with the added benefit of not having to worry about whether or not your loan will get approved.
You can also save massive amounts of money on your car loan if you have your credit score in check.
How much can you save? Let’s assume you have a credit score of 600. If you improved your credit score by just 60 points, you can save over $2,500 on your car loan.
Surprise! It pays to have good credit.
Improving your credit score can seem very daunting though — especially if you have a really bad one (<600). If that sounds like you, don’t worry. We have a system that can help you improve your credit score and get you an awesome deal on your loan.
What is a credit score?
What credit score is needed to buy a car?
How to improve your credit score
Step 1: Delete your debt
Step 2: Keep your cards
Step 3: Decrease your credit rate
Step 4: Automate your finances
What is your credit score?
There are essentially two elements that make up your credit. They are:
Credit report. This is a comprehensive report that gives potential auto lenders basic information about you and your credit usage. This includes things like the number and type of accounts you have open, your payment history, and purchases you’ve made using credit.
Credit score. This is also known as your FICO score, as it was developed by the Fair Isaac Corporation. It’s a single number between 300 and 850 that tells lenders how risky you are to lend to. Auto lenders will look at this number, along with other pieces of info like your salary and age, and make a judgment on your interest rate and whether or not they’ll lend to you at all. That’s why it’s so important that you have as good of a credit score as possible.
Your score comes from the information found within your credit report.
The actual number is determined by the following information and their associated weight in relation to your score (credit score formula courtesy of Wells Fargo):
What your credit score is based on:
35% payment history. How reliable you are. Late payments hurt you.
30% amounts owed. How much you owe and how much credit you have available, or your “credit utilization rate.”
15% length of history. How long you’ve had credit. Older accounts are better because they show you’re reliable.
10% how many types of credit. If you have more lines of credit open, the better your score will be.
10% account inquiries. How many times you have or a lender has checked your credit background.
Your credit score will be within a range of 300 and 850. The range determines whether or not your score is solid — but a good rule of thumb is the higher your credit score, the better you’re off.
If you’re confused, don’t worry. Here’s a handy chart to help you figure out how good your credit score is.
It’s also ludicrously easy to find your credit score. In fact, you should do it after you read this article. I suggest starting at Credit Karma or Mint. They’ll find your credit score quickly after you enter in some basic information about yourself (e.g., name, birthdate, SSN).
What credit score is needed to buy a car?
Imagine you want to get a new car that costs $20,000. Your credit score is 680. Not bad but not spectacular either. You decide to put down $5,000 and take out a 48-month auto loan with a principal amount of $15,000. Take a look at how much your monthly payment would be.
48-month new car loan
FICO Score
APR
Monthly payment
Total interest paid
720 – 850
4.008%
$339
$1,259
690 – 719
5.387%
$348
$1,708
660 – 689
7.578%
$363
$2,435
620 – 659
10.411%
$383
$3,404
590 – 619
14.945%
$417
$5,018
500 – 589
15.922%
$425
$5,376
Source: MyFico.
Your monthly payment would be around $363 with a total of $2,435 in interest paid.
But do you know how much you could save if you took the time to improve your credit score from 680 to 720?
$1,176. That’s like getting 5.88% off the sticker price of $20,000.
For example, if your credit score was really bad (~500), you’d save $4,117 if you improved your credit score to 720.
You’d save even more if you’re taking out a used car loan, which typically has a higher interest rate than new ones. Check it out below.
48-month used car loan
FICO Score
APR
Monthly payment
Total interest paid
720 – 850
4.924%
$345
$1,556
690 – 719
6.6%
$356
$2,108
660 – 689
9.089%
$374
$2,948
620 – 659
11.509%
$391
$3,787
590 – 619
16.292%
$427
$5,513
500 – 589
17.549%
$437
$5,981
Source: MyFico.
Using the same principal amount as before ($15,000) we see that we stand to save $4,425 if we improved our credit score from 500 to 720. That’s a HUGE win.
How to improve your credit score
You need a good credit score to get a good interest rate on your loan. I won’t belabor the point.
So here are four things you can start doing today to get a great one:
Delete your debt
Keep your cards
Decrease your credit rate
Automate your finances
Step 1: Delete your debt
Debt is one of the most common factors contributing to a low credit score. It’s also one of the biggest barriers in the way of a Rich Life.
If you want to start earning, saving, and investing more, you need to be debt-free.
Luckily, we have plenty of resources to help get you there. Check them out below.
The five steps to get out of debt fast
Pay off your credit card IWT style
IWT debt calculator
If you want even more insights on getting out of debt, check out my (very) old video on negotiating your debt.
youtube
Step 2: Keep your cards
It’s easy to think that since credit cards are often the source of debt, they need to be canceled in order to get a hold of your finances. That is a myth. Pure and simple.
15% of your credit score is determined by your credit history. That means every credit card account you close is going to negatively impact your credit history.
It also affects your credit utilization rate, which is crucial to getting a great credit score (more on that later).
Of course, there are going to be times when you need to close a credit account. Maybe you can’t afford the yearly fees. Maybe the APR is too high. That’s fine … BUT if you’re planning on applying for a car loan, consider holding off on closing the account until AFTER you get the loan. You want as much credit as possible going into the application process.
Also be sure to put a recurring charge on the ones you don’t use that often. This shows that your card is active and keeps your credit history healthy.
Step 3: Decrease your credit rate
This is also known as the amount you owe, and it impacts 30% of your credit score.
Figuring out your credit utilization rate is simple:
(how much you owe) / (total credit available)
The lower this number is, the better it is for your credit score.
For example, let’s imagine you have $1,000 in debt on two different credit cards. Each card has a $2,500 credit limit. How much is your credit utilization rate?
$1,000 in debt / $5,000 of total credit = .20 or 20%
That means your credit utilization rate is 20%. However, if you closed one of those cards, your credit utilization rate would jump to 40%!
The lower your credit utilization rate is the better. That shows auto lenders that you don’t spend all of the money you have in your available credit — indicating you probably won’t default on your loan and they won’t lose money.
There are two ways to improve your credit rate:
Don’t carry a lot of debt on your credit cards.
Increase the amount of credit available to you.
We’ve already hit the first part — so let’s take a look at a script to help you negotiate your credit limit with your card company:
YOU: Hi, I’d like to request a credit increase. I currently have $5,000 available and I’d like $10,000.
CC REP: Uh … why?
YOU: I’ve been paying my bill in full for the last 18 months and I have some upcoming purchases. I’d like a credit limit of $10,000. Can you approve my request?
CC REP: Okay. I’ve put in a request for an increase. It should be activated in about seven days. Anything else I can do for you?
Use this script to get a credit limit increase every six to 12 months. Only do this if/when you’re out of debt though.
Step 4: Automate your finances
Ahhh automated finances. This is my system to help get you out of debt, save for any huge purchase, and invest passively.
And since 35% of your credit score is determined by your payment history, it’s important to automate your system so you pay your bill on time and in full each month.
For more information on how to automate your finances, check out my 12-minute video where I go through the exact process with you.
youtube
Get the first chapter of “I Will Teach You to Be Rich” for FREE
To help you even more, I’d like to offer you something: The first chapter of my New York Times best-seller, “I Will Teach You to Be Rich.”
It’s all about credit cards and it’ll help you tap into even more perks, max out your rewards, and beat the credit card companies at their own game.
I want you to have the tools and word-for-word scripts to fight back against the huge credit card companies. To download it free now, enter your name and email below.
What credit score is needed to buy a car is a post from: I Will Teach You To Be Rich.
from Surety Bond Brokers? Business https://www.iwillteachyoutoberich.com/blog/what-credit-score-is-needed-to-buy-a-car/
0 notes
Text
What credit score is needed to buy a car
Your credit score needs to be as high as possible before you buy a car — ideally this means more than 740.
A credit score this high puts you in prime position to get the best interest rates with the added benefit of not having to worry about whether or not your loan will get approved.
You can also save massive amounts of money on your car loan if you have your credit score in check.
How much can you save? Let’s assume you have a credit score of 600. If you improved your credit score by just 60 points, you can save over $2,500 on your car loan.
Surprise! It pays to have good credit.
Improving your credit score can seem very daunting though — especially if you have a really bad one (<600). If that sounds like you, don’t worry. We have a system that can help you improve your credit score and get you an awesome deal on your loan.
What is a credit score?
What credit score is needed to buy a car?
How to improve your credit score
Step 1: Delete your debt
Step 2: Keep your cards
Step 3: Decrease your credit rate
Step 4: Automate your finances
What is your credit score?
There are essentially two elements that make up your credit. They are:
Credit report. This is a comprehensive report that gives potential auto lenders basic information about you and your credit usage. This includes things like the number and type of accounts you have open, your payment history, and purchases you’ve made using credit.
Credit score. This is also known as your FICO score, as it was developed by the Fair Isaac Corporation. It’s a single number between 300 and 850 that tells lenders how risky you are to lend to. Auto lenders will look at this number, along with other pieces of info like your salary and age, and make a judgment on your interest rate and whether or not they’ll lend to you at all. That’s why it’s so important that you have as good of a credit score as possible.
Your score comes from the information found within your credit report.
The actual number is determined by the following information and their associated weight in relation to your score (credit score formula courtesy of Wells Fargo):
What your credit score is based on:
35% payment history. How reliable you are. Late payments hurt you.
30% amounts owed. How much you owe and how much credit you have available, or your “credit utilization rate.”
15% length of history. How long you’ve had credit. Older accounts are better because they show you’re reliable.
10% how many types of credit. If you have more lines of credit open, the better your score will be.
10% account inquiries. How many times you have or a lender has checked your credit background.
Your credit score will be within a range of 300 and 850. The range determines whether or not your score is solid — but a good rule of thumb is the higher your credit score, the better you’re off.
If you’re confused, don’t worry. Here’s a handy chart to help you figure out how good your credit score is.
It’s also ludicrously easy to find your credit score. In fact, you should do it after you read this article. I suggest starting at Credit Karma or Mint. They’ll find your credit score quickly after you enter in some basic information about yourself (e.g., name, birthdate, SSN).
What credit score is needed to buy a car?
Imagine you want to get a new car that costs $20,000. Your credit score is 680. Not bad but not spectacular either. You decide to put down $5,000 and take out a 48-month auto loan with a principal amount of $15,000. Take a look at how much your monthly payment would be.
48-month new car loan
FICO Score
APR
Monthly payment
Total interest paid
720 – 850
4.008%
$339
$1,259
690 – 719
5.387%
$348
$1,708
660 – 689
7.578%
$363
$2,435
620 – 659
10.411%
$383
$3,404
590 – 619
14.945%
$417
$5,018
500 – 589
15.922%
$425
$5,376
Source: MyFico.
Your monthly payment would be around $363 with a total of $2,435 in interest paid.
But do you know how much you could save if you took the time to improve your credit score from 680 to 720?
$1,176. That’s like getting 5.88% off the sticker price of $20,000.
For example, if your credit score was really bad (~500), you’d save $4,117 if you improved your credit score to 720.
You’d save even more if you’re taking out a used car loan, which typically has a higher interest rate than new ones. Check it out below.
48-month used car loan
FICO Score
APR
Monthly payment
Total interest paid
720 – 850
4.924%
$345
$1,556
690 – 719
6.6%
$356
$2,108
660 – 689
9.089%
$374
$2,948
620 – 659
11.509%
$391
$3,787
590 – 619
16.292%
$427
$5,513
500 – 589
17.549%
$437
$5,981
Source: MyFico.
Using the same principal amount as before ($15,000) we see that we stand to save $4,425 if we improved our credit score from 500 to 720. That’s a HUGE win.
How to improve your credit score
You need a good credit score to get a good interest rate on your loan. I won’t belabor the point.
So here are four things you can start doing today to get a great one:
Delete your debt
Keep your cards
Decrease your credit rate
Automate your finances
Step 1: Delete your debt
Debt is one of the most common factors contributing to a low credit score. It’s also one of the biggest barriers in the way of a Rich Life.
If you want to start earning, saving, and investing more, you need to be debt-free.
Luckily, we have plenty of resources to help get you there. Check them out below.
The five steps to get out of debt fast
Pay off your credit card IWT style
IWT debt calculator
If you want even more insights on getting out of debt, check out my (very) old video on negotiating your debt.
youtube
Step 2: Keep your cards
It’s easy to think that since credit cards are often the source of debt, they need to be canceled in order to get a hold of your finances. That is a myth. Pure and simple.
15% of your credit score is determined by your credit history. That means every credit card account you close is going to negatively impact your credit history.
It also affects your credit utilization rate, which is crucial to getting a great credit score (more on that later).
Of course, there are going to be times when you need to close a credit account. Maybe you can’t afford the yearly fees. Maybe the APR is too high. That’s fine … BUT if you’re planning on applying for a car loan, consider holding off on closing the account until AFTER you get the loan. You want as much credit as possible going into the application process.
Also be sure to put a recurring charge on the ones you don’t use that often. This shows that your card is active and keeps your credit history healthy.
Step 3: Decrease your credit rate
This is also known as the amount you owe, and it impacts 30% of your credit score.
Figuring out your credit utilization rate is simple:
(how much you owe) / (total credit available)
The lower this number is, the better it is for your credit score.
For example, let’s imagine you have $1,000 in debt on two different credit cards. Each card has a $2,500 credit limit. How much is your credit utilization rate?
$1,000 in debt / $5,000 of total credit = .20 or 20%
That means your credit utilization rate is 20%. However, if you closed one of those cards, your credit utilization rate would jump to 40%!
The lower your credit utilization rate is the better. That shows auto lenders that you don’t spend all of the money you have in your available credit — indicating you probably won’t default on your loan and they won’t lose money.
There are two ways to improve your credit rate:
Don’t carry a lot of debt on your credit cards.
Increase the amount of credit available to you.
We’ve already hit the first part — so let’s take a look at a script to help you negotiate your credit limit with your card company:
YOU: Hi, I’d like to request a credit increase. I currently have $5,000 available and I’d like $10,000.
CC REP: Uh … why?
YOU: I’ve been paying my bill in full for the last 18 months and I have some upcoming purchases. I’d like a credit limit of $10,000. Can you approve my request?
CC REP: Okay. I’ve put in a request for an increase. It should be activated in about seven days. Anything else I can do for you?
Use this script to get a credit limit increase every six to 12 months. Only do this if/when you’re out of debt though.
Step 4: Automate your finances
Ahhh automated finances. This is my system to help get you out of debt, save for any huge purchase, and invest passively.
And since 35% of your credit score is determined by your payment history, it’s important to automate your system so you pay your bill on time and in full each month.
For more information on how to automate your finances, check out my 12-minute video where I go through the exact process with you.
youtube
Get the first chapter of “I Will Teach You to Be Rich” for FREE
To help you even more, I’d like to offer you something: The first chapter of my New York Times best-seller, “I Will Teach You to Be Rich.”
It’s all about credit cards and it’ll help you tap into even more perks, max out your rewards, and beat the credit card companies at their own game.
I want you to have the tools and word-for-word scripts to fight back against the huge credit card companies. To download it free now, enter your name and email below.
What credit score is needed to buy a car is a post from: I Will Teach You To Be Rich.
from Finance https://www.iwillteachyoutoberich.com/blog/what-credit-score-is-needed-to-buy-a-car/
via http://www.rssmix.com/
0 notes
Last Seen Blogs


tcnydancer
les-be-honest.

dragon-illution
My sketchbook among other things.

heartinhandgallery-blog
Untitled

soft-x-fondos
Soft.x.fondos