#edit: short-term username change for security
Text
i did it guys. i set a moving-out date. :)
#bonus: i get to go on schoolies!!#i'm going to get my own life!!!#its going to be hard#but it is soooooo going to be worth it omg#i love my friends so much; seriously i wouldn't be able to do this without them <3#[the plan]#edit: short-term username change for security
2 notes
·
View notes
Text
WINDOWS LOGON TYPES
You don't need to utilize Windows Logs, naturally, you may use any type of authentication data. Since you may see, it is worth it to understand the security log. Then the password logon needs to be disabled.
On the subsequent page, you will find an option named Edit name'. At this time you can select the delay choice to go with various modes of snipping. Finally, another choice is ThinLaunch. The System Restore'' option may also help solve Windows being stuck, as it makes it possible for you to determine the reason for the problem so that you can take remedial action. Restricted admin mode is a significant approach to restrict the spread of admin credentials in ways they are sometimes harvested by malware utilizing pass-the-hash and associated practices.
So far as logons generated by means of an ASP, script remember that embedding passwords in source code isn't a good practice for maintenance purposes in addition to the risk that someone malicious will see the source code and thereby add the password. In the event the logon script doesn't get the job done for you, return to the fundamentals and see whether it works at all by double-clicking on it. The login screen will appear where you're able to type out your username as well as the password. Windows is essentially a big parcel of software that's continually being updated, changed and updated. To log in to a different user, you should wait around for Window to startup and login. Employing a lengthy password is vital to prevent against cracking with Ophcrack which uses rainbow tables but then it is easily forgotten and it may be troublesome to type in such a very long password each time you need to login. There's a work bar at the surface of the screen of the remote software.

If you have many distinct accounts configured, select the one which you want to skip the entire login and password option for. Provided that you've got an accessible Windows administrator account, you can enter safe mode and change Windows password within it. Somehow, as soon as a user account profile becomes corrupted for a single reason or another, Windows will load a short-term account consequently, thus barring you from logging into your account, despite the most suitable login credentials. It can be extremely painful to lose all of the information on a computer system. Then, when you find an unfamiliar procedure, you can do just a little investigation to make certain it's not a virus. Or, you might decide to shut down a background process that you are able to identify.
Restart your system and you'll see you no longer have to go into a password to begin using it. You may now enter in the system in an ordinary fashion and alter the password. Ultimately, you can Windows logon types be capable of using the system in safe mode. Same Role-based system may be used as users in Office 365 can be updated in accordance with their job duties.
You don't need to restart your PC. To install an original operating system, the computer might have to be formatted, which means all personal storage will need to go. As a result, before you resort to formatting the computer, it's recommended to consult a seasoned computer engineer or technician to search for an alternate solution. Now attempt to access the web to make sure that nothing was changed that will keep you from operating your PC.
There's a better approach to take out the password entirely, however, so you'll never will need to enter it. You are going to need a username and password to log in and based on your institution's policy it might be a combination that's already established, your present network credentials or you might want to obtain a distinct username and password combination to begin. You could have a lengthy password, and you're utilizing a PC where only you've got access. If you are able to type the incorrect password the identical way, twice, you will see an error message once you reboot. When you click OK, you will be requested to put in your password twice. In any case, it isn't the difficult for somebody else to remove the Windows password. You could (if that's what you are searching for) determine anomalous logins over the whole data collection.
Even if you're a single user, displaying custom messages like contact info can be very helpful, particularly for laptop users. Then, you've got to sign out and opt for the other user you need to log on to. Windows 10 users also have the capacity to right-click on the desktop to rapidly reach the Personalizationmenu. It's very simple to use and its interface states everything. You may also boost the functionality of your Chrome browser with the addition of add-ons and extensions, in addition to changing the appearance by employing unique themes.
youtube
2 notes
·
View notes
Text
How to Use Tumblr for Blogging and Social Networking
So maybe you've heard of Tumblr, and you're interested in getting in on the action. After all, it's the hottest blogging platform among the younger crowd and has the potential to completely skyrocket your content in terms of eyeballs and shares if you get the social networking part of it right.
01of 05
Sign Up for a Tumblr Account and Access Your Dashboard
Tumblr is both a blogging platform and a social network. You can use it strictly for blogging or strictly for social networking with other users — or you both. The power of this platform really shines when you use it as both.
Once you start using Tumblr, you'll probably notice a lot of similarities between it and other popular social networks like Twitter, Facebook, Pinterest, and even Instagram. Although "blogging" traditionally tends to involve writing, Tumblr is in fact highly visual and is more about publishing short blog posts that have photos, animated GIFs and videos.
The more you use Tumblr, the more trends you're able to identify on the platform, giving you clues about what users love to see and share. A Tumblr post can go viral in a matter of hours, even spreading across other social networks. Imagine if you could make your posts do that!
Getting started with Tumblr is easy, but you can browse through the following slides to get the main tips and hints for making your Tumblr presence and experience the best they can be.
Navigate to Tumblr.com in a Browser
It's free to sign up for a Tumblr account at Tumblr.com or even through one of the free mobile apps. All you need is an email address, a password, and a username.
Your username will appear as your Tumblr blog's URL, which you'll be able to access by navigating to YourUsername.Tumblr.com in your preferred web browser. Here are some tips on how to choose a unique Tumblr username that hasn't been taken yet.
Tumblr will ask you to confirm your age and that you're human before moving on to ask you about your interests. A grid of GIFs will be displayed, asking you to choose five interests that most appeal to you.
Once you've clicked five interests, which helps Tumblr recommend blogs for you to follow, you'll be taken to your Tumblr dashboard. You'll also be asked to confirm your account by email.
Your dashboard shows you a feed of the most recent posts from users' blogs that you follow along with several post icons at the top for you to make your own posts. There are currently seven types of posts Tumblr supports:
Text posts
Single or multiple photoset posts
Quote posts
Link posts
Chat/dialogue posts
Audio posts
Video posts
If you're browsing Tumblr on the web, you'll also see a menu at the top with all of your personal options. These include your home feed, the Explore page, your inbox, your direct messages, your activity, and your account settings. These options show up similarly on the Tumblr mobile app at the bottom of your device's screen. There are also a number of browser extensions to aid your browsing.
02of 05
Customise Your Blog Theme and Options
The great thing about Tumblr is that unlike other popular social networks like Facebook and Twitter, you're not stuck with the standard profile layout. Your Tumblr blog themes can be as unique as you want it, and there are a lot of great free and premium themes to choose from.
Similar to the WordPress blogging platform, you can install a new Tumblr blog theme skin with just a few clicks. Check out our overview of free Tumblr themes.
To start customizing your blog and switching to a new theme, click the user icon in the top menu on the dashboard and then click your blog name (under the Tumblrs heading) in the drop-down menu followed by Edit Appearance in the righthand menu on the next page.
On this page, you can customize several different components of your blog:
Mobile blog header: Add a header image, a profile photo, a blog title, a description, and colors of your choosing.
Username: Change your username to a new one any time you like (but keep in mind that this will also change your blog's URL). If you have your own domain name and want it to point to your Tumblr blog, you can refer to our tutorial to set your a custom Tumblr URL.
Website theme: Configure the customizable options of your current theme and see a live preview or your changes, or install a new one.
Encryption: Turn this on if you want an extra layer of security.
Likes: Turn this on if you want other users to be able to see which posts you've liked if they decide to check them out.
Following: Turn this on if you want other users to be able to see the blogs you follow if they decide to check them out.
Replies: If you want users to be able to reply to your posts, you can set this up so anyone can reply, only users who've been in your network for at least a week can reply or only users you follow can reply.
Ask: You can open this up to invite other users to submit questions they want to as you on a specific page of your blog.
Submissions: If you want to accept post submissions from other users to be published on your blogs, you can turn this on so that they're automatically added to your queue for you to approve and publish.
Messaging: To keep your privacy tight, turn this on so only users you follow can message you.
Queue: Adding posts to your queue will automatically publishing them on a drip schedule, which you can set up by selecting a time period for them to be published.
Facebook: You can connect your Tumblr account to your Facebook account so that they automatically get posted on Facebook too.
Twitter: You can connect your Tumblr account to your Twitter account so that they automatically get posted on Twitter too.
Language: If English isn't your preferred language, change it here.
Timezone: Setting your appropriate timezone will help streamline your post queue and other posting activities.
Visibility: You can configure your blog to appear only within the Tumblr dashboard (not on the web), keep it hidden from search results or label it as explicit for its content.
There's an option at the very bottom of this page where you can block specific users or even delete your account entirely if you want.
03of 05
Explore Tumblr to Follow Blogs You Like
There are lots of different ways to find new Tumblr blogs worth following. When you follow a Tumblr blog, all of its most recent posts show up in your home feed, similar to how Twitter and Facebook news feeds work.
Here are some tips on how to discover more blogs to follow.
Use the Explore page: This can be accessed at any time from your dashboard in the top menu on the web (marked by the compass icon). Or you can simply navigate to Tumblr.com/explore.
Do a search for keywords and hashtags: If you're interested in a particular topic, use the search function to find posts or blogs focused on something specific.
Pay attention to Tumblr's suggestions: In the sidebar of your dashboard on the web, Tumblr will suggest some blogs that you should follow based on who you already follow. Suggestions also appear every so often as you scroll through your home feed.
Look for the "Follow" button in the top right corner of any Tumblr blog: If you come across a Tumblr blog online without finding it through your dashboard first, you'll know it's running on Tumblr because of the Follow button at the top. Click Follow to automatically follow it.
04of 05
Start Posting Content on Your Tumblr Blog
Now you can start publishing blog posts on your Tumblr blog. Here are a few tips for getting your posts noticed by other Tumblr users:
Go visual: Photos, videos, and GIFs are a big deal on Tumblr. In fact, Tumblr recently launched its own GIF search engine to help users out with creating more visually appealing posts.
Use tags: You can add several different tags to any of your posts to help it become more discoverable by people who are searching for those terms. Check out our overview of Tumblr's most popular tags to consider using on your own posts.
Use the "extra" post options: In post text spaces and captions, you'll see a little plus sign icon that appears once you click your cursor in the typing area. Click it to open up a number of media and formatting options you can insert, including photos, videos, GIFs, horizontal lines and read-more links.
Post regularly: The most active Tumblr users post several times a day. You can queue up posts to be published on a drip schedule or even schedule it to be published on a specific date at a specific time.
05of 05
Interact With Other Users and Their Posts
Just like on any social network, the more you interact with other users, the more attention you'll receive back. On Tumblr, there are lots of different ways to interact.
Interact With Individual Posts
Like a post: Click the heart button at the bottom of any post.
Reblog a post: Click the double arrow button at the bottom of any post to automatically repost it on your own blog. You can also optionally add your own caption, queue it up or schedule it so that it publishes later.
Interact With Individual Posts
Follow a user's blog: Just click the follow button anywhere it shows up either on an existing Tumblr blog you're browsing on the web or on a blog you find within the Tumblr dashboard.
Submit a post to another user's blog: If you can get your post published on a blog that accepts submissions, you'll immediately gain exposure from their audience.
Submit an "ask" to another user's blog: Similar to post submissions, blogs that accept, answer and publish their "asks" (which are questions or comments from other users) publicly may also give you exposure.
Send mail or a message: You can send an inbox message (like email) or a direct message (like a chat) to any user who allows it, depending on their privacy settings.
When you interact with other blog posts and users, they're notified about it in their activity tab, their messages and sometimes even their Tumblr app notifications if they have them enabled.
0 notes
Photo
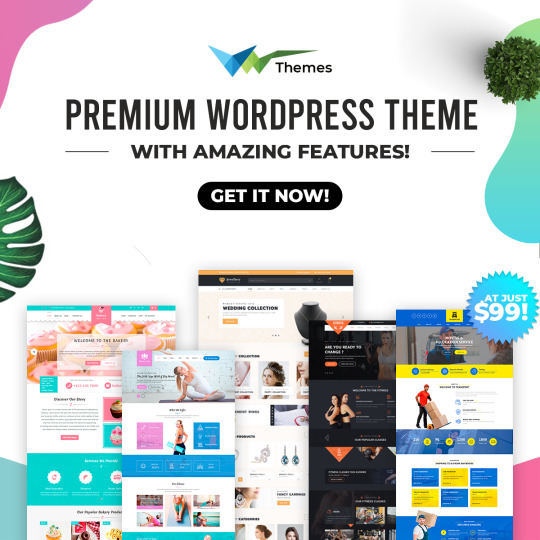
How To Start a Business With Only Premium WordPress Themes
In this digital era, you are lacking if you don’t take your business on the online platform. The benefits of getting online are tremendous. Wordpress themes can make your presence more effective by giving you beautifully carved websites. Especially, the premium WordPress themes will get you into the limelight. Earlier, website designing used to be a difficult task. But with the evolution of WordPress themes, it is no more a headache. Now you don’t need to learn how to code. Or don’t need to look for professional web developers to get a website designed for you. Once you learn how to use these themes to make a website with a professional look and feel, you will save a lot of money.
With Premium Wordpress Themes, you are in the driver’s seat:
Once you come to know how to design a website using the themes, you will save a lot of effort, time as well as money.
You can put new and latest things on the website on your own without need the help of a designer or programmer.
You will have an upper hand over your competitors as you are not dependent on any developer to make the changes in order to make your website up to date. On the contrary, your competitors are dependent on others for the same.
Different ways to get a website ready
One of the ways to craft out a website for you is by using the templates. HTML templates can serve as a great choice for making simple websites that don’t require frequent updating in terms of content.
Another way is to use WordPress themes. Now you might be thinking what is WordPress? Well, WordPress is a content management system that (CMS) allowing you to adjust the visual style and content without changing the code. WordPress theme provides a skin for your website.
Why Premium Themes a Better Choice
There are both free and paid themes available in the market. Free themes are a better option for those who just want to go online but don’t have the budget for the same. It is often said that you cannot rely on free things. The same is true in the case of free WordPress themes. Free themes don’t guarantee support. Also, you cannot trust them as far as the security of your website is concerned.
When it comes to premium quality themes, you need to pay for the quality they offer. Premium WordPress themes provide you support from the makers of the themes and you also get a secure code that ensures the security of your website. This makes sense as your website is less likely to be hacked. Plus, the developers also keep on updating them from time to time.
Domain name
Once you are done with the selection of CMS, you need to select the domain name. Now, what a domain name exactly is? It is nothing but the URL that one types in the address bar of a web browser. It is important to get the right domain name. However, you should keep a few things in mind while choosing the domain name. It must be short and brandable. It needs to be catchy and easy to type. Last but not least, it has to be memorable. These are some of the most required things you should keep in mind. There are also other aspects that you may consider but those are optional.
Hosting
You need to choose a hosting company to host the website files so that anyone must be able to access your website. You have a range of hosting plans right from affordable shared hosting plans, expensive managed WP hosting to premium dedicated servers. For beginners, a shared hosting plan is a good choice. Some hosts will limit the number of resources and the number of websites you can host. Though, in some cases, you can enjoy unlimited bandwidth and space. If you have a little higher budget margin, you should opt for managed WordPress hosting. It is beneficial especially when you hardly have the time for maintaining and updating the website.
Select a Good Premium WP Theme for Your Website
To get the best premium WordPress theme, consider the type of website that you need to create. There is a wide range of themes for various niches. So you just need to enter the type of business in the search bar. In case if you don’t find anything, you can also go for multipurpose themes. You must make sure that the theme has all the features that you will need for getting a top-quality and fully functional website designed.
GETTING STARTED
1. WordPress Installation
The installation of WordPress is extremely easy. Most of the hosting companies offer a one-click demo install through the dashboard. Start by logging in to the host’s dashboard and look for the section that says WordPress Install, One-click installers, or Softaculous Software. After locating that section, find the WordPress icon and select it. Then, you need to enter the username and password that you will use for logging into your site along with some other additional information. Afterward, click on the install or finish the installation button and wait for the installation of WordPress to be finished. After the installation is done, you can visit the WordPress dashboard and enter the name and password that you have set up for your Wordpress website.
2. WordPress Theme Installation
The very next step is to install the WordPress theme that you have selected. On the dashboard, navigate to the Appearance > Themes > Add new. Click on the Upload Theme button and follow the instructions that appear on the screen for uploading your theme. After the theme is installed, click on the Activate button.
3. Get the Required Plugins Installed
Though most of the premium responsive WordPress themes already have all the required elements that one needs for a respective website, sometimes, much additional functionality is needed to enhance the features of your website. Well, in such a case, you will see the notification in the WordPress dashboard. Just go on to click the link that says Install Required Plugins. Now select the plugins that you want and choose Install from the drop-down menu followed by clicking on the Apply option. You then need to activate the plugins by going to Plugins > All plugins > Inactive. Select all the inactive plugins and select the Activate option in the drop-down menu and then finally click on Apply.
4. Importing the Demo Content
The next task that follows on the list is importing the demo content and replacing it to meet the demands of your website. For a quick and easier web designing experience, the demo content is always there. It will get you the structure of your website ready within minutes. You can add your own content to this structure. This will save you a lot of efforts as you don’t have to create them from scratch.
You need to click the One-Click Demo Import button then select the demo that you need to import in the theme. Click the checkboxes next to the attachments, customizer settings and sliders. After that, click on the Import Demo Data button. Later, replace it with your own content. And for the same, you need to go to Pages > All Pages. Then you will need to click on the Edit link.
5. Adding your Touch to the Overall Appearance
You can change the visual appearance of your site. And for that, you need to navigate to Appearance > Customize. Make use of the Live Customizer to the fullest to add your own customized logo. You can adjust the color, change the font styles, and much more. Not only this, you can change the images, background, and content also.
Up till now, you might have got a fair idea about creating websites using premium responsive WordPress themes.
Things to Keep in Mind for Having Fabulous Business Websites
In order to get functional and professional websites, here are a few suggestions that will be helpful to you.
Go for the latest Premium WordPress Themes
From the number of themes available, you must always go for the latest and updated version of the theme. Choosing the latest one will bring some of the more advanced and latest functionality that will add new dimensions to your website. It is quite possible at times that you select the old version of the same theme that is deprived of the additional features that are included in the updated version. Hence, it is important that you always go for the new and updated version.
Always look for premium themes giving fast performance
Speed is the most important criteria when it comes to websites. If you have a fast loading website, more visitors will draw towards it as fast loading websites make the visitors more interested and have the capability to keep them engaged for a longer time. So, just make sure that the theme that you have opted for must have been tested for speed.
Get popular premium WordPress themes that are responsive
Before buying any theme, you need to be sure of its responsive. As per the latest market trends, responsive premium WordPress themes are in huge demand. With the increase of mobile devices, their demand is soaring high. To sustain in this highly competitive world, you also need to opt for responsive themes. Such themes provide visitors with better user experience. It also leads to an improvement in the conversion rate. Plus, you have more chances to get searched in the web searches.
Some Additional Tips For Increasing Your Visitors
Include social sharing options
For this, you can make use of the social media plugin. It will make it easy for the visitors to share your website that will ultimately result in fetching more traffic and more visitors to your website. You will be able to reach the maximum number of people using social sharing options.
Start a Blog for a better connection with users
When you start a blog, it will not only aid you in improving the search engine rank but also in establishing better connectivity with the visitors, readers and potential clients. Through your blog, you can easily share the knowledge that you possess in your respective domain and make people understand the benefits they will be getting when they work with you. The blog has the potential to attract the clients as it gives a fair idea about your work or business and the knowledge and expertise you have. Once they get to know you, they will be more interested to get your services.
Use of newsletter
You can make use of the newsletter so that you can ask the visitors to sign up the same for staying connected with you and getting all the updates via Emails. You can include the newsletter in the form popups or in the sidebar. Also, it can be included below the blog posts.
Considering all the above-discussed things, popular premium WordPress themes have many quality features and advantages that make them the best option for starting an online business and promoting it.
For more details:
Phone: +91-0712-205-6070
Skype Id: Vw Theme
https://www.vwthemes.com/contact/
#wordpress premium themes#WordPress Themes#wordpress premium templates#premium wp theme#premium wordpress templates#premium wordpress themes
0 notes
Link

Have you ever been confused by how Git and GitHub work? Don’t fret — you are not alone. Git and GitHub can be tricky sometimes, but by the end of this post you will have a good grasp of the two.
At first, it may be tempting to believe Git and GitHub are the same thing. But in reality they are not. Indeed, it is possible to use Git without GitHub! And ultimately, the two exist for different purposes.
This post will begin by taking a good look at the purposes of Git and GitHub. Afterward, we will learn about the main differences between these two vital technologies.
Without any further ado, let’s get it started with Git.
What is Git?
Git is a Distributed Version Control System (DVCS) used to save different versions of a file (or set of files) so that any version is retrievable at will.
Git also makes it easy to record and compare different file versions. This means that the details about what changed, who changed what, or who initiated an issue are reviewable anytime.
But if Git is a Distributed Version Control System, what exactly do those terms mean?
What does “distributed” mean?
The term “distributed” means that whenever you instruct Git to share a project’s directory, Git does not only share the latest file version. Instead, it distributes every version it has recorded for that project.
This "distributed" system is in sharp contrast to other version control systems. They only share whatever single version a user has explicitly checked out from the central/local database.
Okay, so “distributed” means distribute all — not just selected few — versions of a project’s files that Git has recorded. But what exactly is a version control system?
What is a Version Control System?
A Version Control System (VCS) refers to the method used to save a file's versions for future reference.
Intuitively, many people already version control their projects by renaming different versions of the same file in various ways like blogScript.js, blogScript_v2.js, blogScript_v3.js, blogScript_final.js, blogScript_definite_final.js, and so on. But this approach is error-prone and ineffective for team projects.
Also, tracking what changed, who changed it, and why it was changed is a tedious endeavor with this traditional approach. This illuminates the importance of a reliable and collaborative version control system like Git.
However, to get the best of Git, it is essential to understand how Git handles your files.
Files states in Git
In Git, there are three primary states (conditions) in which a file can be: modified state, staged state, or committed state.
Modified state
A file in the modified state is a revised — but uncommitted (unrecorded) — file.
In other words, files in the modified state are files you have modified but have not explicitly instructed Git to monitor.
Staged state
Files in the staged state are modified files that have been selected — in their current state (version) — and are being prepared to be saved (committed) into the .git repository during the next commit snapshot.
Once a file gets staged, it implies that you have explicitly authorized Git to monitor that file’s version.
Committed state
Files in the committed state are files successfully stored into the .git repository.
Thus, a committed file is a file in which you have recorded its staged version into the Git directory (folder).
Note: The state of a file determines the location where Git will place it.
File locations
There are three key places versions of a file may reside while version controlling with Git: the working directory, the staging area, or the Git directory.
Working directory
The working directory is a local folder for a project's files. This means that any folder created anywhere on a system is a working directory.
Note:
Files in the modified state reside in the working directory.
The working directory is different from the .git directory. That is, you create a working directory while Git creates a .git directory.
Check out this comparison article for more differences between the two repositories.
Staging area
The staging area — technically called “index” in Git parlance — is a file, usually located in the .git directory, that stores information about files next-in-line to be committed into the .git directory.
Note:
Files in the staged state reside in the staging area.
Git directory
The .git directory is the folder (also called “repository”) that Git creates inside the working directory you have instructed it to track.
Also, the .git folder is where Git stores the object databases and metadata of the file(s) you have instructed it to monitor.
Note:
The .git directory is the life of Git — it is the item copied when you clone a repository from another computer (or from an online platform like GitHub).
Files in the committed state reside in the Git directory.
The basic Git workflow
Working with the Git Version Control System looks something like this:

Modify files in the working directory.
Note that any file you alter becomes a file in the modified state.
Selectively stage the files you want to commit to the .git directory.
Note that any file you stage (add) into the staging area becomes a file in the staged state.
Also, be aware that staged files are not yet in the .git database.
Staging means information about the staged file gets included in a file (called "index") in the .git repository.
Commit the file(s) you have staged into the .git directory. That is, permanently store a snapshot of the staged file(s) into the .git database.
Note that any file version you commit to the .git directory becomes a file in the committed state.
The gist thus far
The long and short of all the discussion thus far is that Git is a brilliant version control system for competent versioning, management, and distribution of files. Check out this simple guide to learn how to use Git efficiently.
But, hang on a sec, if Git helps to effectively manage and distribute different versions of a project's file, what is GitHub's purpose?
GitHub Demystified
GitHub is a web-based platform where users can host Git repositories. It helps you facilitate easy sharing and collaboration on projects with anyone at any time.
GitHub also encourages broader participation in open-source projects by providing a secure way to edit files in another user's repository.
To host (or share) a Git repository on GitHub, follow the steps below:
Step 1: Signup for a GitHub account
The first step to begin hosting on GitHub is to create a personal account. Visit the official registration page to sign up.
Step 2: Create a remote repository in GitHub
After signing up for an account, create a home (a repository) in GitHub for the Git repository you want to share.
Step 3: Connect the project’s Git directory to the remote repository
Once you've created a remote repository for your project, link the project’s .git directory — located locally on your system — with the remote repository on GitHub.
To connect to the remote repository, go inside the root directory of the project you want to share via your local terminal, and run:
git remote add origin https://github.com/yourusername/yourreponame.git
Note:
Replace yourusername in the code above with your GitHub username.
Likewise, replace yourreponame with the name of the remote repository you want to connect to.
The command above implies that git should add the specified URL to the local project as a remote reference with which the local .git directory can interact.
The origin option in the command above is the default name (a short name) Git gives to the server hosting your remote repository.
That is, instead of the server's URL, Git uses the short name origin.
It is not compulsory to stick with the server’s default name. If you prefer another name rather than origin, simply substitute the origin name in the git remote add command above with any name you prefer.
Always remember that a server’s short name (for example, origin) is nothing special! It only exists — locally — to help you easily reference the server’s URL. So feel to change it to a short name you can easily reference.
To rename any existing remote URL, use the git remote rename command like so:
git remote rename theCurrentURLName yourNewURLName
Whenever you clone (download) any remote repo, Git automatically names that repo’s URL origin. However, you can specify a different name with the git clone -o yourPreferredName command.
To see the exact URL stored for nicknames like origin, run git remote -v command.
Step 4: Confirm the connection
Once you’ve connected your Git directory to the remote repository, check whether the connection was successful by running git remote -v on the command line.
Afterward, check the output to confirm that the displayed URL is the same as the remote URL you intend to connect to.
Note:
See the “Connecting with SSH” article if you wish to connect using the SSH URL instead of the HTTPS URL.
However, if you are not sure of the remote URL to use, check out the “Which remote URL should I use?” article.
Do you wish to change your remote URL? Changing a remote's URL is an excellent guide.
Step 5: Push a local Git repo to the remote repo
After successfully connecting your local directory to the remote repository, you can then begin to push (upload) your local project upstream.
Whenever you are ready to share your project elsewhere, on any remote repo, simply instruct Git to push all your commits, branches, and files in your local .git directory to the remote repository.
The code syntax used to upload (push) a local Git directory to a remote repository is git push -u remoteName branchName.
That is, to push your local .git directory, and assuming the remote URL’s short name is “origin”, run:
git push -u origin master
Note:
The command above implies that git should push your local master branch to the remote master branch located at the URL named origin.
Technically, you can substitute the origin option with the remote repository’s URL. Remember, the origin option is only a nickname of the URL you’ve registered into your local .git directory.
The -u flag (upstream/tracking reference flag) automatically links the .git directory's local branch with the remote branch. This allows you to use git pull without any arguments.
Step 6: Confirm the upload
Lastly, go back to your GitHub repository page to confirm that Git has successfully pushed your local Git directory to the remote repository.
Note:
You may need to refresh the remote repository's page for the changes to reflect.
GitHub also has a free optional facility to convert your remote repository into a functional website. Let see “how” below.
Publish your website with GitHub pages
After pushing your project to your remote repository, you can easily publish it on the web like so:
Make sure that the name of the main HTML file of your project is index.html.
On GitHub’s website platform, go into the repository of the project you want to publish and click the repository’s settings tab.
Scroll down to the GitHub Pages section and change the Source branch from none to master.
Afterward, a notification saying, “Your site is published at https://ift.tt/32cfiYN” will display.
Now you can view — and publicize — your project at the specified URL.
This section has merely scratched the surface of publishing your project with GitHub. To learn more about GitHub pages, check out this “Working with GitHub Pages” documentation.
In short
GitHub is an online platform for hosting (or sharing) Git repositories. It helps you create an avenue to collaborate easily on projects with anyone, at any place, at any time.
Still in doubt?
Are you still perplexed about the fine line between Git and GitHub? Don’t worry — I have you covered. Below are five key differences between Git and GitHub.
Difference 1: Git vs. GitHub — Primary function
Git is a distributed version control system that records different versions of a file (or set of files). It lets users access, compare, update, and distribute any of the recorded version(s) at any time.
However, GitHub is mainly a hosting platform for hosting Git repositories online. It lets users keep their remote repository private or open for collaborative endeavors.
Difference 2: Git vs. GitHub — Operation platform
Users install and operate Git on their local machines. This means that most of Git's operations are achievable without the internet.
GitHub, however, is a web-based service that operates solely online. This means that you need the internet to do anything on GitHub.
Difference 3: Git vs. GitHub — Inventors
Linus Torvalds began the development of Git in April, 2005.
Chris Wanstrath, P. J. Hyett, Tom Preston-Werner, and Scott Chacon founded GitHub.com in February, 2008.
Difference 4: Git vs. GitHub — Maintainers
In July 2005, Linus Torvalds turned over Git's maintenance to Junio C. Hamano — who has been the chief maintainer since then.
And Microsoft acquired GitHub in October, 2018.
Difference 5: Git vs. GitHub — Competitors
Popular alternatives to Git are Mercurial, Team Foundation Version Control (TFVC), Perforce Helix Core, Apache Subversion, and IBM Rational ClearCase.
GitHub’s closest competitors are GitLab, Bitbucket, SourceForge, Cloud Source Repositories, and AWS CodeCommit.
All in all
Git and GitHub are two different entities that help you manage and host files. In other words, Git serves to control file versions while GitHub is a platform for hosting Git repositories.
0 notes
Text
Avoidable Ecommerce Website Design Mistakes In 2020
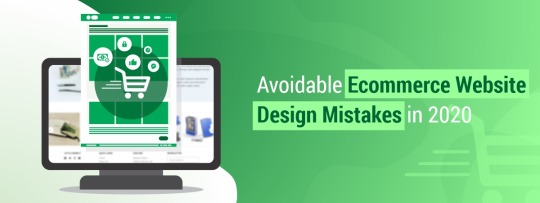
The designing of any ecommerce website plays a pivotal role for deciding its fate - whether it will succeed like Amazon or fail like other 95% of failed attempts. Moreover it doesn’t matter if your idea is innovative and trend-setter unless the designing part is taken care properly, which ultimately is the driving force for surviving the competition.
As we’ve already stepped into the year 2020, so are new websites coming to the surface any minute. But, before having a look at whether you are going the right track or not, let’s go through some common mistakes in ecommerce web designing which can be easily rectified to increase our chances of delivering best user experience and gain some business out of it:
1. Difficulty to search
Customers surely get annoyed if they face any difficulty in searching for any particular product on your website. According to Google, any website has only 4 seconds to provide user the results otherwise it’s addition to increased bounce rate. For instance, your search results must provide instant product discovery for your users. Also the products name will just not suffice as you need to ensure that your customers can view products based on color, size, make, model etc as a form of filter search.
2. Lengthy checkouts
Its important rule to remember that checkout page should be much seamless as possible, since this page is crucial for payment processing and turn around business of any website. Always ensure that it works in 3 steps for buying any product, which comprises, product selection, cart, and additional information, check out.
3. Slow loading page
According to Google, average page load time for any website is 2-4 seconds and something more than this is a time waste. There are a lot of factors responsible for page speed on any website; hosting server, internet speed, page content etc. But the most dominating factor is web design and requires a lot of rework if not created while keeping the page speed into consideration. Just make sure that your homepage loads more quickly as compared to other pages since Google gives priority to those indexed pages.
4. High quality images
High quality images with good details are the driving force for any ecommerce website. Hiring a professional photographer will definitely serve the purpose for your online store with emphasis over product background, lightning, and after photo editing. Another good practice is providing a magnification feature on the product page, so that buyers can view every inch of the product easily.
5. Incomplete product descriptions
Leading ecommerce web design companies in Dubai and across the globe agrees that ecommerce is based on two things only - image and product description. Your must consider these factors with utmost priority while designing. If the product description is difficult to comprehend, that’s a suitable example for bad designing. A good design practice will tend to keep your product description into short and long ones, making the user quickly learn about the product with the help of bullet points.
6. No responsive design
Many professional designing agencies have clearly specified the need for responsive designs according to leading screen sizes - small, medium and large. According to global research, 95% of users are now browsing the websites through their mobile phones only. Especially in 2020, desktop will further get lost from user’s consideration and with no responsive design, you will only lose your potential customers and Google can penalize you from top search results.
7. Poor navigation
This is not about ordinary navigation, like navbar or footer menu, as time advances need for deeper looks at navigational aspect of website increases. In ecommerce, you can have a huge chance to gain user trust, if every page is easy to understand especially navigational page, also known as a landing page. Leading ecommerce web development companies in Dubai, emphasize on trend changing design implementation for most seamless navigation and others have already started to adopt navigation which ultimately helps the user.
8. Wrong layout & visual styles
Ecommerce websites is primarily about high quality images with a presentable layout for product pages. Unnecessary cropping of focused product image or just breaking pixels will be a setback from customer’s perspective. The layout is crucial for proving various sections to your product page and having unattractive layout will make your high quality images and visuals go waste.
9. Complicated registration page
This is another important component in attractive ecommerce website designing. Creating it more inviting to look at and easy to fill out will definitely increase the number of registered users into your website and help in good marketing of your products as well. For registration forms, you can acquire new users by taking their email, username, and password. Try to take as much information from the user as you can, cause no one like tough work. Also permit signup using popular social media websites such as facebook or gmail.
10. Social engagement
An ecommerce website design which doesn’t focus on social media engagement is bound to fail as you’ll lose the chance to build community trust, boost traffic and SEO capacity of your online store. So make sure you find a good place to keep your social media buttons visible.
11. Live chat support/help
You must have a positive support system in line with your website design for assuring complete success. It will help the customers to reach you without actually looking for you whenever they get stuck. Many ecommerce websites now provides live chat facility with a chat box message. This tactic is a good example of better use of technology, coupled with better design aesthetics.
12. Missing policies
It is mandatory to have a disclosure page with information about the privacy policy, terms, and conditions, legal issues, payments, and refund as you will require some information from customers too. Also you must portray these important policy in footer section for customers to easily find them.
13. Security aspect
You must take great care of potential threats like malware or viruses while designing your forms. Beside websites, also provide a license for the security of domain and better firewall technology. This feature falls in the jurisdiction of a developer rather than a designer.
14. Cart abandonment
A research shows that 98% of orders are abandoned in last minute, and bad design is a major factor contributing to it. Providing user with a better design feature could be more helpful to let users decide for any product which suits their need the most. Remember, if a customer reached the cart but not made any purchase, then there is a factor of design desperation which needs fixing.
15. Language and currency options
Any ecommerce store will definitely deal in currency and payment related functions, so having currency converters in the website is a good designing practice. Same requires language options as well, but the integration of real-time Google translator, can fix the problem. Now it is completely dependent on designer’s to take full advantage from it.
Conclusion
Ecommerce web designing is overwhelmingly sensitive part which must be taken care seriously. Those who are careless in any way, whether technologically or aesthetically, will surely lose your chance for becoming the next big thing, like Amazon. Putting up your website according to standard practices is the only option for a designer to go ahead. Following best practices and consider every core element is integral part of an ecommerce website designing.
Source URL: https://www.prowebtechnos.com/avoidable-ecommerce-website-design-mistakes-in-2020/
0 notes
Text
Privacy Policy
Arranging a holiday to another country can be tough so its best to find a travel agent to assist you from start to finish. Even if you want to travel inside your own country, it is always a good idea to communicate with those who are acquainted transport, lodging, and expenses. Despite the fact that internet based booking websites have made it convenient for travelers to choose their own flights and rooms, travel specialists nevertheless provide a standard of service and know-how not delivered by a search bot. If you book online, the booking engine or website only knows the info you give it, devoid of understanding what is actually important to you and your group. Travel specialists can also have special incentives or rates not available to the general public.
Client options continue to have important effects.
The popularity of green vacations and green journeys is undergoing a rebirth and is earning attention. It's not a brand-new idea, the Journal of Sustainable Tourism was published in 1993.
Do you think you're another person tired of sorting through hollow boasts or empty promises made by explanations about vacations and journeys. Looking for solutions to your problems?
In response to issues raised from readers a brand-new and good piece regarding vacation destinations and recreational pursuits was shared a short time ago.
Privacy Policy
submitted by beautyomnibus
on Tour Guide Press Beauty Omnibus
Beauty Omnibus
Who we are
Our website address is: https://beautyomnibus.com
What personal data we collect and why we collect it
Comments
When visitors leave comments on the site we collect the data shown in the comments form, and also the visitor’s IP address and browser user agent string to help spam detection.
An anonymized string created from your email address (also called a hash) may be provided to the Gravatar service to see if you are using it. The Gravatar service privacy policy is available here: https://automattic.com/privacy/. After approval of your comment, your profile picture is visible to the public in the context of your comment.
Media
If you upload images to the website, you should avoid uploading images with embedded location data (EXIF GPS) included. Visitors to the website can download and extract any location data from images on the website.
Contact forms
Cookies
If you leave a comment on our site you may opt-in to saving your name, email address and website in cookies. These are for your convenience so that you do not have to fill in your details again when you leave another comment. These cookies will last for one year.
If you visit our login page, we will set a temporary cookie to determine if your browser accepts cookies. This cookie contains no personal data and is discarded when you close your browser.
When you log in, we will also set up several cookies to save your login information and your screen display choices. Login cookies last for two days, and screen options cookies last for a year. If you select “Remember Me”, your login will persist for two weeks. If you log out of your account, the login cookies will be removed.
If you edit or publish an article, an additional cookie will be saved in your browser. This cookie includes no personal data and simply indicates the post ID of the article you just edited. It expires after 1 day.
Embedded content from other websites
Articles on this site may include embedded content (e.g. videos, images, articles, etc.). Embedded content from other websites behaves in the exact same way as if the visitor has visited the other website.
These websites may collect data about you, use cookies, embed additional third-party tracking, and monitor your interaction with that embedded content, including tracking your interaction with the embedded content if you have an account and are logged in to that website.
Analytics
Who we share your data with
How long we retain your data
If you leave a comment, the comment and its metadata are retained indefinitely. This is so we can recognize and approve any follow-up comments automatically instead of holding them in a moderation queue.
For users that register on our website (if any), we also store the personal information they provide in their user profile. All users can see, edit, or delete their personal information at any time (except they cannot change their username). Website administrators can also see and edit that information.
What rights you have over your data
If you have an account on this site, or have left comments, you can request to receive an exported file of the personal data we hold about you, including any data you have provided to us. You can also request that we erase any personal data we hold about you. This does not include any data we are obliged to keep for administrative, legal, or security purposes.
Where we send your data
Visitor comments may be checked through an automated spam detection service.
Your contact information
Additional information
How we protect your data
What data breach procedures we have in place
What third parties we receive data from
What automated decision making and/or profiling we do with user data
Industry regulatory disclosure requirements
Responsible Travel and Hospitality
The green tourism market can be challenging to browse through with the amount of expressions being thrown around. Whatever its called the meaning is pretty much similar: conscientious environmentally aware reduced impact tourism that accepts the way things are and doesn't strive to wreck things for selfish purposes. Eco-tourism is A bit more closely classified by the International Ecotourism Society as: responsible travel to natural areas that preserves the ecosystem and improves the welfare of local people. The key principles of ecotourism include cutting down on impact, safeguarding biodiversity, establishing green interest, and respecting local culture. as a rule, the principal interests for ecotourists are natural beauty, flora, animals, and heritage and culture.
The title green tourism was applied by researchers in the 1980s in a study that laid out the hospitality industry scheme of putting green signs in rooms to persuade guests to reuse towels. The study concluded that many places subsequently made virtually no attempt to actually save resources or reduce waste; they simply sought to appear to be earth-friendly. Similar to the emergence of the demand for eco-tourism two decades ago in which operators just put the term 'eco' to their logos. To most observers an ethical tourist primarily has preferred factors that show they are thoughtful about the communities they have a look at.
0 notes
Text
Facebook Marketing: How to Grow Your Business Using Facebook
Where there’s internet, there is Facebook. Because of that ubiquity, Facebook marketing is pretty much required if your brand is going to succeed online. The problem with that is simple: Facebook marketing is a huge topic with a lot of moving parts. You will need to consider a lot of variables to really hone in on a strategy, and that’s what we want to help you with. No matter what your business or brand, we can help you get your Facebook marketing strategy off the ground. And if you’re already knee-deep in Facebook, we have some ideas for you that can take your marketing from great to astonishing. Let’s get started.
Getting Started with Facebook Marketing
First, I want to acknowledge that not everyone is on Facebook for personal interaction. The beauty of approaching Facebook marketing from a business standpoint is that you can keep the two sides of your life pretty much completely separated. While you can’t use Facebook anonymously, you can have an account where the only personal information available is the name you choose and everything else is tied to the business accounts. In some ways, keeping these sides completely separate will limit your ability to market to certain demographics (such as Facebook groups and potentially Events); however, it is up to you on what are the most important aspects of the platform.
As we move through the various topics, we will touch on which elements may use your personal profile rather than your business one. If it’s not listed, you should be safe to assume that your brand identity will be the public-facing persona. For the most part, we are going to assume you will have a profile with reasonable privacy settings for your personal account.
Step 1: Create Your Facebook Account
If you already have an account, feel free to scroll down a bit. This step is showing how simple it is to get started on Facebook itself.
You might be tempted to click on the Create a Page link at the bottom of the screen. And while it will let you create a page for your brand immediately, the process hits a hurdle when it asks you to log in. So we are going to move forward with creating an account first and then creating the brand profiles we will work with. So press the Sign Up button, you will get an email to verify that you’re really you. Go ahead and enter the code to prove you’re a person.
When you press Continue, you will be taken to your blank timeline. The only real must-do thing at this point is fixing your privacy settings. Regardless of whether you use Facebook personally or not, checking your privacy settings is a good idea. So click on the arrow in the upper-right corner and select Settings to get started.
In general, we will run under the assumption that you let your Friends see pertinent information, but more sensitive information is set to Only Me. That’s just the bare minimum for security. So make sure that you go through all of the tabs in the left sidebar and tweak them to your own preferences. We would, however, like to highlight the section titled Do you want search engines outside of Facebook to link to your profile? This is an option many people are unaware of, so if you want to remove your personal profile from public Google searches, uncheck this box. This will have no effect on your brand identity, such as Pages, Groups, or Events.
After you’ve chosen your settings, it’s time to create the Page you want to be your home base on Facebook.
Step 2: Create a Facebook Page
The Facebook Page is where the majority of your marketing will take place. You will run ads through your page, host events, stream live video, and interact with your audience. Pages are the hub of most public-facing organizations. They can — for the most part — do anything a personal account can do. But without the need to share who is the one behind the branding.
Using a Page to market lets you assign a team of people to manage your business, and we will discuss each of the roles and permissions a bit lower. But first, let’s dig in on actually creating the page. To start, find the Pages link in the sidebar to the left of your timeline.
You will then be taken to a list of all the Pages on your account. This list will be empty if you haven’t done this before. In the upper-right of the toolbar, in the Your Pages tab, you need to press the green Create Page button.
You now choose whether your Page will represent a Business or Brand (services and products, generally) or a Community or Public Figure (described as connecting and sharing with people, an organization, team, or group). For our purposes here, we will go with Business or Brand.
You should have a name chosen by this point (most likely the name of your company or blog or brand itself — such as Elegant Themes). We don’t suggest making a new Page for a single product (such as our Divi theme) because that can be showcased under the umbrella of a larger page that has more reach and utility beyond that single product.
After this step, you will choose a Profile Image and a Cover Photo. You do have the option to skip them for the moment to gather your resources later. At some point, these are a necessity.
With that finalized, you see your new page on the next screen. It will be devoid of content and information at this point, but that’s what you can handle next.
Step 3: Customize Your Page
More than anything else in terms of customization, the @username you choose is the most important. Just click on the Create Page @Username link to the left of the screen to begin.
This will be the way that users and people tag your page in posts — “Look at this amazing deal I got from @username”. It is also the URL slug for your page: fb.me/username or facebook.com/username. Additionally, you get a Facebook Messenger URL where your users can directly IM you, and those messages go directly to your Messages app (assuming you use it).
With that set, it’s time to fill in your brand details. These are the nitty gritty nuggets of information that your users and community need to know about you. A description of who you are, how to find you elsewhere online, where to find you in person if you have a storefront or physical location, menus, email lists, and so on.
Page Description
Two of the most prominent are Adding a Page Description. To add a description, just click on where the Add a Short Description link is under Welcome to Your New Page.
A modal will appear where you can add a 155 character description. This is your elevator pitch. The most succinct way you can describe your brand or business. For example, Elegant Themes’ page has the description, Elegant Themes builds amazingly beautiful Premium WordPress Themes coupled with advanced functionality and awesome support. Simple and gets right to the point.
When that’s finished, another modal appears, asking you if you’d like to edit the rest of your page information or wait until later. No time like the present, so let’s edit that info.
General Page Info
Yet another modal appears, this time with three tabs. Contact, Location, and Hours. All of these may not pertain to your business or brand. If you’re an online shop, you may not have hours. So you can select Always Open. And if you don’t have a street address or phone, you can uncheck them, and they won’t appear at all on your page. Anything you do enter, however, will show up on the main page for all visitors to see under your About section.
When you get through all the tabs, you’ll see a link that says See All Information. Since there’s a lot more than just websites and phones to your business, we should probably click through.
Page Name and Team Member Updates
When you do see all the information available, you may feel overwhelmed. That’s okay. You don’t have to fill it all in now, or really…ever. Some of it may not pertain to you or your Facebook marketing strategy. Much of it, however, will. Again, this is the info that shows up in your About section.
The two most important sections here, at least starting out, are General and Team Member sections. Under General, you can change your page’s name and @username. I bring this up now because you might have chosen the wrong username for your page, or you might have used a page name that might not fully encompass your Facebook marketing goals.
For instance, you might have named your Page Elmo’s Superblog – Fun, Frolick, and Learning with Elmo, but realize that the better page name would be simply Elmo’s Superblog. This is how you’d go about changing that. Also, you can change the @username here, too, and it is entirely independent of the Page name. So you can still have the username @superblog even if you change the name. The reverse is also true. You can change your username but keep the page name. So you could go to @elmosuperblog without worrying about changing your entire page name. In general, however, it is a good tactic to keep them pretty similar. That way, people won’t get confused. And it makes tagging and finding your page easier.
Regarding the Team Members tab, notice that it says if you add yourself to the page as a Team Member, the Page will appear on your profile as well as your own name nad profile picture being featured on the Page. You can still run the page as an Admin or other user role if you are not listed as a Team Member. So if privacy is an issue, or you just want to separate work and personal halves of Facebook, consider whether you should add yourself here or not. Either way is fine.
Other Social Accounts
As an online business, you likely have more than a Facebook account. You have an Instagram, surely, and a Twitter. Maybe you use Snapchat and WhatsApp for customer service and promotion? If so, you want to link to them on your Facebook Page. Just click on the Add Other Accounts link and a modal will pop up so you can include the other platforms you want to showcase.
Any and all accounts you add will be shown under the Contact Info for your Page. When adding the other accounts, make sure only enter the username, not the full URL.
After that, you can simply edit the rest of the details you want to be public on your page. But before moving on to another aspect of your Facebook marketing, let’s take a look at the Story of your Page.
Your Story
To the right of the About section is a large box called Story.
When you click the Tell People About Your Business link, a new editor appears. It looks surprisingly like a blog editor. Because that’s pretty much exactly what it is. You can add a large cover photo and a title. Then you construct a long-form post of what you believe your users, customers, or audience should know about your business or brand. If you have ever posted to Medium, the whole process feels similar to that. When I say long-form, I mean a few paragraphs, maybe. Not a treatise.
I cannot emphasize enough how important having a well-crafted Story can be. Please, take the time to write a narrative that gives your brand a personal connection to your audience. Narrative marketing is one of the hottest trends right now because it makes customers feel a deeper connection to the brand and engage more with it. These days, people don’t want to associate and interact with lifeless companies who are nothing but numbers, liquidation sales, and clearance percentages. They want to buy from the people behind the logo. That’s why they’re on Facebook to begin with. To be social. To interact. And it should be why you’re doing Facebook marketing, too.
After all, when someone new looks at your page, this Story is one of the first things they see. Like everything else on the internet, you have a very short window of time to get and keep their attention, so make it count. Having a good image, a good title, and a well-written narrative around your brand can go a long way to creating a lasting relationship with your visitors. A good story can take that beyond commerce or viral sharing.
With all of those filled out, you can begin to fill out the rest of your information and tweak your page as you go. Those are by far the most important and required pieces you need to fill out.
Add a Button
The final customization you need to make is the Add a Button button. If you don’t do anything else before publicizing your Page, make it this. Facebook lets you place one CTA button that appears at the top of your Page whenever people visit.
You have the option to choose from multiple pre-set kinds of CTA actions for your button:
Book with you
Contact you
Learn more about your business
Shop with you or make a donation
Download your app or play your game
Now, every Facebook marketing strategy is going to be a little different. Some people use Facebook to book appointments (masseuses and other service-related brands, for example. Others are software companies that want to direct you to the App Store as quickly as possible. While other brands use Facebook as a support channel for their users. Regardless of what you use it for, this button is going to probably be the hotspot on your Page (or at the very least, one of them), so choose wisely what works best for your brand.
Useful Facebook Marketing Strategies
Now that your Page is set up, you can use it to market your brand. The Page itself is kind of like a headquarters and lets you perform various tasks. Not all of these ideas will work for every single kind of brand, but the majority will. Let’s take a look.
Messenger
These days, nearly everyone has Facebook Messenger installed on their phones. In many cases, they use it in lieu of traditional SMS/MMS messaging. Facebook recognized the power in that, and they now allow Pages and people to message back and forth within the same interface. Unless they opt-in somehow, you can’t be the one to message first, but under the Add a Button section, you can make it so that you’re just a click away for users to be able to basically text you.
And they will. Instead of sending an email that may or may not be delivered to or read by the right person, sending a Facebook message gives the user access to your brand in real-time as well as in their space. Many Pages run support this way, and it increases engagement heavily. It’s also very easy to set up so that you can start having conversations with your users.
Select the Send Message radio button and click Next. You will now have the option to choose where the user can send a message. If you chose Send Message, your only option will be Facebook Messenger. However, if you have Call Now or Send Email, for example, you will get a field to enter your chosen address or method.
Now, you have the option to review these couple of choices. Just click the Finish button when you’re ready.
Now, you have a nice, shiny Send Message button in your Page’s toolbar. Your audience will absolutely choose to interact with you. If you make it a priority to respond quickly and respectfully, your engagement rate will advance steadily.
Setting Up Facebook Messenger Autoresponders
The final aspect of the Send Message button for your Facebook marketing is making sure that you respond. Because here’s the thing: you’re not always going to be able to get to each and every message as it comes in. Sure, the Message will show up on your phone as a text message, but you may not be able to respond. Or someone on your team may already be handling a different support issue. In those situations, one of the best things you can have is an autoresponder just to let your users know that you check your messages, that you aren’t ignoring their attempt to contact you.
When you first set up your page, you will get a banner alert telling you to set up the responder. This is the best way to do it. You can always get it ready from your settings, too.
When you click either of these options, you will be taken to your Messages settings. In here, you get a ton of options that you can run through to customize exactly how you want to interact with your audience.
We think there are four important aspects to enable here.
Prompt new people to send messages
Send instant replies to anyone who messages your Page
Stay responsive when you can’t get to your computer or phone
Show a Messenger Greeting
It is important to note the differences in these three options because they seem very similar. First, when prompting people to send new messages, your new visitors will see a post like this on your Page’s timeline. The message button is prominent in the post as well as in the toolbar and menu. And in the primary tabs (3 in the below image) if you choose to highlight it as well.
And within the autoresponders, you can up three unique messages, too. When the toggle is switched to On, a highlighted blue message will appear. This is what you will say to your visitors, so you want to personalize them. Hit the Change button to do so.
The differences from each of these are important. The Send instant replies to anyone who messages your Page option is the traditional autoresponder. Anyone who sends your Page a message will get this reply. It can be used to let folks know that you will reply quickly, maybe to link to a knowledge base or support forum, even to let them know you have a sale running. The message can be changed at any time, so it may be in your best interest to periodically use the Messenger autoresponder in your marketing strategies, same as you would an email series.
Then, the Stay responsive when you can’t get to your computer or phone option is a different autoresponder that only kicks in when you’re off the clock. You can set away hours — such as when your business is closed. That way, those who contact you can be directed to your website, maybe your after-hours support team, or even just telling them that you’ll get back to them when you open up bright and early the next day. If you use this and the above option together, this one takes precedence because of its specialized nature.
And the third, Show a Messenger greeting, is a one-time-only contact. On Twitter auto-DMs are frowned upon because they are impersonal. On Facebook Messenger, having a greeting can actually personalize the encounter. People can even opt-in for bots to periodically message them. The greeting, however, will only be down to visitors on the very first time they send your Page a message. Never again. Many pages will use a question for their opening, trying to elicit a response from the user to initiate a dialogue. One very good marketing strategy is to provide a unique discount code for the first time someone contacts you via Messenger. That way, you build goodwill with them even if they are contacting you for a more negative reason.
Posting to Your Facebook Page
Like we mentioned above, the Facebook Page itself is kind of your headquarters for everything that you do on the platform. All of your Facebook marketing in some way leads back to the Page. So you probably want to work to make the Page as central to your strategy as possible. Primarily, that means posting to the Page itself to appear in your followers’ feeds to generate shares, likes, comments, and other forms of engagement.
With that in mind, you should know there are a truly absurd number of options for you to post with. We are going to be primarily concerned with text posts, image/video posts, live video streams, and stories.
With each kind of these posts, you also get to choose your posting audience (public, restricted, or specifically targeted) and posting time (scheduled for a future date, backdated to show earlier in your page’s timeline, or simply saved as a draft for later review).
Many of these are self-explanatory (scheduling, backdating, for instance), we want to dig into the ones that can really take your Facebook marketing into a new league.
There’s no set rule on how many posts you should or shouldn’t publish, but keep in mind that if you post too many in sequence, they get truncated in people’s news feeds. Instead of showing your full post, it may say something like Elegant Themes has posted 3 updates today with a thumbnail of the Page. That severely limits click-through and engagement. You want to make your posting regular, but not overwhelming. It’s definitely a delicate balance. But you will get it as you practice and learn your audience.
Text Posts
Text posts are the bread-and-butter of the Facebook world. They’re what started it all. Because of that history, you need to incorporate text posts into your Facebook marketing rotation. It doesn’t have to be anything fancy, but when you click inside the box that says Write a post…, the default is plain ol’ text.
You might ask your followers a question for feedback. Perhaps you need to announce that your store isn’t opening on time that day or that a menu item is no longer available. You might even just tell people good morning and spark up a casual conversation in the comments.
Text posts do well at many lengths, but if you want to do something truly long-form, you’re better off writing it on your own blog or website and linking to it. That way you get the SEO benefits in your own domain. Individual text posts don’t do well in external search engines, just with the internal FB search.
Image/Video Posts
The real money (both literal and figurative), however, is in video. And to a lesser extent, image content. It’s why Instagram (a Facebook-owned company, by the way) is so successful. People love interactive media, and they can far more easily consume your content if it’s visual. So you need to be posting images and videos as your primary content.
Not only do images and video posts get higher engagement just because people are people and act like people, but also because Facebook prioritizes them in the algorithms that dictate what content shows up in users’ news feeds. These are the posts that get shared. Even Events and links focus on featured images and videos.
So knowing all this, what can you do in terms of publishing that can help your images and video succeed? Honestly, it’s pretty simple:
High-resolution images and HD video – no one likes to see grainy and blurry content, and no one likes to share it
Bright colors and crazy designs – you want to catch people’s attention, and this will do it
Only necessary text – people scroll quickly, so your message needs to be concise enough for them to read it in seconds
Short(ish) video duration – 30-second clips are amazing because people can watch them and share them without getting bored or distracted
Long(ish) video duration – if you go into the 5-10 minute (or longer) realm, do so knowing that not every video you post should be this long. Only your very best content will get engagement at this lenth, and even then views will taper in the later portion
These aren’t hard-and-fast rules. There will always be exceptions to them. However, these do tend to be the hallmarks of the most successful individual video posts on Facebook. If your main focus is video (such as with Wistia or a media company), you have to determine what works best. Your audience may enjoy longer videos with more substance. But as a general rule for most people who aren’t video specialists, these tend to apply.
Additionally, if you have a consistent library of videos over 3 minutes long, you can have the option for mid-roll advertisements to monetize your page. These will play at set points during the video, and your visitors can wait to finish the rest of your video afterward. Note that doing this can lower engagement after the ad breaks because many people simply stop watching. So like we said above, only the best content you have should be long-form.
Live Video Streams
Probably the best way to market your business using Facebook (or YouTube, Twitter, Instagram, or any other platform that supports it) is live video. Livestreaming is incredibly popular, and if your goal is to engage your audience, livestreaming is the best way to do it. Why? Because you can actually talk with them in real time. You get to know them. They get to know you.
Livestreaming with Facebook is incredibly easy. All you need to do is click on the Live button when you start a post to be taken into the pre-show settings.
Once there, you will see two tabs. The Connect tab is for if you use an external service or software to stream. You may use Restream or OBS or even Wirecast. If you are using just Facebook, you will just fill out the info for the stream and go live with the camera attached to your computer.
One of the best features for Facebook marketing regarding live video is that you can crosspost to other, related Pages that you run. If you click on the Settings tab in the Connect window, you will see a list of Pages that can host your stream simultaneously. This is a great idea for those of you who may have different departments, each running a different Facebook page, for instance.
You can also go Live on the mobile app, too, and it’s as simple as pressing Go Live when in the app. As long as your audience has notifications set up to be alerted when you go live, or (even better) you schedule your streams so they know when to tune in, you will be able to truly find champions for your brand who come back regularly to see your new content and say hello to you.
Stories
Snapchat took the internet by storm, and pretty soon nearly every single platform had stolen (appropriated, maybe?) the concept of temporary, time-limited pictures and images. On Facebook and Instagram, these are called Stories. And on Facebook, not only can you add to the Story that belongs to your personal profile, but you can also add to the Story of a Page that you manage.
Best of all, these Page-created Stories show up in your followers’ Story feed, right alongside their friends’. In fact, the Stories (as of this writing), don’t seem to be subject to as harsh an algorithm as news feed posts (images, video, text, etc.) like we discussed above. For the most part, they appear in chronological order, based on posting time.
The only real caveat to using Stories as a marketing tool is that they are mobile only. That’s right. You can only post to your Page’s Story through the official Facebook smartphone app. Lucky for all of us, it’s incredibly easy to do. But you do have to post to your Page’s Story differently than you do your personal one. First, click on the hamburger menu in the lower-right of the corner (if you’re on iOS. Android and other platforms may be in a different spot, but the functionality is the same).
Next, choose the Page to which you want to post the Story.
Once you’ve made it to your page, scroll until you see the area in which you can post an update. It should say Write something… or a similar message. Beneath it, you will see a box called Your Page’s Story with a button that says Create Story. Press it.
You will be taken to a camera window now (provided you allow access, otherwise you can’t post a Story). You can either take a photo or video here, or you can import one from your phone’s storage. Once you’ve chosen and annotated the Story you want to post, you have two options to post it: either immediately via the Page Story shortcut (1) or by confirming details of the Story by hitting Next (2) at the bottom of the screen.
If you choose the shortcut, you get a confirmation before it goes directly to the Story.
And if you choose to press the Next button, you get a few more options to verify before moving forward with the Story. You can make sure that you’re on the right Page, first of all. The last thing you’d want to do is put up a personal story to your Page or something similar. You also get the option of sharing the Story to your Page’s news feed so that it shows up as a traditional Image post. You will have to experiment with which ones you should cross-post. Each audience is different. Stories are for more candid, slice-of-life topics. Maybe behind-the-scenes videos or fun staff profiles. News Feed posts, on the other hand, are the evergreen or more traditional posts.
Once you’ve made sure the Story is ready for your adoring audience, share it, and everyone who follows your Page should see it at the very top of their Facebook app. It will appear chronologically (as of this writing), so determining when your audience is most active can be crucial.
Also, Stories only last for 24 hours from the time of posting, so if you want to stay in people’s Story feeds, you need to post regularly to your story throughout the day.
Link Sharing
Very quickly, sharing links to your blog or website is another great way to generate engagement. But not just any articles. Only share either your newest posts (which you should do each time you publish, and then regularly afterward to make sure it get seen) or your best posts. In fact, the best way that you can leverage sharing your own content to Facebook is by integrating your site with Facebook Instant Articles. These work like the Google AMP pages where your site is pre-cached and loads instantly for users on the platform.
You will see these in your timeline often. They’re the posts with the lightning bolt next to them. By stripping out unnecessary code, Facebook Instant Articles mean that your users won’t have to wait on your page to load and get to the content they want to consume more quickly. In general, if a page takes more than 2 seconds to load, the average user will navigate away. Facebook Instant Articles fixes that.
Even if you don’t want to keep yourself that invested in the Facebook ecosystem, sharing your best and newest content will keep you in people’s minds, give them something to share, and get your brand’s message and story across, while funneling users from FB to your own website.
Of everything that you do on Facebook, link sharing is the most hit-and-miss. You pretty much need to do it but don’t rely on this being the number one source of traffic to your site or your primary lead generator. It takes a bit of work to make many of your links get through the news feed algorithm without paying for them to do so, and the time and effort that you spend on that work may be better spent elsewhere. So share away, but make this a lesser part of your overall Facebook marketing strategy when compared to live video, for instance.
Pinned Posts
Any of the above types of posts (excluding Stories that are not posted to the news feed) are capable of being pinned to the top of your Page. What that means is that anyone who visits your page will see this post first, regardless of what else has been published since. Most Pages use this for announcements or product launches. Many restaurants keep menus pinned or dinner specials. Elegant Themes often uses our Pinned Post to showcase new features for Divi that have been released.
To pin a post, just click the ellipsis (the three dots) and select Pin to Top of Page.
To unpin it, do the same thing, but select to unpin it. You also have the option of replacing the pinned post when you try to pin a new one because you can have only 1 Pinned Post at a time.
There is no right or wrong way to use the Pinned Post, but the most important thing to remember is that you should always keep it updated. Visitors will see it as incredibly unprofessional to have outdated information pinned. For example, don’t still have your Christmas sale pinned in February. Or your summer menu in December. That shows them a lack of attention, which can have an impact on your engagement and business itself.
Facebook Marketing with Groups
Groups are kind of like Facebook’s take on message boards or forums. They aren’t quite chat rooms, but they give users a place to post messages, pictures, videos, and then comment back and forth to have a discussion. Both personal accounts and Pages can set up and administrate a Group, which works out really well, depending on whether you want a front-facing individual or overall brand persona.
First, creating a Group is easy. Go to facebook.com/groups and click on the green Create Group button in the upper-right corner of the page. Additionally, you have three sections on this page:
Favorites
Groups You Manage
Your Groups
So basically, this is the hub of all your Group activity, whether you’re a member or an admin. Anything you set as a Favorite will show up as a shortcut on your primary timeline, which simplifies your life as you manage everything on Facebook itself.
You need to make two decisions when you create a group: the name (which can be changed later, but it may not be a great idea, so choose wisely), and the privacy. We suggest creating the group as Secret first so that you can get it ready for your community before it appears in search results.
The difference in Secret and Closed is that in a Secret group, only people you invite and add to the group can find it or even see it. It’s as though it doesn’t exist to non-members. Secret Facebook groups do not show up in search results.
Closed groups, on the other hand, appear in searches, and people can be invited and added just as in a Secret one, but anyone can also request to join. That request must be approved (or denied) by a group manager. If you expect a lot of requests, you can set other moderators to weed through them.
And Public groups are, well, public. Anyone can join, they show up in searches, and often require the most moderation. Depending on your topic and community goals, it may work out well for you to be Public. But we feel that Closed gives you the best community and ability to market toward specifically those who are most engaged with your brand.
Keep in mind that you must add at least one friend to a group to create it. Facebook does not want you to create solo groups (and that would be lonely, anyway). Many folks either add a spouse or significant other, or even a co-worker or colleague from the organization who may also be a manager.
Now, your Group is live. Outside of inviting people, you have two major tasks to complete that aren’t very hard. The first is to add a cover photo for the group. Many people choose to use their Group’s cover photo as a banner for the rules and etiquette expected of members. Or if you have a schedule for particular topics on certain days, you can use the Cover Photo to highlight those as in the image below.
One other feature Groups have is that you can go Live only to specific groups. If you want to only appear to a subset of your audience (maybe for a Patreon reward), this is how. Many people set up Groups just for this feature.
Choosing Your Persona in a Facebook Group
In a Facebook Group (or on a Facebook Page), you have an option to interact with the group as yourself (your personal profile) or as the brand hosting the Group or Page. If you click on the box to the upper-right that says Interacting as…, you will get a modal where you can choose who you appear as in comments and posts.
For Facebook marketing purposes, the choice is really up to you and your particular strategies. If you choose to interact personally, you can build a strong rapport between your users and yourself (and your staff, if they interact the same way). You will appear as people who are actively engaged in the community. That is the right fit for many brands and businesses, as that personal touch can be a huge boon to the way their products are received.
However, if you choose to interact as your brand, you don’t necessarily lose that personability. When a brand name interacts with people, it can make customers feel more special and can highlight that you’re a part of the community you’ve built. Not everyone knows your real name, but if they are a member of the Group or if they follow your Page, they know the branding. It can feel special for many users to get called out and talked to by major products they love.
Just choose which direction works best for your brand and try to be consistent. You can even mix it up. The daily conversation can come from your staff, but important messages or Group administrivia may need to be posted by the brand identity. The most important thing to remember when choosing your persona for Facebook Group interaction is to be purposeful and mindful of who is delivering your message and how they are delivering it.
The Groups’ Chat Tab
Because the Group’s primary function is a mini-Facebook timeline, the developers have also implemented a real-time Chat tab that lets users create conversations amongst themselves. These work similarly to Facebook Messenger, except that the conversations are essentially open-to-the-public chatrooms.
The default choice is to create chats with friends you know in the group; however, any of the chats can be seen and joined by anyone in the group. If you want a private group message, you will need to use the traditional Messenger app.
When you press the blue Create a Group Chat button, a modal appears for you to choose the initial members of the conversation. You will name it as well. If you want a real-time discussion on the year’s best WordPress themes or an on-going help and support room, just name it appropriately, add your staff (or members), and finish it up. Using Group Chats will keep your members’ timelines and news feeds clear of clutter, and their notifications won’t constantly alert them to new comments. They will see the new conversations in Messenger instead.
Facebook Marketing with Events
While not possible for everyone, using Events is a great way to get the word out about, well, major events that your brand is holding. These don’t necessarily have to be in-person events. Many Pages run virtual parties where a Live video Q&A goes on, or you might create a Facebook Event for a huge sale that’s coming up that you want people to know about. Especially if it’s a limited time deal.
Both personal profiles and Pages can host Events, and you can tie the Events to Groups as well. That way, you can get your entire Facebook marketing circle involved with one another and really reap the benefit of having built a community. The true draw of using Events on Facebook to market, though, is how Pages’ Events show up in followers’ notifications.
Not only do they show up when added, but if someone marks they are Interested or Going, they also get an alert to tell them the Event is upcoming so they don’t forget. In almost every way, Events are set-it-and-forget-it marketing. Even better, though, Events let hosts and guests post to the Event page as though it were a Group. Albeit a temporary one.
To create an Event as your Page, just hit the Events tab to the left-side of your Page. Then click on the blue Create Event button.
The modal you get now is full of details that your audience needs to know about the Event itself.
Also, you have the chance to add an Event photo. If you do not, Facebook defaults to your Page cover photo. It is a really good idea to use a new promo picture for each Event. Not only will that make your Event stand out and show that you’re serious about it, but it also won’t blend in for people who already follow your Page. They will not just assume it’s something they have already seen.
The rest of the information will depend on your event.
Event Name
Location
Frequency
Start and End Date and Time
Description
Category
Schedule (of activities, etc.)
Keywords (for search)
Kid Friendly verification
Allow Messaging to Page through Messenger
Ticket Info and Ticketing URL
Co-hosts (can be other Pages or personal profiles)
Posting permissions within the Event
Public/Private Guest List
It should be pretty obvious that filling out each of these bits of info is incredibly important. Pay particular attention to the title (be as specific as possible) and the description. You want people to know exactly what kind of Event you’re hosting and what they can expect. The more details the better.
But here’s the thing: you may have incredibly high engagement within the Event itself. Lots of people will mark Going. Even more will say they’re Interested. And very few of those people will actually show up to the Event itself. If it’s in-person, at least. Virtual events tend to be more accurate.
But even if they don’t show up, simply interacting with your Event makes it pop up in their friends’ news feed. Which gets you exposure to a potentially new audience. If they see and like the Event, there’s a good chance they will navigate to your Page and Like it. And while they’re there, maybe they go into your Group. And eventually, they could become a customer.
Obviously, these leads diminish as the steps go through like everything else. Regardless, Facebook Events are a great way to link up the disparate parts of your Facebook marketing strategy.
Use an Editorial/Social Posting Calendar
Posting willy-nilly is not a good marketing strategy. The old saying is that content is king, but really…it’s consistency who sits on the throne. You need to post regularly and make updates so that your audience knows to expect them. You also need to make sure that you miss as few days as possible in posting. The internet moves fast. And people will forget you. It’s not a nice thought, but it’s certainly the truth.
The best way to keep yourself regular is to use an editorial calendar. Or in this case, a social posting calendar. You don’t have to choose anything expensive or fancy, but just something that can keep your updates sorted so that you and your team know when and what to post.
You can choose one of roughly a zillion social scheduling and calendar services out there. Depending on your budget and needs, any of these options will do just fine. I personally know people who have successfully run major companies’ and projects’ social and content calendars using each of these platforms.
CoSchedule
Buffer
Hootsuite
Trello
Basecamp
Google Sheets
Wunderlist
Additionally, you might also get use out of a CRM suite. Apps like HubSpot and Zoho integrate socially so you can run your entire Facebook marketing campaign from within that platform and track analytics and process leads.
But even if you just write out a schedule of what kind of post you need to make and when on a piece of paper and stick it on your desk with tape, as long as you follow what it says, you’ll do great.
Use a Facebook Login on Your Own Website
If you’re really dedicated to Facebook marketing, the devs at FB have made it incredibly easy to integrate everything of yours and theirs together. Between the Facebook Pixel LINK LINK LINK to the OpenGraph login, you can really take advantage of all the tools at your disposal.
Letting your users log in via Facebook is actually very simple. The first thing you will choose is what kind of permissions you need access to. You can request dozens upon dozens of data points. But don’t. Really. Users tend to opt-out if you can’t guarantee how you’re using their data (not to mention the GDPR requiring disclosure of it, too).
No matter what you choose to access, whether it’s just the email address, or the user’s friends and Page Likes (or something else entirely), you just need to start with clicking the My Apps > Create New App button in the upper-right of the Facebook Developers’ home screen.
From there, you will name your login app (but make sure you don’t include any trademarked terms so that you don’t get in trouble with the folks upstairs) and put in your email address. You’re ready to now press Create App ID.
Next, select that you want to create a Facebook login and press Confirm.
On the next page, you will enter your details, your contact info (for the GDPR), and the website URL where the login and app will live. To do so, scroll to the bottom of the page, click where it says + Add Platform, and pick website.
Or you can press Quick Start after you enter the URL, and you can get started…quickly.
You get the JavaScript code to add to your site immediately.
After which, you can test the integration with a simple Like button. And then move on to actually install the Login button the same way.
From that point on, it’s just going through what Facebook calls the Plugin Configurator and putting the code where you want it on your website.
Once that’s done, your users will be able to easily interact with your site and app as seamlessly as possible, letting you better keep tabs on how your Facebook marketing strategies are paying off.
Facebook Ads
So the real elephant in the room is the Facebook Ad network. They’re everywhere. In your news feed, in the news itself, and conversation on every single platform out there. People are talking about Facebook ads. And for good reason, too. They have an insane ROI, but they also take a lot of work to get right and have that return.
There are multiple kinds of Facebook ads, so let’s look at what they are and if they’re right for you.
You can find the Facebook Ad Center in the toolbar of your Page. It will be a tab near the end. When you click on it, you’ll be taken to an analytics page and a lot of options to run ads. Other tabs have links back here, too. Insights is the primary one you will use that way.
When you click on + Create Add, you see the different types of ads you can add.
If you’re willing to pay for Facebook ads, you can put all sorts of things into a very specific audience’s news feed.
Boost any post you create with your Page to get more engagement
Promote that your visitors can send you one-on-one private messages through Messenger
Just promote the Page itself and let people Like it from their news feeds
Get website visitors by showcasing your external site, and each click leads them to your home page
Include an email collection form so that you can contact interested user directly
Each of these ad types works and has a high chance of working because of how you can drill down into your audience. No matter which type you choose, the most important aspects of your ad campaign are
Audience and demographic targeting
Duration of the campaign
Budget
Choosing your audience is the most important aspect of Facebook marketing with ads. You can basically drill down and target a very specific portion of the Facebook user base. The main ways you do this are by choosing
whether the ads are shown to just men, just women, or to everyone
the age range from which you want to display ads to, where between 13 years old to 65+
the location of whom you want to target, from a country to a state/province, to a county, or even city
their public interests and Page likes
When you finish choosing these (and you should absolutely spend a lot of time making sure that you create and save the best audience you can so that you can refine it over time), Facebook will present you with an overall estimate of the maximum number of people within your reach. For the example below, we have targeted a potential 1.4 million people.
The budget is probably the most limiting factor because you only have so much cash that can go toward advertising. There is a ceiling on how much return you can get for your investment. It will take lots of experimenting to figure out what that is. Your budget ties directly to the duration of your campaign, too. You have the option to run an ad for 1, 7, or 14 days. Facebook will distribute your total budget over the course of that time. They will also tell you how many people you can expect to reach. That number (obviously an estimate) is based on the audience you chose. They also amortize your daily spend based on these factors.
And when you finish everything and set the ad to go live, your Ad Center tab will report the results back to you.
Additionally, you should be able to track the performance of your campaigns in a general sense by checking out the Insights tab. Here you willsee trends and data for your Page and overall engagements. You can also compare yourself to competitor Pages to see where you both stand.
As you track the numbers and look at your Page analytics and refine your audience, you will see an increase in ROI across the board with Facebook ads.
Final Thoughts on Facebook Marketing
I hesitated to say that these are the final thoughts on the topic because it is such a large subject. But the information in this article should give you a pretty solid overview of the potential that Facebook holds. Potential for lead generation, community building, advertising, and so much more. The Facebook developer team has spent a lot of time and effort to make their methods of data acquisition a marketer’s paradise. If you aren’t taking advantage of that work, you’re missing out on a lot of benefit for your brand.
When you take Pages, ads, Stories, and livestreams into consideratio, along with the Groups, Events (which you can also boost and promote with the ads interface, by the way), and the rest of the platform, you should be able to truly excel in the Facebook marketing world. It may take some time to get used to it and integrate it all into your strategies, but when you do, you won’t be sorry. And neither will your audience.
What has your experience been with Facebook marketing? Share your stories, tips, and tricks in the comments!
Article featured image by Anikei / shutterstock.com
The post Facebook Marketing: How to Grow Your Business Using Facebook appeared first on Elegant Themes Blog.
😉SiliconWebX | 🌐ElegantThemes
0 notes
Text
How to Create Your First Website
You are at the beginning of an amazing website and blogging journey, and I’m really glad you chose me to help you navigate from the beginning. Don't worry about not knowing where to start or what to do. Today's the day to create your first website, my friend. This beginner’s blogging guide was written for newbies just like you!
Even the most successful blogger on planet Earth started with 0 views from square 1, right?
Let's dive right in!
Easily Create Your First Website

Disclosure: There are some affiliate links below, but these are all products I highly recommend. I promise that I won't put anything on this page that I haven't verified and/or personally used. Thank you so much for your support!
STEP 1: GET DOMAIN AND HOSTING
If you are a newbie, then I’m guessing you were like me and understanding the industry lingo can be confusing. So let me drop some helpful knowledge of some words you’ll hear and use quite a bit….
A domain name is a term used for your website address. For example, my domain is lolaceleste.com
Website hosting is what powers your website to be seen on the Internet. Without it, no one will be able to see your website. All blog owners must pay for their domain and hosting. The great news is that it's inexpensive.
Website hosting is one of the most critical elements of your business and one which is taken for granted by a lot of new website owners. I LOVE that my domain name AND hosting account is all in-house with iPage. I can't stress enough how important a good hosting provider is for a successful online business. Believe me, select a bad hosting provider and you will quickly feel the pain.
A good website hosting provider allows you to forget about the backend, or all the techy stuff when it comes to your website.
A bad website hosting provider will cause your site to continuously have server crashes, poor security, and backup issues. You’ll find yourself always on the phone or chat with the support techs. All that energy needs to go towards growing your business OKAAAY!?
Ipage gets thumbs up with both!
Let your creativity kick in! It’s time to create your website’s name. This name will be your domain name and where others will type in the address bar – http://yourblogname.com.
A few suggestions for selecting your domain name:
Select a name that is simple, short and easy to spell.
Select a domain name that relates to your overall niche or brand. Have at least 5 domain names in mind before purchase time.
Have at least 5 domain names in mind before purchase time.
I have had my heart broken many times because I was set on just one name and it was already taken. Preparing 5 names before the "big moment" will help with any surprises that your search will turn up.
Time to purchase!
I normally purchase all of my domains through iPage. I have been using iPage for almost 9 years, so I can honestly say they are a resource you can trust.
Click here to get started with iPage today!
Here’s the really good part…..
New accounts get a free domain with hosting iPage accounts. Yep! For one year iPage will foot the bill for your new domain name.
Head over to iPage’s homepage.

Click SIGN UP NOW button.
Type in a domain name.
It's available YAY! (if not, no worries ...you have 4 more names ready to try)
Now add your extension by clicking the ".com + " button.
Here, you will be asked to select the hosting plan. Unless you plan on paying for 3 years in advance, make sure you click the 1-year option.
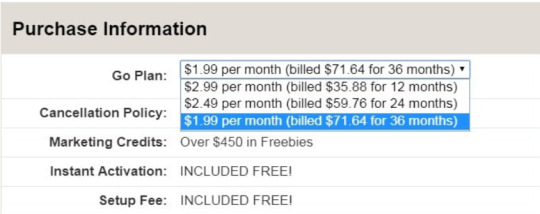

Next, you need to put in your billing information on another page. You can use your PayPal account or your credit card.

Click, “Check Out”. Then, “Return to Home Page”.
To verify your account, head to your email inbox, find the email titled, “Your iPage Order Confirmation”, then click on the link to verify your account and complete the sign-up.
Create your password, select your security question, put “http://lolaceleste.com” in the referral section, (sending you BIG THANK YOU for giving me credit) check the box if you agree to the terms of service, and “Save and Continue”.
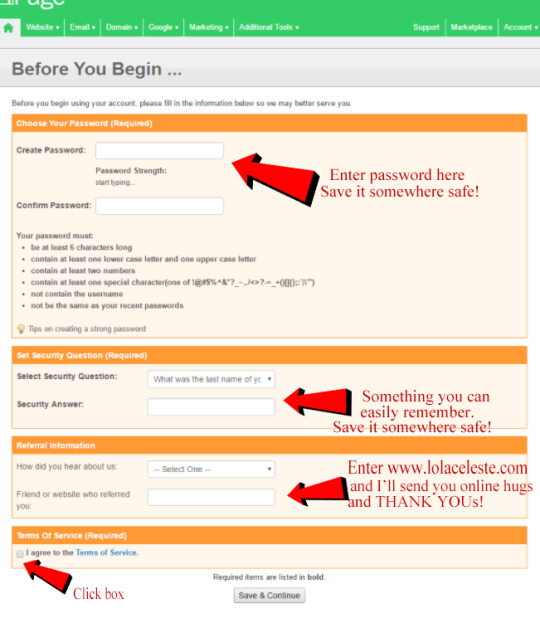
STEP 2: INSTALL WORDPRESS
For your Blog, I recommend using WordPress. Wordpress is the world's most popular blogging platform and it runs some of the web's biggest and most popular blogs. It is a powerful blogging tool and it can be used to create any kind of site you want. It allows creative newbies like yourself to create blogs, online stores, photo galleries, etc with simple drag and drop software. I haven’t run into anything I can’t do with WordPress.
Wordpress is a simple blogging platform, but yes there is a small learning curve before you know your way around it. I have built hundreds of sites using WordPress and I can’t see using any other platform. The site you're on right now is built with Wordpress!
There are a few different ways to install WordPress. Manually or my choice with a few clicks using MOJO Marketplace installer. I like simple, and that’s another reason why I recommend iPage. They make it easy to install Wordpress.
Now that your hosting is all set up, you can get started installing WordPress!
Go to your CONTROL PANEL inside iPage
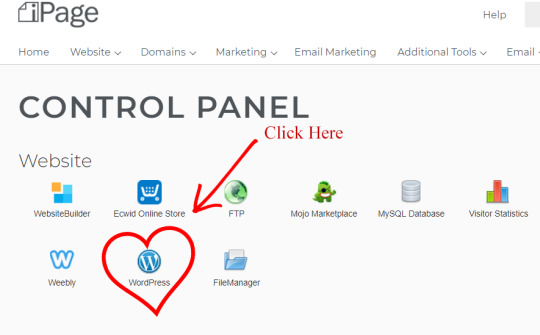
Go to website section: Click Wordpress.
Mojo Marketplace installer window will pop up and load.
Next, click on INSTALL button to the right of Wordpress
Select your domain name in drop down box in which to install Wordpress

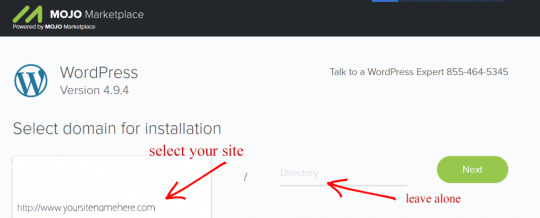
Click NEXT button.
On this screen, enter your site's name of the site in SITE NAME OR TITLE area, keep supplied email name in ADMIN USERNAME area, and keep password generated OR change to one you supply. In both cases make sure you write down your password.

Check all three boxes at the bottom. Click NEXT button.
A pop-up ad may appear; click to exit it.
Wait as MoJo does its thing.
WAIT FOR THE BIG GREEN CHECK MARK TO THE UPPER LEFT SIDE OF SCREEN.
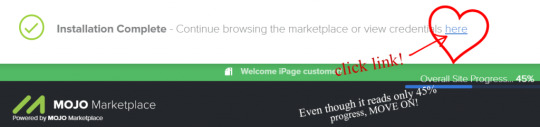
Once you get the green circled check mark, your installation is complete. Note; your site's overall site progress will display 45% but it's ok to move on. This is MOJO's way of getting you to look around and spend money on a theme. I have other plans for you that are FREEEEEE!
Here you will see important and sensitive details that you’ll want to record in a safe place. This information gives you the link to log in to your new site.
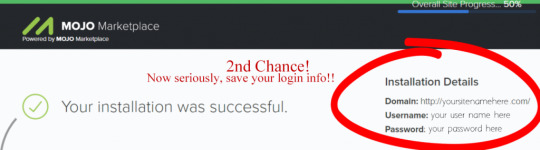
Time to login to your new site!
Click or copy the DOMAIN link you saved.
Enter your saved username and password to access your Wordpress site.

Click login button.
And now you can see your new Wordpress dashboard.
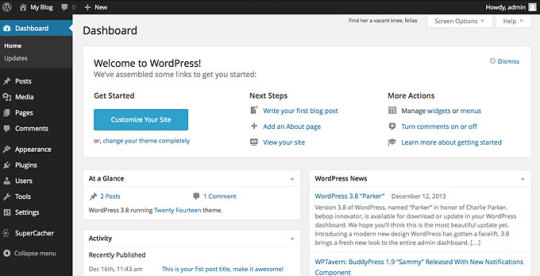
…..It’s a whole new world!
And this my friend is your new and powerful place to make all the blogging goodness happen.
Don't miss grabbing 20 FREE Styled Stock Images for your website and social media below!

STEP 3: SETTING UP PAGES
Now that your site is set up, it’s important to add a few essential Wordpress pages.
The following pages are important and your site needs them to establish credibility and authority for your visitors, Google, and your other social media properties.
About Page - This page tells your visitors what you and your site is about. It lays the framework for your site and can include a mission statement and more. Include a photo and brief bio, and explain why you’re blogging and why the reader should care.
Contact Page- Every site needs a Contact Us Page. It shows you can be contacted and have an open line between you and your site visitors. Nothing fancy if you chose; just tell your readers how best to reach you. Do not put your full email address on here. Spambots will get a hold of it! NOOOO! What I do is just spell out my email address whenever I need to display it. Example info(at)lolaceleste(dot)com. Not the sexiest thing, but better than receiving spam day and night in your inbox.

Here's how:
Go to dashboard > POSTS > ALL PAGES.
You will see what pages are already there that came with your default theme. Every new WordPress blog has an About page already set up, but we want to edit and customize it.
Click edit under the about title.

You will now arrive at the edit page screen. The title area (which includes the word “About”) and a text area, which also contains the theme's default will be shown. Waiting and ready for you to customize it.
You can also see here that the Status is showing as Published. That means it’s live on the Internet for all to see.
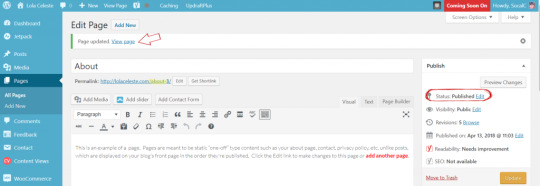
Click on the large text area and type in your contact information. Hit the UPDATE button to save.
Want to see what this page looks like live? Click on the View Page link just under the title. This should open up a new tab with your new live edit page.
Now go back to your dashboard and repeat for your contact page and any additional pages you wish to create.
STEP 4: install a Wordpress theme
The design of Wordpress blogs run on "themes."
Wordpress software uses themes to create the graphics and layouts you see on all those blogs. Through these themes, you can customize your new website.
It’s incredible how many free themes are available for Wordpress. Remember that little learning curve I talked about earlier? This is where you will need to be patient with yourself and learn the ins and outs. I strongly suggest you get cozy with the default theme before moving on to a more custom free theme or purchased premium theme.
How to pick a new Wordpress theme:
In your Wordpress dashboard, go to "Appearance > Themes."

On the next page, you'll see all of your installed themes. You can search for new themes by clicking on "Add New" at the top of the page.

Here you will see several options to search for a new theme.

Search and try not to get obsessed with all the pretty themes. I'm SO guilty of this!
Found a theme? Simply hover over the theme you like and click the "Install" button.
Click ACTIVATE.

Congratulations! You just installed your first Wordpress theme!
Make it yours and click the customization button and play around.

STEP 5: INSTALL ESSENTIAL PLUGINS
Last step!
What are WordPress plugins? Technically speaking, WordPress plugins are bits of software that can be uploaded to extend and expand the functionality of your WordPress site.
Real talk, they are goodies you add on to your site or blog that make things easier to do. Want to display your posts in a grid format like Pinterest? There’s a plugin for that. Want to make sure Google knows your site exists and tell the world every time you post something? There’s a plugin for that too.
Kind of get the idea?
Take a minute and go back to your dashboard. Navigate to “Plugins > Add New.”
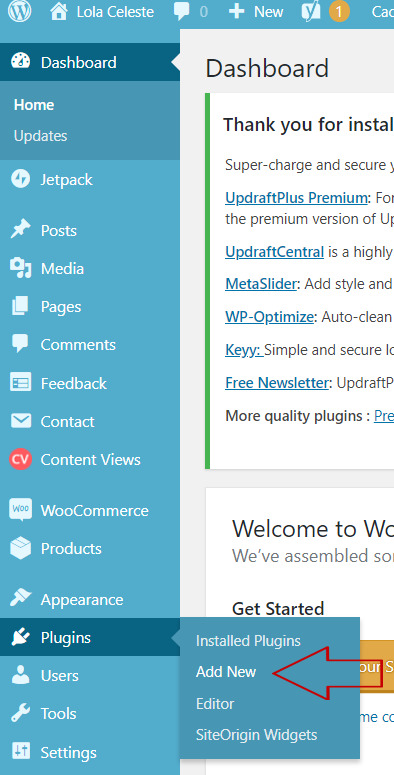
On next page, place the following must have plugins (in my opinion) in search box one at a time.
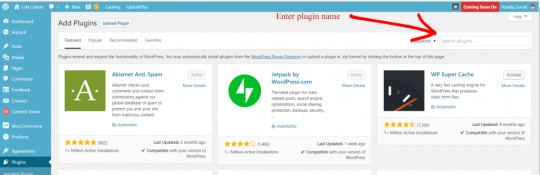
MUST HAVE PLUGINS:
Akismet
WordPress SEO – by Yoast
W3 Total Cache – website load
Updraft Plus – back up website
Type the plugin name in search box. Once it turns up the correct search, click INSTALL NOW button.
Now Click ACTIVATE button and you're all good.
Repeat process for additional plugin installs.
Pour yourself a cocktail and pat yourself on the back. You created your first website!
Ready to keep going and publish your first blog post? I got ya covered. Click over to 9 Steps to Create Your First Blog Post. I even included a sweet little checklist for you!
Read the full article
0 notes
Text
How to Start a Travel Blog
Updated: 8/31/2018 | August 31st, 2018
Whether as a hobby or profession, starting a travel blog is pretty easy. You can set it up in under 30 minutes. It’s gotten a lot easier than when I started my blog in 2008 when I didn’t know the first thing about making a website. Luckily, on my adventures around the world, I met Matt and Kat, a British couple who also happened to be web designers. When I came home and decided I wanted to start this travel blog, they agreed to help me set it up and teach me HTML. Back then, I hand-coded the website and used a funky tool called Dreamweaver to build it. It was painfully slow, and I wasn’t very good at it. (And my original website was really ugly!)
Luckily, you no longer have to build websites that way. They have gotten a lot easier and simpler thanks to WordPress, a simple out-of-the-box platform designed to make sites easier for those not technically savvy (like myself). It powers over 25% of the internet and is the best platform to start a blog on. It’s super flexible and can do whatever you want it to do — from a simple journal to a complex e-commerce website.
In our blogging course, we’ve had thousands of students start a website on WordPress without any technical skills. They got them up and running — and you can too!
A few months back, I talked about the ways you could succeed with a travel blog, but today, I want to give a quick tutorial on how to create a travel blog from scratch in seven easy steps.
Step 1: Picking a Name
Step 2: Signing Up for a Host
Step 3: Installing WordPress
Step 4: Setting Up Your Website
Step 5: Installing Your Theme
Step 6: Creating Your Main Pages
Step 7: Joining Our Blogging Course
Step 1: Pick your name
The first thing you need to do is pick a domain name (i.e., your website name). When doing so, there are no hard and fast rules. There’s no such thing as a “wrong domain name,” but there are a couple of rules I like to live by:
Make a name that can last – If you pick “JohnsAsiaAdeventure.com” and then you leave Asia, the domain name won’t make sense anymore. Make sure you pick a name that isn’t so focused that if you decide to shift gears, you can keep the same domain name.
Don’t date your blog – Don’t pick something related to your age either. “Twenty-Something Travel” becomes really irrelevant when you get older, which actually happened to a blogger I know. Pick a name that can be used no matter your age!
Try to avoid certain words like “nomad,” “vagabond,” “wanderlust,” and “adventure.” They have been done to death, and they will make you seem like you’re copying people, not being original.
Pick a name that describes what you do as much as possible – I was a nomad, so “Nomadic Matt” was the best pick for me. If you’re into luxury, put words in your domain name that convey that. You want people to see the name and go “I get what that website is about.”
Keep it short – Use 3-4 words maximum. You want the name that rolls off the tongue. Even Ramit Sethi from “I Will Teach You to Be Rich” abbreviates his site to “I Will Teach” or “IWT.” The shorter, the better.
Keep it simple – I’m not a fan of using jargon or slang in your domain name, as I think that makes things confusing for people who don’t know it. The last thing you want is someone saying, “What does that mean?” or being confused. If someone has to think hard about the meaning, then you’ve already lost them. So don’t try to be clever!
Step 2: Sign up for a host
After you’ve picked out your domain name, you’ll need to register it online and buy hosting (the little computer in the sky that’s going to power your website). There are a lot of basic hosting companies out there — and most of them are pretty terrible. However, the two biggest and best are HostGator and Bluehost. I would go with one of those two.
However, though they are owned by the same parent company, I lean toward HostGator, as I find its call center customer service quicker and friendlier, and HostGator is prone to fewer outages (no one wants their website to go down!). I’ve been using it since I’ve started; I still run my email through it. It’s also really improved its service recently and now offers free SSL certificates (that’s the thing that tells users your website is secure).
Here’s a walk-through of how to set up your host with HostGator (it won’t take long):
First, head over to the website’s sign-up page and get hosting for only $2.78 per month. That’s over 60% off the normal price!
Enter the domain name you picked and then choose the Hatchling Plan. This is the most basic plan, but it’s perfect for new blogs:
I wouldn’t recommend spending more money until you get a lot of traffic and decide you’re going to do this long-term! Additionally, the longer you buy your hosting for, the cheaper it is. If you select three years of hosting, your domain will only cost $127 USD, so I think you should do that. It’s a steal, cheaper than most other hosting packages. You don’t have to pick three years, but the marginal cost of adding additional years is small, and it means you don’t have to worry about renewing for a long time!
That’s it! All that takes about five minutes from start to finish!
Again, you can click here to go to HostGator to set it up.
Step 3: How to Install WordPress
After you’ve registered your domain name and chosen your hosting package, the next thing you’ll want to do is install WordPress. (WordPress is what will actually run the website. The host is simply the computer your site sits on.) WordPress is an open-source and free Web publishing application, content management system (CMS) and blogging tool built by a community of developers and contributors to make it easy for people to blog!
After you’ve paid, you’ll get an email telling your login details. After you click the link in the email and log in, you’ll see this screen. Click “Get Started with WordPress Today”:
You’ll be taken to this screen below. In the dropdown menu, select your domain name and hit “Next”:
Enter your user information. Under the blog title, enter the name of your blog. Create a strong username and then hit install.
Then presto! It’s done!
After your WordPress is installed, a screen will display the username you chose and a password generated for you. (You can change the password later.)
Now your website is up and running.
Step 4: Setting up your website
After you’ve installed WordPress, go to domainname.com/wp-admin and use the username and password you created to log in. You’ll see a screen like this after you log in:
Here’s a little overview of the menu on the left side of the screen:
Dashboard – The dashboard is the first thing you see when you log in to WordPress, and it’s the main administrative area for your blog.
Home – This will take you back to the main dashboard view.
Updates – This area will tell you if WordPress, your plugins, or your theme need to be updated.
Jetpack – Jetpack is a plugin that allows you to add a spell-checker, contact forms, extra widgets, etc.
Posts – You can view all your blog posts here, as well as set up new ones and add categories and tags.
Media – Here’s where you can view your media library and add new media content, like photos and videos.
Pages – Pages are the individual landing pages on your website (like your About page, Contact page, Resources page, etc.). You can add new pages here as well as review and edit existing ones.
Comments – Comments on your blog posts go here. You may want to check the spam folder periodically to make sure you’re not missing real comments.
WPForms – WordPress’s contact-form plugin.
Marketplace – Here you can create an online marketplace.
Appearance – This section lets you entirely customize your site’s appearance.
Plugins – Review, install, and update your plugins here.
Users – If there’s more than one person accessing your blog, you can create accounts and give them certain privileges here.
Tools – This section has certain tools to aid you with management tasks.
Settings – You can adjust all your site’s settings here, including things like your blog title and the size of thumbnails being used.
Insights – Insights provides traffic and user stats about those visiting your website. (Google Analytics is a better choice, though.)
Plugins are a great way to add additional functionality to a WordPress-powered site. And with over 56,000 (at last check) listed in the WordPress Repository and many more premium options available from developers, there are endless possibilities as to what you can do with your site. (I’ll list some examples below.)
Note: Jetpack, Mojo Marketplace, Insights, and WP Forms are pre-installed plugins.
From the main screen, click Plugins –> Add New on the left-hand column:
Now it’s time for you to install your own.
If you can think of a feature you’d like to have on your site, I can almost guarantee there is a plugin for it, but here are the essential ones for your travel blog:
Akismet – Just like getting junk mail in your mailbox, your website will get spammers looking to leave junk comments on your site. Akismet seeks to reduce the amount of this by automatically filtering it for you. This plugin comes installed with WordPress, and all you need do is activate it and sign up for an account at akismet.com.
Yoast SEO – The best SEO plugin out there. This combines the ability to create metatags and descriptions for your posts, optimize your titles, create a sitemap for search engines to read, customize how your posts appear across social media, and a whole lot more. It’s simple and easy to use and comes with foolproof instructions.
Relevanssi – While WordPress does a lot of things well, what it fails at is adding search functionality to your site. Relevanssi seeks to fix this and give your readers the most accurate results when searching your site.
Google Analytics for WordPress – Adding analytic tracking to your website is an important way to find out who your readers are, where they are coming from, and what your most popular content is. When you sign up for Google Analytics, the site asks you to place a snippet of code into your website. For most people, that can be difficult, which is why there’s Google Analytics for WordPress. This adds a lovely graphical interface to your site where you can click a couple of buttons and set up your tracking without any hassle.
Sumo – Free tools to help you grow your site, including the best social sharing plugin on the web. Use this! It comes with great analytics and testing features.
Jetpack – Jetpack (pre-installed) is aimed at supercharging your website with a host of features from WordPress’s free hosting platform, giving you the best of both worlds. With this plugin, you can add a spell-checker, contact forms, extra widgets, and a whole slew of more features, all with just one plugin.
W3 Total Cache – This plugin works by creating saved copies of your site, saving WordPress from having to generate them for every new visitor. This, in turn, cuts down on the amount of work your hosting server has to do and makes loading your website much faster.
Step 5: Install your theme
One of the most important things a blog needs besides good content is a good design. People decide in seconds whether or not they trust your website and choose to stay. A visually unappealing website will turn off readers and reduce the number of return visits you get.
So to accomplish a good design, you will need an amazing WordPress theme (i.e., design templates and files).
Luckily, there are lots of out-of-the-box options for you where you can download a predesigned theme, upload it to your website, switch it on, change some settings, and presto! A new look for your website!
You can get:
Free themes – Free themes are plentiful and for budding new bloggers looking to make their mark online. They seem like a great option, as they allow you to keep costs low. There are many great free themes online, but most of them are not amazing. If you plan on blogging for a long time, this might become a problem as your website grows. However, if you just need a simple design to blog for your friends and family, then go the free route. You can find some good free themes at wordpress.org.
Premium themes – The next step up from a free theme is a premium theme. Premium themes are paid themes that offer a bit more uniqueness, flexibility, and functionality. These cost $25 USD and up, depending on the developer and features.
I suggest getting a premium theme. Yes, it’s another cost — but here is why you should do it:
With a premium theme, you almost always get customer support from the developers. If you get in trouble, they are there for you. You don’t get that with a free theme.
With a premium theme, there are more controls and instructions so they are easier to change. Free themes don’t have that.
Premium themes tend to be a lot prettier.
Premium themes are faster and more SEO friendly.
The two best companies for premium themes are WooCommerce and StudioPress. My favorite is StudioPress as it is more SEO friendly, a bit sleeker, and cooler. WooCommerce is great for photographers and more “fun” personal blogs.
To install your theme, simply go to the left-hand column, click Appearance –> Themes –> Upload.
Whatever theme you picked will come as a .ZIP file for you to easily upload. From there, you just activate it, and it’s turned on! All themes come with a manual and help file so you can customize your design to your specific needs.
(If you want a custom logo, two sites to find freelancers are Upwork and 99designs.)
Step 6: Create your main pages
After you’ve uploaded your theme, you’re going to want to make a few basic pages on your website in addition to the blog posts. The difference between a page and a post is that a page is a static piece of content that lives separate from the blog. A post is a blog post that gets “buried” as you write more and more. For example, this post is a blog post. When I update again, another blog post will get put on top of it, and it will be pushed down in the archives, making it harder to find. But a page, like my About page, lives on the top of the website, right near the main URL, and does NOT get buried. It’s a lot easier to find.
To create these pages, go again to your left sidebar and click Pages —> Add New. (For blog posts, use Posts –> Add New.)
I recommend creating four basic pages to start:
About page – This where you tell people about yourself and your history, what your blog is about, and why it will help them. This is one of the most important pages on your website, so make it personable!
Contact page – People need a way to reach you! Be sure to be very clear on what emails you will and won’t respond to, so people don’t send you spam.
Privacy page – This is a standard user agreement page informing readers what the applicable laws on your site are, that you use cookies, etc. etc. You can find out-of-the-box examples throughout the internet.
Copyright page – This is a standard page letting people know you own this work and not to steal it. You can find out-of-the-box examples of these, too, throughout the internet.
(If you look in my footer, under the “About” section, you can see examples of all four of these pages!)
Step 7: Join our blogging course! (optional)
If you’re looking for more in-depth advice, I have a very detailed and robust blogging course that uses my ten years of blogging knowledge to help you start, grow, and monetize your website. It gives you a behind-the-scenes look at how I run this website and features detailed analytics, tricks, tips, and secrets about what I do. You’ll learn everything I know about creating a successful blog.
I will help you come up with your domain name, sign up for hosting, create engaging content, go viral, network with bloggers, get media attention, master SEO, create products, grow a newsletter, and make money. I will give you the tools for success — and then show you how to use those tools!
Plus, you’ll get over 12 hours of expert interviews, edited feedback on your writing, monthly webinars and Q&As with me (ask me anything!), tech support and help setting up your blog, and a community of bloggers to help you succeed right out of the gate.
I’ll be there every step of the way. I’ll be your personal mentor.
If you’re interested, click here to learn more and get started!
***
That’s it! You’ve set up your basic website. Sure, there are social media buttons to add, blogs to write, images to upload, and things to tweak but all that comes later. Once you do the steps above, you have the framework needed to create and share your story with the world! To recap on how to start a travel blog:
Step 1: Pick a Name
Step 2: Sign Up for Hosting
Step 3: Install WordPress
Step 4: Set Up Your Website
Step 5: Install Your Theme
Step 6: Creat Your Main Pages
Step 7: Join Our Blogging Course (Optional!)
By following these steps, you can start your travel blog and your stories and tips with the world! (That’s where the real fun begins!)
Disclosure: Please note that some of the links above are affiliate links, including the links for HostGator and Bluehost. At no additional cost to you, I earn a commission if you make a purchase using these links. If you have any questions about the companies or my status as an affiliate, please don’t hesitate to email me.
The post How to Start a Travel Blog appeared first on Nomadic Matt's Travel Site.
from Traveling News https://www.nomadicmatt.com/travel-blogs/how-to-create-a-travel-blog/
0 notes
Text
How to Start a Travel Blog
Updated: 8/31/2018 | August 31st, 2018
Whether as a hobby or profession, starting a travel blog is pretty easy. You can set it up in under 30 minutes. It’s gotten a lot easier than when I started my blog in 2008 when I didn’t know the first thing about making a website. Luckily, on my adventures around the world, I met Matt and Kat, a British couple who also happened to be web designers. When I came home and decided I wanted to start this travel blog, they agreed to help me set it up and teach me HTML. Back then, I hand-coded the website and used a funky tool called Dreamweaver to build it. It was painfully slow, and I wasn’t very good at it. (And my original website was really ugly!)
Luckily, you no longer have to build websites that way. They have gotten a lot easier and simpler thanks to WordPress, a simple out-of-the-box platform designed to make sites easier for those not technically savvy (like myself). It powers over 25% of the internet and is the best platform to start a blog on. It’s super flexible and can do whatever you want it to do — from a simple journal to a complex e-commerce website.
In our blogging course, we’ve had thousands of students start a website on WordPress without any technical skills. They got them up and running — and you can too!
A few months back, I talked about the ways you could succeed with a travel blog, but today, I want to give a quick tutorial on how to create a travel blog from scratch in seven easy steps.
Step 1: Picking a Name
Step 2: Signing Up for a Host
Step 3: Installing WordPress
Step 4: Setting Up Your Website
Step 5: Installing Your Theme
Step 6: Creating Your Main Pages
Step 7: Joining Our Blogging Course
Step 1: Pick your name
The first thing you need to do is pick a domain name (i.e., your website name). When doing so, there are no hard and fast rules. There’s no such thing as a “wrong domain name,” but there are a couple of rules I like to live by:
Make a name that can last – If you pick “JohnsAsiaAdeventure.com” and then you leave Asia, the domain name won’t make sense anymore. Make sure you pick a name that isn’t so focused that if you decide to shift gears, you can keep the same domain name.
Don’t date your blog – Don’t pick something related to your age either. “Twenty-Something Travel” becomes really irrelevant when you get older, which actually happened to a blogger I know. Pick a name that can be used no matter your age!
Try to avoid certain words like “nomad,” “vagabond,” “wanderlust,” and “adventure.” They have been done to death, and they will make you seem like you’re copying people, not being original.
Pick a name that describes what you do as much as possible – I was a nomad, so “Nomadic Matt” was the best pick for me. If you’re into luxury, put words in your domain name that convey that. You want people to see the name and go “I get what that website is about.”
Keep it short – Use 3-4 words maximum. You want the name that rolls off the tongue. Even Ramit Sethi from “I Will Teach You to Be Rich” abbreviates his site to “I Will Teach” or “IWT.” The shorter, the better.
Keep it simple – I’m not a fan of using jargon or slang in your domain name, as I think that makes things confusing for people who don’t know it. The last thing you want is someone saying, “What does that mean?” or being confused. If someone has to think hard about the meaning, then you’ve already lost them. So don’t try to be clever!
Step 2: Sign up for a host
After you’ve picked out your domain name, you’ll need to register it online and buy hosting (the little computer in the sky that’s going to power your website). There are a lot of basic hosting companies out there — and most of them are pretty terrible. However, the two biggest and best are HostGator and Bluehost. I would go with one of those two.
However, though they are owned by the same parent company, I lean toward HostGator, as I find its call center customer service quicker and friendlier, and HostGator is prone to fewer outages (no one wants their website to go down!). I’ve been using it since I’ve started; I still run my email through it. It’s also really improved its service recently and now offers free SSL certificates (that’s the thing that tells users your website is secure).
Here’s a walk-through of how to set up your host with HostGator (it won’t take long):
First, head over to the website’s sign-up page and get hosting for only $2.78 per month. That’s over 60% off the normal price!
Enter the domain name you picked and then choose the Hatchling Plan. This is the most basic plan, but it’s perfect for new blogs:
I wouldn’t recommend spending more money until you get a lot of traffic and decide you’re going to do this long-term! Additionally, the longer you buy your hosting for, the cheaper it is. If you select three years of hosting, your domain will only cost $127 USD, so I think you should do that. It’s a steal, cheaper than most other hosting packages. You don’t have to pick three years, but the marginal cost of adding additional years is small, and it means you don’t have to worry about renewing for a long time!
That’s it! All that takes about five minutes from start to finish!
Again, you can click here to go to HostGator to set it up.
Step 3: How to Install WordPress
After you’ve registered your domain name and chosen your hosting package, the next thing you’ll want to do is install WordPress. (WordPress is what will actually run the website. The host is simply the computer your site sits on.) WordPress is an open-source and free Web publishing application, content management system (CMS) and blogging tool built by a community of developers and contributors to make it easy for people to blog!
After you’ve paid, you’ll get an email telling your login details. After you click the link in the email and log in, you’ll see this screen. Click “Get Started with WordPress Today”:
You’ll be taken to this screen below. In the dropdown menu, select your domain name and hit “Next”:
Enter your user information. Under the blog title, enter the name of your blog. Create a strong username and then hit install.
Then presto! It’s done!
After your WordPress is installed, a screen will display the username you chose and a password generated for you. (You can change the password later.)
Now your website is up and running.
Step 4: Setting up your website
After you’ve installed WordPress, go to domainname.com/wp-admin and use the username and password you created to log in. You’ll see a screen like this after you log in:
Here’s a little overview of the menu on the left side of the screen:
Dashboard – The dashboard is the first thing you see when you log in to WordPress, and it’s the main administrative area for your blog.
Home – This will take you back to the main dashboard view.
Updates – This area will tell you if WordPress, your plugins, or your theme need to be updated.
Jetpack – Jetpack is a plugin that allows you to add a spell-checker, contact forms, extra widgets, etc.
Posts – You can view all your blog posts here, as well as set up new ones and add categories and tags.
Media – Here’s where you can view your media library and add new media content, like photos and videos.
Pages – Pages are the individual landing pages on your website (like your About page, Contact page, Resources page, etc.). You can add new pages here as well as review and edit existing ones.
Comments – Comments on your blog posts go here. You may want to check the spam folder periodically to make sure you’re not missing real comments.
WPForms – WordPress’s contact-form plugin.
Marketplace – Here you can create an online marketplace.
Appearance – This section lets you entirely customize your site’s appearance.
Plugins – Review, install, and update your plugins here.
Users – If there’s more than one person accessing your blog, you can create accounts and give them certain privileges here.
Tools – This section has certain tools to aid you with management tasks.
Settings – You can adjust all your site’s settings here, including things like your blog title and the size of thumbnails being used.
Insights – Insights provides traffic and user stats about those visiting your website. (Google Analytics is a better choice, though.)
Plugins are a great way to add additional functionality to a WordPress-powered site. And with over 56,000 (at last check) listed in the WordPress Repository and many more premium options available from developers, there are endless possibilities as to what you can do with your site. (I’ll list some examples below.)
Note: Jetpack, Mojo Marketplace, Insights, and WP Forms are pre-installed plugins.
From the main screen, click Plugins –> Add New on the left-hand column:
Now it’s time for you to install your own.
If you can think of a feature you’d like to have on your site, I can almost guarantee there is a plugin for it, but here are the essential ones for your travel blog:
Akismet – Just like getting junk mail in your mailbox, your website will get spammers looking to leave junk comments on your site. Akismet seeks to reduce the amount of this by automatically filtering it for you. This plugin comes installed with WordPress, and all you need do is activate it and sign up for an account at akismet.com.
Yoast SEO – The best SEO plugin out there. This combines the ability to create metatags and descriptions for your posts, optimize your titles, create a sitemap for search engines to read, customize how your posts appear across social media, and a whole lot more. It’s simple and easy to use and comes with foolproof instructions.
Relevanssi – While WordPress does a lot of things well, what it fails at is adding search functionality to your site. Relevanssi seeks to fix this and give your readers the most accurate results when searching your site.
Google Analytics for WordPress – Adding analytic tracking to your website is an important way to find out who your readers are, where they are coming from, and what your most popular content is. When you sign up for Google Analytics, the site asks you to place a snippet of code into your website. For most people, that can be difficult, which is why there’s Google Analytics for WordPress. This adds a lovely graphical interface to your site where you can click a couple of buttons and set up your tracking without any hassle.
Sumo – Free tools to help you grow your site, including the best social sharing plugin on the web. Use this! It comes with great analytics and testing features.
Jetpack – Jetpack (pre-installed) is aimed at supercharging your website with a host of features from WordPress’s free hosting platform, giving you the best of both worlds. With this plugin, you can add a spell-checker, contact forms, extra widgets, and a whole slew of more features, all with just one plugin.
W3 Total Cache – This plugin works by creating saved copies of your site, saving WordPress from having to generate them for every new visitor. This, in turn, cuts down on the amount of work your hosting server has to do and makes loading your website much faster.
Step 5: Install your theme
One of the most important things a blog needs besides good content is a good design. People decide in seconds whether or not they trust your website and choose to stay. A visually unappealing website will turn off readers and reduce the number of return visits you get.
So to accomplish a good design, you will need an amazing WordPress theme (i.e., design templates and files).
Luckily, there are lots of out-of-the-box options for you where you can download a predesigned theme, upload it to your website, switch it on, change some settings, and presto! A new look for your website!
You can get:
Free themes – Free themes are plentiful and for budding new bloggers looking to make their mark online. They seem like a great option, as they allow you to keep costs low. There are many great free themes online, but most of them are not amazing. If you plan on blogging for a long time, this might become a problem as your website grows. However, if you just need a simple design to blog for your friends and family, then go the free route. You can find some good free themes at wordpress.org.
Premium themes – The next step up from a free theme is a premium theme. Premium themes are paid themes that offer a bit more uniqueness, flexibility, and functionality. These cost $25 USD and up, depending on the developer and features.
I suggest getting a premium theme. Yes, it’s another cost — but here is why you should do it:
With a premium theme, you almost always get customer support from the developers. If you get in trouble, they are there for you. You don’t get that with a free theme.
With a premium theme, there are more controls and instructions so they are easier to change. Free themes don’t have that.
Premium themes tend to be a lot prettier.
Premium themes are faster and more SEO friendly.
The two best companies for premium themes are WooCommerce and StudioPress. My favorite is StudioPress as it is more SEO friendly, a bit sleeker, and cooler. WooCommerce is great for photographers and more “fun” personal blogs.
To install your theme, simply go to the left-hand column, click Appearance –> Themes –> Upload.
Whatever theme you picked will come as a .ZIP file for you to easily upload. From there, you just activate it, and it’s turned on! All themes come with a manual and help file so you can customize your design to your specific needs.
(If you want a custom logo, two sites to find freelancers are Upwork and 99designs.)
Step 6: Create your main pages
After you’ve uploaded your theme, you’re going to want to make a few basic pages on your website in addition to the blog posts. The difference between a page and a post is that a page is a static piece of content that lives separate from the blog. A post is a blog post that gets “buried” as you write more and more. For example, this post is a blog post. When I update again, another blog post will get put on top of it, and it will be pushed down in the archives, making it harder to find. But a page, like my About page, lives on the top of the website, right near the main URL, and does NOT get buried. It’s a lot easier to find.
To create these pages, go again to your left sidebar and click Pages —> Add New. (For blog posts, use Posts –> Add New.)
I recommend creating four basic pages to start:
About page – This where you tell people about yourself and your history, what your blog is about, and why it will help them. This is one of the most important pages on your website, so make it personable!
Contact page – People need a way to reach you! Be sure to be very clear on what emails you will and won’t respond to, so people don’t send you spam.
Privacy page – This is a standard user agreement page informing readers what the applicable laws on your site are, that you use cookies, etc. etc. You can find out-of-the-box examples throughout the internet.
Copyright page – This is a standard page letting people know you own this work and not to steal it. You can find out-of-the-box examples of these, too, throughout the internet.
(If you look in my footer, under the “About” section, you can see examples of all four of these pages!)
Step 7: Join our blogging course! (optional)
If you’re looking for more in-depth advice, I have a very detailed and robust blogging course that uses my ten years of blogging knowledge to help you start, grow, and monetize your website. It gives you a behind-the-scenes look at how I run this website and features detailed analytics, tricks, tips, and secrets about what I do. You’ll learn everything I know about creating a successful blog.
I will help you come up with your domain name, sign up for hosting, create engaging content, go viral, network with bloggers, get media attention, master SEO, create products, grow a newsletter, and make money. I will give you the tools for success — and then show you how to use those tools!
Plus, you’ll get over 12 hours of expert interviews, edited feedback on your writing, monthly webinars and Q&As with me (ask me anything!), tech support and help setting up your blog, and a community of bloggers to help you succeed right out of the gate.
I’ll be there every step of the way. I’ll be your personal mentor.
If you’re interested, click here to learn more and get started!
***
That’s it! You’ve set up your basic website. Sure, there are social media buttons to add, blogs to write, images to upload, and things to tweak but all that comes later. Once you do the steps above, you have the framework needed to create and share your story with the world! To recap on how to start a travel blog:
Step 1: Pick a Name
Step 2: Sign Up for Hosting
Step 3: Install WordPress
Step 4: Set Up Your Website
Step 5: Install Your Theme
Step 6: Creat Your Main Pages
Step 7: Join Our Blogging Course (Optional!)
By following these steps, you can start your travel blog and your stories and tips with the world! (That’s where the real fun begins!)
Disclosure: Please note that some of the links above are affiliate links, including the links for HostGator and Bluehost. At no additional cost to you, I earn a commission if you make a purchase using these links. If you have any questions about the companies or my status as an affiliate, please don’t hesitate to email me.
The post How to Start a Travel Blog appeared first on Nomadic Matt's Travel Site.
from Nomadic Matt's Travel Site https://ift.tt/2NAMksW
via IFTTT
0 notes
Text
How to Start a Travel Blog
Updated: 8/31/2018 | August 31st, 2018
Whether as a hobby or profession, starting a travel blog is pretty easy. You can set it up in under 30 minutes. It’s gotten a lot easier than when I started my blog in 2008 when I didn’t know the first thing about making a website. Luckily, on my adventures around the world, I met Matt and Kat, a British couple who also happened to be web designers. When I came home and decided I wanted to start this travel blog, they agreed to help me set it up and teach me HTML. Back then, I hand-coded the website and used a funky tool called Dreamweaver to build it. It was painfully slow, and I wasn’t very good at it. (And my original website was really ugly!)
Luckily, you no longer have to build websites that way. They have gotten a lot easier and simpler thanks to WordPress, a simple out-of-the-box platform designed to make sites easier for those not technically savvy (like myself). It powers over 25% of the internet and is the best platform to start a blog on. It’s super flexible and can do whatever you want it to do — from a simple journal to a complex e-commerce website.
In our blogging course, we’ve had thousands of students start a website on WordPress without any technical skills. They got them up and running — and you can too!
A few months back, I talked about the ways you could succeed with a travel blog, but today, I want to give a quick tutorial on how to create a travel blog from scratch in seven easy steps.
Step 1: Picking a Name
Step 2: Signing Up for a Host
Step 3: Installing WordPress
Step 4: Setting Up Your Website
Step 5: Installing Your Theme
Step 6: Creating Your Main Pages
Step 7: Joining Our Blogging Course
Step 1: Pick your name
The first thing you need to do is pick a domain name (i.e., your website name). When doing so, there are no hard and fast rules. There’s no such thing as a “wrong domain name,” but there are a couple of rules I like to live by:
Make a name that can last – If you pick “JohnsAsiaAdeventure.com” and then you leave Asia, the domain name won’t make sense anymore. Make sure you pick a name that isn’t so focused that if you decide to shift gears, you can keep the same domain name.
Don’t date your blog – Don’t pick something related to your age either. “Twenty-Something Travel” becomes really irrelevant when you get older, which actually happened to a blogger I know. Pick a name that can be used no matter your age!
Try to avoid certain words like “nomad,” “vagabond,” “wanderlust,” and “adventure.” They have been done to death, and they will make you seem like you’re copying people, not being original.
Pick a name that describes what you do as much as possible – I was a nomad, so “Nomadic Matt” was the best pick for me. If you’re into luxury, put words in your domain name that convey that. You want people to see the name and go “I get what that website is about.”
Keep it short – Use 3-4 words maximum. You want the name that rolls off the tongue. Even Ramit Sethi from “I Will Teach You to Be Rich” abbreviates his site to “I Will Teach” or “IWT.” The shorter, the better.
Keep it simple – I’m not a fan of using jargon or slang in your domain name, as I think that makes things confusing for people who don’t know it. The last thing you want is someone saying, “What does that mean?” or being confused. If someone has to think hard about the meaning, then you’ve already lost them. So don’t try to be clever!
Step 2: Sign up for a host
After you’ve picked out your domain name, you’ll need to register it online and buy hosting (the little computer in the sky that’s going to power your website). There are a lot of basic hosting companies out there — and most of them are pretty terrible. However, the two biggest and best are HostGator and Bluehost. I would go with one of those two.
However, though they are owned by the same parent company, I lean toward HostGator, as I find its call center customer service quicker and friendlier, and HostGator is prone to fewer outages (no one wants their website to go down!). I’ve been using it since I’ve started; I still run my email through it. It’s also really improved its service recently and now offers free SSL certificates (that’s the thing that tells users your website is secure).
Here’s a walk-through of how to set up your host with HostGator (it won’t take long):
First, head over to the website’s sign-up page and get hosting for only $2.78 per month. That’s over 60% off the normal price!
Enter the domain name you picked and then choose the Hatchling Plan. This is the most basic plan, but it’s perfect for new blogs:
I wouldn’t recommend spending more money until you get a lot of traffic and decide you’re going to do this long-term! Additionally, the longer you buy your hosting for, the cheaper it is. If you select three years of hosting, your domain will only cost $127 USD, so I think you should do that. It’s a steal, cheaper than most other hosting packages. You don’t have to pick three years, but the marginal cost of adding additional years is small, and it means you don’t have to worry about renewing for a long time!
That’s it! All that takes about five minutes from start to finish!
Again, you can click here to go to HostGator to set it up.
Step 3: How to Install WordPress
After you’ve registered your domain name and chosen your hosting package, the next thing you’ll want to do is install WordPress. (WordPress is what will actually run the website. The host is simply the computer your site sits on.) WordPress is an open-source and free Web publishing application, content management system (CMS) and blogging tool built by a community of developers and contributors to make it easy for people to blog!
After you’ve paid, you’ll get an email telling your login details. After you click the link in the email and log in, you’ll see this screen. Click “Get Started with WordPress Today”:
You’ll be taken to this screen below. In the dropdown menu, select your domain name and hit “Next”:
Enter your user information. Under the blog title, enter the name of your blog. Create a strong username and then hit install.
Then presto! It’s done!
After your WordPress is installed, a screen will display the username you chose and a password generated for you. (You can change the password later.)
Now your website is up and running.
Step 4: Setting up your website
After you’ve installed WordPress, go to domainname.com/wp-admin and use the username and password you created to log in. You’ll see a screen like this after you log in:
Here’s a little overview of the menu on the left side of the screen:
Dashboard – The dashboard is the first thing you see when you log in to WordPress, and it’s the main administrative area for your blog.
Home – This will take you back to the main dashboard view.
Updates – This area will tell you if WordPress, your plugins, or your theme need to be updated.
Jetpack – Jetpack is a plugin that allows you to add a spell-checker, contact forms, extra widgets, etc.
Posts – You can view all your blog posts here, as well as set up new ones and add categories and tags.
Media – Here’s where you can view your media library and add new media content, like photos and videos.
Pages – Pages are the individual landing pages on your website (like your About page, Contact page, Resources page, etc.). You can add new pages here as well as review and edit existing ones.
Comments – Comments on your blog posts go here. You may want to check the spam folder periodically to make sure you’re not missing real comments.
WPForms – WordPress’s contact-form plugin.
Marketplace – Here you can create an online marketplace.
Appearance – This section lets you entirely customize your site’s appearance.
Plugins – Review, install, and update your plugins here.
Users – If there’s more than one person accessing your blog, you can create accounts and give them certain privileges here.
Tools – This section has certain tools to aid you with management tasks.
Settings – You can adjust all your site’s settings here, including things like your blog title and the size of thumbnails being used.
Insights – Insights provides traffic and user stats about those visiting your website. (Google Analytics is a better choice, though.)
Plugins are a great way to add additional functionality to a WordPress-powered site. And with over 56,000 (at last check) listed in the WordPress Repository and many more premium options available from developers, there are endless possibilities as to what you can do with your site. (I’ll list some examples below.)
Note: Jetpack, Mojo Marketplace, Insights, and WP Forms are pre-installed plugins.
From the main screen, click Plugins –> Add New on the left-hand column:
Now it’s time for you to install your own.
If you can think of a feature you’d like to have on your site, I can almost guarantee there is a plugin for it, but here are the essential ones for your travel blog:
Akismet – Just like getting junk mail in your mailbox, your website will get spammers looking to leave junk comments on your site. Akismet seeks to reduce the amount of this by automatically filtering it for you. This plugin comes installed with WordPress, and all you need do is activate it and sign up for an account at akismet.com.
Yoast SEO – The best SEO plugin out there. This combines the ability to create metatags and descriptions for your posts, optimize your titles, create a sitemap for search engines to read, customize how your posts appear across social media, and a whole lot more. It’s simple and easy to use and comes with foolproof instructions.
Relevanssi – While WordPress does a lot of things well, what it fails at is adding search functionality to your site. Relevanssi seeks to fix this and give your readers the most accurate results when searching your site.
Google Analytics for WordPress – Adding analytic tracking to your website is an important way to find out who your readers are, where they are coming from, and what your most popular content is. When you sign up for Google Analytics, the site asks you to place a snippet of code into your website. For most people, that can be difficult, which is why there’s Google Analytics for WordPress. This adds a lovely graphical interface to your site where you can click a couple of buttons and set up your tracking without any hassle.
Sumo – Free tools to help you grow your site, including the best social sharing plugin on the web. Use this! It comes with great analytics and testing features.
Jetpack – Jetpack (pre-installed) is aimed at supercharging your website with a host of features from WordPress’s free hosting platform, giving you the best of both worlds. With this plugin, you can add a spell-checker, contact forms, extra widgets, and a whole slew of more features, all with just one plugin.
W3 Total Cache – This plugin works by creating saved copies of your site, saving WordPress from having to generate them for every new visitor. This, in turn, cuts down on the amount of work your hosting server has to do and makes loading your website much faster.
Step 5: Install your theme
One of the most important things a blog needs besides good content is a good design. People decide in seconds whether or not they trust your website and choose to stay. A visually unappealing website will turn off readers and reduce the number of return visits you get.
So to accomplish a good design, you will need an amazing WordPress theme (i.e., design templates and files).
Luckily, there are lots of out-of-the-box options for you where you can download a predesigned theme, upload it to your website, switch it on, change some settings, and presto! A new look for your website!
You can get:
Free themes – Free themes are plentiful and for budding new bloggers looking to make their mark online. They seem like a great option, as they allow you to keep costs low. There are many great free themes online, but most of them are not amazing. If you plan on blogging for a long time, this might become a problem as your website grows. However, if you just need a simple design to blog for your friends and family, then go the free route. You can find some good free themes at wordpress.org.
Premium themes – The next step up from a free theme is a premium theme. Premium themes are paid themes that offer a bit more uniqueness, flexibility, and functionality. These cost $25 USD and up, depending on the developer and features.
I suggest getting a premium theme. Yes, it’s another cost — but here is why you should do it:
With a premium theme, you almost always get customer support from the developers. If you get in trouble, they are there for you. You don’t get that with a free theme.
With a premium theme, there are more controls and instructions so they are easier to change. Free themes don’t have that.
Premium themes tend to be a lot prettier.
Premium themes are faster and more SEO friendly.
The two best companies for premium themes are WooCommerce and StudioPress. My favorite is StudioPress as it is more SEO friendly, a bit sleeker, and cooler. WooCommerce is great for photographers and more “fun” personal blogs.
To install your theme, simply go to the left-hand column, click Appearance –> Themes –> Upload.
Whatever theme you picked will come as a .ZIP file for you to easily upload. From there, you just activate it, and it’s turned on! All themes come with a manual and help file so you can customize your design to your specific needs.
(If you want a custom logo, two sites to find freelancers are Upwork and 99designs.)
Step 6: Create your main pages
After you’ve uploaded your theme, you’re going to want to make a few basic pages on your website in addition to the blog posts. The difference between a page and a post is that a page is a static piece of content that lives separate from the blog. A post is a blog post that gets “buried” as you write more and more. For example, this post is a blog post. When I update again, another blog post will get put on top of it, and it will be pushed down in the archives, making it harder to find. But a page, like my About page, lives on the top of the website, right near the main URL, and does NOT get buried. It’s a lot easier to find.
To create these pages, go again to your left sidebar and click Pages —> Add New. (For blog posts, use Posts –> Add New.)
I recommend creating four basic pages to start:
About page – This where you tell people about yourself and your history, what your blog is about, and why it will help them. This is one of the most important pages on your website, so make it personable!
Contact page – People need a way to reach you! Be sure to be very clear on what emails you will and won’t respond to, so people don’t send you spam.
Privacy page – This is a standard user agreement page informing readers what the applicable laws on your site are, that you use cookies, etc. etc. You can find out-of-the-box examples throughout the internet.
Copyright page – This is a standard page letting people know you own this work and not to steal it. You can find out-of-the-box examples of these, too, throughout the internet.
(If you look in my footer, under the “About” section, you can see examples of all four of these pages!)
Step 7: Join our blogging course! (optional)
If you’re looking for more in-depth advice, I have a very detailed and robust blogging course that uses my ten years of blogging knowledge to help you start, grow, and monetize your website. It gives you a behind-the-scenes look at how I run this website and features detailed analytics, tricks, tips, and secrets about what I do. You’ll learn everything I know about creating a successful blog.
I will help you come up with your domain name, sign up for hosting, create engaging content, go viral, network with bloggers, get media attention, master SEO, create products, grow a newsletter, and make money. I will give you the tools for success — and then show you how to use those tools!
Plus, you’ll get over 12 hours of expert interviews, edited feedback on your writing, monthly webinars and Q&As with me (ask me anything!), tech support and help setting up your blog, and a community of bloggers to help you succeed right out of the gate.
I’ll be there every step of the way. I’ll be your personal mentor.
If you’re interested, click here to learn more and get started!
***
That’s it! You’ve set up your basic website. Sure, there are social media buttons to add, blogs to write, images to upload, and things to tweak but all that comes later. Once you do the steps above, you have the framework needed to create and share your story with the world! To recap on how to start a travel blog:
Step 1: Pick a Name
Step 2: Sign Up for Hosting
Step 3: Install WordPress
Step 4: Set Up Your Website
Step 5: Install Your Theme
Step 6: Creat Your Main Pages
Step 7: Join Our Blogging Course (Optional!)
By following these steps, you can start your travel blog and your stories and tips with the world! (That’s where the real fun begins!)
Disclosure: Please note that some of the links above are affiliate links, including the links for HostGator and Bluehost. At no additional cost to you, I earn a commission if you make a purchase using these links. If you have any questions about the companies or my status as an affiliate, please don’t hesitate to email me.
The post How to Start a Travel Blog appeared first on Nomadic Matt's Travel Site.
from Traveling News https://www.nomadicmatt.com/travel-blogs/how-to-create-a-travel-blog/
0 notes
Photo

Updated: 8/31/2018 | August 31st, 2018
Whether as a hobby or profession, starting a travel blog is pretty easy. You can set it up in under 30 minutes. It’s gotten a lot easier than when I started my blog in 2008 when I didn’t know the first thing about making a website. Luckily, on my adventures around the world, I met Matt and Kat, a British couple who also happened to be web designers. When I came home and decided I wanted to start this travel blog, they agreed to help me set it up and teach me HTML. Back then, I hand-coded the website and used a funky tool called Dreamweaver to build it. It was painfully slow, and I wasn’t very good at it. (And my original website was really ugly!)
Luckily, you no longer have to build websites that way. They have gotten a lot easier and simpler thanks to WordPress, a simple out-of-the-box platform designed to make sites easier for those not technically savvy (like myself). It powers over 25% of the internet and is the best platform to start a blog on. It’s super flexible and can do whatever you want it to do — from a simple journal to a complex e-commerce website.
In our blogging course, we’ve had thousands of students start a website on WordPress without any technical skills. They got them up and running — and you can too!
A few months back, I talked about the ways you could succeed with a travel blog, but today, I want to give a quick tutorial on how to create a travel blog from scratch in seven easy steps.
Step 1: Picking a Name
Step 2: Signing Up for a Host
Step 3: Installing WordPress
Step 4: Setting Up Your Website
Step 5: Installing Your Theme
Step 6: Creating Your Main Pages
Step 7: Joining Our Blogging Course
Step 1: Pick your name
The first thing you need to do is pick a domain name (i.e., your website name). When doing so, there are no hard and fast rules. There’s no such thing as a “wrong domain name,” but there are a couple of rules I like to live by:
Make a name that can last – If you pick “JohnsAsiaAdeventure.com” and then you leave Asia, the domain name won’t make sense anymore. Make sure you pick a name that isn’t so focused that if you decide to shift gears, you can keep the same domain name.
Don’t date your blog – Don’t pick something related to your age either. “Twenty-Something Travel” becomes really irrelevant when you get older, which actually happened to a blogger I know. Pick a name that can be used no matter your age!
Try to avoid certain words like “nomad,” “vagabond,” “wanderlust,” and “adventure.” They have been done to death, and they will make you seem like you’re copying people, not being original.
Pick a name that describes what you do as much as possible – I was a nomad, so “Nomadic Matt” was the best pick for me. If you’re into luxury, put words in your domain name that convey that. You want people to see the name and go “I get what that website is about.”
Keep it short – Use 3-4 words maximum. You want the name that rolls off the tongue. Even Ramit Sethi from “I Will Teach You to Be Rich” abbreviates his site to “I Will Teach” or “IWT.” The shorter, the better.
Keep it simple – I’m not a fan of using jargon or slang in your domain name, as I think that makes things confusing for people who don’t know it. The last thing you want is someone saying, “What does that mean?” or being confused. If someone has to think hard about the meaning, then you’ve already lost them. So don’t try to be clever!
Step 2: Sign up for a host
After you’ve picked out your domain name, you’ll need to register it online and buy hosting (the little computer in the sky that’s going to power your website). There are a lot of basic hosting companies out there — and most of them are pretty terrible. However, the two biggest and best are HostGator and Bluehost. I would go with one of those two.
However, though they are owned by the same parent company, I lean toward HostGator, as I find its call center customer service quicker and friendlier, and HostGator is prone to fewer outages (no one wants their website to go down!). I’ve been using it since I’ve started; I still run my email through it. It’s also really improved its service recently and now offers free SSL certificates (that’s the thing that tells users your website is secure).
Here’s a walk-through of how to set up your host with HostGator (it won’t take long):
First, head over to the website’s sign-up page and get hosting for only $2.78 per month. That’s over 60% off the normal price!
Enter the domain name you picked and then choose the Hatchling Plan. This is the most basic plan, but it’s perfect for new blogs:
I wouldn’t recommend spending more money until you get a lot of traffic and decide you’re going to do this long-term! Additionally, the longer you buy your hosting for, the cheaper it is. If you select three years of hosting, your domain will only cost $127 USD, so I think you should do that. It’s a steal, cheaper than most other hosting packages. You don’t have to pick three years, but the marginal cost of adding additional years is small, and it means you don’t have to worry about renewing for a long time!
That’s it! All that takes about five minutes from start to finish!
Again, you can click here to go to HostGator to set it up.
Step 3: How to Install WordPress
After you’ve registered your domain name and chosen your hosting package, the next thing you’ll want to do is install WordPress. (WordPress is what will actually run the website. The host is simply the computer your site sits on.) WordPress is an open-source and free Web publishing application, content management system (CMS) and blogging tool built by a community of developers and contributors to make it easy for people to blog!
After you’ve paid, you’ll get an email telling your login details. After you click the link in the email and log in, you’ll see this screen. Click “Get Started with WordPress Today”:
You’ll be taken to this screen below. In the dropdown menu, select your domain name and hit “Next”:
Enter your user information. Under the blog title, enter the name of your blog. Create a strong username and then hit install.
Then presto! It’s done!
After your WordPress is installed, a screen will display the username you chose and a password generated for you. (You can change the password later.)
Now your website is up and running.
Step 4: Setting up your website
After you’ve installed WordPress, go to domainname.com/wp-admin and use the username and password you created to log in. You’ll see a screen like this after you log in:
Here’s a little overview of the menu on the left side of the screen:
Dashboard – The dashboard is the first thing you see when you log in to WordPress, and it’s the main administrative area for your blog.
Home – This will take you back to the main dashboard view.
Updates – This area will tell you if WordPress, your plugins, or your theme need to be updated.
Jetpack – Jetpack is a plugin that allows you to add a spell-checker, contact forms, extra widgets, etc.
Posts – You can view all your blog posts here, as well as set up new ones and add categories and tags.
Media – Here’s where you can view your media library and add new media content, like photos and videos.
Pages – Pages are the individual landing pages on your website (like your About page, Contact page, Resources page, etc.). You can add new pages here as well as review and edit existing ones.
Comments – Comments on your blog posts go here. You may want to check the spam folder periodically to make sure you’re not missing real comments.
WPForms – WordPress’s contact-form plugin.
Marketplace – Here you can create an online marketplace.
Appearance – This section lets you entirely customize your site’s appearance.
Plugins – Review, install, and update your plugins here.
Users – If there’s more than one person accessing your blog, you can create accounts and give them certain privileges here.
Tools – This section has certain tools to aid you with management tasks.
Settings – You can adjust all your site’s settings here, including things like your blog title and the size of thumbnails being used.
Insights – Insights provides traffic and user stats about those visiting your website. (Google Analytics is a better choice, though.)
Plugins are a great way to add additional functionality to a WordPress-powered site. And with over 56,000 (at last check) listed in the WordPress Repository and many more premium options available from developers, there are endless possibilities as to what you can do with your site. (I’ll list some examples below.)
Note: Jetpack, Mojo Marketplace, Insights, and WP Forms are pre-installed plugins.
From the main screen, click Plugins –> Add New on the left-hand column:
Now it’s time for you to install your own.
If you can think of a feature you’d like to have on your site, I can almost guarantee there is a plugin for it, but here are the essential ones for your travel blog:
Akismet – Just like getting junk mail in your mailbox, your website will get spammers looking to leave junk comments on your site. Akismet seeks to reduce the amount of this by automatically filtering it for you. This plugin comes installed with WordPress, and all you need do is activate it and sign up for an account at akismet.com.
Yoast SEO – The best SEO plugin out there. This combines the ability to create metatags and descriptions for your posts, optimize your titles, create a sitemap for search engines to read, customize how your posts appear across social media, and a whole lot more. It’s simple and easy to use and comes with foolproof instructions.
Relevanssi – While WordPress does a lot of things well, what it fails at is adding search functionality to your site. Relevanssi seeks to fix this and give your readers the most accurate results when searching your site.
Google Analytics for WordPress – Adding analytic tracking to your website is an important way to find out who your readers are, where they are coming from, and what your most popular content is. When you sign up for Google Analytics, the site asks you to place a snippet of code into your website. For most people, that can be difficult, which is why there’s Google Analytics for WordPress. This adds a lovely graphical interface to your site where you can click a couple of buttons and set up your tracking without any hassle.
Sumo – Free tools to help you grow your site, including the best social sharing plugin on the web. Use this! It comes with great analytics and testing features.
Jetpack – Jetpack (pre-installed) is aimed at supercharging your website with a host of features from WordPress’s free hosting platform, giving you the best of both worlds. With this plugin, you can add a spell-checker, contact forms, extra widgets, and a whole slew of more features, all with just one plugin.
W3 Total Cache – This plugin works by creating saved copies of your site, saving WordPress from having to generate them for every new visitor. This, in turn, cuts down on the amount of work your hosting server has to do and makes loading your website much faster.
Step 5: Install your theme
One of the most important things a blog needs besides good content is a good design. People decide in seconds whether or not they trust your website and choose to stay. A visually unappealing website will turn off readers and reduce the number of return visits you get.
So to accomplish a good design, you will need an amazing WordPress theme (i.e., design templates and files).
Luckily, there are lots of out-of-the-box options for you where you can download a predesigned theme, upload it to your website, switch it on, change some settings, and presto! A new look for your website!
You can get:
Free themes – Free themes are plentiful and for budding new bloggers looking to make their mark online. They seem like a great option, as they allow you to keep costs low. There are many great free themes online, but most of them are not amazing. If you plan on blogging for a long time, this might become a problem as your website grows. However, if you just need a simple design to blog for your friends and family, then go the free route. You can find some good free themes at wordpress.org.
Premium themes – The next step up from a free theme is a premium theme. Premium themes are paid themes that offer a bit more uniqueness, flexibility, and functionality. These cost $25 USD and up, depending on the developer and features.
I suggest getting a premium theme. Yes, it’s another cost — but here is why you should do it:
With a premium theme, you almost always get customer support from the developers. If you get in trouble, they are there for you. You don’t get that with a free theme.
With a premium theme, there are more controls and instructions so they are easier to change. Free themes don’t have that.
Premium themes tend to be a lot prettier.
Premium themes are faster and more SEO friendly.
The two best companies for premium themes are WooCommerce and StudioPress. My favorite is StudioPress as it is more SEO friendly, a bit sleeker, and cooler. WooCommerce is great for photographers and more “fun” personal blogs.
To install your theme, simply go to the left-hand column, click Appearance –> Themes –> Upload.
Whatever theme you picked will come as a .ZIP file for you to easily upload. From there, you just activate it, and it’s turned on! All themes come with a manual and help file so you can customize your design to your specific needs.
(If you want a custom logo, two sites to find freelancers are Upwork and 99designs.)
Step 6: Create your main pages
After you’ve uploaded your theme, you’re going to want to make a few basic pages on your website in addition to the blog posts. The difference between a page and a post is that a page is a static piece of content that lives separate from the blog. A post is a blog post that gets “buried” as you write more and more. For example, this post is a blog post. When I update again, another blog post will get put on top of it, and it will be pushed down in the archives, making it harder to find. But a page, like my About page, lives on the top of the website, right near the main URL, and does NOT get buried. It’s a lot easier to find.
To create these pages, go again to your left sidebar and click Pages —> Add New. (For blog posts, use Posts –> Add New.)
I recommend creating four basic pages to start:
About page – This where you tell people about yourself and your history, what your blog is about, and why it will help them. This is one of the most important pages on your website, so make it personable!
Contact page – People need a way to reach you! Be sure to be very clear on what emails you will and won’t respond to, so people don’t send you spam.
Privacy page – This is a standard user agreement page informing readers what the applicable laws on your site are, that you use cookies, etc. etc. You can find out-of-the-box examples throughout the internet.
Copyright page – This is a standard page letting people know you own this work and not to steal it. You can find out-of-the-box examples of these, too, throughout the internet.
(If you look in my footer, under the “About” section, you can see examples of all four of these pages!)
Step 7: Join our blogging course! (optional)
If you’re looking for more in-depth advice, I have a very detailed and robust blogging course that uses my ten years of blogging knowledge to help you start, grow, and monetize your website. It gives you a behind-the-scenes look at how I run this website and features detailed analytics, tricks, tips, and secrets about what I do. You’ll learn everything I know about creating a successful blog.
I will help you come up with your domain name, sign up for hosting, create engaging content, go viral, network with bloggers, get media attention, master SEO, create products, grow a newsletter, and make money. I will give you the tools for success — and then show you how to use those tools!
Plus, you’ll get over 12 hours of expert interviews, edited feedback on your writing, monthly webinars and Q&As with me (ask me anything!), tech support and help setting up your blog, and a community of bloggers to help you succeed right out of the gate.
I’ll be there every step of the way. I’ll be your personal mentor.
If you’re interested, click here to learn more and get started!
***
That’s it! You’ve set up your basic website. Sure, there are social media buttons to add, blogs to write, images to upload, and things to tweak but all that comes later. Once you do the steps above, you have the framework needed to create and share your story with the world! To recap on how to start a travel blog:
Step 1: Pick a Name
Step 2: Sign Up for Hosting
Step 3: Install WordPress
Step 4: Set Up Your Website
Step 5: Install Your Theme
Step 6: Creat Your Main Pages
Step 7: Join Our Blogging Course (Optional!)
By following these steps, you can start your travel blog and your stories and tips with the world! (That’s where the real fun begins!)
Disclosure: Please note that some of the links above are affiliate links, including the links for HostGator and Bluehost. At no additional cost to you, I earn a commission if you make a purchase using these links. If you have any questions about the companies or my status as an affiliate, please don’t hesitate to email me.
The post How to Start a Travel Blog appeared first on Nomadic Matt's Travel Site.
How to Start a Travel Blog https://ift.tt/2NAMksW
0 notes
Photo
WHAT IT TAKES TO BUILD AN ATHLETIC WORDPRESS WEBSITE (ACTUAL INPUTS FROM THE EXPERTS)
Earlier WordPress was known as a Blogging platform but it has grown significantly. Now it\'s a world’s most popular content management system(CMS), currently WP powers more than 26% of the web & more than 50,000 new sites launch every day. If you are thinking to build your online presence then Wordpress is a Great choice ... Give it A Try ...! Being an Open Source & free software, it\'s developed by a huge community of developers & it\'s users. Everyone is encouraged to contribute, add code, valuable features, & modify it towards the betterment of this community. It comes with bundle of quality features, i.e. Simplicity, Flexibility, SEO friendly, Easy Installation and Upgrades, Multilingual, Media Management, Security, Mobile Optimization (Responsive) etc. WP can handle a variety of business websites and various domains as per custom requirements. World\'s most famous brands are using WordPress & thousands of businesses around the globe depend on it like: TechCrunch, eBay, McAfee, Mozilla, CNN, Google Ventures, Sony Music, MTV News, Samsung, Forbes and even NASA.
What does CMS actually means?
Content Management System is extremely important to build a strong website & WordPress have established themselves as the leader for online CMS. It\'s the most powerful CMS to build a strong website without having to worry about the coding, technical part. It allow you to create, edit, manage & maintain website efficiently. Content can be publish, update fast & easily, this will help to improve & maintain search engine ranking. Also it has control over proper flow of content. Overall WP CMS will save your business cost & time in many ways.
With all this above mentioned simplicity of WP, it still takes a careful and well directed effort to built a professional, secure, solid and easy to use Wordpress website. Below are few points to consider and I will try my level best to get most of it for you :)
A] Choose A Domain name & Hosting providers
Domain name is your business identity on the web, therefore you want to select the one which is unique for your business, easy to find & promote your on-line presence. While selecting domain you must consider this points: Make it Easy to type, Keep it short, Use Keywords, Protect your Brand, Easy to Remember, Reject Hyphens & Numbers.
Domain name have four basic elements Top-level Domain (TLD), Root Domain, Sub Domain and Subfolder.
There are many different TLD\'s, most familiar is .com, .org for organization, .net for network, .int for international organization, .edu for Education organization, .gov for government agencies. Also some specific to countries i.e. India (.co.in), Australia (.au), United States of America (.us), United Kingdom (.uk) etc. Unlike the TLD, you have full control over your root domain; example.com is a root domain. After root domain, Sub Domain is the domain that appears before the root domain; sub.example.com Once you create a root domain, you can create sub domains at no additional charges. Then sub folders are listed after the TLD for example domain.com/subfolder.
Choose A Hosting Package:-
Web hosting means taking space on the Internet for websites. When you make a new website it\'s need to publish or upload with a Web hosting services. This makes your website available to be viewed by others on the Internet. Hence choosing the right hosting provider is immensely important.
Consider this points when selecting Web Hosting Company: Amount of web space, FTP access, Reliability and speed of access, Bandwidth allotment, Technical support, SSL (secure server) for ecommerce website, Email, Auto responders, Mail Forwarding, Control Panel, Multiple Domain Hosting and Sub domains, Monthly/Quarterly/Annual Payment Plans, Price etc.
Along with the above points consider Price, Terms, Duration, Transfer Policy, Downtime %, Customer Support, Management while selecting Domain & Hosting registration, Read reviews on the company's service.
Once you have both a domain & hosting account, you will need to point the domain to your host\'s name servers, to connect the domain name to the server.
Top Domain & Web Hosting Providers:- Go Daddy, Name cheap, 1&1 Internet, Blue host, Just Host, Hostgator. B] How to Install WordPress?
Installing WordPress by using Hosting Services:-
Well-established hosting company has integrated one-click-installation for WordPress.
Below are the steps to upload WP:
Log in to your hosting account.
Go to your control panel.
Look for the “WordPress” icon.
Choose the domain where you want to install your website.
Click the “Install Now” button and you should get access to your NEW WordPress website.
Installing WordPress Manually:-
First you need to download the latest version of WordPress from its official download page. Then upload the extracted files and folders to your hosting account using FTP (file transfer protocol). To upload files using FTP, you must first download and install an FTP client program, such as FileZilla. FileZilla will ask for your FTP credentials (host name, user name and password).
Create A Database:-
Using your host's control panel create Database. For this you need to create database name, database username and password. A database is where all your WordPress data is stored, including your content ( posts, pages and comments) and user data. Each time a page loads, WordPress queries the database for required information such as title, content, categories, tags and published date.
Install WordPress:-
To install the WordPress fill up the some basic information about your administrative username & the title of your new site, database details to complete the installation. Once you fill in that information, press the Install WordPress button.
C] Choose A Theme
You must be thinking What is Theme? What\'s the reason to choose the theme ? Now once you have successfully installed WordPress, your website will be very basic & clean. But to look site beautiful it\'s need to upload theme. Theme means a design template or design foundation that tells WordPress how your Website should look. There are a gazillion & amazing free and premium options available for themes. Where your site is about Food, Ecommerce, Real Estate, Education, Business or anything else, you\'ll find themes suit to your needs, serves the purpose of website.
Points to consider for Theme selection:-
Great design
Valid HTML and CSS
Compatibility with the latest version of WordPress
Supported most popular plugins
Extensive support and documentation
Responsive Browser Compatibility
Page Builders
SEO Friendliness
Create Essential Pages :- Once theme installation completed, you\'re ready to start creating necessary pages & content. Home page, About page, Contact page, Products or Services page etc....
D] Installing Plugins
It is necessary that we should not change WP core files, as it overwrites at the time of version updates. So to add/expand any type of extra functionality there is a wide range of free Plugins available to choose from (over 43,914 and more). In this way it\'s a shortcut to add features without building it from the scratch.
Here are few top plugins in Wordpress 2015:
Yoast SEO
Gravity Forms
Contact Form 7
WooCommerce
Buddypress
WPML
Akismet
Learn Dash
E] Wordpress Security
WordPress is the most developer-friendly CMS out there, so you can essentially do anything you want with it. Unfortunately, that has some disadvantages as well, which makes it a favorite target for hackers. you have to take some extra efforts in order to protect your Data and giving hackers a difficult time.
Here are some tips:-
Keep your website & plugins up-to-date
Remove unwanted data and keep regular updates
Protect your \"Admin Access\" with strong password
Prefer two-factor authentication
Choose right Web Hosting provider Keep your system clean from Viruses, Malware
"Stay vigilant"
F] Testing & bug fixing
Website testing & bug fixing need to take place before launching the site to ensure that it looks great and works beautifully regardless of the browser or platform used. After all, your website is visited by lot of people, Right? So, you\'ll need to test sites functionality to catch any bugs prior to release.
There are a variety of tools available for testing server code-side code. This includes PHP, Java Script, CSS Errors, HTML Errors, Cross browsing Errors, Mobile checker and various other tests. So make it sure that you go through this post and run all the necessary tests on your website before making it live.
You’re ready to launch! Once the site is ready, it must be cross-checked with the website launch checklist with few of the following points/criteria:
No spelling and grammar mistakes
No errors in web page formatting
Web and mobile responsiveness, browser compatibility
SEO compatible and image alt tags
Valid code and copyright, policy info
No broken links
Working Forms and contact Email
Set up 404 error page
For more details or take advantage of our services you can visit us on http://www.starkdigital.net/wordpress-best-cms
#wordpress#wordpress expert#wordpress web development#wordpress website design#Custom WordPress Development#wordpress installation#wordpress security#Building a Wordpress Site#wordpress development company#Wordpress Developer Australia#Best Web Design Company#best web development company#best website design#Wordpress plugins development#Wordpress Theme Customization Service#webdesign#web development#web designer#web developers#web hosting
0 notes
Text
Simple Security
As most of us now know, internet and phone security is becoming more and more of a concern for everyday people. Thanks largely to people like Ed Snowden and Wikileaks, it is now widely known that groups like the NSA and the CIA have developed the ability to penetrate and control almost any communications device in the world. Major companies that store the credit cards and personal information of millions of people get hacked almost every day. A whole economy exists around the vast databases that exist to store your browsing habits, shopping history, and the records of virtually anything you do on the internet. We've moved from the country to the city in terms of security and privacy - it's become time to learn how to start locking your doors.
I'll share some tools and practices that I use on my phone and laptop, but the most important thing is begin to change how you think about security. Spend a few moments to consider who and what you're trying to protect against. Most people are not going to go to the lengths of a journalist investigating the military industrial complex or an activist trying to evade state surveillance. If that describes you, you should already know everything in here. For those who are interested, the book Beyond Fear, by security researcher Bruce Schneier, is an excellent read on changing the way you think about security and privacy.
Most people are looking for ways to protect against identity theft and viruses, keep their internet activity out of as many databases as possible, and make work a little harder for any surveillance bureaucracies who might be glancing their way. Some of this might make your online life a little more inconvenient; it's up to you to decide what's worth it.
Habits
Use different passwords for different sites. It is inevitable that a company with whom you have an account will be hacked, and the attackers will get your username and password. If you use one username and password for everything, they will now have access to your email, your online banking, and anything else that uses that username/password combination. Having different passwords will make this significantly more difficult. At the very least, have several different passwords - a unique password for your email, a different one for your facebook or bank, a general one for things you don't care about. Write them down if you have to.
Don't allow any site to store your credit card info. Uncheck the box that says "Remember this card". They keep all that card information in databases, and those databases are not secure. Honestly, when you start paying attention to how often major companies have their databases stolen it's a wonder that any of us trust them at all.
Use a lock screen on your device. For phones, a numeric pin is probably the best, but anything that keeps your phone locked is important in case your phone gets lost or stolen. For computers, make sure that your screen locks after a short period of inactivity, or when the lid is closed. While it can be annoying to enter a password so often, this is the first line of defense if your device is ever lost or stolen. A device without a lock screen is like a house with no locks on the door. Anytime you're not home, someone can just walk right in.
Pay attention to emails that seem fishy. No bank or internet company will ever ask you to send your password or other personal info in an email. Call them if you're not sure about an email, especially your bank. Avoid clicking suspicious links from email contacts - double check with them if a link is by itself, or is contained in an email that doesn't seem like their usual writing style, as their email may have been hacked.
When downloading anything from an unknown source, check the filename to make sure it's what you're expecting. Look at the filename extension (.avi, .exe, etc...). If you’re using bittorrent, make sure the torrent title follows the naming conventions of other similar torrents, and check the filenames before you open anything.
Install updates regularly, just make sure they come through the normal update channel for your software and not through some weird looking popup. Updates often contain security patches.
Never click anything in a popup you're not expecting to see. Your windows is not going to run faster, you're not infected with 10 million viruses, you didn't win a million dollars.
Tools
Signal - An app for your phone that can replace your regular texting app, Signal encrypts any messages sent to other Signal users, and can encrypt all the texts stored on your device. This makes it significantly harder for any attacker to intercept and read your messages. Easy to use, free and open source, and generally trusted by security experts. Signal was developed by a badass anarchist named Moxie Marlinspike - read more here (https://moxie.org/).
WhatsApp - Also for your phone, WhatsApp uses the same protocol as Signal, and is generally a good choice for international messaging.
HTTPS Everywhere - developed by the Electronic Frontier Foundation, forces your browser to use encrypted connections whenever possible. Helps keep your browsing safe from anyone who might be intercepting your internet traffic.
Disconnect.me - Blocks connections to 3rd-party websites (i.e., not the ones you're trying to look at) that collect browsing data through ads and plugins. Helps keep your info out of marketing databases. Just the free version is probably fine, though there’s a premium upgrade as well.
Adblock Plus, Adblock for Youtube - does exactly what it says, not only making your internet experience way more pleasant, but also keeping your info out of the hands of ad companies.
Tor - Probably a step beyond useful for most people, Tor makes it very difficult to identify an internet user by send their traffic through a network of volunteer maintained servers around the world. Slow, but essential for some people in particular situations. Try the Tor Browser Bundle for the simplest experience, but if you're not already using it, you probably don't need to.
Other general tools and practices
VPN - More and more people are using VPNs to connect to the internet. A VPN (Virtual Private Network) sends all traffic though an encrypted connection before it goes out into the world. That protects it from ISPs (like Comcast, Verizon, etc...) who want to harvest your data for marketing and surveillance purposes. It's probably worth paying for a subscription - there are many out there but look for one whose privacy policies state that do not retain any logs of internet use. A useful guide is here (https://torrentfreak.com/vpn-services-anonymous-review-2017-170304/) and AirVPN seems like a good choice to me. [Edit: after a bit more research, AirVPN gets very mixed reviews. May or may not be a good choice.]
Full disk encryption - There are different ways to do this, but it basically makes all the data on your device inaccessible without a password or PIN. Most newer Apple and Android phones have this enabled by default (check your security settings on your phone to be sure). For computers, it can be a bit more difficult but it's still totally doable - look up a guide for your type of device or ask a tech-savvy friend.
Incognito mode - Most modern browsers have a private browsing mode (Incognito in Chrome, Private Browsing in Firefox, InPrivate in Edge and Internet Explorer). Websites visited in incognito mode will not be able to save any data on your device - web history, cookies, cache data, etc. This is one of the major ways that companies like Facebook track your activity beyond their website. However, it does nothing to keep websites from tracking your activity on their end.
Antivirus/Anti-malware - While built-in antivirus solutions have definitely gotten better, it's still probably a good idea to run antivirus and anti-malware software. There are many out there, the names that come up well in reviews are BitDefender, Kaspersky, MalwareBytes, and Avira. Check reviews, decide whether you're willing to subscribe to a paid service, and make sure that whatever application you install runs regularly scheduled scans and updates. Here's a good place to start: http://www.tomsguide.com/us/best-antivirus,review-2588.html
Other notes
-Everyone probably knows this already, but social media makes all of its money harvesting and selling your personal data. That data then gets used in ways that you may not be aware of or at all ok with. For an extreme example concerning the recent US election - check out Cambridge Analytica (https://motherboard.vice.com/en_us/article/how-our-likes-helped-trump-win). Someday we will all look back and be horrified that we didn't just delete our facebook already.
-Your devices are increasingly likely to be searched at international borders, particular the US border. Border and Customs agents can and will look through your emails, texts, and social media profiles. The best way to avoid this is probably to factory reset your device before you cross the border, or keep your data at home or in the cloud with no passwords stored on your device. It's an emerging area of concern and there doesn't seem to be a consensus on the best way to deal with it.
-If you are an activisty type you probably already know this, but leave your phone at home or at least turned off if you are going to a protest. Police agencies use tools to identify protest participants by their devices, and any arrestees will likely have their devices seized and searched.
Further reading
- https://arstechnica.com/security/2016/12/a-beginners-guide-to-beefing-up-your-privacy-and-security-online/
- https://ssd.eff.org/
0 notes
Text
How to Stop Instagram From Blocking Your Comments
As an Instagram user, you probably already know that the app and the social networks get frequent updates. The new platform is over protective, and the tolerance for spammers has been reduced to zero. Do something that looks like spamming, and you could be in trouble.
The idea behind the new updates is generally good, and it is to ban and delete fake accounts and all kinds of spammers that cause problems for other users.
Users who are new to Instagram could easily make an innocent mistake and end up getting banned without knowing what happened. The chances are you won’t be able to do anything about it. If you are lucky, you could receive a warning message first.
Navigating through the site these days is not an easy task. There are tons of fake accounts and mines you have to jump over all the time. Make a mistake, and the Instagram masters will unleash their wrath.
But there is still hope! The text below contains all the information you need to make sure you take the right path on Instagram. These simple tricks can help you blend in with normal Instagram users.
Continue with posting photos. That’s another typical spammer strategy, but if you post regularly, every day or a couple of times a week, you’ll be safe.
If you have just created an account on Instagram, don’t start commenting and liking other people’s posts immediately. Doing that would fit right into what goes on with fake accounts. Instead, start posting photos of your own. The more, the better, but don’t post them all at the same time, go with two or three a day. After about a week, like and comment whatever you want.
Make sure to complete the profile creation process. That includes the profile photo and the short bio. Don’t expose information to the Instagram security features.
Don’t press the Like button too much. This is an action that pushes you right in front of the firing squad! The maximum limit is 350 likes per hour, but it’s safer not to test it.
Don’t follow masses of people. Spammers send out requests to as many people as possible to push their scams. Acting like that is not a good idea. The limit for new followings is 20 every hour, but the maximum number of people you can follow is 7500. Make your choices wisely. You could use apps and tools to help you access private Instagram profile as you wish.
Don’t mention users who are not on your follower’s list in other posts unless they mentioned you first. That can happen if your photo is selected as a winner of a weekly competition or something like that. People congratulate you, but don’t thank each and every one of them and don’t mention more people in your comments. It sucks, that’s true, but that’s what you got to do on Instagram these days.
Don’t make duplicate comments and that includes emojis. If the algorithm catches you doing that, you won’t be able to comment while you are in detention. When does it stop? No one ones. If you’re so unlucky to get the ‘Action Blocked’ message, your faith is in the hands of Instagram. The detention time of doing the actions that the site doesn’t like varies from a couple of hours to a couple of weeks.
Be careful with using Like and Follow apps and bot services. The safest thing to do is skip these apps altogether. The truth is that these apps have some benefits true users would like. Still, you should be aware that using these apps is illegal as far as Instagram and its parent company Facebook are a concern. The security has been tightened lately.
Stick to the Community Guidelines. You should always check the rules and terms of the community before you decide on doing something that could get you banned.
No one likes these rules because they feel like a dictatorship, or at least a quick and rough solution. It is a huge step towards getting rid of spammers, bots, and fake accounts, but some regular users may be affected by it as well.
What should I do if I’m already blocked?
When you get blocked or banned on Instagram, your profile should be active again anywhere from 4 hours to 4 weeks since the incident. Can you do something to speed things up? The following list has some options you could try to speed things up, but they don’t work every time.
If you start getting pop-up messages like the Action Block, the ‘Tell Us’ button is all you need. Click on it to inform Instagram about them making a mistake. Some people had a lot of success by doing this. Instagram contacted them asking for some additional security info.
One of these steps is to write your full name, username, and a code they send to you. You have to send a picture of yourself holding a piece of paper with that number. Once everything is confirmed, your account should be up and running in a couple of days.
You can also contact Instagram in the following ways
1. Open the Instagram app and go to your profile page. Open the options menu and scroll down until you see the option ‘Report a problem.‘ Then select it and choose ‘Something isn’t working.’ Fill the form and send it to Instagram customer support.
2. Fill out the Form for reporting Hacked Accounts. Tell them that you can’t access your account and that it’s probably hacked.
3. Edit your Bio. Some users had success by changing the information in their Bio.
4. Reinstall the app on your device. That seems like a blind shot, but users reported having luck by trying this method.
5. If you did something and your account got disabled, you can write to the customer support saying that it was a mistake. The rest is up to them.
These are the major things you should keep in mind when using Instagram, and you shouldn’t worry about any bans or blocks in the future.
The post How to Stop Instagram From Blocking Your Comments appeared first on PrivateViewer.net.
from PrivateViewer.net http://ift.tt/2lSbJzK
via IFTTT
0 notes
Last Seen Blogs

freelancefiend2112
freelancefiend (somehow shadowbanned again…)

nebbae
The ✨Nebula✨

bigfeetlongtoesblog
Bigfeetlongtoes

rorykeanerirl
Mami

junipasims
JunipaSims