#brasshopper
Text

based on planthoppers and clockwork, with a tiny bit of grasshopper and toy soldier
#pokemon#fakemon#fakemon art#fakemon design#bug type#steel type#planthopper#treehopper#cricktock#brasshopper
295 notes
·
View notes
Text
Traxsource Essential Tech 2024-01-29

DATE CREATED: 2024-02-20
Tracklist :
Andre Salmon & Chanel Carmichael & Mood Child – Cuidado Con Ese Tigrillo (03:12)
Ant Brooks – Take It Back (Original Mix) (06:10)
Arafura & Peppe Dibari – French Kiss (06:09)
Block & Crown & Mike Ferullo – Get Down And Don’t Stop (05:03)
Blueheist – Brasshopper (05:40)
Carl The Jackal – Oxygen (04:52)
Carly Wilford – The Dance (Extended Mix) (05:17)
Chicks Luv Us – Knowledge (Extended Mix) (06:28)
Chico Rose & Dot N Life & Mryn – Bills, Bills (feat. MRYN) (Extended Mix) (05:46)
DROPDEXX – Better Than Me (05:03)
Damir Pushkar – Energy (05:15)
Dances & Taylor Pierce – Oo La Lee (Extended Mix) (05:03)
Dimatteo – La Colombia (Extended Mix) (05:39)
Galo – Orange Soda (Original Mix) (05:01)
Gene Farris & Amal Nemer – Dharma (Original Mix) (05:25)
Gianmarco Limenta & Yoni La Voz & Tiboy – Pantera (Paco Wegmann Remix) (06:11)
HoneyLuv, Roland Clark – This Is My Life (Extended Mix) (05:31)
Ibitaly – Heartbreak (Extended Vocal Mix) (
Read the full article
0 notes
Note
It's a major hard-drive crash on his laptop. Sublime text and all of his documents? Gone. Any and all photos? Gone. His brass band study playlist featuring subway gawds and brasshopper? Very gone. Orion isn't super computer savvy, just barely knows how to wipe malware, so this is totally out of his depth. Thankfully the college has an IT department on campus, and he shows up with the near dead computer under his arm and who knows what number cup of tea that is in his hand.
The woman at the desk is maybe two or three years older than Orion, with a riot of dark curls, wearing a shirt that says “DO NO HARM BUT TAKE NO SHIT” and a pentacle necklace. She’s curvy and sharp-eyed behind plastic-framed glasses.
“Alright, talk to me, prettyboy.”
47 notes
·
View notes
Text
Traxsource The Sound Of House - Deep House January 2024

DATE CREATED: 2024-01-15
Tracklist :
77Mushrooms - Back To Back (Original Mix).mp3
77Mushrooms - Gloaming (Original Mix).mp3
77Mushrooms - Summer Fling (Original Mix).mp3
96 Vibe - Muévelo Así (Original Mix).mp3
96 Vibe - Te Tumba (Original Mix).mp3
Alexander Koning - All Old Vibrations (Original Mix).mp3
Alexander Koning - Dismin (Original Mix).mp3
Alexander Koning - The Fam Break (Alexander Koning No Acid Mix).mp3
Alexander Koning - The Fam Break (Original Mix).mp3
Alvaro Smart - Dare You (Original Mix).mp3
Anton C - Enigma Beats (Javier Torrealba Remix).mp3
Anton C - Enigma Beats (Original Mix).mp3
Anton C - Loudness (Original Mix).mp3
Ben A - And You Know (Original Mix).mp3
Ben A - In My Mind (Original Mix).mp3
Ben Kim, Pakkio Sans - New Past (Original Mix).mp3
Black Fancy - Acid Waves (Original Mix).mp3
Black Fancy - Obrigado (Dub Mix).mp3
Black Fancy - Obrigado (Original Mix).mp3
Blueheist - Brasshopper (Original Mix).mp3
BOND - Bringing It Down (
Read the full article
0 notes
Audio
Broken Brass Ensemble - The Hitchhiker
Stutter & Twitch are proud to introduce to you an alternative take on the world famous sound of New Orleans Jazz. Combining the powers of funk, jazz, hip-hop and soul, Broken Brass Ensemble act as urban brass ambassadors, pioneering on their euphoric groove. Intertwining heroic melodies and leitmotifs, against a loud and proud back-beat, STR003 will soar into stores January 27th, setting a warm and hopeful precedent for the New Year. With origins based in the Netherlands, Broken Brass Ensemble have been firing up a storm all over Europe with an energizing live shows, pairing punchy bass-lines with hard-hitting brass. Selling out on CDs and vinyl from their previous debut album 'Brasshopper' in just over a year, and consistently filling 300 capacity venues without promotion, on merit alone, shows that underestimating this octet is out of the question.
#broken brass ensemble#the hitchhiker#funk#soul#brass#jazz#hip hop#netherlands#2017#stutter & twitch
1 note
·
View note
Photo

Brasshopper #artfair #art #sculpture #animal #instagood #instagramhub #brass #instrument #insect #grasshopper #photograph #photography #photographyislifee #photographer #filmphotography #peculiar #imagination #instaart #instaartist
#filmphotography#insect#imagination#grasshopper#art#photographyislifee#artfair#instagramhub#instrument#brass#photography#animal#photographer#peculiar#photograph#sculpture#instagood#instaartist#instaart
0 notes
Text
Beach House: End Of The Year Tour!
Beach house progress, both big and small, feels like it’s happening so quickly that we hardly have time to keep up with documenting it, but I did walk through the whole house yesterday and make a big ol’ video tour… which basically catches you right up to date! So excuse this post for only having around around a dozen photos (we have thousands on our phones, but they’d take us all day to upload and explain, and nobody got time for that with Christmas being less than a week away).
First let’s start at the front door. We hung a wreath (from Tar-jay) and put some battery powered LED candles with timers in the windows (so they’re auto-pilot even when we’re not there). Hallelujah, the house finally looks lived in! I mean, except for the whole it-has-no-landscaping-and-I-desperately-need-to-sand-and-stain-the-front-door thing. Also I still want to paint those white blocks behind the lanterns to match the house. Someday…
lanterns / wreath / house numbers / doormat / siding: SW Mellow Coral / ceiling: SW Breaktime / trim: SW Pure White
While things are far from finished, things are even farther from where they were this time last year. This photo is from almost exactly a year ago, and looking back is a nice reminder that wrinkly curtains and an unfinished pantry are far smaller problems to work through than THE ENTIRE SIDE OF THE HOUSE BEING TORN OFF. Here’s that whole story if you missed it (yup, we literally had to have 500 square feet removed and rebuild from scratch).
SO YEAH. It’s looking a lot better at the end of 2017 than it did at the end of 2016. And weirdly enough that picture makes me excited to get started on the duplex, because as much as I love having finished walls to decorate and finished floors to arrange furniture on, the process of planning (and dreaming about) all of the potential that’s fills the air during a big demo/rebuilding project is oddly addicting. Can’t wait to share our duplex progress as soon as we have our plans approved and all of our permits pulled! But back to the pink house, where I’m walking you guys through every room in a little video tour of sorts: If you can’t see this in a reader, click through to view it on our blog or you can view it here on YouTube.
If you can’t watch the video right now, I’d definitely recommend dropping back in and catching it when you can (a video is basically worth a million photos and I pretty much cover every crevice and explain a lot of extra stuff I couldn’t squeeze into this post).
One recent update, after months and months of debate, is that we finally pulled the trigger and painted the railing. The vertical balusters had all already been painted (SW Stone Isle), so it was just that top rail and the post at the end that were “wood.” I’ll explain why that’s in quotes in a second. It’s hard to see in this picture since that front post is getting hit with a ton of light through the open door, but we went with a deeper gray tone (SW Perpetual Gray) that’s about 3 shades darker than the trim, so it accents the post and the top rail without being too crazy and compete-y with the standout stars of the entire house (those stained glass windows).
I know what some of you are thinking. NOOOO! How could you disgrace such old beautiful wood with paint?!?! Well, this railing had been covered in a thick paint-like brown stain that showed zero grain and was sticky, roughed up, and ruined in a bunch of places (covered in paint splatters, spackle globs, and decades of other issues). After attempting to sand it down, we learned it was a darker redder wood – meaning we’d never be able to stain it to match the lovely heart pine floors. So, we reasoned that a fresh coat of paint applied nice and evenly was a heckuva lot better than its current state. And it really does look glossy and lovely in person, which makes us incredibly relieved.
The good news is that we don’t have any shortage of wood tones in this house. We have original heart pine everywhere (we stripped and clear-sealed all of the original doors that we could, brought the original floors both upstairs and downstairs back to their glory, etc). This house’s middle name could be wood. Pinkie “Wood” House. Wait that sounds bad. Forget the middle name thing.
Down in the living room, we added this cool wall-mounted bookcase, which instantly made us both say “Ahhh! It looks like an actual room people live in!” We also got to hang some cozy white curtains which need DESPERATELY to be steamed and hemmed. They’re Lenda curtains from Ikea– I just cut off the top tabs and make sure to wash them to pre-shrink them before hanging. We also have them in our home office and love how washable and easy they are. Also, my secondhand brass grasshopper (aka: Brasshopper) is a total badass and I love him more each day.
bookcase / blue pillow / curtains / rods / similar brass grasshopper
Also bought a rug from New England Loom (if you don’t follow them on Instagram you’re missing out because they have so many lovely secondhand rugs to be discovered) and the colors and patterns and antique feeling of the rug is PERFECT for a room that will be assaulted with food and sand and everything else that a rental living room has to deal with, so I have high hopes for it holding up like a champ (seeing as it is decades old already, that really does inspire confidence). That pretty blue pillow is from this Etsy shop (I love all of her pillows) and the pink one is from Target a while back. And you guys know the sofa is the Ikea Karlstad that they no longer make, which is a straight up travesty.
We also updated the light in here to this gleaming beauty from West Elm. The old light was a one-bulb fixture that we hung and immediately said “this room needs way more light.” We love the juxtaposition of this leggier modern light and the old-looking medallion (which is actually from Home Depot – shhh). And the old brick chimney that we discovered behind the wall and exposed is probably my favorite feature in the room, along with the giant windows (this room is 9′ tall, so the windows are easily over 6.5′ feet tall – that’s taller than John!). Don’t mind that TV on the floor. We found something we think will work for in there, just gotta get it out there in our next car load. #AlwaysRoadTrippingWithFurniture
rug source / chandelier / ceiling medallion /curtains / rods
The kitchen came a long way too, with the quartz island going in (it’s Pearl Jasmine by Silestone and we LOVE it so much) and a working sink. Cue the choir of angels! You can hear two ways we saved money on our quartz counters in Podcast Episode #74, which also covers why our original plan to do butcher block there didn’t work out. There are still some things missing though. Mainly, the backsplash that we’ll add after we hang the other missing element: shelves on either side of the stove under the sconces (probably two per side, not sure yet but we’ll keep you posted).
stools / quartz / butcher block / cabinets / range: secondhand refurbished / trim: SW Stone Isle / walls: SW White Heron
The back door was blue for a hot second, which some of you might have seen on Instagram, but as the room came together more John and I both realized that the same gray as the trim (SW Stone Isle) would let the pink stove do her thing and be the accent in the room that she has always been destined to become. Plus, we have a blue chippy door leading to the mudroom nearby, and one blue door + one pink stove is… enough. You know I didn’t love painting that door twice, so if I did it, it had to be done. Ha!
green vase / wood cutting board / wood stand / hanging rod / hood / kettle / sconces / pink salt & pepper
Upstairs the bedrooms are coming along with some art up on the walls, layered cozy bedding, and even headboards. HUZZAH! Still need to hang all the curtains up there (once we do that the headboard will look exactly as wide as the window because we are tricky tricksters). Stay tuned…
rug / large art / lamp / side table / striped blanket / headboard / fan
This is another view of that front bedroom, which is the largest of the four (the bunk room is teeny tiny and the middle bedroom and back bedroom are just fine but not giant). It also has that exposed brick chimney that we discovered hiding behind the wall, and next to it you’ll see my favorite craigslist find of all time that you might have already “met” on Facebook or Instagram when I shared a quick shot of it this weekend. Yes, I really did find an inlay piece of furniture on Craiglist, and yes, it’s currently selling for $2,000 on Restoration Hardware (I got it for $400!). Insert that screaming cat emoji face here. Seriously, it’s the score of a lifetime, and I’m going to share the whole story, including how I fix up a few missing inlay spots soon. So… stay tuned. Again.
And before we move on, that sconce looks crazy small above the dresser (we just hung it as a placeholder and it’s looking like a placeholder, so we’ll probably get a wider double-sconce for that spot soon). Anyway, on with the tour! Or should I say “roll the next flashback!” This is that wall a year ago. Same house. Just nekkid a year ago versus clothed now. With walls. You get what I mean.
And now, the back bedroom. Aka: our room whenever we stay there! Although the front room is the largest and has that lovely exposed brick, the back bedroom has its own master bathroom (complete with my big beautiful clawfoot tub) and it has its own stairs that lead up to it, which are surprisingly useful. We originally thought those back stairs would be more of a fun thing for kids and a cool historic detail to preserve, but we weren’t sure we’d actually use them very much but we go up and down them all the time!
rug / fan / leather stools / striped duvet cover / pocked doors: SW Riverway
One of our bigger projects this past weekend was this built-in dresser that we added to the nook behind the pocket doors that you see above. We love gaining some storage and function in that formerly blank area at the top of the back steps, and there’s more than enough room to pull out the drawers and take like five steps back before you’d fall down the steps (you know I’d be the one to bite it all the way down these steps, so we have to make sure these things we’re adding won’t curse me later).
dresser / mirror / wood top / door color: SW Riverway
John would be quick to point out it’s not complete. We ran out of nails for our nail gun, so the trim still needs to be attached, caulked, etc. But basically, a Malm from Ikea fit pretty perfectly in the space, so we made it look even more built-in by removing and reinstalling the molding around it (see below) and adding a few skinny filler pieces to each side (scraps from our kitchen install). We also popped some leftover butcher block counter from downstairs on top to tie into the pine floors and we’re also planning to add some leather pulls to it to tie in the stools at the foot of the bed (you can see them in the shot two photos up). Can’t wait to finish it up and share the final pics!
Next let’s move onto the master bathroom, which is easily my favorite room because I get to soak in that big ol’ tub after hours of DIY and it feels so freaking good every time. Except for the first time. I had sort of a false start in there (more on that in this podcast) but now the tub and I are bros and only happy things happen when I’m in there. And the kids love it too.
marble table / floor tile / accent floor tile / wall hooks / blinds / tub color: SW Riverway
I’m basically salivating while looking at this because we’re back home and our house has two bathrooms that we still have to redo and two tubs that are about 10″ deep (half of my body sticks out like an iceberg) so I’m itching to add a deeper bathtub into my life here at home.
The hall bath is still my boo too, thanks to my favorite vanity ever. The top is tiled with marble and the rounded wood drawers make it look like a furniture piece we converted to be a vanity but it came that way and WE SALUTE IT because goodness knows we have other stuff to keep us busy. Still on the list: making built-in bunk beds, building out the pantry and the mudroom, tiling the backsplash, landscaping, etc, etc. That big round silver mirror is an awesome (and recent!) HomeGoods find (the same one in brass hangs above our mantel at home) so if you’re looking for one in either color, try HomeGoods. Target also has a really similar one that’s slightly smaller and thinner in gold.
vanity / faucet / drum stool / light fixture / floor tile
And although we haven’t built the wall to wall bunkbeds in our small-but-mighty kids room yet, we did hang art. And that’s half the battle, right? (Nope, half the battle is being halfway done with the bunkbeds, but let me lie to myself for a second, ok?). That cute colorful painting is from our dear friend Lesli Devito (remember when we house crashed her wayyyy back here) and if you don’t have one of her paintings or prints I highly recommend getting one. The door also got a sign that says Mermaids Welcome and it made my whole life to hang it up (also we took a poll among a bunch of kids and basically everyone is cool with mermaid and pirates, but don’t get me started on how split the group was on dolphins).
marble table / mermaids welcome plaque / art by Lesli DeVito
So there you have it: a tour as of yesterday of the beach house (remember: watch the video! it has approximately 98% more info than some pics and captions can convey). Also, we hope you have a very happy holiday surrounded by the ones you love and delicious food and all the mermaid-related memorabilia that your heart desires. And if you have a tub where your entire body can be submerged, know that I, for one, now know what I’m missing and am deeply deeply jealous.
P.S. To see the entire process of fixing up this beach house (from floor planning and demo to tiling and tiling and tiling and getting the floors redone) here’s a full category of beach house updates for you to flip through.
*This post contains affiliate links*
The post Beach House: End Of The Year Tour! appeared first on Young House Love.
Beach House: End Of The Year Tour! published first on http://ift.tt/2uiWrIt
0 notes
Text
Beach House: End Of The Year Tour!
Beach house progress, both big and small, feels like it’s happening so quickly that we hardly have time to keep up with documenting it, but I did walk through the whole house yesterday and make a big ol’ video tour… which basically catches you right up to date! So excuse this post for only having around around a dozen photos (we have thousands on our phones, but they’d take us all day to upload and explain, and nobody got time for that with Christmas being less than a week away).
First let’s start at the front door. We hung a wreath (from Tar-jay) and put some battery powered LED candles with timers in the windows (so they’re auto-pilot even when we’re not there). Hallelujah, the house finally looks lived in! I mean, except for the whole it-has-no-landscaping-and-I-desperately-need-to-sand-and-stain-the-front-door thing. Also I still want to paint those white blocks behind the lanterns to match the house. Someday…
lanterns / wreath / house numbers / doormat / siding: SW Mellow Coral / ceiling: SW Breaktime / trim: SW Pure White
While things are far from finished, things are even farther from where they were this time last year. This photo is from almost exactly a year ago, and looking back is a nice reminder that wrinkly curtains and an unfinished pantry are far smaller problems to work through than THE ENTIRE SIDE OF THE HOUSE BEING TORN OFF. Here’s that whole story if you missed it (yup, we literally had to have 500 square feet removed and rebuild from scratch).
SO YEAH. It’s looking a lot better at the end of 2017 than it did at the end of 2016. And weirdly enough that picture makes me excited to get started on the duplex, because as much as I love having finished walls to decorate and finished floors to arrange furniture on, the process of planning (and dreaming about) all of the potential that’s fills the air during a big demo/rebuilding project is oddly addicting. Can’t wait to share our duplex progress as soon as we have our plans approved and all of our permits pulled! But back to the pink house, where I’m walking you guys through every room in a little video tour of sorts: If you can’t see this in a reader, click through to view it on our blog or you can view it here on YouTube.
If you can’t watch the video right now, I’d definitely recommend dropping back in and catching it when you can (a video is basically worth a million photos and I pretty much cover every crevice and explain a lot of extra stuff I couldn’t squeeze into this post).
One recent update, after months and months of debate, is that we finally pulled the trigger and painted the railing. The vertical balusters had all already been painted (SW Stone Isle), so it was just that top rail and the post at the end that were “wood.” I’ll explain why that’s in quotes in a second. It’s hard to see in this picture since that front post is getting hit with a ton of light through the open door, but we went with a deeper gray tone (SW Perpetual Gray) that’s about 3 shades darker than the trim, so it accents the post and the top rail without being too crazy and compete-y with the standout stars of the entire house (those stained glass windows).
I know what some of you are thinking. NOOOO! How could you disgrace such old beautiful wood with paint?!?! Well, this railing had been covered in a thick paint-like brown stain that showed zero grain and was sticky, roughed up, and ruined in a bunch of places (covered in paint splatters, spackle globs, and decades of other issues). After attempting to sand it down, we learned it was a darker redder wood – meaning we’d never be able to stain it to match the lovely heart pine floors. So, we reasoned that a fresh coat of paint applied nice and evenly was a heckuva lot better than its current state. And it really does look glossy and lovely in person, which makes us incredibly relieved.
The good news is that we don’t have any shortage of wood tones in this house. We have original heart pine everywhere (we stripped and clear-sealed all of the original doors that we could, brought the original floors both upstairs and downstairs back to their glory, etc). This house’s middle name could be wood. Pinkie “Wood” House. Wait that sounds bad. Forget the middle name thing.
Down in the living room, we added this cool wall-mounted bookcase, which instantly made us both say “Ahhh! It looks like an actual room people live in!” We also got to hang some cozy white curtains which need DESPERATELY to be steamed and hemmed. They’re Lenda curtains from Ikea– I just cut off the top tabs and make sure to wash them to pre-shrink them before hanging. We also have them in our home office and love how washable and easy they are. Also, my secondhand brass grasshopper (aka: Brasshopper) is a total badass and I love him more each day.
bookcase / blue pillow / curtains / rods / similar brass grasshopper
Also bought a rug from New England Loom (if you don’t follow them on Instagram you’re missing out because they have so many lovely secondhand rugs to be discovered) and the colors and patterns and antique feeling of the rug is PERFECT for a room that will be assaulted with food and sand and everything else that a rental living room has to deal with, so I have high hopes for it holding up like a champ (seeing as it is decades old already, that really does inspire confidence). That pretty blue pillow is from this Etsy shop (I love all of her pillows) and the pink one is from Target a while back. And you guys know the sofa is the Ikea Karlstad that they no longer make, which is a straight up travesty.
We also updated the light in here to this gleaming beauty from West Elm. The old light was a one-bulb fixture that we hung and immediately said “this room needs way more light.” We love the juxtaposition of this leggier modern light and the old-looking medallion (which is actually from Home Depot – shhh). And the old brick chimney that we discovered behind the wall and exposed is probably my favorite feature in the room, along with the giant windows (this room is 9′ tall, so the windows are easily over 6.5′ feet tall – that’s taller than John!). Don’t mind that TV on the floor. We found something we think will work for in there, just gotta get it out there in our next car load. #AlwaysRoadTrippingWithFurniture
rug source / chandelier / ceiling medallion /curtains / rods
The kitchen came a long way too, with the quartz island going in (it’s Pearl Jasmine by Silestone and we LOVE it so much) and a working sink. Cue the choir of angels! You can hear two ways we saved money on our quartz counters in Podcast Episode #74, which also covers why our original plan to do butcher block there didn’t work out. There are still some things missing though. Mainly, the backsplash that we’ll add after we hang the other missing element: shelves on either side of the stove under the sconces (probably two per side, not sure yet but we’ll keep you posted).
stools / quartz / butcher block / cabinets / range: secondhand refurbished / trim: SW Stone Isle / walls: SW White Heron
The back door was blue for a hot second, which some of you might have seen on Instagram, but as the room came together more John and I both realized that the same gray as the trim (SW Stone Isle) would let the pink stove do her thing and be the accent in the room that she has always been destined to become. Plus, we have a blue chippy door leading to the mudroom nearby, and one blue door + one pink stove is… enough. You know I didn’t love painting that door twice, so if I did it, it had to be done. Ha!
green vase / wood cutting board / wood stand / hanging rod / hood / kettle / sconces / pink salt & pepper
Upstairs the bedrooms are coming along with some art up on the walls, layered cozy bedding, and even headboards. HUZZAH! Still need to hang all the curtains up there (once we do that the headboard will look exactly as wide as the window because we are tricky tricksters). Stay tuned…
rug / large art / lamp / side table / striped blanket / headboard / fan
This is another view of that front bedroom, which is the largest of the four (the bunk room is teeny tiny and the middle bedroom and back bedroom are just fine but not giant). It also has that exposed brick chimney that we discovered hiding behind the wall, and next to it you’ll see my favorite craigslist find of all time that you might have already “met” on Facebook or Instagram when I shared a quick shot of it this weekend. Yes, I really did find an inlay piece of furniture on Craiglist, and yes, it’s currently selling for $2,000 on Restoration Hardware (I got it for $400!). Insert that screaming cat emoji face here. Seriously, it’s the score of a lifetime, and I’m going to share the whole story, including how I fix up a few missing inlay spots soon. So… stay tuned. Again.
And before we move on, that sconce looks crazy small above the dresser (we just hung it as a placeholder and it’s looking like a placeholder, so we’ll probably get a wider double-sconce for that spot soon). Anyway, on with the tour! Or should I say “roll the next flashback!” This is that wall a year ago. Same house. Just nekkid a year ago versus clothed now. With walls. You get what I mean.
And now, the back bedroom. Aka: our room whenever we stay there! Although the front room is the largest and has that lovely exposed brick, the back bedroom has its own master bathroom (complete with my big beautiful clawfoot tub) and it has its own stairs that lead up to it, which are surprisingly useful. We originally thought those back stairs would be more of a fun thing for kids and a cool historic detail to preserve, but we weren’t sure we’d actually use them very much but we go up and down them all the time!
rug / fan / leather stools / striped duvet cover / pocked doors: SW Riverway
One of our bigger projects this past weekend was this built-in dresser that we added to the nook behind the pocket doors that you see above. We love gaining some storage and function in that formerly blank area at the top of the back steps, and there’s more than enough room to pull out the drawers and take like five steps back before you’d fall down the steps (you know I’d be the one to bite it all the way down these steps, so we have to make sure these things we’re adding won’t curse me later).
dresser / mirror / wood top / door color: SW Riverway
John would be quick to point out it’s not complete. We ran out of nails for our nail gun, so the trim still needs to be attached, caulked, etc. But basically, a Malm from Ikea fit pretty perfectly in the space, so we made it look even more built-in by removing and reinstalling the molding around it (see below) and adding a few skinny filler pieces to each side (scraps from our kitchen install). We also popped some leftover butcher block counter from downstairs on top to tie into the pine floors and we’re also planning to add some leather pulls to it to tie in the stools at the foot of the bed (you can see them in the shot two photos up). Can’t wait to finish it up and share the final pics!
Next let’s move onto the master bathroom, which is easily my favorite room because I get to soak in that big ol’ tub after hours of DIY and it feels so freaking good every time. Except for the first time. I had sort of a false start in there (more on that in this podcast) but now the tub and I are bros and only happy things happen when I’m in there. And the kids love it too.
marble table / floor tile / accent floor tile / wall hooks / blinds / tub color: SW Riverway
I’m basically salivating while looking at this because we’re back home and our house has two bathrooms that we still have to redo and two tubs that are about 10″ deep (half of my body sticks out like an iceberg) so I’m itching to add a deeper bathtub into my life here at home.
The hall bath is still my boo too, thanks to my favorite vanity ever. The top is tiled with marble and the rounded wood drawers make it look like a furniture piece we converted to be a vanity but it came that way and WE SALUTE IT because goodness knows we have other stuff to keep us busy. Still on the list: making built-in bunk beds, building out the pantry and the mudroom, tiling the backsplash, landscaping, etc, etc. That big round silver mirror is an awesome (and recent!) HomeGoods find (the same one in brass hangs above our mantel at home) so if you’re looking for one in either color, try HomeGoods. Target also has a really similar one that’s slightly smaller and thinner in gold.
vanity / faucet / drum stool / light fixture / floor tile
And although we haven’t built the wall to wall bunkbeds in our small-but-mighty kids room yet, we did hang art. And that’s half the battle, right? (Nope, half the battle is being halfway done with the bunkbeds, but let me lie to myself for a second, ok?). That cute colorful painting is from our dear friend Lesli Devito (remember when we house crashed her wayyyy back here) and if you don’t have one of her paintings or prints I highly recommend getting one. The door also got a sign that says Mermaids Welcome and it made my whole life to hang it up (also we took a poll among a bunch of kids and basically everyone is cool with mermaid and pirates, but don’t get me started on how split the group was on dolphins).
marble table / mermaids welcome plaque / art by Lesli DeVito
So there you have it: a tour as of yesterday of the beach house (remember: watch the video! it has approximately 98% more info than some pics and captions can convey). Also, we hope you have a very happy holiday surrounded by the ones you love and delicious food and all the mermaid-related memorabilia that your heart desires. And if you have a tub where your entire body can be submerged, know that I, for one, now know what I’m missing and am deeply deeply jealous.
P.S. To see the entire process of fixing up this beach house (from floor planning and demo to tiling and tiling and tiling and getting the floors redone) here’s a full category of beach house updates for you to flip through.
*This post contains affiliate links*
The post Beach House: End Of The Year Tour! appeared first on Young House Love.
Beach House: End Of The Year Tour! published first on http://ift.tt/2BedaSe
0 notes
Photo
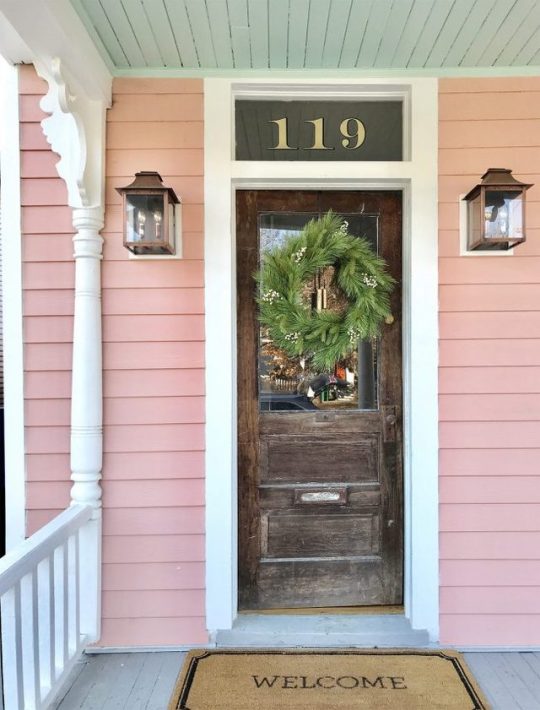
Beach House: End Of The Year Tour! http://ift.tt/2D8c9Mf
Beach house progress, both big and small, feels like it’s happening so quickly that we hardly have time to keep up with documenting it, but I did walk through the whole house yesterday and make a big ol’ video tour… which basically catches you right up to date! So excuse this post for only having around around a dozen photos (we have thousands on our phones, but they’d take us all day to upload and explain, and nobody got time for that with Christmas being less than a week away).
First let’s start at the front door. We hung a wreath (from Tar-jay) and put some battery powered LED candles with timers in the windows (so they’re auto-pilot even when we’re not there). Hallelujah, the house finally looks lived in! I mean, except for the whole it-has-no-landscaping-and-I-desperately-need-to-sand-and-stain-the-front-door thing. Also I still want to paint those white blocks behind the lanterns to match the house. Someday…
lanterns / wreath / house numbers / doormat / siding: SW Mellow Coral / ceiling: SW Breaktime / trim: SW Pure White
While things are far from finished, things are even farther from where they were this time last year. This photo is from almost exactly a year ago, and looking back is a nice reminder that wrinkly curtains and an unfinished pantry are far smaller problems to work through than THE ENTIRE SIDE OF THE HOUSE BEING TORN OFF. Here’s that whole story if you missed it (yup, we literally had to have 500 square feet removed and rebuild from scratch).
SO YEAH. It’s looking a lot better at the end of 2017 than it did at the end of 2016. And weirdly enough that picture makes me excited to get started on the duplex, because as much as I love having finished walls to decorate and finished floors to arrange furniture on, the process of planning (and dreaming about) all of the potential that’s fills the air during a big demo/rebuilding project is oddly addicting. Can’t wait to share our duplex progress as soon as we have our plans approved and all of our permits pulled! But back to the pink house, where I’m walking you guys through every room in a little video tour of sorts: If you can’t see this in a reader, click through to view it on our blog or you can view it here on YouTube.
If you can’t watch the video right now, I’d definitely recommend dropping back in and catching it when you can (a video is basically worth a million photos and I pretty much cover every crevice and explain a lot of extra stuff I couldn’t squeeze into this post).
One recent update, after months and months of debate, is that we finally pulled the trigger and painted the railing. The vertical balusters had all already been painted (SW Stone Isle), so it was just that top rail and the post at the end that were “wood.” I’ll explain why that’s in quotes in a second. It’s hard to see in this picture since that front post is getting hit with a ton of light through the open door, but we went with a deeper gray tone (SW Perpetual Gray) that’s about 3 shades darker than the trim, so it accents the post and the top rail without being too crazy and compete-y with the standout stars of the entire house (those stained glass windows).
I know what some of you are thinking. NOOOO! How could you disgrace such old beautiful wood with paint?!?! Well, this railing had been covered in a thick paint-like brown stain that showed zero grain and was sticky, roughed up, and ruined in a bunch of places (covered in paint splatters, spackle globs, and decades of other issues). After attempting to sand it down, we learned it was a darker redder wood – meaning we’d never be able to stain it to match the lovely heart pine floors. So, we reasoned that a fresh coat of paint applied nice and evenly was a heckuva lot better than its current state. And it really does look glossy and lovely in person, which makes us incredibly relieved.
The good news is that we don’t have any shortage of wood tones in this house. We have original heart pine everywhere (we stripped and clear-sealed all of the original doors that we could, brought the original floors both upstairs and downstairs back to their glory, etc). This house’s middle name could be wood. Pinkie “Wood” House. Wait that sounds bad. Forget the middle name thing.
Down in the living room, we added this cool wall-mounted bookcase, which instantly made us both say “Ahhh! It looks like an actual room people live in!” We also got to hang some cozy white curtains which need DESPERATELY to be steamed and hemmed. They’re Lenda curtains from Ikea– I just cut off the top tabs and make sure to wash them to pre-shrink them before hanging. We also have them in our home office and love how washable and easy they are. Also, my secondhand brass grasshopper (aka: Brasshopper) is a total badass and I love him more each day.
bookcase / blue pillow / curtains / rods / similar brass grasshopper
Also bought a rug from New England Loom (if you don’t follow them on Instagram you’re missing out because they have so many lovely secondhand rugs to be discovered) and the colors and patterns and antique feeling of the rug is PERFECT for a room that will be assaulted with food and sand and everything else that a rental living room has to deal with, so I have high hopes for it holding up like a champ (seeing as it is decades old already, that really does inspire confidence). That pretty blue pillow is from this Etsy shop (I love all of her pillows) and the pink one is from Target a while back. And you guys know the sofa is the Ikea Karlstad that they no longer make, which is a straight up travesty.
We also updated the light in here to this gleaming beauty from West Elm. The old light was a one-bulb fixture that we hung and immediately said “this room needs way more light.” We love the juxtaposition of this leggier modern light and the old-looking medallion (which is actually from Home Depot – shhh). And the old brick chimney that we discovered behind the wall and exposed is probably my favorite feature in the room, along with the giant windows (this room is 9′ tall, so the windows are easily over 6.5′ feet tall – that’s taller than John!). Don’t mind that TV on the floor. We found something we think will work for in there, just gotta get it out there in our next car load. #AlwaysRoadTrippingWithFurniture
rug source / chandelier / ceiling medallion /curtains / rods
The kitchen came a long way too, with the quartz island going in (it’s Pearl Jasmine by Silestone and we LOVE it so much) and a working sink. Cue the choir of angels! You can hear two ways we saved money on our quartz counters in Podcast Episode #74, which also covers why our original plan to do butcher block there didn’t work out. There are still some things missing though. Mainly, the backsplash that we’ll add after we hang the other missing element: shelves on either side of the stove under the sconces (probably two per side, not sure yet but we’ll keep you posted).
stools / quartz / butcher block / cabinets / range: secondhand refurbished / trim: SW Stone Isle / walls: SW White Heron
The back door was blue for a hot second, which some of you might have seen on Instagram, but as the room came together more John and I both realized that the same gray as the trim (SW Stone Isle) would let the pink stove do her thing and be the accent in the room that she has always been destined to become. Plus, we have a blue chippy door leading to the mudroom nearby, and one blue door + one pink stove is… enough. You know I didn’t love painting that door twice, so if I did it, it had to be done. Ha!
green vase / wood cutting board / wood stand / hanging rod / hood / kettle / sconces / pink salt & pepper
Upstairs the bedrooms are coming along with some art up on the walls, layered cozy bedding, and even headboards. HUZZAH! Still need to hang all the curtains up there (once we do that the headboard will look exactly as wide as the window because we are tricky tricksters). Stay tuned…
rug / large art / lamp / side table / striped blanket / headboard / fan
This is another view of that front bedroom, which is the largest of the four (the bunk room is teeny tiny and the middle bedroom and back bedroom are just fine but not giant). It also has that exposed brick chimney that we discovered hiding behind the wall, and next to it you’ll see my favorite craigslist find of all time that you might have already “met” on Facebook or Instagram when I shared a quick shot of it this weekend. Yes, I really did find an inlay piece of furniture on Craiglist, and yes, it’s currently selling for $2,000 on Restoration Hardware (I got it for $400!). Insert that screaming cat emoji face here. Seriously, it’s the score of a lifetime, and I’m going to share the whole story, including how I fix up a few missing inlay spots soon. So… stay tuned. Again.
And before we move on, that sconce looks crazy small above the dresser (we just hung it as a placeholder and it’s looking like a placeholder, so we’ll probably get a wider double-sconce for that spot soon). Anyway, on with the tour! Or should I say “roll the next flashback!” This is that wall a year ago. Same house. Just nekkid a year ago versus clothed now. With walls. You get what I mean.
And now, the back bedroom. Aka: our room whenever we stay there! Although the front room is the largest and has that lovely exposed brick, the back bedroom has its own master bathroom (complete with my big beautiful clawfoot tub) and it has its own stairs that lead up to it, which are surprisingly useful. We originally thought those back stairs would be more of a fun thing for kids and a cool historic detail to preserve, but we weren’t sure we’d actually use them very much but we go up and down them all the time!
rug / fan / leather stools / striped duvet cover / pocked doors: SW Riverway
One of our bigger projects this past weekend was this built-in dresser that we added to the nook behind the pocket doors that you see above. We love gaining some storage and function in that formerly blank area at the top of the back steps, and there’s more than enough room to pull out the drawers and take like five steps back before you’d fall down the steps (you know I’d be the one to bite it all the way down these steps, so we have to make sure these things we’re adding won’t curse me later).
dresser / mirror / wood top / door color: SW Riverway
John would be quick to point out it’s not complete. We ran out of nails for our nail gun, so the trim still needs to be attached, caulked, etc. But basically, a Malm from Ikea fit pretty perfectly in the space, so we made it look even more built-in by removing and reinstalling the molding around it (see below) and adding a few skinny filler pieces to each side (scraps from our kitchen install). We also popped some leftover butcher block counter from downstairs on top to tie into the pine floors and we’re also planning to add some leather pulls to it to tie in the stools at the foot of the bed (you can see them in the shot two photos up). Can’t wait to finish it up and share the final pics!
Next let’s move onto the master bathroom, which is easily my favorite room because I get to soak in that big ol’ tub after hours of DIY and it feels so freaking good every time. Except for the first time. I had sort of a false start in there (more on that in this podcast) but now the tub and I are bros and only happy things happen when I’m in there. And the kids love it too.
marble table / floor tile / accent floor tile / wall hooks / blinds / tub color: SW Riverway
I’m basically salivating while looking at this because we’re back home and our house has two bathrooms that we still have to redo and two tubs that are about 10″ deep (half of my body sticks out like an iceberg) so I’m itching to add a deeper bathtub into my life here at home.
The hall bath is still my boo too, thanks to my favorite vanity ever. The top is tiled with marble and the rounded wood drawers make it look like a furniture piece we converted to be a vanity but it came that way and WE SALUTE IT because goodness knows we have other stuff to keep us busy. Still on the list: making built-in bunk beds, building out the pantry and the mudroom, tiling the backsplash, landscaping, etc, etc. That big round silver mirror is an awesome (and recent!) HomeGoods find (the same one in brass hangs above our mantel at home) so if you’re looking for one in either color, try HomeGoods. Target also has a really similar one that’s slightly smaller and thinner in gold.
vanity / faucet / drum stool / light fixture / floor tile
And although we haven’t built the wall to wall bunkbeds in our small-but-mighty kids room yet, we did hang art. And that’s half the battle, right? (Nope, half the battle is being halfway done with the bunkbeds, but let me lie to myself for a second, ok?). That cute colorful painting is from our dear friend Lesli Devito (remember when we house crashed her wayyyy back here) and if you don’t have one of her paintings or prints I highly recommend getting one. The door also got a sign that says Mermaids Welcome and it made my whole life to hang it up (also we took a poll among a bunch of kids and basically everyone is cool with mermaid and pirates, but don’t get me started on how split the group was on dolphins).
marble table / mermaids welcome plaque / art by Lesli DeVito
So there you have it: a tour as of yesterday of the beach house (remember: watch the video! it has approximately 98% more info than some pics and captions can convey). Also, we hope you have a very happy holiday surrounded by the ones you love and delicious food and all the mermaid-related memorabilia that your heart desires. And if you have a tub where your entire body can be submerged, know that I, for one, now know what I’m missing and am deeply deeply jealous.
P.S. To see the entire process of fixing up this beach house (from floor planning and demo to tiling and tiling and tiling and getting the floors redone) here’s a full category of beach house updates for you to flip through.
*This post contains affiliate links*
The post Beach House: End Of The Year Tour! appeared first on Young House Love.
0 notes
Text
Beach House: End Of The Year Tour!
Beach house progress, both big and small, feels like it’s happening so quickly that we hardly have time to keep up with documenting it, but I did walk through the whole house yesterday and make a big ol’ video tour… which basically catches you right up to date! So excuse this post for only having around around a dozen photos (we have thousands on our phones, but they’d take us all day to upload and explain, and nobody got time for that with Christmas being less than a week away).
First let’s start at the front door. We hung a wreath (from Tar-jay) and put some battery powered LED candles with timers in the windows (so they’re auto-pilot even when we’re not there). Hallelujah, the house finally looks lived in! I mean, except for the whole it-has-no-landscaping-and-I-desperately-need-to-sand-and-stain-the-front-door thing. Also I still want to paint those white blocks behind the lanterns to match the house. Someday…
lanterns / wreath / house numbers / doormat / siding: SW Mellow Coral / ceiling: SW Breaktime / trim: SW Pure White
While things are far from finished, things are even farther from where they were this time last year. This photo is from almost exactly a year ago, and looking back is a nice reminder that wrinkly curtains and an unfinished pantry are far smaller problems to work through than THE ENTIRE SIDE OF THE HOUSE BEING TORN OFF. Here’s that whole story if you missed it (yup, we literally had to have 500 square feet removed and rebuild from scratch).
SO YEAH. It’s looking a lot better at the end of 2017 than it did at the end of 2016. And weirdly enough that picture makes me excited to get started on the duplex, because as much as I love having finished walls to decorate and finished floors to arrange furniture on, the process of planning (and dreaming about) all of the potential that’s fills the air during a big demo/rebuilding project is oddly addicting. Can’t wait to share our duplex progress as soon as we have our plans approved and all of our permits pulled! But back to the pink house, where I’m walking you guys through every room in a little video tour of sorts: If you can’t see this in a reader, click through to view it on our blog or you can view it here on YouTube.
If you can’t watch the video right now, I’d definitely recommend dropping back in and catching it when you can (a video is basically worth a million photos and I pretty much cover every crevice and explain a lot of extra stuff I couldn’t squeeze into this post).
One recent update, after months and months of debate, is that we finally pulled the trigger and painted the railing. The vertical balusters had all already been painted (SW Stone Isle), so it was just that top rail and the post at the end that were “wood.” I’ll explain why that’s in quotes in a second. It’s hard to see in this picture since that front post is getting hit with a ton of light through the open door, but we went with a deeper gray tone (SW Perpetual Gray) that’s about 3 shades darker than the trim, so it accents the post and the top rail without being too crazy and compete-y with the standout stars of the entire house (those stained glass windows).
I know what some of you are thinking. NOOOO! How could you disgrace such old beautiful wood with paint?!?! Well, this railing had been covered in a thick paint-like brown stain that showed zero grain and was sticky, roughed up, and ruined in a bunch of places (covered in paint splatters, spackle globs, and decades of other issues). After attempting to sand it down, we learned it was a darker redder wood – meaning we’d never be able to stain it to match the lovely heart pine floors. So, we reasoned that a fresh coat of paint applied nice and evenly was a heckuva lot better than its current state. And it really does look glossy and lovely in person, which makes us incredibly relieved.
The good news is that we don’t have any shortage of wood tones in this house. We have original heart pine everywhere (we stripped and clear-sealed all of the original doors that we could, brought the original floors both upstairs and downstairs back to their glory, etc). This house’s middle name could be wood. Pinkie “Wood” House. Wait that sounds bad. Forget the middle name thing.
Down in the living room, we added this cool wall-mounted bookcase, which instantly made us both say “Ahhh! It looks like an actual room people live in!” We also got to hang some cozy white curtains which need DESPERATELY to be steamed and hemmed. They’re Lenda curtains from Ikea– I just cut off the top tabs and make sure to wash them to pre-shrink them before hanging. We also have them in our home office and love how washable and easy they are. Also, my secondhand brass grasshopper (aka: Brasshopper) is a total badass and I love him more each day.
bookcase / blue pillow / curtains / rods / similar brass grasshopper
Also bought a rug from New England Loom (if you don’t follow them on Instagram you’re missing out because they have so many lovely secondhand rugs to be discovered) and the colors and patterns and antique feeling of the rug is PERFECT for a room that will be assaulted with food and sand and everything else that a rental living room has to deal with, so I have high hopes for it holding up like a champ (seeing as it is decades old already, that really does inspire confidence). That pretty blue pillow is from this Etsy shop (I love all of her pillows) and the pink one is from Target a while back. And you guys know the sofa is the Ikea Karlstad that they no longer make, which is a straight up travesty.
We also updated the light in here to this gleaming beauty from West Elm. The old light was a one-bulb fixture that we hung and immediately said “this room needs way more light.” We love the juxtaposition of this leggier modern light and the old-looking medallion (which is actually from Home Depot – shhh). And the old brick chimney that we discovered behind the wall and exposed is probably my favorite feature in the room, along with the giant windows (this room is 9′ tall, so the windows are easily over 6.5′ feet tall – that’s taller than John!). Don’t mind that TV on the floor. We found something we think will work for in there, just gotta get it out there in our next car load. #AlwaysRoadTrippingWithFurniture
rug source / chandelier / ceiling medallion /curtains / rods
The kitchen came a long way too, with the quartz island going in (it’s Pearl Jasmine by Silestone and we LOVE it so much) and a working sink. Cue the choir of angels! You can hear two ways we saved money on our quartz counters in Podcast Episode #74, which also covers why our original plan to do butcher block there didn’t work out. There are still some things missing though. Mainly, the backsplash that we’ll add after we hang the other missing element: shelves on either side of the stove under the sconces (probably two per side, not sure yet but we’ll keep you posted).
stools / quartz / butcher block / cabinets / range: secondhand refurbished / trim: SW Stone Isle / walls: SW White Heron
The back door was blue for a hot second, which some of you might have seen on Instagram, but as the room came together more John and I both realized that the same gray as the trim (SW Stone Isle) would let the pink stove do her thing and be the accent in the room that she has always been destined to become. Plus, we have a blue chippy door leading to the mudroom nearby, and one blue door + one pink stove is… enough. You know I didn’t love painting that door twice, so if I did it, it had to be done. Ha!
green vase / wood cutting board / wood stand / hanging rod / hood / kettle / sconces / pink salt & pepper
Upstairs the bedrooms are coming along with some art up on the walls, layered cozy bedding, and even headboards. HUZZAH! Still need to hang all the curtains up there (once we do that the headboard will look exactly as wide as the window because we are tricky tricksters). Stay tuned…
rug / large art / lamp / side table / striped blanket / headboard / fan
This is another view of that front bedroom, which is the largest of the four (the bunk room is teeny tiny and the middle bedroom and back bedroom are just fine but not giant). It also has that exposed brick chimney that we discovered hiding behind the wall, and next to it you’ll see my favorite craigslist find of all time that you might have already “met” on Facebook or Instagram when I shared a quick shot of it this weekend. Yes, I really did find an inlay piece of furniture on Craiglist, and yes, it’s currently selling for $2,000 on Restoration Hardware (I got it for $400!). Insert that screaming cat emoji face here. Seriously, it’s the score of a lifetime, and I’m going to share the whole story, including how I fix up a few missing inlay spots soon. So… stay tuned. Again.
And before we move on, that sconce looks crazy small above the dresser (we just hung it as a placeholder and it’s looking like a placeholder, so we’ll probably get a wider double-sconce for that spot soon). Anyway, on with the tour! Or should I say “roll the next flashback!” This is that wall a year ago. Same house. Just nekkid a year ago versus clothed now. With walls. You get what I mean.
And now, the back bedroom. Aka: our room whenever we stay there! Although the front room is the largest and has that lovely exposed brick, the back bedroom has its own master bathroom (complete with my big beautiful clawfoot tub) and it has its own stairs that lead up to it, which are surprisingly useful. We originally thought those back stairs would be more of a fun thing for kids and a cool historic detail to preserve, but we weren’t sure we’d actually use them very much but we go up and down them all the time!
rug / fan / leather stools / striped duvet cover / pocked doors: SW Riverway
One of our bigger projects this past weekend was this built-in dresser that we added to the nook behind the pocket doors that you see above. We love gaining some storage and function in that formerly blank area at the top of the back steps, and there’s more than enough room to pull out the drawers and take like five steps back before you’d fall down the steps (you know I’d be the one to bite it all the way down these steps, so we have to make sure these things we’re adding won’t curse me later).
dresser / mirror / wood top / door color: SW Riverway
John would be quick to point out it’s not complete. We ran out of nails for our nail gun, so the trim still needs to be attached, caulked, etc. But basically, a Malm from Ikea fit pretty perfectly in the space, so we made it look even more built-in by removing and reinstalling the molding around it (see below) and adding a few skinny filler pieces to each side (scraps from our kitchen install). We also popped some leftover butcher block counter from downstairs on top to tie into the pine floors and we’re also planning to add some leather pulls to it to tie in the stools at the foot of the bed (you can see them in the shot two photos up). Can’t wait to finish it up and share the final pics!
Next let’s move onto the master bathroom, which is easily my favorite room because I get to soak in that big ol’ tub after hours of DIY and it feels so freaking good every time. Except for the first time. I had sort of a false start in there (more on that in this podcast) but now the tub and I are bros and only happy things happen when I’m in there. And the kids love it too.
marble table / floor tile / accent floor tile / wall hooks / blinds / tub color: SW Riverway
I’m basically salivating while looking at this because we’re back home and our house has two bathrooms that we still have to redo and two tubs that are about 10″ deep (half of my body sticks out like an iceberg) so I’m itching to add a deeper bathtub into my life here at home.
The hall bath is still my boo too, thanks to my favorite vanity ever. The top is tiled with marble and the rounded wood drawers make it look like a furniture piece we converted to be a vanity but it came that way and WE SALUTE IT because goodness knows we have other stuff to keep us busy. Still on the list: making built-in bunk beds, building out the pantry and the mudroom, tiling the backsplash, landscaping, etc, etc. That big round silver mirror is an awesome (and recent!) HomeGoods find (the same one in brass hangs above our mantel at home) so if you’re looking for one in either color, try HomeGoods. Target also has a really similar one that’s slightly smaller and thinner in gold.
vanity / faucet / drum stool / light fixture / floor tile
And although we haven’t built the wall to wall bunkbeds in our small-but-mighty kids room yet, we did hang art. And that’s half the battle, right? (Nope, half the battle is being halfway done with the bunkbeds, but let me lie to myself for a second, ok?). That cute colorful painting is from our dear friend Lesli Devito (remember when we house crashed her wayyyy back here) and if you don’t have one of her paintings or prints I highly recommend getting one. The door also got a sign that says Mermaids Welcome and it made my whole life to hang it up (also we took a poll among a bunch of kids and basically everyone is cool with mermaid and pirates, but don’t get me started on how split the group was on dolphins).
marble table / mermaids welcome plaque / art by Lesli DeVito
So there you have it: a tour as of yesterday of the beach house (remember: watch the video! it has approximately 98% more info than some pics and captions can convey). Also, we hope you have a very happy holiday surrounded by the ones you love and delicious food and all the mermaid-related memorabilia that your heart desires. And if you have a tub where your entire body can be submerged, know that I, for one, now know what I’m missing and am deeply deeply jealous.
P.S. To see the entire process of fixing up this beach house (from floor planning and demo to tiling and tiling and tiling and getting the floors redone) here’s a full category of beach house updates for you to flip through.
*This post contains affiliate links*
The post Beach House: End Of The Year Tour! appeared first on Young House Love.
Beach House: End Of The Year Tour! published first on http://ift.tt/2hUI8pL
0 notes
Text
Beach House: End Of The Year Tour!
Beach house progress, both big and small, feels like it’s happening so quickly that we hardly have time to keep up with documenting it, but I did walk through the whole house yesterday and make a big ol’ video tour… which basically catches you right up to date! So excuse this post for only having around a dozen photos (we have thousands on our phones, but they’d take us all day to upload and explain, and nobody got time for that with Christmas being less than a week away).
First let’s start at the front door. We hung a wreath (from Tar-jay) and put some battery powered LED candles with timers in the windows (so they’re auto-pilot even when we’re not there). Hallelujah, the house finally looks lived in! I mean, except for the whole it-has-no-landscaping-and-I-desperately-need-to-sand-and-stain-the-front-door thing. Also I still want to paint those white blocks behind the lanterns to match the house. Someday…
lanterns / wreath / house numbers / doormat / siding: SW Mellow Coral / ceiling: SW Breaktime / trim: SW Pure White
While things are far from finished, things are even farther from where they were this time last year. This photo is from almost exactly a year ago, and looking back is a nice reminder that wrinkly curtains and an unfinished pantry are far smaller problems to work through than THE ENTIRE SIDE OF THE HOUSE BEING TORN OFF. Here’s that whole story if you missed it (yup, we literally had to have 500 square feet removed and rebuild from scratch).
SO YEAH. It’s looking a lot better at the end of 2017 than it did at the end of 2016. And weirdly enough that picture makes me excited to get started on the duplex, because as much as I love having finished walls to decorate and finished floors to arrange furniture on, the process of planning (and dreaming about) all of the potential that’s fills the air during a big demo/rebuilding project is oddly addicting. Can’t wait to share our duplex progress as soon as we have our plans approved and all of our permits pulled! But back to the pink house, where I’m walking you guys through every room in a little video tour of sorts: If you can’t see this in a reader, click through to view it on our blog or you can view it here on YouTube.
If you can’t watch the video right now, I’d definitely recommend dropping back in and catching it when you can (a video is basically worth a million photos and I pretty much cover every crevice and explain a lot of extra stuff I couldn’t squeeze into this post).
One recent update, after months and months of debate, is that we finally pulled the trigger and painted the railing. The vertical balusters had all already been painted (SW Stone Isle), so it was just that top rail and the post at the end that were “wood.” I’ll explain why that’s in quotes in a second. It’s hard to see in this picture since that front post is getting hit with a ton of light through the open door, but we went with a deeper gray tone (SW Perpetual Gray) that’s about 3 shades darker than the trim, so it accents the post and the top rail without being too crazy and compete-y with the standout stars of the entire house (those stained glass windows).
I know what some of you are thinking. NOOOO! How could you disgrace such old beautiful wood with paint?!?! Well, this railing had been covered in a thick paint-like brown stain that showed zero grain and was sticky, roughed up, and ruined in a bunch of places (covered in paint splatters, spackle globs, and decades of other issues). After attempting to sand it down, we learned it was a darker redder wood – meaning we’d never be able to stain it to match the lovely heart pine floors. So, we reasoned that a fresh coat of paint applied nice and evenly was a heckuva lot better than its current state. And it really does look glossy and lovely in person, which makes us incredibly relieved.
The good news is that we don’t have any shortage of wood tones in this house. We have original heart pine everywhere (we stripped and clear-sealed all of the original doors that we could, brought the original floors both upstairs and downstairs back to their glory, etc). This house’s middle name could be wood. Pinkie “Wood” House. Wait that sounds bad. Forget the middle name thing.
Down in the living room, we added this cool wall-mounted bookcase, which instantly made us both say “Ahhh! It looks like an actual room people live in!” We also got to hang some cozy white curtains which need DESPERATELY to be steamed and hemmed. They’re Lenda curtains from Ikea– I just cut off the top tabs and make sure to wash them to pre-shrink them before hanging. We also have them in our home office and love how washable and easy they are. Also, my secondhand brass grasshopper (aka: Brasshopper) is a total badass and I love him more each day.
bookcase / blue pillow / curtains / rods / similar brass grasshopper
Also bought a rug from New England Loom (if you don’t follow them on Instagram you’re missing out because they have so many lovely secondhand rugs to be discovered) and the colors and patterns and antique feeling of the rug is PERFECT for a room that will be assaulted with food and sand and everything else that a rental living room has to deal with, so I have high hopes for it holding up like a champ (seeing as it is decades old already, that really does inspire confidence). That pretty blue pillow is from this Etsy shop (I love all of her pillows) and the pink one is from Target a while back. And you guys know the sofa is the Ikea Karlstad that they no longer make, which is a straight up travesty.
We also updated the light in here to this gleaming beauty from West Elm. The old light was a one-bulb fixture that we hung and immediately said “this room needs way more light.” We love the juxtaposition of this leggier modern light and the old-looking medallion (which is actually from Home Depot – shhh). And the old brick chimney that we discovered behind the wall and exposed is probably my favorite feature in the room, along with the giant windows (this room is 9′ tall, so the windows are easily over 6.5′ feet tall – that’s taller than John!). Don’t mind that TV on the floor. We found something we think will work for in there, just gotta get it out there in our next car load. #AlwaysRoadTrippingWithFurniture
rug source / chandelier / ceiling medallion /curtains / rods
The kitchen came a long way too, with the quartz island going in (it’s Pearl Jasmine by Silestone and we LOVE it so much) and a working sink. Cue the choir of angels! You can hear two ways we saved money on our quartz counters in Podcast Episode #74, which also covers why our original plan to do butcher block there didn’t work out. There are still some things missing though. Mainly, the backsplash that we’ll add after we hang the other missing element: shelves on either side of the stove under the sconces (probably two per side, not sure yet but we’ll keep you posted).
stools / quartz / butcher block / cabinets / range: secondhand refurbished / trim: SW Stone Isle / walls: SW White Heron
The back door was blue for a hot second, which some of you might have seen on Instagram, but as the room came together more John and I both realized that the same gray as the trim (SW Stone Isle) would let the pink stove do her thing and be the accent in the room that she has always been destined to become. Plus, we have a blue chippy door leading to the mudroom nearby, and one blue door + one pink stove is… enough. You know I didn’t love painting that door twice, so if I did it, it had to be done. Ha!
green vase / wood cutting board / wood stand / hanging rod / hood / kettle / sconces / pink salt & pepper
Upstairs the bedrooms are coming along with some art up on the walls, layered cozy bedding, and even headboards. HUZZAH! Still need to hang all the curtains up there (once we do that the headboard will look exactly as wide as the window because we are tricky tricksters). Stay tuned…
rug / large art / lamp / side table / striped blanket / headboard / fan
This is another view of that front bedroom, which is the largest of the four (the bunk room is teeny tiny and the middle bedroom and back bedroom are just fine but not giant). It also has that exposed brick chimney that we discovered hiding behind the wall, and next to it you’ll see my favorite craigslist find of all time that you might have already “met” on Facebook or Instagram when I shared a quick shot of it this weekend. Yes, I really did find an inlay piece of furniture on Craiglist, and yes, it’s currently selling for $2,000 on Restoration Hardware (I got it for $400!). Insert that screaming cat emoji face here. Seriously, it’s the score of a lifetime, and I’m going to share the whole story, including how I fix up a few missing inlay spots soon. So… stay tuned. Again.
And before we move on, that sconce looks crazy small above the dresser (we just hung it as a placeholder and it’s looking like a placeholder, so we’ll probably get a wider double-sconce for that spot soon). Anyway, on with the tour! Or should I say “roll the next flashback!” This is that wall a year ago. Same house. Just nekkid a year ago versus clothed now. With walls. You get what I mean.
And now, the back bedroom. Aka: our room whenever we stay there! Although the front room is the largest and has that lovely exposed brick, the back bedroom has its own master bathroom (complete with my big beautiful clawfoot tub) and it has its own stairs that lead up to it, which are surprisingly useful. We originally thought those back stairs would be more of a fun thing for kids and a cool historic detail to preserve, but we weren’t sure we’d actually use them very much but we go up and down them all the time!
rug / fan / leather stools / striped duvet cover / pocked doors: SW Riverway
One of our bigger projects this past weekend was this built-in dresser that we added to the nook behind the pocket doors that you see above. We love gaining some storage and function in that formerly blank area at the top of the back steps, and there’s more than enough room to pull out the drawers and take like five steps back before you’d fall down the steps (you know I’d be the one to bite it all the way down these steps, so we have to make sure these things we’re adding won’t curse me later).
dresser / mirror / wood top / door color: SW Riverway
John would be quick to point out it’s not complete. We ran out of nails for our nail gun, so the trim still needs to be attached, caulked, etc. But basically, a Malm from Ikea fit pretty perfectly in the space, so we made it look even more built-in by removing and reinstalling the molding around it (see below) and adding a few skinny filler pieces to each side (scraps from our kitchen install). We also popped some leftover butcher block counter from downstairs on top to tie into the pine floors and we’re also planning to add some leather pulls to it to tie in the stools at the foot of the bed (you can see them in the shot two photos up). Can’t wait to finish it up and share the final pics!
Next let’s move onto the master bathroom, which is easily my favorite room because I get to soak in that big ol’ tub after hours of DIY and it feels so freaking good every time. Except for the first time. I had sort of a false start in there (more on that in this podcast) but now the tub and I are bros and only happy things happen when I’m in there. And the kids love it too.
marble table / floor tile / accent floor tile / wall hooks / blinds / tub color: SW Riverway
I’m basically salivating while looking at this because we’re back home and our house has two bathrooms that we still have to redo and two tubs that are about 10″ deep (half of my body sticks out like an iceberg) so I’m itching to add a deeper bathtub into my life here at home.
The hall bath is still my boo too, thanks to my favorite vanity ever. The top is tiled with marble and the rounded wood drawers make it look like a furniture piece we converted to be a vanity but it came that way and WE SALUTE IT because goodness knows we have other stuff to keep us busy. Still on the list: making built-in bunk beds, building out the pantry and the mudroom, tiling the backsplash, landscaping, etc, etc. That big round silver mirror is an awesome (and recent!) HomeGoods find (the same one in brass hangs above our mantel at home) so if you’re looking for one in either color, try HomeGoods. Target also has a really similar one that’s slightly smaller and thinner in gold.
vanity / faucet / drum stool / light fixture / floor tile
And although we haven’t built the wall to wall bunkbeds in our small-but-mighty kids room yet, we did hang art. And that’s half the battle, right? (Nope, half the battle is being halfway done with the bunkbeds, but let me lie to myself for a second, ok?). That cute colorful painting is from our dear friend Lesli Devito (remember when we house crashed her wayyyy back here) and if you don’t have one of her paintings or prints I highly recommend getting one. The door also got a sign that says Mermaids Welcome and it made my whole life to hang it up (also we took a poll among a bunch of kids and basically everyone is cool with mermaid and pirates, but don’t get me started on how split the group was on dolphins).
marble table / mermaids welcome plaque / art by Lesli DeVito
So there you have it: a tour as of yesterday of the beach house (remember: watch the video! it has approximately 98% more info than some pics and captions can convey). Also, we hope you have a very happy holiday surrounded by the ones you love and delicious food and all the mermaid-related memorabilia that your heart desires. And if you have a tub where your entire body can be submerged, know that I, for one, now know what I’m missing and am deeply deeply jealous.
P.S. To see the entire process of fixing up this beach house (from floor planning and demo to tiling and tiling and tiling and getting the floors redone) here’s a full category of beach house updates for you to flip through.
*This post contains affiliate links*
The post Beach House: End Of The Year Tour! appeared first on Young House Love.
Beach House: End Of The Year Tour! published first on http://ift.tt/2qCHnUt
0 notes
Text
Beach House: End Of The Year Tour!
Beach house progress, both big and small, feels like it’s happening so quickly that we hardly have time to keep up with documenting it, but I did walk through the whole house yesterday and make a big ol’ video tour… which basically catches you right up to date! So excuse this post for only having around a dozen photos (we have thousands on our phones, but they’d take us all day to upload and explain, and nobody got time for that with Christmas being less than a week away).
First let’s start at the front door. We hung a wreath (from Tar-jay) and put some battery powered LED candles with timers in the windows (so they’re auto-pilot even when we’re not there). Hallelujah, the house finally looks lived in! I mean, except for the whole it-has-no-landscaping-and-I-desperately-need-to-sand-and-stain-the-front-door thing. Also I still want to paint those white blocks behind the lanterns to match the house. Someday…
lanterns / wreath / house numbers / doormat / siding: SW Mellow Coral / ceiling: SW Breaktime / trim: SW Pure White
While things are far from finished, things are even farther from where they were this time last year. This photo is from almost exactly a year ago, and looking back is a nice reminder that wrinkly curtains and an unfinished pantry are far smaller problems to work through than THE ENTIRE SIDE OF THE HOUSE BEING TORN OFF. Here’s that whole story if you missed it (yup, we literally had to have 500 square feet removed and rebuild from scratch).
SO YEAH. It’s looking a lot better at the end of 2017 than it did at the end of 2016. And weirdly enough that picture makes me excited to get started on the duplex, because as much as I love having finished walls to decorate and finished floors to arrange furniture on, the process of planning (and dreaming about) all of the potential that’s fills the air during a big demo/rebuilding project is oddly addicting. Can’t wait to share our duplex progress as soon as we have our plans approved and all of our permits pulled! But back to the pink house, where I’m walking you guys through every room in a little video tour of sorts: If you can’t see this in a reader, click through to view it on our blog or you can view it here on YouTube.
If you can’t watch the video right now, I’d definitely recommend dropping back in and catching it when you can (a video is basically worth a million photos and I pretty much cover every crevice and explain a lot of extra stuff I couldn’t squeeze into this post).
One recent update, after months and months of debate, is that we finally pulled the trigger and painted the railing. The vertical balusters had all already been painted (SW Stone Isle), so it was just that top rail and the post at the end that were “wood.” I’ll explain why that’s in quotes in a second. It’s hard to see in this picture since that front post is getting hit with a ton of light through the open door, but we went with a deeper gray tone (SW Perpetual Gray) that’s about 3 shades darker than the trim, so it accents the post and the top rail without being too crazy and compete-y with the standout stars of the entire house (those stained glass windows).
I know what some of you are thinking. NOOOO! How could you disgrace such old beautiful wood with paint?!?! Well, this railing had been covered in a thick paint-like brown stain that showed zero grain and was sticky, roughed up, and ruined in a bunch of places (covered in paint splatters, spackle globs, and decades of other issues). After attempting to sand it down, we learned it was a darker redder wood – meaning we’d never be able to stain it to match the lovely heart pine floors. So, we reasoned that a fresh coat of paint applied nice and evenly was a heckuva lot better than its current state. And it really does look glossy and lovely in person, which makes us incredibly relieved.
The good news is that we don’t have any shortage of wood tones in this house. We have original heart pine everywhere (we stripped and clear-sealed all of the original doors that we could, brought the original floors both upstairs and downstairs back to their glory, etc). This house’s middle name could be wood. Pinkie “Wood” House. Wait that sounds bad. Forget the middle name thing.
Down in the living room, we added this cool wall-mounted bookcase, which instantly made us both say “Ahhh! It looks like an actual room people live in!” We also got to hang some cozy white curtains which need DESPERATELY to be steamed and hemmed. They’re Lenda curtains from Ikea– I just cut off the top tabs and make sure to wash them to pre-shrink them before hanging. We also have them in our home office and love how washable and easy they are. Also, my secondhand brass grasshopper (aka: Brasshopper) is a total badass and I love him more each day.
bookcase / blue pillow / curtains / rods / similar brass grasshopper
Also bought a rug from New England Loom (if you don’t follow them on Instagram you’re missing out because they have so many lovely secondhand rugs to be discovered) and the colors and patterns and antique feeling of the rug is PERFECT for a room that will be assaulted with food and sand and everything else that a rental living room has to deal with, so I have high hopes for it holding up like a champ (seeing as it is decades old already, that really does inspire confidence). That pretty blue pillow is from this Etsy shop (I love all of her pillows) and the pink one is from Target a while back. And you guys know the sofa is the Ikea Karlstad that they no longer make, which is a straight up travesty.
We also updated the light in here to this gleaming beauty from West Elm. The old light was a one-bulb fixture that we hung and immediately said “this room needs way more light.” We love the juxtaposition of this leggier modern light and the old-looking medallion (which is actually from Home Depot – shhh). And the old brick chimney that we discovered behind the wall and exposed is probably my favorite feature in the room, along with the giant windows (this room is 9′ tall, so the windows are easily over 6.5′ feet tall – that’s taller than John!). Don’t mind that TV on the floor. We found something we think will work for in there, just gotta get it out there in our next car load. #AlwaysRoadTrippingWithFurniture
rug source / chandelier / ceiling medallion /curtains / rods
The kitchen came a long way too, with the quartz island going in (it’s Pearl Jasmine by Silestone and we LOVE it so much) and a working sink. Cue the choir of angels! You can hear two ways we saved money on our quartz counters in Podcast Episode #74, which also covers why our original plan to do butcher block there didn’t work out. There are still some things missing though. Mainly, the backsplash that we’ll add after we hang the other missing element: shelves on either side of the stove under the sconces (probably two per side, not sure yet but we’ll keep you posted).
stools / quartz / butcher block / cabinets / range: secondhand refurbished / trim: SW Stone Isle / walls: SW White Heron
The back door was blue for a hot second, which some of you might have seen on Instagram, but as the room came together more John and I both realized that the same gray as the trim (SW Stone Isle) would let the pink stove do her thing and be the accent in the room that she has always been destined to become. Plus, we have a blue chippy door leading to the mudroom nearby, and one blue door + one pink stove is… enough. You know I didn’t love painting that door twice, so if I did it, it had to be done. Ha!
green vase / wood cutting board / wood stand / hanging rod / hood / kettle / sconces / pink salt & pepper
Upstairs the bedrooms are coming along with some art up on the walls, layered cozy bedding, and even headboards. HUZZAH! Still need to hang all the curtains up there (once we do that the headboard will look exactly as wide as the window because we are tricky tricksters). Stay tuned…
rug / large art / lamp / side table / striped blanket / headboard / fan
This is another view of that front bedroom, which is the largest of the four (the bunk room is teeny tiny and the middle bedroom and back bedroom are just fine but not giant). It also has that exposed brick chimney that we discovered hiding behind the wall, and next to it you’ll see my favorite craigslist find of all time that you might have already “met” on Facebook or Instagram when I shared a quick shot of it this weekend. Yes, I really did find an inlay piece of furniture on Craiglist, and yes, it’s currently selling for $2,000 on Restoration Hardware (I got it for $400!). Insert that screaming cat emoji face here. Seriously, it’s the score of a lifetime, and I’m going to share the whole story, including how I fix up a few missing inlay spots soon. So… stay tuned. Again.
And before we move on, that sconce looks crazy small above the dresser (we just hung it as a placeholder and it’s looking like a placeholder, so we’ll probably get a wider double-sconce for that spot soon). Anyway, on with the tour! Or should I say “roll the next flashback!” This is that wall a year ago. Same house. Just nekkid a year ago versus clothed now. With walls. You get what I mean.
And now, the back bedroom. Aka: our room whenever we stay there! Although the front room is the largest and has that lovely exposed brick, the back bedroom has its own master bathroom (complete with my big beautiful clawfoot tub) and it has its own stairs that lead up to it, which are surprisingly useful. We originally thought those back stairs would be more of a fun thing for kids and a cool historic detail to preserve, but we weren’t sure we’d actually use them very much but we go up and down them all the time!
rug / fan / leather stools / striped duvet cover / pocked doors: SW Riverway
One of our bigger projects this past weekend was this built-in dresser that we added to the nook behind the pocket doors that you see above. We love gaining some storage and function in that formerly blank area at the top of the back steps, and there’s more than enough room to pull out the drawers and take like five steps back before you’d fall down the steps (you know I’d be the one to bite it all the way down these steps, so we have to make sure these things we’re adding won’t curse me later).
dresser / mirror / wood top / door color: SW Riverway
John would be quick to point out it’s not complete. We ran out of nails for our nail gun, so the trim still needs to be attached, caulked, etc. But basically, a Malm from Ikea fit pretty perfectly in the space, so we made it look even more built-in by removing and reinstalling the molding around it (see below) and adding a few skinny filler pieces to each side (scraps from our kitchen install). We also popped some leftover butcher block counter from downstairs on top to tie into the pine floors and we’re also planning to add some leather pulls to it to tie in the stools at the foot of the bed (you can see them in the shot two photos up). Can’t wait to finish it up and share the final pics!
Next let’s move onto the master bathroom, which is easily my favorite room because I get to soak in that big ol’ tub after hours of DIY and it feels so freaking good every time. Except for the first time. I had sort of a false start in there (more on that in this podcast) but now the tub and I are bros and only happy things happen when I’m in there. And the kids love it too.
marble table / floor tile / accent floor tile / wall hooks / blinds / tub color: SW Riverway
I’m basically salivating while looking at this because we’re back home and our house has two bathrooms that we still have to redo and two tubs that are about 10″ deep (half of my body sticks out like an iceberg) so I’m itching to add a deeper bathtub into my life here at home.
The hall bath is still my boo too, thanks to my favorite vanity ever. The top is tiled with marble and the rounded wood drawers make it look like a furniture piece we converted to be a vanity but it came that way and WE SALUTE IT because goodness knows we have other stuff to keep us busy. Still on the list: making built-in bunk beds, building out the pantry and the mudroom, tiling the backsplash, landscaping, etc, etc. That big round silver mirror is an awesome (and recent!) HomeGoods find (the same one in brass hangs above our mantel at home) so if you’re looking for one in either color, try HomeGoods. Target also has a really similar one that’s slightly smaller and thinner in gold.
vanity / faucet / drum stool / light fixture / floor tile
And although we haven’t built the wall to wall bunkbeds in our small-but-mighty kids room yet, we did hang art. And that’s half the battle, right? (Nope, half the battle is being halfway done with the bunkbeds, but let me lie to myself for a second, ok?). That cute colorful painting is from our dear friend Lesli Devito (remember when we house crashed her wayyyy back here) and if you don’t have one of her paintings or prints I highly recommend getting one. The door also got a sign that says Mermaids Welcome and it made my whole life to hang it up (also we took a poll among a bunch of kids and basically everyone is cool with mermaid and pirates, but don’t get me started on how split the group was on dolphins).
marble table / mermaids welcome plaque / art by Lesli DeVito
So there you have it: a tour as of yesterday of the beach house (remember: watch the video! it has approximately 98% more info than some pics and captions can convey). Also, we hope you have a very happy holiday surrounded by the ones you love and delicious food and all the mermaid-related memorabilia that your heart desires. And if you have a tub where your entire body can be submerged, know that I, for one, now know what I’m missing and am deeply deeply jealous.
P.S. To see the entire process of fixing up this beach house (from floor planning and demo to tiling and tiling and tiling and getting the floors redone) here’s a full category of beach house updates for you to flip through.
*This post contains affiliate links*
The post Beach House: End Of The Year Tour! appeared first on Young House Love.
Beach House: End Of The Year Tour! published first on http://ift.tt/2r6hzQy
0 notes
Text
Beach House: End Of The Year Tour!
Beach house progress, both big and small, feels like it’s happening so quickly that we hardly have time to keep up with documenting it, but I did walk through the whole house yesterday and make a big ol’ video tour… which basically catches you right up to date! So excuse this post for only having around around a dozen photos (we have thousands on our phones, but they’d take us all day to upload and explain, and nobody got time for that with Christmas being less than a week away).
First let’s start at the front door. We hung a wreath (from Tar-jay) and put some battery powered LED candles with timers in the windows (so they’re auto-pilot even when we’re not there). Hallelujah, the house finally looks lived in! I mean, except for the whole it-has-no-landscaping-and-I-desperately-need-to-sand-and-stain-the-front-door thing. Also I still want to paint those white blocks behind the lanterns to match the house. Someday…
lanterns / wreath / house numbers / doormat / siding: SW Mellow Coral / ceiling: SW Breaktime / trim: SW Pure White
While things are far from finished, things are even farther from where they were this time last year. This photo is from almost exactly a year ago, and looking back is a nice reminder that wrinkly curtains and an unfinished pantry are far smaller problems to work through than THE ENTIRE SIDE OF THE HOUSE BEING TORN OFF. Here’s that whole story if you missed it (yup, we literally had to have 500 square feet removed and rebuild from scratch).
SO YEAH. It’s looking a lot better at the end of 2017 than it did at the end of 2016. And weirdly enough that picture makes me excited to get started on the duplex, because as much as I love having finished walls to decorate and finished floors to arrange furniture on, the process of planning (and dreaming about) all of the potential that’s fills the air during a big demo/rebuilding project is oddly addicting. Can’t wait to share our duplex progress as soon as we have our plans approved and all of our permits pulled!
But back to the pink house, where I’m walking you guys through every room in a little video tour of sorts: If you can’t see this in a reader, click through to view it on our blog or you can view it here on YouTube.
If you can’t watch the video right now, I’d definitely recommend dropping back in and catching it when you can (a video is basically worth a million photos and I pretty much cover every crevice and explain a lot of extra stuff I couldn’t squeeze into this post).
One recent update, after months and months of debate, is that we finally pulled the trigger and painted the railing. The vertical balusters had all already been painted (SW Stone Isle), so it was just that top rail and the post at the end that were “wood.” I’ll explain why that’s in quotes in a second. It’s hard to see in this picture since that front post is getting hit with a ton of light through the open door, but we went with a deeper gray tone (SW Perpetual Gray) that’s about 3 shades darker than the trim, so it accents the post and the top rail without being too crazy and compete-y with the standout stars of the entire house (those stained glass windows).
I know what some of you are thinking. NOOOO! How could you disgrace such old beautiful wood with paint?!?! Well, we love the old wood here. In fact, we stripped doors and floors to restore it! But this railing had been covered in a thick paint-like brown stain that showed zero grain and was sticky, roughed up, and ruined in a bunch of places (covered in paint splatters, spackle globs, and decades of other issues that had built up). After attempting to sand it down, we learned it was a darker redder wood – meaning we’d never be able to stain it to match the lovely heart pine floors. So, we reasoned that a fresh coat of paint applied nice and evenly was a heckuva lot better than its current state. And it really does look glossy and lovely in person, which makes us incredibly relieved.
The good news is that we don’t have any shortage of wood tones in this house. We have original heart pine everywhere (we stripped and clear-sealed all of the original doors that we could, brought the original floors both upstairs and downstairs back to their glory, etc). This house’s middle name could be wood. Pinkie “Wood” House. Wait that sounds bad. Forget the middle name thing.
Down in the living room, we added this cool wall-mounted bookcase, which instantly made us both say “Ahhh! It looks like an actual room people live in!” We also got to hang some cozy white curtains which need DESPERATELY to be steamed and hemmed. They’re Lenda curtains from Ikea– I just cut off the top tabs and make sure to wash them to pre-shrink them before hanging. We also have them in our home office and love how washable and easy they are. Also, my secondhand brass grasshopper (aka: Brasshopper) is a total badass and I love him more each day.
bookcase / blue pillow / curtains / rods / similar brass grasshopper
Also bought a rug from New England Loom (if you don’t follow them on Instagram you’re missing out because they have so many lovely secondhand rugs to be discovered) and the colors and patterns and antique feeling of the rug is PERFECT for a room that will be assaulted with food and sand and everything else that a rental living room has to deal with, so I have high hopes for it holding up like a champ (seeing as it is decades old already, that really does inspire confidence). That pretty blue pillow is from this Etsy shop (I love all of her pillows) and the pink one is from Target a while back. And you guys know the sofa is the Ikea Karlstad that they no longer make, which is a straight up travesty.
We also updated the light in here to this gleaming beauty from West Elm. The old light was a one-bulb fixture that we hung and immediately said “this room needs way more light.” We love the juxtaposition of this leggier modern light and the old-looking medallion (which is actually from Home Depot – shhh). And the old brick chimney that we discovered behind the wall and exposed is probably my favorite feature in the room, along with the giant windows (this room is 9′ tall, so the windows are easily over 6.5′ feet tall – that’s taller than John!). Don’t mind that TV on the floor. We found something we think will work for in there, just gotta get it out there in our next car load. #AlwaysRoadTrippingWithFurniture
rug source / chandelier / ceiling medallion /curtains / rods
The kitchen came a long way too, with the quartz island going in (it’s Pearl Jasmine by Silestone and we LOVE it so much) and a working sink. Cue the choir of angels! You can hear two ways we saved money on our quartz counters in Podcast Episode #74, which also covers why our original plan to do butcher block there didn’t work out. There are still some things missing though. Mainly, the backsplash that we’ll add after we hang the other missing element: shelves on either side of the stove under the sconces (probably two per side, not sure yet but we’ll keep you posted).
stools / quartz / butcher block / cabinets / range: secondhand refurbished / trim: SW Stone Isle / walls: SW White Heron
The back door was blue for a hot second, which some of you might have seen on Instagram, but as the room came together more John and I both realized that the same gray as the trim (SW Stone Isle) would let the pink stove do her thing and be the accent in the room that she has always been destined to become. Plus, we have a blue chippy door leading to the mudroom nearby, and one blue door + one pink stove is… enough. You know I didn’t love painting that door twice, so if I did it, it had to be done. Ha!
green vase / wood cutting board / wood stand / hanging rod / hood / kettle / sconces / pink salt & pepper
Upstairs the bedrooms are coming along with some art up on the walls, layered cozy bedding, and even headboards. HUZZAH! Still need to hang all the curtains up there (once we do that the headboard will look exactly as wide as the window because we are tricky tricksters). Stay tuned…
rug / large art / lamp / side table / striped blanket / headboard / fan
This is another view of that front bedroom, which is the largest of the four (the bunk room is teeny tiny and the middle bedroom and back bedroom are just fine but not giant). It also has that exposed brick chimney that we discovered hiding behind the wall, and next to it you’ll see my favorite craigslist find of all time that you might have already “met” on Facebook or Instagram when I shared a quick shot of it this weekend. Yes, I really did find an inlay piece of furniture on Craiglist, and yes, it’s currently selling for $2,000 on Restoration Hardware (I got it for $400!). Insert that screaming cat emoji face here. Seriously, it’s the score of a lifetime, and I’m going to share the whole story, including how I fix up a few missing inlay spots soon. So… stay tuned. Again.
And before we move on, that sconce looks crazy small above the dresser (we just hung it as a placeholder and it’s looking like a placeholder, so we’ll probably get a wider double-sconce for that spot soon). Anyway, on with the tour! Or should I say “roll the next flashback!”
This is that wall a year ago. Same house. Just nekkid a year ago versus clothed now. With walls. You get what I mean.
And now, the back bedroom. Aka: our room whenever we stay there! Although the front room is the largest and has that lovely exposed brick, the back bedroom has its own master bathroom (complete with my big beautiful clawfoot tub) and it has its own stairs that lead up to it, which are surprisingly useful. We originally thought those back stairs would be more of a fun thing for kids and a cool historic detail to preserve, but we weren’t sure we’d actually use them very much but we go up and down them all the time!
rug / fan / leather stools / striped duvet cover / pocked doors: SW Riverway
One of our bigger projects this past weekend was this built-in dresser that we added to the nook behind the pocket doors that you see above. We love gaining some storage and function in that formerly blank area at the top of the back steps, and there’s more than enough room to pull out the drawers and take like five steps back before you’d fall down the steps (you know I’d be the one to bite it all the way down these steps, so we have to make sure these things we’re adding won’t curse me later).
dresser / mirror / wood top / door color: SW Riverway
John would be quick to point out it’s not complete. We ran out of nails for our nail gun, so the trim still needs to be attached, caulked, etc. But basically, a Malm from Ikea fit pretty perfectly in the space, so we made it look even more built-in by removing and reinstalling the molding around it (see below) and adding a few skinny filler pieces to each side (scraps from our kitchen install). We also popped some leftover butcher block counter from downstairs on top to tie into the pine floors and we’re also planning to add some leather pulls to it to tie in the stools at the foot of the bed (you can see them in the shot two photos up). Can’t wait to finish it up and share the final pics!
Next let’s move onto the master bathroom, which is easily my favorite room because I get to soak in that big ol’ tub after hours of DIY and it feels so freaking good every time. Except for the first time. I had sort of a false start in there (more on that in this podcast) but now the tub and I are bros and only happy things happen when I’m in there. And the kids love it too.
marble table / floor tile / accent floor tile / wall hooks / blinds / tub color: SW Riverway
I’m basically salivating while looking at this because we’re back home and our house has two bathrooms that we still have to redo and two tubs that are about 10″ deep (half of my body sticks out like an iceberg) so I’m itching to add a deeper bathtub into my life here at home.
The hall bath is still my boo too, thanks to my favorite vanity ever. The top is tiled with marble and the rounded wood drawers make it look like a furniture piece we converted to be a vanity but it came that way and WE SALUTE IT because goodness knows we have other stuff to keep us busy. Still on the list: making built-in bunk beds, building out the pantry and the mudroom, tiling the backsplash, landscaping, etc, etc. That big round silver mirror is an awesome (and recent!) HomeGoods find (the same one in brass hangs above our mantel at home) so if you’re looking for one in either color, try HomeGoods. Target also has a really similar one that’s slightly smaller and thinner in gold.
vanity / faucet / drum stool / light fixture / floor tile
And although we haven’t built the wall to wall bunkbeds in our small-but-mighty kids room yet, we did hang art. And that’s half the battle, right? (Nope, half the battle is being halfway done with the bunkbeds, but let me lie to myself for a second, ok?). That cute colorful painting is from our dear friend Lesli Devito (remember when we house crashed her wayyyy back here) and if you don’t have one of her paintings or prints I highly recommend getting one. The door also got a sign that says Mermaids Welcome and it made my whole life to hang it up (also we took a poll among a bunch of kids and basically everyone is cool with mermaid and pirates, but don’t get me started on how split the group was on dolphins).
marble table / mermaids welcome plaque / art by Lesli DeVito
So there you have it: a tour as of yesterday of the beach house (remember: watch the video! it has approximately 98% more info than some pics and captions can convey). Also, we hope you have a very happy holiday surrounded by the ones you love and delicious food and all the mermaid-related memorabilia that your heart desires. And if you have a tub where your entire body can be submerged, know that I, for one, now know what I’m missing and am deeply deeply jealous.
P.S. To see the entire process of fixing up this beach house (from floor planning and demo to tiling and tiling and tiling and getting the floors redone) here’s a full category of beach house updates for you to flip through.
*This post contains affiliate links*
The post Beach House: End Of The Year Tour! appeared first on Young House Love.
0 notes
Last Seen Blogs

chara-chichijima-ogasawara
洋風居酒屋CHARA

ghostofcinders
Ghost Of Cinders

dusty-cakerie
comms open! | puzzling potpourri

jheart1992
Unbetitelt

jagurer
jagures