#and a circle of paper with 3 colours of washi tape on it
Text

sometimes you just need to say "fuck it. i'll make my own embellishments"
#trans#junk journal#mudposting#this is: a diy brad kit base that i painted white just for pretty edges#and a circle of paper with 3 colours of washi tape on it#and some like. dollar store 'liquid laminate' stuff on top!!#its in the foam so it can dry upright#im making a trans page#and have done away with subtlety for it#partly cuz i want to#partly cuz its hard to make a subtle trans page without it looking like a cishet gender reveal type page#so this is my answer now that ive made a secret book for this type of thing#which sssshould conclude my queer series#probably#maybe#i might add a couple that i otherwise havent#but im pretty happy with what i have#and then i will post it#in june#ill wait#for fun#gives me time to think too gjsjxjd make sure im happy with it all#anyways#im still crafting yall i just like#never post
2 notes
·
View notes
Text
Wrapping up my Etsy orders gives me warm fuzzies.
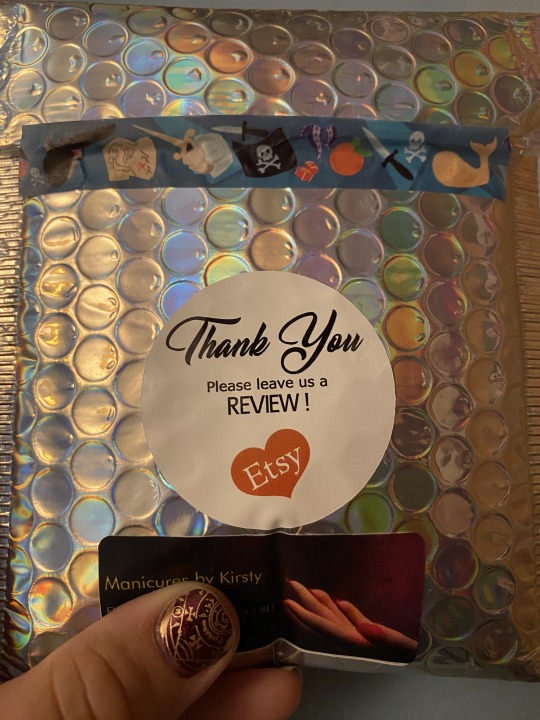

So with my (mostly Good Omens and Our Flag Means Death) themed etsy orders, I like to make my customers feel like it's their birthday even if it isn't. (I can't always do the outside of the envelopes like this on international orders due to huge customs labels taking up space, but I like to on UK orders).
So they get a pretty holographic envelope, some fun washi tape to unwrap first, then inside you get a hand-written thank-you note from me, some free stickers (OFMD or GO, depending on the theme of what you've ordered, as a little bonus present), pretty organza bag, and usually (mostly for the rings), pretty sparkly wrapping paper and different fun washi tape. EG kraken rings get kraken washi tape, snake rings get snake skin print washi tape.
It's not just an order, it's an experience.
Anyway: https://www.etsy.com/shop/manicuresbykirsty
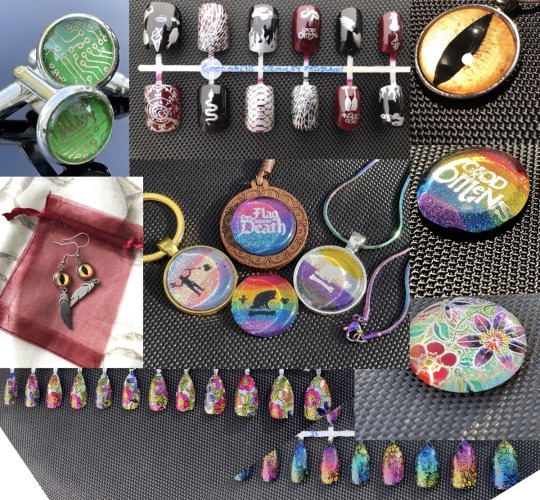
I also do hand painted cabochons to set into badges, bracelets, keyrings, and pendants, with a variety of necklace options, including metal-free for those with allergies. I specialise in rainbow holographic pride flag designs which you can have your pronouns or fandom themes on top of - eg nonbinary flag with Stede Bonnet's flag over it, or pronouns, or instead of a flag, just a fun, colour shifting, magnetic multichrome background with something like the Good Omens logo on it, or Aziraphale's summoning circle from the bookshop.
I have a load more designs I can do, and with neatrly 2,000 different polishes in my collection, I can match almost any colour, so let me know what you have in mind and I can do a custom commission.
I also do custom nail art on re-usable press-on nails, which can be worn for repeated short-term wear, eg for a night out or a weekend, then taken off again for work the next day easily, and re-worn again as many times as you like, without damage to your natural nails. Perfect if you can't wear nice nails at work or school.
If you're stuck for a Christmas gift for someone, let me know and I can brainstorm something they'll love. I'm a disabled artist and money is tight right now, so even if you can't order at the moment, please feel free to share, as every little helps!
Thanks <3
#good omens#our flag means death#ofmd#good omens art#good omens fanart#good omens jewelry#ofmd jewelry#fandom jewelry#pride flag#pride badges#pronoun badges
18 notes
·
View notes
Text
Handbook Notes: How to use washi tape for decoration
The "handbook trend" is all the rage, I'm sure we all know washi tape is a great helper for handbooks, but how to use washi tape to make handbooks? Read on to find out how to use washi tape to decorate your handbook.
What is washi tape?
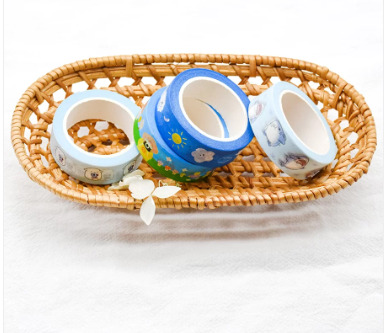
Washi tape is a type of washi tape made from translucent Japanese washi paper, which is close to paper and can be torn off manually.
What is a notebook?
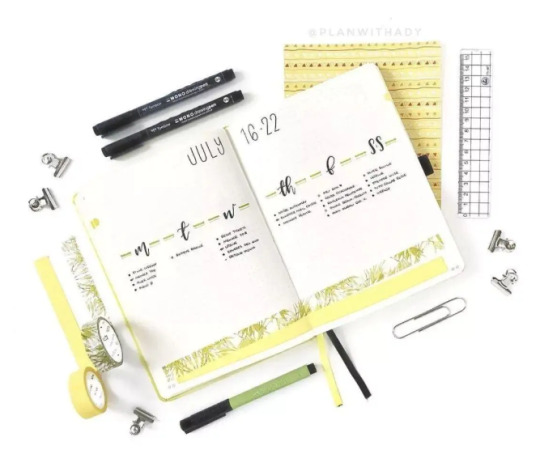
It is a superb booklet of schedules, life lessons, reading tips, spending money and even an encyclopaedia, with beautiful hand-drawn illustrations and decorated with washi tape, stickers and stamps.
How to decorate your handbook with washi tape
1. Pull-tabs
A strip of washi tape is a straightforward way of using a long strip of tape, so that the pattern can be fully displayed with a lot of flair.
Stick it on the edge of the page to make a border: full, half or incomplete, with different washi tape colours.
Stick a frame with washi tape: an easy way to create a layered look and a convenient way to lay out a page. You can also stick many boxes on the page.
Pull-up strips for half a frame: for example, criss-crossed pull-up strips for borders, which are atmospheric and stylish and also make the page easy to typeset.
Pull strips to fill the page: pull one, pull strips in the margins can make the page fuller; one is not enough, two, the same colour is too monotonous, two colours.
Pulling strips to partition the page: the partition is more obvious and the page is fuller.
2. Collage
Two strips of washi tape torn together: use as a border divider, or to decorate a blank space, creating a casual look.
Crossed collage: two strips of the same colour together for a harmonious look.
Three or more washi tape collages: can be used as backgrounds for patterned photographs or as decoration for blank spaces. It has a retro taste and a heavy sense of age at once.
3. Tear a small strip
A piece of washi tape to decorate a blank space: when you encounter a blank space in your handbook that is not filled, you can tear a piece of washi tape and stick it on, for a richer picture.
A piece of washi tape as a background for a title: for example, use black washi tape as a background and write the title in white highlighter, it's refreshingly simple, consistent and classy.
Make a background for a picture: add layers and make the picture more visible.
Using washi tape for the pattern: adds a sense of vibrancy to the page
A piece of washi tape for typographic partitioning: partitioning with washi tape is intuitive.
4. Cutting washi tape
Cut out washi tape patterns and combine them to make stickers: Use the elements of washi tape to combine them into a new image, where each element of the washi tape pattern can be reused.
Cut washi tape into shapes: into strips, cutting washi tape thinner as needed; into circles and squares to make labels for lists.
5. Other
Stick pictures or sticky notes: two in one.
Indexes: can be made into indexes for handbooks and books, which are also beautiful.
After reading the above, are you a bit itchy to buy washi tape, you can contact Washi Mill to order by visiting https://www.washimill.com/ or call +86-15999751683.
0 notes
Text
ATEEZ as students studying
HONGJOONG:
king of self-care! but studies for 15 minutes then take a 2 hour break and calls it self-care (omg he thinks he’s me or smth)
has power naps every single day at least 30 mins because he’s Stressed
always thinking of ways to drop out during the middle of lectures
that one kid that talks to nobody & sits at the back of the class with his hood on to hide his airpods
doesn’t do it anymore bc one time it disconnected and “there’s some whores in this house” blasted out loud & now he’s paranoid
shows up to group studies but lets the group carry him,,, but he puts out One Really good idea to get his name on the paper
only cares about topics he’s interested in, other than that he’s just astral projecting
“yo can you send me your answers so i can compare mine?” but he copies it and says “we got the same answers” (all men do is lie</3)
calculates his marks; “ok so i need at least a 80 on this...oh wait no, a 95...damn okay...”
the type to arrives late with ice coffee
SEONGHWA:
wakes up at 5 am to study instead of staying up
scented candles and lofi music for the ~studying mood~
a linguistic learner
learns best by teaching others so he’ll do group studies often to help other people
teaches people without making them feel dumb
uses grammarly for his emails with 3 paragraphs asking 1 question with a proper greeting and a ‘sincerely, park seonghwa’
professor: ok - sent from iphone
you’ll never see him during exams week, he’s Gone
a loyal user of the outline method
his desk must be cleared at all times! a clean workspace makes it easier to focus
brings extra pencil just in case anyone needs them bc he’s the sweetest person ever (he’s fully aware that he’ll never get them back but it’s okay bc sharing is caring)
does his readings on time (you’ll never catch him slacking)
actually has his shit together for the most part 1/2
YUNHO:
writes “i love you” or “sorry” at the end of his tests (that he bombed)
the type to ask you to print “just one thing real quick” and it’s 15 page and at 2 am
uses emojis like :D & \(^o^)/ when sending emails to his professors
has a bad habit of copying word for word on the slide and he doesn’t actually understand/learn anything
goes to the library bc he thinks that’ll help him be in the ~studying vibe~
it doesn’t. ends up texting or watching youtube gameplay
has never heard of the colour-coding system in his entire life and ends up with a page filled with neon highlight
snacks breaks are the only thing keeping him Normal
leaves himself an encouraging note at the end of the reading page so when he’s finished he feels good !!
friends with all of the professors and uses all office hours
strongest points are his guessing skills in multiple-choice questions (process of elimination ftw!)
he tries his best, doesn’t care about marks that much because he knows it doesn’t determine him (and he’s right!)
YEOSANG:
probably runs a studyblr/gram
has the cutest note ever, his handwriting is so pretty!!
he thinks that buying an ipad pro & apple pencil will make him smarter
likes it bc he can doodle on it then erase them easily :”)
has to wear blue ray glasses because of how he looks at a screen so much
mildliners, muji 0.38 gel pen, 6 ring binder, minimal planner, washi tapes, you name it! he visits muji and daiso every other week
buys wayyy too many planners and notebooks which he never ends up using
only uses pastel mildliners because they’re easy on the eyes. cringes every time he sees yunho’s highlighters v_v
his flaw is that he spends 10 mins writing his header with brush tip pens
mutes the group project gc but gets his part done like the good classmate he is
sweats every time he gets an assignment back, takes a whole ten minute to mentally prepare himself
a visual learner; makes mind maps, flow charts, etc
actually has a working printer that he uses pretty often to prints lessons before class just to be Extra prepare
tells everyone he slept well but his bullet journal habit tracker for sleep says otherwise (plz rest!!)
exclusively uses college ruled paper like the sane person he is
SAN:
uses wide-ruled paper (unfortunately not everyone is perfect</3)
starts off very positive, motivated, and organized
then everything goes downhill by the second week
will definitely set byeol on top of his keyboard, take a picture, and send it to his professor as an ‘excuse’ as why he needs an extension (it works)
can’t sit still for any longer than 30 mins, his legs are always bouncing or fidgeting with pen
flashcard king! spends a lot of time on them but it’s worth it
a utensil chewer (always willing to share his pencil but when ppl saw the bite marks they’re like No Thanks >_>)
can’t study well with groups or himself bc he’ll be distracted,,, so he needs one person that can ground him bc when they’re in the zone, he will too be on his x game mode
sends his assignment at 11:58 pm hoping his professor will take the Hint (plz don’t be afraid to ask for help u_u)
prefers listening to ghibli studio soundtracks but then he either gets emotional or sleepy
sometimes forget to mute his mic and we just hear him groaning in frustration
“haha sorry i just stubbed my toe...”
then mutes his mic and goes back to his mental breakdown
MINGI:
the only person that studies every single day just to get his brain used to the information and running
probably listens to anime op or edm music for that Energy Boost
everyone either hates or love him because...
1. loves him bc he always comes clutched with study guides (and willing to share if he likes you enough)
2. he’s good at everything even if he’s not paying attention/doing it last minute
just naturally good at retaining information and applying them
asks Big Brain question that even the professors are shook
sometimes he gets super into the topic and wants to know Everything
“i’ve never failed an exam in my life” and he’s right! big brain mingi
fetal flaw is that he forgets easily (hence why the last minute) and has to write on his palm as a reminder
clicks his pens All the time so he switched to pens with caps just to keep others from jumping him
takes naps 10 mins before classes
actually has his shit together for the post part 2/2
“if no one got me, i know khan academy and quizlet got me. can i get an amen”
WOOYOUNG:
y’all know that one mf that doesn’t have a pencil?
yea he’s been using the same one someone lend to him before a test and never returned it
it’s been two months and it’s still working well and they’re never going to get it back
a minimalist,,,, but in a bad way</3 bc he carries his stolen pencil and paper that he spilled his energy drink over and that’s about it
just throw loose papers in his bag and forgets about their existence
doesn’t do binders or notebooks, just crumbled up paper
sometimes carries a textbook just to show everyone that he’s got his life together
really noisy for No reason, always wants to know other’s marks
a kinesthetic learner
hides his screen with he gets the kahoot questions wrong (you’ll never catch him slippin)
plays coolmathgames.com during class
doesn’t really know what to study/prioritize so he overwhelms himself with every single topic ever
thinks he’s god by pulling an all-nighter to look at the 60+ slides last minute
Swears he’ll change and do better next semester,,,</3
goes to the cafe, takes pictures of his notes & laptop, post it on his story, then leaves
JONGHO:
thrives off of red bull and ice americanos
gets notes and study guides from his upperclassmen because everyone loves jongho
an audio learner so he’ll probably work out or go on a jog while listening to lessons/audiobook
never pulls all-nighters bc it messes up his sleep schedule and says he’ll do it in the morning but he never does
doesn’t even own a highlighter, he’ll circle or underline stuff with a red or black pen
has never touched a textbook in his life
only the study guides and slides, his textbook is collecting dust rn
his notes are literally Only for him because his handwriting only makes sense to him
has questionable handwriting,,, it’s like decoding
multitasks a lot but it ends up taking a lot longer than he wanted to (bc it’s a myth)
very spontaneous; he’ll grind for 5 hours straight but sometimes he won’t even touch a pencil
works best when he talks about the work in groups and share information with each other, like having a convo about the topic
unmutes his mic Once after the lesson to say “bye”
does his work right after the lessons but then takes a short break & doesn’t even Look back for the rest of the night
-
a/n: tag yourself ! i’m a bit of hohong (i projected myself on all of them in some way lmaooo)
#ateez#ateez scenarios#ateez imagines#ateez drabbles#kim hongjoong#park seonghwa#jeong yunho#kang yeosang#choi san#song mingi#jung wooyoung#choi jongho#ateez writings#ateez hongjoong#ateez seonghwa#ateez yunho#ateez yeosang#ateez san#ateez mingi#ateez wooyoung#ateez jongho#tried to put both online and in class stuff so yea :>
146 notes
·
View notes
Text
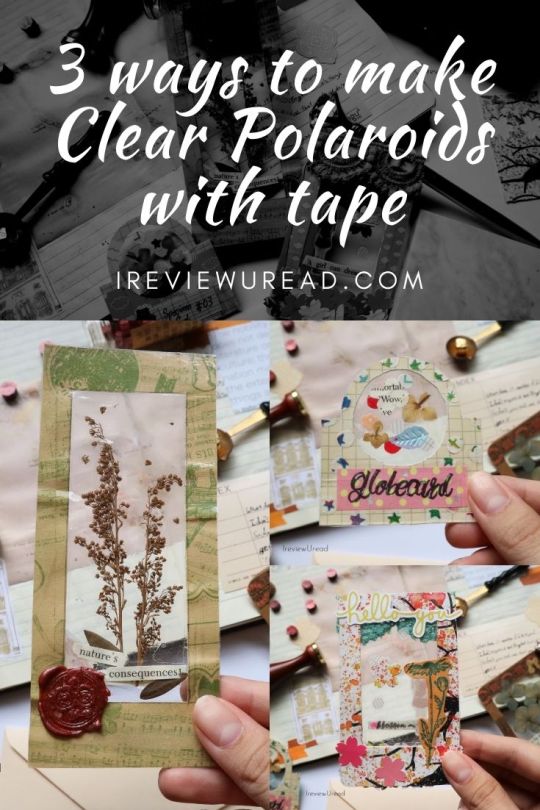
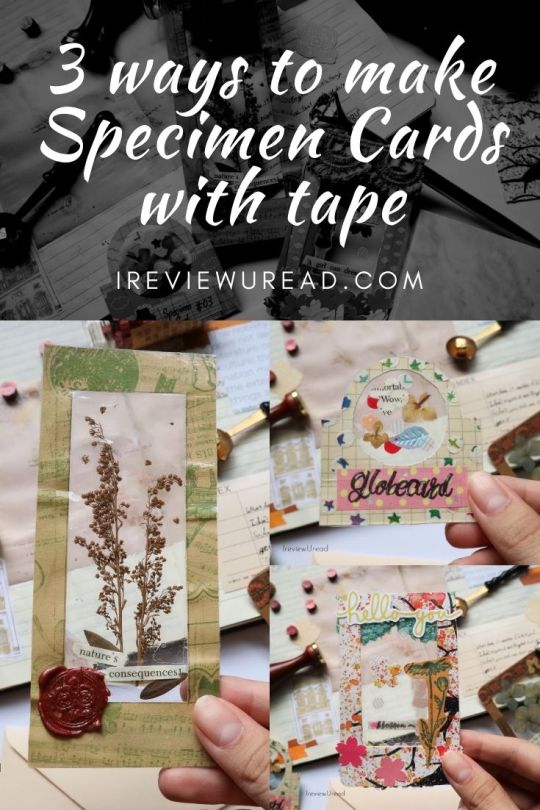
3 ways to make Clear Polaroids & Specimen Cards with Tape
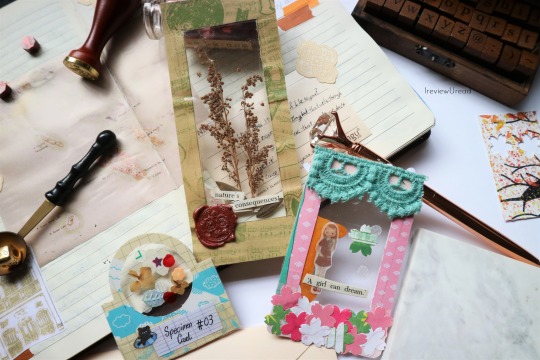
3 ways to make Clear Polaroids & Specimen Cards with Packing Tape
youtube
youtube
I got inspired to create these after watching Job’s Journal Clear polaroid video. He used an instant lamination sheet that does not requires a laminator to work but that is still a little pricey for me. Thus, I decided to take the low budget approach to this situation. I decided to use clear packing tape instead. Since clear packing tape is wider, it gives you a wider window. You can still use the regular tape but that will give you narrow windows. An idea is for you to slightly overlap or put the tape side by side to give you wider windows but you’ll see a straight line in the middle of your specimen cards. As such, we’re using clear packing tape in this DIY.

Image from IjournalUsee
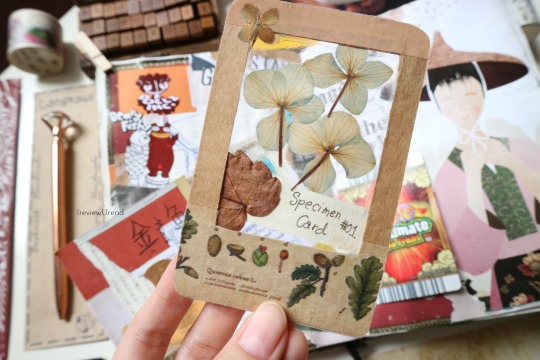
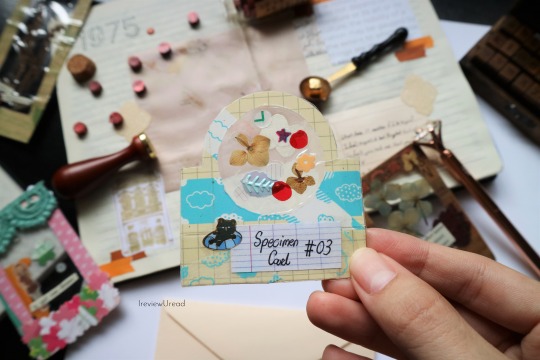
This is the first clear Polaroid with packing tape creation that I created. I used a thin cardboard packaging that contained my washi stickers as the polaroid. I covered the parts I don’t like with washi tapes. These flowers are from the Bloom Box that was sent to me. I pressed and dried the flowers for a few months before using it.
Featured in Job’s Journal video
At the back, I put the number on the quote so that I can track the number of specimen card I’ve made. Mainly it’s because I have no idea what to write there as well. I like how you can see the back of the pressed flowers and leaf. Every vine and every line could be seen without worrying that they will be destroyed if you touch them. The thing I am unsure is how long the colour on the flower would stay when kept in between tapes but I guess we’ll find out in a few years.
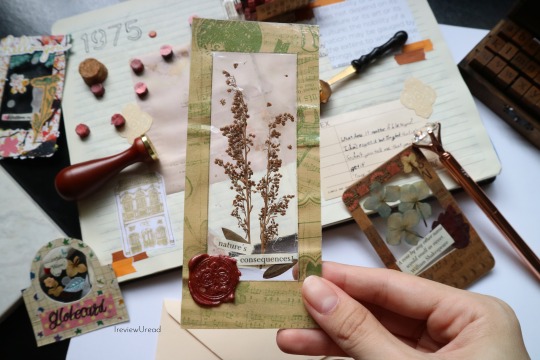
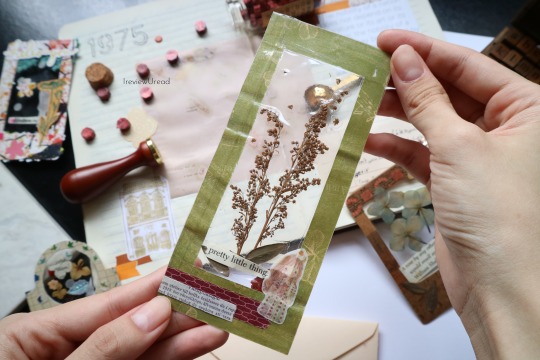
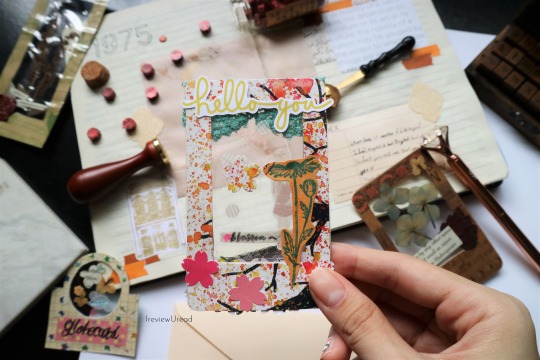
Long Specimen Card with a Wax Seal
The first tutorial that I featured in this tutorial is a long specimen card with a wax seal. I used a filmsy double sided craft paper for this that’s why the edges looked so crumpled. The end result is also not what I expected for the paper is too flimsy to be a window card. I would suggest that you use a thin cardboard or the back of a sticker sheet as your base instead.
Another suggestion is for you to leave a part of the base uncovered so that the wax seal can adhere more firmly to the card. Using pliers is a good tool to have for those who can’t handle small items because your hand would shake. It gives you better precision as well. Lastly, after measuring the amount of packing tape you need for the project, leave the tape at the side for a few minutes before using if not the static will suck up the scattered leafs and strips of paper, ruining your planned specimen card design.
How to make a Long Specimen Card with Wax Seal?
Cut a long rectangle.
Draw a smaller rectangle 2cm from the sides. Make the bottom smaller by drawing 2.5cm to 3cm from the bottom instead.
Cut out the smaller rectangle.
Measure the amount of clear packing tape you need to cover the inner rectangle and cut it out. Leave the tape to the side.
Arrange your dried flowers and other items accordingly.
Paste the packing tape that you have left to the side onto the card.
Flip the card and press the packing tape down.
Flip to the undecorated side and decorate it ensure that things doesn’t show on the other side.
Seal it up with another piece of tape when you’re done.
Cover the sides with tape too. Leave an area open for the wax seal
Add the wax seal.
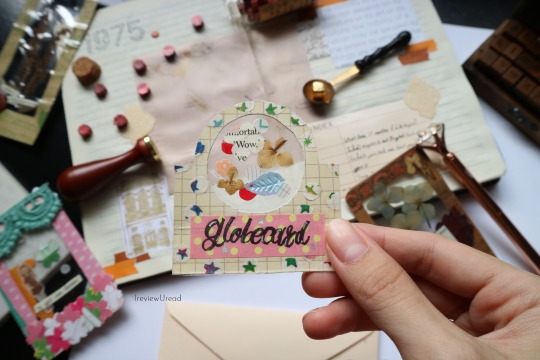
2D Globe Clear Polaroid Card
This globe polaroid card is a 2D stagnant version of the shaker globe. I used a hole punch and cut out multiple patterns from a washi tape to decorate the side of the card that was plain. I then put a variety of decorations in to make it more appealing.
How to make a 2D Globe Clear Polaroid Card?
Prepare the items in the window:
Translucent circle - Use a single hole punch to punch out a few translucent circles.
Book page flower - trace a pressed flower on an old book page and cut it out.
Washi and sticker circle - Cut the parts of the washi tape and stickers into circles
Cut a circle in a thin cardboard
Arrange the prepared items, dried flowers and shiny trinklets in the window.
Measure the amount of clear tape you need and leave it aside.
Decorate the bottom of the card.
Seal the items in with the tape.
Flip to the other side and seal it in.
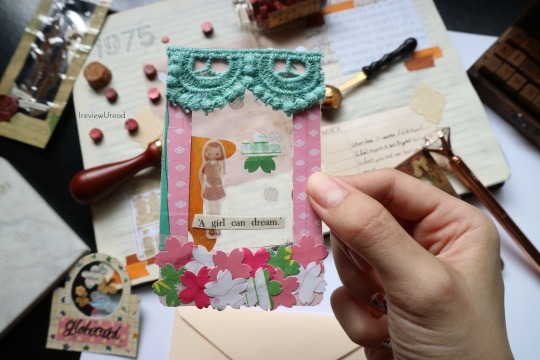
No Dried Flowers Window Card feat. lace
This last one is created is made specifically so that there’s no dried flowers in it. That means you can send it out in your mail without worrying that some countries doesn’t allow dried flowers. I used lace at the back to resemble a window’s curtains and I stacked the sakura flowers cut out to resemble the flower bed. I also kept in mind the 2 sides of the inner items so that each side have their spark.
How to make a No Dried Flowers Window Card with lace ?
Cut out an inner rectangle, 2cm border from the sides, 3cm from the bottom.
Paste the side that is filled with advertisement with scrap paper.
Use a puncher and punch out multiple sakura flowers for the flower bed.
Measure the lace according to your card size and cut it.
Cut out the quote from an old book.
Place the items in the frame and put a clear tape over it.
Flip to the other side and do the same.
Paste the frame, the sakura flowers and the flower stamps on the frame.
Pin me on pinterest
1 note
·
View note
Link
How to make a nappy cake
This beautiful baby shower centrepiece takes nappy cakes to a whole new level. Maxabella shows you how to make this pretty-in-pink floral gift that any expectant mum will love.
Create a clever illusion and wow your friends with a nappy cake! This nappy cake is a practical baby gift – it’s made with baby lotions, baby powder and bath wash as well as 50 newborn nappies and colourful hairbands. I still like to think it’s a grown-up kind of cake. Baby gifts are really for the mum and dad after all …
Like so many handmade gifts, a nappy cake looks thoughtful and impressive, but it’s not at all hard to put together.
What you need
50+ newborn nappies
4 bottles of baby products – we used a baby wash, powder, shampoo and lotion
3 extra-large elastic bands, 1 large elastic band and 1 medium elastic band
50 hair elastics (or elastic bands)
Scissors
Pretty wrapping paper
Pipe cleaners /washi tape /baker’s twine (depending on how you want to decorate your cake)
What you do
1. Roll the nappies
Roll each of the nappies and secure with a hair band. To keep things neat, roll the ‘open’ end of the nappy first. When you secure the roll, make sure the band is in approximately the same position for each nappy.
2. Add the baby products
Arrange the baby products in a circular group and secure together with an extra-large elastic band. Add a second extra-large elastic band.
3. To create the first tier of nappies
Tuck the rolled nappies under both elastic bands so they circle the baby products. Tuck a second layer of rolled nappies under just one of the elastic bands (leaving the second elastic band to hold the first layer of nappies in tight). Wrap sides with wrapping paper.
4. To wrap with wrapping paper
Cut long strips of wrapping paper and fold in both ends to form a neat edge. Wrap around each tier of the cake and cut to size. Secure the ends with some washi tape (or normal sticky tape if you prefer). Alternatively, you can wrap each tier in a large ribbon and tie with a bow.
5. To create the second tier
Put the large elastic band around the top of the baby products and tuck a layer of rolled nappies under it so they sit on top of the first tier of nappies. Wrap sides with wrapping paper.
6. To create the top tier
Make a bundle of seven rolled nappies and secure with the medium-sized elastic band (or tie with baker’s twine as here). Put this layer of nappies onto the top of the cake. Wrap sides with wrapping paper.
7. To decorate the top
You can add a present bow, curls of ribbon or make your own flags, bunting or flowers.
8. To make the flowers
Cut two large flower shapes and two smaller flower shapes from your wrapping paper. Pierce the centre of the two large flowers with a pipe cleaner and thread through. Add the two smaller flowers to the top and fold the very tip of the pipe cleaner over to secure. Rotate the flowers so the petals form a circle. Crush the petals upwards then peel the layers back to form your flower.
9. To make the flags
Fold a piece of wrapping paper in half and, starting at the folded edge, cut inwards to make a triangle. Unfold the triangle to make a diamond shape, add glue, put a pipe cleaner along the folded line and fold the triangle to form a flag.
To make bunting: Cut the flags as per instructions above and glue them along a piece of baker’s twine. Tie each end of the baker’s twine to the top of a pipe cleaner with a neat bow (you could also use a skewer).
Enjoy making your friend this lovely present and best wishes to her and her new baby!
Watch video
0 notes
Text
33 DIY Living Room Furniture Tasks You Will Need To Take
And they are often remodeled into this straightforward paintings with just a few wooden stain and glue. If you haven't began collecting them, there is no time like the current! The flowers will wilt after some time, but that simply makes way for a new art and a decor refresh!
seventy two. E-book Web page Wall : Need to fill a variety of space shortly? sixty nine. Duct Tape Canvas Art : This might easily be the quickest and most cheap piece of wall art you can make. 68. Colour Block Painting : The gold stripes on this portray make it really feel especially glam.
After getting them on the wall, simply start applying the thumbtacks. 65. Hex Nut Wall Artwork : Raid the ironmongery store or your stash of unused IKEA fasteners to make this geometric patterned art work. sixty four. Mini Chalkboard Portraits : You possibly can DIY this artwork again and again, but we love the thought of hand drawn household portraits on these mini plaques.
56. Washi Tape Frames : The frame is half the battle when hanging wall art. 51. Cupcake Wrapper Wall Artwork : Who knew cupcake wrappers could be so chic? We're betting visitors will be drawn to this feathery wall artwork.
forty six. Chevron Out of doors Wall Artwork : This gorgeous outdoor art was constituted of salvaged items of lumber from an interior renovation. They are often reworked into colourful floating shelves with just some coats of paint. forty three. Shoebox Wall Art : Do not recycle these shoeboxes just but!
forty one. DIY Living Room Decoration : Speak about double responsibility artwork! forty. Geometric Patchwork Wall Artwork : We love the idea of art work in place of a headboard, and this simple geometric paper thought is at the high of our listing. The secret's to start out with a hexagon, then add the lines to make it look like a cube.
33. Wooden Stick Wall Art : Now we have a critical crush on this optical phantasm wall art. 32. Junk Mail Wall Artwork : Would you ever guess that this cool summary piece was produced from spam from Crate & Barrel? Begin with paint chips, of course!
25. Glowing Hearts Wall Artwork : Use battery powered string lights to make this glowing murals. 23. USA Wall Artwork : This piece is such a great take on the transport pallet. 22. Print Your Own Wall Artwork : Have a favorite image you wish to enlarge and print in your wall?
18. Triptych Chevron Wall Art : Glam up your dining room with this straightforward chevron paintings. sixteen. Gold Leaf Map Wall Artwork : What a fun idea to gold leaf a portion of this deconstructed map. 15. Material Animal Silhouette Wall Artwork : That is the perfect mission for nursery.
14. Circle Punch Wall Art : An important stash-buster undertaking, this paper art work will be made with wrapping paper, scrapbook paper, and even old greeting playing cards. When you're done painting use a wet paintbrush to blend the colour transitions. 13. Ombre Quote Wall Artwork : The important thing to creating this ombre artwork?
10. Washi Tape Dot Wall Art : Make your own polka dot wall decals with this straightforward tutorial. This framed silk scarf adds coloration sample and texture to the room. 9. Framed Scarf Wall Art : Who says you'll be able to only body paper goods?
8. Clipboard Wall Art : These stenciled letters are a fun twist on typographic art. Using gold coloured thumbtacks really elevates this piece to a murals. 4. Thumbtack Wall Artwork : Who knew office provides may very well be so chic?
3. Postcard Wall Artwork : Whether it's a set of postcards like these Penguin classics covers or a random assortment, utilizing a group of postcards is an affordable art solution. Straightforward to Paste the decal without any messy paint and brushes. Those wall stickers will add enjoyable to your house or enterprise in jiffy.
1- Add no less than a hundred.00 AED of eligible items (through which case all other eligible objects in the order also ship free) to your Purchasing Cart. Easy to put in although greatest completed with two individuals for visuals when sticking onto wall.
0 notes
Text
5 Ways To Use Washi Tapes | IreviewUread DIY x Sticky Rice Sisters
youtube
It’s been a while since I created a DIY video and since we’re all stuck inside exercising, baking, I thought why not let’s add crafting to the mix. In this DIY tutorial series, I will be showing you 5 ways that you can use washi tapes. These 5 ways include using washi tape in art, in a card and in journals.
Sticky Rice Sisters
Sticky Rice Sisters is a pair of half Taiwanese and half California sisters that operates a kawaii stationery store. I’ll be collaborating with them for this washi tape craft. You can check out more washi tape crafts on their blog. They will be creating 3 washi tape crafts:
Washi Tape Photo Frame decoration
Differentiating wires
Differentiating cups/straws
Blog | Youtube | Instagram
*Do note that their crafts will be up on a later date. So I will update this post again when their post is up!*
youtube
5 ways to use Washi Tape
Jumping back to my washi tape crafts. I’m presenting 5 different ways you can use washi tape. :
Washi Tape Sliding Art Card
Washi Tape Suncatcher card
3 ways to decorate your journals
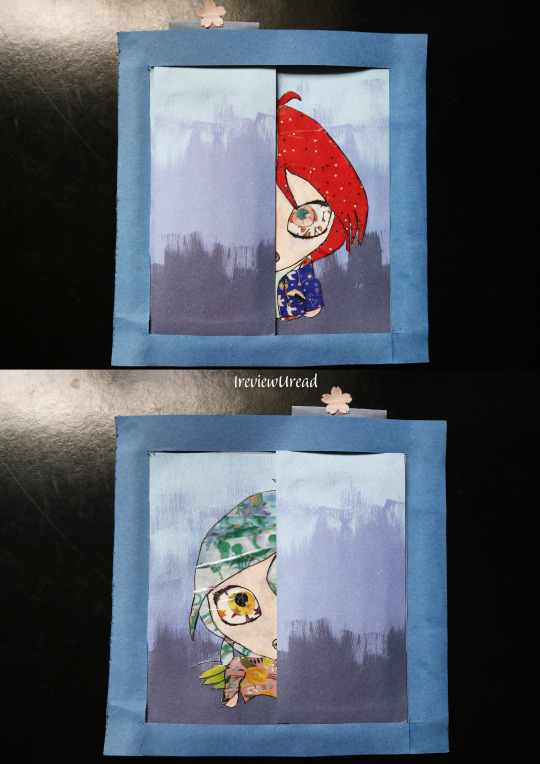
Washi Tape Sliding Art Card
The character in the frame is Will Vandom from W.i.t.c.h. I was inspired by my recent W.i.t.c.h. Journal with me collaboration spread. On one side, I feature her as a normal teenager and on the other side, I feature her as a guardian. I drew her in pigtails instead of her usual guardian form for I want her to look more spectacular than normal. However, this does kind of remind me of Haylin’s hairstyle. I will be featuring the full time-lapse of me creating this washi art piece in another video (will update this link once it’s out).
The slider is removable and you are able to journal or write a hidden note at the inside of the slider. This is a versatile piece that you can turn it into a card, a journal page or leave it as an art piece. You can change the internal design, the frame and the background. All you need is the basic mechanism to create it.
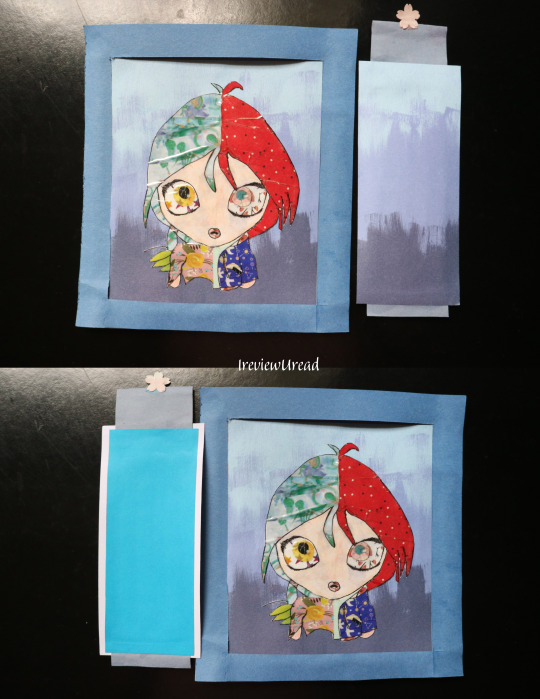
Washi Tape Sliding Art Card Steps
Draw the picture you want. You can print a picture or get a photo if you don’t want to draw
Use washi to colour the drawing if you chose to draw
Paste your picture on a background. Cut an extra portion half the size of the background to make the slider
Create the frame’s base and stick the background onto the middle of the base. Create the frame as well. The frame should be as big as the base but with the middle square cut out.
Paste a holder on the top for you to hold when sliding the slider and a little foot roller piece at the bottom so that the slider won’t fly out when sliding the slider
Paste the sides of the frame and the bottom half of the bottom frame. Leave space at the bottom frame for the slider to move. Insert the slider from the top to reach the bottom.


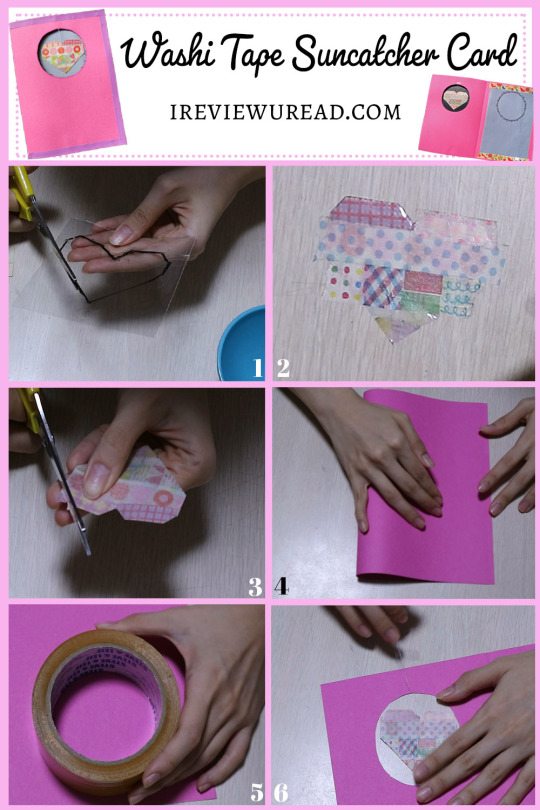
Washi Tape Suncatcher card
In the darkness, there is light. By raising this card up towards the sun you are able to see two sides of this washi suncatcher. The stronger patterns from the front show up more in the back while the lighter patterns in the back act as the background. Like a bass to a band. Like the previous DIY, this piece is also very versatile. You can change the suncatcher and the card’s patterns and design as you wish. I’ve included the template and the measurements of the heart I feature in the video for your reference. Do remember you can change the suncatcher shape and design featured int he video.
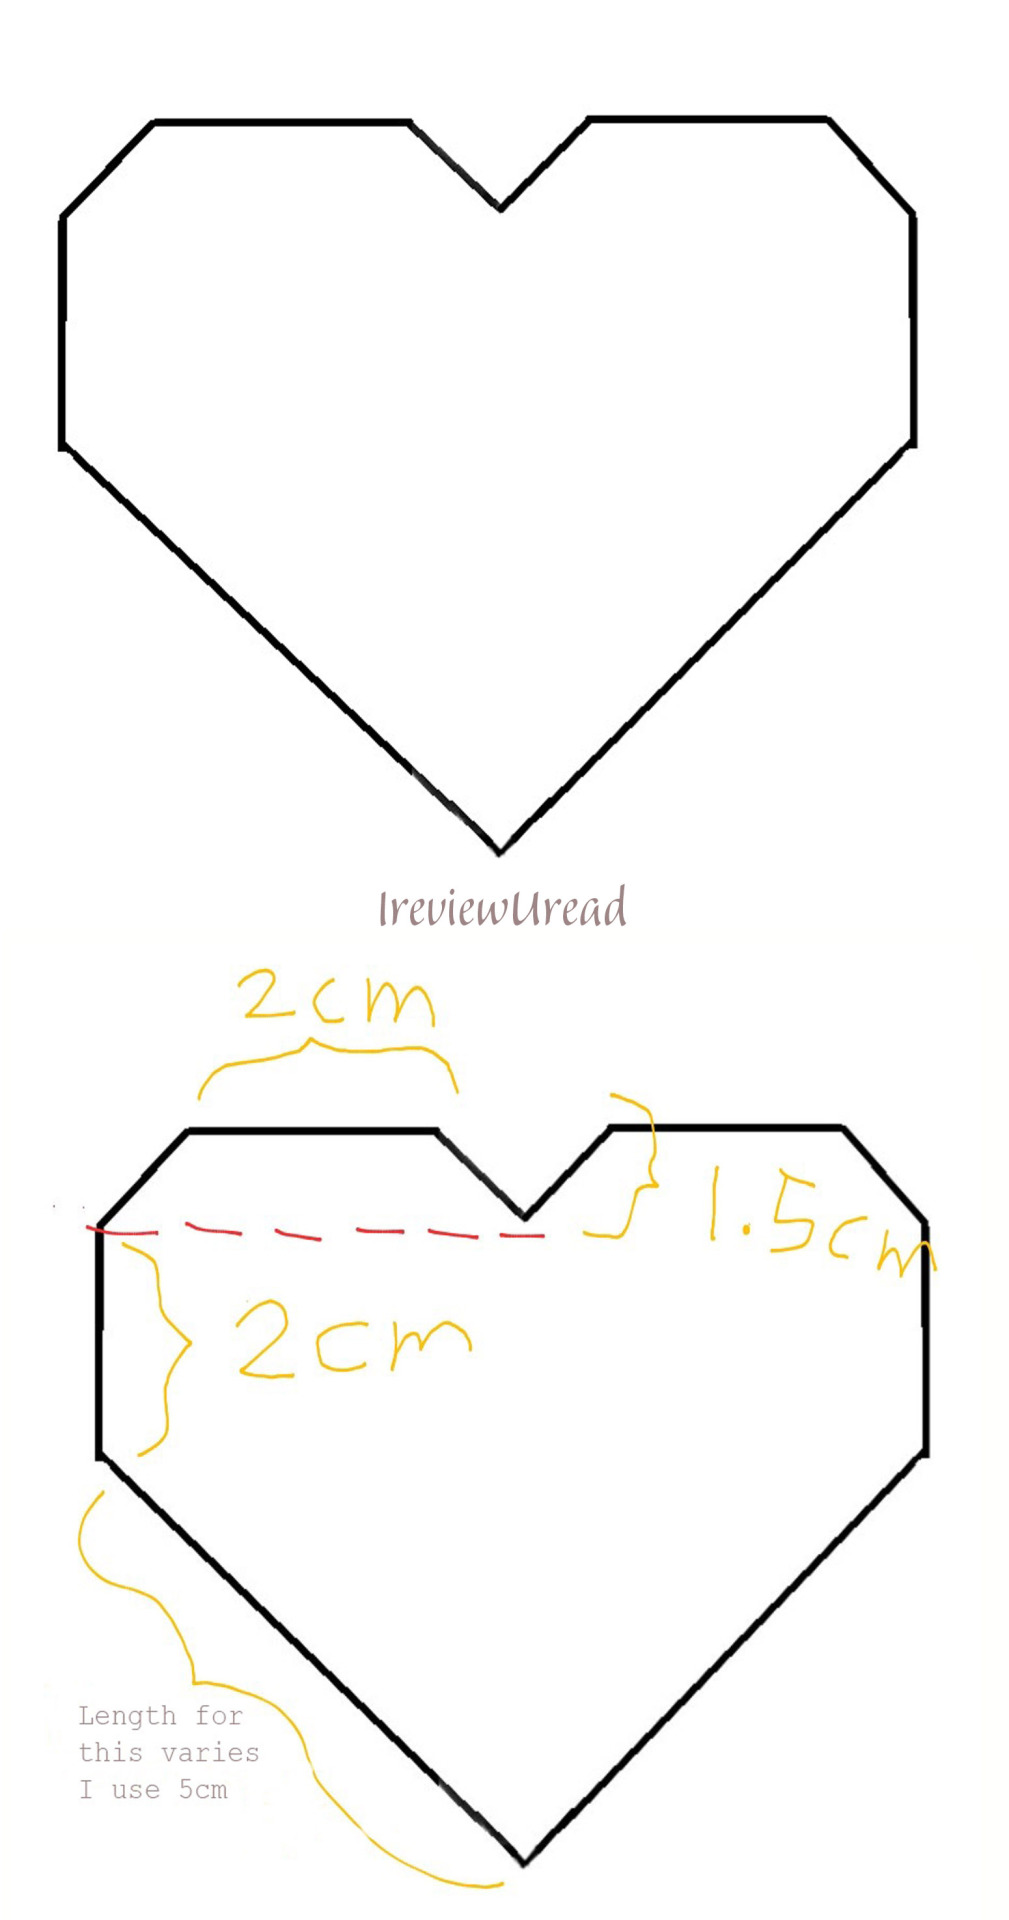
Washi Tape Suncatcher Card Steps
Draw half a heart using the template with a whiteboard marker on the plastic waste. Fold the plastic in half and cut it to create the perfect heart. Wipe off the marker traces.
Paste different washi tapes on both sides of the heart.
Trim off the excess washi tapes
Fold the A4 sized construction paper in half. This will be your card.
Measure the heart and draw a circle on the first page of the construction paper. Ensure the circle is able to fit the heart. Cut out the circle.
Sew the thread to the top of the heart and the top of the circle. Tie a knot in both of them and secure the knots with a small piece of washi tape.
You can decorate the internal of the card however you like.
We’re moving on to the journal portion of the tutorial. In this journal, I feature 3 ways to decorate your journal. You can use these 3 ways in separate journal spreads or in the same spread.
3 ways to decorate your journals
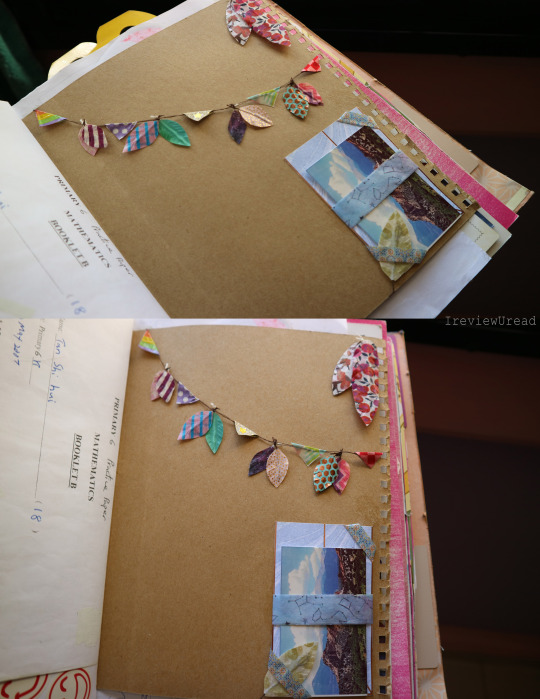
Washi Tape Feathers
Washi Tape Flag
Washi Pockets
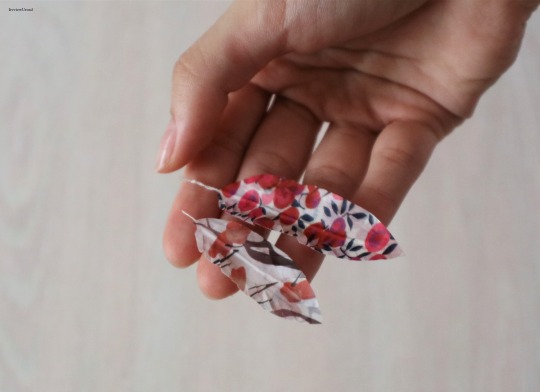
Washi Tape Feathers
Cut 3 pieces of threads of the same length and braid them together. Tie the ends. you can use 2 pieces of thread as well but 3 pieces will give the stem more thickness.
Tape 1 side of the braid with washi tape, leave an end out.
Tape the other side in the same area.
Cut the tape into a shape of the feather.
Cut diagonal lines downwards throughout the leaf.
Push the feathers in opposite directions for them to look more natural.
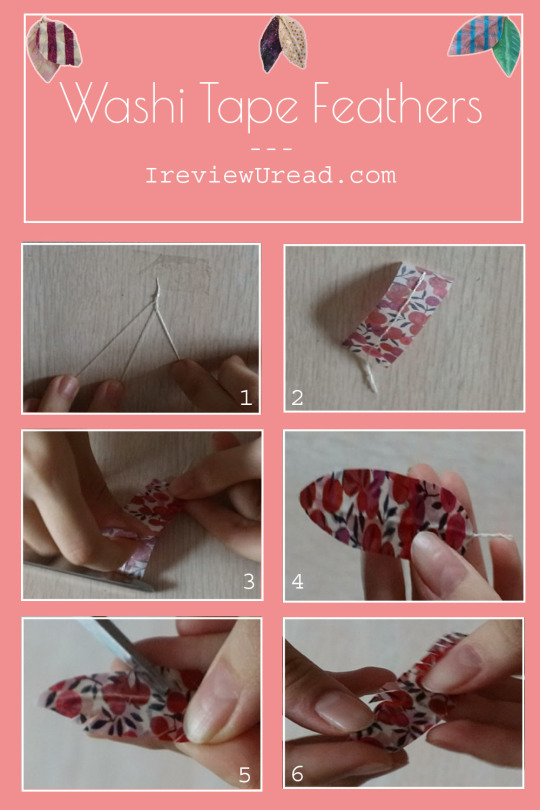
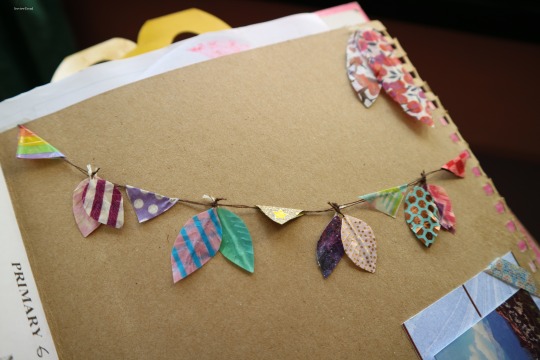
I’ve added the feathers to the flags for I feel that it helps give them depth and fills the space in between the flags.
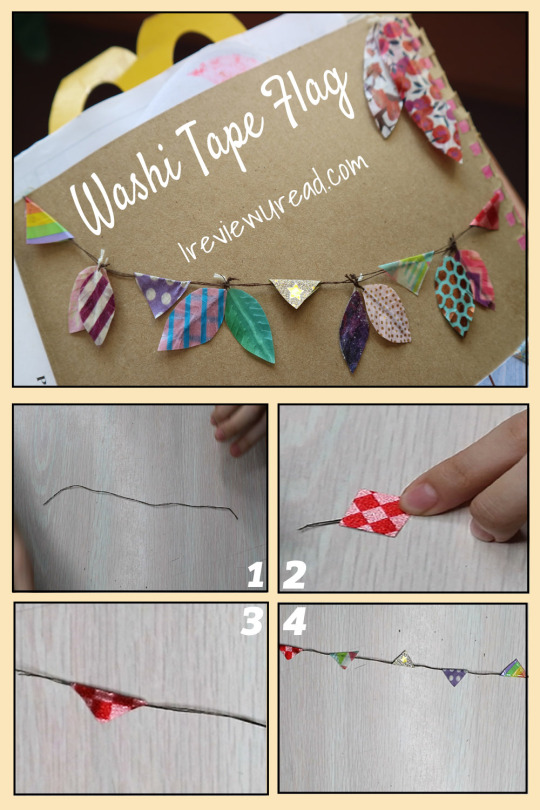
Washi Tape Flag
Cut 2 threads of the same length and tie the ends together.
Cut washi tapes in square
Paste them diagonally on the threads and fold the ends of the square together to make a triangle
Continue until you’ve reached the end of the thread.
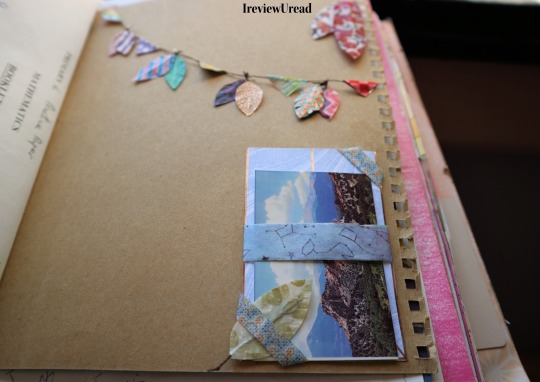
This pocket is a see-through pocket so that you can see what’s inside the pocket without the clear glare from a clear plastic pocket.
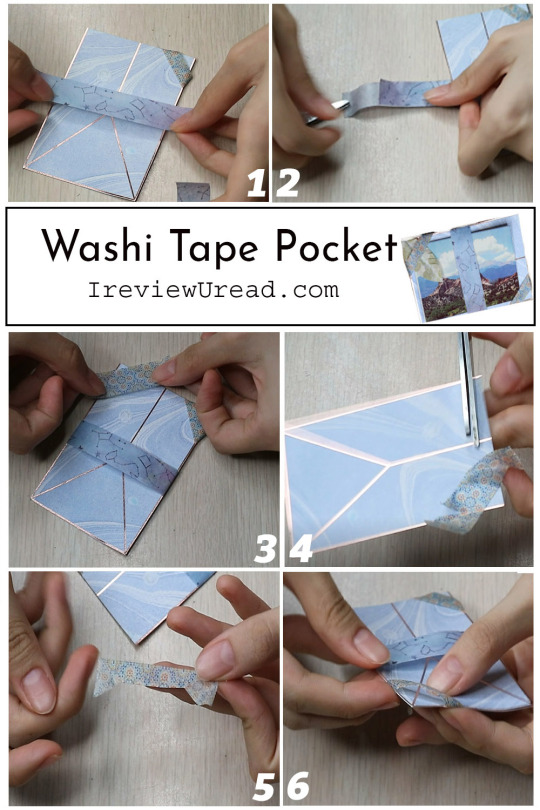
Washi Tape Pocket
For the middle holder, cut 2 pieces of washi tape. One-piece the same length as your base and another piece slightly longer than the base.
Paste the shorter piece on the middle of the longer piece. Sticky sides facing each other. Pull the washi tape over and adhere them to the back of the base.
Measure the corners of the base with the washi tape
Aligning the scissors to the sides of the base, cut half of the sides of the washi tape.
Fold the half that was cut downwards to meet the other half.
Adhere the washi tape to the back of the base. Create as many corners as you want.
That’s the end of the 5 ways you can use your washi tape. You can head over to Sticky rice sisters for more ways to use washi tapes or over to my DIY collection to learn other DIY crafts.
*Do note that Sticky Rice Sisters crafts will be up on a later date. So I will update this post again when their post is up!*
0 notes
Last Seen Blogs

mylifesgreatestmoments-blog
My Life's Greatest Moments
scych
Chronicles of Edenic Exile

navysubsailor
Just random stuff I like.
you-plus-me-equals-otp
Say it Like You Mean it

glysine
the 8th