#Windows photo organizing software
Text
Best Photo Organizing Software for Organizing Images
In addition, software is used to find duplicate photos and produce picture albums, making it the excellent application for all image management requirements.
Best photo organizing software is a valuable software for users and users alike. It aids to promptly organize and take care of digital pictures, making it less complicated to find the ideal photo whenever you require it. By using a best photo organizing software, photographers easily team images by job, time, search term tags or place. That enables you to sort with your image library using ease, making photo organization a breeze. With creating photo albums and identifying images, it is much simpler to find the desired image once required. Software additionally supplies additional safety for image libraries.
That is a very useful tool that will certainly help them arrange photo albums much better, and shield their reminders from possible photo loss.
Best Photo Organizing Software Windows 10
That enables far better image organizing by having the ability to arrange images by various standards such as date taken, place, topic or person. This makes it less complicated to locate the photo you require.
In recap, best photo organizing software offers numerous advantages, making image organizing easier and much more efficient. This software choice that deserves taking into consideration, it supplies a considerable picture library with alternatives for producing collections and sections, along with finding pictures. This photo organizing software supplies a very easy way to manage and arrange huge picture libraries.
Just How Do You Use a Best Photo Organizing Software for Computer?
By having photo organizing software for photographers, managing your picture library has never ever been simpler. To use best photo organizing software, customers merely need to upload their image submits right into the program. They will after that have access to a album of images that they browse through or search using key words and groups. When taking advantage of software many functions and abilities, people will have ultimate control over their image libraries.
Photo Organizing Software Including Photo Management and Sort Photos
This photo organizer software is made to make taking care of photo libraries less complicated. With the best photo organizing software, you are able to easily handle your pictures and guarantee that they are arranged successfully. This allows photographers to arrange, take care of and structure photos quickly. The photo management software is designed to be user-friendly, by using instinctive navigating and uncomplicated controls.
This best photo organizing software is helpful to handle and supplies an extensive library of apps for image organizing. The software's customer interface is instinctive and the functions are very easy to accessibility. That person guidebook will assist you begin using the image management software.
Tip about Best Photo Organizing Software
When looking for software, there are a few things to think about. This photo organizing software for beginners must have features like photo tagging, photo sorting and management. It ought to additionally be helpful to use and have a hassle-free interface.
By using photo organizing software, persons search for images by place, key phrase, or day - making it simple to find precisely the image they're looking for. Furthermore, photo management software is utilized to find duplicate photos and develop photo collections, making it the ideal software for all image organizing needs.
#photo organizing software#best photo organizing software#photo organizing software download#best photo organizing software PC#photo organizing software Windows 10
0 notes
Text

i didn't have a tutorial yet... so i made one lol. its longer than i wanted it to be, but i wanted to make sure it's easy to follow for people who've never made cc or have no experience with photo editing software, and fully explain my process. it's by no means hard at all though lol, i guarantee you making skin details is the easiest thing aside from recolors and if you want to learn this is a good place to start :-)
for people who are more experienced than that, and want to know specific things-- i've sectioned everything so it should be easy to skim through until you find what you need!
requirements.
this tutorial will only require sims 4 studio (free) and photoshop (not free) or gimp (free). i pirated photoshop 2022 myself. any version will do but i think 2022 just has nice new features for making content! if you don't want to buy or pirate, gimp is a similar alternative.

1.1 how to find skins to use as a base.
in case you don't have (a) skin(s) in mind to use for your skinblend, my tip is to download as much random ones as you can find. this way you have a lot to choose from and it's easier to get an idea of what you want.
go-to creators for maxis match skins: heihu, madmono, pyxiidis, faaeish, miikocc, emmibouquet and stretchskeleton.
creators for maxis mix/alpha skins: sims3melancholic, obscurus, ddarkstonee and pralinesims.
creators for maxis mix/alpha skins that only allow editing for private use: northernsiberiawinds, remussirrion and thisisthem.
go into cas and try them all out. if you like a part of a skin, write down which skin it is and what part(s) you want to use of it from which swatch if it has multiple.
for example, i almost always use one or two skins for just the nose shape, one for the eyebags, one to three for the lips and one for the basic shading of the face. don't be afraid to use the opposite style skins of what you're going for, you can always add or erase details.
1.2 exporting the skins.
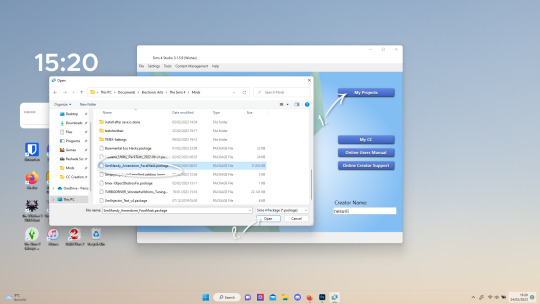
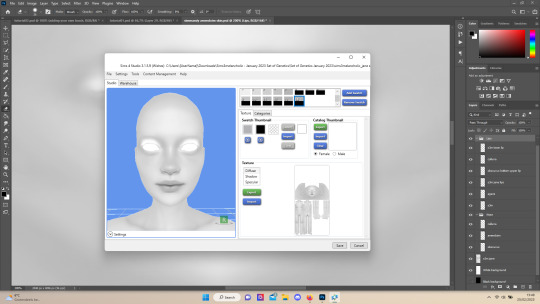
now we're gonna export the skins with sims 4 studio. click on "my projects" (1) and navigate to whereever you have the skins you want to use, and select one and click "open" (2).
the colored little boxes in the top right are the swatches. click whichever swatch you wanted to use something from (1), then click the "export" button (2). you'll get a window to save the exported skin now.
tip: i highly recommend making an organized folder for your skinblend, to have all your files together and easy to find. if you haven't made it already you can easily do so within this window.
i put mine in a folder called "resources" in a folder named "unnamed skin" for example.
name the exported skin file (3) and make sure the "save as type" is set to .png (4).
after saving the file, you can just click "cancel" on the bottom right to go back to sims4studio's starting screen. if you have multiple skins you want to use, repeat the above process for all the other skins to export them too.

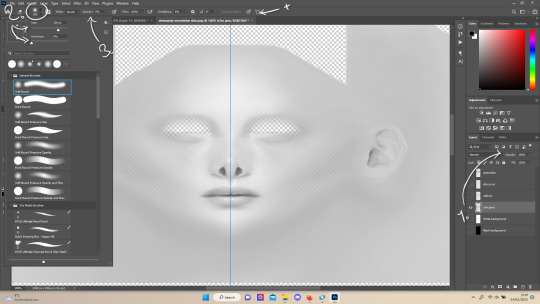
2.1 opening the exported files in photoshop/gimp.
open your program of choice and click on "file" from the top bar (1) and then "open..." and navigate to the skin files. you can left click and hold down your CTRL key to select multiple at once to open.
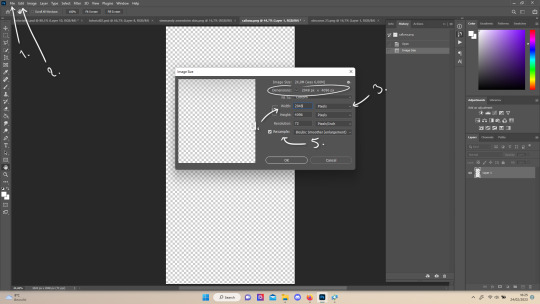
we have to layer them all in one file, but before we do that we have to check if they're all the same size.
note: some skindetails might be 2048x4096, others may be 1024x2048. unless you want your skin to be compatible with the HQ mod, you should just opt for 1024x2048, as without the mod both resolutions look identical. the bigger one will just make your fize unnecessarily large.
click "image" at the top bar (2), then "image size". it'll say the size at dimensions. if it's at the size you want it to be at, just exit the window.
if you need to edit it, select "pixels" from the dropdown menu (3), and put in 1024 for width and 2048 for height OR 2048 for width and 4096 for height. if you're sizing up select "bicubic smoother (enlargement)" under resample (5).
repeat this for every skin you opened.
2.2 layering the skins together.

copy and paste all the skins individually onto one by selecting them with CTRL + A and CTRL + C on your keyboard, and pasting them into one of the other opened skins with CTRL + SHIFT + V. you can then close all the other tabs.
the file now has multiple layers. you can rename them by double clicking the layer name. this makes it easier to keep track of whats what. you can reorder them as well by dragging them with your mouse. put the skin you want to use as base (for the general facial shading, highlighting) at the bottom.
tip: i recommend making all white and all black background layers to see the skins better. you can do so by pressing D, then CTRL + SHIFT + N. for the white layer then press CTRL + BACKSPACE and for the black layer repeat the first two steps and then press ALT + BACKSPACE. now there should be two new layers in black and white. drag them to the bottom of the list. i prefer using white so i put black last.
2.3 changing the opacity in parts of the base skin layer.
to make ea's preset details (cheek/nose bridge sharpness, dimples) come through your skinblend, you need to change the opacity of the base skin sometimes. alpha skins tend to be fully opaque but maxis match skins are usually already transparant enough.
hide all the layers aside from this base layer by clicking the eye icon next to the layer names. you can see the transparancy with the visibility of the grey-white blocks or if you find it easier you can also unhide the black background to see it instead.
to change the opacity, you can either edit the entire layer's opacity (1) or use the eraser tool (E key) to add transparancy at specific parts.
if you have photoshop 2022, turn on vertical symmetry (+). if you don't have it, you can choose to edit only one side of the skin and mirror it later or do both sides and embrace some asymmetry.
i selected the eraser (2) and set the brush size to about 200px and 0% hardness. the opacity of the brush i set to about 10% (3). i used the eraser on the lower cheeks, the nose bridge and tip and the bottom of the chin. i also erase the upper eyelid 100%, cause i prefer to have eyelid freedom :p. it then looks like the above! this will very subtly let through details, if you want more you should make it more transparant.
2.4 optionally: editing out freckles, pores and/or eyelashes.
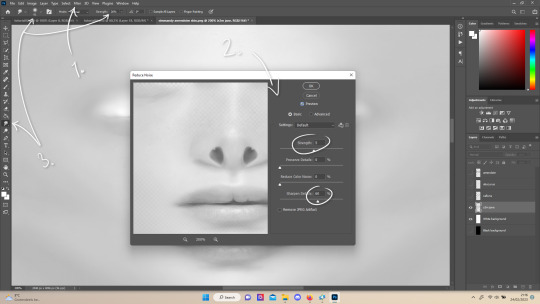
your base may have pores, freckles or moles you want to get rid of. to smoothen everything at once, click "filter" at the top bar (1), "noise" and then "reduce noise". i only edit the strength and sharpen details setting (2), this setting erased the pores and most of the freckles for me while keeping the details looking sharp, but you likely have to adjust it a little cause it depends on how large/fine the details are.
the remaining freckles, pores and eyelashes i remove by using the smudge tool, with 0% brush hardness and at 25% strength. (3) brush size depends on the size of the details. i just go over it in circular motions until the freckle or whatever it is has been blended away without pixelation.

for this part i'm going to only show how i do the nose as an example, however it works the same for editing in eyebags, lips, jaw lines or whatever you want to add in too.

unhide the layer of the skin you want to use a part of, and hide the base layer.
if you are going to use multiple parts of that skin (for example, you want both the nose and the lips of that skin), duplicate the layer by right clicking the layer name and choosing "duplicate layer...". then hide the duplicated layer. it's easier to edit one part at a time.
use the selection tool (M) to select the part. press CTRL + SHIFT + I and then DELETE. press CTRL + D to unselect. should look something like the above.
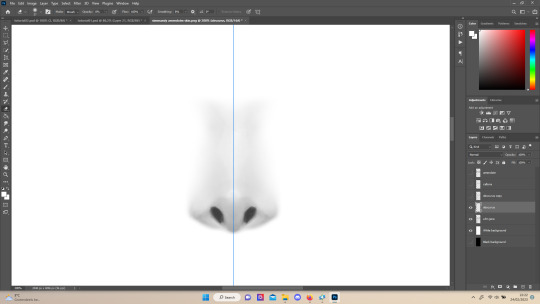
use the eraser tool (E) at a moderately small size like 30px~ with about 30% hardness and 100% opacity to erase around "hard lines", like the nostrils in this case and the bottom of the nose. the nose bridge has "soft lines", so if you were to use a hard brush for that, the shading of the nose bridge would look far too harsh and unblended.
for the soft lines, set the eraser tool at a bigger size like 100px~ with 0% hardness and a lowered opacity between 15-45%. erase soft lines "gradually", so the shadows blend in with the layers underneath it. should look something like the picture above.
always look at the newly added part with both a black and white background to see if there's anything you need to erase more. then look if it blends in properly with the layers underneath. if it's too dark or light, you can click on "image" on the top bar, then "adjustments" and "brightness/contrast", and lower or raise the brightness until it blends in better.
i'm using two separate skins to make the nose, so i've repeated the process above for the second nose skin, then used the method of step 2.3 to erase certain parts and make other parts more transparant / blended in. as you can see above, it's now the perfect offspring between the two noses i used.
note: for a maxis match nose, you'll want to avoid a completely opaque nose, mainly at the nose bridge it should be more transparant. i always make sure the lips and eyebags are fully opaque though, unless you're going for a vanilla type of skin it doesn't look good transparant.

at this point, i like to save the file with the white background layer on and see what it looks like in sims 4 studio. this gives you a better idea of what it looks like on sims and what you may want to change or add. press CTRL + SHIFT + S and name your file, and set the file type to .png.
open any skin or skin detail cc file just like in step 1.2, and instead of exporting anything, click "import". now navigate to the file you just saved, and open it. the sim model now displays what your skin looks like. should look something like the above! you can click cancel after you've looked enough, so you don't have to worry about ruining the original cc file.

maybe you're happy with the skins current state... but in case you want to add or change some things, here's a step by step how i do it.
5.1 drawing shadows & highlights.
as you probably have noticed, everything needs to be done in greyscale, so select black (for shadows) or white (for highlights) in the top right colored box. make a new layer (CTRL + SHIFT + N). select the brush tool (B) and set the brush at about 0px with 100% opacity. draw the shape of the shadow or highlight where you want it. make sure to make a new layer for every shadow and highlight!
now you can either use the smudge tool to blend it out, but i prefer using "filter" from the top bar, "blur" > "gaussian blur". i just play around with the radius until it's blended out but still has some shape to it. it depends on how small or wide and blended you want it to be.
then i use the eraser to shape the shadow/highlight further. for example, i want the shadow in this case more blended out towards the eye, but harder towards the forehead and nose, so i use the eraser on that side. lastly i change the layer opacity to make the shadow/highlight less dark/light. my preference lays with subtle details, but of course you can make it as contrasted as you like!
5.2 drawing small details.
to draw your own details, use the brush in 1-3px brush size, 100% opacity in black. i can't help you here cause it's just drawing where you want and then blending it out with the smudging or blurring tool where needed, and using the eraser at lower opacity to blend it in.
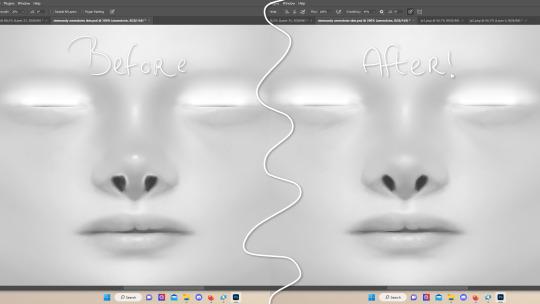
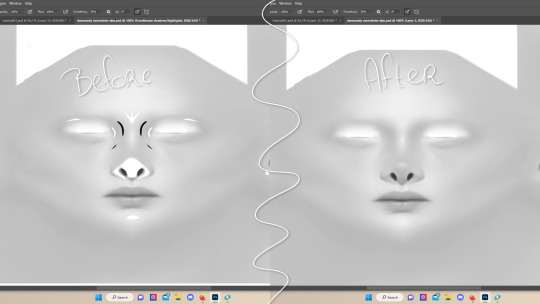
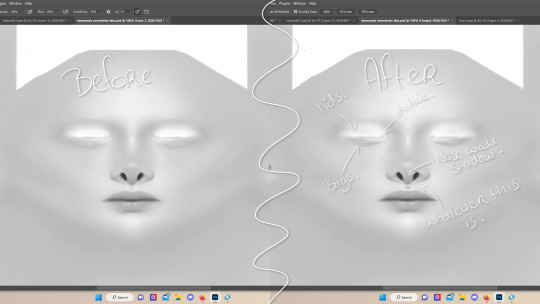
to give you some ideas, i usually draw some details on the nose like sharper nostrils or a nose wall, some texture on the lips and the eyebags. i like using reference pictures of real peoples skins to see where and how to draw things. before and after pictured above! (i'm so proud of these eyebags yall T-T)
5.3 adding other creators cc skin details.
if you don't like drawing things yourself or know just the right cc skin detail your skin needs, you can also use other creators' skin details on yours.
maxis match + mix details: pyxidis about face, miikocc face kits, okruee face details, sammi-xox face details, lamingtonsims face details.
maxis mix + alpha details: detail overlays by obscurus-sims, ddarkstonee & sims3melancholic
like in step 1.2, just open the file in s4s and export whatever swatches you want to use. remember to make sure the resolution of the file is the same as your skin's before copy and pasting it on your skinblend! and remember you can lower the opacity layer for these too.
5.4 mirroring your skin.
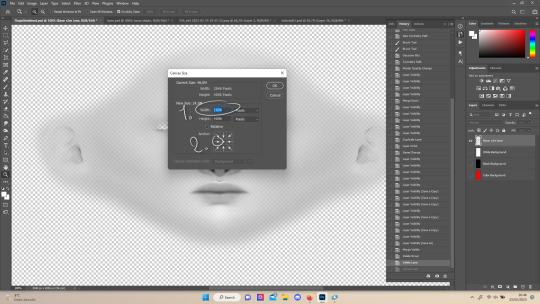
if your skin isn't mirrored/symmetrical yet, save your file as a .psd and then right click the layers, click "merge visible", press CTRL + ALT + C, and set the canvas width to half what it is now (either 1024 or 512). (1) click the arrow in the left middle if you want to mirror the left side, or the arrow on the right middle for the right side. (2) press "ok".
press CTRL + A, then CTRL + X, then CTRL + SHIFT + V. delete the layer beneath the active one (it's empty). then press CTRL + ALT + C again, and put the canvas width back to the original (2048 or 1024). select the same arrow you selected before, and click "ok".
press CTRL + A again, then CTRL + C. now click "image" from the top bar, "image rotation" and then "flip canvas horizontal". now press CTRL + SHIFT + V .... and voila, your skin should now be mirrored.
note: ik there's a ridiculous amount of steps for such a simple thing so i feel like there's probably a much faster way to do this, but i hate following tutorials and guides (the irony) so this is just the way i taught myself lmao
5.5 last test & optional last touches.
at this point, i'm done with the skin. i erase everything aside from the face if the skin still has a full body texture cause i prefer face-only skinoverlays. i always save as .psd and .png, .psd is to edit it later on if need be. once again import your skin into s4s like in step 4, and see if you're happy with the skin. if not, just keep editing whatever you need!
i also like to add alternate versions of the skin lastly here. some examples: a soft nose or hard nose bridge (justice for flat soft noses, simblr loves to erase them lol), different eyebags, lighter or darker lip option, version with eyelid overlay or without.

6.1 creating the package file.

to make the package file for your skinblend, open s4s and select "create cas standalone" and then click "cas". (2) now select "skin detail forehead" from part type (3), click the most left forehead wrinkle and click "next" (4). name the skin file whatever you want, you can always change it later!
click "import" and open your skin file. and voila! you're pretty much done!
6.2 editing the age, gender & occult flags and category.
right now your skinblend is only available for young adult to elder sims, and not for aliens and werewolves, so you probably want to change this. go to "categories" (1) and check the boxes you want under "age & gender flags" and "occult" (2). you don't need to change any of the other things.
if you wish to change the skin detail slot it's in, you can change it at "outfit type". most people use either forehead or mouth crease, but you can use any of the ones that start with 'skindetail'.
6.3 adding swatch colors, thumbnails or additional swatches.
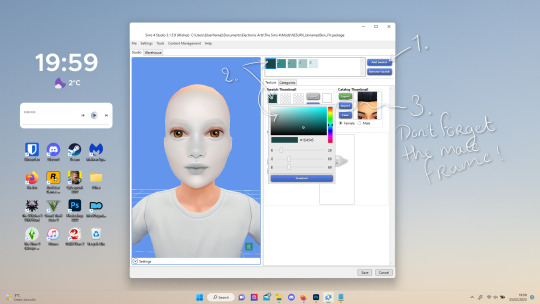
if you want, you can add multiple swatches (1). you can also edit the color of the swatches (2) and upload a custom thumbail with 104x148px resolution (3), make sure to upload for both male and female frames.
6.4 editing the sorting layer.
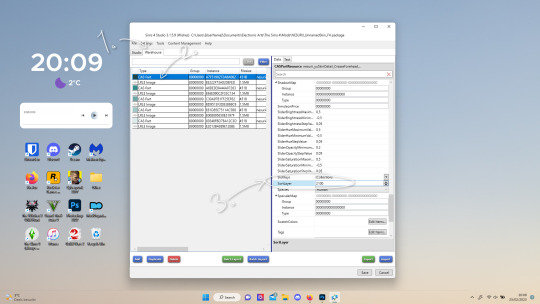
it's not the end of the world if you don't do this, but you may run into some skin details or freckles/moles that won't display on top of your skinblend if you don't edit it :).
click on the "warehouse" tab (1), select the first "cas part" (2). scroll down on the right to find "sort layer" (3) and put in 2100. you're gonna want to change this for each cas part individually.
now just save your file... and try it out in game!
if you need any help or have any questions please comment below <3 feel free to tag me in the end result if you want too.
(my end result)
242 notes
·
View notes
Text
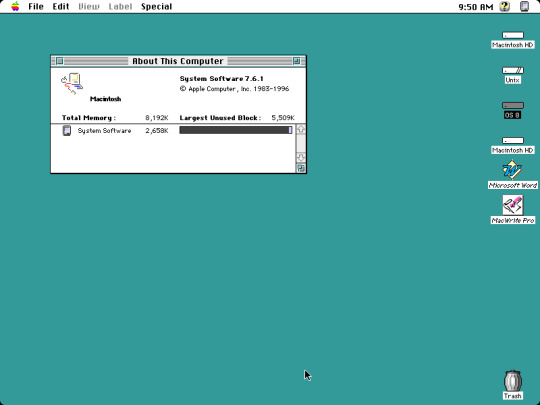
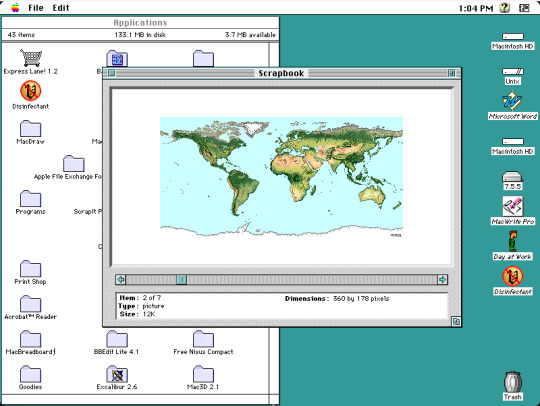
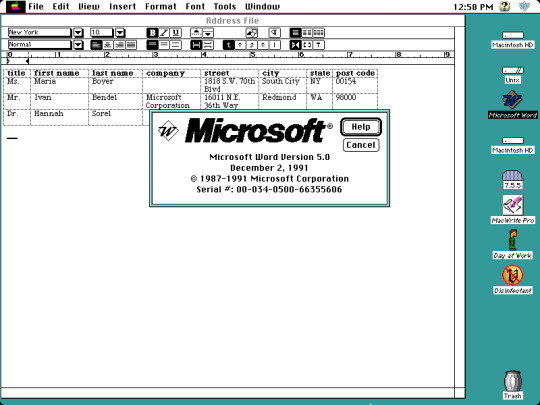
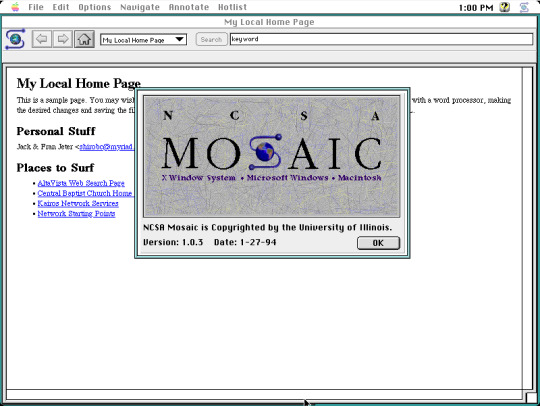

I stumbled upon some long forgotten disk images stored on my computer, the actual disk images themselves date back from around 2008 when I was only a teenager. One of the disk images contains an installation of Macintosh System Software 7 which first debuted in 1991, but the version I have installed is 7.6.1, released in 1997. Here are just a few applications I have installed. Screenshots taken on Basilisk II, a Classic Mac emulator available on Windows, Mac, and Linux.
Hopefully these photos are in order.
First screenshot at the top left is just a blank desktop with no running applications, except a window that says "About this Macintosh" which shows you how much memory individual applications are currently using. It even tells you how much memory the operating system is using, which is just a little over 2.5 MB. I decided to allocate 8 MB of RAM for the emulator but you can allocate more if needed.
Second screenshot located in the top center is from an application called Scrapbook, showcasing a graphic of the world's continents. A simple application to keep some of your favorite images or sound clips in. However, there was no true organization in Scrapbook so in order to find media in this program, you had to click the back and next buttons to view and find content, you couldn't categorize your media. Not all media and sound formats were supported, for instance dragging a JPEG wouldn't do anything. In the background is a Finder window showing various folder and application icons.
Third screenshot at the top right is Microsoft Word 5.0. No bloat, no nagging about subscribing to Microsoft 365, just productivity. This version dates back to 1991, making this version of Word older than I am!
Center-most screenshot is from one of the earliest web browsers available in the early 90s called NCSA Mosaic, showing a sample website that came bundled with the browser. Although it was not the first browser in existence at the time, Mosaic was instrumental in popularizing the internet to the masses. This version dates back to 1994, I was only two years old at the time and was unaware of the impact the internet would have in the world over the years. The browser eventually lost marketshare to Netscape, and Mosaic was discontinued in 1997.
Bottom photo is a screenshot from a simple dirt bike game called... Dirt Bike. Looks like this was developed by an independent developer. What else is there to say about it? You ride a dirt bike around and you can even create custom paths if you want to make the game even more exciting.
If this post gets decent traction, I'll get around to posting more screencaps of what I have in this disk image, even some of the schoolwork I did in it!
#macintosh#System 7#1990s#1990s aesthetic#90s aesthetic#90s nostalgia#old computers#technology#computing#vintage#vintage electronics#retro aesthetic#retro computing#vintage computing#apple#apple computers#abandonware#vaporwave#software#old software#vintage mac#BasiliskII#classic mac#microsoft word#old web#old internet#nostalgiacore#old games#old programs
9 notes
·
View notes
Text
Getting Started with Computers: Essential Knowledge for New Users

Introduction:
In today's digital age, computers have become an indispensable part of our lives. Whether you're a student, a professional, a retiree, or anyone in between, having essential computer skills is no longer a luxury but a necessity. If you're new to the world of computers and are looking to kickstart your journey, this blog will provide you with the fundamental knowledge you need to get started. We'll explore computer basics for beginners and essential computer skills that will set you on the right path.
Understanding the Basics
Before diving into the nitty-gritty of essential computer skills, let's start with some fundamental computer basics for beginners.
1. Hardware and Software
Computers consist of two main components: hardware and software. Hardware refers to the physical components of a computer, like the monitor, keyboard, CPU, and more. Software, on the other hand, encompasses the programs and applications that run on the computer.
2. Operating System
An operating system (OS) is the software that manages the computer's hardware and provides a platform for other software to run. Common examples of operating systems include Windows, macOS, and Linux.
3. User Interface
The user interface is what you interact with when using a computer. This includes the desktop, icons, and windows. Understanding how to navigate and interact with the user interface is vital for any computer user.
Essential Computer Skills
Now that you have a grasp of the computer basics, let's delve into some essential computer skills.
1. Typing Skills
Being able to type efficiently is a fundamental computer skill. Learning to touch type will make your computer usage more enjoyable and productive. There are many online typing tutorials and games that can help you improve your typing speed and accuracy.
2. Internet Basics
The internet is a vast resource, and knowing how to navigate it is crucial. You should be familiar with web browsers like Google Chrome, Mozilla Firefox, or Microsoft Edge. Learn how to perform searches, bookmark websites, and stay safe online.
3. File Management
Understanding how to create, organize, and manage files and folders is essential. You should be able to save and retrieve documents, photos, and other files on your computer.
4. Email Communication
Email is a primary mode of communication in the digital age. You should know how to create and manage an email account, send and receive emails, and attach files.
5. Basic Troubleshooting
No computer user is immune to occasional issues. Learning basic troubleshooting techniques, such as restarting your computer, clearing browser cache, or updating software, can save you a lot of frustration.
6. Security Awareness
In today's digital landscape, cybersecurity is crucial. Be aware of the importance of strong, unique passwords, keeping your operating system and software up to date, and being cautious of phishing emails and suspicious websites.
7. Software Applications
Explore essential software applications like word processors (e.g., Microsoft Word or Google Docs), spreadsheets (e.g., Microsoft Excel or Google Sheets), and presentation software (e.g., Microsoft PowerPoint or Google Slides). These applications are commonly used for work, school, and personal projects.
Where to Learn More
If you're looking to expand your knowledge and skills, there are various ways to do so. You can find online tutorials, video courses, and community college classes dedicated to computer basics for beginners and essential computer skills. Don't hesitate to reach out to friends or family members who are tech-savvy for guidance and support.
In conclusion, getting started with computers and gaining essential computer skills is an investment in your future. Whether you want to boost your employability, stay connected with loved ones, or simply navigate the digital world more effectively, these skills are invaluable. So, take the first step, embrace the world of technology, and become a confident and proficient computer user.
2 notes
·
View notes
Text
Demystifying Digital Images and Video: Formats, Tools, Copyright, and More.
Introduction
In today's digital age, images and videos have become an integral part of our daily lives. From personal photographs shared on social media to professional content uploaded on platforms like YouTube and Twitch, understanding the intricacies of image and video file formats, codecs, and manipulation tools is essential. This blog post aims to provide a comprehensive overview of these digital elements, focusing on the definitions of common file types, export settings for popular broadcasting platforms, image manipulation tools, and the critical aspects of image copyright.
Definitions of Commonly Used Image and Web Video Formats, Wrappers, and Codecs
Image Formats:
JPEG (Joint Photographic Experts Group): JPEG is the most widely used image format for photographs and digital images. It uses lossy compression, which reduces file size while maintaining reasonable image quality.
PNG (Portable Network Graphics): PNG is preferred for images with transparent backgrounds or crisp, high-quality graphics. Unlike JPEG, it uses lossless compression.
GIF (Graphics Interchange Format): GIFs are a popular choice for short, looping animations and simple graphics. They use lossless compression and support transparency.
TIFF (Tagged Image File Format): TIFF is a versatile format commonly used in professional photography and graphic design. It supports lossless compression and maintains high image quality.
BMP (Bitmap): BMP is a Windows-native format known for its lack of compression. It results in large file sizes but retains image quality.
Video Formats and Codecs:
MP4 (MPEG-4): MP4 is a widely supported video format that uses the H.264 codec. It offers a balance between quality and file size, making it ideal for streaming and sharing on the web.
AVI (Audio Video Interleave): AVI is an older format that supports various codecs. It is not as efficient as MP4 in terms of compression and is used less frequently nowadays.
MOV (QuickTime Movie): MOV is a format developed by Apple and is popular among Mac users. It can use various codecs, such as H.264 and ProRes, for high-quality video.
MKV (Matroska): MKV is an open-source container format that can contain videos with a variety of codecs, making it highly customizable.
Export Settings for Popular Broadcast Platforms
When it comes to sharing images and videos on popular broadcasting platforms like YouTube, Twitch, and Facebook, selecting the right export settings is crucial for optimal quality and compatibility.
YouTube: For video content on YouTube, the recommended format is MP4 with H.264 video codec and AAC audio codec. The ideal resolution is 1080p (1920x1080) or 4K (3840x2160) for higher quality. These settings balance quality and compatibility across devices.
Twitch: Twitch also prefers the MP4 format with H.264 video and AAC audio codecs. A resolution of 720p (1280x720) or 1080p is recommended, depending on the viewer's internet speed and quality preferences.
Facebook: Facebook accepts a wide range of video formats, including MP4 and MOV. However, MP4 with H.264 video and AAC audio codecs is a reliable choice. The resolution should be adapted to the target audience and device capabilities.
Commonly Used Image Manipulation Tools and Techniques
Image manipulation tools are essential for enhancing and editing images. Here are some commonly used tools and techniques, along with their purposes:
Adobe Photoshop: Photoshop is a versatile image editing software that can be used for tasks like retouching, color correction, and compositing.
Adobe Lightroom: Lightroom is perfect for photo organization and enhancement, with features like exposure adjustment, color grading, and batch processing.
GIMP (GNU Image Manipulation Program): GIMP is a free alternative to Photoshop, offering similar features for image editing and manipulation.
Canva: Canva is a user-friendly online tool for creating graphics and social media content. It simplifies design tasks for non-designers.
Cropping and Resizing: These techniques are fundamental for adjusting image dimensions and removing unwanted parts of an image.
Image Copyright Essentials
Artists and content creators must be aware of copyright laws to protect their intellectual property. Key copyright essentials include:
Ownership: Creators automatically own the copyright to their work upon creation, but registration provides additional legal protection.
Fair Use: Fair use allows limited use of copyrighted material without permission for purposes like criticism, commentary, news reporting, and education.
Licensing: Creators can license their work under specific terms, such as Creative Commons licenses, allowing others to use their work while respecting their rights.
Public Domain: Works in the public domain are not protected by copyright and can be used freely.
DMCA Takedowns: The Digital Millennium Copyright Act (DMCA) enables copyright owners to request the removal of infringing content from online platforms.
Attribution: When using copyrighted material, proper attribution is often required to credit the creator.
Conclusion
Understanding digital image and video formats, codecs, export settings, image manipulation tools, and copyright essentials is essential for content creators, whether amateur or professional. By adhering to best practices and legal guidelines, creators can ensure their work is of high quality, reaches the right audience, and is protected from unauthorized use. Whether you're a budding photographer, a vlogger, or a graphic designer, the knowledge presented in this blog post can serve as a valuable resource to navigate the digital content landscape successfully.
References
Reference list
Arts Law Centre of Australia 2010, Copyright - Arts Law Centre of Australia, Arts Law Centre of Australia.
Attorney-General's Department 2022, Copyright basics, Attorney-General’s Department.
Image Manipulation: The What, How, and Why 2021, Clipping Path Campus.
Image Processing: Techniques, Types, & Applications [2022] n.d., www.v7labs.com.
Video File Formats, Codecs, and Containers Explained | TechSmith 2018, Welcome to the TechSmith Blog.
By: Juan Gutierrez.
3 notes
·
View notes
Note
hi!! i really really love your collages!! i love to collage and i never even considered i could do it digitally! if you don't mind me asking, what software do you use?
hi omg!!! thank you! i also love traditional collage but it’s much more trouble to find the images you want, cut them out, go through the stress of pasting them all down in one try… it is much less stress for me digitally.
i don’t mind you asking at all—i use procreate on my ipad, but i think it is one thing you could do on almost any software. medibang and gimp are ones i know friends like that are free, or even procreate’s pocket version for iphone is really good in my experience and slightly cheaper.
as for some other tips you didn’t ask for:
the first thing i do is make the canvas bigger than i intend for my final image to be. this is to make sure that the images i place are full sized and so i have some leeway to shift things around before the final crop. generally i’ll have a layer that serves as a “window” around the dimensions i intend for my final image to be. that way, if i move part of the image in the process, even if it disappears from view it is still on the canvas and simply hidden behind the window layer. with my valentines specifically, i had a “sticker table” in the canvas off to the side of my actual valentine, so i could sift through my materials without covering what i was working on and then crop down to the square when i was finished.
i generally use pexels, unsplash, and png blogs on here (with disclaimers they don’t mind people using their stuff) to source my images. sometimes they are already cut out if it’s from a png blog, but other times i have to select the part of the image i want myself and “cut it out”.
use paper texture overlays!! a lot of times it’s hardly noticeable, but it makes a huge difference in making the collage look more organic and closer to traditional. you can find these on any free stock photo site!
i also like to add shadows under each element i would consider a cutout in real life—so each individual sticker in the valentines has a layer underneath it, where i 1) selected the sticker layer, 2) filled the layer beneath it with like a desaturated brown, 3) set it to multiply, 4) offset it slightly down and to the right (and made sure it was the same angle for every component), and 5) used “gaussian blur” to soften the edge. i’ve never seen anybody mention doing this but it’s definitely something i would consider a key part of making my digital collages!
thank you again for your interest in my art, it’s especially exciting for someone to show interest in my collages 💜
#let me know if you have any more questions i don’t mind sharing at all!!#lexanswers#wildandflouresc3nt
7 notes
·
View notes
Text
Ok so for all my windows using friends. We all know that new windows photos is dreadful and extra slow and bloaty on slower computers. There is a better solution for photo viewing on your PC, and as an added bonus this comes with a photo managing app that does many of the same things as adobe bridge. Oh and it's free.
What is this stunning software you ask?
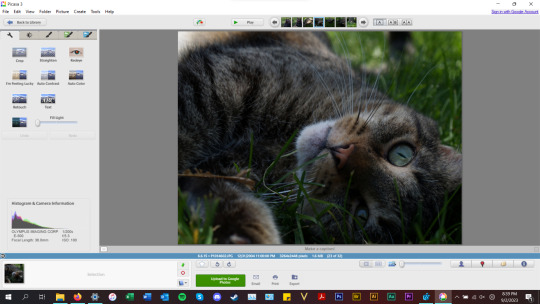
Great question! Back in 2002, Google created a nifty piece of software known as Picasa Photos. They eventually killed this software in 2016 to focus on the infinitely more spying Google Photos (I'm not kidding about Google photos having privacy issues. They literally got sued over this in my home state of IL for violating our biometric privacy laws. I got paid $500 from Google for this btw). Moving on, Picasa slapped and that's why they killed it. Fortunately I am not the only Picasa Photo Viewer 3 enthusiast on the internet and there are others who saved the installation exe files. That said, I have helpfully found one that works which you can now download from my google drive here. Note that you cannot use the Google Photos/Google Account related options in the software anymore as Google has discontinued support for it.
Picasa has it all for the person who needs a good photo organizer:
finds ALL photos in your documents, downloads, and pictures folders for you.
ability to open and edit camera raw files
ability to add tags to photos, sort into folders, locate in the system etc.
basic photo editing tools with a good histogram. one of the best editing tools they have, which I would argue is almost on par with a tool from the adobe camera raw editor is the "neutral color picker" tool, where you can select an area in the picture to set a custom white balance in the image (easiest, best color correction). Also contains a primitive healing brush tool.
very good at red eye removal. I used that feature a lot back in 2005.
good printing options (easy to print multiple copies of the same photo on the same page in a variety of standard sizes.
ability to create a photo collage with multiple photos or a photo slideshow video
sort by person tool
lots of fun filters to apply to images if that's your thing.
add custom geotags to photos using another dated google product, google earth.
create a gift cd of photos or create poster sized versions of your photos that print over multiple sheets somewhat like the rastrabator.
the image viewer part is slick, lightweight and fast unlike windows photos. It allows you to quickly arrow key through your photos in a very nice way.
Allow me to show you some screenshots of this glorious piece of abandonware.
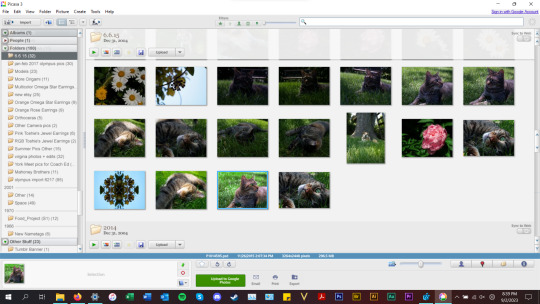


anyways, tldr; this piece of abandonware is the best, most glorious free photo viewer for windows, and as a person who's been using it for the last 18 years I highly recommend it to everyone who does not have adobe PS & Bridge and also anyone with windows who wants a quick way to preview photos in their folders.
2 notes
·
View notes
Text
can plex run on pc with vpn
🔒🌍✨ Get 3 Months FREE VPN - Secure & Private Internet Access Worldwide! Click Here ✨🌍🔒
can plex run on pc with vpn
Plex VPN compatibility
Plex is a popular media server application that allows users to organize and stream their media content, such as movies, TV shows, music, and photos, across different devices. While Plex offers great features for local and remote streaming, some users may want to ensure their online activities remain private and secure by using a Virtual Private Network (VPN) while accessing Plex.
Using a VPN with Plex can offer added benefits, such as encrypting your internet connection, hiding your IP address, and allowing you to access geo-restricted content. However, it's essential to ensure compatibility between the VPN service you choose and Plex to avoid any potential issues or conflicts.
When selecting a VPN for Plex compatibility, there are a few key factors to consider. Firstly, you'll want to choose a VPN provider that offers fast and reliable servers to ensure smooth streaming quality. Additionally, compatibility with Plex's remote access feature is crucial for seamless connectivity outside your home network.
Some VPN providers offer dedicated apps or setup guides specifically for Plex users, making it easier to configure the VPN service with your Plex server. It's also essential to check for any potential IP address conflicts that could arise when using a VPN with Plex, as this could affect your ability to access your media library remotely.
Overall, using a VPN with Plex can enhance your online privacy and security while streaming content. By ensuring compatibility between your chosen VPN service and Plex, you can enjoy a seamless streaming experience without compromising your data security.
PC requirements for Plex with VPN
Title: Meeting the PC Requirements for Plex with VPN Integration
Plex, a popular media server application, offers seamless streaming of multimedia content across various devices. Integrating a Virtual Private Network (VPN) with Plex enhances privacy and security, allowing users to access their media libraries remotely with peace of mind. However, ensuring that your PC meets the necessary requirements for running Plex with VPN is essential for optimal performance and functionality.
First and foremost, your PC should meet the minimum specifications recommended by Plex. This typically includes a relatively modern processor, such as an Intel Core i3 or AMD equivalent, and a sufficient amount of RAM, ideally 4GB or more. Additionally, having ample storage space for your media files is crucial, especially if you plan on hosting a large library.
When it comes to incorporating a VPN into the mix, there are additional considerations. Since VPNs encrypt and route network traffic, they can consume more system resources. Therefore, having a reasonably powerful CPU and ample RAM is beneficial for handling the added workload. A dual-core processor or better, coupled with at least 8GB of RAM, should suffice for most VPN-integrated Plex setups.
Furthermore, ensuring a stable internet connection is imperative, especially when streaming media remotely. A high-speed broadband connection with low latency is ideal for a smooth streaming experience. Additionally, opting for a reputable VPN service with fast servers and minimal impact on connection speeds is advisable.
In terms of software, make sure your operating system is compatible with both Plex and your chosen VPN client. Most modern versions of Windows, macOS, and Linux are supported, but it's always wise to double-check compatibility before installation.
By meeting these PC requirements for Plex with VPN integration, users can enjoy a secure and seamless media streaming experience, whether they're at home or on the go. With the right hardware and software setup, Plex becomes not just a media server, but a versatile and secure entertainment solution.
Running Plex on VPN-enabled PC
Running Plex on a VPN-enabled PC offers a secure and versatile way to access your media library remotely while ensuring privacy and security. Plex, a popular media server software, allows users to stream movies, TV shows, music, and other digital content across various devices. By combining Plex with a VPN (Virtual Private Network), users can enhance their online experience in several ways.
Firstly, utilizing a VPN adds an extra layer of security by encrypting internet traffic between the Plex server and the connected devices. This encryption prevents third parties from intercepting or monitoring data, safeguarding sensitive information such as login credentials and media content.
Moreover, running Plex on a VPN-enabled PC enables users to bypass geographical restrictions and access their media library from anywhere in the world. Whether traveling abroad or accessing content from a restricted location, the VPN masks the user's IP address, allowing seamless and unrestricted streaming.
Additionally, using a VPN helps mitigate the risk of ISP (Internet Service Provider) throttling, which can degrade streaming quality or limit bandwidth for certain activities like media streaming. By encrypting data traffic, VPNs prevent ISPs from identifying and throttling specific types of online activity, ensuring consistent and uninterrupted streaming experiences.
However, it's essential to choose a VPN provider that offers fast connection speeds, robust security features, and support for multiple devices. Additionally, configuring Plex to work seamlessly with a VPN may require some technical expertise, including port forwarding and network settings adjustments.
In conclusion, running Plex on a VPN-enabled PC provides a secure, flexible, and convenient way to access your media library remotely while safeguarding your privacy and ensuring smooth streaming experiences. With the right VPN provider and proper configuration, users can enjoy seamless access to their favorite content from anywhere in the world.
VPN setup for Plex on PC
Setting up a Virtual Private Network (VPN) for Plex on your PC is a smart move to enhance security and privacy while accessing your media remotely. Plex, a popular media server software, allows you to stream your movies, TV shows, music, and photos from your PC to various devices over the internet. However, without proper security measures, this could expose your personal data to potential threats. Here's how to set up a VPN for Plex on your PC:
Choose a Reliable VPN Service: Select a reputable VPN provider that offers fast speeds, reliable connections, and robust encryption protocols. Look for VPNs with servers in locations that support your streaming needs.
Download and Install the VPN Software: Once you've chosen a VPN provider, download and install their software on your PC. Follow the installation instructions provided by the VPN service.
Connect to a VPN Server: Launch the VPN application and connect to a server location of your choice. For optimal Plex performance, select a server close to your physical location.
Configure Plex for Remote Access: Log in to your Plex account and navigate to the settings. Under "Remote Access," enable the option to manually specify public port. Enter a port number of your choice (e.g., 32400) and click "Apply."
Port Forwarding: If your VPN service supports port forwarding, configure it to forward the port you specified in Plex settings to your PC's local IP address.
Test Remote Access: Once everything is set up, test remote access to your Plex server from a device outside your home network. You should now be able to securely access your media library through Plex while connected to the VPN.
By following these steps, you can enjoy the convenience of Plex while ensuring your data remains secure and protected from unauthorized access. Always remember to keep your VPN software and Plex server up to date to mitigate potential security risks.
Plex performance with VPN on PC
Title: Enhancing Plex Performance with VPN on PC: A Comprehensive Guide
Plex, a popular media server application, offers seamless streaming of your favorite movies, TV shows, music, and more. However, utilizing a VPN (Virtual Private Network) with Plex on your PC can significantly enhance privacy and security while accessing content remotely. Understanding how to optimize Plex performance with a VPN on your PC is crucial for a smooth and secure streaming experience.
Firstly, why use a VPN with Plex? A VPN encrypts your internet connection, preventing ISPs and third parties from monitoring your online activities. This encryption ensures that your data remains private and secure, vital when streaming content, especially if accessing geo-restricted or copyrighted material. Additionally, a VPN can bypass censorship and geo-blocks, allowing access to content from anywhere in the world.
When using Plex with a VPN on your PC, consider the following tips to optimize performance:
Choose a Reliable VPN Service: Select a VPN provider known for fast speeds, robust security features, and a wide server network. This ensures minimal impact on Plex streaming quality.
Select Nearby Servers: Connect to VPN servers close to your physical location to reduce latency and improve streaming speeds.
Configure VPN Settings: Some VPNs offer specialized settings for streaming or bypassing throttling. Adjust these settings to optimize performance specifically for Plex usage.
Test Connection Speeds: Before streaming content on Plex, perform speed tests with and without the VPN enabled to gauge any performance differences. This helps identify the most suitable VPN server for optimal performance.
Monitor Bandwidth Usage: Some VPNs impose bandwidth limitations, which can affect streaming quality. Monitor your VPN's bandwidth usage to ensure smooth Plex streaming without interruptions.
By following these guidelines, you can maximize Plex performance while maintaining privacy and security with a VPN on your PC. Enjoy seamless streaming of your favorite media content without compromising on speed or reliability.
0 notes
Text
Photo Organizing Software for Experienced Including Picture Management with Remove Duplicate Photos
By using best photo organizing software, users are rest assured that their photo libraries are secure and secure from picture loss, or they are focus a lot more on the creative process.
Image management software is an indispensable possession that helps individuals arrange photo collections better and secure their memories from prospective photo loss. Using photo organizing software, photographers conveniently guaranteeing all of their picture management needs are satisfied. To make use of computer photo organizing software, photographers merely require to post their picture files into the program.
Meaning of Photo Organizing Software
This application permits people to search images by day taken, area, person or subject as well as making use of tags for simple photo finding. Best photo organizing software is an indispensable property that assists individuals organize photo libraries better and safeguard their reminders from potential photo loss. On the whole, photo management software is a fantastic application that helps customers alike to handle photo libraries in a reliable fashion. Photo organizer allows customers to swiftly synchronize their photos right into folders, collections, categories, and much more.
This makes image organization much faster and less complicated than in the past. There are several photo organizer available for downloading from the internet. To guide users make the appropriate option for their needs, right here is a consider a few of the very best photo organizer software around. That Windows 11 photo organizing software developed for skilled and beginner professional photographers. The tool also supplies a range of photo management programs, allowing photographers to order images effortlessly.
Recommendation about PC Photo Organizing Software
Photo management software is a photo manager application that manages the procedure of handling and organizing digital photo files. Additionally, software permits persons to quickly search for particular photos or colors, making image organizing far more efficient. As picture collections expand in size, photo organizing software additionally makes it much easier to store photo data in such a way that is both easily available and protected.
That photo organizer software provides a very easy method to manage and handle photos, getting them simpler to locate and remove. This is specifically useful if people have the very same picture numerous times, or if people trying to find picture data that are similar. By utilizing photo organizer software, persons determine which pictures are matches and delete them to maintain image library arranged. This capacity to find duplicate images in an image album saves time when browsing images. Photo software organizing makes it easier to situate and search photo duplicates to make sure that photographers keep their image collection arranged.
Superb Best Photo Organizing Software with Several Awesome Features for Eliminate Duplicate Photos for Photography Structuring
Software is becoming progressively popular in the world of digital photography and picture storage. Software also helps keep picture collections arranged, that make photo albums and slideshows a lot more impressive.
Programs like easy photo organizing software simplify the task of finding duplicate photos, allowing people to quickly search for image data with comparable characteristics. Photo organizing software for professionals likewise supplies various other features such as sorting, making it an ideal tool for photo management. With using Windows 10 photo organizing software, people keep their image library arranged and devoid of duplicate images. Photo organizing software for photographers gives users the capability to swiftly and simply organize their photo collection by automatically sorting through pictures, grouping them into albums, and identifying them with search phrases for simple browsing. On top of that, image management software support users delete duplicate images in their album and remove them to save storage room, that function is particularly valuable for photographers with huge photo libraries.
Presented are software like:
Adobe Bridge, ACDSee Photo Studio Ultimate, FastStone, Shotwell, SortPix XL, Movavi Picverse and imgSeek.
Facts about Photo Organizing Software Download
Helpful photo organizing software provides a range of advantages that aids make photo organizing simpler and extra reliable. With PC photo organizing software, users are able to arrange pictures in a way that makes sense for them. Lastly, photo management software permits persons to swiftly and quickly resize, plant, and enhance their pictures to give them a specialist surface. With software, picture management ends up being easy and quick. Generally, software offers a variety of advantages that make image management simpler and a lot more efficient.
This new program used for
Photo organizing software for photographers
Photo manager
Manage photos software
Duplicate photo remover
Sorts of Photo Organizing Software
This makes it simple for photographers to rapidly and quickly gain access to the pictures they require for portfolios or jobs. On the other hand, picture management suites allow users to search and organize pictures in one location. https://www.gameenflame.com/best-photo-organizing-software-for-windows-pc/ Depending upon your requirements and preferences, users choose the type of photo organizing software for Windows 10 that best suits your operations. No matter which photo organizing software you pick, it is important to make sure that it meets your image organizing objectives and is easy to handle. With careful consideration of these aspects, individuals identify picture organizing application that matches your requirements and helps make image organization a breeze. The most effective software makes the process of photo organization easier than ever before.
Manual about Best Photo Organizing Software to Sort Photos and Eliminate Duplicate Photos with a Lot of Ideal Options
Luckily, there are photo organizer readily available to help make this procedure simpler. Several PC photo organizing software consist of tagging and categorization features that make it easier to find details image files. In addition, software aids users develop picture libraries and slideshows, along with enhance and share images online.
Furthermore, software aids professional photographers establish photo collections and slide shows, as well as improve and share pictures online. This ensures that users picture libraries continue to be personal and secure. Photo organizing software is an indispensable software for photographers and customers who wish to simplify the job of handling image data promptly and conveniently. With these apps, customers handle their picture libraries better, safeguard their picture files from unauthorized access, and also tailor photos for sharing.
Resource about Best Photo Organizing Software with Several Well-Known Features for Remove Duplicate Photos for Picture Organization
Organizing photos is a tiresome job, particularly when photographers have hundreds or even millions of them. By making use of software functions, you conserve initiative handling your photo collection.
Whether persons are a skilled digital photographer or just beginning, software assistance customers organize their picture memories into libraries, groups and more. With facial recognition modern technology, image editing and enhancing tools, image sharing abilities and even more, photo organizer software make image organization a breeze. This is a powerful photo organizer with advanced image management applications and includes facial recognition abilities as well as picture organization options consisting of libraries and sections.
Resources for Further Exploration of Best Photo Organizing Software for Photographers Options
Software is an indispensable asset that assists individuals arrange photo libraries much better and secure their memories from potential picture loss. This testimonials are incredibly helpful in figuring out which photo organizer ideal meets your needs.
Photo organizing software additionally aids keep picture libraries organized, which make photo collections and slideshows more excellent. Windows photo organizing software is a photo manager application that achieves the process of managing and organizing picture files.
#photo organizing software#best photo organizing software#best PC photo organizing software#best photo organizing software PC#best Windows photo organizing software
1 note
·
View note
Link
$269.00 $ Seagate One Touch 5TB Portable External HDD - Space Grey https://nzdepot.co.nz/product/seagate-one-touch-5tb-portable-external-hdd-space-grey/?feed_id=147441&_unique_id=6610e52d75b36 Features: MASSIVE CAPACITY 5TB of expansive space inside a travel-ready drive. REFINED DESIGN Complements today’s devices with a chic polished aluminum enclosure. EASY-TO-USE BACKUP SOFTWARE Seagate Toolkit enables on-demand backup along with automatic hourly, daily, weekly, or monthly backups. INCREDIBLY COMPATIBLE Its USB 3.2 Gen 1 (USB 3.0) interface works with both Windows and Mac out of the box- no reformatting necessary. MYLIO CREATE Enjoy one-year complimentary subscription to Mylio Create- an intuitive yet powerful app that helps organize photos into a life calendar and offers easy protection, editing, sharing, and syncing across multiple devices. ADOBE CREATIVE CLOUD PHOTOGRAPHY PLAN […] #
0 notes
Text
Unlocking the Power of Organization: A Deep Dive into Windows Home Server 2011
In today's digital age, keeping our files, media, and backups organized is more crucial than ever. Enter Windows Home Server 2011, a powerful solution designed to streamline your digital life and bring peace of mind to your home network.
What exactly is Windows Home Server 2011, and why should you consider it for your home setup? Let's take a closer look.
Simplified File Sharing and Backup
Windows Home Server 2011 offers seamless file sharing capabilities, allowing you to easily access your documents, photos, and media files from any device within your home network. With centralized storage and automated backup features, you can rest assured that your data is safe and easily accessible whenever you need it.
Remote Access and Media Streaming
One of the standout features of Windows Home Server 2011 is its ability to provide remote access to your files and media. Whether you're on the go or away from home, you can securely access your content from any internet-connected device, ensuring that you never miss a beat.
Additionally, Windows Home Server 2011 doubles as a media server, allowing you to stream music, videos, and photos to compatible devices throughout your home. Say goodbye to the hassle of transferring files between devices – with Windows Home Server 2011, your media is always within reach.
Enhanced Security and Peace of Mind
Security is paramount when it comes to protecting your digital assets. With Windows Home Server 2011, you can enjoy peace of mind knowing that your data is safeguarded with built-in security features such as automated backups, user access controls, and encryption options.
Why Choose MSKeyDeals?
Ready to experience the benefits of Windows Home Server 2011 for yourself? Look no further than MSKeyDeals, your one-stop shop for software solutions at unbeatable prices. Plus, with our exclusive coupon code AN30SAVE, you can enjoy even greater savings on your purchase.
Don't let disorganization and scattered files hold you back – unlock the power of organization with Windows Home Server 2011. Purchase now from MSKeyDeals and take control of your digital life today!
[CTA: Shop Now at mskeydeals with Coupon Code AN30SAVE]
0 notes
Text
#fedora #gnome #linux . You flagged my post in your shit community so I'm going to post it online here and on so many other platform because your platform sucks and the fact that you flag people for mentioning it shows me how fucking low life you are: ok so i dont undrestand, if someone is a genius to create a powerlful platfrom like gnome but yet lacking simple features like sorting !!! if people are on a linux platform its not always for fun its for work and being organized its so important for me, but i cant even sort my damn files by their type. i changed my dconf i changed my settings even tried to find an extention, i did everything that everyone talked in this community but yet i cant sort my damn fuging files based on type. like wtf fedora and gnome?! if you are sooooooo lazy to put such a feature then dont release in the first place, its so annoying how i cant even change from stupid nautilus , its really really really stupid that you dont have a sort by button anywhere, and lets not get me started with the file chooser, its absolutely terrible. im a designer and a photographer and i need to see my content bcuz i have more than 10000 photos and yet every time i wanna upload i have to go and check through folder to see which picture i need bcuz you simply lack thumbnails when you need to choose a file !!!!!!!!!!!!!! why not just make things easy ???????? i cant imagine how many times i changed from gnome to kde and back and everytime i tell myself its ok you can do gnome this time bcuz kde is even worse for heavy design work so i have no choice but to be on gnome, but then after a few weeks im exhausted from trying to make this shyt platform work for me as a designer, not everyone is on linux for games, its stupid, it really is that you cant even provide settings or enable them on your end. fix this !!!!! its ridiculous, your platform its amazing except you are lacking a lot of features that make everything faster and easier and no im not downloading extra software to organize my files and even thats not helpful bcuz the file chooser will be the same shyt, trust me i tried many times, nothing ever works. its like you want people to suffer on your platform and give up and change to windows ! but bcuz of gimp and krita i cant give up gnome so do something for Jesus sake , if windows can do it, you can too !!!!! -
0 notes
Link
0 notes
Text
Unlocking Business Efficiency: How RDPEXTRA Advanced Features Boost Productivity
In modern-day rapid-paced business surroundings, maximizing performance is crucial for staying competitive and reaching success. Remote Desktop Protocol (RDP) answers have become essential gear for businesses seeking to streamline operations, improve collaboration, and enhance productivity. RDPEXTRA, with its advanced features, gives an effective platform that may notably boost efficiency and drive enterprise increase.
The Importance of Business Efficiency
Efficiency is the cornerstone of a hit commercial enterprise. It encompasses the potential to accomplish obligations with minimal time, attempt, and resources at the same time as preserving great results. In a global where time is money, businesses that perform effectively benefit an aggressive part by being able to supply products and services faster, respond to purchaser desires directly, and adapt to market adjustments hastily.
Understanding RDPEXTRA
RDPEXTRA is a main company of Remote Desktop Protocol solutions that cater to companies of all sizes. With its consumer-pleasant interface, robust security capabilities, and superior capability, RDPEXTRA gives a comprehensive platform for far-flung access and collaboration. By leveraging RDPEXTRA’s advanced features, businesses can unencumber new stages of efficiency and productiveness.
Advanced Features of RDPEXTRA
Multi-Monitor Support
RDPEXTRA lets customers connect to more than one video display unit simultaneously, enabling them to paint on a couple of duties or packages seamlessly. This function enhances productivity by reducing the need to exchange among home windows and improving multitasking skills.
File Transfer Capabilities
With RDPEXTRA, users can effortlessly transfer documents among neighborhood and remote gadgets with only a few clicks. This function streamlines workflows with the aid of casting off the want for outside file-sharing equipment and simplifying the process of sharing files, photos, and different documents.
Clipboard Sharing
RDPEXTRA’s clipboard-sharing function permits customers to replicate and paste text, photographs, and files among local and remote devices results easily. This capability promotes collaboration by allowing team contributors to percentage data speedy and efficiently.
Session Recording
RDPEXTRA offers session recording talents that permit users to file their far-off computer periods for auditing, schooling, or troubleshooting purposes. This function enhances transparency and accountability in the organization at the same time as supplying valuable insights into personal activities.
Customizable Security Settings
RDPEXTRA gives customizable protection settings that enable companies to tailor their far-off get admission to an environment consistent with their unique protection requirements. From encryption protocols to access controls, RDPEXTRA offers several protection features to protect sensitive records and ensure compliance with industry regulations.
Boosting Productivity with RDPEXTRA
By leveraging RDPEXTRA’s advanced functions, companies can unencumber new stages of performance and productivity throughout numerous departments:
IT Support: IT groups can troubleshoot issues remotely, carry out software program updates, and manipulate systems extra successfully.
Sales & Marketing: Sales representatives can get admission to consumer records securely from everywhere, collaborate on presentations in real time, and streamline lead control processes.
Design & Development: Designers and builders can paint on initiatives collaboratively, share resources seamlessly, and test packages throughout one-of-a-kind environments.
Customer Support: Customer assist teams can assist customers remotely, troubleshoot technical troubles efficiently, and offer personalized help through display sharing.
RDPEXTRA’s advanced features play an important position in unlocking commercial enterprise efficiency by enhancing collaboration, streamlining workflows, improving security, and boosting productivity throughout diverse departments. By investing in a dependable RDP solution like RDPEXTRA, companies can stay in advance of the curve in the contemporary aggressive landscape and attain sustainable growth in the long run.
Whether you are seeking out a cheap RDP answer or considering where to buy RDP offerings from trusted vendors like RDPEXTRA can make all of the distinctions in optimizing your commercial enterprise operations for maximum efficiency and achievement.
0 notes
Text
296 - So Many Apple OS Updates! - With Guest Mike Potter, Jeff Gamet, and Ben Roethig
The latest In Touch With iOS with Dave he is joined by guest Mike Potter, Jeff Gamet, and Ben Roethig. Beta this week.iOS 17.4 was released to the public. Apple releases iOS 17.4, iPad 17.4 with compliance for EU Digital Markets Act. it also includes must install security fixes, iOS 17.4 patch list expands to over 40. Transcripts are now available in Apple Podcasts and they are amazing. Apple Changes Trade-In Values for Macs, iPhones, iPads, and Apple Watches. Plus much more.
The show notes are at InTouchwithiOS.com
Direct Link to Audio
Links to our Show
Give us a review on Apple Podcasts! CLICK HERE we would really appreciate it!
Click this link Buy me a Coffee to support the show we would really appreciate it. intouchwithios.com/coffee
Another way to support the show is to become a Patreon member patreon.com/intouchwithios
Website: In Touch With iOS
YouTube Channel
In Touch with iOS Magazine on Flipboard
Facebook Page
Mastodon
X
Instagram
Threads
Spoutible
Topics
Beta this week.iOS 17.4 was released to the public. Apple releases iPadOS 17.4 with compliance for EU Digital Markets Act
Apple Releases iOS 17.4 and iPadOS 17.4 With EU App Changes, New Emoji, Podcast Transcripts and More
iOS 17.4 Features: What's New in iOS 17.4
iOS 17.4 Lets Budget Apps Read Real-Time Apple Card Transaction Info
Make Sure to Update: iOS 17.4 and iPadOS 17.4 Fix Two Major Security Vulnerabilities
macOS 14.4 brings 50+ security fixes, iOS 17.4 patch list expands to over 40
How to find your new Apple Cash card number in iOS 17.4
iOS 17.4: Apple's 'new instrument cluster experience' for CarPlay
iOS 17.4 has landed – here are six new features it brings to your iPhone
Apple debuts new transcripts feature for Apple Podcasts in iOS 17.4
Apple introduces transcripts for Apple Podcasts
Transcripts on Apple Podcasts
Transcripts now available in Apple Podcasts
Apple Releases watchOS 10.4 With Fix for Ghost Touch Bug - MacRumors
Apple Releases HomePod Software 17.4 With Music Preference Update
Apple Releases visionOS 1.1 With Improvements to Persona, EyeSight, Virtual Keyboard and More
Apple Releases tvOS 17.4
Apple Releases macOS Sonoma 14.4
News
Apple updates rules surrounding EU DMA compliance to address developer concerns
Apple Changes Trade-In Values for iPhones, iPads, and Apple Watches
Apple Ups Mac Trade-In Prices Following M3 MacBook Air Launch
Apple hit with class action lawsuit over iCloud's 5GB limit
Over 200 Apple Watches recovered from Illinois lakes by metal detectorist and diver
The FDA just approved an iPhone-powered blood glucose monitor as Apple Watch sugar-sensing plan continues
Apple TV+ adds a limited time library of 50 movies to stream for free
Photo Editor Luminar Arrives on the iPad and Vision Pro
Our Host
Dave Ginsburg is an IT professional supporting Mac, iOS and Windows users and shares his wealth of knowledge of iPhone, iPad, Apple Watch, Apple TV and related technologies. Visit the YouTube channel https://youtube.com/intouchwithios follow him on Mastadon @daveg65, and the show @intouchwithios
Our Regular Contributors
Jeff Gamet is a podcaster, technology blogger, artist, and author. Previously, he was The Mac Observer’s managing editor, and Smile’s TextExpander Evangelist. You can find him on Mastadon @jgamet as well as Twitter and Instagram as @jgamet His YouTube channel https://youtube.com/jgamet
Ben Roethig Former Associate Editor of GeekBeat.TV and host of the Tech Hangout and Deconstruct with Patrice Mac user since the mid 90s. Tech support specialist. Twitter @benroethig Website: https://roethigtech.blogspot.com
About our Guest
Mike Potter is the organizer of Macstock Conference: and the host of the For Mac Eyes Only Podcast. You can reach him on Mastodon: https://tooting.ninja/@formaceyesonly https://tooting.ninja/@macstockexpo
Here is our latest Episode!
0 notes
Text
Ultimate Guide to Photo Organizer on Your Computer
A photo organizer is a powerful tool that can help you easily manage and organize your entire collection of photos stored on your computer.
Firstly, photo organizers typically offer tools for organizing photos into albums or folders, making it easy to group photos by event, date, location, or other criteria. This can help users stay organized and find specific photos quickly when they need them. Many photo organizers also offer tagging features, allowing users to add keywords or labels to their photos for even easier searching and sorting.
In addition to organizing photos, many photo organizers photo organizing software info here also offer basic editing tools for adjusting things like brightness, contrast, color, and cropping. Users can use these tools to enhance their photos or correct common issues like red-eye or overexposure. Some photo organizers even offer advanced editing features, such as filters and effects, for users who want to take their editing skills to the next level.
A photo organizer is a photo organizing software program designed to help users manage and organize their photo collections stored on their entire computer. It allows users to easily view, search, and edit photos, as well as create albums and slideshows. It also provides tools for tagging, categorizing, and sorting images based on various criteria such as date, location, and subject.
Another key feature of many photo organizers is the ability to share photos with others. Users can often easily create slideshows or photo galleries to share with friends and family, either online or via email. Some photo organizers even offer integration with social media sites like Facebook and Instagram, allowing users to quickly share their photos with a wider audience.
Many photo organizers also offer backup and syncing features, allowing users to safely store their photos in the cloud or on an external hard drive. This can help protect against data loss in case of computer failure or other issues. Some photo organizers even offer automatic syncing features, ensuring that users always have the most up-to-date version of their photo collection.
One important consideration when choosing a photo organizer is compatibility with different devices and operating systems. Users who want to access their photos on multiple devices, such as a computer, smartphone, or tablet, should look for a photo organizer that offers syncing and cloud storage options. It's also important to check that the photo organizer is compatible with the user's operating system, in case of that's Windows, macOS, or Linux.
Unleashing the Benefits of Photo Organizing Software
Photo organizing photo organizing software offers many advantages, such as allowing you to easily categorize and tag photos for easy searching and organization.
One of the biggest advantages of using photo organizing software is the ability to easily categorize and tag your photos. This allows you to quickly search for specific images based on keywords or themes, making it much easier to find that one special picture you are looking for. With the ability to add tags, captions, and ratings to your photos, you can create a personalized system that works best for you.
Another advantage of photo organizing software is the ability to create albums or collections of photos to keep everything neat and tidy. Then you want to group photos by date, location, o
1 note
·
View note
Last Seen Blogs

stary-night-12
无标题

mintlemonade
Untitled

katarenai
life is hard for otaku

hunner806
I Don't Know What To Name This

mariilynmonroeee
Marilyn Monroe