#WebGL・canvas
Text
WebGL Sunny Scenery
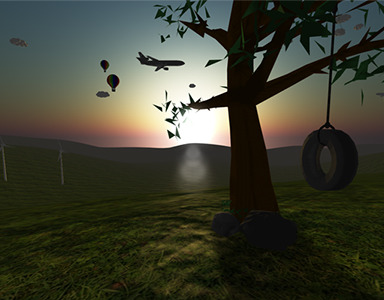
WebGL 3D demo of a beautiful, sunny, scenery, with lens flare & sky shader.
Check it out:
https://thewebdesignerpro.com/scenery.html
3 notes
·
View notes
Text
Summer Afternoon

https://summer-afternoon.vlucendo.com/
Summer Afternoon
2 notes
·
View notes
Photo
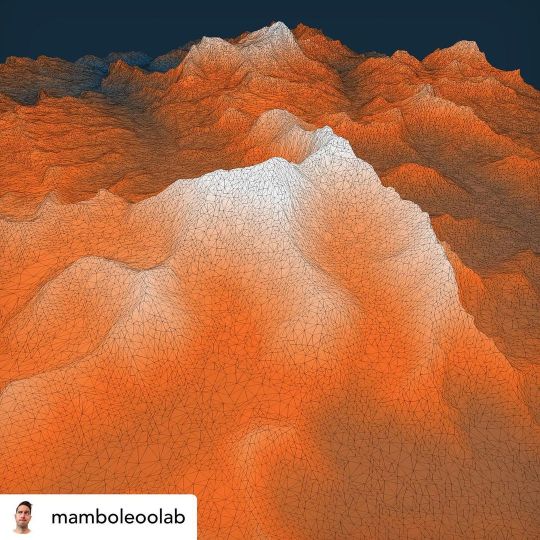
Art by @mamboleoolab Everest - 8 848m #webgl #threejs #maperitive #mapporn #generative #generativeart #generativedesign #procedural #javascript #canvas #processing #hiking #mountain #everest https://www.instagram.com/p/CfWut3TLQAb/?igshid=NGJjMDIxMWI=
#webgl#threejs#maperitive#mapporn#generative#generativeart#generativedesign#procedural#javascript#canvas#processing#hiking#mountain#everest
1 note
·
View note
Text
god i wish there was a free animation software that could export as html5 canvas (or other web thing, like, webgl or whatever)
like your options are give unreasonable sums of money to adobe for adobe animate (or sail the high seas)
or try to wrangle a game engine like godot or game maker into doing animation
or go fuck yourself.
7 notes
·
View notes
Text
How to mix vuex / vue with HTML5 games
Do you want a vue ui mixed with Babylon.js, Three.js, PIXI.js, canvas, Webgl, etc? Or maybe just to store some variables... or make reactive changes? Here's how it works in a few of my games...
There are 3 main points of integration. These are mutating state in the store (writing to a variable in the store), reading state from the store (accessing the store variables from other places), and reacting to changes in state (triggering a function when a value in the store changes).
First, how do you expose the store? Well you can literally just export it and then import it. Or be lazy and stick it on window.store. You'll want to have a sensible order of initialization when your game starts up so that you don't try to access the store before it exists. But games already use loaders etc to load up their images and sounds, so there's a place for that. Load up the store first, probably.
For reading state from the store you can use a syntax like store.getters['setttings/graphicsMode']. It can be a little simpler than that, but this shows the synatx for a store nested within a store. In my game for example, I have a gameStore and a settingsStore just because I didn't feel like putting *all* of the properties into one giant vuex config. One can also access the state via store.state.settingsStore.someProperty but this is reading it directly instead of uses the getter. You probably want to use the getter, because then you can have a computed property, but either will work.
For writing state to the store, the key is store.dispatch. Syntax is like store.dispatch('devStore/toggleDeveloperMenu', optionalPayload). This is invoking the *action* which means you need to create actions instead of just using a setter with this particular syntax.
So that's reading and writing! But what about reactivity? Well lets say your game logic dispatches some state which enters the store, you'll find that if that state is displayed in your vue ui it is already reactive and working. For example if you store.dispatch('game/updateHitpoints', { hp: 50 }) and there's already ui to draw the hitpoint bar on the hud that is going to change automagically. But what if you're pressing buttons in your vue-based settings menu or game ui? How does one get the game itself to react to that? Well there are two some what easy ways (among a million homegrown options). The first is to use the window to dispatch an event from the same action that you use to update the state, and be sure that you always use the action instead of directly accessing the setter. This will work fine, and I did it at first, but there is a more elegant and integrated way. That is to use store.watch.
The store.watch(selector, callback) will invoke your callback when the state defined by the selector you provide changes. For example this is how to setup your game to change the rendering settings in bablyon js (pseudocode) whenever someone changes the graphics level from low | medium | high | ultra.
store.watch(state => state.settings.graphicsMode, () => changeGraphics(store.getters['settings/graphicsMode']));; The first arg is the selector function, which in this case specifies that we're watching graphicsMode for changes. The second function is what gets invoked when it does change. The actual body of my changeGraphics function is skipped b/c it doesn't really matter.. for me it might turn off shadows and downscale the resolution or something like that.
Personally I create a function called bindToStore(stateSelector, callback) which sets up the watcher and invokes it once for good measure. This way when my game is starting it up, as all the watchers get setup listening for changes, that first first invocation also puts the ui into the correct state.
So that's writing, reading, and reacting to state changes across the border between vuex/vue and any html5 app or game engine by integrating with getters, actions via dispatch, and watchers. Good luck and have fun!
#vuex#vue#vuejs#vue2#vue3#html5 game dev#babylon.js#three.js#pixi.js#game development#game design#javascript
9 notes
·
View notes
Text
Making the ultimate-guitar.com music player easier to practice with
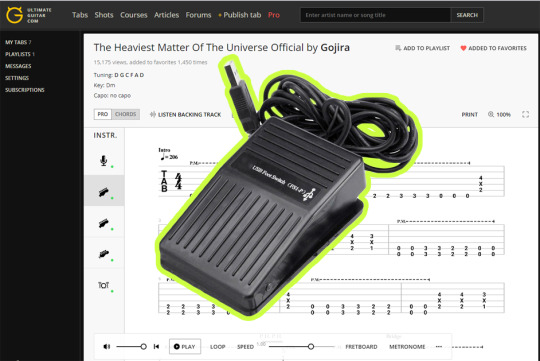
Recently I have been practicing a few songs on my guitar and I realized that is important for me to not move away my hands from my guitar, when I do it because I need to use the mouse or keyboard I lose a bit of focus and some precious time, not to mention is not good for my back as I have to lean forward, doing this one time wouldn’t be a problem but as I sometimes do it more than 100 times in a single day it can start hurting! (my body reminds me I’m no longer in my twenties!).
I’m a programmer so I decided to try to create a solution myself after not finding existing solutions online, so I decided to buy a USB pedal, one of those you can press to simulate any key on your keyboard, but this was just the first step as there isn’t actually a single key I can press to rewind to the current section of the song, the ultimate-guitar.com web player lacks a button or hotkey to do that; fortunately I can write some JavaScript and add it myself with the help of tampermonkey (you may user your preferred userscript manager); first of all a warning: Technical jargon soon ahead!
My requirements are just 2 commands, one to go back to the start of the part being played of the song (e.g. verse, chorus, bridge) and another to go back to the start of the selected part of the song... but the thing is that I only have one USB pedal! And I don’t want to buy another! Plus I don’t want to move my feet around, I’m practicing guitar here not drums! So I just made a bit of code that does one thing when pressed once and a different thing when is pressed twice, in JavaScript code that is pretty easy to achieve using setTimeout.

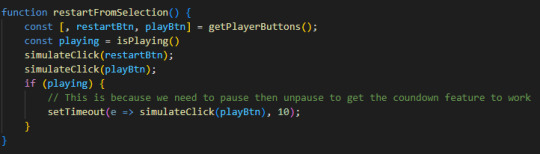
About the first command: After fiddling it a bit I discovered that the main part of the ultimate-gutar.com player (the tablature) uses obfuscated WASM code that renders over a canvas element using WebGL (it seems like this was a desktop software that was transformed into a web version), fortunately for me there is a little bar at the bottom made of simple plain DOM elements (e.g. not canvas) with a little green line signifying the player’s position, it looks like this:

First I tried to use the left offset of each part to calculate where to simulate a click but that wasn't working too well, I did some tests and sometimes it was moving after or before the desired position, playing before is not a big deal but playing after is unacceptable, so I fiddled a bit more with the HTML and realized there was a much better source of data to make such calculation:

The different parts have their widths specified with percentages with 5 decimal places! This means that data has not been clamped like the offsets I was trying to use, those are limited by the amount of pixels available on the screen. Great, so I started using that porcentual width, and I add those until I reach a number greater than the porcentual position of the green line, as expected this gave me much better results and now the simulated click was moving me to the desired position, the code ended up looking like this:
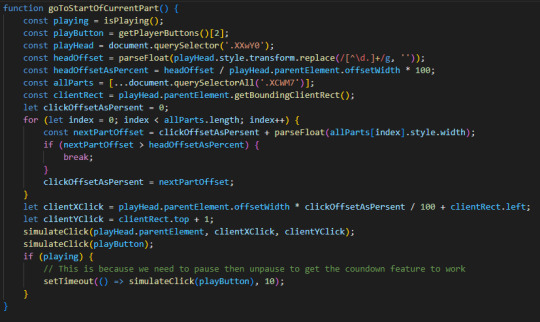
Then I created the second command which was pretty straightforward giving that I can get the desired result simulating a click on the restart button (⏮) and then the play button (⏵), so the code ended up looking like this:
That’s it! You may find the full code: at https://gist.github.com/Ivanca/a90848f8ee4d7f62e939630013e214d8
While we are at it I would like to mention I’m looking for a TypeScript/JavaScript full-time remote job position, I have more than 12 years of experience using JavaScript, and I have experience with PHP, Python, C#, React and Angular as well, I’m located in Colombia (so not the US), if you or your company are interested ping me at ivanca at gmail.
2 notes
·
View notes
Text
The Burden of Being Seen Online
I talk about one of my fears that's plagued me recently again.
When you access the Websites section of the Neocities front page, it automatically sets the viewing mode to the most followed Neocities sites. This is less organic, but more useful in the long run for finding indie sites. The most visited sites on Neocities are a Neopets fansite, some WebGL demonstrations, and the lovely Bogleech. The most followed are the famous Fauux, a districts site that I question if it's alive, Sadgrl, and Dokodemo. I'm friends with at least one of these people, but this intro has gone on enough. For a while, I've been on the second page for the most followed sites. It's still a long journey of a scroll down to find me, but I'm there. Big achievement. Woohoo! Yippee! IT'S HAPPY HOUR!! I'm right there, and with that, comes traffic. And with that, comes being seen.
I've always had a habit of deleting my works once I've grown too large, because being seen has usually made me extremely uncomfortable of a judgement I couldn't see by people who didn't say anything to me, only watched. Being seen is judgement in itself, positive or negative. It shatters me to the core, and feels like eyes piercing my shell. In addition, as of writing this, I have 170-ish followers on my small Tumblr. I literally just reblog shitposts and make my own sillies there. Feels weird. Audience is weird.
But being seen also leads to my goal in life -- to have my works appreciated. I like when people see my art, my writing, the shit I smear on a digital canvas and call my own. Seeing me as a person is another thing. I am just a little guy on the web, and there are many much bigger guys there that could kill me instantly. But what I want to be seen for is not usually what I am actually seen for -- my low-effort, low-time, well-timed small jokes are usually the rocket-launchers. Not the stuff I pour my sweat into. I'm sure that happens to everyone in a high-paced traffic jam of a web, but it does leave me quite miffed by the sight of it.
All of my life, I have been socially isolated in the real world. On the web, it varies. I do not touch normie spaces anymore. I've learnt my lesson -- being seen there is a death sentence to someone who is not right in the head. I slip out of a slight line or say something that isn't on a thin thread, and there are swords pointed at me. I do not understand an ever-changing set of rules on the web or in normie spaces, so I merely stay on my own. Net nomad, some call it. Vagabond is a cooler word, though.
But while I am still a vagabond, this vagabondness is now popular, because everybody else is fed up with the normie web. We gather, create our own spaces, and visit them and leave pretty messages. I have been praised and seen plenty of times here, and I truly treasure it all.
But even that leaves me on edge, for being seen means being percieved, judged, and left to boil in the minds of many.
Being seen is suffering, but one I must persist in, let myself be wound by in order to succeed in what I do best -- create. I create by edge and by whim. I pick up paper and just go at it. Many are like this, most of them also mentally ill as I am, and both refrain from and wish to discuss here. A shy artist is a forgotten one, until perhaps after death, such as Van Gogh. Love that guy's Clone High appearance, by the way.
Hey, you're seeing this right now. Do you have any thoughts on my site? What I write, make?
6 notes
·
View notes
Link
0 notes
Text
Practical Tools for E-commerce!

Account Security Tool:
VMLogin Fingerprint Browser:
A cross-border browser is an indispensable tool for cross-border users. It is an expert in cross-border account security management, providing an anti-association browser for cross-border business with multiple account batch management.
By creating a virtual browser to change the fingerprint information of the website tracking, each anti-association browser fingerprint information is unique, each virtual browser can be configured with independent IP, canvas fingerprints, WebGL, MAC address, and other important privacy parameters of the modification, the real do browser fingerprinting environment is independent of each other, 100% security isolation, to ensure that e-commerce multi-account batch security anti-association login and management It supports global website platforms.
Suitable for e-commerce, social media marketing, advertising, affiliate marketing, and other online businesses.
New users can experience it for free.
#software#protection#vmlogin#ecommercesuccess#ecommercebusiness#ecommercestore#ecommercemarketing#ecommercetips#business growth#toolsforsuccess#antidetectbrowser#advertising#socialmediaadvertising#affiliatingmarketing#account management
0 notes
Text
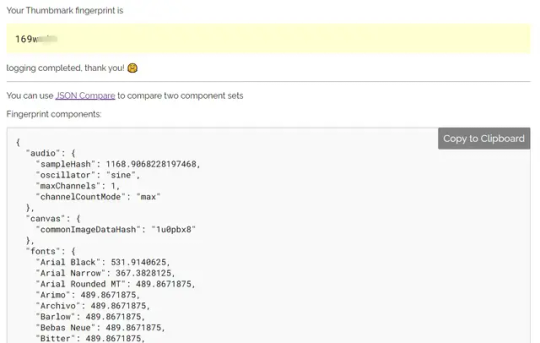
Lightweight Browser Fingerprint Library - Thumbmark.js
An open-source alternative to the well-known Fingerprint.js library.
ThumbmarkJS is a lightweight browser fingerprinting JavaScript library that creates a unique fingerprint of a user’s browser by collecting details like audio, canvas, and WebGL fingerprints, available fonts and plugins, screen size, timezone, and more.
How to use it:
1. Install & download.
# NPM
$ npm install thumbmarkjs
2.…
View On WordPress
0 notes
Text
ARKREIS
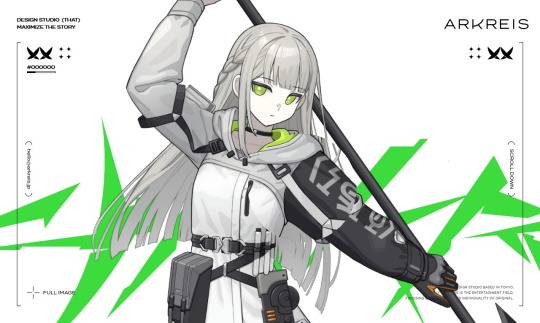
ARKREIS
https://arkreis.jp/

0 notes
Text
What's Fingerprint and how it's used to identify you
Concerns about how a website can identify you on more Websites. Well, I've got a solution to that!
When you browse the internet websites collects some data of your computer or mobile phone( your time zone, your screen size, canvas fingerprint, webgl…) and they use it to assign you a fingerprint. In this way they know who you are in more websites. You may be wondering:”How do I stop it?”. You’re here to find it out. I’ll do a version for Gecko browsers because they’re known for their security…
View On WordPress
#Best browsers#Best extension#Best search engine#Guide#No trackers#Privacy#Safe browsing#Security#TechWiki#tutorial#VPN
0 notes
Text
A Fun Guide to Three.js 3D Web Magic
Ever imagined bringing a splash of 3D wonder to your web pages? Well, you’re about to embark on an exciting journey into the realm of Three.js! In this guide, we’re not just going to explore the magic it holds, but we’re going to have some hands-on fun with its most dazzling features. And rest assured, we’re going to keep it as interactive and enjoyable as a carnival ride!
So, are you ready to kickstart this adventure into the vibrant world of Three.js?
What is Three.js?
Three.js is a JavaScript library that makes it easy to create 3D graphics on the web. Whether you’re building games, visualizations, or interactive experiences, Three.js is your ticket to the third dimension. Let’s embark on this journey!
Cool Features of Three.js
1. Cross-Platform Compatibility
One of the standout features of Three.js is its seamless compatibility with various web browsers. Whether your audience is using Chrome, Firefox, Safari, or Edge, Three.js ensures a consistent and captivating 3D experience across platforms.
2. Abundance of Geometry and Materials
With Three.js, you have access to a rich library of predefined geometries (like cubes, spheres, and planes) and materials (including basic, Lambert, Phong, and more). This makes it easy to create intricate 3D scenes with minimal effort.
3. Lighting and Shadows
Creating realistic lighting and shadows is a breeze with Three.js. To add depth and realism to your scenes, you can experiment with various light sources like ambient, directional, point, and spotlights.
4. Animation and Interactivity
Three.js empowers you to bring your creations to life with animations and interactivity. You can animate objects, control camera movements, and respond to user input to craft dynamic and engaging experiences.
5. Post-Processing Effects
Elevate your visuals with post-processing effects like bloom, depth of field, and vignette. These effects add a layer of polish and professionalism to your 3D scenes.
Getting Started with Three.js
Now, let’s walk through a basic tutorial by making a spinning 3D moon to kickstart your journey with Three.js.
Before starting you can view the live demo here!
Step 1: Setting Up Your Environment
Section Breakdown:
Document Type Declaration:
<!DOCTYPE html> declares the document type and version (HTML5 in this case).
2. HTML Root Element:
<html> tags define the root of the HTML document.
3. Head Section:
<head> contains meta-information about the document and external resources like stylesheets and scripts.
4. Character Encoding and Viewport:
<meta charset="UTF-8"> sets the character encoding to UTF-8 for proper text display.
<meta name="viewport" content="width=device-width, initial-scale=1.0"> ensures proper scaling on different devices.
5. Page Title:
<title> sets the title displayed in the browser tab.
6. Internal CSS:
<style> contains CSS rules. In this case, it removes any default margin from the body.
Step 2: JavaScript Section
Section Breakdown:
Loading Three.js Library:
<script src="https://threejs.org/build/three.min.js"></script> loads the Three.js library from an external source.
Script Tags:
<script> tags are used to embed JavaScript code within the HTML document.
Step 3: Setting up the Scene and Camera
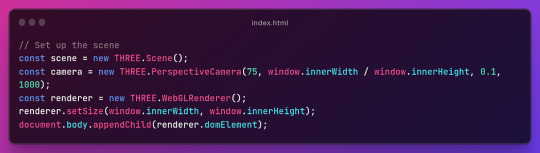
Section Breakdown:
1.Creating a Scene:
const scene = new THREE.Scene(); creates a new 3D scene.
2. Setting up the Camera:
const camera = new THREE.PerspectiveCamera(75, window.innerWidth / window.innerHeight, 0.1, 1000); sets up a perspective camera with specified parameters (field of view, aspect ratio, near and far clipping planes).
3. Initializing the Renderer:
const renderer = new THREE.WebGLRenderer(); creates a WebGL renderer.
4. Setting Renderer Size and Appending to DOM:
renderer.setSize(window.innerWidth, window.innerHeight); sets the size of the renderer to match the window.
document.body.appendChild(renderer.domElement); appends the renderer’s canvas element to the document body.
Step 4: Creating a Sphere and Adding Moon Texture
Section Breakdown:
1.Creating a Sphere:
const geometry = new THREE.SphereGeometry(5, 32, 32); creates a sphere geometry with specified radius and segments.
2.Loading a Texture:
const textureLoader = new THREE.TextureLoader(); creates a texture loader.
const texture = textureLoader.load('path_to_your_image.jpg'); loads an image texture.
3.Applying Texture to the Sphere:
const material = new THREE.MeshBasicMaterial({ map: texture }); creates a material using the loaded texture.
const sphere = new THREE.Mesh(geometry, material); creates a mesh using the sphere geometry and applied material.
scene.add(sphere); adds the sphere to the scene.
Step 5:Animating the Moon
Section Breakdown:
1. Animation Loop:
function animate() { ... } defines an animation loop using a recursive requestAnimationFrame call.
2.Sphere Rotation:
sphere.rotation.y += 0.01; incrementally rotates the sphere around the y-axis. Adjust the value for different rotation speeds.
3.Rendering the Scene:
renderer.render(scene, camera); renders the scene using the defined camera.
Step 6: Setting Camera Position and Handling Window Resizing
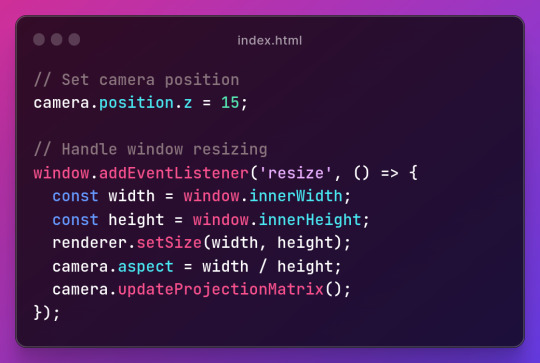
Section Breakdown:
1.Setting Camera Position:
camera.position.z = 15; sets the camera’s position along the z-axis.
2.Handling Window Resizing:
window.addEventListener('resize', () => { ... }); adds an event listener for window resizing.
3.Inside the event handler:
const width = window.innerWidth; and const height = window.innerHeight; retrieve the new window dimensions.
renderer.setSize(width, height); updates the renderer’s size.
camera.aspect = width / height; adjusts the camera’s aspect ratio.
camera.updateProjectionMatrix(); updates the camera’s projection matrix.
Conclusion
And there you have it! You’ve just created a basic 3D scene using Three.js. Customize it further by tweaking textures and rotations. Integrate it into your projects for added charm. Access the full source code here.
In the next part, we will learn to add key, mouse, and touch controls. Happy coding!😃

0 notes
Text
Is Bokeh the Future of Data Visualization with Interactive Python Plots?

Data visualization plays a crucial role in understanding and communicating insights from data. Python, being a versatile programming language, offers numerous libraries for creating visualizations. Among them, Bokeh stands out as a powerful and user-friendly library that allows you to build interactive visualizations with ease.
Bokeh is an open-source Python library specifically designed for creating interactive visualizations for modern web browsers. It enables you to generate rich, interactive plots, charts, and dashboards that can be easily shared and deployed across different platforms. Whether you’re a data scientist, web developer, or data enthusiast, Bokeh provides a comprehensive set of tools to help you bring your data to life.
With just a few lines of Python code, Bokeh enables you to create interactive, JavaScript-powered visualizations displayable in a web browser.
Its workflow involves two stages selecting visual building blocks and customizing them. Bokeh integrates a Python library responsible for defining visualization content and interactivity with BokehJS, a JavaScript library that handles the display in web browsers. Bokeh automates the generation of JavaScript and HTML code and supports the loading of supplementary JavaScript from Bokeh’s CDN for enhanced functionality.
Key Features of Bokeh:
Interactive Visualizations: Bokeh allows users to create interactive plots that respond to user input, such as mouse movements, clicks, or selections. This interactivity enhances data exploration and enables users to gain deeper insights by dynamically manipulating visual elements.
Multiple Rendering Options: Bokeh offers multiple rendering options, making it flexible for various use cases. It supports rendering visualizations as HTML documents, standalone web applications, or embedded components within other Python frameworks like Flask and Django.
Diverse Plotting Types: Bokeh supports a wide range of plotting types, including scatter plots, line plots, bar plots, histograms, heatmaps, and more. These plot types can be customized extensively to suit specific data visualization requirements.
High-performance Rendering: Bokeh leverages modern web technologies, such as HTML5 Canvas and WebGL, to efficiently render interactive plots. This enables smooth interaction even with large datasets and complex visualizations.
Cross-platform Compatibility: Bokeh visualizations can be displayed on different platforms and devices, including desktops, tablets, and mobile devices. The responsive design ensures that the visualizations adapt to various screen sizes, maintaining their interactivity and readability.
Cross-language Support: Bokeh supports multiple programming languages, including Python, R, and Julia, allowing users to leverage Bokeh’s capabilities in their preferred language environment.
Community and Documentation: Bokeh has an active community of users and developers, providing support, examples, and tutorials. The official Bokeh documentation is comprehensive, making it easier for users to get started and explore its advanced features.
Getting Started with Bokeh:
To start using Bokeh, you need to install it via pip, a package manager for Python. Once installed, you can import Bokeh in your Python script or Jupyter Notebook and begin creating visualizations.
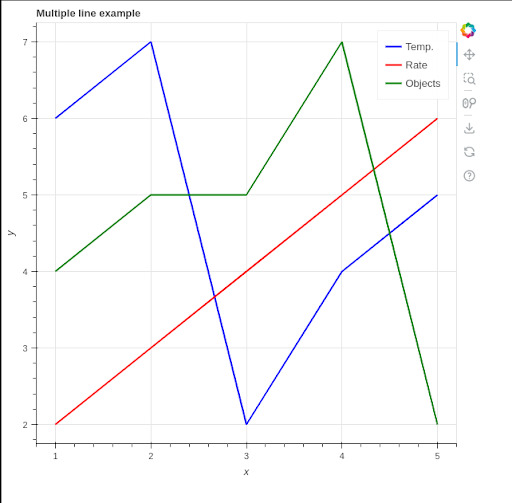
Bokeh provides multiple interfaces for creating plots. The most used interface is the ‘bokeh.plotting’ module, which offers a convenient way to define and customize visual elements. You can create plots, add data, and configure various plot attributes such as titles, axes, legends, and tooltips.
Bokeh follows a declarative approach, allowing users to define plots and visual elements using a concise syntax. Here’s a simple example to illustrate the basic usage of Bokeh:
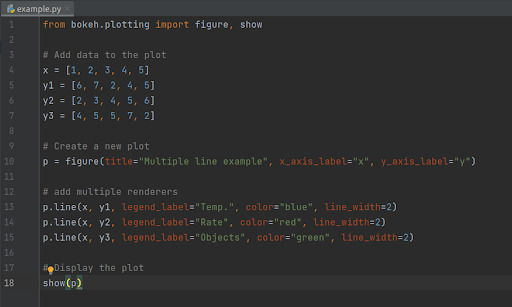
When you execute these lines of code, Bokeh creates an output file “example.html”. Bokeh also opens a browser to display it.
See the results in browser:
Conclusion:
Bokeh is a powerful Python library that empowers users to create interactive visualizations for the web. With its intuitive API and extensive customization options, Bokeh enables you to create visually appealing plots, charts, and dashboards that engage and inform your audience. Whether you’re exploring data, presenting insights, or building web applications, Bokeh is a valuable tool in your data visualization toolkit. By leveraging Bokeh’s capabilities, you can effectively communicate complex information, uncover hidden.
Originally published by: Is Bokeh the Future of Data Visualization with Interactive Python Plots?
0 notes
Last Seen Blogs

t-violet
oh

zipperjelly83
Tobet88, Trang Chu Nha Cai Tobet88 tai tobet88.lif

hiraethwoorld
sara
writethatdown
—𝓼.𝓮

ovochloe
chloe