#Travis Charset
Text


The Sandman: Dream And Death
Art by Travis Charset
#Comics#Travis Charset#DC Comics#Sandman#Dream#Death#Morpheus#The Endless#Endless#Art#DC#Fantasy#Fantasy Comics
191 notes
·
View notes
Text
Agilenano - News: How To Set Up An Express API Backend Project With PostgreSQL Chidi Orji 2020-04-08T11:00:00+00:002020-04-08T13:35:17+00:00
We will take a Test-Driven Development (TDD) approach and the set up Continuous Integration (CI) job to automatically run our tests on Travis CI and AppVeyor, complete with code quality and coverage reporting. We will learn about controllers, models (with PostgreSQL), error handling, and asynchronous Express middleware. Finally, we’ll complete the CI/CD pipeline by configuring automatic deploy on Heroku.
It sounds like a lot, but this tutorial is aimed at beginners who are ready to try their hands on a backend project with some level of complexity, and who may still be confused as to how all the pieces fit together in a real project.
It is robust without being overwhelming and is broken down into sections that you can complete in a reasonable length of time.
Getting Started
The first step is to create a new directory for the project and start a new node project. Node is required to continue with this tutorial. If you don’t have it installed, head over to the official website, download, and install it before continuing.
I will be using yarn as my package manager for this project. There are installation instructions for your specific operating system here. Feel free to use npm if you like.
Open your terminal, create a new directory, and start a Node.js project.
# create a new directory mkdir express-api-template # change to the newly-created directory cd express-api-template # initialize a new Node.js project npm init
Answer the questions that follow to generate a package.json file. This file holds information about your project. Example of such information includes what dependencies it uses, the command to start the project, and so on.
You may now open the project folder in your editor of choice. I use visual studio code. It’s a free IDE with tons of plugins to make your life easier, and it’s available for all major platforms. You can download it from the official website.
Create the following files in the project folder:
README.md .editorconfig
Here’s a description of what .editorconfig does from the EditorConfig website. (You probably don’t need it if you’re working solo, but it does no harm, so I’ll leave it here.)
“EditorConfig helps maintain consistent coding styles for multiple developers working on the same project across various editors and IDEs.”
Open .editorconfig and paste the following code:
root = true [*] indent_style = space indent_size = 2 charset = utf-8 trim_trailing_whitespace = false insert_final_newline = true
The [*] means that we want to apply the rules that come under it to every file in the project. We want an indent size of two spaces and UTF-8 character set. We also want to trim trailing white space and insert a final empty line in our file.
Open README.md and add the project name as a first-level element.
# Express API template
Let’s add version control right away.
# initialize the project folder as a git repository git init
Create a .gitignore file and enter the following lines:
node_modules/ yarn-error.log .env .nyc_output coverage build/
These are all the files and folders we don’t want to track. We don’t have them in our project yet, but we’ll see them as we proceed.
At this point, you should have the following folder structure.
EXPRESS-API-TEMPLATE ├── .editorconfig ├── .gitignore ├── package.json └── README.md
I consider this to be a good point to commit my changes and push them to GitHub.
Starting A New Express Project
Express is a Node.js framework for building web applications. According to the official website, it is a
Fast, unopinionated, minimalist web framework for Node.js.
There are other great web application frameworks for Node.js, but Express is very popular, with over 47k GitHub stars at the time of this writing.
In this article, we will not be having a lot of discussions about all the parts that make up Express. For that discussion, I recommend you check out Jamie’s series. The first part is here, and the second part is here.
Install Express and start a new Express project. It’s possible to manually set up an Express server from scratch but to make our life easier we’ll use the express-generator to set up the app skeleton.
# install the express generator globally yarn global add express-generator # install express yarn add express # generate the express project in the current folder express -f
The -f flag forces Express to create the project in the current directory.
We’ll now perform some house-cleaning operations.
Delete the file index/users.js. Delete the folders public/ and views/. Rename the file bin/www to bin/www.js. Uninstall jade with the command yarn remove jade. Create a new folder named src/ and move the following inside it: 1. app.js file 2. bin/ folder 3. routes/ folder inside. Open up package.json and update the start script to look like below. "start": "node ./src/bin/www"
At this point, your project folder structure looks like below. You can see how VS Code highlights the file changes that have taken place.
EXPRESS-API-TEMPLATE ├── node_modules ├── src | ├── bin │ │ ├── www.js │ ├── routes │ | ├── index.js │ └── app.js ├── .editorconfig ├── .gitignore ├── package.json ├── README.md └── yarn.lock
Open src/app.js and replace the content with the below code.
var logger = require('morgan'); var express = require('express'); var cookieParser = require('cookie-parser'); var indexRouter = require('./routes/index'); var app = express(); app.use(logger('dev')); app.use(express.json()); app.use(express.urlencoded({ extended: true })); app.use(cookieParser()); app.use('/v1', indexRouter); module.exports = app;
After requiring some libraries, we instruct Express to handle every request coming to /v1 with indexRouter.
Replace the content of routes/index.js with the below code:
var express = require('express'); var router = express.Router(); router.get('/', function(req, res, next) { return res.status(200).json({ message: 'Welcome to Express API template' }); }); module.exports = router;
We grab Express, create a router from it and serve the / route, which returns a status code of 200 and a JSON message.
Start the app with the below command:
# start the app yarn start
If you’ve set up everything correctly you should only see $ node ./src/bin/www in your terminal.
Visit http://localhost:3000/v1 in your browser. You should see the following message:
{ "message": "Welcome to Express API template" }
This is a good point to commit our changes.
The corresponding branch in my repo is 01-install-express. Converting Our Code To ES6
The code generated by express-generator is in ES5, but in this article, we will be writing all our code in ES6 syntax. So, let’s convert our existing code to ES6.
Replace the content of routes/index.js with the below code:
import express from 'express'; const indexRouter = express.Router(); indexRouter.get('/', (req, res) => res.status(200).json({ message: 'Welcome to Express API template' }) ); export default indexRouter;
It is the same code as we saw above, but with the import statement and an arrow function in the / route handler.
Replace the content of src/app.js with the below code:
import logger from 'morgan'; import express from 'express'; import cookieParser from 'cookie-parser'; import indexRouter from './routes/index'; const app = express(); app.use(logger('dev')); app.use(express.json()); app.use(express.urlencoded({ extended: true })); app.use(cookieParser()); app.use('/v1', indexRouter); export default app;
Let’s now take a look at the content of src/bin/www.js. We will build it incrementally. Delete the content of src/bin/www.js and paste in the below code block.
#!/usr/bin/env node /** * Module dependencies. */ import debug from 'debug'; import http from 'http'; import app from '../app'; /** * Normalize a port into a number, string, or false. */ const normalizePort = val => { const port = parseInt(val, 10); if (Number.isNaN(port)) { // named pipe return val; } if (port >= 0) { // port number return port; } return false; }; /** * Get port from environment and store in Express. */ const port = normalizePort(process.env.PORT || '3000'); app.set('port', port); /** * Create HTTP server. */ const server = http.createServer(app); // next code block goes here
This code checks if a custom port is specified in the environment variables. If none is set the default port value of 3000 is set on the app instance, after being normalized to either a string or a number by normalizePort. The server is then created from the http module, with app as the callback function.
The #!/usr/bin/env node line is optional since we would specify node when we want to execute this file. But make sure it is on line 1 of src/bin/www.js file or remove it completely.
Let’s take a look at the error handling function. Copy and paste this code block after the line where the server is created.
/** * Event listener for HTTP server "error" event. */ const onError = error => { if (error.syscall !== 'listen') { throw error; } const bind = typeof port === 'string' ? `Pipe ${port}` : `Port ${port}`; // handle specific listen errors with friendly messages switch (error.code) { case 'EACCES': alert(`${bind} requires elevated privileges`); process.exit(1); break; case 'EADDRINUSE': alert(`${bind} is already in use`); process.exit(1); break; default: throw error; } }; /** * Event listener for HTTP server "listening" event. */ const onListening = () => { const addr = server.address(); const bind = typeof addr === 'string' ? `pipe ${addr}` : `port ${addr.port}`; debug(`Listening on ${bind}`); }; /** * Listen on provided port, on all network interfaces. */ server.listen(port); server.on('error', onError); server.on('listening', onListening);
The onError function listens for errors in the http server and displays appropriate error messages. The onListening function simply outputs the port the server is listening on to the console. Finally, the server listens for incoming requests at the specified address and port.
At this point, all our existing code is in ES6 syntax. Stop your server (use Ctrl + C) and run yarn start. You’ll get an error SyntaxError: Invalid or unexpected token. This happens because Node (at the time of writing) doesn’t support some of the syntax we’ve used in our code.
We’ll now fix that in the following section.
Configuring Development Dependencies: babel, nodemon, eslint, And prettier
It’s time to set up most of the scripts we’re going to need at this phase of the project.
Install the required libraries with the below commands. You can just copy everything and paste it in your terminal. The comment lines will be skipped.
# install babel scripts yarn add @babel/cli @babel/core @babel/plugin-transform-runtime @babel/preset-env @babel/register @babel/runtime @babel/node --dev
This installs all the listed babel scripts as development dependencies. Check your package.json file and you should see a devDependencies section. All the installed scripts will be listed there.
The babel scripts we’re using are explained below:
@babel/cli A required install for using babel. It allows the use of Babel from the terminal and is available as ./node_modules/.bin/babel. @babel/core Core Babel functionality. This is a required installation. @babel/node This works exactly like the Node.js CLI, with the added benefit of compiling with babel presets and plugins. This is required for use with nodemon. @babel/plugin-transform-runtime This helps to avoid duplication in the compiled output. @babel/preset-env A collection of plugins that are responsible for carrying out code transformations. @babel/register This compiles files on the fly and is specified as a requirement during tests. @babel/runtime This works in conjunction with @babel/plugin-transform-runtime.
Create a file named .babelrc at the root of your project and add the following code:
{ "presets": ["@babel/preset-env"], "plugins": ["@babel/transform-runtime"] }
Let’s install nodemon
# install nodemon yarn add nodemon --dev
nodemon is a library that monitors our project source code and automatically restarts our server whenever it observes any changes.
Create a file named nodemon.json at the root of your project and add the code below:
{ "watch": [ "package.json", "nodemon.json", ".eslintrc.json", ".babelrc", ".prettierrc", "src/" ], "verbose": true, "ignore": ["*.test.js", "*.spec.js"] }
The watch key tells nodemon which files and folders to watch for changes. So, whenever any of these files changes, nodemon restarts the server. The ignore key tells it the files not to watch for changes.
Now update the scripts section of your package.json file to look like the following:
# build the content of the src folder "prestart": "babel ./src --out-dir build" # start server from the build folder "start": "node ./build/bin/www" # start server in development mode "startdev": "nodemon --exec babel-node ./src/bin/www" prestart scripts builds the content of the src/ folder and puts it in the build/ folder. When you issue the yarn start command, this script runs first before the start script. start script now serves the content of the build/ folder instead of the src/ folder we were serving previously. This is the script you’ll use when serving the file in production. In fact, services like Heroku automatically run this script when you deploy. yarn startdev is used to start the server during development. From now on we will be using this script as we develop the app. Notice that we’re now using babel-node to run the app instead of regular node. The --exec flag forces babel-node to serve the src/ folder. For the start script, we use node since the files in the build/ folder have been compiled to ES5.
Run yarn startdev and visit http://localhost:3000/v1. Your server should be up and running again.
The final step in this section is to configure ESLint and prettier. ESLint helps with enforcing syntax rules while prettier helps for formatting our code properly for readability.
Add both of them with the command below. You should run this on a separate terminal while observing the terminal where our server is running. You should see the server restarting. This is because we’re monitoring package.json file for changes.
# install elsint and prettier yarn add eslint eslint-config-airbnb-base eslint-plugin-import prettier --dev
Now create the .eslintrc.json file in the project root and add the below code:
{ "env": { "browser": true, "es6": true, "node": true, "mocha": true }, "extends": ["airbnb-base"], "globals": { "Atomics": "readonly", "SharedArrayBuffer": "readonly" }, "parserOptions": { "ecmaVersion": 2018, "sourceType": "module" }, "rules": { "indent": ["warn", 2], "linebreak-style": ["error", "unix"], "quotes": ["error", "single"], "semi": ["error", "always"], "no-console": 1, "comma-dangle": [0], "arrow-parens": [0], "object-curly-spacing": ["warn", "always"], "array-bracket-spacing": ["warn", "always"], "import/prefer-default-export": [0] } }
This file mostly defines some rules against which eslint will check our code. You can see that we’re extending the style rules used by Airbnb.
In the "rules" section, we define whether eslint should show a warning or an error when it encounters certain violations. For instance, it shows a warning message on our terminal for any indentation that does not use 2 spaces. A value of [0] turns off a rule, which means that we won’t get a warning or an error if we violate that rule.
Create a file named .prettierrc and add the code below:
{ "trailingComma": "es5", "tabWidth": 2, "semi": true, "singleQuote": true }
We’re setting a tab width of 2 and enforcing the use of single quotes throughout our application. Do check the prettier guide for more styling options.
Now add the following scripts to your package.json:
# add these one after the other "lint": "./node_modules/.bin/eslint ./src" "pretty": "prettier --write '**/*.{js,json}' '!node_modules/**'" "postpretty": "yarn lint --fix"
Run yarn lint. You should see a number of errors and warnings in the console.
The pretty command prettifies our code. The postpretty command is run immediately after. It runs the lint command with the --fix flag appended. This flag tells ESLint to automatically fix common linting issues. In this way, I mostly run the yarn pretty command without bothering about the lint command.
Run yarn pretty. You should see that we have only two warnings about the presence of alert in the bin/www.js file.
Here’s what our project structure looks like at this point.
EXPRESS-API-TEMPLATE ├── build ├── node_modules ├── src | ├── bin │ │ ├── www.js │ ├── routes │ | ├── index.js │ └── app.js ├── .babelrc ├── .editorconfig ├── .eslintrc.json ├── .gitignore ├── .prettierrc ├── nodemon.json ├── package.json ├── README.md └── yarn.lock
You may find that you have an additional file, yarn-error.log in your project root. Add it to .gitignore file. Commit your changes.
The corresponding branch at this point in my repo is 02-dev-dependencies. Settings And Environment Variables In Our .env File
In nearly every project, you’ll need somewhere to store settings that will be used throughout your app e.g. an AWS secret key. We store such settings as environment variables. This keeps them away from prying eyes, and we can use them within our application as needed.
I like having a settings.js file with which I read all my environment variables. Then, I can refer to the settings file from anywhere within my app. You’re at liberty to name this file whatever you want, but there’s some kind of consensus about naming such files settings.js or config.js.
For our environment variables, we’ll keep them in a .env file and read them into our settings file from there.
Create the .env file at the root of your project and enter the below line:
TEST_ENV_VARIABLE="Environment variable is coming across"
To be able to read environment variables into our project, there’s a nice library, dotenv that reads our .env file and gives us access to the environment variables defined inside. Let’s install it.
# install dotenv yarn add dotenv
Add the .env file to the list of files being watched by nodemon.
Now, create the settings.js file inside the src/ folder and add the below code:
import dotenv from 'dotenv'; dotenv.config(); export const testEnvironmentVariable = process.env.TEST_ENV_VARIABLE;
We import the dotenv package and call its config method. We then export the testEnvironmentVariable which we set in our .env file.
Open src/routes/index.js and replace the code with the one below.
import express from 'express'; import { testEnvironmentVariable } from '../settings'; const indexRouter = express.Router(); indexRouter.get('/', (req, res) => res.status(200).json({ message: testEnvironmentVariable })); export default indexRouter;
The only change we’ve made here is that we import testEnvironmentVariable from our settings file and use is as the return message for a request from the / route.
Visit http://localhost:3000/v1 and you should see the message, as shown below.
{ "message": "Environment variable is coming across." }
And that’s it. From now on we can add as many environment variables as we want and we can export them from our settings.js file.
This is a good point to commit your code. Remember to prettify and lint your code.
The corresponding branch on my repo is 03-env-variables. Writing Our First Test
It’s time to incorporate testing into our app. One of the things that give the developer confidence in their code is tests. I’m sure you’ve seen countless articles on the web preaching Test-Driven Development (TDD). It cannot be emphasized enough that your code needs some measure of testing. TDD is very easy to follow when you’re working with Express.js.
In our tests, we will make calls to our API endpoints and check to see if what is returned is what we expect.
Install the required dependencies:
# install dependencies yarn add mocha chai nyc sinon-chai supertest coveralls --dev
Each of these libraries has its own role to play in our tests.
mocha test runner chai used to make assertions nyc collect test coverage report sinon-chai extends chai’s assertions supertest used to make HTTP calls to our API endpoints coveralls for uploading test coverage to coveralls.io
Create a new test/ folder at the root of your project. Create two files inside this folder:
test/setup.js test/index.test.js
Mocha will find the test/ folder automatically.
Open up test/setup.js and paste the below code. This is just a helper file that helps us organize all the imports we need in our test files.
import supertest from 'supertest'; import chai from 'chai'; import sinonChai from 'sinon-chai'; import app from '../src/app'; chai.use(sinonChai); export const { expect } = chai; export const server = supertest.agent(app); export const BASE_URL = '/v1';
This is like a settings file, but for our tests. This way we don’t have to initialize everything inside each of our test files. So we import the necessary packages and export what we initialized — which we can then import in the files that need them.
Open up index.test.js and paste the following test code.
import { expect, server, BASE_URL } from './setup'; describe('Index page test', () => { it('gets base url', done => { server .get(`${BASE_URL}/`) .expect(200) .end((err, res) => { expect(res.status).to.equal(200); expect(res.body.message).to.equal( 'Environment variable is coming across.' ); done(); }); }); });
Here we make a request to get the base endpoint, which is / and assert that the res.body object has a message key with a value of Environment variable is coming across.
If you’re not familiar with the describe, it pattern, I encourage you to take a quick look at Mocha’s “Getting Started” doc.
Add the test command to the scripts section of package.json.
"test": "nyc --reporter=html --reporter=text --reporter=lcov mocha -r @babel/register"
This script executes our test with nyc and generates three kinds of coverage report: an HTML report, outputted to the coverage/ folder; a text report outputted to the terminal and an lcov report outputted to the .nyc_output/ folder.
Now run yarn test. You should see a text report in your terminal just like the one in the below photo.
Test coverage report (Large preview)
Notice that two additional folders are generated:
.nyc_output/ coverage/
Look inside .gitignore and you’ll see that we’re already ignoring both. I encourage you to open up coverage/index.html in a browser and view the test report for each file.
This is a good point to commit your changes.
The corresponding branch in my repo is 04-first-test. Continuous Integration(CD) And Badges: Travis, Coveralls, Code Climate, AppVeyor
It’s now time to configure continuous integration and deployment (CI/CD) tools. We will configure common services such as travis-ci, coveralls, AppVeyor, and codeclimate and add badges to our README file.
Let’s get started.
Travis CI
Travis CI is a tool that runs our tests automatically each time we push a commit to GitHub (and recently, Bitbucket) and each time we create a pull request. This is mostly useful when making pull requests by showing us if the our new code has broken any of our tests.
Visit travis-ci.com or travis-ci.org and create an account if you don’t have one. You have to sign up with your GitHub account. Hover over the dropdown arrow next to your profile picture and click on settings. Under Repositories tab click Manage repositories on Github to be redirected to Github. On the GitHub page, scroll down to Repository access and click the checkbox next to Only select repositories. Click the Select repositories dropdown and find the express-api-template repo. Click it to add it to the list of repositories you want to add to travis-ci. Click Approve and install and wait to be redirected back to travis-ci. At the top of the repo page, close to the repo name, click on the build unknown icon. From the Status Image modal, select markdown from the format dropdown. Copy the resulting code and paste it in your README.md file. On the project page, click on More options > Settings. Under Environment Variables section, add the TEST_ENV_VARIABLE env variable. When entering its value, be sure to have it within double quotes like this "Environment variable is coming across." Create .travis.yml file at the root of your project and paste in the below code (We’ll set the value of CC_TEST_REPORTER_ID in the Code Climate section). language: node_js env: global: - CC_TEST_REPORTER_ID=get-this-from-code-climate-repo-page matrix: include: - node_js: '12' cache: directories: [node_modules] install: yarn after_success: yarn coverage before_script: - curl -L https://codeclimate.com/downloads/test-reporter/test-reporter-latest-linux-amd64 > ./cc-test-reporter - chmod +x ./cc-test-reporter - ./cc-test-reporter before-build script: - yarn test after_script: - ./cc-test-reporter after-build --exit-code $TRAVIS_TEST_RESUL
First, we tell Travis to run our test with Node.js, then set the CC_TEST_REPORTER_ID global environment variable (we’ll get to this in the Code Climate section). In the matrix section, we tell Travis to run our tests with Node.js v12. We also want to cache the node_modules/ directory so it doesn’t have to be regenerated every time.
We install our dependencies using the yarn command which is a shorthand for yarn install. The before_script and after_script commands are used to upload coverage results to codeclimate. We’ll configure codeclimate shortly. After yarn test runs successfully, we want to also run yarn coverage which will upload our coverage report to coveralls.io.
Coveralls
Coveralls uploads test coverage data for easy visualization. We can view the test coverage on our local machine from the coverage folder, but Coveralls makes it available outside our local machine.
Visit coveralls.io and either sign in or sign up with your Github account. Hover over the left-hand side of the screen to reveal the navigation menu. Click on ADD REPOS. Search for the express-api-template repo and turn on coverage using the toggle button on the left-hand side. If you can’t find it, click on SYNC REPOS on the upper right-hand corner and try again. Note that your repo has to be public, unless you have a PRO account. Click details to go to the repo details page. Create the .coveralls.yml file at the root of your project and enter the below code. To get the repo_token, click on the repo details. You will find it easily on that page. You could just do a browser search for repo_token. repo_token: get-this-from-repo-settings-on-coveralls.io
This token maps your coverage data to a repo on Coveralls. Now, add the coverage command to the scripts section of your package.json file:
"coverage": "nyc report --reporter=text-lcov | coveralls"
This command uploads the coverage report in the .nyc_output folder to coveralls.io. Turn on your Internet connection and run:
yarn coverage
This should upload the existing coverage report to coveralls. Refresh the repo page on coveralls to see the full report.
On the details page, scroll down to find the BADGE YOUR REPO section. Click on the EMBED dropdown and copy the markdown code and paste it into your README file.
Code Climate
Code Climate is a tool that helps us measure code quality. It shows us maintenance metrics by checking our code against some defined patterns. It detects things such as unnecessary repetition and deeply nested for loops. It also collects test coverage data just like coveralls.io.
Visit codeclimate.com and click on ‘Sign up with GitHub’. Log in if you already have an account. Once in your dashboard, click on Add a repository. Find the express-api-template repo from the list and click on Add Repo. Wait for the build to complete and redirect to the repo dashboard. Under Codebase Summary, click on Test Coverage. Under the Test coverage menu, copy the TEST REPORTER ID and paste it in your .travis.yml as the value of CC_TEST_REPORTER_ID. Still on the same page, on the left-hand navigation, under EXTRAS, click on Badges. Copy the maintainability and test coverage badges in markdown format and paste them into your README.md file.
It’s important to note that there are two ways of configuring maintainability checks. There are the default settings that are applied to every repo, but if you like, you could provide a .codeclimate.yml file at the root of your project. I’ll be using the default settings, which you can find under the Maintainability tab of the repo settings page. I encourage you to take a look at least. If you still want to configure your own settings, this guide will give you all the information you need.
AppVeyor
AppVeyor and Travis CI are both automated test runners. The main difference is that travis-ci runs tests in a Linux environment while AppVeyor runs tests in a Windows environment. This section is included to show how to get started with AppVeyor.
Visit AppVeyor and log in or sign up. On the next page, click on NEW PROJECT. From the repo list, find the express-api-template repo. Hover over it and click ADD. Click on the Settings tab. Click on Environment on the left navigation. Add TEST_ENV_VARIABLE and its value. Click ‘Save’ at the bottom of the page. Create the appveyor.yml file at the root of your project and paste in the below code. environment: matrix: - nodejs_version: "12" install: - yarn test_script: - yarn test build: off
This code instructs AppVeyor to run our tests using Node.js v12. We then install our project dependencies with the yarn command. test_script specifies the command to run our test. The last line tells AppVeyor not to create a build folder.
Click on the Settings tab. On the left-hand navigation, click on badges. Copy the markdown code and paste it in your README.md file.
Commit your code and push to GitHub. If you have done everything as instructed all tests should pass and you should see your shiny new badges as shown below. Check again that you have set the environment variables on Travis and AppVeyor.
Repo CI/CD badges. (Large preview)
Now is a good time to commit our changes.
The corresponding branch in my repo is 05-ci. Adding A Controller
Currently, we’re handling the GET request to the root URL, /v1, inside the src/routes/index.js. This works as expected and there is nothing wrong with it. However, as your application grows, you want to keep things tidy. You want concerns to be separated — you want a clear separation between the code that handles the request and the code that generates the response that will be sent back to the client. To achieve this, we write controllers. Controllers are simply functions that handle requests coming through a particular URL.
To get started, create a controllers/ folder inside the src/ folder. Inside controllers create two files: index.js and home.js. We would export our functions from within index.js. You could name home.js anything you want, but typically you want to name controllers after what they control. For example, you might have a file usersController.js to hold every function related to users in your app.
Open src/controllers/home.js and enter the code below:
import { testEnvironmentVariable } from '../settings'; export const indexPage = (req, res) => res.status(200).json({ message: testEnvironmentVariable });
You will notice that we only moved the function that handles the request for the / route.
Open src/controllers/index.js and enter the below code.
// export everything from home.js export * from './home';
We export everything from the home.js file. This allows us shorten our import statements to import { indexPage } from '../controllers';
Open src/routes/index.js and replace the code there with the one below:
import express from 'express'; import { indexPage } from '../controllers'; const indexRouter = express.Router(); indexRouter.get('/', indexPage); export default indexRouter;
The only change here is that we’ve provided a function to handle the request to the / route.
You just successfully wrote your first controller. From here it’s a matter of adding more files and functions as needed.
Go ahead and play with the app by adding a few more routes and controllers. You could add a route and a controller for the about page. Remember to update your test, though.
Run yarn test to confirm that we’ve not broken anything. Does your test pass? That’s cool.
This is a good point to commit our changes.
The corresponding branch in my repo is 06-controllers. Connecting The PostgreSQL Database And Writing A Model
Our controller currently returns hard-coded text messages. In a real-world app, we often need to store and retrieve information from a database. In this section, we will connect our app to a PostgreSQL database.
We’re going to implement the storage and retrieval of simple text messages using a database. We have two options for setting a database: we could provision one from a cloud server, or we could set up our own locally.
I would recommend you provision a database from a cloud server. ElephantSQL has a free plan that gives 20MB of free storage which is sufficient for this tutorial. Visit the site and click on Get a managed database today. Create an account (if you don’t have one) and follow the instructions to create a free plan. Take note of the URL on the database details page. We’ll be needing it soon.
ElephantSQL turtle plan details page (Large preview)
If you would rather set up a database locally, you should visit the PostgreSQL and PgAdmin sites for further instructions.
Once we have a database set up, we need to find a way to allow our Express app to communicate with our database. Node.js by default doesn’t support reading and writing to PostgreSQL database, so we’ll be using an excellent library, appropriately named, node-postgres.
node-postgres executes SQL queries in node and returns the result as an object, from which we can grab items from the rows key.
Let’s connect node-postgres to our application.
# install node-postgres yarn add pg
Open settings.js and add the line below:
export const connectionString = process.env.CONNECTION_STRING;
Open your .env file and add the CONNECTION_STRING variable. This is the connection string we’ll be using to establish a connection to our database. The general form of the connection string is shown below.
CONNECTION_STRING="postgresql://dbuser:dbpassword@localhost:5432/dbname"
If you’re using elephantSQL you should copy the URL from the database details page.
Inside your /src folder, create a new folder called models/. Inside this folder, create two files:
pool.js model.js
Open pools.js and paste the following code:
import { Pool } from 'pg'; import dotenv from 'dotenv'; import { connectionString } from '../settings'; dotenv.config(); export const pool = new Pool({ connectionString });
First, we import the Pool and dotenv from the pg and dotenv packages, and then import the settings we created for our postgres database before initializing dotenv. We establish a connection to our database with the Pool object. In node-postgres, every query is executed by a client. A Pool is a collection of clients for communicating with the database.
To create the connection, the pool constructor takes a config object. You can read more about all the possible configurations here. It also accepts a single connection string, which I will use here.
Open model.js and paste the following code:
import { pool } from './pool'; class Model { constructor(table) { this.pool = pool; this.table = table; this.pool.on('error', (err, client) => `Error, ${err}, on idle client${client}`); } async select(columns, clause) { let query = `SELECT ${columns} FROM ${this.table}`; if (clause) query += clause; return this.pool.query(query); } } export default Model;
We create a model class whose constructor accepts the database table we wish to operate on. We’ll be using a single pool for all our models.
We then create a select method which we will use to retrieve items from our database. This method accepts the columns we want to retrieve and a clause, such as a WHERE clause. It returns the result of the query, which is a Promise. Remember we said earlier that every query is executed by a client, but here we execute the query with pool. This is because, when we use pool.query, node-postgres executes the query using the first available idle client.
The query you write is entirely up to you, provided it is a valid SQL statement that can be executed by a Postgres engine.
The next step is to actually create an API endpoint to utilize our newly connected database. Before we do that, I’d like us to create some utility functions. The goal is for us to have a way to perform common database operations from the command line.
Create a folder, utils/ inside the src/ folder. Create three files inside this folder:
queries.js queryFunctions.js runQuery.js
We’re going to create functions to create a table in our database, insert seed data in the table, and to delete the table.
Open up queries.js and paste the following code:
export const createMessageTable = ` DROP TABLE IF EXISTS messages; CREATE TABLE IF NOT EXISTS messages ( id SERIAL PRIMARY KEY, name VARCHAR DEFAULT '', message VARCHAR NOT NULL ) `; export const insertMessages = ` INSERT INTO messages(name, message) VALUES ('chidimo', 'first message'), ('orji', 'second message') `; export const dropMessagesTable = 'DROP TABLE messages';
In this file, we define three SQL query strings. The first query deletes and recreates the messages table. The second query inserts two rows into the messages table. Feel free to add more items here. The last query drops/deletes the messages table.
Open queryFunctions.js and paste the following code:
import { pool } from '../models/pool'; import { insertMessages, dropMessagesTable, createMessageTable, } from './queries'; export const executeQueryArray = async arr => new Promise(resolve => { const stop = arr.length; arr.forEach(async (q, index) => { await pool.query(q); if (index + 1 === stop) resolve(); }); }); export const dropTables = () => executeQueryArray([ dropMessagesTable ]); export const createTables = () => executeQueryArray([ createMessageTable ]); export const insertIntoTables = () => executeQueryArray([ insertMessages ]);
Here, we create functions to execute the queries we defined earlier. Note that the executeQueryArray function executes an array of queries and waits for each one to complete inside the loop. (Don’t do such a thing in production code though). Then, we only resolve the promise once we have executed the last query in the list. The reason for using an array is that the number of such queries will grow as the number of tables in our database grows.
Open runQuery.js and paste the following code:
import { createTables, insertIntoTables } from './queryFunctions'; (async () => { await createTables(); await insertIntoTables(); })();
This is where we execute the functions to create the table and insert the messages in the table. Let’s add a command in the scripts section of our package.json to execute this file.
"runQuery": "babel-node ./src/utils/runQuery"
Now run:
yarn runQuery
If you inspect your database, you will see that the messages table has been created and that the messages were inserted into the table.
If you’re using ElephantSQL, on the database details page, click on BROWSER from the left navigation menu. Select the messages table and click Execute. You should see the messages from the queries.js file.
Let’s create a controller and route to display the messages from our database.
Create a new controller file src/controllers/messages.js and paste the following code:
import Model from '../models/model'; const messagesModel = new Model('messages'); export const messagesPage = async (req, res) => { try { const data = await messagesModel.select('name, message'); res.status(200).json({ messages: data.rows }); } catch (err) { res.status(200).json({ messages: err.stack }); } };
We import our Model class and create a new instance of that model. This represents the messages table in our database. We then use the select method of the model to query our database. The data (name and message) we get is sent as JSON in the response.
We define the messagesPage controller as an async function. Since node-postgres queries return a promise, we await the result of that query. If we encounter an error during the query we catch it and display the stack to the user. You should decide how choose to handle the error.
Add the get messages endpoint to src/routes/index.js and update the import line.
# update the import line import { indexPage, messagesPage } from '../controllers'; # add the get messages endpoint indexRouter.get('/messages', messagesPage)
Visit http://localhost:3000/v1/messages and you should see the messages displayed as shown below.
Messages from database. (Large preview)
Now, let’s update our test file. When doing TDD, you usually write your tests before implementing the code that makes the test pass. I’m taking the opposite approach here because we’re still working on setting up the database.
Create a new file, hooks.js in the test/ folder and enter the below code:
import { dropTables, createTables, insertIntoTables, } from '../src/utils/queryFunctions'; before(async () => { await createTables(); await insertIntoTables(); }); after(async () => { await dropTables(); });
When our test starts, Mocha finds this file and executes it before running any test file. It executes the before hook to create the database and insert some items into it. The test files then run after that. Once the test is finished, Mocha runs the after hook in which we drop the database. This ensures that each time we run our tests, we do so with clean and new records in our database.
Create a new test file test/messages.test.js and add the below code:
import { expect, server, BASE_URL } from './setup'; describe('Messages', () => { it('get messages page', done => { server .get(`${BASE_URL}/messages`) .expect(200) .end((err, res) => { expect(res.status).to.equal(200); expect(res.body.messages).to.be.instanceOf(Array); res.body.messages.forEach(m => { expect(m).to.have.property('name'); expect(m).to.have.property('message'); }); done(); }); }); });
We assert that the result of the

Agilenano - News
from Agilenano from shopsnetwork (4 sites) https://agilenano.com/blogs/news/how-to-set-up-an-express-api-backend-project-with-postgresql-chidi-orji-2020-04-08t11-00-00-00-002020-04-08t13-35-17-00-00
0 notes
Text
How To Set Up An Express API Backend Project With PostgreSQL
How To Set Up An Express API Backend Project With PostgreSQL
Chidi Orji
2020-04-08T11:00:00+00:002020-04-08T11:45:27+00:00
We will take a Test-Driven Development (TDD) approach and the set up Continuous Integration (CI) job to automatically run our tests on Travis CI and AppVeyor, complete with code quality and coverage reporting. We will learn about controllers, models (with PostgreSQL), error handling, and asynchronous Express middleware. Finally, we’ll complete the CI/CD pipeline by configuring automatic deploy on Heroku.
It sounds like a lot, but this tutorial is aimed at beginners who are ready to try their hands on a backend project with some level of complexity, and who may still be confused as to how all the pieces fit together in a real project.
It is robust without being overwhelming and is broken down into sections that you can complete in a reasonable length of time.
Getting Started
The first step is to create a new directory for the project and start a new node project. Node is required to continue with this tutorial. If you don’t have it installed, head over to the official website, download, and install it before continuing.
I will be using yarn as my package manager for this project. There are installation instructions for your specific operating system here. Feel free to use npm if you like.
Open your terminal, create a new directory, and start a Node.js project.
# create a new directory mkdir express-api-template # change to the newly-created directory cd express-api-template # initialize a new Node.js project npm init
Answer the questions that follow to generate a package.json file. This file holds information about your project. Example of such information includes what dependencies it uses, the command to start the project, and so on.
You may now open the project folder in your editor of choice. I use visual studio code. It’s a free IDE with tons of plugins to make your life easier, and it’s available for all major platforms. You can download it from the official website.
Create the following files in the project folder:
README.md
.editorconfig
Here’s a description of what .editorconfig does from the EditorConfig website. (You probably don’t need it if you’re working solo, but it does no harm, so I’ll leave it here.)
“EditorConfig helps maintain consistent coding styles for multiple developers working on the same project across various editors and IDEs.”
Open .editorconfig and paste the following code:
root = true [*] indent_style = space indent_size = 2 charset = utf-8 trim_trailing_whitespace = false insert_final_newline = true
The [*] means that we want to apply the rules that come under it to every file in the project. We want an indent size of two spaces and UTF-8 character set. We also want to trim trailing white space and insert a final empty line in our file.
Open README.md and add the project name as a first-level element.
# Express API template
Let’s add version control right away.
# initialize the project folder as a git repository git init
Create a .gitignore file and enter the following lines:
node_modules/ yarn-error.log .env .nyc_output coverage build/
These are all the files and folders we don’t want to track. We don’t have them in our project yet, but we’ll see them as we proceed.
At this point, you should have the following folder structure.
EXPRESS-API-TEMPLATE ├── .editorconfig ├── .gitignore ├── package.json └── README.md
I consider this to be a good point to commit my changes and push them to GitHub.
Starting A New Express Project
Express is a Node.js framework for building web applications. According to the official website, it is a
Fast, unopinionated, minimalist web framework for Node.js.
There are other great web application frameworks for Node.js, but Express is very popular, with over 47k GitHub stars at the time of this writing.
In this article, we will not be having a lot of discussions about all the parts that make up Express. For that discussion, I recommend you check out Jamie’s series. The first part is here, and the second part is here.
Install Express and start a new Express project. It’s possible to manually set up an Express server from scratch but to make our life easier we’ll use the express-generator to set up the app skeleton.
# install the express generator globally yarn global add express-generator # install express yarn add express # generate the express project in the current folder express -f
The -f flag forces Express to create the project in the current directory.
We’ll now perform some house-cleaning operations.
Delete the file index/users.js.
Delete the folders public/ and views/.
Rename the file bin/www to bin/www.js.
Uninstall jade with the command yarn remove jade.
Create a new folder named src/ and move the following inside it: 1. app.js file 2. bin/ folder 3. routes/ folder inside.
Open up package.json and update the start script to look like below.
"start": "node ./src/bin/www"
At this point, your project folder structure looks like below. You can see how VS Code highlights the file changes that have taken place.
EXPRESS-API-TEMPLATE ├── node_modules ├── src | ├── bin │ │ ├── www.js │ ├── routes │ | ├── index.js │ └── app.js ├── .editorconfig ├── .gitignore ├── package.json ├── README.md └── yarn.lock
Open src/app.js and replace the content with the below code.
var logger = require('morgan'); var express = require('express'); var cookieParser = require('cookie-parser'); var indexRouter = require('./routes/index'); var app = express(); app.use(logger('dev')); app.use(express.json()); app.use(express.urlencoded({ extended: true })); app.use(cookieParser()); app.use('/v1', indexRouter); module.exports = app;
After requiring some libraries, we instruct Express to handle every request coming to /v1 with indexRouter.
Replace the content of routes/index.js with the below code:
var express = require('express'); var router = express.Router(); router.get('/', function(req, res, next) { return res.status(200).json({ message: 'Welcome to Express API template' }); }); module.exports = router;
We grab Express, create a router from it and serve the / route, which returns a status code of 200 and a JSON message.
Start the app with the below command:
# start the app yarn start
If you’ve set up everything correctly you should only see $ node ./src/bin/www in your terminal.
Visit http://localhost:3000/v1 in your browser. You should see the following message:
{ "message": "Welcome to Express API template" }
This is a good point to commit our changes.
The corresponding branch in my repo is 01-install-express.
Converting Our Code To ES6
The code generated by express-generator is in ES5, but in this article, we will be writing all our code in ES6 syntax. So, let’s convert our existing code to ES6.
Replace the content of routes/index.js with the below code:
import express from 'express'; const indexRouter = express.Router(); indexRouter.get('/', (req, res) => res.status(200).json({ message: 'Welcome to Express API template' }) ); export default indexRouter;
It is the same code as we saw above, but with the import statement and an arrow function in the / route handler.
Replace the content of src/app.js with the below code:
import logger from 'morgan'; import express from 'express'; import cookieParser from 'cookie-parser'; import indexRouter from './routes/index'; const app = express(); app.use(logger('dev')); app.use(express.json()); app.use(express.urlencoded({ extended: true })); app.use(cookieParser()); app.use('/v1', indexRouter); export default app;
Let’s now take a look at the content of src/bin/www.js. We will build it incrementally. Delete the content of src/bin/www.js and paste in the below code block.
#!/usr/bin/env node /** * Module dependencies. */ import debug from 'debug'; import http from 'http'; import app from '../app'; /** * Normalize a port into a number, string, or false. */ const normalizePort = val => { const port = parseInt(val, 10); if (Number.isNaN(port)) { // named pipe return val; } if (port >= 0) { // port number return port; } return false; }; /** * Get port from environment and store in Express. */ const port = normalizePort(process.env.PORT || '3000'); app.set('port', port); /** * Create HTTP server. */ const server = http.createServer(app); // next code block goes here
This code checks if a custom port is specified in the environment variables. If none is set the default port value of 3000 is set on the app instance, after being normalized to either a string or a number by normalizePort. The server is then created from the http module, with app as the callback function.
The #!/usr/bin/env node line is optional since we would specify node when we want to execute this file. But make sure it is on line 1 of src/bin/www.js file or remove it completely.
Let’s take a look at the error handling function. Copy and paste this code block after the line where the server is created.
/** * Event listener for HTTP server "error" event. */ const onError = error => { if (error.syscall !== 'listen') { throw error; } const bind = typeof port === 'string' ? `Pipe ${port}` : `Port ${port}`; // handle specific listen errors with friendly messages switch (error.code) { case 'EACCES': alert(`${bind} requires elevated privileges`); process.exit(1); break; case 'EADDRINUSE': alert(`${bind} is already in use`); process.exit(1); break; default: throw error; } }; /** * Event listener for HTTP server "listening" event. */ const onListening = () => { const addr = server.address(); const bind = typeof addr === 'string' ? `pipe ${addr}` : `port ${addr.port}`; debug(`Listening on ${bind}`); }; /** * Listen on provided port, on all network interfaces. */ server.listen(port); server.on('error', onError); server.on('listening', onListening);
The onError function listens for errors in the http server and displays appropriate error messages. The onListening function simply outputs the port the server is listening on to the console. Finally, the server listens for incoming requests at the specified address and port.
At this point, all our existing code is in ES6 syntax. Stop your server (use Ctrl + C) and run yarn start. You’ll get an error SyntaxError: Invalid or unexpected token. This happens because Node (at the time of writing) doesn’t support some of the syntax we’ve used in our code.
We’ll now fix that in the following section.
Configuring Development Dependencies: babel, nodemon, eslint, And prettier
It’s time to set up most of the scripts we’re going to need at this phase of the project.
Install the required libraries with the below commands. You can just copy everything and paste it in your terminal. The comment lines will be skipped.
# install babel scripts yarn add @babel/cli @babel/core @babel/plugin-transform-runtime @babel/preset-env @babel/register @babel/runtime @babel/node --dev
This installs all the listed babel scripts as development dependencies. Check your package.json file and you should see a devDependencies section. All the installed scripts will be listed there.
The babel scripts we’re using are explained below:
@babel/cli A required install for using babel. It allows the use of Babel from the terminal and is available as ./node_modules/.bin/babel. @babel/core Core Babel functionality. This is a required installation. @babel/node This works exactly like the Node.js CLI, with the added benefit of compiling with babel presets and plugins. This is required for use with nodemon. @babel/plugin-transform-runtime This helps to avoid duplication in the compiled output. @babel/preset-env A collection of plugins that are responsible for carrying out code transformations. @babel/register This compiles files on the fly and is specified as a requirement during tests. @babel/runtime This works in conjunction with @babel/plugin-transform-runtime.
Create a file named .babelrc at the root of your project and add the following code:
{ "presets": ["@babel/preset-env"], "plugins": ["@babel/transform-runtime"] }
Let’s install nodemon
# install nodemon yarn add nodemon --dev
nodemon is a library that monitors our project source code and automatically restarts our server whenever it observes any changes.
Create a file named nodemon.json at the root of your project and add the code below:
{ "watch": [ "package.json", "nodemon.json", ".eslintrc.json", ".babelrc", ".prettierrc", "src/" ], "verbose": true, "ignore": ["*.test.js", "*.spec.js"] }
The watch key tells nodemon which files and folders to watch for changes. So, whenever any of these files changes, nodemon restarts the server. The ignore key tells it the files not to watch for changes.
Now update the scripts section of your package.json file to look like the following:
# build the content of the src folder "prestart": "babel ./src --out-dir build" # start server from the build folder "start": "node ./build/bin/www" # start server in development mode "startdev": "nodemon --exec babel-node ./src/bin/www"
prestart scripts builds the content of the src/ folder and puts it in the build/ folder. When you issue the yarn start command, this script runs first before the start script.
start script now serves the content of the build/ folder instead of the src/ folder we were serving previously. This is the script you’ll use when serving the file in production. In fact, services like Heroku automatically run this script when you deploy.
yarn startdev is used to start the server during development. From now on we will be using this script as we develop the app. Notice that we’re now using babel-node to run the app instead of regular node. The --exec flag forces babel-node to serve the src/ folder. For the start script, we use node since the files in the build/ folder have been compiled to ES5.
Run yarn startdev and visit http://localhost:3000/v1. Your server should be up and running again.
The final step in this section is to configure ESLint and prettier. ESLint helps with enforcing syntax rules while prettier helps for formatting our code properly for readability.
Add both of them with the command below. You should run this on a separate terminal while observing the terminal where our server is running. You should see the server restarting. This is because we’re monitoring package.json file for changes.
# install elsint and prettier yarn add eslint eslint-config-airbnb-base eslint-plugin-import prettier --dev
Now create the .eslintrc.json file in the project root and add the below code:
{ "env": { "browser": true, "es6": true, "node": true, "mocha": true }, "extends": ["airbnb-base"], "globals": { "Atomics": "readonly", "SharedArrayBuffer": "readonly" }, "parserOptions": { "ecmaVersion": 2018, "sourceType": "module" }, "rules": { "indent": ["warn", 2], "linebreak-style": ["error", "unix"], "quotes": ["error", "single"], "semi": ["error", "always"], "no-console": 1, "comma-dangle": [0], "arrow-parens": [0], "object-curly-spacing": ["warn", "always"], "array-bracket-spacing": ["warn", "always"], "import/prefer-default-export": [0] } }
This file mostly defines some rules against which eslint will check our code. You can see that we’re extending the style rules used by Airbnb.
In the "rules" section, we define whether eslint should show a warning or an error when it encounters certain violations. For instance, it shows a warning message on our terminal for any indentation that does not use 2 spaces. A value of [0] turns off a rule, which means that we won’t get a warning or an error if we violate that rule.
Create a file named .prettierrc and add the code below:
{ "trailingComma": "es5", "tabWidth": 2, "semi": true, "singleQuote": true }
We’re setting a tab width of 2 and enforcing the use of single quotes throughout our application. Do check the prettier guide for more styling options.
Now add the following scripts to your package.json:
# add these one after the other "lint": "./node_modules/.bin/eslint ./src" "pretty": "prettier --write '**/*.{js,json}' '!node_modules/**'" "postpretty": "yarn lint --fix"
Run yarn lint. You should see a number of errors and warnings in the console.
The pretty command prettifies our code. The postpretty command is run immediately after. It runs the lint command with the --fix flag appended. This flag tells ESLint to automatically fix common linting issues. In this way, I mostly run the yarn pretty command without bothering about the lint command.
Run yarn pretty. You should see that we have only two warnings about the presence of alert in the bin/www.js file.
Here’s what our project structure looks like at this point.
EXPRESS-API-TEMPLATE ├── build ├── node_modules ├── src | ├── bin │ │ ├── www.js │ ├── routes │ | ├── index.js │ └── app.js ├── .babelrc ├── .editorconfig ├── .eslintrc.json ├── .gitignore ├── .prettierrc ├── nodemon.json ├── package.json ├── README.md └── yarn.lock
You may find that you have an additional file, yarn-error.log in your project root. Add it to .gitignore file. Commit your changes.
The corresponding branch at this point in my repo is 02-dev-dependencies.
Settings And Environment Variables In Our .env File
In nearly every project, you’ll need somewhere to store settings that will be used throughout your app e.g. an AWS secret key. We store such settings as environment variables. This keeps them away from prying eyes, and we can use them within our application as needed.
I like having a settings.js file with which I read all my environment variables. Then, I can refer to the settings file from anywhere within my app. You’re at liberty to name this file whatever you want, but there’s some kind of consensus about naming such files settings.js or config.js.
For our environment variables, we’ll keep them in a .env file and read them into our settings file from there.
Create the .env file at the root of your project and enter the below line:
TEST_ENV_VARIABLE="Environment variable is coming across"
To be able to read environment variables into our project, there’s a nice library, dotenv that reads our .env file and gives us access to the environment variables defined inside. Let’s install it.
# install dotenv yarn add dotenv
Add the .env file to the list of files being watched by nodemon.
Now, create the settings.js file inside the src/ folder and add the below code:
import dotenv from 'dotenv'; dotenv.config(); export const testEnvironmentVariable = process.env.TEST_ENV_VARIABLE;
We import the dotenv package and call its config method. We then export the testEnvironmentVariable which we set in our .env file.
Open src/routes/index.js and replace the code with the one below.
import express from 'express'; import { testEnvironmentVariable } from '../settings'; const indexRouter = express.Router(); indexRouter.get('/', (req, res) => res.status(200).json({ message: testEnvironmentVariable })); export default indexRouter;
The only change we’ve made here is that we import testEnvironmentVariable from our settings file and use is as the return message for a request from the / route.
Visit http://localhost:3000/v1 and you should see the message, as shown below.
{ "message": "Environment variable is coming across." }
And that’s it. From now on we can add as many environment variables as we want and we can export them from our settings.js file.
This is a good point to commit your code. Remember to prettify and lint your code.
The corresponding branch on my repo is 03-env-variables.
Writing Our First Test
It’s time to incorporate testing into our app. One of the things that give the developer confidence in their code is tests. I’m sure you’ve seen countless articles on the web preaching Test-Driven Development (TDD). It cannot be emphasized enough that your code needs some measure of testing. TDD is very easy to follow when you’re working with Express.js.
In our tests, we will make calls to our API endpoints and check to see if what is returned is what we expect.
Install the required dependencies:
# install dependencies yarn add mocha chai nyc sinon-chai supertest coveralls --dev
Each of these libraries has its own role to play in our tests.
mocha test runner chai used to make assertions nyc collect test coverage report sinon-chai extends chai’s assertions supertest used to make HTTP calls to our API endpoints coveralls for uploading test coverage to coveralls.io
Create a new test/ folder at the root of your project. Create two files inside this folder:
test/setup.js
test/index.test.js
Mocha will find the test/ folder automatically.
Open up test/setup.js and paste the below code. This is just a helper file that helps us organize all the imports we need in our test files.
import supertest from 'supertest'; import chai from 'chai'; import sinonChai from 'sinon-chai'; import app from '../src/app'; chai.use(sinonChai); export const { expect } = chai; export const server = supertest.agent(app); export const BASE_URL = '/v1';
This is like a settings file, but for our tests. This way we don’t have to initialize everything inside each of our test files. So we import the necessary packages and export what we initialized — which we can then import in the files that need them.
Open up index.test.js and paste the following test code.
import { expect, server, BASE_URL } from './setup'; describe('Index page test', () => { it('gets base url', done => { server .get(`${BASE_URL}/`) .expect(200) .end((err, res) => { expect(res.status).to.equal(200); expect(res.body.message).to.equal( 'Environment variable is coming across.' ); done(); }); }); });
Here we make a request to get the base endpoint, which is / and assert that the res.body object has a message key with a value of Environment variable is coming across.
If you’re not familiar with the describe, it pattern, I encourage you to take a quick look at Mocha’s “Getting Started” doc.
Add the test command to the scripts section of package.json.
"test": "nyc --reporter=html --reporter=text --reporter=lcov mocha -r @babel/register"
This script executes our test with nyc and generates three kinds of coverage report: an HTML report, outputted to the coverage/ folder; a text report outputted to the terminal and an lcov report outputted to the .nyc_output/ folder.
Now run yarn test. You should see a text report in your terminal just like the one in the below photo.

Test coverage report (Large preview)
Notice that two additional folders are generated:
.nyc_output/
coverage/
Look inside .gitignore and you’ll see that we’re already ignoring both. I encourage you to open up coverage/index.html in a browser and view the test report for each file.
This is a good point to commit your changes.
The corresponding branch in my repo is 04-first-test.
Continuous Integration(CD) And Badges: Travis, Coveralls, Code Climate, AppVeyor
It’s now time to configure continuous integration and deployment (CI/CD) tools. We will configure common services such as travis-ci, coveralls, AppVeyor, and codeclimate and add badges to our README file.
Let’s get started.
Travis CI
Travis CI is a tool that runs our tests automatically each time we push a commit to GitHub (and recently, Bitbucket) and each time we create a pull request. This is mostly useful when making pull requests by showing us if the our new code has broken any of our tests.
Visit travis-ci.com or travis-ci.org and create an account if you don’t have one. You have to sign up with your GitHub account.
Hover over the dropdown arrow next to your profile picture and click on settings.
Under Repositories tab click Manage repositories on Github to be redirected to Github.
On the GitHub page, scroll down to Repository access and click the checkbox next to Only select repositories.
Click the Select repositories dropdown and find the express-api-template repo. Click it to add it to the list of repositories you want to add to travis-ci.
Click Approve and install and wait to be redirected back to travis-ci.
At the top of the repo page, close to the repo name, click on the build unknown icon. From the Status Image modal, select markdown from the format dropdown.
Copy the resulting code and paste it in your README.md file.
On the project page, click on More options > Settings. Under Environment Variables section, add the TEST_ENV_VARIABLE env variable. When entering its value, be sure to have it within double quotes like this "Environment variable is coming across."
Create .travis.yml file at the root of your project and paste in the below code (We’ll set the value of CC_TEST_REPORTER_ID in the Code Climate section).
language: node_js env: global: - CC_TEST_REPORTER_ID=get-this-from-code-climate-repo-page matrix: include: - node_js: '12' cache: directories: [node_modules] install: yarn after_success: yarn coverage before_script: - curl -L https://codeclimate.com/downloads/test-reporter/test-reporter-latest-linux-amd64 > ./cc-test-reporter - chmod +x ./cc-test-reporter - ./cc-test-reporter before-build script: - yarn test after_script: - ./cc-test-reporter after-build --exit-code $TRAVIS_TEST_RESUL
First, we tell Travis to run our test with Node.js, then set the CC_TEST_REPORTER_ID global environment variable (we’ll get to this in the Code Climate section). In the matrix section, we tell Travis to run our tests with Node.js v12. We also want to cache the node_modules/ directory so it doesn’t have to be regenerated every time.
We install our dependencies using the yarn command which is a shorthand for yarn install. The before_script and after_script commands are used to upload coverage results to codeclimate. We’ll configure codeclimate shortly. After yarn test runs successfully, we want to also run yarn coverage which will upload our coverage report to coveralls.io.
Coveralls
Coveralls uploads test coverage data for easy visualization. We can view the test coverage on our local machine from the coverage folder, but Coveralls makes it available outside our local machine.
Visit coveralls.io and either sign in or sign up with your Github account.
Hover over the left-hand side of the screen to reveal the navigation menu. Click on ADD REPOS.
Search for the express-api-template repo and turn on coverage using the toggle button on the left-hand side. If you can’t find it, click on SYNC REPOS on the upper right-hand corner and try again. Note that your repo has to be public, unless you have a PRO account.
Click details to go to the repo details page.
Create the .coveralls.yml file at the root of your project and enter the below code. To get the repo_token, click on the repo details. You will find it easily on that page. You could just do a browser search for repo_token.
repo_token: get-this-from-repo-settings-on-coveralls.io
This token maps your coverage data to a repo on Coveralls. Now, add the coverage command to the scripts section of your package.json file:
"coverage": "nyc report --reporter=text-lcov | coveralls"
This command uploads the coverage report in the .nyc_output folder to coveralls.io. Turn on your Internet connection and run:
yarn coverage
This should upload the existing coverage report to coveralls. Refresh the repo page on coveralls to see the full report.
On the details page, scroll down to find the BADGE YOUR REPO section. Click on the EMBED dropdown and copy the markdown code and paste it into your README file.
Code Climate
Code Climate is a tool that helps us measure code quality. It shows us maintenance metrics by checking our code against some defined patterns. It detects things such as unnecessary repetition and deeply nested for loops. It also collects test coverage data just like coveralls.io.
Visit codeclimate.com and click on ‘Sign up with GitHub’. Log in if you already have an account.
Once in your dashboard, click on Add a repository.
Find the express-api-template repo from the list and click on Add Repo.
Wait for the build to complete and redirect to the repo dashboard.
Under Codebase Summary, click on Test Coverage. Under the Test coverage menu, copy the TEST REPORTER ID and paste it in your .travis.yml as the value of CC_TEST_REPORTER_ID.
Still on the same page, on the left-hand navigation, under EXTRAS, click on Badges. Copy the maintainability and test coverage badges in markdown format and paste them into your README.md file.
It’s important to note that there are two ways of configuring maintainability checks. There are the default settings that are applied to every repo, but if you like, you could provide a .codeclimate.yml file at the root of your project. I’ll be using the default settings, which you can find under the Maintainability tab of the repo settings page. I encourage you to take a look at least. If you still want to configure your own settings, this guide will give you all the information you need.
AppVeyor
AppVeyor and Travis CI are both automated test runners. The main difference is that travis-ci runs tests in a Linux environment while AppVeyor runs tests in a Windows environment. This section is included to show how to get started with AppVeyor.
Visit AppVeyor and log in or sign up.
On the next page, click on NEW PROJECT.
From the repo list, find the express-api-template repo. Hover over it and click ADD.
Click on the Settings tab. Click on Environment on the left navigation. Add TEST_ENV_VARIABLE and its value. Click ‘Save’ at the bottom of the page.
Create the appveyor.yml file at the root of your project and paste in the below code.
environment: matrix: - nodejs_version: "12" install: - yarn test_script: - yarn test build: off
This code instructs AppVeyor to run our tests using Node.js v12. We then install our project dependencies with the yarn command. test_script specifies the command to run our test. The last line tells AppVeyor not to create a build folder.
Click on the Settings tab. On the left-hand navigation, click on badges. Copy the markdown code and paste it in your README.md file.
Commit your code and push to GitHub. If you have done everything as instructed all tests should pass and you should see your shiny new badges as shown below. Check again that you have set the environment variables on Travis and AppVeyor.
Repo CI/CD badges. (Large preview)
Now is a good time to commit our changes.
The corresponding branch in my repo is 05-ci.
Adding A Controller
Currently, we’re handling the GET request to the root URL, /v1, inside the src/routes/index.js. This works as expected and there is nothing wrong with it. However, as your application grows, you want to keep things tidy. You want concerns to be separated — you want a clear separation between the code that handles the request and the code that generates the response that will be sent back to the client. To achieve this, we write controllers. Controllers are simply functions that handle requests coming through a particular URL.
To get started, create a controllers/ folder inside the src/ folder. Inside controllers create two files: index.js and home.js. We would export our functions from within index.js. You could name home.js anything you want, but typically you want to name controllers after what they control. For example, you might have a file usersController.js to hold every function related to users in your app.
Open src/controllers/home.js and enter the code below:
import { testEnvironmentVariable } from '../settings'; export const indexPage = (req, res) => res.status(200).json({ message: testEnvironmentVariable });
You will notice that we only moved the function that handles the request for the / route.
Open src/controllers/index.js and enter the below code.
// export everything from home.js export * from './home';
We export everything from the home.js file. This allows us shorten our import statements to import { indexPage } from '../controllers';
Open src/routes/index.js and replace the code there with the one below:
import express from 'express'; import { indexPage } from '../controllers'; const indexRouter = express.Router(); indexRouter.get('/', indexPage); export default indexRouter;
The only change here is that we’ve provided a function to handle the request to the / route.
You just successfully wrote your first controller. From here it’s a matter of adding more files and functions as needed.
Go ahead and play with the app by adding a few more routes and controllers. You could add a route and a controller for the about page. Remember to update your test, though.
Run yarn test to confirm that we’ve not broken anything. Does your test pass? That’s cool.
This is a good point to commit our changes.
The corresponding branch in my repo is 06-controllers.
Connecting The PostgreSQL Database And Writing A Model
Our controller currently returns hard-coded text messages. In a real-world app, we often need to store and retrieve information from a database. In this section, we will connect our app to a PostgreSQL database.
We’re going to implement the storage and retrieval of simple text messages using a database. We have two options for setting a database: we could provision one from a cloud server, or we could set up our own locally.
I would recommend you provision a database from a cloud server. ElephantSQL has a free plan that gives 20MB of free storage which is sufficient for this tutorial. Visit the site and click on Get a managed database today. Create an account (if you don’t have one) and follow the instructions to create a free plan. Take note of the URL on the database details page. We’ll be needing it soon.

ElephantSQL turtle plan details page (Large preview)
If you would rather set up a database locally, you should visit the PostgreSQL and PgAdmin sites for further instructions.
Once we have a database set up, we need to find a way to allow our Express app to communicate with our database. Node.js by default doesn’t support reading and writing to PostgreSQL database, so we’ll be using an excellent library, appropriately named, node-postgres.
node-postgres executes SQL queries in node and returns the result as an object, from which we can grab items from the rows key.
Let’s connect node-postgres to our application.
# install node-postgres yarn add pg
Open settings.js and add the line below:
export const connectionString = process.env.CONNECTION_STRING;
Open your .env file and add the CONNECTION_STRING variable. This is the connection string we’ll be using to establish a connection to our database. The general form of the connection string is shown below.
CONNECTION_STRING="postgresql://dbuser:dbpassword@localhost:5432/dbname"
If you’re using elephantSQL you should copy the URL from the database details page.
Inside your /src folder, create a new folder called models/. Inside this folder, create two files:
pool.js
model.js
Open pools.js and paste the following code:
import { Pool } from 'pg'; import dotenv from 'dotenv'; import { connectionString } from '../settings'; dotenv.config(); export const pool = new Pool({ connectionString });
First, we import the Pool and dotenv from the pg and dotenv packages, and then import the settings we created for our postgres database before initializing dotenv. We establish a connection to our database with the Pool object. In node-postgres, every query is executed by a client. A Pool is a collection of clients for communicating with the database.
To create the connection, the pool constructor takes a config object. You can read more about all the possible configurations here. It also accepts a single connection string, which I will use here.
Open model.js and paste the following code:
import { pool } from './pool'; class Model { constructor(table) { this.pool = pool; this.table = table; this.pool.on('error', (err, client) => `Error, ${err}, on idle client${client}`); } async select(columns, clause) { let query = `SELECT ${columns} FROM ${this.table}`; if (clause) query += clause; return this.pool.query(query); } } export default Model;
We create a model class whose constructor accepts the database table we wish to operate on. We’ll be using a single pool for all our models.
We then create a select method which we will use to retrieve items from our database. This method accepts the columns we want to retrieve and a clause, such as a WHERE clause. It returns the result of the query, which is a Promise. Remember we said earlier that every query is executed by a client, but here we execute the query with pool. This is because, when we use pool.query, node-postgres executes the query using the first available idle client.
The query you write is entirely up to you, provided it is a valid SQL statement that can be executed by a Postgres engine.
The next step is to actually create an API endpoint to utilize our newly connected database. Before we do that, I’d like us to create some utility functions. The goal is for us to have a way to perform common database operations from the command line.
Create a folder, utils/ inside the src/ folder. Create three files inside this folder:
queries.js
queryFunctions.js
runQuery.js
We’re going to create functions to create a table in our database, insert seed data in the table, and to delete the table.
Open up queries.js and paste the following code:
export const createMessageTable = ` DROP TABLE IF EXISTS messages; CREATE TABLE IF NOT EXISTS messages ( id SERIAL PRIMARY KEY, name VARCHAR DEFAULT '', message VARCHAR NOT NULL ) `; export const insertMessages = ` INSERT INTO messages(name, message) VALUES ('chidimo', 'first message'), ('orji', 'second message') `; export const dropMessagesTable = 'DROP TABLE messages';
In this file, we define three SQL query strings. The first query deletes and recreates the messages table. The second query inserts two rows into the messages table. Feel free to add more items here. The last query drops/deletes the messages table.
Open queryFunctions.js and paste the following code:
import { pool } from '../models/pool'; import { insertMessages, dropMessagesTable, createMessageTable, } from './queries'; export const executeQueryArray = async arr => new Promise(resolve => { const stop = arr.length; arr.forEach(async (q, index) => { await pool.query(q); if (index + 1 === stop) resolve(); }); }); export const dropTables = () => executeQueryArray([ dropMessagesTable ]); export const createTables = () => executeQueryArray([ createMessageTable ]); export const insertIntoTables = () => executeQueryArray([ insertMessages ]);
Here, we create functions to execute the queries we defined earlier. Note that the executeQueryArray function executes an array of queries and waits for each one to complete inside the loop. (Don’t do such a thing in production code though). Then, we only resolve the promise once we have executed the last query in the list. The reason for using an array is that the number of such queries will grow as the number of tables in our database grows.
Open runQuery.js and paste the following code:
import { createTables, insertIntoTables } from './queryFunctions'; (async () => { await createTables(); await insertIntoTables(); })();
This is where we execute the functions to create the table and insert the messages in the table. Let’s add a command in the scripts section of our package.json to execute this file.
"runQuery": "babel-node ./src/utils/runQuery"
Now run:
yarn runQuery
If you inspect your database, you will see that the messages table has been created and that the messages were inserted into the table.
If you’re using ElephantSQL, on the database details page, click on BROWSER from the left navigation menu. Select the messages table and click Execute. You should see the messages from the queries.js file.
Let’s create a controller and route to display the messages from our database.
Create a new controller file src/controllers/messages.js and paste the following code:
import Model from '../models/model'; const messagesModel = new Model('messages'); export const messagesPage = async (req, res) => { try { const data = await messagesModel.select('name, message'); res.status(200).json({ messages: data.rows }); } catch (err) { res.status(200).json({ messages: err.stack }); } };
We import our Model class and create a new instance of that model. This represents the messages table in our database. We then use the select method of the model to query our database. The data (name and message) we get is sent as JSON in the response.
We define the messagesPage controller as an async function. Since node-postgres queries return a promise, we await the result of that query. If we encounter an error during the query we catch it and display the stack to the user. You should decide how choose to handle the error.
Add the get messages endpoint to src/routes/index.js and update the import line.
# update the import line import { indexPage, messagesPage } from '../controllers'; # add the get messages endpoint indexRouter.get('/messages', messagesPage)
Visit http://localhost:3000/v1/messages and you should see the messages displayed as shown below.

Messages from database. (Large preview)
Now, let’s update our test file. When doing TDD, you usually write your tests before implementing the code that makes the test pass. I’m taking the opposite approach here because we’re still working on setting up the database.
Create a new file, hooks.js in the test/ folder and enter the below code:
import { dropTables, createTables, insertIntoTables, } from '../src/utils/queryFunctions'; before(async () => { await createTables(); await insertIntoTables(); }); after(async () => { await dropTables(); });
When our test starts, Mocha finds this file and executes it before running any test file. It executes the before hook to create the database and insert some items into it. The test files then run after that. Once the test is finished, Mocha runs the after hook in which we drop the database. This ensures that each time we run our tests, we do so with clean and new records in our database.
Create a new test file test/messages.test.js and add the below code:
import { expect, server, BASE_URL } from './setup'; describe('Messages', () => { it('get messages page', done => { server .get(`${BASE_URL}/messages`) .expect(200) .end((err, res) => { expect(res.status).to.equal(200); expect(res.body.messages).to.be.instanceOf(Array); res.body.messages.forEach(m => { expect(m).to.have.property('name'); expect(m).to.have.property('message'); }); done(); }); }); });
We assert that the result of the call to /messages is an array. For each message object, we assert that it has the name and message property.
The final step in this section is to update the CI files.
Add the following sections to the .travis.yml file:
services: - postgresql addons: postgresql: "10" apt: packages: - postgresql-10 - postgresql-client-10 before_install: - sudo cp /etc/postgresql/{9.6,10}/main/pg_hba.conf - sudo /etc/init.d/postgresql restart
This instructs Travis to spin up a PostgreSQL 10 database before running our tests.
Add the command to create the database as the first entry in the before_script section:
# add this as the first line in the before_script section - psql -c 'create database testdb;' -U postgres
Create the CONNECTION_STRING environment variable on Travis, and use the below value:
CONNECTION_STRING="postgresql://postgres:postgres@localhost:5432/testdb"
Add the following sections to the .appveyor.yml file:
before_test: - SET PGUSER=postgres - SET PGPASSWORD=Password12! - PATH=C:\Program Files\PostgreSQL\10\bin\;%PATH% - createdb testdb services: - postgresql101
Add the connection string environment variable to appveyor. Use the below line:
CONNECTION_STRING=postgresql://postgres:Password12!@localhost:5432/testdb
Now commit your changes and push to GitHub. Your tests should pass on both Travis CI and AppVeyor.
The corresponding branch in my repo is 07-connect-postgres.
Note: I hope everything works fine on your end, but in case you should be having trouble for some reason, you can always check my code in the repo!
Now, let’s see how we can add a message to our database. For this step, we’ll need a way to send POST requests to our URL. I’ll be using Postman to send POST requests.
Let’s go the TDD route and update our test to reflect what we expect to achieve.
Open test/message.test.js and add the below test case:
it('posts messages', done => { const data = { name: 'some name', message: 'new message' }; server .post(`${BASE_URL}/messages`) .send(data) .expect(200) .end((err, res) => { expect(res.status).to.equal(200); expect(res.body.messages).to.be.instanceOf(Array); res.body.messages.forEach(m => { expect(m).to.have.property('id'); expect(m).to.have.property('name', data.name); expect(m).to.have.property('message', data.message); }); done(); }); });
This test makes a POST request to the /v1/messages endpoint and we expect an array to be returned. We also check for the id, name, and message properties on the array.
Run your tests to see that this case fails. Let’s now fix it.
To send post requests, we use the post method of the server. We also send the name and message we want to insert. We expect the response to be an array, with a property id and the other info that makes up the query. The id is proof that a record has been inserted into the database.
Open src/models/model.js and add the insert method:
async insertWithReturn(columns, values) { const query = ` INSERT INTO ${this.table}(${columns}) VALUES (${values}) RETURNING id, ${columns} `; return this.pool.query(query); }
This is the method that allows us to insert messages into the database. After inserting the item, it returns the id, name and message.
Open src/controllers/messages.js and add the below controller:
export const addMessage = async (req, res) => { const { name, message } = req.body; const columns = 'name, message'; const values = `'${name}', '${message}'`; try { const data = await messagesModel.insertWithReturn(columns, values); res.status(200).json({ messages: data.rows }); } catch (err) { res.status(200).json({ messages: err.stack }); } };
We destructure the request body to get the name and message. Then we use the values to form an SQL query string which we then execute with the insertWithReturn method of our model.
Add the below POST endpoint to /src/routes/index.js and update your import line.
import { indexPage, messagesPage, addMessage } from '../controllers'; indexRouter.post('/messages', addMessage);
Run your tests to see if they pass.
Open Postman and send a POST request to the messages endpoint. If you’ve just run your test, remember to run yarn query to recreate the messages table.
yarn query

POST request to messages endpoint. (Large preview)

GET request showing newly added message. (Large preview)
Commit your changes and push to GitHub. Your tests should pass on both Travis and AppVeyor. Your test coverage will drop by a few points, but that’s okay.
The corresponding branch on my repo is 08-post-to-db.
Middleware
Our discussion of Express won’t be complete without talking about middleware. The Express documentation describes a middlewares as:
“[...] functions that have access to the request object (req), the response object (res), and the next middleware function in the application’s request-response cycle. The next middleware function is commonly denoted by a variable named next.”
A middleware can perform any number of functions such as authentication, modifying the request body, and so on. See the Express documentation on using middleware.
We’re going to write a simple middleware that modifies the request body. Our middleware will append the word SAYS: to the incoming message before it is saved in the database.
Before we start, let’s modify our test to reflect what we want to achieve.
Open up test/messages.test.js and modify the last expect line in the posts message test case:
it('posts messages', done => { ... expect(m).to.have.property('message', `SAYS: ${data.message}`); # update this line ... });
We’re asserting that the SAYS: string has been appended to the message. Run your tests to make sure this test case fails.
Now, let’s write the code to make the test pass.
Create a new middleware/ folder inside src/ folder. Create two files inside this folder:
middleware.js
index.js
Enter the below code in middleware.js:
export const modifyMessage = (req, res, next) => { req.body.message = `SAYS: ${req.body.message}`; next(); };
Here, we append the string SAYS: to the message in the request body. After doing that, we must call the next() function to pass execution to the next function in the request-response chain. Every middleware has to call the next function to pass execution to the next middleware in the request-response cycle.
Enter the below code in index.js:
# export everything from the middleware file export * from './middleware';
This exports the middleware we have in the /middleware.js file. For now, we only have the modifyMessage middleware.
Open src/routes/index.js and add the middleware to the post message request-response chain.
import { modifyMessage } from '../middleware'; indexRouter.post('/messages', modifyMessage, addMessage);
We can see that the modifyMessage function comes before the addMessage function. We invoke the addMessage function by calling next in the modifyMessage middleware. As an experiment, comment out the next() line in the modifyMessage middle and watch the request hang.
Open Postman and create a new message. You should see the appended string.
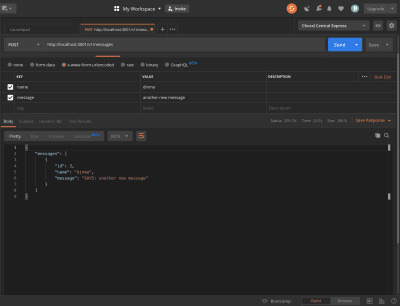
Message modified by middleware. (Large preview)
This is a good point to commit our changes.
The corresponding branch in my repo is 09-middleware.
Error Handling And Asynchronous Middleware
Errors are inevitable in any application. The task before the developer is how to deal with errors as gracefully as possible.
In Express:
“Error Handling refers to how Express catches and processes errors that occur both synchronously and asynchronously.
If we were only writing synchronous functions, we might not have to worry so much about error handling as Express already does an excellent job of handling those. According to the docs:
“Errors that occur in synchronous code inside route handlers and middleware require no extra work.”
But once we start writing asynchronous router handlers and middleware, then we have to do some error handling.
Our modifyMessage middleware is a synchronous function. If an error occurs in that function, Express will handle it just fine. Let’s see how we deal with errors in asynchronous middleware.
Let’s say, before creating a message, we want to get a picture from the Lorem Picsum API using this URL https://picsum.photos/id/0/info. This is an asynchronous operation that could either succeed or fail, and that presents a case for us to deal with.
Start by installing Axios.
# install axios yarn add axios
Open src/middleware/middleware.js and add the below function:
export const performAsyncAction = async (req, res, next) => { try { await axios.get('https://picsum.photos/id/0/info'); next(); } catch (err) { next(err); } };
In this async function, we await a call to an API (we don’t actually need the returned data) and afterward call the next function in the request chain. If the request fails, we catch the error and pass it on to next. Once Express sees this error, it skips all other middleware in the chain. If we didn’t call next(err), the request will hang. If we only called next() without err, the request will proceed as if nothing happened and the error will not be caught.
Import this function and add it to the middleware chain of the post messages route:
import { modifyMessage, performAsyncAction } from '../middleware'; indexRouter.post('/messages', modifyMessage, performAsyncAction, addMessage);
Open src/app.js and add the below code just before the export default app line.
app.use((err, req, res, next) => { res.status(400).json({ error: err.stack }); }); export default app;
This is our error handler. According to the Express error handling doc:
“[...] error-handling functions have four arguments instead of three: (err, req, res, next).”
Note that this error handler must come last, after every app.use() call. Once we encounter an error, we return the stack trace with a status code of 400. You could do whatever you like with the error. You might want to log it or send it somewhere.
This is a good place to commit your changes.
The corresponding branch in my repo is 10-async-middleware.
Deploy To Heroku
To get started, go to https://www.heroku.com/ and either log in or register.
Download and install the Heroku CLI from here.
Open a terminal in the project folder to run the command.
# login to heroku on command line heroku login
This will open a browser window and ask you to log into your Heroku account.
Log in to grant your terminal access to your Heroku account, and create a new heroku app by running:
#app name is up to you heroku create app-name
This will create the app on Heroku and return two URLs.
# app production url and git url https://app-name.herokuapp.com/ | https://git.heroku.com/app-name.git
Copy the URL on the right and run the below command. Note that this step is optional as you may find that Heroku has already added the remote URL.
# add heroku remote url git remote add heroku https://git.heroku.com/my-shiny-new-app.git
Open a side terminal and run the command below. This shows you the app log in real-time as shown in the image.
# see process logs heroku logs --tail

Heroku logs. (Large preview)
Run the following three commands to set the required environment variables:
heroku config:set TEST_ENV_VARIABLE="Environment variable is coming across." heroku config:set CONNECTION_STRING=your-db-connection-string-here. heroku config:set NPM_CONFIG_PRODUCTION=false
Remember in our scripts, we set:
"prestart": "babel ./src --out-dir build", "start": "node ./build/bin/www",
To start the app, it needs to be compiled down to ES5 using babel in the prestart step because babel only exists in our development dependencies. We have to set NPM_CONFIG_PRODUCTION to false in order to be able to install those as well.
To confirm everything is set correctly, run the command below. You could also visit the settings tab on the app page and click on Reveal Config Vars.
# check configuration variables heroku config
Now run git push heroku.
To open the app, run:
# open /v1 route heroku open /v1 # open /v1/messages route heroku open /v1/messages
If like me, you’re using the same PostgresSQL database for both development and production, you may find that each time you run your tests, the database is deleted. To recreate it, you could run either one of the following commands:
# run script locally yarn runQuery # run script with heroku heroku run yarn runQuery
Continuous Deployment (CD) With Travis
Let’s now add Continuous Deployment (CD) to complete the CI/CD flow. We will be deploying from Travis after every successful test run.
The first step is to install Travis CI. (You can find the installation instructions over here.) After successfully installing the Travis CI, login by running the below command. (Note that this should be done in your project repository.)
# login to travis travis login --pro # use this if you’re using two factor authentication travis login --pro --github-token enter-github-token-here
If your project is hosted on travis-ci.org, remove the --pro flag. To get a GitHub token, visit the developer settings page of your account and generate one. This only applies if your account is secured with 2FA.
Open your .travis.yml and add a deploy section:
deploy: provider: heroku app: master: app-name
Here, we specify that we want to deploy to Heroku. The app sub-section specifies that we want to deploy the master branch of our repo to the app-name app on Heroku. It’s possible to deploy different branches to different apps. You can read more about the available options here.
Run the below command to encrypt your Heroku API key and add it to the deploy section:
# encrypt heroku API key and add to .travis.yml travis encrypt $(heroku auth:token) --add deploy.api_key --pro
This will add the below sub-section to the deploy section.
api_key: secure: very-long-encrypted-api-key-string
Now commit your changes and push to GitHub while monitoring your logs. You will see the build triggered as soon as the Travis test is done. In this way, if we have a failing test, the changes would never be deployed. Likewise, if the build failed, the whole test run would fail. This completes the CI/CD flow.
The corresponding branch in my repo is 11-cd.
Conclusion
If you’ve made it this far, I say, “Thumbs up!” In this tutorial, we successfully set up a new Express project. We went ahead to configure development dependencies as well as Continuous Integration (CI). We then wrote asynchronous functions to handle requests to our API endpoints — completed with tests. We then looked briefly at error handling. Finally, we deployed our project to Heroku and configured Continuous Deployment.
You now have a template for your next back-end project. We’ve only done enough to get you started, but you should keep learning to keep going. Be sure to check out the express docs as well. If you would rather use MongoDB instead of PostgreSQL, I have a template here that does exactly that. You can check it out for the setup. It has only a few points of difference.
Resources
“Create Express API Backend With MongoDB ,” Orji Chidi Matthew, GitHub
“A Short Guide To Connect Middleware,” Stephen Sugden
“Express API template,” GitHub
“AppVeyor vs Travis CI,” StackShare
“The Heroku CLI,” Heroku Dev Center
“Heroku Deployment,” Travis CI
“Using middleware,” Express.js
“Error Handling,” Express.js
“Getting Started,” Mocha
nyc (GitHub)
ElephantSQL
Postman
Express
Travis CI
Code Climate
PostgreSQL
pgAdmin

(ks, yk, il)
0 notes
Text
New York Knicks Land Quincy Acy In Four-Player Deal

On August 6th, 2014, the New York Knicks traded guard Wayne Ellington and forward-center Jeremy Tyler to the Sacramento Kings for forwards Quincy Acy and Travis Outlaw.
*The trade also features the removal of a protection on the 2016 second round pick that the Kings owned from the Knicks from a prior trade.
Travis Outlaw became a member of the Sacramento Kings in a unique way. The forward was waived by the New Jersey Nets through the amnesty clause that came about from the 2011 NBA lockout. After the lockout ended and the CBA was agreed to by both owners and players, a one-time rule came into effect. Teams were allowed to waive a player, and remove that player's salary from their cap sheets.
Outlaw had signed a five-year, $35 million deal with the New Jersey Nets and had largely disappointed in his first season with New Jersey. Seeing an opportunity to get rid of Outlaw, the Nets used the amnesty clause on the forward, getting rid of four years and $28 million on their payroll owed to Outlaw. The next step of the amnesty waiver clause was teams making bids to sign Outlaw. The Kings won the bid, signing Outlaw to a four-year, $12 million deal.
The Kings were in the midst of a six-year streak of losing seasons coming into the 2011-12 season. They got off to a poor start (2-5) when the team fired coach Paul Westphal. Westphal and young star DeMarcus Cousins had failed to see eye to eye. The team replaced Westphal with assistant coach Keith Smart.
The Kings never turned their season around under Smart, going 20-39 over the final 59 games to finish 22-44. Outlaw was on the fringes of Sacramento’s rotation in his first season. The Mississippi product played in just 38 games games and averaged 4.3 PPG, 1.6 RPG, 0.5 SPG and 0.5 BPG in 14.4 MPG.
In the 2012 offseason, the Kings had the fifth pick in the 2012 draft and selected Kansas forward Thomas Robinson. Though Sacramento’s offense was solid, finishing 12th overall during the 2012-13 season, the team was second to last in overall defense. Sacramento began the year 2-8 and never recovered, going 28-54. Outlaw still couldn’t find much time in his second year on the court. He saw action in 38 contests and compiled 5.3 PPG, 1.6 RPG and 0.6 APG in 11.7 MPG.
In the 2013 offseason, the Kings had the seventh overall pick and used it on Kansas guard Ben McLemore. Sacramento hired coach Mike Malone to take over. Sacramento also made some key personnel moves, dealing former Rookie of the Year Tyreke Evans and acquiring Greivis Vasquez in a three-team trade with the New Orleans Pelicans and Portland Trail Blazers.
Though Malone had started to build a better relationship with Cousins compared to his predecessors, the Kings were still far away from a playoff team. Sacramento struggled again, finishing the 2013-14 season with a 28-54 record. In December of that season, the Kings made a deal with the Toronto Raptors, acquiring Rudy Gay, Aaron Gray and Quincy Acy.
Acy ended up appearing in 56 games with the Kings, compiling 2.7 PPG and 3.6 RPG in 14.0 MPG. Outlaw played in 63 games (four starts) and posted 5.4 PPG, 2.7 RPG and 0.8 APG in 16.9 MPG.
In the 2014 offseason, Acy appeared in Summer League for the Kings’ entry in Las Vegas. Acy put up 11.3 PPG on 53.8% shooting, 6.7 RPG, 0.6 APG, 0.9 SPG and 0.7 BPG in 26.3 MPG. The Kings had a glut at power forward with Acy, Jason Thompson and Carl Landry on the roster.
Seeing a way to get rid of Outlaw’s onerous contract, the Kings dealt Acy along with Outlaw to the New York Knicks. Outlaw ended his time in Sacramento with averages of 5.1 PPG, 2.1 RPG and 0.6 APG in 140 career games. He posted shooting splits of 39/31/74 from the field, three-point line and free-throw line respectively.
Jeremy Tyler had a long path to become a New York Knick. He first joined the Knicks Summer League team in Las Vegas in 2013. Tyler impressed, piling up 12.8 PPG on 56.2% shooting, 6.4 RPG and a whopping 27.8 PER in 17.7 MPG.
After his strong showing in Summer League, the Knicks committed to him with a two-year, partially guaranteed contract. Tyler competed in training camp for the Knicks but was a final cut in training camp due to a stress fracture in his right foot.
Tyler went back to the NBA D-League whoile rehabbing his foot. He ended up playing for the Knicks’ D-League affiliate, the Erie Bayhawks. Tyler excelled, averaging 19.8 PPG and 11.4 RPG in five games before the Knicks decided to sign him back to the main roster after waiving J.R. Smith’s little brother Chris Smith. The deal was a two-year deal for $1.8 million. The second year of the deal was non-guaranteed.
At times, Tyler showed potential as a solid pick and roll big man. He could never get consistent playing time, appearing in 41 games and managing 3.6 PPG, 2.7 RPG and 0.5 BPG in 9.7 MPG. The Knicks finished the 2013-14 season with a disappointing 37-45 record. The team had gone through changes in the front office, hiring former coaching legend Phil Jackson as president of basketball operations.
The 2014 offseason saw the Knicks make a big move when they dealt center Tyson Chandler and guard Raymond Felton to the Dallas Mavericks. In return, the Knicks acquired Samuel Dalembert, Jose Calderon, Shane Larkin, Wayne Ellington and two second round picks. Known as a quality three-point shooter, Ellington had one year left on his contract.
In his second Summer League stint with the Knicks in 2014, Tyler had a weaker performance. In five games, the 6′10″ big averaged 9.8 PPG on 43.2% shooting and 5.8 RPG in 25.7 MPG. This would be Tyler’s last performance with the Knicks before he was dealt with Ellington to Sacramento.
As part of the deal, the protections on a 2016 second round pick that the Kings owned via New York were removed. The pick was protected from 31-37 in the draft. The Knicks first dealt the pick to Portland in a 2012 deal involving Raymond Felton, Kurt Thomas and Jared Jeffries. The second rounder later moved to Sacramento in the three-team deal involving Tyreke Evans and Greivis Vasquez. After removing the protections, the Kings dealt the future second rounder to the Houston Rockets in September of 2014.
After the trade, the Kings waived Wayne Ellington using the stretch provision nearly one month after the trade. Ellington had one year and $2.77 million remaining on his contract. By rule of the CBA, the stretch provision stipulated that if a player was waived before September 1st, their remaining salary is paid out in twice the remaining years, plus one.
Since Ellington had one year on his deal, he was waived and the Kings paid out the rest of his salary over a three-year period. Ellington went on to sign a deal with the Los Angeles Lakers. Tyler was waived a few days after Ellington.
For the Knicks, Outlaw — and his guaranteed contract — was traded in 2014 preseason so the team could make room on the roster to sign undrafted free agent Travis Wear to a contract for the season.
The Knicks began the 2014-15 season with hope, winning two of their first three games. A run that saw them lose 35 of their next 38 games destroyed any chance of playoff hopes that the franchise had coming into the season. New York would finish the season with the second-worst record in the NBA at 17-65. The mark set a franchise record for the worst season in terms of winning percentage in the franchise’s history.
The losing and subsequent injuries to forwards Carmelo Anthony, Amar’e Stoudemire and Andrea Bargnani allowed Acy to see serious minutes in New York’s rotation. Acy explored developing a three-pointer. After attempting 17 long bombs in his first two seasons, Acy took 60 threes, making 18 (30%). He ended his season with averages of 5.9 PPG, 4.4 RPG and 1.0 APG in 68 games (22 starts) and 18.9 MPG. In the offseason, Acy ended up signing back with Sacramento on a two-year deal with a player option in the final year.
New York Knicks general manager Steve Mills on the trade (via ESPN):
“We were clearly heavier at (shooting guard) and needed to strengthen our situation at (small forward). So this clearly helps us there.”
On Quincy Acy and Travis Outlaw (via USA Today):
“Quincy, we’ve watched him and paid attention to him. We actually saw him a lot in Summer League. He adds a lot of energy. He’s a high energy player and he defends, he can play multiple positions, he runs the floor, blocks shots, he adds a level of energy that we think is missing when we look across the roster and we think he can be helpful there. He’s also a guy who is young and a guy who is going to give us everything he can, regardless of how many minutes he plays. With Travis, he’s a veteran, which we like, he can shoot the 3-ball, he’s long and athletic and we know he’s a guy that has the capabilities to play behind Melo (Carmelo Anthony).”
How Acy provides energy which is unique (via New York Post):
“[Quincy] adds a lot of energy. He’s a high-energy player and he defends, he can play multiple positions, he runs the floor, blocks shots. He adds a level of energy that we think is missing when we look across the roster, and we think he can be helpful there.”
On Outlaw (via Newsday):
“With Travis, he is a veteran that can shoot the three and he’s long and athletic. We know he’s a guy who has the capabilities to play behind Melo.”
On trying to balance the roster out (via New York Post):
“Phil [Jackson] and I have been looking at our roster ever since we made the [Tyson Chandler trade], and one of our goals was to balance the roster out from a position standpoint a little bit better than it was following the trade. Part of this was to make the roster better balanced, and also to provide us with depth across all the positions.”
Sacramento Kings general manager Pete D’Alessandro on the trade (via The Sacramento Bee):
“We want to thank Quincy and Travis for their contributions to the Kings organization. We all wish them great success.”
Related Tweets:
Major S/O to the Kings fans and org. I thank Vivek, Pete & ESPECIALLY Coach Malone, & all my teammates. Ready for the next chap. #KnicksTape
— Quincy Acy (@QuincyAcy)
August 6, 2014
Man all the Knicks fans showing love is great, I appreciate it all, I see all the love #KnicksTape
— Quincy Acy (@QuincyAcy)
August 8, 2014
Image via Lockerdome
0 notes
Text
Raffle Update

Hello Lovelies,
We just wanted to post a quick update regarding the raffle!
<3
Together we raised a total of $1465 for the 2Spirit Warrior Society!!!
Here are the winners (any not listed have requested to remain anon <3):
<!-- /* Font Definitions */ @font-face {font-family:"MS 明朝"; panose-1:0 0 0 0 0 0 0 0 0 0; mso-font-charset:128; mso-generic-font-family:roman; mso-font-format:other; mso-font-pitch:fixed; mso-font-signature:1 134676480 16 0 131072 0;} @font-face {font-family:"Cambria Math"; panose-1:2 4 5 3 5 4 6 3 2 4; mso-font-charset:0; mso-generic-font-family:auto; mso-font-pitch:variable; mso-font-signature:-536870145 1107305727 0 0 415 0;} @font-face {font-family:Cambria; panose-1:2 4 5 3 5 4 6 3 2 4; mso-font-charset:0; mso-generic-font-family:auto; mso-font-pitch:variable; mso-font-signature:-536870145 1073743103 0 0 415 0;} /* Style Definitions */ p.MsoNormal, li.MsoNormal, div.MsoNormal {mso-style-unhide:no; mso-style-qformat:yes; mso-style-parent:""; margin:0cm; margin-bottom:.0001pt; mso-pagination:widow-orphan; font-size:12.0pt; font-family:Cambria; mso-ascii-font-family:Cambria; mso-ascii-theme-font:minor-latin; mso-fareast-font-family:"MS 明朝"; mso-fareast-theme-font:minor-fareast; mso-hansi-font-family:Cambria; mso-hansi-theme-font:minor-latin; mso-bidi-font-family:"Times New Roman"; mso-bidi-theme-font:minor-bidi; mso-ansi-language:EN-US;} .MsoChpDefault {mso-style-type:export-only; mso-default-props:yes; font-family:Cambria; mso-ascii-font-family:Cambria; mso-ascii-theme-font:minor-latin; mso-fareast-font-family:"MS 明朝"; mso-fareast-theme-font:minor-fareast; mso-hansi-font-family:Cambria; mso-hansi-theme-font:minor-latin; mso-bidi-font-family:"Times New Roman"; mso-bidi-theme-font:minor-bidi; mso-ansi-language:EN-US;} @page WordSection1 {size:612.0pt 792.0pt; margin:72.0pt 90.0pt 72.0pt 90.0pt; mso-header-margin:35.4pt; mso-footer-margin:35.4pt; mso-paper-source:0;} div.WordSection1 {page:WordSection1;} -->
Charlie from Newburyport won the toque by an Unist’ot’en supporter
Shannon from Denver won the “Solidarity Youth Led March in Bismark" by Amber Bracken.
Jessica from Tallahassee won the “Solidarity with Standing Rock” Print by Annie Banks
Louisa from Oakland won Noel'le Launghaul's woodcut print "What Divides Us?"
Anomali from Lake Worth won a custom embroidery piece form Nick Berger.
Red Hart-Smith from Burlington won a choice of photograph by Wulfgang Zapf
Nancy from Worcester won a knitted bandana by Audrey and the ‘Dandelion’ print by beyon wren moor
Shane from Victoria won Bug Crü’s print ‘Four Deaths.’
Emily from Coast Salish Territories won a tattoo session with Kiala and a knitted bandana by Audrey.
Lindsey from Portland won a piece of original art called “Limbs” by Ruby Doom.
Maor from Portland won a patch printed by Bubzee.
Terah li from Lkwungen territory won a patch printed by Bubzee
Becca from Northapton won a patch printed by Bubzee.
Stitch from Lkwungen Territory won a shit ton of dumpstered candy
Tine & Travis Hreno from Akron won the Beehive Collective Poster.
Stephanie from Calgary won a Herbal Consultation with Cea
Colleen from Marshfield won the ‘Water Protector Print’ by Amber Bracken
Thank you to everyone who donated and shared this fundraiser.
xo wulfie and beyon
2 notes
·
View notes
Quote
We will take a Test-Driven Development (TDD) approach and the set up Continuous Integration (CI) job to automatically run our tests on Travis CI and AppVeyor, complete with code quality and coverage reporting. We will learn about controllers, models (with PostgreSQL), error handling, and asynchronous Express middleware. Finally, we’ll complete the CI/CD pipeline by configuring automatic deploy on Heroku.
It sounds like a lot, but this tutorial is aimed at beginners who are ready to try their hands on a backend project with some level of complexity, and who may still be confused as to how all the pieces fit together in a real project.
It is robust without being overwhelming and is broken down into sections that you can complete in a reasonable length of time.
Getting Started
The first step is to create a new directory for the project and start a new node project. Node is required to continue with this tutorial. If you don’t have it installed, head over to the official website, download, and install it before continuing.
I will be using yarn as my package manager for this project. There are installation instructions for your specific operating system here. Feel free to use npm if you like.
Open your terminal, create a new directory, and start a Node.js project.
# create a new directory
mkdir express-api-template
# change to the newly-created directory
cd express-api-template
# initialize a new Node.js project
npm init
Answer the questions that follow to generate a package.json file. This file holds information about your project. Example of such information includes what dependencies it uses, the command to start the project, and so on.
You may now open the project folder in your editor of choice. I use visual studio code. It’s a free IDE with tons of plugins to make your life easier, and it’s available for all major platforms. You can download it from the official website.
Create the following files in the project folder:
README.md
.editorconfig
Here’s a description of what .editorconfig does from the EditorConfig website. (You probably don’t need it if you’re working solo, but it does no harm, so I’ll leave it here.)
“EditorConfig helps maintain consistent coding styles for multiple developers working on the same project across various editors and IDEs.”
Open .editorconfig and paste the following code:
root = true
[*]
indent_style = space
indent_size = 2
charset = utf-8
trim_trailing_whitespace = false
insert_final_newline = true
The [*] means that we want to apply the rules that come under it to every file in the project. We want an indent size of two spaces and UTF-8 character set. We also want to trim trailing white space and insert a final empty line in our file.
Open README.md and add the project name as a first-level element.
# Express API template
Let’s add version control right away.
# initialize the project folder as a git repository
git init
Create a .gitignore file and enter the following lines:
node_modules/
yarn-error.log
.env
.nyc_output
coverage
build/
These are all the files and folders we don’t want to track. We don’t have them in our project yet, but we’ll see them as we proceed.
At this point, you should have the following folder structure.
EXPRESS-API-TEMPLATE
├── .editorconfig
├── .gitignore
├── package.json
└── README.md
I consider this to be a good point to commit my changes and push them to GitHub.
Starting A New Express Project
Express is a Node.js framework for building web applications. According to the official website, it is a
Fast, unopinionated, minimalist web framework for Node.js.
There are other great web application frameworks for Node.js, but Express is very popular, with over 47k GitHub stars at the time of this writing.
In this article, we will not be having a lot of discussions about all the parts that make up Express. For that discussion, I recommend you check out Jamie’s series. The first part is here, and the second part is here.
Install Express and start a new Express project. It’s possible to manually set up an Express server from scratch but to make our life easier we’ll use the express-generator to set up the app skeleton.
# install the express generator globally
yarn global add express-generator
# install express
yarn add express
# generate the express project in the current folder
express -f
The -f flag forces Express to create the project in the current directory.
We’ll now perform some house-cleaning operations.
Delete the file index/users.js.
Delete the folders public/ and views/.
Rename the file bin/www to bin/www.js.
Uninstall jade with the command yarn remove jade.
Create a new folder named src/ and move the following inside it: 1. app.js file 2. bin/ folder 3. routes/ folder inside.
Open up package.json and update the start script to look like below.
"start": "node ./src/bin/www"
At this point, your project folder structure looks like below. You can see how VS Code highlights the file changes that have taken place.
EXPRESS-API-TEMPLATE
├── node_modules
├── src
| ├── bin
│ │ ├── www.js
│ ├── routes
│ | ├── index.js
│ └── app.js
├── .editorconfig
├── .gitignore
├── package.json
├── README.md
└── yarn.lock
Open src/app.js and replace the content with the below code.
var logger = require('morgan');
var express = require('express');
var cookieParser = require('cookie-parser');
var indexRouter = require('./routes/index');
var app = express();
app.use(logger('dev'));
app.use(express.json());
app.use(express.urlencoded({ extended: true }));
app.use(cookieParser());
app.use('/v1', indexRouter);
module.exports = app;
After requiring some libraries, we instruct Express to handle every request coming to /v1 with indexRouter.
Replace the content of routes/index.js with the below code:
var express = require('express');
var router = express.Router();
router.get('/', function(req, res, next) {
return res.status(200).json({ message: 'Welcome to Express API template' });
});
module.exports = router;
We grab Express, create a router from it and serve the / route, which returns a status code of 200 and a JSON message.
Start the app with the below command:
# start the app
yarn start
If you’ve set up everything correctly you should only see $ node ./src/bin/www in your terminal.
Visit http://localhost:3000/v1 in your browser. You should see the following message:
{
"message": "Welcome to Express API template"
}
This is a good point to commit our changes.
The corresponding branch in my repo is 01-install-express.
Converting Our Code To ES6
The code generated by express-generator is in ES5, but in this article, we will be writing all our code in ES6 syntax. So, let’s convert our existing code to ES6.
Replace the content of routes/index.js with the below code:
import express from 'express';
const indexRouter = express.Router();
indexRouter.get('/', (req, res) =>
res.status(200).json({ message: 'Welcome to Express API template' })
);
export default indexRouter;
It is the same code as we saw above, but with the import statement and an arrow function in the / route handler.
Replace the content of src/app.js with the below code:
import logger from 'morgan';
import express from 'express';
import cookieParser from 'cookie-parser';
import indexRouter from './routes/index';
const app = express();
app.use(logger('dev'));
app.use(express.json());
app.use(express.urlencoded({ extended: true }));
app.use(cookieParser());
app.use('/v1', indexRouter);
export default app;
Let’s now take a look at the content of src/bin/www.js. We will build it incrementally. Delete the content of src/bin/www.js and paste in the below code block.
#!/usr/bin/env node
/**
* Module dependencies.
*/
import debug from 'debug';
import http from 'http';
import app from '../app';
/**
* Normalize a port into a number, string, or false.
*/
const normalizePort = val => {
const port = parseInt(val, 10);
if (Number.isNaN(port)) {
// named pipe
return val;
}
if (port >= 0) {
// port number
return port;
}
return false;
};
/**
* Get port from environment and store in Express.
*/
const port = normalizePort(process.env.PORT || '3000');
app.set('port', port);
/**
* Create HTTP server.
*/
const server = http.createServer(app);
// next code block goes here
This code checks if a custom port is specified in the environment variables. If none is set the default port value of 3000 is set on the app instance, after being normalized to either a string or a number by normalizePort. The server is then created from the http module, with app as the callback function.
The #!/usr/bin/env node line is optional since we would specify node when we want to execute this file. But make sure it is on line 1 of src/bin/www.js file or remove it completely.
Let’s take a look at the error handling function. Copy and paste this code block after the line where the server is created.
/**
* Event listener for HTTP server "error" event.
*/
const onError = error => {
if (error.syscall !== 'listen') {
throw error;
}
const bind = typeof port === 'string' ? `Pipe ${port}` : `Port ${port}`;
// handle specific listen errors with friendly messages
switch (error.code) {
case 'EACCES':
alert(`${bind} requires elevated privileges`);
process.exit(1);
break;
case 'EADDRINUSE':
alert(`${bind} is already in use`);
process.exit(1);
break;
default:
throw error;
}
};
/**
* Event listener for HTTP server "listening" event.
*/
const onListening = () => {
const addr = server.address();
const bind = typeof addr === 'string' ? `pipe ${addr}` : `port ${addr.port}`;
debug(`Listening on ${bind}`);
};
/**
* Listen on provided port, on all network interfaces.
*/
server.listen(port);
server.on('error', onError);
server.on('listening', onListening);
The onError function listens for errors in the http server and displays appropriate error messages. The onListening function simply outputs the port the server is listening on to the console. Finally, the server listens for incoming requests at the specified address and port.
At this point, all our existing code is in ES6 syntax. Stop your server (use Ctrl + C) and run yarn start. You’ll get an error SyntaxError: Invalid or unexpected token. This happens because Node (at the time of writing) doesn’t support some of the syntax we’ve used in our code.
We’ll now fix that in the following section.
Configuring Development Dependencies: babel, nodemon, eslint, And prettier
It’s time to set up most of the scripts we’re going to need at this phase of the project.
Install the required libraries with the below commands. You can just copy everything and paste it in your terminal. The comment lines will be skipped.
# install babel scripts
yarn add @babel/cli @babel/core @babel/plugin-transform-runtime @babel/preset-env @babel/register @babel/runtime @babel/node --dev
This installs all the listed babel scripts as development dependencies. Check your package.json file and you should see a devDependencies section. All the installed scripts will be listed there.
The babel scripts we’re using are explained below:
@babel/cliA required install for using babel. It allows the use of Babel from the terminal and is available as ./node_modules/.bin/babel.
@babel/coreCore Babel functionality. This is a required installation.
@babel/nodeThis works exactly like the Node.js CLI, with the added benefit of compiling with babel presets and plugins. This is required for use with nodemon.
@babel/plugin-transform-runtimeThis helps to avoid duplication in the compiled output.
@babel/preset-envA collection of plugins that are responsible for carrying out code transformations.
@babel/registerThis compiles files on the fly and is specified as a requirement during tests.
@babel/runtimeThis works in conjunction with @babel/plugin-transform-runtime.
Create a file named .babelrc at the root of your project and add the following code:
{
"presets": ["@babel/preset-env"],
"plugins": ["@babel/transform-runtime"]
}
Let’s install nodemon
# install nodemon
yarn add nodemon --dev
nodemon is a library that monitors our project source code and automatically restarts our server whenever it observes any changes.
Create a file named nodemon.json at the root of your project and add the code below:
{
"watch": [
"package.json",
"nodemon.json",
".eslintrc.json",
".babelrc",
".prettierrc",
"src/"
],
"verbose": true,
"ignore": ["*.test.js", "*.spec.js"]
}
The watch key tells nodemon which files and folders to watch for changes. So, whenever any of these files changes, nodemon restarts the server. The ignore key tells it the files not to watch for changes.
Now update the scripts section of your package.json file to look like the following:
# build the content of the src folder
"prestart": "babel ./src --out-dir build"
# start server from the build folder
"start": "node ./build/bin/www"
# start server in development mode
"startdev": "nodemon --exec babel-node ./src/bin/www"
prestart scripts builds the content of the src/ folder and puts it in the build/ folder. When you issue the yarn start command, this script runs first before the start script.
start script now serves the content of the build/ folder instead of the src/ folder we were serving previously. This is the script you’ll use when serving the file in production. In fact, services like Heroku automatically run this script when you deploy.
yarn startdev is used to start the server during development. From now on we will be using this script as we develop the app. Notice that we’re now using babel-node to run the app instead of regular node. The --exec flag forces babel-node to serve the src/ folder. For the start script, we use node since the files in the build/ folder have been compiled to ES5.
Run yarn startdev and visit http://localhost:3000/v1. Your server should be up and running again.
The final step in this section is to configure ESLint and prettier. ESLint helps with enforcing syntax rules while prettier helps for formatting our code properly for readability.
Add both of them with the command below. You should run this on a separate terminal while observing the terminal where our server is running. You should see the server restarting. This is because we’re monitoring package.json file for changes.
# install elsint and prettier
yarn add eslint eslint-config-airbnb-base eslint-plugin-import prettier --dev
Now create the .eslintrc.json file in the project root and add the below code:
{
"env": {
"browser": true,
"es6": true,
"node": true,
"mocha": true
},
"extends": ["airbnb-base"],
"globals": {
"Atomics": "readonly",
"SharedArrayBuffer": "readonly"
},
"parserOptions": {
"ecmaVersion": 2018,
"sourceType": "module"
},
"rules": {
"indent": ["warn", 2],
"linebreak-style": ["error", "unix"],
"quotes": ["error", "single"],
"semi": ["error", "always"],
"no-console": 1,
"comma-dangle": [0],
"arrow-parens": [0],
"object-curly-spacing": ["warn", "always"],
"array-bracket-spacing": ["warn", "always"],
"import/prefer-default-export": [0]
}
}
This file mostly defines some rules against which eslint will check our code. You can see that we’re extending the style rules used by Airbnb.
In the "rules" section, we define whether eslint should show a warning or an error when it encounters certain violations. For instance, it shows a warning message on our terminal for any indentation that does not use 2 spaces. A value of [0] turns off a rule, which means that we won’t get a warning or an error if we violate that rule.
Create a file named .prettierrc and add the code below:
{
"trailingComma": "es5",
"tabWidth": 2,
"semi": true,
"singleQuote": true
}
We’re setting a tab width of 2 and enforcing the use of single quotes throughout our application. Do check the prettier guide for more styling options.
Now add the following scripts to your package.json:
# add these one after the other
"lint": "./node_modules/.bin/eslint ./src"
"pretty": "prettier --write '**/*.{js,json}' '!node_modules/**'"
"postpretty": "yarn lint --fix"
Run yarn lint. You should see a number of errors and warnings in the console.
The pretty command prettifies our code. The postpretty command is run immediately after. It runs the lint command with the --fix flag appended. This flag tells ESLint to automatically fix common linting issues. In this way, I mostly run the yarn pretty command without bothering about the lint command.
Run yarn pretty. You should see that we have only two warnings about the presence of alert in the bin/www.js file.
Here’s what our project structure looks like at this point.
EXPRESS-API-TEMPLATE
├── build
├── node_modules
├── src
| ├── bin
│ │ ├── www.js
│ ├── routes
│ | ├── index.js
│ └── app.js
├── .babelrc
├── .editorconfig
├── .eslintrc.json
├── .gitignore
├── .prettierrc
├── nodemon.json
├── package.json
├── README.md
└── yarn.lock
You may find that you have an additional file, yarn-error.log in your project root. Add it to .gitignore file. Commit your changes.
The corresponding branch at this point in my repo is 02-dev-dependencies.
Settings And Environment Variables In Our .env File
In nearly every project, you’ll need somewhere to store settings that will be used throughout your app e.g. an AWS secret key. We store such settings as environment variables. This keeps them away from prying eyes, and we can use them within our application as needed.
I like having a settings.js file with which I read all my environment variables. Then, I can refer to the settings file from anywhere within my app. You’re at liberty to name this file whatever you want, but there’s some kind of consensus about naming such files settings.js or config.js.
For our environment variables, we’ll keep them in a .env file and read them into our settings file from there.
Create the .env file at the root of your project and enter the below line:
TEST_ENV_VARIABLE="Environment variable is coming across"
To be able to read environment variables into our project, there’s a nice library, dotenv that reads our .env file and gives us access to the environment variables defined inside. Let’s install it.
# install dotenv
yarn add dotenv
Add the .env file to the list of files being watched by nodemon.
Now, create the settings.js file inside the src/ folder and add the below code:
import dotenv from 'dotenv';
dotenv.config();
export const testEnvironmentVariable = process.env.TEST_ENV_VARIABLE;
We import the dotenv package and call its config method. We then export the testEnvironmentVariable which we set in our .env file.
Open src/routes/index.js and replace the code with the one below.
import express from 'express';
import { testEnvironmentVariable } from '../settings';
const indexRouter = express.Router();
indexRouter.get('/', (req, res) => res.status(200).json({ message: testEnvironmentVariable }));
export default indexRouter;
The only change we’ve made here is that we import testEnvironmentVariable from our settings file and use is as the return message for a request from the / route.
Visit http://localhost:3000/v1 and you should see the message, as shown below.
{
"message": "Environment variable is coming across."
}
And that’s it. From now on we can add as many environment variables as we want and we can export them from our settings.js file.
This is a good point to commit your code. Remember to prettify and lint your code.
The corresponding branch on my repo is 03-env-variables.
Writing Our First Test
It’s time to incorporate testing into our app. One of the things that give the developer confidence in their code is tests. I’m sure you’ve seen countless articles on the web preaching Test-Driven Development (TDD). It cannot be emphasized enough that your code needs some measure of testing. TDD is very easy to follow when you’re working with Express.js.
In our tests, we will make calls to our API endpoints and check to see if what is returned is what we expect.
Install the required dependencies:
# install dependencies
yarn add mocha chai nyc sinon-chai supertest coveralls --dev
Each of these libraries has its own role to play in our tests.
mochatest runner
chaiused to make assertions
nyccollect test coverage report
sinon-chaiextends chai’s assertions
supertestused to make HTTP calls to our API endpoints
coverallsfor uploading test coverage to coveralls.io
Create a new test/ folder at the root of your project. Create two files inside this folder:
test/setup.js
test/index.test.js
Mocha will find the test/ folder automatically.
Open up test/setup.js and paste the below code. This is just a helper file that helps us organize all the imports we need in our test files.
import supertest from 'supertest';
import chai from 'chai';
import sinonChai from 'sinon-chai';
import app from '../src/app';
chai.use(sinonChai);
export const { expect } = chai;
export const server = supertest.agent(app);
export const BASE_URL = '/v1';
This is like a settings file, but for our tests. This way we don’t have to initialize everything inside each of our test files. So we import the necessary packages and export what we initialized — which we can then import in the files that need them.
Open up index.test.js and paste the following test code.
import { expect, server, BASE_URL } from './setup';
describe('Index page test', () => {
it('gets base url', done => {
server
.get(`${BASE_URL}/`)
.expect(200)
.end((err, res) => {
expect(res.status).to.equal(200);
expect(res.body.message).to.equal(
'Environment variable is coming across.'
);
done();
});
});
});
Here we make a request to get the base endpoint, which is / and assert that the res.body object has a message key with a value of Environment variable is coming across.
If you’re not familiar with the describe, it pattern, I encourage you to take a quick look at Mocha’s “Getting Started” doc.
Add the test command to the scripts section of package.json.
"test": "nyc --reporter=html --reporter=text --reporter=lcov mocha -r @babel/register"
This script executes our test with nyc and generates three kinds of coverage report: an HTML report, outputted to the coverage/ folder; a text report outputted to the terminal and an lcov report outputted to the .nyc_output/ folder.
Now run yarn test. You should see a text report in your terminal just like the one in the below photo.
Test coverage report (Large preview) Notice that two additional folders are generated:
.nyc_output/
coverage/
Look inside .gitignore and you’ll see that we’re already ignoring both. I encourage you to open up coverage/index.html in a browser and view the test report for each file.
This is a good point to commit your changes.
The corresponding branch in my repo is 04-first-test.
Continuous Integration(CD) And Badges: Travis, Coveralls, Code Climate, AppVeyor
It’s now time to configure continuous integration and deployment (CI/CD) tools. We will configure common services such as travis-ci, coveralls, AppVeyor, and codeclimate and add badges to our README file.
Let’s get started.
Travis CI
Travis CI is a tool that runs our tests automatically each time we push a commit to GitHub (and recently, Bitbucket) and each time we create a pull request. This is mostly useful when making pull requests by showing us if the our new code has broken any of our tests.
Visit travis-ci.com or travis-ci.org and create an account if you don’t have one. You have to sign up with your GitHub account.
Hover over the dropdown arrow next to your profile picture and click on settings.
Under Repositories tab click Manage repositories on Github to be redirected to Github.
On the GitHub page, scroll down to Repository access and click the checkbox next to Only select repositories.
Click the Select repositories dropdown and find the express-api-template repo. Click it to add it to the list of repositories you want to add to travis-ci.
Click Approve and install and wait to be redirected back to travis-ci.
At the top of the repo page, close to the repo name, click on the build unknown icon. From the Status Image modal, select markdown from the format dropdown.
Copy the resulting code and paste it in your README.md file.
On the project page, click on More options > Settings. Under Environment Variables section, add the TEST_ENV_VARIABLE env variable. When entering its value, be sure to have it within double quotes like this "Environment variable is coming across."
Create .travis.yml file at the root of your project and paste in the below code (We’ll set the value of CC_TEST_REPORTER_ID in the Code Climate section).
language: node_js
env:
global:
- CC_TEST_REPORTER_ID=get-this-from-code-climate-repo-page
matrix:
include:
- node_js: '12'
cache:
directories: [node_modules]
install:
yarn
after_success: yarn coverage
before_script:
- curl -L https://codeclimate.com/downloads/test-reporter/test-reporter-latest-linux-amd64 > ./cc-test-reporter
- chmod +x ./cc-test-reporter
- ./cc-test-reporter before-build
script:
- yarn test
after_script:
- ./cc-test-reporter after-build --exit-code $TRAVIS_TEST_RESUL
First, we tell Travis to run our test with Node.js, then set the CC_TEST_REPORTER_ID global environment variable (we’ll get to this in the Code Climate section). In the matrix section, we tell Travis to run our tests with Node.js v12. We also want to cache the node_modules/ directory so it doesn’t have to be regenerated every time.
We install our dependencies using the yarn command which is a shorthand for yarn install. The before_script and after_script commands are used to upload coverage results to codeclimate. We’ll configure codeclimate shortly. After yarn test runs successfully, we want to also run yarn coverage which will upload our coverage report to coveralls.io.
Coveralls
Coveralls uploads test coverage data for easy visualization. We can view the test coverage on our local machine from the coverage folder, but Coveralls makes it available outside our local machine.
Visit coveralls.io and either sign in or sign up with your Github account.
Hover over the left-hand side of the screen to reveal the navigation menu. Click on ADD REPOS.
Search for the express-api-template repo and turn on coverage using the toggle button on the left-hand side. If you can’t find it, click on SYNC REPOS on the upper right-hand corner and try again. Note that your repo has to be public, unless you have a PRO account.
Click details to go to the repo details page.
Create the .coveralls.yml file at the root of your project and enter the below code. To get the repo_token, click on the repo details. You will find it easily on that page. You could just do a browser search for repo_token.
repo_token: get-this-from-repo-settings-on-coveralls.io
This token maps your coverage data to a repo on Coveralls. Now, add the coverage command to the scripts section of your package.json file:
"coverage": "nyc report --reporter=text-lcov | coveralls"
This command uploads the coverage report in the .nyc_output folder to coveralls.io. Turn on your Internet connection and run:
yarn coverage
This should upload the existing coverage report to coveralls. Refresh the repo page on coveralls to see the full report.
On the details page, scroll down to find the BADGE YOUR REPO section. Click on the EMBED dropdown and copy the markdown code and paste it into your README file.
Code Climate
Code Climate is a tool that helps us measure code quality. It shows us maintenance metrics by checking our code against some defined patterns. It detects things such as unnecessary repetition and deeply nested for loops. It also collects test coverage data just like coveralls.io.
Visit codeclimate.com and click on ‘Sign up with GitHub’. Log in if you already have an account.
Once in your dashboard, click on Add a repository.
Find the express-api-template repo from the list and click on Add Repo.
Wait for the build to complete and redirect to the repo dashboard.
Under Codebase Summary, click on Test Coverage. Under the Test coverage menu, copy the TEST REPORTER ID and paste it in your .travis.yml as the value of CC_TEST_REPORTER_ID.
Still on the same page, on the left-hand navigation, under EXTRAS, click on Badges. Copy the maintainability and test coverage badges in markdown format and paste them into your README.md file.
It’s important to note that there are two ways of configuring maintainability checks. There are the default settings that are applied to every repo, but if you like, you could provide a .codeclimate.yml file at the root of your project. I’ll be using the default settings, which you can find under the Maintainability tab of the repo settings page. I encourage you to take a look at least. If you still want to configure your own settings, this guide will give you all the information you need.
AppVeyor
AppVeyor and Travis CI are both automated test runners. The main difference is that travis-ci runs tests in a Linux environment while AppVeyor runs tests in a Windows environment. This section is included to show how to get started with AppVeyor.
Visit AppVeyor and log in or sign up.
On the next page, click on NEW PROJECT.
From the repo list, find the express-api-template repo. Hover over it and click ADD.
Click on the Settings tab. Click on Environment on the left navigation. Add TEST_ENV_VARIABLE and its value. Click ‘Save’ at the bottom of the page.
Create the appveyor.yml file at the root of your project and paste in the below code.
environment:
matrix:
- nodejs_version: "12"
install:
- yarn
test_script:
- yarn test
build: off
This code instructs AppVeyor to run our tests using Node.js v12. We then install our project dependencies with the yarn command. test_script specifies the command to run our test. The last line tells AppVeyor not to create a build folder.
Click on the Settings tab. On the left-hand navigation, click on badges. Copy the markdown code and paste it in your README.md file.
Commit your code and push to GitHub. If you have done everything as instructed all tests should pass and you should see your shiny new badges as shown below. Check again that you have set the environment variables on Travis and AppVeyor.
Repo CI/CD badges. (Large preview) Now is a good time to commit our changes.
The corresponding branch in my repo is 05-ci.
Adding A Controller
Currently, we’re handling the GET request to the root URL, /v1, inside the src/routes/index.js. This works as expected and there is nothing wrong with it. However, as your application grows, you want to keep things tidy. You want concerns to be separated — you want a clear separation between the code that handles the request and the code that generates the response that will be sent back to the client. To achieve this, we write controllers. Controllers are simply functions that handle requests coming through a particular URL.
To get started, create a controllers/ folder inside the src/ folder. Inside controllers create two files: index.js and home.js. We would export our functions from within index.js. You could name home.js anything you want, but typically you want to name controllers after what they control. For example, you might have a file usersController.js to hold every function related to users in your app.
Open src/controllers/home.js and enter the code below:
import { testEnvironmentVariable } from '../settings';
export const indexPage = (req, res) => res.status(200).json({ message: testEnvironmentVariable });
You will notice that we only moved the function that handles the request for the / route.
Open src/controllers/index.js and enter the below code.
// export everything from home.js
export * from './home';
We export everything from the home.js file. This allows us shorten our import statements to import { indexPage } from '../controllers';
Open src/routes/index.js and replace the code there with the one below:
import express from 'express';
import { indexPage } from '../controllers';
const indexRouter = express.Router();
indexRouter.get('/', indexPage);
export default indexRouter;
The only change here is that we’ve provided a function to handle the request to the / route.
You just successfully wrote your first controller. From here it’s a matter of adding more files and functions as needed.
Go ahead and play with the app by adding a few more routes and controllers. You could add a route and a controller for the about page. Remember to update your test, though.
Run yarn test to confirm that we’ve not broken anything. Does your test pass? That’s cool.
This is a good point to commit our changes.
The corresponding branch in my repo is 06-controllers.
Connecting The PostgreSQL Database And Writing A Model
Our controller currently returns hard-coded text messages. In a real-world app, we often need to store and retrieve information from a database. In this section, we will connect our app to a PostgreSQL database.
We’re going to implement the storage and retrieval of simple text messages using a database. We have two options for setting a database: we could provision one from a cloud server, or we could set up our own locally.
I would recommend you provision a database from a cloud server. ElephantSQL has a free plan that gives 20MB of free storage which is sufficient for this tutorial. Visit the site and click on Get a managed database today. Create an account (if you don’t have one) and follow the instructions to create a free plan. Take note of the URL on the database details page. We’ll be needing it soon.
ElephantSQL turtle plan details page (Large preview) If you would rather set up a database locally, you should visit the PostgreSQL and PgAdmin sites for further instructions.
Once we have a database set up, we need to find a way to allow our Express app to communicate with our database. Node.js by default doesn’t support reading and writing to PostgreSQL database, so we’ll be using an excellent library, appropriately named, node-postgres.
node-postgres executes SQL queries in node and returns the result as an object, from which we can grab items from the rows key.
Let’s connect node-postgres to our application.
# install node-postgres
yarn add pg
Open settings.js and add the line below:
export const connectionString = process.env.CONNECTION_STRING;
Open your .env file and add the CONNECTION_STRING variable. This is the connection string we’ll be using to establish a connection to our database. The general form of the connection string is shown below.
CONNECTION_STRING="postgresql://dbuser:dbpassword@localhost:5432/dbname"
If you’re using elephantSQL you should copy the URL from the database details page.
Inside your /src folder, create a new folder called models/. Inside this folder, create two files:
pool.js
model.js
Open pools.js and paste the following code:
import { Pool } from 'pg';
import dotenv from 'dotenv';
import { connectionString } from '../settings';
dotenv.config();
export const pool = new Pool({ connectionString });
First, we import the Pool and dotenv from the pg and dotenv packages, and then import the settings we created for our postgres database before initializing dotenv. We establish a connection to our database with the Pool object. In node-postgres, every query is executed by a client. A Pool is a collection of clients for communicating with the database.
To create the connection, the pool constructor takes a config object. You can read more about all the possible configurations here. It also accepts a single connection string, which I will use here.
Open model.js and paste the following code:
import { pool } from './pool';
class Model {
constructor(table) {
this.pool = pool;
this.table = table;
this.pool.on('error', (err, client) => `Error, ${err}, on idle client${client}`);
}
async select(columns, clause) {
let query = `SELECT ${columns} FROM ${this.table}`;
if (clause) query += clause;
return this.pool.query(query);
}
}
export default Model;
We create a model class whose constructor accepts the database table we wish to operate on. We’ll be using a single pool for all our models.
We then create a select method which we will use to retrieve items from our database. This method accepts the columns we want to retrieve and a clause, such as a WHERE clause. It returns the result of the query, which is a Promise. Remember we said earlier that every query is executed by a client, but here we execute the query with pool. This is because, when we use pool.query, node-postgres executes the query using the first available idle client.
The query you write is entirely up to you, provided it is a valid SQL statement that can be executed by a Postgres engine.
The next step is to actually create an API endpoint to utilize our newly connected database. Before we do that, I’d like us to create some utility functions. The goal is for us to have a way to perform common database operations from the command line.
Create a folder, utils/ inside the src/ folder. Create three files inside this folder:
queries.js
queryFunctions.js
runQuery.js
We’re going to create functions to create a table in our database, insert seed data in the table, and to delete the table.
Open up queries.js and paste the following code:
export const createMessageTable = `
DROP TABLE IF EXISTS messages;
CREATE TABLE IF NOT EXISTS messages (
id SERIAL PRIMARY KEY,
name VARCHAR DEFAULT '',
message VARCHAR NOT NULL
)
`;
export const insertMessages = `
INSERT INTO messages(name, message)
VALUES ('chidimo', 'first message'),
('orji', 'second message')
`;
export const dropMessagesTable = 'DROP TABLE messages';
In this file, we define three SQL query strings. The first query deletes and recreates the messages table. The second query inserts two rows into the messages table. Feel free to add more items here. The last query drops/deletes the messages table.
Open queryFunctions.js and paste the following code:
import { pool } from '../models/pool';
import {
insertMessages,
dropMessagesTable,
createMessageTable,
} from './queries';
export const executeQueryArray = async arr => new Promise(resolve => {
const stop = arr.length;
arr.forEach(async (q, index) => {
await pool.query(q);
if (index + 1 === stop) resolve();
});
});
export const dropTables = () => executeQueryArray([ dropMessagesTable ]);
export const createTables = () => executeQueryArray([ createMessageTable ]);
export const insertIntoTables = () => executeQueryArray([ insertMessages ]);
Here, we create functions to execute the queries we defined earlier. Note that the executeQueryArray function executes an array of queries and waits for each one to complete inside the loop. (Don’t do such a thing in production code though). Then, we only resolve the promise once we have executed the last query in the list. The reason for using an array is that the number of such queries will grow as the number of tables in our database grows.
Open runQuery.js and paste the following code:
import { createTables, insertIntoTables } from './queryFunctions';
(async () => {
await createTables();
await insertIntoTables();
})();
This is where we execute the functions to create the table and insert the messages in the table. Let’s add a command in the scripts section of our package.json to execute this file.
"runQuery": "babel-node ./src/utils/runQuery"
Now run:
yarn runQuery
If you inspect your database, you will see that the messages table has been created and that the messages were inserted into the table.
If you’re using ElephantSQL, on the database details page, click on BROWSER from the left navigation menu. Select the messages table and click Execute. You should see the messages from the queries.js file.
Let’s create a controller and route to display the messages from our database.
Create a new controller file src/controllers/messages.js and paste the following code:
import Model from '../models/model';
const messagesModel = new Model('messages');
export const messagesPage = async (req, res) => {
try {
const data = await messagesModel.select('name, message');
res.status(200).json({ messages: data.rows });
} catch (err) {
res.status(200).json({ messages: err.stack });
}
};
We import our Model class and create a new instance of that model. This represents the messages table in our database. We then use the select method of the model to query our database. The data (name and message) we get is sent as JSON in the response.
We define the messagesPage controller as an async function. Since node-postgres queries return a promise, we await the result of that query. If we encounter an error during the query we catch it and display the stack to the user. You should decide how choose to handle the error.
Add the get messages endpoint to src/routes/index.js and update the import line.
# update the import line
import { indexPage, messagesPage } from '../controllers';
# add the get messages endpoint
indexRouter.get('/messages', messagesPage)
Visit http://localhost:3000/v1/messages and you should see the messages displayed as shown below.
Messages from database. (Large preview) Now, let’s update our test file. When doing TDD, you usually write your tests before implementing the code that makes the test pass. I’m taking the opposite approach here because we’re still working on setting up the database.
Create a new file, hooks.js in the test/ folder and enter the below code:
import {
dropTables,
createTables,
insertIntoTables,
} from '../src/utils/queryFunctions';
before(async () => {
await createTables();
await insertIntoTables();
});
after(async () => {
await dropTables();
});
When our test starts, Mocha finds this file and executes it before running any test file. It executes the before hook to create the database and insert some items into it. The test files then run after that. Once the test is finished, Mocha runs the after hook in which we drop the database. This ensures that each time we run our tests, we do so with clean and new records in our database.
Create a new test file test/messages.test.js and add the below code:
import { expect, server, BASE_URL } from './setup';
describe('Messages', () => {
it('get messages page', done => {
server
.get(`${BASE_URL}/messages`)
.expect(200)
.end((err, res) => {
expect(res.status).to.equal(200);
expect(res.body.messages).to.be.instanceOf(Array);
res.body.messages.forEach(m => {
expect(m).to.have.property('name');
expect(m).to.have.property('message');
});
done();
});
});
});
We assert that the result of the call to /messages is an array. For each message object, we assert that it has the name and message property.
The final step in this section is to update the CI files.
Add the following sections to the .travis.yml file:
services:
- postgresql
addons:
postgresql: "10"
apt:
packages:
- postgresql-10
- postgresql-client-10
before_install:
- sudo cp /etc/postgresql/{9.6,10}/main/pg_hba.conf
- sudo /etc/init.d/postgresql restart
This instructs Travis to spin up a PostgreSQL 10 database before running our tests.
Add the command to create the database as the first entry in the before_script section:
# add this as the first line in the before_script section
- psql -c 'create database testdb;' -U postgres
Create the CONNECTION_STRING environment variable on Travis, and use the below value:
CONNECTION_STRING="postgresql://postgres:postgres@localhost:5432/testdb"
Add the following sections to the .appveyor.yml file:
before_test:
- SET PGUSER=postgres
- SET PGPASSWORD=Password12!
- PATH=C:\Program Files\PostgreSQL\10\bin\;%PATH%
- createdb testdb
services:
- postgresql101
Add the connection string environment variable to appveyor. Use the below line:
CONNECTION_STRING=postgresql://postgres:Password12!@localhost:5432/testdb
Now commit your changes and push to GitHub. Your tests should pass on both Travis CI and AppVeyor.
The corresponding branch in my repo is 07-connect-postgres.
Note: I hope everything works fine on your end, but in case you should be having trouble for some reason, you can always check my code in the repo!
Now, let’s see how we can add a message to our database. For this step, we’ll need a way to send POST requests to our URL. I’ll be using Postman to send POST requests.
Let’s go the TDD route and update our test to reflect what we expect to achieve.
Open test/message.test.js and add the below test case:
it('posts messages', done => {
const data = { name: 'some name', message: 'new message' };
server
.post(`${BASE_URL}/messages`)
.send(data)
.expect(200)
.end((err, res) => {
expect(res.status).to.equal(200);
expect(res.body.messages).to.be.instanceOf(Array);
res.body.messages.forEach(m => {
expect(m).to.have.property('id');
expect(m).to.have.property('name', data.name);
expect(m).to.have.property('message', data.message);
});
done();
});
});
This test makes a POST request to the /v1/messages endpoint and we expect an array to be returned. We also check for the id, name, and message properties on the array.
Run your tests to see that this case fails. Let’s now fix it.
To send post requests, we use the post method of the server. We also send the name and message we want to insert. We expect the response to be an array, with a property id and the other info that makes up the query. The id is proof that a record has been inserted into the database.
Open src/models/model.js and add the insert method:
async insertWithReturn(columns, values) {
const query = `
INSERT INTO ${this.table}(${columns})
VALUES (${values})
RETURNING id, ${columns}
`;
return this.pool.query(query);
}
This is the method that allows us to insert messages into the database. After inserting the item, it returns the id, name and message.
Open src/controllers/messages.js and add the below controller:
export const addMessage = async (req, res) => {
const { name, message } = req.body;
const columns = 'name, message';
const values = `'${name}', '${message}'`;
try {
const data = await messagesModel.insertWithReturn(columns, values);
res.status(200).json({ messages: data.rows });
} catch (err) {
res.status(200).json({ messages: err.stack });
}
};
We destructure the request body to get the name and message. Then we use the values to form an SQL query string which we then execute with the insertWithReturn method of our model.
Add the below POST endpoint to /src/routes/index.js and update your import line.
import { indexPage, messagesPage, addMessage } from '../controllers';
indexRouter.post('/messages', addMessage);
Run your tests to see if they pass.
Open Postman and send a POST request to the messages endpoint. If you’ve just run your test, remember to run yarn query to recreate the messages table.
yarn query
POST request to messages endpoint. (Large preview) GET request showing newly added message. (Large preview) Commit your changes and push to GitHub. Your tests should pass on both Travis and AppVeyor. Your test coverage will drop by a few points, but that’s okay.
The corresponding branch on my repo is 08-post-to-db.
Middleware
Our discussion of Express won’t be complete without talking about middleware. The Express documentation describes a middlewares as:
“[...] functions that have access to the request object (req), the response object (res), and the next middleware function in the application’s request-response cycle. The next middleware function is commonly denoted by a variable named next.”
A middleware can perform any number of functions such as authentication, modifying the request body, and so on. See the Express documentation on using middleware.
We’re going to write a simple middleware that modifies the request body. Our middleware will append the word SAYS: to the incoming message before it is saved in the database.
Before we start, let’s modify our test to reflect what we want to achieve.
Open up test/messages.test.js and modify the last expect line in the posts message test case:
it('posts messages', done => {
...
expect(m).to.have.property('message', `SAYS: ${data.message}`); # update this line
...
});
We’re asserting that the SAYS: string has been appended to the message. Run your tests to make sure this test case fails.
Now, let’s write the code to make the test pass.
Create a new middleware/ folder inside src/ folder. Create two files inside this folder:
middleware.js
index.js
Enter the below code in middleware.js:
export const modifyMessage = (req, res, next) => {
req.body.message = `SAYS: ${req.body.message}`;
next();
};
Here, we append the string SAYS: to the message in the request body. After doing that, we must call the next() function to pass execution to the next function in the request-response chain. Every middleware has to call the next function to pass execution to the next middleware in the request-response cycle.
Enter the below code in index.js:
# export everything from the middleware file
export * from './middleware';
This exports the middleware we have in the /middleware.js file. For now, we only have the modifyMessage middleware.
Open src/routes/index.js and add the middleware to the post message request-response chain.
import { modifyMessage } from '../middleware';
indexRouter.post('/messages', modifyMessage, addMessage);
We can see that the modifyMessage function comes before the addMessage function. We invoke the addMessage function by calling next in the modifyMessage middleware. As an experiment, comment out the next() line in the modifyMessage middle and watch the request hang.
Open Postman and create a new message. You should see the appended string.
Message modified by middleware. (Large preview) This is a good point to commit our changes.
The corresponding branch in my repo is 09-middleware.
Error Handling And Asynchronous Middleware
Errors are inevitable in any application. The task before the developer is how to deal with errors as gracefully as possible.
In Express:
“Error Handling refers to how Express catches and processes errors that occur both synchronously and asynchronously.
If we were only writing synchronous functions, we might not have to worry so much about error handling as Express already does an excellent job of handling those. According to the docs:
“Errors that occur in synchronous code inside route handlers and middleware require no extra work.”
But once we start writing asynchronous router handlers and middleware, then we have to do some error handling.
Our modifyMessage middleware is a synchronous function. If an error occurs in that function, Express will handle it just fine. Let’s see how we deal with errors in asynchronous middleware.
Let’s say, before creating a message, we want to get a picture from the Lorem Picsum API using this URL https://picsum.photos/id/0/info. This is an asynchronous operation that could either succeed or fail, and that presents a case for us to deal with.
Start by installing Axios.
# install axios
yarn add axios
Open src/middleware/middleware.js and add the below function:
export const performAsyncAction = async (req, res, next) => {
try {
await axios.get('https://picsum.photos/id/0/info');
next();
} catch (err) {
next(err);
}
};
In this async function, we await a call to an API (we don’t actually need the returned data) and afterward call the next function in the request chain. If the request fails, we catch the error and pass it on to next. Once Express sees this error, it skips all other middleware in the chain. If we didn’t call next(err), the request will hang. If we only called next() without err, the request will proceed as if nothing happened and the error will not be caught.
Import this function and add it to the middleware chain of the post messages route:
import { modifyMessage, performAsyncAction } from '../middleware';
indexRouter.post('/messages', modifyMessage, performAsyncAction, addMessage);
Open src/app.js and add the below code just before the export default app line.
app.use((err, req, res, next) => {
res.status(400).json({ error: err.stack });
});
export default app;
This is our error handler. According to the Express error handling doc:
“[...] error-handling functions have four arguments instead of three: (err, req, res, next).”
Note that this error handler must come last, after every app.use() call. Once we encounter an error, we return the stack trace with a status code of 400. You could do whatever you like with the error. You might want to log it or send it somewhere.
This is a good place to commit your changes.
The corresponding branch in my repo is 10-async-middleware.
Deploy To Heroku
To get started, go to https://www.heroku.com/ and either log in or register.
Download and install the Heroku CLI from here.
Open a terminal in the project folder to run the command.
# login to heroku on command line
heroku login
This will open a browser window and ask you to log into your Heroku account.
Log in to grant your terminal access to your Heroku account, and create a new heroku app by running:
#app name is up to you
heroku create app-name
This will create the app on Heroku and return two URLs.
# app production url and git url
https://app-name.herokuapp.com/ | https://git.heroku.com/app-name.git
Copy the URL on the right and run the below command. Note that this step is optional as you may find that Heroku has already added the remote URL.
# add heroku remote url
git remote add heroku https://git.heroku.com/my-shiny-new-app.git
Open a side terminal and run the command below. This shows you the app log in real-time as shown in the image.
# see process logs
heroku logs --tail
Heroku logs. (Large preview) Run the following three commands to set the required environment variables:
heroku config:set TEST_ENV_VARIABLE="Environment variable is coming across."
heroku config:set CONNECTION_STRING=your-db-connection-string-here.
heroku config:set NPM_CONFIG_PRODUCTION=false
Remember in our scripts, we set:
"prestart": "babel ./src --out-dir build",
"start": "node ./build/bin/www",
To start the app, it needs to be compiled down to ES5 using babel in the prestart step because babel only exists in our development dependencies. We have to set NPM_CONFIG_PRODUCTION to false in order to be able to install those as well.
To confirm everything is set correctly, run the command below. You could also visit the settings tab on the app page and click on Reveal Config Vars.
# check configuration variables
heroku config
Now run git push heroku.
To open the app, run:
# open /v1 route
heroku open /v1
# open /v1/messages route
heroku open /v1/messages
If like me, you’re using the same PostgresSQL database for both development and production, you may find that each time you run your tests, the database is deleted. To recreate it, you could run either one of the following commands:
# run script locally
yarn runQuery
# run script with heroku
heroku run yarn runQuery
Continuous Deployment (CD) With Travis
Let’s now add Continuous Deployment (CD) to complete the CI/CD flow. We will be deploying from Travis after every successful test run.
The first step is to install Travis CI. (You can find the installation instructions over here.) After successfully installing the Travis CI, login by running the below command. (Note that this should be done in your project repository.)
# login to travis
travis login --pro
# use this if you’re using two factor authentication
travis login --pro --github-token enter-github-token-here
If your project is hosted on travis-ci.org, remove the --pro flag. To get a GitHub token, visit the developer settings page of your account and generate one. This only applies if your account is secured with 2FA.
Open your .travis.yml and add a deploy section:
deploy:
provider: heroku
app:
master: app-name
Here, we specify that we want to deploy to Heroku. The app sub-section specifies that we want to deploy the master branch of our repo to the app-name app on Heroku. It’s possible to deploy different branches to different apps. You can read more about the available options here.
Run the below command to encrypt your Heroku API key and add it to the deploy section:
# encrypt heroku API key and add to .travis.yml
travis encrypt $(heroku auth:token) --add deploy.api_key --pro
This will add the below sub-section to the deploy section.
api_key:
secure: very-long-encrypted-api-key-string
Now commit your changes and push to GitHub while monitoring your logs. You will see the build triggered as soon as the Travis test is done. In this way, if we have a failing test, the changes would never be deployed. Likewise, if the build failed, the whole test run would fail. This completes the CI/CD flow.
The corresponding branch in my repo is 11-cd.
Conclusion
If you’ve made it this far, I say, “Thumbs up!” In this tutorial, we successfully set up a new Express project. We went ahead to configure development dependencies as well as Continuous Integration (CI). We then wrote asynchronous functions to handle requests to our API endpoints — completed with tests. We then looked briefly at error handling. Finally, we deployed our project to Heroku and configured Continuous Deployment.
You now have a template for your next back-end project. We’ve only done enough to get you started, but you should keep learning to keep going. Be sure to check out the express docs as well. If you would rather use MongoDB instead of PostgreSQL, I have a template here that does exactly that. You can check it out for the setup. It has only a few points of difference.
http://damianfallon.blogspot.com/2020/04/how-to-set-up-express-api-backend.html
0 notes
Text
How To Set Up An Express API Backend Project With PostgreSQL
About The Author
Awesome frontend developer who loves everything coding. I’m a lover of choral music and I’m working to make it more accessible to the world, one upload at a …
More about
Chidi
…
In this article, we will create a set of API endpoints using Express from scratch in ES6 syntax, and cover some development best practices. Find out how all the pieces work together as you create a small project using Continuous Integration and Test-Driven Development before deploying to Heroku.
We will take a Test-Driven Development (TDD) approach and the set up Continuous Integration (CI) job to automatically run our tests on Travis CI and AppVeyor, complete with code quality and coverage reporting. We will learn about controllers, models (with PostgreSQL), error handling, and asynchronous Express middleware. Finally, we’ll complete the CI/CD pipeline by configuring automatic deploy on Heroku.
It sounds like a lot, but this tutorial is aimed at beginners who are ready to try their hands on a back-end project with some level of complexity, and who may still be confused as to how all the pieces fit together in a real project.
It is robust without being overwhelming and is broken down into sections that you can complete in a reasonable length of time.
Getting Started
The first step is to create a new directory for the project and start a new node project. Node is required to continue with this tutorial. If you don’t have it installed, head over to the official website, download, and install it before continuing.
I will be using yarn as my package manager for this project. There are installation instructions for your specific operating system here. Feel free to use npm if you like.
Open your terminal, create a new directory, and start a Node.js project.
# create a new directory
mkdir express-api-template # change to the newly-created directory
cd express-api-template # initialize a new Node.js project
npm init
Answer the questions that follow to generate a package.json file. This file holds information about your project. Example of such information includes what dependencies it uses, the command to start the project, and so on.
You may now open the project folder in your editor of choice. I use visual studio code. It’s a free IDE with tons of plugins to make your life easier, and it’s available for all major platforms. You can download it from the official website.
Create the following files in the project folder:
README.md
.editorconfig
Here’s a description of what .editorconfig does from the EditorConfig website. (You probably don’t need it if you’re working solo, but it does no harm, so I’ll leave it here.)
“EditorConfig helps maintain consistent coding styles for multiple developers working on the same project across various editors and IDEs.”
Open .editorconfig and paste the following code:
root = true
[*]
indent_style = space
indent_size = 2
charset = utf-8
trim_trailing_whitespace = false
insert_final_newline = true
The [*] means that we want to apply the rules that come under it to every file in the project. We want an indent size of two spaces and UTF-8 character set. We also want to trim trailing white space and insert a final empty line in our file.
Open README.md and add the project name as a first-level element.
# Express API template
Let’s add version control right away.
# initialize the project folder as a git repository
git init
Create a .gitignore file and enter the following lines:
node_modules/
yarn-error.log
.env
.nyc_output
coverage
build/
These are all the files and folders we don’t want to track. We don’t have them in our project yet, but we’ll see them as we proceed.
At this point, you should have the following folder structure.
EXPRESS-API-TEMPLATE
├── .editorconfig
├── .gitignore
├── package.json
└── README.md
I consider this to be a good point to commit my changes and push them to GitHub.
Starting A New Express Project
Express is a Node.js framework for building web applications. According to the official website, it is a
Fast, unopinionated, minimalist web framework for Node.js.
There are other great web application frameworks for Node.js, but Express is very popular, with over 47k GitHub stars at the time of this writing.
In this article, we will not be having a lot of discussions about all the parts that make up Express. For that discussion, I recommend you check out Jamie’s series. The first part is here, and the second part is here.
Install Express and start a new Express project. It’s possible to manually set up an Express server from scratch but to make our life easier we’ll use the express-generator to set up the app skeleton.
# install the express generator globally
yarn global add express-generator # install express
yarn add express # generate the express project in the current folder
express -f
The -f flag forces Express to create the project in the current directory.
We’ll now perform some house-cleaning operations.
Delete the file index/users.js.
Delete the folders public/ and views/.
Rename the file bin/www to bin/www.js.
Uninstall jade with the command yarn remove jade.
Create a new folder named src/ and move the following inside it:
1. app.js file
2. bin/ folder
3. routes/ folder inside.
Open up package.json and update the start script to look like below.
"start": "node ./src/bin/www"
At this point, your project folder structure looks like below. You can see how VS Code highlights the file changes that have taken place.
EXPRESS-API-TEMPLATE
├── node_modules
├── src
| ├── bin
│ │ ├── www.js
│ ├── routes
│ | ├── index.js
│ └── app.js
├── .editorconfig
├── .gitignore
├── package.json
├── README.md
└── yarn.lock
Open src/app.js and replace the content with the below code.
var logger = require('morgan');
var express = require('express');
var cookieParser = require('cookie-parser');
var indexRouter = require('./routes/index');
var app = express(); app.use(logger('dev'));
app.use(express.json());
app.use(express.urlencoded({ extended: true }));
app.use(cookieParser());
app.use('/v1', indexRouter); module.exports = app;
After requiring some libraries, we instruct Express to handle every request coming to /v1 with indexRouter.
Replace the content of routes/index.js with the below code:
var express = require('express');
var router = express.Router();
router.get('/', function(req, res, next) { return res.status(200).json({ message: 'Welcome to Express API template' });
});
module.exports = router;
We grab Express, create a router from it and serve the / route, which returns a status code of 200 and a JSON message.
Start the app with the below command:
# start the app
yarn start
If you’ve set up everything correctly you should only see $ node ./src/bin/www in your terminal.
Visit http://localhost:3000/v1 in your browser. You should see the following message:
{ "message": "Welcome to Express API template"
}
This is a good point to commit our changes.
Converting Our Code To ES6
The code generated by express-generator is in ES5, but in this article, we will be writing all our code in ES6 syntax. So, let’s convert our existing code to ES6.
Replace the content of routes/index.js with the below code:
import express from 'express'; const indexRouter = express.Router(); indexRouter.get('/', (req, res) => res.status(200).json({ message: 'Welcome to Express API template' })
); export default indexRouter;
It is the same code as we saw above, but with the import statement and an arrow function in the / route handler.
Replace the content of src/app.js with the below code:
import logger from 'morgan';
import express from 'express';
import cookieParser from 'cookie-parser';
import indexRouter from './routes/index';
const app = express();
app.use(logger('dev'));
app.use(express.json());
app.use(express.urlencoded({ extended: true }));
app.use(cookieParser());
app.use('/v1', indexRouter); export default app;
Let’s now take a look at the content of src/bin/www.js. We will build it incrementally. Delete the content of src/bin/www.js and paste in the below code block.
#!/usr/bin/env node
/** * Module dependencies. */
import debug from 'debug';
import http from 'http';
import app from '../app';
/** * Normalize a port into a number, string, or false. */
const normalizePort = val => { const port = parseInt(val, 10); if (Number.isNaN(port)) { // named pipe return val; } if (port >= 0) { // port number return port; } return false;
}; /** * Get port from environment and store in Express. */
const port = normalizePort(process.env.PORT || '3000');
app.set('port', port); /** * Create HTTP server. */
const server = http.createServer(app); // next code block goes here
This code checks if a custom port is specified in the environment variables. If none is set the default port value of 3000 is set on the app instance, after being normalized to either a string or a number by normalizePort. The server is then created from the http module, with app as the callback function.
The #!/usr/bin/env node line is optional since we would specify node when we want to execute this file. But make sure it is on line 1 of src/bin/www.js file or remove it completely.
Let’s take a look at the error handling function. Copy and paste this code block after the line where the server is created.
/** * Event listener for HTTP server "error" event. */
const onError = error => { if (error.syscall !== 'listen') { throw error; } const bind = typeof port === 'string' ? `Pipe ${port}` : `Port ${port}`; // handle specific listen errors with friendly messages switch (error.code) { case 'EACCES': alert(`${bind} requires elevated privileges`); process.exit(1); break; case 'EADDRINUSE': alert(`${bind} is already in use`); process.exit(1); break; default: throw error; }
}; /** * Event listener for HTTP server "listening" event. */
const onListening = () => { const addr = server.address(); const bind = typeof addr === 'string' ? `pipe ${addr}` : `port ${addr.port}`; debug(`Listening on ${bind}`);
};
/** * Listen on provided port, on all network interfaces. */
server.listen(port);
server.on('error', onError);
server.on('listening', onListening);
The onError function listens for errors in the http server and displays appropriate error messages. The onListening function simply outputs the port the server is listening on to the console. Finally, the server listens for incoming requests at the specified address and port.
At this point, all our existing code is in ES6 syntax. Stop your server (use Ctrl + C) and run yarn start. You’ll get an error SyntaxError: Invalid or unexpected token. This happens because Node (at the time of writing) doesn’t support some of the syntax we’ve used in our code.
We’ll now fix that in the following section.
Configuring Development Dependencies: babel, nodemon, eslint, And prettier
It’s time to set up most of the scripts we’re going to need at this phase of the project.
Install the required libraries with the below commands. You can just copy everything and paste it in your terminal. The comment lines will be skipped.
# install babel scripts
yarn add @babel/cli @babel/core @babel/plugin-transform-runtime @babel/preset-env @babel/register @babel/runtime @babel/node --dev
This installs all the listed babel scripts as development dependencies. Check your package.json file and you should see a devDependencies section. All the installed scripts will be listed there.
The babel scripts we’re using are explained below:
@babel/cliA required install for using babel. It allows the use of Babel from the terminal and is available as ./node_modules/.bin/babel.@babel/coreCore Babel functionality. This is a required installation.@babel/nodeThis works exactly like the Node.js CLI, with the added benefit of compiling with babel presets and plugins. This is required for use with nodemon.@babel/plugin-transform-runtimeThis helps to avoid duplication in the compiled output.@babel/preset-envA collection of plugins that are responsible for carrying out code transformations.@babel/registerThis compiles files on the fly and is specified as a requirement during tests.@babel/runtimeThis works in conjunction with @babel/plugin-transform-runtime.
Create a file named .babelrc at the root of your project and add the following code:
{ "presets": ["@babel/preset-env"], "plugins": ["@babel/transform-runtime"]
}
Let’s install nodemon
# install nodemon
yarn add nodemon --dev
nodemon is a library that monitors our project source code and automatically restarts our server whenever it observes any changes.
Create a file named nodemon.json at the root of your project and add the code below:
{ "watch": [ "package.json", "nodemon.json", ".eslintrc.json", ".babelrc", ".prettierrc", "src/" ], "verbose": true, "ignore": ["*.test.js", "*.spec.js"]
}
The watch key tells nodemon which files and folders to watch for changes. So, whenever any of these files changes, nodemon restarts the server. The ignore key tells it the files not to watch for changes.
Now update the scripts section of your package.json file to look like the following:
# build the content of the src folder "prestart": "babel ./src --out-dir build" # start server from the build folder "start": "node ./build/bin/www" # start server in development mode "startdev": "nodemon --exec babel-node ./src/bin/www"
prestart scripts builds the content of the src/ folder and puts it in the build/ folder. When you issue the yarn start command, this script runs first before the start script.
start script now serves the content of the build/ folder instead of the src/ folder we were serving previously. This is the script you’ll use when serving the file in production. In fact, services like Heroku automatically run this script when you deploy.
yarn startdev is used to start the server during development. From now on we will be using this script as we develop the app. Notice that we’re now using babel-node to run the app instead of regular node. The --exec flag forces babel-node to serve the src/ folder. For the start script, we use node since the files in the build/ folder have been compiled to ES5.
Run yarn startdev and visit http://localhost:3000/v1. Your server should be up and running again.
The final step in this section is to configure ESLint and prettier. ESLint helps with enforcing syntax rules while prettier helps for formatting our code properly for readability.
Add both of them with the command below. You should run this on a separate terminal while observing the terminal where our server is running. You should see the server restarting. This is because we’re monitoring package.json file for changes.
# install elsint and prettier yarn add eslint eslint-config-airbnb-base eslint-plugin-import prettier --dev
Now create the .eslintrc.json file in the project root and add the below code:
{ "env": { "browser": true, "es6": true, "node": true, "mocha": true }, "extends": ["airbnb-base"], "globals": { "Atomics": "readonly", "SharedArrayBuffer": "readonly" }, "parserOptions": { "ecmaVersion": 2018, "sourceType": "module" }, "rules": { "indent": ["warn", 2], "linebreak-style": ["error", "unix"], "quotes": ["error", "single"], "semi": ["error", "always"], "no-console": 1, "comma-dangle": [0], "arrow-parens": [0], "object-curly-spacing": ["warn", "always"], "array-bracket-spacing": ["warn", "always"], "import/prefer-default-export": [0] }
}
This file mostly defines some rules against which eslint will check our code. You can see that we’re extending the style rules used by Airbnb.
In the "rules" section, we define whether eslint should show a warning or an error when it encounters certain violations. For instance, it shows a warning message on our terminal for any indentation that does not use 2 spaces. A value of [0] turns off a rule, which means that we won’t get a warning or an error if we violate that rule.
Create a file named .prettierrc and add the code below:
{ "trailingComma": "es5", "tabWidth": 2, "semi": true, "singleQuote": true
}
We’re setting a tab width of 2 and enforcing the use of single quotes throughout our application. Do check the prettier guide for more styling options.
Now add the following scripts to your package.json:
# add these one after the other "lint": "./node_modules/.bin/eslint ./src" "pretty": "prettier --write '**/*.{js,json}' '!node_modules/**'" "postpretty": "yarn lint --fix"
Run yarn lint. You should see a number of errors and warnings in the console.
The pretty command prettifies our code. The postpretty command is run immediately after. It runs the lint command with the --fix flag appended. This flag tells ESLint to automatically fix common linting issues. In this way, I mostly run the yarn pretty command without bothering about the lint command.
Run yarn pretty. You should see that we have only two warnings about the presence of alert in the bin/www.js file.
Here’s what our project structure looks like at this point.
EXPRESS-API-TEMPLATE
├── build
├── node_modules
├── src
| ├── bin
│ │ ├── www.js
│ ├── routes
│ | ├── index.js
│ └── app.js
├── .babelrc
├── .editorconfig
├── .eslintrc.json
├── .gitignore
├── .prettierrc
├── nodemon.json
├── package.json
├── README.md
└── yarn.lock
You may find that you have an additional file, yarn-error.log in your project root. Add it to .gitignore file. Commit your changes.
Settings And Environment Variables In Our .env File
In nearly every project, you’ll need somewhere to store settings that will be used throughout your app e.g. an AWS secret key. We store such settings as environment variables. This keeps them away from prying eyes, and we can use them within our application as needed.
I like having a settings.js file with which I read all my environment variables. Then, I can refer to the settings file from anywhere within my app. You’re at liberty to name this file whatever you want, but there’s some kind of consensus about naming such files settings.js or config.js.
For our environment variables, we’ll keep them in a .env file and read them into our settings file from there.
Create the .env file at the root of your project and enter the below line:
TEST_ENV_VARIABLE="Environment variable is coming across"
To be able to read environment variables into our project, there’s a nice library, dotenv that reads our .env file and gives us access to the environment variables defined inside. Let’s install it.
# install dotenv
yarn add dotenv
Add the .env file to the list of files being watched by nodemon.
Now, create the settings.js file inside the src/ folder and add the below code:
import dotenv from 'dotenv';
dotenv.config();
export const testEnvironmentVariable = process.env.TEST_ENV_VARIABLE;
We import the dotenv package and call its config method. We then export the testEnvironmentVariable which we set in our .env file.
Open src/routes/index.js and replace the code with the one below.
import express from 'express';
import { testEnvironmentVariable } from '../settings'; const indexRouter = express.Router(); indexRouter.get('/', (req, res) => res.status(200).json({ message: testEnvironmentVariable })); export default indexRouter;
The only change we’ve made here is that we import testEnvironmentVariable from our settings file and use is as the return message for a request from the / route.
Visit http://localhost:3000/v1 and you should see the message, as shown below.
{ "message": "Environment variable is coming across."
}
And that’s it. From now on we can add as many environment variables as we want and we can export them from our settings.js file.
This is a good point to commit your code. Remember to prettify and lint your code.
Writing Our First Test
It’s time to incorporate testing into our app. One of the things that give the developer confidence in their code is tests. I’m sure you’ve seen countless articles on the web preaching Test-Driven Development (TDD). It cannot be emphasized enough that your code needs some measure of testing. TDD is very easy to follow when you’re working with Express.js.
In our tests, we will make calls to our API endpoints and check to see if what is returned is what we expect.
Install the required dependencies:
# install dependencies yarn add mocha chai nyc sinon-chai supertest coveralls --dev
Each of these libraries has its own role to play in our tests.
mochatest runnerchaiused to make assertionsnyccollect test coverage reportsinon-chaiextends chai’s assertionssupertestused to make HTTP calls to our API endpointscoverallsfor uploading test coverage to coveralls.io
Create a new test/ folder at the root of your project. Create two files inside this folder:
test/setup.js
test/index.test.js
Mocha will find the test/ folder automatically.
Open up test/setup.js and paste the below code. This is just a helper file that helps us organize all the imports we need in our test files.
import supertest from 'supertest';
import chai from 'chai';
import sinonChai from 'sinon-chai';
import app from '../src/app'; chai.use(sinonChai);
export const { expect } = chai;
export const server = supertest.agent(app);
export const BASE_URL = '/v1';
This is like a settings file, but for our tests. This way we don’t have to initialize everything inside each of our test files. So we import the necessary packages and export what we initialized — which we can then import in the files that need them.
Open up index.test.js and paste the following test code.
import { expect, server, BASE_URL } from './setup'; describe('Index page test', () => { it('gets base url', done => { server .get(`${BASE_URL}/`) .expect(200) .end((err, res) => { expect(res.status).to.equal(200); expect(res.body.message).to.equal( 'Environment variable is coming across.' ); done(); }); });
});
Here we make a request to get the base endpoint, which is / and assert that the res.body object has a message key with a value of Environment variable is coming across.
If you’re not familiar with the describe, it pattern, I encourage you to take a quick look at Mocha’s “Getting Started” doc.
Add the test command to the scripts section of package.json.
"test": "nyc --reporter=html --reporter=text --reporter=lcov mocha -r @babel/register"
This script executes our test with nyc and generates three kinds of coverage report: an HTML report, outputted to the coverage/ folder; a text report outputted to the terminal and an lcov report outputted to the .nyc_output/ folder.
Now run yarn test. You should see a text report in your terminal just like the one in the below photo.
Test coverage report (Large preview)
Notice that two additional folders are generated:
.nyc_output/
coverage/
Look inside .gitignore and you’ll see that we’re already ignoring both. I encourage you to open up coverage/index.html in a browser and view the test report for each file.
This is a good point to commit your changes.
Continuous Integration(CD) And Badges: Travis, Coveralls, Code Climate, AppVeyor
It’s now time to configure continuous integration and deployment (CI/CD) tools. We will configure common services such as travis-ci, coveralls, AppVeyor, and codeclimate and add badges to our README file.
Let’s get started.
Travis CI
Travis CI is a tool that runs our tests automatically each time we push a commit to GitHub (and recently, Bitbucket) and each time we create a pull request. This is mostly useful when making pull requests by showing us if the our new code has broken any of our tests.
Visit travis-ci.com or travis-ci.org and create an account if you don’t have one. You have to sign up with your GitHub account.
Hover over the dropdown arrow next to your profile picture and click on settings.
Under Repositories tab click Manage repositories on Github to be redirected to Github.
On the GitHub page, scroll down to Repository access and click the checkbox next to Only select repositories.
Click the Select repositories dropdown and find the express-api-template repo. Click it to add it to the list of repositories you want to add to travis-ci.
Click Approve and install and wait to be redirected back to travis-ci.
At the top of the repo page, close to the repo name, click on the build unknown icon. From the Status Image modal, select markdown from the format dropdown.
Copy the resulting code and paste it in your README.md file.
On the project page, click on More options > Settings. Under Environment Variables section, add the TEST_ENV_VARIABLE env variable. When entering its value, be sure to have it within double quotes like this "Environment variable is coming across."
Create .travis.yml file at the root of your project and paste in the below code (We’ll set the value of CC_TEST_REPORTER_ID in the Code Climate section).
language: node_js
env: global: - CC_TEST_REPORTER_ID=get-this-from-code-climate-repo-page
matrix: include: - node_js: '12'
cache: directories: [node_modules]
install: yarn
after_success: yarn coverage
before_script: - curl -L https://codeclimate.com/downloads/test-reporter/test-reporter-latest-linUX-amd64 > ./cc-test-reporter - chmod +x ./cc-test-reporter - ./cc-test-reporter before-build
script: - yarn test
after_script: - ./cc-test-reporter after-build --exit-code $TRAVIS_TEST_RESUL
First, we tell Travis to run our test with Node.js, then set the CC_TEST_REPORTER_ID global environment variable (we’ll get to this in the Code Climate section). In the matrix section, we tell Travis to run our tests with Node.js v12. We also want to cache the node_modules/ directory so it doesn’t have to be regenerated every time.
We install our dependencies using the yarn command which is a shorthand for yarn install. The before_script and after_script commands are used to upload coverage results to codeclimate. We’ll configure codeclimate shortly. After yarn test runs successfully, we want to also run yarn coverage which will upload our coverage report to coveralls.io.
Coveralls
Coveralls uploads test coverage data for easy visualization. We can view the test coverage on our local machine from the coverage folder, but Coveralls makes it available outside our local machine.
Visit coveralls.io and either sign in or sign up with your Github account.
Hover over the left-hand side of the screen to reveal the navigation menu. Click on ADD REPOS.
Search for the express-api-template repo and turn on coverage using the toggle button on the left-hand side. If you can’t find it, click on SYNC REPOS on the upper right-hand corner and try again. Note that your repo has to be public, unless you have a PRO account.
Click details to go to the repo details page.
Create the .coveralls.yml file at the root of your project and enter the below code. To get the repo_token, click on the repo details. You will find it easily on that page. You could just do a browser search for repo_token.
repo_token: get-this-from-repo-settings-on-coveralls.io
This token maps your coverage data to a repo on Coveralls. Now, add the coverage command to the scripts section of your package.json file:
"coverage": "nyc report --reporter=text-lcov | coveralls"
This command uploads the coverage report in the .nyc_output folder to coveralls.io. Turn on your Internet connection and run:
yarn coverage
This should upload the existing coverage report to coveralls. Refresh the repo page on coveralls to see the full report.
On the details page, scroll down to find the BADGE YOUR REPO section. Click on the EMBED dropdown and copy the markdown code and paste it into your README file.
Code Climate
Code Climate is a tool that helps us measure code quality. It shows us maintenance metrics by checking our code against some defined patterns. It detects things such as unnecessary repetition and deeply nested for loops. It also collects test coverage data just like coveralls.io.
Visit codeclimate.com and click on ‘Sign up with GitHub’. Log in if you already have an account.
Once in your dashboard, click on Add a repository.
Find the express-api-template repo from the list and click on Add Repo.
Wait for the build to complete and redirect to the repo dashboard.
Under Codebase Summary, click on Test Coverage. Under the Test coverage menu, copy the TEST REPORTER ID and paste it in your .travis.yml as the value of CC_TEST_REPORTER_ID.
Still on the same page, on the left-hand navigation, under EXTRAS, click on Badges. Copy the maintainability and test coverage badges in markdown format and paste them into your README.md file.
It’s important to note that there are two ways of configuring maintainability checks. There are the default settings that are applied to every repo, but if you like, you could provide a .codeclimate.yml file at the root of your project. I’ll be using the default settings, which you can find under the Maintainability tab of the repo settings page. I encourage you to take a look at least. If you still want to configure your own settings, this guide will give you all the information you need.
AppVeyor
AppVeyor and Travis CI are both automated test runners. The main difference is that travis-ci runs tests in a LinUX environment while AppVeyor runs tests in a Windows environment. This section is included to show how to get started with AppVeyor.
Visit AppVeyor and log in or sign up.
On the next page, click on NEW PROJECT.
From the repo list, find the express-api-template repo. Hover over it and click ADD.
Click on the Settings tab. Click on Environment on the left navigation. Add TEST_ENV_VARIABLE and its value. Click ‘Save’ at the bottom of the page.
Create the appveyor.yml file at the root of your project and paste in the below code.
environment: matrix: - nodejs_version: "12"
install: - yarn
test_script: - yarn test
build: off
This code instructs AppVeyor to run our tests using Node.js v12. We then install our project dependencies with the yarn command. test_script specifies the command to run our test. The last line tells AppVeyor not to create a build folder.
Click on the Settings tab. On the left-hand navigation, click on badges. Copy the markdown code and paste it in your README.md file.
Commit your code and push to GitHub. If you have done everything as instructed all tests should pass and you should see your shiny new badges as shown below. Check again that you have set the environment variables on Travis and AppVeyor.
Repo CI/CD badges. (Large preview)
Now is a good time to commit our changes.
The corresponding branch in my repo is 05-ci.
Adding A Controller
Currently, we’re handling the GET request to the root URL, /v1, inside the src/routes/index.js. This works as expected and there is nothing wrong with it. However, as your application grows, you want to keep things tidy. You want concerns to be separated — you want a clear separation between the code that handles the request and the code that generates the response that will be sent back to the client. To achieve this, we write controllers. Controllers are simply functions that handle requests coming through a particular URL.
To get started, create a controllers/ folder inside the src/ folder. Inside controllers create two files: index.js and home.js. We would export our functions from within index.js. You could name home.js anything you want, but typically you want to name controllers after what they control. For example, you might have a file usersController.js to hold every function related to users in your app.
Open src/controllers/home.js and enter the code below:
import { testEnvironmentVariable } from '../settings'; export const indexPage = (req, res) => res.status(200).json({ message: testEnvironmentVariable });
You will notice that we only moved the function that handles the request for the / route.
Open src/controllers/index.js and enter the below code.
// export everything from home.js
export * from './home';
We export everything from the home.js file. This allows us shorten our import statements to import { indexPage } from '../controllers';
Open src/routes/index.js and replace the code there with the one below:
import express from 'express';
import { indexPage } from '../controllers';
const indexRouter = express.Router(); indexRouter.get('/', indexPage); export default indexRouter;
The only change here is that we’ve provided a function to handle the request to the / route.
You just successfully wrote your first controller. From here it’s a matter of adding more files and functions as needed.
Go ahead and play with the app by adding a few more routes and controllers. You could add a route and a controller for the about page. Remember to update your test, though.
Run yarn test to confirm that we’ve not broken anything. Does your test pass? That’s cool.
This is a good point to commit our changes.
Connecting The PostgreSQL Database And Writing A Model
Our controller currently returns hard-coded text messages. In a real-world app, we often need to store and retrieve information from a database. In this section, we will connect our app to a PostgreSQL database.
We’re going to implement the storage and retrieval of simple text messages using a database. We have two options for setting a database: we could provision one from a cloud server, or we could set up our own locally.
I would recommend you provision a database from a cloud server. ElephantSQL has a free plan that gives 20MB of free storage which is sufficient for this tutorial. Visit the site and click on Get a managed database today. Create an account (if you don’t have one) and follow the instructions to create a free plan. Take note of the URL on the database details page. We’ll be needing it soon.
ElephantSQL turtle plan details page (Large preview)
If you would rather set up a database locally, you should visit the PostgreSQL and PgAdmin sites for further instructions.
Once we have a database set up, we need to find a way to allow our Express app to communicate with our database. Node.js by default doesn’t support reading and writing to PostgreSQL database, so we’ll be using an excellent library, appropriately named, node-postgres.
node-postgres executes SQL queries in node and returns the result as an object, from which we can grab items from the rows key.
Let’s connect node-postgres to our application.
# install node-postgres
yarn add pg
Open settings.js and add the line below:
export const connectionString = process.env.CONNECTION_STRING;
Open your .env file and add the CONNECTION_STRING variable. This is the connection string we’ll be using to establish a connection to our database. The general form of the connection string is shown below.
CONNECTION_STRING="postgresql://dbuser:dbpassword@localhost:5432/dbname"
If you’re using elephantSQL you should copy the URL from the database details page.
Inside your /src folder, create a new folder called models/. Inside this folder, create two files:
pool.js
model.js
Open pools.js and paste the following code:
import { Pool } from 'pg';
import dotenv from 'dotenv';
import { connectionString } from '../settings';
dotenv.config(); export const pool = new Pool({ connectionString });
First, we import the Pool and dotenv from the pg and dotenv packages, and then import the settings we created for our postgres database before initializing dotenv. We establish a connection to our database with the Pool object. In node-postgres, every query is executed by a client. A Pool is a collection of clients for communicating with the database.
To create the connection, the pool constructor takes a config object. You can read more about all the possible configurations here. It also accepts a single connection string, which I will use here.
Open model.js and paste the following code:
import { pool } from './pool'; class Model { constructor(table) { this.pool = pool; this.table = table; this.pool.on('error', (err, client) => `Error, ${err}, on idle client${client}`); } async select(columns, clause) { let query = `SELECT ${columns} FROM ${this.table}`; if (clause) query += clause; return this.pool.query(query); }
} export default Model;
We create a model class whose constructor accepts the database table we wish to operate on. We’ll be using a single pool for all our models.
We then create a select method which we will use to retrieve items from our database. This method accepts the columns we want to retrieve and a clause, such as a WHERE clause. It returns the result of the query, which is a Promise. Remember we said earlier that every query is executed by a client, but here we execute the query with pool. This is because, when we use pool.query, node-postgres executes the query using the first available idle client.
The query you write is entirely up to you, provided it is a valid SQL statement that can be executed by a Postgres engine.
The next step is to actually create an API endpoint to utilize our newly connected database. Before we do that, I’d like us to create some utility functions. The goal is for us to have a way to perform common database operations from the command line.
Create a folder, utils/ inside the src/ folder. Create three files inside this folder:
queries.js
queryFunctions.js
runQuery.js
We’re going to create functions to create a table in our database, insert seed data in the table, and to delete the table.
Open up queries.js and paste the following code:
export const createMessageTable = `
DROP TABLE IF EXISTS messages;
CREATE TABLE IF NOT EXISTS messages ( id SERIAL PRIMARY KEY, name VARCHAR DEFAULT '', message VARCHAR NOT NULL ) `; export const insertMessages = `
INSERT INTO messages(name, message)
VALUES ('chidimo', 'first message'), ('orji', 'second message')
`; export const dropMessagesTable = 'DROP TABLE messages';
In this file, we define three SQL query strings. The first query deletes and recreates the messages table. The second query inserts two rows into the messages table. Feel free to add more items here. The last query drops/deletes the messages table.
Open queryFunctions.js and paste the following code:
import { pool } from '../models/pool';
import { insertMessages, dropMessagesTable, createMessageTable,
} from './queries'; export const executeQueryArray = async arr => new Promise(resolve => { const stop = arr.length; arr.forEach(async (q, index) => { await pool.query(q); if (index + 1 === stop) resolve(); });
}); export const dropTables = () => executeQueryArray([ dropMessagesTable ]);
export const createTables = () => executeQueryArray([ createMessageTable ]);
export const insertIntoTables = () => executeQueryArray([ insertMessages ]);
Here, we create functions to execute the queries we defined earlier. Note that the executeQueryArray function executes an array of queries and waits for each one to complete inside the loop. (Don’t do such a thing in production code though). Then, we only resolve the promise once we have executed the last query in the list. The reason for using an array is that the number of such queries will grow as the number of tables in our database grows.
Open runQuery.js and paste the following code:
import { createTables, insertIntoTables } from './queryFunctions'; (async () => { await createTables(); await insertIntoTables();
})();
This is where we execute the functions to create the table and insert the messages in the table. Let’s add a command in the scripts section of our package.json to execute this file.
"runQuery": "babel-node ./src/utils/runQuery"
Now run:
yarn runQuery
If you inspect your database, you will see that the messages table has been created and that the messages were inserted into the table.
If you’re using ElephantSQL, on the database details page, click on BROWSER from the left navigation menu. Select the messages table and click Execute. You should see the messages from the queries.js file.
Let’s create a controller and route to display the messages from our database.
Create a new controller file src/controllers/messages.js and paste the following code:
import Model from '../models/model'; const messagesModel = new Model('messages');
export const messagesPage = async (req, res) => { try { const data = await messagesModel.select('name, message'); res.status(200).json({ messages: data.rows }); } catch (err) { res.status(200).json({ messages: err.stack }); }
};
We import our Model class and create a new instance of that model. This represents the messages table in our database. We then use the select method of the model to query our database. The data (name and message) we get is sent as JSON in the response.
We define the messagesPage controller as an async function. Since node-postgres queries return a promise, we await the result of that query. If we encounter an error during the query we catch it and display the stack to the user. You should decide how choose to handle the error.
Add the get messages endpoint to src/routes/index.js and update the import line.
# update the import line
import { indexPage, messagesPage } from '../controllers'; # add the get messages endpoint
indexRouter.get('/messages', messagesPage)
Visit http://localhost:3000/v1/messages and you should see the messages displayed as shown below.
Messages from database. (Large preview)
Now, let’s update our test file. When doing TDD, you usually write your tests before implementing the code that makes the test pass. I’m taking the opposite approach here because we’re still working on setting up the database.
Create a new file, hooks.js in the test/ folder and enter the below code:
import { dropTables, createTables, insertIntoTables,
} from '../src/utils/queryFunctions'; before(async () => { await createTables(); await insertIntoTables();
}); after(async () => { await dropTables();
});
When our test starts, Mocha finds this file and executes it before running any test file. It executes the before hook to create the database and insert some items into it. The test files then run after that. Once the test is finished, Mocha runs the after hook in which we drop the database. This ensures that each time we run our tests, we do so with clean and new records in our database.
Create a new test file test/messages.test.js and add the below code:
import { expect, server, BASE_URL } from './setup';
describe('Messages', () => { it('get messages page', done => { server .get(`${BASE_URL}/messages`) .expect(200) .end((err, res) => { expect(res.status).to.equal(200); expect(res.body.messages).to.be.instanceOf(Array); res.body.messages.forEach(m => { expect(m).to.have.property('name'); expect(m).to.have.property('message'); }); done(); }); });
});
We assert that the result of the call to /messages is an array. For each message object, we assert that it has the name and message property.
The final step in this section is to update the CI files.
Add the following sections to the .travis.yml file:
services: - postgresql
addons: postgresql: "10" apt: packages: - postgresql-10 - postgresql-client-10
before_install: - sudo cp /etc/postgresql/{9.6,10}/main/pg_hba.conf - sudo /etc/init.d/postgresql restart
This instructs Travis to spin up a PostgreSQL 10 database before running our tests.
Add the command to create the database as the first entry in the before_script section:
# add this as the first line in the before_script section - psql -c 'create database testdb;' -U postgres
Create the CONNECTION_STRING environment variable on Travis, and use the below value:
CONNECTION_STRING="postgresql://postgres:postgres@localhost:5432/testdb"
Add the following sections to the .appveyor.yml file:
before_test: - SET PGUSER=postgres - SET PGPASSWORD=Password12! - PATH=C:\Program Files\PostgreSQL\10\bin\;%PATH% - createdb testdb
services: - postgresql101
Add the connection string environment variable to appveyor. Use the below line:
CONNECTION_STRING=postgresql://postgres:Password12!@localhost:5432/testdb
Now commit your changes and push to GitHub. Your tests should pass on both Travis CI and AppVeyor.
Note: I hope everything works fine on your end, but in case you should be having trouble for some reason, you can always check my code in the repo!
Now, let’s see how we can add a message to our database. For this step, we’ll need a way to send POST requests to our URL. I’ll be using Postman to send POST requests.
Let’s go the TDD route and update our test to reflect what we expect to achieve.
Open test/message.test.js and add the below test case:
it('posts messages', done => { const data = { name: 'some name', message: 'new message' }; server .post(`${BASE_URL}/messages`) .send(data) .expect(200) .end((err, res) => { expect(res.status).to.equal(200); expect(res.body.messages).to.be.instanceOf(Array); res.body.messages.forEach(m => { expect(m).to.have.property('id'); expect(m).to.have.property('name', data.name); expect(m).to.have.property('message', data.message); }); done(); });
});
This test makes a POST request to the /v1/messages endpoint and we expect an array to be returned. We also check for the id, name, and message properties on the array.
Run your tests to see that this case fails. Let’s now fix it.
To send post requests, we use the post method of the server. We also send the name and message we want to insert. We expect the response to be an array, with a property id and the other info that makes up the query. The id is proof that a record has been inserted into the database.
Open src/models/model.js and add the insert method:
async insertWithReturn(columns, values) { const query = ` INSERT INTO ${this.table}(${columns}) VALUES (${values}) RETURNING id, ${columns} `; return this.pool.query(query);
}
This is the method that allows us to insert messages into the database. After inserting the item, it returns the id, name and message.
Open src/controllers/messages.js and add the below controller:
export const addMessage = async (req, res) => { const { name, message } = req.body; const columns = 'name, message'; const values = `'${name}', '${message}'`; try { const data = await messagesModel.insertWithReturn(columns, values); res.status(200).json({ messages: data.rows }); } catch (err) { res.status(200).json({ messages: err.stack }); }
};
We destructure the request body to get the name and message. Then we use the values to form an SQL query string which we then execute with the insertWithReturn method of our model.
Add the below POST endpoint to /src/routes/index.js and update your import line.
import { indexPage, messagesPage, addMessage } from '../controllers'; indexRouter.post('/messages', addMessage);
Run your tests to see if they pass.
Open Postman and send a POST request to the messages endpoint. If you’ve just run your test, remember to run yarn query to recreate the messages table.
yarn query
POST request to messages endpoint. (Large preview)
GET request showing newly added message. (Large preview)
Commit your changes and push to GitHub. Your tests should pass on both Travis and AppVeyor. Your test coverage will drop by a few points, but that’s okay.
Middleware
Our discussion of Express won’t be complete without talking about middleware. The Express documentation describes a middlewares as:
“[…] functions that have access to the request object (req), the response object (res), and the next middleware function in the application’s request-response cycle. The next middleware function is commonly denoted by a variable named next.”
A middleware can perform any number of functions such as authentication, modifying the request body, and so on. See the Express documentation on using middleware.
We’re going to write a simple middleware that modifies the request body. Our middleware will append the word SAYS: to the incoming message before it is saved in the database.
Before we start, let’s modify our test to reflect what we want to achieve.
Open up test/messages.test.js and modify the last expect line in the posts message test case:
it('posts messages', done => { ... expect(m).to.have.property('message', `SAYS: ${data.message}`); # update this line ...
});
We’re asserting that the SAYS: string has been appended to the message. Run your tests to make sure this test case fails.
Now, let’s write the code to make the test pass.
Create a new middleware/ folder inside src/ folder. Create two files inside this folder:
middleware.js
index.js
Enter the below code in middleware.js:
export const modifyMessage = (req, res, next) => { req.body.message = `SAYS: ${req.body.message}`; next();
};
Here, we append the string SAYS: to the message in the request body. After doing that, we must call the next() function to pass execution to the next function in the request-response chain. Every middleware has to call the next function to pass execution to the next middleware in the request-response cycle.
Enter the below code in index.js:
# export everything from the middleware file export * from './middleware';
This exports the middleware we have in the /middleware.js file. For now, we only have the modifyMessage middleware.
Open src/routes/index.js and add the middleware to the post message request-response chain.
import { modifyMessage } from '../middleware'; indexRouter.post('/messages', modifyMessage, addMessage);
We can see that the modifyMessage function comes before the addMessage function. We invoke the addMessage function by calling next in the modifyMessage middleware. As an experiment, comment out the next() line in the modifyMessage middle and watch the request hang.
Open Postman and create a new message. You should see the appended string.
Message modified by middleware. (Large preview)
This is a good point to commit our changes.
Error Handling And Asynchronous Middleware
Errors are inevitable in any application. The task before the developer is how to deal with errors as gracefully as possible.
In Express:
“Error Handling refers to how Express catches and processes errors that occur both synchronously and asynchronously.
If we were only writing synchronous functions, we might not have to worry so much about error handling as Express already does an excellent job of handling those. According to the docs:
“Errors that occur in synchronous code inside route handlers and middleware require no extra work.”
But once we start writing asynchronous router handlers and middleware, then we have to do some error handling.
Our modifyMessage middleware is a synchronous function. If an error occurs in that function, Express will handle it just fine. Let’s see how we deal with errors in asynchronous middleware.
Let’s say, before creating a message, we want to get a picture from the Lorem Picsum API using this URL https://picsum.photos/id/0/info. This is an asynchronous operation that could either succeed or fail, and that presents a case for us to deal with.
Start by installing Axios.
# install axios
yarn add axios
Open src/middleware/middleware.js and add the below function:
export const performAsyncAction = async (req, res, next) => { try { await axios.get('https://picsum.photos/id/0/info'); next(); } catch (err) { next(err); }
};
In this async function, we await a call to an API (we don’t actually need the returned data) and afterward call the next function in the request chain. If the request fails, we catch the error and pass it on to next. Once Express sees this error, it skips all other middleware in the chain. If we didn’t call next(err), the request will hang. If we only called next() without err, the request will proceed as if nothing happened and the error will not be caught.
Import this function and add it to the middleware chain of the post messages route:
import { modifyMessage, performAsyncAction } from '../middleware'; indexRouter.post('/messages', modifyMessage, performAsyncAction, addMessage);
Open src/app.js and add the below code just before the export default app line.
app.use((err, req, res, next) => { res.status(400).json({ error: err.stack });
}); export default app;
This is our error handler. According to the Express error handling doc:
“[…] error-handling functions have four arguments instead of three: (err, req, res, next).”
Note that this error handler must come last, after every app.use() call. Once we encounter an error, we return the stack trace with a status code of 400. You could do whatever you like with the error. You might want to log it or send it somewhere.
This is a good place to commit your changes.
Deploy To Heroku
To get started, go to https://www.heroku.com/ and either log in or register.
Download and install the Heroku CLI from here.
Open a terminal in the project folder to run the command.
# login to heroku on command line
heroku login
This will open a browser window and ask you to log into your Heroku account.
Log in to grant your terminal access to your Heroku account, and create a new heroku app by running:
#app name is up to you
heroku create app-name
This will create the app on Heroku and return two URLs.
# app production url and git url
https://app-name.herokuapp.com/ | https://git.heroku.com/app-name.git
Copy the URL on the right and run the below command. Note that this step is optional as you may find that Heroku has already added the remote URL.
# add heroku remote url
git remote add heroku https://git.heroku.com/my-shiny-new-app.git
Open a side terminal and run the command below. This shows you the app log in real-time as shown in the image.
# see process logs
heroku logs --tail
Heroku logs. (Large preview)
Run the following three commands to set the required environment variables:
heroku config:set TEST_ENV_VARIABLE="Environment variable is coming across."
heroku config:set CONNECTION_STRING=your-db-connection-string-here.
heroku config:set NPM_CONFIG_PRODUCTION=false
Remember in our scripts, we set:
"prestart": "babel ./src --out-dir build", "start": "node ./build/bin/www",
To start the app, it needs to be compiled down to ES5 using babel in the prestart step because babel only exists in our development dependencies. We have to set NPM_CONFIG_PRODUCTION to false in order to be able to install those as well.
To confirm everything is set correctly, run the command below. You could also visit the settings tab on the app page and click on Reveal Config Vars.
# check configuration variables
heroku config
Now run git push heroku.
To open the app, run:
# open /v1 route
heroku open /v1 # open /v1/messages route
heroku open /v1/messages
If like me, you’re using the same PostgresSQL database for both development and production, you may find that each time you run your tests, the database is deleted. To recreate it, you could run either one of the following commands:
# run script locally
yarn runQuery # run script with heroku
heroku run yarn runQuery
Continuous Deployment (CD) With Travis
Let’s now add Continuous Deployment (CD) to complete the CI/CD flow. We will be deploying from Travis after every successful test run.
The first step is to install Travis CI. (You can find the installation instructions over here.) After successfully installing the Travis CI, login by running the below command. (Note that this should be done in your project repository.)
# login to travis
travis login --pro # use this if you’re using two factor authentication
travis login --pro --github-token enter-github-token-here
If your project is hosted on travis-ci.org, remove the --pro flag. To get a GitHub token, visit the developer settings page of your account and generate one. This only applies if your account is secured with 2FA.
Open your .travis.yml and add a deploy section:
deploy: provider: heroku app: master: app-name
Here, we specify that we want to deploy to Heroku. The app sub-section specifies that we want to deploy the master branch of our repo to the app-name app on Heroku. It’s possible to deploy different branches to different apps. You can read more about the available options here.
Run the below command to encrypt your Heroku API key and add it to the deploy section:
# encrypt heroku API key and add to .travis.yml
travis encrypt $(heroku auth:token) --add deploy.api_key --pro
This will add the below sub-section to the deploy section.
api_key: secure: very-long-encrypted-api-key-string
Now commit your changes and push to GitHub while monitoring your logs. You will see the build triggered as soon as the Travis test is done. In this way, if we have a failing test, the changes would never be deployed. Likewise, if the build failed, the whole test run would fail. This completes the CI/CD flow.
The corresponding branch in my repo is 11-cd.
Conclusion
If you’ve made it this far, I say, “Thumbs up!” In this tutorial, we successfully set up a new Express project. We went ahead to configure development dependencies as well as Continuous Integration (CI). We then wrote asynchronous functions to handle requests to our API endpoints — completed with tests. We then looked briefly at error handling. Finally, we deployed our project to Heroku and configured Continuous Deployment.
You now have a template for your next back-end project. We’ve only done enough to get you started, but you should keep learning to keep going. Be sure to check out the Express.js docs as well. If you would rather use MongoDB instead of PostgreSQL, I have a template here that does exactly that. You can check it out for the setup. It has only a few points of difference.
Resources
“Create Express API Backend With MongoDB ,” Orji Chidi Matthew, GitHub
“A Short Guide To Connect Middleware,” Stephen Sugden
“Express API template,” GitHub
“AppVeyor vs Travis CI,” StackShare
“The Heroku CLI,” Heroku Dev Center
“Heroku Deployment,” Travis CI
“Using middleware,” Express.js
“Error Handling,” Express.js
“Getting Started,” Mocha
nyc (GitHub)
ElephantSQL
Postman
Express
Travis CI
Code Climate
PostgreSQL
pgAdmin
(ks, yk, il)
Website Design & SEO Delray Beach by DBL07.co
Delray Beach SEO
source http://www.scpie.org/how-to-set-up-an-express-api-backend-project-with-postgresql/
source https://scpie1.blogspot.com/2020/04/how-to-set-up-express-api-backend.html
0 notes
Text
How To Set Up An Express API Backend Project With PostgreSQL
About The Author
Awesome frontend developer who loves everything coding. I’m a lover of choral music and I’m working to make it more accessible to the world, one upload at a …
More about
Chidi
…
In this article, we will create a set of API endpoints using Express from scratch in ES6 syntax, and cover some development best practices. Find out how all the pieces work together as you create a small project using Continuous Integration and Test-Driven Development before deploying to Heroku.
We will take a Test-Driven Development (TDD) approach and the set up Continuous Integration (CI) job to automatically run our tests on Travis CI and AppVeyor, complete with code quality and coverage reporting. We will learn about controllers, models (with PostgreSQL), error handling, and asynchronous Express middleware. Finally, we’ll complete the CI/CD pipeline by configuring automatic deploy on Heroku.
It sounds like a lot, but this tutorial is aimed at beginners who are ready to try their hands on a back-end project with some level of complexity, and who may still be confused as to how all the pieces fit together in a real project.
It is robust without being overwhelming and is broken down into sections that you can complete in a reasonable length of time.
Getting Started
The first step is to create a new directory for the project and start a new node project. Node is required to continue with this tutorial. If you don’t have it installed, head over to the official website, download, and install it before continuing.
I will be using yarn as my package manager for this project. There are installation instructions for your specific operating system here. Feel free to use npm if you like.
Open your terminal, create a new directory, and start a Node.js project.
# create a new directory mkdir express-api-template # change to the newly-created directory cd express-api-template # initialize a new Node.js project npm init
Answer the questions that follow to generate a package.json file. This file holds information about your project. Example of such information includes what dependencies it uses, the command to start the project, and so on.
You may now open the project folder in your editor of choice. I use visual studio code. It’s a free IDE with tons of plugins to make your life easier, and it’s available for all major platforms. You can download it from the official website.
Create the following files in the project folder:
README.md
.editorconfig
Here’s a description of what .editorconfig does from the EditorConfig website. (You probably don’t need it if you’re working solo, but it does no harm, so I’ll leave it here.)
“EditorConfig helps maintain consistent coding styles for multiple developers working on the same project across various editors and IDEs.”
Open .editorconfig and paste the following code:
root = true [*] indent_style = space indent_size = 2 charset = utf-8 trim_trailing_whitespace = false insert_final_newline = true
The [*] means that we want to apply the rules that come under it to every file in the project. We want an indent size of two spaces and UTF-8 character set. We also want to trim trailing white space and insert a final empty line in our file.
Open README.md and add the project name as a first-level element.
# Express API template
Let’s add version control right away.
# initialize the project folder as a git repository git init
Create a .gitignore file and enter the following lines:
node_modules/ yarn-error.log .env .nyc_output coverage build/
These are all the files and folders we don’t want to track. We don’t have them in our project yet, but we’ll see them as we proceed.
At this point, you should have the following folder structure.
EXPRESS-API-TEMPLATE ├── .editorconfig ├── .gitignore ├── package.json └── README.md
I consider this to be a good point to commit my changes and push them to GitHub.
Starting A New Express Project
Express is a Node.js framework for building web applications. According to the official website, it is a
Fast, unopinionated, minimalist web framework for Node.js.
There are other great web application frameworks for Node.js, but Express is very popular, with over 47k GitHub stars at the time of this writing.
In this article, we will not be having a lot of discussions about all the parts that make up Express. For that discussion, I recommend you check out Jamie’s series. The first part is here, and the second part is here.
Install Express and start a new Express project. It’s possible to manually set up an Express server from scratch but to make our life easier we’ll use the express-generator to set up the app skeleton.
# install the express generator globally yarn global add express-generator # install express yarn add express # generate the express project in the current folder express -f
The -f flag forces Express to create the project in the current directory.
We’ll now perform some house-cleaning operations.
Delete the file index/users.js.
Delete the folders public/ and views/.
Rename the file bin/www to bin/www.js.
Uninstall jade with the command yarn remove jade.
Create a new folder named src/ and move the following inside it:
1. app.js file
2. bin/ folder
3. routes/ folder inside.
Open up package.json and update the start script to look like below.
"start": "node ./src/bin/www"
At this point, your project folder structure looks like below. You can see how VS Code highlights the file changes that have taken place.
EXPRESS-API-TEMPLATE ├── node_modules ├── src | ├── bin │ │ ├── www.js │ ├── routes │ | ├── index.js │ └── app.js ├── .editorconfig ├── .gitignore ├── package.json ├── README.md └── yarn.lock
Open src/app.js and replace the content with the below code.
var logger = require('morgan'); var express = require('express'); var cookieParser = require('cookie-parser'); var indexRouter = require('./routes/index'); var app = express(); app.use(logger('dev')); app.use(express.json()); app.use(express.urlencoded({ extended: true })); app.use(cookieParser()); app.use('/v1', indexRouter); module.exports = app;
After requiring some libraries, we instruct Express to handle every request coming to /v1 with indexRouter.
Replace the content of routes/index.js with the below code:
var express = require('express'); var router = express.Router(); router.get('/', function(req, res, next) { return res.status(200).json({ message: 'Welcome to Express API template' }); }); module.exports = router;
We grab Express, create a router from it and serve the / route, which returns a status code of 200 and a JSON message.
Start the app with the below command:
# start the app yarn start
If you’ve set up everything correctly you should only see $ node ./src/bin/www in your terminal.
Visit http://localhost:3000/v1 in your browser. You should see the following message:
{ "message": "Welcome to Express API template" }
This is a good point to commit our changes.
Converting Our Code To ES6
The code generated by express-generator is in ES5, but in this article, we will be writing all our code in ES6 syntax. So, let’s convert our existing code to ES6.
Replace the content of routes/index.js with the below code:
import express from 'express'; const indexRouter = express.Router(); indexRouter.get('/', (req, res) => res.status(200).json({ message: 'Welcome to Express API template' }) ); export default indexRouter;
It is the same code as we saw above, but with the import statement and an arrow function in the / route handler.
Replace the content of src/app.js with the below code:
import logger from 'morgan'; import express from 'express'; import cookieParser from 'cookie-parser'; import indexRouter from './routes/index'; const app = express(); app.use(logger('dev')); app.use(express.json()); app.use(express.urlencoded({ extended: true })); app.use(cookieParser()); app.use('/v1', indexRouter); export default app;
Let’s now take a look at the content of src/bin/www.js. We will build it incrementally. Delete the content of src/bin/www.js and paste in the below code block.
#!/usr/bin/env node /** * Module dependencies. */ import debug from 'debug'; import http from 'http'; import app from '../app'; /** * Normalize a port into a number, string, or false. */ const normalizePort = val => { const port = parseInt(val, 10); if (Number.isNaN(port)) { // named pipe return val; } if (port >= 0) { // port number return port; } return false; }; /** * Get port from environment and store in Express. */ const port = normalizePort(process.env.PORT || '3000'); app.set('port', port); /** * Create HTTP server. */ const server = http.createServer(app); // next code block goes here
This code checks if a custom port is specified in the environment variables. If none is set the default port value of 3000 is set on the app instance, after being normalized to either a string or a number by normalizePort. The server is then created from the http module, with app as the callback function.
The #!/usr/bin/env node line is optional since we would specify node when we want to execute this file. But make sure it is on line 1 of src/bin/www.js file or remove it completely.
Let’s take a look at the error handling function. Copy and paste this code block after the line where the server is created.
/** * Event listener for HTTP server "error" event. */ const onError = error => { if (error.syscall !== 'listen') { throw error; } const bind = typeof port === 'string' ? `Pipe ${port}` : `Port ${port}`; // handle specific listen errors with friendly messages switch (error.code) { case 'EACCES': alert(`${bind} requires elevated privileges`); process.exit(1); break; case 'EADDRINUSE': alert(`${bind} is already in use`); process.exit(1); break; default: throw error; } }; /** * Event listener for HTTP server "listening" event. */ const onListening = () => { const addr = server.address(); const bind = typeof addr === 'string' ? `pipe ${addr}` : `port ${addr.port}`; debug(`Listening on ${bind}`); }; /** * Listen on provided port, on all network interfaces. */ server.listen(port); server.on('error', onError); server.on('listening', onListening);
The onError function listens for errors in the http server and displays appropriate error messages. The onListening function simply outputs the port the server is listening on to the console. Finally, the server listens for incoming requests at the specified address and port.
At this point, all our existing code is in ES6 syntax. Stop your server (use Ctrl + C) and run yarn start. You’ll get an error SyntaxError: Invalid or unexpected token. This happens because Node (at the time of writing) doesn’t support some of the syntax we’ve used in our code.
We’ll now fix that in the following section.
Configuring Development Dependencies: babel, nodemon, eslint, And prettier
It’s time to set up most of the scripts we’re going to need at this phase of the project.
Install the required libraries with the below commands. You can just copy everything and paste it in your terminal. The comment lines will be skipped.
# install babel scripts yarn add @babel/cli @babel/core @babel/plugin-transform-runtime @babel/preset-env @babel/register @babel/runtime @babel/node --dev
This installs all the listed babel scripts as development dependencies. Check your package.json file and you should see a devDependencies section. All the installed scripts will be listed there.
The babel scripts we’re using are explained below:
@babel/cli A required install for using babel. It allows the use of Babel from the terminal and is available as ./node_modules/.bin/babel. @babel/core Core Babel functionality. This is a required installation. @babel/node This works exactly like the Node.js CLI, with the added benefit of compiling with babel presets and plugins. This is required for use with nodemon. @babel/plugin-transform-runtime This helps to avoid duplication in the compiled output. @babel/preset-env A collection of plugins that are responsible for carrying out code transformations. @babel/register This compiles files on the fly and is specified as a requirement during tests. @babel/runtime This works in conjunction with @babel/plugin-transform-runtime.
Create a file named .babelrc at the root of your project and add the following code:
{ "presets": ["@babel/preset-env"], "plugins": ["@babel/transform-runtime"] }
Let’s install nodemon
# install nodemon yarn add nodemon --dev
nodemon is a library that monitors our project source code and automatically restarts our server whenever it observes any changes.
Create a file named nodemon.json at the root of your project and add the code below:
{ "watch": [ "package.json", "nodemon.json", ".eslintrc.json", ".babelrc", ".prettierrc", "src/" ], "verbose": true, "ignore": ["*.test.js", "*.spec.js"] }
The watch key tells nodemon which files and folders to watch for changes. So, whenever any of these files changes, nodemon restarts the server. The ignore key tells it the files not to watch for changes.
Now update the scripts section of your package.json file to look like the following:
# build the content of the src folder "prestart": "babel ./src --out-dir build" # start server from the build folder "start": "node ./build/bin/www" # start server in development mode "startdev": "nodemon --exec babel-node ./src/bin/www"
prestart scripts builds the content of the src/ folder and puts it in the build/ folder. When you issue the yarn start command, this script runs first before the start script.
start script now serves the content of the build/ folder instead of the src/ folder we were serving previously. This is the script you’ll use when serving the file in production. In fact, services like Heroku automatically run this script when you deploy.
yarn startdev is used to start the server during development. From now on we will be using this script as we develop the app. Notice that we’re now using babel-node to run the app instead of regular node. The --exec flag forces babel-node to serve the src/ folder. For the start script, we use node since the files in the build/ folder have been compiled to ES5.
Run yarn startdev and visit http://localhost:3000/v1. Your server should be up and running again.
The final step in this section is to configure ESLint and prettier. ESLint helps with enforcing syntax rules while prettier helps for formatting our code properly for readability.
Add both of them with the command below. You should run this on a separate terminal while observing the terminal where our server is running. You should see the server restarting. This is because we’re monitoring package.json file for changes.
# install elsint and prettier yarn add eslint eslint-config-airbnb-base eslint-plugin-import prettier --dev
Now create the .eslintrc.json file in the project root and add the below code:
{ "env": { "browser": true, "es6": true, "node": true, "mocha": true }, "extends": ["airbnb-base"], "globals": { "Atomics": "readonly", "SharedArrayBuffer": "readonly" }, "parserOptions": { "ecmaVersion": 2018, "sourceType": "module" }, "rules": { "indent": ["warn", 2], "linebreak-style": ["error", "unix"], "quotes": ["error", "single"], "semi": ["error", "always"], "no-console": 1, "comma-dangle": [0], "arrow-parens": [0], "object-curly-spacing": ["warn", "always"], "array-bracket-spacing": ["warn", "always"], "import/prefer-default-export": [0] } }
This file mostly defines some rules against which eslint will check our code. You can see that we’re extending the style rules used by Airbnb.
In the "rules" section, we define whether eslint should show a warning or an error when it encounters certain violations. For instance, it shows a warning message on our terminal for any indentation that does not use 2 spaces. A value of [0] turns off a rule, which means that we won’t get a warning or an error if we violate that rule.
Create a file named .prettierrc and add the code below:
{ "trailingComma": "es5", "tabWidth": 2, "semi": true, "singleQuote": true }
We’re setting a tab width of 2 and enforcing the use of single quotes throughout our application. Do check the prettier guide for more styling options.
Now add the following scripts to your package.json:
# add these one after the other "lint": "./node_modules/.bin/eslint ./src" "pretty": "prettier --write '**/*.{js,json}' '!node_modules/**'" "postpretty": "yarn lint --fix"
Run yarn lint. You should see a number of errors and warnings in the console.
The pretty command prettifies our code. The postpretty command is run immediately after. It runs the lint command with the --fix flag appended. This flag tells ESLint to automatically fix common linting issues. In this way, I mostly run the yarn pretty command without bothering about the lint command.
Run yarn pretty. You should see that we have only two warnings about the presence of alert in the bin/www.js file.
Here’s what our project structure looks like at this point.
EXPRESS-API-TEMPLATE ├── build ├── node_modules ├── src | ├── bin │ │ ├── www.js │ ├── routes │ | ├── index.js │ └── app.js ├── .babelrc ├── .editorconfig ├── .eslintrc.json ├── .gitignore ├── .prettierrc ├── nodemon.json ├── package.json ├── README.md └── yarn.lock
You may find that you have an additional file, yarn-error.log in your project root. Add it to .gitignore file. Commit your changes.
Settings And Environment Variables In Our .env File
In nearly every project, you’ll need somewhere to store settings that will be used throughout your app e.g. an AWS secret key. We store such settings as environment variables. This keeps them away from prying eyes, and we can use them within our application as needed.
I like having a settings.js file with which I read all my environment variables. Then, I can refer to the settings file from anywhere within my app. You’re at liberty to name this file whatever you want, but there’s some kind of consensus about naming such files settings.js or config.js.
For our environment variables, we’ll keep them in a .env file and read them into our settings file from there.
Create the .env file at the root of your project and enter the below line:
TEST_ENV_VARIABLE="Environment variable is coming across"
To be able to read environment variables into our project, there’s a nice library, dotenv that reads our .env file and gives us access to the environment variables defined inside. Let’s install it.
# install dotenv yarn add dotenv
Add the .env file to the list of files being watched by nodemon.
Now, create the settings.js file inside the src/ folder and add the below code:
import dotenv from 'dotenv'; dotenv.config(); export const testEnvironmentVariable = process.env.TEST_ENV_VARIABLE;
We import the dotenv package and call its config method. We then export the testEnvironmentVariable which we set in our .env file.
Open src/routes/index.js and replace the code with the one below.
import express from 'express'; import { testEnvironmentVariable } from '../settings'; const indexRouter = express.Router(); indexRouter.get('/', (req, res) => res.status(200).json({ message: testEnvironmentVariable })); export default indexRouter;
The only change we’ve made here is that we import testEnvironmentVariable from our settings file and use is as the return message for a request from the / route.
Visit http://localhost:3000/v1 and you should see the message, as shown below.
{ "message": "Environment variable is coming across." }
And that’s it. From now on we can add as many environment variables as we want and we can export them from our settings.js file.
This is a good point to commit your code. Remember to prettify and lint your code.
Writing Our First Test
It’s time to incorporate testing into our app. One of the things that give the developer confidence in their code is tests. I’m sure you’ve seen countless articles on the web preaching Test-Driven Development (TDD). It cannot be emphasized enough that your code needs some measure of testing. TDD is very easy to follow when you’re working with Express.js.
In our tests, we will make calls to our API endpoints and check to see if what is returned is what we expect.
Install the required dependencies:
# install dependencies yarn add mocha chai nyc sinon-chai supertest coveralls --dev
Each of these libraries has its own role to play in our tests.
mocha test runner chai used to make assertions nyc collect test coverage report sinon-chai extends chai’s assertions supertest used to make HTTP calls to our API endpoints coveralls for uploading test coverage to coveralls.io
Create a new test/ folder at the root of your project. Create two files inside this folder:
test/setup.js
test/index.test.js
Mocha will find the test/ folder automatically.
Open up test/setup.js and paste the below code. This is just a helper file that helps us organize all the imports we need in our test files.
import supertest from 'supertest'; import chai from 'chai'; import sinonChai from 'sinon-chai'; import app from '../src/app'; chai.use(sinonChai); export const { expect } = chai; export const server = supertest.agent(app); export const BASE_URL = '/v1';
This is like a settings file, but for our tests. This way we don’t have to initialize everything inside each of our test files. So we import the necessary packages and export what we initialized — which we can then import in the files that need them.
Open up index.test.js and paste the following test code.
import { expect, server, BASE_URL } from './setup'; describe('Index page test', () => { it('gets base url', done => { server .get(`${BASE_URL}/`) .expect(200) .end((err, res) => { expect(res.status).to.equal(200); expect(res.body.message).to.equal( 'Environment variable is coming across.' ); done(); }); }); });
Here we make a request to get the base endpoint, which is / and assert that the res.body object has a message key with a value of Environment variable is coming across.
If you’re not familiar with the describe, it pattern, I encourage you to take a quick look at Mocha’s “Getting Started” doc.
Add the test command to the scripts section of package.json.
"test": "nyc --reporter=html --reporter=text --reporter=lcov mocha -r @babel/register"
This script executes our test with nyc and generates three kinds of coverage report: an HTML report, outputted to the coverage/ folder; a text report outputted to the terminal and an lcov report outputted to the .nyc_output/ folder.
Now run yarn test. You should see a text report in your terminal just like the one in the below photo.
Test coverage report (Large preview)
Notice that two additional folders are generated:
.nyc_output/
coverage/
Look inside .gitignore and you’ll see that we’re already ignoring both. I encourage you to open up coverage/index.html in a browser and view the test report for each file.
This is a good point to commit your changes.
Continuous Integration(CD) And Badges: Travis, Coveralls, Code Climate, AppVeyor
It’s now time to configure continuous integration and deployment (CI/CD) tools. We will configure common services such as travis-ci, coveralls, AppVeyor, and codeclimate and add badges to our README file.
Let’s get started.
Travis CI
Travis CI is a tool that runs our tests automatically each time we push a commit to GitHub (and recently, Bitbucket) and each time we create a pull request. This is mostly useful when making pull requests by showing us if the our new code has broken any of our tests.
Visit travis-ci.com or travis-ci.org and create an account if you don’t have one. You have to sign up with your GitHub account.
Hover over the dropdown arrow next to your profile picture and click on settings.
Under Repositories tab click Manage repositories on Github to be redirected to Github.
On the GitHub page, scroll down to Repository access and click the checkbox next to Only select repositories.
Click the Select repositories dropdown and find the express-api-template repo. Click it to add it to the list of repositories you want to add to travis-ci.
Click Approve and install and wait to be redirected back to travis-ci.
At the top of the repo page, close to the repo name, click on the build unknown icon. From the Status Image modal, select markdown from the format dropdown.
Copy the resulting code and paste it in your README.md file.
On the project page, click on More options > Settings. Under Environment Variables section, add the TEST_ENV_VARIABLE env variable. When entering its value, be sure to have it within double quotes like this "Environment variable is coming across."
Create .travis.yml file at the root of your project and paste in the below code (We’ll set the value of CC_TEST_REPORTER_ID in the Code Climate section).
language: node_js env: global: - CC_TEST_REPORTER_ID=get-this-from-code-climate-repo-page matrix: include: - node_js: '12' cache: directories: [node_modules] install: yarn after_success: yarn coverage before_script: - curl -L https://codeclimate.com/downloads/test-reporter/test-reporter-latest-linUX-amd64 > ./cc-test-reporter - chmod +x ./cc-test-reporter - ./cc-test-reporter before-build script: - yarn test after_script: - ./cc-test-reporter after-build --exit-code $TRAVIS_TEST_RESUL
First, we tell Travis to run our test with Node.js, then set the CC_TEST_REPORTER_ID global environment variable (we’ll get to this in the Code Climate section). In the matrix section, we tell Travis to run our tests with Node.js v12. We also want to cache the node_modules/ directory so it doesn’t have to be regenerated every time.
We install our dependencies using the yarn command which is a shorthand for yarn install. The before_script and after_script commands are used to upload coverage results to codeclimate. We’ll configure codeclimate shortly. After yarn test runs successfully, we want to also run yarn coverage which will upload our coverage report to coveralls.io.
Coveralls
Coveralls uploads test coverage data for easy visualization. We can view the test coverage on our local machine from the coverage folder, but Coveralls makes it available outside our local machine.
Visit coveralls.io and either sign in or sign up with your Github account.
Hover over the left-hand side of the screen to reveal the navigation menu. Click on ADD REPOS.
Search for the express-api-template repo and turn on coverage using the toggle button on the left-hand side. If you can’t find it, click on SYNC REPOS on the upper right-hand corner and try again. Note that your repo has to be public, unless you have a PRO account.
Click details to go to the repo details page.
Create the .coveralls.yml file at the root of your project and enter the below code. To get the repo_token, click on the repo details. You will find it easily on that page. You could just do a browser search for repo_token.
repo_token: get-this-from-repo-settings-on-coveralls.io
This token maps your coverage data to a repo on Coveralls. Now, add the coverage command to the scripts section of your package.json file:
"coverage": "nyc report --reporter=text-lcov | coveralls"
This command uploads the coverage report in the .nyc_output folder to coveralls.io. Turn on your Internet connection and run:
yarn coverage
This should upload the existing coverage report to coveralls. Refresh the repo page on coveralls to see the full report.
On the details page, scroll down to find the BADGE YOUR REPO section. Click on the EMBED dropdown and copy the markdown code and paste it into your README file.
Code Climate
Code Climate is a tool that helps us measure code quality. It shows us maintenance metrics by checking our code against some defined patterns. It detects things such as unnecessary repetition and deeply nested for loops. It also collects test coverage data just like coveralls.io.
Visit codeclimate.com and click on ‘Sign up with GitHub’. Log in if you already have an account.
Once in your dashboard, click on Add a repository.
Find the express-api-template repo from the list and click on Add Repo.
Wait for the build to complete and redirect to the repo dashboard.
Under Codebase Summary, click on Test Coverage. Under the Test coverage menu, copy the TEST REPORTER ID and paste it in your .travis.yml as the value of CC_TEST_REPORTER_ID.
Still on the same page, on the left-hand navigation, under EXTRAS, click on Badges. Copy the maintainability and test coverage badges in markdown format and paste them into your README.md file.
It’s important to note that there are two ways of configuring maintainability checks. There are the default settings that are applied to every repo, but if you like, you could provide a .codeclimate.yml file at the root of your project. I’ll be using the default settings, which you can find under the Maintainability tab of the repo settings page. I encourage you to take a look at least. If you still want to configure your own settings, this guide will give you all the information you need.
AppVeyor
AppVeyor and Travis CI are both automated test runners. The main difference is that travis-ci runs tests in a LinUX environment while AppVeyor runs tests in a Windows environment. This section is included to show how to get started with AppVeyor.
Visit AppVeyor and log in or sign up.
On the next page, click on NEW PROJECT.
From the repo list, find the express-api-template repo. Hover over it and click ADD.
Click on the Settings tab. Click on Environment on the left navigation. Add TEST_ENV_VARIABLE and its value. Click ‘Save’ at the bottom of the page.
Create the appveyor.yml file at the root of your project and paste in the below code.
environment: matrix: - nodejs_version: "12" install: - yarn test_script: - yarn test build: off
This code instructs AppVeyor to run our tests using Node.js v12. We then install our project dependencies with the yarn command. test_script specifies the command to run our test. The last line tells AppVeyor not to create a build folder.
Click on the Settings tab. On the left-hand navigation, click on badges. Copy the markdown code and paste it in your README.md file.
Commit your code and push to GitHub. If you have done everything as instructed all tests should pass and you should see your shiny new badges as shown below. Check again that you have set the environment variables on Travis and AppVeyor.
Repo CI/CD badges. (Large preview)
Now is a good time to commit our changes.
The corresponding branch in my repo is 05-ci.
Adding A Controller
Currently, we’re handling the GET request to the root URL, /v1, inside the src/routes/index.js. This works as expected and there is nothing wrong with it. However, as your application grows, you want to keep things tidy. You want concerns to be separated — you want a clear separation between the code that handles the request and the code that generates the response that will be sent back to the client. To achieve this, we write controllers. Controllers are simply functions that handle requests coming through a particular URL.
To get started, create a controllers/ folder inside the src/ folder. Inside controllers create two files: index.js and home.js. We would export our functions from within index.js. You could name home.js anything you want, but typically you want to name controllers after what they control. For example, you might have a file usersController.js to hold every function related to users in your app.
Open src/controllers/home.js and enter the code below:
import { testEnvironmentVariable } from '../settings'; export const indexPage = (req, res) => res.status(200).json({ message: testEnvironmentVariable });
You will notice that we only moved the function that handles the request for the / route.
Open src/controllers/index.js and enter the below code.
// export everything from home.js export * from './home';
We export everything from the home.js file. This allows us shorten our import statements to import { indexPage } from '../controllers';
Open src/routes/index.js and replace the code there with the one below:
import express from 'express'; import { indexPage } from '../controllers'; const indexRouter = express.Router(); indexRouter.get('/', indexPage); export default indexRouter;
The only change here is that we’ve provided a function to handle the request to the / route.
You just successfully wrote your first controller. From here it’s a matter of adding more files and functions as needed.
Go ahead and play with the app by adding a few more routes and controllers. You could add a route and a controller for the about page. Remember to update your test, though.
Run yarn test to confirm that we’ve not broken anything. Does your test pass? That’s cool.
This is a good point to commit our changes.
Connecting The PostgreSQL Database And Writing A Model
Our controller currently returns hard-coded text messages. In a real-world app, we often need to store and retrieve information from a database. In this section, we will connect our app to a PostgreSQL database.
We’re going to implement the storage and retrieval of simple text messages using a database. We have two options for setting a database: we could provision one from a cloud server, or we could set up our own locally.
I would recommend you provision a database from a cloud server. ElephantSQL has a free plan that gives 20MB of free storage which is sufficient for this tutorial. Visit the site and click on Get a managed database today. Create an account (if you don’t have one) and follow the instructions to create a free plan. Take note of the URL on the database details page. We’ll be needing it soon.
ElephantSQL turtle plan details page (Large preview)
If you would rather set up a database locally, you should visit the PostgreSQL and PgAdmin sites for further instructions.
Once we have a database set up, we need to find a way to allow our Express app to communicate with our database. Node.js by default doesn’t support reading and writing to PostgreSQL database, so we’ll be using an excellent library, appropriately named, node-postgres.
node-postgres executes SQL queries in node and returns the result as an object, from which we can grab items from the rows key.
Let’s connect node-postgres to our application.
# install node-postgres yarn add pg
Open settings.js and add the line below:
export const connectionString = process.env.CONNECTION_STRING;
Open your .env file and add the CONNECTION_STRING variable. This is the connection string we’ll be using to establish a connection to our database. The general form of the connection string is shown below.
CONNECTION_STRING="postgresql://dbuser:dbpassword@localhost:5432/dbname"
If you’re using elephantSQL you should copy the URL from the database details page.
Inside your /src folder, create a new folder called models/. Inside this folder, create two files:
pool.js
model.js
Open pools.js and paste the following code:
import { Pool } from 'pg'; import dotenv from 'dotenv'; import { connectionString } from '../settings'; dotenv.config(); export const pool = new Pool({ connectionString });
First, we import the Pool and dotenv from the pg and dotenv packages, and then import the settings we created for our postgres database before initializing dotenv. We establish a connection to our database with the Pool object. In node-postgres, every query is executed by a client. A Pool is a collection of clients for communicating with the database.
To create the connection, the pool constructor takes a config object. You can read more about all the possible configurations here. It also accepts a single connection string, which I will use here.
Open model.js and paste the following code:
import { pool } from './pool'; class Model { constructor(table) { this.pool = pool; this.table = table; this.pool.on('error', (err, client) => `Error, ${err}, on idle client${client}`); } async select(columns, clause) { let query = `SELECT ${columns} FROM ${this.table}`; if (clause) query += clause; return this.pool.query(query); } } export default Model;
We create a model class whose constructor accepts the database table we wish to operate on. We’ll be using a single pool for all our models.
We then create a select method which we will use to retrieve items from our database. This method accepts the columns we want to retrieve and a clause, such as a WHERE clause. It returns the result of the query, which is a Promise. Remember we said earlier that every query is executed by a client, but here we execute the query with pool. This is because, when we use pool.query, node-postgres executes the query using the first available idle client.
The query you write is entirely up to you, provided it is a valid SQL statement that can be executed by a Postgres engine.
The next step is to actually create an API endpoint to utilize our newly connected database. Before we do that, I’d like us to create some utility functions. The goal is for us to have a way to perform common database operations from the command line.
Create a folder, utils/ inside the src/ folder. Create three files inside this folder:
queries.js
queryFunctions.js
runQuery.js
We’re going to create functions to create a table in our database, insert seed data in the table, and to delete the table.
Open up queries.js and paste the following code:
export const createMessageTable = ` DROP TABLE IF EXISTS messages; CREATE TABLE IF NOT EXISTS messages ( id SERIAL PRIMARY KEY, name VARCHAR DEFAULT '', message VARCHAR NOT NULL ) `; export const insertMessages = ` INSERT INTO messages(name, message) VALUES ('chidimo', 'first message'), ('orji', 'second message') `; export const dropMessagesTable = 'DROP TABLE messages';
In this file, we define three SQL query strings. The first query deletes and recreates the messages table. The second query inserts two rows into the messages table. Feel free to add more items here. The last query drops/deletes the messages table.
Open queryFunctions.js and paste the following code:
import { pool } from '../models/pool'; import { insertMessages, dropMessagesTable, createMessageTable, } from './queries'; export const executeQueryArray = async arr => new Promise(resolve => { const stop = arr.length; arr.forEach(async (q, index) => { await pool.query(q); if (index + 1 === stop) resolve(); }); }); export const dropTables = () => executeQueryArray([ dropMessagesTable ]); export const createTables = () => executeQueryArray([ createMessageTable ]); export const insertIntoTables = () => executeQueryArray([ insertMessages ]);
Here, we create functions to execute the queries we defined earlier. Note that the executeQueryArray function executes an array of queries and waits for each one to complete inside the loop. (Don’t do such a thing in production code though). Then, we only resolve the promise once we have executed the last query in the list. The reason for using an array is that the number of such queries will grow as the number of tables in our database grows.
Open runQuery.js and paste the following code:
import { createTables, insertIntoTables } from './queryFunctions'; (async () => { await createTables(); await insertIntoTables(); })();
This is where we execute the functions to create the table and insert the messages in the table. Let’s add a command in the scripts section of our package.json to execute this file.
"runQuery": "babel-node ./src/utils/runQuery"
Now run:
yarn runQuery
If you inspect your database, you will see that the messages table has been created and that the messages were inserted into the table.
If you’re using ElephantSQL, on the database details page, click on BROWSER from the left navigation menu. Select the messages table and click Execute. You should see the messages from the queries.js file.
Let’s create a controller and route to display the messages from our database.
Create a new controller file src/controllers/messages.js and paste the following code:
import Model from '../models/model'; const messagesModel = new Model('messages'); export const messagesPage = async (req, res) => { try { const data = await messagesModel.select('name, message'); res.status(200).json({ messages: data.rows }); } catch (err) { res.status(200).json({ messages: err.stack }); } };
We import our Model class and create a new instance of that model. This represents the messages table in our database. We then use the select method of the model to query our database. The data (name and message) we get is sent as JSON in the response.
We define the messagesPage controller as an async function. Since node-postgres queries return a promise, we await the result of that query. If we encounter an error during the query we catch it and display the stack to the user. You should decide how choose to handle the error.
Add the get messages endpoint to src/routes/index.js and update the import line.
# update the import line import { indexPage, messagesPage } from '../controllers'; # add the get messages endpoint indexRouter.get('/messages', messagesPage)
Visit http://localhost:3000/v1/messages and you should see the messages displayed as shown below.
Messages from database. (Large preview)
Now, let’s update our test file. When doing TDD, you usually write your tests before implementing the code that makes the test pass. I’m taking the opposite approach here because we’re still working on setting up the database.
Create a new file, hooks.js in the test/ folder and enter the below code:
import { dropTables, createTables, insertIntoTables, } from '../src/utils/queryFunctions'; before(async () => { await createTables(); await insertIntoTables(); }); after(async () => { await dropTables(); });
When our test starts, Mocha finds this file and executes it before running any test file. It executes the before hook to create the database and insert some items into it. The test files then run after that. Once the test is finished, Mocha runs the after hook in which we drop the database. This ensures that each time we run our tests, we do so with clean and new records in our database.
Create a new test file test/messages.test.js and add the below code:
import { expect, server, BASE_URL } from './setup'; describe('Messages', () => { it('get messages page', done => { server .get(`${BASE_URL}/messages`) .expect(200) .end((err, res) => { expect(res.status).to.equal(200); expect(res.body.messages).to.be.instanceOf(Array); res.body.messages.forEach(m => { expect(m).to.have.property('name'); expect(m).to.have.property('message'); }); done(); }); }); });
We assert that the result of the call to /messages is an array. For each message object, we assert that it has the name and message property.
The final step in this section is to update the CI files.
Add the following sections to the .travis.yml file:
services: - postgresql addons: postgresql: "10" apt: packages: - postgresql-10 - postgresql-client-10 before_install: - sudo cp /etc/postgresql/{9.6,10}/main/pg_hba.conf - sudo /etc/init.d/postgresql restart
This instructs Travis to spin up a PostgreSQL 10 database before running our tests.
Add the command to create the database as the first entry in the before_script section:
# add this as the first line in the before_script section - psql -c 'create database testdb;' -U postgres
Create the CONNECTION_STRING environment variable on Travis, and use the below value:
CONNECTION_STRING="postgresql://postgres:postgres@localhost:5432/testdb"
Add the following sections to the .appveyor.yml file:
before_test: - SET PGUSER=postgres - SET PGPASSWORD=Password12! - PATH=C:\Program Files\PostgreSQL\10\bin\;%PATH% - createdb testdb services: - postgresql101
Add the connection string environment variable to appveyor. Use the below line:
CONNECTION_STRING=postgresql://postgres:Password12!@localhost:5432/testdb
Now commit your changes and push to GitHub. Your tests should pass on both Travis CI and AppVeyor.
Note: I hope everything works fine on your end, but in case you should be having trouble for some reason, you can always check my code in the repo!
Now, let’s see how we can add a message to our database. For this step, we’ll need a way to send POST requests to our URL. I’ll be using Postman to send POST requests.
Let’s go the TDD route and update our test to reflect what we expect to achieve.
Open test/message.test.js and add the below test case:
it('posts messages', done => { const data = { name: 'some name', message: 'new message' }; server .post(`${BASE_URL}/messages`) .send(data) .expect(200) .end((err, res) => { expect(res.status).to.equal(200); expect(res.body.messages).to.be.instanceOf(Array); res.body.messages.forEach(m => { expect(m).to.have.property('id'); expect(m).to.have.property('name', data.name); expect(m).to.have.property('message', data.message); }); done(); }); });
This test makes a POST request to the /v1/messages endpoint and we expect an array to be returned. We also check for the id, name, and message properties on the array.
Run your tests to see that this case fails. Let’s now fix it.
To send post requests, we use the post method of the server. We also send the name and message we want to insert. We expect the response to be an array, with a property id and the other info that makes up the query. The id is proof that a record has been inserted into the database.
Open src/models/model.js and add the insert method:
async insertWithReturn(columns, values) { const query = ` INSERT INTO ${this.table}(${columns}) VALUES (${values}) RETURNING id, ${columns} `; return this.pool.query(query); }
This is the method that allows us to insert messages into the database. After inserting the item, it returns the id, name and message.
Open src/controllers/messages.js and add the below controller:
export const addMessage = async (req, res) => { const { name, message } = req.body; const columns = 'name, message'; const values = `'${name}', '${message}'`; try { const data = await messagesModel.insertWithReturn(columns, values); res.status(200).json({ messages: data.rows }); } catch (err) { res.status(200).json({ messages: err.stack }); } };
We destructure the request body to get the name and message. Then we use the values to form an SQL query string which we then execute with the insertWithReturn method of our model.
Add the below POST endpoint to /src/routes/index.js and update your import line.
import { indexPage, messagesPage, addMessage } from '../controllers'; indexRouter.post('/messages', addMessage);
Run your tests to see if they pass.
Open Postman and send a POST request to the messages endpoint. If you’ve just run your test, remember to run yarn query to recreate the messages table.
yarn query
POST request to messages endpoint. (Large preview)
GET request showing newly added message. (Large preview)
Commit your changes and push to GitHub. Your tests should pass on both Travis and AppVeyor. Your test coverage will drop by a few points, but that’s okay.
Middleware
Our discussion of Express won’t be complete without talking about middleware. The Express documentation describes a middlewares as:
“[…] functions that have access to the request object (req), the response object (res), and the next middleware function in the application’s request-response cycle. The next middleware function is commonly denoted by a variable named next.”
A middleware can perform any number of functions such as authentication, modifying the request body, and so on. See the Express documentation on using middleware.
We’re going to write a simple middleware that modifies the request body. Our middleware will append the word SAYS: to the incoming message before it is saved in the database.
Before we start, let’s modify our test to reflect what we want to achieve.
Open up test/messages.test.js and modify the last expect line in the posts message test case:
it('posts messages', done => { ... expect(m).to.have.property('message', `SAYS: ${data.message}`); # update this line ... });
We’re asserting that the SAYS: string has been appended to the message. Run your tests to make sure this test case fails.
Now, let’s write the code to make the test pass.
Create a new middleware/ folder inside src/ folder. Create two files inside this folder:
middleware.js
index.js
Enter the below code in middleware.js:
export const modifyMessage = (req, res, next) => { req.body.message = `SAYS: ${req.body.message}`; next(); };
Here, we append the string SAYS: to the message in the request body. After doing that, we must call the next() function to pass execution to the next function in the request-response chain. Every middleware has to call the next function to pass execution to the next middleware in the request-response cycle.
Enter the below code in index.js:
# export everything from the middleware file export * from './middleware';
This exports the middleware we have in the /middleware.js file. For now, we only have the modifyMessage middleware.
Open src/routes/index.js and add the middleware to the post message request-response chain.
import { modifyMessage } from '../middleware'; indexRouter.post('/messages', modifyMessage, addMessage);
We can see that the modifyMessage function comes before the addMessage function. We invoke the addMessage function by calling next in the modifyMessage middleware. As an experiment, comment out the next() line in the modifyMessage middle and watch the request hang.
Open Postman and create a new message. You should see the appended string.
Message modified by middleware. (Large preview)
This is a good point to commit our changes.
Error Handling And Asynchronous Middleware
Errors are inevitable in any application. The task before the developer is how to deal with errors as gracefully as possible.
In Express:
“Error Handling refers to how Express catches and processes errors that occur both synchronously and asynchronously.
If we were only writing synchronous functions, we might not have to worry so much about error handling as Express already does an excellent job of handling those. According to the docs:
“Errors that occur in synchronous code inside route handlers and middleware require no extra work.”
But once we start writing asynchronous router handlers and middleware, then we have to do some error handling.
Our modifyMessage middleware is a synchronous function. If an error occurs in that function, Express will handle it just fine. Let’s see how we deal with errors in asynchronous middleware.
Let’s say, before creating a message, we want to get a picture from the Lorem Picsum API using this URL https://picsum.photos/id/0/info. This is an asynchronous operation that could either succeed or fail, and that presents a case for us to deal with.
Start by installing Axios.
# install axios yarn add axios
Open src/middleware/middleware.js and add the below function:
export const performAsyncAction = async (req, res, next) => { try { await axios.get('https://picsum.photos/id/0/info'); next(); } catch (err) { next(err); } };
In this async function, we await a call to an API (we don’t actually need the returned data) and afterward call the next function in the request chain. If the request fails, we catch the error and pass it on to next. Once Express sees this error, it skips all other middleware in the chain. If we didn’t call next(err), the request will hang. If we only called next() without err, the request will proceed as if nothing happened and the error will not be caught.
Import this function and add it to the middleware chain of the post messages route:
import { modifyMessage, performAsyncAction } from '../middleware'; indexRouter.post('/messages', modifyMessage, performAsyncAction, addMessage);
Open src/app.js and add the below code just before the export default app line.
app.use((err, req, res, next) => { res.status(400).json({ error: err.stack }); }); export default app;
This is our error handler. According to the Express error handling doc:
“[…] error-handling functions have four arguments instead of three: (err, req, res, next).”
Note that this error handler must come last, after every app.use() call. Once we encounter an error, we return the stack trace with a status code of 400. You could do whatever you like with the error. You might want to log it or send it somewhere.
This is a good place to commit your changes.
Deploy To Heroku
To get started, go to https://www.heroku.com/ and either log in or register.
Download and install the Heroku CLI from here.
Open a terminal in the project folder to run the command.
# login to heroku on command line heroku login
This will open a browser window and ask you to log into your Heroku account.
Log in to grant your terminal access to your Heroku account, and create a new heroku app by running:
#app name is up to you heroku create app-name
This will create the app on Heroku and return two URLs.
# app production url and git url https://app-name.herokuapp.com/ | https://git.heroku.com/app-name.git
Copy the URL on the right and run the below command. Note that this step is optional as you may find that Heroku has already added the remote URL.
# add heroku remote url git remote add heroku https://git.heroku.com/my-shiny-new-app.git
Open a side terminal and run the command below. This shows you the app log in real-time as shown in the image.
# see process logs heroku logs --tail
Heroku logs. (Large preview)
Run the following three commands to set the required environment variables:
heroku config:set TEST_ENV_VARIABLE="Environment variable is coming across." heroku config:set CONNECTION_STRING=your-db-connection-string-here. heroku config:set NPM_CONFIG_PRODUCTION=false
Remember in our scripts, we set:
"prestart": "babel ./src --out-dir build", "start": "node ./build/bin/www",
To start the app, it needs to be compiled down to ES5 using babel in the prestart step because babel only exists in our development dependencies. We have to set NPM_CONFIG_PRODUCTION to false in order to be able to install those as well.
To confirm everything is set correctly, run the command below. You could also visit the settings tab on the app page and click on Reveal Config Vars.
# check configuration variables heroku config
Now run git push heroku.
To open the app, run:
# open /v1 route heroku open /v1 # open /v1/messages route heroku open /v1/messages
If like me, you’re using the same PostgresSQL database for both development and production, you may find that each time you run your tests, the database is deleted. To recreate it, you could run either one of the following commands:
# run script locally yarn runQuery # run script with heroku heroku run yarn runQuery
Continuous Deployment (CD) With Travis
Let’s now add Continuous Deployment (CD) to complete the CI/CD flow. We will be deploying from Travis after every successful test run.
The first step is to install Travis CI. (You can find the installation instructions over here.) After successfully installing the Travis CI, login by running the below command. (Note that this should be done in your project repository.)
# login to travis travis login --pro # use this if you’re using two factor authentication travis login --pro --github-token enter-github-token-here
If your project is hosted on travis-ci.org, remove the --pro flag. To get a GitHub token, visit the developer settings page of your account and generate one. This only applies if your account is secured with 2FA.
Open your .travis.yml and add a deploy section:
deploy: provider: heroku app: master: app-name
Here, we specify that we want to deploy to Heroku. The app sub-section specifies that we want to deploy the master branch of our repo to the app-name app on Heroku. It’s possible to deploy different branches to different apps. You can read more about the available options here.
Run the below command to encrypt your Heroku API key and add it to the deploy section:
# encrypt heroku API key and add to .travis.yml travis encrypt $(heroku auth:token) --add deploy.api_key --pro
This will add the below sub-section to the deploy section.
api_key: secure: very-long-encrypted-api-key-string
Now commit your changes and push to GitHub while monitoring your logs. You will see the build triggered as soon as the Travis test is done. In this way, if we have a failing test, the changes would never be deployed. Likewise, if the build failed, the whole test run would fail. This completes the CI/CD flow.
The corresponding branch in my repo is 11-cd.
Conclusion
If you’ve made it this far, I say, “Thumbs up!” In this tutorial, we successfully set up a new Express project. We went ahead to configure development dependencies as well as Continuous Integration (CI). We then wrote asynchronous functions to handle requests to our API endpoints — completed with tests. We then looked briefly at error handling. Finally, we deployed our project to Heroku and configured Continuous Deployment.
You now have a template for your next back-end project. We’ve only done enough to get you started, but you should keep learning to keep going. Be sure to check out the Express.js docs as well. If you would rather use MongoDB instead of PostgreSQL, I have a template here that does exactly that. You can check it out for the setup. It has only a few points of difference.
Resources
“Create Express API Backend With MongoDB ,” Orji Chidi Matthew, GitHub
“A Short Guide To Connect Middleware,” Stephen Sugden
“Express API template,” GitHub
“AppVeyor vs Travis CI,” StackShare
“The Heroku CLI,” Heroku Dev Center
“Heroku Deployment,” Travis CI
“Using middleware,” Express.js
“Error Handling,” Express.js
“Getting Started,” Mocha
nyc (GitHub)
ElephantSQL
Postman
Express
Travis CI
Code Climate
PostgreSQL
pgAdmin
(ks, yk, il)
Website Design & SEO Delray Beach by DBL07.co
Delray Beach SEO
source http://www.scpie.org/how-to-set-up-an-express-api-backend-project-with-postgresql/
source https://scpie.tumblr.com/post/614850761301639168
0 notes
Text
How To Set Up An Express API Backend Project With PostgreSQL
About The Author
Awesome frontend developer who loves everything coding. I’m a lover of choral music and I’m working to make it more accessible to the world, one upload at a …
More about
Chidi
…
In this article, we will create a set of API endpoints using Express from scratch in ES6 syntax, and cover some development best practices. Find out how all the pieces work together as you create a small project using Continuous Integration and Test-Driven Development before deploying to Heroku.
We will take a Test-Driven Development (TDD) approach and the set up Continuous Integration (CI) job to automatically run our tests on Travis CI and AppVeyor, complete with code quality and coverage reporting. We will learn about controllers, models (with PostgreSQL), error handling, and asynchronous Express middleware. Finally, we’ll complete the CI/CD pipeline by configuring automatic deploy on Heroku.
It sounds like a lot, but this tutorial is aimed at beginners who are ready to try their hands on a back-end project with some level of complexity, and who may still be confused as to how all the pieces fit together in a real project.
It is robust without being overwhelming and is broken down into sections that you can complete in a reasonable length of time.
Getting Started
The first step is to create a new directory for the project and start a new node project. Node is required to continue with this tutorial. If you don’t have it installed, head over to the official website, download, and install it before continuing.
I will be using yarn as my package manager for this project. There are installation instructions for your specific operating system here. Feel free to use npm if you like.
Open your terminal, create a new directory, and start a Node.js project.
# create a new directory mkdir express-api-template # change to the newly-created directory cd express-api-template # initialize a new Node.js project npm init
Answer the questions that follow to generate a package.json file. This file holds information about your project. Example of such information includes what dependencies it uses, the command to start the project, and so on.
You may now open the project folder in your editor of choice. I use visual studio code. It’s a free IDE with tons of plugins to make your life easier, and it’s available for all major platforms. You can download it from the official website.
Create the following files in the project folder:
README.md
.editorconfig
Here’s a description of what .editorconfig does from the EditorConfig website. (You probably don’t need it if you’re working solo, but it does no harm, so I’ll leave it here.)
“EditorConfig helps maintain consistent coding styles for multiple developers working on the same project across various editors and IDEs.”
Open .editorconfig and paste the following code:
root = true [*] indent_style = space indent_size = 2 charset = utf-8 trim_trailing_whitespace = false insert_final_newline = true
The [*] means that we want to apply the rules that come under it to every file in the project. We want an indent size of two spaces and UTF-8 character set. We also want to trim trailing white space and insert a final empty line in our file.
Open README.md and add the project name as a first-level element.
# Express API template
Let’s add version control right away.
# initialize the project folder as a git repository git init
Create a .gitignore file and enter the following lines:
node_modules/ yarn-error.log .env .nyc_output coverage build/
These are all the files and folders we don’t want to track. We don’t have them in our project yet, but we’ll see them as we proceed.
At this point, you should have the following folder structure.
EXPRESS-API-TEMPLATE ├── .editorconfig ├── .gitignore ├── package.json └── README.md
I consider this to be a good point to commit my changes and push them to GitHub.
Starting A New Express Project
Express is a Node.js framework for building web applications. According to the official website, it is a
Fast, unopinionated, minimalist web framework for Node.js.
There are other great web application frameworks for Node.js, but Express is very popular, with over 47k GitHub stars at the time of this writing.
In this article, we will not be having a lot of discussions about all the parts that make up Express. For that discussion, I recommend you check out Jamie’s series. The first part is here, and the second part is here.
Install Express and start a new Express project. It’s possible to manually set up an Express server from scratch but to make our life easier we’ll use the express-generator to set up the app skeleton.
# install the express generator globally yarn global add express-generator # install express yarn add express # generate the express project in the current folder express -f
The -f flag forces Express to create the project in the current directory.
We’ll now perform some house-cleaning operations.
Delete the file index/users.js.
Delete the folders public/ and views/.
Rename the file bin/www to bin/www.js.
Uninstall jade with the command yarn remove jade.
Create a new folder named src/ and move the following inside it:
1. app.js file
2. bin/ folder
3. routes/ folder inside.
Open up package.json and update the start script to look like below.
"start": "node ./src/bin/www"
At this point, your project folder structure looks like below. You can see how VS Code highlights the file changes that have taken place.
EXPRESS-API-TEMPLATE ├── node_modules ├── src | ├── bin │ │ ├── www.js │ ├── routes │ | ├── index.js │ └── app.js ├── .editorconfig ├── .gitignore ├── package.json ├── README.md └── yarn.lock
Open src/app.js and replace the content with the below code.
var logger = require('morgan'); var express = require('express'); var cookieParser = require('cookie-parser'); var indexRouter = require('./routes/index'); var app = express(); app.use(logger('dev')); app.use(express.json()); app.use(express.urlencoded({ extended: true })); app.use(cookieParser()); app.use('/v1', indexRouter); module.exports = app;
After requiring some libraries, we instruct Express to handle every request coming to /v1 with indexRouter.
Replace the content of routes/index.js with the below code:
var express = require('express'); var router = express.Router(); router.get('/', function(req, res, next) { return res.status(200).json({ message: 'Welcome to Express API template' }); }); module.exports = router;
We grab Express, create a router from it and serve the / route, which returns a status code of 200 and a JSON message.
Start the app with the below command:
# start the app yarn start
If you’ve set up everything correctly you should only see $ node ./src/bin/www in your terminal.
Visit http://localhost:3000/v1 in your browser. You should see the following message:
{ "message": "Welcome to Express API template" }
This is a good point to commit our changes.
Converting Our Code To ES6
The code generated by express-generator is in ES5, but in this article, we will be writing all our code in ES6 syntax. So, let’s convert our existing code to ES6.
Replace the content of routes/index.js with the below code:
import express from 'express'; const indexRouter = express.Router(); indexRouter.get('/', (req, res) => res.status(200).json({ message: 'Welcome to Express API template' }) ); export default indexRouter;
It is the same code as we saw above, but with the import statement and an arrow function in the / route handler.
Replace the content of src/app.js with the below code:
import logger from 'morgan'; import express from 'express'; import cookieParser from 'cookie-parser'; import indexRouter from './routes/index'; const app = express(); app.use(logger('dev')); app.use(express.json()); app.use(express.urlencoded({ extended: true })); app.use(cookieParser()); app.use('/v1', indexRouter); export default app;
Let’s now take a look at the content of src/bin/www.js. We will build it incrementally. Delete the content of src/bin/www.js and paste in the below code block.
#!/usr/bin/env node /** * Module dependencies. */ import debug from 'debug'; import http from 'http'; import app from '../app'; /** * Normalize a port into a number, string, or false. */ const normalizePort = val => { const port = parseInt(val, 10); if (Number.isNaN(port)) { // named pipe return val; } if (port >= 0) { // port number return port; } return false; }; /** * Get port from environment and store in Express. */ const port = normalizePort(process.env.PORT || '3000'); app.set('port', port); /** * Create HTTP server. */ const server = http.createServer(app); // next code block goes here
This code checks if a custom port is specified in the environment variables. If none is set the default port value of 3000 is set on the app instance, after being normalized to either a string or a number by normalizePort. The server is then created from the http module, with app as the callback function.
The #!/usr/bin/env node line is optional since we would specify node when we want to execute this file. But make sure it is on line 1 of src/bin/www.js file or remove it completely.
Let’s take a look at the error handling function. Copy and paste this code block after the line where the server is created.
/** * Event listener for HTTP server "error" event. */ const onError = error => { if (error.syscall !== 'listen') { throw error; } const bind = typeof port === 'string' ? `Pipe ${port}` : `Port ${port}`; // handle specific listen errors with friendly messages switch (error.code) { case 'EACCES': alert(`${bind} requires elevated privileges`); process.exit(1); break; case 'EADDRINUSE': alert(`${bind} is already in use`); process.exit(1); break; default: throw error; } }; /** * Event listener for HTTP server "listening" event. */ const onListening = () => { const addr = server.address(); const bind = typeof addr === 'string' ? `pipe ${addr}` : `port ${addr.port}`; debug(`Listening on ${bind}`); }; /** * Listen on provided port, on all network interfaces. */ server.listen(port); server.on('error', onError); server.on('listening', onListening);
The onError function listens for errors in the http server and displays appropriate error messages. The onListening function simply outputs the port the server is listening on to the console. Finally, the server listens for incoming requests at the specified address and port.
At this point, all our existing code is in ES6 syntax. Stop your server (use Ctrl + C) and run yarn start. You’ll get an error SyntaxError: Invalid or unexpected token. This happens because Node (at the time of writing) doesn’t support some of the syntax we’ve used in our code.
We’ll now fix that in the following section.
Configuring Development Dependencies: babel, nodemon, eslint, And prettier
It’s time to set up most of the scripts we’re going to need at this phase of the project.
Install the required libraries with the below commands. You can just copy everything and paste it in your terminal. The comment lines will be skipped.
# install babel scripts yarn add @babel/cli @babel/core @babel/plugin-transform-runtime @babel/preset-env @babel/register @babel/runtime @babel/node --dev
This installs all the listed babel scripts as development dependencies. Check your package.json file and you should see a devDependencies section. All the installed scripts will be listed there.
The babel scripts we’re using are explained below:
@babel/cli A required install for using babel. It allows the use of Babel from the terminal and is available as ./node_modules/.bin/babel. @babel/core Core Babel functionality. This is a required installation. @babel/node This works exactly like the Node.js CLI, with the added benefit of compiling with babel presets and plugins. This is required for use with nodemon. @babel/plugin-transform-runtime This helps to avoid duplication in the compiled output. @babel/preset-env A collection of plugins that are responsible for carrying out code transformations. @babel/register This compiles files on the fly and is specified as a requirement during tests. @babel/runtime This works in conjunction with @babel/plugin-transform-runtime.
Create a file named .babelrc at the root of your project and add the following code:
{ "presets": ["@babel/preset-env"], "plugins": ["@babel/transform-runtime"] }
Let’s install nodemon
# install nodemon yarn add nodemon --dev
nodemon is a library that monitors our project source code and automatically restarts our server whenever it observes any changes.
Create a file named nodemon.json at the root of your project and add the code below:
{ "watch": [ "package.json", "nodemon.json", ".eslintrc.json", ".babelrc", ".prettierrc", "src/" ], "verbose": true, "ignore": ["*.test.js", "*.spec.js"] }
The watch key tells nodemon which files and folders to watch for changes. So, whenever any of these files changes, nodemon restarts the server. The ignore key tells it the files not to watch for changes.
Now update the scripts section of your package.json file to look like the following:
# build the content of the src folder "prestart": "babel ./src --out-dir build" # start server from the build folder "start": "node ./build/bin/www" # start server in development mode "startdev": "nodemon --exec babel-node ./src/bin/www"
prestart scripts builds the content of the src/ folder and puts it in the build/ folder. When you issue the yarn start command, this script runs first before the start script.
start script now serves the content of the build/ folder instead of the src/ folder we were serving previously. This is the script you’ll use when serving the file in production. In fact, services like Heroku automatically run this script when you deploy.
yarn startdev is used to start the server during development. From now on we will be using this script as we develop the app. Notice that we’re now using babel-node to run the app instead of regular node. The --exec flag forces babel-node to serve the src/ folder. For the start script, we use node since the files in the build/ folder have been compiled to ES5.
Run yarn startdev and visit http://localhost:3000/v1. Your server should be up and running again.
The final step in this section is to configure ESLint and prettier. ESLint helps with enforcing syntax rules while prettier helps for formatting our code properly for readability.
Add both of them with the command below. You should run this on a separate terminal while observing the terminal where our server is running. You should see the server restarting. This is because we’re monitoring package.json file for changes.
# install elsint and prettier yarn add eslint eslint-config-airbnb-base eslint-plugin-import prettier --dev
Now create the .eslintrc.json file in the project root and add the below code:
{ "env": { "browser": true, "es6": true, "node": true, "mocha": true }, "extends": ["airbnb-base"], "globals": { "Atomics": "readonly", "SharedArrayBuffer": "readonly" }, "parserOptions": { "ecmaVersion": 2018, "sourceType": "module" }, "rules": { "indent": ["warn", 2], "linebreak-style": ["error", "unix"], "quotes": ["error", "single"], "semi": ["error", "always"], "no-console": 1, "comma-dangle": [0], "arrow-parens": [0], "object-curly-spacing": ["warn", "always"], "array-bracket-spacing": ["warn", "always"], "import/prefer-default-export": [0] } }
This file mostly defines some rules against which eslint will check our code. You can see that we’re extending the style rules used by Airbnb.
In the "rules" section, we define whether eslint should show a warning or an error when it encounters certain violations. For instance, it shows a warning message on our terminal for any indentation that does not use 2 spaces. A value of [0] turns off a rule, which means that we won’t get a warning or an error if we violate that rule.
Create a file named .prettierrc and add the code below:
{ "trailingComma": "es5", "tabWidth": 2, "semi": true, "singleQuote": true }
We’re setting a tab width of 2 and enforcing the use of single quotes throughout our application. Do check the prettier guide for more styling options.
Now add the following scripts to your package.json:
# add these one after the other "lint": "./node_modules/.bin/eslint ./src" "pretty": "prettier --write '**/*.{js,json}' '!node_modules/**'" "postpretty": "yarn lint --fix"
Run yarn lint. You should see a number of errors and warnings in the console.
The pretty command prettifies our code. The postpretty command is run immediately after. It runs the lint command with the --fix flag appended. This flag tells ESLint to automatically fix common linting issues. In this way, I mostly run the yarn pretty command without bothering about the lint command.
Run yarn pretty. You should see that we have only two warnings about the presence of alert in the bin/www.js file.
Here’s what our project structure looks like at this point.
EXPRESS-API-TEMPLATE ├── build ├── node_modules ├── src | ├── bin │ │ ├── www.js │ ├── routes │ | ├── index.js │ └── app.js ├── .babelrc ├── .editorconfig ├── .eslintrc.json ├── .gitignore ├── .prettierrc ├── nodemon.json ├── package.json ├── README.md └── yarn.lock
You may find that you have an additional file, yarn-error.log in your project root. Add it to .gitignore file. Commit your changes.
Settings And Environment Variables In Our .env File
In nearly every project, you’ll need somewhere to store settings that will be used throughout your app e.g. an AWS secret key. We store such settings as environment variables. This keeps them away from prying eyes, and we can use them within our application as needed.
I like having a settings.js file with which I read all my environment variables. Then, I can refer to the settings file from anywhere within my app. You’re at liberty to name this file whatever you want, but there’s some kind of consensus about naming such files settings.js or config.js.
For our environment variables, we’ll keep them in a .env file and read them into our settings file from there.
Create the .env file at the root of your project and enter the below line:
TEST_ENV_VARIABLE="Environment variable is coming across"
To be able to read environment variables into our project, there’s a nice library, dotenv that reads our .env file and gives us access to the environment variables defined inside. Let’s install it.
# install dotenv yarn add dotenv
Add the .env file to the list of files being watched by nodemon.
Now, create the settings.js file inside the src/ folder and add the below code:
import dotenv from 'dotenv'; dotenv.config(); export const testEnvironmentVariable = process.env.TEST_ENV_VARIABLE;
We import the dotenv package and call its config method. We then export the testEnvironmentVariable which we set in our .env file.
Open src/routes/index.js and replace the code with the one below.
import express from 'express'; import { testEnvironmentVariable } from '../settings'; const indexRouter = express.Router(); indexRouter.get('/', (req, res) => res.status(200).json({ message: testEnvironmentVariable })); export default indexRouter;
The only change we’ve made here is that we import testEnvironmentVariable from our settings file and use is as the return message for a request from the / route.
Visit http://localhost:3000/v1 and you should see the message, as shown below.
{ "message": "Environment variable is coming across." }
And that’s it. From now on we can add as many environment variables as we want and we can export them from our settings.js file.
This is a good point to commit your code. Remember to prettify and lint your code.
Writing Our First Test
It’s time to incorporate testing into our app. One of the things that give the developer confidence in their code is tests. I’m sure you’ve seen countless articles on the web preaching Test-Driven Development (TDD). It cannot be emphasized enough that your code needs some measure of testing. TDD is very easy to follow when you’re working with Express.js.
In our tests, we will make calls to our API endpoints and check to see if what is returned is what we expect.
Install the required dependencies:
# install dependencies yarn add mocha chai nyc sinon-chai supertest coveralls --dev
Each of these libraries has its own role to play in our tests.
mocha test runner chai used to make assertions nyc collect test coverage report sinon-chai extends chai’s assertions supertest used to make HTTP calls to our API endpoints coveralls for uploading test coverage to coveralls.io
Create a new test/ folder at the root of your project. Create two files inside this folder:
test/setup.js
test/index.test.js
Mocha will find the test/ folder automatically.
Open up test/setup.js and paste the below code. This is just a helper file that helps us organize all the imports we need in our test files.
import supertest from 'supertest'; import chai from 'chai'; import sinonChai from 'sinon-chai'; import app from '../src/app'; chai.use(sinonChai); export const { expect } = chai; export const server = supertest.agent(app); export const BASE_URL = '/v1';
This is like a settings file, but for our tests. This way we don’t have to initialize everything inside each of our test files. So we import the necessary packages and export what we initialized — which we can then import in the files that need them.
Open up index.test.js and paste the following test code.
import { expect, server, BASE_URL } from './setup'; describe('Index page test', () => { it('gets base url', done => { server .get(`${BASE_URL}/`) .expect(200) .end((err, res) => { expect(res.status).to.equal(200); expect(res.body.message).to.equal( 'Environment variable is coming across.' ); done(); }); }); });
Here we make a request to get the base endpoint, which is / and assert that the res.body object has a message key with a value of Environment variable is coming across.
If you’re not familiar with the describe, it pattern, I encourage you to take a quick look at Mocha’s “Getting Started” doc.
Add the test command to the scripts section of package.json.
"test": "nyc --reporter=html --reporter=text --reporter=lcov mocha -r @babel/register"
This script executes our test with nyc and generates three kinds of coverage report: an HTML report, outputted to the coverage/ folder; a text report outputted to the terminal and an lcov report outputted to the .nyc_output/ folder.
Now run yarn test. You should see a text report in your terminal just like the one in the below photo.
Test coverage report (Large preview)
Notice that two additional folders are generated:
.nyc_output/
coverage/
Look inside .gitignore and you’ll see that we’re already ignoring both. I encourage you to open up coverage/index.html in a browser and view the test report for each file.
This is a good point to commit your changes.
Continuous Integration(CD) And Badges: Travis, Coveralls, Code Climate, AppVeyor
It’s now time to configure continuous integration and deployment (CI/CD) tools. We will configure common services such as travis-ci, coveralls, AppVeyor, and codeclimate and add badges to our README file.
Let’s get started.
Travis CI
Travis CI is a tool that runs our tests automatically each time we push a commit to GitHub (and recently, Bitbucket) and each time we create a pull request. This is mostly useful when making pull requests by showing us if the our new code has broken any of our tests.
Visit travis-ci.com or travis-ci.org and create an account if you don’t have one. You have to sign up with your GitHub account.
Hover over the dropdown arrow next to your profile picture and click on settings.
Under Repositories tab click Manage repositories on Github to be redirected to Github.
On the GitHub page, scroll down to Repository access and click the checkbox next to Only select repositories.
Click the Select repositories dropdown and find the express-api-template repo. Click it to add it to the list of repositories you want to add to travis-ci.
Click Approve and install and wait to be redirected back to travis-ci.
At the top of the repo page, close to the repo name, click on the build unknown icon. From the Status Image modal, select markdown from the format dropdown.
Copy the resulting code and paste it in your README.md file.
On the project page, click on More options > Settings. Under Environment Variables section, add the TEST_ENV_VARIABLE env variable. When entering its value, be sure to have it within double quotes like this "Environment variable is coming across."
Create .travis.yml file at the root of your project and paste in the below code (We’ll set the value of CC_TEST_REPORTER_ID in the Code Climate section).
language: node_js env: global: - CC_TEST_REPORTER_ID=get-this-from-code-climate-repo-page matrix: include: - node_js: '12' cache: directories: [node_modules] install: yarn after_success: yarn coverage before_script: - curl -L https://codeclimate.com/downloads/test-reporter/test-reporter-latest-linUX-amd64 > ./cc-test-reporter - chmod +x ./cc-test-reporter - ./cc-test-reporter before-build script: - yarn test after_script: - ./cc-test-reporter after-build --exit-code $TRAVIS_TEST_RESUL
First, we tell Travis to run our test with Node.js, then set the CC_TEST_REPORTER_ID global environment variable (we’ll get to this in the Code Climate section). In the matrix section, we tell Travis to run our tests with Node.js v12. We also want to cache the node_modules/ directory so it doesn’t have to be regenerated every time.
We install our dependencies using the yarn command which is a shorthand for yarn install. The before_script and after_script commands are used to upload coverage results to codeclimate. We’ll configure codeclimate shortly. After yarn test runs successfully, we want to also run yarn coverage which will upload our coverage report to coveralls.io.
Coveralls
Coveralls uploads test coverage data for easy visualization. We can view the test coverage on our local machine from the coverage folder, but Coveralls makes it available outside our local machine.
Visit coveralls.io and either sign in or sign up with your Github account.
Hover over the left-hand side of the screen to reveal the navigation menu. Click on ADD REPOS.
Search for the express-api-template repo and turn on coverage using the toggle button on the left-hand side. If you can’t find it, click on SYNC REPOS on the upper right-hand corner and try again. Note that your repo has to be public, unless you have a PRO account.
Click details to go to the repo details page.
Create the .coveralls.yml file at the root of your project and enter the below code. To get the repo_token, click on the repo details. You will find it easily on that page. You could just do a browser search for repo_token.
repo_token: get-this-from-repo-settings-on-coveralls.io
This token maps your coverage data to a repo on Coveralls. Now, add the coverage command to the scripts section of your package.json file:
"coverage": "nyc report --reporter=text-lcov | coveralls"
This command uploads the coverage report in the .nyc_output folder to coveralls.io. Turn on your Internet connection and run:
yarn coverage
This should upload the existing coverage report to coveralls. Refresh the repo page on coveralls to see the full report.
On the details page, scroll down to find the BADGE YOUR REPO section. Click on the EMBED dropdown and copy the markdown code and paste it into your README file.
Code Climate
Code Climate is a tool that helps us measure code quality. It shows us maintenance metrics by checking our code against some defined patterns. It detects things such as unnecessary repetition and deeply nested for loops. It also collects test coverage data just like coveralls.io.
Visit codeclimate.com and click on ‘Sign up with GitHub’. Log in if you already have an account.
Once in your dashboard, click on Add a repository.
Find the express-api-template repo from the list and click on Add Repo.
Wait for the build to complete and redirect to the repo dashboard.
Under Codebase Summary, click on Test Coverage. Under the Test coverage menu, copy the TEST REPORTER ID and paste it in your .travis.yml as the value of CC_TEST_REPORTER_ID.
Still on the same page, on the left-hand navigation, under EXTRAS, click on Badges. Copy the maintainability and test coverage badges in markdown format and paste them into your README.md file.
It’s important to note that there are two ways of configuring maintainability checks. There are the default settings that are applied to every repo, but if you like, you could provide a .codeclimate.yml file at the root of your project. I’ll be using the default settings, which you can find under the Maintainability tab of the repo settings page. I encourage you to take a look at least. If you still want to configure your own settings, this guide will give you all the information you need.
AppVeyor
AppVeyor and Travis CI are both automated test runners. The main difference is that travis-ci runs tests in a LinUX environment while AppVeyor runs tests in a Windows environment. This section is included to show how to get started with AppVeyor.
Visit AppVeyor and log in or sign up.
On the next page, click on NEW PROJECT.
From the repo list, find the express-api-template repo. Hover over it and click ADD.
Click on the Settings tab. Click on Environment on the left navigation. Add TEST_ENV_VARIABLE and its value. Click ‘Save’ at the bottom of the page.
Create the appveyor.yml file at the root of your project and paste in the below code.
environment: matrix: - nodejs_version: "12" install: - yarn test_script: - yarn test build: off
This code instructs AppVeyor to run our tests using Node.js v12. We then install our project dependencies with the yarn command. test_script specifies the command to run our test. The last line tells AppVeyor not to create a build folder.
Click on the Settings tab. On the left-hand navigation, click on badges. Copy the markdown code and paste it in your README.md file.
Commit your code and push to GitHub. If you have done everything as instructed all tests should pass and you should see your shiny new badges as shown below. Check again that you have set the environment variables on Travis and AppVeyor.
Repo CI/CD badges. (Large preview)
Now is a good time to commit our changes.
The corresponding branch in my repo is 05-ci.
Adding A Controller
Currently, we’re handling the GET request to the root URL, /v1, inside the src/routes/index.js. This works as expected and there is nothing wrong with it. However, as your application grows, you want to keep things tidy. You want concerns to be separated — you want a clear separation between the code that handles the request and the code that generates the response that will be sent back to the client. To achieve this, we write controllers. Controllers are simply functions that handle requests coming through a particular URL.
To get started, create a controllers/ folder inside the src/ folder. Inside controllers create two files: index.js and home.js. We would export our functions from within index.js. You could name home.js anything you want, but typically you want to name controllers after what they control. For example, you might have a file usersController.js to hold every function related to users in your app.
Open src/controllers/home.js and enter the code below:
import { testEnvironmentVariable } from '../settings'; export const indexPage = (req, res) => res.status(200).json({ message: testEnvironmentVariable });
You will notice that we only moved the function that handles the request for the / route.
Open src/controllers/index.js and enter the below code.
// export everything from home.js export * from './home';
We export everything from the home.js file. This allows us shorten our import statements to import { indexPage } from '../controllers';
Open src/routes/index.js and replace the code there with the one below:
import express from 'express'; import { indexPage } from '../controllers'; const indexRouter = express.Router(); indexRouter.get('/', indexPage); export default indexRouter;
The only change here is that we’ve provided a function to handle the request to the / route.
You just successfully wrote your first controller. From here it’s a matter of adding more files and functions as needed.
Go ahead and play with the app by adding a few more routes and controllers. You could add a route and a controller for the about page. Remember to update your test, though.
Run yarn test to confirm that we’ve not broken anything. Does your test pass? That’s cool.
This is a good point to commit our changes.
Connecting The PostgreSQL Database And Writing A Model
Our controller currently returns hard-coded text messages. In a real-world app, we often need to store and retrieve information from a database. In this section, we will connect our app to a PostgreSQL database.
We’re going to implement the storage and retrieval of simple text messages using a database. We have two options for setting a database: we could provision one from a cloud server, or we could set up our own locally.
I would recommend you provision a database from a cloud server. ElephantSQL has a free plan that gives 20MB of free storage which is sufficient for this tutorial. Visit the site and click on Get a managed database today. Create an account (if you don’t have one) and follow the instructions to create a free plan. Take note of the URL on the database details page. We’ll be needing it soon.
ElephantSQL turtle plan details page (Large preview)
If you would rather set up a database locally, you should visit the PostgreSQL and PgAdmin sites for further instructions.
Once we have a database set up, we need to find a way to allow our Express app to communicate with our database. Node.js by default doesn’t support reading and writing to PostgreSQL database, so we’ll be using an excellent library, appropriately named, node-postgres.
node-postgres executes SQL queries in node and returns the result as an object, from which we can grab items from the rows key.
Let’s connect node-postgres to our application.
# install node-postgres yarn add pg
Open settings.js and add the line below:
export const connectionString = process.env.CONNECTION_STRING;
Open your .env file and add the CONNECTION_STRING variable. This is the connection string we’ll be using to establish a connection to our database. The general form of the connection string is shown below.
CONNECTION_STRING="postgresql://dbuser:dbpassword@localhost:5432/dbname"
If you’re using elephantSQL you should copy the URL from the database details page.
Inside your /src folder, create a new folder called models/. Inside this folder, create two files:
pool.js
model.js
Open pools.js and paste the following code:
import { Pool } from 'pg'; import dotenv from 'dotenv'; import { connectionString } from '../settings'; dotenv.config(); export const pool = new Pool({ connectionString });
First, we import the Pool and dotenv from the pg and dotenv packages, and then import the settings we created for our postgres database before initializing dotenv. We establish a connection to our database with the Pool object. In node-postgres, every query is executed by a client. A Pool is a collection of clients for communicating with the database.
To create the connection, the pool constructor takes a config object. You can read more about all the possible configurations here. It also accepts a single connection string, which I will use here.
Open model.js and paste the following code:
import { pool } from './pool'; class Model { constructor(table) { this.pool = pool; this.table = table; this.pool.on('error', (err, client) => `Error, ${err}, on idle client${client}`); } async select(columns, clause) { let query = `SELECT ${columns} FROM ${this.table}`; if (clause) query += clause; return this.pool.query(query); } } export default Model;
We create a model class whose constructor accepts the database table we wish to operate on. We’ll be using a single pool for all our models.
We then create a select method which we will use to retrieve items from our database. This method accepts the columns we want to retrieve and a clause, such as a WHERE clause. It returns the result of the query, which is a Promise. Remember we said earlier that every query is executed by a client, but here we execute the query with pool. This is because, when we use pool.query, node-postgres executes the query using the first available idle client.
The query you write is entirely up to you, provided it is a valid SQL statement that can be executed by a Postgres engine.
The next step is to actually create an API endpoint to utilize our newly connected database. Before we do that, I’d like us to create some utility functions. The goal is for us to have a way to perform common database operations from the command line.
Create a folder, utils/ inside the src/ folder. Create three files inside this folder:
queries.js
queryFunctions.js
runQuery.js
We’re going to create functions to create a table in our database, insert seed data in the table, and to delete the table.
Open up queries.js and paste the following code:
export const createMessageTable = ` DROP TABLE IF EXISTS messages; CREATE TABLE IF NOT EXISTS messages ( id SERIAL PRIMARY KEY, name VARCHAR DEFAULT '', message VARCHAR NOT NULL ) `; export const insertMessages = ` INSERT INTO messages(name, message) VALUES ('chidimo', 'first message'), ('orji', 'second message') `; export const dropMessagesTable = 'DROP TABLE messages';
In this file, we define three SQL query strings. The first query deletes and recreates the messages table. The second query inserts two rows into the messages table. Feel free to add more items here. The last query drops/deletes the messages table.
Open queryFunctions.js and paste the following code:
import { pool } from '../models/pool'; import { insertMessages, dropMessagesTable, createMessageTable, } from './queries'; export const executeQueryArray = async arr => new Promise(resolve => { const stop = arr.length; arr.forEach(async (q, index) => { await pool.query(q); if (index + 1 === stop) resolve(); }); }); export const dropTables = () => executeQueryArray([ dropMessagesTable ]); export const createTables = () => executeQueryArray([ createMessageTable ]); export const insertIntoTables = () => executeQueryArray([ insertMessages ]);
Here, we create functions to execute the queries we defined earlier. Note that the executeQueryArray function executes an array of queries and waits for each one to complete inside the loop. (Don’t do such a thing in production code though). Then, we only resolve the promise once we have executed the last query in the list. The reason for using an array is that the number of such queries will grow as the number of tables in our database grows.
Open runQuery.js and paste the following code:
import { createTables, insertIntoTables } from './queryFunctions'; (async () => { await createTables(); await insertIntoTables(); })();
This is where we execute the functions to create the table and insert the messages in the table. Let’s add a command in the scripts section of our package.json to execute this file.
"runQuery": "babel-node ./src/utils/runQuery"
Now run:
yarn runQuery
If you inspect your database, you will see that the messages table has been created and that the messages were inserted into the table.
If you’re using ElephantSQL, on the database details page, click on BROWSER from the left navigation menu. Select the messages table and click Execute. You should see the messages from the queries.js file.
Let’s create a controller and route to display the messages from our database.
Create a new controller file src/controllers/messages.js and paste the following code:
import Model from '../models/model'; const messagesModel = new Model('messages'); export const messagesPage = async (req, res) => { try { const data = await messagesModel.select('name, message'); res.status(200).json({ messages: data.rows }); } catch (err) { res.status(200).json({ messages: err.stack }); } };
We import our Model class and create a new instance of that model. This represents the messages table in our database. We then use the select method of the model to query our database. The data (name and message) we get is sent as JSON in the response.
We define the messagesPage controller as an async function. Since node-postgres queries return a promise, we await the result of that query. If we encounter an error during the query we catch it and display the stack to the user. You should decide how choose to handle the error.
Add the get messages endpoint to src/routes/index.js and update the import line.
# update the import line import { indexPage, messagesPage } from '../controllers'; # add the get messages endpoint indexRouter.get('/messages', messagesPage)
Visit http://localhost:3000/v1/messages and you should see the messages displayed as shown below.
Messages from database. (Large preview)
Now, let’s update our test file. When doing TDD, you usually write your tests before implementing the code that makes the test pass. I’m taking the opposite approach here because we’re still working on setting up the database.
Create a new file, hooks.js in the test/ folder and enter the below code:
import { dropTables, createTables, insertIntoTables, } from '../src/utils/queryFunctions'; before(async () => { await createTables(); await insertIntoTables(); }); after(async () => { await dropTables(); });
When our test starts, Mocha finds this file and executes it before running any test file. It executes the before hook to create the database and insert some items into it. The test files then run after that. Once the test is finished, Mocha runs the after hook in which we drop the database. This ensures that each time we run our tests, we do so with clean and new records in our database.
Create a new test file test/messages.test.js and add the below code:
import { expect, server, BASE_URL } from './setup'; describe('Messages', () => { it('get messages page', done => { server .get(`${BASE_URL}/messages`) .expect(200) .end((err, res) => { expect(res.status).to.equal(200); expect(res.body.messages).to.be.instanceOf(Array); res.body.messages.forEach(m => { expect(m).to.have.property('name'); expect(m).to.have.property('message'); }); done(); }); }); });
We assert that the result of the call to /messages is an array. For each message object, we assert that it has the name and message property.
The final step in this section is to update the CI files.
Add the following sections to the .travis.yml file:
services: - postgresql addons: postgresql: "10" apt: packages: - postgresql-10 - postgresql-client-10 before_install: - sudo cp /etc/postgresql/{9.6,10}/main/pg_hba.conf - sudo /etc/init.d/postgresql restart
This instructs Travis to spin up a PostgreSQL 10 database before running our tests.
Add the command to create the database as the first entry in the before_script section:
# add this as the first line in the before_script section - psql -c 'create database testdb;' -U postgres
Create the CONNECTION_STRING environment variable on Travis, and use the below value:
CONNECTION_STRING="postgresql://postgres:postgres@localhost:5432/testdb"
Add the following sections to the .appveyor.yml file:
before_test: - SET PGUSER=postgres - SET PGPASSWORD=Password12! - PATH=C:\Program Files\PostgreSQL\10\bin\;%PATH% - createdb testdb services: - postgresql101
Add the connection string environment variable to appveyor. Use the below line:
CONNECTION_STRING=postgresql://postgres:Password12!@localhost:5432/testdb
Now commit your changes and push to GitHub. Your tests should pass on both Travis CI and AppVeyor.
Note: I hope everything works fine on your end, but in case you should be having trouble for some reason, you can always check my code in the repo!
Now, let’s see how we can add a message to our database. For this step, we’ll need a way to send POST requests to our URL. I’ll be using Postman to send POST requests.
Let’s go the TDD route and update our test to reflect what we expect to achieve.
Open test/message.test.js and add the below test case:
it('posts messages', done => { const data = { name: 'some name', message: 'new message' }; server .post(`${BASE_URL}/messages`) .send(data) .expect(200) .end((err, res) => { expect(res.status).to.equal(200); expect(res.body.messages).to.be.instanceOf(Array); res.body.messages.forEach(m => { expect(m).to.have.property('id'); expect(m).to.have.property('name', data.name); expect(m).to.have.property('message', data.message); }); done(); }); });
This test makes a POST request to the /v1/messages endpoint and we expect an array to be returned. We also check for the id, name, and message properties on the array.
Run your tests to see that this case fails. Let’s now fix it.
To send post requests, we use the post method of the server. We also send the name and message we want to insert. We expect the response to be an array, with a property id and the other info that makes up the query. The id is proof that a record has been inserted into the database.
Open src/models/model.js and add the insert method:
async insertWithReturn(columns, values) { const query = ` INSERT INTO ${this.table}(${columns}) VALUES (${values}) RETURNING id, ${columns} `; return this.pool.query(query); }
This is the method that allows us to insert messages into the database. After inserting the item, it returns the id, name and message.
Open src/controllers/messages.js and add the below controller:
export const addMessage = async (req, res) => { const { name, message } = req.body; const columns = 'name, message'; const values = `'${name}', '${message}'`; try { const data = await messagesModel.insertWithReturn(columns, values); res.status(200).json({ messages: data.rows }); } catch (err) { res.status(200).json({ messages: err.stack }); } };
We destructure the request body to get the name and message. Then we use the values to form an SQL query string which we then execute with the insertWithReturn method of our model.
Add the below POST endpoint to /src/routes/index.js and update your import line.
import { indexPage, messagesPage, addMessage } from '../controllers'; indexRouter.post('/messages', addMessage);
Run your tests to see if they pass.
Open Postman and send a POST request to the messages endpoint. If you’ve just run your test, remember to run yarn query to recreate the messages table.
yarn query
POST request to messages endpoint. (Large preview)
GET request showing newly added message. (Large preview)
Commit your changes and push to GitHub. Your tests should pass on both Travis and AppVeyor. Your test coverage will drop by a few points, but that’s okay.
Middleware
Our discussion of Express won’t be complete without talking about middleware. The Express documentation describes a middlewares as:
“[…] functions that have access to the request object (req), the response object (res), and the next middleware function in the application’s request-response cycle. The next middleware function is commonly denoted by a variable named next.”
A middleware can perform any number of functions such as authentication, modifying the request body, and so on. See the Express documentation on using middleware.
We’re going to write a simple middleware that modifies the request body. Our middleware will append the word SAYS: to the incoming message before it is saved in the database.
Before we start, let’s modify our test to reflect what we want to achieve.
Open up test/messages.test.js and modify the last expect line in the posts message test case:
it('posts messages', done => { ... expect(m).to.have.property('message', `SAYS: ${data.message}`); # update this line ... });
We’re asserting that the SAYS: string has been appended to the message. Run your tests to make sure this test case fails.
Now, let’s write the code to make the test pass.
Create a new middleware/ folder inside src/ folder. Create two files inside this folder:
middleware.js
index.js
Enter the below code in middleware.js:
export const modifyMessage = (req, res, next) => { req.body.message = `SAYS: ${req.body.message}`; next(); };
Here, we append the string SAYS: to the message in the request body. After doing that, we must call the next() function to pass execution to the next function in the request-response chain. Every middleware has to call the next function to pass execution to the next middleware in the request-response cycle.
Enter the below code in index.js:
# export everything from the middleware file export * from './middleware';
This exports the middleware we have in the /middleware.js file. For now, we only have the modifyMessage middleware.
Open src/routes/index.js and add the middleware to the post message request-response chain.
import { modifyMessage } from '../middleware'; indexRouter.post('/messages', modifyMessage, addMessage);
We can see that the modifyMessage function comes before the addMessage function. We invoke the addMessage function by calling next in the modifyMessage middleware. As an experiment, comment out the next() line in the modifyMessage middle and watch the request hang.
Open Postman and create a new message. You should see the appended string.
Message modified by middleware. (Large preview)
This is a good point to commit our changes.
Error Handling And Asynchronous Middleware
Errors are inevitable in any application. The task before the developer is how to deal with errors as gracefully as possible.
In Express:
“Error Handling refers to how Express catches and processes errors that occur both synchronously and asynchronously.
If we were only writing synchronous functions, we might not have to worry so much about error handling as Express already does an excellent job of handling those. According to the docs:
“Errors that occur in synchronous code inside route handlers and middleware require no extra work.”
But once we start writing asynchronous router handlers and middleware, then we have to do some error handling.
Our modifyMessage middleware is a synchronous function. If an error occurs in that function, Express will handle it just fine. Let’s see how we deal with errors in asynchronous middleware.
Let’s say, before creating a message, we want to get a picture from the Lorem Picsum API using this URL https://picsum.photos/id/0/info. This is an asynchronous operation that could either succeed or fail, and that presents a case for us to deal with.
Start by installing Axios.
# install axios yarn add axios
Open src/middleware/middleware.js and add the below function:
export const performAsyncAction = async (req, res, next) => { try { await axios.get('https://picsum.photos/id/0/info'); next(); } catch (err) { next(err); } };
In this async function, we await a call to an API (we don’t actually need the returned data) and afterward call the next function in the request chain. If the request fails, we catch the error and pass it on to next. Once Express sees this error, it skips all other middleware in the chain. If we didn’t call next(err), the request will hang. If we only called next() without err, the request will proceed as if nothing happened and the error will not be caught.
Import this function and add it to the middleware chain of the post messages route:
import { modifyMessage, performAsyncAction } from '../middleware'; indexRouter.post('/messages', modifyMessage, performAsyncAction, addMessage);
Open src/app.js and add the below code just before the export default app line.
app.use((err, req, res, next) => { res.status(400).json({ error: err.stack }); }); export default app;
This is our error handler. According to the Express error handling doc:
“[…] error-handling functions have four arguments instead of three: (err, req, res, next).”
Note that this error handler must come last, after every app.use() call. Once we encounter an error, we return the stack trace with a status code of 400. You could do whatever you like with the error. You might want to log it or send it somewhere.
This is a good place to commit your changes.
Deploy To Heroku
To get started, go to https://www.heroku.com/ and either log in or register.
Download and install the Heroku CLI from here.
Open a terminal in the project folder to run the command.
# login to heroku on command line heroku login
This will open a browser window and ask you to log into your Heroku account.
Log in to grant your terminal access to your Heroku account, and create a new heroku app by running:
#app name is up to you heroku create app-name
This will create the app on Heroku and return two URLs.
# app production url and git url https://app-name.herokuapp.com/ | https://git.heroku.com/app-name.git
Copy the URL on the right and run the below command. Note that this step is optional as you may find that Heroku has already added the remote URL.
# add heroku remote url git remote add heroku https://git.heroku.com/my-shiny-new-app.git
Open a side terminal and run the command below. This shows you the app log in real-time as shown in the image.
# see process logs heroku logs --tail
Heroku logs. (Large preview)
Run the following three commands to set the required environment variables:
heroku config:set TEST_ENV_VARIABLE="Environment variable is coming across." heroku config:set CONNECTION_STRING=your-db-connection-string-here. heroku config:set NPM_CONFIG_PRODUCTION=false
Remember in our scripts, we set:
"prestart": "babel ./src --out-dir build", "start": "node ./build/bin/www",
To start the app, it needs to be compiled down to ES5 using babel in the prestart step because babel only exists in our development dependencies. We have to set NPM_CONFIG_PRODUCTION to false in order to be able to install those as well.
To confirm everything is set correctly, run the command below. You could also visit the settings tab on the app page and click on Reveal Config Vars.
# check configuration variables heroku config
Now run git push heroku.
To open the app, run:
# open /v1 route heroku open /v1 # open /v1/messages route heroku open /v1/messages
If like me, you’re using the same PostgresSQL database for both development and production, you may find that each time you run your tests, the database is deleted. To recreate it, you could run either one of the following commands:
# run script locally yarn runQuery # run script with heroku heroku run yarn runQuery
Continuous Deployment (CD) With Travis
Let’s now add Continuous Deployment (CD) to complete the CI/CD flow. We will be deploying from Travis after every successful test run.
The first step is to install Travis CI. (You can find the installation instructions over here.) After successfully installing the Travis CI, login by running the below command. (Note that this should be done in your project repository.)
# login to travis travis login --pro # use this if you’re using two factor authentication travis login --pro --github-token enter-github-token-here
If your project is hosted on travis-ci.org, remove the --pro flag. To get a GitHub token, visit the developer settings page of your account and generate one. This only applies if your account is secured with 2FA.
Open your .travis.yml and add a deploy section:
deploy: provider: heroku app: master: app-name
Here, we specify that we want to deploy to Heroku. The app sub-section specifies that we want to deploy the master branch of our repo to the app-name app on Heroku. It’s possible to deploy different branches to different apps. You can read more about the available options here.
Run the below command to encrypt your Heroku API key and add it to the deploy section:
# encrypt heroku API key and add to .travis.yml travis encrypt $(heroku auth:token) --add deploy.api_key --pro
This will add the below sub-section to the deploy section.
api_key: secure: very-long-encrypted-api-key-string
Now commit your changes and push to GitHub while monitoring your logs. You will see the build triggered as soon as the Travis test is done. In this way, if we have a failing test, the changes would never be deployed. Likewise, if the build failed, the whole test run would fail. This completes the CI/CD flow.
The corresponding branch in my repo is 11-cd.
Conclusion
If you’ve made it this far, I say, “Thumbs up!” In this tutorial, we successfully set up a new Express project. We went ahead to configure development dependencies as well as Continuous Integration (CI). We then wrote asynchronous functions to handle requests to our API endpoints — completed with tests. We then looked briefly at error handling. Finally, we deployed our project to Heroku and configured Continuous Deployment.
You now have a template for your next back-end project. We’ve only done enough to get you started, but you should keep learning to keep going. Be sure to check out the Express.js docs as well. If you would rather use MongoDB instead of PostgreSQL, I have a template here that does exactly that. You can check it out for the setup. It has only a few points of difference.
Resources
“Create Express API Backend With MongoDB ,” Orji Chidi Matthew, GitHub
“A Short Guide To Connect Middleware,” Stephen Sugden
“Express API template,” GitHub
“AppVeyor vs Travis CI,” StackShare
“The Heroku CLI,” Heroku Dev Center
“Heroku Deployment,” Travis CI
“Using middleware,” Express.js
“Error Handling,” Express.js
“Getting Started,” Mocha
nyc (GitHub)
ElephantSQL
Postman
Express
Travis CI
Code Climate
PostgreSQL
pgAdmin
(ks, yk, il)
Website Design & SEO Delray Beach by DBL07.co
Delray Beach SEO
source http://www.scpie.org/how-to-set-up-an-express-api-backend-project-with-postgresql/
0 notes
Text
Top 200 Fantasy Prospect Forwards – February 2019
Here are the Top 200 prospects to own in your points-only keeper league – February edition!
As always, players within +/-5.0 rating points of each other should be considered equal and at that point are a matter of team needs or personal bias. These rankings are late this month due to a thorough review of each team's depth chart in an effort to find any players with fantasy upside that I didn't yet have on my template. Yep, I always have an excuse for my tardiness. But I started the process on the 8th (two days in advance) and just kind of lost myself in it. I didn't want to do 10 teams thoroughly and then whip through the rest. So here we are. My Twitter followers did get an update on this:
{source}<blockquote class="twitter-tweet" data-partner="tweetdeck"><p lang="en" dir="ltr">Just a note regarding this month's <a href="https://twitter.com/hashtag/fantasyhockey?src=hash&ref_src=twsrc%5Etfw">#fantasyhockey</a> prospect rankings. I've been carefully reviewing each team's full depth chart and all the players not currently tracked on my template. I'm adding players who have popped this year. It's taken several days so far</p>— Dobber (@DobberHockey) <a href="https://twitter.com/DobberHockey/status/1095788034837172224?ref_src=twsrc%5Etfw">February 13, 2019</a></blockquote>
<script async src="https://platform.twitter.com/widgets.js" charset="utf-8"></script>{/source}
{source}<blockquote class="twitter-tweet" data-partner="tweetdeck"><p lang="en" dir="ltr">I hope to finish tonight for posting tomorrow, but may need another day. Top end should remain relatively similar, but bottom half of the Top 200 will have some new names.</p>— Dobber (@DobberHockey) <a href="https://twitter.com/DobberHockey/status/1095788211949981696?ref_src=twsrc%5Etfw">February 13, 2019</a></blockquote>
<script async src="https://platform.twitter.com/widgets.js" charset="utf-8"></script>{/source}
It turns out that only a couple of newcomers actually cracked the list (although a few lower-ranked players I was able to catch their great seasons and bump them up into the Top 200). So what I've done is presented a list at the bottom of new players I added to the template. The Top 50 fantasy prospect defensemen will be up on Sunday.
Click any player name to be taken to his phenomenal prospect profile…
Feb 10 Prospect Team type Prospect Rating Jan 10 Dec 10 1 Dylan Strome CHI o 87.0 4 6 2 Brady Tkachuk OTT p 84.7 2 1 3 Andrei Svechnikov CAR o 83.5 1 2 4 Eeli Tolvanen NSH o 79.4 5 3 5 Henrik Borgstrom FLA t 78.7 6 5 6 Jesperi Kotkaniemi MON o 78.2 3 7 7 Robert Thomas STL t 74.8 7 8 8 Jordan Kyrou STL o 74.5 13 15 9 Casey Mittelstadt BUF o 74.2 8 4 10 Martin Necas CAR o 73.7 9 10 11 Drake Batherson OTT p 73.6 10 9 12 Kailer Yamamoto EDM os 73.5 11 12 13 Andreas Johnsson TOR o 73.2 21 43 14 Filip Zadina DET o 71.6 14 16 15 Troy Terry ANA o 71.1 15 17 16 Cody Glass VGK o 70.6 16 18 17 Sam Steel ANA o 70.4 17 19 18 Jordan Greenway MIN p 69.9 18 20 19 Morgan Frost PHI o 69.0 33 35 20 Vitali Kravtsov NYR o 68.5 19 21 21 Kristian Vesalainen WPG p 68.4 20 22 22 Filip Chytil NYR o 68.0 25 26 23 Jason Robertson DAL o 67.9 41 138 24 Gabriel Vilardi LAK o 67.8 22 25 25 Michael Rasmussen DET p 67.8 23 23 26 Brett Howden NYR t 67.3 24 14 27 Jaret Anderson-Dolan LAK o 66.9 26 24 28 Nick Suzuki MON t 66.8 27 27 29 Tage Thompson BUF o 66.5 29 30 30 Luke Kunin MIN o 66.5 30 31 31 Dylan Sikura CHI o 66.4 31 29 32 Aleksi Heponiemi FLA o 66.1 32 33 33 Kirill Kaprizov MIN os 66.0 28 28 34 Logan Brown OTT o 66.0 34 34 35 Ryan Donato BOS o 65.8 38 46 36 Alexander Nylander BUF o 65.6 35 36 37 Conor Garland ARI os 65.5 52 120 38 Alex Formenton OTT o 65.2 37 49 39 Barrett Hayton ARI t 64.9 39 38 40 Martin Kaut COL t 64.9 40 39 41 Lias Andersson NYR t 64.6 36 37 42 Owen Tippett FLA o 64.6 42 32 43 Michael McLeod NJD t 63.9 43 41 44 Warren Foegele CAR o 63.7 44 42 45 Ty Dellandrea DAL o 63.6 45 44 46 Adam Gaudette VAN o 63.4 47 40 47 Dillon Dube CGY o 63.0 50 54 48 Joshua Ho-Sang NYI o 63.0 46 45 49 Maxime Comtois ANA p 62.2 48 48 50 Andrew Mangiapane CGY o 61.6 53 55 51 Dominik Kahun CHI o 61.2 75 79 52 Vitali Abramov CBJ os 60.7 51 47 53 Joel Farabee PHI t 60.1 58 62 54 Anders Bjork BOS t 60.1 49 52 55 Daniel Sprong ANA o 59.6 59 58 56 Nikita Scherbak LAK o 59.5 54 56 57 Nicolas Roy CAR t 59.4 55 59 58 Taylor Raddysh TBL p 59.1 56 60 59 Oliver Wahlstrom NYI o 59.0 57 61 60 Jonathan Dahlen VAN o 58.6 60 57 61 Joe Veleno DET o 58.4 61 64 62 Denis Gurianov DAL o 58.2 63 66 63 Evgeny Svechnikov DET o 57.7 64 67 64 Aleksi Saarela CAR o 57.7 71 72 65 Boris Katchouk TBL t 57.6 67 68 66 Antti Suomela SJS o 57.4 68 70 67 Jakob Forsbacka Karlsson BOS t 57.2 65 50 68 Isac Lundestrom ANA o 56.9 72 73 69 Kieffer Bellows NYI p 56.9 73 74 70 Carl Grundstrom LAK o 56.8 80 81 71 Rasmus Kupari LAK o 56.3 74 76 72 Grigori Denisenko FLA o 56.1 76 83 73 Nick Merkley ARI o 55.9 62 65 74 Jayce Hawryluk FLA o 55.6 92 93 75 Zach Aston-Reese PIT o 55.5 82 85 76 Jason Dickinson DAL t 55.3 79 80 77 Mason Appleton WPG o 55.3 130 130 78 Roope Hintz DAL o 55.0 81 82 79 German Rubtsov PHI t 54.6 69 71 80 Sammy Blais STL o 54.2 83 128 81 Julien Gauthier CAR o 54.0 84 86 82 Jeremy Bracco TOR o 53.9 131 131 83 Josh Norris OTT o 53.8 85 88 84 Ryan Poehling MON t 53.8 86 91 85 Jonathan Davidsson CBJ o 53.7 87 89 86 Nic Petan WPG os 53.5 88 75 87 Valentin Zykov VGK o 53.4 89 87 88 Vladislav Kamenev COL t 53.3 91 51 89 John Quenneville NJD t 52.8 93 90 90 Dylan Gambrell SJS o 52.6 94 92 91 Emil Bemstrom CBJ o 52.5 266 368 92 Mikhail Vorobyev PHI o 52.3 90 84 93 Riley Tufte DAL p 52.2 95 147 94 Tyler Benson EDM o 51.9 147 149 95 Klim Kostin STL p 51.7 96 95 96 Liam Foudy CBJ t 51.7 97 96 97 Cooper Marody EDM o 51.6 112 108 98 Sasha Chmelevski SJS o 51.5 98 123 99 Alex Barre-Boulet TBL os 51.0 122 119 100 Sonny Milano CBJ o 50.6 100 98 101 Rudolfs Balcers OTT o 50.5 102 100 102 Rourke Chartier SJS o 50.4 103 101 103 Dominik Bokk STL o 50.4 104 102 104 Zach Senyshyn BOS o 50.3 105 99 105 Max Jones ANA p 50.1 106 103 106 Janne Kuokkanen CAR o 49.9 108 105 107 Matt Luff LAK o 49.8 125 124 108 Sheldon Dries COL os 49.6 109 133 109 Kevin Stenlund CBJ p 49.4 110 106 110 Mitchell Stephens TBL t 49.4 111 107 111 Sheldon Rempal LAK os 48.9 113 109 112 Maxim Letunov SJS o 48.9 107 104 113 Victor Olofsson BUF o 48.7 126 125 114 Rasmus Asplund BUF o 48.6 99 97 115 Travis Boyd WAS o 48.6 114 111 116 Kevin Roy ANA o 48.6 115 112 117 Trent Frederic BOS p 48.5 116 113 118 Mason Shaw MIN os 48.5 117 114 119 Jake Evans MON o 48.4 118 115 120 Tanner Laczynski PHI o 48.4 163 165 121 Shane Bowers COL t 48.4 119 116 122 Ryan McLeod EDM o 48.3 121 118 123 Kole Lind VAN o 48.0 123 122 124 John Hayden CHI p 47.8 120 110 125 Kiefer Sherwood ANA t 47.7 127 126 126 Alexander Khovanov MIN o 47.5 NR NR 127 C.J. Smith BUF o 47.3 172 172 128 Cliff Pu CAR o 47.2 101 94 129 Nikita Gusev VGK os 47.1 132 132 130 Adam Mascherin DAL os 46.9 133 117 131 Evan Barratt CHI o 46.9 NR NR 132 Brendan Lemieux WPG p 46.8 160 162 133 Michael Dal Colle NYI o 46.6 129 129 134 Dmitry Sokolov MIN o 46.6 134 134 135 Gabriel Fortier TBL o 46.6 177 177 136 Shane Gersich WAS o 46.5 135 135 137 Filip Chlapik OTT o 46.5 136 136 138 AJ Greer COL p 46.4 138 139 139 Matthew Highmore CHI o 46.3 139 140 140 Alexandre Texier CBJ o 46.2 140 141 141 Joseph Blandisi PIT o 46.1 245 246 142 Spencer Foo CGY o 46.1 124 121 143 Erik Foley STL o 46.0 142 143 144 Adam Brooks TOR o 45.9 143 144 145 Dmytro Timashov TOR o 45.9 144 145 146 Wade Allison PHI o 45.8 145 146 147 Maxim Mamin FLA o 45.8 128 127 148 Francis Perron SJS o 45.6 137 137 149 Stelio Mattheos CAR o 45.5 146 148 150 Jonatan Berggren DET o 45.4 148 150 151 Patrick Harper NSH os 45.3 149 151 152 Teddy Blueger PIT o 45.3 276 274 153 Saku Maenalanen CAR o 45.2 164 182 154 Juho Lammikko FLA o 45.2 152 154 155 Alexander Volkov TBL o 45.0 153 155 156 Akil Thomas LAK o 45.0 154 156 157 Joey Anderson NJD o 45.0 155 157 158 Otto Koivula NYI o 44.9 271 269 159 Marcus Davidsson BUF t 44.9 182 184 160 Tyler Steenbergen ARI o 44.7 156 158 161 Ville Meskanen NYR o 44.6 157 159 162 Pierre Engvall TOR o 44.6 158 160 163 Aarne Talvitie NJD o 44.4 221 NR 164 Lukas Jasek VAN t 44.4 162 164 165 Noah Gregor SJS o 44.2 165 166 166 Philipp Kurashev CHI o 44.1 166 186 167 Mike Amadio LAK o 44.1 167 167 168 Benoit-Olivier Groulx ANA o 44.1 168 168 169 Victor Ejdsell CHI p 44.0 141 142 170 Tyler Lewis COL o 44.0 169 169 171 Rem Pitlick NSH p 44.0 170 170 172 Jesper Boqvist NJD o 44.0 171 171 173 Jonny Brodzinski LAK o 43.9 173 173 174 Tomas Hyka VGK o 43.9 174 174 175 Anatoly Golyshev NYI os 43.8 175 175 176 Brett Seney NJD os 43.7 176 176 177 Axel Holmstrom DET o 43.5 159 161 178 Nick Henry COL o 43.5 216 218 179 Kalle Kossila ANA o 43.4 178 178 180 Dryden Hunt FLA o 43.1 180 180 181 Austin Wagner LAK p 43.1 181 183 182 Michael Bunting ARI o 43.1 302 301 183 Remi Elie BUF p 42.9 151 153 184 Ivan Chekhovich SJS o 42.9 263 262 185 Daniel O'Regan BUF t 42.9 184 181 186 Matthew Phillips CGY os 42.8 217 219 187 Peter Cehlarik BOS o 42.7 185 187 188 Cameron Hebig EDM o 42.7 186 188 189 Michael Spacek WPG o 42.7 187 189 190 Anthony Richard NSH o 42.6 225 226 191 Martins Dzierkals TOR o 42.6 188 190 192 Riley Barber WAS t 42.6 220 222 193 Carsen Twarynski PHI o 42.5 189 191 194 Brandon Gignac NJD o 42.5 335 334 195 Jake Leschyshyn VGK o 42.5 373 373 196 Jonah Gadjovich VAN p 42.5 190 192 197 Jack Drury CAR t 42.5 191 193 198 Antoine Morand ANA o 42.5 192 194 199 Nikolay Prokhorkin LAK o 42.4 277 275 200 Rocco Grimaldi NSH os 42.1 193 195
Players who graduated from this list, this month:
77 Crouse Lawson ARI 66 Wallmark Lucas CAR 78 Lindblom Oskar PHI 70 Joseph Mathieu TBL 12 Roslovic Jack WPG
Players added to the template:
126 Alexander Khovanov MIN 131 Evan Barratt CHI 201 Liam Hawel DAL 207 Riley Sutter WAS 220 Riley Damiani DAL 223 John Leonard SJS 230 Kody Clark WAS 240 Mackenzie Entwistle CHI 248 Alexander True SJS 261 Jack Rodewald OTT 273 Morgan Geekie CAR 300 Tyler Madden VAN 303 Matej Pekar BUF 323 David Gustafsson WPG 329 Linus Weissbach BUF 330 Fredrik Olofsson CHI 331 Joe Wegwerth FLA 332 Christopher Wilkie FLA 365 Ryan McGregor TOR 374 Ben Jones VGK 376 Noah Cates PHI 391 Mathias Laferriere STL 416 Joel Teasdale MON 419 Morgan Barron NYR 423 Jakub Lauko BOS 424 Mathias Emilio Pettersen CGY 434 Aiden Dudas LAK 438 Cole Fonstad MON 439 Brandon Kruse VGK 448 Riley Stotts TOR 468 Martin Pospisil CGY 471 Brandon Hagel CHI 480 Eetu Tuulola CGY 489 Erik Walli Walterholm ARI 492 Nikolai Kovalenko COL 493 Vladislav Kara TOR 503 Albin Eriksson DAL 511 Cole Guttman TBL 512 Eetu Pakkila NJD 513 Brett Stapley MON 516 Parker Kelly OTT 522 Blade Jenkins NYI 524 Hugh McGing STL
from All About Sports https://dobberhockey.com/hockey-home/hockey-rankings/top-200-fantasy-prospect-forwards-february-2019/
0 notes
Text
Investigative Report in Kentucky Reveals Corruption Still Exists in Foster Care as Children Die or Go Missing


4-year-old Hunter Payton died in foster care from a fractured skull. The foster parent was later charged with murder. Image source from Wave 3 News video.
by Health Impact News/Medicalkidnap.com staff
The corruption in Kentucky Child Protection Services and Foster Care has been reported on extensively here at Health Impact News since 2015. See:
Child Trafficking Reported in Kentucky as “One of the Most Corrupt States in the Country”
A new report aired on Wave 3 News by investigative journalist John Boel reveals that corruption in the Kentucky Cabinet for Health and Family Services is apparently ongoing, as one child was allegedly murdered by his foster parent after being taken away from his family, and another foster parent is blowing the whistle on the abuses of Kentucky foster care where children go missing due to lack of oversight.
The current investigation began in 2017, when 4-year-old Hunter Payton died in foster care, and his biological parents questioned the story put forward as to the cause of his death, which was reported to be an accident.
“They told us it was an 'unlikely' injury,” Hunter's mother April Payton said. “It doesn't happen. Something hit him hard.”
He had only been in foster care for 3 months. During that time, the parents allegedly complained to the state about bruising on their son, and they were apparently told several different stories about how he died in an accidental fall.
As John Boel reports:
Months after our report, Billy Embry-Martin, 33, was charged with murder.
The lawsuit accuses him and his husband, Travis Embry-Martin, of “violent punishment, physical abuse and denial of food.”
Billy Embry-Martin is free on bond awaiting a December trial on the murder charge.
Further Investigation Reveals Kentucky Foster Care System is “Corrupt and Incompetent”

The Payton family before Hunter's death. Image source courtesy of Wave 3 News.
In another report by John Boel published in September, 2018, attorney Ron Hines spoke out against Kentucky Cabinet for Health and Family Services:
“The Cabinet for families and children, the setup, is corrupt and incompetent,” attorney Ron Hines said. “It's no longer helping children, and just getting them a better jump start in life, nothing like that anymore. It's a for-profit scheme.”
Attorney Hines stated that the problem stems from the State of Kentucky paying a private company to place children in foster homes:
When Hines looked into it and filed a wrongful death lawsuit, he found the Kentucky Cabinet for Health and Family Services paying a private company to place children in foster homes. Private companies place about half of the children in state care into foster homes.
“Simply for finding people who want to be foster parents, these private firms are making so many dollars per head per kid, so it's a vicious cycle,” Hines said. “The more kids, the more money. That's why it's run rampant. That's why the courts are swamped.”
Foster Parent Blows Whistle

Foster Parent Kim Campbell. Image courtesy Wave 3.
Next in John Boel's investigation, he interviewed Kim Campbell, a Kentucky foster parent who is enraged over the practices of the system that is killing and harming children:
“When these things happen, kids get lost, and they get hurt, they get killed, everybody scratches their head and says we don't know how it happened,” foster parent Kim Campbell said. “It starts like this.”
An outraged Campbell said she now understands how tragedies happen in Kentucky's foster care system. Her situation has nothing to do with privatization. She's been dealing with the same state government agency that's been placing foster children for decades. She brought us a pile of documentation to show what happened after she took emergency placement of a foster child on Feb. 16.
“The problem is, they had never met us,” Campbell said. “They never laid eyes on us. And I know they're supposed to come meet us to make sure we're an approved home.”
Two weeks after Campbell and her husband had taken in a foster child, a state worker wrote: “I don't even have you listed as having a placement.”
Five weeks and multiple emails after taking the teen the Campbells complained, “she has yet to be placed with us from an official standpoint. We have no info on her. We have no medical card.”
“We could have been anybody,” Campbell said. “We could've been very bad people. We could've done harm to her. We could have claimed she ran away, they wouldn't have known, they didn't lay eyes on her.”
At the 6 week mark Campbell complained, “If we were showing as unapproved in the system from the get go, why were we not contacted immediately?”
At the 2 month mark she wrote the state, “I have still never received any information on the child from the worker or her supervisor.”
“We had moved,” Campbell said. “They didn't know where we were. We told them we were moving and gave our address but they told my husband when they called him that we weren't even in the system as being an approved home. So if we're not in an approved home, why do we have your child for two months that you have not even come out to see?” (Source.)

Reporter John Boel has been reporting on the corruption in Kentucky CPS and Foster Care for over 10 years, and yet nothing seems to have changed. Here are some of his past investigations:
Whistleblowers Reveal CPS Child Kidnappings in Kentucky Adoption Business
Is Kentucky The Most Corrupt State in the Country Trafficking Children Through Child “Protection” Services?
Comment on this article at MedicalKidnap.com.
More on Kentucky corruption in kidnapping children:
Child Trafficking Reported in Kentucky as “One of the Most Corrupt States in the Country”
Kentucky is Being Investigated for Corruption: Will the State's Sordid History of Legal Kidnapping Finally be Punished?
Destroying Families in Kentucky via State-sponsored Child Trafficking: United We Stand, Divided We Fall
Medical Kidnapping in Kentucky: Mother Coerced to Give Up Daughter to Adoption in Order to Keep Son
Kentucky Baby Medically Kidnapped Along with Siblings and Forced on to Formula
Pregnant Homeschool Mom Assaulted by Sheriff as CPS Kidnaps Her Kids in Kentucky
Mom Speaks Out on Corrupt Kentucky Child “Protection” System that Destroyed her Family
Kentucky Parents Found Not Guilty of Charges in Criminal Court but Family Court Refuses to Return Children
Kentucky Family Falsely Accused of Child Abuse – Children Medically Kidnapped to Cover Corruption
1-Hour Old Newborn Baby Kidnapped at Kentucky Hospital because Parents Refused to Take Parenting Classes
Lexington KY Social Worker Caught Lying – Charged with “Misconduct”
Medical Kidnapping: A Threat to Every Family in America T-Shirt

100% Pre-shrunk Cotton!
Order here!
Medical Kidnapping is REAL!
See: Medical Kidnapping: A Threat to Every Family in America Today
Help spread the awareness of Medical Kidnapping by wearing the Medical Kidnapping t-shirt!
Support the cause of MedicalKidnap.com, which is part of the Health Impact News network.
Order here!
<!--//<![CDATA[
var m3_u = (location.protocol=='https:'?'https://network.sophiamedia.com/openx/www/delivery/ajs.php':'http://network.sophiamedia.com/openx/www/delivery/ajs.php');
var m3_r = Math.floor(Math.random()*99999999999);
if (!document.MAX_used) document.MAX_used = ',';
document.write ("<scr"+"ipt type='text/javascript' src='"+m3_u);
document.write ("?zoneid=3&target=_blank");
document.write ('&cb=' + m3_r);
if (document.MAX_used != ',') document.write ("&exclude=" + document.MAX_used);
document.write (document.charset ? '&charset='+document.charset : (document.characterSet ? '&charset='+document.characterSet : ''));
document.write ("&loc=" + escape(window.location));
if (document.referrer) document.write ("&referer=" + escape(document.referrer));
if (document.context) document.write ("&context=" + escape(document.context));
if (document.mmm_fo) document.write ("&mmm_fo=1");
document.write ("'><\/scr"+"ipt>");
//]]>-->

Support the cause against Medical Kidnapping by purchasing our new book!
If you know people who are skeptical and cannot believe that medical kidnapping happens in the U.S. today, this is the book for them! Backed with solid references and real life examples, they will not be able to deny the plain evidence before them, and will become better educated on this topic that is destroying the American family.

1 Book – 228 pages
Retail: $24.99
FREE Shipping Available!
Now: $14.99
Order here!

2 Books
Retail: $49.98 (for 2 books)
FREE Shipping Available!
Now: $19.99 (for 2 books)
Order here!
Also available as eBook:

eBook – Download Immediately!
$9.99
<!--//<![CDATA[
var m3_u = (location.protocol=='https:'?'https://network.sophiamedia.com/openx/www/delivery/ajs.php':'http://network.sophiamedia.com/openx/www/delivery/ajs.php');
var m3_r = Math.floor(Math.random()*99999999999);
if (!document.MAX_used) document.MAX_used = ',';
document.write ("<scr"+"ipt type='text/javascript' src='"+m3_u);
document.write ("?zoneid=3&target=_blank");
document.write ('&cb=' + m3_r);
if (document.MAX_used != ',') document.write ("&exclude=" + document.MAX_used);
document.write (document.charset ? '&charset='+document.charset : (document.characterSet ? '&charset='+document.characterSet : ''));
document.write ("&loc=" + escape(window.location));
if (document.referrer) document.write ("&referer=" + escape(document.referrer));
if (document.context) document.write ("&context=" + escape(document.context));
if (document.mmm_fo) document.write ("&mmm_fo=1");
document.write ("'><\/scr"+"ipt>");
//]]>-->
0 notes
Text
Agilenano - News: How To Set Up An Express API Backend Project With PostgreSQL Chidi Orji 2020-04-08T11:00:00+00:002020-04-08T13:35:17+00:00
We will take a Test-Driven Development (TDD) approach and the set up Continuous Integration (CI) job to automatically run our tests on Travis CI and AppVeyor, complete with code quality and coverage reporting. We will learn about controllers, models (with PostgreSQL), error handling, and asynchronous Express middleware. Finally, we’ll complete the CI/CD pipeline by configuring automatic deploy on Heroku.
It sounds like a lot, but this tutorial is aimed at beginners who are ready to try their hands on a backend project with some level of complexity, and who may still be confused as to how all the pieces fit together in a real project.
It is robust without being overwhelming and is broken down into sections that you can complete in a reasonable length of time.
Getting Started
The first step is to create a new directory for the project and start a new node project. Node is required to continue with this tutorial. If you don’t have it installed, head over to the official website, download, and install it before continuing.
I will be using yarn as my package manager for this project. There are installation instructions for your specific operating system here. Feel free to use npm if you like.
Open your terminal, create a new directory, and start a Node.js project.
# create a new directory mkdir express-api-template # change to the newly-created directory cd express-api-template # initialize a new Node.js project npm init
Answer the questions that follow to generate a package.json file. This file holds information about your project. Example of such information includes what dependencies it uses, the command to start the project, and so on.
You may now open the project folder in your editor of choice. I use visual studio code. It’s a free IDE with tons of plugins to make your life easier, and it’s available for all major platforms. You can download it from the official website.
Create the following files in the project folder:
README.md .editorconfig
Here’s a description of what .editorconfig does from the EditorConfig website. (You probably don’t need it if you’re working solo, but it does no harm, so I’ll leave it here.)
“EditorConfig helps maintain consistent coding styles for multiple developers working on the same project across various editors and IDEs.”
Open .editorconfig and paste the following code:
root = true [*] indent_style = space indent_size = 2 charset = utf-8 trim_trailing_whitespace = false insert_final_newline = true
The [*] means that we want to apply the rules that come under it to every file in the project. We want an indent size of two spaces and UTF-8 character set. We also want to trim trailing white space and insert a final empty line in our file.
Open README.md and add the project name as a first-level element.
# Express API template
Let’s add version control right away.
# initialize the project folder as a git repository git init
Create a .gitignore file and enter the following lines:
node_modules/ yarn-error.log .env .nyc_output coverage build/
These are all the files and folders we don’t want to track. We don’t have them in our project yet, but we’ll see them as we proceed.
At this point, you should have the following folder structure.
EXPRESS-API-TEMPLATE ├── .editorconfig ├── .gitignore ├── package.json └── README.md
I consider this to be a good point to commit my changes and push them to GitHub.
Starting A New Express Project
Express is a Node.js framework for building web applications. According to the official website, it is a
Fast, unopinionated, minimalist web framework for Node.js.
There are other great web application frameworks for Node.js, but Express is very popular, with over 47k GitHub stars at the time of this writing.
In this article, we will not be having a lot of discussions about all the parts that make up Express. For that discussion, I recommend you check out Jamie’s series. The first part is here, and the second part is here.
Install Express and start a new Express project. It’s possible to manually set up an Express server from scratch but to make our life easier we’ll use the express-generator to set up the app skeleton.
# install the express generator globally yarn global add express-generator # install express yarn add express # generate the express project in the current folder express -f
The -f flag forces Express to create the project in the current directory.
We’ll now perform some house-cleaning operations.
Delete the file index/users.js. Delete the folders public/ and views/. Rename the file bin/www to bin/www.js. Uninstall jade with the command yarn remove jade. Create a new folder named src/ and move the following inside it: 1. app.js file 2. bin/ folder 3. routes/ folder inside. Open up package.json and update the start script to look like below. "start": "node ./src/bin/www"
At this point, your project folder structure looks like below. You can see how VS Code highlights the file changes that have taken place.
EXPRESS-API-TEMPLATE ├── node_modules ├── src | ├── bin │ │ ├── www.js │ ├── routes │ | ├── index.js │ └── app.js ├── .editorconfig ├── .gitignore ├── package.json ├── README.md └── yarn.lock
Open src/app.js and replace the content with the below code.
var logger = require('morgan'); var express = require('express'); var cookieParser = require('cookie-parser'); var indexRouter = require('./routes/index'); var app = express(); app.use(logger('dev')); app.use(express.json()); app.use(express.urlencoded({ extended: true })); app.use(cookieParser()); app.use('/v1', indexRouter); module.exports = app;
After requiring some libraries, we instruct Express to handle every request coming to /v1 with indexRouter.
Replace the content of routes/index.js with the below code:
var express = require('express'); var router = express.Router(); router.get('/', function(req, res, next) { return res.status(200).json({ message: 'Welcome to Express API template' }); }); module.exports = router;
We grab Express, create a router from it and serve the / route, which returns a status code of 200 and a JSON message.
Start the app with the below command:
# start the app yarn start
If you’ve set up everything correctly you should only see $ node ./src/bin/www in your terminal.
Visit http://localhost:3000/v1 in your browser. You should see the following message:
{ "message": "Welcome to Express API template" }
This is a good point to commit our changes.
The corresponding branch in my repo is 01-install-express. Converting Our Code To ES6
The code generated by express-generator is in ES5, but in this article, we will be writing all our code in ES6 syntax. So, let’s convert our existing code to ES6.
Replace the content of routes/index.js with the below code:
import express from 'express'; const indexRouter = express.Router(); indexRouter.get('/', (req, res) => res.status(200).json({ message: 'Welcome to Express API template' }) ); export default indexRouter;
It is the same code as we saw above, but with the import statement and an arrow function in the / route handler.
Replace the content of src/app.js with the below code:
import logger from 'morgan'; import express from 'express'; import cookieParser from 'cookie-parser'; import indexRouter from './routes/index'; const app = express(); app.use(logger('dev')); app.use(express.json()); app.use(express.urlencoded({ extended: true })); app.use(cookieParser()); app.use('/v1', indexRouter); export default app;
Let’s now take a look at the content of src/bin/www.js. We will build it incrementally. Delete the content of src/bin/www.js and paste in the below code block.
#!/usr/bin/env node /** * Module dependencies. */ import debug from 'debug'; import http from 'http'; import app from '../app'; /** * Normalize a port into a number, string, or false. */ const normalizePort = val => { const port = parseInt(val, 10); if (Number.isNaN(port)) { // named pipe return val; } if (port >= 0) { // port number return port; } return false; }; /** * Get port from environment and store in Express. */ const port = normalizePort(process.env.PORT || '3000'); app.set('port', port); /** * Create HTTP server. */ const server = http.createServer(app); // next code block goes here
This code checks if a custom port is specified in the environment variables. If none is set the default port value of 3000 is set on the app instance, after being normalized to either a string or a number by normalizePort. The server is then created from the http module, with app as the callback function.
The #!/usr/bin/env node line is optional since we would specify node when we want to execute this file. But make sure it is on line 1 of src/bin/www.js file or remove it completely.
Let’s take a look at the error handling function. Copy and paste this code block after the line where the server is created.
/** * Event listener for HTTP server "error" event. */ const onError = error => { if (error.syscall !== 'listen') { throw error; } const bind = typeof port === 'string' ? `Pipe ${port}` : `Port ${port}`; // handle specific listen errors with friendly messages switch (error.code) { case 'EACCES': alert(`${bind} requires elevated privileges`); process.exit(1); break; case 'EADDRINUSE': alert(`${bind} is already in use`); process.exit(1); break; default: throw error; } }; /** * Event listener for HTTP server "listening" event. */ const onListening = () => { const addr = server.address(); const bind = typeof addr === 'string' ? `pipe ${addr}` : `port ${addr.port}`; debug(`Listening on ${bind}`); }; /** * Listen on provided port, on all network interfaces. */ server.listen(port); server.on('error', onError); server.on('listening', onListening);
The onError function listens for errors in the http server and displays appropriate error messages. The onListening function simply outputs the port the server is listening on to the console. Finally, the server listens for incoming requests at the specified address and port.
At this point, all our existing code is in ES6 syntax. Stop your server (use Ctrl + C) and run yarn start. You’ll get an error SyntaxError: Invalid or unexpected token. This happens because Node (at the time of writing) doesn’t support some of the syntax we’ve used in our code.
We’ll now fix that in the following section.
Configuring Development Dependencies: babel, nodemon, eslint, And prettier
It’s time to set up most of the scripts we’re going to need at this phase of the project.
Install the required libraries with the below commands. You can just copy everything and paste it in your terminal. The comment lines will be skipped.
# install babel scripts yarn add @babel/cli @babel/core @babel/plugin-transform-runtime @babel/preset-env @babel/register @babel/runtime @babel/node --dev
This installs all the listed babel scripts as development dependencies. Check your package.json file and you should see a devDependencies section. All the installed scripts will be listed there.
The babel scripts we’re using are explained below:
@babel/cli A required install for using babel. It allows the use of Babel from the terminal and is available as ./node_modules/.bin/babel. @babel/core Core Babel functionality. This is a required installation. @babel/node This works exactly like the Node.js CLI, with the added benefit of compiling with babel presets and plugins. This is required for use with nodemon. @babel/plugin-transform-runtime This helps to avoid duplication in the compiled output. @babel/preset-env A collection of plugins that are responsible for carrying out code transformations. @babel/register This compiles files on the fly and is specified as a requirement during tests. @babel/runtime This works in conjunction with @babel/plugin-transform-runtime.
Create a file named .babelrc at the root of your project and add the following code:
{ "presets": ["@babel/preset-env"], "plugins": ["@babel/transform-runtime"] }
Let’s install nodemon
# install nodemon yarn add nodemon --dev
nodemon is a library that monitors our project source code and automatically restarts our server whenever it observes any changes.
Create a file named nodemon.json at the root of your project and add the code below:
{ "watch": [ "package.json", "nodemon.json", ".eslintrc.json", ".babelrc", ".prettierrc", "src/" ], "verbose": true, "ignore": ["*.test.js", "*.spec.js"] }
The watch key tells nodemon which files and folders to watch for changes. So, whenever any of these files changes, nodemon restarts the server. The ignore key tells it the files not to watch for changes.
Now update the scripts section of your package.json file to look like the following:
# build the content of the src folder "prestart": "babel ./src --out-dir build" # start server from the build folder "start": "node ./build/bin/www" # start server in development mode "startdev": "nodemon --exec babel-node ./src/bin/www" prestart scripts builds the content of the src/ folder and puts it in the build/ folder. When you issue the yarn start command, this script runs first before the start script. start script now serves the content of the build/ folder instead of the src/ folder we were serving previously. This is the script you’ll use when serving the file in production. In fact, services like Heroku automatically run this script when you deploy. yarn startdev is used to start the server during development. From now on we will be using this script as we develop the app. Notice that we’re now using babel-node to run the app instead of regular node. The --exec flag forces babel-node to serve the src/ folder. For the start script, we use node since the files in the build/ folder have been compiled to ES5.
Run yarn startdev and visit http://localhost:3000/v1. Your server should be up and running again.
The final step in this section is to configure ESLint and prettier. ESLint helps with enforcing syntax rules while prettier helps for formatting our code properly for readability.
Add both of them with the command below. You should run this on a separate terminal while observing the terminal where our server is running. You should see the server restarting. This is because we’re monitoring package.json file for changes.
# install elsint and prettier yarn add eslint eslint-config-airbnb-base eslint-plugin-import prettier --dev
Now create the .eslintrc.json file in the project root and add the below code:
{ "env": { "browser": true, "es6": true, "node": true, "mocha": true }, "extends": ["airbnb-base"], "globals": { "Atomics": "readonly", "SharedArrayBuffer": "readonly" }, "parserOptions": { "ecmaVersion": 2018, "sourceType": "module" }, "rules": { "indent": ["warn", 2], "linebreak-style": ["error", "unix"], "quotes": ["error", "single"], "semi": ["error", "always"], "no-console": 1, "comma-dangle": [0], "arrow-parens": [0], "object-curly-spacing": ["warn", "always"], "array-bracket-spacing": ["warn", "always"], "import/prefer-default-export": [0] } }
This file mostly defines some rules against which eslint will check our code. You can see that we’re extending the style rules used by Airbnb.
In the "rules" section, we define whether eslint should show a warning or an error when it encounters certain violations. For instance, it shows a warning message on our terminal for any indentation that does not use 2 spaces. A value of [0] turns off a rule, which means that we won’t get a warning or an error if we violate that rule.
Create a file named .prettierrc and add the code below:
{ "trailingComma": "es5", "tabWidth": 2, "semi": true, "singleQuote": true }
We’re setting a tab width of 2 and enforcing the use of single quotes throughout our application. Do check the prettier guide for more styling options.
Now add the following scripts to your package.json:
# add these one after the other "lint": "./node_modules/.bin/eslint ./src" "pretty": "prettier --write '**/*.{js,json}' '!node_modules/**'" "postpretty": "yarn lint --fix"
Run yarn lint. You should see a number of errors and warnings in the console.
The pretty command prettifies our code. The postpretty command is run immediately after. It runs the lint command with the --fix flag appended. This flag tells ESLint to automatically fix common linting issues. In this way, I mostly run the yarn pretty command without bothering about the lint command.
Run yarn pretty. You should see that we have only two warnings about the presence of alert in the bin/www.js file.
Here’s what our project structure looks like at this point.
EXPRESS-API-TEMPLATE ├── build ├── node_modules ├── src | ├── bin │ │ ├── www.js │ ├── routes │ | ├── index.js │ └── app.js ├── .babelrc ├── .editorconfig ├── .eslintrc.json ├── .gitignore ├── .prettierrc ├── nodemon.json ├── package.json ├── README.md └── yarn.lock
You may find that you have an additional file, yarn-error.log in your project root. Add it to .gitignore file. Commit your changes.
The corresponding branch at this point in my repo is 02-dev-dependencies. Settings And Environment Variables In Our .env File
In nearly every project, you’ll need somewhere to store settings that will be used throughout your app e.g. an AWS secret key. We store such settings as environment variables. This keeps them away from prying eyes, and we can use them within our application as needed.
I like having a settings.js file with which I read all my environment variables. Then, I can refer to the settings file from anywhere within my app. You’re at liberty to name this file whatever you want, but there’s some kind of consensus about naming such files settings.js or config.js.
For our environment variables, we’ll keep them in a .env file and read them into our settings file from there.
Create the .env file at the root of your project and enter the below line:
TEST_ENV_VARIABLE="Environment variable is coming across"
To be able to read environment variables into our project, there’s a nice library, dotenv that reads our .env file and gives us access to the environment variables defined inside. Let’s install it.
# install dotenv yarn add dotenv
Add the .env file to the list of files being watched by nodemon.
Now, create the settings.js file inside the src/ folder and add the below code:
import dotenv from 'dotenv'; dotenv.config(); export const testEnvironmentVariable = process.env.TEST_ENV_VARIABLE;
We import the dotenv package and call its config method. We then export the testEnvironmentVariable which we set in our .env file.
Open src/routes/index.js and replace the code with the one below.
import express from 'express'; import { testEnvironmentVariable } from '../settings'; const indexRouter = express.Router(); indexRouter.get('/', (req, res) => res.status(200).json({ message: testEnvironmentVariable })); export default indexRouter;
The only change we’ve made here is that we import testEnvironmentVariable from our settings file and use is as the return message for a request from the / route.
Visit http://localhost:3000/v1 and you should see the message, as shown below.
{ "message": "Environment variable is coming across." }
And that’s it. From now on we can add as many environment variables as we want and we can export them from our settings.js file.
This is a good point to commit your code. Remember to prettify and lint your code.
The corresponding branch on my repo is 03-env-variables. Writing Our First Test
It’s time to incorporate testing into our app. One of the things that give the developer confidence in their code is tests. I’m sure you’ve seen countless articles on the web preaching Test-Driven Development (TDD). It cannot be emphasized enough that your code needs some measure of testing. TDD is very easy to follow when you’re working with Express.js.
In our tests, we will make calls to our API endpoints and check to see if what is returned is what we expect.
Install the required dependencies:
# install dependencies yarn add mocha chai nyc sinon-chai supertest coveralls --dev
Each of these libraries has its own role to play in our tests.
mocha test runner chai used to make assertions nyc collect test coverage report sinon-chai extends chai’s assertions supertest used to make HTTP calls to our API endpoints coveralls for uploading test coverage to coveralls.io
Create a new test/ folder at the root of your project. Create two files inside this folder:
test/setup.js test/index.test.js
Mocha will find the test/ folder automatically.
Open up test/setup.js and paste the below code. This is just a helper file that helps us organize all the imports we need in our test files.
import supertest from 'supertest'; import chai from 'chai'; import sinonChai from 'sinon-chai'; import app from '../src/app'; chai.use(sinonChai); export const { expect } = chai; export const server = supertest.agent(app); export const BASE_URL = '/v1';
This is like a settings file, but for our tests. This way we don’t have to initialize everything inside each of our test files. So we import the necessary packages and export what we initialized — which we can then import in the files that need them.
Open up index.test.js and paste the following test code.
import { expect, server, BASE_URL } from './setup'; describe('Index page test', () => { it('gets base url', done => { server .get(`${BASE_URL}/`) .expect(200) .end((err, res) => { expect(res.status).to.equal(200); expect(res.body.message).to.equal( 'Environment variable is coming across.' ); done(); }); }); });
Here we make a request to get the base endpoint, which is / and assert that the res.body object has a message key with a value of Environment variable is coming across.
If you’re not familiar with the describe, it pattern, I encourage you to take a quick look at Mocha’s “Getting Started” doc.
Add the test command to the scripts section of package.json.
"test": "nyc --reporter=html --reporter=text --reporter=lcov mocha -r @babel/register"
This script executes our test with nyc and generates three kinds of coverage report: an HTML report, outputted to the coverage/ folder; a text report outputted to the terminal and an lcov report outputted to the .nyc_output/ folder.
Now run yarn test. You should see a text report in your terminal just like the one in the below photo.
Test coverage report (Large preview)
Notice that two additional folders are generated:
.nyc_output/ coverage/
Look inside .gitignore and you’ll see that we’re already ignoring both. I encourage you to open up coverage/index.html in a browser and view the test report for each file.
This is a good point to commit your changes.
The corresponding branch in my repo is 04-first-test. Continuous Integration(CD) And Badges: Travis, Coveralls, Code Climate, AppVeyor
It’s now time to configure continuous integration and deployment (CI/CD) tools. We will configure common services such as travis-ci, coveralls, AppVeyor, and codeclimate and add badges to our README file.
Let’s get started.
Travis CI
Travis CI is a tool that runs our tests automatically each time we push a commit to GitHub (and recently, Bitbucket) and each time we create a pull request. This is mostly useful when making pull requests by showing us if the our new code has broken any of our tests.
Visit travis-ci.com or travis-ci.org and create an account if you don’t have one. You have to sign up with your GitHub account. Hover over the dropdown arrow next to your profile picture and click on settings. Under Repositories tab click Manage repositories on Github to be redirected to Github. On the GitHub page, scroll down to Repository access and click the checkbox next to Only select repositories. Click the Select repositories dropdown and find the express-api-template repo. Click it to add it to the list of repositories you want to add to travis-ci. Click Approve and install and wait to be redirected back to travis-ci. At the top of the repo page, close to the repo name, click on the build unknown icon. From the Status Image modal, select markdown from the format dropdown. Copy the resulting code and paste it in your README.md file. On the project page, click on More options > Settings. Under Environment Variables section, add the TEST_ENV_VARIABLE env variable. When entering its value, be sure to have it within double quotes like this "Environment variable is coming across." Create .travis.yml file at the root of your project and paste in the below code (We’ll set the value of CC_TEST_REPORTER_ID in the Code Climate section). language: node_js env: global: - CC_TEST_REPORTER_ID=get-this-from-code-climate-repo-page matrix: include: - node_js: '12' cache: directories: [node_modules] install: yarn after_success: yarn coverage before_script: - curl -L https://codeclimate.com/downloads/test-reporter/test-reporter-latest-linux-amd64 > ./cc-test-reporter - chmod +x ./cc-test-reporter - ./cc-test-reporter before-build script: - yarn test after_script: - ./cc-test-reporter after-build --exit-code $TRAVIS_TEST_RESUL
First, we tell Travis to run our test with Node.js, then set the CC_TEST_REPORTER_ID global environment variable (we’ll get to this in the Code Climate section). In the matrix section, we tell Travis to run our tests with Node.js v12. We also want to cache the node_modules/ directory so it doesn’t have to be regenerated every time.
We install our dependencies using the yarn command which is a shorthand for yarn install. The before_script and after_script commands are used to upload coverage results to codeclimate. We’ll configure codeclimate shortly. After yarn test runs successfully, we want to also run yarn coverage which will upload our coverage report to coveralls.io.
Coveralls
Coveralls uploads test coverage data for easy visualization. We can view the test coverage on our local machine from the coverage folder, but Coveralls makes it available outside our local machine.
Visit coveralls.io and either sign in or sign up with your Github account. Hover over the left-hand side of the screen to reveal the navigation menu. Click on ADD REPOS. Search for the express-api-template repo and turn on coverage using the toggle button on the left-hand side. If you can’t find it, click on SYNC REPOS on the upper right-hand corner and try again. Note that your repo has to be public, unless you have a PRO account. Click details to go to the repo details page. Create the .coveralls.yml file at the root of your project and enter the below code. To get the repo_token, click on the repo details. You will find it easily on that page. You could just do a browser search for repo_token. repo_token: get-this-from-repo-settings-on-coveralls.io
This token maps your coverage data to a repo on Coveralls. Now, add the coverage command to the scripts section of your package.json file:
"coverage": "nyc report --reporter=text-lcov | coveralls"
This command uploads the coverage report in the .nyc_output folder to coveralls.io. Turn on your Internet connection and run:
yarn coverage
This should upload the existing coverage report to coveralls. Refresh the repo page on coveralls to see the full report.
On the details page, scroll down to find the BADGE YOUR REPO section. Click on the EMBED dropdown and copy the markdown code and paste it into your README file.
Code Climate
Code Climate is a tool that helps us measure code quality. It shows us maintenance metrics by checking our code against some defined patterns. It detects things such as unnecessary repetition and deeply nested for loops. It also collects test coverage data just like coveralls.io.
Visit codeclimate.com and click on ‘Sign up with GitHub’. Log in if you already have an account. Once in your dashboard, click on Add a repository. Find the express-api-template repo from the list and click on Add Repo. Wait for the build to complete and redirect to the repo dashboard. Under Codebase Summary, click on Test Coverage. Under the Test coverage menu, copy the TEST REPORTER ID and paste it in your .travis.yml as the value of CC_TEST_REPORTER_ID. Still on the same page, on the left-hand navigation, under EXTRAS, click on Badges. Copy the maintainability and test coverage badges in markdown format and paste them into your README.md file.
It’s important to note that there are two ways of configuring maintainability checks. There are the default settings that are applied to every repo, but if you like, you could provide a .codeclimate.yml file at the root of your project. I’ll be using the default settings, which you can find under the Maintainability tab of the repo settings page. I encourage you to take a look at least. If you still want to configure your own settings, this guide will give you all the information you need.
AppVeyor
AppVeyor and Travis CI are both automated test runners. The main difference is that travis-ci runs tests in a Linux environment while AppVeyor runs tests in a Windows environment. This section is included to show how to get started with AppVeyor.
Visit AppVeyor and log in or sign up. On the next page, click on NEW PROJECT. From the repo list, find the express-api-template repo. Hover over it and click ADD. Click on the Settings tab. Click on Environment on the left navigation. Add TEST_ENV_VARIABLE and its value. Click ‘Save’ at the bottom of the page. Create the appveyor.yml file at the root of your project and paste in the below code. environment: matrix: - nodejs_version: "12" install: - yarn test_script: - yarn test build: off
This code instructs AppVeyor to run our tests using Node.js v12. We then install our project dependencies with the yarn command. test_script specifies the command to run our test. The last line tells AppVeyor not to create a build folder.
Click on the Settings tab. On the left-hand navigation, click on badges. Copy the markdown code and paste it in your README.md file.
Commit your code and push to GitHub. If you have done everything as instructed all tests should pass and you should see your shiny new badges as shown below. Check again that you have set the environment variables on Travis and AppVeyor.
Repo CI/CD badges. (Large preview)
Now is a good time to commit our changes.
The corresponding branch in my repo is 05-ci. Adding A Controller
Currently, we’re handling the GET request to the root URL, /v1, inside the src/routes/index.js. This works as expected and there is nothing wrong with it. However, as your application grows, you want to keep things tidy. You want concerns to be separated — you want a clear separation between the code that handles the request and the code that generates the response that will be sent back to the client. To achieve this, we write controllers. Controllers are simply functions that handle requests coming through a particular URL.
To get started, create a controllers/ folder inside the src/ folder. Inside controllers create two files: index.js and home.js. We would export our functions from within index.js. You could name home.js anything you want, but typically you want to name controllers after what they control. For example, you might have a file usersController.js to hold every function related to users in your app.
Open src/controllers/home.js and enter the code below:
import { testEnvironmentVariable } from '../settings'; export const indexPage = (req, res) => res.status(200).json({ message: testEnvironmentVariable });
You will notice that we only moved the function that handles the request for the / route.
Open src/controllers/index.js and enter the below code.
// export everything from home.js export * from './home';
We export everything from the home.js file. This allows us shorten our import statements to import { indexPage } from '../controllers';
Open src/routes/index.js and replace the code there with the one below:
import express from 'express'; import { indexPage } from '../controllers'; const indexRouter = express.Router(); indexRouter.get('/', indexPage); export default indexRouter;
The only change here is that we’ve provided a function to handle the request to the / route.
You just successfully wrote your first controller. From here it’s a matter of adding more files and functions as needed.
Go ahead and play with the app by adding a few more routes and controllers. You could add a route and a controller for the about page. Remember to update your test, though.
Run yarn test to confirm that we’ve not broken anything. Does your test pass? That’s cool.
This is a good point to commit our changes.
The corresponding branch in my repo is 06-controllers. Connecting The PostgreSQL Database And Writing A Model
Our controller currently returns hard-coded text messages. In a real-world app, we often need to store and retrieve information from a database. In this section, we will connect our app to a PostgreSQL database.
We’re going to implement the storage and retrieval of simple text messages using a database. We have two options for setting a database: we could provision one from a cloud server, or we could set up our own locally.
I would recommend you provision a database from a cloud server. ElephantSQL has a free plan that gives 20MB of free storage which is sufficient for this tutorial. Visit the site and click on Get a managed database today. Create an account (if you don’t have one) and follow the instructions to create a free plan. Take note of the URL on the database details page. We’ll be needing it soon.
ElephantSQL turtle plan details page (Large preview)
If you would rather set up a database locally, you should visit the PostgreSQL and PgAdmin sites for further instructions.
Once we have a database set up, we need to find a way to allow our Express app to communicate with our database. Node.js by default doesn’t support reading and writing to PostgreSQL database, so we’ll be using an excellent library, appropriately named, node-postgres.
node-postgres executes SQL queries in node and returns the result as an object, from which we can grab items from the rows key.
Let’s connect node-postgres to our application.
# install node-postgres yarn add pg
Open settings.js and add the line below:
export const connectionString = process.env.CONNECTION_STRING;
Open your .env file and add the CONNECTION_STRING variable. This is the connection string we’ll be using to establish a connection to our database. The general form of the connection string is shown below.
CONNECTION_STRING="postgresql://dbuser:dbpassword@localhost:5432/dbname"
If you’re using elephantSQL you should copy the URL from the database details page.
Inside your /src folder, create a new folder called models/. Inside this folder, create two files:
pool.js model.js
Open pools.js and paste the following code:
import { Pool } from 'pg'; import dotenv from 'dotenv'; import { connectionString } from '../settings'; dotenv.config(); export const pool = new Pool({ connectionString });
First, we import the Pool and dotenv from the pg and dotenv packages, and then import the settings we created for our postgres database before initializing dotenv. We establish a connection to our database with the Pool object. In node-postgres, every query is executed by a client. A Pool is a collection of clients for communicating with the database.
To create the connection, the pool constructor takes a config object. You can read more about all the possible configurations here. It also accepts a single connection string, which I will use here.
Open model.js and paste the following code:
import { pool } from './pool'; class Model { constructor(table) { this.pool = pool; this.table = table; this.pool.on('error', (err, client) => `Error, ${err}, on idle client${client}`); } async select(columns, clause) { let query = `SELECT ${columns} FROM ${this.table}`; if (clause) query += clause; return this.pool.query(query); } } export default Model;
We create a model class whose constructor accepts the database table we wish to operate on. We’ll be using a single pool for all our models.
We then create a select method which we will use to retrieve items from our database. This method accepts the columns we want to retrieve and a clause, such as a WHERE clause. It returns the result of the query, which is a Promise. Remember we said earlier that every query is executed by a client, but here we execute the query with pool. This is because, when we use pool.query, node-postgres executes the query using the first available idle client.
The query you write is entirely up to you, provided it is a valid SQL statement that can be executed by a Postgres engine.
The next step is to actually create an API endpoint to utilize our newly connected database. Before we do that, I’d like us to create some utility functions. The goal is for us to have a way to perform common database operations from the command line.
Create a folder, utils/ inside the src/ folder. Create three files inside this folder:
queries.js queryFunctions.js runQuery.js
We’re going to create functions to create a table in our database, insert seed data in the table, and to delete the table.
Open up queries.js and paste the following code:
export const createMessageTable = ` DROP TABLE IF EXISTS messages; CREATE TABLE IF NOT EXISTS messages ( id SERIAL PRIMARY KEY, name VARCHAR DEFAULT '', message VARCHAR NOT NULL ) `; export const insertMessages = ` INSERT INTO messages(name, message) VALUES ('chidimo', 'first message'), ('orji', 'second message') `; export const dropMessagesTable = 'DROP TABLE messages';
In this file, we define three SQL query strings. The first query deletes and recreates the messages table. The second query inserts two rows into the messages table. Feel free to add more items here. The last query drops/deletes the messages table.
Open queryFunctions.js and paste the following code:
import { pool } from '../models/pool'; import { insertMessages, dropMessagesTable, createMessageTable, } from './queries'; export const executeQueryArray = async arr => new Promise(resolve => { const stop = arr.length; arr.forEach(async (q, index) => { await pool.query(q); if (index + 1 === stop) resolve(); }); }); export const dropTables = () => executeQueryArray([ dropMessagesTable ]); export const createTables = () => executeQueryArray([ createMessageTable ]); export const insertIntoTables = () => executeQueryArray([ insertMessages ]);
Here, we create functions to execute the queries we defined earlier. Note that the executeQueryArray function executes an array of queries and waits for each one to complete inside the loop. (Don’t do such a thing in production code though). Then, we only resolve the promise once we have executed the last query in the list. The reason for using an array is that the number of such queries will grow as the number of tables in our database grows.
Open runQuery.js and paste the following code:
import { createTables, insertIntoTables } from './queryFunctions'; (async () => { await createTables(); await insertIntoTables(); })();
This is where we execute the functions to create the table and insert the messages in the table. Let’s add a command in the scripts section of our package.json to execute this file.
"runQuery": "babel-node ./src/utils/runQuery"
Now run:
yarn runQuery
If you inspect your database, you will see that the messages table has been created and that the messages were inserted into the table.
If you’re using ElephantSQL, on the database details page, click on BROWSER from the left navigation menu. Select the messages table and click Execute. You should see the messages from the queries.js file.
Let’s create a controller and route to display the messages from our database.
Create a new controller file src/controllers/messages.js and paste the following code:
import Model from '../models/model'; const messagesModel = new Model('messages'); export const messagesPage = async (req, res) => { try { const data = await messagesModel.select('name, message'); res.status(200).json({ messages: data.rows }); } catch (err) { res.status(200).json({ messages: err.stack }); } };
We import our Model class and create a new instance of that model. This represents the messages table in our database. We then use the select method of the model to query our database. The data (name and message) we get is sent as JSON in the response.
We define the messagesPage controller as an async function. Since node-postgres queries return a promise, we await the result of that query. If we encounter an error during the query we catch it and display the stack to the user. You should decide how choose to handle the error.
Add the get messages endpoint to src/routes/index.js and update the import line.
# update the import line import { indexPage, messagesPage } from '../controllers'; # add the get messages endpoint indexRouter.get('/messages', messagesPage)
Visit http://localhost:3000/v1/messages and you should see the messages displayed as shown below.
Messages from database. (Large preview)
Now, let’s update our test file. When doing TDD, you usually write your tests before implementing the code that makes the test pass. I’m taking the opposite approach here because we’re still working on setting up the database.
Create a new file, hooks.js in the test/ folder and enter the below code:
import { dropTables, createTables, insertIntoTables, } from '../src/utils/queryFunctions'; before(async () => { await createTables(); await insertIntoTables(); }); after(async () => { await dropTables(); });
When our test starts, Mocha finds this file and executes it before running any test file. It executes the before hook to create the database and insert some items into it. The test files then run after that. Once the test is finished, Mocha runs the after hook in which we drop the database. This ensures that each time we run our tests, we do so with clean and new records in our database.
Create a new test file test/messages.test.js and add the below code:
import { expect, server, BASE_URL } from './setup'; describe('Messages', () => { it('get messages page', done => { server .get(`${BASE_URL}/messages`) .expect(200) .end((err, res) => { expect(res.status).to.equal(200); expect(res.body.messages).to.be.instanceOf(Array); res.body.messages.forEach(m => { expect(m).to.have.property('name'); expect(m).to.have.property('message'); }); done(); }); }); });
We assert that the result of the
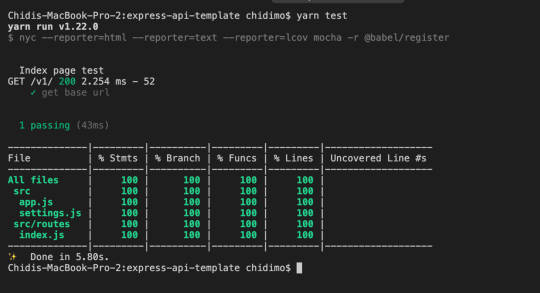
Agilenano - News
from Agilenano from shopsnetwork (4 sites) http://feedproxy.google.com/~r/Agilenano-News/~3/JCvpZjXXQOw/how-to-set-up-an-express-api-backend-project-with-postgresql-chidi-orji-2020-04-08t11-00-00-00-002020-04-08t13-35-17-00-00
0 notes
Text
Ramblings: Arvidsson Tricks, Puljujarvi on the Block, Nyquist, Hertl, & The Kanes (Jan. 16)
Let’s start this off with some news out of Edmonton. Apparently, Peter Chiarelli is ready and willing to make a splash. Rumours have swirled of late that the Oilers are willing to move this year’s first-round selection to push for a playoff spot. And according to Elliott Freidman on the NHL Network, Jesse Puljujarvi has joined in on the fun as an official trade chip.
Firstly, if ownership allows Chiarelli to destroy their future even further by dealing that pick or Puljujarvi, then there must no longer be any doubt; Chia has some disgusting dirt on Daryl Katz.
Whatever happens in Edmonton (and I assume it’ll be an unmitigated disaster), Puljujarvi getting out of town seems like the best hope for his fantasy value moving forward. Either that or a locked in spot next to Connor McDavid. A scenario that does not appear to be in the cards.
**
Speaking of the Oilers, their next opponent is the Canucks on Wednesday. Elias Pettersson skated by himself after practice again on Tuesday but Canucks’ head coach, Travis Green wasn’t willing to rule him out for Wednesday’s tilt just yet. At the very least, it appears as though the super rookie should be back for Friday against the Sabres.
**
The bottoming out continued in Anaheim on Tuesday. The Ducks fell to the Red Wings 3-1 and are now winless in 12. They’ve collected just four points in the last month.
The freefall is real.
Rickard Rakell opened the scoring in the second frame with his seventh of the year. Rakell was skating on a new top line with Ryan Getzlaf and newly acquired Devin Shore for much of this one. That was due to Jakob Silfverberg leaving the game due to injury.
There had been chatter that the soon-to-be UFA, Silfverberg was a trade chip as the Ducks fall further and further away from contending status. We’ll await word on the severity of the injury, but with the deadline less than six weeks out, it’ll be something to watch.
Gus Nyquist scored the game-winner in this one. He’s maintaining his stellar campaign and looks like another potential mover this deadline. The 29-year-old is producing at the best point-per-game rate of his career (0.83) and all the metrics appear sustainable. His IPP is trending at a career-high 74.1 but that’s likely explained by his playing over 50 percent of his five-on-five ice with the burgeoning, Dylan Larkin.
If Nyquist does indeed get moved, the potential for improvement is there, but so is the potential for a reduced role. He only sees a little over two minutes on the power play now, so he’s not overly reliant on PPPs. A move to a team like Pittsburgh would likely see his even-strength deployment improve but his PPTOI decrease. Conversely, a swap to a team like Edmonton would perhaps lead to a downgrade at evens but an increase on the power-play (assuming he doesn’t get the McDavid/Draisaitl juicer spot at five-on-five).
These situations need to be closely monitored as you head into your own fantasy playoffs.
**
The Panthers held a players-only meeting on Tuesday morning. The team had been struggling. The coaching staff appearing no longer to be shy in vocalizing their displeasure with some of the stars. Often a closed-door meeting will have a short-term impact on a slide.
And this one did too, just not on the scoreboard.
Florida was tuned up 5-1 by the Habs on Tuesday but it wasn’t for a lack of trying. The Panthers outshot the Canadiens 53-28 but ran into a brick wall named Antti Niemi.
Here were the lines:
**
Shea Weber led the charge for Montreal with a power-play tally to go along with an even-strength assist.
Don’t look now, but the Habs are tied with the Bruins for third in the Atlantic and are just one point behind the Maple Leafs. Granted the Habs have played more games than both of the teams they trail, but this has been a gutsy showing from a team many wrote off before puck drop in October.
**
Have you purchased Dobber’s 11th Annual Midseason Fantasy Guide yet? Whether you’re going for a third straight Championship, looking to sneak into the playoffs, or preparing a full-scale rebuild, this guide has you covered.
Purchase it here
**
Viktor Arvidsson led the Predators to a 7-2 statement win over the Capitals. The Swedish buzzsaw recorded a hat trick and six shots on goal in this one. His third tally coming while shorthanded.
Arvidsson is back to a point-per-game (24 in 24) and is the straw that stirs the drink in Nashville. I recommended you kick the tires on him a few weeks back to see if his limited games played would lower his perceived value. Here’s hoping you listened.
Despite the lopsided final score, the Caps had a ton of grade-A chances. They were thwarted time and time again by the one known as Juicy Fruit. Juuse Saros stood tall (okay, that was too easy) stopping 26 of 28.
The 23-year-old has been lights out the past month. He’s recorded a 0.971 save percentage in six appearances. Just what the doctor ordered as Nashville tries to limit Pekka Rinne’s workload heading into the spring fling.
**
Two assists for Ryan Johansen brings him to 42 points on the season and 11 in his past eight games.
Ditto for Mattias Ekholm, who for my money has been the Predators best blueliner for much of this season. He’s sporting a new career-high in points with 36 after tonight. And we’ve got 34 contests to go.
**
Who’s the best netminder in Winnipeg? That should (and is) an easy answer. But my goodness has Laurent Brossoit played well for the Jets this season. The backup netminder had another stellar performance on Tuesday as he outduelled Marc-Andre Fleury by stopping 43 of 44 in Winnipeg’s 4-1 victory.
That’s seven straight wins and a 0.943 save percentage for the former Oiler. Meanwhile, 2017-18 Vezina finalist, Connor Hellebuyck has been kicking it below league average for much of the campaign.
Is a goalie controversy coming in Winnipeg? No. Probably not.
**
Blake Wheeler kept his recent two-year hot streak rolling with two third period assists on Tuesday. He’s on pace for 107 points and yet just barely cracks the top 10 scorers in the league.
If I couldn’t play fantasy hockey in the ‘80s and ‘90s when guys regularly topped 150 points, I’ll take this level of production as a nice consolation prize.
**
In the loss, Brandon Pirri was amongst the top Golden Knights in power play deployment with 6:01 on the night. He continued to skate alongside Paul Stastny, Alex Tuch and Max Pacioretty on the power play. However, he was elevated to the top line with William Karlsson and Jonathan Marchessault at even-strength.
Pirri scored an even-strength goal to bring his season total to eight goals and 12 points in 11 games. Somehow, he’s still available in a bucket load of leagues. Get this guy onto your roster and into the lineup to reap the heater.
**
Thomas Chabot took part in a full practice on Tuesday morning and is looking good to return to the lineup against the Avalanche on Wednesday.
**
The Rangers defeated the Hurricanes 6-2 in one of the early affairs. Mika Zibanejad led the way with two goals and two helpers, while another likely deadline mover in Mats Zuccarello added three assists.
Dougie Hamilton didn’t skate on the team’s top power-play unit, but he did see the most PPTOI (3:52) of any Carolina skater. He managed four shots on goal in 22:35 of action – A nice change of pace after breaking the 20-minute barrier just once in the last 12 games.
**
Andrei Vasilevskiy and Tampa Bay Lightning shutout the Stars 2-0 on Tuesday. Vas is now sporting an 18-5-2 record and a 0.925 save percentage. The former first-round selection has witnessed his numbers improve in four consecutive seasons. At 24 years old, he’s flirting with being a dominant asset.
**
David Perron kept his hot play going with a goal that forced overtime against the Islanders. Make it 15 points over a 12-game run.
Val Filppula won it in OT, and Robin Lehner picked up his 13th win of the season. The 27-year-old is sporting a 0.927 save percentage on the year. It’s been a fantastic turnaround.
Jordan Binnington suffered his first taste of defeat in his young NHL career but was good again. He’s peeling starts away from the habitually untrustworthy Jake Allen. I’m not ready to anoint him as a true asset moving forward but he’s certainly worth a speculative add.
The Blues find themselves just two points out of the Wildcard. At this point, they'll play whoever gives them the best chance to win.
**
The trio of Artemi Panarin, Pierre-Luc Dubois, and Cam Atkinson was running around against New Jersey. Each member of the top line recorded a goal and an assist as the Blue Jackets defeated the Devils 4-1.
It was Joonas Korpisalo who earned the victory – his third straight in the last week. Another potential goalie controversy? Again, probably not. But with Torts at the helm and Sergei Bobrovsky not on good terms with the antagonistic coach, anything could happen.
**
Chicago is not a good team anymore. But Patrick Kane remains a tremendous player. The 30-year-old has 27 points in his last 14 games and 64 in 47 on the season. His 1.36 point-per-game output is the best of his illustrious career.
{source}<blockquote class="twitter-tweet" data-lang="en"><p lang="en" dir="ltr">"Every time he touches the puck, something magic happens."<br><br>Is Patrick Kane playing his best hockey…ever? <a href="https://t.co/DcgIeE7Pdn">pic.twitter.com/DcgIeE7Pdn</a></p>— Blackhawks Talk (@NBCSBlackhawks) <a href="https://twitter.com/NBCSBlackhawks/status/1085210885642170376?ref_src=twsrc%5Etfw">January 15, 2019</a></blockquote>
<script async src="https://platform.twitter.com/widgets.js" charset="utf-8"></script>{/source}
**
Speaking of Kanes, the Sharks and Penguins met in the late affair. I was looking forward to seeing some of the best players on the planet chuck some sauce around. However, this one was handled somewhat easily by San Jose.
Evander Kane was a catalyst throughout assisting on each of Tomas Hertl's three tallies. Kane also added three hits and six shots on goal as the Sharks defeated the Pens 5-2. That's 14 points in the last nine games for Kane.
As for Hertl, he's up to 19 goals and 41 points in 43 contests. This is a player who lost significant chunks of time during two of his five campaigns. So this would count as his fourth full season. Right on cue for the breakout.
Erik Karlsson broke his disastrous two-game pointless skid with his 39th assist. He trails only teammate, Brent Burns (43) for top amongst blueline distributors.
Matt Murray snapped his nine-game win streak in this one. To be fair, it looked like the California sun drained the entire Pens lineup.
**
Looking for a buy-low option? Look no further than William Nylander. As Maple Leaf fans and fantasy owners pull out their hair watching him put up a paltry three points in 17 games, clever beasts can exploit the situation. Nylander has been deployed just 30-odd percent of his even-strength ice next to Auston Matthews so far this season but there are clear signs of good things to come.
The 22-year-old leads the Leafs in Corsi For percentage (CF%) and Expected Goals For percentage (xGF%). He’s also fifth in the league in shot attempts per 60 and scoring chances per 60. Meanwhile, he’s shooting just 3.2 percent after living in the 10 percent range in his first two full seasons.
A bump is coming. Buy-low while you can.
**
Thanks for reading and feel free to follow me on Twitter @Hockey_Robinson
from All About Sports https://dobberhockey.com/hockey-rambling/ramblings-arvidsson-tricks-puljujarvi-on-the-block-nyquist-hertl-the-kanes-jan-16/
0 notes
Text
Ramblings: Hart Wins His Debut, Ghost Wakes Up, Morrissey, Skinner, Kadri, & Kase (Dec. 19)
The Maple Leafs and Devils met on Tuesday evening in Jersey. Toronto came into the contest on a mini-slide, picking up just four points in their last five contests. That slipped them to third in the Atlantic and they were looking to right the ship. Meanwhile, Taylor Hall returned from injury for a floundering Devils squad who needs to get the momentum running in the right direction if they have any aspirations of a wild card spot this spring.
It was all Toronto early in this one. The Maple Leafs scored three goals on their first eight shots, with Auston Matthews getting in on two of them (1+1). The porous play of Keith Kinkaid only further exacerbates the issues in net for the Devils. Cory Schneider is now mercifully on the IR, but his days of stopping pucks at a respectable level appear over. Kinkaid has had stretches of success, but shouldn't be considered a long-term solution.
That leaves Mackenzie Blackwood.
The 22-year-old is up with the big club after posting a .911 save percentage in 15 AHL games this season. Blackwood has the pedigree of a potential NHL starter but still has more than a few warts to clear up. If you're looking for a prospect goalie with a clear path though, there aren't too many better spots than in New Jersey.
Blackwood would see some action after Kinkaid let in his fifth of the night. It wasn't overly promising for the youngster either as he stopped 8/10 and the Leafs cruised to a 7-2 victory.
Nazem Kadri produced three even-strength primary assists on the night. The line of him, Marleau and Nylander seem to be forming some chemistry. Kadri still sees strong deployment on that vaunted top power-play unit. He's likely good for a better pace than the 45-point clip he was at coming into this game.
Watch for an opportunity to buy low.
**
With Dave Hakstol finally and mercifully, let go. The Flyers hosted the Red Wings on Tuesday evening. Fill-in coach, Scott Gordon shook up the lines ahead of this one. It was JVR being elevated to the top line next to Claude Giroux and Travis Konecny. A great spot for the two youngsters.
Jakub Voracek, who has been waking from his early-season slumber and just saw a seven-game, eight-point streak snapped in Vancouver last Saturday, was skating next to Sean Couturier and Wayne Simmonds. That left Nolan Patrick to skate beside Scott Laughton and Michael Raffl.
What really needs to be fixed for the fantasy folk is the power play.
The Flyers have historically been a dangerous team on the man-advantage. They clicked at 20.7 percent a season ago, but have slipped all the way the 30th overall this season with a putrid 12.7 percent conversion rate. This has been felt in no bigger a spot than to Shayne Gostisbehere owners.
Ghost led all defenders in power-play points last season with 33. He has seven in 31 contests this year to be on pace for 19. Bravo to all you who have remained patient, waiting for your All-Star blueliner to return to form.
Ghost continued to skate on the top unit with Voracek next to him on the point. Simmonds was given the first crack at the net front job on the top unit – a place that he occupied (and thrived in) for years in Philly.
Lo and behold, Gostisbehere managed to get in on the action tonight. He assisted on a van Riemsdyk first period even-strength tally and converted an even-strength goal as well. That brings the Gostisbehere up to 15 points in 33 games. We'll take this a positive indication that more good times will follow.
**
Allow me to bury the lede here and slip in that 20-year-old, Carter Hart started his first NHL game. He's the sixth goaltender to start a game for Philadelphia this season.
The Flyers' top prospect wasn't exactly lighting the AHL on fire as a first-year pro, with just a 0.901 save percentage in 17 games. He had been warming up though, with a 0.922 mark across his last seven starts.
And what'd ya know, the kid earned himself a victory. Hart stopped 20 of 22 shots as the Flyers took down Detroit 3-2. Not a bad opening act.
**
Obligatory Elias Pettersson chat. Coming into Tuesday's matchup against the Lightning, here is how the 20-year-old rookie compares to his first-year brethren over the past 25 years
{source}<blockquote class="twitter-tweet" data-lang="en"><p lang="en" dir="ltr">Most points through their first 30 NHL games (last 25 years):<br><br>Alexei Yashin 36<br>Elias Pettersson 35<br>Alex Ovechkin 34<br>Connor McDavid 34<br>Evgeni Malkin 33<br>Sidney Crosby 31<br>Patrick Kane 30 <a href="https://t.co/DgtIhvtQrS">pic.twitter.com/DgtIhvtQrS</a></p>— /Cam Robinson/ (@Hockey_Robinson) <a href="https://twitter.com/Hockey_Robinson/status/1074537548616163329?ref_src=twsrc%5Etfw">December 17, 2018</a></blockquote>
<script async src="https://platform.twitter.com/widgets.js" charset="utf-8"></script>{/source}
The 20-year-old saw his seven-game, 13 point streak come to an end on Tuesday as the Canucks fell to the Lightning 5-2. It was a feisty and shot-filled affair. Not bad for a couple of teams on opposite ends of the continent.
The Lightning are now 26-7-2 on the season. Vasilevskiy is back and looking like the franchise netminder he is. This team is jacked up.
**
The Ducks took on the Rangers on the road. They've been riding hot of late and I think I know the reason.
{source}<blockquote class="twitter-tweet" data-lang="en"><p lang="en" dir="ltr">Ducks are 12-3-2 since Ondrej Kase recovered from concussion and joined the lineup. Nine goals in his 17 games, with six in his last six.</p>— Eric Stephens (@icemancometh) <a href="https://twitter.com/icemancometh/status/1074894735196733440?ref_src=twsrc%5Etfw">December 18, 2018</a></blockquote>
<script async src="https://platform.twitter.com/widgets.js" charset="utf-8"></script>{/source}
I've been a big proponent of Kase's for a while. Maybe not as big as our boy, Slim Cliffy, but a proponent nonetheless. His spot in the top six was facilitated by injuries, but he's held it due to his production. He looks like a perfect fit next to Ryan Getzlaf on L1. Now all that's left is to get him onto the top power-play unit and watch him produce at a consistent 60-point-pace.
Kase managed to snag a secondary assist in this one to give him eight points in his last five games. That's a heater. But it's not as good as what Kevin Hayes is up to. The Rangers' pivot scored the shorthanded game-winner on Tuesday to extend his point streak to five games and 10 points.
Hayes has been excellent in the second quarter and doesn't look to be slowing down anytime soon. He's clicking below his career shooting percentage and has been feasting on opponents at five-on-five. Those are great signs for prolonged success.
If he's still on the wire, it's time to snatch him up.
**
Vladdy Namestnikov had a goal and two helpers in this one. But he's seeing virtually no power-play deployment and has been living in the bottom six.
Leave him be for now.
**
John Klingberg skated at Stars' practice for the second consecutive day. He's getting closer to a return and could suit up on Thursday against Chicago. Needless to say, this is a big-time Christmas present for the Stars and for fantasy owners. I know it's been a long five weeks without him on my roster.
**
Dallas and Calgary hooked up for a battle in the Big D. The Flames came into this one having won eight of their last nine games. Meanwhile, the Stars reunited Jamie Benn, Tyler Seguin and Alex Radulov on the top line to spark some offence. The Dallas trio hooked up on the first goal of the game as the Stars beat the Flames 2-0
It wasn't an overly exciting contest, but Ben Bishop did leave this one after taking a knock to the head. He returned to lock up the shutout, but we've seen players come back into games after potential concussions only to feel the effects a day later. Keep an eye on his status.
**
{source}<blockquote class="twitter-tweet" data-lang="en"><p lang="en" dir="ltr">Chicago just announced that they will loan Henri Jokiharju to Finland for the <a href="https://twitter.com/hashtag/WJC2019?src=hash&ref_src=twsrc%5Etfw">#WJC2019</a>. That's HUGE for the Suomi. They've got their top defender now and will hope to get Vaakanainen to complete the top pair.</p>— /Cam Robinson/ (@Hockey_Robinson) <a href="https://twitter.com/Hockey_Robinson/status/1075069051234222080?ref_src=twsrc%5Etfw">December 18, 2018</a></blockquote>
<script async src="https://platform.twitter.com/widgets.js" charset="utf-8"></script>{/source}
**
The Panthers earned a much-needed victory on Tuesday evening. They overcame two first period deficits to beat the Sabres 5-2. Evgeni Dadonov led the way with two goals and an assist. One of the tallies came via a penalty shot that narrowly squeaked in. And I do mean narrowly.
https://dobberhockey.com/wp-content/uploads/sites/2/2018/12/Daddy.mp4
Dadonov continues his terrific season. The 29-year-old now sits with 33 points in 32 contests.
**
Jeff Skinner tallied his 25th goal of the season and added an assist in this one. He's all alone in second for the race for the Rocket. But at some point, his 24 percent conversion rate is going to crater. I love him next to Eichel in all-situations as captain Jack is establishing himself as a premier talent in this league. However, I smell a serious sell-high opportunity here with Skinner.
If you can pull an established 75-80 point player for Skinner, please do.
**
Martin Jones and the Sharks shutout the Wild 4-0. Logan Couture provided two goals, while Tomas Hertl chipped in with a couple of assists.
This was a big outing for Jones and his owners. He had just a 0.893 save percentage over the last six weeks coming into this game. Hopefully, this is the beginning of a sustained run of quality starts. Erik Karlsson is looking more and more like himself. That shouldn't hurt things.
**
Josh Morrissey kept his hot play alive despite Winnipeg losing 4-1 to LA in one of the late games. The 23-year-old grabbed a first period assist to give him 10 points in his last seven games. He's up to 21 points in 32 games all while seeing just 1:43 on the man-advantage each night. Granted, that Jets' second power-play unit boasts some big skill, but it's difficult to maintain a 50-plus point pace from the backend with top unit deployment.
I expect a cold streak is coming.
**
Feel free to follow me on Twitter @Hockey_Robinson
from All About Sports https://dobberhockey.com/hockey-rambling/ramblings-hart-makes-his-debut-ghost-wakes-up-morrissey-skinner-kadri-kase-dec-19/
0 notes
Text
Ramblings: Rask repercussions, Sanheim injury, prospects off to strong starts, RFA’s and more (Sep 17)
The last update of the Fantasy Guide was Sunday Night. You can likely look for updates to happen daily or every second day until puck drop.
Friday’s update was no easy task and very in-depth. The Erik Karlsson trade had so many implications and I ended up touching about 20 player projections on both teams as a result. This is why you buy this online Guide to supplement anything you picked up at the newsstand.
To me, the biggest jump in projected points goes to Karlsson himself. Brent Burns and Karlsson are too far into the elite category to cannibalize each other’s production. My favorite 50-50 sleeper player as a result of this trade is the guy I traded three hours prior to Ottawa announcing the deal – Marc-Edouard Vlasic. On one hand, he’s a Band-Aid Boy who only seems to get hurt when his production is on fire. But on the other hand, he is the best left-hand shooting defenseman on San Jose. He has been tied at the hip to Justin Braun for the last five years (so that’s the downside of the 50-50 risk), but he is a favorite to pair up with Karlsson.
My favorite non-Karlsson player in this deal is the boost that goes to Chris Tierney. This had help, of course, from J-G Pageau getting injured and now Tierney is the second-line center. He’s at a prime age with a steady increase in production. It is Ottawa, though, so his ceiling is limited. But I like him for mid-40s now, with a bit of upside.
*
ANNOUNCEMENT 1: Dobbernomics is now open. A FREE game where the value of each player is driven by total ownership. You get five transactions per week, that you can save or use, to take advantage of a player’s low cap value while dropping a player with high cap value thereby increasing the overall value of your roster. Winning can be twofold – most fantasy points at the end of the year, or highest roster value. Check it out here!
*
So the Victor Rask injury is even more serious than we thought. He didn’t just slice his fingers in the kitchen and require minor surgery – he sliced tendons and required major surgery. Rod Brind’Amour says he will be out “months for sure”. Because Rask was one of the key centermen on the team, this has an impact on several players. Martin Necas goes from “a pretty good chance” of making the team to “a near-lock”. Ditto for Lucas Wallmark, who has to clear waivers to be sent down. I bumped up Wallmark’s projected games played in the Guide. I bumped up Necas’ production expectation. This also puts Janne Kuokkanen and Aleksi Saarela firmly on the map. I still don’t have them making the team, but now I think they will get in a dozen games (or more) early on in the season. If Necas were to crash and burn, then Sebastian Aho will have to be taken off the wing and put at center. And that would shift things around quite a bit.
*
Tampa defenseman Jake Dotchin getting released from his contract last week (followed quickly by St. Louis prospect Dmitrii Sergeev) because of conditioning (or lack thereof) was very interesting. Naturally my first thought was that NHL teams can get out of bad contracts any time the player they no longer want eats an extra cupcake for dessert. If you subscribe to the Athletic you can read an article of them diving into the issue here. But it looks as though in order to pull this off, teams would need to provide many warnings and thoroughly document the entire process. Because in order to keep teams honest, the NHLPA pretty much has to appeal each and every case.
*
Jonathan Drouin has reportedly arrived in camp in remarkable shape. His agent said that he trained hard all summer and arrived in camp leaner and faster. One observer called him easily the best player on the ice Sunday. He was also on the wing, it should be noted. I really like his outlook for the year ahead in terms of personal progression. But since nobody else on the Canadiens will hit 60 points, it is hard to see him get there.
*
Columbus beatwriter Aaron Portzline had this to say about Vitali Abramov’s chances of making the roster, given that the forward corps is deep when it comes to one-way contracts:
“The challenge ahead of Abramov is steep. He needs to prove more than his NHL readiness; he needs to prove he can play and produce in a top-nine role, which does not appear readily available. He’ll likely need to do that at the AHL level first.”
You can check out Abramov’s scouting profile here, if you don’t know much about him.
*
ANNOUNCEMENT 2: Rob Vollman’s player usage charts are now live on Frozen Tools. Furthermore, we stuck each team’s usage chart in the “advanced” tab of each player profile. Now all the advanced stats you need is at your fingertips (and it loads remarkably fast). Kudos to Eric Daoust for getting that done.
*
Travis Sanheim sustained an injury during a preseason game. He was hit by Matt Martin and left the game with a shoulder injury. An update will be provided later today, but don’t be surprised if he misses the start of the season.
{source}<blockquote class="twitter-tweet" data-lang="en"><p lang="en" dir="ltr">Matt Martin boards Travis Sanheim. Shocker <a href="https://t.co/ArVomyr2Vx">pic.twitter.com/ArVomyr2Vx</a></p>— Broad Street Hockey (@BroadStHockey) <a href="https://twitter.com/BroadStHockey/status/1041391884386672640?ref_src=twsrc%5Etfw">September 16, 2018</a></blockquote>
<script async src="https://platform.twitter.com/widgets.js" charset="utf-8"></script>{/source}
*
Josh Morrissey signed a two-year deal worth $3.15 per season. Darnell Nurse is expected to sign something similar. Besides Nurse, the remaining RFA’s are Miles Wood, William Nylander, Sam Reinhart, Nick Ritchie and Shea Theodore. Of these six players, I can see Nylander holding out the longest, followed by Theodore. Call it a hunch. Funny thing about Nylander is that I remember going through this about 20 years ago. I just remember his dad, Michael Nylander, holding out…thought I can’t dig up firm documentation on it. Contract stuff with the Nylander family seems to be a regular thing, unless my memory is off.
*
I didn’t give Martin Kaut much of a chance to make the Colorado roster this year or even next, but it is looking as though the team really wants him to succeed quickly and they are giving him every opportunity to do so. He played on the right wing on Colorado’s second line with Tyson Jost and Alex Kerfoot and is apparently doing well. He is eligible to play in the AHL this year and the belief is that he will be sent there but will be one of the first call-ups when injury strikes. Similar to the thinking with Mikko Rantanen back in his post-draft year when he played nine games with the big club and tore it up in the AHL.
*
The Bruins gave a tryout contract to goaltender Alex Sakellaropoulos. Presumably to challenge the staff with fitting more letters on a jersey than they did with Forsbacka-Karlsson.
*
It looks like Jordan Greenway is being tried at center and he isn’t doing too bad there. Generally prospects who are natural centermen start off on the wing unless they are the cream of the crop. Obviously Greenway is just that. The Wild are also using Mikael Granlund on the point on the power play, which is interesting. That means Jared Spurgeon won’t rake in Ryan Suter’s lost PP points and instead the team will roll with Granlund – Matt Dumba duo. Assuming the experiment works, of course. But I don’t see why it wouldn’t.
*
Early camp notes from out of Vancouver are saying that wunderkind Elias Pettersson is working well on a line with Sven Baertschi and Nikolay Goldobin in an all-Euro line. If so, that’s a huge boon for Goldobin and Baertschi owners.
*
We’re already getting cuts from training camp, but at this point the notable names haven’t started yet.
*
Announcement 3: Later today I plan to make available my player draft list for $9.99. You already get it free with the Fantasy Guide, but some of the more casual players may not want the Guide and will look to save a dollar. I’m just waiting on the cover graphic.
*
See you next Monday.
from All About Sports https://dobberhockey.com/hockey-rambling/ramblings-rask-repercussions-sanheim-injury-prospects-off-to-strong-starts-rfas-and-more-sep-17/
0 notes
Text
Ramblings: Primary Points Per 60, Roslovic, Nylander, Barrie, Wheeler (Sept 8th)
Weekly reminder to purchase Dobber’s Fantasy Guide. Seriously, I feel like a broken record here. Buy the thing and begin your dominance.
**
Do you want to compete against your fellow DobberHockey readers for a chance to become the ultimate champion? There is a tiered competition consisting of annual one-year rotisserie leagues that are run and participated by members of DobberHockey. There are three tiers, which comprise of the Entry, Pro and Expert divisions. This league is run on the Yahoo platform.
We are currently recruiting managers to join the Entry division. For further details, please visit this thread on the forums and find out how you can join.
**
When mining the draft floor for underappreciated talent, I like to take a little stroll down the Primary-Points-Per-60 aisle. There we find players who are maximizing their output and are main factors in the production. These guys can already be established stars who garner all the juiciest deployment. They can be up and comers who may or may not be highly valued in leagues already. Or they can be unheralded players who could (and should) be in line for a lineup promotion.
I’d like to hone in on a few of these players today and shine a light on the potential windfall that could be bestowed upon your squad if you find gold in a pan full of silt.
Jack Roslovic
The 25th overall selection from 2015 has been marinating nicely. He spent his draft-plus one campaign in the NCAA where he was named an NCHC All-Rookie. His 10 goals and 26 points in 36 games were good for a share of the team lead despite being a full year younger than any other skater on the team.
The development he charted at the University of Miami (Ohio) helped catapult him into the American league to begin the 2016-17 campaign. There he stepped right into the Manitoba Moose lineup and was an impact player. 13 goals and 48 points in 65 contests.
The 20-year-old was dynamite on the power play. He led all AHL rookies in power play assists with 21, and his 25 total PPPs was good for a share of 2nd most. He even earned himself a quick call-up to the big club.
Last season, the American centre took another step forward. His 35 points in 33 AHL games represented a 1.09 point-per-game output. That figure placed him amongst the top 10 skaters. He played the remaining 31 contests in a limited role with the Jets where you guessed it, he produced some high-level primary points-per-60 (P1/60).
Among players with at least 300 minutes of NHL action last season, Roslovic’s 1.78 P1/60 was firmly in the top 40. And he’s keeping some fine company
Upon receiving the call-up in the new year, Roslovic was immediately thrust into a middle six winger role and received secondary power play minutes. All in, he was skating around 12 minutes a night with 1:17 of that coming on the man-advantage. He was given the prominent role of replacing an injured Mark Schiefele on the top line for a stretch too.
When Winnipeg traded for Paul Stastny at the deadline, that proved to be the end of the offensive deployment for the offensively-inclined forward. However, he still managed to produce two goals and six points in the final 11 games. This while seeing 11 minutes of even-strength ice and none on the power play.
{source}<blockquote class="twitter-tweet" data-lang="en"><p lang="en" dir="ltr">I like Bryan Little as much as the next guy, but I'm firmly entrenched on the "Give Jack Roslovic the 2C gig in Winnipeg" squad.</p>— /Cam Robinson/ (@Hockey_Robinson) <a href="https://twitter.com/Hockey_Robinson/status/1038182154503520256?ref_src=twsrc%5Etfw">September 7, 2018</a></blockquote>
<script async src="https://platform.twitter.com/widgets.js" charset="utf-8"></script>{/source}
All said each of his 14 points in 31 contests was recorded during even-strength action. 35 percent of those points came from a defensively-deployed third line with Bryan Little and Mathieu Perreault. He stayed with that unit and flashed his skill level for the Jets through two rounds of playoff action.
The two-time AHL All-Star is a 21-year-old with 42 NHL games to his name. Historically he’d be chiselled into a bottom six role to ‘pay his dues’. However, that’s likely not the most effective way to utilize the supremely gifted distributor. It’s been evident for some time that Little has little chemistry with Patrik Laine and Nikolaj Ehlers. It shouldn’t take long for the coaching staff to conclude that the hard shut down minutes should fall to Little and Perrault on L3 while Roslovic is allowed to run free with the two dynamic scoring wingers.
It’s a bet I’d be willing to take in the mid-late rounds this draft season. Give this kid some room and let the points flow.
**
Here are a few other notable players who produced strong P1/60 last season. Each should see their situation, deployment, and/or surrounding talent increase.
Name P1/60 (2017-18)
Anthony Cirelli 2.88
Valentin Zykov 2.86
Sebastian Aho (CAR) 2.38
Ondrej Kase 2.27
Michael Ferland 1.82
William Nylander 1.76 (more on him later)
Travis Konecny 1.69
Josh Ho-Sang 1.64
Jake DeBrusk 1.62
Jeff Skinner 1.42
**
I haven’t had a chance to say my piece on the new Blake Wheeler extension. A tidal wave of virtual ink has already been spilt on the matter so I won’t splash around too much. However, this is the classic case of paying a player for what they’ve already accomplished.
And that’s okay.
Setting career-highs as a 32-year-old is as impressive as it is unlikely to be replicated. But there are a few things that are sitting nicely for Wheeler and the Jets to feel comfortable in rewarding their team captain for his prior work.
The biggest factor has to be him owning the distinct privilege of dishing to one of the deadliest snipers in the game on the power play. We cannot diminish the Patrik Laine-effect and how his ascension is just beginning. Last season, Wheeler recorded 71 primary points. 71. That was good for the fifth most in the league. However, the lion’s share of those came on the man-advantage. His 34 primary points (only six of which were goals) led the league and was nine more than third place, Taylor Hall.
It’s not as if his passes to Laine are going to magically stop ending up in the back of the net because his beard is getting a few grey hairs in it. Realistically, the number of pucks flying past netminders is likely to increase as Laine enters his prime ages – which begins meow.
Wheeler may not top 90 points again, but his contract (and fantasy value) should remain very high for the foreseeable future.
**
If it hasn't already happened yet, Tyson Barrie absolutely needs to start being considered as one of the top offensive defenders to own in fantasy. Outside of the down year in 2016-17 where he posted a 0.51 point-per-game output, the recently turned 27-year-old has played at a 0.675 point-per-game pace over the last five seasons. That’s a 55-point pace.
Colorado may have jumped the gun a tad in their ascension up the Western Conference standings and could see a bit of a slide back down in 2018-19. However, their young offensive core is explosive. MacKinnon and Rantanen won’t be slowing down anytime soon. These are the pieces that Barrie gets to dance around with when the opposition takes a penalty.
Barrie sat second in defenseman scoring on the power play last season with 31 of his 57 points coming on the man-advantage. He did so in just 68 games. His 7.42 points-per-60 minutes on the powerplay trailed only Morgan Rielly for defenders who saw at least 150 power play minutes.
Heading into 2018-19, Barrie should be considered one of the best bets to break 50-points from the back-end with a realistic shot at 60. Few blueliners can boast that.
**
William Nylander recorded 47 points during even-strength play last season. That was good for 25th most in the league. Ahead of the likes of Malkin, Barkov, Kuznetsov, Marchand, Tarasenko, Wheeler, Kessel, etc. While his final point count mirrored his 2016-17 season (61 points), his power play production dipped from 27 to 12 last season. If he had replicated his man-advantage metrics, he’d have produced 76 points. Split the difference between the two years and we’re talking about a 69-point player
Is anyone really looking to bet against John Tavares adding some more dirt to that top unit? As a team, the Leafs clicked at 25 percent with the man-advantage last season. That’s not going to move up much more, but there’s no way Matthews and Nylander will live in the sub-15 PPP land.
70-points should be a slam dunk in an 82-game campaign for the 22-year-old Swede. Willy may be the cheapest avenue to get in on the Leafs high-octane offence. I’ll be buying.
**
Stats courtesy Dobber’s Frozen Pool and corsicahockey.com
**
Follow me on Twitter @Hockey_Robinson
from All About Sports https://dobberhockey.com/hockey-rambling/ramblings-primary-points-per-60-roslovic-nylander-barrie-wheeler-sept-8th/
0 notes
Last Seen Blogs

crescentbeams
in the name of the moon

bishopsbooks
Rodgers'reads

qesocucegup
Untitled

secretlyruthless-blog
pretty girl

haroldthefish
Save Me