#I wish there was an easier way to download youtube clips
Text
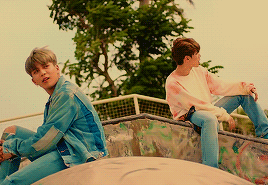
Still thinking about the early days of QSMP where Fit would visit Vegetta just to say hi and was completely oblivious to the fact that Vegetta was flirting with him a large majority of the time.
#i talk#qsmp talk#Can't remember the date but specifically thinking about that one VOD where he's showing Fit around his castle garden#then Vegetta is like ''wait here for a moment! :)'' and Fit goes ''Ok! :D''#then Vegetta goes inside; strips; puts on his Casualonas outfit; and then goes back outside to greet Fit#and Fit's just like ''oh cool! :D''#Like he definitely picked up on some of the flirting but other times he was just respectfully like ''oh that's neat!''#Once when the QSMP was down Vegetta was talking to Willy (? pretty sure it was Willy)#and started ranking how hot all the QSMP men are#and he said IRL Fit is probably the guy he'd go for most / the one he considers the hottest but he was hotter with his beard#wild#What I wouldn't give to have a full transcript of that conversation#anyways if I find the VOD I'm talking about in my files (and if it isn't too long) maybe I can clip it#but no promises#I wish there was an easier way to download youtube clips
12 notes
·
View notes
Text
How to Create Faceless YouTube Short Automation Videos with Free AI Tools to Make Money Online and Work From Home

Do you want to create attention-grabbing short videos that could get thousands of views on social media just by using free AI tools?, all you have to do is create faceless YouTube Short Automation Videos with Free AI Tools.
Then read this blog post till the end, I will show you how you can do it.
https://youtu.be/-8y6Cs1tq8o
In this blog, I'm sharing tools tips, and tricks that can help you improve health, wealth, and relationships. Recently, I posted a blog post about a way to earn money on YouTube without recording videos, in this blog post, I will discuss another way to make money on YouTube by creating faceless YouTube Short Automation Videos with Free AI Tools.
If you are interested in these kinds of content, you can give your comments and suggestions down below. Bookmark this post for future reference.
First, sign in to chat.Openeai.com, you can write a question like "can you give me give me 10 popular quotes from the Democritus?"

then chatGPT will give you 10 quotes. However, it's better to change it a little bit because, with these AI tools, it's always a good idea to use them as a tool instead of directly getting the response as an answer to create your content.
Try to modify it and make it unique so the chances of another person getting the same results will be lower.
For example, you can play with anything that you like, I'm gonna write something like "turn each of these quotes into business quotes". That will be something unique that we can create from the quotes.
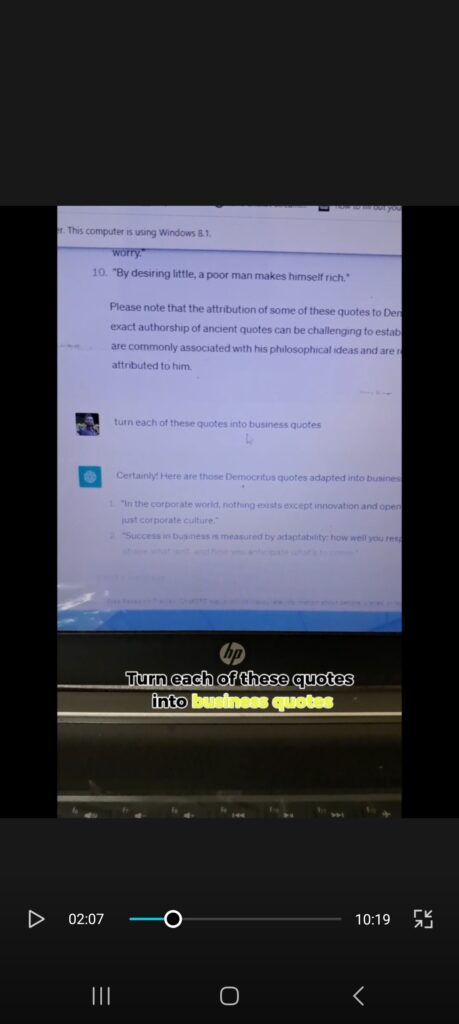
Then Chat GPT will give some quotes which can be related to business. Then, we gonna sign up for the Leonardo.ai website which is free. There's an option called AI Image Generation.
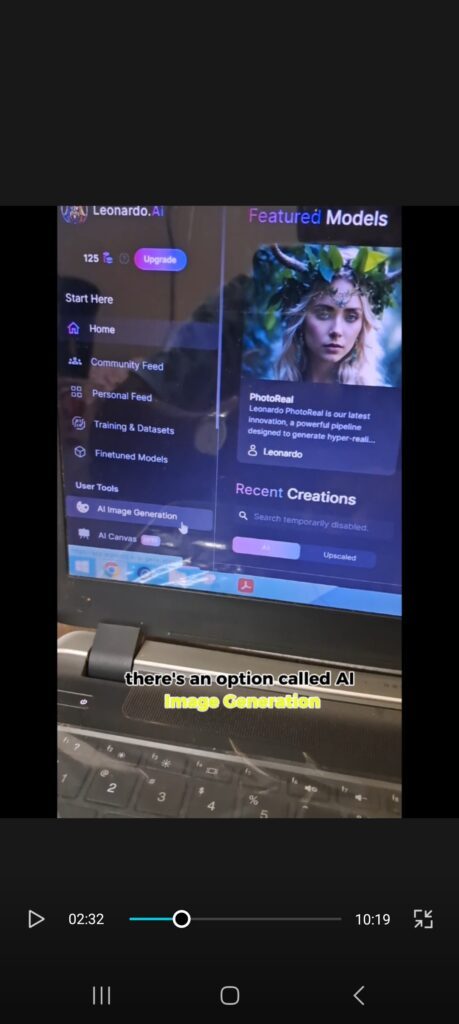
You can type any prompt to create whatever character you want with any appearance. You can be creative to create a unique character. For this example, I have typed the prompt as Democritus Man with a black background.
I got four impressive image results. Pick the one you want and upscale. I chose one and upscaled it by clicking the three-dot button.
There are two options to upscale, choose whatever option you like. After upscaling, all you gotta do is download the generated image by clicking the download button. The image will be downloaded to your computer.
The next free website we gonna use to create YouTube Short Automation Videos is called D-ID you can log in and hit the create video button. Click the add button and import the downloaded image to the website.

Then all you have to do is go to chatGPT and copy one of the quotes. Next, come to the D-ID and paste the quote.
After that, hit the Generate Video button. A talking video of the generated avatar will be generated.
Click on it and click on the download option to download the video.
Go to a CapCut free video editing software. This free amazing video editing software can help us create YouTube Short Automation Videos. You can download Capcut on your desktop or on your mobile phone.
Click on the plus button and import the video we download from the D-ID website.
Firstly, we need to change the ratio to optimize for short videos. Click on the ratio button and select ratio as 9:16. Now you will see there is the d-id watermark on the video and the video looks small on the frame.
To fix these issues, expand the video dimensions to zoom in a little. click the tick mark to save changes.
As the next step, we need to create captions. For that, we have to go back and tap the text button and you will see the button called auto captions, click that.
Over here, we can customize, style, and add animations to the captions as we wish.
Ensure you turn on the identify invalid clips option. This will make CapCut automatically detect tone sounds and pauses in the audio of the video which will make it easier for you to delete these parts with a click of a button.
When we hit start capcut will automatically create captions and highlight the pauses and tone sounds of the audio clip. Double-check the invalid parts and delete them all by clicking delete all.
You will notice that there is a CapCut watermark at the end. Just delete it by clicking on the part and the clicking delete button.
We can add some effects to the video now. Go back and select effects, then click video effects. From the list of effects available, you can choose whatever the effects you prefer.
You can also adjust the glow and intensity of the effects as you wish.
The effects you add will be represented as tabs. Drag the tabs till the end of the video if you want these effects to last throughout the video.
Similarly, you can change the font of the captions. Just go back and select the text button, then choose the part of the caption you wanna edit and click the styles button to customize the features of captions.
Add a suitable audio track to your video. Always ensure you are using royalty-free soundtracks in your content to avoid copyright issues.
If you notice that the background sound is louder than the audio of the video, you can reduce the volume of the background sound by clicking on it and clicking the volume button to lower the volume of the sound.
Same way, you can select the video and tap on the volume button to increase the audio of the video.
You may notice that the soundtrack is longer than the video in the timeline. To remove the unnecessary part, click the audio go to the place you want to split, and hit the split button. Then you can select the unnecessary part and remove it by tapping the delete button.
By creating these types of videos around a specific niche, you can build a huge audience on one or more social media platforms.
After that, you can monetize these audiences to earn money online. You just have to select a relevant and great product's affiliate link in the bio section and drive traffic to these offers.
Whenever a member clicks through your affiliate link and purchases something, you will earn a commission. This way you will be able to earn a decent amount of money online depending on your dedication and skills.
I hope you found this blog post helpful and I would like to know your thoughts and opinions in the comment section.
If you want to learn how to make money on YouTube without recording videos, check out this FREE training
Read the full article
0 notes
Text
1 month update
It has roughly been a month since I decided to do online side gig and turn them into a functional, profitable business. So the plan has always been to go into business for myself, but I needed Accounting and Finance degrees plus certifications and work experience/networking.
Well you can see that hasn't happened yet. Granted I've been in the, I need to be financially free mindset for about 7 years now. And I had vision blinders on to the point I was blind to all the options out there in the world. I could have been a multimilionair if A. I continued making AMV's and stuff that I was making for fun in highschool and freshman year of college.
So that was right around when YouTube went live. I was in highschool 2004-2009, so you can imagine if I kept on being creative over the last 2 decades, what sort of money that would have brought in. Granted I didn't know until probably 2015, that one could make money off YouTube. Those video's are still live, and some have thousands of views for low quality stuff where I just got pictures off the internet and made a video, sometime putting hours of work into them, until I liked them.
And if I didn't get bored easily of gaming, my gaming channel could have been monitized 7 years ago. Granted no personal computer, so only being able to record on a PS4 at the time, and no way to edit stuff, made me just stop playing all together. Though there will always be potential for the channel to start having videos posted to it again.
But honestly, I thought the markets for everything had been tapped out. I personally don't think I can solve problems, or at least see a problem that needs a new or better solution to what's out there. To myself I'm not creative, as I have a hard time articulating what I'm trying to do, and sometimes it could take months or years for me to finally say or ask what I'm trying to do.
YouTube has away of giving me what I need before I know I need it. And it's been doing that since 2019/2020, though I wish it could have prevented my financial crisis I had that year.
So enough back story.
So 1 month into giving it my to create a better life for my kids. I've had $0 profit. My etsy shops need to be gone through for a 3rd time, and SEO optimized again. I'm struggling with titling things and descriptions and tags. And so far no amount of YouTube video's are helpful besides telling me, you need to figure this sh*t out.
My YouTube channels are Ok. My Ambience Channel is being neglected a bit, but at the same time, like Etsy, I'm struggling with SEO creative optimization to make people want to click the videos, and I don't have the ability to get the software to make the video's longer than 30 minutes at the moment.
And for me, as I've been utilizing Frequencies, Ambient noises, and such for almost 4 years now (YouTube suggested to me, when I was struggling with being able to sleep), it's something I not only want to do for myself and kids, but I want to give to others. But that channel ain't going too great right now.
My Fact channel, the one you see some blogs about, is going decent. I'm hoping I can monetize it before the school year starts up in August. I have some series ideas for the channels though so I'm hoping that will help. I'm doing decently keeping all my stuff SEO optimized for this one, as it's facts and information and education in general, it's alot easier to create things that the algorythm can get out to the public.
I'm fully aware if I had better software to make high quality content I probably would have been monitized already. But if I want to add clips that aren't from places like pixabay, I first have to record the clips from my phone, put it in my google drops box, and than download to the laptop I use for my day job. And sometimes that can take hours to get to the drop box.
But I'm not letting that stop me, and I plan to remake old conent in the future when I have better equipment, and can get an extra hand to find clips that the public would like, because what I like and what everyone finds high qulaity isn't the same.
I also generate AI art for Adobe stock, no sales there, but my subscription to the AI just renewed today, so I need to get some more art up there, and make sure these ones are more creative in the titling, descriptions and tags. I let Adobe fill it all in for me for my 1st 40 images, and I"ll be honest they weren't great.
I had just got done watching a side hustle video with this as an idea, and I just rushed through it. Lesson learned, and now I plan to take my time and find what works for me.
Then I have a good friend (whom I call Krispy) we met in a game I've been for 3y now, and that's his in game name. And he thought affiliate marketing would a good idea.
So call me crazy I'm trying it, well doing it. Had to get a business account for pintrest, which I never use pintrest. I've been very anti social media, as even though I want to be out there, I don't want to be out there. At least not out there with pictures or videos of myself.
I'm always on the fence about it with my own kids. Social Anxiety for the win, am I right?
And I've made $0 off that as of today as well. So, money made $0, expenses probably close to betwenn $500 and $1k. But I'm sticking it through. A couple of things I've gotten have 1 year subscription plan, so I don't have to worry too much about losing video software, and other things are free.
I'm working on turning my losses around, by bloggin, sharing links to my stuff and just optimizing what's already out there.
If you've made it to the end, thanks for reading. I hope you can read more of blogs and check out some of my YouTube Channels or Etsy Shops. I appreciate everyone who reads about my adventure.
#business#entrepreneur#life#success#youtube channel#1 month#check in#youtube#etsy#pintrest#affiliate marketing#side hustles
0 notes
Text
Programa para descargar videos de youtube android

#PROGRAMA PARA DESCARGAR VIDEOS DE YOUTUBE ANDROID FULL#
#PROGRAMA PARA DESCARGAR VIDEOS DE YOUTUBE ANDROID ANDROID#
#PROGRAMA PARA DESCARGAR VIDEOS DE YOUTUBE ANDROID TV#
#PROGRAMA PARA DESCARGAR VIDEOS DE YOUTUBE ANDROID DOWNLOAD#
If you are a content maker, you can now edit your videos and make them even better by adding filters and music. When opening the app, you can find recommended videos according to your subscriptions and previously seen content. With Youtube's app, you will have different tabs for subscribed channels, trending videos, activity and library which makes it easier to find the videos you want or discover brand new content tailored to your tastes.
#PROGRAMA PARA DESCARGAR VIDEOS DE YOUTUBE ANDROID TV#
The app also allows you to watch your videos on a TV by choosing the device you wish to watch it on. Download the app and sign in to your account to start using the newly designed Youtube app, where you can edit and upload videos, create your own playlists or express your opinions on the comments section. You can subscribe to your favorite channels and share their videos with your friends or to your social media pages just with a few clicks. The app was thought to make the searching process easier and to allow you to find the video you're looking for right away.
#PROGRAMA PARA DESCARGAR VIDEOS DE YOUTUBE ANDROID DOWNLOAD#
Now you can download the app optimized for your mobile or tablet devices, design to provide a better user experience. Translated to more than 30 languages including German, French, Italian, Russian, Danish, Dutch, Spanish, Portuguese, Hebrew and Chinese.Youtube is one of the largest online video platforms that provides all types of videos, from music clips to comedy sketches and all other types of entertainment.Share on Facebook, Twitter or via email.Fullscreen mode: mouse cursor, toolbar and playlist autohide.YouTube categories: “Most Popular”, “Music”, “Games”, etc.Remembers recent keywords and channels.Search by keyword, channel name or paste a YouTube link.Filter videos by publication date, video duration and video quality.Sort videos by relevance, date, view count and rating.Stop after this video: "Last one, kids!".Editable playlist: drag'n'drop and remove videos.
#PROGRAMA PARA DESCARGAR VIDEOS DE YOUTUBE ANDROID FULL#
Take video snapshots at full resolution.Compact mode: a small, always-on-top window.Channel subscriptions without using a YouTube account.Minitube focuses on a pleasing overall experience, not on having tons of features.
#PROGRAMA PARA DESCARGAR VIDEOS DE YOUTUBE ANDROID ANDROID#
continious material on that subject - Simples! well worth it! Murtha Piggott La mejor aplicación para descargar videos de youtube desde tu android en todas las calidades desde tu android, viene incluido con muchas opciones mas como po. but thats the clever thing - it is! choose you search subject and off you go. After installing it, and running it, I 'get' the purpose, and would gladly recommend it Will, Stormfront Tech Allan CampbellĪt first, I was skeptical of the utility of Minitube. Great app! Was hesitant to buy, but it did what it said and was exactly what I was after! James Bedford My dad has even told me that this is without a doubt the program that he spends most of his time on (he does other things, but this is almost constantly open in another space playing some traditional Italian music or 1930s comedies). My 4 years old is a big fan of Minitube -) RobertoĪ clean, modern interface and no requirement of third party plug-ins makes this program an invaluable tool Tomaaato She really LOVES television, so I think she will like using Minitube as Minitube would be a terrific way to introduce her to the world of Internet I will be installing a copy of Minitube om my Mother's PC. Videos more like the experience of watching television, and more enjoyable. I believe you succeeded well in your goal to make watching It's been a long time since I found a program that works out of the box and does what the blurb says it should. It sort of subtly changes your perception of what's going on. Minitube allows you to search for videos in a breeze without any complications in between. It's a terrific app that eliminates the need to poke around YouTube's Web site and navigate through a sea of ads, comments, and related videos you may not care about. Makes it impossible to stop watching videos when what you should be doing is writing that program's review. If you're looking for a way to check out YouTube clips outside the browser, it's a really elegant solution Lifehacker My kids just love this app! Easy to use and a great interface.
0 notes
Text
Your Content and Accessibility For the Blind
Hello everyone! I was thinking about accessibility and wanted to make a post to help creators. This is going to cover general accessibility for blind people interacting with your content. Some of it may be obvious to some and this is by no means comprehensive, so feel free to add anything you think of that is helpful. Also, I wanted to include some ideas for DeafBlind people, but I am not DeafBlind or D/deaf, so I simply listed some general accessibility ideas. If anyone has any other tips or things to consider, please add them in a comment or message and I’ll include it here.
Remember, blindness exists on a spectrum. This post will focus on making things accessible for totally blind people, although these tips can also be beneficial for people with residual vision who use screen readers to reduce eye strain, for small text, for clarity, etc. D/deafness and DeafBlindness are also on spectrums. Some DeafBlind people have some hearing, some vision, a little of both, or none of either. If someone asks you for better or different accessibility services for your content, listen and try to accommodate them as best you can. I have provided some links and resources here to attempt to explain accessibility for blind people, which will include blind people who are DeafBlind. The point is accessibility issues can come from both sides whether it be the audio or visual sides.
Some general helpful links:
AFB’s Advice for image descriptions here
Screen-readers here
Improving Accessibility for the DeafBlind community here
How DeafBlind People Use Technology and The Importance of Braille and Transcripts: Understanding Assistive Technology
Online Content:
GIFs, Pictures, Fan-art, PSA and info posts, Memes, Screenshots of Text Posts or Screenshots of Twitter Threads- Provide an image description on your original post! This is the best option, as you probably know your content best and what you wish to draw attention to. More importantly, every reblog will include an image description, which means the blind person doesn’t need to hunt for an image description in the reblogs! If you know more than one language, include image descriptions in those languages.
Note: Always include descriptions when you post images with or about blind people or characters. Particularly fan-art you made of blind characters. If you don’t, consider why and think about how it would feel to be shut out of something about yourself.
What should you include?
Write Image Description in brackets and include End of Image Description at the end for clarification. As for what you should describe, it depends on what the picture is. Include where it is from. For example, “a screenshot of a Twitter thread by BlindBetaIsAwesome”. Include the text and describe any GIFs or images it includes. Write everything out as they appear. Describe emojis as well. When writing out screen names or hashtags, capitalize the first letter of each word. Otherwise screen-readers read it oddly. For example instead of #accessibilityfortheblind try #AccessibilityForTheBlind. If you think someone will want to search a name, include a link.
You should describe what is important in the image, especially for conveying information or humor. General ideas include: image origin, who is in the image, what they’re doing, any relevant colors or clothing, objects they’re holding, their facial expression, any emojis, and any text in the image. Blind people do like to know about color. For NSFW stuff, include ‘NSFW’ at the start, but other than that, yes, blind people also generally like NSFW things described.
Fanfiction:
Generally, fanfic is very accessible to screen-readers and Braille Displays. However, there are a few ways you can make it more accessible.
Pictures: Include alt-text for any images you post such as artwork or character social media posts. Describe it like you would any other image. Alt-text is different from an image description because instead of a screen-reader saying “image” when it finds an image, it will describe the image. An image description is the text included beneath the picture that everyone can see. Including some kind of description, especially for plot-relevant images, can allow all blind readers to experience the fic.
Chat conversations: Again, for hashtags and screen names, capitalize the first letter of each word for the ease of screen-readers. For characters who don’t use capitalization much, you can add a hyphen between each word to make it easier to read like this: blind-beta-likes-fanfic-too.
Emojis: Screen readers can’t fully read emojis like this one that uses keyboard slashes and symbols to create an image ¯\_(ツ)_/¯ (image description: emoji of a person shrugging with both palms lifted upwards. End description.) However, they can read emojis that come on a phone such as 🧁which screen readers read as “cupcake”.
Podfics are also good for hearing people with no vision or reduced vision. Having a podfic with good quality (maybe one that can describe images found in the story) will reduce some of the issues listed here and give blind people another, fun way to interact with content. However, I would try to keep in mind the things I mentioned above for the sake of screen-readers and Braille Displays, which are particularly important for some DeafBlind people who may want to read your fanfic and may not be able to hear well enough to use a screen-reader.
Lastly, keep in mind that any kind of comic may be inaccessible to some blind people. Write with them in mind. Include a message at the start of the story, maybe that it contains material from the comic, graphic novel, or print cartoon. If you know of a comic dub, link to it. If there is none, include details in the story so that a non-manga or non-comic reader would be able to understand.
Web-Comics/Web-Graphic-Novels:
First, I did research and found a comic book store for the blind called Comics Empower. Unfortunately, when I click the link provided on Twitter and the articles I read, the site seems to be down.
However, this is about you all and sharing your comics with blind readers. You have a few options:
Alt-text. This is descriptions directly ‘inside’ the image, which is not visible to everyone. You can read about alt-text for comics specially here and you can read general info for alt-text for screen-readers and Braille Displays here.
Image descriptions. These are descriptions of each comic page (hopefully with a paragraph for each panel) that can be visible to anyone. You can describe your comic, who is in it, what they’re doing, and what they’re saying, probably beneath the image.
Comic Audio Performances. These are accessible to both blind and sighted audiences. These are videos using actors for the dialogue, sound effects, and moving comic panels. Pros for this style include increased viewership, increased accessibility for the blind, and perhaps more revenue if you have a way to monetize the content. Cons include that it is more work, could potentially cost money when hiring actors initially, may not be accessible to anyone with hearing loss, and may still require a bit of audio description for some panels that are hard to follow with only sound effects.
What can you do?
A few ideas I had were to use a combination of image descriptions and audio performances to make the comics accessible to a number of people who may be blind, or DeafBlind. Having options is helpful. For ther issue of some panels needing extra description in order to make sense, I thought of including time-stamps and descriptions in the description section, labeling it as image descriptions for the blind. Include dialogue for reference. Or an audio description could be added such as:
Audio narration: “Bee sits on a couch writing.”
Sound Effect of a purring cat.
Audio narration: “Blind Beta picks up an orange cat and puts him on the couch next to them.”
Dialogue: “I’m so glad I have a cat to cuddle with!”
I will touch on this in the video section, but while it is sadly not possible to add audio descriptions onto YouTube as of 2021, you can add them manually through websites you like YouDescribe. For your comics, I suggest, reading about YouDescribe, downloading the app, creating a narration transcript for your web comic performance, and posting the described audio performance onto YouDescribe. Post both versions as close to the same time as you can, and include a link to the described version in the YouTube description. A glance at YouDescribe will tell you not all videos are available with descriptions and not all blind people are aware of this service. Not all videos are searchable in their library either. However, it is an option I wanted to include.
You could also simply include the audio narration in your main YouTube video if you would like. Or any combination of my suggestions you feel comfortable with.
YouTube Videos/Video Clips:
I wanted to cover YouTube videos and video clips shared on websites like tumblr. For small clips, image descriptions and transcripts could probably be listed together. I have seen this done and it seems to help people.
Again, the original poster should post the description with the video. This is because they know the most important parts and because all reblogs of the post will include the description, so no one will have to hunt down a description that may not exist.
For the clip or clip compilation, mention where the clips come from, who is in them, and what they are doing. You could probably have a separate paragraph for each clip and include times-stamps if possible.
For videos you post on YouTube, descriptions can be very helpful! Unfortunately, YouTube does not support adding an audio description track at this time. Ideally, YouTube would have a description track one could turn on and off such as with subtitles. Until then, if you want to add a description, you should add one yourself when you post the video onto YouTube or any other website.
Before I get into how, let’s go over something else.
What videos need descriptions?
-Recipe videos - especially ones with only text. Ingredients, steps, measures, methods, any flourishes or special scenery (such as when shopping for ingredients) should be described. Blind people don’t just want you to read the recipe to them. They want to know what is happening in the video and how it is being done.
-Tutorials - These often contain a voice-over and accompanying images to demonstrate. A creator can opt to simply include more visual description along with the other information in the voice-over or add extra narration later (see the “How?” section below). For these videos, make sure to avoid or expand on any visually dependent parts such as “click here” or “fold here” or “when you finish, it should look like this”. Videos that contain only text and demonstration, however, will need a more traditional audio description the same as any other video.
-Silent aesthetic videos - Sometimes containing music or focusing on natural noise, these videos are usually vlogs with soothing activities or daily routines. They often show scenery, pretty things, or tours. Because these videos are silent, sometimes containing only text, they are not accessible. However, they can be easy to describe, perhaps in a soothing or educational fashion.
-Music videos - Because these videos are by nature visual, they may not be accessible. They may also have inconsistent, poor, or changing lighting for aesthetic purposes or set changes. This means audio descriptions would be helpful.
-Text-based videos - Obviously these are not accessible or may be difficult to read depending on font size, style, or background. For these, putting the text in the description may suffice. Label it so that blind people are aware they are getting the same material. If the text includes pictures or short clips, you could also simply include your own narration on the video itself or see the “How?” section below for another alternative.
-Game Play-Throughs - Games can sometimes be completely inaccessible pe very difficult depending on the person’s level of site. A lot of video games a not accessible or difficult to play, with quick-moving graphics, perhaps small text, or other difficulties. Because of this, blind people may enjoy game plays on YouTube for video games and mobile games.
-Skits or other performances - Think of these as Netflix shows with audio description tracks. Blind people may miss out on some visual humor, plot elements, or other fun visual aspects like costumes.
-Original Films, Animation, Clips From Shows - Again, think of it as any TV show that needs to description to cover visual aspects of what is happening. Scenery, characters, what they’re doing, any text, facial expressions, etc.
Pet videos- Because pets are cute and they should be described! Especially because these videos are sometimes hard to follow, such as a pet doing a trick.
How? How Do We Provide This?
There is always the option to add your own audio descriptions. However, that way confuse already-existing narration or may not be possible for already-published videos. You may also have trouble speaking and wish for someone else to provide audio descriptions. The video may be a music video or one you want to remain silent for the aesthetic. You may want to add a description to a video you enjoy that is not one you uploaded personally.
A free website and mobile app called YouDescribe can help with that. It allows people to add audio descriptions to videos on YouTube. You can even describe videos on a wishlist. Find out more here.
If you describe your video or have it described, be sure to link to the YouDescribe video in the description of your YouTube version so that people can find it easily, or note that it is available on YouDescribe.
Here is a link to the website
And a link to the app.
This site may be a bit too niche, but I figure if it helps one person, I’ll be happy. My entire blog is niche, when you think about it- targeting writers who specifically want to write and read about blind characters. It’ll be fine.
Keep in mind that audio descriptions may not be accessible to all DeafBlind people. An inclusive option could be to include a description under your video so people with Braille Displays can read it.
Print Books, Audiobooks, Large Print Books, or Braille Books?
Let’s get into something you writers might be interested in. Books! Let’s say you wrote a book with a blind character. How do you make sure it can be accessed by blind readers? You want to have a few options.
Print books - These are accessible to people with reduced vision. It is also possible to scan print books to read with voiceover, but I can’t imagine many people buying books simply to scan unless they borrowed/found it. So it could be an option, I suppose. Scanning books also takes time because you need to do each individual page.
Audiobooks - Audiobooks are great. They are accessible to blind people who can hear. They are cheaper to produce than Braille books, take up less space, and are better for the environment. They can be expensive when you buy them. Libraries have extensive collections now, however, because libraries don’t usually have any Braille books and very few large print books, not all blind people use them, even for digital access. However,many blind people love audiobooks so it a good way to make sure your content is accessible.
As of now, my library app is accessible with a screenreader, so reading audiobooks is possible. E-books are not currently accessible with a screen-reader on this particular app.
Make sure to release your print books and audiobooks at the same time or as soon as possible. It isn’t fair for blind people to have to wait, although there are cases where not having an audiobook is understandable. Keep in mind that the less options you have, the less accessible your content will be.
Large Print Books - I used to get large print books myself. I would say it is less likely publishers will want to publish large print books because they are, of course, larger and take up more space. (Not as much as Braille books, but we’ll get into that.) As you may assume, they are also less popular with readers. Publishers make exceptions for textbooks, so if you are making a textbook or an educational book, particularly one with drawings, publishers might allow it. They also might consider making large print editions of children’s books. Large print books can sometimes be found at libraries, although they are usually crammed into their own limited section. That shows how rare it is for large print books to be printed compared to regular-sized books. I have an extra note about this in the children’s book section, but for the most part, I think you can get away with not having a large print edition of your book.
Braille Books - I should you one doesn’t just make a Braille book. Feelings toward them are generally complicated. They can wear down over time, cost a lot, and take up a lot of space. One volume of a book is several volumes of Braille books. Libraries don’t generally have them- you have to request them from various places like The National Library Service for the Blind (NLS). For more information about obtaining or borrowing Braille books, look here.
Braille Books have largely been replaced by refreshable Braille displays and audiobooks. However, they are still important. They can also help DeafBlind people, if a book cannot be read on a Braille display (see the section on e-books below). My suggestion would be to skip Braille books unless you are writing for children (see the Children’s Books section) or your book contains many diagrams that need to be embossed.
Children’s Books -
I wanted to briefly discuss children’s books. With children’s books, you will, of course, want to have a print book and an audiobook available, perhaps even someone reading the book on YouTube. If the book has pictures, descriptions of the pictures would be nice. This is also where I think large print and Braille books may be not only possible or more likely, but important. Children are just learning to read and will continue to explore a love for reading. Therefore, a lack of reading material can be challenging.
If possible, you may want to consider asking your publisher if large print or Braille versions are possible. While websites are available so that children can get books, you may want to ask for your book to be published in these formats if your story has a blind MC.
Braille literacy is declining in the blind community, with children (and frankly many others) choosing to use VoiceOver and audiobooks to read rather than Braille. Being able to read helps reinforce spelling, grammar, meaning in ways that are not possible with having things read to you. That said, children should also be encouraged to learn technology and use audiobooks when they feel comfortable.
If you are publishing a children’s book, particularly with a blind MC, consider what your options are for increasing accessibility.
E-Books:
This is one of the more accessible options, as it can be read with a screen-reader or Braille display. E-books are also common enough that they are released at the same time as print books. The text can usually be adjusted and readers usually have a Search feature. However, accessibility is still a problem with e-books. While authors cannot fix this, they should be aware of it. You can read about accessibility issues here.
-
I hope all this helped somewhat. I provide sensitivity reading for blind characters for anyone who is interested.
364 notes
·
View notes
Photo

so i thought it’d be a good idea to make a full indepth tutorial on how i make my gifs and what i do to achieve them! please be aware that everyone’s giffing style is different and this is just how i make them and what my settings are! you can do absolutely whatever you wish when you’re making your gifs!
i will be going over where you can get videos, how you can download them, how to use photoshop, vapoursynth, and colouring (regular gifs, performance gifs and selective colouring to change colours in gifs)!
step one: downloading the video
so i always try to get 1080p videos and if not 720p for the highest quality possible (there is the option of 4k as well but that’s not used so often)
TS files: kpopexciting, kpop24hours (you need a login for this), HDhallyu (for more older performances circa 2015 and before), dongyoungsang (for kdramas/tv shows)
Youtube videos: 4K Video Downloader
Vlive videos: Soshistagram
Twitter videos: Twitter Video Downloader
Instagram videos: Dredown
step two: using vapoursynth
so vapoursynth is similar to avisynth but it works much faster and has more options when it comes to sharpening and denoising gifs especially performance gifs! i’ll go over the steps i do to use vapoursynth but i have also provided a video i’ve recorded (it’s very basic) in case text is a little too confusing! there’s also this tutorial that goes into details on how the options work and how you can use them!
have two windows open, one containing the videos you’re using and the other with vapoursynth.
drag whatever video you want to use onto ‘vapourscript.bat’ and a terminal window will popup. this is where you put in the the timestamp of where you want to start and end your clip in the HH:MM:SS format.
enter your starting point first and then it will prompt you again asking for the duration of how long you want the clip to be.
hit enter again and wait until the resizer.html pops up and from here you’ll put the settings you want to use for your gifs.
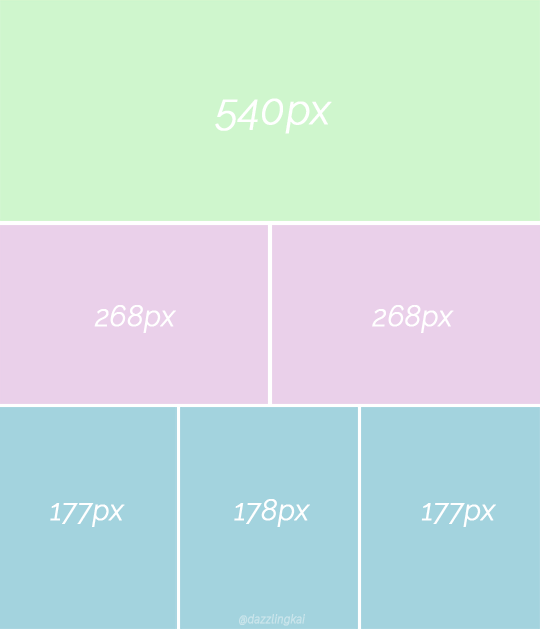
gif size
gif widths (the first number) recommended for Tumblr:
1 gif per row: 540px
2 gifs per row: 268px
3 gifs per row: 177/178px
opacity
changes how you view the video in the window.
preprocessor
refers to how the video will render! it refers to the number of frames per second (30 frames or 60 frames). i don’t normally use this cause it slows down the application for me personally but you can use it to your liking1
denoise
helps remove noise from gifs. I use KNLM and you can toggle the settings how you see fit
extra sharpening
it’s pretty self-explanatory but you just basically go off of your preference!!
then you just copy and paste your what you see on that white box in the browser onto the application and trim it to the length or number of frames you need! once your done you go to script > encode video and make sure to change the ‘no header’ to ‘y4m’!
step three: using photoshop
to create gifs in Photoshop, go to File > Import > Video Frames to Layers and then select your video file/output file from Vapoursynth. depending on how long your clip is you can press ok or select the option “limit to every 2 frames”.
with photoshop you can adjust the timing of your gif even further! my usual preferences are:
<20 frames: 0.15
20-59 frames: 0.1
60+ frames: 0.07
you gif should be under 3mb - to decrease a gif’s size, i usually delete frames and/or use selective color to increase the black percentage for whites, neutrals, and blacks.
with tumblr saying you can go over 3mb for gifs you definitely can but it will lower the quality of the gif. if i need to i’ll go up to 4mb at most.
step four: sharpening
it’s completely optional to do this since vapoursynth does some sharpening for you and you can find a ton from @completeresources and @yeahps to just name a couple ps resource blogs!!
you have to change the timeline from frame animation to video timeline and you can do that by clicking the button on the bottom left corner on the timeline that looks like stacked rectangles.
from here you will have to make all your frames into one layer so you have to go to filter > convert for smart filters. and you can use your action on that by going to the actions panel, selecting what action you want to use and press the play button.
now you can put the colouring that you would like on your gif!
step five: saving
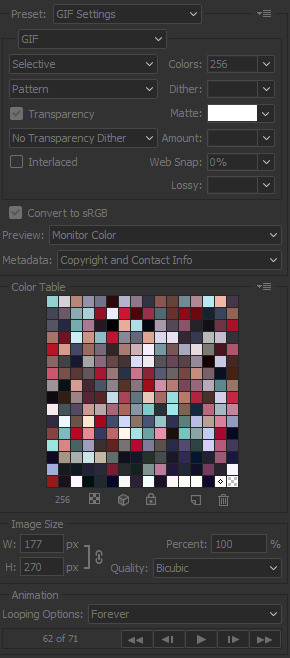
now when you save you can do the shortcut ctrl+alt+shift+s or go to file > export > save for web and these are my setting for when i save:
miscellaneous notes
here i have three different gifs of the same scene to just show the difference between using .mp4, .ts only, and .ts + VS. as you can see there’s a significant difference between each of them especially the .mp4 versus .ts + VS.

how i colour
the adjustments i currently use the most are:
curves
brightness/contrast
color lookup
levels
selective color
some things that i personally like when i’m colouring is:
having the black of the gif to the darkest it can be
vibrant
to get the black areas to the darkest it can be, there are two options. option one is i would use a mix of curves and levels. i would start off with the curves and use the eye dropper tool that is filled with black and click on that then i would click on the darkest spot of the gif then it’ll automatically recolour the gif so the area that you selected would be black.
to keep the skin tone of idols intact i usually do the following:
keep the vibrance high
use selective colour to colour correct the skin
give a warmer tone to the gif using color balance
here’s just an example of how colouring can make a difference in the gifs and how they look afterwards as well:

most of the time i have around 3-5 adjustments for gifs if i need to but you definitely can add more to your desire!
how to change colours on gifs
changing colours completely is honestly a lot and sometimes it can take up to 10+ adjustment layers if you need to. it takes a lot of practice but the more you do the better you’ll be at it! i’ll basically be explaining how i went from this:

to this:

so tips for this type of colouring:
its easier on gifs that have mostly white backgrounds
it’s easier to change from cool tones to warm tones rather than the other way; especially if there are people in the gif. trying to change warm tones will affect the person’s skin colour
the main adjustments that i use to achieve this colouring is:
hue/saturation
colour balance
colour selective
so i’m going to be changing the blues of this gif into red/pink!
so you use the hue/saturation tool and click the drop-down with master and go to really any option cause you need the eye dropper to be activated.

i’ll use the eye dropper tool to select the cyans/blues in the gif and from there it’ll only change that colour to pretty much any colour you want. it doesn’t always allow you to have smooth changing of colours like this gif so sometimes you may need to use multiple hue/saturation layers to fix it! sometimes using colour balance also helps as well but it’s more broad in that it will change everything that is within the shade range of the colour you’ve selected.
for mostly white backgrounds what’s easiest is that you create a new layer and fill that layer with the colour you wish and change the layer from normal to multiply.
before:

after:
351 notes
·
View notes
Note
Hello, there! Addicted- that sounds like an appropriate name kkkkk-, I would like your advice on one subject. I want to make a gif from a movie, "Fear" do you know it? I have it downloaded on my computer, Which program you advise me to use? I never made one before, so I'm pretty lost here.
hey, @mementovive!
you can call me aj, if you prefer. 😉
as far as gif-making goes, i make most of my gifs from dvds, but the process is pretty similar to making them from downloads, from what i understand.
the programs i use are:
handbrake (to convert files to mp4 format)
windows movie maker (to cut and manipulate the mp4 files down to the right scenes and sizes)
and adobe photoshop cs5 (to make the actual gifs)
the process itself is kind of involved, so i’ll put the instructions after the “keep reading,” if you’re interested.
__________
i suppose i should preface this post by saying i have a pc, and i have no idea if any of these programs work for macs.
so.
to make gifs, i start in handbrake, where i take the following steps:
(note: if your video file is already in mp4 format, you can skip down to the “windows movie maker” part of the tutorial.)
select the source from wherever i have the video file saved.
“browse” to find the destination where i want to save the converted file and save it under whatever file name i want.
select the “high profile” preset from the right-hand menu.
make sure the cropping is set to zero in all directions. (if a change to the cropping is needed, select “custom” in order to do so.)
make sure that the “anamorphic: none” and “modulus: 16″ size options are selected.
hit the “start button” up top and wait for the video to convert.
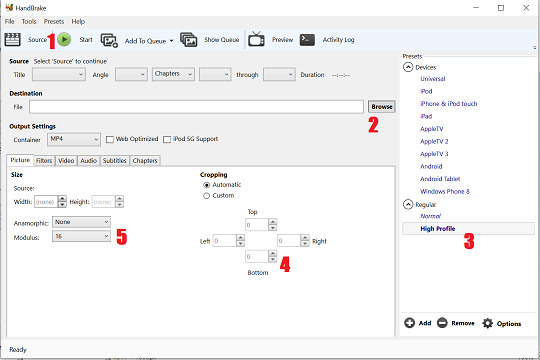
the bigger the file is, the longer it takes to convert.
(i typically try to only convert short clips, a few seconds or minutes in length at most, to avoid crashing the program.)
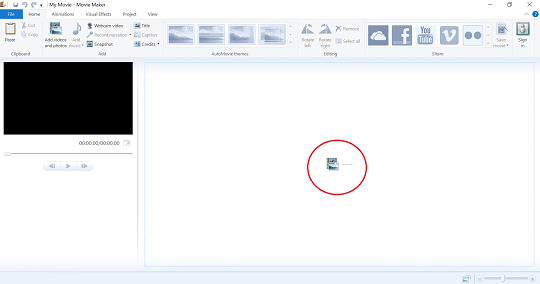
i then move to windows movie maker, where i select the little filmstrip icon in the center of the screen to import my newly-made mp4 file:
once the mp4 file uploads, i use the slide rule on the filmstrip to select where i want to crop the file. then i hit the “split” button and delete the excess video material i don’t want.

since photoshop balks at longer files, i usually limit each clip to no longer than 25 seconds in duration. i also try to leave some extra frames before and after the scene i actually want to gif, as photoshop tends to shave off of a second or so from each clip when you upload to start giffing.
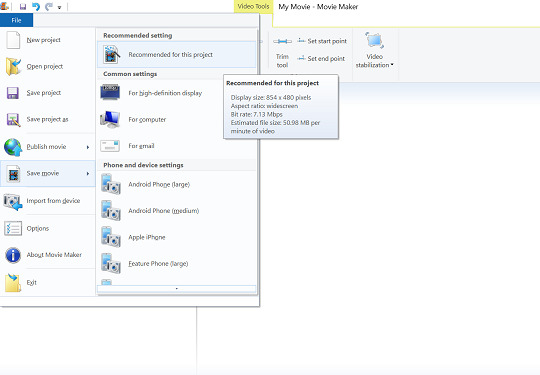
after cropping the file down to the size/length i want it to be, i click on the blue “file” tab at the top of the program, select “save movie” and then the “recommended for this project” setting on the sub-menu. i then save the file to my preferred destination.
i am now ready to go to photoshop and begin giffing.
to open my intended mp4 file, i go to the “file” menu, select “import,” and then select “video frames to layers” from the sub-menu.

i then select the mp4 file from whatever destination i saved it to in movie maker.
at this point, a pop-up menu called “import video to layers” appears, like so:
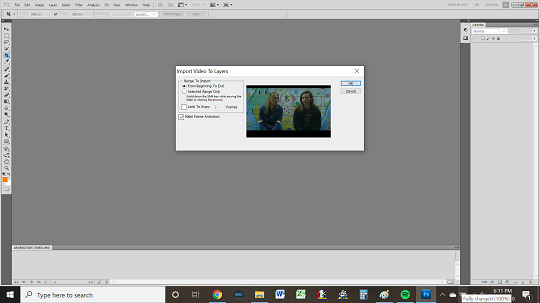
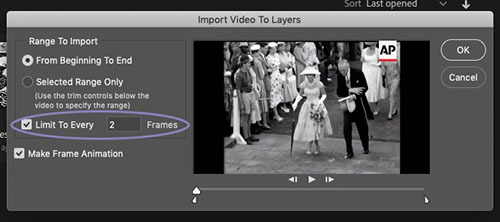
if i want to gif the whole clip, i select the “from beginning to end” option. otherwise, i click “selected range only” and use the slide rule on the video viewer to select which portion of the clip i want.
in either case, i make sure that the “limit to every” box is checked, like so:

i typically choose 2 frames, as doing so makes the gifs smoother.
(the higher the number of frames selected, the more gaps there will be between frames, which translates to the gifs ultimately being choppier.)
i also keep the “make frame animation” box at the bottom of the pop-up menu selected.
once i have selected everything i need to, i then hit the “ok” button, at which point photoshop creates an animation timeline at the bottom of my screen.
from here, my next tasks become
cropping,
sizing,
coloring,
and sharpening
my gifs, in that order.
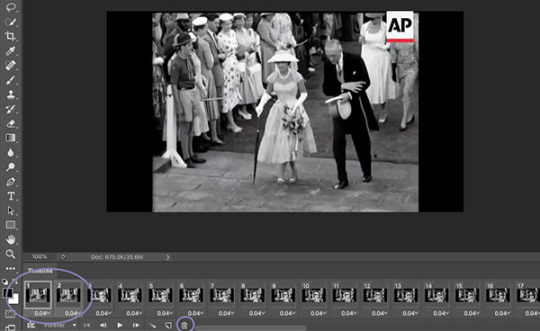
my first item of business is to delete any extra frames i do not wish to gif from the timeline. i do so by selecting said frames in the timeline and clicking on the little trashcan icon at the bottom of the timeline, near the scroll bar.
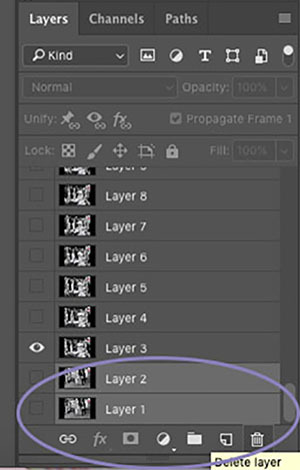
once i have the frames i actually want to work with---which may all be for one gif or for multiple gifs i intend to make into a set---i click on the menu icon on the right-hand side of the animation timeline.
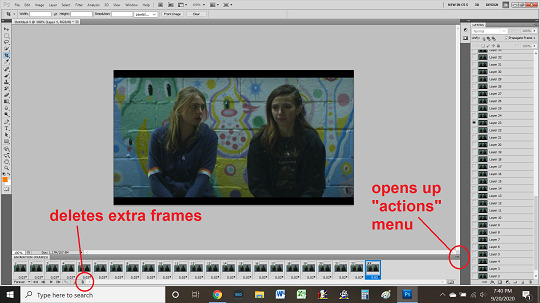
doing so opens up a pop-up “actions” menu.
i then select “select all” from the actions menu, which highlights all remaining frames in the animation timeline.

next, on the “layers” widget on the right side of the screen, i select all layers, making sure that they’re highlighted, and press CTRL + G to put them into a “group” folder. the name is this folder is unimportant. (photoshop will automatically name it “group 1.”)
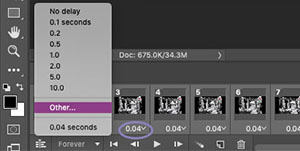
i then return to the animation timeline, where, with all frames still selected, i click on the little black arrow at the bottom of a frame (beside the timestamp that says “0.03″ and select “other.”
i then input a set delay of 0.09 seconds and click “ok.”

now i select the crop tool from the tools widget on the left side of my screen. i use this tool to cut away any framing around the gif, like so:


next, i click on the “image” tab at the top of the screen and select “image size.”
the size of image i want will depend on what kind of gif(s) i’m making. if i am making a single gif or large gifs for a “stackable” set like this one, i make it no wider than 540px. if i am making a gifset that is two gifs across, then no wider than 268px. if a gifset that is three gifs across, then no wider than 177px.
if i adjust my gif to the width i want and the height ends up being less than ideal, then i undo the width adjustment, input the height i want, and then crop the gif to the proper width (manually) using the crop tool rather than the “image size” menu, as doing so prevents skewing.
in any case, once i have the gif the size i want it to be, i start on coloring.
honestly, coloring gifs is the most artful and least scientific part of the whole process. the tools for doing so are found both in the “layers > new adjustment layer” tab at the top of the program and in the “adjustments” widget on the right-hand side of the program, adjacent to the layers widget.
there are lots of good tutorials on coloring available for beginners, both on tumblr and on youtube, so i recommend reading/watching a couple, just to get a feel for what all goes into the process.
once you have the basics down, you kinda just have to play around to find what looks good to you. some gif-makers use psds, some color by hand.
i tend to have kind of a “base set” of coloration that i use and then go by feel on a lot of stuff, favoring bolder colors where i can, though i am still striving to achieve the kind of beautifully vivid hues expert gif-makers like @panchostokes create.
seriously! check these out. they’re gorgeous!
in any case, after coloring the gif comes sharpening, which is another process i suggest you check out tutorials to learn.
tbh, sharpening is one of my weakest skills as a gif-maker, and particularly as i most often make gifs of 90s and early 00s shows, which tend to have low resolution and therefore need a lot of work; in addition to using tutorials, i’ve been playing around with my own sharpening “recipe” lately, but i haven’t hit on the perfect admixture just yet.
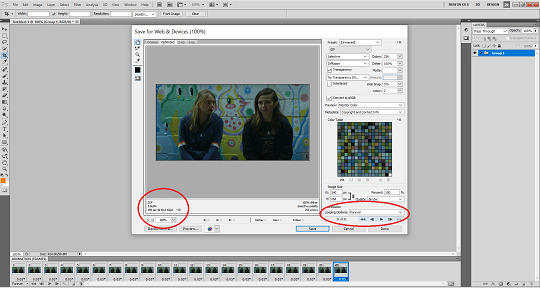
once i’m finished with the gif---cropping, coloring, sharpening---i go to the “file” menu in photoshop and click “save for web devices.”
before saving, i make sure that the lower left-hand corner of the pop-up shows that my gif is under the current tumblr gif size limit (to ensure maximum image quality).
at present---as of september 2020---the current limit is 8mb.
however, most gif-makers try to keep their gifs under 5mb, when possible, as tumblr compresses larger gifs, ultimately lowering the quality by changing them from .gif to .gifv files.
if i find one of my gifs is over the size limit, then i go back to make the gif smaller---by cropping it---shaving off the extra mbs.
finally, i check to make sure that the “forever” looping option is selected, so that my gif doesn’t stop running after its first play-through.
once i have everything as i like, i click “save.”
---and that’s the basics of how i make gifs.
of course, mine is neither the only nor best way to make gifs, and i’m sure that more seasoned gif-makers reading this tutorial are probably side-eyeing my process 👀 👀 👀.
there are undoubtedly easier ways to do things and methods that achieve prettier results; this process is just the one i’ve developed through trial and error, so it’s the one i stick with.
note that i also didn’t say anything here about adding text to gifs, but that’s something else you can learn how to do through more thorough tutorials than this one.
my best advice for aspiring gif-makers is to find a gif-maker whose work wows you and see if they have any tutorials or tips; i personally learned almost everything i know about gif-making from this very excellent tutorial @everynineyearsandthirtyfourdays posted years ago.
anyway.
good luck giffing fear!
i hadn’t heard of that movie before, but i see that billy plays a role. nice!
feel welcome to send more questions any time.
6 notes
·
View notes
Text
part I: downloading videos and making screencaps
how to make critical role gifs (a tutorial)
masterpost || part II
The method I use for giffing is the > Load files into Stack method. What this means is that you take screencaps of videos and load them into Photoshop to convert them into frames. In this part I’ll teach you how to easily download Critical Role videos and make screencaps out of them.
what you’ll need:
This extension and script (for downloading videos);
This website (for downloading twitch clips);
Adapter (for making screencaps).
downloading videos
There are two options when it comes to downloading Critical Role videos: downloading full episodes and downloading Twitch clips. The latter is preferable because the files are smaller and finding the moment you want to gif in a specific video is easier; the problem it presents is that not every single moment in an episode gets clipped and if you want to gif an older episode it’s nearly impossible to find the specific clip you need. Downloading the full episodes from youtube means the files are bigger (and using this method they come without audio) but you do have access to every second of the episode.
Before we start downloading: Higher quality videos = higher quality gifs. For cr this means 1080p and I try to never go below that because yes it does make a big difference (both twitch and youtube also offer lesser quality).
twitch clips
This is the most straight forward way of downloading videos. All you need is the url of a clip (you can find them on Critical Role’s Twitch page here, make sure to check the quality of the clip by clicking on settings).
Copy the url of the clip you want to download;
go to this website and enter the URL in to the grey bar;
click ‘get download link’;
click ‘click to download’;
your download will start.
And that’s it. It’s simple, easy and quick.
youtube videos
Downloading youtube videos is almost just as easy, you just need to install an extension + script to your Google Chrome first, after which you will be able to download any youtube video you would like.
Go here and follow the three steps detailed;
open the youtube video you would like to download;
find the green arrow next to the like/dislike button and open the dropdown menu next to it;
click your preferred download option (WebM 1080HD);
your download will start.

Things to note when downloading youtube videos using this method: It may take a bit longer to download as the files are bigger and the download will not contain audio (which is not an issue when giffing and if you wish you could still download the audio separately).
making screencaps
For this step you will need the free program Adapter (available for both Windows and Mac). Download and install it following the instructions; it’s all very easy.
I will detail all the steps I take and what settings I use which is fine if you are just copying the basics but there is an incredibly clear and easy tutorial about the program right here for people who would like to play around and find their own preferred settings!
So once you have your video file and Adapter is installed this is how you make screencaps:
Open Adapter and click browse to select the video file;
click on the settings button (the gear symbol) at the right hand bottom corner;
change the settings on the right side (again, here’s a tutorial much more in-depth but you can copy the image below). The most important ones to take note of are;
Video to Image Mode: Export Sequence of Frames;
Export Frame Rate 24 Images per second [you can change the 24 to anything between 20 and 25];
Resolution: Same as Source;
Trimming: [insert the range of the video you want to take screencaps of]*
check that the format option below (next to the Convert button) is set to Image > PNG (or Image > JPG if you prefer);
click convert.
This may sound a lot more complicated than it actually is but if look at the image below you can easily copy it as you can use these settings every time you want to make screencaps, save for the Trimming which will vary every time.


*IMPORTANT: The time you enter in the Trimming section will adjust the range of the video Adapter takes screencaps of. Look up the specific timestamps on the youtube video or in a different player (VLC) and then enter them here:

For the example above I used this clip because I wanted to gif Travis’ face. It is a 57.65 second clip that I only need 07.00 seconds from; by entering the exact times I want screencaps from I make looking for the right ones a lot easier later on and save a lot storing space (especially if you want to gif something from a 3+ hour episode lol).
After Adapter finishes (anywhere between a few seconds and a few minutes) you will have the screencaps you need to make gifs in Photoshop.
Part II: creating gifs in photoshop.
8 notes
·
View notes
Text
How to convert YouTube videos to MP3
By following the instructions I gave you in my tutorial dedicated to the subject , you finally managed to know the way to download videos from YouTube without dalliance . However, if you're now here and you're reading this guide, it seems clear to me that you simply haven't yet been ready to find a satisfactory solution that permits you to download the live videos of your favorite singers and save them in MP3 format, so you'll hear them. smoothly on your portable player.
I'm wrong? No, here it's . Then let me offer you this point too, some useful recommendations on what to try to do . Give me a couple of minutes of your precious time also as your attention and that i will show you, during a simple but at an equivalent time detailed way, the way to convert YouTube videos to MP3 . I anticipate directly that to try to do this you only have to resort to the utilization of some special computer programs, very easy to use (even for those that , a touch such as you , don't consider themselves exactly an expert in computer science) and highly intuitive.
What does one say? the thought of downloading new software on your PC (or Mac) doesn't suit you considerably and would you wish to understand if there's any alternative? in fact yes, God forbid. you'll also do everything directly from the browser, using specific online services, also as from mobile, through special applications for Android and iOS. But now just chat and let's take action. Make yourself comfortable and skim everything below. i'm sure that within the end you'll be ready to tell yourself you're very happy and satisfied with what you've got learned. Good fun!
Warning: Use the tools indicated during this guide only and exclusively to download legally distributed music from YouTube or for live variants of the songs you already own within the original version, practically the videos with an ingenious Commons or open source license. it's absolutely not my intention to encourage the implementation of illegal activities, therefore I don't take any responsibility for the utilization that you simply will actually make of the instructions contained within the post.
Media Human YouTube to MP3 Converter (Windows / Mac)
The first of the useful resources i would like to speak to you about is Media Human YouTube to MP3 Converter . it's a free program available for Windows and Mac that permits you to download YouTube music videos and automatically convert them to MP3 while keeping the standard of the first file intact. Despite the name, videos also can be saved in OGG or M4A format with a bitrate up to 320 kbps.
You inquire from me the way to use it? I'll point it bent you directly . the primary step you would like to require is to attach to the program's website and click on on the Download YouTubeToMP3 link on the left.
When the download is complete, if you're using Windows, open the .exe file you only obtained and click on first on Run then on Yes . Then put the check next to the item I accept the terms of the license agreement and complete the setup by clicking on Next four consecutive times then on Install and on Finish .
If, on the opposite hand, what you're using may be a Mac, open the downloaded .dmg package and drag the Media Human YouTube to MP3 Converter icon onto the Applications folder via the Finder window that opened on the screen. Then attend the Applications folder of macOS, right-click on the program icon and choose Open twice during a row.
Once the Media Human YouTube to MP3 Converter window is displayed on the screen, click the Paste Link button to stick the link of the video you would like to convert to MP3. Alternatively, click within the center of the window and paste the link directly using the key combination Ctrl + V on Windows and cmd + v on Mac. differently to insert the link is to tug it directly into the program window.
Finally, return to the most program window, click on the down arrow at the highest right and your video are going to be immediately converted to audio and saved on your computer, within the Music folder (by default).
If you then want to vary the destination folder of the songs downloaded with Media Human YouTube to MP3 Converter, click on the gear icon located at rock bottom left of the most program window and choose Preferences… from the menu that appears.
In the new window that opens on the screen, attend the Audio Output tab and alter the folder during which to save lots of the MP3s downloaded from YouTube by clicking on the Choose… button . who is at the marked Output folder: . Then save the changes made by first pressing the Apply button then the OK button .
I would also wish to means that, again from an equivalent program preferences tab, you'll change the bitrate as you think that is more appropriate by selecting it from the acceptable menu . If, on the opposite hand, you would like to intervene on quality, select the acceptable item and use the relative menu.
If you then use iTunes , you'll also set the program to automatically export the downloaded songs to the iTunes library. to try to to this, just put the check next to the increased iTunes item and choose the reference playlist from the menu below.
ClipGrab (Windows / Mac)
Are you trying to find a legitimate alternative to the above program? Then i can not help but suggest you set ClipGrab to the test . this is often a no-cost program available for Windows and Mac which, in fact, allows you to extract the audio track of videos from YouTube by saving it in MP3 format (as well as OGG). it's very simple to use. let's examine how it works directly .
To download the program on your computer, hook up with its website and press the Free Download button . When the download is complete, open the .exe file you only obtained and click on on Run , on Yes and on Next . Then accept the terms of the license agreement by ticking the acceptable option and click on Next two more times. Remove the check next to the entry for the installation of additional software (eg Opera ), click on Next again , then on Install and complete the setup by clicking on Finish .
If, on the opposite hand, what you're using may be a Mac, open the downloaded package in .dmg format and drag the program icon to the Applications folder within the Finder window that opened. Then attend the macOS Applications folder , right-click on the ClipGrab icon and choose Open twice during a row.
Now, no matter the OS , select the Downloads tab within the program window that appeared on the screen and paste the address of the YouTube video you would like to convert to MP3 within the bar at the highest . Select the MP3 (audio only) option from the Format: menu at rock bottom and use the Quality: adjacent menu to pick the standard you favor .
Finally, click on the Download this clip button ! , indicate the folder during which you would like to save lots of the computer file and await the conversion procedure of the video to MP3 song to be started and completed. Easier than that?
4K YouTube to MP3 (Windows / Mac)
Another great software, always free and available for both PC and Mac, that you simply can cash in of to convert YouTube videos to MP3 is 4K YouTube to MP3 . In fact, it's a resource capable of fulfilling the aim in question in a superb way, which is characterized by its very simple and highly intuitive interface. It allows you to save lots of the audio of the videos present on YouTube in MP3 but also in OGG and M4A. Again, you'll select the ultimate quality of the audio file also because the destination location.
You inquire from me the way to use it? I'll point it bent you directly . First, connected to the download page of the program and click on on the Download 4K YouTube to MP3 button . When the download is complete, open the file obtained, click on Run then on Next . Then check the box to simply accept the terms of use of the program and press Next again twice during a row. Then click on Install , on Yes , check the box to start out the program immediately and click on on Finish .
If, on the opposite hand, what you recognize is employing a Mac, open the .dmg package you only obtained and drag the software icon to the Applications folder via the Finder window that opened. Then attend the Applications folder of macOS, right-click on the program icon and choose Open twice during a row.
Now that you simply see the 4K YouTube to MP3 window on the screen, press the Paste Link button and therefore the link of the YouTube video you would like to save lots of the audio to MP3 are going to be pasted into the program. The download will then be started automatically. you'll then find the song in your computer's Music folder . That's all!
If you would like , you'll also immediately start playing the song you only downloaded by clicking on the Play button attached to the program window. If, on the opposite hand, you would like to directly open the folder during which it had been stored, move the pointer over it and choose the item View within the folder .
Then, before starting the download, you would like to switch the software settings by changing the ultimate quality of the file, the destination folder, etc., click on the Tools item attached to the menu bar and choose Preferences… . Therefore, adjust all the varied settings using the extra window you see appear on the screen.
Filegram (Online)
Don't feel like downloading new programs to your computer? No problem. As anticipated at the start , you'll still convert YouTube videos to MP3 by using special online services. Among the varied available on the square I suggest you contact Filegram . it's very easy to use, at no cost and is in a position to flawlessly fulfill the aim in question, directly from the online browser (any). The audio download is in top quality and also allows you to line the bitrate. In short, what more does one want?
To use it, connected to the most page of the service, paste the link of the video of your interest within the Paste the URL links here field and check the box next to the item I'm not a robot . Wait a couple of moments for the video to be “picked up” and confirm that the Audio item is chosen within the top left-hand corner and therefore the MP3 item is chosen from the relevant menu (and if not, you'll roll in the hay yourself).
1 note
·
View note
Text
Gif Tutorial
I was recently asked for some tips for making gifs, so I thought I’d make a tutorial show how I make mine. I’m using Photoshop CC 2017 for this, but I think the steps should work for most versions of Photoshop. I previously used CS6 Extended but this version has disappeared from my laptop and left me with basic CS6 which I wasn’t able to gif with.
I download my video clips from Youtube or screen record from documentaries/other sources online.
1. First open your Photoshop program and go to File > Open and open the video clip that you have saved.
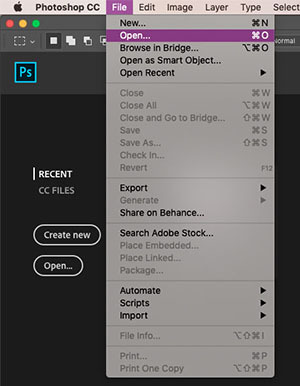
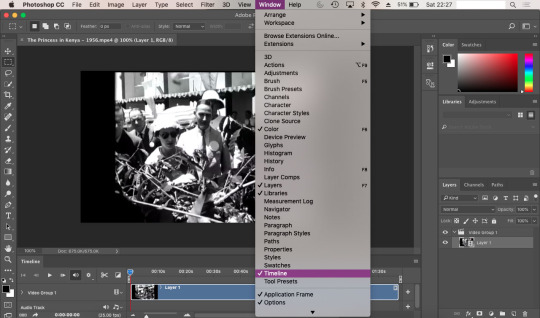
2. Once you’ve opened your video, you need to make sure the timeline window is open, to do this go to Window > Timeline. If you want to use the clip you’re using to make a single gif, rather than taking clips from a full video, then skip to step 5.
3. To save separate clips from a long video you need to adjust the dials below the time markers. To avoid having a gif that’s too large to upload to tumblr and also too long, I suggest keeping your clips to no more than 6 seconds (this may depend on your clip). You can zoom in closer to the time markers to see a more accurate time including seconds by using the slider tool at the bottom of the timeline window. Sliding towards the smaller mountain zooms out (showing the full clip length as in the screenshot), the bigger mountain zoom in, allowing you to see the seconds and create a more accurate clipping. Use the play button to the left of the window to play through your clip and adjust the dials as you wish.

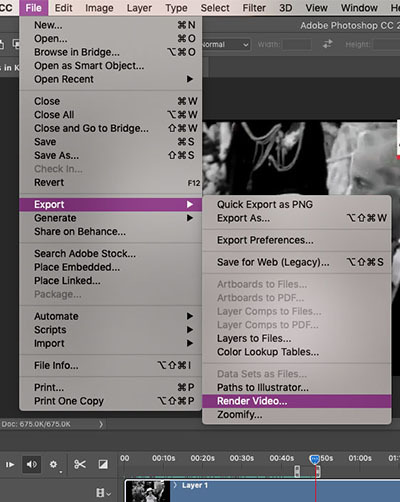
4. Once you’ve selected the clip you want to use, it’s time to save them. Go to File > Export > Render Video. A new window will open, where you can rename the clip and select a folder to save them to. You can ignore the other options.
You can go back and repeat step 3 and 4 as many times as you like to save the clips you want to gif. Tumblr has a limit of 10 images/gifs per post, but some tutorial and resource pages will show you how to put two gifs on to one canvas so you can upload more than 10 at a time.
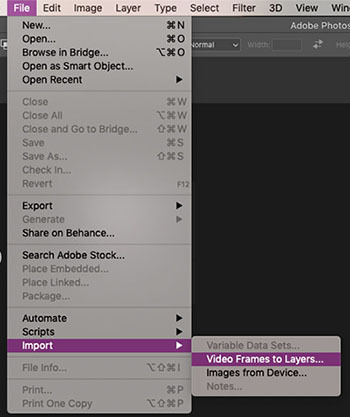
5. To start giffing, you need to import those clips you just saved. File > Import > Video Frames to Layers. As mentioned in step 2, if your video clip is short already then you don’t need to go through steps 3-4. Once the next window opens, you need to make sure that ‘Limit to Every 2 frames’ is ticked.
6. When I created my clip using step 3, there were some frames left over from the previous shot which I don’t want in my gif. To get rid of these, just select the frames you don’t want and you can either press the delete/backspace button on your keyboard, or click on the little bin icon. Now that you’ve deleted these frames from the timeline, you need to do the same in the layers window. Be sure not to delete the frame with the eye icon as this is now the first frame of your gif. You may need to have a scroll to the last frames in your clip, to check there aren’t any other excess frames you don’t want. If so, just follow these same steps.
7. Next up we’re going to set the time delay between frames. This will determine how fast or slow your finished gif loops. To do this, you need to select all of the frames on your timeline, and click on the arrow next to the number shown (typically defaults at 0.04). The seconds shown in the list will make your gif run super slow - this is the delay between each frame, so if you select 5.0 there will be a five second delay between one frame and another. So, to choose your own time, select ‘Other’. For me, unless my chosen clip is super short where I might want it to loop a lot more slowly, I try to have my gifs play in as close to ‘real time’ as I can. I set my delay at 0.06 seconds and adjust it later on if needed. You can always press the play button and see how your gif runs, but this isn’t usually an accurate playback speed.
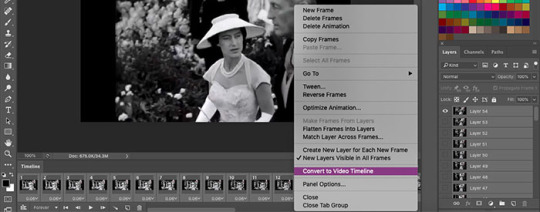
8. Once you’ve done this, you need to highlight all of the frames in the timeline window and all of the layers in the layer window. Next, click on the button that looks like three lines, on the right side of the timeline window and select ‘Convert to Video Timeline’. Then, in the layers window, right click one of the layers and select ‘Convert to Smart Object’. This will compress all of the layers into one, but will still be playable.
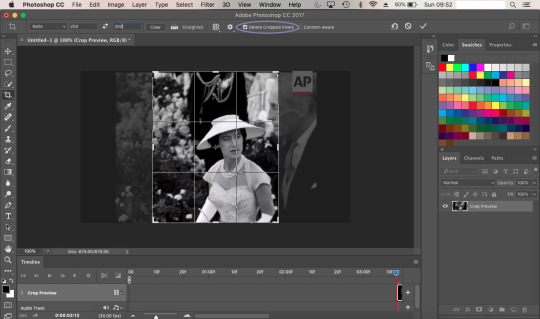
9. Now we’re going to crop your gif. First, you might want an idea of how what kind of layout you want for your gifs - this will depend on how many gifs per set you want. If you’re just making one gif, then set your crop with to 500px and your height to whatever works best (250, 300, 500 etc). Two gifs per set (if you want them side by side) need a width of 245px, three gifs side by side need a width of 160px. Before you crop, you should make sure that on the top bar ‘Delete Cropped Pixels’ is unticked. This will allow you to move your frame and re-crop the area.
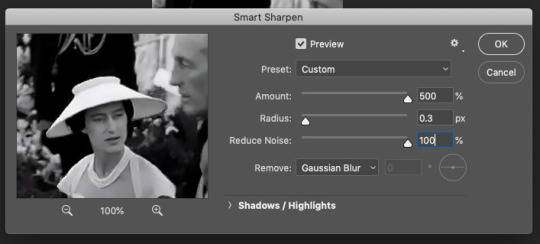
10. Once you’re happy with your cropped area, it’s time to make some adjustments. For my gif, I want it to have a width of 245px and a height of 300px. To change the size of your image you need to go to the top menu bar and select Image > Image Size. Make sure the measurements are set to pixels. Next we need to sharpen the image, so we go to Filter > Sharpen > Smart Sharpen. I always have mine set to 500% for the Amount, 0.3px for the Radius. In CS6, Smart Sharpen didn’t have an option to reduce noise, so I just set this to 100% as this seemed to work best for the quality. It helps if you have Preview ticked, so you can see how the adjustments affect your image.
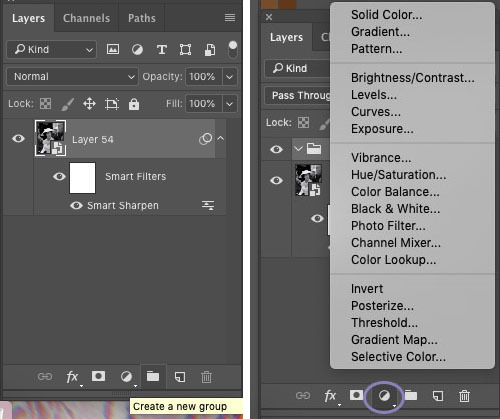
11. Now it’s time to start applying filters! To keep everything together in one place, you’ll want to create a new group so click on the little folder icon at the bottom of the layers window. Then click on the round icon to the left of it - here are your adjustment options. Have a play around with these and see which ones work best for you. Click on the eye symbol next to the adjustment layer will turn the layer visibility off, so you can see the effect it has on your image and see if you need to make any changes.
I tend to edit all of my gifs in the same style, the only difference being the options I use for black and white gifs, and those for colour. My basic go-to adjustments are Brightness/Contrast, Levels, Selective Colour (W/N/B for B&W, all colours for coloured gifs). To create a level tone for my B&W gifs, I apply a Gradient Map, fading from black into a very light grey. Colour gifs - I play around with Vibrance, Hue/Saturation and Colour Balance. It doesn’t hurt to play through your gif while you’re editing, to see if the settings your using work for all frames and not just the cover.
12. Once you’re happy with your gif, we need to save that masterpiece. Go to File > Export > Save for Web (Legacy). Some version of PS might just say ‘Save for Web’. In the next window, the only thing you need to do is select ‘Forever’ in the Looping Options drop down menu. Here, you can also check the size of your gif and make sure it’s below the 3MB limit. If it’s over, then you may need to go back and cut the length of your clip a little by adjusting the sliders in the same way as in step 3. If it’s a tiny bit over the limit, shaving a second or two off of your clip should be enough. If it’s over by a lot then you may need to split your gif into two. Again, following step 3, you can simply adjust the sliders to split the timeline into two sections. Once you’ve done this try saving again and check the size. When you’re happy, all you need to do is click Save and you’re done! You’ll need to do this for every clip you want to gif. The more you gif, the easier it’ll become and you’ll find your own rhythm where it may take only a few minutes to make one gif.
As mentioned earlier, if your final gif playback is too fast/slow all you need to do is drag and drop the finished gif back into PS and adjust the time delay as per step 7. You can change this and save it again as many times as you like until it’s right for you.

** TIP ** Never close your tab window until you’re 100% happy with your gif, to the point that you’ve uploaded it. If you’ve noticed a mistake or a problem with your gif this allows you to go back and edit it without having to start over again. Also you can save your work in progress as a PDF at anytime. Trust me, there’s been many a time where I’ve closed my window and had to start again if there’s been a mistake.
21 notes
·
View notes
Text
"palette” gif tutorial
hi everyone!!! so i’ve gotten countless requests to make a tutorial for my lara jean gifset, more specifically this gif:
so today i’ll be showing you how i make this gif right here:
as mentioned in the original post, this whole gifset was inspired by one of my favorite mvs of all time: palette (hence the creative name lmao). i essentially used screenshots of the mv to make my own similar template to work off!
disclaimer: i suck at explaining things, so you’re all gonna have to bear with me and my 100000 screenshots and poor attempts at explaining wtf i’m doing. hopefully you can manage to understand what i’m on about!!
if you’ve never made a gif, check out this detailed tutorial i made some time ago:
how to make gifs + color gifs (this tutorial includes links to download ps)
tutorial under the cut (i’m sorry for how long this is rip)
first, screenshot the mv. (timestamp 0:38)
here is my screenshot:
now, we’re gonna open ps and go to file > open to open the screenshot on there. this is my screen rn:
notice how my timeline is there (little box on the right side of the screenshot). we’re going to need the timeline for the gif later. if u don’t see the timeline, go to window > timeline and it should show up!!
time to crop the screenshot. using the crop tool, (left sidebar, 5th icon from the top) remove the black parts of the image (top and bottom) until all you’re left w is the white area. final product:
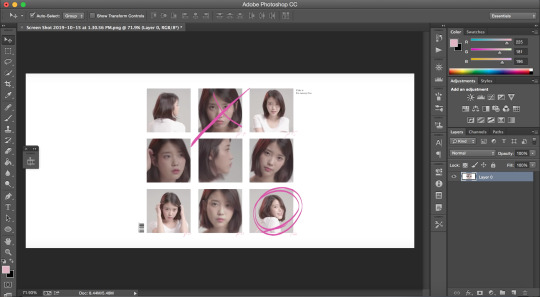
now it’s time to change the size of the canvas we’re working it so it can be the dimensions we want it to be! go to image > canvas size
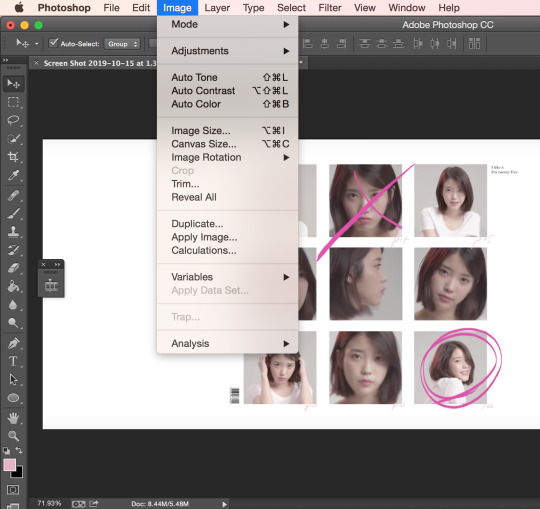
a window like this should pop up:
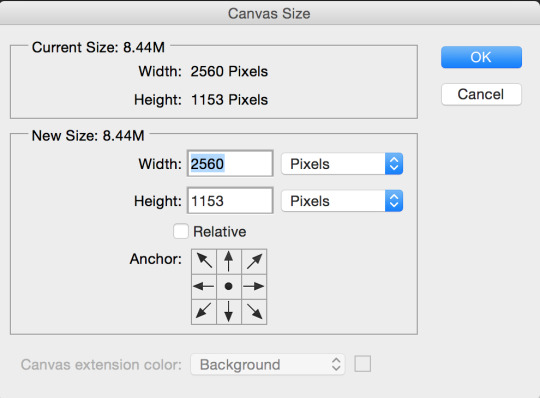
we want our gif to b 540px by 400px, so just fill that out and press ok:
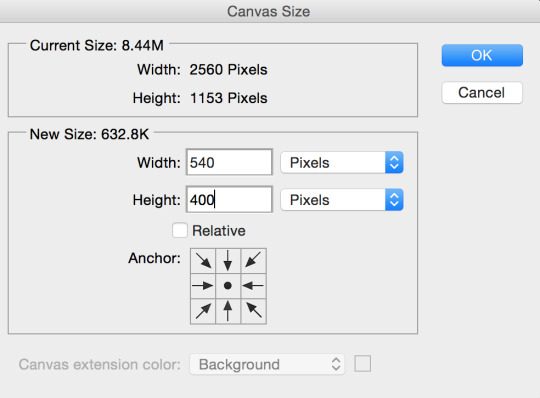
this is what your screen should look like after (aka super zoomed in):

we’re gonna fix that rn!!! making sure the layer (right sidebar) is selected (you can tell it’s selected when it’s in blue), press command + t, which will leave you with this:

okay, so i’ve covered this before in my previous basic gif making tutorial and not much has changed since then aka i’m still shit at attempting to explain wtf i’m doing. BUT basically this part involves using the top bar (pictured below) and changing the % of the W and the H to make the image the amount of zoomed in i want it to b (if that makes sense)

again, i usually just play around w the %s, depending on how zoomed in i want my image or gif to be, its dimensions, etc. the higher the %, the more zoomed in it is. basically, putting in 50% would make it way more zoomed in than 20% and so on. for this, i’ve tried out several % and decided to use 39%, but of course you can pick the % you prefer. so write in your chosen % in these two boxes in the top bar like this:

click the checkmark at the right of the top box and voilà! this is what you should have rn:
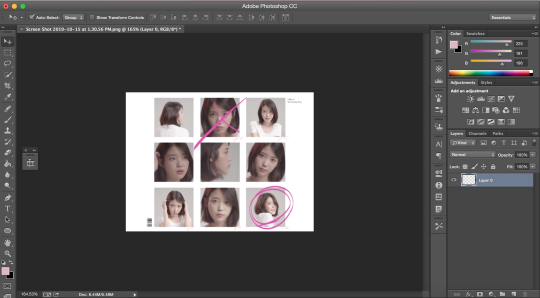
see how all the 9 squares fit perfectly inside? wow, powerful. anyway, let’s keep going djfhdkfd. now we’re going to make our own squares aka the squares in which the gif is going to be. start by creating a new layer (at the bottom of the right sidebar, the second to last icon before the trash icon). give it a name so it’s easier to keep track of: i picked s1, since this is going to be the layer where the first square is going to be (and so on). also make sure the new layer is above your image like this:
time to actually make the first square!! select the rectangular marquee tool (left sidebar, 2nd icon from the top) and select one of the squares in the image (113px by 113px) like this:

select the paint bucket tool (left sidebar, under the eraser tool) and make sure the color is set to black (#000000) before you click on the square you just selected. very important: don’t forget to have the s1 layer selected (should be in blue) when you do this or else it will fuck up.
this is what your screen should look like after:
as you can see, we have one square done, but there are 8 more left. right click on your s1 layer in the right sidebar and click on duplicate layer. name that layer s2. making sure the s2 layer is selected, drag it to the place of the second square:
keep doing the same thing until all the squares are covered with black ones like this:
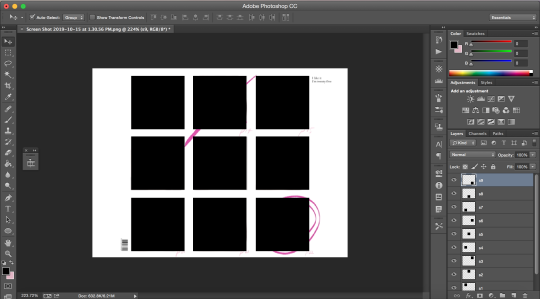
now i’m going to hide the black square layers by clicking on the little eye icon (left of layer) for each of them bc i want to include the little dark pink doodles on my gif as well, but you don’t have to, so if you don’t wanna include it in your gif, you can skip over this part!!
there are technically 3 ways you could do that (well maybe more lol but these 3 are the ones who came to mind:
method #1: use the brush tool to draw your own doodle (or trace over the existing one with a new brush)
method #2: use the magic wand tool to select the doodle and use the brush tool over your selection
or method #3: look up doodles on google and drag them onto your image
i don’t have an ounce of patience rn, so i will b using method #2. select the magic wand tool (left sidebar, 4th icon) and make sure you select the first doodle the best you can. don’t forget to make sure your screenshot (image with the doodle on it) is selected while you select the doodle or it won’t select anything!!! like this:
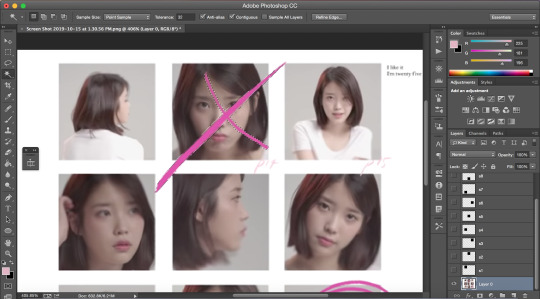
create a new layer (bottom of the right sidebar, the second to last icon before the trash icon) and again, make sure it’s above all the other layers. with your new layer selected (in blue), select the paint bucket tool (left sidebar, under the eraser tool) and pick a color (i used #e1b5c4). click on your selected doodle. this is what you should have:
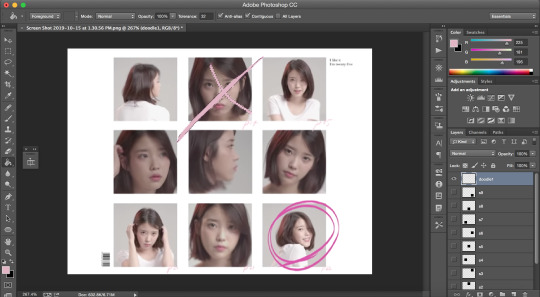
repeat for the other doodle with another layer.
final product:
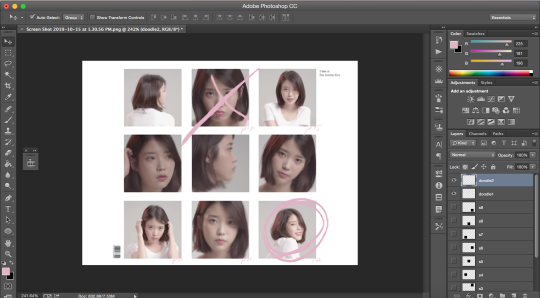
it looks a bit Rough, but hopefully you get the idea?
now we’re going to merge all the little squares into one layer of little squares. if you have doodles, remove the eye icon (left of layers) for both of them to hide them and make sure all of your eyes are there for the square layers. select the s1 layer and then the other layers up to s9 while keeping one finger on the shift button until all the square layers are selected (in blue) like this:
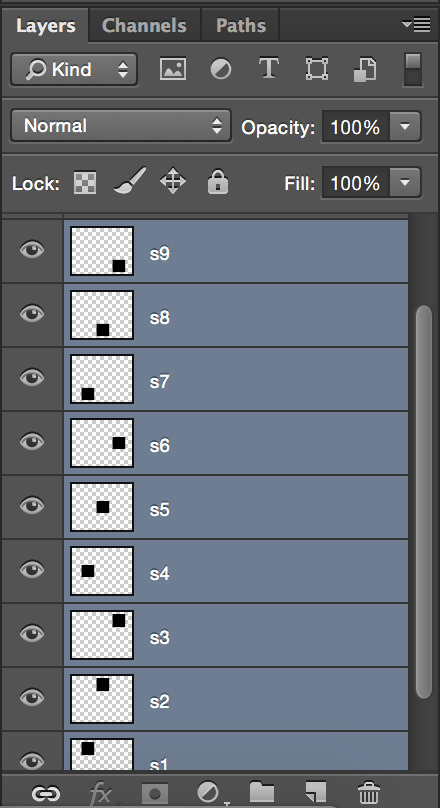
right click on the s1 layer > merge layers. all you should be left with is:
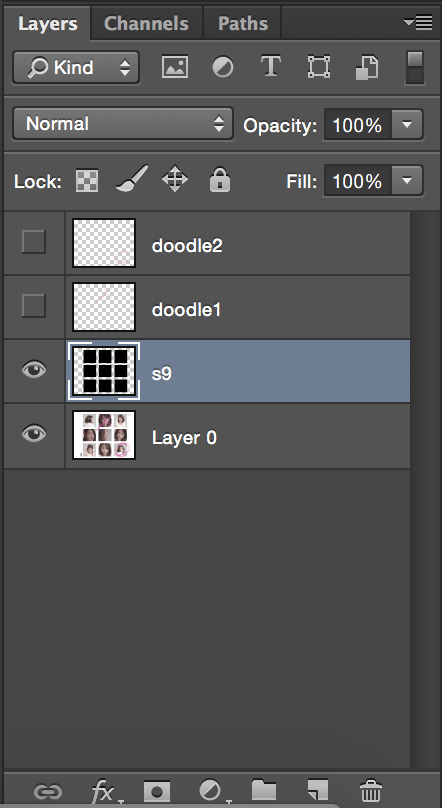
now that this is done, we need to fix the background.
create a new layer that you will drag above the screenshot (layer 0) but under the s9 layer. i named mine bg (background). i want to keep the barcode in the original screenshot, so i won’t select that part. using the rectangular marquee tool (left sidebar, 2nd icon from the top) and with the bg layer selected, draw a square at the right of the bar code so you have this:
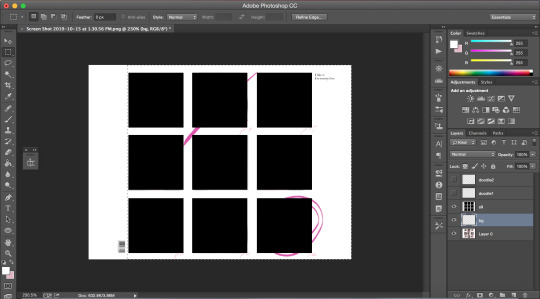
with the paint bucket tool (left sidebar, under the eraser tool) and the color set to white (#ffffff), click on the selection.
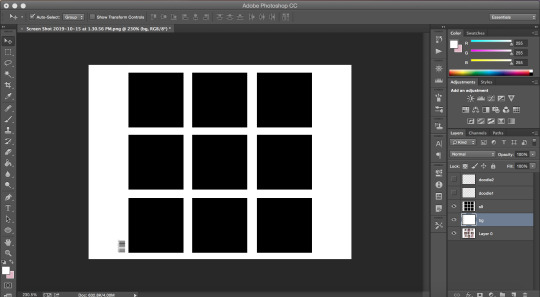
and that’s your template!!!
with doodles:
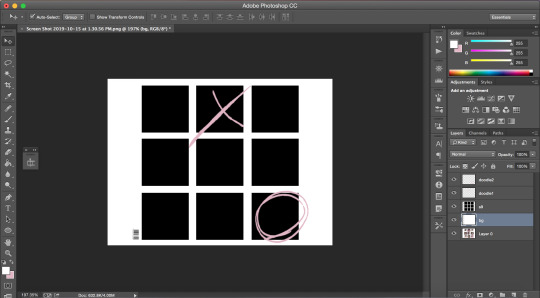
now onto making sure the gif is going to actually move properly.
click on the little arrows at the right side of the timeline to expand it until you have this:
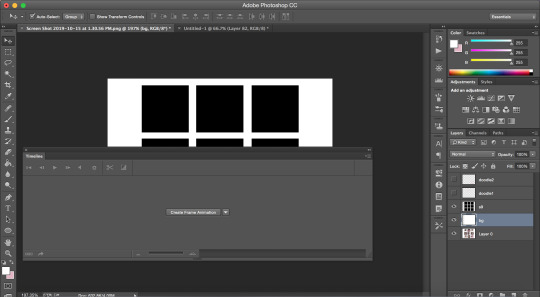
and then click on create frame animation. your screen should look like this:
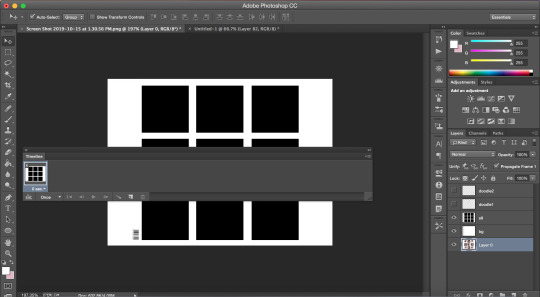
notice how it says once at the bottom of the timeline? make sure to change that to forever, or it will not play:
click on the convert to video timeline icon (the one on the left of the forever). this is what you should be left with:
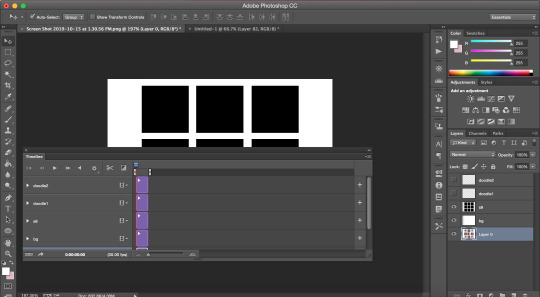
now, time to make the gif that is going to go there*
*if you have no idea how to make gif and are lost af, i suggest you check out my previous tutorial where i explained this part with more screenshots and more specifically bc i will be more vague here regarding this
also i’ve said this again and again, but remember to ALWAYS USE 720P OR 1080P FOOTAGE WHENEVER POSSIBLE FOR YOUR GIFS or else they will be grainy and extremely unpleasant to work with.
i’ll be using a video from youtube for this. i suggest converto as a converter, it works really well and allows you to download youtube videos in 720p and 1080p!! once you have your footage ready, go to file > import > video frames to layers. use the markers to select the part you wish to gif, and, once you’re happy with your selection, click ok.
to select all the frames, click on the icon on the right of the timeline (4 lines with an arrow) and click on select all frames. then, go to select > all layers in the top bar. everything should be selected (in blue) like this:
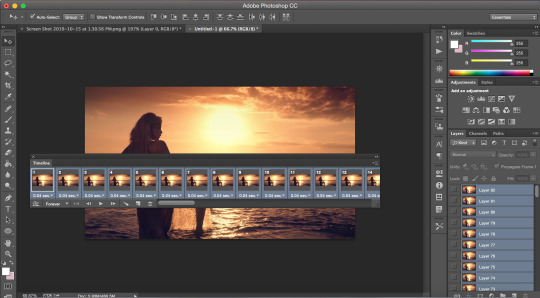
now, fixing the speed of the gif.
super helpful post explaining gif speed right here
i’ll personally be using 0.06 here.
click on one of the frames in the timeline > other. write in the speed you chose and then press ok. go to convert to video timeline icon (the one on the left of the forever).
you should have something like this:
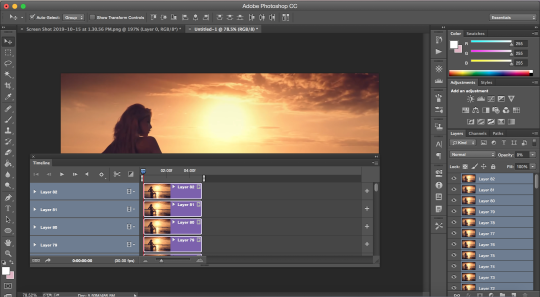
go to filter > convert for smart filters:
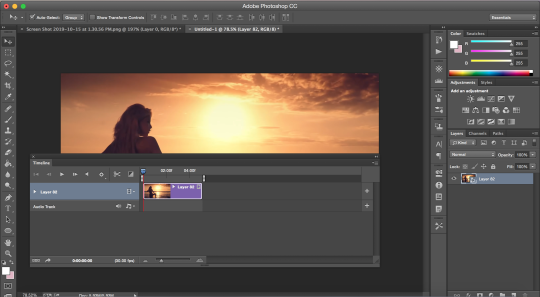
the time has come to drag your gif to the canvas:
make sure the gif is above the s9 layer (layer with the black squares) like this:
to make our gif fit inside the squares, we’re going to make sure the gif layer is selected. then, press the option (alt) button and click between the gif layer and the s9 layer to create a clipping mask (like this). this is what it does:
this is where i usually play around trying to find a size for my gif that looks nice. press command + t and, like we did earlier, find a % you’re happy with. i’m going to go with 20%. after moving my gif around and making it less zoomed in, it now looks like this:
this is usually where i would sharpen my gif, so, with your gif layer still selected, go to filter > sharpen > smart sharpen, and then ok.
these are my settings:
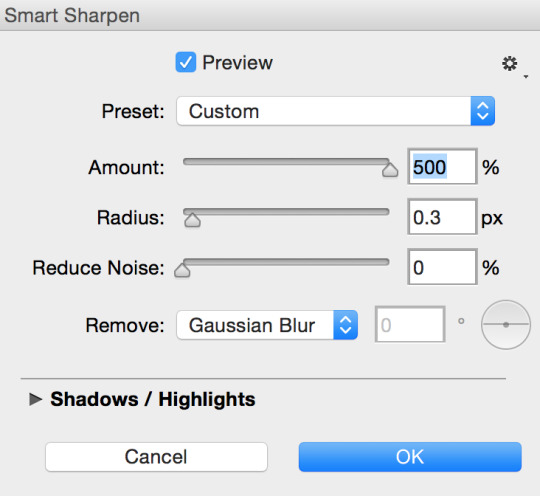
we have to fix the length of the gif, since there’s a lovely limit on this amazing site. i suggest you pick something to gif with not much movement, or you’ll have to make it even shorter. there’s no magic formula, just try not to make it too long, especially since the gif is large in size, so the smaller the better in this situation. this is what i have:
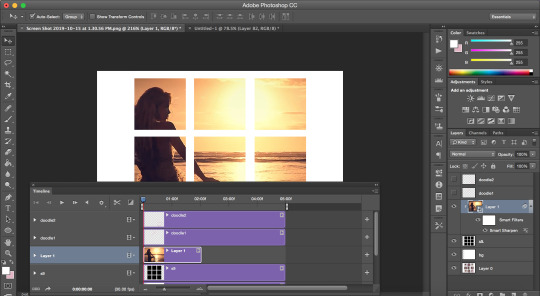
notice how the layers in the timeline are all of different lengths, so make sure you make them all the same like this:
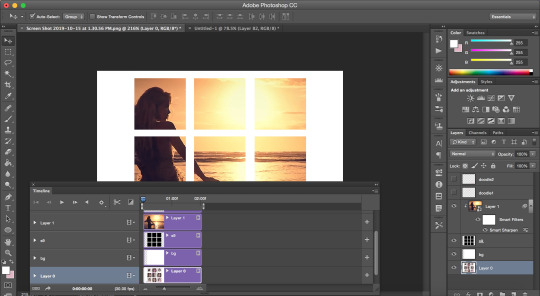
once you have a psd ready, go to file > open and when it loads, drag it onto the canvas, above the gif. i added one of my psd on mine.
for the text on the top right, i can’t remember the exact font i used, so i picked another font different from the original.
these are my settings:
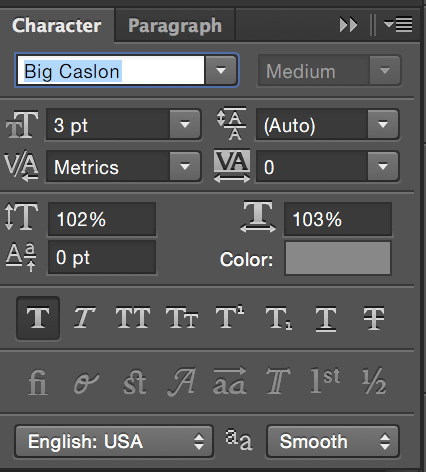
what it looks like with the psd + doodles + text:
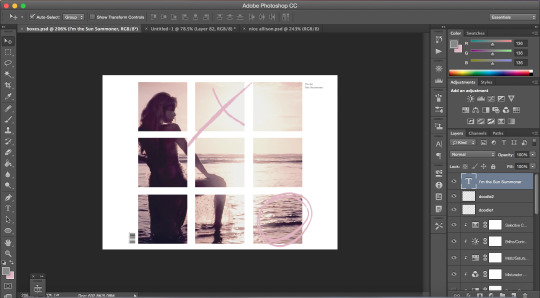
and we are DONE!!! all that’s left is to save our gif!! go to file > save for web
these are my settings:
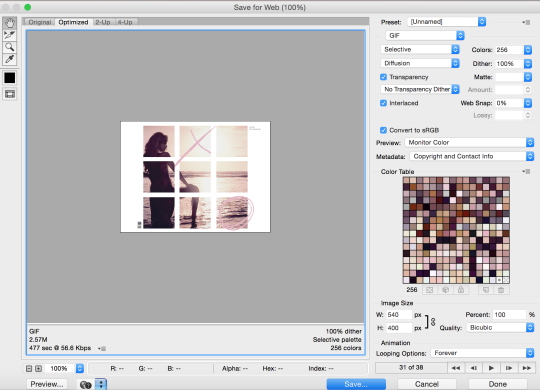
SUPER SUPER IMPORTANT: make sure your gif is set to forever in the looping options at the bottom right of the window or else your gif will absolutely not play properly!!
also, CHECK YOUR GIF SIZE (bottom left). with this website changing its gif limit every 2 seconds, better safe than sorry!!
here’s the final product:
thanks for sticking around and reading all of this!!! i hope it was somewhat helpful even though i suck at explaining how i do stuff! :)
#stupid tumblr crashed so i had to start over but here it is finally!!! sorry for how long it took!!#gif tutorial
48 notes
·
View notes
Text
How To Merge Audio E-book Information Mp3 Cutter & Merger is a device for modifying Mp3.
Join An Ensemble!
When you've got been into the music trade for even one month, Audacity can be nothing new to you. JMI is a worldwide community of NGOs that provides alternatives for younger individuals and children to develop by way of music throughout all boundaries. Open to all kinds of music, we work for and http://www.magicaudiotools.com with youth, harnessing the power of music to bridge social, geographical and cultural divides, creating an international platform for intercultural dialogue and acceptance.
Fast MP3 Cutter Joiner cuts and trims a large MP3 file (up to 10 GB) into a number of smaller pieces, and joins multiple MP3 recordsdata into a single file as nicely. All the information which are edited or merged using the Mp3 cutter or the Mp3 Merger will be discovered within the folder named mp3 within the sdcard of the memory card. With its distinctive method that works for any instrument, Musical U helps members see significant enhancements in just some weeks, from as little as 15 minutes observe per day.
Additionally, you too can take heed to the merged audio whereas enhancing to verify the effects. That is useful if you wish to rip a music album CD and separate its songs into completely different audio files. First, it's important to import the audio or the video file which you wish to edit in Filmora. There are additionally quite a lot of preloaded sound-results and royalty free music tracks in the Filmora library that you could drag-and-drop onto the timeline and edit.
MP3 Toolkit is a powerful Home windows app consists of MP3 converter, CD ripper, tag editor, MP3 cutter, MP3 merger and MP3 recorder for customers who wish to deal with MP3 files easier. We're undecided if it will catch on. Spotify and Apple Music are dominating the market proper now. But the inclusion of movies certainly is fascinating. Are you planning to attempt YouTube Music? Let us know in the comments section, and preserve us posted with how you discover it.
In their own words, Meet & Jam is focused building on more than a faceless categorised adverts, however an actual and private group. They have over 12,000 musicians on the positioning and often organise jam nights within the UK. This is a direct hyperlink to their classifieds. Energy MP3 Cutter and Joiner is indeed a powerful device that helps you cut up and merge MP3 audio recordsdata effortlessly. It's easy to use MP3 editor and creates one software program with the audio splitter and merger. Aside from MP3 it additionally supports many different file codecs like WAV, OGG and WMA.
Add text info to tracks that you simply merge! Magic Audio Merger can add text comments such as album and artist info. You possibly can edit this info at any time with built-in tag editor. The built-in media player allows taking part in back individual fragments in addition to the merged recordsdata. Cut up any audio track effortlessly with MP3Cut that comes with a super simple and trendy looking mp3 player. In case you are not that familiar with the best way to lower the file at the actual splitpoint, you can merely move the sliders placed on each ends of the participant in response to the portion you wish to trim.
There are tons of such tools all over the web, however, I?have chosen the perfect MP3 cutter and joiner for you. Even if you already know nothing about reducing or merging audio information, these tools are very straightforward for you to function. So undergo this list of free audio cutter software and see which one?can meet your demands.
Together with the power to cut and be a part of songs, you may as well use the convert feature to create ringtones to your telephone. By having the ability to be part of multiple songs, you can create one file that could be a playlist of your favorites in the order you want to hear them. You may as well take out among the worst songs of a CD, leaving you with only the tunes you like. The most effective feature is the fade in and fade out effect as this will maintain tune transitions easy and remove jilted cuts that might otherwise wreck the listening experience. Advanced settings can take some follow and testing to determine what works best but are easy enough to alter and alter. Elaker MP3 Cutter Joiner is a great way to mix and edit your favorite music without the trouble and complexity of a full editor.
is a nice mp3 cutter that can used to cut or split mp3 songs on-line. To make use of this mp3 song cutter just add your track in mp3 format and choose the interval of the tune that you just wish to minimize utilizing markers after which click on on cut mp3 file. Then download the clipped mp3 file to your pc disk. The resulting mp3 can have the same quality as the unique one.
Hit recording artist Ed Sheeran is poised to make a more vital bounce into the performing world, and the challenge could not be extra perfect. The Daily Mail first reported and Deadline confirmed that Sheeran is in talks to join the solid of Oscar-winning Slumdog Millionaire filmmaker Danny Boyle's upcoming musical comedy from Working Title. The script for the untitled function hails from Love Really and About Time screenwriter Richard Curtis, audio merger and whereas the plot has been stored below wraps, The Daily Mail has some intriguing story details, assuming they're true: It's the story of a person who wakes up someday to discover he's the only particular person on the earth who remembers the songs of The Beatles.
1 note
·
View note
Text
Cd Editor On-line
Free Children Songs There are many MP3 web sites round, butthis is the first one we've seen that's devoted to MP3 music recordsdata for kids. The very best audio converter software program supports multiple input and output file formats like MP4, MP3, WAV, WMA and so on. Additionally they make file conversion job simpler along with sustaining high-high quality sound. In this article, we'll focus on the very best audio converter software that it's best to use. Choose ".mp3" within the format discipline. In this final step, it's a easy matter of hitting Convert icon on the backside-right nook of the main display screen to run means of converting FLAC music in Mac to another file format.
Click on the Information" button and select the Add information" option from the drop down menu. 2) Is there a greater manner to do this? I am planning on uploading theflac information to the server via http and triggering the script somehow. CloudConvert is likely one of the handiest on-line file conversion instruments. It's slick, quick, and would not shove any junk on you. Naturally, it really works great for converting audio files, and lets you convert FLAC to MP3 online. Added converting FLAC to Mp3 files.
Nonetheless there are a number of essential streaming services that provide very high sound high quality - Spotify , Tidal and soon Qobuz - and depending on the file, they are often indistinguishable from the CD. While Spotify content material materials is ripped in 320Kbps Ogg Vorbis, it's Tidal that offers crucial numerous to private collections as it's also primarily based on FLAC. Assist for Cowl Artwork Download and add album covers to your information and make your library much more shiny. When the process has completed, the status of progress bars will show as "Completed", your FLAC audio files have been successfully transformed to MP3 format on Mac.
Some of the popularaudio converters in the Mac Retailer is the apt-titled To MP3 Converter Free, an easy-to-use utility for converting from one in all 200 audio and video codecs to MP3. Of course, the software program helps FLAC information, and the method for making the conversion couldn't be easier. The software also lets you change the output from a continuing bitrate to a variable bitrate, switch tags from the supply file, and alter the quantity to the maximum level.
Ready for conversion to complete, you possibly can obtain MP3 file right afterwards. FLAC (Free Lossless Audio Codec) is compressed to keep file sizes small, nevertheless it's also lossless, which means that it's on par with CD high quality. CD audio converted to FLAC will usually be lowered to 50 percent of its unique measurement. For reference, a 3-minute music on a CD will take up 30-40 MB of area whereas a ripped FLAC version of that same music takes up 15-20 MB. If sound quality is your prime priority, then FLAC is the format for you.

If your authentic file accommodates video, you can easily remove it maintaining the sound solely. Add your clip to this system and then rework it following the how-to above. You'll be able to add a number of files to transform all of them in a single go. Click on "Profile" drop-down button to open the "Profile" window, you can select "Common Audio > WAV - Waveform Audio (.wav)" as output format. Lastly, the free online doc converter FileZigZag can competently deal with quite a lot of file varieties, including Microsoft Workplace formats and PDFs. Like Zamzar, it makes you present an e mail deal with as a way to obtain a obtain hyperlink for the transformed file. But apart from that, it is straightforward and straightforward to use, and you can run it from any browser window.
Earlier than using this DVD to MP3 converter, please just remember to have put in the Java Applet in your pc. You too can set the FLAC to MP3 Converter to delete a supply file after conversion and preserve the the unique folder construction, when doing batch conversion. Click on "Profile", go to "Normal Audio", then choose "MP3 - MPEG Layer - three Audio (.mp3)" as output format. This was the original 1-minute stereo music file used to transform to all the opposite formats. Undecided why you need to do that though - FLAC recordsdata are better quality than MP3 (lossless compression, so they're just pretty much as good as WAV files, but half the scale).

You may choose what pattern charge you need to use. forty four.1 kHz (or 44100 Hz) is the sample fee used by audio CDs. Lower than that and you may start to hear the loss in quality. Launch Wondershare FLAC Converter on your Mac, then click the Add Files button on the higher left so as to add FLAC video that you simply wish to convert to MP3. Or you can too directly drag and drop your required FLAC audio to the FLAC to MP3 converter. You might need to convert a hardly ever used file kind to a more widespread format, which could make it easier to share with others, reserve it to a mobile device, or make it suitable along with your media participant.
volume control rms normalization software program Sound Amplifier & Normalizer CD players and different legacy audio gamers do not support Replay Achieve metadata; auto level edit mp4 wav normaliser. Nonetheless, some lossy audio codecs, are structured in a approach that they encode the quantity of each compressed body in a stream, and tools corresponding to MP3Gain benefit from this to alter the amount of all frames in a stream, in a reversible approach, without including noise finest free wave to flac to mp3 converter online free youtube convertor that fixes high quality; Applicantion which cut back size of file for mobile the right way to increase cd volume on ringtone wav sound editor flac leveling increase mp4 batch normalizer. free online audio volume restore Free cut back flac file size downloads MP3Resizer. Increasing the loudness to match commercial CDs? tips on how to improve quantity on music batch resize flac normalizer musikfiler.
FLAC to MP3 on-line conversion has been made simpler utilizing It's a FLAC to MP3 freeware converter that has good conversion features. It helps conversion to many different file codecs. This free online FLAC to MP3 converter supplied with conversion output that's of great quality. To transform FLAC to MP3 online using is very simple and fast. Playback compatibility, storage intensive or otherwise, you generally have a have to convert the FLAC on Mac & PC to another extra pleasant and usable music format. Here subsequently, this text revolves round a tool - Video Converter for Mac ( for Windows ) with its features as well as an easy information on converting your FLAC files.

1 note
·
View note
Text
How To Combine Video And Audio Recordsdata
There are several methods to hitch a Lync Meeting utilizing Lync for iPad. With videos, it's also possible to take out the sound or even convert the video clip into audio solely. MP3 Joiner supplies several simple ways for you to easily regulate the sequence of the MP3 files to be merged. Audio Converter + Video Converter: Want to convert a wav to mp3? You can quick merge, combine and join MP3 audio recordsdata with out recompressing and with out high quality loss. No extra affected by unrecognized audio format and make your music universally accessible and helpful. By default, all the imported MP3 audio information are checked to be merged into one, if you wish to merge all the added MP3 files into one, simply click "Merge" button.
To simplify enjoying and recording audio, if SoX is invoked as play, the output file is robotically set to be the default sound device, www.magicaudiotools.com and if invoked as rec, the default sound system is used as an enter source. Or, Skype for Business calls you on your mobile phone and you will settle for the Skype for Business name to hitch the meeting. Simply bear in mind however, that Energy MP3 Cutter Joiner will not be an audio editing tool. You can too take advantage of the opposite features of this program, equivalent to audio recorder, audio converter, CD burner, radio station and YouTube MP3 extractor.
Hear and obtain the audio file after it has been processed and merged. Free audio and mp3 editor that anyone can use to satisfy all their music enhancing wants. The tool not only can edit audio information online but in addition helps to edit sound from the video file. Shuangs Audio Joiner is a free audio file join software. Load audio files straight from CD and convert towav files automatically. Minimize, join, trim, combine, delete components, split with AVS Audio Editor Use Timeline for maximum precision.
Spotify audio converter is the audio converter that may assist users obtain and convert any Spotify songs, album and playlist to frequent MP3, AAC, FLAC or WAV format, so that you could play them with your music participant more freely. The app supports more than 300 audio formats, routinely converting them to mp3 for faster and easier operation. Joining audio tracks is straightforward: import files to the listing and put them in the desired order; select the output format and set encoder choices; add tag information for the output file if you wish to and eventually click Be part of recordsdata.
This option is enabled by default when utilizing SoX to play or file audio. Audacity is a superb open-supply audio recording and editing program appropriate with most working systems. It is very often it's important to an audio or music editor to do some jobs like extract some songs from a big audio file perhaps in your mp3 participant; split and be a part of a portion of an mp3 file to create a ringtone in your smart cellphone; reduce out the commercials from a radio program you recorded; or even to separate a wav file you have got transferred from vinyl into its genuine observe.
Within the higher proper corner change on the choice Be part of recordsdata". Browse to the folder where your audio recordsdata are stored, choose the ones you want to merge and click on "Open". You can get the precise output quality as needed for each audio joining and audio conversion This free MP3 joiner gram supplies typically used presets along with detailed parameter settings include frequency, bitrate, variety of channels, and so forth. Medieval Cue Splitter - Good for different audio file sorts if you want to cut up into authentic CD tracks a ripped audio file with an accompanying CUE file; supports mp3, flac, ape, ogg, wma, mpc, wv (lossless WavPack compressed) and ta (True Audio codec) information.
If this selection is given then SoX will maintain reading audio until it reaches the tip of the input file. If themp3 information are just MPEG-1 or MPEG-2 Layer III audio, then the files can just be concatenated. MP3 Cutter Joiner Free (model four.6.3) has a file size of seven.95 MB and is available for download from our web site. In addition, audio conversion may be completed concurrently while you combine audio files into one. Direct MP3 Joiner is a program that will require much less free area than most applications in the part Software program utilities.
As for supported formats, VLC Media Player helps a variety of each audio and video recordsdata. Audio Cutter Joiner is a robust audio editor, which comprises audio splitter and audio joiner in a single program. You may also fully silence your music whereas your video clips play in an effort to hear the audio clearly with none musical accompaniment. You may edit, merge, and convert any audio file. However audio joiner is more than MP3 joiner , just study more detail about the most effective audio joiner software as below.
I have several audio CDs, each one having one lecture on it. Nonetheless, the one lecture is split up into roughly 70 tracks on every CD. Therefore, when I attempt to RIP the CD into an MP3 file, I get approximately 70 MP3s for every lecture. Otherwise, all uploaded files and converted audio will be deleted robotically after 2 hours. Or choose all of the MP3 information or the folder where the MP3 audio are situated after which directly drag and drop them to the main window of the MP3 combiner.
Shuangs Audio Joiner is an easy audio merging device to combine WAV, MP3, WMV and other various formats. Attempting this similar operate exterior of the Track Stack on a new monitor, the same factor happens the place Achieve is added, however the insert plug-ins do not appear to factor into the merged audio whether or not they are bypassed or not. Click on the Add Movies button after which you'll be able to add audio information into the free audio converter. Bandicut crashed when changing video with audio that can not be performed in Encoding mode.
1 note
·
View note
Text
KastorSoft
M4A stands for MPEG four Audio and is a filename extension used to characterize audio recordsdata. Key phrases: websites like , various to mp3DirectCut, on-line program similar to Audacity, extract audio from a movie. You may add multiple recordsdata to transform all of them in a single go. Batch Convert think about having a mp3 converter which might convert FLAC to mp3 with one click on deciding on the entire music tree? Batch Converter can, and with advanced file naming rules the transformed mp3 information are named just as you want.
The FLAC file format associated with theflac filename extension refers to the FLAC audio encoding algorithm. FLAC is the acronym for Free Lossless Audio Codec. The algorithm is from the lossless audio compression family of codecs for digital audio compression. It was developed by the muse, a non-revenue organization that produces open and free to use multimedia formats, and flac to m4a converter online free youtube had its initial release in 2001. Though there isn't widespread compatibility for the format as in comparison with related codecs such as MP3, the flac to m4a converter online free youtube format enjoys some compatibility and help with in automotive and residential stereo producers as effectively audio playback software program and portable audio devices.
Massive-scale digital media distributors, resembling Apple and Amazon, use DRM (Digital Rights Administration) encryption for copyright protection and to authenticate the media participant you authorize to play the encrypted files. Once you buy an album or song from iTunes, the DRM-protected file can solely play on an Apple system that's associated together with your Apple ID. If you wish to play that song or album on an Android telephone or tablet, you need to use a duplicate of the file that doesn't have DRM encryption. You possibly can inform if a file is encrypted or protected by proper-clicking on it and consulting its properties.
Although streaming services could come and go, and even the long-term prospects of Spotify will not be assured , a FLAC file is like a CD: as soon as you buy it or rip it, it's yours eternally (barring storage catastrophes). FLAC might by no means really supplant MP3, but if you care about sound high quality, then FLAC is undoubtedly your best choice - both now and into the foreseeable future.
FLAC stands for Free Lossless Audio Codec, an audio format just like MP3, but lossless, which means that audio is compressed in FLAC with none loss in quality. This is just like how Zip works, except with FLAC you'll get much better compression as a result of it is designed specifically for audio, and you'll play back compressed FLAC files in your favourite player (or your automobile or residence stereo, see supported gadgets ) identical to you'd an MP3 file.
After the conversion course of is full, you will have to navigate to your output location as this system does not provde the possibility to instantly open the listing. As you may see, converting FLAC audio files to MP4 Audio format using fre:ac 1.0 (Open Supply) is an easy and straightforward course of and the fast conversion pace that this program comes with ensures that the duty will likely be carried out in no time. If you need other applications that may assist you convert your recordsdata, then verify the instruments from the "Different Downloads" section.
MP3, WMA, M4A, OGG, FLAC, and so on. Convert Spotify Music to plain MP3, AAC, WAV, FLAC. Unable to convert my WAV recordsdata. Upon discovering this, figuring out the best way to uninstall this was not straightforward. Step 2: Choose MP3 format from Audio presets. Convert Audio information encoded by Flac - free lossless audio codec to MPEG-4 compressed audio. It even can convert video to audio format to extract audio from video.
FLAC to format bezstratnej kompresji audio. Utwory w tym formacie znane są z wysokiej jakości dźwięku. Niestety, format ten nie jest natywnie obsługiwany przez urządzenia Apple. Oczywiście nadal możliwe jest odtwarzanie ścieżek zapisanych w tym formacie, ale wymagana jest wcześniej konwersja FLAC na M4A. Format M4A jest domyślnym formatem dźwięku na wszystkich urządzeniach Apple i pozwala on zachować w dużej mierze oryginalną jakość nagrania FLAC. Pliki M4A zajmują też stosunkowo niewiele miejsca w pamięci urządzenia. Poniżej przygotowaliśmy listę najlepszych narzędzi, które pomogą wam wygodnie przekonwertować pliki FLAC na M4A.I don't recomend putting in rockbox. Rockbox nonetheless has a whole lot of kinks that have to be worked out. It is good at it unlocks a number of format compatibility in your iPod however it locks you out of iTunes Music retailer songs and it isn't suitable with iPod batter saving strategies. A 60GB 5G iPod will get around sixteen hours of battery life when it is slated for 20 hours.Await a while till the FLAC to M4A conversion completes and we will get pleasure from them then. By the way in which, despite the fact that this software program is a converter, it can be used as a video downloader too. That is the characteristic that makes it stand out among the comparable merchandise. make it easier to convert M4A to WAV with out high quality loss. 1. You are allowed to extract audio recordsdata from a sure video clip in case you are glad with the sound track.
1 note
·
View note
Text
Online MIDI Instruments
Obtain crack for Direct MIDI to MP3 Converter 6.2.2.forty six or keygen : Direct MIDI to MP3 Converter is a quick audio utility that allows you to convert MIDI information to MP3, WAV, WMA and OGG codecs. MIDI, the abbreviation of Musical Instrument Digital Interface, is a well-liked file format that is used to play keyboard instruments. The previous few days, I noticed some discussion board users ask tips on how to convert MP3 to MIDI or YouTube to MIDI When you've got the same doubt, right here is the right place. In this article, we will give you the perfect MP3 to MIDI converters.
Alternatively, for those who make a musical assortment of MIDI files taken from totally different sources the volume stage will be noticeably totally different. Moreover, digitization of some fragments sounding too loud might produce a clipping sound. In these cases Midi2Wav Recorder provides an option to regulate total level and clipping of recording while the built-in mixer lets altering quantity to the specified level.
We might find a plenty of music information in some recreation and leisure software program are with MIDI as the file extension at present. Those would be the most typical MIDI files on LAPTOP. A few of you may really feel astonished at the truth that a four-min MIDI file solely occupies a whole bunch of kilobytes while a WMV file takes up 40MBytes. Even though it's compressed to be a MP3 file, it is going to interact 4MBytes as properly. In distinction, a MIDI file is absolutely dreamy little.
Bear File Converter is an absolutely free online audio converter. It helps to convert WAV, OGG, WMA, MP3 and extra stream audio to midi to mp3 converter скачать бесплатно file which furthermore the transformed MIDI file is relatively small. But do not forget that the audio file to be transformed has to be 50MB or smaller in dimension. It converts WAV, MP3, OGG, AAC and WMA recordsdata to MIDI format.
01. As step one, you should obtain and install Audacity. The, you should launch the software and get ready to transform the recordsdata. Now, start the process simply by pressing on the File" and Open" to import the MP3 file to transform. If not, you can easily drag and drop the recordsdata into the interface. Then, you should click on the button labeled Play".Sadly, when you are trying to report MIDI recordsdata CD-burning programs give a message "Incompatible file format". Audio CD gamers are designed for replica of digital sound in WAV format, while in MIDI files there are only instructions about reproduction of the notes by totally different instruments but not the digital sound. If you wish to file MIDI compositions on audio CD or to convert them into MP3 information, you could first create an audio file in WAV format that can comprise digital variant of the music that we hear when enjoying again the MIDI file. There are two ways to do it utilizing your laptop equipment.MIDI to MP3 Converter for MAC is an easy and dependable software for conversion MIDI recordsdata of Format zero and Format 1 to high quality MP3, WAV, M4A, AIFF and FLAC audio formats. In the typical Home windows "Open"-dialog, choose the file(s) you need to convert to MP3 format, then click on "Open" button. Convert MIDI recordsdata to WAV, MP3, OGG, WMA MIDI Converter Studio is specifically designed to make conversion of MIDI (.Due to the compact dimension of MIDI audio file, it is quicker and easier for on-line uploads and taking part in. WinAmp used to have the ability to do this. You could possibly play any sound file to a "MP3-out" plugin, which might write the file. I used this to turn many old-fashioned multi-track MOD and S3M recordsdata, in addition to NES sport ROM audio tracks into MP3 to burn to CD.When you find yourself happy with the sound, you can finally decide to transform the entire file and procure the ensuing Mp3. Positive! The Convert MIDI to MP3 receive convert from midi to mp3 for LAPTOP COMPUTER works on most present Windows working systems. On this example we are converting midi recordsdata to mp3 format, so selectmp3 (MPEG-1 Audio Layer 3) within the Output format dropdown.ConverterLite is a free MP3 to MIDI converter for Home windows customers. With over 2,500,000 downloads, ConverterLite appears to be the most effective MP3 to MIDI converters out there. But the support is restricted to Windows 7, Windows XP and Home windows Vista. You could discover some difficulties running it on different variations of Home windows. Whereas installing the software, watch out in hitting subsequent. Since it is a free software program, they could ask your permission to install certain software program. Be smart and select skip when prompted for such permissions.
1 note
·
View note
Last Seen Blogs

junoswrlld
✶juno✶

foxracing-blog
Fox Racing

ballantines04
Chibi Reader

yourendless-possibilities
MasterofCreation

mischievoustwins
Forge & Gred Weasley