#I have no idea where my flashdrive with all my icons are
Text
@thatslayer
"Faith... it's been some time. Did I do something wrong?" Michael lifted his head from his book, catching her scent before he had seen her.
#thatslayer#v; stronger than both#Hi I hope you've been well!#I apologize for the lack of icon#I have no idea where my flashdrive with all my icons are#I will add icons as soon as I find it!
6 notes
·
View notes
Text
// So it’s when I sit down to finally rekindle things here that I’ve discovered my flashdrive is uh... missing-
// And if you aren’t aware, that means all of my icons are missing too. I honestly have no idea where it may be this time, as my mother and I have both turned this place upside down looking for it. So on that note, I’m....going to be making new icons lmao. So just know I am here and planning on bringing things back! I just...have an awful lot of work cut out for me first.
#[ooc] the digital witch#// if it turns back up before then that's great though#// but if not..#// oof yeah that's like somewhere around 3000 icons or possibly more down the drain#// first i need to get a new flash drive though so hey it's got the whole night and morning to magically return?#// either way#// admittedly i had been rather dissatisfied with the quality of my icons as of late#// so this IS an opportunity to spruce things up#// but jeez i just used the thing a couple weeks ago and i VIVIDLY remember running back to the library to pick it back up so um.#// who knows where i put it after that lol
3 notes
·
View notes
Text
mtmte liveblog issue 1
and now we’re onto mtmte proper! issue 1 today
ooh i love the cover w/everyone where rodimus is saying “wanna make somethin’ of it?” besttttt
god i forgot how twinky rodimus is at the beginning of mtmte
i love rodimus so much. charismatic frat boy idiot of my HEART
godddd the title slaps. ‘liars, a to d - part 1: how to say goodbye and mean it” so fuckin good
HHHHH remember how the last chapter is called "how to say goodbye and mean it: part 2” I'm fucking inconsolable
even ratchet looks kinda twinky here. I think nick roche just has a twinky art style
RIGOR MORPHIS HBVHKSJHDBHFSKDFBJS THAT REMAINS THE FUNNIEST SHIT I HAVE EVER READ
bumblebee has it rough. I never read exrid or w/e but doesn't he die later too. Ls
really love the detail of drift being rodimus’s speechwriter
CYCLONUS TIME
sad gay old man. I don't even really remember cyclonus’s backstory tbh...but I love him
oughadbjfsdbfj I forgot abt this scene where prowl, chromedome and rewind are all in a room together...how awkward lmaoooo
prowl and chromedome passive-aggressively conversing like the petty exes they are while rewind sits on prowls desk looking thru stuff....iconic
prowl calling rewind “[chromedome’s] best friend” makes sense in the meta context of like, ‘we were easing into the whole ‘gay married robots’ thing so we started off w/that’ but w/the canon context of prowl absolutely knowing they’re married, that line is fucking hilarious
prowl calling rewind annoying....hvbdskjufjsd sir we Get It ur not over chromedome
prowl’s whole view on the war ending is super interesting....honestly so is everyone's, I love how nuanced the characterizations are in this series - it makes sense that there’d be a huge range of reactions to a 4 million yr civil war ending
ICONIC PROWL TABLE FLIPPING SHOT
godddd i love how i actually understand what's going on since I've read the series already hbdsjkfbhsjkfkl
TAILGATE!!!!!!!!!!!! HHHHHHH MY BOY
‘preliminary damage report: you’re an idiot” hvbhajjkshfdbsjk POOR TAILGATE.
‘rungian’ I SEE THAT
ooooh man I love tailgate misleading the audience by saying that the ark’s launch is doomed without him - even we don’t get to know yet that he’s a waste disposal bot
and then tailgate talks about detonating stuff, which lends retrospective credibility to his later claims of being a bomb disposal expert
WHIRL!!!! I love whirl...he somehow ended up being one of my favorite characters after my second readthru
also the first time I read mtmte I reaaaaaally did not pick up on the fact that whirl was trying to commit suicide here oof
when whirl says the title line - ‘how to say goodbye and mean it’ HHHH OOF
and then poor confused cyclonus barges in, inadvertently saving whirl’s life. poetry
ah, i love that body horror reveal. so gnarly
i feel like whirl attacked cyclonus for a bunch of reasons, like ‘who the fuck is this guy to barge in on my cool speech where i express emotion, he must die’ and ‘hey convenient outlet for my rage, nice’ and ‘oh maybe this guy will finish the job for me’ etcetc. nuance!
BRAINSTORM!!!!!! hes another one of my favs
brainstorm ‘joking’ that opening the briefcase would mean the end of the world....ah, foreshadowing
‘autopedia’ hvbdjskhfjbjskf that always gets me
swerve’s bit about quests is so fuckgin good
rungs serial code....eyes eomji
POOR RUNG I forgot he got his arm knocked off. geez
cyclonus flying in the bg of the drift-rodimus-magnus scene LMAOOOO
god i love magnus. Law Dad
magnus’s Law Vision(tm) god i forgot abt that hbvhjdabfjsd i love him
cyclonus just phoning this fight in lmao
tailgate saying ‘sums’ just made me remember how British this series can be at times LMAOOO
chromedome don't be mean to ur husband its not his fault hes an adorable tiny flashdrive
lov the poetry of tailgate kinda saving cyclonus’s life by accidentally blowing up whirl, who was about to kill cyclonus
tailgate immediately flipping shit then passing out...what a little icon
rewind: ok yall can deal w/all the bodies, i just have to go do one last illegal thing before we blast off
i also had no idea what rewind was doing here the first time i read this lmao
rodimus leaving bumblebee on read is pretty funny to me lmao
ah, i love that panel of the lost light blowing up right after bumblebee says ‘i thought you had a plan’
uh oh! a bunch of generic no-name dudes have been ejected into space!
‘not a good start’ yeah that's for sure rodimus
HHHHH tailgate’s message from the future...SO fucking good. the continuity in mtmte is fucking stellar and so much of it went over my head the first time i read it...im so excited to reexperience it
the dos and don'ts list HHHHHHH
damnnnnn i cant believe mtmte issue 1 came out in 2011...bruh....i was still in middle school for part of 2011. mind blown
anyways issue 1 fucking slaps. the start to one of my favorite series of all time. cant wait to read more!
#im gonna make the titles normal unlike my hunty liveblogs lmaoooo#im also gonna actually write what issues im doing#lj rereads mtmte#this ended up being way longer than i planned lol whoops
1 note
·
View note
Text
Before I go and brave the outside world to find a computer repair place,
@ tech people of tumblr, please give this computer illiterate man a hand
I recently purchased a gaming desktop, because my laptop is literally falling apart and doesn’t do the things I need it to do.
The desktop arrived and I immediately set it up. It was a pre-built one because again, I’m computer illiterate, and all those DSJ3888329i etc etc specs are a completely foreign language to me and I have no idea what any of that means.
Everything was going great, and then I noticed that the speaker icon on the bottom right had a red X on it, which made sense as I didn’t have speakers yet. Tried plugging my headphones into it where it clearly has a headphone jack, but that didn’t work. Assumed I needed to actually set up speakers before it would allow headphone usage. No big deal.
Waited a couple days for the speakers to arrive. Plugged them in, right out of the box, brand new speakers. Speaker icon still had the red X. The speakers in question are usb, so I thought maybe that particular usb port wasn’t working. Switched it to every single usb port that the computer has. Computer would not recognize that speakers were plugged in. Troubleshooted it and that just told me that nothing was plugged in, but the speakers themselves were lighting up, so obv power was getting to them. (Then went and got my flashdrive and confirmed that the usb ports do in fact work)
did some googling, followed directions, uninstalled and reinstalled audio drivers, updated drivers, pretty much every single thing that google had to offer as a fix to this issue, I tried, and still would not work.
Emailed support.
Waited a few days for them to reply, and in that time the speaker icon magically got rid of the red X, and is letting me change the volume levels. But when I would try to play audio, there would be nothing. Computer volume is up. Speaker volume is up. Even tried my headphones which I use every day and I know work, but still no sound.
Support finally responded, and they just told me to reinstall drivers. Thanks.
Now they’re saying that I have to send the computer back to them for repairs, and that my card will be charged for replacement parts. Which is bullshit because the damn thing never worked in the first place, so why should I have to pay for something that came to me broken? They also didn’t say anything about covering the shipping fees, which I’m going to assume wont be cheap considering the size/weight.
So again, before I go out and take this to a repair store in town or try to ship this,
is there anything else I could do to fix this myself?
Will Best Buy’s Geek Squad take a look at it even though I didn’t buy it from Best Buy? If so, any idea how much they’d charge?
Any recommendations for computer repair places in Tucson, AZ?
Anyone who does computer repairs in Tucson willing to help?
5 notes
·
View notes
Text
a complete gif tutorial
hi! so i was requested by @popalice007 to make a tutorial on how to make gifs and i am very happy to oblige! this will cover pretty much everything, from capturing frames to saving the final product. this is just how i personally do it, and there are loads of other ways to gif, and i recommend looking at other gifmakers’ tutorials to get a more well rounded view on how to gif. please continue reading if you are interested, and please like/reblog if you find it useful!
disclaimer this is going to get really wordy as i try to explain where to find things and how to do them and my thought process behind why i do them, but please send me a message/ask if something needs clarified!
also some of the pictures can be viewed in full size by clicking on them!
part 1: required materials and other tips
just another heads up, i have a pc, and while i believe most of this should be the same whether you have a mac or a pc, i could be very wrong as i’m not a computer expert and have never really used anything besides windows.
so the two programs i use are kmplayer and adobe photoshop cs5 portable. kmplayer can be downloaded for free here. i have the 32 bit version for windows, so that is what i’m going to be providing the instructions for, since the 64 bit version seems to be a little different. photoshop is pretty expensive, but thepiratebay has several torrents for it, and other downloads and torrents for it do exist. i downloaded mine quite awhile ago so i don’t remember exactly where and how i did it so it might require some researching. i would just double check the comments and instructions to make sure the download will work. there are also dedicated photoshop tumblrs that will probably have links to downloads.
if you are giffing a scene from a tv show, movie, video, etc, you also need to have the video saved somewhere on your computer/flashdrive/whatever. hd-source is a good source for tv shows, and there are tons of other sources. i download a lot from thepiratebay using a program called utorrent (i just use the free version) but beware because since you are downloading copyrighted materials it isnt legal, and while i have never had a problem, i have heard of people getting warning letters from their internet providers. you can also download youtube videos and videos from other places and there are lots of other ways to get videos that i won’t cover.
no matter where you get your video, you want it to be pretty high quality, since the higher quality the video is, the clearer and nicer the gif will turn out to be. most of the time you want 720p if you can get it. 1080p is nice and if you can get your hands on it without the video size being enormous you can certainly utilize it, but it isn’t a necessity and usually i don’t bother. anything lower than 480p can get to looking pretty grainy especially if you are doing full size 540 px gifs, but if you are giffing something from a convention panel video taken by a phone, for example, you don’t really have an option.
additionally, if you are giffing dialogue, find a script online somewhere or find subtitles. you can transcribe it yourself if you want, but if a character is mumbling or has an accent or something i like to be sure of what they are saying.
and finally, have some patience! a lot of the popular gifmakers have been doing this for years and have streamlined their process so it doesn’t take hours, but as a beginner it takes time to get everything right,so it is totally normal if you get to feeling frustrated.
part 2: capturing the frames
first you will want to have an idea of what scene you would like to gif. before i get started i create a new folder where i want the captured frames to go, and i name it something memorable so i can find it again later. kmplayer does also automatically create a folder called capture that you can use if you want. if you are doing a gifset like this, i would have 8 different folders and gave each of those gifs/scenes their own folders.
however, the example i’m going to be using throughout this tutorial is going to be a dialogue scene, specifically this one here, just because they can get a little more complicated imo (plus i want to show how i use the text tool etc). if i’m giffing a scene where characters are talking, even if the scene is a long one with back and forth dialogue, i usually like to cap it all at once and put it in the same folder, and then i separate it out later in photoshop. you can also plan ahead and put all the different bits in different folders, thats up to you and your personal preference.
next i open up kmplayer. kmplayer likes to update pretty regularly and will let you know when you open it if it wants to update. it doesn’t usually hurt to ignore it if you are in a rush, but i usually let it do its thing and make sure i don’t also download whatever browser service, etc. it also wants to install. sometimes ads show up on the right side, you can close them by hitting the little arrow between the ads and the video screen
to open the video, click on “kmplayer” in the upper left hand corner and then click on “open files”. search for your video file and double click it to open it

kmplayer will then open the video, and if its 720p often i have to make the window smaller because it fill up the entire screen and i need to be able to see other windows besides the video. if i remember correctly when you first download kmplayer it isnt automatically set to keep the aspect ratio the same, so if you need to, hit the f2 key to open the preferences or click the lightning bolt on top next to kmplayer, and then click on preferences. under general and then screen on the sidebar, and then under general again i have my settings like so, and hopefully that resolves that issue if you have it. you might have to reopen the video again for that to kick in but i’m not positive. if it still doesn’t work try to google it. i’ve had the problem a couple times and the answer is out there but i’m no tech pro.

anyway, i then locate the beginning of the scene that i want to gif. you can click around on the bottom along the progress bar, as well as using alt+left or right to jump forward and back a minute, the left or right arrow key to jump 5 seconds, or the f key to go forward a single frame. every frame counts, and it is preferable to have too many frames and have to delete them later than to find out your gif will only be 10 frames long because you started capping in the middle of the scene, or because you stopped capping too early. i typically will watch the clip a few times so that i have a set idea of where i want to start and stop.
once you are paused at the beginning of the scene you want to gif, press ctrl+g to open kmplayer’s frame extraction window. click on the folder icon so that you can locate that empty folder you had made earlier. this is where kmplayer will save the screencaps. i then set my settings to png, continuously, original size, and every frame, like so

now we are ready to start capturing! click start on the frame extraction window, and then click back over to the video (this is why i make the video window smaller, so that i can see the video and the frame extraction window at the same time). once i’m back on the window, i hold down and/or tap the f key. kmplayer will capture the frames as you go along. the audio plays along with it albeit choppily which is why i watch the clip several times beforehand, because it can be hard to follow and is disorienting. you can also click the play and pause button, but, again, the audio tends to play at a different rate and it gets confusing, so for me frame by frame is the way to go. keep tapping f until you get to end of the scene/wherever you want to stop. i keep the folder where the caps go open usually so if i mess up or change my mind on where to start/end, i can delete the whole folder and create a new empty one to start over again. this process takes practice and is often dependent on what you are trying to gif and its not a big deal if you have to try it a couple times to get it right.
once you have reached the end of the scene, click back over to the frame extraction window and click stop. if you are giffing multiple scenes from the same video you can click the folder icon and select a different folder to save frames into and then repeat the process of finding the scene and capping it, or if you want to cap from a different video, you can open a new video and cap from there. then if you are satisfied and have all your caps, you are free to exit out of kmplayer.
part 3: making the gif
now it is time to actually make the gif! go ahead and open photoshop, and if it is your first time you can play around and familiarize yourself with where things are. basic gifs don’t require a lot of the tools that photoshop has, and you can customize some as to what windows and panels are open. below is what my workspace typically looks like so that i can get to certain things quicker, but i will explain as i go along where the controls normally are found in the toolbar. also, if you hover over a control photoshop will tell you what it is and what it does.


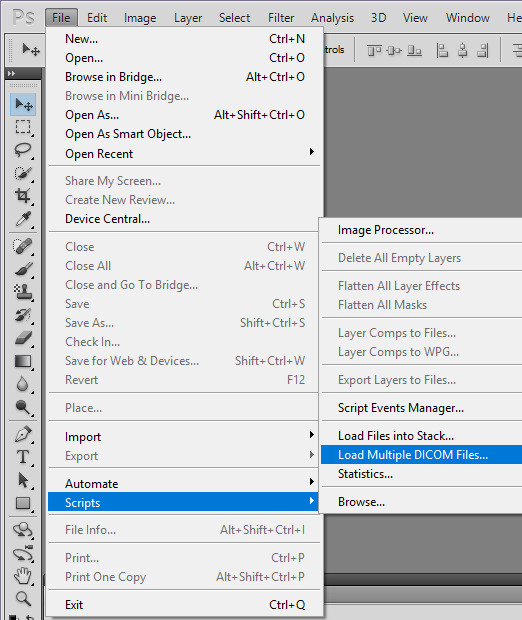
to open the frames, go to file, then scripts, then load multiple dicom files. then find your folder of caps, select it, and then click OK to open
be aware that depending on the number of frames in that file and the size of the images it sometimes can take awhile to fully load. once they are loaded, you should be able to see all those screencaps as layers on the right hand side of the screen. if not, go to the top where it says windows and click on layers. i frequently accidentally cap a couple extra frames where the scene shifts and i go ahead and delete those layers by highlighting them (use the shift or ctrl key to highlight several at a time) and then clicking on the trashcan at the bottom of the layers sidepanel.
next we are going to turn these layers into gif frames! i have combined this step into an action that i use to automatically do this for me to save time since i gif on a semi regular basis, but the steps are as follows.
first, make sure the animation bar is open. if it is not then go up to window and click animation, and then it should open at the bottom of the screen. you also have to be in frame animation mode. on the upper right hand corner of that panel is an icon with four lines and and an arrow. click on that and then click on convert to frame animation. then in the same menu click make frames from layers.

this can also sometimes take some time if there are a lot of caps but when its done loading there will be frames in the animation bar. in the animation menu click select all frames. then, underneath any of the frames, there will be an arrow beside where it says 0 sec. click it and change the frame delay. what you set it to can be up to personal preference. i typically set mine to 0.07 or 0.08 which seems a bit slow, but i find when i convert the gif to a smart object (we’ll get to that) that seems to speed it up a little so i’ve just stuck with it. feel free to change the delay if you find later that that is too slow for your taste. also in lower left corner of the animation bar is where you set how many times the gif loops. change it from once to forever. the controls to play the gif are also below the frames.

since i gif a scene like this all in one big long take, it is now time to separate it into separate gifs if need be. if you are making a gifset like this you can skip this part because you most likely capped frames from different scenes and gave them their own folders, so they shouldnt need separating.
sometimes you have to get creative on how you split apart the scene, and there arent really any hard and fast rules. here are some things i like to keep in mind:
the camera angles - this is the most important for me. if the camera goes from showing one character to another, or from one angle to another, i separate those into separate gifs pretty much no matter what.
the length of the gifs - this is dependent on the size you are going to crop to, how much movement the scene has, how much color, etc., but i typically try not to go over 80-100 frames in a 265px width gif. they can be trimmed down later, but if it takes 200 frames for the camera to switch to the other character, don’t make that one gif
the dialogue - if there is a natural break in the dialogue, that is a good place to end a gif. you don’t need 50 frames of no one speaking if you are doing a gifset with dialogue.
how many gifs you are making/size - at some point you have to decide how wide your gifs will be and how many of them. if your gifs will be 268 px wide (2 columns of gifs) then you have to have an even number of gifs, and you will need to separate to account for that
going along with the first tip, i’m going to separate the frames by camera changes. i do this first so that way when i crop the gifs, i get things centered how i like.
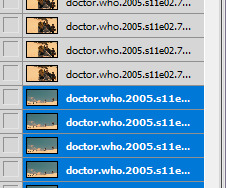
you can see here by looking at the thumbnails of the layers what i mean by the camera changing angles.
first, press ctrl+n to open a new blank image. if the preset doesn’t say dicom files, click on that menu and click dicom files, that way the new image will be the same size as the original. hit ok.
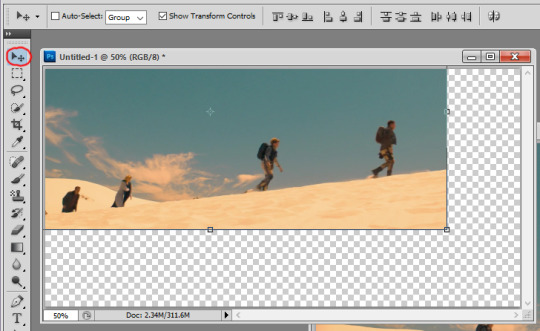
next, highlight the layers in the original that are going to be the new gif. hold shift while clicking the first and last layer that you want to be in the new gif to do that. click on them, hold, and drag them over to the new document. they will probably be off center and/or invisible. if the layers are invisible click an empty box next to one of the layers so that an eye appears and the layer shows up. then click the move tool and move the layers around til the fill the document correctly. be sure not to stretch/transform the layers by dragging on the edges and corners. as long as all the layers are still highlighted they should all move at once.

next, scroll to the bottom of the layers and delete the blank layer. then repeat the steps to make frames and set the time delay and there is your new gif!
the layers for that new gif are still in the original document, so go ahead and hit the trashcan to delete them, as well as the now blank frames. continue opening new documents and splitting up the scene until you have a new gif for every camera change. the last gif i leave in the original document. i ended up with 5 camera changes so 6 gifs to start with
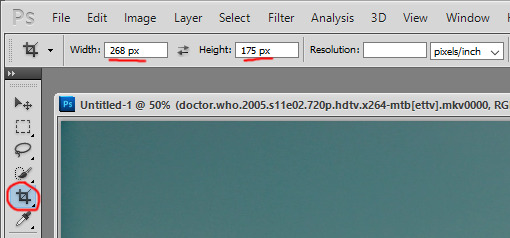
at this point i crop each gif. tumblr has a guide for image sizes, and the width is the most important thing to follow there. the height is really up to you. if i’m only doing two or four gifs i tend to make them taller than if i do 8 or 10 gifs just because it looks better to me. i’m going to probably end up with 8 gifs because a couple bits are a little long, so i’m going to go with 268 px as the width and 175px as the height. again, the 268 part is the important part to get right since i’m doing two gifs across. to crop, find the crop tool on the left and set your dimensions at the top. make sure when you enter your dimensions, it is in pixels/px and not inches or centimeters.
click, hold, and drag to stretch to create a shadow for what you cropping. i usually go as big as the edges of the image will allow, and then bring the corners in a tad, since occasionally i get a video that has a black outline and i don’t like to have that in the gif. either hit enter or the checkmark in the upper right corner of the toolbar to crop.

you might have to zoom at this point and resize your window. in the bottom left corner there is a percentage you can change, and now that the gif is cropped it will be small enough that you can set it to 100% if it isn’t that already. continue to crop the remaining gifs to the same size. after this i usually play through each one to make sure i have everything in the frame and roughly centered. if you need to undo, press ctrl+z or ctrl+alt+z and recrop or redo whatever needs redone. there is also a history you can pull up under windows, and you can use that to backtrack multiple steps.
next i figure out if i need to break up any of the gifs because of their length. with a gif this size i can probably get away with having more frames and i can trim them later, but if a gif has more than 100 frames i look and see if i can either trim it down now because there is a lot of frames without talking or movement, or if there is a natural break in dialogue where i can split it into two gifs. there are also times when the gifs are really short that you can sometimes combine with a gif before or after that one. that’s your perogative ultimately and what you think looks good but will fall under the 3mb limit, and takes practice and experience to get an idea if a gif is going to be too large. sometimes i go back and rewatch the scene to figure out where to split things up. i also keep in mind that i want 8 gifs for this scene and right now i have 6, so i need to create 2 more, whether i separate two gifs in half, or separate one gif into three new ones.
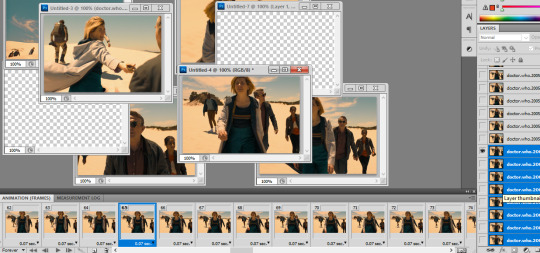
ultimately i decided to split my largest gif of 180 frames into 3 gifs because it has quite a bit of dialogue, and the other gifs are either already under 80 frames or can easily have some frames deleted out of it. between using the script, rewatching the scene a few more times, and trying to lipread what the doctor was saying, i decided to separate between frames 65/66 and 120/121 so that way they were roughly the same number of frames. the process to separate them is the same as it was when we had the big original gif. i selected the last frame i wanted to include in the new gif so that way the eye appears next to the corresponding layer in the layer panel, and this is how i know which layers to drag to the new document. for example, in the picture i’m moving frames 1-65 to the new document, so i select frame 65, then find that layer and select all the layers below and including that layer and drag them. then repeat the steps to make the frames, etc.
go ahead and delete the empty frames, as well as any frames on the other gifs you may want to delete to trim them up.
so now we should have all of our gifs laid out! my next step is to sharpen them, and i do this using smart objects, and the steps are as follows. (i also made this into an action.)
first, select all the frames and all the layers in the gif. if you deleted some frames but didn’t delete the corresponding layers, don’t worry about it, it doesn’t matter and doesn’t affect the final product.
next, click on convert to timeline animation. this is in the animation menu where we earlier found convert to frame animation.
then, at the top go to filter and click on convert for smart filters. this creates a smart object and turns all of the frames and layers into just a single layer/object. this allows us to sharpen the whole gif at once instead of having to sharpen each frame one at a time (trust me that takes forever if you don’t have an action or do it this way).

next under filter again, then under sharpen, click on smart sharpen. this brings up a window with a bunch of settings. these are what mine are:
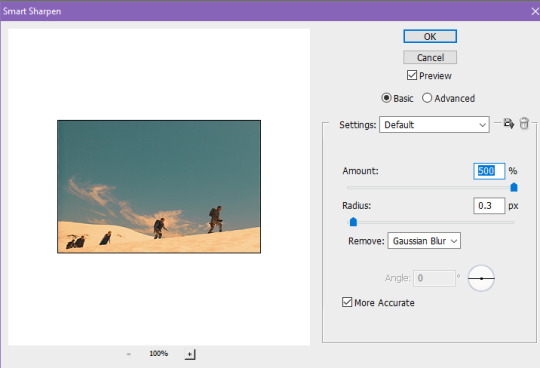
repeat this for every gif. look how much better they look already!
at this point, if you haven’t saved yet, do it now! this is a good time to save and take a break. go to file and then save. the format should be set as photoshop/.psd. i go ahead and rename the files too, for example, dwshades1 and so on. i number them too so i can get the order right when i upload them. with it saved as a psd, you could close out and reopen it later and the layers will all be there.
next is coloring! this is technically optional, but is usually the most fun part of giffing in my opinion, and i tend to find uncolored gifs rather boring and bland. this is where you can do some brightening, color correcting, make gifs black and white, and more! its time to get creative with those adjustments.
as there are so many ways to color things, and whole tutorials dedicated just to coloring, i’m only going to show the basics of where to find the adjustments and some of the different adjustment layers that i use most. my first step always though is to create a group just for the coloring layers. the button to create a group is at the bottom of the layer panel and looks like a folder. the button to the left of that is the one that contains the different adjustments you can make.

the black and white circle contains a list of different adjustments you can make. the two i like to use most are curves and vibrance. curves is really useful to brighten gifs and vibrance obviously adds vibrance. my advice is to just play around with all the settings, and look at coloring tutorials. a lot of gifmakers also have psds that you can download. you can either use them as is to apply to your gifs and credit the maker, or just study what they did and learn from it.
anyway, i went ahead and colored my gifs. here is a before and after look, as well as a list of adjustment layers i added:


in this case the before gif doesn’t look bad, but that isn’t always the case, sometimes they start out super dark and colorless. and i like the tone and colors of the colored gif better (you can see how much i like purples and blues lol). again, all personal preference.
whether you color or not, if you have dialogue in your gifs, the next step is adding it in! if the gif doesn’t have a dialogue or if you don’t want to add text, you can skip this next bit.
first, select the text tool on the left side toolbar, it looks like a T. next i choose my font, font size, and color at the top. here are my settings, the key thing is to make it easy to read.

there are more settings like bold and italics under window and then character. these are my settings.

after these are set, click in roughly the middle of the gif and start typing the text that goes with that gif. i usually start with white for the first person to speak, and then change to yellow for the second person and so on, so that way its clear who is speaking, but that’s up to you. when the text starts to go off the edge of the gif, i hit enter to start the next line until i’m out of text. otherwise photoshop will allow you to type right off the edge of the gif.
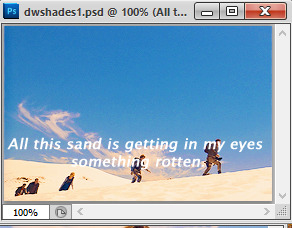
a little hard to read, right? that’s why i add stroke, which outlines the text. to do this, make sure the text layer is highlighted, and then click the fx button at the bottom of the layer panel, and then click stroke.
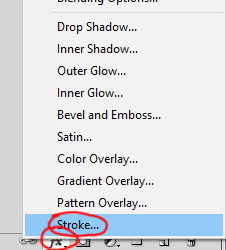
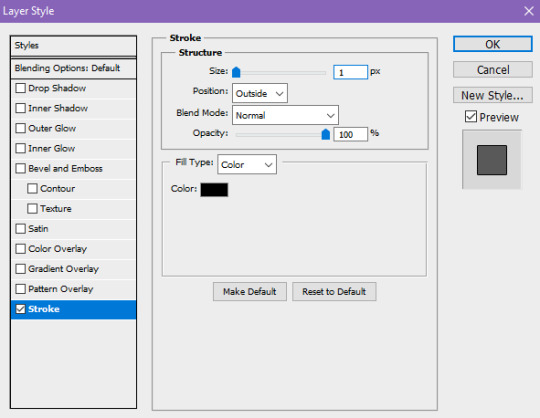
these are the settings i use. usually i only have to change the size from 3 to 1px. hit ok.
so much easier to read! also, double check to make sure that the text layer is above the coloring layers.
next, i want to move the text to where i want. select the move tool on the left, and first move the text layer all the way to the bottom. photoshop has it so that it is kind of magnetized to the edges. i then go back to the character menu and change the baseline shift setting to 5 pt.
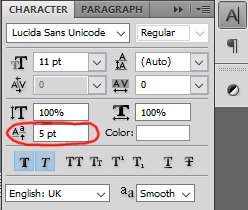
however, when you click to a different gif it doesn’t reset back to 0, so manually reset it back to 0 before moving your text layer, then change it to 5 again.
next, to center it on the gif. first select the gif layer, then hold ctrl while you select the text layer. the order is important, if you select the text then the gif, the gif will be moved to center itself around the text. then, with the move tool still selected, click this button on the top tool bar to align horizontal centers.

great! now save your gif again, and repeat all these steps for the text for every gif that you are adding text to. most of the time i type the text on each gif first, and then move the text that way i’m not switching tools a dozen times, but it really doesn’t matter.
your gifs are officially done! time to save them in a format that you can upload to tumblr. go up to file, and click save for web and devices. these are my settings, but you can play around with some of the ones on the upper right side. however, you want to make sure that it is a gif, and that it is set to loop forever. those are circled. hit save, name your gif however you want, and save it somewhere you can find it later. do this for all of your gifs.

the other thing i circled in the document size. tumblr does not allow you to upload images that are above 3mb. if yours is above this, you have a few options to cut down on the size. changing the settings on this window such as going from diffusion to pattern, or reducing the number of colors can change the size, but if you reduce the number of colors, you lose some quality. you can also change your coloring layers around, because making a bright gif with a lot of colors can increase the size. black and white gifs tend to be smaller.
the option i tend to go for if i want to keep the colors and quality, is to reduce the number of frames you have. its a little trickier to do in timeline mode than it is when the frames are all there, but this is how to do it. if your gifs are all under 3mb, you can skip ahead to uploading.
in the timeline animation bar, there are blue rectangularish sliders you can move at the beginning and end, as well as a triangular one that shows where you are within the gif. decide the new place where you want the gif to start and end, and move the rectangle sliders there, like so. one tick over does not equal a frame, so i use the triangle indicator to figure out how many frames over i’m moving.

then in the animation bar menu, click trim document duration to work area. this will set your gif to begin and end where those sliders were. at this point you can try saving again to see if your gif is below 3mb. if so, then save it! if not, continue to move the sliders and trim until your gif is below the limit.
so now all your gifs are saved and ready to be uploaded! upload them like you would any other photo post. i always save as a draft first so i can make sure they upload right and so i can look them over again to be sure they are looping correctly and have no typos. only then do i close out of photoshop. tag with the appropriate edit tags (for example, dwedit for doctor who) or tag popular blogs for maximum exposure, but be aware that only the first 5 tags count and will appear in the tags. post and you are done! congrats!
#popalice007#yeahps#completeresources#chaoticresources#gif tutorial#hey look something original#my resources
47 notes
·
View notes
Last Seen Blogs

hyacinth43
hyacinth

44faced
44faced
technicallyswagpizza
Technically Swag Pizza
shakespecre
let me read you a story
brokenbmx
Brokenbmx