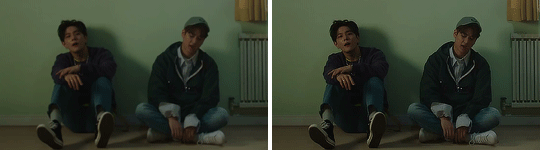
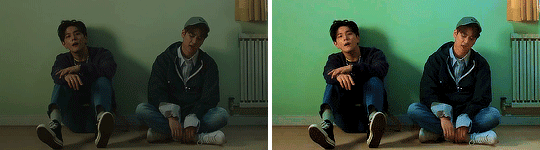
#Edited the second one slightly too make a smoother loop
Text
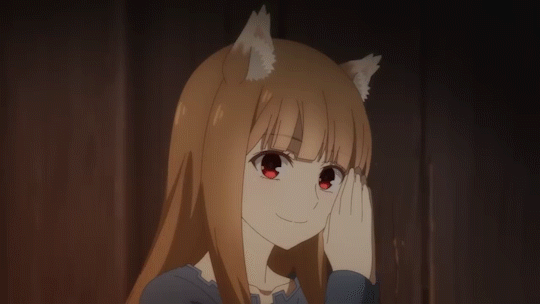

Spice & Wolf 2024 PV 2 ▶ 5/?
#Spice & Wolf#Ookami to Koushinryou#Spice & Wolf Anime#Spice & Wolf Anime 2024#Spice & Wolf Anime 2024 PV 2#Spice & Wolf Anime 2024 PV 2 ▶ Gif#Spice & Wolf gif#gif#Holo the Wisewolf#Edited the second one slightly too make a smoother loop
94 notes
·
View notes
Note
in regards to your recs (🎸)
kaikai kitan by eve: i love my pop rock and omg the guitar???? THE CHORUS IS SO CATCHY HELP ITS SO ??????? the slight hip hop influence in the second verse is so fun wowowowowow… and the instrumental bridge is carried out in such a fun manner… wow that was so good…
villain by teniwoha: oh the intro is so fun OH IT REMINDS ME OF GLITCH POP OHHH THE WAY IT ADDS MORE INSTRUMENTAL LAYERS AND PROGRESSES OHHHHHH okay my god the bass in between chorus and second verse so good oh OKAY this is random enough to keep interest but not too random that it’s just weird
show off (vocaloid ver) by 和田たちあき: this vocalist reminds me of the teniwoha one (like an electronic midi generated/edited vocal) and despite the differ in genre it’s STILL SO FUN i love the more traditional smoother/natural band set up instrumental it’s so cool and adds a contrast between the more disjointed electronic voice
dramaturgy by eve: it’s slightly more laidback than kaikai kitan but still as good OH THE SECOND PART OF THE CHORUS ?????? i’m not getting over this chorus it’s just???? the vocalist note rises are just so catchy… and the way it slowly leads into the chorus again… a tentative few lines of the chorus with less layers and then the finale.. wow
konoichi demo koi ga shitai by mikito p: the vocals have been slightly edited and it makes it more fun omg and the combo of electronic and traditional for the accompanying harmony… the electronic arpeggios in the background are so fun omg THE INSTRUMENTAL BRIDGE WITH THE LIGHT LEAD GUITAR the way this song leads into chorus.. THE GUITARS… wow
i added these all to my playlist your music taste is SO good i cannot stress this enough wow……
HELLO HELLO!!!! omg i hope u know that complimenting my music taste means we're best friends now sorry i dont make the rules /j
anyways SO SO glad you liked all of them!!! im a BIG fan of energetic instrumentals and layering so im happy we agree there lol <3 if you like the more glitchy vocals and things that are more on the math rock side, id suggest checking out tsumiki's album sakkac craft which i have been listening to on loop for weeks now ngl, it just scratches my brain???
ALSO SPEAKING OF THE VOCALS ON THE SECOND THIRD AND FIFTH ONES, all three of those songs are made with vocaloids!!! villain uses the vocaloid flower, show off uses otomachi una, and kunoichi demo koi ga shitai uses both hatsune miku and kagamine rin!!! its really really amazing how people can make vocal synths work so well with all different ranges of instrumentals, yk??? and like all three songs are pretty different its a testament to how different vocaloid songs can be!!!
the other two, kaikai kitan and dramaturgy, are by eve who's genuinely one of my top artists? his song bokura mada underground is my number one of all time on spotify i think, i absolutely adore his work and he has a ton of it that's all over the place vibe-wise
anyways lol ill get off my little soap box here, ty for the thoughts and im happy you enjoyed the songs :D
2 notes
·
View notes
Text
Daydream induced piece of writing pt. 1
A work in progress (a short fic based off a daydream (it was at midnight, so technically not day, but I hadn’t been sleeping) I had!)– still writing other parts, but I wanted to post what I had so far. This may get edited in the future :)
The gentle breeze plays with my hair and I let a breathy laugh escape my lips as loose strands of my hair dance across my skin. I reach up to rub my cheek with the back of my hand and feel my lips tug up at the corners when I stare at the clouds. The pink hues that had previously painted themselves across the skies were faint now, barely peeking out from behind darkening clouds. I stare out at the city lights that glow brightly in the distance and the horizon, with its permanent halo of pale light that never allowed you to properly guess the time.
“Breathtaking,” I whisper to myself.
And then a faint movement. A quick flick of a… something. Dangled from the top of the roof, darting to but not fro. I only barely caught a glimpse of it, but I have several guesses as to what it could be.
“Isn’t it?” I pause as I feel his warm breath fan over the expanse of skin behind my ear. A shiver runs down my spine and goosebumps rise. I turn my head around, groaning when I hit my forehead against the glass of my window.
“It’s you again, ” I’m rubbing my forehead and speaking far too softly. But I know he can hear me. My right leg, still inside my room, inches higher, my knee coming up to my chest and my foot resting on the windowsill where I’m sat. I strain my neck to see behind me. I look up.
“That it is.” I whip my head back around to look in front, then peer up the spot where I first saw his tail this evening. And then he retracts and it disappears again. “We have to stop bumping into each other like this.” I can hear the smile in his voice.
“You mean you have to stop visiting me at night when I’m alone in my room and barely dressed? What a shame.” I can hear his low chuckle. I can hear his footsteps above my head. And then the noise stops. “Boys… so flighty.” I tsk and shake my head. I hide my mouth behind my hand.
And there he is. A blur as he hangs his head down and swings himself onto the ledge that surrounds the outside perimeter of my room. The four feet wide ledge is filthy, a trail of hardened dirt leading to a drain behind me. He doesn’t seem to mind. His bare feet touch the ground, but it’s almost as if he’s floating. He takes a step toward me and I find myself pressing my back further into the window I’m leaned against.
He takes another step and I force myself to let go of the breath I hadn’t realized I’d been holding in. He takes another step and I grip the edges of the windowsill. And then he’s right in front of me and he’s leaning in. He grins, one corner of his mouth lifting higher than the other and a sharp tooth peeks out at me. “I am not–” he stills and his eyes carefully scan my expression. I keep it neutral. “– a boy.” And, as if it were even possible, his grin grows wider.
In a flash, he’s back to being feet away from me. I raise an eyebrow. He recognizes the challenge immediately. He extends a sudden hand to me and leans toward me once again. His eyebrows waggle comically. I snort. “What are you doing?”
His eyebrows pump up and down and I throw my head back in laughter. Too quickly for me to process, his hand flies between the back of me and the glass. I’m spared another bump to the head. Then I blink and he’s back to where he had been just mere seconds ago, hand still stretched outward.
“Dance with me?”
I try my best to suppress a smile and I pretend to think on it, tapping my chin with my index finger. I tilt my head up only so I can look down at him from over my nose. He cracks another grin. “I suppose…” I’m teasing him. “There’s not much else to do at three am, is there?” I take his hand and a gasp escapes from my lips when he pulls me toward him. He holds our arms up and loops his free one around my waist. His cool touch, a sharp contrast to the warm heat of the night summer air, makes me shiver. He steps to the side and pulls me along with him. And then he steps forward, and I’m stepping backward. I look up at him once I’ve gotten into the rhythm of it and squint my eyes at him, pursing my lips.
“Definitely not a boy. You are all man.” I throw him a stupid grin.
“I… am not either.” He’s trying to hide the amusement in his voice. “You couldn’t tell by my skin and hair color?”
“Are those your only differences?” I joke and move my hand that has drifted to rest on his shoulder down his arm and then over his back. I’m surprised to feel a swelling under my fingertips as my hand sweeps over a bump hidden by the light fabric of his white button-down shirt.
“That you can clearly see.” His lips pull into that lopsided grin again and a sharp tooth catches the light. He catches me staring and winks. “And the teeth.”
I shake my head at him and bring my hand back up to rest comfortably on his shoulder. I hum. “You’re telling me that you haven’t seen any other…” I pause. “… men–” he laughs, “–that have blue skin?” It’s his turn to pretend to think. His eyes look up as he draws in a deep breath through his nose. He exhales and I notice the way his nostrils look more like teardrops than most humans’ do. There’s a silver lining around his iris and I add another thing to the list of things that fascinate me about him.
“I can’t say I have. In all my time here… my mother did always tell me I was special.” He grins and I find myself doing the same. There’s a comfortable silence that falls between us.
We’re swaying back and forth now and I rest my head against his chest. The absence of a heartbeat registers somewhere deep in my mind but I choose to focus instead on his rhythmic breathing.
Then he breaks our calm by stating: “We’re waltzing.” My head shoots up and I stare at him incredulously.
“What?”
“We’re waltzing.”
He says it with an easy grin taking over his face, spreading slowly as his handsome features turn devilish. He dips me, slyly remarking, “I’ve always wanted to do this.” I roll my eyes but let him hold me there, back arched, head pointed to the ground yards below, and eyes staring at the face and the stars, which shine comparatively less bright to his mischievous eyes.
The contours of his face are highlighted in the evening moon’s gleam and I feel my breath slowly escape my body. He pulls me back up and we’re standing face to face once more. My heart rate picks up but I find comfort in the excitement of being with him. I look down at our feet then back to his face. My breath hitches in my throat when I once again am startled by his proximity. The proximity and his almost alien features.
A nose smoother and sharper than any man’s could ever be; his eyes too silver, too special; his face too long to be human; his teeth too white, too sharp; his cheekbones too prominent to be natural; his hair too full, soft, and sleek; his features too breathtaking to be of this realm.
“You call this waltzing?” He looks offended, his eyebrows furrowing and his pale blue lips widening to an exaggerated ‘O’. He huffs and turns away.
“I call this fun– and close enough.” I laugh at his expense and watch as he softens. All of him does. His face relaxes, visible tension in his shoulders release, his arms around me less like vices and more like gentle ribbons pulling me closer. He pokes my side, forcing me to cry out an “Oh!” He steps back, his hands trailing down the lengths of my arms until they reach my own hands. He entwines our fingers together and I can’t help but notice again just how cold he is. His hands, dusted a light blue, contrast heavily with my tan olive complexion. His fingers are longer than mine and I briefly entertain the idea that he’s an expert pianist.
I look up at his face to find him seemingly deep in thought. My mouth opens but before a single word can escape my lips, he pulls me in close and leans in. Instinctively, I pull back. The moons behind his head and his midnight black hair shines with an ethereal halo. He leans in closer and cocks his head to the side slightly. Then his cold hand cradles my head from behind, the other arm gripping me tightly. I think he notices how completely frozen in place I am because he chuckles and whispers softly, “It’s alright.” And then he’s throwing us off the side of the ledge and we’re falling.
#writing#ethereal#fantasy#daydream#sunset#dancing#waltz#fic#short#blue#work in progress#part one#story
1 note
·
View note
Text
kmplayer gif tutorial
hello all! i’m gonna show you how i make my gifs! I use kmplayer and avisynth to make gifs, but I’m going to focus on kmplayer for this one. This tutorial is long and quite in depth so if you’re a beginner, this should be good for you!
also! this is purely just a gif tutorial and not a coloring tutorial lol
what you will need:
photoshop (im using cs5)
kmplayer
any video downloader (I use 4k download or savieo)
Screencapping
Okay first find a video and/or a scene that you want to gif. You’ll want to get the highest quality video possible. Don’t download anything under 720p or else your gif will look grainy. Try to get 1080p as much as possible.
Once you get that downloaded, open your video in kmplayer and go to the scene you want. I like to go a few seconds beforehand to make sure i don’t miss any frames. Now on your keyboard press Ctrl + G to open up the screen cap menu.
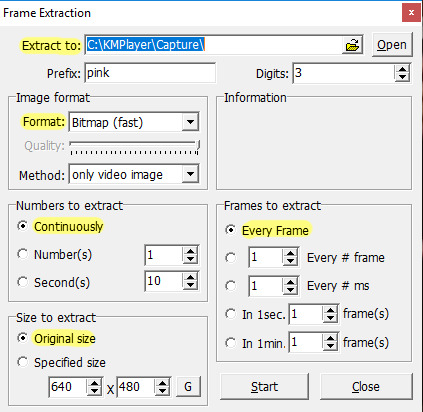
I don’t remember the default settings but here are the settings you’ll want:
Extract to: you’ll want to create a folder to hold your screen caps and then direct that folder here
Format: JPEG and Bitmap are both good options. Bitmap (i believe) is going to be a higher quality image
Numbers to extract: continuously
Size to extract: original size. You want the full size image
Frames to extract: every frame. This ensures that you’re getting every frame and helps your gif look smoother
also the “prefix” is just going to be the first part of the image name, so put whatever you want for this! :)
Once this is done, press Start in the menu and play the video. When the scene is done, press pause on the video. Open the menu again (Ctrl + G) and stop that as well. Now all you want to do is go into the folder with your screen caps and delete the ones you don’t want.
Frame timing and converting to smart objects
Open photoshop: we are now going to start the giffing process! Before you start, make sure you have the animation window and the layers window open. To do this, go to Window > Animation and Layers, if it’s not already showing.
Now, click on File > Scripts > Load multiple DICOM files. Find your screen caps folder and load them in. You’ll see in your animation bar that it only has one image showing.

In order to pull your screen caps from this, go to the top right hand corner of the animation bar and click this button. Click “Make frames from layers”.

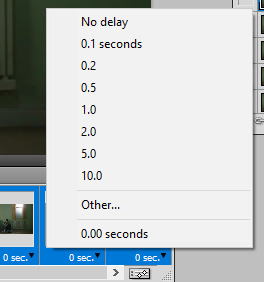
This is so your gif actually plays all the frames and not just the one showing. Next, change the timing of the gif. Personal preference is a big thing in giffing so you’ll want to play around with what works for you. The average timing used by a lot of people is either 0.04 or 0.05 (for screencaps i should say). I find that 0.04 can be a little fast for my liking, so 0.05 is good. To do this, click the “0 sec” and then “Other...” and type in your timing. Make sure you select all the frames before doing this, unless you want to change each frame individually ^.^
P.S. if you ever want to delete a frame in your gif, you can delete the layer in the layer window but in the animation bar, you’ll have to click on the frame and click the tiny trash can next to the bottom scroll bar.
The next step is to click the button in the bottom right hand corner of the animation bar. It looks like it has two sliders on it. It will change your animation from frames to timeline.
Next, right click on a frame in your layers window and select “similar layers”. Then right click again and select “convert to smart object”. This may take a moment btw.

If you see that your animation timeline shortened into one line instead of multiple lines, you’re on the right track! Next thing to do is to crop the part of the scene you want.
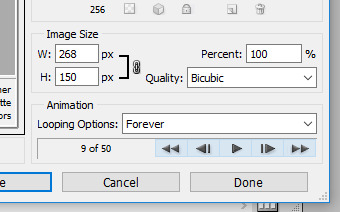
Image size, sharpening and canvas size.

Image size will change the photo size without cropping anything out. Canvas size will change the size without transforming the image. What I like to do is to change the image size to about 5 or so pixels larger than what I actually want for either the width or height. In this case, I want my gif to be 268 x 150. So my cropped photo is going to make my height much larger than I’m going to want it, if that makes sense.
P.S. For sizing, make sure your width is either 177px for 3 panel gifs, 268px for 2 panels, or 540px for a single panel. If you want a 3 panel gifset, make the middle gifs 178 px (i know, it’s a little dumb but if you don’t, it’ll make the middle gif slightly blurry)
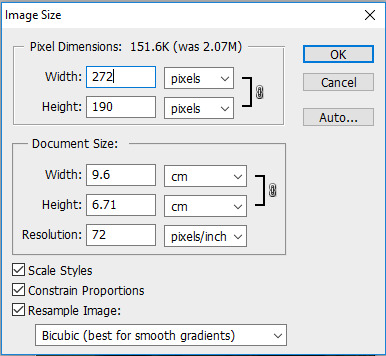
(This is what I’m going to resize my cropped image to)
You can just make the width or height automatically what you want (268 in the width for my case), but I find that after sharpening, a line can form around your image. I prevent this by making the image slightly larger than what I want and then cutting that part out later.
Now I want to sharpen my gif! Again, this is about personal preference, but I think this is what a lot of people use as well. Right click on your smart object in the layers window and select “New Smart Object via Copy”. I’ve seen people select “Duplicate layer” instead but I honestly don’t know what the difference is lkasndfllanslk.
Set the top layer’s opacity to 50% and leave the bottom layer at 100%. To actually sharpen the gif, go to Filter > Sharpen > Smart Sharpen.
For the top layer:
1. Smart sharpen: Amount 500%, Radius 0.4
2. Gaussian blur: 0.3 (its also under filter)
For the bottom layer:
1. Smart sharpen: Amount 500%, Radius 0.4, no gaussian blur

After this, go to canvas size and change it to your actual gif size. For my gif, it will take my 272 x 190 to my desired 268 x 150. Then combine your two smart objects by selecting both of them and clicking “Convert to Smart Object”.
Gif without sharpening vs gif with sharpening
Now you’ll want to edit it to your liking, just make it sure it’s under 3mb for tumblr’s image limits.
I’m not going to get too much into coloring bc it can be a real pain sometimes but! I will say that selective coloring is your best friend, just don’t saturate/over color or the gif will look more grainy.
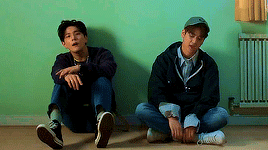
After coloring and such, this is what I get:
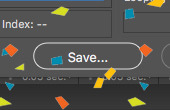
We’re almost there! Save your new gif under “Save for web & devices” and not for “Save as”. When it opens, it’ll look really confusing, but all you need to worry about is that the “Looping options” says forever and not once, or else your gif will stop after it plays the first time.
The last step that I didn’t even learn until recently is that you’ll have to open up your gif again in photoshop. When you do this, you’ll find that the timing has changed from 0.05 to 0.07. Idk why it does this, but your gif will look smoother if you change it back. (It might only be for screencap gifs but idk)
Here’s a comparison of the gif as is vs the gif when i changed the timing again:

And then you go through the process again if you’re making other gifs! I wrote a lot but it really isn’t that hard once you practice a couple times. I’m still learning too! (as you can see since my gifs are still grainy and such) but i hope this was helpful for people who don’t know where to start! Happy giffing!
#text#im not the end all be all but i will say that I know i've improved ever since learning some of these things#if anyone wants to share their knowledge i would lvoe that
13 notes
·
View notes
Note
Do you think you could post the tutorials you used to make GIFs, please? :)
I actually learnt how to make gifs form a bunch of different tutorials and I wouldn’t know where to find them now
A few people have asked this question before so I’m just gonna show you with screenshots how I make gifs under the cut :)
in particular, this one, from this set

before we start - I use photoshop CC, which I pay for and I’m working on a macbook air
Converting video file to mp4
I only gif with mp4 files because I import the frames into Photoshop from a video file and it only accepts mp4. If i’ve downloaded something in a different format, I use Handbrake to convert it - these are my settings
once I’ve got the file, I open it in Quicktime and trim it to the part I want to gif, then save that shorter video clip in the folder I’m using for the edit.

this part it optional but it just makes it easier in the next step because it’s more precise and you’re not importing unnecessary frames
Importing frames
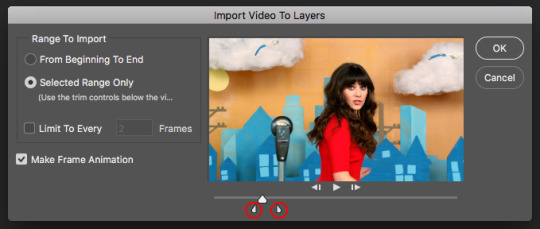
in Photoshop go to File → Import → Video Frames to Layers and select the trimmed mp4 file

then using the sliders, drag them to the area you want for the gif.
leave the “Limit to Every x Frames” box unticked because it makes your gifs heaps smoother
and then click OK
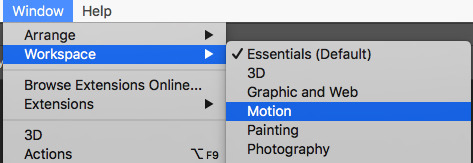
so now you should then be able to see your timeline at the bottom and your layers to the right hand side. if not, select Window → Workspace → Motion
Crop and resize
next I resize the gif so it will fit exactly with tumblr dimensions. this gif fits exactly all the way across the dashboard which is 19.05cm or 540 pixels. (For more on tumblr dimensions, this is very helpful.)
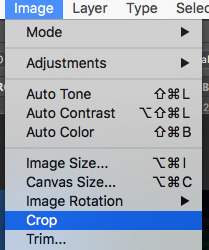
select: Image → Image Size

then I change the width to 19.05 cm. don’t worry about the height at the moment. It is relative to the width so it will change by itself

then using Crop on the toolbar….
I select the entire width of the gif and 8.5cm of the height. (8.5 has no significance when it comes to tumblr dimensions, it’s just what I chose for this gif set. it’s really up to you what you do with the height!)


then, Image → Crop
Colouring
and now it’s time for cOlOuRiNg
for this gif set I created my own colouring, which I will be describing the process of down below.
important: before you add a psd or start colouring at all, make sure you’ve selected the first frame of the gif

next, click this button above your timeline and then Select All Frames.


next, make sure the last/top layer of your gif is selected

I just plan to add a pretty natural colouring to this gif so I’m going to use minimal adjustment layers. this will also ensure that the image quality of the gif is not lost.
first colouring adjustment is a curves layer, using the white eyedroper tool. basically you just select the lightest part of any frame with this tool and it will make that point white and brighten everything accordingly. very very useful. this is a really simple tutorial on how it works.

next, I might add a brightness and contrast layer if I thought it was necessary but this scene was already quite well lit so I didn’t need to.
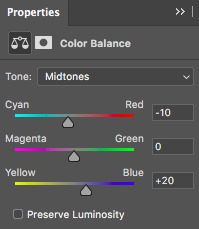
next is a colour balance layer. this can be kind of tricky to get right but I think it’s definitely one of the most important layers and can totally transform a gif. brightening a gif can often leave it a bit yellow looking so this step is really useful in restoring the balance of colour. these are the settings I used for this gif
neeeext, I used a black selective colour layer. This just adds a tiny bit of contrast and gives it a bit more depth.

next, the vibrance layer. I feel like this one probably speaks for itself hahaha

so here you can see a before and after of the colouring process. just simple and natural colouring.

Text
now that the colouring is finished, the next step would be to add text. I didn’t have any text in this gif but i’ll put my text settings below anyway :)
an important thing to remember before adding text is that you need to have the first frame and psd layer selected - so when you add the text, it will become the very top layer
here’s a helpful tip on how to make sure your text is in the same place across all your gifs
and these are my text settings.
download

anyways back to the gif making
Previewing the gif
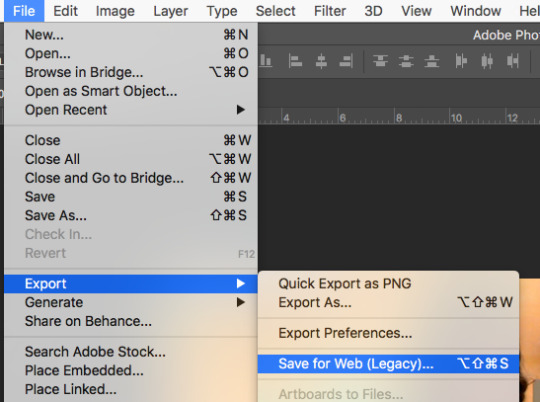
File → Export → Save for Web
(or command + option + shift + S on a mac which is what I do)
aaaannnd theeenn
you will get this massive window

down here is where you can see the file size of the gif and where you can preview how it looks.

the maximum file size for gifs on tumblr is 3MB so obviously this is too large :(
I just deleted some frames at the beginning and end of the gif to reduce the file size and make sure it’s under 3mb.
Then when you click the Preview button it should open up in your web browser and you can check to see if you’re happy with everything before we move on toooo
Sharpening
so first you’ve got to select all of your frames.
click the button in the red circle and then Select All Frames

then select all your layers - select the first layer, hold shift and select the last layer
then select Convert to Video Timeline

then Filter → Convert for Smart Filters

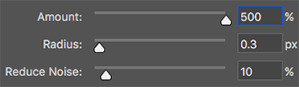
then Filter → Sharpen → Smart Sharpen

these are the settings I use and then select “OK” to apply.
tips:
play around with the “Amount” slider if it looks too sharp
don’t worry if you don’t have the “Reduce Noise” slider - it’s not on all versions of Photoshop
Save your gif
select File → Export → Save for Web
you might notice that your file size is slightly bigger since it’s been sharpened which is to be expected.
once you’ve sharped your gif, it will automatically loop only once. so you’ve just got to change Looping Options to Forever in the bottom right

then click Save to save your gif
but sadly… we’re not done yet
Speed
next we’ve got the change the speed of the gif
so even though it was set to 0.04 seconds when I was making the gif, once you’ve sharped the gif, it will default to a speed of 0.03 seconds which is too fast

locate where you’ve saved the gif and open it again in photoshop - make sure you’re opening the .gif file not the .psd
right click on the file Open With → Adobe Photoshop
then just got to Select all Frames (as outlined in the sharpening section) and click on where it says 0.03 secs and select Other
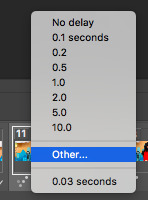
and you can then change the speed to however fast or slow you want!
I usually use 0.05 or 0.06. those speeds are closest to the actual speed of what you’re trying to gif. I chose 0.05 for this gif.
now… it’s finally time to save the final version of your gif….
Saving your gif (again)
once again select select File → Export → Save for Web
you won’t need to change the Looping Options this time - it will automatically be on Forever
and then select Save
the confetti won’t come up when you save your final version of your gif……… but it should
here’s the final cropped, resized, coloured and sharpened gif

i know it seems like a lot but I just wanted to outline in super super detail but it’s really not as complicated as I might have made it seem!!
if you’ve managed to make it to the end of this I just want to say thank u. I feel like we’ve been on this journey together and I wish you the best
let me know if there’s anything you want clarification on because I’m more than happy to help!! :) xox
#Anonymous#photoshop help#im sorry.... this is so long#let me know if anything is confusing!!#xx#tutorial
40 notes
·
View notes
Link
Curly hair can be fun and flirty, but if your hair is naturally straight, you might think you have to use damaging heat to get the curls you crave. Luckily, there are plenty of ways to get curls without using heat! Pin curls have been used for decades to get curly hair without heat, and they’ll work on any hair length. You can also try cold rollers to style your hair into curls as it dries. If you’d prefer voluminous waves, pull your hair into a bun before you go to bed, or wrap your hair around a headband for vintage curls that work on any length!
[Edit]Steps
[Edit]Trying Pin Curls
Start with damp, detangled hair, and add styling lotion. Wash and condition your hair as you normally would, then gently towel dry it until it’s damp. Detangle your hair with a wide-toothed comb, then evenly distribute a small amount of styling lotion through your hair from the roots to the ends.[1]
If you have thin hair that doesn't hold a curl well, you might want to start with wetter hair. However, if your hair is very thick, it might be best to work with barely-damp hair to cut down on the drying time.
If you don’t have styling lotion, use lightweight mousse instead. Don’t use heavy products, as this can make your curls look stiff and crunchy, rather than soft.
Separate out a section of hair near your face. For your pin curls to look their best, you’ll want each section of hair to be approximately the same size. Typically, pin curls are made with about sections, which will allow you to wrap them easily.[2]
If you experiment with pin curls, you may find that slightly larger or smaller curls work better for your hair!
If you prefer, you can pin up the hair on the top of your hair and start the curls at the bottom, then work your way around to the front of your head.[3]
Wrap the ends of the first section around one of your fingers 1-2 times. Place the ends of your hair against your finger, then loosely roll the hair around it a few times. Try to create a neat curl, with the ends tucked in, which will give you a smoother look when you’re finished.[4]
For bouncier curls, wrap the curl upward around your finger, or toward your face. For more voluminous waves, wrap downward, or away from your face.
Don’t roll too tightly or it will be difficult to remove the curl from your finger without disturbing it.
You can also roll the hair around the very tips of 2 of your fingers, instead, which may make it easier to remove the curl.
Slip your fingers out of the curl and wrap the hair all the way up to your scalp. Carefully slide your fingers out of the loops you just made, holding your hair in the shape of the curl. Then, roll that curl all the way up the section of your hair until you reach your scalp. When you’re finished, you’ll see a circular curl resting close to your head.[5]
Don't twist the hair as you’re rolling the curl, as this will create frizz.
This part can take a little practice, but be patient and keep trying!
Secure the curl with a pin. Slide a pin onto the curl you just made, making sure it’s tight against your scalp to hold the hair in place. Pin-curl clips, which have 2 prongs, are the best for this, especially the ones that are slightly curved, as this allows them to sit more comfortably against your scalp.
If you don’t have pin-curl clips, you can use 2 bobby pins in an X-shape instead.[6]
Continue curling all of your hair. Pin curling can take a while, since you’re working with smaller sections of hair. However, this is the way to get the biggest, bounciest curls without using heat, so be patient and make sure each section is as neat as possible.[7]
If you have any short hair remaining when you’re finished, like bangs or short layers around your face, pin it in sections around the curls. You can also sweep your bangs to the side and pin them in one curl.[8]
Let your curls dry completely, then remove the pins. Traditionally, pin curls are done at night, which allows them to dry while you’re sleeping. Then, when you wake up in the morning, you can just remove all of the pins, and you’ll have a glam style that should last all day.[9]
For big, fluffy, vintage curls, brush out your hair. Keep brushing until you get the smooth look you want, but keep in mind that it can take as much as 5 minutes of brushing to calm down the curls, so be patient.[10]
You can also use your fingers if you’d prefer more defined curls.
[Edit]Putting Your Hair in a Bun
Wet your hair with water. If you want, you can wash and condition your hair. However, if your hair is already clean, you can just dampen it with water. If you’re starting with very wet hair, gently blot it with a towel to remove any excess water.[11]
Your hair might hold a curl better 2-3 days after your last shampoo, rather than the same day you washed it.
Comb your hair thoroughly. To get smooth, sleek curls, detangle your hair completely before you put it up. Use a wide-toothed comb to get rid of any tangles, and part your hair with the comb if you’re planning on doing more than one bun.
If you’re only making one bun, comb your hair back away from your face.
Create one bun for voluminous waves. Pull your hair back into a ponytail at the top of your head, then fasten it with a hair tie. Wrap your hair in a bun by twisting the ponytail 2-3 times, then wrapping your ponytail around the first elastic all the way to the end. Secure the bun with a second hair elastic or bobby pins.[12]
You can also make a donut bun with a sock. Cut the toes off of a sock and roll it into a donut shape, then place the end of your ponytail through the hole in the sock. Spread the ends of your hair until they cover the entire sock, tucking the ends underneath. Then, roll the sock down the length of your ponytail until you reach the crown of your head, and secure it in place with bobby pins.[13]
Separate your hair into 2 buns for tighter waves. If you want waves with a little more curl, try dividing your hair into 2 buns or twists, instead. Once you’ve parted your hair with your comb, pull each section into a ponytail high on the side of your head. Twist the ponytail tightly until it starts to curl around itself, then continue wrapping the ponytail around the base all the way to the ends. Secure each twist with a hair tie or bobby pins.[14]
You can also tuck the twist into a wraparound cloth headband to secure it.
For curls that start lower on your head, place the buns near the nape of your neck.
Sleep in the buns. Since you’re wrapping your damp hair up tightly, you’ll need to let your hair dry for about 6-8 hours, or overnight. Luckily, this is a great way to get wavy hair while you sleep, and since your hair is pulled up, it’s more comfortable to lay on than some other styles might be.
If you don’t want to sleep in the buns, try wearing your hair up all day, then take it down for a glam evening look.
Take the buns out in the morning. When you wake up, gently remove the hair elastics or pins that are holding your buns in place. Use your fingers to loosen your hair, and enjoy your light waves![15]
Use a little hairspray to set the waves, if you want.
[Edit]Using Cold Rollers
Choose wet-set rollers that are a little smaller than the curls you want. If you want larger curls, or if you mostly just want to add volume, opt for large rollers, like a diameter. If you’d prefer tighter curls, use small or medium rollers, which typically range from in diameter.[16]
Rod-shaped curlers are great for creating spiral curls or defining natural curls. They're also perfect for curling short hair, since they tend to have a smaller diameter.
If you don’t have rollers, you can cut strips out of an old T-shirt, instead. Make the strips the same width that you want your curls to be, and a little longer than the length of your hair.
Foam rollers might get damaged if you put them into wet hair, so make sure to use a roller that’s designed to be used while your hair is damp. Also, look for a soft roller, like one made from rubber, satin, or silicone, if you’re planning to sleep with the rollers in.
Dampen your hair. Wash and condition your hair, or just spritz it with water from a spray bottle. If you’re starting with wet hair, gently blot your hair with a soft towel until it’s damp. The curls will hold better if you start with damp hair, but if it’s too wet, it might not dry completely once you put in the rollers.[17]
Do not apply serum or leave-in conditioner to your hair, as the curls may not set.
Detangle your hair with a wide-toothed comb. Gently run a wide-toothed comb through your damp hair to make sure it’s perfectly tangle-free. If you have any tangles in your hair, your curls will look messy, and it will be harder to get the sections perfectly even.
Avoid brushing your hair when it’s wet, which can lead to breakage.
Section off a small piece of your hair near your forehead. Separate out a piece of hair that’s about the same width as the roller, or just a little smaller. Typically, this will be about . Hold the section of hair away from your head vertically, then place the roller horizontally against the end of your hair, on the side facing away from you. Roll the hair away from your face, all the way down toward your scalp. Secure the roller with the included clips.[18]
If you’re using a T-shirt, roll your hair the same way, then tie the ends of the strip to hold the curl in place.
If you only want to curl the ends of your hair, stop rolling halfway up your head and tie the strips at the place where you want the curls to stop.
Continue rolling the top section of your hair. By following a pattern when you’re rolling your hair, you’ll end up with a more symmetrical style, and it will be easier to keep the sections separate. Start by rolling the top section of your hair, or the mohawk area, all the way back to your crown. When you’re finished, you should have a neat row of horizontal rollers all the way along the top of your head.[19]
This will give you plenty of volume at your roots.
Roll the sides and back of your hair to finish. Once you’ve rolled the front section, take another section of hair near one of your ears. This time, hold the hair straight out from your head horizontally, and place the roller vertically at the end of your hair. Roll the hair all the way to your scalp and secure it again, then continue for the hair on both sides of your head.[20]
Roll your hair under for curls that curve toward your neck, or roll it up for curls that bounce outward.
You can arrange the rollers at the back of your head horizontally or vertically, depending on the look you’re going for. Using horizontal rollers will give you more of a voluminous curl, while putting in your rollers vertically will result in more of a spiral curl.
Leave the rollers in place until your hair is dry. Since you’re not using heat, it will take several hours for the curls to set, so plan to leave the rollers in for at least 4 hours, although overnight is better. If you want your hair to dry faster without adding any heat, use a hair dryer set to its coolest temperature.[21]
Hide the rollers by wrapping your head in a silk scarf if you need to go somewhere before your curls are set.
Remove the rollers and loosen your hair. Once your hair is completely dry, take the clips out of the rollers, untie the T-shirt strips, or remove the bobby pins from your hair. Do this gently, especially if you want tighter curls.[22]
For loose curls or big waves, gently run a wide-toothed comb through your hair. You can also run your fingers through your curls to fan them out, but do not brush them.
Set the look with a little hairspray if you'd like.
[Edit]Wrapping Your Hair around a Headband
Start with damp hair. Your curls will set best if your hair is slightly damp when you put it up. Wash and dry your hair as normal, then blot it dry. If you don’t need to wash your hair, you can just spritz it with plain water from a spray bottle, instead.[23]
Use a wide-toothed comb to detangle your hair, as well.
Place an elastic headband over your head. Pull the headband down so it sits low on your forehead and circles around the back of your head, over your hair. Your curls will start where the headband sits, so adjust it based on how you want your curls to look.[24]
This is a great option if you want to go out while your curls are setting! Your hair will be pulled up in a soft, romantic style. Try picking a headband that will match your outfit for the day!
Take a small section of hair and wrap it around the headband. Start on one side, working with the hair closest to your face. Choose a section that’s the same width you want your curls to be—about will result in soft, pretty waves. Wrap the first section up and over the headband, then tuck it behind the elastic. At this point, your hair will be looped once around the headband. Keep looping the hair around the headband until you get to the end of the section, then pin it in place with a bobby pin.[25]
If you don’t have bobby pins, you can just tuck the ends of your hair under the headband to hold them in place.
Continue wrapping all the way around your head. Once you’ve wrapped the first section around the headband, take another section of hair that’s about the same size as the first one, and wrap it in the same way. Keep doing this until you’ve wrapped all of your hair around the headband.[26]
To make sure your curls are even, you may want to wrap all the way around one side, then move to the front of the other side and work toward the back again.
Let your hair dry in the headband. You’ll need about 4-6 hours for your hair to dry, or a little more if you have very thick hair. You can wear this style out, or you can sleep in it if you’d prefer. Either way, check to make sure your hair is completely dry before you take it down, or your curls might fall out.
To speed things up, you can use a hair dryer on the cold setting to blow air over your hair.
Remove the headband and shake out your curls. Take out all of the pins around the whole headband, then gently unwrap each section of your hair. When you’ve unwrapped all of your curls, slip the headband off of your head.
This style will give you pretty, vintage curls.
Lightly scrunch your curls with mousse or hairspray to hold them in place.
[Edit]Video
[Edit]Tips
Avoid brushing your hair after you style it. This will separate the curls and leave your hair looking messy and frizzy. Instead, gently loosen the curls with your hands for a tousled look.
[Edit]Things You'll Need
[Edit]Trying Pin Curls
Wide-tooth comb
Pin-curl clips or bobby pins
[Edit]Using Cold Rollers
Curlers or a T-shirt cut into strips
Towel (optional)
Spray bottle (optional)
[Edit]Putting Your Hair in a Bun
2 hair elastics for each bun
Bobby pins
Sock (optional)
[Edit]Wrapping Your Hair around a Headband
Circular elastic headband
Bobby pins
[Edit]Related wikiHows
Curl Hair
Style Curly Hair
Get Curly Hair to Turn Into Wavy Hair
Curl Hair Without Hairspray
[Edit]References
Videos provided by x3Haha
[Edit]Quick Summary
↑ https://www.vintagehairstyling.com/bobbypinblog/2017/07/demystifying-pin-curls.html
↑ https://avastrange.com/2012/07/15/pin-curls-for-dummies/
↑ https://abeautifulmess.com/2012/03/how-to-style-pin-curls.html
↑ https://avastrange.com/2012/07/15/pin-curls-for-dummies/
↑ https://www.vintagehairstyling.com/bobbypinblog/2017/07/demystifying-pin-curls.html
↑ https://www.vintagehairstyling.com/bobbypinblog/2017/07/demystifying-pin-curls.html
↑ https://www.vintagehairstyling.com/bobbypinblog/2017/07/demystifying-pin-curls.html
↑ https://abeautifulmess.com/2012/03/how-to-style-pin-curls.html
↑ https://www.vintagehairstyling.com/bobbypinblog/2017/07/demystifying-pin-curls.html
↑ https://avastrange.com/2012/07/15/pin-curls-for-dummies/
↑ https://www.today.com/style/how-sleep-wet-hair-wake-glam-hairstyle-yes-its-possible-t5131
↑ https://www.today.com/style/how-sleep-wet-hair-wake-glam-hairstyle-yes-its-possible-t5131
↑ http://stylecaster.com/beauty/how-to-curl-hair-without-heat/
↑ http://stylecaster.com/beauty/how-to-curl-hair-without-heat/
↑ http://stylecaster.com/beauty/how-to-curl-hair-without-heat/
↑ https://www.marieclaire.com/beauty/news/a16422/how-to-use-hair-rollers/
↑ https://www.today.com/style/how-sleep-wet-hair-wake-glam-hairstyle-yes-its-possible-t5131
↑ https://www.today.com/style/how-sleep-wet-hair-wake-glam-hairstyle-yes-its-possible-t5131
↑ https://www.marieclaire.com/beauty/news/a16422/how-to-use-hair-rollers/
↑ https://www.marieclaire.com/beauty/news/a16422/how-to-use-hair-rollers/
↑ http://stylecaster.com/beauty/how-to-curl-hair-without-heat/
↑ https://www.marieclaire.com/beauty/news/a16422/how-to-use-hair-rollers/
↑ https://www.cosmopolitan.com/style-beauty/beauty/a9914838/hairstyles-for-wet-hair/
↑ https://www.cosmopolitan.com/style-beauty/beauty/a9914838/hairstyles-for-wet-hair/
↑ https://www.cosmopolitan.com/style-beauty/beauty/a9914838/hairstyles-for-wet-hair/
↑ https://www.cosmopolitan.com/style-beauty/beauty/a9914838/hairstyles-for-wet-hair/
0 notes
Last Seen Blogs

insomniidemai-blog
Untitled

devynmerkies
Devyn Merkies

obsoletehumanity
Obsolete Humanity

ian-st-blog
Ian St

tunisiechirurgieesthetique-blog
Tunisie Chirurgie Esthétique