#Blur that foreground! We faking cameras here
Text

FULL IMAGE and also Huaisang’s face
Ah but I couldn’t resist moving Huaisang’s fan to its default position, cropping things totally makes them more cinematic yknow
#The original is way better though I just wanted ppl to be able to see his fan design#huaisang gains strength points when you can just see his eyes#Blur that foreground! We faking cameras here#mdzs fanart#nie huaisang#3zun#mdzs#lan xichen#jin guangyao#meng yao#xiyao#nieyao#my art
555 notes
·
View notes
Photo

Epic Nature Photography with your Smartphone
by Court Whelan
If I were a betting man, I’d say you’re headed somewhere outdoors for the coming holiday weekend. I mean, it’s summertime and the living’s easy…get out there and make the most of it, right!?
I shoot nature, travel, wildlife, and adventure photography for a living. When I’m ensuring the best shots humanly possible, I’m bringing my fancy dancey camera (Canon 5D mark IV, if you’re wondering) and all the lenses. However, when I’m on my own adventures, I’m usually traveling fast, and light…minimal is the name of my game. Fortunately, we now all carry one of the most powerful tech devices on the face of the earth. Drumroll…it’s your smartphone.
Now trust me, I’m definitely one for a “digital detox” here and there, especially on nature outings.
However, I also really want to make memories and capture great photos when I’m out doing fun stuff with friends and family. So, chances are when I’m on local adventures here in Colorado, I’m using my iPhone for nearly all the shots I’m going to get.
If you want to go light, go minimal, but still get great shots, I’ve got a list of my five favorite techniques for getting the best and most creative images (and videos) possible on your smartphone.
#1 – Use Portrait Mode for Way More than Just Portrait
Portrait mode is amazing, and nearly all smartphones offer some version of this. Basically, your camera is using a combo of lenses and internal technology to result in a shot with a VERY shallow depth of field. The result? The thing you’re focusing on is sharp, but most everything behind and in front of it is nicely blurred. We call that blur bokeh, and it’s highly coveted in the photography world. This gives your photos that “pro” look. In the past, you had to have the very best lenses to allow you to do this, so it’s always been restricted to top-level pro photography. Now, your smartphone just gave you a level-up. Embrace it!
Sure, portrait mode is good for people shots, but try it for other things when you have a nice “foreground element” as we call it...a subject that’s prominently in front, with a nice background.

In the above shot, you can see that the background is full of nice textures…green vegetation, tropical looking, but it’s not distracting. It’s just the background, and that blur helps focus the viewer’s attention on what you’re trying to showcase…the babe with the board…
As an added bonus, the soft background blur helps make your actual subject look even sharper…a good thing in the world of photography!

I use portrait for just about anything…especially gourmet charcuterie boards while hut-hiking in Colorado backcountry!
#2 – Use that Grid on your Screen for Composition
That little grid that looks like a tic-tac-toe board on your phone camera screen is more powerful than you think. This is known as a “rule-of-thirds” grid, and it is the most powerful composition tool imaginable.
I’ve given entire lectures and designed multi-part classes on composition and the Rule of Thirds, so this is a big topic. It’s all about crazy math, and something known as the Fibonacci sequence, found everywhere in nature, from whirls of leaves on trees all the way to how the double helix of our DNA is structured…it’s the same ratio and formula (it’s worth googling if this intrigues you…).
But at its MOST basic use in photography, it can be distilled down into one line: Break your scene into thirds, group scenery or subjects into 1/3 or 2/3s of the screen, and put subjects at one of the four intersecting points instead of smack dab in the middle of the screen.
In the above photo, you can see 1) the main foreground of the grass is in the lower third, 2) the main scenery is in the middle, and 3) the sky takes up most of the upper third. In addition, I put the big mountain (Mt. Denali) right smack dab on that upper right intersection. No need to put significance to all four green dots.
I’ll be the first to say it, rules are meant to be broken. But when it comes to composing your photos, even if it’s just a beer can next to a campfire, be deliberate. Use the rule above to start out with, and if you wish to break it, be able to explain to yourself why you did it for a better photo.
#3 – Use your Polarized Sunglasses like a Polarizing Filter
This is one of the friggin’ coolest tricks I’ve found to date. In the world of photography, having a polarizing filter can produce really cool results…it minimizes glare, adds saturation to your shot, and can emphasize the edges of clouds in a really dramatic, beautiful way.

For “normal” cameras with big lenses, a sunglass frame is too small, but for smartphones, they’re perfect. Simply put your Zeal polarized sunglasses in front of your lens and boom…you’re going to likely notice your landscape shot will get a cool filter to it.
I love this technique when photographing summer thunderstorms in the distance.
100% of Zeal sunglasses are polarized and they have a few different lens options that make for great filters!
#4 – Use Slo-Mo More!
The slow-motion feature of these new smartphones is amazing. This kind of tech used to be so hard to come by (and expensive!!), but now we all have it in our pockets. Brilliant.
Here are some of my favorite ways to use slo-mo when out in nature
-Swift water – try getting down to the shore and taking a few seconds of a rushing creek or river…safely, of course.
-A campfire flickering in the night
-To make epic panoramic videos of amazing landscapes (you can do so with normal video, but it’s usually kind of shakey and nailing the right speed is difficult…slo mo is incredible)
-Fireworks
-Group photos of friends and family – just ask everyone to jump up and do something goofy…it’s an instant classic!
Remember, though, that slow-motion expands the video by 6-10 times the length. So if you wish to share that super cool 10-second flickering fire, it’ll turn into a minute or more. Stick with just 2-3 seconds of whatever you’re doing.

#5 – Position yourself for the Best Light
It’s one of the most cliché things in photography, but it’s true—photography is all about light. Start getting good at using light to your advantage. Flash usually is too harsh, too fake, and just not enough…natural light is the best way to go for nature photography.
When photographing your landscape, start to really pay attention to the light…is it top-down and producing harsh shadows? (hint: not good). Or is it just rising or setting for the day and producing this nice soft lighting on the cliffs and mountains around you?

When lining up for photos of your friends in nature, put the light behind you or to your side rather than behind the people you’re photographing. You want the light on their faces.
And do so at an angle. Typically we want a nice, soft, angled light. If you were a clock, and the direction you were looking/photographing was 12, you want your light source (e.g., the sun) at either 4 or 5 o’clock, or 7 or 8 o’clock. Just slightly off to the right or left, behind you. Make sense?

In the above photo, you can tell the sun is at about my 8 o’clock.
Trust me, if you are taking photos of friends and family out in nature, asking them to slightly turn, or you moving yourself to make the best shot, you’ll look like a pro, and will have the photos to prove it.
So there you have it…a quick roadmap for success when you’re out on your next adventure and want to capture it in all its glory. If you want more tips and tricks on photography, from beginner to advanced, check out my podcast, The Wild Photographer, on iTunes, Spotify, Google, or whenever you get your podcasts.
Cheers, have a great 4th of July, and be well!
Court
During this public health crisis, spending time in outdoor spaces has become even more important for many Americans. Yet these unusual circumstances mean that all of us, from seasoned outdoor enthusiasts to families heading out to their local park for the first time, could use a little guidance about how to stay safe. The Recreate Responsibly guidelines offer a starting point for getting outside to keep yourself healthy and to maintain access to our parks, trails, and beaches. Visit https://www.recreateresponsibly.org/ for the latest guidelines.
#zealopticsfeatured#iphonephotooftheday#iphonephotography#phonephotography#photography#phototips#photographyforbeginners#landscape#portrait#slomo
0 notes
Text
iPhone X Review: Gorgeous, pricey, and worth it
yahoo
If you have any interest in Apple’s (AAPL) hotly anticipated, $999, 10th-anniversary iPhone X (pronounced “ten”), then there are four dates to keep in mind:
September 12, 2017, when Apple first unveiled it to the public.
Tuesday, October 31, when most of the professional reviews appear.
November 3, when the phone is supposed to be available to buy.
The day when you can actually get one. These phones are difficult to manufacture and massively back-ordered, so if you order now, you might get one before the end of the year.
The price, the delays, and the popularity all tell you one thing, loud and clear: There’s an unbelievable amount of advanced technology in this thing.

The iPhone X is gorgeous, powerful, and expensive.
The Headline: Big Screen, Small Body
Everybody talks about the iPhone X price ($999 for 64 gigs of storage, $1,149 for 256 gigs). Or they talk about its face-recognition feature, but the best thing about the iPhone X is its size.
It’s a standard-size phone, only a hair bigger than an iPhone 7 or 8, and therefore easy to wrap your fingers around without growing extra knuckles. Yet the X has the screen size of the iPhone Plus models! By lopping off all the blank margins that usually surround an iPhone’s screen, Apple has found a much sweeter spot on the screen/body tradeoff spectrum. It’s all screen, much like recent Samsung smartphones.

The iPhone X has about the same screen size as an iPhone Plus—in the body about the same size as a standard iPhone.
And what a screen it is. It’s Apple’s first OLED screen, meaning it’s got much darker darks and brighter brights than what’s come before—a million-to-one contrast ratio, Apple says. Unfortunately, there’s no way to see it except in person, because whatever screen you’re now reading on can’t display the X’s stunning range of color. But you see it right away, and it’s glorious to look at, no matter what app you’re running.
The phone is also very fast. Apple says that its processor is “the most powerful and smartest chip ever in a smartphone,” and that it has “four efficiency cores”—clearly, that’s better than three efficiency cores, right?
In practice, all of this means that opening apps happen a fraction of a second faster than the iPhone 8, and saving video files or performing other intensive operations saves you a second or two. Speed leaps over the iPhone 7 or 6, of course, are even more dramatic.
Yet somehow, Apple maintains that the iPhone X gets two hours more life per battery charge than the iPhone 7 and 8. Bizarrely, Apple gave most reviewers only 24 hours with the iPhone X before posting their reviews (not a week or two, as in the past 10 years), so nobody can really say what battery life is like in real-world scenarios. I’ll update this review once I’ve had a chance to live with it.
Facial Recognition
OK, so Apple made this phone all screen. In that case, where’s the Home button?
It’s gone. On the iPhone X, there is no Home button.
Wait, what? Every smartphone has a Home button!
On the iPhone, we use it to open the Home screen, trigger Siri, switch apps, pay with Apple Pay, take screenshots, turn on the screen magnifier, force quit an app, force-restart the whole phone when it gets locked up, and so on. Without a Home button, what happens to all of that?
You have to re-learn new techniques. Apple has come up with replacement gestures for all of them.
To return to the Home screen, you swipe up from the bottom of the screen. This can be a tiny swipe, even a quarter of an inch upward; it quickly becomes quick and instinctive. (Until, that is, you try to do it on someone’s iPad and feel like an idiot.)
To open the app switcher, you make the same swipe up, but then stop with your finger in the center. The app “cards” now appear.
(Infuriatingly, Apple has changed the way you quit programs from the app switcher. You can’t just swipe them up off the top of the screen anymore. Instead, you have to hold your finger on one of the app “cards,” wait until a red Delete button appears on each card, and then swipe up. That’s a change without a purpose.)
You trigger Siri using the Sleep switch on the right side, which Apple now calls the Side switch.
Here’s a complete list of the old Home-button functions—and how Apple’s rethought them on the iPhone X.
OK, fine. But what about the fingerprint reader?
It’s gone, too. Instead, Apple says it’s come up with something better: Face ID.
Face ID
When you get your phone, you train it to recognize your face in Settings. It’s a very cool process (you can see it in my video above): you roll your head around as though doing a relaxation exercise for your neck. Twice.

You train Face ID by letting it scan your head twice.
Now the iPhone knows the exact contours of your face. After that, just looking at the phone unlocks it—so fast, you may not even realize what’s happened. There are only two clues that the phone is unlocked: a tiny padlock icon opens, and any notification banners (“Message from: Robin”) expand to reveal their potentially embarrassing contents (“Hey! I picked up that cream for your armpit rash”).
Unlocking the phone doesn’t take you all the way to the Home screen, which would be cool. You still have to do a little up-swipe afterunlocking.
In any case, you can’t fool Face ID with a photo, or a mask, or even a 3-D model of your head; I tried. (And what about that Bloomberg article that said that Apple substituted a less accurate camera to make manufacturing easier? “Completely false,” Apple said in a statement. “The quality and accuracy of Face ID haven’t changed. It continues to be 1 in a million probability of a random person unlocking your iPhone with Face ID.”)
You’ll use Face ID wherever you used to use your fingerprint: Triggering Apple Pay, for example, or logging into apps. Any app that was ever unlocked by your fingerprint automatically works with Face ID, without needing to be rewritten.
True Depth
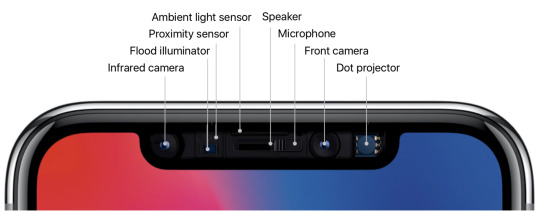
So how does the front-facing camera recognize your face? Using a mass of sensors Apple calls True Depth.
When you lift the phone to wake it, an infrared lamp blasts invisible light forward to see if a face is in range. If so, a tiny projector blasts 30,000 pinpoints of infrared light onto your face, and a camera reads the distortion of their spacing and shape to find the contours of your face.

The True Depth camera is an array of sensors.
(Samsung’s Galaxy phones, of course, had face unlocking first. But Apple’s depth camera system is far more reliable.)
I tried to fool the True Depth camera by putting on wigs, a fake mustache, a fake unibrow, and glasses. I even invited a Yahoo Studios makeup artist to turn me into a zombie, with full face makeup. None of it fooled Face ID.

I tried to fool the Face ID in various ways. Only the beard freaked it out.
I finally got it to fail by applying a full beard that covered half my face. At that point, it didn’t recognize me and didn’t unlock.
Of course, very few people sprout that much hair overnight. Ordinarily, Face ID continues to fine-tune its mathematical model of your face every time you use it, so things like slow hair growth (and wrinkle growth) won’t fool it. If you do do something radical (like shaving off your beard), you just re-train.
Anything new freaks people out, so here are some FAQs about Face ID:
What if I want to unlock the phone at night? Since it uses infrared light, Face ID even works in the dark.
What if I’m in a car accident? As long as your eyes, nose, and mouth are essentially unchanged, it’ll work. If not, you can always use your password, which is required even if you turn on Face ID. (Your password is also needed after any restart, or after someone’s tried five times to unlock the phone with his face.)
What if I’m wearing a scarf or a hat? As long as your eyes, nose, and mouth are uncovered, it’ll work.
Can two different people register their faces? For now, it’s one person at a time.
What about sunglasses? Face ID works through sunglasses if infrared signals can penetrate them. Some do, some don’t.
What if a cop forces me to look at my phone? You can quickly disable Face ID by squeezing the buttons on both sides of the phone, or by pressing the Side switch five times.
What if I have plastic surgery? You can retrain Face ID to recognize the New You.
What about identical twins? They can fool Face ID. If you’re worried, use the password instead.
What if someone tries to unlock my phone by pointing it at my face while I’m asleep? No good. Face ID doesn’t work unless your eyes are open and looking at the phone.
What if I don’t have eyeballs? You can turn off that requirement.
What if somebody decapitates me and then tries to use my severed head to unlock my phone? Now you’re just being silly.
Beyond Face ID
The depth camera does more than just recognize your face. Because it can tell the difference between the foreground and the background, the iPhone X can, for the first time, take front-facing Portrait-mode photos, which means beautifully blurry backgrounds. (On recent iPhone Plus models, two lenses on the back can tell the difference between the subject and the background—and to softly blur the background, as in professional photos. See my story here.)

The iPhone X can create artificially (but convincingly) blurred backgrounds, now with either the back OR front camera.
The iPhone X can also create what Apple calls Animoji—a choice of 12 animated cartoon faces whose expressions follow and mimic your expressions in real time, by tracking the motion of 50 different muscles in your face. Happy, sad, wink, frown, laugh, mouth open, eyebrows up, whatever—your little cartoon-animal avatar does the same. You can record yourself saying something and then send the resulting animation via the Messages app. Suddenly, you’re Warner Brothers.
youtube
Software companies can write apps that exploit the depth camera, too. Already, Snapchat is testing a version whose fun superimposed-face filters (masks, glasses, and so on) use real-time lighting information for realistic reflections and shadows. And Apple has built a new Scenes feature into its free Clips video-recording app that replaces your background, greenscreen style, in real time. You can shoot yourself with a new background of your choosing, like an artsy linescape, on the bridge of the “Star Wars” Millennium Falcon, and so on.

The upcoming version of Apple’s Clips app creates real-time, live greenscreen effects, transporting you into other worlds.
Apple hasn’t said much about the Settings option called Attention Aware Features, but it’s also very cool. The True Depth camera will prevent the screen from turning off while you’re looking at it—and it will make your morning alarm sound quieter if you’re looking at it.
The Notch
Apple packs all of those depth-sensing components into an inch-wide area at the top of the screen that people are calling the Notch. It’s causing some consternation, because it creates a gap in the status bar. It’s there in most of your apps, looking like a clunky missing chunk.
Fortunately, the notch does not intrude upon photos or videos (unless you manually zoom into them).

The notch (the black gap) appears in many apps–and in photos or videos you’ve zoomed into.
It doesn’t take long to get used to the Notch. But it is a kind of weird design decision. It winds up dividing the menu bar into two “ears” and leaving no room for your cell carrier’s name or battery percentage.
The rest of the package
Like the iPhone 8, the iPhone X is waterproof—it can tolerate 30 minutes 3 feet underwater. The glass front and back are, Apple says, 50% stronger. The speakers are louder. There’s still no headphone jack. (As always, a two-inch adapter for existing headphones comes in the box, along with a set of Apple earbuds that plugs into the charging jack. But really, wireless earbuds are the way to go.)
The cameras are even better, especially in low light. The flash now has four LEDs in two different colors, for better flesh tones. Like recent Plus models, the back has two lenses—standard, and 2X zoom—but for the first time, the zoom lens is optically stabilized, too. It makes a huge difference in video stability.
You can charge the iPhone X on a special charging pad. We can thank Apple for adopting the same charging-pad standard that Samsung and other companies use, called Qi (pronounced “chee”). In other words, you don’t have to buy Apple’s charging pad; you can use any company’s. They cost about $12 on Amazon.

You can charge the iPhone X either with its traditional Lightning cable or on a Qi charging pad.
Next year, Apple will sell its own charging pad, called AirPower, capable of charging three Apple devices at once. Meantime, Apple intends to throw its weight behind the Qi charging standard. It’s talking to hotels, airports, and car makers, in hopes of both making charging surfaces available everywhere you want to be.
And the iPhone X runs iOS 11, of course—with a few special tweaks just for Xers. For example, the Flashlight on/off switch is now right there on the Lock screen, not even hiding on the Control Center anymore. And you can now move among open apps just by dragging your finger along the bottom edge of the screen, without even opening the app switcher first. It’s pretty great.

The Lock screen now has a flashlight button at lower left. (Also: See that horizontal line at the bottom? It appears in most apps. It’s meant to remind you: “Swipe up here to go Home.”)
A new realm
Apple intends for the iPhone X to strike you as a masterpiece, as a vision of the future. It probably doesn’t intend for the iPhone X to remind you of recent Samsung phones, which also have features like all-screen designs, wireless charging, and prices around $1,000.
In the Apple ecosystem, though, the iPhone X represents a far more exciting leap than the incremental upgrades we’ve seen in recent iPhone models. The X’s cameras are fantastic, the screen is the best you’ve ever seen, the depth camera will unlock a whole new realm of apps, the Face ID works.
Above all, you’re carrying around a Plus-size screen in a normal-size body. There may be some unbelievably sophisticated technology in this phone—but maybe the most winning feature of all is how little space it takes up in your hand.
More from David Pogue:
Inside the Amazon company that’s even bigger than Amazon
The $50 Google Home Mini vs. the $50 Amazon Echo Dot — who wins?
The Fitbit Ionic doesn’t quite deserve the term ‘smartwatch’
Augmented reality? Pogue checks out 7 of the first iPhone AR apps
How Apple’s iPhone has improved since its 2007 debut
Gulliver’s Gate is a $40 million world of miniatures in Times Square
Samsung’s Bixby voice assistant is ambitious, powerful, and half-baked
Is through-the-air charging a hoax?
David Pogue, tech columnist for Yahoo Finance, is the author of “iPhone: The Missing Manual.” He welcomes nontoxic comments in the comments section below. On the web, he’s davidpogue.com. On Twitter, he’s @pogue. On email, he’s [email protected]. You can read all his articles here, or you can sign up to get his columns by email.
#Tech#David Pogue#Pogue#_lmsid:a077000000BAh3wAAD#_revsp:yahoofinance.com#$AAPL#_author:David Pogue#_uuid:e631cdee-245c-30d7-9745-27c1be1cab69
2 notes
·
View notes
Text
Doogee S90: A Modular Rugged Phone (That’s Actually Useful!)
Our verdict of the Doogee S90:
A massive battery and big screen make the Doogee S90 a solid option for the rugged market, but it really shines when combined with the add-on modules. 810
Modular phones never quite panned out, did they? But in the rugged device market, it turns out they’re quite useful. Doogee has consistently stood out in a sea of Chinese import phones: sometimes with innovation, sometimes with quirky design choices. Their latest rugged device—the Doogee S90—is no different.
At launch, the Doogee S90 features 4 interchangeable modules: a 5,000mAh battery pack, “night-vision” camera, walkie talkie, and gamepad. A 5G module is promised later, and there could potentially be more modules if the idea takes off.
Join us as we take a closer look at this intriguing device, and at the end of this review you can win a complete package for yourself!
youtube
Doogee S90 Specifications and Pricing
CPU: MediaTek Helio P60 with Mali-G72 GPU
RAM: 6Gb
Storage: 128Gb on-board (~100Gb useable)
Screen: 6.18″ FHD+ (2246 x 1080px)
Battery: 5050mAh
Dual-SIM tray (2x NanoSIM or 1 NanoSIM + 1 microSD)
Camera: 16+8MP rear, 8MP front
Other notable features: NFC, wireless charging, modular interface on rear, two dedicated buttons
Price: $470 for the ultimate package, or $300 for the base phone (Delivery estimated February 2019)
Note that this is an active Kickstarter, and there may be small changes to the hardware and software when the final product is delivered. Before agreeing to review pre-order or crowdfunding products, we look carefully at the history of the company, and how far along the production process they are. In this case, Doogee has a proven track record to deliver, so there is little risk involved. We’ve noted in the review where certain features were promised but unable to be tested yet.
Inside our test package, we found:
The Doogee S90 itself
5000mAh battery module
Wireless charging pad (microUSB connection) and power adaptor
Walkie talkie and aerial
Night-vision camera module
USB-C charging cable and headphone to USB-C cable
The Doogee S90 is IP68 rated, thanks to rubber covers over the SIM slot and USB-C port. Bumpers in each corner provide a degree of drop protection, along with the hefty metal rim. Weighing 10.6 ounces (300g), the device measures 6.33 x 3.14 x 0.6 inches (170 x 80 x 15 mm), so it’s a bulky device weighing nearly twice that of some smaller phones. The high capacity internal battery and large 6.18 inch screen are responsible for that difference.
On the right side you’ll find the volume rocker, power button, and a camera shutter button. On the left side there’s an additional button that you can customize for both single, double, and long-click. These actions can either open an app, or be set to:
Take a screenshot
Open sound recording
Turn on the flashlight
Activate SOS mode
Turn on game mode
Modular Add-Ons
Doogee has placed a set of electrical contacts on the back of the device and employed a magnetic locking system, allowing add-on modules to be easily attached. It’s incredibly simple to use, and they’re automatically recognised by the system. The modules stay on securely during normal use or in your pocket, but can be pulled off with a little effort. You don’t need any special tools, and the main device doesn’t need to be dismantled. This is the kind of modular approach that could really appeal, so I really hope it’s developed further.
Let’s take a closer look at the current range of modules available.
Battery Pack
Adding around 150g, the 5000mAh battery module effectively doubles the already generous internal 5050mAh battery capacity. It snaps on and immediately begins trickle charging the device. It’s a lot more convenient than lugging around a separate package, and you’re less likely to lose this while camping. The only downside is that you lose the wireless charging feature, as the external battery module itself needs to be charged over USB-C.
Oh, and it turns the Doogee S90 into a massive brick. But if you wanted sleek and sexy, you probably wouldn’t be looking toward the rugged market anyway.
Walkie Talkie
Promising to work with standard walkie talkie frequencies in the range of 400-480Mhz and at an unobstructed range of 10km, the walkie talkie module and accompanying app will be able to operate even without a Wi-Fi or cellular network. Again, it adds a good bit of bulk to the back of the device. Unfortunately the module sent for testing was a prototype, so we were unable to fully test the features. However, this isn’t the first time Doogee has added walkie talkie features to a device, so we’re confident they can deliver.
Gamepad
Not included in our test package, but available in the ultimate reward pledge or to purchase separately, is the gamepad module. This connects over Bluetooth, and is similar if not identical to the G1 gamepad offered with the S70 model. However, I should note that Fortnite is not currently compatible with the device, and even if it were, Gamepads are not currently supported by the game. Other games should be fine.
Night-Vision Camera
If you were conjuring up dreams of using your mobile to navigate in the complete darkness like some kind of super secret agent, I’m afraid that’s not quite the case. The “Night-Vision” camera module is a ultra sensitive wide-angle sensor and lens package, which supposedly amplifies the light 12 times. It’s based on a Sony IMX291 (2mp) sensor, coupled with a 130-degree wide-angle lens.
The operative word is “amplifies”. It does not work in the complete absence of light. There are no infrared LEDs.
Check out the review video for full sample shots from the add-on camera module, but the following side by side comparison should give you an idea of the difference it makes for low-light situations, as well as the distortion from the wide angle lens. This was taken in the early evening with no other lighting; the night-vision camera makes it look like a bright daytime.
Left is the standard camera; right is the night-vision module. Not the wide-angle lens distortion, but overall much brighter image.
It’s quite a noisy image and the focus is fixed, but it’s better than nothing at all which is what you’d usually get in this kind of lighting condition. Whether you’ll find a use for extreme low light, low resolution photography and video is another matter. Personally, I would have much preferred a true infrared night vision mode, for wandering round forests in the dead of night, as one is wont to do.
Built-in Camera Quality
Featuring a now standard 16+8MP regular camera in the base phone, the standout feature for me during testing was “aperture mode”, which is where the secondary sensor is used to identify the foreground subject and artificially add bokeh to the rest of the image. In my experience, claims of a secondary sensor are sometimes fake: the software merely adds a circular blur around the point of focus. In the case of the Doogee S90, it’s clearly making use of that sensor, and does a great job of picking out the subject accurately.
Sample indoor image from Doogee S90 (aperture mode)
On the image above, you can see a slight error where the algorithm included the bottle underneath the camera body in the section of sharp focus, but in fairness I was trying something deliberately difficult for this test shot. More natural shots worked reliably, like these two beautiful rescue hens:
Sample outdoor image from Doogee S90 (aperture mode)
In standard rear camera mode, photos are passable, but nothing outstanding.
Standard camera mode
The 8MP front sensor tells a similar story, and is fine for selfies and video chatting.
Front facing selfie cam
Doogee S90 Performance
Antutu scored the device around 132,000—not in the top 50 of current smartphones, but not bad. PCMark (Work 2.0) test was a more respectable 6799. In terms of raw power then, it’s roughly equivalent of a Samsung Galaxy S8, or just below that of the Google Pixel 2.
I was able to run Player Unknown Battlegrounds fine—again, sample footage is in the review video. Unfortunately Fortnite refused to install. General UI interactions, web browsing etc was all as smooth as I could wish for, probably helped by the optimizations in Android 8.1.
In terms of battery life, we managed a solid day and then some (on just the phone, not with the backup battery), with average usage. While this may be shorter than you’d expect from such a large battery, but it’s mainly needed to power that gorgeous big screen. If you took the battery module with you, you’d have no trouble getting through a long weekend of camping. With light usage, two or three days from a single charge would not be unusual.
Should You Buy or Back the Doogee S90?
If the modular approach is something that interests you, and the modules on offer are of use, you’ll save on the final retail price by backing the Kickstarter now. The ultimate bundle, which includes all the current modules shown here as well as the gamepad, is available for $470. Or you can mix and match only the ones you want.
It’s a unique approach and one that I hope they continue to release new modules for. The massive battery and large screen in a rugged package are a great combination. Generally, these mid-range import phones are forgotten about quickly, as the next model is inevitably churned out. Don’t expect to get the next major Android upgrade a year down the line; but perhaps the next Doogee modular phone will be compatible with existing modular upgrades. As with any imported phones, check the frequencies will work with your network before purchasing.
If you’re not interested in any of the modules though, you should look elsewhere. The circuitry needed to interface with those modules add to the cost of the device, so you’ll find better performance per dollar on other devices.
Thanks to Doogee, we’ve got a complete pack to giveaway to one lucky reader! Enter below for your chance to win.
Enter the Competition!
Doogee S90 Rugged Modular Phone Giveaway
Read the full article: Doogee S90: A Modular Rugged Phone (That’s Actually Useful!)
Doogee S90: A Modular Rugged Phone (That’s Actually Useful!) published first on http://droneseco.tumblr.com/
0 notes
Text
Post-production is an important process in photography because it helps you reconcile the differences between the image captured by your camera and what your eyes saw. The goal is to make the photo look authentic and natural as possible even as you tweak a few things that may have gone wrong during the shooting. However, it should be emphasized that editing will never turn a mediocre photo into a masterpiece and should therefore not be seen as a way of fixing production errors.
Another thing we need to point out is that editing can be very subjective because everyone has his own style (which evolves over time). However, irrespective of your style, there are photo editing mistakes that you need to avoid if you want your photos to look natural, realistic and professional.
We discuss some of these mistakes and how to avoid them below.
1. Cropping Poorly
There is no doubt that cropping is one of the most important post-production procedures. The crop tool gives you the power to tell a story with your photo. It, therefore, follows that you shouldn’t start cropping before you know the story you want to tell and how you want to tell it. Cropping important details can alter the story while unnecessary elements may draw attention to the wrong things.
Effective cropping starts in–camera (with your lens) while taking the shot. Ideally, cropping should help you get rid of undesired elements and create a more polished and balanced look. Unfortunately, sometimes we crop poorly and the results can be catastrophic.
Always take your client’s interest into account. Turns out, your client’s artistic orientation and vision may not always be in line with yours. And sometimes the client needs something specific that only hearing from them can reveal. It is always advisable to know how the photo is going to be displayed before you set out to crop.
When it comes to portrait cropping, the position of the eye is very important. The eyes should be the default landing point. Use “the rule of thirds” to place eyes as the center of focus and also to ensure well-balanced and interesting photos. Remember that you don’t have to be rigid with your cropping. Experimentation is encouraged. Your subject can be far off to one side or even slightly off frame depending on the impression you want to create, but avoid placing the subject at the center as much as possible. It’s just plain boring and counter-intuitive!
Eyes not properly positioned
Eye well positioned on the top third of the frame
2. Over-reliance on Actions and Presets
Photoshop actions (called presets in Lightroom) help us quickly achieve amazing results when editing without having to manually apply each process; and comes with many other advantages including a quicker workflow, fun and interesting editing, and ability to create consistent images with the same effect, among others. However, it is important to understand how actions work and where they are most useful. Over-reliance on actions is not encouraged because they are not an end in themselves but an addition to the editing process. Again, for purposes of learning, try to apply processes manually or better still create your own actions.
3. Overusing textures
Textures can be very appealing and fun to work with especially if you are editing portraits and gaming images because there is a lot to work with, in most editing applications. However, moderation is key when dealing with textures and effects because you always run the danger of ending up with an image that doesn’t look authentic.
This is an example of over-used textures. There is just too much going on here.
4. Creating fake bokehs
We all love bokehs because of the impact it creates on the photo. If and when done well, the separation between the subject and background allows your photo to pop in an awe-inspiring manner and affords the two elements perfect harmony. A bokeh is beautiful when it’s as natural as it can get. However, many photographers fail to get a good bokeh with the shot and try to create one artificially by blurring out the background. The outcome is a blurred looking photo or a plastic background that ruins the fidelity of the photo. Again, trying to create a background with a perfect fade in into your object may be a bit complicated in editing. The more you try to achieve this, the more your photo will look unnatural or over edited. The best remedy is to get a crisp background when taking the photo.
A good bokeh! Perfect harmony between subject and background.
5. Selective Colouring
Selective colouring is the inevitable deathblow to your photo and a gross sin that you shouldn’t commit. The fact that something looks different doesn’t mean it’s appealing. The selective colouring fad faded away when people finally got tired of it and decided it belongs to the past. If you choose to go black and white go that route and get the best out of it. If you go for colour, say bye to B&W and have fun with colour. This way, you save your photos from the awkward, out of place look. And please note that selective colouring is a very unprofessional way of drawing attention to your subject. People will notice that it came as an afterthought and you won’t like the tacky look either.
Notice how the subject looks out of place in the photos below.
6. Mishandling Curves
Knowing your curves is an important accomplishment in photo editing, but understanding how curves work requires a lot of practice and patience and that’s why many photographers misapply or shy away from them. A good understanding of curves will help you create colours, shadows and contrast without blurring colours and overlapping shadows. Sean McCormark from the Digital Photography School shares insights on how to use curves in Photoshop in this blog https://digital-photography-school.com/understand-curves-tool-photoshop/
7. Failing to create a focal point
Creating a focal point is critical because you draw attention to the subject of your photo. You don’t want to end up with a photo that has an excellent composition and expression but is lacking in focus. A strong focal point can be achieved while taking the photo by playing with background and foreground placement, creating shallow depth of field or by highlighting your object using lighting. If you don’t get this right as you take the shot, you can use the vignetting effect tool or a radial brush to brighten the focal point in Lightroom. The local adjustment brush can also be used to increase clarity on your object which will give a similar effect.
This is a photo with no focus. There is no particular subject for the eyes to land on.
8. Trying to be trendy
Trends come and go, but you want your images to stand the test of time. Again, some trends may appeal to some people but not all. When editing your photos, don’t get trapped into “this trendy business”. However, if you feel strongly compelled to go that route, develop two versions; the trendy one (for your pleasure) and one with a more classic touch.
9. Failing to zoom out and in
Zooming out and in after a few fixes here and there helps you keep track of changes in your image so that you know whether you’re on course or veered off from the image you wanted to achieve. This is very important when working on eyes, or specific parts of the body. You need to zoom out to see the whole eye to get a glimpse of what’s happening. It is much easier to see the changes if you view the whole image.
10. Perfect Skin
When smoothing skin features, there is always the temptation to get a perfect skin tone. Work side by side with the original to help you know when you are getting off the mark as the skin will start looking unnatural and quite different from the original photo.
The skin and eyes look over edited and unnatural in this photo.
11. Turning muddy colours into black and white photos
Turning muddy colours (greys, browns, and other desaturated colours) into black and white will not help you enhance detail. You will most probably end up with a funny greyish photo.
12. One fell swoop editing
If you are not racing against time, it is always advisable to take a break from the images, probably days or even a week. When you come back, you’ll realize that there are many tweaks that you want to make because of the new ideas that a break affords you. As much as possible, avoid editing your photos in one sitting.
13. Messing around with HDR effects
HDR images can be quite stunning when expertly done. However, applying HDR professionally requires time and effort and many photographers are just not fit for purpose. If you are not sure of your HDR skills, you will do your photography a lot of justice if you leave HDR alone as you sharpen your skills for later. You can learn more about HDR in the YouTube video below.
youtube
14. Jumping onto editing program before you know it well
Sounds basic but photographers have this habit of jumping onto new editing programs even before they understand it well. Take your time to know the program well so that you are able to use all the important features properly and be in a position to fix issues that may arise without complicating the problem. Editing becomes difficult, boring and time wasting if you don’t understand your tools well. This mistake opens doors to many other mistakes and frustrations. The key is to ensure that you continue learning new features. We sometimes have this weakness of sticking with one feature once we know it well and not challenging ourselves to learn new ones. Explore, and learn continuously but don’t start using a feature before you’ve mastered it properly.
15. Sparkling eyes and bright teeth
Eyes can be very tricky to deal with. While we want sparkling eyes, excessively bright eyes will make your subject look like an alien. If you end up with sclera (the white of the eye) that is completely white, something must be seriously wrong because the sclera is not a true white. Don’t push it too far. On the other hand, the brighter the teeth the less unnatural it will look. The secret is to find a good balance that gives the desired effect without coming off as a fake or exaggerated.
These eyes look sharp but still fairly authentic. Beyond this point the look may be exaggerated. A perfectly white sclera robs the eye of its authenticity.
16. Editing the original file
Those who have been here know what it means to discover that you have edited the original but you have no backup. How do you go back to fix mistakes when the edits are irreversible? Keeping the original means you have a chance to start a fresh should something go wrong.
17. Sharpening to correct focus
Sharpening will not correct focus for you unless you are perfect in this skill. Instead, it will mess up your photo. Chances are high that you will not get the balance right leading to artefacts, halos and other unwanted noise. The remedy is to get the right camera settings to render the correct focus as you take the photo.
18. Removing natural spots from the face and body
Things like wrinkles and birthmarks are not necessarily bad. In fact, they make the photo look more authentic. Sometimes clients request to have them removed, but as a professional, you should advise them accordingly. This can also be an area of conflict whereby the photographer deletes believing the client will like it but instead the client gets offended that the photographer removed it. For some people, birthmarks mean a lot and for the elderly wrinkles may be associated with longevity, personality and wisdom. It is better to ask but even better not to touch them. But things may be a bit different for models because they must look gorgeous in a photo, though not to the extent that the look is plastic or alien-like.
19. Not Shooting in Raw
Shooting in Raw gives you more latitude in post-production. You get a lot of detail to work with which means you can do many edits before you start losing important detail and quality. You also get more control over your exposure. On the other hand, JPEG compression artefact can introduce mosquito noise, blockiness, and colour degradation. It may also interest you to know that most presets are created to work in the Raw format.
20. Post production to fix shooting mistakes
It should be clear right from the onset that post production is not the magic wand for fixing shooting problems. Even pros with sophisticated editing programs will find it difficult to turn poorly taken photos into masterpieces. Taking poor photos and hoping to edit them out is one of the most serious crimes in photography that can cause you editing nightmares. Beginner photographers are guilty of this gross sin because they often don’t put in enough effort to come up with the best photo, but trust you me, even seasoned photographers are culpable here. If you have a lot of shooting mistakes to address in post, it goes without saying that you’ll mess up the operation. Learn how to take the best photo and that way you will improve your photography skills too. Post-production will just be complimentary minor tweaks to improve the photo.
21. Failure to compare before and after situation
Frequently check before and after situation just to be sure that you are in touch with the changes happening to your image especially when you are starting to lose important detail or the image is beginning to look unnatural. A good trick is to apply too much of any adjustment and reduce gradually as you find the optimum spot just before editing starts distracting the eyes from the subject.
22. Trying to replace the background
Sometimes you get a nice photo where everything is perfect but the background is the only problem. Occasionally, you will just need light and shadows to dim the background and draw attention to your photo. In some cases, lights and shadows will not suffice and the process of background removal may become a bit technical even for pros. The best remedy for this problem is to have the ideal background in mind when shooting. Unlike during the days of film, digital photography gives us room for experimentation, trying out different settings until you get what works. Take multiple photos in different locations and choose the one with the best background.
23. Losing detail and quality
Getting enough detail in a photo usually takes a lot of effort and often involves shooting in RAW. When you start losing detail in post-production, this should be a clear warning that you have pushed those sliders a bit too far. The biggest culprit here is exposure adjustments. If you brighten too much, you lose highlights detail, if you add too much black the shadow detail is lost. If you push the contrast too much, the subtleties disappear. While editing, keep checking your histogram and don’t clip your highlights or shadows. In Lightroom, pressing “J” will show clipped highlights in red and clipped shadows in blue.
Apart from detail, you can also lose the overall quality of your image. For instance, cranking up your exposure can add noise into the file. And reducing this noise can be detrimental to the image. Just get the right exposure in your camera. Be sure to learn how the exposure triangle works.
24. Colour Banding
When trying to bring back detail in the sky, you may end up with wobbly bands of colour instead of a perfectly balanced gradient. This is called banding. The moment it starts creeping in, know that the editing is a bit too much. It may not be easily noticeable when editing, so remember to zoom out and view the full image to notice even the smallest glimpse of banding or change in fidelity.
Notice colour banding in the horizon. Banding is more noticeable when you view the full image.
25. When people notice the editing before the image
If the first thing people say when they see your photo is that post processing is good, then there is a problem because editing work should not be easily noticeable. This is called distraction, the edit taking focus away from the image because post production effects are more prominent than the subject.
Conclusion
The more you edit your photos the better they get, but just up to a certain level above which you will start getting negative results. When it comes to photo editing, less is actually more and the surest way of ensuring fewer edits is by taking the best possible shots. We sometimes want to push photo editing applications to the limits to get the best out of them but results that come out of these endeavours can be very un-natural or even bizarre. To get authentic realistic results that can stand the test of time, it’s important to avoid pushing things too much. Moderation is key! Know your editing application well, and ensure that you get the best shot from your camera because there are some things even professional editors can’t correct once they go wrong.
25 Photo Editing Mistakes to Avoid Post-production is an important process in photography because it helps you reconcile the differences between the image captured by your camera and what your eyes saw.
0 notes
Text
Berlin Street Art and the Leica Oscar Barnack Award
Photography and street art are two of my favourite things and Berlin has to be one of the best places to experience them. I was invited to Berlin to meet the finalists of the prestigious Leica LOBA Awards and to try my hand at photographing street art with the Leica TL2. Housed in a stylish yellow leather case, it’s an intriguing mix of retro style and modern technology. There are touch screen controls and high tech features such as Wi-Fi transfer and 4x video. I loved the slow-mo effect when filming! Paul and I have long been fans of Leica lenses for their precision but I’d never tried a Leica camera before. All their cameras are handmade at their factory in Germany and the quality really shows. I’d had a tutorial at Leica’s Mayfair store on Bruton Place but thankfully it’s easy to use once you get the hang of it.
Leica Oskar Barnack Award 2017
First we had the chance to interview the winners, Terje Abusdal and Sergey Melnitchenko, at the gallery exhibition in Neue Schule für
Photografie. The overall winner of the awards, Terje Abusdal, has documented the lives of the Finnskogen ethnic group in Norway. His series, “Slash and Burn” portrays the lives of the Finnish descendants, also known as Forest of the Finns. Their 17th century ancestors originally used slash and burn techniques to clear agricultural land and the photos have an eery quality, reflecting their former shamanic rituals.
Sergey Melnitchenko won the Newcomer award and got into photography when he had a tongue piercing and his Grandma said she’d buy him a small camera if he removed it! Born in Ukraine, he currently lives in China and whilst working as a dancer there, he took fascinating portrait photos of his fellow dancers for his series “Behind the Scenes”.
London based photographer Vera Torok was one of my favourite finalists, with her innovative techniques. She accidentally loaded a pre-used film into her Leica L6 and exposed it twice. The series of photographs is entitled “Accidentally on Purpose” and aims to show the complexity of living in a digital world, continually surrounded by information.
Patrick Willocq also wowed with his colourful series of photographs, “You Cannot Pick a Stone with One Finger”. The French photographer worked closely with the Dagomba, an ethnic tribe living in Ghana to produce these vibrant images.
Then we walked to the evening venue, the atmospheric St Elisabeth Kirche, a former church that was lit up beautifully for the awards ceremony – Berlin at night looks as great as during the day. Dr Andreas Kaufmann – majority shareholder and chairman of the supervisory board, Leica Camera AG gave an interesting talk about the founder of Leica and awards namesake, Oskar Barnack. This visionary inventor realised that photos with a human element, such as someone running into your shot accidentally, can be much more interesting than “perfect” images. if someone runs into your shot. He photographed his children and the shots had a lot more life than most at the time. He also documented catastrophes, street scenes and events including reportage on local floods. The Leica was introduced in the 1920s and Oscar invented new aesthetics like cropping people to the side of the frame rather than always having them in the centre.
Beautiful Places in Berlin
Earlier in the day, I had time for a quick walk around Berlin. I haven’t been for many years and was blown away by the majestic buildings and sense of history. Walking to Brandenburg Gate, I came across monumental museums and leafy parks. The most striking of these was the Tiergarten and the memorial for the 220,000-500,000 Sinti and Roma victims of Nazi genocide. Designed by Israeli artist Dani Karavan , it’s a circular pool with a triangular stone at its centre upon which a flower is placed daily. There’s a sense of calm and reconciliation about this place. The Leica TL2 really picked up on the nuances of light playing on the water and leaves.
It was here that the first person approached me to find out about my camera. He was to be the first of many, as I soon found out that it’s a real conversation starter!
Photo by Chris Beastall
Brandenburg Gate was built between 1788 and 1791 and has an impressive statue on top with the goddess of victory and four horses. The weather turned dark and stormy when I visited and my camera picked up on the mood perfectly.
It’s hard to imagine that the photos above and below were taken within a few minutes of each other. Clearly the weather in Berlin is as changeable as in London. The Reichstag dates from 1894 and is the meeting place of the German Parliament, known as the Bundestag.
The TL2 seemed to lend itself particularly well to architectural details, like the patterns on Oberbaum Bridge and the colonnaded walkways of the Neues Museum. There isn’t a viewfinder, which can be disconcerting in bright sunlight although it’s possible to buy a bolt-on. My particular Leica didn’t have a zoom lens, which actually helps you to learn how to crop your photos better. Being a mirrorless model, it’s extremely light and fast to focus and shoot.
Flowers and a fountain gave me the perfect opportunity to attempt the bokeh effect for which Leica is famous. Bokeh is basically focusing on an object in the foreground such as a flower whilst deliberately blurring the background.
Berlin Street Art
The next day we were treated to a street art tour in the trendy Kreuzberg Berlin area. There are some interesting artworks here, many of which were created by famous street artists such as OSGEMEOS. These Brazilian twins once both had a dream in which they saw all people as being yellow, so now their signature style incorporates yellow characters.
Some of the street art aims to make you think but as our guide said, there are often multiple possible interpretations. For example, The Pink Man depicts a giant man and a multitude of smaller men, but are they helping each other or fighting? Is the character in the giant’s hand going to be consumed by him and what could this mean? He’s a different colour to all the others so is he being singled out for being different and could this be a statement about the situation in wartime? Italian artist BLU leaves it up to you to decide.
At first glance, this street art might look like a couple embracing but look a bit closer and the figure on the right could be engulfing the other person…
I asked our guide how the street artists managed to create such huge paintings without detection. Apparently the larger artworks are commissioned by the local council and sometimes by restaurants. However it’s a fine line as the street art is causing property prices to rise and they want to keep the area accessible for locals. Amidst the urban landscape there are occasional pockets of green.
After our tour we headed to RioGrande for a quick riverside lunch of goulash and the obligatory German beer ;-). My final destination was the infamous Checkpoint Charlie. After East Germany built the Berlin Wall to stop the mass exodus of its citizens to the West, this famous sentry point was established in 1961 as a gateway for foreign tourists and Allied diplomats. It’s a bit bizarre to see the fake American soldiers who pose with tourists for photographs for a fee.
Sadly, Checkpoint Charlie was often the final destination for those trying to escape. At least 140 people died and tributes to some of the victims are displayed close by, as well as the photo of an unnamed American soldier. The Allies could not officially assist anyone trying to escape although American serviceman Eric Yaw did help Hans-Peter Spitzner and his daughter to flee in the trunk of his car. The wall was finally knocked down in 1989.
It’s moving to think that East and West Berlin are now reunited. Berlin street art is a unifying element thanks to the diversity of artists that you’ll come across in Berlin. The past should not be forgotten but like this vintage Trabant car reimagined by Thierry Noir, it has been infused with a new lease of life and colour.
Similarly, the variety of photographers entering the Leica LOBA Awards is heartening to see. I can see why the LEICA brand inspires so much devotion from it’s fans, and hope that you like the photos of Berlin. If you’re visiting the city, you can see all the finalists’ photographs at a free exhibition at the Neue Schule für Photographie until 15 October, when the exhibition heads to Rome.
Are you a fan of street art?
The post Berlin Street Art and the Leica Oscar Barnack Award appeared first on Luxury Columnist.
Berlin Street Art and the Leica Oscar Barnack Award published first on http://ift.tt/2pewpEF
0 notes
Text
iPhone X Review: Gorgeous, pricey, and worth it
yahoo
If you have any interest in Apple’s (AAPL) hotly anticipated, $999, 10th-anniversary iPhone X (pronounced “ten”), then there are four dates to keep in mind:
September 12, 2017, when Apple first unveiled it to the public.
Today, when most of the professional reviews appear.
November 3, when the phone is supposed to be available to buy.
The day when you can actually get one. These phones are difficult to manufacture and massively back-ordered, so if you order now, you might get one before the end of the year.
The price, the delays, and the popularity all tell you one thing, loud and clear: There’s an unbelievable amount of advanced technology in this thing.

The iPhone X is gorgeous, powerful, and expensive.
The Headline: Big Screen, Small Body
Everybody talks about the iPhone X price ($999 for 64 gigs of storage, $1,149 for 256 gigs). Or they talk about its face-recognition feature, but the best thing about the iPhone X is its size.
It’s a standard-size phone, only a hair bigger than an iPhone 7 or 8, and therefore easy to wrap your fingers around without growing extra knuckles. Yet the X has the screen size of the iPhone Plus models! By lopping off all the blank margins that usually surround an iPhone’s screen, Apple has found a much sweeter spot on the screen/body tradeoff spectrum. It’s all screen, much like recent Samsung smartphones.

The iPhone X has about the same screen size as an iPhone Plus—in the body about the same size as a standard iPhone.
And what a screen it is. It’s Apple’s first OLED screen, meaning it’s got much darker darks and brighter brights than what’s come before—a million-to-one contrast ratio, Apple says. Unfortunately, there’s no way to see it except in person, because whatever screen you’re now reading on can’t display the X’s stunning range of color. But you see it right away, and it’s glorious to look at, no matter what app you’re running.
The phone is also very fast. Apple says that its processor is “the most powerful and smartest chip ever in a smartphone,” and that it has “four efficiency cores”—clearly, that’s better than three efficiency cores, right?
In practice, all of this means that opening apps happen a fraction of a second faster than the iPhone 8, and saving video files or performing other intensive operations saves you a second or two. Speed leaps over the iPhone 7 or 6, of course, are even more dramatic.
Yet somehow, Apple maintains that the iPhone X gets two hours more life per battery charge than the iPhone 7 and 8. Bizarrely, Apple gave most reviewers only 24 hours with the iPhone X before posting their reviews (not a week or two, as in the past 10 years), so nobody can really say what battery life is like in real-world scenarios. I’ll update this review once I’ve had a chance to live with it.
Facial Recognition
OK, so Apple made this phone all screen. In that case, where’s the Home button?
It’s gone. On the iPhone X, there is no Home button.
Wait, what? Every smartphone has a Home button!
On the iPhone, we use it to open the Home screen, trigger Siri, switch apps, pay with Apple Pay, take screenshots, turn on the screen magnifier, force quit an app, force-restart the whole phone when it gets locked up, and so on. Without a Home button, what happens to all of that?
You have to re-learn new techniques. Apple has come up with replacement gestures for all of them.
To return to the Home screen, you swipe up from the bottom of the screen. This can be a tiny swipe, even a quarter of an inch upward; it quickly becomes quick and instinctive. (Until, that is, you try to do it on someone’s iPad and feel like an idiot.)
To open the app switcher, you make the same swipe up, but then stop with your finger in the center. The app “cards” now appear.
(Infuriatingly, Apple has changed the way you quit programs from the app switcher. You can’t just swipe them up off the top of the screen anymore. Instead, you have to hold your finger on one of the app “cards,” wait until a red Delete button appears on each card, and then swipe up. That’s a change without a purpose.)
You trigger Siri using the Sleep switch on the right side, which Apple now calls the Side switch.
Here’s a complete list of the old Home-button functions—and how Apple’s rethought them on the iPhone X.
OK, fine. But what about the fingerprint reader?
It’s gone, too. Instead, Apple says it’s come up with something better: Face ID.
Face ID
When you get your phone, you train it to recognize your face in Settings. It’s a very cool process (you can see it in my video above): you roll your head around as though doing a relaxation exercise for your neck. Twice.

You train Face ID by letting it scan your head twice.
Now the iPhone knows the exact contours of your face. After that, just looking at the phone unlocks it—so fast, you may not even realize what’s happened. There are only two clues that the phone is unlocked: a tiny padlock icon opens, and any notification banners (“Message from: Robin”) expand to reveal their potentially embarrassing contents (“Hey! I picked up that cream for your armpit rash”).
Unlocking the phone doesn’t take you all the way to the Home screen, which would be cool. You still have to do a little up-swipe afterunlocking.
In any case, you can’t fool Face ID with a photo, or a mask, or even a 3-D model of your head; I tried. (And what about that Bloomberg article that said that Apple substituted a less accurate camera to make manufacturing easier? “Completely false,” Apple said in a statement. “The quality and accuracy of Face ID haven’t changed. It continues to be 1 in a million probability of a random person unlocking your iPhone with Face ID.”)
You’ll use Face ID wherever you used to use your fingerprint: Triggering Apple Pay, for example, or logging into apps. Any app that was ever unlocked by your fingerprint automatically works with Face ID, without needing to be rewritten.
True Depth
So how does the front-facing camera recognize your face? Using a mass of sensors Apple calls True Depth.
When you lift the phone to wake it, an infrared lamp blasts invisible light forward to see if a face is in range. If so, a tiny projector blasts 30,000 pinpoints of infrared light onto your face, and a camera reads the distortion of their spacing and shape to find the contours of your face.
The True Depth camera is an array of sensors.
(Samsung’s Galaxy phones, of course, had face unlocking first. But Apple’s depth camera system is far more reliable.)
I tried to fool the True Depth camera by putting on wigs, a fake mustache, a fake unibrow, and glasses. I even invited a Yahoo Studios makeup artist to turn me into a zombie, with full face makeup. None of it fooled Face ID.

I tried to fool the Face ID in various ways. Only the beard freaked it out.
I finally got it to fail by applying a full beard that covered half my face. At that point, it didn’t recognize me and didn’t unlock.
Of course, very few people sprout that much hair overnight. Ordinarily, Face ID continues to fine-tune its mathematical model of your face every time you use it, so things like slow hair growth (and wrinkle growth) won’t fool it. If you do do something radical (like shaving off your beard), you just re-train.
Anything new freaks people out, so here are some FAQs about Face ID:
What if I want to unlock the phone at night? Since it uses infrared light, Face ID even works in the dark.
What if I’m in a car accident? As long as your eyes, nose, and mouth are essentially unchanged, it’ll work. If not, you can always use your password, which is required even if you turn on Face ID. (Your password is also needed after any restart, or after someone’s tried five times to unlock the phone with his face.)
What if I’m wearing a scarf or a hat? As long as your eyes, nose, and mouth are uncovered, it’ll work.
Can two different people register their faces? For now, it’s one person at a time.
What about sunglasses? Face ID works through sunglasses if infrared signals can penetrate them. Some do, some don’t.
What if a cop forces me to look at my phone? You can quickly disable Face ID by squeezing the buttons on both sides of the phone, or by pressing the Side switch five times.
What if I have plastic surgery? You can retrain Face ID to recognize the New You.
What about identical twins? They can fool Face ID. If you’re worried, use the password instead.
What if someone tries to unlock my phone by pointing it at my face while I’m asleep? No good. Face ID doesn’t work unless your eyes are open and looking at the phone.
What if I don’t have eyeballs? You can turn off that requirement.
What if somebody decapitates me and then tries to use my severed head to unlock my phone? Now you’re just being silly.
Beyond Face ID
The depth camera does more than just recognize your face. Because it can tell the difference between the foreground and the background, the iPhone X can, for the first time, take front-facing Portrait-mode photos, which means beautifully blurry backgrounds. (On recent iPhone Plus models, two lenses on the back can tell the difference between the subject and the background—and to softly blur the background, as in professional photos. See my story here.)

The iPhone X can create artificially (but convincingly) blurred backgrounds, now with either the back OR front camera.
The iPhone X can also create what Apple calls Animoji—a choice of 12 animated cartoon faces whose expressions follow and mimic your expressions in real time, by tracking the motion of 50 different muscles in your face. Happy, sad, wink, frown, laugh, mouth open, eyebrows up, whatever—your little cartoon-animal avatar does the same. You can record yourself saying something and then send the resulting animation via the Messages app. Suddenly, you’re Warner Brothers.
youtube
Software companies can write apps that exploit the depth camera, too. Already, Snapchat is testing a version whose fun superimposed-face filters (masks, glasses, and so on) use real-time lighting information for realistic reflections and shadows. And Apple has built a new Scenes feature into its free Clips video-recording app that replaces your background, greenscreen style, in real time. You can shoot yourself with a new background of your choosing, like an artsy linescape, on the bridge of the “Star Wars” Millennium Falcon, and so on.

The upcoming version of Apple’s Clips app creates real-time, live greenscreen effects, transporting you into other worlds.
Apple hasn’t said much about the Settings option called Attention Aware Features, but it’s also very cool. The True Depth camera will prevent the screen from turning off while you’re looking at it—and it will make your morning alarm sound quieter if you’re looking at it.
The Notch
Apple packs all of those depth-sensing components into an inch-wide area at the top of the screen that people are calling the Notch. It’s causing some consternation, because it creates a gap in the status bar. It’s there in most of your apps, looking like a clunky missing chunk.
Fortunately, the notch does not intrude upon photos or videos (unless you manually zoom into them).

The notch (the black gap) appears in many apps–and in photos or videos you’ve zoomed into.
It doesn’t take long to get used to the Notch. But it is a kind of weird design decision. It winds up dividing the menu bar into two “ears” and leaving no room for your cell carrier’s name or battery percentage.
The rest of the package
Like the iPhone 8, the iPhone X is waterproof—it can tolerate 30 minutes 3 feet underwater. The glass front and back are, Apple says, 50% stronger. The speakers are louder. There’s still no headphone jack. (As always, a two-inch adapter for existing headphones comes in the box, along with a set of Apple earbuds that plugs into the charging jack. But really, wireless earbuds are the way to go.)
The cameras are even better, especially in low light. The flash now has four LEDs in two different colors, for better flesh tones. Like recent Plus models, the back has two lenses—standard, and 2X zoom—but for the first time, the zoom lens is optically stabilized, too. It makes a huge difference in video stability.
You can charge the iPhone X on a special charging pad. We can thank Apple for adopting the same charging-pad standard that Samsung and other companies use, called Qi (pronounced “chee”). In other words, you don’t have to buy Apple’s charging pad; you can use any company’s. They cost about $12 on Amazon.

You can charge the iPhone X either with its traditional Lightning cable or on a Qi charging pad.
Next year, Apple will sell its own charging pad, called AirPower, capable of charging three Apple devices at once. Meantime, Apple intends to throw its weight behind the Qi charging standard. It’s talking to hotels, airports, and car makers, in hopes of both making charging surfaces available everywhere you want to be.
And the iPhone X runs iOS 11, of course—with a few special tweaks just for Xers. For example, the Flashlight on/off switch is now right there on the Lock screen, not even hiding on the Control Center anymore. And you can now move among open apps just by dragging your finger along the bottom edge of the screen, without even opening the app switcher first. It’s pretty great.

The Lock screen now has a flashlight button at lower left. (Also: See that horizontal line at the bottom? It appears in most apps. It’s meant to remind you: “Swipe up here to go Home.”)
A new realm
Apple intends for the iPhone X to strike you as a masterpiece, as a vision of the future. It probably doesn’t intend for the iPhone X to remind you of recent Samsung phones, which also have features like all-screen designs, wireless charging, and prices around $1,000.
In the Apple ecosystem, though, the iPhone X represents a far more exciting leap than the incremental upgrades we’ve seen in recent iPhone models. The X’s cameras are fantastic, the screen is the best you’ve ever seen, the depth camera will unlock a whole new realm of apps, the Face ID works.
Above all, you’re carrying around a Plus-size screen in a normal-size body. There may be some unbelievably sophisticated technology in this phone—but maybe the most winning feature of all is how little space it takes up in your hand.
More from David Pogue:
Inside the Amazon company that’s even bigger than Amazon
The $50 Google Home Mini vs. the $50 Amazon Echo Dot — who wins?
The Fitbit Ionic doesn’t quite deserve the term ‘smartwatch’
Augmented reality? Pogue checks out 7 of the first iPhone AR apps
How Apple’s iPhone has improved since its 2007 debut
Gulliver’s Gate is a $40 million world of miniatures in Times Square
Samsung’s Bixby voice assistant is ambitious, powerful, and half-baked
Is through-the-air charging a hoax?
David Pogue, tech columnist for Yahoo Finance, is the author of “iPhone: The Missing Manual.” He welcomes nontoxic comments in the comments section below. On the web, he’s davidpogue.com. On Twitter, he’s @pogue. On email, he’s [email protected]. You can read all his articles here, or you can sign up to get his columns by email.
#Tech#David Pogue#Pogue#_lmsid:a077000000BAh3wAAD#_revsp:yahoofinance.com#$AAPL#_author:David Pogue#_uuid:e631cdee-245c-30d7-9745-27c1be1cab69
2 notes
·
View notes
Last Seen Blogs

bigkittysworld
Untitled

7713-illust
7713-illust

my-reena-me-blog
Reena

karenfordonte
Caring For Donte

iamperizada
I AM A DREAMER.