ooak-tree-dolls
Handmade from Ooak Tree
Ooak Tree - where creativity fairies come from...
Unique items, handmade with great love and care. Customs & repaints: plush toys, Monster High & Ever After High dolls, board game miniatures and much more...
177 posts
Don't wanna be here? Send us removal request.
Last Seen Blogs
king-ttut
KING TTUT

bittyboom
MOVED!!! - I’ve Poisoned the Water Supply!!

ivars
ivars

vermillionair
tautology
Note
Hi, I wanted to know if you still make the La Muerte & Carmen & Johnny Spirit dolls? And how much do you charge?
Yeah, I do. :)
For pricing, timing etc. please contact me via e-mail at: [email protected]
2 notes
·
View notes
Photo

Things you can do with plant fibers are pretty amazing! Apart of wavy texture Angora have - this banana top fiber is as good as animal fibers! soft, smooth, easy to style. And sips color way better 😀 #rainbow_hair #banana_fiber #vegan #DollWig #sunset_colors https://www.instagram.com/p/CNZw2MbjQwD/?igshid=ecr1oaalvmk
31 notes
·
View notes
Photo

So I am doing some crazily-complex orders lately... but they are all EPIC and I love them so much! 💚🌌 This one required disassembling actual old watch mechanism to aquire cogs and bolts in proper size 😹 #WiP #steampunkstyle #fairy #fae #magic #dontmesswithfairies #faecore https://www.instagram.com/p/CNGQey8jd-e/?igshid=1tn39kq4c8nff
29 notes
·
View notes
Video
My brain: so what exactly are we doing with our life...? Me: we are creating steampunk fairy wings! My brain: B...but w h y ?! Me: FUN. #WiP #steampunk #fairy_wings #OoakTreeDolls #HandmadeFromOoakTree https://www.instagram.com/p/CMxiIkejSdJ/?igshid=cbd34lj30fyd
6 notes
·
View notes
Text
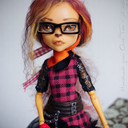
Rainbow Catrina: LGBTQ Pride x Mexican culture
Rainbow Catrina: LGBTQ Pride x Mexican culture

View On WordPress
#ally#Frankie Stein#La Catrina#La Muerte#Latina#LGBTQ#LGBTQ ally#Mexicana#Mexico#Pride#Pride Month#Santa Muerte
201 notes
·
View notes
Photo

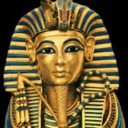
This is the only picture I was able to retrieve after my PC crashed a month ago, taking to the grave both my everyday HDD and the backup drive... 😭😭😭 So half of a year of custom work - several dolls, plushies, miniatures and countless awesome wigs will never see the daylight and be published. I am still a bit demotivated by the whole situation and not sure if I want to post the picture here, as it is not the best quality. Not what I am used to and demand from myself. But on the other hand - it is the only existing photo of one of most requested custom #OLDMonsterHigh characters - Pharaoh. So here it is - Pharaoh and Johnny Spirit. Doubke Trouble. the most hauntastic bad boys Monster High had 😍. Hope ya'll love them as much I loved the process of bringing them to life. #oldmonsterhigh #MonsterHigh #mattel #Pharaoh #royal #JohnnySpirit #badboy #OoakTreeDolls https://www.instagram.com/p/CIQ9sGLjGlV/?igshid=u06qcwedxym0
5 notes
·
View notes
Note
How much would you charge for say a Monster High Johnny Spirit doll?
Hi there :-)
For commissions, pricing etc. please contact me via e-mail [email protected].
Thanks!
1 note
·
View note
Text
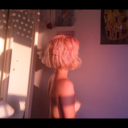
This one is my first ever Disney Animators repaint
– the doll was ordered by US-based cosplayer as a part of her this year’s ComicCon creation.
I am hoping to see more photos of my little one around the web after the event!
The doll was repained exclusively with acrylics for more defined features and this pop of color paints can give.
I wanted her to be obviously cartoon-inspired character, but at the same time not in manga drawing style.
Disney Animator dolls have very defined eye sockets, so it owuldn’t look nice to leave them unpainted just for the sake of recreating manga-style eye shape.
All the other pieces: shoes, hat, dress & accessories and the wig were also created by me.
The hat was especially time-consuming piece – made with worbla, covered with gauze, and then several [close to 15 probably] layers of white paint to resemble look of these popular in mid-century summer hats worn by small children [think Anne from the Green Gables style].
Pokemon: Indigo League. Sabrina. This one is my first ever Disney Animators repaint - the doll was ordered by US-based cosplayer as a part of her this year's ComicCon creation.
0 notes
Text
“No discernible talents. Some enthusiasm for music, but mediocre skill—can hardly even hobble through a Paganini caprice. Utterly useless.”
—The Monocle
Vanya Hargreeves is one of the super-children adopted by Sir Reginald Hargreeves.
Unlike the rest of her siblings, she was not allowed to go into the field or do much of anything that they did.
Designated as Number Seven by Hargreeves, Vanya seemingly displayed no special abilities, leading Sir Reginald to label her as “utterly useless” – she was always told that there was “nothing special” about her.
Vanya pursued a love of music but was considered to have only a mediocre level of skill by her caretaker. As a result, she grew up self-conscious and with little confidence.
Her only real skill, however, was the music; she could play the Violin extremely well – better than anyone could imagine…
If you watched Netflix’s series or read the comic – you know how it all ended.
If not – I’d only say that it ended as you could expect it will when you mix together a child who was left with no love & an abusive parent. Yay bad parenting [but seriously – nope]
Even tho I am not really a fan of the TV series or the comic – when I saw the series trailer I just wanted to make the White Violin – Vanya’s super-powered alter-ego.
She just somehow spoke to my creativity 🙂
The Umbrella Academy: White Violin "No discernible talents. Some enthusiasm for music, but mediocre skill—can hardly even hobble through a Paganini caprice.
5 notes
·
View notes
Text
As it turns out not only me, but lots of other people fell in love with Gamora and baby Groot characters – so when I was asked to create the cutest ever plant and his badass guardian – I happily agreed!
I love recreating my early pieces and see how much I improved and how many new techniques I learned 😛
Since Gamora is an orphan from an alien world, who seeks redemption for her past crimes, she can now show more of her caring side, by looking after baby Groot 😉
I may one day try to make teen Groot and Rocket as another doll set… but it would require some crazy amounts of faux fur and loads of patience in sculpting tiny vines on Groot’s body – it is just whole new level of being crazy customizer I did not achieve yet 😀 😀 😀
As for current baby Groot – he was sculpted from Magic Sculpt resin putty, painted, and decorated with some of my wargaming greenery to bring him into life.
If you were ever wondering about replacing crazy overpriced Apoxie Sculpt – I assure you Magic Sculpt is even better. It is easier to work with, not as hard to knead and way less stretchy.
Also – this project just proves how much wargaming and doll customizing have in common 😀
– more than half of my stash is used in both hobbies!
So if you need great quality stuff, that can be used on dolls, but won’t be overpriced by “doll customizing” label – ask in any wargaming / hobby model store nearby! People there will be more than happy to help you 🙂
Some details of the custom: closeup of Groot, and painted details on combat boots
OOAK Gamora doll by Handmade from Ooak Tree
Would you believe she was a dead corpse doll before? Yay for Ghoulia Yelps transformation 😀
OOAK Gamora doll by Handmade from Ooak Tree
OOAK Gamora doll by Handmade from Ooak Tree
OOAK Gamora doll by Handmade from Ooak Tree
OOAK Gamora doll by Handmade from Ooak Tree
OOAK Gamora doll by Handmade from Ooak Tree
Materials used:
– for Groot: Magic Sculpt, acrylic paints, wargaming terrain greenery
– for Gamora: Ghoulia Yelps doll, airbrush, watercolor pencils for faceup, mixed textiles, hand dyed alpaca wig
ALL PIECES WERE HAND MADE BY ME.
Gamora & baby Groot ver 2.0 As it turns out not only me, but lots of other people fell in love with Gamora and baby Groot characters - so when I was asked to create the cutest ever plant and his badass guardian - I happily agreed!
#baby groot#gamora#gamora doll#groot#guardians of the galaxy#Monster High custom#Monster High repaint#zoe salanda
5 notes
·
View notes
Text
I remember when I first saw the new Tomb Raider in 2013…
– it was SO much different from what I remembered from my teen years!
New Tomb Raider is a prequel to all Lara’s adventures we already saw, a story of how she became our beloved female badass character.
It was really fun to watch her development from brave but a little lost young woman into Lara we all knew and loved in these 3 new games.
So when I was asked to create a doll based on new, younger version of Lara Croft – I was hyped! ❤
To be accurate – the doll is based on Shadow of the Tomb Raider design, but still – new, younger, closer to us – normal mortals, Lara Croft! 😉
In Shadow of the Tomb Raider, Lara must master her skills to be able to survive in a deadly jungle, overcome terrifying tombs, and persevere through her darkest hour. As she races to save the world from a Mayan apocalypse, Lara will be forged into the Tomb Raider she is destined to be.
I spend over 3 weeks only crafting her bow – with lots of different methods and medias I tested what will work best – both in given scale and for the sake of quality.
I made 5 bows from all kinds if materials – from wood to wires to hot glue and resin.
3 of these broke. So I sculpted, sanded and polished remaining two to the best of my abilities… and got the final look that truly resembles Lara’s in-game weapon 🙂
The final version of her bow is made from wire core, wrapped in several layers of epoxy putty, sculpted, sanded and painted. Arrows were made from wood, EVA foam, and epoxy putty.
Clothes – from lots of different textiles, knits, and elastics.
And last but not least – base doll! this time it was DC Super Hero Girls doll.
I LOVE LOVE LOVE THE BODY SHAPE they have ❤
Shadow of Tomb Raider original in-game character design
Some of body blushing details from WiP stage
Lara Croft – Shadow of the Tomb Raider I remember when I first saw the new Tomb Raider in 2013... - it was SO much different from what I remembered from my teen years!
#DC Super Hero Girls#Lara Croft#Lara Croft OOAK doll#Rise of the Tomb ZRaider#Shadows of Tomb Raider
1 note
·
View note
Text
You all probably remember that I am absolutely in love with Mexican beliefs about life after death, and Dia de los Muertos celebration…
– so I just couldn’t reject an order for Mama Imelda custom doll! 😀
It wasn’t an easy task!
First of all – Monster High dolls are discontinued, so finding them becomes more and more difficult. Especially rare and desired dolls – like one needed for this custom!
Second – intricate Calavera designs are both bold in colors and subtle in lines, what makes them difficult to draw in such a small scale.
And on top of other obstacles – textile market is very seasonal.
Most people don’t realize that – there are specific colors and fabrics tied to each season, and it is really hard to find them after their natural season.
For example – pastels, chiffon and batiste cotton are tied to spring – so sewing a boho doll dress in mid-December may be an almost impossible task if you don’t have some textiles already hoarded in hand.
A similar problem occurred with Mama Imelda dress – she is out of season in February!
It’s already way after All Saints day, and way before Easter – both holidays tied to Catholic beliefs and calendar share a similar color scheme with purple as one of most important symbolic colors.
So when I realized I will need a purple fabric for my dress – I was in despair. Luckily my Client was willing to wait a bit longer for proper textile hit the market again.
But it was worth the wait – I found perfect textile and was able to recreate Mama Imelda as close as possible to the original design, keeping in mind her tiny scale 🙂
Even tho Mama Imelda is not one of the main characters of Pixar’s COCO movie – she is for sure one of the most recognizable.
Her fierce character and iron will established her family well being for the next generations.
“Music had torn her family apart, but shoes held them all together. You see, that woman was my great-great-grandmother, Mamá Imelda. She died way before I was born.”
― Miguel, opening narration.
Mama Imelda OOAK doll by Handmade from Ooak Tree
Mama Imelda OOAK doll by Handmade from Ooak Tree
Mama Imelda OOAK doll by Handmade from Ooak Tree
Mama Imelda OOAK doll by Handmade from Ooak Tree
Mama Imelda OOAK doll by Handmade from Ooak Tree
And if you didn’t already saw the movie – here is the trailer – I hope you’ll love it! ❤ 🙂
youtube
Mama Imelda You all probably remember that I am absolutely in love with Mexican beliefs about life after death, and… 362 more words
16 notes
·
View notes
Text
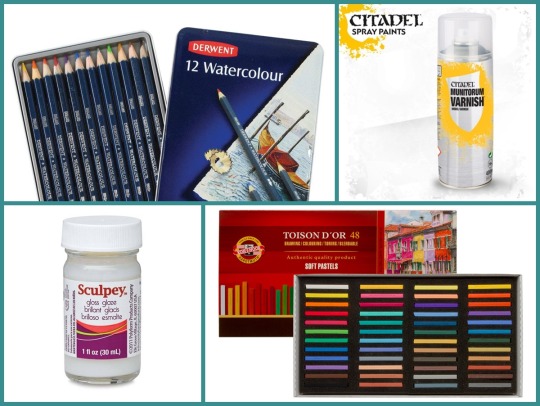
What materials do I use? What to avoid? And some basic rules.
In this post I will show you which materials I use, which are good for dolls & which you should avoid (and why).
There will also be some basic rules about how to use each medium.
If you want to check on how to cut costs on basic materials and what to get to start your first repaint – check my previous post here.
OK, so let’s get started…
SEALANTS
Sealants are a must! You need a layer of something “toothy” over vinyl (or plastic or resin) for your watercolor pencils and pastel dust to stick to.
Sealants used as last layer also make your work waterproof & permanent.
Basic rules of working with sealant
ALWAYS and I mean it – always – use vapor mask!
Even when working with an airbrush.
Other options? You’ll die. Or get cancer. Or asthma. Just wear the goddamn’ mask!
You need a good vapor mask with disposable filters, that are meant for lacquer and chemical vapors. Mine uses A1P2 filter type. Most popular and good brand? 3M.
Those cheap paper masks that make you look like a Dr. house? It’s shit. It doesn’t even protect you from a flu. Buy a good mask.
You either spend like $15 on a mask… or $5000 on a coffin – the choice is yours.
Just be warned.
you need at least 2-3 layers of sealant as a base before you even start to work with your doll. Just think about it as creating a paper from scratch – you need some thickness to it or you’ll just punch a hole in the layer with your sharp pencils.
If you start with basic shading – 2 layers is enough. If you start with drawing some basic lines & shapes – I would recommend 3 layers.
each sealant layer needs time to dry – usually it is 15-30 minutes per layer.
What means you spray the doll – you leave it to dry – you spray the doll – you leave it to dry. There is no safe way to make it faster and working. Sealant compounds must dry and cure properly. Heating it will cause the sealant to get sticky and gooey – you don’t want that.
Some things just need time – this is one of those.
always spray in a ventilated area: either it will be a garage, a basement, your kitchen with kitchen vent/ hood working, or even a room you don’t sleep in, that have more than one window and great air flow.
Spray residue can harm your lungs. Why? Not because it’s radioactive shit that will make you glow in the dark… geez.
Because tiny sealant particles can get to your lungs, stay there, harden, and lesser your lung capacity. It can give you headache and asthma in best case scenario, or evolve into cancer in the worst scenario.
Therefore you always spray in a ventilated area and wear a mask.
spray with good weather. Heat and high humidity can affect how sealant layers dry and cure over time. If it’s too hot – sealant won’t cure. Too cold – it cannot evaporate. Too humid – it cannot dry. It seems like a lot, but besides extreme weather, you can spray almost any day.
If it’s not super hot, no snow blizzards or heavy rains – you’re good to go.
Or you can always spray indoors 🙂
spray from at least one feet /30-40cm distance, in short series.
You rather want to dust your doll in a delicate sealant cloud, than pour it in a heavy rain of sealant. Thin layers. Proper distance. And you’ll be good.
give your can a good shake. Best way is to warm the can in your hands for several minutes and then vigorously shake up and down for 1-2 minutes.
The better you shake your sealant – the thinner and smoother layer you’ll get.
Shaking helps all ingredients to mix well, warm up, and makes pressure inside can higher.
If you learn all the basics of how to properly use sealant – you can be sure no matter what brand you’ll choose – it will always give you great results.
Sealant brands – pros and cons of each
MSC
Most popular among doll artists is MSC aka Mr. Super Clear, but it is also really expensive, sold in tiny cans and really hard to get in some areas.
Why it’s so pricey? Because it’s good. Obviously.
But also because it is produced and imported from Japan – a small country, located on several bigger and smaller islands – so shipping anything from there costs tons of money!
MSC pros:
– creates good tooth to surface
– usually 2 layers are enough as a base
– widely known & tested
– waterproof
MSC cons:
– pricey!
– hard to find in some areas
– sold in small cans
– very vulnerable to air humidity and temperature
– tends to lighten surface
– new Matt version tends to crack over time
See the problem? If you want your doll’s head to perfectly match the body – you must either spray both with MSC or constantly checking shade of the head and blush it with pastels.
CITADEL Munitorum Varnish aka Purity Seal
It’s basically MSC in bigger can 😀
Made in UK. Widely popular among miniature artists and board game players. If you have a nerd friend playing miniature games – he’ll know how to help you get this one!
My sealant of choice ❤
Munitorum Varnish pros:
– big can!
– fair price
– creates good tooth
– less vulnerable to weather conditions
– waterproof
– a bit elastic – won’t crack
Munitorum Varnish cons:
– mostly available in boardgame stores or online
– must be sprayed from a proper distance, or it will tend to cure into a satin finish
– usually needs 3 layers as a base for watercolor pencils
Most of my repaints were made with Munitorum Varnish spray 🙂
Army Painter and Vallejo Spray Matte Sealant
Those are meant to be used with wargame miniatures. They are less popular than other brands. They both give a nice surface to work with watercolor pencils, but colors on them aren’t as bold as with MSC or CITADEL.
The biggest con I have with these two is the packaging – both Army Painter;s and Vallejo’s Sealant cans ended up with broken nozzle just after few uses.
I have no idea what causes it – but the nozzle tends to crack or getting clogged easily.
You can buy spare ones, but I just let them go for other, easier to use for me, media.
Tamiya C matte sealant
It’s also Japanese sealant, same as MSC.
Sold in tiny cans [is everything in Japan tiny? Why? ] and meant to be used with wargame minis.
I used only one can of it, because of it’s horrible smell. Even tho it gave me a good surface to work with, and can was easy to operate – I felt the smell even in my pro mask with filters. And even after 4 hours with wide opened windows in my apartment.
If you have a basement or a garage – you can probably use it with more success.
Hint for drying a doll in humid climate!
For those who are afraid of air humidity in their region, or have a sneaky furry friend as a part of their family – there is a trick to help you save your dolls and let them dry safely!
It’s a drying chamber / dry box.
Basically a plastic box, filled with silica gel packets [those do-not-eat baggies you can find in new pair of shoes or newly bought bag] and some tiny holes poked in a lid.
You can put the doll there and leave it to fully dry in most clean and dry conditions you can get at home. Also – without any fluff particles, fur or dust bunnies that could be stuck to a wet sealant layer.
PAINTS
When it comes to paints I always recommend miniature painting brands.
Why?
Because they are meant to be used with tiny surfaces!
Miniature paints have the smallest pigment particles you can get – it helps you get smoother layers and better coverage than any art grade paint. These paints are also a bit elastic after fully dry so they won’t chip off easily, even from squishy vinyl heads.
They’ve meant to be used with resin wargame and boardgame miniatures – tiny objects that are often used, moved around and thrown to a box without air pillows.
They can really withstand a lot more than your usual acrylics.
The only con I can find is that they need a lot more practice than pencils to achieve same results.
You need to learn how to control your paint thickness and train a steady hand to achieve clean lines and smooth layers.
ALWAYS thin your paints before use! Either with water or paint thinner.
– you need it to get smooth layers without gritty or lumpy texture and to avoid future chipping.
Paints are not meant to give full coverage in one layer, so don’t try to achieve that.
As with any other medium on a tiny surface – work with thin layers, patiently building up color and coverage.
What people usually are afraid of is that paints are sold in small bottles so they won’t last long. But it’s not true!
Thanks to great coverage and small scale we work with you really don’t need much at a time.
You also usually use paint thinned down with water or dedicated thinner in 50/50 ratio.
Paint brands – pros and cons of each
CITADEL [ sometimes called Games Workshop]
It’s a brand of paints that was created for Warhammer miniatures. It’s probably the most popular brand in the miniature artists world.
CITADEL pros:
– variety of colors
– different lines for different special effects, eg. drybrushing, layering etc.
– easy to find both in stores and online
– good coverage
CITADEL cons:
– poor package – it makes paints dry out faster
– thick – it needs acrylic thinner to work properly
– you can feel overwhelmed with how many lines they have for different things
[mostly unnecessary ones, like Dry line for example]
Vallejo
It’s a Spanish brand, very popular among pro painters.
My personal choice ❤
I love all their series, they have clear descriptions, lots of additional mediums, and what’s great – they last forever!
Vallejo pros:
– great package! It’s almost impossible for these to dry out or spill, or use too much of it
– variety of colors – from vibrant Game Color series, Metallic mediums in all colors to Model Color in more toned down shades
– lots of different mediums: metallizers, thinners, shading media etc.
– great quality and coverage
Vallejo cons:
– they are a bit harder to find outside EU, most often available online
– outside of EU they can cost a bit more than Citadel
Army Painter
This is typically a wargame miniature designed brand. Their colors are more earthy and calm, more toned down – meant to be used for skin tones and army uniforms.
If you’re looking something super vibrant – that’s not your type.
They have similar packages to Vallejo –a tiny bottle with dropper.
Tamiya
Japanese brand of paints.
Sold in tiny jars. I must say I don’t like these packages neither working with a bit jelly consistency of these paints.
Big pros of these is their long tradition on market – probably any miniature model store will have Tamiya paints – from wargame stores to these for car or train lovers.
If you want to try these – you aim for Tamiya C series – acrylic based paints.
P3 and Pactra
Similar to Army Painter – these are more into natural shades. I worked with them shortly, because they’re less available where I live. Their coverage isn’t as good as other brands.
Still – they give great smooth layers when dry.
What else do I need to start with paints?
paintbrushes – duuuh! 😉 I recommend getting tiny paintbrushes, often referred to as miniature brushes, in sizes of 1,2, 0, 00, and 000. Preferably sable bristles or nylon.
Nylon brushes are cheaper but last shorter. Sable ones are pricey but properly cleaned will last for years.
paint thinner – I use Vallejo Airbrush Thinner.
Thinner changes surface tension of the paint, which allows you to dilute paint without losing as much coverage as it is when diluting with water. Diluted paint gives you a smoother layer and thinner, sharper lines – eg. when you want to paint eyelashes.
brush cleaner – I use 2in1 hair shampoo with conditioner because it cleans brushes without damaging sable bristles.
Remember to always use lukewarm water for your brushes, never too hot! Hot water will damage your paintbrushes and make paint harden around bristles.
WATERCOLOR PENCILS
You can only use watercolor pencils – normal colored pencils are your worst enemy!
Why?
Usually colored pencil core is a mix of pigments, mineral oils and binder – they are meant to be used on paper and sip into it thanks to addition of mineral oils.
Sadly that’s the main villain – mineral oil, or basically any other oil, will destroy sealant layers.
It will make layers sticky and fragile. It will prevent sealant from curing and your work won’t be permanent or waterproof.
On the other hand – watercolor pencils are made from tightly compressed, clean, water-soluble pigments. Nothing more. Just pigments that can be dissolved by using water.
They are dry, and allow sealant to cure properly.
They will also give you clean, sharp lines.
Please remember, that if you want colors to stand out – you will work with layers over layers over layers. First layer won’t be super-saturated in color, since there isn’t too much pigment yet. You need to seal your work several times and re-draw any details you want to be more saturated. But thanks to working with pencils – it’s an easy and fast process – just remember to always leave sealant layer for recommended time to dry 🙂
Do I need to wet my pencils?
– no, you don’t. But you can.
If you want sharp lines, tiny details and great control over the final result – use your pencils dry.
If you’ll need a bigger surface to be covered in one color, or maybe a smooth transition between colors – use dry pencils on the doll, and then damp brush to smooth em’ out.
Never ever dip pencil core in water cup! It will make the core soft, mushy and fragile.
And you won’t be able to properly sharpen it for days, before all the moisture evaporates.
Watercolor Pencil brands – pros and cons of each
What brands I recommend? What I use?
– I worked with Derwent Watercolor, Derwent Inktense, Kooh-i-Noor Mondeluz and Faber Castel.
Derwent Watercolor
It’s most recommended brand. Easily available online and in stores worldwide.
Derwent offers soft core with great saturation. It is also easy to sharpen.
Derwent Watercolor pros:
– widely available
– great quality
– great saturation
– lots of colors to choose from
– can be bought per piece and in sets
– easy to sharpen
Derwent Watercolor cons:
– fragile core – they sometimes tend to break on the tip if sharpened too much
– high price
– colors on outer shell are often different than what you get when drawing – make sure to have your own swatches on paper!
Derwent Inktense
Those are basically Chinese inks in form of a pencil. They are meant to be used on silk and cotton fabrics wet and are waterproof when dry. They have great color saturation but give slightly translucent layers.
White is their weakest point – you’ll prefer to get it from other brand.
Derwent Inktense pros:
– vivid colors
– easy to sharpen
– can be bought by piece
– widely available
– tougher core
Derwent Inktense cons:
– white gives almost no coverage
– any lighter color will be semi translucent
– pricey
– sadly the outer shell does not match inner core colors as well
Kooh-i-Noor Mondeluz
This is a Czech brand with great tradition [they were funded in 1790] and are probably the cheapest watercolor pencils you can get with one of the best quality pigments.
They offer big palette of colors in very reasonable prices.
Kooh-i-Noor Mondeluz pros:
– they are cheap
– lots of colors to choose from
– very good saturation
– give smooth layers
– white offers great coverage
– outside shell exactly match core color you’ll get
Kooh-i-Noor Mondeluz cons:
– outside of EU mostly available online
– they can only be bought in sets – from 12 to 72 colors
– they are a bit harder to sharpen – you’ll need new, good quality sharpener because of their smooth inner core
Faber-Castel Albrecht Durer Watercolor pencils
Those are thicker than any other pencils you’ll find. They are easy to grip and offer bold colors. And they cost a ton of gold!
Faber-Castel Albrecht Durer pros:
– thick, easy to grip pencils
– bold colors
– easy to dissolve with water if you want smooth color transitions
– can be used with a paintbrush instead of paint
Faber-Castel Albrecht Durer cons:
– thick core won’t give you tiniest details
– very soft
– hard to sharpen
– very pricey
– hard to find
– available only in sets
– lesser choice of colors
– dry and wet color will look totally different
Best thing about making repaint with watercolor pencils is that you don’t need nothing more to start – no paintbrushes, thinners, cups with water etc.
Just the pencils and a sharpener and you’re ready to go!
It’s also the most popular artistic medium – we all had pencils as kids, so we all know how to handle them. There is less space for an error than with paints.
Soft Pastels
– soft pastels, or something else?
Pastels are used for blushing and shading. With bigger than 1:6 dolls or for more advanced artists – pastels are often skipped for an airbrush, but they give this soft, natural look that cannot be achieved by anything else.
Think of them like a girl’s make up 😉
As any other medium pastels need a basic layer of sealant to grip to.
You can use them with normal paintbrushes, Q-tips, cotton swabs or new, unused makeup brushes. I prefer the last option because makeup brushes offer softer bristles than other brushes – that will result in a smooth shading.
You can use the cheapest brushes you’ll find in your local beauty store – they don’t need to be clinically tested or gentle for skin – you’ll use them for dolls only!
Why you need a new set of makeup brushes instead of using your old ones?
Because human skin is oily. Always.
Any type of human skin will be covered in natural sebum, that will over time sip into makeup brush and no washing session can fully clean it from bristles.
And as I mentioned before – you need to avoid any oil near your dolls.
You can use soft pastels sold in blocks, or already ground into dust [eg. Pan Pastel].
You can even get pure mineral pigments.
What brands I recommend? What I use?
– I mostly use Kooh-i-Noor, Stabilo and mineral pigments.
Recommended brands will be same as for watercolor pencils: Derwent, Faber Castel, Prismacolor.
You aim for good quality pastels – soft, highly packed with pigments, with small % of binders and fillers.
How to use soft pastels?
you can use them as they are – simply dab your makeup brush over pastel block to get some pigment
you can grind it on sandpaper – 400 or finer grit is best
you can scratch some dust with craft knife over a paper
you can be lazy and buy already ground pastels or pigments 😀
Mineral pigments instead of soft pastels?
I often use pure mineral pigments, that I got for cheap in local eco beauty store.
If you want ever to use a human make up product on dolls – you must always check if what you get is a pure mineral product without silicones, parabens or any kind of oils.
Because otherwise – as you already know – you will destroy your doll.
No, Rhonda, your eye shadow set won’t work!
No, they are no good, I don’t care how much you’ve paid for them.
Pure mineral pigments are often offered by brands that specialize in mineral make up, like Annabelle Minerals etc.
They can also be bought on Etsy from small manufacturers or in local eco beauty stores.
They are already finely ground, with no additional fillers, so they offer bold vivid colors with great coverage and smooth layering.
You will also often get mineral shimmers and glitters, that are fine enough to be used on doll eye make up.
Read the labels, ask seller about full list of ingredients – and you’ll be good 🙂
And those are mineral pigments I have from my local store:
OTHER GOODIES
– what you can use, and what should be avoided at any cost?
What else you can use for doll faceup?
– any kind of textile glue to attach eyelashes
– human grade eyelashes
– any craft glitters
– 3D paints
– any acrylic based inks and contour paints
– POSCA acrylic markers
– nail art stickers, rhinestones or coloring dust
– decals –but you’ll need to seal them at least 2 times after they are dry!
What to avoid?
– anything with oils – either mineral or natural
– human makeup products: powders, eye shadows, eyeliners, body shimmers etc.
– normal colored pencils
– oil pastels
– alcohol-based inks – they will sip into vinyl and destroy it
– Sharpies!!! no, they are not good, neither for faces or for hair – they will bleed over time
– permanent markers
– Mod Podge instead of gloss or varnish – it will get sticky and yellow over time.
And no amount of sealant will save it.
– nail polish – yes, it will hold to sealed vinyl head, but it’s too stiff when dry and will chip off easily
– gouache paints or caulk paints – they will chip off
– any cheap art grade spray sealant / fixative – they will get sticky on vinyl and provide no tooth
If you are interested on my notes about dyeing doll hair – check this note here.
Doll LAB: recommended materials. Tips & tricks. What materials do I use? What to avoid? And some basic rules. In this post I will show you which materials I use, which are good for dolls & which you should avoid (and why).
#acrylic paints#derwent#doll repaint#doll sealant#MSC#Munitorum Varnish#Purity Seal#recommended sealant#sealant#watercolor pencils#what sealant#what sealant to use on doll
136 notes
·
View notes
Text
Doll LAB: what materials you need to start a repaint?
Doll LAB: what materials you need to start a repaint?
A simple answer is – good quality ones!
It’s not always as simple as “higher price – better quality”, but basically any well known, widely used & tested brand is a better choice than random no-name medium grabbed at a local craft store, because “it was cheaper than XYZ person on YouTube uses and I didn’t have time for research!”.
Often better quality goes with a higher price, but there are…
View On WordPress
#acrylic paints#CITADEL#derwent#inktense#MSC#pencils#Purity Seal#repaint matierials#sealant#watercolor pencils#what to use for repaints
23 notes
·
View notes
Text
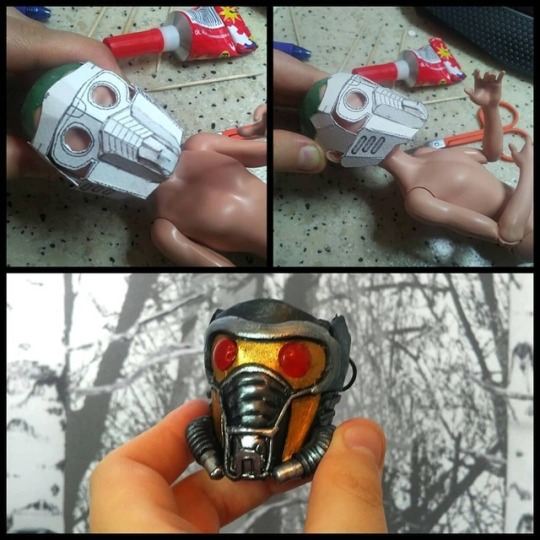
Okay, it’s officially one of my hardest, most complex custom works ever, alongside La Muerte.
I’ve spent weeks figuring out how to make all the pieces: from clothes to coat, boots, helmet, walkman, and headphones…
I used materials you’d never suppose can be used either for a doll or for what they’ve become:
– buttons and hairpin for headphones,
– tiny clockworks for walkman’s tape mechanism etc.
His helmet had to not only look good, but also being safe to put on repainted doll’s face without scratching it, and as close to original as possible, keeping in mind given scale.
After all the research and test runs I’ve decided on making a “skeleton” out of cardboard and paper mache, and then covering it with craft foam and Apoxie Sculpt.
What started as a tiny origami ended as great movie prop 😀

You wouldn’t believe it’s mostly paper, would you? I also added a short clip on my IG to showcase how nicely it catches the light.
As for the doll itself – I used Deuce Gorgon and gave him brushed acrylic yarn hair.
Seriously – this is the best doll hair fiber ever if you want something natural-looking and in scale.
It was the first time I made beard on a doll and I must say it seemed scarier than it actually was 😀 😀 😀
Fun fact: I used my Friend’s photos as a reference for the barber work, therefore, my Star Lord is kind of mix between Chris Pratt and anonymous handsome Polish guy :3
And here is the final result:
Peter Quill / Star Lord Okay, it's officially one of my hardest, most complex custom works ever, alongside La Muerte.
47 notes
·
View notes
Photo
CRAZY LOT OF WORK but I am so proud of how it turned out ! 😍😍😍 #starlord #starlordhelmet #starlordcosplay #guardiansofthegalaxy #ooakdoll #WiP https://www.instagram.com/p/BsvPy4ADQMH/?utm_source=ig_tumblr_share&igshid=12m9t59fkq7rb
14 notes
·
View notes
Photo
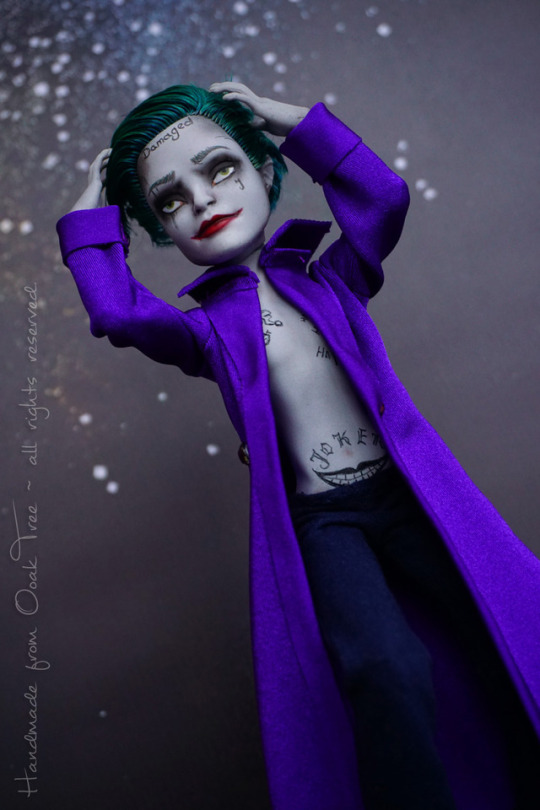


We'll be in a bit darker than usual themes with my dolls... I do not get dark, edgy, projects often, so I always enjoy making them...
And it turned out I had 3 full customs in more edgy style one by one :3
Some time ago I was asked to once again recreate Suicide Squad Joker, and this is the result of my work :-)
#jared leto joker#jared leto#Suicide Squad#ooaktreedolls#handmade from ooak tree#ooak tree dolls#monster high repaint#monster high custom
78 notes
·
View notes