mat-fab
MAT-FAB
DESIGN-FABRICATION + DIGITAL CRAFT RESEARCH STUDIO (est 2010)
203 posts
Don't wanna be here? Send us removal request.
Last Seen Blogs

rossygabby
💖POEMAS SIN CONTROL💖

caffeinesystem
These are just choices

club-pendejo
El club de los pendejos.

flutteringfable
fable

blanquii7
✨Blanqui7
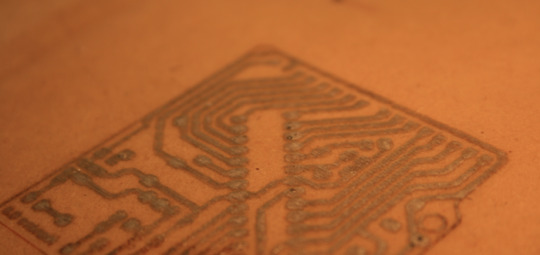
Photo


New software algorithms reduce 3D printing time and waste ~ 3ders.org
Clever Support: Efficient Support Structure Generation for Digital Fabrication PDF
24 notes
·
View notes
Video
Eighth-grader Quin uses his passion for electronics to teach fellow students about 3D printing, arduinos, and other hands-on lessons in STEM skills
~ Edutopia
youtube
20 notes
·
View notes
Link
So as Halloween nears, you crazy kids are trying to think up some fun ideas for party favors and food, right?
Dangerous Popsicles!
Instructables user, wei wei, shares her design and instructions for ‘Dangerous Popsicles‘—which she made in a variety of shapes, including spiky cacti and a whole family of different ideas for molds you may or may not dare to try! Using an Instructable that is beginner-friendly, San Francisco-based wei wei shares her process, which is a combination of basic 3D design, 3D printing, and both one-part and two-part mold making techniques, with silicone casting.
Instructable for Spiky Cactus Popsicles, designed in Rhino.
Wei wei points out that even if you don’t own a 3D printer yourself, you can easily have your model printed at a third-party 3D printing company likeShapeways or Materialise, where you can upload your design and have the mold prototype printed out for you to take to the next step. Wei Wei outsourced her design to an a Stratasys Objet 3d printer. First though, you need your design. Wei wei designed her’s in Rhino, but there are plenty of free 3D modeling tools out there that are available, which offer a lot of opportunity to explore and practice design.
Wei wei points out that the shape of the model is “very symmetrical, with a clear front and back, where the spikes are.” Since this is for a two-part mold, you will need to consider where the parting line is, with this one having a center line between the front and the back. Once that’s done, you’ll need to either use your 3D printer to print out the original, or arrange to have that done for you.
Once you have the original shape for creating the mold, you’ll need to gather your materials. Make sure everything is in place and your environment is prepared before you start, as you will want to focus on the materials and not be running about looking for the “ingredients.” For more details on all the materials and each step, be sure to click here.
For creating the mold, you’ll need silicone casting materials and tools:
Silicone (for this project, wei wei used Sorta Clear 40, which is good for food-safe applications)
Mixing tools
Mold release
Molding clay
Vacuum chamber
Gloves and protection for work surface
Following the instructions of wei wei’s Instructable, you will then need to:
Prepare the original for casting.
Embed the registration keys so that the two parts of the mold fit together just right.
Perform silicone mixing and degassing.
Pour the first half of the mold, and then the second.
And last, after cleaning the mold thoroughly and wiping it dry, align the two parts and stick them together, securing the mold with rubber bands. Get ready to cast your popsicles with whichever popsicle recipe you like, put everything in the freezer and wait 24 hours. Wei wei also included information on dealing with air bubbles during the casting process, as well as how she customized a plastic piece to hold the stick in place.
While the spiky cactus is the perfect design to start with, you can dream up all sorts of shapes and concepts as wei wei did with cacti, terrifying ‘viruses’, and all sorts of unusual, colorful shapes. Now that you’ve made your own mold, you will have hundreds of popsicles to enjoy in the future. This is a clever idea to put a smile on everyone’s lips, along with a cool, sweet treat. It’s also a great way to get an introduction to 3D printing and the casting of molds.
Current thinking is that with the advent of 3D printing and so many creative ideas for molds, one day it will be more normal for consumers to run to their 3D printers than to a store downtown. Making your own popsicle molds definitely falls in line with that concept—and what better time to start trying something so simple and fun than right before Halloween when arts and crafts abound, and “dangerous popsicles” sound perfect for your little ghosts and ghouls to gobble up at a party.
Have you tried making any food-safe 3D-printed molds, or have you made any Instructables of your own? Tell us about your experiences in the 3D printed Dangerous Popsicle forum thread at 3DPB.com.
via: 3DPrint.com
5 notes
·
View notes
Photo
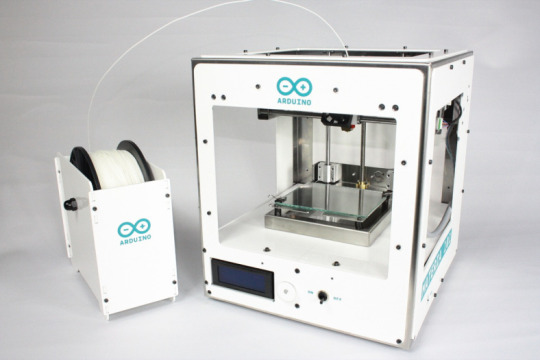
Materia 101 = Arduino + Sharebot
"This weekend, Arduino founder Massimo Banzi announced on an Italian television show called ‘Che tempo che fa’, that his company would be entering the 3D printing space via a collaborative effort with Italian 3D printer manufacturer Sharebot. For those who are unaware, Arduino is the most commonly used open source hardware platform. It is used by both amateurs and professionals to create interactive electronic projects. Along with the various electronic boards offered by the platform, there is also a free Arduino software which can be used to program those boards, as well as a thriving and helpful community.
The electronics board will be compatible with Arduino Mega 2560 with open source firmware. The entire printer is open source and is targeted towards collective use, such as in classrooms, maker spaces, and cooperative work environments.
Specs:
Printer Size: 310 x 330 x 350 mm
Printer Weight: 10 kg
Printing Technology: Fused Filament Fabrication (FFF)
Build Volume: 140 x 100 x 100 mm +/- 5mm
X and Y Resolution: 0.06 mm
Z Resolution: 0.0025 mm
Filament Type and Size: 1.75 mm, PLA.
Experimented filaments: Cristal Flex, PLA Thermosense, Thermoplastic Polyuretane (TPU), PET, PLA Sand, PLA Flex
LCD display 20 x 4 with encoder menu”
~ 3dprint.com
50 notes
·
View notes
Video
youtube
MorpHex at Maker Faire Trondheim 2014
9 notes
·
View notes
Link
The latest news from Made in Space in collaboration with NASA is that the programme is ahead of schedule, and the 3D printer is all set to head into orbit three months earlier than planned. This coming August in fact. The launch of the 3D printer was originally scheduled for November 2014.
The 3D printer in question has reportedly passed all of the checks required by NASA, conducted at the agency’s Marshall Space Flight Center in Alabama over 20,000+ hours. The results have been pleasing and have met all of the requirements for use aboard the International Space Station.
According to Niki Werkheiser, the NASA 3D Print project manager: “NASA was able to provide key guidance on how to best comply with strenuous space certification, safety and operational requirements, and Made In Space excelled at incorporating that insight into the design. As a result, the hardware passed testing with flying colors. Made In Space now has first-hand experience of the full ‘A-to-Z’ process for designing, building and testing hardware for spaceflight.”
As a result the 3D printer will take its place aboard the next cargo mission heading to the Space Station, slated for August but no actual date is yet confirmed, by the private company SpaceX.
“The ability to manufacture on demand in space is going to be a paradigm shift for the way development, research and exploration happen in space,” said Michael Snyder, lead engineer and director of R&D for Made In Space.
The plan is to install the 3D printer within the space station’s Microgravity Science Glovebox (MSG), where its first job will be to 3D print a set of test parts and tools that will subsequently be sent back to Earth for analysis and to ensure final qualification of the process in its intended environment. If this final testing proves successful a permanent 3D printer will be installed in-situ aboard the space station.
“Passing the final tests and shipping the hardware are significant milestones, but they ultimately lead to an even more meaningful one — the capability for anyone on Earth to have the option of printing objects on the ISS,” said Made In Space CEO Aaron Kemmer. “This is unprecedented access to space.”
Source: 3D Printing Industry
Author:
Rachel is Editor-in-Chief of 3DPI and manages the content of the site and the writing team. With a 20-year history of writing and editing in the 3D printing sector, she brings a wealth of experience to 3DPI including the ability to balance reality with the exciting potential that this technology presents. Rachel is a BA (Honors) graduate in English.
3 notes
·
View notes
Link
So you want to print 3D designs, but you don’t own a 3D printer and you think it might be hard to design and build what you want? Well, as of today, it’s faster and easier than ever before for everyone to 3D print. Today marks the launch of the 3D Hubs 3D API, an enterprise-grade print network…
5 notes
·
View notes
Photo
Printrbot GO Family - Small, Medium, and Large
Specs and Information:
Go Small - $1299
Single extruder
8” x 6” x 6” build volume
12mm bars for X, Y, Z
GT2 belts/pulleys
fits in a Pelican 1550 case perfectly
Raspberry Pi loaded with Octoprint (control the Printrbot over WiFi)
Folding design, optional covers and handle included
Outside case dimensions (without handle & covers)
Fully Assembled by a Printrbot Assembly Professional
Go Medium - $1499
Dual extruder (includes ExtrudrBoard)
16” x 8” x 8” build volume !
12mm bars for X, Y, Z
GT2 belts/pulleys
ATX power supply inside case
Optional: Ready to add battery and print unplugged
Raspberry Pi loaded with Octoprint (control the Printrbot over WiFi)
Folding design, optional covers and handle included
Outside case dimensions (without handle & covers)
Fully Assembled by a Printrbot Assembly Professional
Go Large - $1699
Triple extruder (includes ExtrudrBoard)
24” x 12”x 12” build volume !!
12mm bars for X, Y, Z
GT2 belts/pulleys
ATX power supply inside case
Optional: Ready to add battery and print unplugged
Raspberry Pi loaded with Octoprint (control the Printrbot over WiFi)
Folding design, optional covers and handle included
Outside case dimensions (without handle & covers)
Fully Assembled by a Printrbot Assembly Professional
~ Printrbot Newsletter
18 notes
·
View notes
Text
3D PRINTING: Classic American Motorcycle Brand Indian Motorcycle Resurrected With 3D Printing
BY SCOTT J GRUNEWALD ON FRI, MARCH 14, 2014
Polaris Industries, the manufacturers of Victory Motorcycles, is revitalizing the iconic Indian Motorcycle brand, and their CEO Scott Wine credits 3D printing with allowing him to bring America’s first motorcycle back to market. Late last year he spoke to Bloomberg TV about how integral 3D printing was to that process.
Over a hundred years ago America got its first motorcycle, and it was an Indian Motorcycle. While the brand has always been sought after and popular, at one time they were the largest manufacturer of motorcycles in the world. Unfortunately during World War 2 they had devoted so many of their resources to producing motorcycles for the army that their bikes became extremely difficult to get in the states. Many of their dealers abandoned them, and this allowed their nearest competitor Harley Davidson to overtake their market share, a blow that they would never recover from. Indian Motorcycle Manufacturing Company and their iconic bikes disappeared in 1953 due to bankruptcy.
While the name was purchased by multiple companies and slapped on bikes for decades the brand had never even flirted with its previous success. In 2011 when Polaris Industries purchased the rights to the brand that all changed. Already well-versed in creating highly sought after and extremely high quality motorcycles, they managed to get done what no one had been able to do previously, reinvent the Indian brand for a modern market, without losing what was special about it in the first place.
Wine used every tool available to him to re-invent the Indian. In the Bloomberg video he explains that when the first motorcycle came out it was leading edge technology, so while trying to revitalize the brand he used the best modern technology available to him. When designing the new bikes, standard clay sculptors were employed, but their work was aided by in-house Stratasys 3D printers. This ability to rapid prototype just about every part of the motorcycle while they designed was integral to the speed that the new bikes were brought to market.
“We actually built an entire bike using 3D printing and rapid prototyping.” said Wine “We have – I would argue – the best clay designers in the world, and we went from their clay design to a bike that consumers could see in a showroom with the fit and finish that you would expect in three months”
If they had used the traditional designing and tooling techniques that were the only available options as little as ten years ago the prototype would have taken over 15 months to complete. By chopping a full year off of the development cycle Polaris was able to bring three new models to market, not just one.
While I lack the balance to ride a motorcycle myself, seriously my first time on a bike ended with me falling on a BBQ and burning a grill pattern onto my backside, the new Indian Motorcycles are a whole lot of fun to look at. In a time when venture capitalists and investments bankers run so many corporations and they’ve stripped so many iconic American brands of their originality in order to make a quick buck, it’s nice to see a company treating a part of American history with a little bit of respect. While the bikes were debuted last summer, they are expected to go on sale in 200 dealers within the next few months. Head on over to their official site to see more pictures and videos of the new Indian Motorcycles in action.
Source: Stratasys Blog
0 notes
Text
TOOLING: All-Metal Printerbot Simple


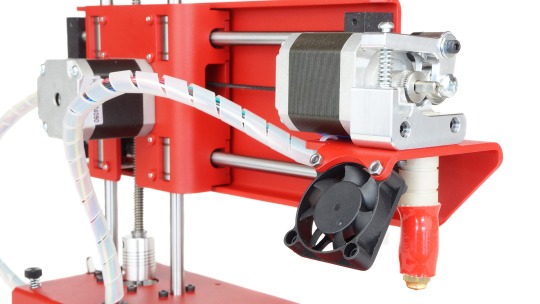
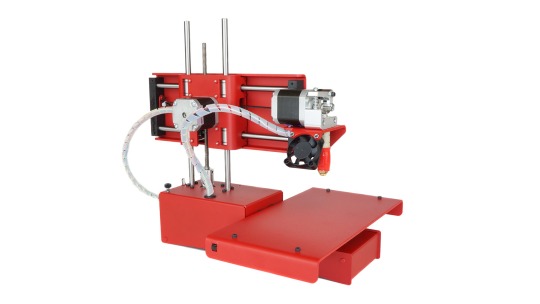
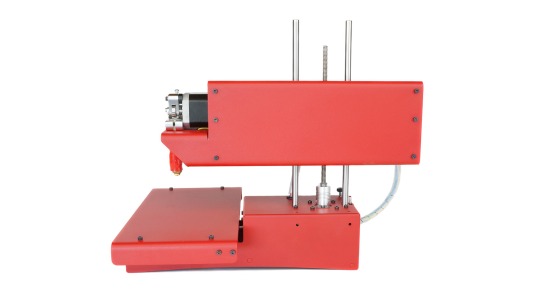
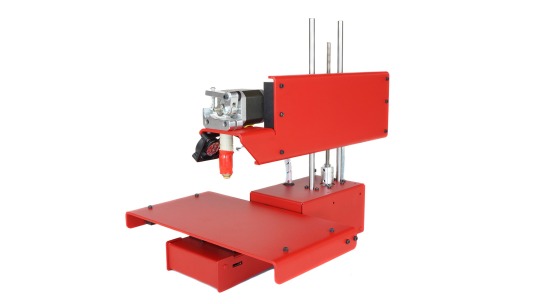
Specs:
Price: TBD
Release Date: 2014
Build Volume: 6″ x 6″ x 6″ (150mm x 150mm x 150mm)
Print Resolution: 100 Microns
Filament: 1.75 PLA
Hot End: 1.75 Ubis Hot End with 0.4mm Nozzle
Construction: Steel and Aluminum Body
Finish: Powder Coated
Print Bed: Semi-Auto Leveling via Software
Belt: GT2
Pulley: Aluminum
Rods: 12mm
Product Weight: 8 lbs
Print Software: Compatible with Repetier Host and Pronterface
More info: makezine.com
(via personalfactory)
1 note
·
View note
Photo
3D Printing is Now the Future
Source: computersciencehub.org

32 notes
·
View notes
Photo


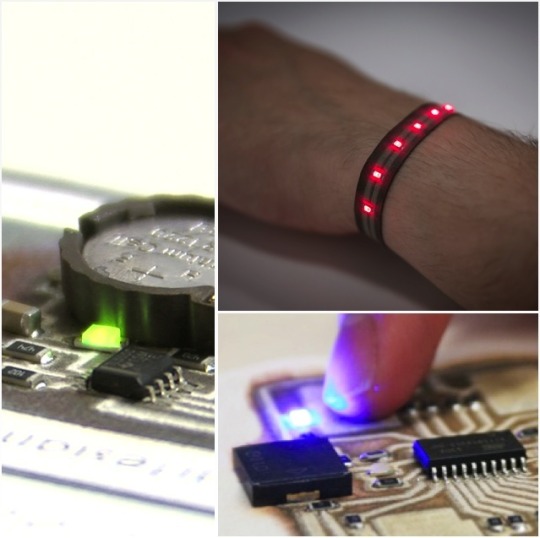


The EX¹ - rapid 3D printing of circuit boards
“In a carefully timed and precisely calculated move, the Australian Cartesian Co. has launched its Kickstarter campaign today, at 2pm GMT, introducing The EX¹ 3D printer. And this is most certainly NOT just another 3D printer. The EX¹ has been developed to print electronics and circuit boards as quickly and as easily as printing a photo, according to the company.
So when I say ‘carefully timed’, this is due to the fact that the Cartesian Co. has coordinated the launch of its campaign to coincide with the 2-year anniversary of an article in Wired that said that ‘within two years 3D printers would print electronic circuits.’
The EX¹ is a desktop device, utilising inkjet technology to print in elemental silver on a range of different substrates in the same way an inkjet printer does. It claims to make the printing of complex circuits simple and quick for a range of applications — from a gamepad remote control for example, to wearable technology.
There is a real barrier into the world of complex circuitry, and Cartesian Co. wants to make electronics accessible for the every day person - giving them the power to bring their ideas to life through creativity and experimentation. We’ve been thinking about how to design a printer that creates circuit boards for four years now and developed the EX¹ over the last 9 months, and we hope the Kickstarter community will feel as passionate about the project as we do. ~ Ariel Briner (Co Founder and Head of Electrical Design at Cartesian)
~ 3dprintingindustry.com
Currently:
140 Backers
$69,163 pledged of $30,000 goal
28 days to go
Prices starting from $899 for Early Bird KIT (all gone) Now you can get it for $1,499 or more :)
personalfactory:
This device is able to make a little earthquake on rapid prototyping and 3d printing markets. On one hand you have to know a little bit about preparing circuit boards and electronics to create useful stuff. On the other one number of applications for this technology seems to be endless and because of that army of amateurs will start tinkering and learning new skills just to create their dreamed projects. As you can see on above pictures this technology can’t create whole electronic devices (for example functioning cellphone) but… now it will be much easier and faster to test the idea of our prototype. I am very excited about development of this project! Great job Cartesian Team!
45 notes
·
View notes
Link
Source: Smithsonian | Feb 13, 2013 | Design Decoded
Gramazio & Kohler, Flight Assembled Architecdture, FRAC Centre in Orléans, France, 2011-2012 (image: François Lauginie via Gramazio & Kohler)
Drones can’t just destroy, they can create. Although the military uses of drones are widely debated, less discussed are their potentially revolutionary civilian implications. They aren’t yet widespread, but drones are being used by hobbyists, photographers, farmers, ranchers, and they may even herald an entirely new type of architecture. Last year, Swiss architectsGramazio & Kohler, in collaboration with Raffaello D’Andrea, developed “Flight Assembled Architecture” – an experimental concept structure that employed small, unmanned aerial vehicles programmed to build.
Flight Assembled Architecture/Architectures volantes from FRAC Centre on Vimeo.
Created as an installation for the FRAC Centre in Orléans, France in early 2012, the project models a speculative construction system that integrates robotics, digital fabrication, engineering, and design. Several small robotic “quadrocopters” lift 1,500 foam blocks into a complex cylindrical tower standing more than six meters high. While these miniature construction drones act, in part, according to a set of pre-programmed parameters, they also operate semi-autonomously; they’re capable of communicating with one another and independently sensing the height of the the tower to place their block accordingly. The tower is a model for a speculative future habitat that would stand more than 600 meters tall and house 30,000 inhabitants.
Gramazio & Kohler, Flight Assembled Architecdture, FRAC Centre in Orléans, France, 2011-2012 (image: François Lauginie via Gramazio & Kohler)
It makes sense to illustrate such a revolutionary concept with a skyscraper – after all, the skyscraper wouldn’t be possible if architects and engineers hadn’t embraced technologies such as steel construction and elevators. Construction drones are the bleeding edge of speculative building technology and they’re perfectly designed to create high-rise buildings in urban areas where construction can be incredibly difficult and costly. As Kohler noted in an essay for the architectural journal Log, “the conditions of aerial robotic construction are entirely liberated from the bottom-up accessibility of material, man, or [existing] machine.” These robots can create buildings without erecting scaffolding or using cranes. Drone-built designs aren’t beholden to current construction limitations and their use opens up a new possibility of architectural forms.
A rendering of the concept building created by Flight Assembled Architecture (image: Gramzio & Kohler)
Of course, if Gramazio & Kohler’s model were built at full-scale in the real-world, much larger robots would have to be used, and building modules would have to be designed to fit the scale and weight of the construction drones. Shipping containers, which have been widely used in architecture for some time, seem like the most convenient option, but to use containers is to limit possibility. Thinking longer term, it’s an inefficient appropriation of existing objects and infrastructure, whereas Gramazio & Kohler drones suggest a profound rethinking of building materials and assembly. Kohler writes, “As the load capacity of flying machines is limited and the machines’ agility directly depends on their load, the development of high-performance lightweight materials systems both aerially transportable and robotically deployed will be necessary.” The architects call this a “high resolution” architecture – smaller, denser, carefully calibrated, and incredibly precise.
A helicopter carries a Fuller-designed geodesic dome, 1954 (image: Buckminster Fuller, Inventory of World Resources: Human Trends and Needs)
Though it sounds like something from a sci-fi future, there is precedent for air-lifted architecture. American polymath and pioneer of the geodesic dome, Buckminster Fuller developed the “Dymaxion House” in the 1920s – an inexpensive, mass-producible architecture that could be transported by helicopter and lowered onto a construction site, requiring only minimal service to install. Fuller also proposed a swords-to-ploughshares appropriation of military equipment and infrastructure to produce and construct his designs. “Flight Assembled Architecture” suggests that the same could be done with drones.
Buckminster Fuller and others like him may have provided spiritual inspiration for the project, but the programmability and versatility of flying robots presents a world of possibilities unimagined during Fuller’s time (actually, he probably did imagine them, the man was a genius). Construction drones could even be programmed with different “skills” or built specifically to perform a particular task; they could work in areas that aren’t fit for humans, aiding in disaster relief or other emergencies.
A rendering of the concept building created by Flight Assembled Architecture (image: Gramzio & Kohler)
Trailers housing remote drone pilots on a military base (image: NOVA, “Rise of the Drones”)
For better or worse, drones have captured the public imagination more than any other weapon since the nuclear bomb. Harnessing the power of the atom enabled us to level cities, but it also gave us a new way to power them. Like the Bomb, the technology behind unmanned aerial vehicles can be used to destroy or it can be used to build. Today, the architecture of drones is limited to the portable, retrofitted trailers and shipping containers used by remote pilots. Tomorrow, however, drones may serve the architect instead of the solider, and herald an entirely new style of aerial architecture.
Read more: http://blogs.smithsonianmag.com/design/2013/02/the-drones-of-the-future-may-build-skyscrapers/#ixzz2kZOK3VxX
Follow us: @SmithsonianMag on Twitter
#Gramzio#Gramzio Kohler#Fabio Gramazio & Matthias Kohler#drones#design#architecture#SmithsonianMag#decoded#buckminister#fuller
4 notes
·
View notes
Photo


" This year’s TEDxKraków conference will be followed by an entire weekend of making, appropriately titled Maker Weekend (26-27.10.2013). The two-day event will feature workshops by such groups and organizations as Alvernia Studios, Untitled Kingdom, WebMuses, Code for Poland and our very own speakers such as Trine Hahnemann’s bread baking workshop and Gever Tulley’s Tinkering workshop. Well today we have published the full schedule and registration links on our website, so check it out, sign up and start making! Click here: Maker Weekend.” ~ tedxkrakow.com
"The workshops cover all sorts of subjects, so everyone should find something that interests them. See below what kind of workshops, meetings and open events have we prepared for you:
Alvernia Studios – film workshops
Code for Poland – programming workshops
Materialination - 3D printing workshops
Bread Baking Workshop
Czysta ReForma Theatre - Courage and performance workshop
Untitled Kingdom UIKitDynamics – Liven up your interface!
Untitled Kingdom - 3D design workshops
Open Pitch Swarm – Hive53
Grupa LASEM
TINKERING WORKSHOP – Tinkering Workshops for Children and Grandparents
LUKKA – Creative Making Workshop - build a MOBILE with us
Illustration and Photography Workshop: Portraits
PanieiPanowie – Vocal Workshop
Workshop of the Art of Brewing Coffee with a Finjan
WebMuses – Responsive Design Workshop
Najedzeni Fest – Culinary Workshops
Krakowski Teatr Tańca – Premiere of the Show “Polyamory”
~ http://tedxkrakow.com/en/events/49-MakerWeekend
4 notes
·
View notes
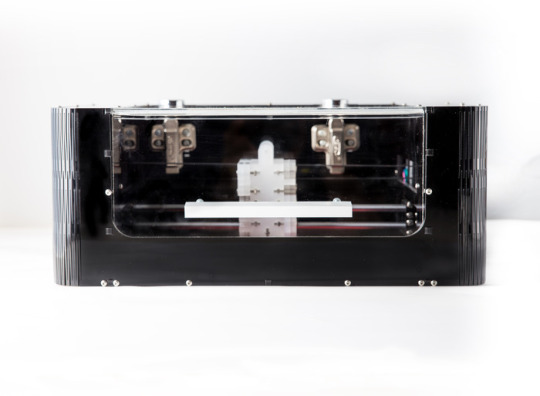
Photo


"On Oct.4, 2013 ALT Design launches its new Atom 3D printer on ZecZec crowdfunding platform, Taiwan’s Kickstarter. The Atom had an original target of NT$600,000 ($20,400), in first four days the Atom raised more than NT$900,000 and reached 150% of its goal.
Specs:
Printing technology: Fused Filament Fabrication (FFF / FDM)
18cm + diameter x 33 cm + high build volume (8000 cm3 or more)
Precision: min 0.05mm / max 0.3mm
Filament: Ø 1.75mm PLA
Print speed: 100 mm / s
Nozzle moving speed (max): 300 mm / s
Machine Dimensions: 37 x 42 x 76 cm
Power Supply: AC 100 - 240V, ~ 2 amps, 50-60 Hz
Power Requirements: 12V DC @ 5 amps
Ports: USB, SD Card
Software: Repetier Host
Weight: 8kg
NEMA17 1.8° step angle 1/16 micro-stepping”
~ 3ders.org
personalfactory: New nice looking delta with basic functions… unfortunately without heated bed :( Looks sturdy and it’s the main advantage. Construction of cheapskate consist of only 3 bearings is much lighter. It is almost entirely original Kossel. I am wondering if it is open-source?
16 notes
·
View notes

Text
RESEARCH: Silkworm Pavilion - MIT Media Lab
News: researchers at MIT Media Lab's Mediated Matter group have created a dome from silk fibres woven by a robotic arm, which was then finished by live silkworms (+ movie).
The project is intended to explore how digital and biological fabrication techniques can be combined to produce architectural structures.
The team programmed the robotic arm to imitate the way a silkworm deposits silk to build its cocoon. The arm then deposited a kilometre-long silk fibre across flat polygonal metal frames to create 26 panels. These panels were arranged to form a dome, which was suspended from the ceiling.
6500 live silkworms were then placed on the structure. As the caterpillars crawled over the dome, they deposited silk fibres and completed the structure.
The Silk Pavilion was designed and constructed at the MIT Media Lab as part of a research project to explore ways of overcoming the existing limitations of additive manufacturing at architectural scales.
Mediated Matter group director Neri Oxman believes that by studying natural processes such as the way silkworms build their cocoons, scientists can develop ways of "printing" architectural structures more efficiently than can be achieved by current 3D printing technologies.
“In traditional 3D printing the gantry-size poses an obvious limitation; it is defined by three axes and typically requires the use of support material, both of which are limiting for the designer who wishes to print in larger scales and achieve structural and material complexity,” Oxman told us earlier this year. “Once we place a 3D printing head on a robotic arm, we free up these limitations almost instantly."
Oxman's team attached tiny magnets to the heads of silkworms so they could motion-track their movements. They used this data to programme the robotic arm to deposit silk on the metal frames.
“We've managed to motion-track the silkworm’s movement as it is building its cocoon,” said Oxman. “Our aim was to translate the motion-capture data into a 3D printer connected to a robotic arm in order to study the biological structure in larger scales.”
Their research also showed that the worms were attracted to darker areas, so fibres were laid more sparsely on the sunnier south and east elevations of the dome.
See our story from March this year about the research behind the Silk Pavilion. Oxman's digital fabrication work features in an article about 3D printing in architecture from our one-off publication Print Shift.
Other Dezeen stories about silk include this 2007 project by Design Academy Eindhoven graduate Elsbeth joy Nielsen, who used silkworms to weave flat silk panels, from which she made a scarf, lampshade and bath bag.
Last year, Simon Peers and Nicholas Godley wove a golden cape from silk extracted from a million wild spiders.
See more pavilion design »
See more design from MIT »
Mediated Matter Group sent us the following information:
Silk Pavilion - Mediated Matter Group at MIT Media Lab
The Silk Pavilion explores the relationship between digital and biological fabrication on product and architectural scales. The primary structure was created of 26 polygonal panels made of silk threads laid down by a CNC (Computer-Numerically Controlled) machine. Inspired by the silkworm’s ability to generate a 3D cocoon out of a single multi-property silk thread (1km in length), the overall geometry of the pavilion was created using an algorithm that assigns a single continuous thread across patches providing various degrees of density.
Overall density variation was informed by the silkworm itself deployed as a biological “printer” in the creation of a secondary structure. A swarm of 6,500 silkworms was positioned at the bottom rim of the scaffold spinning flat nonwoven silk patches as they locally reinforced the gaps across CNC-deposited silk fibers. Following their pupation stage the silkworms were removed. Resulting moths can produce 1.5 million eggs with the potential of constructing up to 250 additional pavilions.
Affected by spatial and environmental conditions including geometrical density as well as variation in natural light and heat, the silkworms were found to migrate to darker and denser areas. Desired light effects informed variations in material organisation across the surface area of the structure. A season-specific sun path diagram mapping solar trajectories in space dictated the location, size and density of apertures within the structure in order to lock-in rays of natural light entering the pavilion from South and East elevations. The central oculus is located against the East elevation and may be used as a sun-clock.
Parallel basic research explored the use of silkworms as entities that can “compute” material organization based on external performance criteria. Specifically, we explored the formation of non-woven fiber structures generated by the silkworms as a computational schema for determining shape and material optimisation of fiber-based surface structures.
Research and Design by the Mediated Matter Group at the MIT Media Lab in collaboration with Prof. Fiorenzo Omenetto (TUFTS University) and Dr. James Weaver (WYSS Institute, Harvard University). Mediated Matter researchers include Markus Kayser, Jared Laucks, Carlos David Gonzalez Uribe, Jorge Duro-Royo and Neri Oxman (Director).
Source: Dezeen
#MIT#Mediated Matter Group#MIT Media Lab#architecture#design#organic#organic matter#silk#silkworms#biodegradable#fiber#innovation#biology
1 note
·
View note