
indiesewsthings
historical costuming adventures
indie | she/her | chaotic historical costuming and dress history
4 posts
Don't wanna be here? Send us removal request.
Last Seen Blogs

squidpedia
Things That I Drew With My Hands And Possibly Feet

tip-top-cloud-surfer
Ready. Set. Sleep.

jestemtutylkodlaany
🦋Perfekcja🦋
g1mm3sk1nn1-2
Erin

justajjfan
The Hunger Games and everything Everlark!
(and other stuff too)
Text
1895 EPQ Project: Part 1
The Foundation Layer
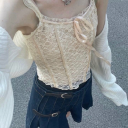
SO basically, in the 1890s you had 2 options for the layer closest to the skin: a chemise and drawers or a combination of the two (handily named combinations). I chose to make combinations since apparently they are more economical in terms of time and fabric, and as a broke busy teenager this suits me just fine.
I wanted my combinations to have 'split' drawers that close with buttons down the centre front. I chose a pattern from an 1895 sewing manual and made my design based on the my pattern, contemporary adverts and extant garments. If you look closely, there's a teensy dotted line on the pattern, I decided this was an option for a low neckline and used that.
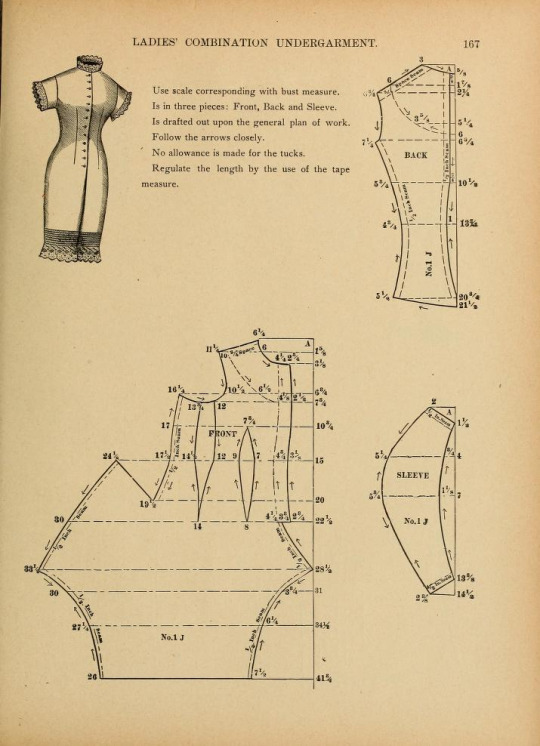
The pattern told me to use a 'scale corresponding with bust measure', however I don't really know 1) what that is, and 2) how to get one, so I decided to draft the pattern according to the scale given in the book and then fake it till you make it. I drafted the pattern pieces onto gridded pattern paper (honestly took me over an hour). I then marked the seam allowances and darts using a Frixion pen, which I cannot recommend enough because it comes right out when you iron it.
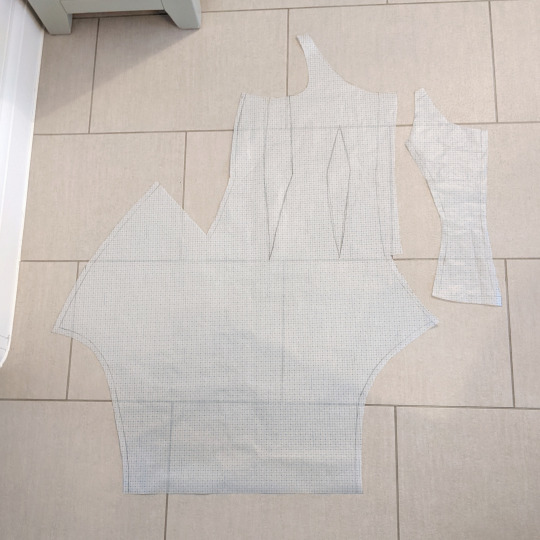
First I sewed the back pieces together with a French seam, then I sewed the darts. Next I sewed the fronts to the back piece at the sides and shoulders and flat felled it. This was the first point I could try it on and see if it fit, so naturally I did and naturally it didn't. So I re-sewed the darts until the fronts overlapped as they were meant to.

The next step was to sew the legs together up to where they meet and flat fell the seam. I then hemmed the raw edges of the split and gathered the rear flap (yes haha butt flap very funny) to fit the back panel.

Then it was placket time, babey. I used 8 buttons spaced 2 inches apart . As several extant garments I looked at used cloth covered buttons (these guys right here), I used plastic buttons covered in my fabric. I put the buttons on the left and the buttonholes on the right. Please don't look at them too closely, they are my second biggest weakness after hooks and eyes.
Then I sewed edging lace around the neckline, armholes and legs. I used reproduction lace from Etsy. Yes, it was expensive but it was really pretty so I didn't mind.
To sew it on (mini tutorial time):
Legs: I joined some insertion lace to some zigzag lace with a whipstitch. Then I top-stitched it to the fabric half an inch from the bottom, then folded the seam allowance into a hem and stitched it down (source)
Neckline: I topstitched the lace around 1/4 inches from the edge and trimmed the excess to about 1/8 inches and overcast it to the main fabric (source)
Armholes: I tacked the lace about 1/4 inches from the edge and then pinned and sewed bias binding on top through the lace. I then turned the bias binding to the wrong side and secured it with a whip stitch (source)


I meant to have pin tucks on the legs, but when I tried the finished combinations on they were already the right length so I couldn't have any.
And then it was done!
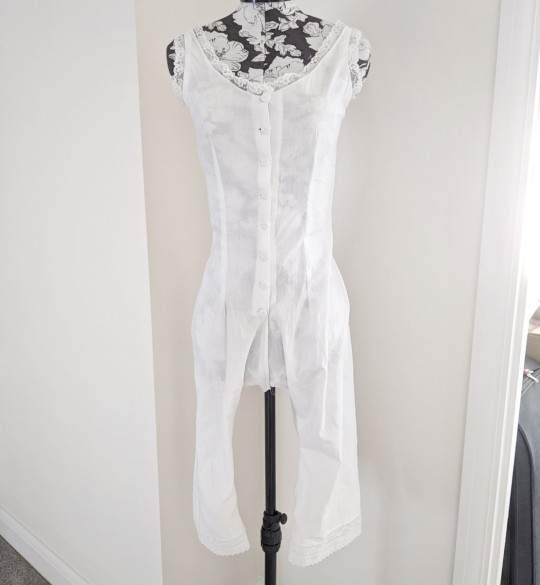
I'm really proud of this because this is by far the hardest garment I've ever made. Not necessarily the the physical putting together of it, but having to figure out the pattern and instructions myself. Even though there are a few places I wouldn't invite you to look at closely, I still like to think that someone, once, made some combinations that were much worse. And then they wore them every day.
My favourite part is the fact that this is school work. I get to work on my hobby then at the end of it I get a grade!
#this is long#historical costuming#historical clothing#historic fashion#historical dress#dress history#historical fashion#fashion history
26 notes
·
View notes
Note
Upsizing clothes! There are a million upcycling tutorials for clothes that are too big, but so few on how to make too small clothes you still love bigger!
Thank you for your suggestion! We all go through weight fluctuations in life, so it stands to reason our clothes should be able to fluctuate with us.
Resizing your clothes used to be a very common practice before the advent of fast fashion. Fast fashion sizing is extremely flawed, especially when it comes to plus size fashion, and we're stuck with a lot of vanity sizing, so it's a good skill to have regardless of whether you're looking to mend something old or buy something new.
How to upsize clothes:
Introduction:
There are many different ways to make a garment larger. The following list is not exhaustive, just a few ideas to get you started.
Grading patterns:
If you're making your own clothes, it's always useful to know how to modify a sewing pattern. The easiest way to adjust a pre-existing pattern to your size is slash and spread grading. First, you need to define which spots on the pattern need extra space. You then cut your pattern in that spot, and slide the resulting pattern pieces away from each other until you've got the size you need. Use paper to fill in the gaps. To ensure the resulting pattern makes for well-fitting clothes, make a mock-up and add, move, or remove darts where necessary to adapt it to your body type.
The image below shows potential slashing lines on a set of standard pattern blocks. Each line is a spot that allows you to add extra space. To read more about this process, check out the corresponding article by Threads Magazine.
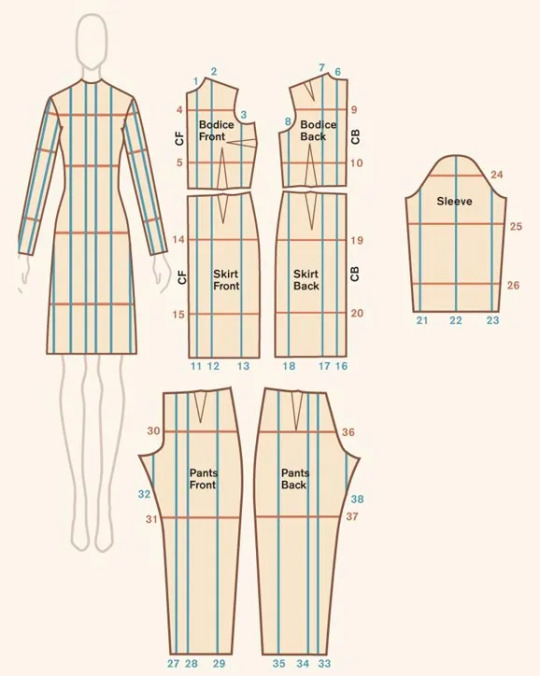
(Image source) [ID: a diagram of slashing lines on a pattern block for a dress, bodice, skirt, sleeve, and a pair of pants.]
To make your clothes easier to let out in the future, make sure to provide ample seam allowance when cutting out your pattern pieces. This surplus fabric has several different uses, including giving you some wiggle room for when you need to size up your garment.
Now, let's take a look at pre-made garments.
Lengthening clothes:
A garment that's too short on you is easy to modify. Just add more material!
If it's a skirt or a dress, add ruffles to the bottom. Ruffles are easy to make by hand or with a sewing machine. You could also add lace, or wear the item with an underskirt.
For pants, let down your hem or sew on a new cuff. If this isn't enough, maybe consider turning your trousers into capri pants or shorts.
As for shirts, sewing an extra layer to the bottom edge is the easiest way to go, too. You could even combine two shirts into one to get an extra long shirt.
Another option is to cut your item in two and insert extra fabric between your separated garment parts.
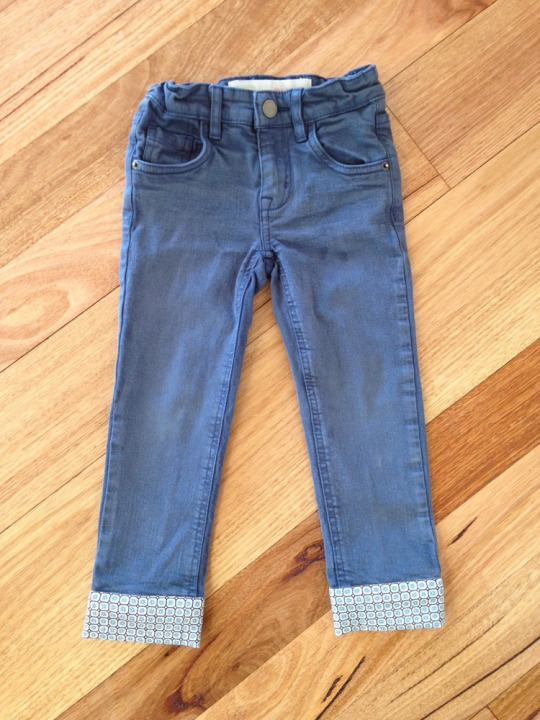
(Image source) [ID: a pair of blue pants with cuffs sewn onto the bottom of the legs to lengthen them. The cuffs are made out of a fabric with a blue and brown geometric print.]
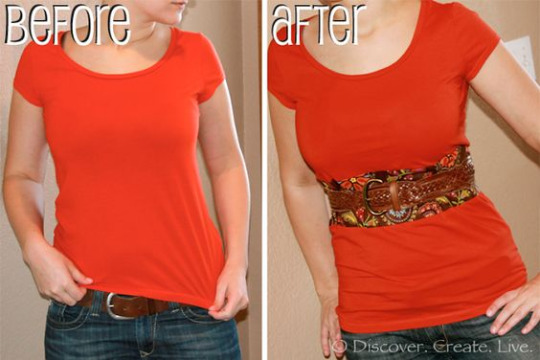
(Image source) [ID: a before and after picture of a red t-shirt that was lenghtened by adding in a patch of colourful fabric at the waist.]
Letting out seams/darts:
Remember how we made sure to have ample seam allowance earlier? When a garment has surplus fabric in the seams and you only need a little extra space, you can undo the seams of your garment and sew them back together again, this time with a smaller seam allowance than before. The Spruce Crafts has a pretty good tutorial on how to let out seams. You won't be able to make major size changes using this technique, but if you only need a few centimetres, this is a good way to go.
A lot of garments also have darts. Darts are fabric folds that are sewn down in strategic places to help the fabric follow the body's curves. If a dart doesn't fit you the way you want it to, then unpick the dart and try on the garment. Either leave the dart open, or pin the dart in place however you want it, then take off the garment again and sew the dart back together.
Be careful not to rip the fabric when using a seam ripper. Also note that removing entire darts may change the garment's fit.
You can also add custom darts to achieve a better fit, but that's a topic for another time.
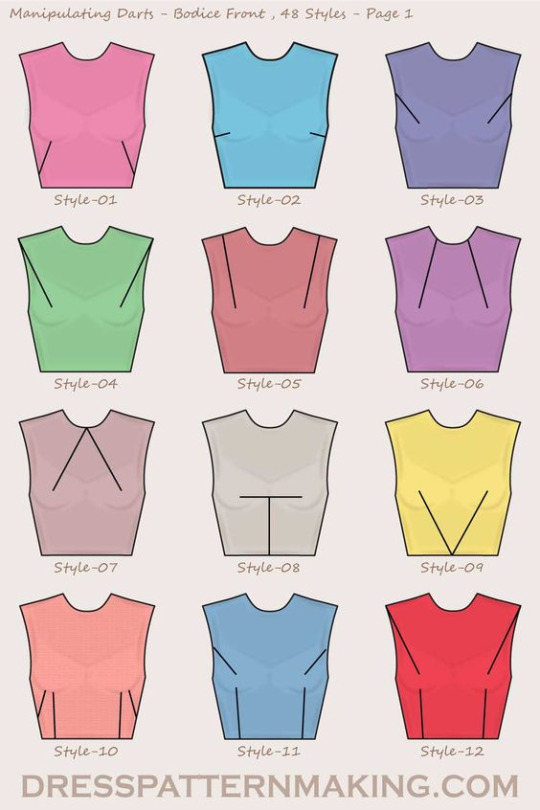
(Image source) [ID: twelve different types of darts on a feminine bodice block.]
Adding extra fabric to your garment:
If we need to add more room than seam allowance or darts can provide us with, we need to add extra material. Remember those slashing lines we looked at earlier? If you're working with a pre-existing garment rather than a pattern, those are the perfect places to chop up your clothes and add in extra fabric.
Check your sewing stash for fabric that's similar in weight and material to your original garment, or go thrift shopping for an item you could use to upsize your garment. Long skirts and maxi dresses are a great source of fabric for alterations like these!
Lace inserts are also a fun choice to add some room, and if you're working with a knit item, you could even knit or crochet your own custom insert.
Define the area where you want to add extra fabric on your item, and measure how much you need. Draw a straight line on your garment with chalk/soap. Make sure the line doesn't cross any important structural or functional parts of your garment like darts or button holes: refer to the slashing diagram we saw earlier if you're not sure what spot to pick. Cut the line open (or unpick the seam if it's situated on a seam), and add in your extra fabric. Finish off your new seams so they don't unravel later on, and you're done!
You can add straight strips of fabric for extra width or length, or you could use flared panels or even godets to make your item flair out.
Want to see this technique in action? Check out this video by Break n Remake:
youtube
Some ideas:
This Pinterest user cut a straight line down the front of a t-shirt and inserted a lace panel to add extra width in the front of the garment.
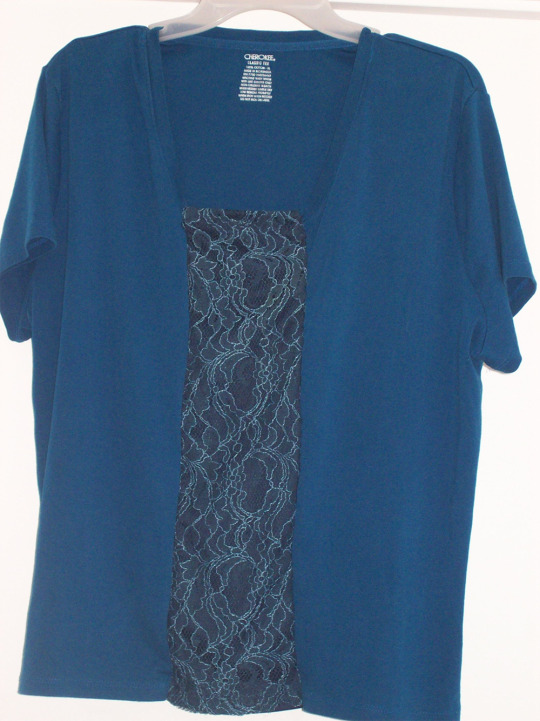
(Image source) [ID: a blue t-shirt with a panel of dark blue lace added in at the centre front.]
Busy Geemaw cut open the side seams of a shirt and used flared panels to add some extra width in the bust and hip area.
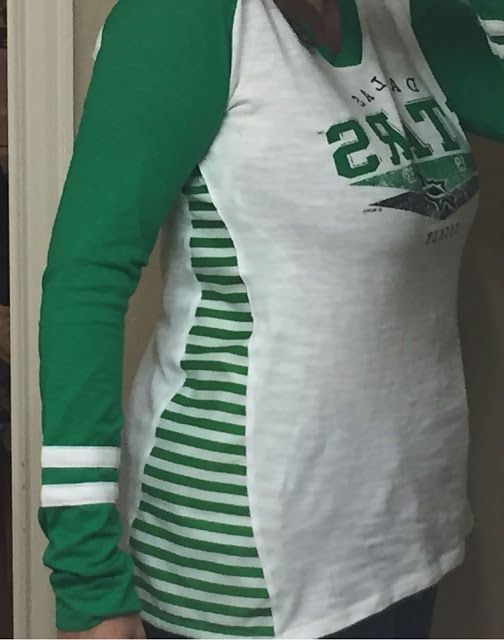
(Image source) [ID: a green and white long-sleeved shirt with a striped flared panel in matching colours inserted at the side seam.]
This person added a panel to the sides of a pair of jeans to give them more space in the hip area. You could easily use a long straight panel or a panel that flares at the bottom to resize the entire garment instead of just the hips, or use a wide piece of elastic for extra stretch.
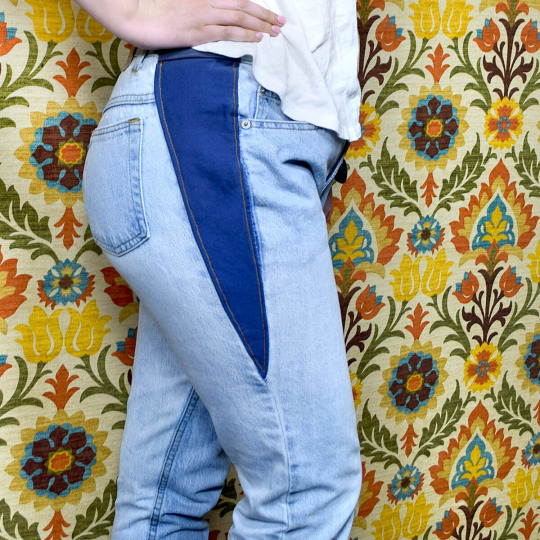
(Image source) [ID: a side view of a pair of light blue jeans with a dark blue wedge-shaped denim insert running down from the waist and ending above the knee.]
This person added a godet in the back of their shirt in order to get more space in the back.
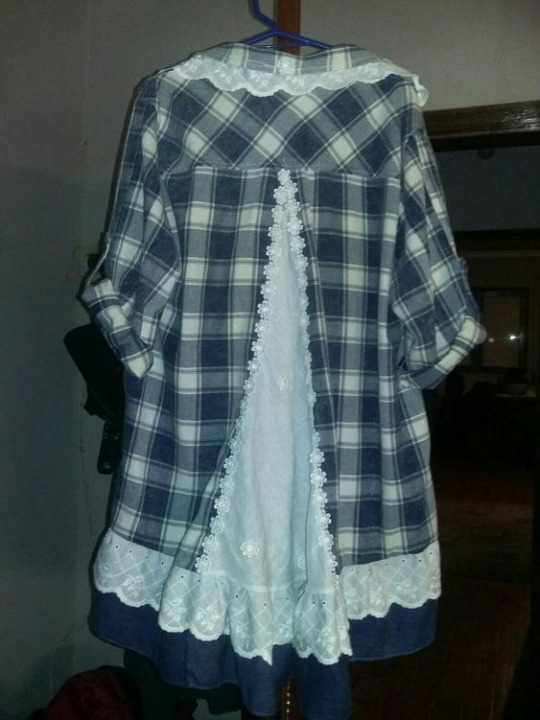
(Image source) [ID: a blue and white plaid shirt with a white lace godet inserted in the back.]
Blue Corduroy enlarged a pair of shorts by opening up the side seams and adding in strips of fabric.
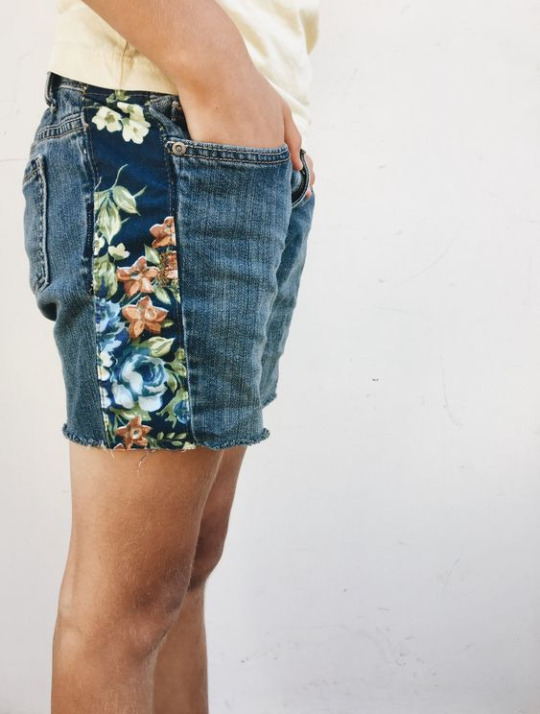
(Image source) [ID: blue denim shorts with a floral fabric insert at the side seams.]
You don't need to resize the entire garment if you don't want to. For example, One Brown Mom turned this ankle-length skirt with a too small waistband into a well-fitting knee-length skirt by taking advantage of the skirt's flared shape.
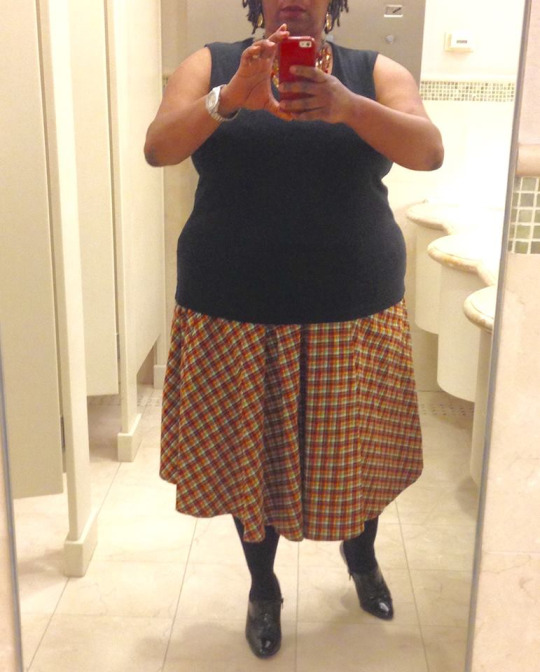
(Image source) [ID: a woman wearing a black shirt and a brown tartan knee-length skirt.]
Conclusion:
Throughout our lives, our weight will fluctuate and our bodies will change. There's no shame in this: it's just a fact of life. Therefore, knowing how to upsize an item that is too small for you is a useful skill to learn.
If you want more inspiration, check out these projects by Confessions of a Refashionista, One Brown Mom, and Thriftanista in the City.
47K notes
·
View notes
Text
The Mildly Chaotic making of 1920s undergarments: Part 2
Bloomers
Following the making of my step-in chemise, I had just enough fabric leftover to make a pair of bloomers, using this pattern I found on pinterest:

I basically just followed the pattern but made 1 adjustment: instead of curving inwards at point O on the diagram, I continued the diagonal line to add more width. Don't do this. It does not have the desired effect and in fact causes the seam to twist round to the front. Bad idea.
When cutting out my pattern, I made the fatal mistake of forgetting to cut the seam allowance on one side. I decided to fix it by putting the smaller piece in the middle and hiding the smaller seam allowance by flat-felling the seams and pretending it was my plan all along.
Since the instructions are already there, I'll just provide some nice in-progress pics:
Pinning the sides together and then sewing, placing the smaller piece in the middle so I could flat fell the seams later:

Sewing the legs together (on my antique probably-from-the-1920s sewing machine!):
The sewn-together drawers before flat-felling the seams:

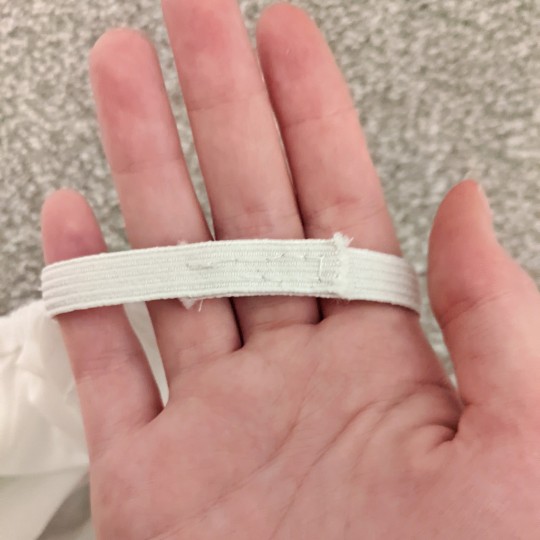
Making a casing for the elastic by hemming the bottom of the legs and leaving a gap to thread it through:

I forgot to take a picture of me inserting the elastic, but here's how I sewed the ends together:
And there you have it, a pair of 1920s bloomers.

This is not a great picture, because I took it at night.
Skills learnt:
sewing an elastic waistband
pattern drafting to my own measurements
#historical costuming#historical clothing#historic fashion#historical dress#fashion history#dress history#historical fashion#1920s fashion
8 notes
·
View notes
Text
The Mildly Chaotic making of 1920s undergarments: Part 1
So this was not in my plan for the next few months At All but I cannot control the hyperfixation. So I took some leftover white cotton fabric from my stash and went to town.
Step-in Chemise/Teddy
As suggested by the name, you step into it rather than pull it over your head. This means that the width at the bust (and waist) must equal your hip measurement. I based my chemise on a pattern I bought, so for obvious reasons I won’t share the diagrams or instructions.
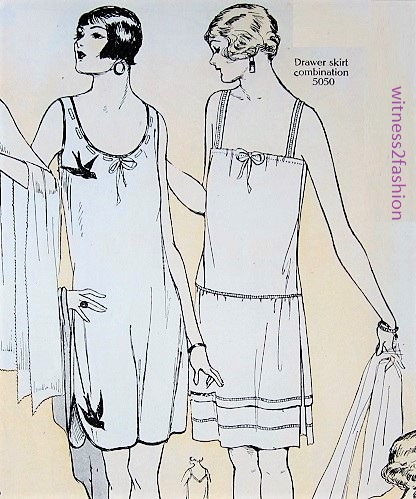
The drawing on the right somewhat resembles what I was going for. While most depictions of underwear from this period show them in pretty shades of pastel or jewel tones, I only had white scraps and no lace (confession time: I’ve never actually sewn with lace before) and I’m too lazy to spend my money on new fabric.
So I cut 3 rectangles: one for the top part that was my hip measurement x my underarm to high hip measurement and 2 ‘skirt’ portions. I made them slightly wider than the top rectangle and long enough that the finished garment would nearly reach my knee.

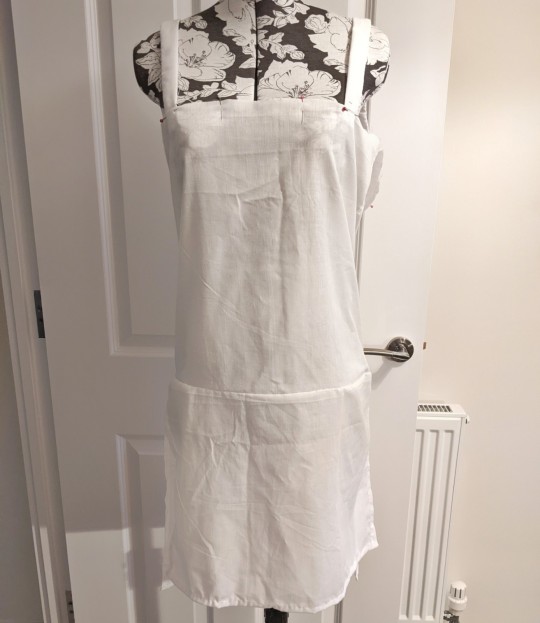
The pattern called for a ‘double-fold net’ at the top, so I purchased some reproduction lace from this Etsy shop (highly recommend) and while I waited for it to arrive, I started sewing the rest of the garment:
First I sewed the top into a tube and hemmed the 2 short sides of the skirt pieces. I was too lazy to thread my sewing machine, so I decided to sew by hand. I ran gathering stitches at the top and gathered the remaining extra width to fit the top portion. I then French-seamed the skirt pieces to the top and hemmed the bottom edges. I also managed to sew the back piece 1) the wrong way round, 2) so it is a solid 1.5″ longer than the front. Nobody knows how, at least I don’t.

Next I sewed 2 1-inch wide tubes and pinned them onto the top for a try-on because I’m a sucker for trying everything on at every stage. You can kind of see it take shape now, it just needs some... Finishing.
Then I just sat around waiting for my lace to arrive (i.e. immediately started making a pair of bloomers).
It finally did (yay!) and here’s what it looked like:
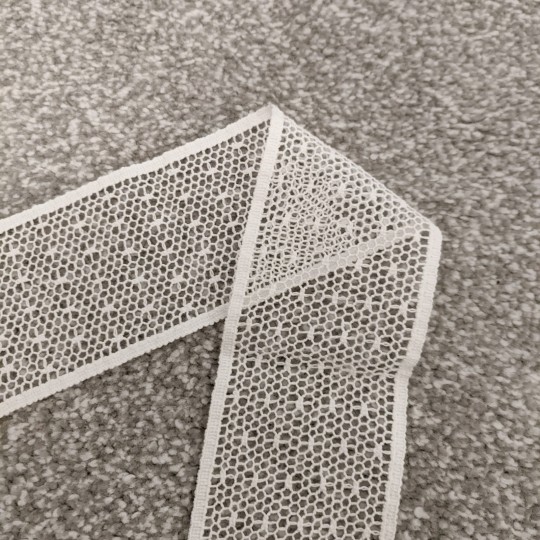
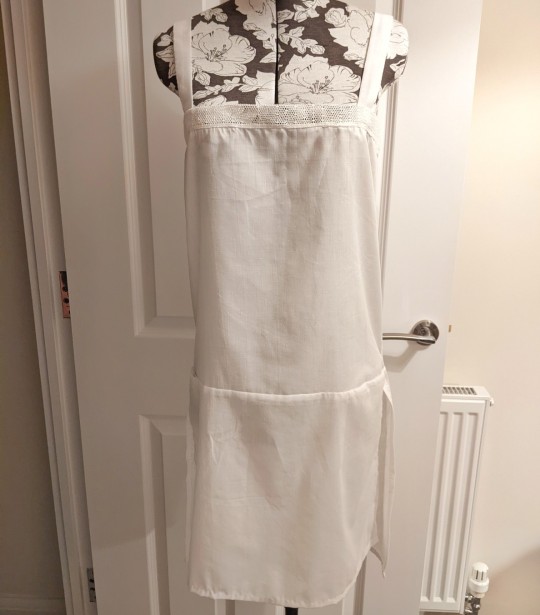
By now I had got round to threading my sewing machine so I machine-stitched the lace to the top of the chemise and trimmed the seam allowance back. Then I sewed the straps to the top of the fabric and then to the lace itself to stop it flapping (excuse the blurriness, taking photos is hard)
After a final fitting, I decided that the ease I included in the hip measurement wasn’t necessary so I sewed 2 darts in the top to help reduce the excess space.
Et voila! Spontaneous underwear-making successfully achieved.
Skills learned:
- adding a lace border
- recreating a pattern from the bare minimum of instructions and 1 illustration.
Now if I can only get my hands on some pastel rayon...
#historical clothing#1920s fashion#historical undergarments#historical costuming#dress history#sewing
55 notes
·
View notes