duran-binding
Duran Binding
A bookbinding blog
114 posts
Don't wanna be here? Send us removal request.
Last Seen Blogs

hasselectionjaipur
Untitled
fierce-little-miana
a question of symbolic

doodleprinceart-blog
DoodlePrinceArt♤

melle-d
Melle-D's Art Dump

petithouse
なに見て暮らすか考えた | アイ工務店で建てた
Text
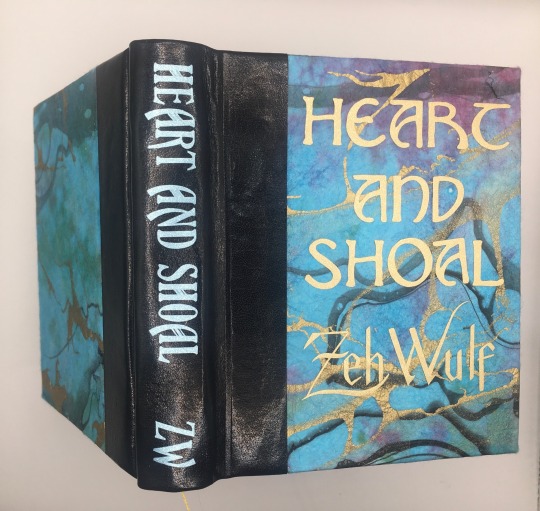
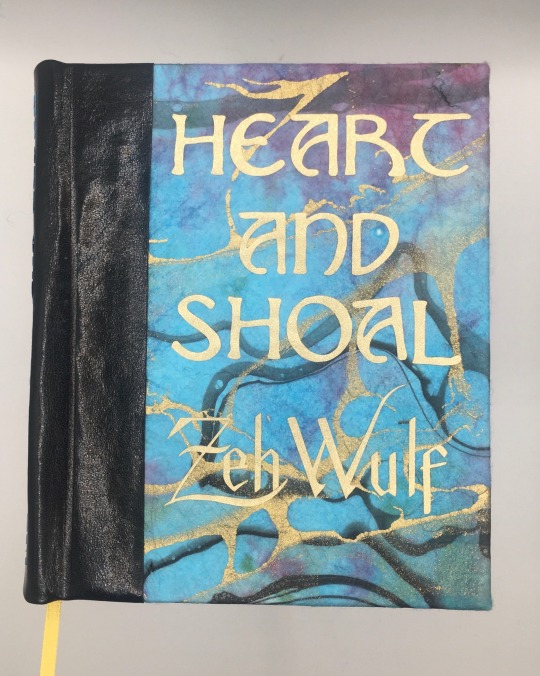
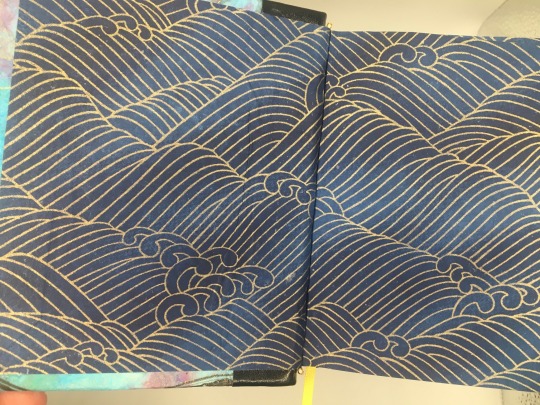
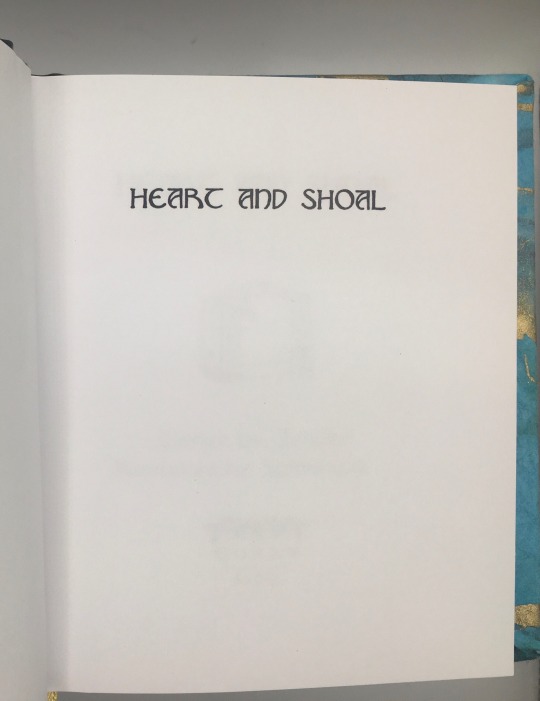
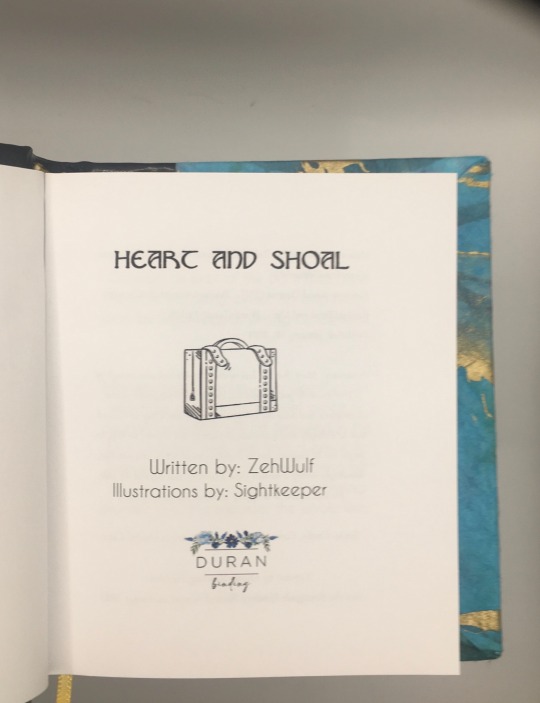
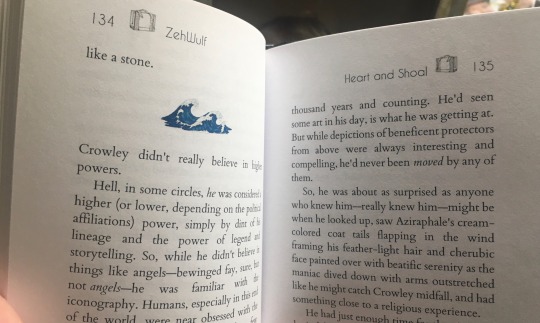
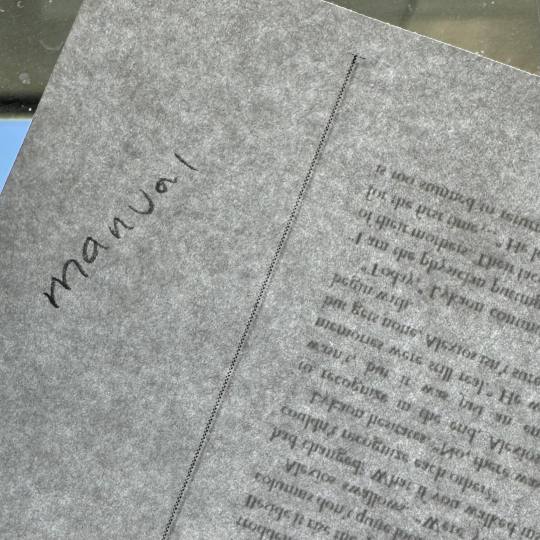
It's bound so beautifully!! 😍
Heart & Shoal by ZehWulf & SightKeeper
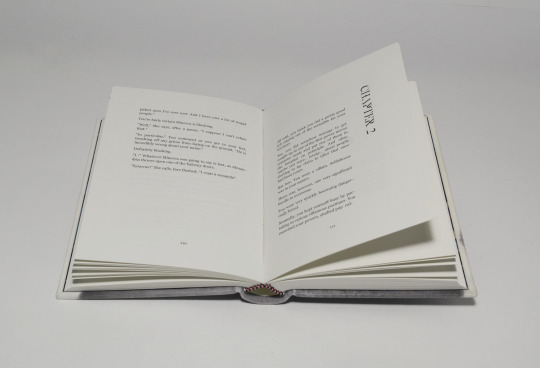
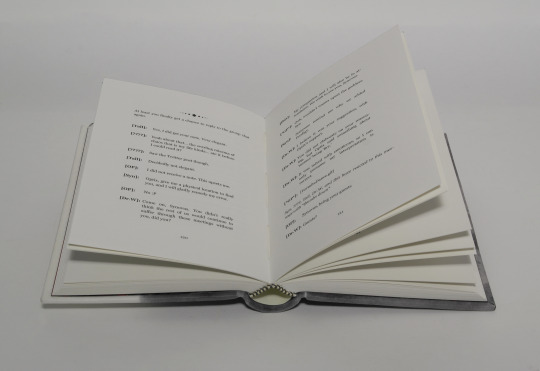
So after Binderary, I decided to take it easy by binding some of the beautiful typesets that Renegade members have done. First up was the absolutely lovely quarto typeset by @duran-binding of @zehwulf's wonderful selkie/fae Good Omens au Heart & Shoal The feelings in this fic! And beautiful illustrations by @sightkeeper


52 notes
·
View notes
Text
OMG

HAPPY EDIBLE BOOKDAY!
Do scrolls count as books? Probably not, but I feel they fit in here in the spirit of written records/stories.
So enjoy my pancake scroll fanbinding.
To be fair, on its own, the scroll was bland. Intentionally so though. I wasn't sure with what I'd be writing on it, so I left myself all options .
handles: bread sticks
scroll: pancakes made in the style of tamagomaki
writing/painting: caramel colour
size: 18cm x ~70cm (scroll size)k

111 notes
·
View notes
Text
Pub news 😍

So thrilled to finally share this news! The Irresistible Urge will be out in July 2025 (Orbit UK & Berkley (Ace)). More details on my Instagram (brigitteknightley).
My authorial blibbityblurbbity:
THE IRRESISTIBLE URGE is my love letter to slow burn romantasy, with a STEM twist. I can't wait for readers to meet Osric the gentleman assassin (favourite colour: morally grey) and Aurienne, the healer who Doesn't Do Love. This is enemies to lovers in its purest form, featuring forced collaboration, a masochistic slow burn, crime as a bonding experience, reluctant attraction, and graphic violence, as a little treat.
PS. This is a whole new story. The Mortifying Ordeal will continue to pspsps on AO3
372 notes
·
View notes
Text

Episode 217: Fanbinding
On Episode 217, “Fanbinding,” Elizabeth and Flourish talk to Tiffo (aka Fanboundbooks) about the art of turning fanfiction into physical books, and the fanbinding collective known as the Renegade Bindery (@renegadeguild). Topics discussed include how exactly you make a book, Renegade’s origin story and huge growth in recent years, fanbinders’ firm commitment to the non-monetized gift economy, and Binderary, a month-long event this February with challenges, fan-run classes, and more. Plus! (Spoiler) Flourish literally joins the Renegade Discord during the recording session.
Click through to our site to listen or read a full transcript!
367 notes
·
View notes
Text
A year and a half ago, I made a post about @renegadepublishing launching their code of conduct. I’m pleased to report the community has been thriving, and is abuzz with even more growth!
Over the past year and a half:
The Discord size has doubled.
The membership has skyrocketed to nearly 200 members.
Our events have also doubled in participation!
We’ve started four brand new events!
We’ve launched 12 satellite servers with 414 members!
All this, and yet, there’s more to come! I’m pleased to announce yet another massive undertaking has finally come to fruition…
THE RENEGADE BOOKBINDING GUILD WEBSITE!
Renegade has grown so much and still remains such an incredible, vibrant community, and this step forward will only enable us to do so much more. There is still more work to be done, but it’s absolutely amazing how far we’ve come. I can’t wait to keep building this community with all the wonderful people in it! 🎉
We’re currently kicking off Binderary 2024 with a bang, with 34 workshops planned for the month of February, all completely free and community-run!
If you’re waiting for a sign, this is it! Come join us, and start your fanbinding journey!*
*Discord is 18+ only!
865 notes
·
View notes
Text

Hi guys! I have a free class coming up as part of Renegade Bindery's binderary event! Please join in on discord :)
@renegadepublishing
17 notes
·
View notes
Text
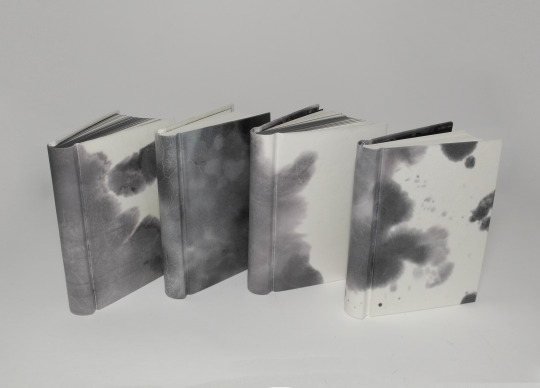

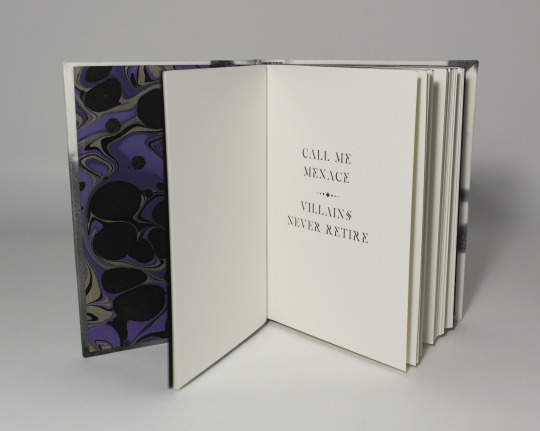
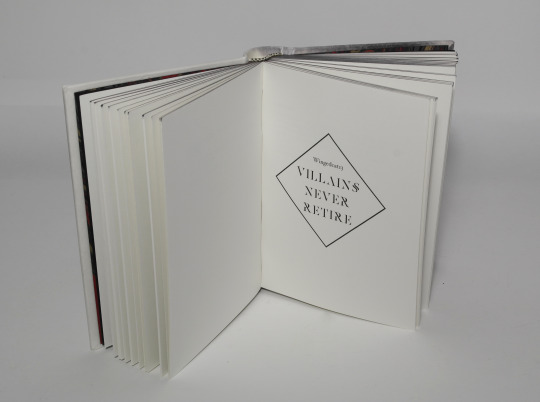
Call Me Menace & Villains Never Retire - wingedcat13
Four alterations of the same book that I had the joy to hand over in person as a surprise gift to @desmothene, @pleasantboat, @finalfrontierpublishing and @fantailpress on a meet-up this January.
Many thanks to @wingedcat13 for the permission to share her work.
Read the Call Me Menace here
and Villains Never Retire starting here.
Materials used
book case
boards - museum board (white)
counter pull layer on boards- museum paper (white)
spine stiffener - photo cardboard (white)
vellum (calf parchment) coloured with alcohol based stain - cover material
inner book
textblock paper - Schleipen fly 05 115gsm
endpapers - marbled paper by Renato Crepaldi
endbands - buttonhole silk
coloured top edge - chameleon acrylic ink

198 notes
·
View notes
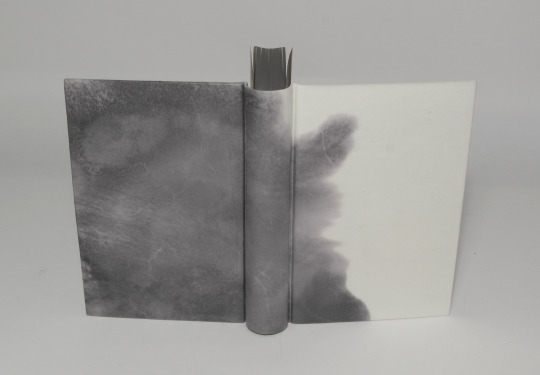
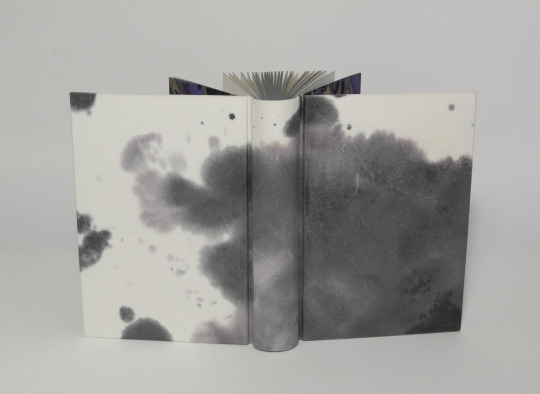
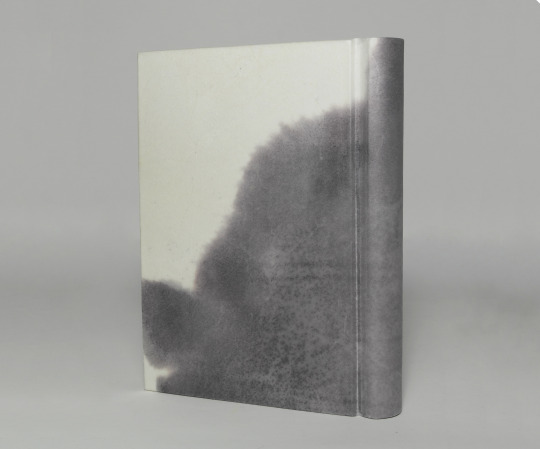
Text
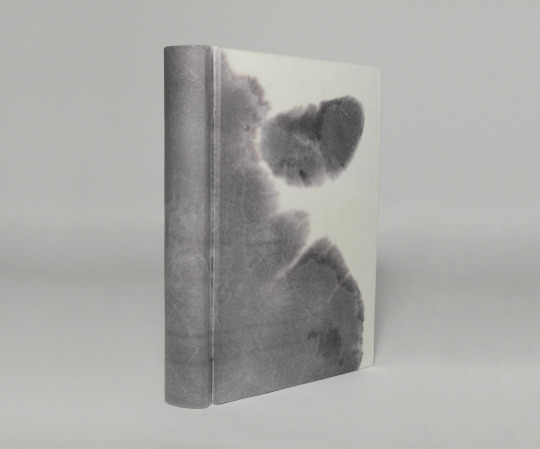
Hey look it's me! 😆 I'll be doing the hidden fore-edge workshop! 💙
Binderary 2024: Week 2
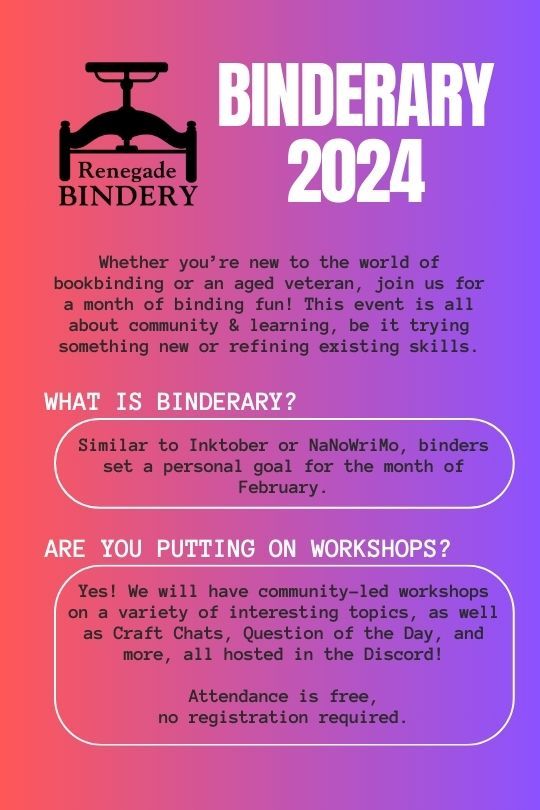
In the Renegade Bindery Discord Server, we are once again running Binderary during the month of February. Attendance is free, and a link to the 18+ Discord Server can be found on our carrd.
Whether you’re new to the world of bookbinding or an aged veteran, join us for a month of binding fun! This event is all about community & learning, be it trying something new or refining existing skills.


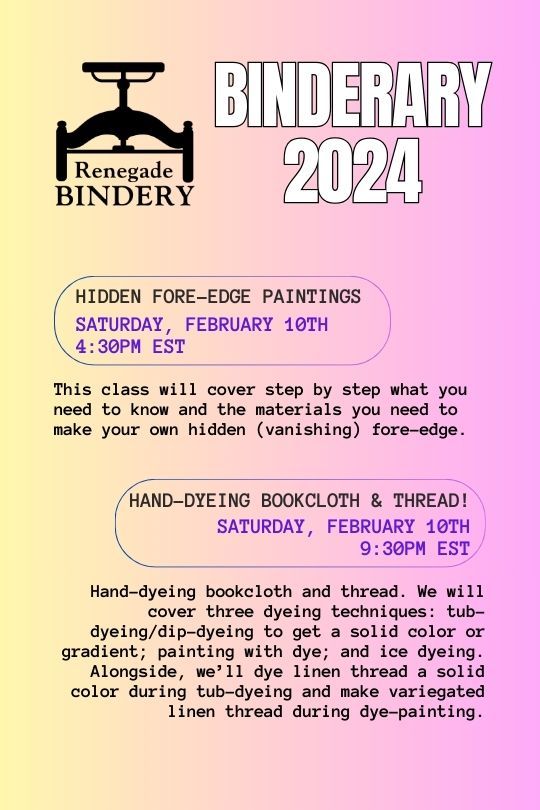

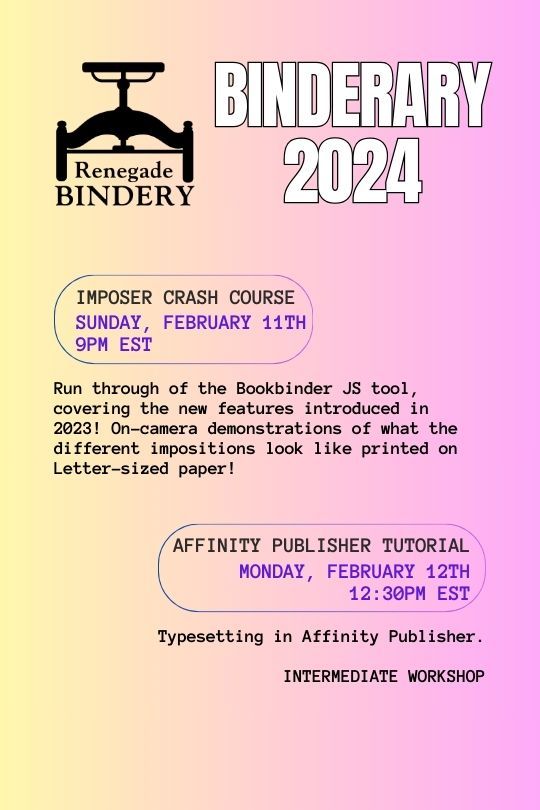

All our workshops are run by members of our fanbinding community, and some of them are even on Tumblr!
Here's the list of who's running the week 2 workshops:
Mini Monologues & Bind Along with six!: @simply-sithel
Double-core French Endband: @no-name-publishing
Hidden Fore-Edge Paintings: @duran-binding
Hand-dyeing Bookcloth and thread!: @epitomereally
Who Needs Tools?: @gargoyleandgremlinpress
Imposer Crash Course: @simply-sithel
Affinity publisher tutorial (Intermediate): @kate2kat
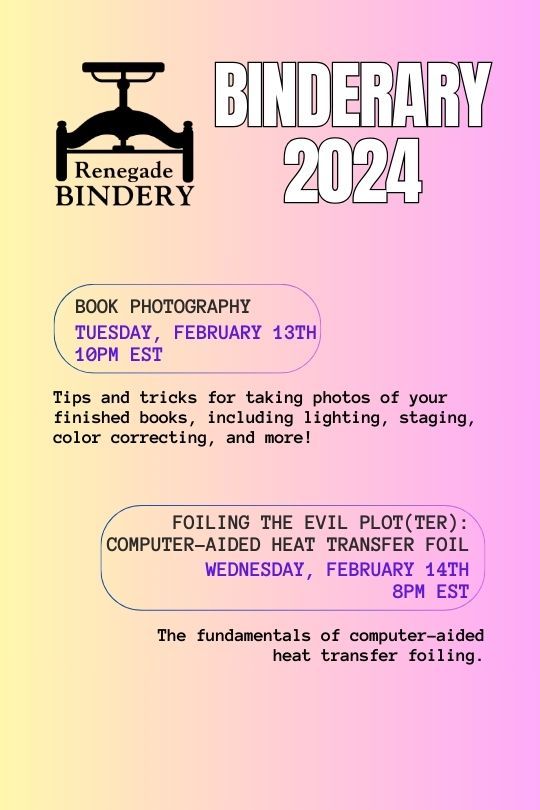
Book Photography: @robins-egg-bindery
Foiling the Evil Plot(ter) -- Computer-Aided Heat Transfer Foil: @starblightbindery, @mourningmountainsbindery
277 notes
·
View notes
Text
Binderary 2024: Week 1
In the Renegade Bindery Discord Server, we are once again running Binderary during the month of February. Attendance is free, and a link to the 18+ Discord Server can be found on our carrd.
Whether you’re new to the world of bookbinding or an aged veteran, join us for a month of binding fun! This event is all about community & learning, be it trying something new or refining existing skills.


All our workshops are run by members of our fanbinding community, and some of them are even on Tumblr!
Here's the list of who's running the week 1 workshops:
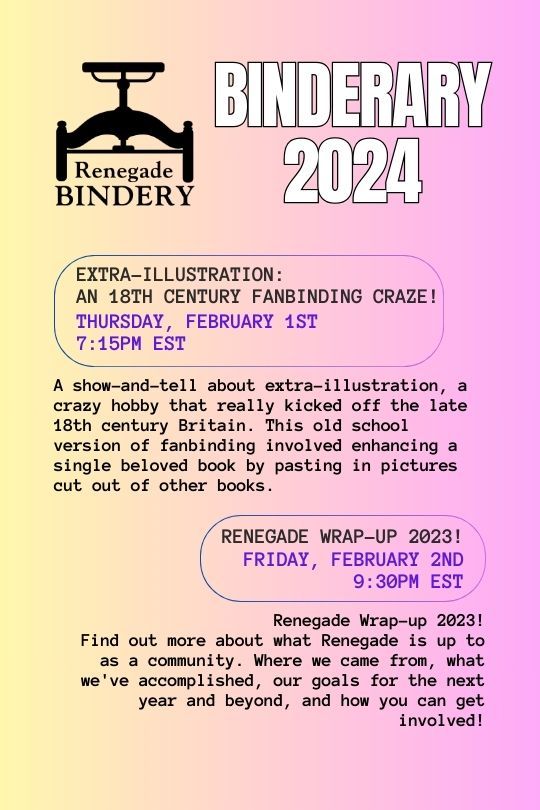
Renegade Wrap-up 2023!: @robins-egg-bindery, @fanboundbooks, @celestial-sphere-press
Split Board Bindings!: @misanthropiczombie
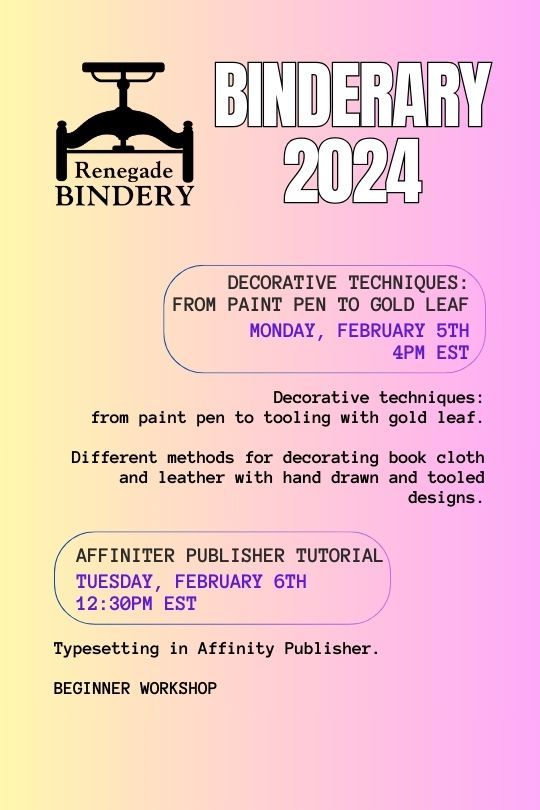
Decorative techniques: from paint pen to gold leaf.: @blackoakbindery
Affinity publisher tutorial (Beginner Workshop): @kate2kat
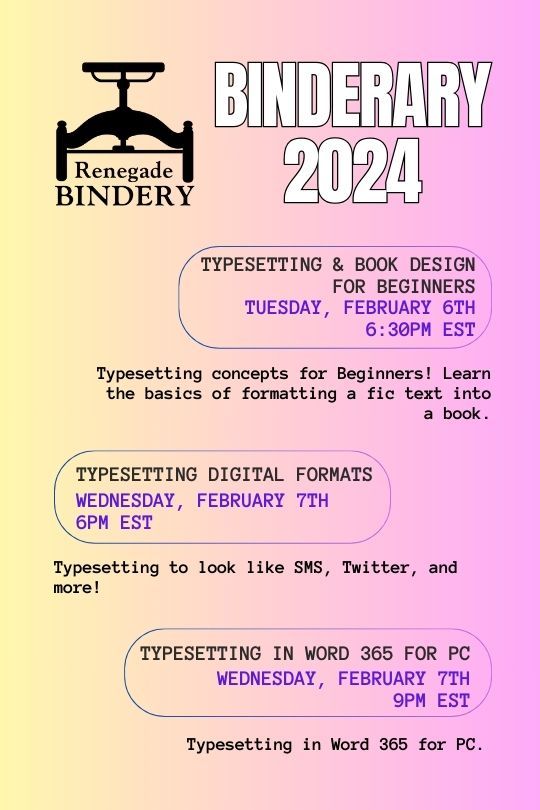
Typesetting & Book Design for Beginners: @bearclubbooks
Typesetting Digital Formats: @sayornispress
Typesetting in Word 365 for PC: @no-name-publishing
528 notes
·
View notes
Text
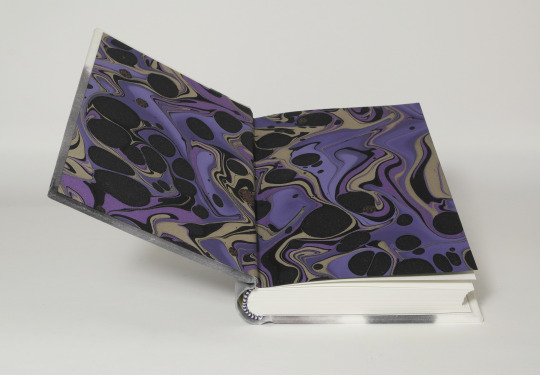
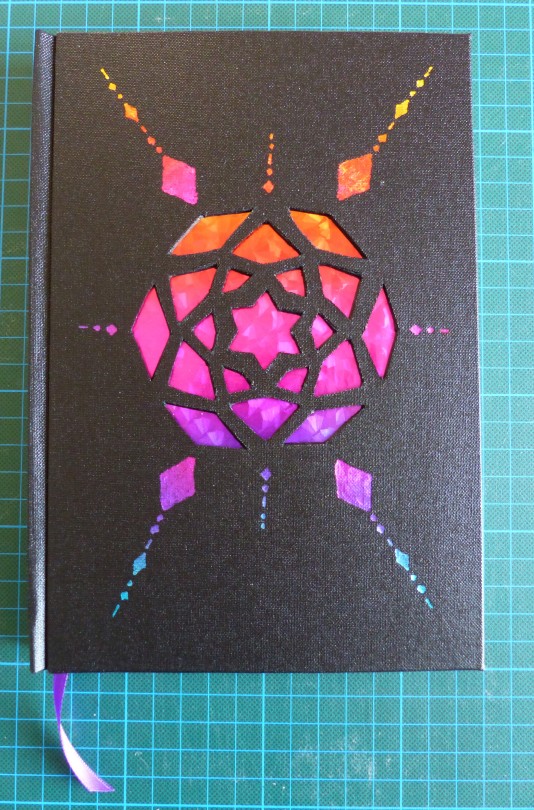
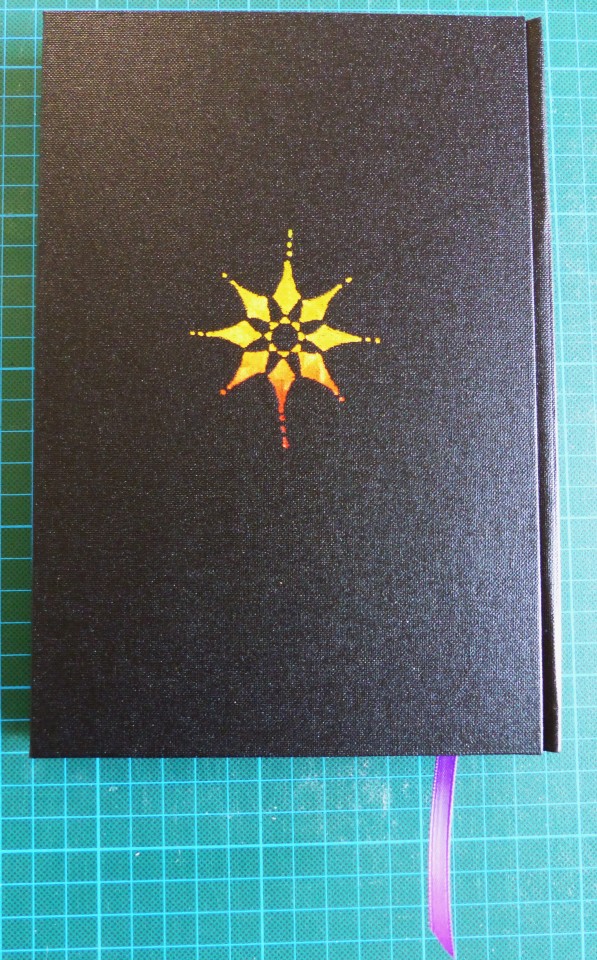
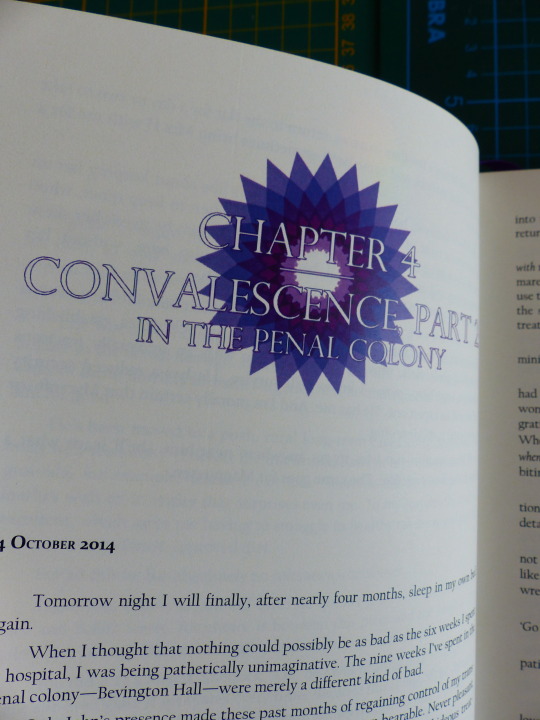
FTH Fanbinding: "Kaleidoscope" by Silvergirl
Whew. This was quite the undertaking as I’d felt ambitious. @totallysilvergirl was the winner of my FTH fanbinding auction and chose one of her own fics, from a fandom I’m actually in (Sherlock). I’d skimmed her AO3 to see what fics might be her potential choice and had immediately zeroed in on “Kaleidoscope”. The title was evocative and the plot sounded intriguing, being a fix-it for the end of Season 3. Good-sized wordcount, too.
I was super happy when she actually chose this fic!
The typesetting took me a long time and I leaned very heavily into the whole kaleidoscope theme. I also decided to use different colours and fonts for the different PoVs.

This was also the first time I tried out a title page spreading over both pages – usually, I’ve only used the right page and the left one stayed blank, but I wanted to try spreading out the picture this time. It worked quite well, overall.
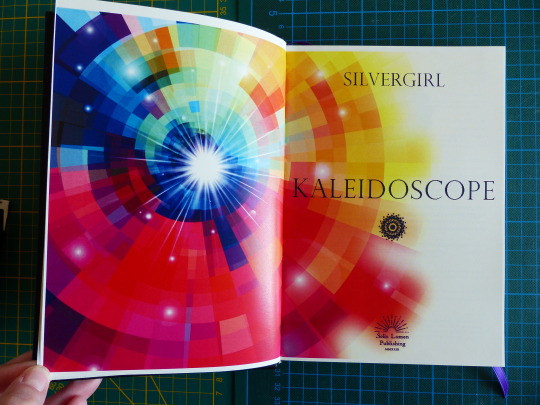
For endpapers, I chose this lovely purple Chiyogami paper. Purple has become Sherlock’s colour, in a way, and so it seemed quite fitting. I strengthened the crease with Schirting again.
Also, because the book had 8 signatures, I think, I sewed with tapes to make the spine more secure. It was the second time trying this and it worked really well!

Now to the case. Oh boy. XD
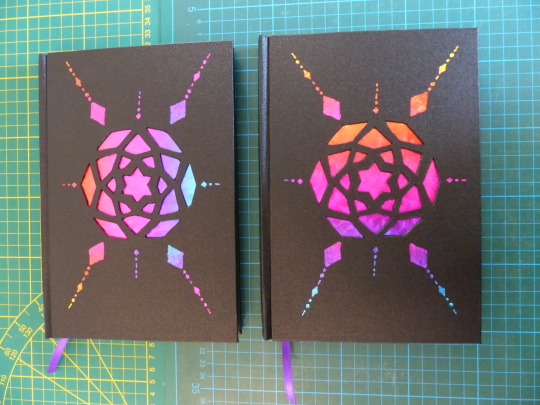
I had to think a bit about the cut-out design. I wanted it to yet again resemble a kaleidoscope, but it took me a while to wrap my head around how best to do it. I finally decided to make a stencil for the centrepiece and add some more elements without cut-outs.
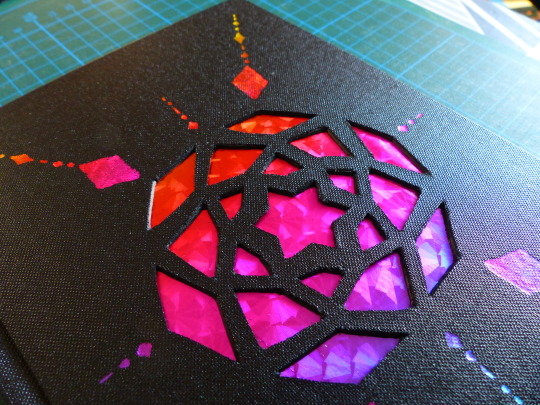
I decided on the lovely shattered glass rainbow foil and am super in love with the effect, especially on the spine! I think it looks so cool!

I not only made SilverGirl’s copy but also one for myself. They’re very similar, just the endpapers and the foil on the cover are different.
I messed up on the spine title on my copy a bit. The fight with the foil is real. *sigh* But it’s not too bad.
A huge thank you again to Silvergirl for participating in FTH this year and for putting her trust in me!
Materials used:
Printed on Clairefontaine DCP 100g
Case + endpapers:
- English Buckram linen
- Chiyogami paper 60g (endpapers)
- hot foil (Decofoil)
The fic in question (go check it out, it's really great!):
198 notes
·
View notes
Text
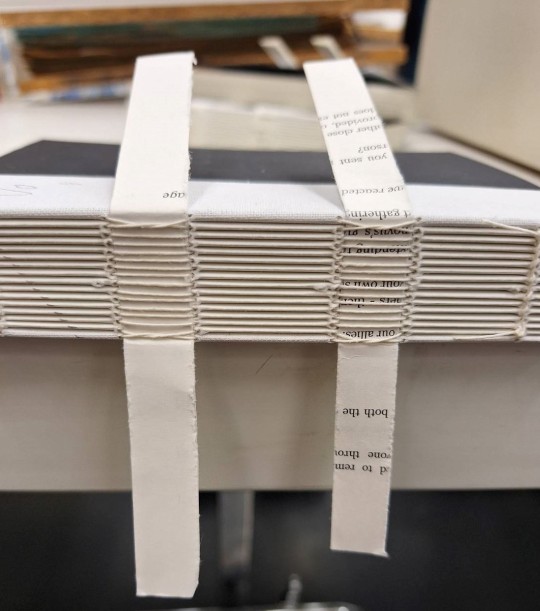

Inserting (durable) tapes after sewing.
Ever wanted to keep on working, but you didn't have all the supplies ready yet? That's what happened to me. I sat at home with a few books printed and ready to be sewn, but the tapes had not arrived. So what I did was I folded some paper the width of the tapes and and sewed on those.
Now paper doesn't make for good tapes and I knew I'd have mine in a few days ready. That's why I folded the pieces of paper in half, sewed on the folded paper and when the tapes arrived I replaced the paper ones.
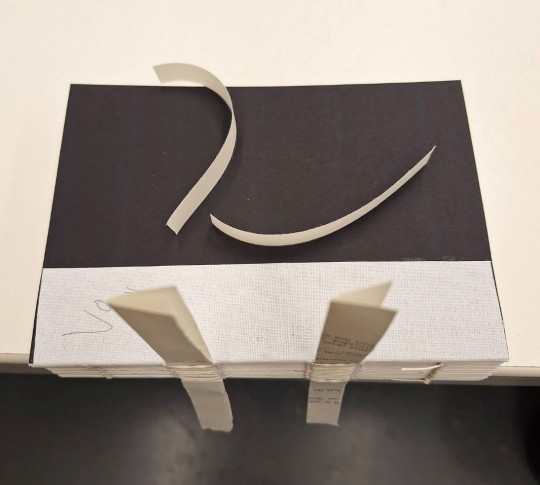
I cut the tapes to length and inserted them into the folded paper with a part sticking out so I have something to hold on to later.
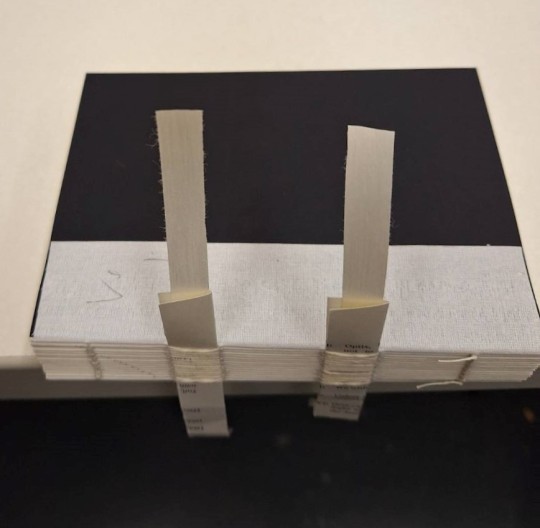
I pulled the paper, with the new tape partly inside, through until I was sure the sewing was in the middle of the new tape before I l held on to the top part of the new tape and pulled the paper completely out
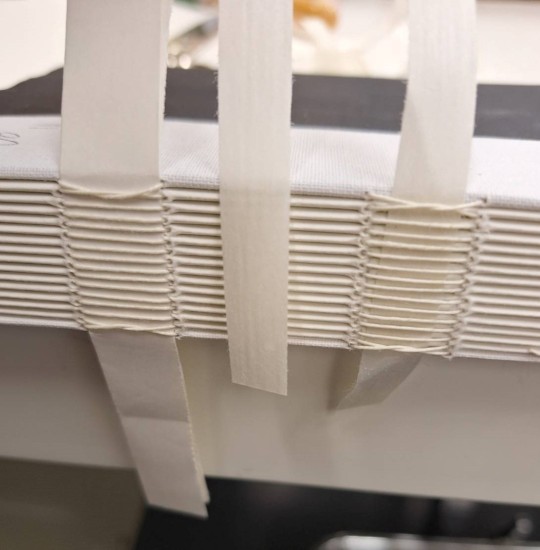
Inserting the tapes like this took me about 1-2 minutes. But that was only because I had planned it ahead, if one pulls out an tape accidentally it's a lot harder to the them back in again (but also possible).
17 notes
·
View notes
Text
Gorgeous news
I am so honoured, so full-hearted, so excited, to announce that I am now represented by Thao Le of the Sandra Dijkstra Literary Agency. Yes, that Thao, the one who represents Ali Hazelwood and Thea Guanzon. (I am all nerves, I am a single nerve, I am screaming, crying, throwing up)
Thao found me through The Mortifying Ordeal, mutual fangirling ensued – and now, this is officially happening. The project we are working on will please the Dramione stans, the slow burn masochists, and the STEM girlies all at once.
So looking forward to sharing this next chapter with you!
Warmly,
Brigitte xx
515 notes
·
View notes
Text
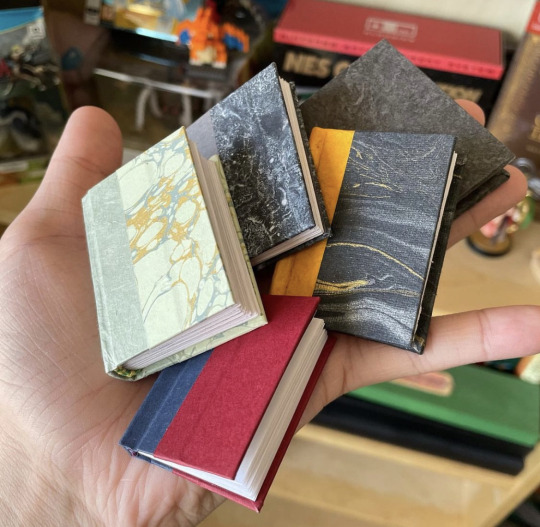
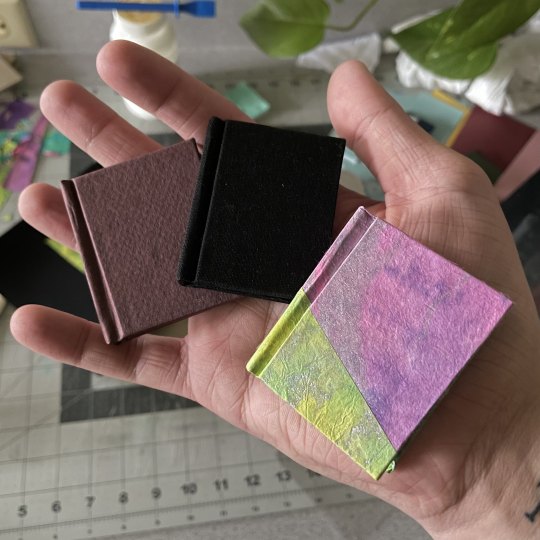
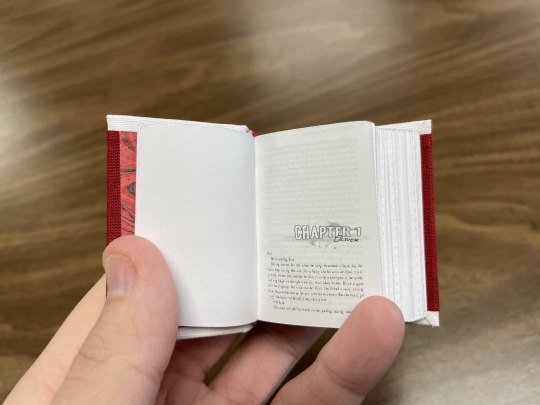
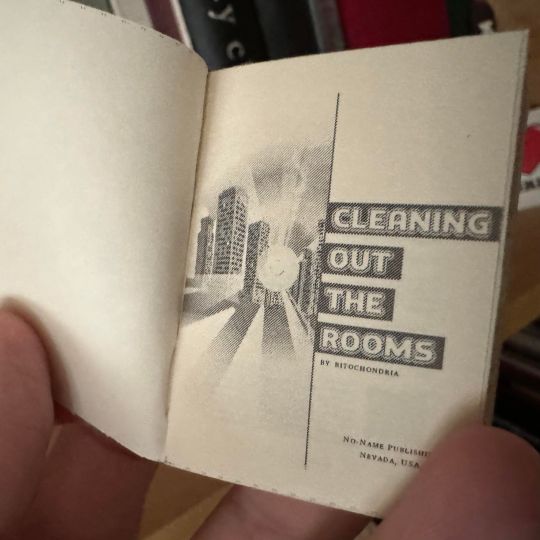
Tiny Book? Tiny Book. Pt1.
Idk yall I just felt like writing a little how-to of how-I-do my tiny A9 books! So if you've ever been interested, I hope this will be helpful. This will be neither a beginner typesetting nor beginner bookbinding tutorial; as I go through my process I will only be showing my process and providing a few tips, assuming you already have the basics understood. We can worry about the rougher technical skills in another post.
Also keep in mind that this guide includes images of fic I've bound, and you're zooming into these fics at your own discretion. I am not responsible if you read something yucky. I know you have a lot of options out there but thank you for flying No-Name Publishing.
Tiny books part 2; Tiny books part 3

Just like with regular ficbinding, there are layers, and they are:
1 - Typesetting and Imposing
2 - Printing
3 - Cutting, Folding, and Sewing
4 - Gluing, Rounding/Backing, Endbands
5 - Building the Case and casing in
6 - BOOK
In this part we will be focusing on steps 1 and 2. Please feel free to skip to the area you're interested in most.
1 - Typesetting and Imposing
Okay, so this area has some nuances that you don't have to consider so closely with typesetting for more traditionally sized books. To me, these tiny books are not about readability, they are about novelty. As such, I do not prioritize readability. Instead, I try to achieve something that is closer to scale. That said, neither do I want these illegible. But we'll begin from the top.
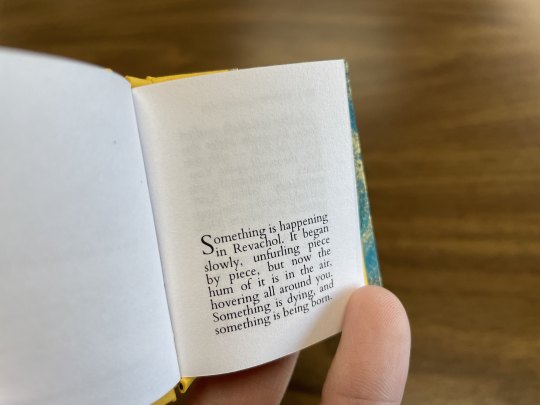
You want to make a tiny book, but you're wondering, what would be an appropriate word count for a tiny book? Tiny books are the perfect medium for the ficlettes, the shorties, the one-shots. They are also perfect for the mid-sized, 10-15-20k fics, in my opinion. Here we can see,

On the left we have a fic that is exactly 12,771 words, typeset on a 1.5" x 2" (37 × 52 mm) document, with .3" margins, 6pt Garamond font, and 5pt line spacing. This book is only approaching 1/2" (13mm) wide, and only took 5 sheets of Letter paper to print.
On the right we have a fic that is exactly 1,939 words, typeset to the same specifications. This book is only 4-5mm wide, and took only 1 sheet of Letter paper.
In my opinion this format of book begins getting unruly around the 300-page mark. However, making any combination of margins, fonts size, and line spacing will yield different page results for different word counts. For example:
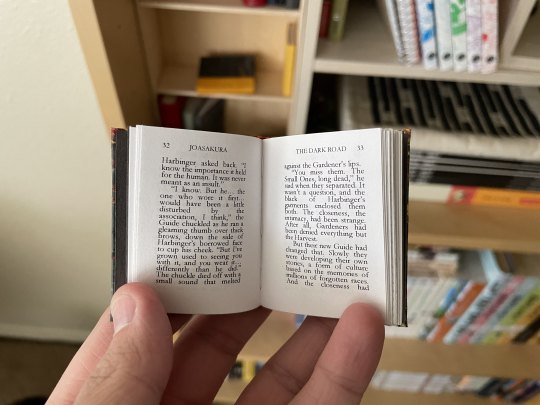
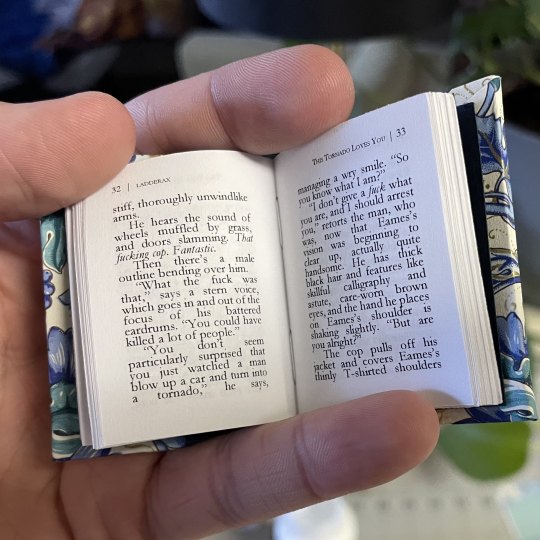
Like the above, in each of these examples I typeset in Garamond font @ 6pt size and 5pt line spacing. Typesetting on an A9 page, this is about as small as I felt comfortable sizing my font while still being legible. But notice the rivers between the words--the rivers of white space bisecting the lines, due to the Justified alignment battling the admittedly tiny work surface. At this scale, with the font at this size and alignment, those will be unavoidable. Over time I began disliking this in my own work, so I pursued a different method, which was typesetting on a quarter letter page (4.25" x 5.5" / 108mm x 140mm), and allowing my imposer to scale the PDF down.
Have you ever seen anything sexier. THIS looks like a tiny book. Little to no rivers, still legible (hand-wobble), and preserves the novelty feel that I desire from a tiny book. This method of scaling down (specifically from quarter letter to A9) does change the final shape of the book, from A9 to A9-ish in this case. Specifically, from 1.5"X2" (37 × 52 mm) to 1.625"X2" (41.3mmX52mm). You're achieving something closer to a square shape, which is delightful to hold.
All this to say, you have some freedom with word count, with font size, with page size. I've done as many pages as 376 and as few as 17. The fantastic thing about tiny books--their structure will not be load-bearing, meaning--the only thing stopping you are your tastes.
Quickly, some more examples of features in a regularly sized typeset and their tiny counterpart after the imposer has scaled them down. First, scaling half-letter down to A9, a little-over 4X shrinkage:
And from B6 to B9, smaller by 3x:

You notice the compression of every element, and too how entirely unparcable the text in the first example is, sometimes not horrible, sometimes very. Make your decisions dependent on your tastes!
You have decided on the fic you'd like to bind into a tiny book. I will be using my own fic as the typesetting example, and I will be using Word 365 for PC. I'm sure many of my pointers during this process might not apply 1-to-1 if you are using a different word processing software, but hopefully you can adapt the concepts to your program of your choosing.
Kay, next you will do your typesetting. Since this is not a typesetting guide I'm trusting that you have your preferred methods, but I will go through my key steps for setting up a tiny typeset:
First, for every typeset I delete each default Style, create mine own, and dictate the document size. For this example I will be doing my preferred quarter letter method, setting the custom page size to 4.25" wide and 5.5" tall, and .5" page margins all around (except Gutter; leave 0"). On the Multiple pages dropdown I will select Mirror margins (however, as all my margins are the same size, this is redundant, though may not be the case for you). My body text style will be Cardo font @ 11pt size and Exactly 15pt line spacing, with a .2" first line indent and Justified alignment.
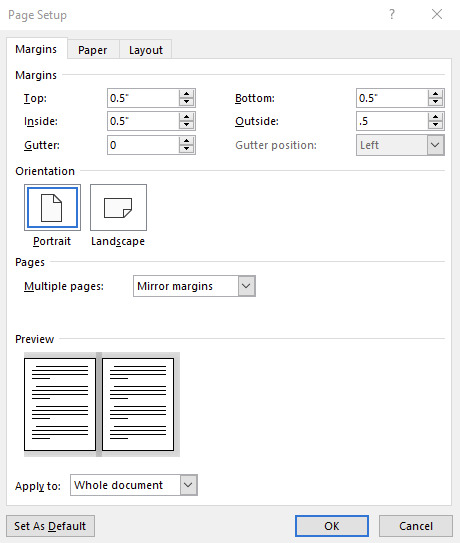
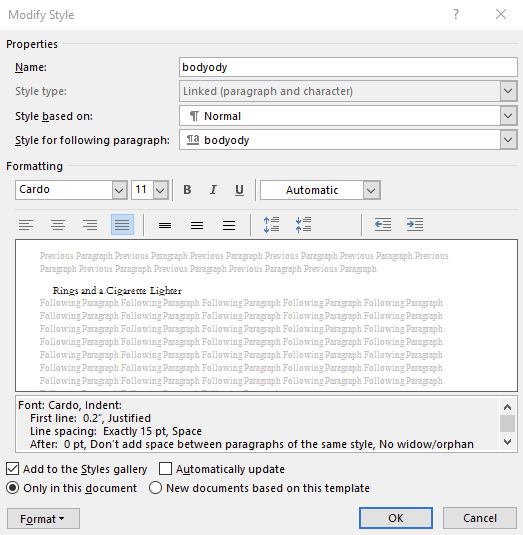
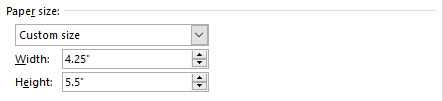
You can use whatever body font you like, I only encourage you to do many many test prints to refine your preferences. Your favorite font for half-letter books might not translate to tiny books. After ~30 tiny books I've found I like Cardo at this size and spacing. And if you're using A-paper sizes, consider doing quarter A4 instead of quarter letter, which is technically A6--4.1"X5.8", or 105mmX148mm. Follow your heart~~nyah 🐱♥
Now I will go to my fic and download the HTML file. I hugely prefer copying from the HTML file rather than the browser itself. It kind of standardizes any goofy formatting that might try to make its way over otherwise, while still preserving the italics and bolds, etc, and makes for an easier editing process. It was important I made my body Style in Word first, so that once I paste the text into my document that Style is automatically applied in one fell swoop (if not, you can change that in your Word settings. Advanced -> Cut, copy and paste -> Merge Formatting. It is a huge time saver.)
Now you've gone through your typesetting process, you have a liddle quarter letter Word document that you're happy with. Gets real close to you. Listen to me--listen, you're going to Export as PDF. Not Save As PDF. Not Print to PDF. Export. It's in--listen--it's in File, then Export, then Create PDF/XPS. You need to Export. Especially if you selected Bookfold instead of Mirror margins in your page settings because we need an unimposed PDF in order for this to work right and exporting to PDF is going to solve 99% of your pdf formatting woes with Word. Okay, I love you 👨❤️💋👨
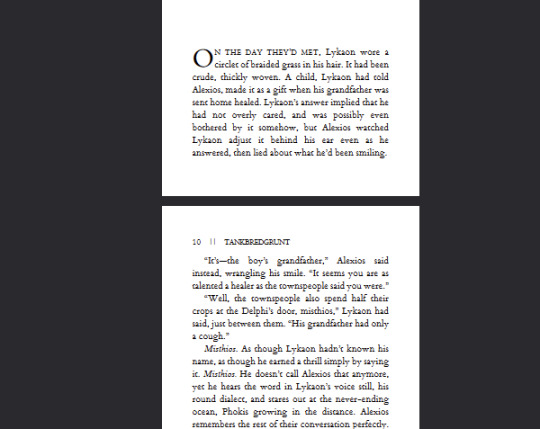
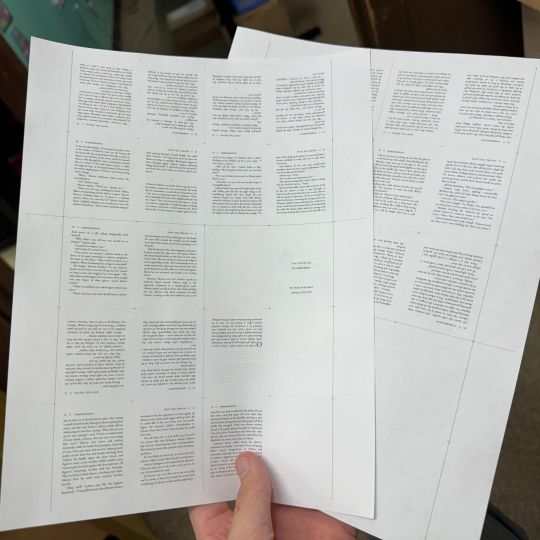
Now, your EXPORTED pdf should look something like mine. Straight, unimposed.
Now what we're going to do is take this PDF back to my penthouse and freak it. Go to this link for the Renegade Bindery-created and -curated imposition tool. This has been will be is such an incredible FREE asset to you, maintained by a crew of intelligent, skilled Renegade Bindery members who understand the importance of community and accessibility. If you find someone hiding this link behind a paywall of any kind it is not with the creators' permission, so shame on them.
Anyway I will be assuming that you know what imposing your document means. If you've never used this site before, it's very straight forward, and here are my settings for making Tiny Books.
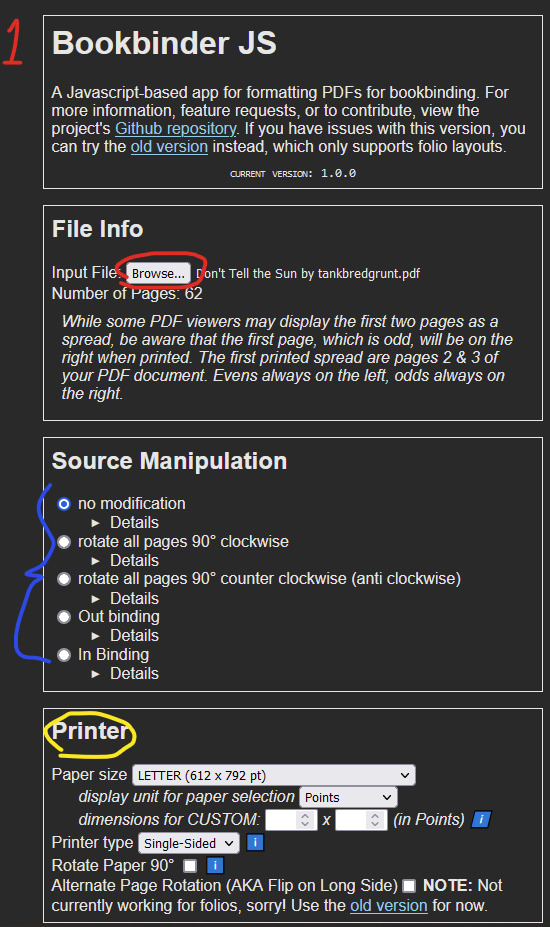
1 - Upload your unimposed exported pdf.
2 - ignore
3 - Select the paper size you will be printing on. This is not the FINAL size of the book, this is what paper you are printing on. These instructions are for Letter sized paper. Don't change any of the other settings right now, I will explain more about the Single-sided vs Duplex option in a bit.
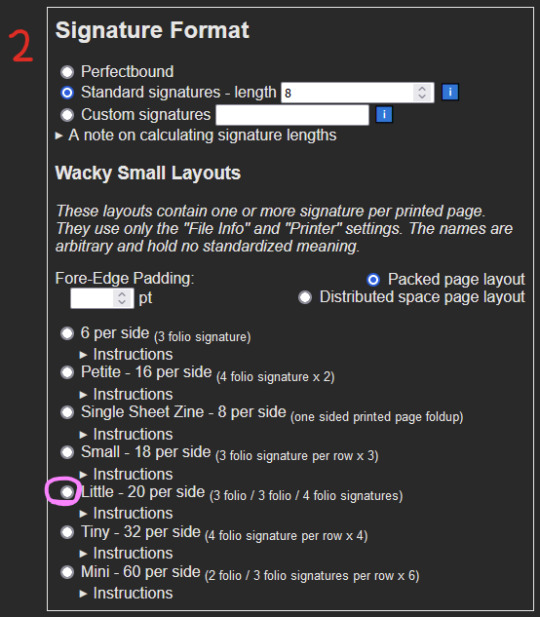
4 - Skip aaalllll the way down to Signature Format. Under Wacky Small Layouts, click on the bubble next to Little. You'll notice there are a lot of options here. I encourage you to play with these settings later on as well, there are so many things you can make with this tool.
Once that's done, scroll down to the very bottom. You'll see the Signature Info area, telling you the results of your imposition. In the case of using the Little option we've selected, 1 sheet of our paper will make 40 book pages. 3-signature-sets of 3/3/4 folio configuration. That's a lot of pages per page.
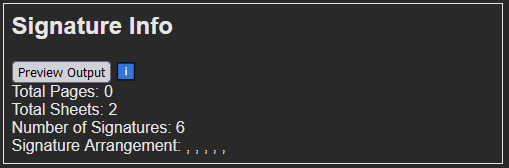
Anyway for our document today it will cost us 2 sheets of Letter paper, and will make 6 signatures. Math says that's 80 pages. Now, you may be concerned because your typeset PDF is not formatted in a number equally divisible by 40. And why would it be. The imposer is doing that math for you in the background, organizing your pages regardless. In my case, my finished typeset is 62 pages, which means that from my second page, I will only be using my 3 folio segments, and discarding the 4 folio segment. This will make more sense later. Click the Generate button, and save the zipped folder wherever you want. Don't change the name of it.
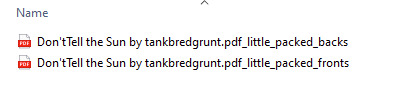
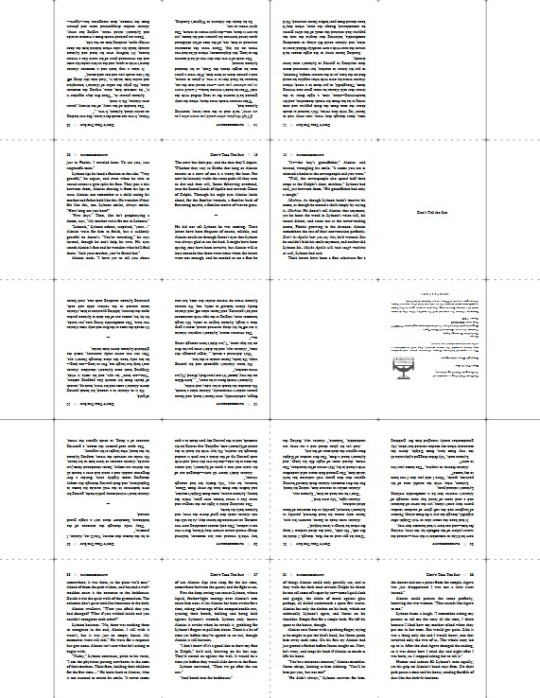
Unzip that baby, and inside you'll notice 2 files--(filename).pdf_little_packed_backs, and .pdf_little_packed_fronts. Appropriately named as one file contains one side of the sheet that will be printed, and the other file the other side.
And when you open them up, they will look like:
2 - Printing
We are manually duplexing this bad boy, because working at this scale amplifies and compounds every millimeter of difference. Manual duplexing will keep printer skew to a minimum, as the printer will not have to perform gymnastics in order to print on the reverse side of your page. Here are some examples:

Two auto-duplexing examples of skew, one horizontal and one vertical, dependent on which direction my paper was loaded into the feeder. There is significant skew. Not a horrible issue on full-sized books but these will matter much more on our tiny books, the key issue being that we do not have much to work with in the margins department. Trimming 5-6-7mm of margins of your half-letter sized textblocks might not be much of an issue; however, here, in order to remove all the trim lines during the cutting process, you will be significantly impacting the margins of your tiny textblock.
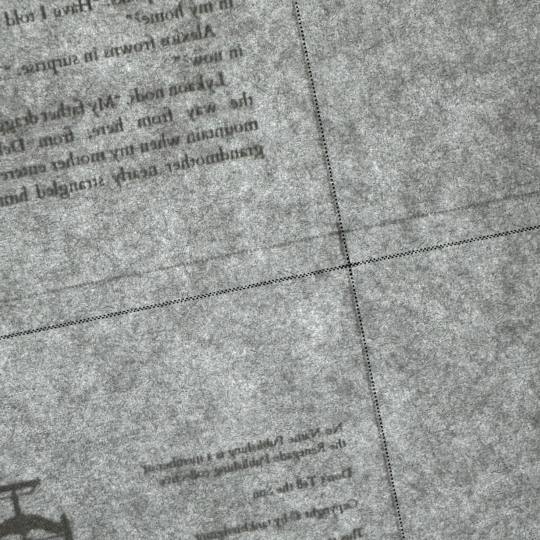
Now here is an example of the skew from manual duplexing:
MUCH subtler. Your skew with manual duplexing will range from this--less than .5mm--to no skew at all, and you will have to cut off far less of each page to remove the trim lines, maintaining the consistency of appearance of your tiny, beautiful pages. This is why during step 3 of the imposing process we selected Single-sided (which is MANUAL duplexing), and not Duplex (which is AUTO duplexing) appropriately. This will result in you either getting two files for manual duplexing, or one auto duplexing file.
Your next consideration when it comes to printing your liddle book will be whether you want to use an inkjet printer or a laser printer. I've until recently only had a laser printer available to me. I can say after about 6 or 7 little books on an inkjet printer that I prefer the laser printing on tiny books. Here is an example of why:

On the left you have a tiny book printed from an inkjet printer printed on the highest quality setting, and on the right is a tiny book printed from a laser printer. These were both printed at the same scaling, same font size, same line spacing, everything. The inkjet printer, printing at this scale, introduces pretty glaring feathering on the letters, whereas the laser printer is crisp as can be. I've said before that to me tiny books are more for novelty rather than readability, however I do still want to make out the word I'm looking at, you know what I mean? For this reason I prefer printing my tiny books from a laser printer. Use what you got though, you'll get a tiny book regardless. Make sure you're flipping on the short edge with these tiny books too, and double check to make sure your page numbers line up. And when you're done you got...
BOOK(-adjacent).
Continue on to part duex.
230 notes
·
View notes
Text

Detail shots of technical differences on Bionic Battle Granny the book and the clamshell box.
First up the inlay on the clamshell vs the onlay on the book.
The inset leather is (almost) even and level with the covering leather.

The onlay, though buffed and slightly rounded a bit along the edges, still adds visibly on the covering material. (Which is not a flaw! it's just the way onlays work.) The onlays were also part of why I decided to make the clamshell, the edges of the onlay could take damage when shoven between other books and in any case they'd be more susceptible to wear. Another reason was light and dust protection.
(I have no idea how to translate this, perhaps indrawn corners vs. cut corners would work best. Anyhow... )
Another part that differs are the corners. On the book I cut material off, pared the rest thinly and folded a tiny ledge over to cover the corner thoroughly (see the first two pictures). On the clamshell I cut some of the material off as well, but not closer to the corner. The remaining material of the turn-ins got pulled over the corner so there's only intact leather there. The downside of this is, there is too much material and it will set in folds even if spread as evenly as possible over the board. Those folds can be hammered down though and having the turn-ins pared thin helps too.


23 notes
·
View notes
Text
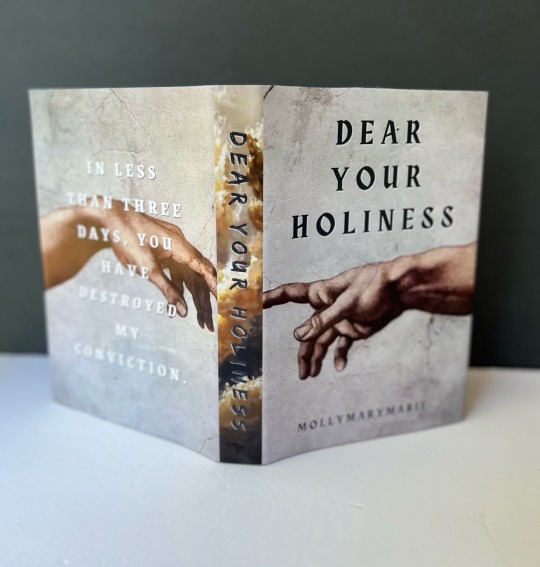


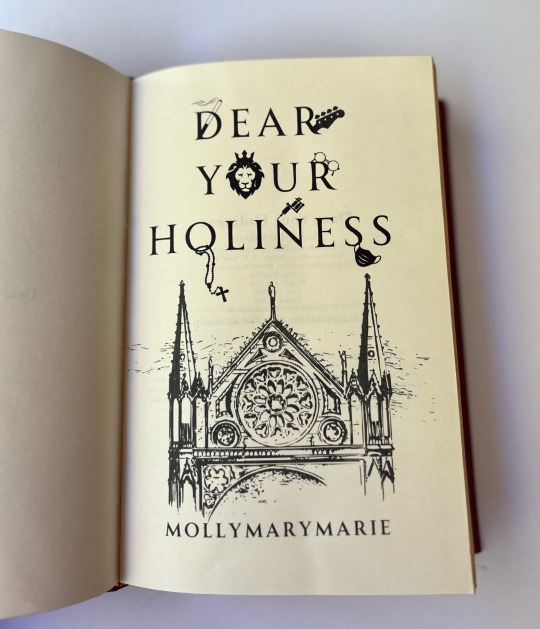
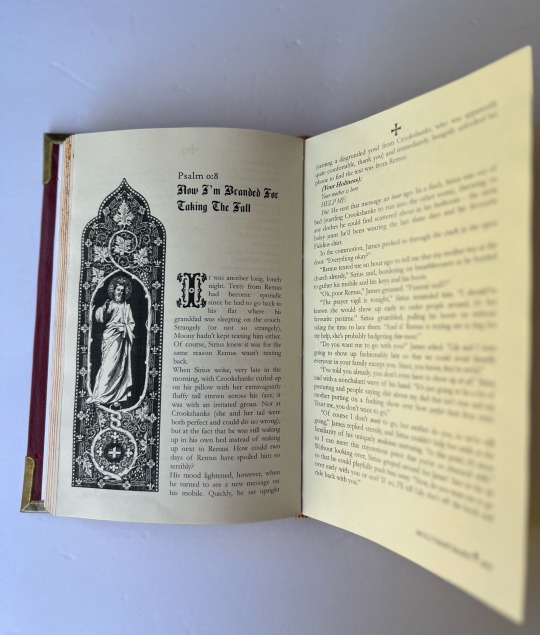
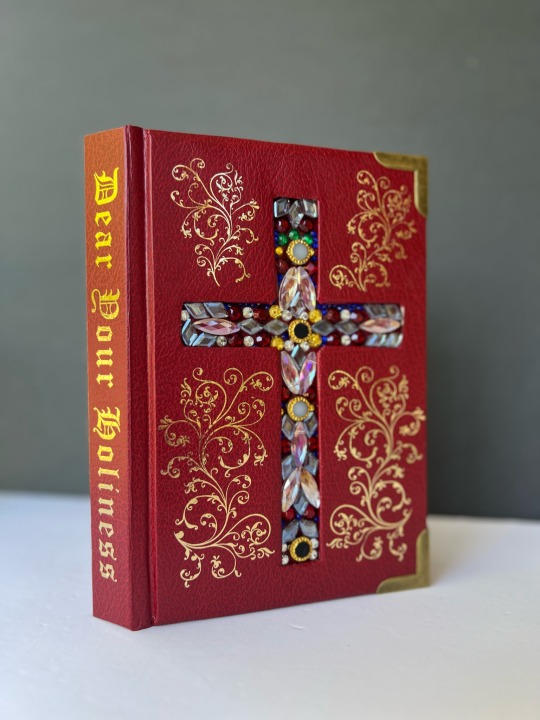


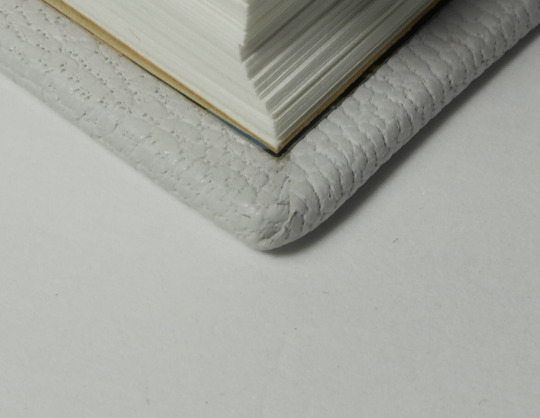
Here’s my take on Dear Your Holiness by the ever talented @mollymarymarie
This might be my fav wolfstar fic ever and I wanted to pay homage to my catholic raised self with a sacrilegious bind 😂✝️
Bible theme inspo from my dear friend Amanda.
Typeset created by yours trulyyyy.
Cross cutout was a bitch but so worth it for that gaudy look, yea?
Read on ao3 for FREEEEE.
302 notes
·
View notes
Text

On working with
ramie band
So what's the big deal about that band. Why do some like it better than the good ol' sturdy twill band that's usually used?
For one, ramie band is super thin in comparison. Despite it's synthetic look, those bands are a natural material and made from fibres of the Ramie plant (Boehmeria nivea)
Ramie band is very thin to begin with, but additionally to that, it can be frayed and spread out to glue almost evenly onto the board.
One can fray them while dry, but it's much easer to just moisten the ends a bit.
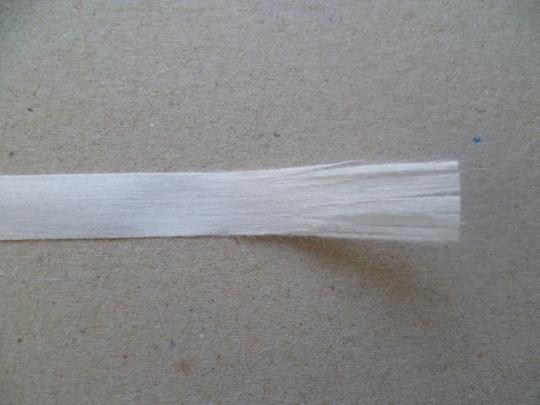
They immediately turn wavy

and can be pulled apart with ease.

Glued down like this they are very much invisible later on. If there are some parts sticking still together, they can gently be separated with a bonefolder or a needle, the tip of a knife.

If glued to the endpapers, like I have here, don't forget to put something between the endpapers to absorb moisture and prevent your textblock from getting wavy.
(Sorry for the low contrast, naturally I forgot to take a picture of the coloured papers.)
I admit, it's not as sturdy as twill and when backing a book, one needs to be a bit cautions with the bands, but that is pretty much the only thing I came across that can be an issue.
37 notes
·
View notes
Text
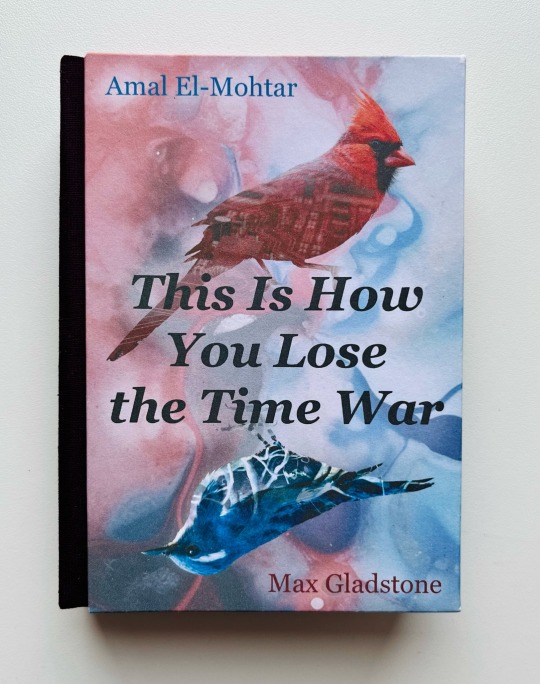
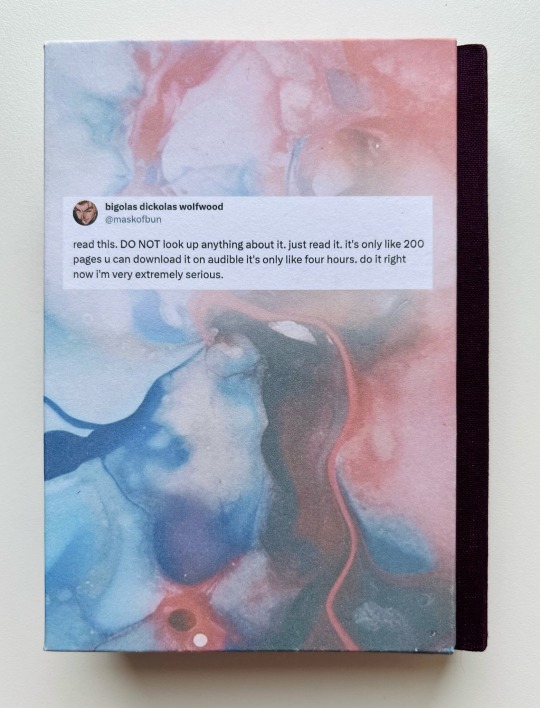


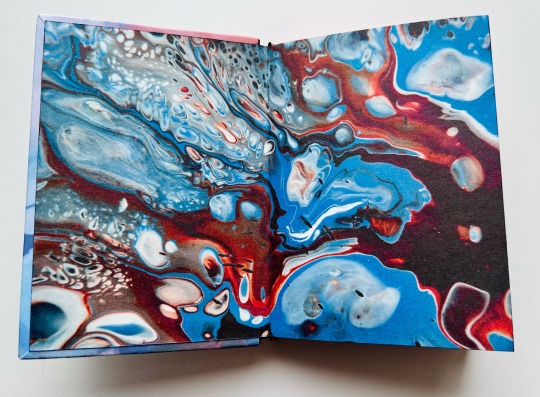
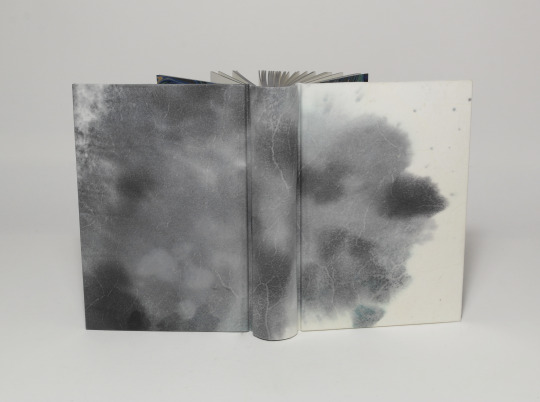
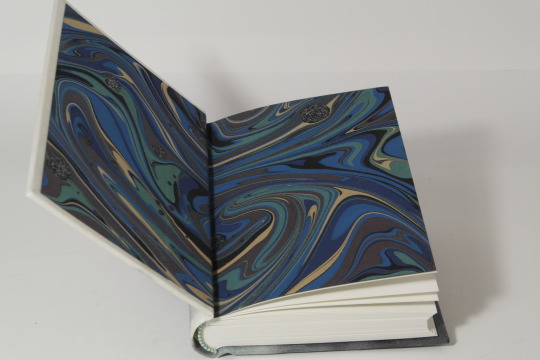
I rebound This Is How You Lose the Time War because I wanted MORE COLORS.
(And also maybe the idea of using that tweet by Bigolas Dickolas as a blurb tickled me greatly. Because that whole situation was a highlight of my month.)
❤️ Did the cover with the same birds but added plot relevant double exposure effect I’ve loved since my True Detective days.
💜 Used purple fabric for the spine, painted the edges in a fun gradient, sewn the endbands;
💙 and used lovely fluid art by Marek Okon for endpapers.
Now no one in my household stands a chance of avoiding exposure to this gorgeous story ❤️💜💙
1K notes
·
View notes