
domesticwarriorgoddess
Domestic Warrior Goddess
Crafts, cakes, and aggressively divine domesticity
18 posts
Don't wanna be here? Send us removal request.
Last Seen Blogs

leaseydouxgifs
GIFS

rdr2gifs
ain't no shame in looking for a better world

ai-blog-writer-glass
Glass Ai Blog Writer

roxwritings
The Rox Den

eceescvcs-blog
İsimsiz
Photo

So we made these tarts today for my sister-in-law's baby shower--well, we got frozen ready-to-bake tart shells, and I winged the filling for them. In fact, I'll tell you a secret: I almost never follow recipes for fillings and icings anymore. I just kind of throw things into the mixer and whip them and it seems to work, because I was really really happy with these tarts! the filling was a light, fluffy cream cheese base, not to heavy or sweet. So I thought I'd better right down what I did:
Fluffy Cream Cheese Tart Filling
2 sticks unsalted butter (room temperature)
8 oz cream cheese (room temperature)
2 tsp vanilla bean paste
1 tsp almond extract
1 cup powdered sugar
16 oz heavy whipping cream
In a stand mixer, whip the butter and at high speed until it is very pale, creamy, and fluffy. Add the vanilla bean paste and almond extract and mix, then add the cup of powdered sugar and mix, starting at a low speed to incorporate the sugar and working up to a high speed (if you start out at the high speed you're going to get sugar all over your kitchen instead of in your cream). Add the cream cheese, whipping at high speed until thoroughly incorporated.
In a separate bowl, whip the heavy cream, beginning at a low speed and increasing to a high speed until the cream is fluffy and holds soft peaks. Add half of the whipped cream to the butter/cream cheese mix and fold until incorporated, then repeat with the rest of the cream.
Pipe or spoon into pre-baked tart shells and top with fruit. This recipe filled two dozen tarts generously.
6 notes
·
View notes
Text
So this afternoon I made cupcakes and 1) I was making my standard chocolate cake recipe and I totally left out the oil, but this turned out okay? it made the cupcakes less moist but this is actually good for the cupcakes because they're usually hard to handle because they're so moist, being a little dry made them easier to unwrap, plus they domed up prettily instead of being flat, and 2) I winged some icing by basically throwing stuff into the mixer and it turned out really well! my brother was practically weeping at my feet over it.
As best as I can recall, the icing I made was
2 or possibly 2.5 sticks of butter
4 oz cream cheese
4 or 5 cups of powdered sugar
1 tsp of vanilla bean paste
1 tsp of vanilla extract (because I was running out of vanilla bean paste)
1/4 or 1/2 tsp of almond extract
I creamed the butter, cream cheese, and vanilla, then added the sugar one cup at a time at medium high speed (at first it was one stick of butter and the cream cheese, then three cups of sugar, except then I was worried I wouldn't have enough icing so I added more butter and more sugar, and another tsp of vanilla, until I was satisfied with the volume).
3 notes
·
View notes
Photo
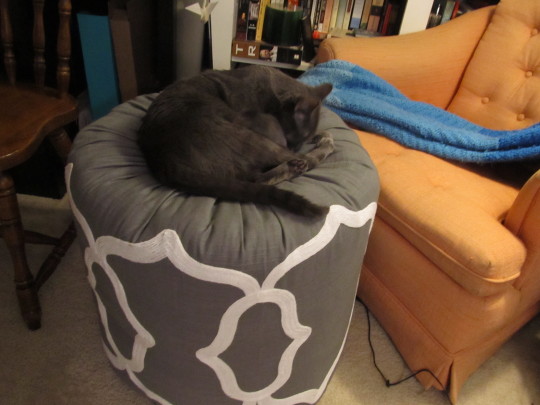


SO I made myself a tuffet! I was referring to it as a pouffe, which is the term I've seen on home decorating blogs while searching for ottomans, but then I fount out that tuffet is also a correct term for a footstool that is completely covered in fabric, so this is definitely my tuffet.
I made it to put my legs up on, the better to have my computer on my lap, but Mithril believes that I have made a giant cat bed for her.
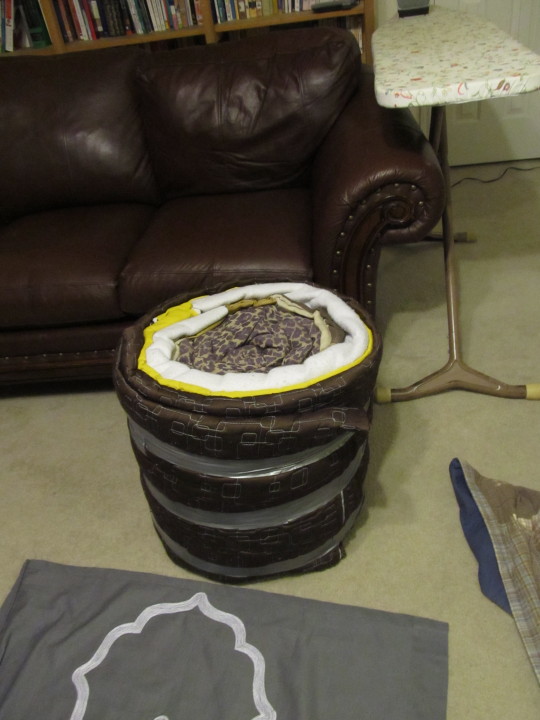
The last two pictures are the nude tuffet--it's made of old comforters, rolled up and strapped in place with duct tape, an idea that I got from Making Nice in the Midwest. Then I covered it with fabric from a curtain panel--the embroidered section wasn't wide enough, so there's a plain section in the back, but eh, it's fine.
It's super cushy, but holds its shape, is sturdy enough to be sat on, and looks pretty good if I do say so myself! I'm pleased.
12 notes
·
View notes
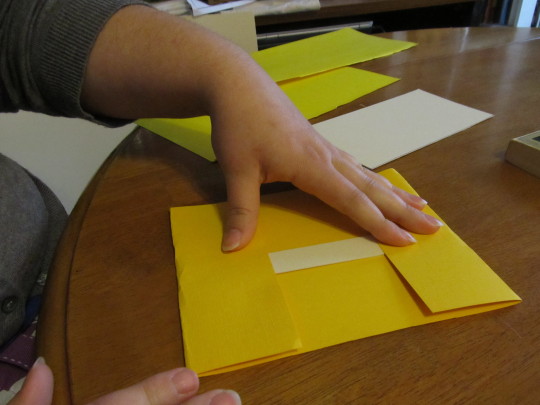
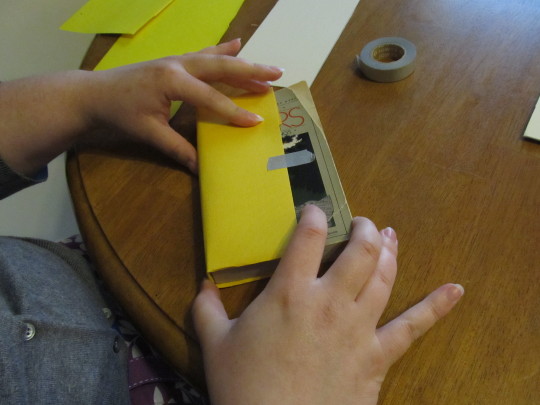
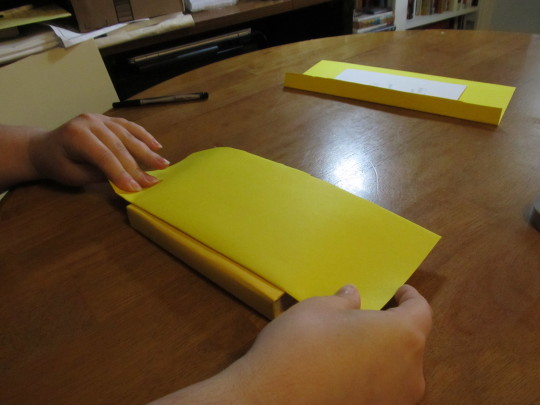
Video
Turning a Paperback into a Hardback (by Charis Ellison)
I made a video tutorial for turning a paperback book into a hardback! ...it's not the greatest or most coherent tutorial in the world, because I'm not actually covering a book, I'm just acting it out to demonstrated how the pieces go together (as described in this post) but I hope that it's still helpful!
11 notes
·
View notes
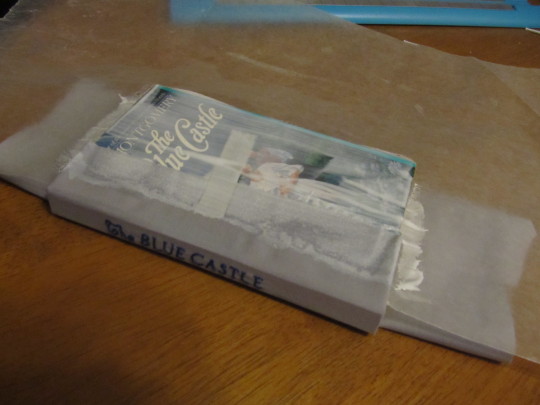
Photo


PART TWO: Making a Book!
Step One: Supplies!
Your embroidered fabric (plan fabric or fancy paper will also work!)
Modge Podge, matte finish ($7 for a large jar--but a small jar would be plenty)
Wide paintbrush
Masking tape
Mat board (found in the framing section of craft stores like Michael’s--$3 for a large sheet)
Scrapbook paper (50 cents for one sheet)
Wax paper
Now things will get complicated, and my pictures aren't the best, but I'll do my best to explain things clearly and hopefully it will be coherent!
I didn't get any good pictures while I was making my recovered Blue Castle, so I took supplementary pictures of me pretending to recover another book--I didn't actually do any gluing, however, so you'll need to use your imaginations to picture the modge podge :P
Step Two: Cutting out the cover pieces!
Cut pieces of mat board for the front and back covers, and the spine. The cover pieces for the front and back should be a quarter inch narrower than the width of the book, and about an 8th of an inch taller. The spine piece should be the width of the book’s original spine, and also an 8th of an inch taller.
The fabric or paper that you use for your cover need to be at least two inches wider on every side than the mat board pieces that you just cut out, so that there's plenty of overlap to be folded over.
Step Three: Attach the fabric to the cover boards
Brush each piece of cut mat board lightly with modge podge, and then carefully smooth the fabric down onto it. (if your fabric is thin, like mine was, use a spray on adhesive for this step instead, because the modge podge bled through and I had to brush additional modge podge on top of the fabric, so that the spots would all blend in. This worked out and looks fine, but did darken my background fabric). On the embroidered pieces it may take a little stretching and pressing to work out air bubbles and waviness in the fabric, so just work slowly and carefully.
On the spine piece, fold the fabric over at the top and bottom, using modge podge to glue it down. For the front cover fold over the left side, and for the back cover fold over the right side (the sides that would be toward the spine). I gave everything a little while to dry, so that things wouldn’t get skewed with handling.
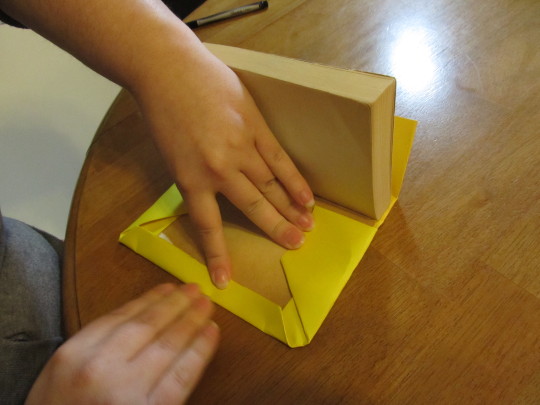
Step Four: Attach the new cover to the book!
Put a piece of wax paper in your book to protect the page from glue drips! This step is very important.
To attach the new cover to the book, I started with the spine, using small pieces of masking time to hold it in place. Don't put any modge podge on the original spine--you don't want the new spine to actually be stuck down, it needs to move freely when the book opens and closes. Brush the back cover of the book with modge podge, making sure that the wrapped around edge of the spine fabric is well saturated and stuck down, and then lay the new back cover down on that, with the folded over edge about a quarter of an inch from the edge of the spine.
Fold the raw fabric edges of the new cover over the old paperback cover, coating them with modge podge and making them as flat as possible, and then (with the wax paper in between the back cover and the book pages!) closed the book, and flip it over to repeat the process with the front cover.
Once both covers were on, I laid another piece of wax paper on top of the closed book, and put a heavy book on of it for 24 hours, so that everything would dry nice and flat. (Confession: I use the Compact Oxford English Dictionary way more often as a weight for craft projects than as a reference book). Modge Podge dries quickly, so 24 hours was probably excessive, but I didn’t want the boards to warp while they were damp from the glue.
Step Five: Ending with endpapers (...sorry)
The finishing touch isto add endpapers, to cover the raw fabric edges folded over to the insides of the covers. I just used an ordinary sheet of scrapbook paper, cut rectangles slightly smaller than the cover, brushed the inside of the cover with modge podge, smoothed on the paper pieces, and (again with the wax paper protecting the book pages!) closed the book and put the Oxford English Dictionary on top of it again for an hour or two, to make sure everything dried flat.
And then it was done!
This is a really easy way to update any paperback into a new hardback, and you can cover your book with fabric (which you can embroider) or paper (which you can stamp, paint, draw on, etc). The possibilities! they are endless!
#tutorial#the domestic warrior goddess answers questions#embroidery#Embroidered Books#embroidered book#the blue castle
24 notes
·
View notes
Photo


Step One: Supplies!
Embroidery hoop (I used Q-Snap Frames - 11" x 17" simply because I had it on hand--$15.00)
Iron transfer pen (I used Sulky - $7)
Heavy tracing paper (Vellum $16.50--this transfer pen should work with regular paper, however)
Embroidery needles (about $4 for a package)
Embroidery floss (about $1 for two skeins)
Fabric (about $1 for half a yard of cotton broadcloth—although in retrospect I would have gotten better results with a heavier fabric)
Step Two: Design!
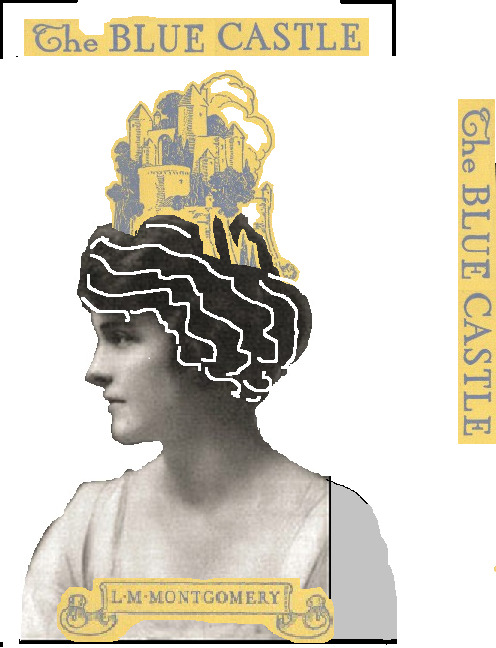
I had a very clear mental image of the design I wanted, but I’m not the best at drawing freehand—it would have taken me ages to get a sketch that was what I wanted, so instead I made a very sophisticated digital mock-up. I used the title and castle image from the original hardback cover, combined them with a vintage portrait found on a Google image search, sized it to fit the dimensions of my book, and printed it out.
You can download the design here!
Step Three: Image Transfer!
To transfer my design to my fabric, I used an iron-on transfer pen and vellum transfer paper. The image needed to be mirrored, so that everything would be facing the right way, so first I laid my vellum over the printed mock-up and traced it in red pen, then I flipped the vellum over, tracing over the red pen outline with my transfer pen. I could have skipped the red pen step by printing out a mirror image in the first place, but the printer was giving me fits :P
Once I had the reversed design drawn out with the transfer pen, I ironed it onto my fabric (which I had pre-ironed), and it was ready to go.
For information on a few different iron-on transfer products, read this post and this post at Needle 'n' Thread.
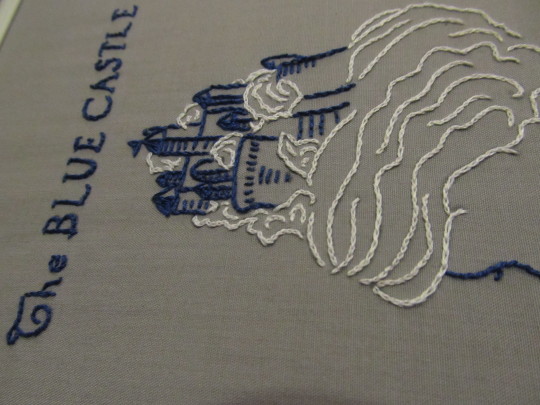
Step Four: Embroidery!
By far the most time consuming part of the process, but doesn’t really need a lot of describing :P I watched a bunch of old Law & Order episodes (everything else I tried to watch was too distracting, but Law & Order is an ideal crafting background because they really spell things out, so you can follow the plot even if you hardly ever look at the screen, plus the format means that you don’t have to keep track of a larger story arch, and you can watch random episodes without worrying about the order. Also there’s lots of it!), and I embroidered.
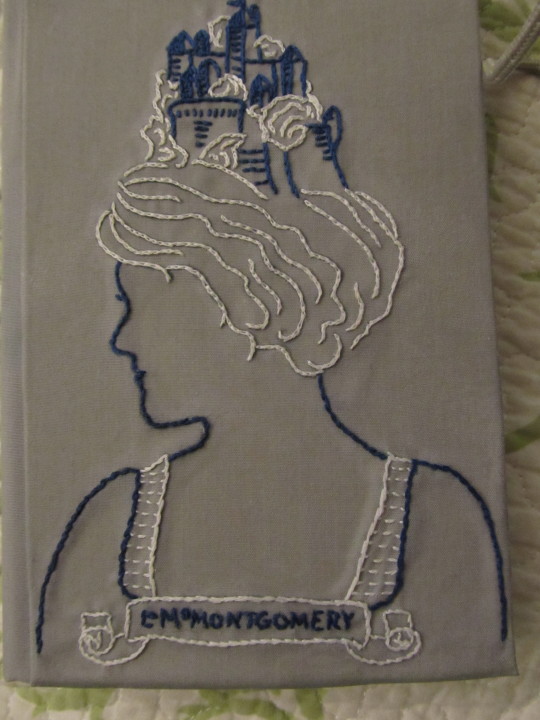
I used split back stitch (when I was little I made up this embroidery stitch and used it all the time on my various random projects—I was always embroidering on random pieces of fabric and making tiny throw pillows out of them—and I didn't know that it was a real stitch with an actual name until recently) for the hair, stem stitch for the title and most of the outlines, a little bit of back stitch for the author’s name and the shading lines on the castle, and my two first French knots :P I did my best to keep the back of my work neat and as flat as possible, without big knots or lumps, since it was going to be glued down later.I didn't time myself, but I guess (based on the number of Law & Order episodes I seem to have watched, according to Netflix) that the embroidery took me about 12 or 15 hours.
If you're new to embroidery, you can check out Needle 'n' Thread for tutorials and videos--don't be intimidated by the advanced embroidery projects that she does! she also has lots of information for beginners.
Up next--turning a paperback book into a hardback, with your new beautiful embroidered cover!
#tutorial#the domestic warrior goddess answers questions#embroidery#embroidered books#the blue castle
49 notes
·
View notes
Photo
Thank you! I'm so glad that you like it so much <3
I am going to post a tutorial on the method I used, and I'm going to post the embroidery pattern that I made, so that anyone with a crafty inclination can make their own! That will go up just as soon as I get a scanner to cooperate with me, and get a few good pictures to illustrate the instructions--hopefully that will be available tomorrow evening!
However, I've also put some thought into it, and I decided that for those who aren't crafty or don't have the time or inclination to recover their book, I'm willing to make embroidered books on commission! buuut...I'm afraid they will be kind of expensive *cough* There's no getting around the fact that it's a pretty labor intensive project and takes up a lot of time.
....as a rule I'm the most awkward about asking people for money (occasionally I bake cakes on commission, and in terms of supplies and time, I often barely break even, because I hate to say 'Yes, I am a total amateur, but please give me $50' even though I made delicious cakes and will totally pull all-nighters trying to make something amazing when I'm only getting $25 for it).
So, I'll be putting up the tutorial soon, but if someone just wants to give me $80, I will make one for them!
That's $80 for a rebound mass market edition like the one above, which is about 6.75" x 4.15"--a lovely petite little book! The turn around time would be about three weeks, depending on factors such as whether I have a copy on hand, ready to be rebound.
If you're interested, just message me!
And if you're interested in commissioning a different book or a different size of book, feel free to contact me! and I'll get back to you on whether it's something I can do, and what the estimated cost and turnaround time would be :)


I should really be in bed right now, but before I climbed under the covers I thought I would check on my project, and it was dry! And I am so bananas excited about it that I had to take a few mediocre pictures to show off!
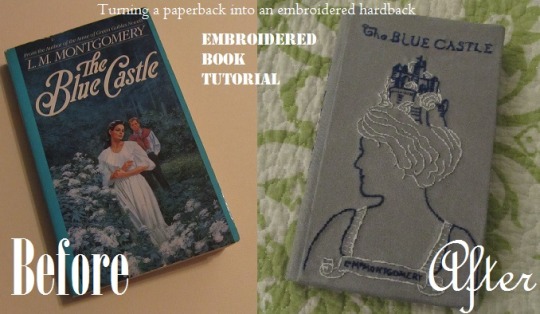
First, the Before picture—my paperback copy of The Blue Castle, with its totally irrelevant cover art (who are these people supposed to be? not the characters in the book, that’s for sure).
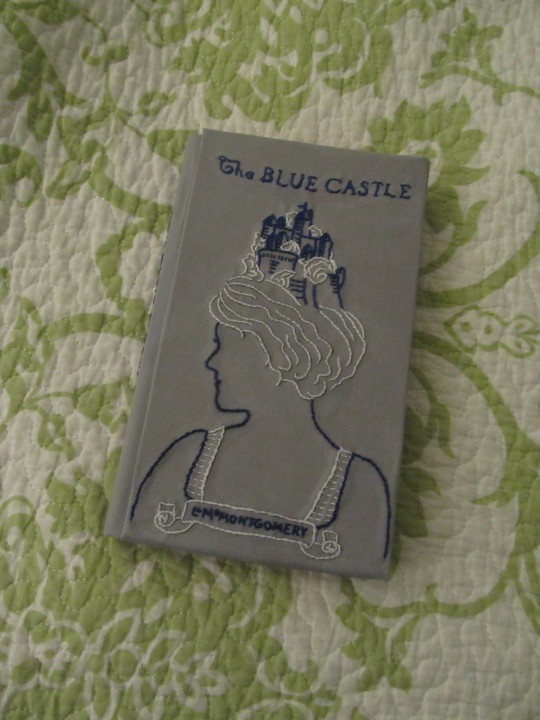
And second, the After picture—that same paperback, reborn as a hardback with an embroidered cloth clover!
The embroidery was my project this weekend—I’m not very quick, and very out of practice, so I estimate that it took me at least 12 hours. Turning it into a new cover didn’t actually take more than an hour or so, but had to be spread out over a couple of days so that things could dry in stages. I finished most of it last night, but this evening I glued in the endpapers (I’m in love with this feather paper, I must go back and buy ten sheets of it) and now it is Completely Finished.
I’ve been daydreaming on this project for a couple of years now (…I’m really slow with craft projects. I dwell lovingly on them for ages, then make things in short bursts) and I’m really happy with the result. There are a handful of imperfections that I’m disappointed with (the fabric I used was much too thin! and some corners aren’t perfectly square…) but for my first attempt, I’m pleased.
161 notes
·
View notes
Text
ohdappledthings reblogged your post I should really be in bed rig... and added:
Dude, you are awesome.
<3!
justonesyllable reblogged your post I should really be in bed rig... and added:
Seriously this is perfect. They should pay you to design covers for every Maud book.
Thanks! :D I do have a whole stack of L.M. Montgomery paperbacks that I got from a friend--I haven't read any of them yet (would you believe that other than the Anne books, The Blue Castle is the only one I've read? soon to be remedied!) but I have a suspicion that eventually they'll all get covered :P
jonimakesstuff reblogged your post I should really be in bed rig... and added:
THIS. THIS IS PERFECTION
:D Thanks!
idiosyncreant reblogged your post I should really be in bed rig... and added:
That is amazing! I also covered my copy, same paperback, but just with a collage of blue castles and other cover art...
That sounds awesome! (I don't know who thought this cover was a good idea...someone who was trying to sell a different book, I guess?)
knitphilia reblogged your post I should really be in bed rig... and added:
Oh wow! My friend and I were just talking about this book over the weekend. And yes, the embroidered cover is a vast improvement. I love it when people make stuff, because.
:)
matterofawesome reblogged your post I should really be in bed rig... and added:
Wow! That’s so cool!
Thanks!
anonsally reblogged your post I should really be in bed rig... and added:
This is AMAZING and I want one! My hardback has a less horrible cover, but it has a rather nondescript looking photo of a castle that is faintly blue, and this cover is much, much prettier and more evocative.
Thank you!
fiercebunny reblogged your post I should really be in bed rig... and added:
This is really lovely! What a good idea for a project.
Thanks!
Thank you so much to everyone who liked and reblogged and commented on my embroidered Blue Castle! <3 It absolutely made my week that so many people liked my project and said nice things about it! I love you all :D
#ohdappledthings#justonesyllable#jonimakesstuff#idiosyncreant#matterofawesome#knitphilia#anonsally#fiercebunny
0 notes
Note
How did you make the Blue Castle cover? I have the same ugly '80s cover, and I'd love to try embroider a cover. Did you glue the cloth onto an old book cover, or make your own from cardboard? Did you design the embroidery yourself?
You're in luck! I was just getting ready to put together a tutorial, and hopefully it will be ready to post tonight or tomorrow--the pictures won't be great, since I took them as an afterthought while I was making it, but hopefully it will still be coherent!
The fabric for the cover onto pieces of mat board (from the framing section at my craft store) and then glued onto the paperback cover.
I did design the embroidery myself--it's a combination of elements from the original hardback cover and a vintage photograph that I used as a reference. If the scanner will cooperate, I'll post a template with the tutorial! if you have any questions, just let me know :)
#the blue castle#embroidered book#embroidered books#embroidery#the domestic warrior goddess answers questions#crafty#chantelandbooks
2 notes
·
View notes
Photo
I should really be in bed right now, but before I climbed under the covers I thought I would check on my project, and it was dry! And I am so bananas excited about it that I had to take a few mediocre pictures to show off!
First, the Before picture--my paperback copy of The Blue Castle, with its totally irrelevant cover art (who are these people supposed to be? not the characters in the book, that's for sure).
And second, the After picture--that same paperback, reborn as a hardback with an embroidered cloth clover!
The embroidery was my project this weekend--I'm not very quick, and very out of practice, so I estimate that it took me at least 12 hours. Turning it into a new cover didn't actually take more than an hour or so, but had to be spread out over a couple of days so that things could dry in stages. I finished most of it last night, but this evening I glued in the endpapers (I'm in love with this feather paper, I must go back and buy ten sheets of it) and now it is Completely Finished.
I've been daydreaming on this project for a couple of years now (...I'm really slow with craft projects. I dwell lovingly on them for ages, then make things in short bursts) and I'm really happy with the result. There are a handful of imperfections that I'm disappointed with (the fabric I used was much too thin! and some corners aren't perfectly square...) but for my first attempt, I'm pleased.
#I made a thing!#embroidery#embroidered book#The Blue Castle#l. m. montgomery#crafty#I'm afraid I am responsible for this#Domestic Warrior Goddess
161 notes
·
View notes
Video
youtube
How to Neatly Fold a Fitted Sheet (by Charis Ellison)
I did an informal survey on Twitter, and it seems that a lot of people find folding a fitted sheet nightmarish and possibly impossible. But it's not impossible! I have made a video of mediocre quality to demonstrate!
14 notes
·
View notes
Text
Charis in the Night Kitchen
so it's 1am and I'm baking, of course. The vast majority of my baking happens in the wee hours. If I ran a bakery, it would open in the middle of the afternoon and run into the late morning, and I would call it the Night Kitchen, and sell both desserts and breakfast pastries, and cater to insomniacs.
I'm always reading about exotic cake recipes that sound incredible and exciting, but on reflection I don't deviate very often from my tried and true recipes--I experiment wildly with fillings and icings, once I figured out the basics and realized how easy it is to make icing by completely winging it (MY FAVORITE I've trained myself to follow recipes carefully but in general I like to wing things).
While my cake is in the oven, maybe I should make a master list of my go-to cake recipes?
Here it is!
Chocolate Cake: this started as the Hershey's Perfectly Chocolate cake but I've adapted it over the last few years, and here's the result--
2 cups white sugar
2 cups all-purpose flour
3/4 cup cocoa powder (1 cup if you want a denser, less sweet cake)
1 1/2 teaspoons baking powder
1 1/2 teaspoons baking soda
1 teaspoon salt
2 eggs
1 cup buttermilk (or 1 cup milk, 1 Tbs vinegar)
1/2 cup vegetable oil
2 teaspoons vanilla extract
1 cup boiling water
Oreo Cake: My basic chocolate cake, with a whole package of oreos roughly chopped and divided between the cake pans.
White Cake: Cupcake 29 from Ming Makes Cupcakes--I double it to make two 9in layers, and it's never failed me.
I also love the Fluffy Vanilla Cake from Sweetapolita, but this one's a little more delicate--it's amazing, but I don't have a 100% success rate with it.
Yellow Cake: Best Birthday Cake from Smitten Kitchen
Gluten-free Cake: Heavenly Chocolate Roll Cake from Smitten Kitchen
Red Velvet Cake: Red Velvet Cupcakes from Brown Eyed Baker
Icings! Frostings!
Salted Caramel Buttercream from Sprinkle Bakes
Whipped Cream Cheese from Brown Eyed Baker
Whipped Vanilla Bean from Sweetapolita (I especially love this recipe because it's a cinch to memorize)
The Perfect Crusting Buttercream from i am baker (to make it chocolate, I just add cocoa to taste, with extra milk in small increments to correct the texture)
And that's it! Those are the cake recipes that I reference the most! The end!
20 notes
·
View notes
Photo

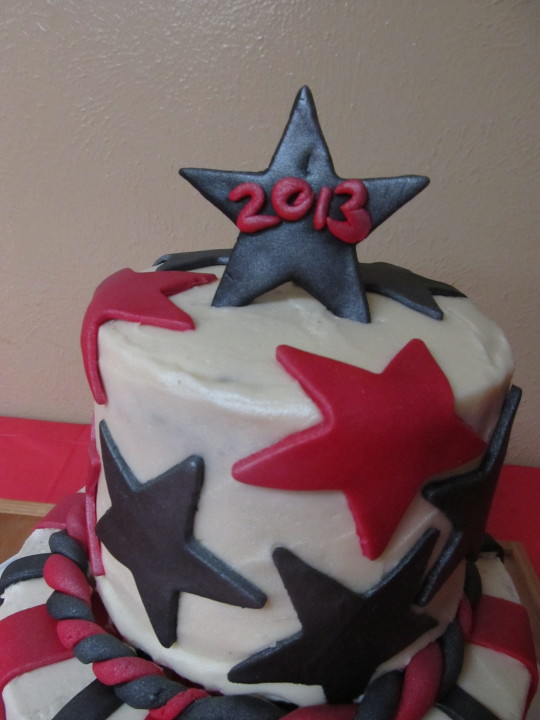

Another cake! this one was for a lunch at my parents' church, honoring the high school graduates (there were two, and one of them was my little brother).
Poor cake--it was hastily slapped together (...because I'd totally forgotten about it until 6:30pm the night before, and wasn't able to get started on it until after 8pm, and was up with it until 4am), and then it got a little beat up during transit (my chocolate cake is delicious, but not really dense and firm enough for tiers, and there was some settling), and some unidentified person put a fingernail into the star topper.
BUT it went over very, very well, and I got a ton of effusive compliments from people, who were apparently looking at a totally different cake from the one I saw :P
#cakes#CAKE CAKE CAKE#I'm afraid I am responsible for this#I'm totally a domestic goddess#Domestic Warrior Goddess
4 notes
·
View notes
Photo


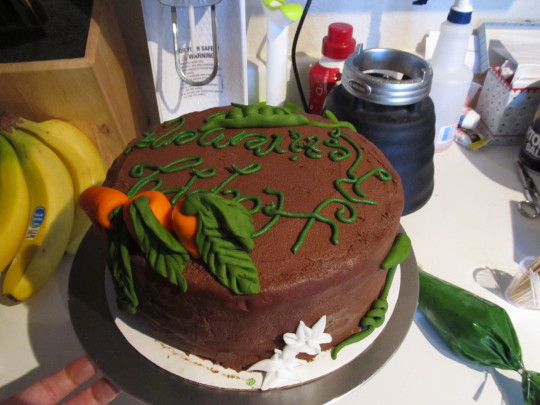
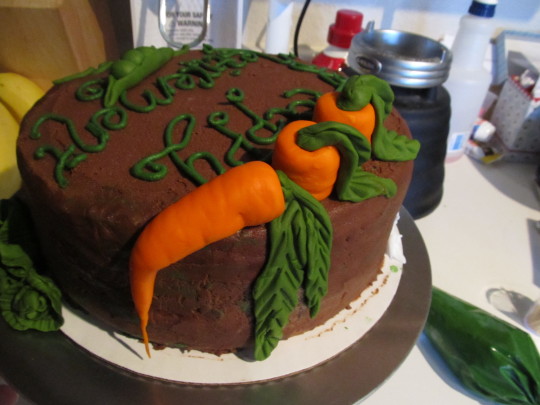

Stuff I did! made a garden-themed retirement cake. Decorations made of fondant. Check out those carrots. I love those carrots.
#CAKE CAKE CAKE#cake#cake decorating#I'm afraid I am responsible for this#I'm totally a domestic goddess#Domestic Warrior Goddess
7 notes
·
View notes
Text
Day one of Whole 30 down, easy up until junk food cravings hit after dinner. Day....three? Of baking soda in the hair. Working a paste of baking soda into roots way more effective than bs dissolved in water, hair felt flat but clean, but the roots were gross again by end of the day. Washed again, hopefully I can taper off. Don't want to overdo it. Did the same shower routine as yesterday, I like it but it has a lot of steps and takes 40 mins. Bathroom needs cleaning, so does litter box, and room needs vacuum. But I put away my folded laundry. Now after attempt at early bedtime failed and left me with less than four hrs of sleep, I am going to bed even earlier, with less exciting book. Hopefully I conk out almost immediately.
1 note
·
View note
Text
A note about my hair—my actual hair still feels kind of gross and not-quite-clean, but my scalp feels fantastic. In the past I’ve always had a problem with gross flaky build-up on my scalp—as in, scratch my head, come away with stuff under my nails and flakes all over my shoulder (I KNOW GROSS, RIGHT?? you suddenly understand my willingness to do weird things like rub baking soda on my head). But after three days my scalp feels totally free of that kind of thing.
A good sign!
2 notes
·
View notes
Text
Tomorrow I start the Whole 30 diet. It's going to be very exciting, since I'm also on my period. No dairy! no sugar! no processed foods! no bread! no other gluten!
Basically vegetables, fruit, and lean meat. Oh, and eggs. For 30 days. It'll be interesting!
I'm also switching to baking soda in my hair instead of shampoo. My hair is really oily but I also get horrible dandruff, and a friend of mine with a similar problem made the switch and loves it. The adjustment period is...fun. The internet tells me that it will take a week or two weeks for my hair to adjust and stop feeling gross, but in the meantime gross it is.
I've been using the oil cleansing method on my face for a while, and I decided to start using it on my body as well--I'm plagued by the fact that I haven't been able to get a spray bottle that works properly. The one I have is supposed to be adjustable, but it won't spray a mist, only a stream, which is useless. Tonight I sprayed a washcloth with oil and wiped myself down with it in order to get a light, even coat on myself.
The hardest thing about all of these changes is working them into a routine. This evening I dampened baking soda, worked into the roots of my hair, then let it sit while I oiled and steamed my face. Then I used the same washcloth I'd used for my face to wipe oil over myself and scrubbed myself under hot water, rinsed my hair, then sprayed vinegar over it, let it sit while I scrubbed myself some more, then rinsed. It seemed to work well enough. My hair is still not feeling less oily, but my body feels nice and clean.
....all of this will be very useful when the new Dark Age comes and commercially produced bath suds are impossible to find. Stockpile baking soda, castor oil, olive oil!
#oil cleansing method#baking soda#hair care#Whole 30#rambling about my hygiene#because you care so much#I know you do
4 notes
·
View notes