crazyexomnivore-blog
Crazy Ex Omnivore
Vegan, Wheat Free, Ethical Cooking
3 posts
Don't wanna be here? Send us removal request.
Last Seen Blogs

letmego-watchmefall
Let me go, watch me fall.

pinlink-pr
FanStream

otherworldnotebook-blog
The Otherworld Notebook

sevenxvirtuesx
main character syndrome

bottes-ugg-en-soldes-4-blog
bottes ugg en soldes - nouvelle collection ugg
Text
Flours For All Occasions
I need to start out by saying I am not a nutritionist, I’m just a bitch with WiFi who studied some #scienceshit and knows an unhealthy amount about food because of all the awful diets I’ve put my body through and all of the allergies I have. Fortunately for you that means I have a decent amount of food knowledge and I’m going to put some of it right here. So let’s talk about FLOURS. (disclaimer: this article is named for my favorite bar which is presumably named after every flower shop ever, I know it’s not original).
Rice Flour
Properties: Rice flour is my all time favorite wheat-free flour. It is easy to digest, flavor-neutral, and produces the best cakey texture in baked goods (especially when mixed with coconut flour!). Although brown rice flour is more nutritious, I’ve found that white rice flour produces better desserts, so if you’re making an occasional treat it’s definitely the way to go. I don’t want to tell you how to live your life but if you’re baking with anything else you’re wrong and I hate you. Also rice pasta is the best pasta and lentil pasta is stupid.
When to use: Cakes, muffins, brownies, cookies
Rating: 11/10
Tapioca Flour
Properties: HELLA starchy. Like the starchiest besides cassava flour (which I’m only not writing about because I pretty much never use it, write what you know, ya know?). It’s basically pure starch so it’s great as a thickener or a binder, you’ll see me use it a lot in baking rather than eggs (we’ll talk about how dumb most egg substitutes are in a future post). Just like never use this as a base in baking, it will not be good no matter what you do.
When to use: Gravys, pot pies, sauces
Rating: 9/10
Coconut Flour
Properties: Coconut flour is relatively low on the glycemic index and keto compliant if used in reasonable serving sizes, so overall it is compatible with *most* dietary restrictions. The high fiber content is convenient if you're counting net carbs or if you generally just care about your digestive system. Although it gives a good fluffy texture to baked goods that most non-wheat flours lack, whatever you make will have a slight coconutty flavor, so just be ready for that. I usually use it half and half with rice flour.
When to use: Pancakes, cakes, muffins
Rating: 8/10
Almond Flour
Properties: I mainly only added this to the list to talk mad shit. Yes it’s nutritious and good and bakes well and WHATEVER but STOP BUYING SO MANY ALMOND PRODUCTS. Almonds are a high irrigation crop and are DESTROYING CALIFORNIA. I’ll probably write more about this in my ethical shopping blog post but like trust me it’s not worth it. Rice flour is better anyway.
When to use: Never, unless you HATE THE ENVIRONMENT
Rating: 0/10
Oat Flour
Properties: Be careful because not all oat flour is gluten-free, check the packaging! Or even better, make your own by blending natural oats in a high power blender. Although high in fiber oat flours is not the greatest if you’re trying to do keto, and I’ve never gotten it to be “fluffy” in baking, but it is hearty and has a pretty neutral flavor.
When to use: Cookies, breakfast bars, hearty breads
Rating: 6/10
Buckwheat Flour
Properties: So buckwheat is a seed (I just googled that so don’t feel dumb if you also thought it was wheat). It has a pretty high mineral content and is good for digestion and blah blah blah…. But I rarely use it. If you’re going for healthy it’s a great alternative, but it usually tastes healthy, so you know, balance.
When to use: When you hate yourself
Rating: 6/10
Obviously there are more flours you could use (chickpea, amaranth, etc.) but I haven’t really experimented with them, but if you want me to I will. I have a lot of shitty stupid allergies and I’m assuming that a lot of you do too, so tell me what they are, I am here to accommodate you. Allergies suck but our food doesn’t have to.
#bobs red mill#gluten free#gluten intolerance#gluten free baking#glutenfree#wheat free#wheatfree#wheat allergy#rice flour#almond flour#tapioca flour#buckwheat flour#oat flour#coconut flour#educational post#nutrition#information
22 notes
·
View notes
Text
Vegan Wheat Free Pumpkin Chocolate Chip Bars
youtube
I always skip past the blog part of recipes so why am I writing one? Just look at the recipe that’s what we’re here for.
Ingredients
¾ Cup White Rice Flour
¾ Cup Coconut Flour
¾ Cup Brown Sugar
¾ Cup White Sugar
1 tsp Salt
1 tsp Baking Powder
1 Tbsp Tapioca Flour
1 tsp Ground Cinnamon
1 Cup Pure Organic Pumpkin Puree
½ Cup Sunflower Oil
1 tsp Vanilla Extract
¼ Cup Cold Water
1. Preheat your oven to 350. Or don’t. Does preheating do anything? Probably. Combine all of the dry ingredients and stir until it’s not super lumpy.
2. Add the wet stuff, use your best judgement here, pumpkin is definitely wet despite what people may tell you. Wait on the water though, let it hang for a sec.
3. Mix everything with a hand mixer, if the flour flies it flies, it’s in God’s hands now.
4. Add the water a little at a time until you don’t need anymore, again use your best judgement, or just watch the video.
5. Bake for 25 minutes and DO NOT open the oven while baking. Never do that. I will say this every time. When they come out they should be solid but don’t like, burn them. Or do. Live your best life honestly.
#vegan#gluten free recipes#gluten free#vegan recipes#gluten free baking#gluten free vegan#vegan baking#pumpkin#pumpkin spice#fall baking#spoopy#spooky scary skeletons#vegan dessert#dessert#desserts
85 notes
·
View notes
Text
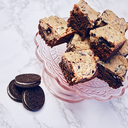
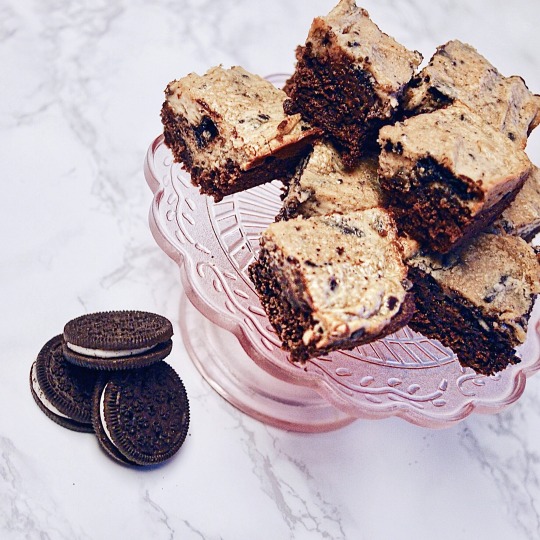
Vegan, Gluten Free Oreo Cheesecake Brownies
youtube
Vegan cheesecake is pretty much never good and we all know it. Not everything needs to be healthy, i’m not going to eat cheesecake brownies every day, so when I do they might as well be fucking amazing. It’s a waste of calories to eat something “healthy” (that’s probably pretty high calorie anyway) when you really just want a dessert. I have a lot of restrictions (some dietary, some ethical) but that doesn’t mean I can make the things I crave.
I’m allergic to wheat, which makes everything suck extra hard, luckily there’s a million options in nature for food substitutes and I spend a lot of time figuring out which ones work. The brownie part was pretty easy, I used half rice flour and half coconut so they wouldn’t get too cakey, and the tapioca acts as a great binder. It’s a pretty basic recipe to start with and the chocolate chips are what make it really fudgy.
The cheesecake took a little more work, I wanted the thick creamy cheesecake texture without sacrificing the cream cheese flavor like most cashew based vegan cheesecakes do. I used half cashew and half vegan cream cheese, try not to sub out go veggie for another brand, I tested other tofu based cream cheeses and this by far had the best result. I’d also highly recommend staying with the ripple yogurt, it really helps with the thickness.
I used My Dad’s vegan gluten free chocolate sandwich cookies, but whatever you can find will work. Remember regular oreos are vegan but not gluten free. Trader Joes does have a gluten free version of their Joe Joes but it is not vegan like the original.
Overall these brownies are chewy and great for group settings, and they keep in the freezer for a few weeks. Or you could just eat all of them on your own but like, probably don’t do that.
Brownies
½ Cup White Rice Flour
½ Cup Coconut Flour
½ Cup Light Brown Sugar
½ Cup White Sugar
1 Tbsp Tapioca Flour
1 tsp Baking Powder
1 tsp Salt
½ Mashed Ripe Banana
¾ Cup plus 2 Tbsp Sunflower Oil
¾ Cup Cold Water
1 tsp Vanilla Extract
Cheesecake
8 oz Go Veggie Plain Cream Cheese
5.3 oz Vanilla Ripple Yogurt
1 tsp Vanilla
4 oz Smooth Cashew Butter (I used Trader Joe's)
⅓ Cup White Sugar
2 tsp Arrowroot Flour (Tapioca will also work)
½ Cup Dark Chocolate Chips, Divided (Enjoy life are my favorite)
6 Crushed Vegan Gluten Free Chocolate Sandwich Cookies
1. Preheat your oven to 350, don’t forget to do this right at the beginning like I always do (especially if your oven only kind of works like mine). Combine all of the dry ingredients for your brownies and stir lightly.
2. In a separate bowl, smush your half banana with 2 tablespoons of sunflower oil (if you substitute the oil, make sure whatever you swap for has a similar smoke point). Once combined, add the rest of you oil and the COLD water. Make a well in your dry ingredients and add the wet mixture in, it will probably look a little gross at this point.
3. Mix BY HAND with a spoon or claw, once combined (it will be grainy), add in half the chocolate chips and mix in gently. Pour into a greased (even if it’s nonstick) 9x9 baking pan and sprinkle the remaining chocolate chips on top, set aside.
4. Combine all cheesecake base ingredients and mix with a hand mixer until completely smooth, you can also do this with a whisk if you’re not as weak as I am. Crush your sandwich cookies in a biodegradable plastic bag and fold them in gently.
5. Pour the cheesecake mixture over the brownies and spread until smooth. Bake for 25 minutes and DO NOT open the oven while baking. After 25 minutes turn off the oven without opening it and let the brownies sit for another 5 minutes.
6. Take the brownies out and let them cool at room temperature for an hour before putting them in the freezer for at least 3 hours. I know this part sucks but it’s what makes them fudgy and perfect. Take a nap during this step, or maybe paint your nails idk, just don’t eat them yet.
7. You’re done, cut into 16 squares and use them to bribe people into being your friend, it works I promise.
#vegan#wheat free#gluten intolerance#gluten free#vegan baking#vegan dessert#vegan recipes#vegan gluten free recipes#gluten free recipes#dessert#vegan food porn#vegan food#vegan brownies#gluten free baking
41 notes
·
View notes