
atmelissaprogramming
Melissa's ProgrammingJournal
11 posts
Don't wanna be here? Send us removal request.
Last Seen Blogs

energylifeamazon
Untitled

gooddaykate
we’re all mad here

mrstrange666
Gothic age , Dark Heroes and Villains

fetihnakliyat
İsimsiz

morpheusdreamt
🌾🥀🍂
Text
Omg What have I done.
Hello Everyone.
So here we are back with my Virtual Pet project, except this time everything has changed(sorry!).
Everything has been completely re-done, the reason for this, game loops! After a discussion on trying to implement animated graphics with my boyfriend, who is also a coder, he suggested making a proper game loop and linked me to this website, here. I’ve only created turn based games in the past, so the need for a game loop wasn’t there, everything was just rendered after each turn.
So over the last week, I sat down and began refactoring my code to use the game loop pattern. I wrote out a plan of action which included the creation of two new classes, one called virtual pet, which would replace our application main, and another called game engine which would contain all the needed methods to implement our game loop. Though in the end these two classes merged into a single class called VirtualPet. It and our Pet and PetOwner class are all that are needed to run the game exactly as it was before these changes, but now we also have fully animated graphics.
So here I’ll share the new VirtualPet class, as a note, its enormous:
import asciiPanel.AsciiPanel;
import javax.swing.*;
import java.awt.event.KeyEvent;
import java.awt.event.KeyListener;
import java.util.HashMap;
/**
* VirtualPet is the game engine class.
* It handles all the variables and methods required to process inputs from the player, variable updates and rendering.
*/
public class VirtualPet extends JFrame implements KeyListener
{
/**
* VirtualPet instance variables, includes game graphics data currently, this data will be moved to an outside file
* format in the future.
*/
private AsciiPanel gameScreen;
private String menu;
private Pet pet;
private PetOwner owner;
private int food = 0;
private boolean hasEaten = true;
private String eating;
private int patValue = 25;
private int washValue = 25;
private HashMap<String, Character[][]> graphics;
private HashMap<String, String> messages;
private HashMap<String, String> menuOptions;
private int frames = 0;
private int currentFrame = 1;
//Graphics
//hatchGraphic
private Character[][] hatchGraphic = {
{(char)47,(char)196,(char)196,(char)47,(char)196,(char)196,(char)92},
{(char)179,(char)0,(char)0,(char)92,(char)0,(char)0,(char)179},
{(char)179,(char)0,(char)0,(char)47,(char)0,(char)0,(char)179},
{(char)179,(char)0,(char)0,(char)92,(char)0,(char)0,(char)179},
{(char)92,(char)196,(char)196,(char)196,(char)196,(char)196,(char)47}
};
//petGraphic
private Character[][] petGraphicHappy1 = {
{(char)218,(char)196,(char)196,(char)196,(char)191},
{(char)179,(char)94,(char)0,(char)94,(char)179},
{(char)179,(char)0,(char)31,(char)0,(char)179},
{(char)192,(char)196,(char)196,(char)196,(char)217}
};
private Character[][] petGraphicHappy2 = {
{(char)218,(char)196,(char)196,(char)196,(char)191},
{(char)179,(char)233,(char)0,(char)233,(char)179},
{(char)179,(char)0,(char)31,(char)0,(char)179},
{(char)192,(char)196,(char)196,(char)196,(char)217}
};
private Character[][] petGraphicContent1 = {
{(char)218,(char)196,(char)196,(char)196,(char)191},
{(char)179,(char)233,(char)0,(char)233,(char)179},
{(char)179,(char)0,(char)45,(char)0,(char)179},
{(char)192,(char)196,(char)196,(char)196,(char)217}
};
private Character[][] petGraphicContent2 = {
{(char)218,(char)196,(char)196,(char)196,(char)191},
{(char)179,(char)45,(char)0,(char)45,(char)179},
{(char)179,(char)0,(char)45,(char)0,(char)179},
{(char)192,(char)196,(char)196,(char)196,(char)217}
};
private Character[][] petGraphicSad1 = {
{(char)218,(char)196,(char)196,(char)196,(char)191},
{(char)179,(char)233,(char)0,(char)233,(char)179},
{(char)179,(char)0,(char)30,(char)0,(char)179},
{(char)192,(char)196,(char)196,(char)196,(char)217}
};
private Character[][] petGraphicSad2 = {
{(char)218,(char)196,(char)196,(char)196,(char)191},
{(char)179,(char)62,(char)0,(char)60,(char)179},
{(char)179,(char)0,(char)30,(char)0,(char)179},
{(char)192,(char)196,(char)196,(char)196,(char)217}
};
//feedGraphic
private Character[][] feedGraphic = {
{(char)240,(char)240,(char)240,(char)240,(char)240,(char)240},
{(char)47,(char)0,(char)0,(char)0,(char)0,(char)92},
{(char)179,(char)70,(char)79,(char)79,(char)68,(char)179},
{(char)179,(char)0,(char)0,(char)0,(char)0,(char)179},
{(char)196,(char)196,(char)196,(char)196,(char)196,(char)196}
};
//eatGraphic
private Character[][] eatGraphic1 = {
{' ','N','O','M','!'},
{'N','O','M','!',' '},
{' ','N','O','M','!'},
{'N','O','M','!',' '},
};
private Character[][] eatGraphic2 = {
{'N','O','M','!',' '},
{' ','N','O','M','!'},
{'N','O','M','!',' '},
{' ','N','O','M','!'},
};
//pettingGraphic
private Character[][] pettingGraphic1 = {
{' ',(char)3,'P','E','T'},
{'P','E','T',(char)3,' '},
{' ',(char)3,'P','E','T'},
{'P','E','T',(char)3,' '}
};
private Character[][] pettingGraphic2 = {
{'P','E','T',(char)3,' '},
{' ',(char)3,'P','E','T'},
{'P','E','T',(char)3,' '},
{' ',(char)3,'P','E','T'}
};
//washGraphic
private Character[][] washGraphic1 = {
{' ',(char)248,'S','C','R','U','B',(char)15},
{(char)15,'S','C','R','U','B',(char)248,' '},
{' ',(char)248,'S','C','R','U','B',(char)15},
{(char)15,'S','C','R','U','B',(char)248,' '}
};
private Character[][] washGraphic2 = {
{(char)15,'S','C','R','U','B',(char)248,' '},
{' ',(char)248,'S','C','R','U','B',(char)15},
{(char)15,'S','C','R','U','B',(char)248,' '},
{' ',(char)248,'S','C','R','U','B',(char)15}
};
//messages
//title
private String title = "Virtual Pet!";
//hatched
private String hatched = "Your Pet has been born";
//chooseFood
private String chooseFood = "What would you like to feed your pet?";
//eatMeat
private String eatMeat = "ate a MEAT.";
//eatVeg
private String eatVeg = "ate a VEG.";
//eatCake
private String eatCake = "ate a CAKE.";
//petting
private String petting = "is patted nicely.";
//washing
private String washing = "is bathed.";
//menuOptions
//petOptions
private String petOptions = "[1.FEED, 2.PET, 3.WASH]";
//foodOptions
private String foodOptions = "[1.MEAT, 2.VEG, 3.CAKE]";
//enterContinue
private String enterContinue = "Press ENTER to continue.";
/**
* VirtualPet initializer, sets up the HashMaps that store game graphics, menus, and messages. Prepares the JFrame,
* initializes the Pet and PetOwner objects, sets the keyListener.
*/
public VirtualPet()
{
graphics = new HashMap<>();
graphics.put("hatchGraphic",hatchGraphic);
graphics.put("petGraphicHappy1",petGraphicHappy1);
graphics.put("petGraphicHappy2", petGraphicHappy2);
graphics.put("petGraphicContent1", petGraphicContent1);
graphics.put("petGraphicContent2", petGraphicContent2);
graphics.put("petGraphicSad1", petGraphicSad1);
graphics.put("petGraphicSad2", petGraphicSad2);
graphics.put("feedGraphic",feedGraphic);
graphics.put("eatGraphic1",eatGraphic1);
graphics.put("eatGraphic2",eatGraphic2);
graphics.put("pettingGraphic1",pettingGraphic1);
graphics.put("pettingGraphic2",pettingGraphic2);
graphics.put("washGraphic1",washGraphic1);
graphics.put("washGraphic2",washGraphic2);
messages = new HashMap<>();
messages.put("title", title);
messages.put("hatched", hatched);
messages.put("chooseFood", chooseFood);
messages.put("eatMeat", eatMeat);
messages.put("eatVeg", eatVeg);
messages.put("eatCake", eatCake);
messages.put("petting", petting);
messages.put("washing", washing);
menuOptions = new HashMap<>();
menuOptions.put("petOptions", petOptions);
menuOptions.put("foodOptions", foodOptions);
menuOptions.put("enterContinue", enterContinue);
gameScreen = new AsciiPanel();
add(gameScreen);
pack();
menu = "startMenu";
pet = new Pet("Fido", 10, 10, 10);
owner = new PetOwner("Melissa", pet);
addKeyListener(this);
}
/**
* Getter for menu variable
* @return
*/
public String getMenu()
{
return menu;
}
/**
* Setter for menu variable, returns a String
* @param menu
*/
public void setMenu(String menu)
{
this.menu = menu;
}
/**
* changeFrame swaps the current frame of the graphic currently being displayed, this occurs currently every 24
* "frames"
*/
public void changeFrame()
{
if(frames % 24 == 0)
{
if(currentFrame == 1)
{
currentFrame = 2;
}
else
{
currentFrame = 1;
}
}
}
@Override
public void keyTyped(KeyEvent e)
{
}
@Override
/**
* Overrides keyPressed. Calls processInput, passing in the currentMenu and the KeyEvent. Clears the screen, renders
* the new screen, and repaints the JFrame with the new screen
*/
public void keyPressed(KeyEvent e)
{
processInput(e, getMenu());
gameScreen.clear();
render(getMenu(), gameScreen);
super.repaint();
}
@Override
public void keyReleased(KeyEvent e)
{
}
/**
* processInput, sets the menu based on the KeyEvent it is passed and the currentMenu the game is on. If pet variables
* need to be updated, values used for updating are set here.
* @param e
* @param currentMenu
*/
public void processInput(KeyEvent e, String currentMenu)
{
int code = e.getKeyCode();
if (currentMenu.equals("startMenu"))
{
if (code == KeyEvent.VK_ENTER)
{
setMenu("hatchMenu");
}
}
if (currentMenu.equals("hatchMenu"))
{
if (code == KeyEvent.VK_ENTER)
{
setMenu("petMenu");
}
}
if(currentMenu.equals("petMenu"))
{
if(code == KeyEvent.VK_1)
{
setMenu("feedMenu");
}
else if(code == KeyEvent.VK_2)
{
setMenu("pettingMenu");
}
else if(code == KeyEvent.VK_3)
{
setMenu("washMenu");
}
}
//hasEaten value, makes sure that the food value isn't cleared by update method before being applied.
if(currentMenu.equals("feedMenu"))
{
if(code == KeyEvent.VK_1)
{
setMenu("eatMenu");
hasEaten = false;
eating = "meat";
food = 25;
}
else if(code == KeyEvent.VK_2)
{
setMenu("eatMenu");
eating = "veg";
hasEaten = false;
food = 15;
}
else if(code == KeyEvent.VK_3)
{
setMenu("eatMenu");
eating = "cake";
hasEaten = false;
food = 20;
}
}
if(currentMenu.equals("eatMenu"))
{
if(code == KeyEvent.VK_ENTER)
{
setMenu("petMenu");
}
}
if(currentMenu.equals("pettingMenu"))
{
if(code == KeyEvent.VK_ENTER)
{
setMenu("petMenu");
patValue = 25;
}
}
if(currentMenu.equals("washMenu"))
{
if(code == KeyEvent.VK_ENTER)
{
setMenu("petMenu");
washValue = 25;
}
}
}
/**
* update processes changes to Pet variables based on the currentMenu. The frames variable is increased here during
* each cycle of the game loop. We change frame here as well.
* @param currentMenu
*/
public void update(String currentMenu)
{
frames++;
changeFrame();
if(currentMenu.equals("eatMenu"))
{
if(!hasEaten)
{
owner.feed(food);
}
food = 0;
hasEaten = true;
}
if(currentMenu.equals("pettingMenu"))
{
owner.pat(patValue);
patValue = 0;
}
if(currentMenu.equals("washMenu"))
{
owner.wash(washValue);
washValue = 0;
}
}
/**
* render method, sets up what is displayed on our JFrame based on the currentMenu. The currentFrame variable is
* evaluated here to determine which frame of animation to show.
* @param currentMenu
* @param gameScreen
*/
public void render(String currentMenu, AsciiPanel gameScreen)
{
if(currentMenu.equals("startMenu"))
{
writeMessage("title", gameScreen, currentMenu);
writeMenuOptions("enterContinue", gameScreen);
}
if(currentMenu.equals("hatchMenu"))
{
draw("hatchGraphic", gameScreen, 5, 7);
writeMessage("hatched", gameScreen, currentMenu);
writeMenuOptions("enterContinue", gameScreen);
}
if(currentMenu.equals("petMenu"))
{
switch (pet.getMood())
{
case "happy":
if(currentFrame == 1)
{
draw("petGraphicHappy1", gameScreen, 4, 5);
}
if(currentFrame == 2)
{
draw("petGraphicHappy2", gameScreen, 4, 5);
}
break;
case "content":
if(currentFrame == 1)
{
draw("petGraphicContent1", gameScreen, 4, 5);
}
if(currentFrame == 2)
{
draw("petGraphicContent2", gameScreen, 4, 5);
}
//draw("petGraphicContent", gameScreen, 4, 5);
break;
case "sad":
if(currentFrame == 1)
{
draw("petGraphicSad1", gameScreen, 4, 5);
}
if(currentFrame == 2)
{
draw("petGraphicSad2", gameScreen, 4, 5);
}
break;
}
petStatus(pet, gameScreen);
writeMenuOptions("petOptions", gameScreen);
}
if(currentMenu.equals("feedMenu"))
{
draw("feedGraphic", gameScreen, 5, 6);
writeMessage("chooseFood", gameScreen, currentMenu);
writeMenuOptions("foodOptions", gameScreen);
}
if(currentMenu.equals("eatMenu"))
{
if(currentFrame == 1)
{
draw("eatGraphic1", gameScreen, 4, 5);
}
if(currentFrame == 2)
{
draw("eatGraphic2", gameScreen, 4, 5);
}
switch (eating)
{
case "meat": writeMessage("eatMeat", gameScreen, currentMenu); break;
case "veg": writeMessage("eatVeg", gameScreen,currentMenu); break;
case "cake": writeMessage("eatCake", gameScreen,currentMenu);break;
}
writeMenuOptions("enterContinue", gameScreen);
}
if(currentMenu.equals("pettingMenu"))
{
if(currentFrame == 1)
{
draw("pettingGraphic1", gameScreen, 4, 5);
}
if(currentFrame == 2)
{
draw("pettingGraphic2", gameScreen, 4, 5);
}
writeMessage("petting", gameScreen, currentMenu);
writeMenuOptions("enterContinue", gameScreen);
}
if(currentMenu.equals("washMenu"))
{
if(currentFrame == 1)
{
draw("washGraphic1", gameScreen, 4, 8);
}
if(currentFrame == 2)
{
draw("washGraphic2", gameScreen, 4, 8);
}
writeMessage("washing", gameScreen, currentMenu);
writeMenuOptions("enterContinue", gameScreen);
}
super.repaint();
}
/**
* draw grabs the selected graphic from the graphics HashMap, includes parameters for the number of rows and columns
* to allow variable sized graphics. Currently the screen position of the graphics is hard coded, this may be changed
* later.
* @param selectedGraphic
* @param gameScreen
* @param row
* @param col
*/
public void draw(String selectedGraphic, AsciiPanel gameScreen, int row, int col)
{
for(int y = 0; y < row; y++)
{
for(int x = 0; x < col; x++)
{
gameScreen.write(graphics.get(selectedGraphic)[y][x], x+38, y+9);
}
}
}
/**
* petStatus displays a String based on the current state of our pet.
* @param pet
* @param gameScreen
*/
public void petStatus(Pet pet, AsciiPanel gameScreen)
{
gameScreen.writeCenter(pet.status(), 16);
}
/**
* displays the selected message from the messages HashMap.
* @param selectedMessage
* @param gameScreen
*/
public void writeMessage(String selectedMessage, AsciiPanel gameScreen, String currentMenu)
{
switch(currentMenu)
{
case "startMenu":
case "hatchMenu":
case "feedMenu":
gameScreen.writeCenter(messages.get(selectedMessage), 15);
break;
case "eatMenu":
case "pettingMenu":
case "washMenu":
gameScreen.writeCenter(pet.getName() + " " +messages.get(selectedMessage), 15);
break;
}
//gameScreen.writeCenter(messages.get(selectedMessage), 15);
}
/**
* displays the selected menu options from the menuOptions HashMap.
* @param selectedMenu
* @param gameScreen
*/
public void writeMenuOptions(String selectedMenu, AsciiPanel gameScreen)
{
gameScreen.writeCenter(menuOptions.get(selectedMenu), 22);
}
public static void main(String[] args) throws InterruptedException
{
VirtualPet app = new VirtualPet();
app.setDefaultCloseOperation(JFrame.EXIT_ON_CLOSE);
app.setVisible(true);
app.setFocusable(true);
app.render(app.getMenu(), app.gameScreen);
//main game loop
while(true)
{
app.update(app.getMenu());
//currently this sleep is required to slow processing down enough for our variables to be updated, otherwise
//incorrect values are rendered.
Thread.sleep(16);
app.render(app.getMenu(), app.gameScreen);
}
}
}
Like I said, its big.
This class has three main methods, processInput, update, and render. Everything else is data or helper methods.
You can see that I’ve included most of what was in our old ApplicationMain file in this new class. The overrided method KeyPressed is how we respond to the player pressing a button on the keyboard, you can see that it calls our proccessInput method. The game is basically a state machine with its given state being which ever menu screen it is currently on. ProccessInput checks this and updates the state and any needed variables, then we clear the screen, render the new information and repaint the panel. ProccessInput is separate from our game loop, this is because we are using JFrame and it uses a separate thread for events.
Our new game loop looks like:
while(true)
{
app.update(app.getMenu());
Thread.sleep(16);
app.render(app.getMenu(), app.gameScreen);
}
Each loop of the game updates, waits one frame, then renders. The reason we wait for one frame is because there seems to be a delay in the feed method for the pet, where the loop does not give it time to update the variables and therefore the render doesn’t generate correct results, so adding this delay slows it down enough for the event thread to have a turn.....while I was writing this I found the solution to my problem, synchronization blocks. By adding the synchronized keyword to key pressed:
public synchronized void keyPressed(KeyEvent e)
{
processInput(e, getMenu());
gameScreen.clear();
render(getMenu(), gameScreen);
super.repaint();
}
This allows the event thread to make its changes, and the game loop thread to have access to those changes afterwards, instead of getting them out of sync. This is the benefit to writing all this down I guess, even though nobody reads this.
The game loop does still require a sleep, but this time its to slow the spin so the game doesn’t murder my machine, the game only needs to sleep for a single millisecond for that to work. Game loop looks like this now:
while(true)
{
app.update(app.getMenu());
Thread.sleep(1);
app.render(app.getMenu(), app.gameScreen);
}
The render method, takes in the current menu and our AsciiPanel. Render uses our game’s state or in this case the currentMenu to decide how to render the screen. It uses four helper methods, draw, writeMessage, writeMenuOptions,and petStatus, to do this. Each of these methods has an associated HashMap, except petStatus, that stores the information that each of these methods will draw or write to the screen. Draw will select either frame 1 or frame 2 of a graphic based on the currentFrame variable, which is changed by modding a constantly increasing frames value by 24(this was changed with our addition of the synchronization block, to 500 as the game runs much faster with the lower sleep time). Write message writes general messages to the screen, we use a switch statement on the currentMenu to determine if the name of the pet is needed in the message string. WriteMenuOptions, writes the menus on the bottom of the screen, or the press enter to return message because it is only displayed at that location. The reason that the menuOptions and the messages are not stored in the same HashMap is to make the code more readable. At the end of the render method we call repaint to update our JFrame with the new display.
Next let’s take a look at our pet owner class:
/**
* PetOwner class contains methods for interacting with the pet.
*/
public class PetOwner
{
private String name;
private Pet pet;
/**
* PetOwner constructor. In the future we will add a method to allow the player to set their name.
* @param name
* @param pet
*/
public PetOwner(String name, Pet pet)
{
this.name = name;
this.pet = pet;
}
/**
* Currently unused setters and getters, I'll be leaving them here for now, as we may need them later.
*/
public String getName()
{
return name;
}
public void setName(String name)
{
this.name = name;
}
public Pet getPet()
{
return pet;
}
public void setPet(Pet pet)
{
this.pet = pet;
}
/**
* feed method allows our PetOwner to set the belly value of their pet.
* @param food
*/
public void feed(int food)
{
pet.setBelly(food);
}
/**
* pat method allows our PetOwner to set the happiness value of their pet.
* @param patValue
*/
public void pat(int patValue)
{
pet.setHappiness(patValue);
}
/**
* wash method allows our PetOwner to set the clean value of their pet.
* @param washValue
*/
public void wash(int washValue)
{
pet.setClean(washValue);
}
}
The major difference is the removal of our food enum, this is because of an access issue between the PetOwner class and the VirtualPet class. Instead we set a variable in the VirtualPet Class to the desired amount and pass it to the PetOwner’s feed method. The same is done for the pat and wash methods(also pet was changed to pat to reduce confusion).
Finally the updated Pet class:
/**
* Pet class controls all values associated with a Pet
*/
public class Pet
{
private String name;
private int belly;
private int happiness;
private int clean;
/**
* Pet constructor, initializes the pet with its given values, may add a method in the future for the player to name
* their pet.
* @param name
* @param belly
* @param happiness
* @param clean
*/
public Pet(String name, int belly, int happiness, int clean)
{
this.name = name;
this.belly = belly;
this.happiness = happiness;
this.clean = clean;
}
/**
* Setters and getters for the pet class, some of these are currently unused, I will leave them for now incase they
* are needed later.
*/
public String getName()
{
return name;
}
public void setName(String name)
{
this.name = name;
}
public int getBelly()
{
return belly;
}
/**
* Setters for belly, happiness, and clean have a conditional that locks the maximum value to 100.
*/
public void setBelly(int belly)
{
if(this.belly + belly > 100)
{
this.belly = 100;
}
else
{
this.belly += belly;
}
}
public int getHappiness()
{
return happiness;
}
public void setHappiness(int happiness)
{
if(this.happiness + happiness > 100)
{
this.happiness = 100;
}
else
{
this.happiness += happiness;
}
}
public int getClean()
{
return clean;
}
public void setClean(int clean)
{
if(this.clean + clean > 100)
{
this.clean = 100;
}
else
{
this.clean += clean;
}
}
/**
* getMood returns a string based on the pet's overall condition, this is used to display the correct graphic for
* the pet.
* @return
*/
public String getMood()
{
int mood = belly + happiness + clean;
if(mood >= 150)
{
return "happy";
}
else if(mood >= 100)
{
return "content";
}
else
{
return "sad";
}
}
/**
* status method returns a string that summarizes the pet's current condition based on all of its variables.
* @return
*/
public String status()
{
String status = name;
if(belly >= 90)
{
status += " is full";
}
else if(belly >= 50)
{
status += " is still a bit hungry";
}
else if(belly >= 25)
{
status += " is hungry";
}
else
{
status += " is starving";
}
if(happiness >= 90)
{
status += ", happy";
}
else if(happiness >= 50)
{
status += ", content";
}
else if(happiness >= 25)
{
status += ", sad";
}
else
{
status += ", crying";
}
if(clean >= 90)
{
status += ", and clean.";
}
else if(clean >= 50)
{
status += ", and mostly clean.";
}
else if(clean >= 25)
{
status += ", and dirty.";
}
else
{
status += ", and filthy.";
}
status += belly + " " + happiness + " " + clean;
return status;
}
}
A few major changes here, first I made it so the pet’s variables have a maximum value of 100. This is for a new method called getMood, which determines the overall mood of the pet based on the total of all three variables. GetMood is used to change which graphic is displayed for the pet, so the player can see how the pet is. You’ll notice that status contains a new line at the bottom:
status += belly + " " + happiness + " " + clean;
This is strictly for debugging and will be removed in the future, it allows me to see the actual numeric values of the pet variables.
Alright everybody that’s it, lot’s of big changes there, but everything should be a bit easier going forward now that we’ve gotten that out of the way.
The next thing I’m planning to do, is to create a file format to hold our pet graphics, they take up a lot of lines in our VirtualPet class, and we will definitly be adding more graphics. It looks like it may be a bit difficult to do, but it will make an excellent learning experience.
Here’s the gitHub link, you can find these changes under the RenderingRefactor branch, I’ll be merging the branches at a later time, once I no longer need to reference the older files.
Don’t Stress.
0 notes
Text
Characters on a screen
Hello everyone, I’ve finished the next part of our virtual pet. After adding the ability to interact with the pet I felt like the screen was looking a bit empty so I’ve added some super simple graphics to each screen, these will be animated eventually but for now they’re static.
So first we need to know what our pet looks like, Ascii Panel uses a grid system so we can create our graphics as two dimensional character arrays. The default characters we can used are Code Page 437, we can reference these directly using their ascii value, you can see that here in this code:
import asciiPanel.AsciiPanel;
import java.awt.event.KeyEvent;
import java.time.LocalDateTime;
import java.time.format.DateTimeFormatter;
import java.util.ArrayList;
import java.util.Arrays;
//main petMenu, all other menus lead back to this root menu
public class PetMenu implements Menu
{
ArrayList<String> petOptions = new ArrayList<>(Arrays.asList("1.FEED", "2.PET", "3.WASH"));
private Pet pet;
private PetOwner owner;
//move pet graphic to pet class to make it more dynamic, we can change which graphic is shown based off, pet status
private char[][] petGraphic = {
{(char)218,(char)196,(char)196,(char)196,(char)191},
{(char)179,(char)233,(char)0,(char)233,(char)179},
{(char)179,(char)0,(char)45,(char)0,(char)179},
{(char)192,(char)196,(char)196,(char)196,(char)217}
};
DateTimeFormatter dtf = DateTimeFormatter.ofPattern("yyyy/MM/dd");
LocalDateTime now = LocalDateTime.now();
public PetMenu(Pet pet, PetOwner owner)
{
this.pet = pet;
this.owner = owner;
}
//display shows the current date, a simple graphic of the pet(we will try to make this animated later), the pet's
//status, and the menu
@Override
public void display(AsciiPanel gameScreen)
{
gameScreen.writeCenter(dtf.format(now), 8);
for(int y = 0; y < 4; y++)
{
for(int x = 0; x < 5; x++)
{
gameScreen.write(petGraphic[y][x], x+38, y+11);
}
}
gameScreen.writeCenter(pet.status(), 16);
gameScreen.writeCenter(petOptions.toString(), 22);
}
@Override
public Menu userInput(KeyEvent key)
{
switch(key.getKeyCode())
{
case KeyEvent.VK_1: return new FeedMenu(this.pet, this.owner);
case KeyEvent.VK_2: return new Petting(this.pet, this.owner);
case KeyEvent.VK_3: return new Wash(this.pet, this.owner);
}
return this;
}
}
The resulting window looks like this:

Pretty simple, you can see that the graphic is displayed using a simple for loop, with an xy coordinate offset to position it in the “middle” of the screen. I did the exact same for the graphics for each other screen.
Hatch menu:
import asciiPanel.AsciiPanel;
import java.awt.event.KeyEvent;
public class HatchMenu implements Menu
{
private Pet pet;
private PetOwner owner;
private char[][] hatchGraphic = {
{(char)47,(char)196,(char)196,(char)47,(char)196,(char)196,(char)92},
{(char)179,(char)0,(char)0,(char)92,(char)0,(char)0,(char)179},
{(char)179,(char)0,(char)0,(char)47,(char)0,(char)0,(char)179},
{(char)179,(char)0,(char)0,(char)92,(char)0,(char)0,(char)179},
{(char)92,(char)196,(char)196,(char)196,(char)196,(char)196,(char)47}
};
public HatchMenu(Pet pet, PetOwner owner)
{
this.pet = pet;
this.owner = owner;
}
@Override
public void display(AsciiPanel gameScreen)
{
for(int y = 0; y < 5; y++)
{
for(int x = 0; x < 7; x++)
{
gameScreen.write(hatchGraphic[y][x], x+38, y+8);
}
}
gameScreen.writeCenter("Your pet " + pet.getName() + " has been born", 15);
gameScreen.writeCenter("Press Enter to continue.", 22);
}
@Override
public Menu userInput(KeyEvent key)
{
return key.getKeyCode() == KeyEvent.VK_ENTER ? new PetMenu(this.pet, this.owner) : this;
}
}
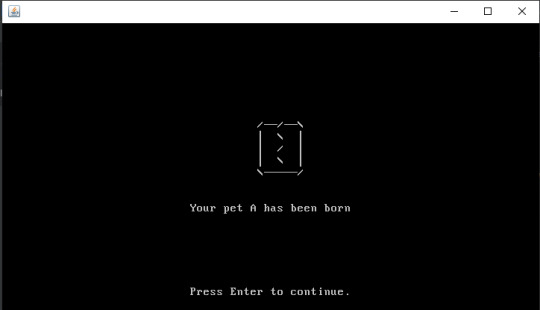
Don’t mind our square egg...
Feed menu:
import asciiPanel.AsciiPanel;
import java.awt.event.KeyEvent;
import java.util.ArrayList;
import java.util.Arrays;
//feed menu displays food options, may move the food enum from petOwner class to this class
public class FeedMenu implements Menu
{
private Pet pet;
private PetOwner owner;
private ArrayList<String> foodList = new ArrayList<>(Arrays.asList("1.MEAT", "2.VEG", "3.CAKE"));
private char[][] foodGraphic = {
{(char)240,(char)240,(char)240,(char)240,(char)240,(char)240},
{(char)47,(char)0,(char)0,(char)0,(char)0,(char)92},
{(char)179,(char)70,(char)79,(char)79,(char)68,(char)179},
{(char)179,(char)0,(char)0,(char)0,(char)0,(char)179},
{(char)196,(char)196,(char)196,(char)196,(char)196,(char)196}
};
public FeedMenu(Pet pet, PetOwner owner)
{
this.pet = pet;
this.owner = owner;
}
@Override
public void display(AsciiPanel gameScreen)
{
for(int y = 0; y < 5; y++)
{
for(int x = 0; x < 6; x++)
{
gameScreen.write(foodGraphic[y][x], x+37, y+9);
}
}
gameScreen.writeCenter("What would you like to feed your pet?", 15);
gameScreen.writeCenter(foodList.toString(), 22);
}
@Override
public Menu userInput(KeyEvent key)
{
switch(key.getKeyCode())
{
case KeyEvent.VK_1: return new Eat(this.pet, this.owner, PetOwner.Food.MEAT);
case KeyEvent.VK_2: return new Eat(this.pet, this.owner, PetOwner.Food.VEG);
case KeyEvent.VK_3: return new Eat(this.pet, this.owner, PetOwner.Food.CAKE);
}
return this;
}
}
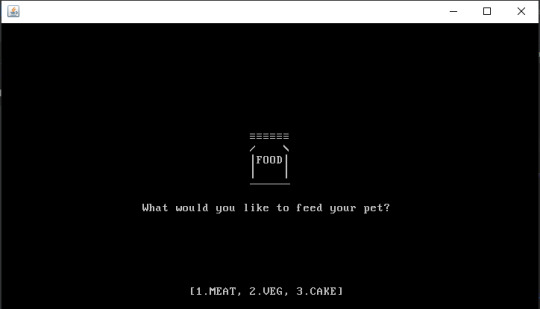
This was supposed to be a bag of food but I couldn’t get it to look right with the character limitations, so its a jar.
Eat menu:
import asciiPanel.AsciiPanel;
import java.awt.event.KeyEvent;
//eat menu shows the result of feeding the pet
public class Eat implements Menu
{
private Pet pet;
private PetOwner owner;
private PetOwner.Food food;
private char[][] eatGraphic = {
{' ','N','O','M','!'},
{'N','O','M','!',' '},
{' ','N','O','M','!'},
{'N','O','M','!',' '},
};
public Eat(Pet pet, PetOwner owner, PetOwner.Food food)
{
this.pet = pet;
this.owner = owner;
this.food = food;
}
@Override
public void display(AsciiPanel gameScreen)
{
for(int y = 0; y < 4; y++)
{
for(int x = 0; x < 5; x++)
{
gameScreen.write(eatGraphic[y][x], x+38, y+9);
}
}
gameScreen.writeCenter(owner.feed(food), 15);
gameScreen.writeCenter("Press Enter to return", 22);
}
@Override
public Menu userInput(KeyEvent key)
{
return key.getKeyCode() == KeyEvent.VK_ENTER ? new PetMenu(this.pet, this.owner) : this;
}
}

Here you can see that you don’t need to use the ascii value for characters like letters, you only need to use it for special characters really.
Petting menu:
import asciiPanel.AsciiPanel;
import java.awt.event.KeyEvent;
public class Petting implements Menu
{
private Pet pet;
private PetOwner owner;
private char[][] pettingGraphic = {
{' ',(char)3,'P','E','T'},
{'P','E','T',(char)3,' '},
{' ',(char)3,'P','E','T'},
{'P','E','T',(char)3,' '}
};
public Petting(Pet pet, PetOwner owner)
{
this.pet = pet;
this.owner = owner;
}
@Override
public void display(AsciiPanel gameScreen)
{
for(int y = 0; y < 4; y++)
{
for(int x = 0; x < 5; x++)
{
gameScreen.write(pettingGraphic[y][x], x+38, y+9);
}
}
gameScreen.writeCenter(owner.pet(), 15);
gameScreen.writeCenter("Press Enter to return", 22);
}
@Override
public Menu userInput(KeyEvent key)
{
return key.getKeyCode() == KeyEvent.VK_ENTER ? new PetMenu(this.pet, this.owner) : this;
}
}

Screens like this will hopefully get text animation so the graphic wiggles back and forth, that will make it look pretty cute.
Wash menu:
import asciiPanel.AsciiPanel;
import java.awt.event.KeyEvent;
public class Wash implements Menu
{
private Pet pet;
private PetOwner owner;
private char[][] washGraphic = {
{' ',(char)248,'S','C','R','U','B',(char)15},
{(char)15,'S','C','R','U','B',(char)248,' '},
{' ',(char)248,'S','C','R','U','B',(char)15},
{(char)15,'S','C','R','U','B',(char)248,' '}
};
public Wash(Pet pet, PetOwner owner)
{
this.pet = pet;
this.owner = owner;
}
@Override
public void display(AsciiPanel gameScreen)
{
for(int y = 0; y < 4; y++)
{
for(int x = 0; x < 8; x++)
{
gameScreen.write(washGraphic[y][x], x+38, y+9);
}
}
gameScreen.writeCenter(owner.wash(), 15);
gameScreen.writeCenter("Press Enter to return", 22);
}
@Override
public Menu userInput(KeyEvent key)
{
return key.getKeyCode() == KeyEvent.VK_ENTER ? new PetMenu(this.pet, this.owner) : this;
}
}
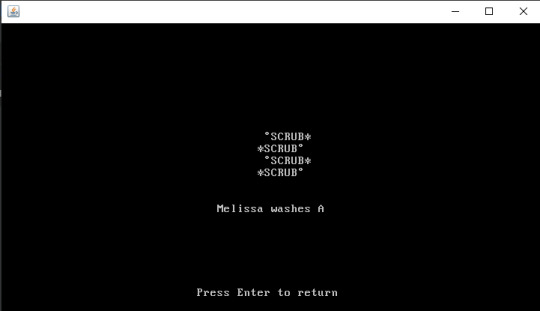
All of these graphics use the same general code so as a future change I plan to create a new class to control graphics and animation, this will make it easier to swap out graphics for different pet types.
So as you can see we have a pretty basic virtual pet now, most of the changes going forward will be to add complexity to the game, and refine logic.
Don’t forget to check out the code on GitHub.
Don’t Stress.
0 notes
Text
So much reading
Hello everyone. So I’ve been continuing my journey in learning Cobol. This chapter focused more on theory than hands on coding, it was very interesting.
The first section covered two different coding styles, Structured and Object Oriented; Structured languages have a more straight forward logic which makes them easier to read and follow the programs flow. While Object Oriented breaks its self up into classes which separate related methods and data. Cobol is considered a structured language but lacks a few elements of traditional structured languages, most notably, Cobol does not contain while or for loops, or defined functions and methods.
But Cobol can mimic these using its PERFORM keyword. The next few sections showed how this is done using a simple program that counts to ten. Loops for instance can be created using the PERFORM keyword in combination with the UNTIL keyword. Methods can be defined as a series of instructions in a paragraph and then “called” with the PERFORM keyword.
Next it goes over why its a bad idea to use the GO TO keyword, which basically breaks the program flow. Because the Cobol works sequentially, it can get confused when it naturally assumes to proceed to the next line, if there is nothing there or if there is something it wasn’t expecting the program can end abnormally. Generally you want the program to flow from top to bottom and not jump around, its easier to read and understand this way.
The section after this looks at paragraphs in more detail, explaining the best practices for writing them. Something interesting it shows here is the practice of numbering paragraphs, usually in the 1000, 2000, 3000 numbering style. This makes it easier to find certain paragraphs. It does make mention of the fact that modern IDEs have find functions and code outlines that make it easier to find what you’re looking for but considering you may be looking at source code on a mainframe terminal which won’t be a modern environment, or you want a quick way to see the step by step structure, the numbering method certainly helps. It also shows the technique of coding an empty paragraph after each paragraph as an explicit end, I really like this because its a lot like the way Java uses curly braces to show the start and end of code blocks, though its much more verbose it Cobol:
1000-OPEN-FILES.
OPEN INPUT ACCT-REC.
OPEN OUTPUT PRINT-LINE.
1000-OPEN-FILES-END. <-- Explicit end
After this it goes through program control with paragraphs, this part showcases the various combinations of keywords with the PERFORM keyword and how they work. I’m not going to go through, but there are a lot of neat things you can do with the PERFORM keyword.
The final part of this chapter explains how to call subprograms, its pretty simple using the CALL keyword. What’s interesting is the number of ways you can give variables to these subprograms, BY REFERENCE, BY CONTENT, and BY VALUE, all of these depend on how you want to use your data, if you want to permanently change the data or if you just change it temporarily, or if you want the subprogram to have its own copy all together.
This chapter was really interesting, you can sort of see all of the neat little parts about Cobol. I’d still say there are better languages to do stuff in but Cobol isn’t as bad as I’ve heard, I’m sure people will still disagree though.
That’s all for now.
Don’t Stress.
0 notes
Text
A Few Hurdles
Hello Everyone, I am back with another update to my virtual pet. The next step is to make it so the player can chose what to do with the pet, so much like our inspiration I decided to go with menus that give the player three options to chose from which they can select using the number keys 1, 2, 3.
The small problem is that currently we run all our code through the console and the only way to wait for user input is to read it using the scanner class. This is a perfectly reasonable option but if we intend to add a more graphical interface we’ll need to completely rewrite the code. So I’ve made a decision to go right into the graphical approach, I want it to be simple and ascii based since I don’t actually want to spend a ton of time designing graphics. For this I’ve chosen an outside library that I know of called, Ascii Panel. I learned of it from when I was learning how to make a rogue-like through a tutorial by Trystan, this is a very good Java based rogue-like tutorial. Trystan created ascii panel themself to provide ascii graphics to the games they were making. Its very simple to use, you’ll see it in the code.
Now on to the code, now that I’ve decided how to display my game, we need to code the necessary parts. The first thing I did was create an Interface for what a basic menu in the game should contain and how it should display:
import java.awt.event.KeyEvent;
import asciiPanel.AsciiPanel;
//menu interface for graphical control of virtual pet
public interface Menu
{
public void display(AsciiPanel gameScreen);
public Menu userInput(KeyEvent key);
}
This is a very simple interface, but it will make it easier to create a variety of different menus.
Then I created a series of different menus to play the game. First the startMenu:
import asciiPanel.AsciiPanel;
import java.awt.event.KeyEvent;
//startmenu, just basic for now. Maybe add better title and graphic in the future
public class StartMenu implements Menu
{
private Pet pet;
private PetOwner owner;
public StartMenu(Pet pet, PetOwner owner)
{
this.pet = pet;
this.owner = owner;
}
@Override
public void display(AsciiPanel gameScreen)
{
gameScreen.writeCenter("Virtual Pet Please Press Enter", 22);
}
@Override
public Menu userInput(KeyEvent key)
{
return key.getKeyCode() == KeyEvent.VK_ENTER ? new PetMenu(this.pet, this.owner) : this;
}
}
The display gives a basic title screen, and the userInput provides behavior for certain keyboard inputs, in this case pressing enter will begin the game and generate a new PetMenu.
import asciiPanel.AsciiPanel;
import java.awt.event.KeyEvent;
import java.util.ArrayList;
import java.util.Arrays;
//main petMenu, all other menus lead back to this root menu
public class PetMenu implements Menu
{
ArrayList<String> petOptions = new ArrayList<>(Arrays.asList("1.FEED", "2.PET", "3.WASH"));
private Pet pet;
private PetOwner owner;
public PetMenu(Pet pet, PetOwner owner)
{
this.pet = pet;
this.owner = owner;
}
//display gives the pet status, the born text may be moved to a hatch screen that runs only when the player starts
//the game the first time
@Override
public void display(AsciiPanel gameScreen)
{
gameScreen.writeCenter("Your pet " + pet.getName() + " has been born", 15);
gameScreen.writeCenter(pet.status(), 16);
gameScreen.writeCenter(petOptions.toString(), 22);
}
@Override
public Menu userInput(KeyEvent key)
{
return key.getKeyCode() == KeyEvent.VK_1 ? new FeedMenu(this.pet, this.owner) : this;
}
}
The pet menu displays the current condition of the pet, right now it also tells the player the pet has been born but this is going to be moved to an initial starting screen to make more sense. The pet’s status and the menu options are also displayed here. Currently the userInput only has code for selecting option 1 which is Feed as it is the only interaction method that I have programmed so far, selecting Feed will generate a new FeedMenu.
import asciiPanel.AsciiPanel;
import java.awt.event.KeyEvent;
import java.util.ArrayList;
import java.util.Arrays;
//feed menu displays food options, may move the food enum from petOwner class to this class
public class FeedMenu implements Menu
{
private Pet pet;
private PetOwner owner;
private ArrayList<String> foodList = new ArrayList<>(Arrays.asList("1.MEAT", "2.VEG", "3.CAKE"));
public FeedMenu(Pet pet, PetOwner owner)
{
this.pet = pet;
this.owner = owner;
}
@Override
public void display(AsciiPanel gameScreen)
{
gameScreen.writeCenter("What would you like to feed your pet?", 15);
gameScreen.writeCenter(foodList.toString(), 22);
}
@Override
public Menu userInput(KeyEvent key)
{
switch(key.getKeyCode())
{
case KeyEvent.VK_1: return new Eat(this.pet, this.owner, PetOwner.Food.MEAT);
case KeyEvent.VK_2: return new Eat(this.pet, this.owner, PetOwner.Food.VEG);
case KeyEvent.VK_3: return new Eat(this.pet, this.owner, PetOwner.Food.CAKE);
}
return this;
}
}
This menu displays a prompt asking the player what to feed the pet, along with options of what the player can feed the pet. The userInput will generate a specific Eat menu depending on which food the player selects.
import asciiPanel.AsciiPanel;
import java.awt.event.KeyEvent;
//eat menu shows the result of feeding the pet
public class Eat implements Menu
{
private Pet pet;
private PetOwner owner;
private PetOwner.Food food;
public Eat(Pet pet, PetOwner owner, PetOwner.Food food)
{
this.pet = pet;
this.owner = owner;
this.food = food;
}
@Override
public void display(AsciiPanel gameScreen)
{
gameScreen.writeCenter(owner.feed(food), 15);
gameScreen.writeCenter("Press Enter to return", 22);
}
@Override
public Menu userInput(KeyEvent key)
{
return key.getKeyCode() == KeyEvent.VK_ENTER ? new PetMenu(this.pet, this.owner) : this;
}
}
The Eat menu displays the result of the pet eating the food and prompts the player to press enter to return to the main menu. The userInput processes will generate a new PetMenu, this returns use back to the root of our menu system.
You may have noticed that all the menus have their own constructors, this allows us to inject them with the same pet and petowner objects. These menus are very basic now but provide the functionality we are looking for.
Finally, when I originally wrote the code, I had a simple main class for testing but now that we are using Ascii Panel I’ve created a new main class called ApplicationMain that will initialize our Ascii Panel and set up our pet and owner objects. The code looks like this:
import javax.swing.JFrame;
import asciiPanel.AsciiPanel;
import java.awt.event.KeyEvent;
import java.awt.event.KeyListener;
//application main sets up the ascii panel and initializes the pet and petowner objects
public class ApplicationMain extends JFrame implements KeyListener
{
private static final long serialVersionUID = 1060623638149583738L;
private AsciiPanel gameScreen;
private Menu menu;
public ApplicationMain()
{
super();
Pet a = new Pet("A", 75);
PetOwner owner = new PetOwner("Melissa", a);
gameScreen = new AsciiPanel();
add(gameScreen);
pack();
menu = new StartMenu(a, owner);
addKeyListener(this);
repaint();
}
public void repaint(){
gameScreen.clear();
menu.display(gameScreen);
super.repaint();
}
@Override
public void keyPressed(KeyEvent e)
{
menu = menu.userInput(e);
repaint();
}
@Override
public void keyTyped(KeyEvent e) {}
@Override
public void keyReleased(KeyEvent e) {}
public static void main(String[] args)
{
ApplicationMain app = new ApplicationMain();
app.setDefaultCloseOperation(JFrame.EXIT_ON_CLOSE);
app.setVisible(true);
}
}
Much of what is here was taken from when I was working on Trystan’s tutorial, all of this code is very reusable. The important elements to look at are how the Ascii Panel is set up, you can see we create the Pet and owner objects, our gameScreen, and we link a new StartMenu to the gameScreen along with a keyListener. This class will probably only get minor changes as we continue.
Okay, that’s all for now. And as I promised here is the github: Virtual Pet. The git hub will update as I program so it will update more often than this tumblr so if anyone (if anyone is reading this) wants to see what is happening sooner you can take a look there.
That’s all for today.
Don’t Stress.
0 notes
Text
Presidential Dummy Data
Hello Everyone, once again we are learning more Cobol. This time the focus was on File Handling, specifically sequential file handling. Cobol is a little convoluted when it comes to files used in programs. First you use a Select statement to give it a internal name with in the program and then the Assign statement to give it an external name. The external name is the one that will be referenced by the JCL. According to the tutorial this allows for flexibility, and although that makes sense when you think about how swap-able the data is, it seems a little over the top just to define a file.
I also learned a bit about how iteration works in cobol, it doesn’t have a for key word so it uses the perform statement with a condition defined in the code block.
Here’s the example the tutorial uses:
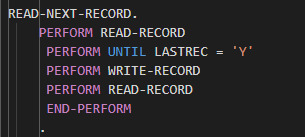
Read-Next-Record is the name of the paragraph, and the loop it runs is the 4 Perform statements, The Read-Record and Write-Record are their own paragraphs containing their own processes. LASTREC is a programmer defined variable that gets set by the Read-Record if it comes across the End of record flag at the bottom of a data block. I’ll admit the nice thing about cobol is its very human readable.
In the end I got to run and fix up a few sample programs where the issues had to do with either a bad variable name in the source or a bad reference in the JCL. The title of this post refers to the output of the code I go to run, which was basically the account information for the US presidents, here’s a small excerpt:
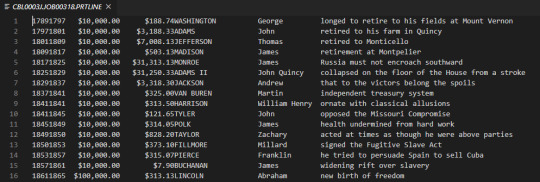
Anyway, that’s all for today.
Don’t Stress.
0 notes
Text
PICTURE Clauses
Here we go back to learning more cobol, this time I learned about programmer defined variables and Picture clauses.
Picture clauses are a pretty alien looking thing when you first come across them, they look like a foreign language hanging out with English (or well which ever language you speak) I’ll give you an example:
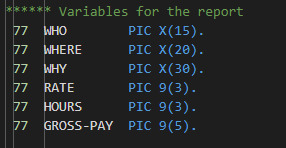
Here are some programmer defined variables in the practice code I have, the 77 on the left its the variable’s level number, level numbers are a data hierarchy for variables. In this case 77 is used because it is a special level that can’t have any subdivision of the data. This makes data access quicker. But hey we’re here to to talk about picture clauses not level numbers. So here on the right we have these weird seemingly nonsensical values : PIC X(15) or PIC 9(5). What could these possibly mean? Its actually very simple, WHO PIC X(15) means the variable “WHO” will store alphanumeric characters(X) and there will 15 of them. Same goes for the other example GROSS-PAY PIC 9(5) means “GROSS-PAY will store digits(9) and there will be 5 of them. This formatting reminds me a lot of the way SQL defines columns.
This lesson ended off with running some cobol code examples and correcting a mistake, in this case a wrongly defined picture clause, it needed to be a PIC 9(5) when it was a PIC X(5). I was pleased with knowing the answer right away.
That’s all for today.
Don’t Stress.
0 notes
Text
The 90s Called They Want Their Toy Back
Hello, so like I said I’d like to try and make posts about my Virtual Pet project at least once a week, Sunday seems like a good day, since once again despite working nights I am some how awake during the day. Either way, I made some good head way with the project.
So what exactly is a virtual pet, and what does making one entail? Well I’m sure you’re all familiar with the Tamagotchi key chain pets from the 90s, if not they look like this:

Pretty cute right? I still have one of these on my house keys, still works. My end goal is to make something like this from scratch.
So lets get to the project planning, what is the bare minimum needed to make a virtual pet? Well we definitely need a pet but also someone to take care of the pet since it can’t do much on its own. So we’ll start off developing these two elements.
So the basic code for our Pet class:
public class Pet
{
private String name;
private int belly;
public Pet(String name, int belly)
{
this.name = name;
this.belly = belly;
}
public String getName()
{
return name;
}
public void setName(String name)
{
this.name = name;
}
public int getBelly()
{
return belly;
}
public void setBelly(int belly)
{
this.belly += belly;
}
public String status()
{
if(belly >= 90)
{
return name + " is full";
}
else if(belly >= 50)
{
return name + " is still a bit hungry";
}
else if(belly >= 25)
{
return name + " is hungry";
}
else
{
return name + " is starving";
}
}
}
Right now the pet class only really needs a name and belly, belly being how full it is. I’ve created setters and getters for both with the setter for belly adding to the current value. We also have a method here called status, they allows us to get information on how the pet feels, this is currently only based on its belly value but we’ll be adding more information in the future.
Next we need our PetOwner class:
public class PetOwner
{
private String name;
private Pet pet;
public enum Food
{
MEAT (25, "MEAT"),
VEG (15, "VEG"),
CAKE (20, "CAKE");
private final int calories;
private final String name;
Food(int calories, String name)
{
this.calories = calories;
this.name = name;
}
}
public PetOwner(String name, Pet pet)
{
this.name = name;
this.pet = pet;
}
public String getName()
{
return name;
}
public void setName(String name)
{
this.name = name;
}
public Pet getPet()
{
return pet;
}
public void setPet(Pet pet)
{
this.pet = pet;
}
public String feed(Food food)
{
pet.setBelly(food.calories);
return pet.getName() + " eats " + food.name + " " + pet.status();
}
}
This class has a little more going on, we have our typical setters and getters but we also have an enum and another method called feed. The enum is the food items we can give to our pet, using an enum we can quickly add more items to the list in the future. Feed is the method we’re going to use to change the pets belly value, which allows us to “feed” it. This method also uses the pet class’s status method so we can get an update on if the pet still needs more feeding afterwards.
That’s about it for today, I’ll be providing a link to the gitHub repo in the next update. Like I said above I’ll be trying to update every Sunday, so I’ll see you guys next week.
Don’t Stress.
0 notes
Text
Now Introducing, Pet Char
So like I mentioned in my first post, the other part of this blog will be following a personal project in Java. I’ve decided to create a Virtual Pet, the basics of this project are simple to implement but the number of ways to expand or improve it are endless. I’ll be showing the process of starting a new project and developing it over time, I want to post about it at least once a week as a motivator. So I hope anyone who reads this will look forward to each new installment.
Don’t Stress.
0 notes
Text
Battling Dinosaurs

So I’ve begun my life with Cobol, the language is about as verbose as they come. Everything has its place, and most things feel like boxes inside of boxes. But its incredibly read-able, you can see by my code images, everything seems simple and clear. I hope it stays that way lol.
Not that I didn’t have any trouble at all, its just that it had nothing to do with cobol at all, with this course you need to be able to log-in to the mainframe to compile and run programs. The set up for this wasn’t clear at first and I didn’t know I need to wait till those running the course set up a way to hand out log-in credentials. So here I am getting all frustrated and bothered over nothing. We need to be better about that. Now that I am calm and everything has been set up its all good.
Cobol is interesting, I look forward to continuing.
Don’t Stress.
0 notes
Link
So the cobol course I will be doing is the one being provided by IBM through the Open Mainframe project, here is a link if anyone is interested in giving it a try as well. As a note you need mainframe log in credentials to do the labs in this course. The github repo has a link in the readme file where you can apply for the log-in. It says it takes 24-hours to get a response but I received mine just 2 minutes after applying. Either way I hope anyone else who does this course has fun learning about this dinosaur.
Don’t Stress.
0 notes
Text
First Post
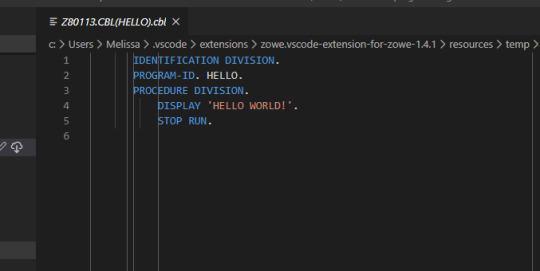
Hello World!, or well I guess anyone who has accidentally stumbled upon this blog. I’m mostly doing this for me and less for people to actively look at.
So the purpose of this whole thing is to write about any programming stuff I am working on. Right now I am starting with two projects, one is a personal project written in Java. The other is working through Open Mainframe’s Cobol course.
I hope all of this will make me a better programmer.
Don’t Stress.
1 note
·
View note