
whumpgifathon
Whump Gifathon - August 2024
A 31 day prompt challenge for whumpers who create gifs and other visual media i.e. art, moodboards, videos, photo edits, etc.
27 posts
Don't wanna be here? Send us removal request.
Last Seen Blogs

derpyraccoon
derpy Raccoon

gcnenineteen-blog
all the KING'S men
cuethemulti
bit fruity, innit?

drewmike
The Drew and Mike Fan Blog
cuethemulti
bit fruity, innit?
Note
Not an ask, but I wanted to say that I love this idea! I'm a newer gif maker, (I started a little over a year ago) and would love the opportunity to get more involved in the whump community. Thank you for making this event! I can't wait!
I'm so glad you're excited!!! That's awesome that you've started making gifs! We can never have enough gifmakers in the community. I hope the prompts will be inspiring and fun! I'm hoping to post them soon!
2 notes
·
View notes
Text

Hi @dolcifusa ! Good question. Okay this got way longer and more detailed than you probably wanted but here’s how I made the whumptober sets. And I’ll put it under a readmore cause it’s kinda long
Keep reading
8 notes
·
View notes
Photo
SHARPENING FOR PHOTOSHOP CC
Any gifmakers who use Photoshop CC know that using the same sharpening technique as CS5 gifmakers doesn’t have the same effect on CC. When sharpening on CC, gifs can turn out “muddy”, or undersharpened, unlike the crisp CS5 sharpening. After many many months of fiddling with my actions and techniques, I finally found a way to better replicate the crisp CS5 sharpening look. I figured I would share what I learned for other people also struggling to make their gifs look better.
My process is under the cut.
Keep reading
2K notes
·
View notes
Note
How do you make GIF's?
Magic
No but seriously, let me show you my process! We’re gonna make this gif.
A detailed look at my gifmaking process below the read more. It’s long. And a lot.
Keep reading
108 notes
·
View notes
Text

THE GIFMAKER'S GUIDE TO SUBTITLES
Ever thought about subtitles? Want to learn how to make them? Look no further 'cause here's a tutorial all about them! I'm gonna show you my process of making subtitles on Photopea, but these tips can also be useful for Photoshop users as well. I hope you find this helpful!
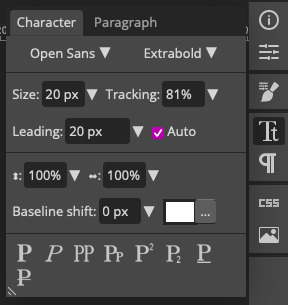
FONT
I use a font that's already in Photopea (yaay no need to download anything!) called Open Sans. It's a pretty neutral font and I really love using it for subtitles. I always set the font to Extrabold Italics. Looks the nicest in my opinion!
Here's how it should look like at the top of your workspace:

Locate the font on the left tab, then find the extra bold setting on the right tab.
SIZE
The font size will depend on the width of your gif. For a full-width gif (540px) you can get away with something bigger, but if you have a two-column gifset for example, you'll need to make it smaller. For big gifs, my go-to is either 20px or 25px. Depends on how I'm feeling.
Here's an example to better show you.

Something you also want to keep in mind when subtitling is to have a nice gap between the bottom of the gif and the text itself. "Oh, but how can I find that?" I hear you asking. By turning on distances!
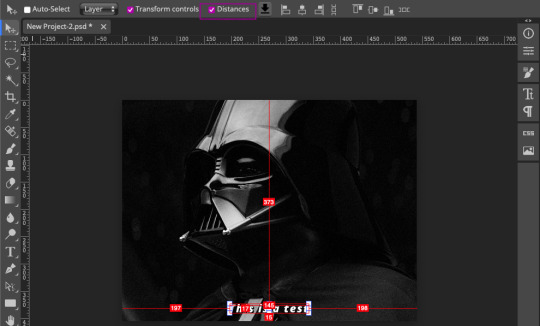
By turning on distances, you can see how big the gap is between the bottom and the text. In this example, I have it set to 15.
If you don't want to forget, you can always add a ruler and line it up with the bottom of the text. Then the rest of your subtitles (if you're making more), all go in the same place. To turn on the ruler function (if you haven't already, go to View > Rulers. You'll now see numbers on the top and the left side of your workspace. Simply drag from the top and a blue appears.

Now any text or shape will snap to that line automatically if you move it around. Now that's neat!
To finish this section off, here are the distances I use for each gif size. As you'll notice, I move the text down a little bit the smaller the gif becomes. But in the end, it's all up to you.
540px — 15
268px — 12
177px — 10
SPACING
What I like to do is increase the tracking so that there is a bit of space between the letters. I put it at 81%, but if you want the spacing to be wider that's cool too!
SHADOWS & OUTLINES
Shadows.... Very scary. But they don't have to be!
Here we have plain text. On its own, can be kinda hard to read. What we need to do in order to fix that is to add some shadows to make the text pop more.

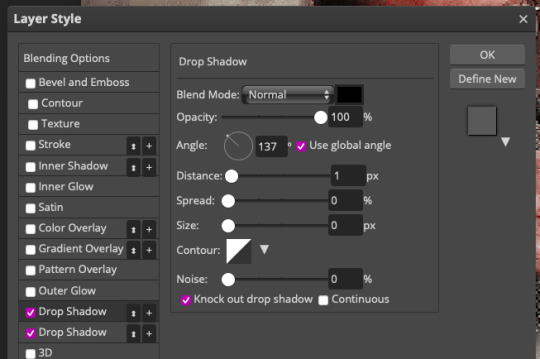
Right-click on the text layer and open up blending options. Then check the drop shadow box and click on it. Set everything to 0, except for opacity (100%) and size (10px). Now you have a shadow all around the text.

Next to the drop shadow, click on the + sign to duplicate it. Change the angle to 137° and set the distance to 1px. Make sure to lower the size to 0.
Now duplicate that layer by clicking the + sign. Everything is exactly the same here, but change the distance to 2px.
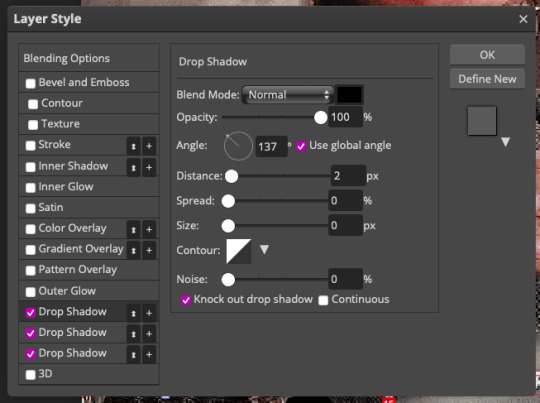
Do this once again, changing the distance to 3px. Don't go over 3px, as the shadows will start to look weird!
Now the shadows are all done! This is how it looks

COLORS
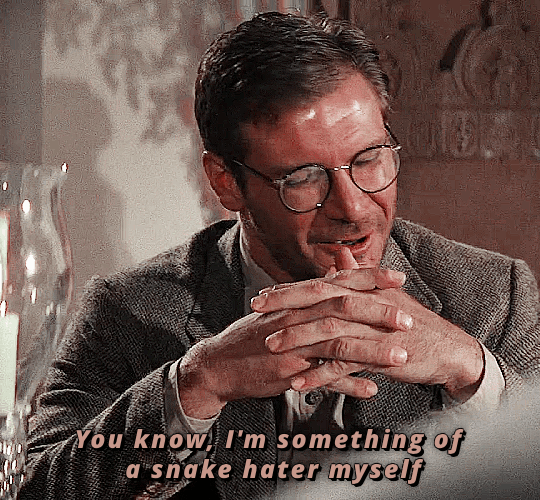
Something that's pretty common is to use white and yellow for subtitles (if there are two people speaking for example). You're more than welcome to use those colours, but something I personally like to do is incorporate the subtitles with the gif so that it looks more cohesive. I always pick my text colour after the base gif is finished. Let's take a gif from this Indiana Jones set I made a few months ago as an example:

he looks so good in this movie aND FOR WHAt-
No subtitles... But that is all about to change (oOoOooO)
Write out your text like normal and select the text layer. Go to the character tab (looks like Tt) on the right side to open up it up. Click on the colour box (in this case it's white) so that the color picker appears.
Here's what the screen looks like after all that clicking we did

Then you chose... but chose wisely... (lol I'm gonna shut up now)

After I have my colour picked, I drag the dot around to make it lighter. I don't want it to be super bright, so I drag it towards the top and middle to get a bit of grey. That way, it looks a little muted as well as lighter which is what I personally like.
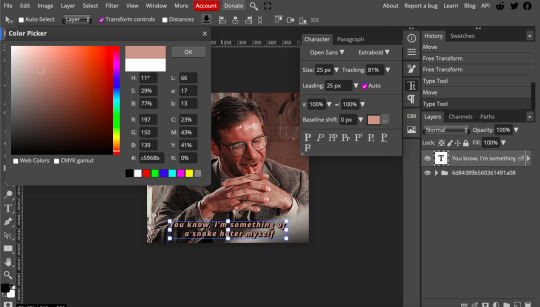
My tip here is to find the most dominant colour in your gifset if you want your subtitles to look cohesive! Here I've picked a colour, the brown wall behind him because it pops against the greyish tones on his blazer. Here's the final result!
We've now reached the end of this tutorial. I hope you've learned something new and that this makes you want to make MANY subtitles from now on. If you have any questions, don't be afraid to send me and ask. Also TAG MEEEE (#userlace) if you make something, I'd LOVE to see what beautiful gifs you make <3<3<3
130 notes
·
View notes
Photo
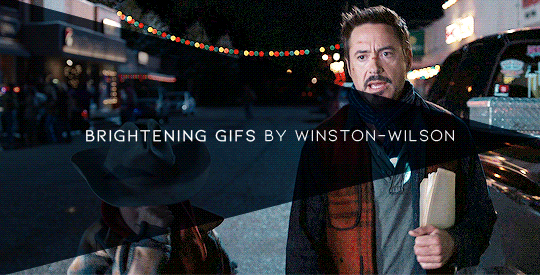
how to brighten gifs by winston-wilson mini tutorial
i’ve gotten a couple of anons asking how i brighten the dark scenes, and as long as there’s no golden rule/way for that, i can sure as well try to explain my way. so how to go from this
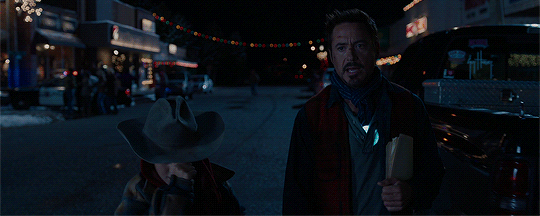
to this
Keep reading
2K notes
·
View notes
Text
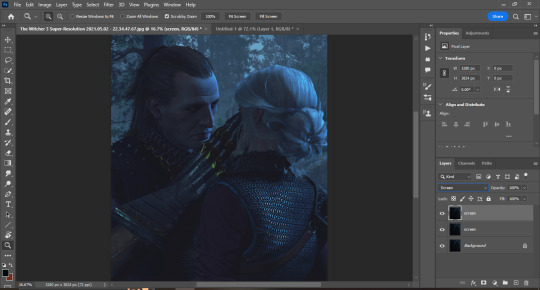
Turn Night to Day: Colorize Dark Photos Using The Curve Tool
...the tygerlyla way (this one not so tedious 😂😂😂)
This technique has helped me immensely with dark photos before I had a photoshop upgrade. No need to fiddle with the Brightness/Exposure slider, and if you do not have the Neural Filters, these steps are the next best alternative... may even be a better alternative!
Step 1: Choose the photo (this is a night shot of my favorite couple Ciri and Morvran).

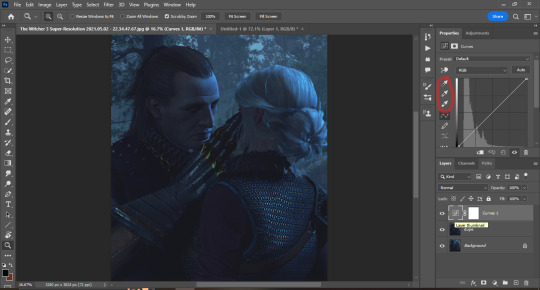
Step 2: Create a duplicate of the photo and change the layer mode to Screen to brighten it some. For this photo I have 2 "screen" duplicates.
Step 3: Flatten the image and create a duplicate. Then put the Curve adjustment layer on top. Tap the Curve thumbnail to manually adjust the droppers (Bottom-Highlights, Mid-Midtones, Top-Shadows).
Step 4: Choose a color for the highlight dropper, midtone dropper and shadow dropper. For this task, I chose light yellow for highlights, orange-brown tint for midtones (it's usually for skintones), and dark brown close to black for shadows).
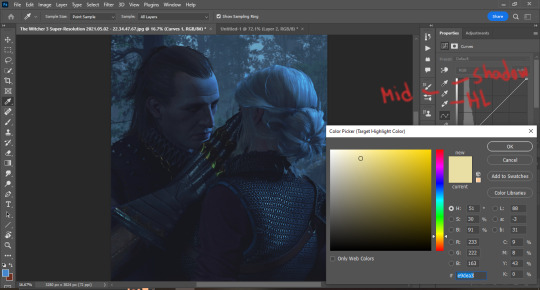
Step 5: Use the highlight dropper tool on the lightest part of the photo. In this case, its the highlights on Ciri's hair. The rest of the photo adjusts to the changes.

Step 6: Use the midtone dropper on the skin. I use it on Ciri's exposed neck. Again the rest of the photo adjusted to the changes.

Step 7: Use the shadow dropper on the darkest part of the photo (the triangle between Morvran's gauntlet and Ciri's shoulder). The rest of the photo adjusted to the changes.
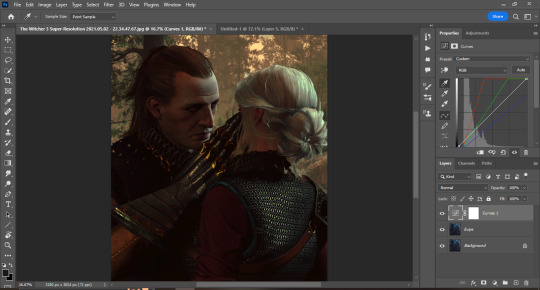
Aaaaand... there we have it! Photo colorized, setting changed from night to day. Now it is up to you to make further enhancements using filters, luts, actions and plugins.
Hope this helps fellow artists and photoshop users!
140 notes
·
View notes
Photo

tutorial below the cut!
Keep reading
6K notes
·
View notes
Text

for the longest time, i made my gifs on ezgif, but more recently i have started to use this method to make higher quality gifs for free. so if anyone wants to start making gifs, but can’t afford photoshop, this might help.
WHAT YOU NEED
photopea (free)
kmplayer (free to download and use)
access to movies or scenepacks (you can send me an ask for these)
sharemania (free)
OTHER HELPFUL TUTORIALS
how to make gifs with photopea by @lacebird (super helpful for mac users)
giffing on photopea by @benoitblanc (different method of giffing on photopea)
ofcamerasflashing’s masterlist by @ofcamerasflashing
background colouring tutorial by @sashafierce
giffing tutorial by @newrcmantlcs
colouring tutorial by @lovestory
text tutorial by @yelenafbelova
THIS TUTORIAL REQUIRES …
you to know the layout of photopea (you can find this in @benoitblanc’s tutorial)
patience. a lot of patience.
tutorial under cut
Keep reading
1K notes
·
View notes
Text
Gifmaking/general photoshopping tips and tricks for beginners (and not)
Hi all! Before we start, I’d like to tell that I’m no expert in any way and everyone should work they way they are comfortable with, these are just some things that I’ve collected over the years to make my life a little easier. And hopefully, yours too. There’s no particular order. I’ll try to keep this nice and short. Let’s get down the rabbit hole, weee! WARNING: IMAGE/GIF /TEXT HEAVY!
Tip #1: Use cropping presets
Instead of typing dimensions by hand, use cropping presets for quick access. To do that, chose the Crop Tool, type in your dimensions, then go down the dropdown menu on the left and chose New Crop Preset. Tada! You saved your settings for further use. Here are some of mine

Tip #2: If available, work with video timeline instead of frame animation
I personally think that it’s much handy and saves you from a lot of unnecessary clicks, plus you can do a lot of effects (such as text animating etc) without too much trouble. It all comes down to personal preference tho, of course. Here's super useful in-depth tutorial on how to make gifs with video timeline
Tip #3: When working with colors (especially very vibrant ones), convert your document from 8 bit to 16 bit first
I bet many of you come across this issue: when you work with colors and using brush tool, the visible stripes may appear and ruin your whole image/gif. Like this:
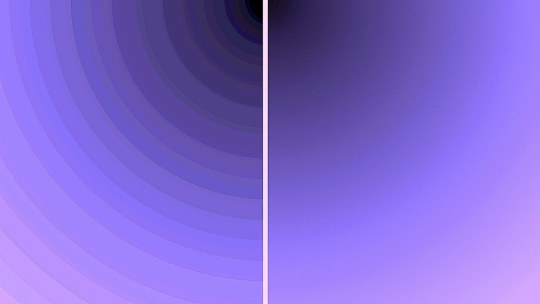
It’s called color banding. Ugly, right? Without too much of technical terms banding happens when an image loses its colors after being digitized (e.g. screencaps, or basically anything that was captured using any capable device). Bad news is that you can’t fully fix it because you can’t restore what’s been lost for good (here’s a great and detailed walk-down on what banding is and how to fix it). But what you can do, is make it less visible. To do that, open your document, and before doing anything with it, go to image > mode > 16 bit. (32 bit is more advanced, i never use it because 16 bit is quite enough for my work) It adds more color depth (or should i say imitates it) to the document, so now when you work on your gifs, the color stripes won’t be as harsh. Another way to fix color banding is to add noise manually. But I prefer to switch image modes because photoshop does a better job at adding more natural kind of noise and it’s barely visible to the eye
Tip #4 (requires video timeline): when slowing down gifs, change the amount of FPS
Sometimes when you slow gifs down they may look kind of choppy. A quick way to fix that is go to your video timeline, click on the three lines button, chose Set Timeline Frame Rate and change the number in the pop-up window. The higher the number, the smoother it will be, but don’t overdo it. I personally go from 60 to 120 FPS and see what looks best for my case. Some times it's barely noticeble, some times it can make a huge difference

Tip #5 There’s no quick solution to anything
Well it’s not exactly a tip, more of an advice actually. I know many of us want our work come to life as fast as possible, preferably, exactly in a way how it was in our mind. But for better or for worse, nothing in this like works like that. So when you make gifs, remember that there’s no «universal» psd coloring, sharpening, blend mode, texture, etc that works exactly the same in every case. Bc every scene is different, the lighting is different, the original color grading is different. As soon as you get used to that, it won’t be a problem anymore. So don’t get scared or discouraged when something doesn’t happen in a matter of «poof» — it’s completely normal. Don’t be too hard on yourself, don’t rush things, take your time and don’t try to be «like that person who’s gifs I like very much». It’s wonderful to get inspired, but try and discover your own tools and ways to work, something that will make your work unique and maybe even becomes sort of your personal signature. Most of the things I did came out of pure experiments i liked the end result of
Tip #6: Discover the power of blend modes and opacity
Don’t be scared to play around with the layers you use, they don’t have to be untouched, on the contrary, they should be modified in ways to achieve interesting results. For example: original gif with only sharpening applied (16 bit mode)
Colored with a whole bunch of Gradient Maps on different blend modes and opacity settings (also 16 bit mode. Not my best work but it pretty much illustrates the point)

Tip #7: Uncheck the «Delete cropped pixels» option in Crop Tool
Sometimes when you do gifs, you often find yourself wanting to reposition them because you feel they’re not quite in the right place, but this happens It’s because this option is checked and Photoshop deletes everything what’s outside of canvas once applied. When it’s unchecked, it just hides those pixels away, so you can freely move your image around whenever you want (not the best example but you get the idea)

Tip #8: Use text boxes instead of individual text layers
That’s pretty self-explanatory. It looks much, much better. Take your Text Tool, drag it across the document to create a box, then paste/type your text and you’re done! Here's a great and detailed guide on subtittles.


And that's about it folks! Have fun being creative :) And if you have any questions, don't hesitate to drop 'em in my askbox.
526 notes
·
View notes
Photo

Some of my lovely friends asked to show how I do my blending, so here is a very long tutorial! I will explain how to:
Blend GIFs with lots of movement
Blend three or more GIFs on one canvas
You will need:
Any version of Photoshop with a timeline
Basic-intermediate knowledge of GIF making (including cropping, how to use adjustment layers for color correction, applying layer masks, and placing multiple GIFs on one canvas)
Since the way I blend depends on the footage I’m able to work with, I often end up going in a different direction than I first planned. So this isn’t a strict step-by-step guide that can be applied to everything you make. These are just some tips!
Read the rest under the cut.
Keep reading
2K notes
·
View notes
Photo
hi everyone! this tutorial is for @xuixialing, who asked for a tutorial on how to make layout gifs, based on my recent gifset here, so here it is! (also this is what i usually do to make simple/complex layout gifs)
you will need: adobe photoshop of any version with timeline (i use cc 2019)
difficulty: medium. previous knowledge of giffing and basic knowledge of masks (optional) is required
the tutorial is under the cut!
Keep reading
478 notes
·
View notes
Text

MY GIFMAKING TUTORIAL
hi !! i am finally getting around to making a gif tutorial so here we are, the most i have done is answer an ask about high quality gifs so i’ll just put that link here - x.
i’m gonna try and go over the whole process but i might end up forgetting something so if you need clarification or a further explanation on something feel free to ask i’m happy to help !! also i’m gonna stick this under a read more bcs this is probably gonna end up being quite long.
Keep reading
553 notes
·
View notes
Photo

hello!!! in response to the colouring tutorial request and a couple of asks i got asking about my psds i have put together this tutorial about my colouring techniques!! if you have any questions please send them my way <3
Keep reading
959 notes
·
View notes
Text
Hello @crispyliza !! So I'm replying in a separate post because this is too long for a reply on the post. Hope you don't mind. I also think it might benefit others who have asked me in the past and those wishing to start gif making. Especially with whumptober just around the corner.
So here's a full look at how I make my gifs. This got very long so I put it under a read more
A quick thing before I start: I use windows and google chrome. If you're a mac or firefox user I'm not sure of this will work for you in terms of programs. The techniques I use in photoshop should though.
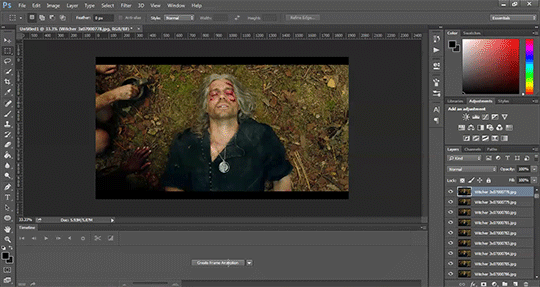
Okay for this demonstration I'm going to show you how I made the gifs for this gifset
To start we need a video. I don't torrent because my internet connection will cut out a random which makes using vpns rather pointless. I've tried. My internet would cut out halfway through a torrent download and then my internet provider was notified to what I was doing. It was just not great. So I found a new way to download videos off the internet! You can use torrents though. If you've got a vpn, go for it.
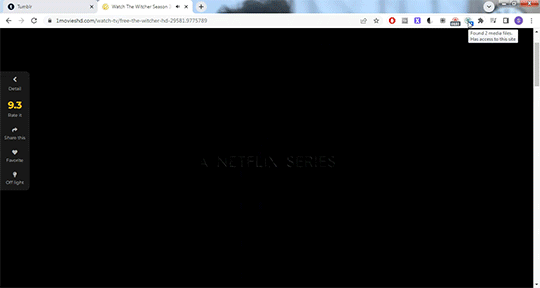
There are several streaming sites that I go to to get my videos. 1movies, and bstsrs are my go to right now since soap2day is gone (rip i miss you).
Now there are three ways I can get a video depending on what website I'm using. Bstsrs is the easiest because they have a whole bunch of links available. I always go with mixdrop because it has an easy to use built in download button. Unfortunately this site doesn't have movies. Just tv shows and sometimes it's not the best quality or there aren't links available. That's when I go to 1movies. Once you've found your video I use the chrome extension Cococut to download it. Click the extension button to open, then the download button. Then you just have to wait until the video is rendered. Click save. Wait until its downloaded.
Okay we now have our video! The next step is to turn the scene you want to gif into frames. For this we're gonna need KMPlayer. This video player makes it really easy to turn scenes into frames/screencaps. Open your video. Find the the scene you want and pause the video. Type control-g to open this screen:
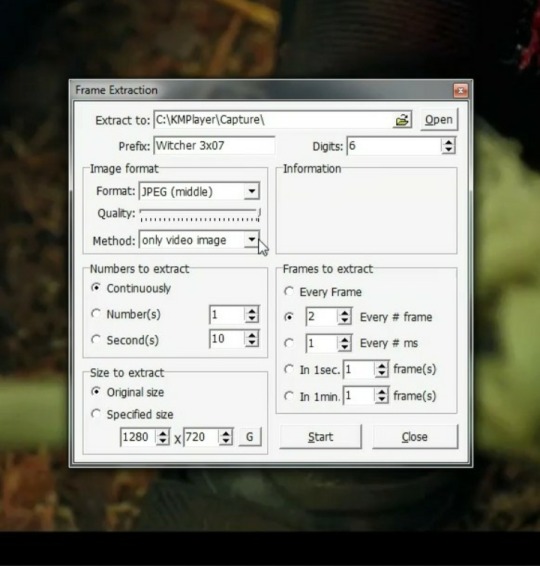
Here you choose the destination you want your frames to be saved. Decide what to name your frames and match up your settings with mine. You want to continuously extract frames, original size, and I stick with every 2 frames. Then, and this is important, choose video images only.
Now click start then start playing your video until the scene you want to gif is done. When you've got everything you wanted, pause the video. Hit ctrl-g again to reopen that screen and click stop. You now have all the frames you need so go ahead and exit out of KMPlayer. You don't need it again unless you need to redo frames or get the dialogue or something.
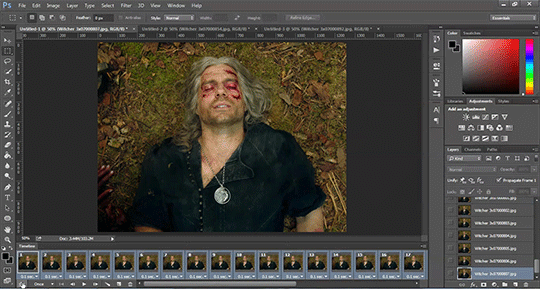
Next up we are gonna open Photoshop. I use Photoshop CC 2014.
Click on File -> Scripts -> Load files into stack -> Browse.
Go wherever you saved your frames and select the ones you need. Click okay and let the frames load completely before doing any thing else. Depending on how many you've selected this could take a while.
Once all of your frames are loaded, click "Create Frame Animation". Next click the little arrow button on right followed by "Make Frames From Layers" so we have all of our frames laid out. Now we need to reverse the frames because they're backwards so click that little button again and then click "Reverse Frames"

Okay you've got your frames loaded and all set to go. Time for all the cropping, resizing, setting the speed, and editing.
First thing I do is set the speed because otherwise I forget and it's important to do and a pain in the ass to do after all the editing is done. So do it first and get it out of the way. Select all of your frames. Click the little button beneath a frame where it says 0.0 and pick your time. I usually go for .1 seconds but .05 is also a popular speed. Just test one out and see which one you like best for your gif. You can hit the play button at any time to test your gif.
To set speed:
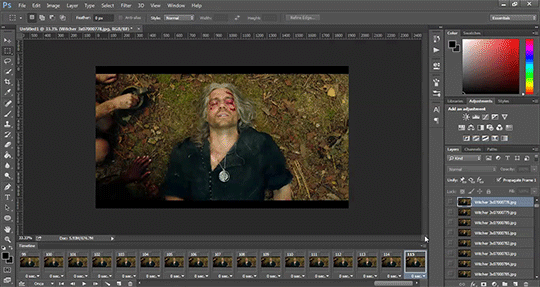
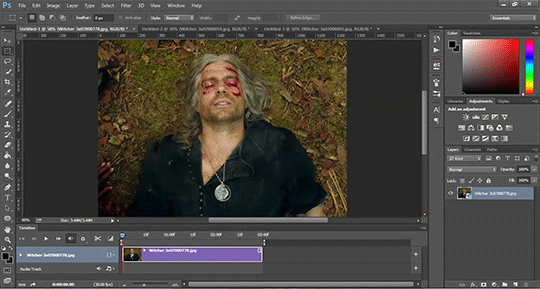
After this I do one of two things. Either I go into cropping and resizing or I separate frames. Depends on how many frames I uploaded. If I uploaded all the frames needed for an entire gifset this is the part where I separate them out onto individual gifs. So let's do that.
Originally I was just gonna do one gif but I have 115 frames uploaded which is waaaay too many for just one gif. I like to keep my gifs between 30 and 80 frames. So I'm going to split this into 3 gifs I think. It'll make a nice balanced gifset.
Select the frames you want for the first gif and copy them using the copy frames option in the same menu as the make frames from layers menu. Open a new document with the same dimensions as your current document. Click "Create Frame Animation" and paste the frames over the selected frame. Make sure that first frame is the same speed as all the other frames. Repeat until you have your desired gifs.
Next up I crop and resize. For this gif I'm going to first crop out the black bars above and below the image because we don't want that in the gif. Use the select tool to pick what you want to keep then "Image" then "Crop".

Now I could leave it as it but I think for this gifset I'm gonna focus more on Geralt so I'm going to crop it in a bit more.
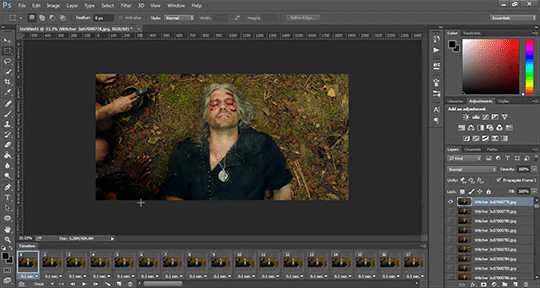
Once cropping is all set i'm going to resize the gif to tumblr dimensions. Click "Image" then "Image Size" and change the width to 540px. The height can be anything and best not to mess with it so your gif keeps it's proportions. 540px is the width of a tumblr post and I plan on making these gifs stacked one on one.
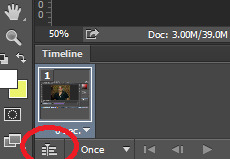
Okay the gifs are all cropped and sized. Now it's time to do some editing. Go back to your first gif. We'll do all the work on this first gif and apply the same things to the other ones later because the scenes are the same. If they were different each gif would be colored and edited individually. First thing to do is turn it from frame animation to timeline. Timeline mode makes applying things like sharpening and brightness much easier and smoother.
So just click this button in the bottom left corner to go into timeline mode. Next up select all your layers. They're on the right side. Make sure you've selected ALL of them. Then click on "Filter" -> "Convert for Smart Filters" THIS IS AN IMPORTANT STEP! We can't edit until this is done.
This button to switch from frames to timeline:
First thing I do is sharpen. You can use one of the presets or try to do manually do it with smart sharpen. I use the preset labelled "sharpen" because I'm lazy and this one does a fine job for my gifs. I also add a layer of surface blur to smooth things out. Just a small touch. Like barely any blur but I think it smooths noise a bit and makes it look better.
Next up: Editing!! This step is going to be different for each and every gif you make. It all depends on the colors in the scene your giffing so you're gonna have to do a lot of experimenting to get the right look you want. Personally that's what I like about it. Makes it fun.
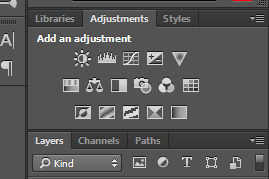
All your adjustments can be found found on the right side of the screen:
I almost always start with the "Levels" layer to brighten up the image because as we all know, every freaking whump scene is sooo dark. So with levels you just slide the little arrows around until you get a look you like.
Then I add a layer of "Curves". I love curves. With curves you can select the whitest white and the darkest black and the middle tone to change the brightness and colors of your gif. Or you can use this part and just brighten or darken a specific part. It's really versatile and i love it. It does take some practice and experimenting though.
Now a layer of "Contrast" and a layer of "Vibrance".
After this it's all about the selective colors, photo filters, and color balance to work on the colors and brightness. For this gif I'm only doing a tiny bit of editing cause I like the coloring but sometimes I'll have multiple layers of these to create a good coloring.
Once you're satisfied with how your gif looks it's time to save it!
Click "File" -> "Save for Web" and wait until it's all loaded. Important thing too look at here is the size of the gif. You can't upload any gif that is larger than 10mbs so make sure it's under that. Sometimes even 9.8 is too big because tumblr is a butt. I go for anything below 9.8. If your gif is too big try resizing it or removing a few frames. Make sure you gif is set to loop forever. Otherwise it'll just stop after a little bit. Don't forget to change this!
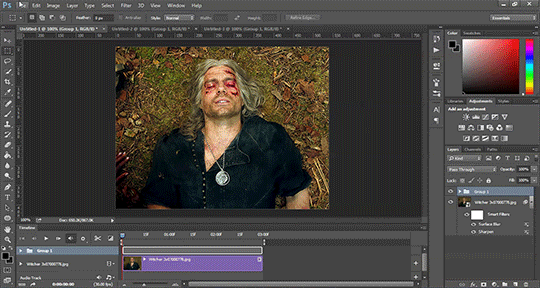
Here are the rest of my settings:
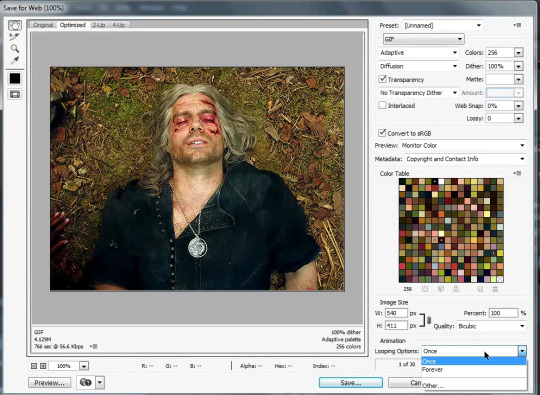
After that you can click save.
And that's it! You've made a gif! Congrats! If you have any questions or want clarification feel free to message me :)
27 notes
·
View notes
Photo
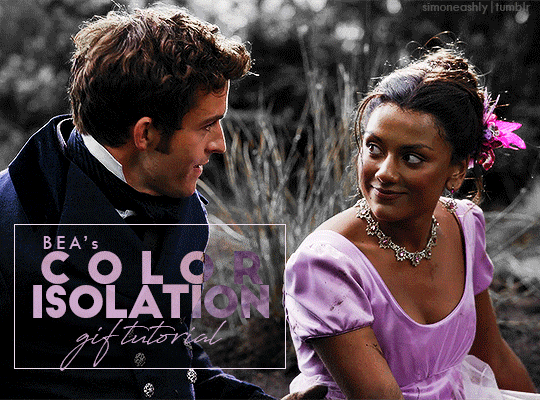
I’ve gotten a few questions on how I made this gifset, and I figured I would show you, since it’s really not that complicated if you choose the right scenes for it.
This tutorial includes 3 versions of color isolation for gifs and assumes you have basic knowledge of Photoshop and gifmaking.
Keep reading
946 notes
·
View notes
Photo
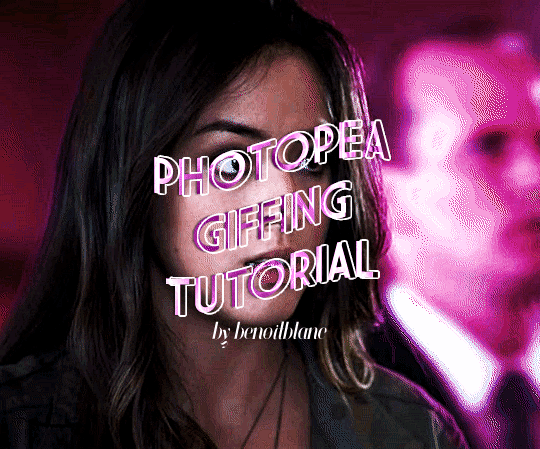
@murdocks asked for a tutorial of how to gif things using photopea, so here i am! for those of you who don’t know what photopea is, it’s a free online editing software that’s very similar to photoshop. in fact, you can import photoshop psds, brushes, etc. if you so choose, but for the sake of this tutorial, i’ve stuck with the basics. fair warning: this is quite long. i’ve started out with how to use the website, then moved on to a practical application.
onward!
Keep reading
897 notes
·
View notes