#tried to screenshot the stuff that came up when the event screen was loading but i was too slow ahaha
Text
auughhh so if you translate thelxie's morse code and caesar cipher it, he legitimately speaks french
#4.2 spoilers#tre plays#genshin impact#thelxie#freminet#there's a video about it...........#i only managed to catch the “ca va” that he says when you talk to him at the camp lol#tried to screenshot the stuff that came up when the event screen was loading but i was too slow ahaha#alsooooo!!!!! if you read freminet's notes around the camp!!!!!!#we learn that he based thelxie's language output on the house of the hearth's cipher#so like. does that mean that they use morse code...??? or??????#and also that in thelxie's case the offset for the caesar cipher is just 1#so perhaps the house uses different numbers for that usually or something idk#but ALSO also#freminet's helmet has a transcription module for this too???#can he send and receive signals while diving or something???? dude that would be so cool;;;;;#just fic thoughts#and it sounds like freminet can understand thelxie if he has his helmet on...............#nobody else can. but helmet freminet can......................#beloved boy talking with his penguin fren. i love him. so much.........................
25 notes
·
View notes
Text
Mitty's unprofessional guide to Menus in RPGMakerMV

Hello guys, Mitt here!
I'm here to give you guys some tips and tricks on how to tackle menus in RPG Maker MV! This will be another one of those big posts yeee!
Disclaimer: I'm far from being a good programmer, but I've learned a few things from trial and error, and I hope my tips will help anyone out there!
I'll also explain exactly how I did Marinette's current menus, and give you a few tips on how you can make something different from a simmilar concept.


I would like to first quickly mention the “Luna Engine”, which came out a while ago. I have never tried it, but it looks handy, and might be the way to go if you're willing to spend a few monies. I can't really give any advice on it though, so do your research first.
This post will be divided in 3 parts:
1. Evented Menus - Common technique, practice makes perfect, try new things.
2. Marinette's Menu - Combination of specific plugins.
3. Making your own menu
So let's get into it!
1.Evented Menus
I figured I would talk about these here!
There are many ways to go about evented menus in any version of RPG Maker. It’s usually quite easy to adapt the method from diferent engines.
Sadly, I'm not very skillful with evented menus, so I can’t directly teach you how to build cool shenanigans, but I remember I made a very simple one for one of Marinette’s previous builds by following some tutorials. These might give you a heads up on how to start with interactable image buttons/ image based layout: [1][2][3][4]
After you get the hang of the mechanics, just start experimenting!
- MV has some performance issues, so it's important to fix those as well when using this technique (or similar) to avoid blinking pictures. There are some preloading plugins out there, but you can also manually load pictures beforehand.
- You can get plugins to the mix to make the job easier. (there are for example plugins that let you call events like they were common events, and another one that lets you assign common events to keyboard keys etc.)
- It's important to practise with dummy menus in projects, mess around with variables, conditions and pictures, and have a ton of patience. This is how you learn to make fancier stuff.
- It's better to pull off this kind of menus in shorter games, otherwise it can get really confusing when it comes to certain mechanics you might want to implement. Be cautious when deciding on making an evented menu for a longer game. (I’m primarily refferencing a fully evented items menu)
- If you find a developer with a really amazing menu out there, it's always nice to ask if it's evented, as you might get some tips from them! A few devs in the discord group are very skillful with evented menus of all kinds, so keep an eye out for them!
- If you just want to event the main menu, use the following script calls to call the other scenes: (Also check out this helpful list)
SceneManager.push(Scene_Item); //Opens Items scene
SceneManager.push(Scene_Save); //Opens Save scene
SceneManager.push(Scene_Load); //Opens Load scene
SceneManager.goto(Scene_Title); //Goes to title
SceneManager.exit(); //Closes the game
The point is, you can do nearly everything (and sometimes better!) with events, as you can do with plugins. All it takes is a lot of patience and practise.
Marinette's current menus could’ve definetely been made with events to have animations and nifty details, but the approach I took was way simpler for me, personally, since I don't have much experience with detailed evented menus, especially when we go into the items, options, save... I honestly have no clue on how to make all those features work properly yet. It would be nice to study the subject one day, though.
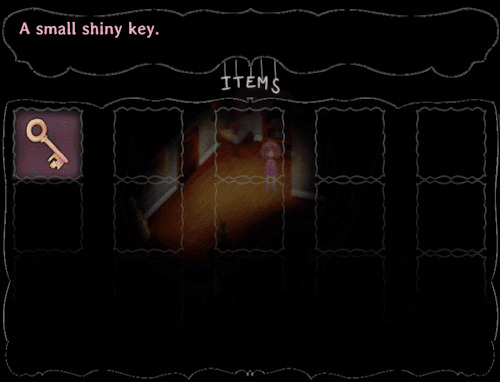
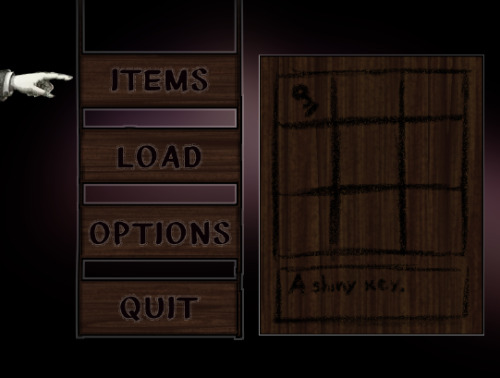
2. Marinette's menu
This is the part where I talk about our menu!
- I started by making a few mockups, which are just images with concepts for menus, from which I posted some in a previous post.
I knew I wanted to keep the map behind the menu visible, preferably either with the default MV blur effect or darken the screen a little. I also knew I wanted to be able to use the items from the menu since the begining.
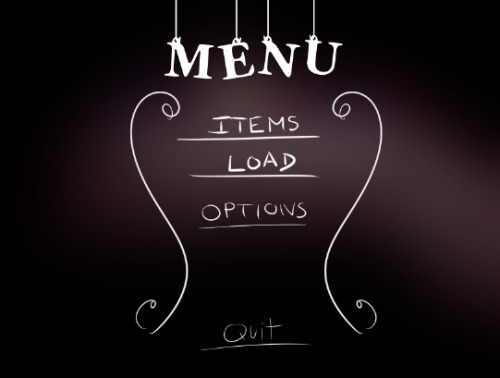
For both the items menu and the main menu, I used a combination of different plugins.
-Soulpour777's "Horror Menu Customizer" to draw out the simple options in the main menu, replacing the default ones. I also made a plugin myself, with heavy help from an online tutorial, that added an invisible window on the top left to center the image.
-Jiffy's "Grid Inventory" to make the item menu's layout.
-Nelderson's "Replace window with Picture" to draw out the images attached to each window. This was the only plugin that I found that worked with transparent images. Be mindful though, some windows overlap, and the images are centered on the top left of each window/ box. If I remember correctly, though, the "Menu Backgrounds" by SumRndmDde is also a good option to do this, but it turns transparency into black, which didn't work for Marinette. Also, disable the game's textbox frame unless you want it to be drawn on top of the images.
-Finally, SumRndmDde's "Super Tools Engine" was used to move around and delete certain windows/boxes that got in the middle of the layout I wanted initially. Basically it edits the boxes’ placement on previously made menus, like the grid items' menu and the main one.

This is how I went about the current menu, and it works wonders! ahaha
Even though I still have some images to finish for it, the layout is final for the most part.
Now...
3. Making your own menu
This is where you'll make a menu of your own!
The reason I explained Marinette's menu like that, is because you can use a simmilar combination of plugins to get any layout you want, with a little searching! Using this kind of approach makes it honestly easier for people like me who...sadly haven't learned how to code yet, but are eager to play around with it.
The first step would be to sketch out some mockups, having in mind the plugins that are available to you. There are a few instances where features you might want are harder to pull off yourself without knowing how to code for being extremely specific. An example of this is menus which open moving menus on the side or something like that.
This is an example of that kind of menu:
This one would probably work best with eventing, if you don’t know how to code.
Be aware of your own limitations, but try to innovate!
With all this in mind, the steps to make a menu would be:
1. Pick a plugin (or just use the default?) that draws out a layout that you can edit with the Super Tools Engine. There are numerous plugins out there that do this, so it isn't hard to find one! Look for cool features in those plugins! Here, have a bunch
2. Edit that plugin with the Super Tools Engine to rearrange the windows or remove any you don't want.
3. Use Nelderson's "Replace window with Picture"or SumRndmDde 's "Menu Backgrounds" to attach images to each part of the menus, like a puzzle. Might require some trial and error, screenshot the window to get it right a little more easily.
Aaaand that's it! You can probably change the text or replace it with images as well, but that calls for more plugin hunting.
Try to mix and match plugin features, ask for the help of coders and be patient! It won't be that much of a headache, and you'll be happy and relieved after finishing a pretty different menu! Also, go past page 1 in google ahaha
If you get stuck on something for too long, leave it and come back later when you have evolved your skillset like the programmer pokemon you are!
I hope this little guide helps anyone out there, don’t be afraid to contact me if you need help. I’ll try to help if I can!
Thank you so much for reading, I’ll see you guys later!
-Mitty
129 notes
·
View notes
Last Seen Blogs

dominick-ferraro
Mimmo Ferraro blog

usaclothingmanufacturer
USA Clothing Manufacturers - Wholesale Clothes in USA

elarafritzenwalden
ELARA FRITZENWALDEN

in-un-abbraccio
a piece of me
quoteoftheweekblog
QUOTE OF THE WEEK 2011-23 ... 12 YEARS & STILL READING