#tldr: look at the pictures. That is what i'm going to use to make witcher art in this tutorial
Text
Painting Tutorial
Disclaimers !!! (important)
I’m not an expert or teacher.
There is an infinite number of ways you can paint. THERE IS NO WRONG WAY TO PAINT! This is how I do it / how I was taught to do it.
I’m doing this (during mars 2020) because I’m getting restless during the global quarantine. If you want to paint but you don’t have the supplies: PLEASE don’t go out to buy supplies. This is not a necessity so please stay safe. Also, if you’re considering buying art supplies on the internet ask yourself if it is necessary (like if you have an assignment/it’s part of your job/...) and try to minimize the strain on delivery services for non-essential supplies.
This post will still exist in a few months. I’ll even self-reblog it at the end of the lockdown so that, if you’re still interested, it’ll be here.
I’m going to make fan art for @letmetellyouaboutmyfeels (madsthenerdygirl on AO3) and her witcher fic “Even Steel Blades Need Fire” that you can find here.
I’m trying to make a non-spoiler piece, but I’ll talk about the fic (so spoilers!) during the process. If you have not read her fic and you don’t want to get spoiled, go read it before you continue.
I started painting two years ago, and I remember vividly my struggles in the beginning. Painting can be confusing, and I am going to assume that people with no experience are going to read this.
I’ll be explaining the painting process in-depth so LONG POST (I guess) and stay tuned for updates !!! (yay)
I think that’s all.
Let’s start !!!
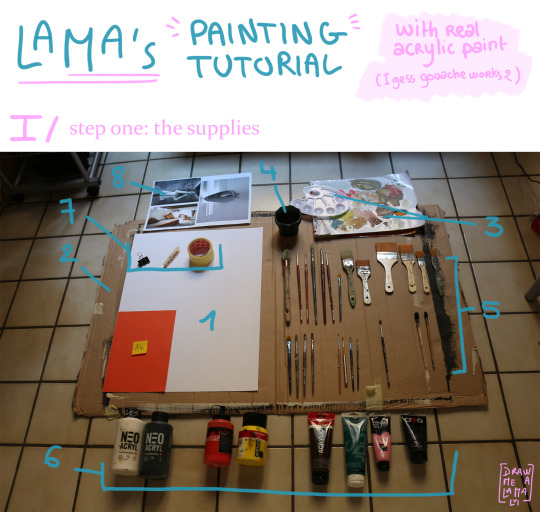
Here we have it all! All the supplies (and some) I use when painting with acrylic paint.
First, note that you don’t need all these supplies to paint. Most of the time I do it with less, but this is a tutorial so...
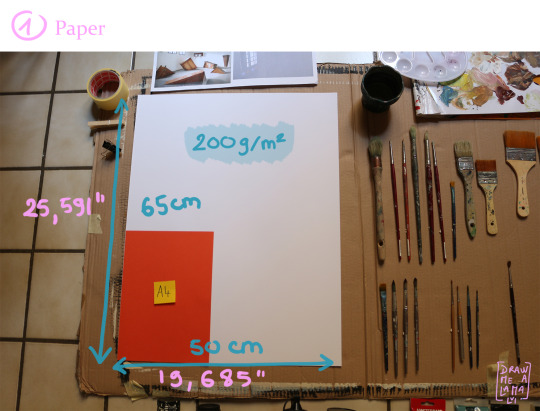
1. Paper
Good news, you don't need to have a canvas to paint !!! You can just use paper (cool right?!).
Any size is ok, but I prefer to paint big (this paper here is on the smaller side. I usually paint on “grand aigle” paper or “double grand aigle”. Which translates to “great (?) eagle”. Look it up!).
Here I’ll be using a 65x50 cm piece (called “format raisin”/ “grapes format”...)
I advise to use 200gms (or 200g/m2) or more but 180g can work too.
225gms and 250gms are my personal favourites.
2. Something to protect the surface you are painting on.
when I started painting I was super messy. I had no control over the paintbrush/the paint/etc..
I recommend using something (cardboard, plastic bag (not the best...), or newspaper) to cover up where you're going to paint.
The smaller your paper, the more likely you are to spill paint next to it.
On that note, when I started painting I used to wear a chemistry lab coat to protect my clothes.
It can save you when you least expect it (read: the whole bottle of paint falls and explodes everywhere). Now I stopped doing that (bad) but I don't really care about my clothes and also painting in your underwear when you're alone is fun.
remember to remove any jewellery (RINGS!!!) (you don't want to scrape off dried paint of off jewellery).
Don't wear gloves. (acrylic paint washes of with soap and hot water). Plus gloves are going to make your hands sweat and I don't recommend wearing them for long periods.
have a towel nearby or something at your disposal (but only use old stuff. you will probably never get all the paint stains off. I use my old lab coat.)
where you are painting is important too. When I started painting I liked using an easel. If you don't have an easel, that's ok. I don't have access to one during this quarantine business, so I'm doing sans-easel.
Also, I prefer to paint on the ground or on a table (depending on the cleanness of the ground and the paper size. if it's too big for one table, I sometimes use two side by side but it's not really practical).
Also with bigger papers, an easel can be impractical = you can't reach the top/bottom easily and you tire very easily.
Here is something my teacher used to tell us:
“Don't sit on a chair.”
Explanation: when using a chair your paintings tend to look "tired" or "sloppy" (Idk how to describe it, but for better results try to stand up)
however if you are doing:
a big piece
painting for a long time
or you have medical issues that make standing up for a long time painful
then I recommend either having a chair nearby to take "sitting" breaks or painting on the ground.
In all cases take breaks!
Second advice from my teacher:
“Don't listen to music while you paint.”
Explanation: when painting you want to avoid "coloring" with brushstrokes that go left-right and up-down all the time. when listening to your music you will unintentionally start following the rhythm of the music with your strokes and making them repetitive. Similarly, I noted that I'm slower when listening to music because I tend to focus more on the music than on what I am painting.
BUT, I know someone who makes these beautiful, giant paintings on bedsheets, which take like weeks to complete and with lots of details. And guess what? Not only does she sit down but she also listens to music while doing so.
In conclusion, it's up to you. but if you struggle painting: try sitting down/standing up/ taking more breaks/ turn on/off your music...
3. Paint pallets
Ok, so here again it's up to personal preferences.
you can use a
plastic/wood/glass pallet (that you re-use every time)
or you can use
disposable paint pallets/a piece of cardboard/paper plates (that you reuse a couple of times before throwing away).
At first, I started to use plastic pallets but I kept trying to clean them at the end of each lesson and I was losing so much time... (note: I found that bigger pallets with no little "holes" work the best).
Problems:
If the paint is dry it’s super difficult to get it off without soap or other types of cleaning products.
You use a lot of water to clean it and paint gets in the sewers.
An alternative is disposable pallets like on the picture (or cardboard/paper plates). you don't have to clean them, it's super cheap/free and a lot lighter.
Problems:
you can't use them forever and will need to throw it away (or recycle them into weird paintings).
If you use straight-up cardboard and try to mix a lot of water in your paint it will make a mess and destroy your pallet.
4. Water dish
Anything that holds water and that you don't use to drink is ok. Remember you will probably never get all the paint off.
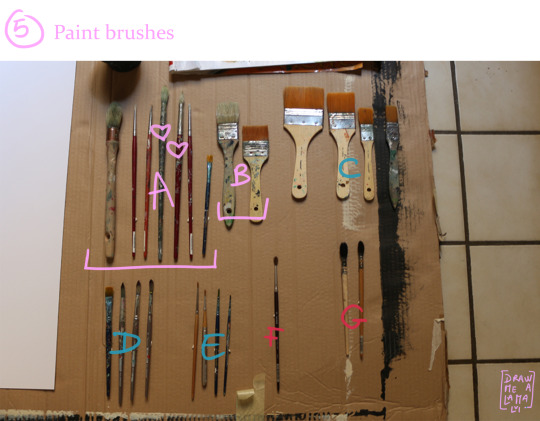
5. Paintbrushes
Okay, this is the weird part where I tell you that "paintbrush" is "pinceau" in french and that the word comes from the Latin "penicillum" which means "small tail" or "penis". Also, there's this text (of which I don't remember de name or the author) but it discusses the implication of artist's preferences for certain types of paintbrushes when you compare them to penises and it's silly and fun but now I need to talk about the paintbrushes I use and I don't want to make this awkward, so just forget what I just wrote there.
Let's see. I grouped and ranked each brush from A to G depending on how much I use them.
A) My personal favourites, that I use all the time: they are mostly round brushes.
There's a big one that's actually to paint walls but works well when I need to cover big surfaces
then a few tiny/flats with rounded tips for detail (called ”Filbert”)
a couple of medium/rounds
and this flat squared tipped (called “Flat” or “Bright”) for when I need to get clean edges.
B) Medium/flat and square tipped brushes I use the same way as the big round.
C) These ones I use when the others are already in use and I need a clean brush. the problem is that some of them have these synthetic bristles that are super bendy and I don't like it.
D) Some more small brushes for detail. I sometimes use them for watercolour because they can hold a lot of water. See how they have a shorter handle? Long handle = for easel painting (because then you can get further away). The small handle = not for easel painting.
To be honest I don't really care. it's not super important (but I prefer the long handle ones).
E) These are really tiny small round brushes that can be used for even smaller detail (but I don't use them a lot).
F) I never use this paintbrush. the bristles are super soft and fur-like and see how they're pointing outward instead of inwards, and don’t make a point? yeah, I can't do anything with that.
G) Please, PLEASE, for the love of god do not use these types of brushes with acrylic paint. they're for ink painting and calligraphy and other stuff. They're super expensive and a pain to wash. I've seen people use them with paint and I don't judge but personally, it just feels wrong to use them with paint.
General tips to keep in mind when buying brushes:
Size matters.
The bigger the better.
Hog bristles = texture + (in general) better quality + stiffer
Synthetic or nylon bristles = cheaper + bendier + smoother finish.
If you are getting a pack of brushes try to look for one with more of the bigger brushes than smaller ones.
You don't need every size but you need a couple under 10, one or two around 20 and one 30 or 40.
Brushes are expensive. Like, think book price range (where I buy them they are around 15 euro or around 20 euro).
Any free brush is a good brush.
Handles don't matter.
General tips to care for brushes:
Wash your brushes.
Use soap (dish soap is fine). I've seen people use shampoo and I'm sure it works but for acrylic paint (= water-based paint), it's a bit overkill.
Let them dry laying flat.
Don't let them sit too long in the water. you don't want to weaken the wood or glue or metal that is holding everything together.
Handles don't matter (just keep a picture or a reference of your brush before it gets covered in paint and you can't tell what size/brand it is anymore).
6. Paint
The fun part!
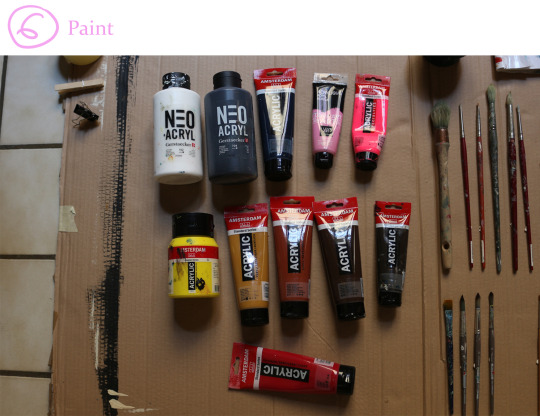
Here are the colours I am going to use (I'm not using all the colours i have and I tried to make a varied but coherent pallet).
(from top to bottom, left to right.)
Titanium White (neo acryl, Gerstaecker, 102)
Black (neo acryl, Gerstaecker,704)
Prussian blue phthalo (acrylic standard series, Amsterdam all acrylics, 566)
Quinacridone pink (I love art, Gerstaecker, 350)
Reflex rose (I love art acrylic, Gerstaecker, 384)
Primary yellow (acrylic standard series, Amsterdam all acrylics, 275)
Raw sienna (acrylic standard series, Amsterdam all acrylics, 234)
Burnt sienna (acrylic standard series, Amsterdam all acrylics, 411)
Burnt umber (acrylic standard series, Amsterdam all acrylics, 409)
Vandyke brown (acrylic standard series, Amsterdam all acrylics, 403)
Carmine (acrylic standard series, Amsterdam all acrylics, 318)
General tips to keep in mind when buying paint, or how to choose colours when you don't want to spend too much on paint:
You CAN NOT paint with only primary colours !!!
NO magenta (it's like using 100% red. Also paint is pigment not light so magenta does not equal red)
Get more white and black paint (you can start with small quantities but these two getts used the most. I've also seen people buy "handyman paint" in white to get large quantities for cheaper but I never tried before.)
Pick darker colours over lighter ones
and pick lighter colours over mid-tones (I will go over this later when I start painting)
If you're like me and don't have tons of money to spend on paint, avoid paints with double colour names like "greenish-yellow", get yellow and get green and get white and then mix! (so you have green, yellow and everything in-between...)
When in doubt pick colours with:
fancy names (royal blue, ultramarine blue,...)
natural pigments names (cobalt, carmine, sienna,..)
well known names (TITANIUM white !!!)
artist’s names (Vandyke brown, Klein blue, ...)
Exciting and unusual names (what intrigues you? If you go: wtf is "Quinacridone pink?", "Phthalocyanine emerald" "Vermillon?", then pick that.)
I know I said don't use primary colours but you NEED to mix colours. Go crazy! (note: straight from the tube colour can be used but in moderation or with good reasons..)
BUT You NEED brown, don't try to make it yourself
you DON'T need purple (I'll explain later)
(fluorescent colours can give you unexpected results when mixing. (I bought the fluorescent pink thinking I'd only use a small amount but now I'm kinda running out. And I don't even like pink that much...))
7. Something to pin down your paper
You only need this if you are going to work on something not horizontal.
Any type of pins (that can support the weight of the paper)
repositionable tape
or any kind of masking tape (that does not ruin paper when removed)
8. references
(The references on the picture are from another project.)
If you're not painting from life I recommend printing out your references over just having it on your phone or laptop or any screen, because
when you print them you are using pigment
and then when you are painting you're looking at pigment and not pixels/light.
So it's actually easier to SEE the colors you have to use (and it can improve your results when painting with PIGMENT).
Also, try to print them as big as you can.
Right now I don't have a printer with me and I can't, like, get it printed or anything (not only because of the lockdown but because this is witcher stuff I'm going to make so I'm going to need reference photos of the actors and everything... yeah, no).
I'm just going to have my refs on a screen...
Hope some of you made it this far. If so, congratulation!
(I tried to make this as clear as possible (English is not my first language and I struggle with writing)).
#painting tutorial#art tutorial#the witcher#witcher fanart#long post#long post cw#tldr: look at the pictures. That is what i'm going to use to make witcher art in this tutorial#lama draws
46 notes
·
View notes
Last Seen Blogs
lepetitebouchon
Lucrum, Sanguinem

zaricats
NELLY-- I AM HEATHCLIFF!

asian-fab-addicted
제목 없음
tornphoenix
My Extraordinary Extra-Ordinary
valeryhlyv
valeryhlyv