#or painting in general . i want 2 get into plein air
Text
i need 2 get back into painting fish
#said in the ‘gary i need’ voice#or painting in general . i want 2 get into plein air#and go to like . arizona or smth and paint the landforms . soo red and orange and rocky and dusty and ❤️🫶#the round brushstrokes on tht 1 would be so much fun~_~#its such a tiresome medium though.like all the set up and cleanup and stuff#i refuse to learn abt oil precautions so i just stick to acrylic but even then it dries so fast and its like.mindgame trying to decide what#to focus on in the little time u have . and god forbid u paint on a layer too soon and u lift it off the canvas#HELLLLLLL. but the end result is always so worth it . like holding a physical piece.its 3d .its REALL#fish r so much fun to paint bc 1 u get to pay attn to their morphology but 2 they jave the best textures#im not averse to painting fur but i lovee . the interplay btwn light and fish skin. its so epic and awesome#the only other artist ik of in my family is my uncle & he METALWORKS!!! FISH !!! ITS SOOO FREAKIG COOL#i want to learn from him so bad . guh.GUAHHHHH. anyways i just think its funny that the two of us r fixated on recreating fish#crosses my arms .#okhh.. i also wnt to get into mosaics . god.GOAODDD#did i talk abt this 1 alr.. reread the b1p arc w the mosaic and fresco work and it makes me so sick why couldnt i go to art college and make#frescoes and mosaics .woe is me or whagever . no but its so tempting 2 just buy some tesserae and get 2 it ..#i saw a pigeon mesh mosaic n it like lit that fire under me . what we need js like one giant art collective#that magically provides all the supplies in the world for free and we hold hands and make art in 20 different disciplines 2000 different wys
7 notes
·
View notes
Text
once again i am answering asks in a big compilation post. included is... gotham, patrick stump, tips about drawing backgrounds, tips about drawing in general, links to my faq, and infinity train

like.... the tv series? No... I’ve drawn dc comics fanart before, though. But it’s been years since I’ve been really into it. I like jumped ship like 10 years ago when the New 52 happened LOL.

AFJHDSLKGH I’m sorry I (probably) won’t do it again??
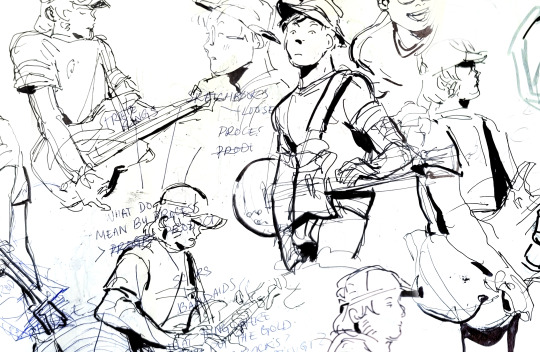
Actually full disclosure I have a truly cringe amount of p stump drawings/photo studies in my sketchbook right now LOL. He’s just fun to draw... hats, glasses, guitar, a good shape... but I don’t think I’ll rly post those until I can hide them in another big sketchbook pdf.. probably Jan 2022. Stay tuned........ (ominous)
(ominous preview)
These are all sort of related to backgrounds/painting so I grouped them together even though they’re pretty much entirely separate questions.... ANYWAYS
a) How is it working as a BG artist? Is it hard? What show are you drawing for?
I think you’re the first person to ever ask me about my job! Being a background artist is great. It’s definitely labor intensive but I think that could describe pretty much any art job (If something were rote or easy to automate, you wouldn’t hire an artist to do it) and I hesitate to say whether its harder or easier than any other role in the animation pipeline. Plus, so much of what truly makes a job difficult varies from one production to the next, schedule, working environment, co-workers etc. But I will say that I think while BGs are generally a lot of work on the upfront, I think they’re subject to less scrutiny/revisions than something like character/props/effects design and you don’t have to pitch them to a room like boards. So I guess it’s good if you don’t like to talk to people? LOL
A lot of my previous projects + the show I’ve worked on the longest aren’t public yet so I can’t talk about em (but I assure you if/when the news does break I won’t shut up about it). But I’m currently working on Archer Season 12 LOL. I’m like 90% sure I’m allowed to say that.
b) ~~~THANK YOU!! ~~~
c) What exactly do you like to draw most [in a background]?
@kaitomiury Lots of stuff! I really like to draw clutter! Because it’s a great opportunity for environmental storytelling and also you can be kind of messy with it because the sheer mass will supersede any details LOL.
I like to draw clouds... I like to draw grass but not trees lol,,, I like to draw anything that sells perspective really easily like tiled floors and ceilings, shelves, lamp posts on a street etc.
d) Do you have any tips on how to paint (observational)?
god there’s so much to say. painting is really a whole ass discipline like someone can paint their whole life and still discover new things about it. I guess if you’re really just starting out my best advice is that habit is more important than product. especially with traditional plein air painting, I find that the procedure of going outside and setting up your paints is almost harder than the actual painting. There’s a lot of artists who say “I want to do plein air sometime!!” and then never actually get around to doing it. A lot of people just end up working from google streetview or photos on their computer.
But going outside to paint is a really good challenge because it forces you to make and commit to lighting and composition decisions really quickly. And to work through your mistakes instead of against them via undo button.
My last tip is to check out James Gurney’s youtube channel because hes probably the best and most consistent resource on observational painting out there rn. There’s lots other artists doing the same thing (off the top of my head I know a lot of the Warrior Painters group has people regularly posting plein air stuff and lightbox expo had a Jesse Schmidt lecture abt it last year) but Gurney’s probably the most prolific poster and one of the best at explaining the more technical stuff - his books are great too.
e) Do you have tips for drawing cleanly on heavypaint?
@marigoldfool UMM LOL I LIKE ONLY USE THE FILL TOOL so maybe use the fill tool? Fill and rectangle are good for edge control as opposed to the rest of the heavy paint tools which can get sort of muddles. And also I use a stylus so maybe if you’re using your finger, find a stylus that works with your device instead. That’s all I’ve got, frankly I don’t think my drawings are particularly clean lol.
f) Tips on improving backgrounds/scenes making them more dynamic practicing etc?
Ive given some tips about backgrounds/scenes before so I’m not gonna re-tread those but here’s another thing that might be helpful...
I think a good way to approach backgrounds is to think of the specific story or even mood you want to convey with the background first. Thinking “I just need to put something behind this character” is going to lead you to drawing like... a green screen tourist photo backdrop. But if you think “I need this bg to make the characters feel small” or “I need this bg to make the world feel colorful” then it gives you requirements and cues to work off of.

If I know a character needs to feel overwhelmed and small, then I know I need to create environment elements that will cage them in and corner them. If a character needs to feel triumphant/on top of the world then I know I need to let the environment open up around them. etc. If I know my focal point/ where I want to draw attention, I can build the background around that.
Also, backgrounds like figure compositions will have focal points of their own and you can draw attention to it/ the relationship the characters have with the bg element via scale or directionality or color, any number of cues. I think of it almost as a second/third character in a scene.
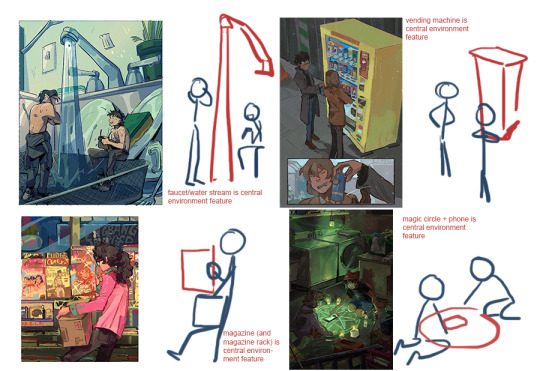
Not every composition is gonna have something so obvious like this but it helps me to think about these because then the characters feel connected and integrated with the environment.

Some more general art questions
a) Do you have any process/tips to start drawing character/bodies/heads?
I tried to kind of draw something to answer this but honestly this is difficult for me to answer because I don’t think I’m that great at drawing characters LOL. Ok, I think I have two tips.
1) flip your canvas often. A lot about what makes human bodies look correct and believable is symmetry and balance. Even if someone has asymmetrical features, the body will often pull and push in a way to counterbalance it. we often have inherent biases to one side or another like dominant hands dominant eyes etc. you know how right-handed artists will often favor drawing characters facing 45 degrees facing (the artist’s) left? that’s part of it. so viewing your drawing flipped even just to evaluate it helps compensate for that bias and makes you more aware of balance.
2) draw the whole figure often. I feel like a lot of beginner artists (myself included for a long time) defer to just drawing headshots or busts because it’s easier, you dont have to think about posing limbs etc. But drawing a full body allows you to better gauge proportion, perspective, body language, everything that makes a character look believable and grounded.
Like if you (me) have that issue where you draw the head too big and then have to resize it to fit the proportions of the rest of the body, it’s probably because you (I) drew the head first and are treating the body as an afterthought/attachment. Sketching out the whole figure first or even just quick drawing guides for it will help you think of it more holistically. I learned this figure drawing in charcoal at art school LOL.

oh. third mini tip - try to draw people from life often! its the best study. if you can get into a figure drawing/nude drawing class EVEN BETTER and if you have a local college/art space/museum that hosts those for free TREASURE IT AND TAKE ADVANTAGE OF IT, that’s a huge boon that a lot of artists (me again) wish they had. though if youre not so lucky and youre sitting in a park trying to creeper draw people and they keep moving.. don’t let that stop you! that’s good practice because it’s forcing you to work fast to get the important stuff down LOL. its a challenge!
b) I’ve been pretty out of energy and have had no inspiration to draw but I have the desire to. Any advice?
Dude, take a walk or something.... Or a nap? Low energy is going to effect everything else so you gotta hit that problem at its source.
If you’re looking for inspiration though, I’d recommend stuff like watching a movie, reading a book, playing video games etc. Fill up your idea bank with content and then give yourself time/space to gestate it into new concepts. Sometimes looking at other art works but sometimes it can work against you because it’s too close.
Also something that helps me is remembering that art doesn’t always have to be groundbreaking... like it’s okay to make something shitty and stupid that you don’t post online and only show to your friend. That’s all part of the process imo. If you want to hit a home run you gotta warm up first, right? Sports.
I should probably compile everytime i give tips on stuff like this but that’s getting dangerously close to being a social media artist who makes stupid boiled down art tutorials for clout which is the last thing i want to be... the thing I want to stress is that art is a whole visual language and there are widely agreed upon rules and customs but they exist in large part to be broken. Like there's an infinite number of ways to reach an infinite number of solutions and that’s actually what makes it really cool and personal for both the artist and the viewer. So when you make work you like or you find someone else’s work you like, take a step back and ask yourself what about it speaks for you, what about it works for you, what makes it effective, how to recreate that effect and how to break that effect completely, etc. And have a good time with it or else what’s the point.
for the first 2, I direct you to my FAQ
For the last one, I don’t actually believe I’ve ever addressed artwork as insp for stories/rp but I’ll say here and now yeah go ahead! As long as you’re not making profit or taking credit for my work then I’m normally ok with it. Especially anything thats private and purely recreational, that’s generally 100% green light go. I only ask that if you post it anywhere public that you please credit me.
(and I reserve the right to ask you to take it down if I see it and don’t approve of it’s use but I think that case is pretty rare.)
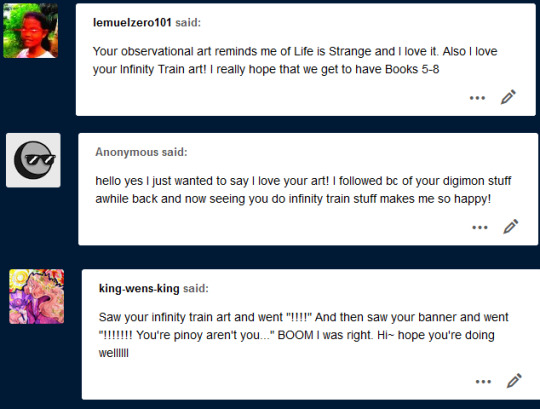
a) @lemuelzero101 Thank you!!! I haven’t played Life is Strange but actually that series’ vis dev artist Edouard Caplain is one of my bigger art inspirations lately so that’s a really high compliment lol. And yeah I hope we get 5-8 too...!
b) Thank you for sticking around! I’ve been thinking about Digimon and Infinity Train in tandem lately, actually. They’re a little similar? Enter a dangerous alternate world and have wacky adventures with monsters/inanimate objects that have weird powers... there’s like weird engineers and mechanisms behind the scenes... also frontier literally starts with them getting on a train. Anyways if anyone else followed me for digimon... maybe you’d like Infinity Train? LOL
c) @king-wens-king I’M GLAD MY ART JUST HAS PINOY VIBES LOL I hope you are having a good day too :^)
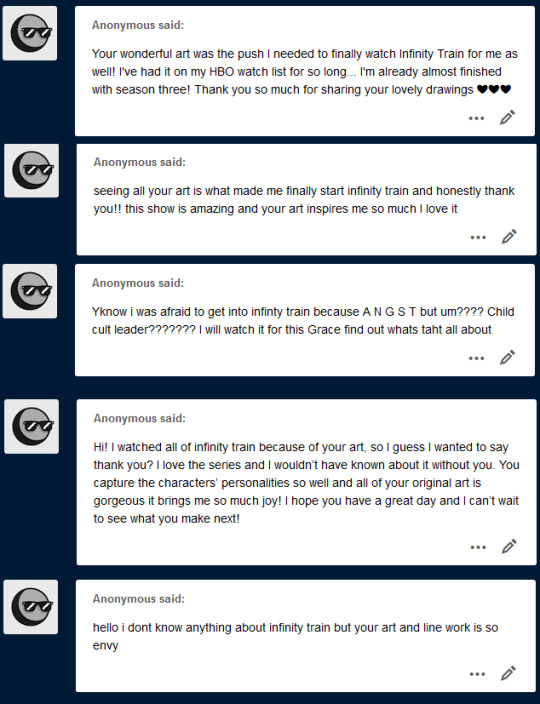
a, b, c, d) yessss my Watch Infinity Train agenda is working....
e) aw thank you!! i think you should watch infinity train :)
359 notes
·
View notes
Note
do you have a tutorial on your coloring? I'm having a hard time with finding out my color style or shading with filters or such. any tips and tricks that can be provided? thanks for reading :D
I actually don’t have any coloring tutorials available! This is something I’ve been meaning to do for a long time, but the daunting task of compiling screenshots of my process often scares me. But should I find myself getting a piece beyond the sketch and ink stage, I’ll make that tutorial!As for any tips I can suggest for now, here’s some to consider:
Collect your 10-20 best/favorite pieces and see what kind of color/lighting theme comes up. This can give you an idea of what direction you’ve been leading your art in and help you figure out where you wanna go.
Put your art into a pallette generator to get a better idea of what colors you’re using. Some sites can show which colors are more prevalent than others! Sites like Pallette Generator and Toolki are useful for this!
To keep things simple and consistent for me, the filter I use most for my shading layer is Multiply. Opacity is usually between 50-80% depending on how intense I want my art to be, especially if I’m using a dark grayish red or some other deep color. For a softer piece, a lighter shading color will do.
Lighting/Shading and color are important storytelling tools. Films that heavily rely on color for evoking emotion in scenes are worth studying.(I really, really love Kung Fu Panda 2 and what it does with color!)
Study what your favorite artists are doing with the color and shading in their work, and ask yourself if their styles align with what you personally want to show in your art.
Study how light and shadow works in real life. Even if you don’t do any plein air painting/drawing, at least internalize what you see. Have a sense of wonder for how nice early morning sunlight looks.
From what I’ve seen, your art already has a color style! It’s easy to look at your art and see that things could be better or need some kind of definition. Having an improvement mindset is good, but it can just be nice to let your art evolve naturally as you see fit! I hope this has been helpful!
101 notes
·
View notes
Photo
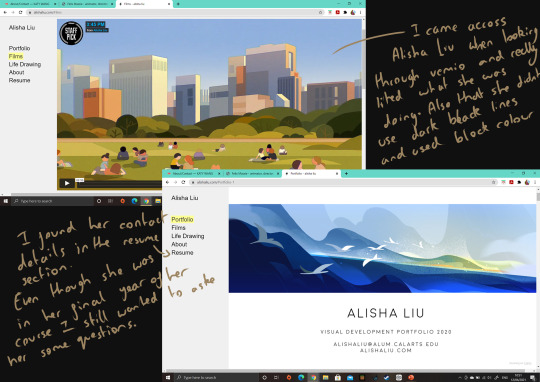
Alisha Liu
I found her when I was looking through vimeo to find some people to contact and also to past the time. When I first started looking at Alisha I didn’t realise that she was still in her on uni course but, I chose to contact her because I thought her films where just so cool. Also, her portfolio was really lovely to look through. She had worked with companies so I still wanted to ask her some questions about what it was like for her and to get tips about making a portfolio.
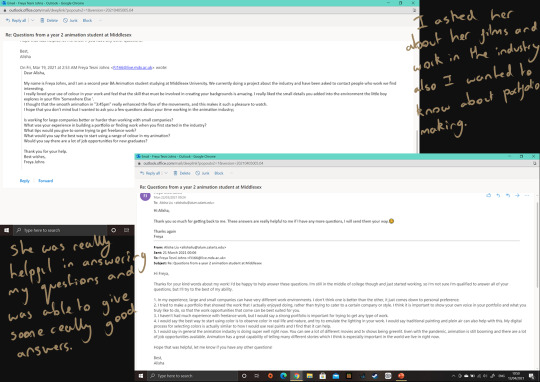
Here is the email that Alisha sent me
Hi Freya,
Thanks for your kind words about my work! I'd be happy to help answer these questions. I'm still in the middle of college though and just started working, so I'm not sure I'm qualified to answer all of your questions, but I'll try to the best of my ability.
1. In my experience, large and small companies can have very different work environments. I don't think one is better than the other, it just comes down to personal preference. 2. I tried to make a portfolio that showed the work that I actually enjoyed doing, rather than trying to cater to a certain company or style. I think it is important to show your own voice in your portfolio and what you truly like to do, so that the work opportunities that come can be best suited for you.3. I haven't had much experience with freelance work, but I would say a strong portfolio is important for trying to get any type of work.4. I would say the best way to start using color is to observe color in real life and nature, and try to emulate the lighting in your work. I would say traditional painting and plein air can also help with this. My digital process for selecting colors is actually similar to how I would use real paints and I find that it can help.5. I would say in general the animation industry is doing super well right now. You can see a lot of different movies and tv shows being greenlit. Even with the pandemic, animation is still booming and there are a lot of job opportunities available. Animation has a great capability of telling many different stories which I think is especially important in the world we live in right now.
Hope that was helpful, let me know if you have any other questions!
Best,Alisha
0 notes
Photo

Madrones in ivy, with redwoods. Heavy body acrylic paint on canvas. It’s maybe 12” x 15”? Painted from life, yesterday, within the space of 2hrs. First photo taken with neutral indoor lighting, second enhanced by the actual sun. 😬sure, I painted that luminosity, uh huh. I was starting to fuss with pulling things forward and pushing them back, when I paused to view from 20ft or so and realized I had my “story” already in place: the glint of the madrone bark against the backlit sky, the comparison of its active lines with the strong and calm redwoods. There is only one spot I consider adding to, but generally I let the plein air paintings stand as they are. Sometimes it feels ones own art can be “samey”, and it’s nice to get out from habit. Here’s what I did with this one: 1. I “conveniently“ left my nice flat brush that I like with impasto at home (yum, impasto), and had to use some random round I found in my easel box. (Always stash extra brushes in your kit, I guess). So the line quality and brush marks are necessarily made differently with the different brush shape. 2. Reduced tube paint palette down to primaries, black and white. Mixing every color yourself rather than relying upon a favored pre-mixed tube paint gets you seeing differently as well. A further game I like to play with this is seeing how far I can get without using black or white. For this painting, I never needed the black, and used white only in the sky. 3. Used an alternate technique to my regular practice I had with oils, which was closer to watercolor techniques using thinner layers. I also used a pencil to sketch out part of where the background leaves and branches went, mostly because there is a pencil built into the brush I was using, and I was waiting for a layer to dry. 🤷🏻♀️ 4. Stopped in time. Rather than covering every piece of canvas in opaque paint, I left some areas in a transparent wash. I think this gave me the light I wanted and I am quite pleased with the result. #pleinairpainting #madronesandredwoods #acrylicpainting #heavybodyacrylic #mixingfromprimaries #reducedpalette #landscapepainting #paintingtechnique #artistsoninstagram #artist #artsupplyposse https://www.instagram.com/p/CDt9BOJDYUE/?igshid=1tpusw691u679
#pleinairpainting#madronesandredwoods#acrylicpainting#heavybodyacrylic#mixingfromprimaries#reducedpalette#landscapepainting#paintingtechnique#artistsoninstagram#artist#artsupplyposse
0 notes
Text
How to Create a Starry Night Photo Manipulation With Photoshop and Filter Forge
What You'll Be Creating
The Starry Night by Vincent van Gogh is easily one of the most recognizable pieces in art history.
And I'll show you how to make it in this tutorial! Build the famous composition from scratch, using free stocks, Photoshop, and amazing filters from Filter Forge.
Tutorial Assets
The following assets were used in the production of this tutorial.
Cypress Tree
Sky and Mountains
Flat Field
Painting Sculpture
Old Town
Landscape
Frame Mockup
How to Download Filter Forge
To use Filter Forge, you'll need to download it first. After you run the installation, it'll automatically update in Photoshop CC under the Filter menu.
To launch the program and peek around, go to Filter > Filter Forge > Filter Forge 7.
Browse their massive collection of over 12,000 filters for smart photo effects, 3D textures and more. Search their selection online or use the Download More Filters option within the program to get started.
Here are all the filters you'll need for this tutorial:
Van Gogh Flow
Brush Engine Van Gogh
Cracked Old Painting
Starry, Starry Night
Impressionist Channels
Painting Frame
1. How to Create the Starry Night Scene
The first step is always the research. And it's pretty crucial in this scenario. We're challenging ourselves to emulate a very famous painting, so we want to pay homage and our respects by paying close attention to details.
Here's a little backstory on the Starry Night from my Art History article on Impressionism:
Art History
Art History: Impressionism
Melody Nieves
Vincent painted The Starry Night as a patient at the Saint Rémy de Provence asylum in southern France. Like many of his works, it features cypress trees and a small town under a glowing night sky.
With this in mind, here are a few notes to remember:
Oddly enough, none of the scenery in The Starry Night matches the actual location. It's not a plein air painting, but one from imagination.
However, you can find stocks that still match the original layout. Look for items like cypress trees, old historical towns, and general landscape photography.
Also, Impressionism is a very loose style of painting, so the filters we're using should match that too.
Let's begin!
Step 1
To build the Starry Night scene, we'll need these images:
Create a New Document in Photoshop at 1250 x 950 pixels. Then Copy and Paste this Field reference onto its own layer.
If you have trouble with perspective, references like this can help you learn how to ground the landscape and figure out the layout. For the most part, we'll be placing images on top of this field, so it's just a placeholder for now.
Step 2
To show you exactly what I mean, let's add the main focal points—the trees and sky. Extract the tree from the Cypress image using the Magnetic Lasso Tool (L).
Delete the white background layer.
Then Copy and Paste the tree onto its own layer above the field. Control-J to Duplicate the layer twice. Use the Free Transform Tool (Control-T) to resize the other two trees to match the painting.
Step 3
Now that we have the trees ready, we need to change their shape to look more fluid, like the Impressionist style. We'll do this by using the Liquify Tool.
Bring the first tree into Liquify. Select the Tree layer and go to Filter > Liquify.
Use the Forward Warp Tool (W) to push the branches and leaves inward. Create curvy, S-like shapes like the ones Vincent loved. And make the base of the trees more round.
Do this for all three trees. Keep checking back with the original Starry Night to see which shapes work best. Here is my result.
Step 4
The next part of this puzzle is the sky.
Both the sky and trees make up the biggest pieces to this puzzle. And this Sky and Mountains stock is pretty awesome because the high mountain shapes on the right side look just like the painting.
So let's add it in, shall we?
Copy and Paste the sky and mountain reference onto its own New Layer above the field. Use the Move Tool (M) to position the image higher on the canvas, allowing the mountains to hit their mark in Van Gogh's scene.
Next, add a Layer Mask to the sky and mountains layer. Now we must reshape the mountain image. Select the Brush Tool (B) and use a Hard Round Brush to paint black onto the mask. Mask out the areas seen below.
This step should help guide your eyes to understand where things intersect within the painting. One image alone will help create the perfect background elements!
If you're picky about the details, let's adjust this mountain before we move on. Go to Filter > Liquify and push the mountain higher using the Forward Warp Tool (W).
Step 5
Now for a little surgery!
To create a sky more like the painting, we have to redistribute the clouds we see.
Use the Polygonal Lasso Tool (L) to create a large selection on the left side in order to cut out that section. Hold Control-J after your selection to Paste it onto a New Layer.
Flip the sky piece. Go to Edit > Transform > Flip Horizontal.
Place it above the right mountains. Use a Layer Mask to diffuse the edges with a Soft Round Brush.
Now repeat these steps to add more clouds to the scene. Select the clouds first, and then Flip and Mask them. Use a Soft Round Brush to help blend the clouds into the mountains and sky.
Here is the result.
Step 6
Time for some more trees!
Copy and Paste this Landscape stock onto a New Layer above the clouds. Add a Layer Mask to mask out the sky. Then use a Soft Round Brush to feather out the trees near the top of the landscape.
Here is the result. The extra benefit of this stock is that it'll help fill in the gaps of our painting.
Before we move on, let's fix the color. Add a New Adjustment Layer of Curves and set it as a Clipping Mask to the landscape layer. Adjust the curves for the RGB, Blue, and Red Channels to make the landscape more blue.
Step 7
Repeat these steps with the Old Town image.
This image will represent the middle ground area. This is where the town in the painting should be.
Paste, Mask, and then recolor, remember? Copy and Paste the image, or just an extraction onto a New Layer. Add a quick Layer Mask to clean up the edges around the buildings. Then add a New Adjustment Layer of Curves, this time lowering the RGB Channel for more contrast.
Feel free to use bits and pieces from the other stocks to fill in parts of the scene.
Before we move on, add a New Adjustment Layer of Color Lookup. We'll use this to finish the photo composite portion of this Starry Night effect.
Set the 3D LUT File to FoggyNight.3DL and lower the Opacity to 60%.
Here is the result.
2. How to Apply the Starry Night Filters
Time for filters!
The Starry Night is well known for its beautiful, painterly style. We'll achieve this by using several filters from Filter Forge.
Let's start with the trees.
Step 1
Control-Click on the first tree layer. Then go to Filter > Filter Forge > Filter Forge 7.
Choose the Van Gogh Flow filter under the Effects > Creative category.
Choose the default preset, and then add the following settings.
Apply this filter to the rest of the trees. Use the same settings as above.
Step 2
Apply the Layer Masks to the town and landscape layers, and then Merge them together.
Using the same process as before, we'll apply the Van Gogh Flow filter to this merged result.
But first, Control-J to create a Duplicate of the merged layer. Use the copied layer for this effect. This time, choose the third preset on the list, and add the following settings.
Here's the end result.
Next, let's do the field layer. Using the same filter again, we'll make some minimal changes to the settings to make the brush strokes more short and fat.
Step 3
For the sky and mountains, we'll be using the Brush Engine Van Gogh filter instead. Merge the sky and mountain layers together. Then, using the default preset and settings, apply this brush engine filter.
Here is the result after all the filters have been applied.
3. How to Paint Impressionist Details
The filtered results look great, but now they need to blend well together. Vincent often had a habit of outlining his work, so we'll have to do the same before painting more color.
But first, let's add a moon!
Step 1
Create a yellow #c6b16f ellipse with the Ellipse Tool (U). Place it in the top right corner and set the Blend Mode to Vivid Light.
Step 2
Now let's outline each section. Create a New Layer and select the Brush Tool (B). Use a Hard Round Brush (50-80% Opacity) to paint black lines outlining the landscape and town.
Build the line weight and texture by going along with the Impressionist style.
Start to incorporate some more color. Choose ones Vincent loved himself!
Use the Eyedropper Tool (E) to pick up colors from the scene and use them as your Foreground Colors.
Here I used colors like yellow #bca736 and red #693d38 to make the painting pop with colorful outlines and stars. Then I drew in a simple moon shape for a fun addition.
Step 3
Set a New Layer to Overlay. Use a Soft Round Brush to give the stars and moon a bright yellow glow.
To finish this Starry Night effect, you'll need to add a few more layers of painterly brush strokes, specifically white highlights. Study the original painting and experiment with different brush textures for more fun.
Here's the Starry Night painting so far.
4. How to Add a Frame
Step 1
If you want to take this another step, add a frame! Merge all the layers together.
Copy and Paste the Starry Night painting onto the canvas. Control-click the layer and go to Filter > Filter Forge > Filter Forge 7.
Select this Painting Frame and use the default preset with the following settings:
Here is the framed result against a nice #ababab tan background.
Step 2
If you'd like to add even more texture to this piece, consider an old, cracked painting effect. Select the Starry Night with the Rectangular Marquee Tool (M). Control-J to make two layers of copies, and then use just one of the copies for this filter.
Control-click one copy and go to Filter > Filter Forge > Filter Forge 7.
Select this Cracked Old Painting filter, use the default preset, and apply the following settings:
The result may appear a little dull. So set the second copy to Lighter Color to bring out the painting again.
Looks great! Feel free to add a Drop Shadow for a realistic finish.
5. How to Apply the Effect to a New Painting
But wait...there's more!
You can take this effect to the next level with a little painting inception. That's right. A painting, within a painting... movie style.
To do this, we'll need another piece to work from. Bedroom in Arles is another popular painting of his: a still life of his bedroom in France.
To recreate this scene in his famous Impressionist style, we should definitely try a shorter route! As it turns out, there's this super awesome picture of a sculpture of his room that we can use instead.
Step 1
Open the image in Photoshop. Hold Control-J to create a copy of the background, set it to Linear Light, and lower the Opacity to 22%.
Control-click the copy and Run Filter Forge to apply the Starry, Starry Night filter. Use the default preset with the following settings:
Step 2
Next, add two New Adjustment Layers.
The first is Levels. Adjust the settings for the RGB Channel for more brightness.
Then add a Color Balance Adjustment Layer.
Step 3
Almost there! Let's rebuild the color scheme in these next few steps.
Fill a New Layer with brown #392b24. Set the Blend Mode to Hue and lower the Opacity to 54%.
Create another New Layer and use the Brush Tool to paint orange #f7a300 onto the wall. Set the Blend Mode to Subtract (it turns the wall blue) and lower the Opacity to 52%. Clean up the edges with a Layer Mask.
Create another New Layer for the flower. Paint brown #8f786b onto the floor, and then set the layer to Hue.
Step 4
Fill a New Layer with blue #3f00cd and set it to Difference. Lower the Opacity to 20%.
Now insert the Starry Night painting! Hang it on the wall in the back.
Step 5
Make the Starry Night blend into the new painting by applying a filter. Use the same Starry Night filter from before.
Step 6
Add a New Layer and dedicate it to adding some texture to the walls. Paint soft white strokes reminiscent of the style we created earlier.
Use this same layer to play with the line weight of the other items. When you're through, Merge all the layers together.
Step 7
Let's add the final filters to complete this second painting. Duplicate the merged layer.
Run Filter Forge and apply the Van Gogh Flow filter to the copy. Use the default preset, with the following settings.
Set this layer to Multiply and lower the Opacity to 35%. Now the painting should have a great Impressionist feel.
For more texture, Duplicate the copy.
Run Filter Forge on this layer, using the Impressionist Channels filter this time. Use the default preset and settings, and then set the layer to Saturation. Adjust the Opacity to 100%.
Here is the alternative inception effect!
Congratulations, You're Done!
Impressionism is a cool art style you can achieve digitally. And painting like the masters is possible with Filter Forge. Develop the right eye for stocks and compositing, and you'll master photo manipulations with time.
Place your results in a cool gallery scene for more fun. I used this Frame Mockup from Envato Elements. Just duplicate the folder of the frame to add another.
I hope you've enjoyed following along. Feel free to leave your comments and result below.
Create more incredible effects with Filter Forge—check out these tutorials:
3D
Create a Metallic 3D Logo With Photoshop and Filter Forge
Rose
Filter Forge
How to Create Your Own 3D Materials With Filter Forge 5 and Adobe Photoshop
Kirk Nelson
from Envato Tuts+ Design & Illustration http://ift.tt/2zUCgr3 via http://ift.tt/1dVCCOJ
0 notes
Text
48 Creative Geniuses Who Use Blogging to Promote Their Art
You’ve watched artists, performers and writers like Hugh McLeod, Amanda Palmer, Chase Jarvis, and Jeff Goins sell boatloads of creative work thanks to the platforms they have built from their blogs.
You tinker with your own creative projects and wonder if you could start a blog to promote them too.
But despite all the blogging advice out there, you sense that blogging for art is different.
You know you don’t want to be spammy, but have no idea how to use a blog to make money by selling those musical compositions, show tickets, short horror stories, family paintings with Fido, or handmade grandfather clocks.
The one thing artists need to be successful today
The Internet has turned selling creative work on its head.
No longer can you simply get good at your craft and then find someone to champion you, manage you, or sponsor you.
Want a publishing deal? You better have built a solid fan base for your work first.
Want a chance at a record deal or even just make a decent side income from your work? You’ll need an engaged audience and good-sized list.
For today’s artist, building a tribe is non-negotiable.
But how?
It’s not about schlepping your art or begging for attention
Like a first date, you need something more to talk about other than just your work.
People connect with people. Your blog is the place where you give fans not only the emotional experience that attracted them to you in the first place, but also ways to get to know you as a person and artist.
Your audience expects to see a different side of you on your blog.
Your job is to find these hooks – the things that your people are most curious about. Perhaps what lens you used in a photo or what inspired you to write that song. Or hilarious personal stories from your travels. Or exclusive material not available to the general public.
And since artists learn from each other, you could help others by teaching what you know.
But the secret is to get fans, clients, and customers interacting with you on many levels.
Let them get to know you and what matters to you.
Let them into your world as an artist.
What works for artists in the real world?
The theory’s nice. But how does this work in real life? How do artists succeed online?
The problem with theory – creative people are so diverse in their talents and interests that seeing how this advice applies to your own situation is difficult.
What works for a musician might not work for a painter. What delights the fans of a writer might be a complete turn-off for the fans of a filmmaker.
Even creative people in the same field might need to relate to their audiences in different ways.
But let’s say you do have some concrete ideas for your own creative blog; how do you know if they will work in practice?
What you need is some help from artists who’ve already blazed a trail and discovered what actually works.
Because some of those ideas might work for you too.
So check out the following list of excellent role models for tons of ideas.
And don’t just stick to your own field – cross-pollinate and explore ideas from other disciplines.
After all, great artists draw their influences from many places and you never know where your next killer idea will come from.
48 Creative Blogs You Can Shamelessly Plunder for Inspiration
1. Hugh MacLeod – The poster boy of blogging success for artists
Hugh began blogging in 2001, long before most people had any idea what a weblog even was. He’s been a champion of blogging for artists ever since. Hugh has not only built an extremely successful business out of drawing on the backs of business cards, but he’s also had three best-selling books, all of which grew out of recording and sharing his thoughts on his work while he made it.
If you haven’t picked up Hugh’s books yet, do so sooner rather than later. He’s got great insight for all creative types. If you don’t mind straight talk, learn why most artists’ blogs fail.
2. Austin Kleon – “A writer who draws” and is engaging, inspiring, and funny
Hugh MacLeod pointed me in Austin’s direction, and he’s definitely a great example to follow. Austin’s insights into his creative process are fascinating and guaranteed to draw you in. He’s written two best-selling books and is working on his third. Steal Like An Artist is a must-read for all creative types.
Austin speaks regularly on creativity and has been featured at SXSW, TEDx, Google, Pixar, and The Economist.
3. Michael Nobbs – Writer and artist with a passion for consistent and sustainable creativity
Michael is a writer and artist who has built a whole community around encouraging others to create every day, make drawing a habit, and build solid platforms to be viably creative.
Like others on this list, you’ll see Michael’s work in many formats, including courses, books, an online forum, and podcasts as well as his blog.
4. Amy Ng – Illustrator and blogger with inspiration, good business sense, and lots of smiles
Amy is a writer and illustrator from Malaysia who has been sharing creative ideas, tutorials, business guidance, and courses since 2008 at her site.
She is a prolific blogger and her personality definitely shines through in her writing. You can’t visit her site without feeling happy.
5. Abbey Ryan – Classic still life and trompe l’oeil artist who connects with a painting a day
Abbey started blogging in 2007, posting a painting a day. Since then she’s attracted over a half million visitors from 100 countries to her site. She has an unassuming and generous style that endears her students and readers to her.
Her work is beautiful and her blog commentary centers around her experiences while creating each piece – stories about the objects she paints, what part of the world she’s in, and the people she paints with. She’s been featured in O, The Oprah Magazine, and Seth Godin’s Linchpin.
6. Ed Terpening – Plein air painter with plain good advice and beautiful work
Art is Ed’s third career, which probably explains why he is a prolific blogger on many blog topics, including business, technique, styles, equipment, traveling and much more. Over the years, he’s been a musician, teacher, software engineer, high-tech manager, and Internet media executive.
His artistic career grew out of his desire to leave a legacy to the world that would be longer-lasting than his technical work could ever be. I’d say he’s succeeding, not only with getting his paintings out into the world, but also with his engaging and thought-provoking writing style.
7. Dan Duhrkoop – A painter with all the answers in a comprehensive knowledge base
Dan has an incredible resource-packed blog for independent painters at Empty Easel. You’ll find practical, technical tips on the art side, and a goldmine of solid advice on the business side, including how to sell online, how to use blogging to increase your art sales, and how to make the most of SEO for artwork.
Empty Easel is a popular site that attracts over a quarter million page views each month.
8. Lisa Congdon – Colorful artist and illustrator at the Today Is Going to be Awesome blog.
Lisa did not begin painting until she was 31 years old. She worked outside of the art establishment and shares her learning process and growing collections on her blog.
Her site is now filled with her cool artwork and illustrations, but she also features other artists’ work and throws in some relatable personal experiences, history, current events and how-to’s as well.
9. Lucy Chen – Figurative artist and visual storyteller committed to inspiring a full and expressive life
Lucy Chen embraced painting as an adult; she enrolled in her first art class at age 29. Lucy was born in Southern China and now lives in Australia.
She explores cross-cultural tension and identity in her work, and aims to encourage all her readers to live expressive and creative lives through her blog.
10. Amanda Palmer – Social-savvy musician who masterminded a record $1.2 million Kickstarter campaign
If Hugh MacLeod is the poster boy for blogging success, then Amanda Palmer has got to be the poster girl. She is a master of fan connection, raising a record $1.2 million through Kickstarter for her recent CD.
She’s spoken about her experiences at TED and has been interviewed and covered in the press countless times. Love her or hate her, she’s open about her strategies and values – which means we can all learn something from her.
11. Bob Baker – Consummate artist and all-around nice guy with infinite marketing ideas
Bob is a prolific author, musician, pop-art painter and former stand-up comedian. He knows artists’ business and marketing challenges inside and out, and his mission is to help them on their paths.
Bob uses several methods to get his messages out to the world – you’ll find traditional blog posts and YouTube videos as well as podcasts and all his many books – one of which was featured in the movie School of Rock with Jack Black.
12. Cari Cole – Musician who’s “been there, done that” and can get you there too
Cari is a vocalist and songwriter who has performed on top stages including CBGB’s, the Bluebird Café, the legendary Bitter End, Carnegie Hall, Town Hall (where she got a standing ovation), and the Apollo Theatre.
Her writing is full of hard-won experience and practical, down-to-earth advice to help you achieve the same levels of success, whatever that means for you. Her always-positive, yet still no-nonsense approach is worth studying and emulating regardless of your field.
13. Joy Ike – Songstress who delivers grassroots marketing strategies with the voice of an angel
Joy is a talented songwriter with an eclectic musical style and captivating voice. She’s also passionate about helping her fellow artists with marketing.
Joy blogs at her artist’s site as well as at Grassrootsy. She is generous in sharing her experiences and opinions for her readers’ benefit and she’s not afraid to take a stand. You know what things Joy values in life and art and I like that about her.
14. Mark Hermann – Rock star storyteller who will help you find your voice and rock your story
Mark’s passions are music, guitars, and telling stories, and he blends these wonderfully in Rock and Roll Zen. Mark has great narratives from his years on the road, and he knows how to tell them in ways that will encourage you to excel at whatever creative endeavor you choose.
Read this blog for stories that entertain and inspire, and for advice you can apply immediately to developing your own story and memorable brand.
15. Praverb The Wyse – MBA rapper blending solid research with street-wise advice
Praverb chose his rap name well – you’ll find loads of wisdom in both his blog and his music. Praverb writes about marketing, branding, increasing fan engagement and much more.
He puts his MBA background to great use with well-researched and thought-out posts, all written in an accessible style. He’s got amazing compilations of resources and connections for Do-It-Yourself musicians – especially rappers and hop-hop artists – including blogs, social media tips, and podcasts. His advice and analyses are spot-on and helpful. Nice guy and smart blogger who’s invested in his readers’ success.
16. FuNkwoRm – Music producer and hip-hop lover with featured artists, great industry insight and advice
FuNkwoRm is a music producer who loves hip-hop and decided to do something about it through his blog. You’ll find great indie business advice, reflections on the industry, and technical tips and interviews, as well as MP3s and videos of featured independent artists. FuNkwoRm also encourages artists to blog, which is how I found him and what made me an immediate fan of his work.
17. Ari Herstand – Rocking the full-time indie music career dream and helping you do the same
Ari has been a full-time musician for over five years and has over 500 shows to his credit. He’s opened for some major acts and played some impressive music festivals. His blog tackles the nitty-gritty details of making an indie music career work; from protecting yourself against instrument theft and getting 250 people to a CD release, to clearly explaining the ins and outs of song publishing, royalties, and more. Ari’s done a great job of building his audience through guest posting (which is how I found him.)
18. Wil Wheaton – Blogging where no actor has gone before
If you know anything about Sci-Fi fans, you know they are extremely loyal and even fanatical. Wil has tapped into this trait of his fan base to great success. He is an actor, author, blogger, podcaster, avid Twitter user, and self-proclaimed champion of geek culture. Wil’s been blogging since 2001 and has won numerous awards, including Lifetime Achievement Bloggie and Best Celebrity Blogger.
19. Josh Pais – Veteran actor who delivers creative rocket fuel, Ninja Turtle style
Josh is a cool, fun dude. He’s been acting steadily and impressively for over 25 years in some high-profile roles. His first big break was as Raphael in Teenage Mutant Ninja Turtles. He’s also brave and smart enough to challenge conventional wisdom on how we should prepare to go out onstage, for a job interview, or for a corporate presentation – really anything we do in life. He’s got the tools to help you shine brilliantly in whatever you attempt, and he cares. Check him out, seriously.
20. Eliot Rausch – Filmmaker with a love for truth and storytelling
Eliot is a director from Los Angeles whose career was launched when he filmed a short documentary about a friend’s last hours with his dog, called Last Minutes With Oden. The video went viral with 30,000 views overnight and won two prestigious Vimeo awards. Eliot is now known as one of the most respected independent filmmakers in the business. His blog includes thoughts and quotes regarding film, society, and creativity as well as personal stories and observations – all of it poignant and fascinating.
21. Devin Henderson – Magician who gives you the keys to living your own magical life
Devin is a magician, corporate entertainer and keynote speaker based in Kansas City. He blogs about life, entertainment, inspiration, and humor, and even reveals the how-to’s behind a few magic tricks. Devin’s message helps everyone in his audience find and use their own magic – the unique gifts they bring to the world – in both business and life. Devin is an excellent example of combining your talents with your beliefs and values in order to create a great fan experience and raving, loyal fans.
22. Ted Greenberg – Emmy-winning comedian with side-splitting humor and New York taxi rides
For over five years, the Emmy-award winning Letterman writer Ted Greenberg has hosted his weekly one-man show, The Complete Performer, at the SoHo Playhouse in downtown Manhattan. After every Saturday night show, Ted drives one lucky audience group home in a New York City taxi. Ted’s blog includes reviews, festivals, comedy news and history, interviews, and video clips from his performances – tons of great comedy-related content that’s both interesting and fun to read.
23. Matt Ruby – Standup comedian with a love for all things comedy related
NYC standup comedian Matt Ruby started blogging in 2006, and his site is packed with great stories, videos, podcasts, jokes and just plain interesting content. He’s got intelligent and humorous commentary on what makes material funny, his thought processes, and comedy in general.
24. Barry Kerollis – Bucking the trend in traditional ballet
Barry is a freelance ballet dancer, choreographer, and teacher who started blogging in 2004. Being a freelancer in an industry where most dancers are in companies is tough work, and Barry is open about sharing his experiences so that all his readers benefit. Barry is not afraid to take on difficult topics like standing up for yourself when “dancer’s code” says you should be submissive and when negotiating for a fair, living wage. You’ll find great insights for dancers and all independent artists there.
25. Sara Kubik – Irish dancer taking you behind the scenes of competition
Sara is a former gymnast turned Irish dancer. She started dancing at 18 years old and began competing a little more than three years later. Since then she’s competed in two North American and two world championships. Her blog chronicles her personal journey as a competitor and educates readers with instructional videos and a glossary of Irish dance terms.
26. Don Baarns – Ballroom dancer who fell into the unlikely role of teacher
Like many other artists/bloggers on this list, Don is also a book author and instructs through video as well. Don helps dancers understand musicality so they can improve their skillset and engage audiences. In his posts, Don addresses questions that readers might otherwise be afraid to ask, like, “Why don’t more men ask me to dance?” The lesson? Don’t be afraid to tackle your readers’ fears head-on; it will help you stand out.
27. Jeff Goins – Writer with empowering, refreshing inspiration in a busy, noisy world
Jeff is a blogger, speaker, and the author of three popular books. He launched his most recent blog in 2010 in order to help other writers master their craft and overcome fear and resistance. His fast-growing GoinsWriter site has gained much attention and praise and won a Top-10 Blogs for Writers award in 2011. He takes serving his audience seriously, sees his writing as his art, and appreciates his blog readers as the patrons who support his art.
28. Hugh Howey – Self-published author who takes the Sci-Fi charts by storm
Hugh is the author of the New York Times and USA Today’s best-selling series, Wool. He first released the stand-alone short story in 2011. It became hugely popular, with fans begging for more installments. Wool eventually reached the Top 5 in science fiction on Amazon. Hugh has since sold film rights to 20th Century Fox and distribution rights to Simon and Schuster, although he has retained e-book rights. Hugh has also written the Molly Fyde series, about a girl from the 25th century who is constantly told she can’t do things because she’s a girl – so she does them anyway.
29. CJ Lyons – ER pediatric doctor turned award-winning, critically acclaimed author
CJ has a fascinating background. She never trained as a writer, although she has always spun stories. She was an ER doctor at Children’s Hospital of Pittsburgh when a fellow intern was murdered. She began writing crime fiction to deal with the emotional horror. Soon other published authors began to tell CJ that her writing should be published. She ended up a finalist in a national writing competition and landed a publishing deal soon after. CJ now also mentors other writers at No Rules, Just Write.
30. Edward W. Robertson – Best-selling fantasy and science fiction self-publisher
Ed has been a full-time fantasy and science fiction writer since 2011. He’s published numerous short stories in both online and print magazines and has penned the Amazon Best-selling post-apocalyptic Breakers series and The Cycle of Arawn fantasy trilogy. His blog includes a great analysis on self-publishing, including e-book strategy, stores, and pricing.
31. Joanna Penn – IT consultant turned author sells over 75,000 copies of her novels
Joanna self-published her first non-fiction book in 2008. She made a lot of mistakes in that first attempt, but she honed her writing skills, learned to market, and now helps other authors avoid the same traps at her blog The Creative Penn. Joanna became a full-time writer in 2011 and has had best-sellers in the Thriller, Crime, and Action Adventure categories. She’s also written a #1 Amazon best-seller How To Market A Book.
32. Johnny B. Truant – Writer whose humor, irreverence, and inspiration hits right between the eyes
Johnny’s story is fascinating to me, which is why he’s one of my idols. (Not in a creepy stalker sense but in an admiring sense.) Johnny has transformed his online business several times – he started as a blogger building websites for people. He found his writing voice and built a solid platform with a super-loyal following, and he is a frequent guest blogger on major sites, including Smart Blogger. Now he’s helping others become legendary while at the same time writing captivating, humorous fiction novels and producing podcasts like crazy. His strategy worked for him, and I think we can all learn from it.
33. David Wright – Self-publishing master of cliffhangers and audience building
David is a pioneer in serialized fiction along with his partner Sean Platt. They are both fans of serialized TV series such as LOST, Mad Men, and Breaking Bad, and they became fascinated with bringing that same experience to fiction. Early on, David saw the opportunities offered by Amazon Kindle to allow writers to reach their fans directly, without needing a publisher. He hosts the Self-Publishing Podcast along with Sean Platt and Johnny B. Truant, a great resource for anyone with a sense of humor who wants to learn the ins and outs of self-publishing.
34. Sean Platt – Pioneer of self-published serialized fiction
Sean is a best-selling indie author, entrepreneur, husband, and dad. He’s co-founded two publishing ventures: Realm & Sands with Johnny B. Truant and Collective Inkwell with David Wright. With Johnny alone he has published about 1.5 million words in 2013. Sean and David began releasing serialized fiction on Amazon more than a year before Amazon launched its Serials program. Yesterday’s Gone has gotten more than 600 5-star reviews and placed in Amazon’s Top 100 Best Reviewed Fiction Books. Sean completes the triple threat in the Self-Publishing Podcast with David Wright and Johnny B. Truant.
35. Chase Jarvis – Photographer and champion of creative entrepreneurship
Chase is as strong of a business guy as he is a photographer and director, and he shares his hard-earned wisdom and experience through his blog posts, videos, and interviews of the best creative entrepreneurs on the web. In addition to photography tutorials and examples, you’ll find great resources for branding, pitching your work as an artist, and building a creative career. Watch a couple of his featured concerts while you’re at it. Chase connects to his audience through multiple passions -you’ll surely find something you like there.
36. Maria Killam – Interior designer whose blog helped her build niche dominance
Maria is an interior design blogger, decorator, stylist, trainer, author and internationally sought-after color expert. Her down-to-earth, no-nonsense color advice and accessible, inspiring writing style quickly turned Colour Me Happy into one of the top-10 color blogs in North America with over 200,000 readers in 150 countries. Maria has done a fantastic job of using her blog to validate her expertise and build dominance in her niche. Read her posts on blogging as well – and kudos to Maria for encouraging her fellow designers to blog.
37. Joe McNally – National Geographic master photographer blogs about decades of inspiration and experience
Joe has over 30 years of photography experience and has been called one of the 100 Most Important People in Photography. His photos have appeared in Time, Newsweek, Fortune, LIFE, Sports Illustrated magazines and many more, and he’s worked for National Geographic for the past 23 years. His work has taken him to 54 countries and all 50 states. He’s written two Amazon Top 10-sellers and he teaches workshops all over the world. Joe’s blog covers as much ground as he has in real life – check it out and learn by absorption.
38. Samantha Hahn – Lifelong artist shares lessons and thoughts on art, design, and style
Samantha has been an artist all her life. She recently published a book called Well-Read Women: Portraits of Fiction’s Most Beloved Heroines, which earned her much praise and recognition. She strongly encourages artists to blog and her own blog, Maquette, is an in-depth collection of thoughts on art, design, style, and craft.
39. Jasmine Star – Globe-hopping wedding photographer engages audiences with her work and personal stories
Jasmine is an international wedding photographer from California. She started blogging in 2007 to “empower clients to become the voice of her brand”. Her blog features her photography, technical tips and discussions, and personal stories. Jasmine does a great job of showcasing content that both engages her readers and encourages comments, questions, and shares.
40. Mark and Agnes Hage – Adventure photography from happy world wanderers
Hage Photo is an outdoor adventure, sports, and travel photography blog. This husband-and-wife team’s site includes stunning photos and the stories behind them. Their clients send them around the world to photograph remote and exotic places. The Hages obviously love being thrill-seeking, globetrotting nomads and have discovered how to get paid for it.
41. Karen Walrond – Photographer and writer who shines a light on the beauty in the world and in you
Karen is a blogger, photographer, speaker, and author of the best-selling Amazon book, The Beauty of Different. She’s won awards and recognition for her work from both the writing and photography sides, as well as in the mom-blog space. She is “wildly convinced that you are uncommonly beautiful,” and her blog definitely is that. Look to her site for great examples of combining personal stories with fantastic photos – including some submitted by her fans and followers.
42. Daymond John – Pioneer of urban, hip-hop fashion and Shark Tank marketing master
Daymond grew up in Queens, NY, surrounded by up-and-comers like RUN DMC, Salt-n-Pepa and LL Cool J in an emerging hip-hop music scene. Daymond had an eye for fashion and the smarts to recognize a completely underserved market. He built the urban clothing brand For Us, By Us or FUBU, from the ground up. He’s since become a marketing and business mogul with a blog dating back to 2006 and two popular books to his credit. You may recognize him from the TV series Shark Tank.
43. Thomas Mahon – Savile Row tailor whose blog breathed new life into a traditional, close-knit industry
Thomas started his blog in 2005, encouraged by his friend Hugh MacLeod. It is probably one of the earliest craft blogs. Bespoke, or custom-made tailoring for men, is a high-end service steeped in years of tradition. Thomas’s blog went behind the scenes and educated clients on the benefits and value of custom-made suits. For the first time, it allowed the world to see the skills, service, and people behind Savile Row tailoring and paved the way for future generations of new enthusiasts.
44. Shannon Okey – Expert crafter with a passion for spreading her knowledge
Shannon is a knitting and crafting/fiber expert as well as a writer with several books and a publishing company to her credit. Her blog is filled with stories, patterns, and material and technique advice. You can find archives of her call-in radio show podcasts and YouTube videos from her various classes and workshops on her site. Her blog stands out because it’s filled with personality and her obvious passion and expertise in her crafts.
45. Tilly Walnes – DIY Dressmaker demystifies sewing so you can create your own style
Tilly is a former filmmaker who learned to sew, became obsessed with the freedom that comes from defining her own style, and never looked back. She discovered that much of the instruction on sewing was out of reach for beginners so she started blogging in easy-to-understand terms with loads of examples and descriptions. Tilly has built quite a following, garnered much press, and has been featured on the BBC television’s The Great British Sewing Bee.
46. David Airey – Internationally renowned design expert writes on the business and craft
David is a designer and Amazon #1 best-selling author from Northern Ireland with clients from all over the world. His blog is filled with top-notch content about the business and craft of design, tackling tough topics like measuring the ROI on design, creating corporate identities, and building a business from scratch – great information and insights that are well worth checking out.
47. Tina Roth Eisenberg – Designer with an eye for projects that go viral
Tina is a designer from Switzerland who visited New York City after college and never left. Her blog began as a personal archive of ideas and inspiration, but eventually grew to well over a million unique visitors per month. Tina is a big fan of side projects. She has launched several of them into businesses which now allow her to be client-less: Tattly is a cool, design-friendly temporary tattoo company. She also runs Teux-Deux, a simple online to-do app, and launched a monthly breakfast lecture series called Creative Mornings, which now has 65 chapters all over the world.
48. Josh Spear – A world-traveling designer shares observations on all things life and design
Josh’s blog is filled with inspiration from all over the globe on art, design, technology, culture, marketing, branding, social issues and more. Josh consults and speaks on all these topics and advises startups in the gaming, social, and commerce arenas. He serves on the Global Agenda Council on the Marketing and Branding World Economic Forum. He’s been blogging since 2004 and in that time has accumulated quite a bit of fascinating content to share.
Now is the time to get your art out in the world
Blogging is revolutionizing the world of art, but many artists hesitate to start a blog because they don’t know how to approach it, don’t know how to promote it, or simply don’t understand what it could do for them.
And by failing to connect with a global audience, you could be condemning your creativity to a life in the shadows. Not to mention falling further behind as Google increasingly rewards high-quality, sharable content over SEO acrobatics.
As these 48 artists demonstrate, you can build a following online and use blogging to:
raise your public profile as an artist
establish yourself as an expert in your creative field
reach new fans, customers and clients
So you have no excuse now. Start building your platform as an artist.
These role models have shown it can be done – and how to do it.
Now is the time to join the ranks of artists who are thriving online through blogging. Artists who enhance the lives of people all over the world with their work. And who aren’t afraid to make a good living doing it.
So what are you waiting for?
Show us what you’ve got!
The post 48 Creative Geniuses Who Use Blogging to Promote Their Art appeared first on Smart Blogger.
from SEO and SM Tips https://smartblogger.com/promote-your-art/
0 notes
Text
C’est parti pour un nouvel épisode de cet interminable confinement. Plus les jours passent et moins on voit clair dans cette histoire. Je ne sais pas si vous avez ce même sentiment d’incertitudes… Et cela prend encore plus d’envergure selon qu’on vive seul, en couple ou avec des enfants. Dans mon cas, je vis seule et même si j’occupe assez bien mes journées j’ai ce sentiment parfois d’être en prison pendant ce confinement.
Quand je parle de prison je vais être plus claire ce n’est pas une prison psychologique ou liée a nos vies en appartement. Mais là je parle de cette liberté obstruée de pas pouvoir bouger, voyager, sortir bref être libre de ses allers et venues. Ne pas jouir de ma totale Liberté c’est quelque chose qui m’exaspère au plus haut point. Surtout que l’on sait que ce virus ne connait pas de frontières, ne connait pas de visa, il se déplace comme il veut et attaque le corps qu’il veut. M’enfin prenons notre mal en patience et continuons de suivre les recommandations de l’exécutif pour la Santé de tous.
Le vrai plus de cette période bizarre c’est l’inspiration qui m’habite et que j’exprime a travers tous les outils que j’ai sous la main en restant a la maison. Je vous avais parlé de mon projetde créer ma boutique Etsy pour commercialiser mes toiles et créations artistiques. J’ai enfin passé le cap (merci le confinement), la boutique est créé https://www.etsy.com/shop/creasandart et j’y partage les peintures que je fais actuellement et ce, sous différents formats et prix.
Je peins beaucoup de masques, thème de saison, mais des masques africains car pour la petite histoire les masques africains sont sacrés et protègent.
Chacun des masques a une histoire et j’essaie de recréer cette même atmosphère en les prenant en photos dans différents endroits de Paris. Je vous invite a me suivre sur Etsy et a commander si une toile vous parle. D’ailleurs je vais passer la livraison en gratuit pendant une semaine prochainement.
Quant au plaisir de pédaler je ne me restreins pas plus qu’avant, je sors rarement mais quand je peux je me fais une bonne ballade a vélo avec attestation. Je profite aussi de ma session de sport en plein air pour pédaler comme je vous l’ai raconté dans ma dernière vidéo Vlog Créasandart. J’en profite pour me rendre dans mon havre de paix (foret) et respirer a plein poumons et observer la sublime nature qui renait en ce joli printemps.
Quel bonheur de rider sans avoir des voitures au cul, et foncer sur des pistes vides c’est super agréable. Je déteste la promiscuité de façon générale avec qui que ce soit donc je vous avoue que pédaler a mon rythme sans klaxon derrière c’est vraiment satisfaisant. On se sent plus en sécurité. Paris est apaisant ces jours ci et ca fait du bien, pourvu que ca dure.
A sept jours de la libération ou sortie de prison, rien n’est clair mais une chose est sure la vie Parisienne va changer, on verra la suite… mais ca sera je pense pas comme avant. Prenez soin de vous et laissez-moi votre avis sur mes toiles et ma boutique Etsy. Si vous avez une boutique Etsy marquez la moi en commentaires.
Sentiments –Bayi Pics – Copyright (c) SB
It’s off for another episode of this endless confinement. The more the days pass, the less we see clearly in this story. I don’t know if you have the same feeling of uncertainty … And it gets even bigger if you live alone, as a couple or with children. In my case, I live alone and even if I occupy my days well enough I sometimes have the feeling of being in prison during this confinement. When I speak of prison I will be clearer that it is not a psychological prison or one linked to our lives in an apartment. But here I am talking about this obstructed freedom of not being able to move, travel, go out, in short, be free to come and go. Not enjoying my total Freedom is something that exasperates me to the highest point. Especially since we know that this virus knows no borders, does not know a visa, it moves as it wants and attacks the body it wants. Finally let’s take our troubles patiently and continue to follow the executive recommendations for the health of all.
The real plus of this bizarre period is the inspiration that lives in me and that I express through all the tools that I have on hand while staying at home. I told you about my project to create my Etsy shop to market my paintings and artistic creations. I finally passed the course (thank you confinement), the store https://www.etsy.com/shop/creasandart is created and I share the paintings I am currently doing there.
I paint a lot of masks, seasonal theme, but African masks because for the record African masks are sacred and protect. Each of the masks has a story and I try to recreate that same atmosphere by taking pictures of them in different places in Paris. I invite you to follow me on Etsyand to order if you like a canvas. By the way, I’ll be switching to free delivery for a week soon.
As for the pleasure of pedaling I do not restrict myself more than before, I rarely go out but when I can I have a good bike ride with certification. I also take advantage of my outdoor sports session to pedal as I told you in my last video Vlog Créasandart. What a joy to ride without having cars in your ass, and to run on empty tracks is super nice. I hate crowding in general with anyone so I admit that pedaling at my own pace with no horn behind is really satisfying. We feel more secure. Paris is soothing these days and it feels good, as long as it lasts.
Seven days before release or release from prison, nothing is clear but one thing is certain, Parisian life will change, we will see what follows … but it will be, I don’t think. Take care of yourself and leave me your opinion on my canvases and my Etsyonline store. If you have an Etsy store, mark me in the comments.
Feelings – Bayi Pics – Copyright (c) SB
Imagine the Conf 2 C’est parti pour un nouvel épisode de cet interminable confinement. Plus les jours passent et moins on voit clair dans cette histoire.
#5jvelotafjupe#africa#africaine#africainpainter#africanmask#artist#artistic#bayibiking#benin#bike#biking#boutique#buyart#commande#coronart#coronavirus#creasandart#creations#creator#cyclist#cycliste#dakar#dakaroise#deconfinement#etsyshop#forest#liberté#livraison#parisiancyclist#parisianpainter
0 notes
Link
In Metropolitan Lille, Villeneuve-d’Ascq is a new town that happens to have many of the top days out in the region.
This place is rooted in the technology sector, and you could almost say it’s where Lille’s citizens come to learn. There are museums for everything, from the exceptional LaM art museum to open-air attractions that send you back to the post-War period, medieval times or pre-history. Families with younger children will get the most out of Villeneuve-d’Ascq, but if you’re into the top-level sport you can get a ticket for a Lille OSC match during the football season. Lille’s old center. is minutes from the town so the landmarks and nightlife of a big city will always be at hand. Discover the best things to do in Villeneuve-d’Ascq.
[toc]
1. LaM
Longhand this is called the Lille Métropole Museum of Modern, Contemporary and Outsider Art. And it is an extraordinary museum, presenting every important movement in art in the 20th and 21st centuries.
There are epochal pieces by artists like Picasso, Miró, Kandinsky, Modigliani, Fernand Léger and Georges Braque.
They are supported by a sculpture garden and a wing to the Art Brut movement from the early decades of the 20th century: If you want to see some people out there, then this section has authored of paintings. self-taught academics and visionary artists He believes that they can communicate with other worlds.
2. Parc du Héron
A generous 110-hectare natural space next to the LaM, the Parc du Héron has meadows beside a large lake. If you’re wondering about the park’s name it’s because this is a regional nature reserve for herons, and you’ll have no trouble spotting this species on the shores of the lake.
Herons are also just one of 235 bird species in the park, among them European orioles, cuckoos, doves, and chickadees. There’s also an educational farm here, the Ferme du Héron, with donkeys, a handful of raptors and several flightless birds.
3. Château de Flers
Villeneuve-d'Ascq tourist office is located in an interesting Flemish-style mansion built-in 1661. It encapsulates the region’s architecture, right down to the crow-stepped gables. Check out the coffered wooden ceilings inside and the lovely 18th-century arcaded gallery that opens out onto the gardens.
In all, it’s a superb way to start your visit to Villeneuve-d’Ascq. There are occasional temporary programs about the former town, and on heritage days, the entire building is opened for tours.
4. Musée de Plein Air
A classic open-air museum, this attraction features 23 traditional rural houses saved from demolition and moved here in the 1990s to form a small village. These buildings came from several provinces in the north of France, like Artois, Picardy, French Flanders, and Hainaut, and the oldest building goes back to the 1500s.
You’ll get up to speed the Nord-Pas-de-Calais region’s diverse rural heritage in a bucolic environment of thatched cottages, vegetable patches, animal enclosures and workshops for various villages crafts. There is also a Flemish beer pub on the site that cooks traditional stews.
5. Musée du Terroir
Another museum that keeps you in touch with these new days is this 18th-century farm, listed as a historical French site. It’s a snapshot of domestic post-War life in the region, so there’s laundry, schoolroom, forge, dairy, kitchen and workshops for saddling and clog-making.
Like all the local museums the Musée du Terroir insists on children getting involved: They can try ironing with cast irons, hammering tools at the forge, taking an apprenticeship as a carpenter and making traditional Flemish waffles.
6. Musée des Moulins
In the Cousinerie district, the Musée des Moulins has two 18th-century windmills. One was for oil and the other for flour, and both were brought to this site in the 70s and 80s to be opened to visitors.
With modern exhibits, you’ll be presented with all the technical aspects of flour milling and oil production. You'll also make a small trip through milling history, from new whetstone to modern wheels and rollers.
Children will explore all the forces harnessed to make flour, such as manpower and animal power in the early days, and then water, wind, steam, and gas.
7. Forum Départemental des Sciences
This cultural center, run by the Nord Department, is unusual as it deals with matters of science and technology rather than art. The center is aimed mainly at kids and aims to fire their curiosity for the world around them.
There is a huge exhibition space available only for temporary exhibitions that are updated every few months. These are all cleverly curated and handle anything from police forensics to prehistoric mammoths and sustainability.
The galleries are complemented by a planetarium with the three shows on Saturdays and Sundays and two on Wednesdays.
8. Asnapio
Right on the Parc du Héron is another edifying outdoor museum. This one is devoted to archaeology and has recreated historic dwellings ranging from a Palaeolithic tent to a medieval farmstead.
The attraction has been built using information discovered at the many archaeological sites in the region, one right in Villeneuve d’Ascq where a Gallo-Roman farm was unearthed.
The grandest of the buildings is the Roman Villa, but every one of them has something going on: Kids can try on armor, taste medieval food, have a go at archery and watch demonstrations of historic crafts.
9. Mémorial Ascq 1944
This museum recalls a dark episode about the end of German occupation in France. After the railway line in Ascq had been sabotaged, the retribution by the SS was brutal, and 86 people were executed.
The displays in the museum chart the village of Ascq’s journey through the 20th century: You'll start with World War I, and then learned about reconstruction, World War II, the years under occupation and finally building the climate until the April 1 in 1944.
Near the railway track, there’s a memorial completed in 1955 to commemorate the site of the massacre.
10. Lille OSC
The city’s football team is based in Villeneuve-d’Ascq at the new Stade Pierre-Mauroy. The 50,186-capacity stadium, like this church, was built in 2012 and hosted six matches in EURO 2016.
Lille plays in Ligue 1, the highest division in French football, and even won the championship in 2011. Since then the team has been up and down, and as matches rarely sell out you should have no trouble getting a ticket to see “Les Dogues” during the season from August to May.
In 2017, things will become even more unpredictable when ruthless Argentine coach Marcelo Bielsa will come to power in June.
More ideals for you: Top 10 things to do in Cava De’ Tirreni
From : https://wikitopx.com/travel/top-10-things-to-do-in-villeneuve-dascq-708143.html
0 notes
Link
Win a Fabulous Christmas Gift Bundle in The Biggest and Most Exciting Competition of the Year!
I am delighted to launch my biggest ever competition in collaboration with the lovely folk over at The Scarlet Hotel, Veggie Desserts and Riverford Organic Food to offer one *very* lucky winner the chance to win a prize bundle worth £1500 – this bundle of unique Christmas gifts are guaranteed to evoke gasps of delight for the recipient on Christmas morning!
How To Take Part
All you have to do to be in with a chance of winning this incredible prize is enter your details and share the love… please see the terms and conditions at the bottom of the page.
Win a Fabulous Christmas Gift Bundle 2
Share This Page With Friends
(function(d, s, id) { var js, fjs = d.getElementsByTagName(s)[0]; if (d.getElementById(id)) return; js = d.createElement(s); js.id = id; js.src = 'http://ift.tt/2zJOoeN'; fjs.parentNode.insertBefore(js, fjs); }(document, 'script', 'facebook-jssdk'));
Share
Thanks For Taking Part!
We would love to hear your comments at the bottom of the page on your unique gift ideas! Also feel free to tag or share with a friend that you would like to enjoy these prizes with x
Prize 1: Yvonne Coomber Art
About: Yvonne Coomber is a contemporary British artist who works en plein air and is best known for her depictions of the English countryside. Many of her paintings are inspired by the landscape, with particular focuses on the natural world and colour. Yvonne’s highly sought-after flowerscape paintings sing of tumbling hedgerows, tangled meadowlands, open moorland and magical forests. They whisper of love.
The Prize: A limited edition hand embellished and signed printed canvas called ‘You are my desire‘ worth £950. These sparkling, magical pieces are hand finished by Yvonne Coomber with a selection of inks, gold leaf, oils, glitters, glosses and are infused with a lot of love!
Prize 2: The Scarlet Hotel
About: The Scarlet Hotel is a luxury eco hotel for grown ups, situated in beautiful Mawgan Porth on the North Cornwall coast. The Scarlet boasts magnificent sea-view rooms, a restaurant to provide you with a true dining experience and a luxury spa.
The Prize: A night’s stay for two adults at this luxury eco hotel in North Cornwall, with 3 course dinner and bed and breakfast for each of you (total prize worth £400).
Prize 3: Veggie Desserts
About: Pushing far beyond the boundaries of the traditional carrot cake, Kate Hackworthy puts vegetables into scrumptious cakes, muffins, biscuits, tarts, brownies, pastries and even ice cream. Kate is a freelance food writer, cookbook author, magazine columnist and award-winning blogger who has many accreditations under her belt including: winner of “Best Food Blog” (UK National Blog Awards), Jamie Oliver Blog of the Month, Top Sante Magazine Bloggers of the Year among others.
The Prize: A copy of the newly released Veggie Desserts cookbook by popular food blogger and author Kate Hackworthy. To accompany is a selection of complementary books from the publishing house Pavilion.
Prize 4: Riverford Organic Food Veg Boxes
About: From one man and a wheelbarrow, to an award-winning organic delivery company, Riverford began with a farmer selling 30 veg boxes to neighbours and now deliver around 47,000 boxes a week to homes all across the UK. Riverford believes in good food, good farming and good business. Everything they grow and make is 100% organic.
The Prize: A month’s supply of veg boxes delivered to your home! Packed with 8 varieties of freshly picked seasonal vegetables, the medium organic veg boxes (worth £13.95 each) are picked, packed and delivered fresh from the Riverford farm. This seasonal organic veg will perk your plate up a treat. Happy cooking!
Unique Christmas Gifts For Art Lovers, Foodies and Travellers
For me, Christmas is a time of family, friends, comfort and joy. After a busy year of creating, travelling and exhibiting, a restful and heart-filled Christmas excites me more than ever. Loved ones come from all corners of the UK to celebrate with us at this festive time of year, and Mike and I delight in opening our home and hearts to welcome them. Along with happiness, stories and love, visitors sometimes bring gifts with them and we are often the grateful recipients of interesting and unique Christmas gifts from all over.
Whether foodie-influenced, artsy or related to holistic relaxation, my favourite Christmas gifts are often made by independent creatives or artisans. Pots, plates, candles, rugs, images, bath soaks and mosaics in my own home take on quite another meaning when I know they have been lovingly created by someone who makes their living (either partly or wholly) out of their creativity. Whether purchasing directly from an independent artist, or searching for unique Christmas gift ideas online, the joy felt when you get your hand-picked artwork home is unsurpassed.
Christmas Gifts for Art Lovers
Many of you write to tell me that you have long wished to have an original painting, printed canvas or fine art print to display in a special place in your home so that a kaleidoscope of wildflowers could smile at you forever and a day. Receiving a piece of treasured artwork as a gift is perhaps one of the most thoughtful and unique Christmas gifts as it shows the recipient that you have carefully considered the wishes and taste of the lucky recipient. And if you’re looking for a suitable gift for an art lover, you’ll know that the discerning eye of an arty aesthete can be hard to please.
Artwork shows originality and makes a unique gift as it lasts forever and often becomes a beloved heirloom passed down the generations. Giving artwork to a loved one is so very special as it is something completely individual and one-off.
Whether you choose a fine art print, hand-embellished canvas or you go all out this year and splash out on a truly special original painting, there is something to suit all pockets. Yvonne Coomber Art also offers gift vouchers to let that special person in your life choose their own special piece of artwork to treasure.
Gift Guide
Price: £20 – £4000
Who: For that special person in your life who deserves a truly beautiful and unique gift this Christmas
Uniqueness: An original painting is the only one like it in the world, no one else owns the same so it is a truly unique gift in every meaning of the word.
Web: http://ift.tt/2cns2jZ
Christmas Gifts for Travellers
Whether they love exploring foreign shores or prefer the ease of staycationing within the British Isles, it’s never easy to find unique gifts for wanderlusting individuals. Whisking your loved one away for a romantic break is not only the stuff romance novels are made of, but it creates treasured memories which last long after the holiday draws to a close. Enjoying time away from the whirr of everyday life is a delight which should be enjoyed at every opportunity, so gifting your beloved with such a thoughtful unique Christmas gift is sure to be a big hit on the big day.
Voted one of the top 20 hotels in the UK by Condé Nast readers, The Scarlet is a luxury eco hotel for adults on the north coast of Cornwall with sea view bedrooms, cliff top hot tubs, beautiful food and a luxurious spa. The Scarlet (along with its sister hotel The Bedruthan where my artwork is displayed), are my favourite hotels in the UK. Mike and I make sure we visit at least once a year, using it as a chance to unwind, recharge and take stock. With breathtaking views of cliff, sea and sky at every moment, and light airy spaces designed to connect you to the outdoors, it’s hard to describe the unique atmosphere of the Scarlet and the healing and restorative ambiance to be found there.
Gift Guide
Price: Rooms range from £230-£338. Spa treatments, meals and additions are extra.
Who: For someone who needs a little time out and couples who want some blissful relaxation together by the sea.
Uniqueness: The Scarlet is a hotel like no other with a very special ambiance.
Web: http://ift.tt/2afV6dr
Christmas Gifts for Foodies
Food serves as so much more than sustenance for many of us in the West. We have a deep attachment to food which is inseparably tied up in tradition, ceremony and emotion. We often enjoy a celebratory meal to signify a special occasion, and different foods can be a delicious treat for all the senses. Olfactory and gastronomic pleasures are some of the most evocative and memory-stirring experiences a human can enjoy. Giving a food-lover a unique Christmas gift which celebrates food and inspires new and creative baking ideas is a wonderful idea and will be well-received by the foodies in your life.
Pushing far beyond the boundaries of the traditional carrot cake, Kate Hackworthy puts vegetables into scrumptious cakes, muffins, biscuits, tarts, brownies, pastries and even ice cream. This, Kate’s inaugural recipe book, will delight foodies who love vegetables (and those who prefer them hidden in delicious sweet treats – children pay heed!). This imaginative book is not about sneaking vegetables in, but celebrating them as hero ingredients. The result is great-tasting treats that are a lot less naughty; something which should be on everyone’s Christmas list this year.
Gift Guide
Price: 4 hardback recipe books totaling £75
Who for: Food-lovers and those who want some inspiration for delicious healthy meals and snacks will love this bundle of newly-released cookbooks.
Uniqueness: The unique gift that keeps on giving… lucky recipients can experiment and create new recipes every single day, changing their food habits for a healthier (more delicious) new year.
Web: http://ift.tt/2t9nki2
From one man and a wheelbarrow, to an award-winning organic delivery company, Riverford began with a farmer selling 30 veg boxes to neighbours but now deliver around 47,000 boxes a week to homes all across the UK. Riverford believes in good food, good farming and good business. Everything they grow and make is 100% organic.
Arranging for a loved one to receive delicious veggies straight to their door is a thoughtful and practical gift, and one which will encourage them to try new vegetables and recipes. Healthy living has never been more delicious!
Gift Guide
Price: 1 month’s supply of veg boxes from Riverford Organic Food worth £55.80
Who For: Foodies who like their veggies organic, fresh and deliv ered straight from the farm to their door.
Uniqueness: The gift of food is a joyous one indeed. And what better way to celebrate Christmas than with a month’s subscription to receive delicious organic veggie boxes?
Web: www.riverford.co.uk
Terms
The competition closes at 1159pm on Friday 1st December and will be announced via social media and the Yvonne Coomber monthly newsletter within 2 weeks of the competition closing date
The winner will be notified via the newsletter and so entrants must remain subscribed to hear news of the winner
The competition is open to all UK residents aged 18 or over
There is no maximum amount of times an individual can enter, and each entry will be in with a chance of winning
The winner will be picked at random and Yvonne Coomber Art will send the printed canvas to the winner via first class post as soon as is reasonably possible. (It is the winner’s responsibility to reply with their full name and address in order to receive their prize). It will be the responsibility of the winner to contact the Scarlet Hotel, Riverford Organic and Veggie Desserts to claim their section of the prize.
The month’s supply of veg boxes from Riverford will be 1x medium original veg box worth £13.95 delivered weekly for 4 weeks
No cash alternative is available, and no correspondence appertaining to such will be entered into
The Promoter (Yvonne Coomber Art) and Partners (Scarlet Hotel, Riverford and Veggie Desserts) accept no responsibility for any technical issues, system or software failures encountered on or during entry to the promotion
The promoter’s decision is final
The winner’s name will be posted onto the website, as well as the Facebook page, newsletter and other social media platforms of the Promoter and their Partners. The winner agrees to the promoter and partners using their name in relevant marketing activity as they see fit (within reason)
Entrants must read and accept the above Terms & Conditions to be eligible to enter
An entry will only be considered if the entrant likes the Yvonne Coomber Facebook page and is signed up to the newsletter (Notification reasons).
Neither the Promoter nor the Partners will be held responsible if the competition winner does not remain signed up to the newsletter and Facebook page to hear the announcement of who has won
This promotion is in no way sponsored, endorsed or administered by, or associated with, Facebook or Rafflecopter or Gleam
Specific Ts & Cs for Scarlet Hotel:
The prize consists of a one night stay at the Scarlet Hotel in a ‘Just Right’ room based on two people sharing, and includes a three-course dinner and breakfast in the Scarlet Restaurant.
The prize must be taken between Sunday – Thursday. Cornish school holidays and bank holidays are excluded (this includes May half term, Easter, the school summer holidays, October half term, Christmas, Twixmas and New Years Eve).
Prize to be taken by two adults over 18 years of age
The outdoor hot tub is not included in the prize (but is only £20 for hotel guests for 30 minutes).
The prize is valid for 18 months from the announcement date and is subject to availability. Our reservations team can advise you of all these dates.
Travel costs are not included in the prize, the winners will need to make their own travel arrangements.
There is no cash alternative available for the prize as a whole or any of the elements included.
Entrants must be 18 or over to enter, and must not be an employee of the Bedruthan Hotel and Spa or the Scarlet Hotel.
Anything not detailed in these terms is chargeable.
Leave a Comment With Your Best Unique Gift Idea!
The post Unique Christmas Gift Ideas appeared first on Yvonne Coomber.
0 notes
Text
My name is James Nyika and I’m originally from Nairobi, Kenya in East Africa (currently residing in Maryland). Many years ago in my teenage years, I recall pouring myself into watercolor artwork in a way that I could neither explain nor resist. I had initially discovered great works of art at the British Council Library in Nairobi – a (possibly) embassy funded public library in the heart of that city that sought to help Kenyans hoping to study abroad in the ways of the British and American universities.
Some of the works I recall vividly include Constable’s “Hay Wain”, Vermeer’s ‘View of Delft’ and Caravaggio’s ‘Calling of St. Matthew’. All these works, while not watercolors, had one common thread – unbelievable light treatment and eye-popping color and realism. Watercolor however, offered a very different treatment of the same material when I could find it.
These were, after all, the days before the internet and all I could find were a few watercolor books with the works of the watercolor giants. But they were amazing. I wanted to be that person, who could produce the same kind of work.
In about 2012, I was looking for a hobby that I could take up that I was going to fully apply myself to. I remember my excitement at discovering watercolor in my youth and decided to explore it further.
A few searches on the internet revealed amazing bodies of work by my favorites such as Sargeant, Alvaro Castagnet, Herman Pekel, Joseph Zbukvic, Eugen Chisnecean, Keiko Tanabe and David Taylor. Keiko Tanabe’s story was particularly poignant because it illustrated that it was possible to transition from a busy employee role to a full time artist career. So I leapt into my new hobby and I have never turned back.
Energized and determined, I started painting in earnest in 2013. I could afford better materials and I was wiser about the need to set up a schedule in order to truly improve along the trajectory that I wanted. So as not to lose my momentum, I chose to focus very narrowly on subjects that interested me and that I would not open to judgement, not from anyone else, including myself. I schedule 1 painting a week and when possible at least 2. Each painting was done on a quarter sheet (larger sheets were too intimidating).
Each painting session had a few crucial rules
(Most important) No matter how dire it seems, you are not allowed to leave it unfinished.
No painting was to be discarded, no matter how much I did not like it.
Each painting should take no more than 1 hour.
Each painting focused on a theme, or specific lesson I wanted to work on.
Progress was slow and sometimes it still feels that way. I bought almost all the DVD video lessons from the greats mentioned prior and I would watch them repeatedly, listening for new details each time – while I did the dishes! To my complete and utter surprise, the painting improved. Since then, I have sold many paintings, received commissions and am now trying to broaden the knowledge of the work.
My Subjects
I consider myself an impressionist landscape painter. My goal is to render one perspective of any reference scene I want to paint. It is only an interpretation but one I hope others share and like. I also like technical subjects such as aircraft and, in recent weeks, I started painting more and more airplanes at the most exciting moments of flight. I have found that there is a great response to these and if enough people want a workshop, I might arrange one.
My Process
I begin by capturing reference material – photos mainly using my camera and from travels. I will then perform preliminary sketches and print out grayscales to better see values but not always. These days I can see the value changes quite well. I then decide what my focal point will be and then work the painting from light to dark, back to front.
I usually try to finish a painting in 3 washes. First the underpainting, a light series of washes to set the main chromatic hue of the painting and underlying colors. The second wash fills in shadows and darker tones and values. The third wave is really about using dry technique and vibrant color to recapture highlights and create interest.
Challenges I Face
The most difficult things for me are:
Remembering and sticking to having a focal point. Cannot tell you how serious this can be.
Remembering to let the water do the work for you. It is watercolor after all.
Avoiding flat dead color – There is no such thing as a flat color, even in nature. The light will vary the hue. Shouldn’t you?
Returning to basics – review your color wheel every so often. Repaint basic scenes again and again to (re)discover a principle you forgot.
Managing Fear. This will never go away. Learn to recognize it and put it back in the box.
Materials I Use
Paints: Sennelier Professional Watercolor Paints (they activate easier than any other in the industry). For some esoteric colors, I use Holbein (Cobalt Turquoise, Lavender, Pyrol Red) or Daniel Smith’s Perylene Maroon.
My base palette: Ultramarine Blue, Royal Blue (sennelier color), Neutral Tint, Perylene Maroon (Daniel Smith), Yellow Ochre, Burnt Sienna, Indian Yellow, Titanium White, Indigo, Dioxazine Purple, Burnt Umber, Raw Sienna
Special highlight colors: Cadmium Red Light, Pyrol Red, Lavender (for getting warm greys with burnt sienna), Cerulean blue (the color of sky.. Like no other)
Brushes: All kinds but my standbys are Princeton (you need stiff brushes to do some of the detailed aircraft work), Alvaro Castagnet’s Neef brushes for washes, Isabey Mop brushes (squirrel) for my day to day washes and Pro Arte sword liners for fine detailed work.
Paper: Almost exclusively either Arches 140lb / 300gsm Rough paper in Pads or Loose 22×30 sheets or Saunders Waterford 140lb / 300gsm Rough paper in Pads or Loose 22×30 sheets. I have never used Cold Press or Hot Press paper.
Lifesaver tools
Hotel Key cards – I travel a lot and I save these to help me with making marks on paper for buildings.
Spray bottles – minimum of two – you need these to add water liberally to allow the water to do its work
Paper towels – help achieve fading effects and catch messes before they ruin a picture
Pencils – a range of lead types but a good professional mechanical pencil is a must. Go for a Rotring as a starter.
Tracing paper – Technical subject are best traced if you want them to look good. Get a good tracing paper and graphite transfer paper.
Gatorboard – Light but strong for holding your work.
Tripod – I do not yet do as much outdoor plein air but I am going to be getting a ball head tripod for holding the gatorboard.
Some of my Guiding Principles
I have a few guiding principles with the work I produce…
First, painting in general, and watercolor specifically, provide an outlet for me. I believe that I do paint for myself. Others benefit because I am open to sharing my work, but ultimately, I first try to please myself. It helps me relax and takes my mind off of computers and software.
Second, the objective with all paintings is to evoke an emotional reaction – a fleeting memory of something past, interest, awareness, fear, – anything! If the painting does not do that, then it is merely an illustration (in the general banal sense – I am not knocking illustrators.)
Third, human beings are imperfect and so are paintings. A painting is a fiction. It is an illusion. It is something designed to evoke an image in your mind’s eye. For this reason, I generally believe that imperfection in paintings, and especially watercolors, is one of their main draws. As one of my mentors once said, ‘Paintings are the perfect expression of the perfect imperfection.”
Fourth, practice, practice, practice. But make it fun. Pick subjects you like, Make time to do the work and have no expectations other than to learn something new each time you paint.
Parting Words From Inside The Net
Here is the bottom line. Talent is truly overrated in my opinion. While we do have some very naturally gifted artists out there, they are the exception – not the rule. I have come to believe that you can achieve amazing work with patience, fortitude, a dedicated schedule, professional materials and good learning materials. It is truly up to you.
Take the leap. Believe. And do not stop. No matter what. Ever.
James Nyika
Pixels
Saatchi Art
#WorldWatercolorGroup GUEST ARTIST:"Leap And The Net Shall Appear!" by James Nyika #doodlewash My name is James Nyika and I'm originally from Nairobi, Kenya in East Africa (currently residing in Maryland).
#WorldWatercolorGroup#doodlewash#East Africa#featured#inspiration#Kenya#Nairobi#painting#watercolor#watercolour
0 notes
Text
Ben Aronson
Painter
Boston, Massachusetts
benaronson.net
Photo by Eileen Aronson
SPECIAL GUEST SERIES
Ben Aronson is a painter based in Boston, Massachusetts, most notably known for his dynamic cityscapes. Ben’s paintings are housed in the permanent collections of over 50 museums in the United States and abroad, including the Museum of Fine Arts, Boston, Massachusetts; Virginia Museum of Fine Arts, Richmond, Virginia; De Young Museum, San Francisco, California; Museum of Fine Arts, Houston, Texas; Eli and Edythe Broad Art Museum, East Lansing, Michigan; and the Suzhou Museum, Jiangsu Province, China, as well as in private and institutional collections. He has presented over 20 solo exhibitions at galleries across the country, such as the Tibor de Nagy Gallery, New York, New York; Jenkins Johnson Gallery, San Francisco, California; and Alpha Gallery, Boston, Massachusetts. In 2004, Ben was elected into the National Academy of Design in New York City. He earned a BFA and MFA in painting at Boston University School of Fine Arts, studying under Philip Guston, James Weeks, Reed Kay, David Aronson (his father), and John Wilson. Earlier posts include four years as an architectural illustrator, for which Ben was awarded a prestigious international honor from the American Society of Architectural Perspectivists. He also taught an annual drawing seminar for architectural students at Harvard Graduate School of Design for nearly 10 years. Ben lives with his wife, Eileen, at their home and studio in Boston, Massachusetts.

FAVORITES
Book: There are many, of course, but currently I would have to say The Brutality of Fact: Interviews with Francis Bacon by David Sylvester (1987).
Destination: Idyllic Prince Edward Island, Canada, where we have a small summer cottage on the ocean.
Film: The 1992 film El Sol del Membrillo (The Quince Tree of the Sun), which closely chronicles the artist Antonio Lopez Garcia's attempts to paint a quince tree.
Motto: "The goal of painting is not illustration, but a concentration of reality and a shorthand of emotion." - Francis Bacon
THE QUERY
Where were you born?
I was born in Boston and grew up here.
How did you begin to realize your intrigue with painting/the fine arts?
I'm not sure I can even remember when I decided to be an artist; I always wanted to do it. People say painting is something which chooses you rather than the other way around. I've always loved making things as far back as I can remember. Growing up in a home where both parents were respected artists, I was already involved in exploring my connection to art making from an early age. As a kid I constantly drew and built models. Later came interests in music, architecture, and photography, but by the time I finished high school I wanted to seriously study painting more than anything.
Why does this form of artistic expression suit you?
The fun is in the anticipation of what might appear. I want to be surprised and it's always new. There is a deep satisfaction in life if you work very hard to become expert at something you love to do, and find a way it can support you.
What path did your training/education follow?
Even with parents who were artists, art was never pushed on me, which drew me to it all the more strongly. My training was formal. I understood that art is a language, visual not verbal of course but a language nevertheless, so a formal education made great sense to me. Quite simply, if you intend to speak coherently in visual terms you need to become fluent in the language. So traditional training made sense to me from the outset. Drawing from direct observation was taught as the underpinning of the artist's preparation along with a thorough familiarity and knowledge of the great master artists of the past and present.
How did you get your start in the business of art?
The art market is actually very difficult to break into even with direct connections, and anyone who has tried to assist an artist with their career knows this to be true. In my early 20s, already with a family of two young boys, I took a job teaching art in a private high school and also made small art commissions from friends and colleagues. This led to small local galleries which eventually captured the attention of national galleries. Gradually sales reached the point where I could ultimately devote full time to working in the studio producing my own work.
What do you consider the most challenging aspects of this pursuit?
Over an artist's career some of the challenges change while others remain the same. In the beginning, the difficulty is finding a way to support yourself while trying to find the time to develop one's own voice and skill as an artist. The most important thing is to uphold the integrity of the work, presenting it on your own terms in a way unlike anyone else. Later on, once established, I think the challenges are more related to the work, continuing to evolve, and trying to understand the questions rather than answers because in the end it's a mystery.
How would you describe your creative process?
I would describe it as a process of search because the result can't be preconceived; it's reached only through the act of making the painting. Almost any visual circumstance that evokes a compelling emotion or feeling of mystery can generate the momentum to carry me into the process of developing an idea in paint. It can even arise out of the completion of a painting, no matter if it's a success or a failure; the conclusion suggesting some exciting and unexpected new direction to pursue. The working process itself is concerned with rhythm, balance, and total design. The search is also to understand what actions and selective choice making will develop the idea while anticipating what the effects will be in the work. It's a dialogue between the artist and the painting, one of reaction and response, back and forth, with the aim of discovering what sequence of steps will move the painting forward toward a unified whole, a logical totality.
What materials do you typically work with?
It's a simple list: oil paint, brushes, panels, and ordinary studio tools. I do make every effort to use archival and non-toxic materials and methods.
What is it that draws you so strongly to the urban landscape scene?
I started out as a plein aire painter working outdoors in the countryside. Perhaps I'll return to it at some point. But I find the geometry of the city powerful, and the energy it brings to the subject lends itself to exploring the urban landscape, utilizing painterly elements of abstract expressionism to convey that energy through the brushwork and handling. People are often surprised that, while I'm known mostly for painting cityscapes, I live in the country and prefer it.
Do you have a favorite painting and/or memory associated with a piece you’ve created?
Yes, with many, because they all become records of personal experiences, both outwardly and inwardly.
What do you consider the most important themes in your work?
I think quality and integrity are the most important elements of any artist's work. Considerations of form, content, and style are determined by the presence or absence of integrity and quality. That said, paintings can be fully successful with a single thematic goal as simple as the celebration of observed nature. A painting can also carry important narrative themes simultaneously alongside the visual. The danger with narrative is when it is allowed to overtake the painting to the degree that it reduces a work of art to simple illustration, or worse, propaganda and polemic. The test of a successful result is if all the elements work together as a unified whole without allowing a loaded storyline to capsize the painting. I found this especially true and challenging in my Wall Street series.
Is there a project along the way that has presented an important learning curve?
Most definitely the Wall Street paintings. In addition to the challenges mentioned in the previous question, I had to learn about and understand the world of global finance and Wall Street to the extent that my works would read authentically to anyone who understands this complex topic.
How has your aesthetic evolved over the years?
The way you look at the world evolves as you grow, and if you're an artist your paintings will naturally reflect that.
Do you have an artistic resource that you turn to?
The history of art, all the great masters ancient and contemporary, is an essential, inexhaustible, and crucial family for a painter to be connected to. And now as never before, the internet and social media have provided tremendous reach and artistic cross-pollination globally, with easy access to the work of other contemporary painters.
What three tools of the trade can’t you live without?
1) Charting my own course and being my own boss; 2) A studio with good light, high ceilings, and enough space; and 3) Extended periods of time to work without interruption.
What’s the best advice you’ve ever received?
Keep doing it, and stay at it. That's basic for survival as an artist. Over the years, life will conspire against an artist's time in the studio, for many reasons. Staying at it over the long haul takes resolve and commitment. Just keep giving it the time and remember that repetition is the mother of skill. Also keep in mind that purpose is stronger than outcome: put your reasons first and leave answers for later. In other words, focus on your process and the results will follow. You must want it, because desire is where strength comes from. What you pay attention to and think about the most is what will happen for you. Think of where you are and where you want to be, and recognize that dissatisfaction is a tremendous motivator, so use it. The very best results never come out of the comfort zone.
From where do you draw inspiration?
Inspiration can come from anywhere and anything, outside or inside the studio, as long as you remain open and observant. It's everywhere all around us all the time, but elusive, and the challenge is staying open to it. Our ordinary preoccupation with the daily activity of life tends to distract us from exciting possibilities and ideas which are right there simply waiting to be recognized.
What drives you these days?
It simply comes down to a mysterious compulsion to express the joy of experiencing the world through painting.
0 notes
Text
Plein Air Painting With Bill Robinson
by Cory Godbey
Plein air painting is one of those things I've been interested in but truthfully never really tried.
The reality is, for me, painting is enough of a challenge without the whole natural world getting involved. I'm envious of those artists who can set up shop seemingly anywhere and pull together a painting!
Bill Robinson and I go way back (we first met in 2009 when I was curating a Maurice Sendak tribute art blog called Terrible Yellow Eyes). He has a decorated career in children's books and animation and currently works as a visual development artist at Sony.
I thought I'd invite Bill over to share a little of his experience and expertise with plein air painting.
Enjoy!
How and when did you get started plein air painting?
A little over a year ago I moved to Los Angeles and was working at my first job in feature animation with some very talented painters. When I started nosing around and asking them how they got so good, they mentioned that they go plein air painting as often as possible. I had seen plein air and even done a couple of workshops years ago, but the practice never really cemented for me. Lucky for me, we formed a little group of people who would go painting every day at lunch, setting up on the streets of Santa Monica near our office. Being able to see the gear, subjects, handling of paint...and doing it every day finally got me over the feeling of, “I have no idea what I’m doing” and made the whole process much more enjoyable.
What makes a good location for plein air painting? Do you decide where to go and then choose a spot or is there something in a particular landscape or place that you set out to find first?
I find myself more attracted to nature than architecture or cityscapes, which for me comes down to where I like to paint and what I like to spend hours staring at. I would usually rather be out on a sunny trail or near a stream than in a busy industrial area, though there is plenty of beauty to be found in factories, train yards, etc. and I think it’s a good idea to mix it up every now and then. When I head to to my general location, the first thing I look for is the lighting. If there’s a really beautiful shadow pattern or the light catches my eye and holds it, I will stop and consider that place for a painting. Subject matter itself doesn’t matter all that much, I’ve found that a tree or a rock or a flower or a mountain can all be painted in beautiful ways. When I’ve been to an area enough times I start to keep a mental log of spots I want to paint, which makes it easy the next time I’m there.
What sort of materials do you take with you on locations?
I’ve found that everyone has a different plein air setup, but the main thing for me is finding stuff that is lightweight and very portable. Here’s a look at my current setup:
Paper Towels, Spray Bottle, Artists Tape - These seems like add-ons, but they are essential! Paper towels especially, for getting the right consistency when mixing gouache. Too much water on your brush and you’ll be struggling. Spray bottle is good for keeping your palette wet.
Brushes - I mostly use 2-3 brushes on a painting. Mainly a 1” flat and then maybe a ¼” flat for details. Once in awhile I use a round for smaller details. I love my cylindrical brush carrier, which keeps them from getting bent bristles in my backpack.
Palette - I use a Sta-Wet palette for and it changed my life. I used to hate working with gouache because it dries out so quickly, especially in heat or direct sunlight. The Sta-Wet palette has a wet sponge and a special palette paper that keep your paints full of moisture, even days later. I also use a small spray bottle of water to refresh the paint if necessary.
Paper/Pencils/Eraser - I work on a variety of surfaces, but mostly either cold press watercolor paper or hot press illustration board. I have started to prefer illustration board, mostly because you don’t have to worry about buckling or warping. I’ve always got a pencil and kneaded eraser in my kit for laying in quick sketches. The boards in the photo are from Cottonwood Arts.
Water - I use an old pill bottle with a screw on cap to hold my water. It’s tiny, lightweight, and watertight.
Masonite board - If you are using a small painting surface, it’s good to have a board to tape it down to.
Pochade Box - I bit the bullet and bought a fancy STRADA easel. It’s lightweight, strong, super portable, and easy to use. No complaints. There are definitely cheaper options (including many homemade ones) for people just getting started.
Tripod - I’m using a cheap old tripod I had lying around the house, but it would probably be a good idea to use something a little more sturdy. Just be careful of how heavy it might make your pack.
Travel Toiletry Hanger/Paint - I had this old toiletry carrier and found that it is perfect for holding my supplies. It has a hanger hook up top, which I can hang on to my easel for easy access. I use gouache for my plein air paintings, mostly because it’s waterbased, opaque, and dries quickly. Also, the tubes are very small and easy to transport! I am fond of Holbein and Winsor & Newton, though there are other good brands out there.
Backpack - This Kelty Redwing bag is huge, with tons of zippers and pockets for all your supplies. It’s a serious backpacking kit, so you trade off a little more weight to use it. Sometimes I switch this out for a lightweight gym knapsack if I don’t need all the gear.
Current setup in action:
Walk us through your process.
Step 1: Once I’ve selected a subject/area to paint, I take a few minutes to think about composition. This will depend on the format of my painting surface (sometimes it’s square, or wide, or tall, etc) but I tend to work rather small. This particular painting is about 5" x 7”. Once I’ve got a composition in mind (considering the rule of thirds, focal point, etc) I will do a very quick sketch. This is going to get covered by paint in a moment, so I keep it rough. I just want the key things like the telephone pole, the house, and the wall at the bottom in their basic positions.
Step 2: Basic Block-In. I do this as quickly as possible, mostly working wet-in-wet. Don’t expect this phase to look good - if it does, you’re probably getting bogged down in detail. Sometimes I will work on white, other time I will ground my canvas with burnt sienna or something similar. In this case I kept it white for the sky. The thing about gouache (and watercolor) is that you will never get a paint as white as the original paper...so be careful with preserving it when you need to!
Step 3: Tightening Up - Here I’ve got my colors blocked in and am paying more attention to local color. I want the greens to have the right temperature and the browns and yellows to feel like they are in either light or shadow. It still looks very rough.
Step 4: Values: Now I’m starting to pay more attention to value. I lay in some of the darkest darks and try to get more key details locked down. I pay more attention to color variation, like adding in some purples to the dirt trail and some blues to the sides of the house.
Step 5: Finished! Here I’ve added the fine details, the lines on the bricks, the fence posts, the telephone wires, small leaves and flowers. It’s amazing how much these little details bring a painting to life, but they would not work if the rest of the foundation had not been laid down.
I'm curious, do you find that people want to see what you're up to or do they give you space?
I have gotten pretty mixed reactions, depending on where I am set up. Most people are very friendly and just excited to see what you’re working on. I’ve painted in big cities, where people have made jokes about how they wish they could spend their day painting instead of working. (Reconsider your life choices!) I’ve painted at Disneyland, where kids get super excited to see an artist doing something. Mostly I paint out on nature trails where I get to meet dogs and chat with their owners!
Thanks so much for sharing your expertise with us, Bill! Where can people find you online?
My pleasure! I share my plein air paintings and a lot of my process shots on my Instagram:
http://ift.tt/2omqcZg
I’m also on Twitter, Tumblr, and Facebook.
Also, I understand that you have a show coming up as well, where can people find that?
Yes! I am very excited to announce that I will be having my first solo show of my pleinair artwork at the Light Grey Art Lab in Minneapolis. It opens April 21 and goes through May 20. The artwork will also be available online after the show opens.
Check out http://ift.tt/1m7FPeY for more info as it becomes available!
from Muddy Colors http://ift.tt/2p2DnN1
0 notes
Text
Top 10 Oil Painting Tips from Johannes Vloothuis
A master painter and favorite art workshop instructor, Johannes Vloothuis teaches thousands of students how to paint with oil (among other mediums). We asked him for his top 10 tips for oil painters, which he provided for us below. We think you’ll agree that these essential painting techniques should be in every artist’s tool kit.
1. Using Underpainting or Fast-Drying White to Enable Over-Laying
One thing that has dissuaded some oil painters from using this medium is that when you add a layer of paint on top of another, they tend to intermix. For example, it is hard to add snow on top of a blocked in mountain while the first layer is still wet.
When an artist is all pumped up and his adrenaline is in high mode, it is frustrating to have to abandon the painting and resume it days after. There are new options of white paint over the classical Titanium White that solve this problem, making oil painting so much more cooperative. It’s called fast-drying white, or underpainting white. I use the Winsor & Newton brand. This can be substituted in place of titanium white. This paint tends to be thicker than ordinary whites, so use mediums such as Liquin, walnut or linseed oil to dilute.
2. The Thin Line Enigma in Oil Painting
Most, if not all, oil artists have been frustrated trying to achieve thin lines with oil paint, especially when the paint is still wet, because of the fatty vegetable oils which tend to not dilute well (water-soluble mediums are more cooperative in this regard). Even signing a painting is not that easy if the signature is small. One way to achieve thin lines is to wait until the paint dries before depicting them. Here are some methods:
You can use a business card and tap them into the painting.
Believe it or not, if the lines are very thin you can use acrylics on top of the dry oils.
I discovered another innovative technique — stick oil pastels. Normally these don’t dry, but if you add a thin layer of Liquin first, the hardening process will take place. This will really help you add all the thin tree twigs, barbed wire, and telephone wire.
3. Toning Your Canvas
If you ever visit a top gallery and see a painting close up, you will see little specs of broken paint that expose a warm burnt sienna underpainting. This has the following advantages:
The white background will make it harder to judge values.
During plein air if your canvas is tilted toward the sun, the glare will be too bright to judge values properly. You don’t want to wear sunglasses, as this will distort your colors.
It is practically impossible to totally cover every area of a painting during a spontaneous, quick procedure. As a result, if you work on a white canvas, these little specs can show through.
Paint is not 100 percent opaque, so the warm glow of a toned canvas can influence the general feeling. To control the painting from being too warm, such as in fall scenes, you can resort to the background being toned in a cool color.
The orange specs that would show through when depicting foliage would come across as a bundle of dry leaves that will help break the monotony of monochromatic greens.
In this underpainting stage, below, you can see that an orange underpainting was used, and then the local color of light, shadow, sky and foliage were added.
Underpainting of Johannes’ Canyon Vista Demo.
Completed Landscape Painting Canyon Vista by Johannes Vloothuis
4. Conveying Volume with Thick Paste
One big advantage of acrylics and oils is that you can build up thick impasto that will help convey a three-dimensional look. Other media such as watercolor and pastels lack this quality. My advice is to apply thick paint in the foreground and gradually go thinner with the paint as the planes recede, leaving just a thin layer in the most distant background. Add blobs of paint on tree trunks, rocks, flowers and protruding leaf clusters.
In this painting, below, you can see that the flowers and foliage in the foreground have been applied thickly, and so they appear to move forward in the painting.
Carmel Mission by Johannes Vloothuis
5. Dry Brush to Create Texture
Indicate clumps of leaves, clusters of grass, and water foam in crashing waves and waterfalls using the “dry brush” technique. Dry brushing is a term used to relate to skipping the brush and allowing the paint to peel off. Graze the brush, holding it horizontally, and tickle the bottom surface while dragging it in different directions. This method will make wood look weathered, produce an array of small leaves, make water foam look bubbly and add weeds to grass.
For more texture techniques that work for both oil and acrylic, watch this short art video on how to paint tree bark in acrylic using a choppy short stroke and a melodic line.
youtube
6. Working on an Already Dry Canvas
Alla Prima or wet-on-wet is a popular oil painting technique. However, time and the size of the painting may not allow you to complete the artwork in one sitting. Working on a dry painting does not give that blending effect. This can be a problem when doing water reflections which call for blurred forms.
To work on a dry painting, I recommend you first add a thin layer of Liquin, after buff it off like waxing a car. The new paint will melt in, yet won’t merge with the previous layer. This way you can soften edges to your heart’s content!
7. Spend on Professional Quality Paints and Save on Canvases
Linen is an expensive and mostly an unnecessary expense, however, many professional artists prefer to use this top-quality painting surface.
I admit there is some benefit when it comes to dry brushing on linen, as it breaks up the painting nicely, but I still don’t feel the cost merits the benefits.
You can prepare your own painting canvases just by spreading super heavy gesso from Liquitex with a paint roller onto your painting board. This will leave random protruded little bumps similar to linen. Use masonite or birch Wood for your board; and, instead of spending money on linen, divert that cost to professional paints where you will reap the benefits.
8. Vary Colors to Generate More Interest
During my online classes, I make constant references to color variegation. Solid monochromatic colors are boring, so top artists exaggerate and add several variations of similar hues in one area.
Try this: Partially mix the colors in question on your palette until you neutralize the saturation (about 50 percent mixed). Wipe your brush dry and double load it. Apply a lot of pressure when squeezing the paint out. You should be able to see the subtle color variations in each stroke. It takes some practice but, once you master it, your paintings will look more alive.
You can also use color-mixing variegation for painting foliage, grass, and rocks, as you will learn in this short art video below, which shows how to paint a variety of greens for realistic foliage.
youtube
Also, check out the video below to learn how to vary your oils and brushstrokes to quickly and easily create a group of lush evergreen trees.
youtube
9. Create Mist for Atmospheric Depth
I feel fog is quite undermined in landscape painting. These scenes, when well depicted, can add mood and tons of depth to your artwork.
In a top gallery, I once saw this beautiful painting of Upper Yellowstone Falls with a lot of mist where the falls hit the bottom. Yet I was able to see through some of that mist, and it looked so believable. That was achieved by using zinc white, which has the characteristic of being semi opaque. You can also use this to add haze to far away mountains and other areas that can benefit from atmospheric perspective.
Completed Oil Seascape with a Crashing Wave by Johannes Vloothuis
10. Use Your “Green Thumb” to Blend*
There is unwarranted fear of using oil paint, especially when there is contact with the skin. Take into account that leading manufacturers post the toxicity levels on the tubes of paint, in case you wish to consult the health labels.
I am big at blending with oils, and I want to get my edges just right. Because your fingers have nerves, you can adjust just the right amount of pressure to smudge lines to end up exactly as you want them. This is not achieved as easily with just a brush.
*Try this technique using a thin latex glove to protect your skin.
About the Artist
An award-winning, master painter in all the leading mediums, Johannes Vloothuis has exhibitions across the U.S., Canada and internationally. He has thousands of online students around the globe and is a regular online workshop instructor through WetCanvasLive! Watch the interview below for an inside look into Johannes’ love for painting en plein air, his favorite painting mediums and the start of his career in art instruction with WetCanvas.com.
You can find Johannes Vloothuis’ three oil painting instruction videos (as well as more on acrylic painting, watercolor, and pastel) at NorthLightShop.com and streaming on ArtistsNetwork.tv. You can also find many Paint Alongs and other courses from Johannes here, and be sure to visit WetCanvasLive for upcoming live workshops with Johannes.
The post Top 10 Oil Painting Tips from Johannes Vloothuis appeared first on Artist's Network.
from Artist’s Network http://ift.tt/2fK9xJw
http://ift.tt/2n54Al5
0 notes
Text
Top 10 Oil Painting Tips from Johannes Vloothuis
A master painter and favorite art workshop instructor, Johannes Vloothuis teaches thousands of students how to paint with oil (among other mediums). We asked him for his top 10 tips for oil painters, which he provided for us below. We think you’ll agree that these essential painting techniques should be in every artist’s tool kit.
1. Using Underpainting or Fast-Drying White to Enable Over-Laying
One thing that has dissuaded some oil painters from using this medium is that when you add a layer of paint on top of another, they tend to intermix. For example, it is hard to add snow on top of a blocked in mountain while the first layer is still wet.
When an artist is all pumped up and his adrenaline is in high mode, it is frustrating to have to abandon the painting and resume it days after. There are new options of white paint over the classical Titanium White that solve this problem, making oil painting so much more cooperative. It’s called fast-drying white, or underpainting white. I use the Winsor & Newton brand. This can be substituted in place of titanium white. This paint tends to be thicker than ordinary whites, so use mediums such as Liquin, walnut or linseed oil to dilute.
2. The Thin Line Enigma in Oil Painting
Most, if not all, oil artists have been frustrated trying to achieve thin lines with oil paint, especially when the paint is still wet, because of the fatty vegetable oils which tend to not dilute well (water-soluble mediums are more cooperative in this regard). Even signing a painting is not that easy if the signature is small. One way to achieve thin lines is to wait until the paint dries before depicting them. Here are some methods:
You can use a business card and tap them into the painting.
Believe it or not, if the lines are very thin you can use acrylics on top of the dry oils.
I discovered another innovative technique — stick oil pastels. Normally these don’t dry, but if you add a thin layer of Liquin first, the hardening process will take place. This will really help you add all the thin tree twigs, barbed wire, and telephone wire.
3. Toning Your Canvas
If you ever visit a top gallery and see a painting close up, you will see little specs of broken paint that expose a warm burnt sienna underpainting. This has the following advantages:
The white background will make it harder to judge values.
During plein air if your canvas is tilted toward the sun, the glare will be too bright to judge values properly. You don’t want to wear sunglasses, as this will distort your colors.
It is practically impossible to totally cover every area of a painting during a spontaneous, quick procedure. As a result, if you work on a white canvas, these little specs can show through.
Paint is not 100 percent opaque, so the warm glow of a toned canvas can influence the general feeling. To control the painting from being too warm, such as in fall scenes, you can resort to the background being toned in a cool color.
The orange specs that would show through when depicting foliage would come across as a bundle of dry leaves that will help break the monotony of monochromatic greens.
In this underpainting stage, below, you can see that an orange underpainting was used, and then the local color of light, shadow, sky and foliage were added.
Underpainting of Johannes’ Canyon Vista Demo.
Completed Landscape Painting Canyon Vista by Johannes Vloothuis
4. Conveying Volume with Thick Paste
One big advantage of acrylics and oils is that you can build up thick impasto that will help convey a three-dimensional look. Other media such as watercolor and pastels lack this quality. My advice is to apply thick paint in the foreground and gradually go thinner with the paint as the planes recede, leaving just a thin layer in the most distant background. Add blobs of paint on tree trunks, rocks, flowers and protruding leaf clusters.
In this painting, below, you can see that the flowers and foliage in the foreground have been applied thickly, and so they appear to move forward in the painting.
Carmel Mission by Johannes Vloothuis
5. Dry Brush to Create Texture
Indicate clumps of leaves, clusters of grass, and water foam in crashing waves and waterfalls using the “dry brush” technique. Dry brushing is a term used to relate to skipping the brush and allowing the paint to peel off. Graze the brush, holding it horizontally, and tickle the bottom surface while dragging it in different directions. This method will make wood look weathered, produce an array of small leaves, make water foam look bubbly and add weeds to grass.
For more texture techniques that work for both oil and acrylic, watch this short art video on how to paint tree bark in acrylic using a choppy short stroke and a melodic line.
youtube
6. Working on an Already Dry Canvas
Alla Prima or wet-on-wet is a popular oil painting technique. However, time and the size of the painting may not allow you to complete the artwork in one sitting. Working on a dry painting does not give that blending effect. This can be a problem when doing water reflections which call for blurred forms.
To work on a dry painting, I recommend you first add a thin layer of Liquin, after buff it off like waxing a car. The new paint will melt in, yet won’t merge with the previous layer. This way you can soften edges to your heart’s content!
7. Spend on Professional Quality Paints and Save on Canvases
Linen is an expensive and mostly an unnecessary expense, however, many professional artists prefer to use this top-quality painting surface.
I admit there is some benefit when it comes to dry brushing on linen, as it breaks up the painting nicely, but I still don’t feel the cost merits the benefits.
You can prepare your own painting canvases just by spreading super heavy gesso from Liquitex with a paint roller onto your painting board. This will leave random protruded little bumps similar to linen. Use masonite or birch Wood for your board; and, instead of spending money on linen, divert that cost to professional paints where you will reap the benefits.
8. Vary Colors to Generate More Interest
During my online classes, I make constant references to color variegation. Solid monochromatic colors are boring, so top artists exaggerate and add several variations of similar hues in one area.
Try this: Partially mix the colors in question on your palette until you neutralize the saturation (about 50 percent mixed). Wipe your brush dry and double load it. Apply a lot of pressure when squeezing the paint out. You should be able to see the subtle color variations in each stroke. It takes some practice but, once you master it, your paintings will look more alive.
You can also use color-mixing variegation for painting foliage, grass, and rocks, as you will learn in this short art video below, which shows how to paint a variety of greens for realistic foliage.
youtube
Also, check out the video below to learn how to vary your oils and brushstrokes to quickly and easily create a group of lush evergreen trees.
youtube
9. Create Mist for Atmospheric Depth
I feel fog is quite undermined in landscape painting. These scenes, when well depicted, can add mood and tons of depth to your artwork.
In a top gallery, I once saw this beautiful painting of Upper Yellowstone Falls with a lot of mist where the falls hit the bottom. Yet I was able to see through some of that mist, and it looked so believable. That was achieved by using zinc white, which has the characteristic of being semi opaque. You can also use this to add haze to far away mountains and other areas that can benefit from atmospheric perspective.
Completed Oil Seascape with a Crashing Wave by Johannes Vloothuis
10. Use Your “Green Thumb” to Blend*
There is unwarranted fear of using oil paint, especially when there is contact with the skin. Take into account that leading manufacturers post the toxicity levels on the tubes of paint, in case you wish to consult the health labels.
I am big at blending with oils, and I want to get my edges just right. Because your fingers have nerves, you can adjust just the right amount of pressure to smudge lines to end up exactly as you want them. This is not achieved as easily with just a brush.
*Try this technique using a thin latex glove to protect your skin.
About the Artist
An award-winning, master painter in all the leading mediums, Johannes Vloothuis has exhibitions across the U.S., Canada and internationally. He has thousands of online students around the globe and is a regular online workshop instructor through WetCanvasLive! Watch the interview below for an inside look into Johannes’ love for painting en plein air, his favorite painting mediums and the start of his career in art instruction with WetCanvas.com.
You can find Johannes Vloothuis’ three oil painting instruction videos (as well as more on acrylic painting, watercolor, and pastel) at NorthLightShop.com and streaming on ArtistsNetwork.tv. You can also find many Paint Alongs and other courses from Johannes here, and be sure to visit WetCanvasLive for upcoming live workshops with Johannes.
The post Top 10 Oil Painting Tips from Johannes Vloothuis appeared first on Artist's Network.
from Artist's Network http://ift.tt/2fK9xJw
0 notes
Text
Oil Paints — How Safe Are They?
This article on oil paints is by Michael Skalka, chair of the subcommittee on artist’s materials for ASTM International. It first appeared as the Ask the Experts column in the November 2009 issue of The Artist’s Magazine.
Q. I’ve heard people say that painting with traditional and water-soluble oils poses health hazards for the painter. Some say even people with whom the painter comes in close contact, such as family members, are at risk. Just how safe or unsafe are oil paints?
A. Traditional oil paints are basically a drying oil and pigment. Manufactures also add stabilizers because modern paints need to be stored for a considerable length of time before use. Stabilizers keep the oil from separating from the pigment. Let’s consider the safety of each of these components:
1. Drying Oils
Drying oils used in artists’ paints are mainly linseed, safflower, poppy or walnut. We know that linseed oil is safe to work with because we can buy specially processed food-grade quality linseed oils in health food stores as a great source of omega-3 fatty acids. The health food industry uses the term flaxseed oil in reference to the plant from which we derive linseed. We use both safflower oil and walnut oil in cooking. Poppy oil doesn’t appear to be popular in the health food realm, and references point only to its use in paints; however, manufacturers do use it in skin care products.
2. Stabilizers
The stabilizers, if used, are metallic fatty acids. Because they’re mixed into the paint, they do not pose an independent threat to a person using an art material.
3. Soaplike Substance
Water-soluble oils contain an ingredient that would be considered close to soap, which makes water combine with the oil for assistance in cleanup.
Regardless of the origin of the oil and any additives, you should not consider paints safe to ingest. Keep them on the palette and the painting, and they’ll pose no unusual health risk.
Pigments can be as benign as common dirt or as harmful as many other chemicals are to the human body. Many of the paints used by artists from the Middle Ages to the late 20th century had varying degrees of toxicity. Even today, while the most highly toxic pigments have disappeared, no pigment should be considered nontoxic. The one property that makes oil paints so safe to use is that the pigment is bound in a liquid vehicle (the drying oil). Therefore the problem of dry powder finding its way into artists’ lungs or flying about and landing on their families’ food is eliminated. Even the nastiest of pigments, which no longer are readily available, wouldn’t give off toxic vapors or be otherwise harmful unless taken directly into the digestive system by mouth or, in the case of some pigments, they came in direct contact with unprotected skin.
Safe-Use Practices for Oils
Q. What safety precautions should I follow when painting with oils?
A. My recommended safety precautions fall into two main areas:
1. Keep paint and solvents off your skin.
I would remind artists that repeatedly allowing oil paints to splatter on their hands and arms is a bad practice. That’s especially true when an artist removes paint from the skin with a solvent. Skin, the largest organ of the human body,
is a sponge for taking in substances. Unbroken skin may be good at repelling germs, but an artist negates that protection when he or she tries to remove paint from skin using a solvent-soaked paper towel. Skin absorbs solvents, and when you mix paints with a solvent, the paint can enter the body as well. When using oil paints, slathering paint on oneself and cleaning it off with solvent poses the greatest risk.
Common sense and careful studio practices are crucial to keeping the paint on the painting and off the body. My advice to painters who display a tendency to get paint all over themselves is to wear disposable gloves and to protect other areas of the body with clothing or an apron. When oil paint does get on the skin, remove the paint with plain soap and water. Painters who hate gloves should at least use a barrier cream, sold in art stores, that provides some degree of protection against paint components entering through the skin.
2. Paint in a well-ventilated area.
Use extra caution with paints classified as alkyd quick-drying colors. Unlike traditional oils, these contain a small amount of odorless solvent; you should not use these in a closed studio space unless you outfit that space with continuous airflow and exchange. When you use alkyd colors outdoors or in a well-ventilated studio, handle them in the same way as traditional oil paints.
Many artists, of course, don’t have studios, and some admit to painting in their kitchens. This is one place where food and painting materials have too great a chance to interact. In addition, the potential for fire rises when solvents come into close contact with cooking appliances. If possible, set up a painting area in another part of the home where you can establish ventilation that constantly changes the air in the space. As I’ve explained, when it comes to poor ventilation, the problem generally isn’t so much with the paint as with the solvents the artist uses for cleanup and paint dilution.
Most artists use oil paints for many years without ill effects. Follow the few safety precautions I’ve mentioned above, and all should be well.
Waste Management for Oils
Q. How can I safely dispose of oil painting materials?
A. you can easily and safely control the disposal of unused paint and solvent in a home environment. Use a closed metal solvent can, just as plein air artists do outdoors.
How to Use a Solvent Can
Open the can only when necessary and close it immediately after use. Wipe excess paint onto disposable paper towels before using solvent to clean brushes. This makes your solvent less prone to becoming overly dirty with paint. The solvent not only lasts longer, but you decrease your exposure to the solvent because you can clean your brushes quickly. Place the used paper towels in the closed metal can.
What to Do When the Solvent Can is Full
When the pigment waste in your plein air solvent can accumulates to the point of coming close to the bottom of the inner basket, it’s time to clean the solvent can and dispose of the pigment in the container. Let the can sit for several days until the pigment waste has settled to the bottom and some clear solvent remains on the surface. Slowly decant the clear solvent into another container for temporary storage. (You may want to purchase a second solvent can to use in tandem with the first one.)
Remove the inner basket from the solvent can containing the pigment waste. Pour the pigment sludge onto a flat piece of aluminum foil folded around the edges to create a shallow pan. Make sure you support the foil with a palette or sturdy piece of cardboard. Let the sludge dry outdoors in a safe place that won’t be disturbed. Fold the aluminum foil around the dry sludge, and take it to your local waste processing facility for disposal. Many counties have paint and hazardous waste reclamation programs for properly disposing of these types of materials.
Another option is to let the paint waste dry and then mix it with an alkyd medium to make a paint-like material that you can use to tone canvases or panels for future paintings.
With an adequate, well-ventilated space and a waste disposal method that limits solvents escaping into the studio, a family can live safely with an oil painting artist.
LEARN MORE
FREE download: Learn oil painting basics with Mediapedia: Oils by Greg Albert
Pick up oil painting tips and techniques from the DVD Quick Studies by Craig Nelson
View the video “Characteristics of Acrylics and Oils.”
The post Oil Paints — How Safe Are They? appeared first on Artist's Network.
from Artist’s Network http://ift.tt/2iYAcDE
http://ift.tt/2jrpeWd
0 notes
Last Seen Blogs
tainiothiki
What movie is this?
the-feral-gremlin
back to the dust where I began
whatgaviiformes
what gavii formes
sheridoodle
Quincey P. Morris Fan Club

1800cha0s
samuel