#oop no Cedric just got up bye bud
Photo
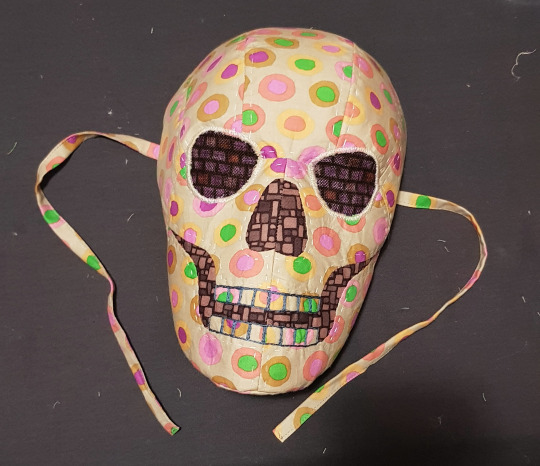
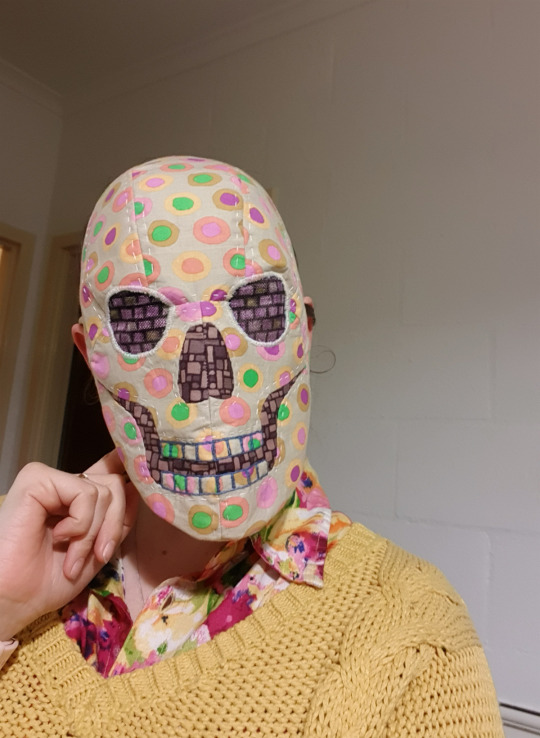
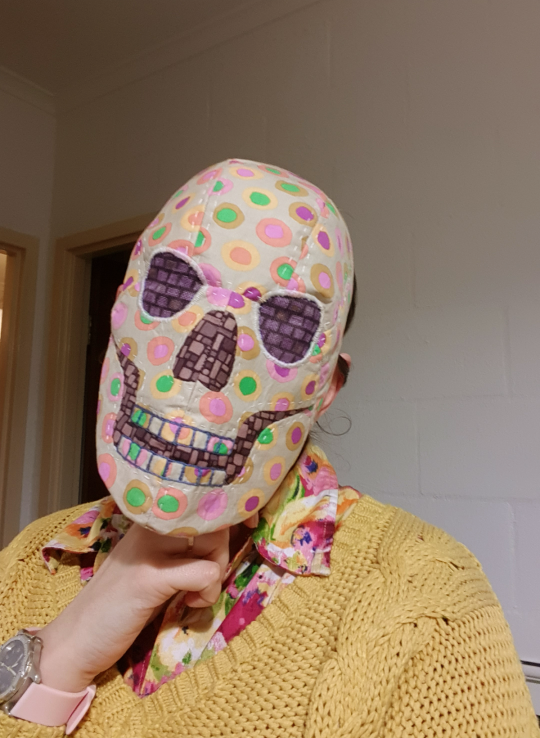
Hand sewn skull mask! Because if death is coming for us all we may as well be jaunty about it!
(feat. me trying to do normal person selfie poses while wearing a mask that looks like a skull got the pox)
This should theoretically work as a practical mask, since it has two layers of fabric plus interfacing, and does go under the chin, but as always, no promises. Be sensible, stay home if you can.
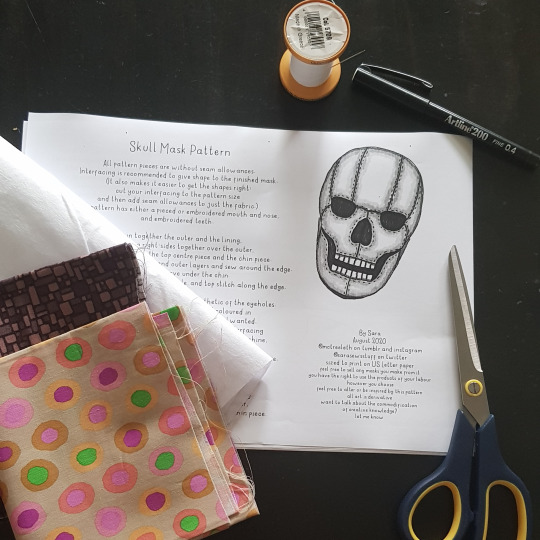
Pattern and instruction under the cut.
The pattern is available here as a six-page PDF for US letter sized paper, but it should also print fine on A4 paper, since it has fairly generous margins. There are limited instructions and layout diagrams included in it, so you really only need to print pages 3-6.
I highly recommend making a paper version of the lining to check on the sizing, as this mask tucks up under the chin more than the Plague Doctor Mask did.
For this version of the mask I used about a fat-eighth of fabric each for the outer and lining, and a bit less than that of heavy-weight non-woven fusible interfacing. The embroidery was done using four strands of regular sewing thread, and the assembly was about half hand-sewn and half machine-sewn.
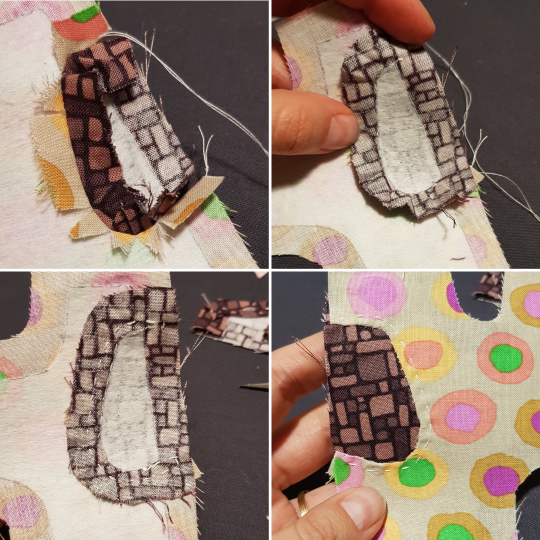
The contrast areas of the nose and the mouth can be either pieced or embroidered. If you choose to piece them, I strongly recommend piecing them by hand. I show a technique similar to English Paper Piecing here, that uses fusible interfacing to help hold the shapes while you hand sew..
First, trace and cut the interfacing pieces, going by the guide in the pattern as to whether you are piecing the face or embroidering. Fuse the interfacing to the outer fabrics with enough space between for seam allowances, and cut each piece with seam allowances.

If you are embroidering the nose and mouth, sew together the face and jaw parts using the techniques below, and fill in the shaded areas of the nose and mouth with whatever stitch you prefer.
If you are piecing the nose and mouth, fold the seam allowance of the curved side of the nose piece to the edge of the interfacing and loosely tack it down. Clip the inner curve of the face piece where the nose goes and loosely tack down the seam allowance of that piece. I use a piece of masking tape on the back to hold the nose piece in place, and then hand stitch the two pieces together using a slip stitch (also known as a ladder stitch) from the front.
(Note: the reason the pieces look completely differently sized in the top left photo is that I was holding the face piece up closer to the camera. It fits neatly together as per the top right photo.)

Carefully remove the masking tape, trying not to pull too many threads, and unpick the tack stitches. Unfold the seam allowance of the nose piece outward over the clipped seam of the face piece, and sew it down using a running or other decorative stitch. Repeat for the other side.
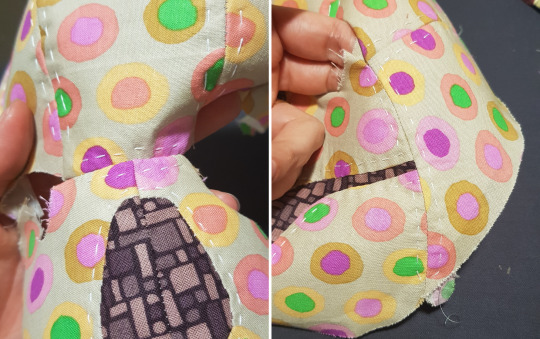
Clip, fold and tack the top edge of the jaw piece. Align the interfacing corner of the lower pointy part of the mouth piece to the place it fits in the jaw piece, and pin to fit. From the front, slip stitch the two pieces together, and stitch the seams down the same as for the nose. Do the same to join the mouth piece to the face piece. Repeat for the other side.

Sew the centre seam to join the two face pieces together, and embroider the teeth. For some reason I forgot to take photos of the embroidery at the top and bottom of the teeth, and the continuation of the running stitches above and below them. But they are all just aesthetic things that that you can see on the finished one.

I also forgot to take a photo of the top pieces being assembled, but they are pretty straightforward – join the five forehead pieces together according to the layout on the pattern, and do the same decorative top-stitching as for all the other bits.
Join the top forehead piece to the face at the top of the nose between the eyes and down each of the cheeks, and do the same decorative stitches.
Join the chin piece to the bottom of the jaw. The outside piecing is done!
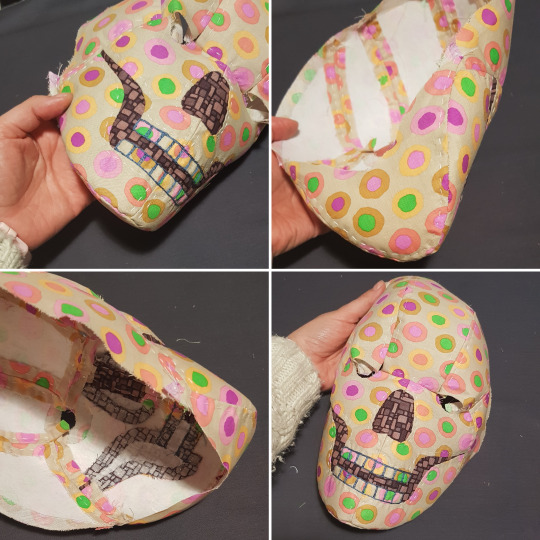
Trace the lining pieces onto the fabric, and sew them together according to the layout on the pattern, so that it matches the shape of the outside. I pressed the seams of the face open, but not the chin, because that would have been too hard.

Pin the straps to the sides of the outer, facing inward, and put the lining over the top of it so that the right sides are together. Stitch around the outside edges, and clip the curve on the underside of the chin. Turn the whole thing right side out through one of the eyeholes, flip the lining into the outer, and top-stitch over the edge.

Trim the eyeholes and baste the two layers together. If you are putting in effort, I would suggest cutting bias binding from your outer fabric and neatly hand sewing it around the eyehole edges. But I just basted it and used the machine to do a zigzag satin stitch around the edges in a thread that was a pretty close colour.
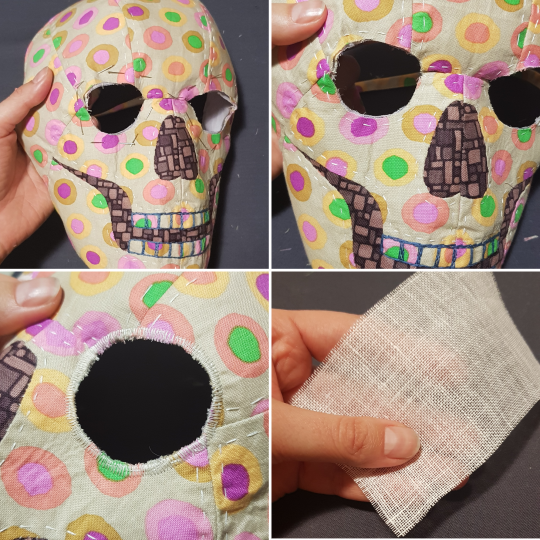
You can leave the eyeholes empty, but it is spookier when your eyes are hidden. I coloured in some very loose weave linen with fabric markers to match the fabric I used for the mouth and nose (roughly, I did pretty a bad job), cut it into circles and sealed the edges with some glue, and hand sewed them in, hiding the hand stitches in the zigzag stitch. The visibility is actually pretty good!

And there you go! Skull mask!

From left to right, Poxxie, Paisley (who is not actually paisley), Patchie, and their friend Fredrickson Paperman.
As before, I am not going to charge anything for this pattern, nor am I going to place restrictions on what you do with the items you make. I do not control your right to profit from your work. All art is derivative, and you making your own version transforms this pattern. Don’t let assertions of intellectual property rights be another way you are alienated from your labour. If you decide to sell your work, demand fair remuneration for your time and skills. Someone offering to pay for the materials is not enough. If you have decided to take an activity you love and turn it into work, make it worthwhile.
On the flip side, please don’t try to sell this bit of writing or the PDF of the pattern or these photographs. They are free for you and for everyone else. Resist society’s message that you should try to profit from your every action, and especially resist the notion that true success is achieved by profiting from anyone else’s labour.
If you want to discuss this stuff further, I would love that! I am researching the commodification of creative knowledge for my PhD, focusing on quilt patterns and designs. Message me @mctreeleth on tumblr and instagram or @sarasewsstuff on twitter for my uni email.
And if you do make one, tag me in it or send me a picture! I love seeing them!
#fabric mask#skull mask#sewn mask#handmade mask#sewing pattern#sewing#quarantine craft#once again I am posting a pattern at a ridiculous hour of the morning#but this time i am in bed with my dogs at least#oop no Cedric just got up bye bud#oh well George is still snuggled up with me#George and Ceddie are the bestest and most cutestest boys#honestly I am just putting that there because I found out that some people reuse all the tags from the source#and I love it when people compliment my dogs#oop Ced's back hi bud!
294 notes
·
View notes
Last Seen Blogs

id3k-tbh
Cba

greatdisrespect
A Cryptid's Hideout

justakinkster2
JustaKinkster

midnight-cowboy5okinawa
題名未設定

anya-anya-anechka-blog
Anya Anechka