#moving 3d archery target platform
Text
🏹 Archery N Motion: Targets in Motion Bullseye Bonanza! 🎯🦌 #PrecisionArchery #WhereEveryShotCounts
🎬 Ready for an adrenaline-pumping archery experience? Dive into the heart of the action with Archery N Motion! 🏹 Watch in awe as we deliver bullseye shots on 3D archery animal targets in mesmerizing motion on our cutting-edge moving target platform. 🌟 "Where every shot counts!" Join us as we showcase the precision and skill that Archery N Motion brings to the world of archery. 🏆 Our moving targets elevate the challenge, creating an immersive and thrilling experience that demands accuracy and finesse. 🚀 Archery N Motion Delivers: Witness archery like never before with our dynamic shots and incredible accuracy. 🤯 It's not just archery; it's an art form in motion! 🌪️ 🎯 Targets in Motion: Immerse yourself in the excitement of hitting bullseyes on 3D animal targets that come to life. 🦌 Feel the rush as you take aim and conquer moving challenges with Archery N Motion. 🛒 Ready to take your archery game to the next level? Order today and experience the thrill for yourself! 🌐 https://archerynmotion.com 🏹 Don't miss out on the action – like, share, and subscribe for more Archery N Motion adventures! 🔥 #ArcherynMotion #BullseyeBonanza #PrecisionArchery #ArcheryChallenge #OrderToday #archerypractice #3darcherytargets #archery #archerylifestyle #movingtargetplatform #3darchery #bowhunting #bowhunt #hunting #movingtargets #dynamicarchery
#archery#bowhunting#3d archery#archery range#hunting#moving target platform#moving targets#moving 3d archery target platform
0 notes
Text
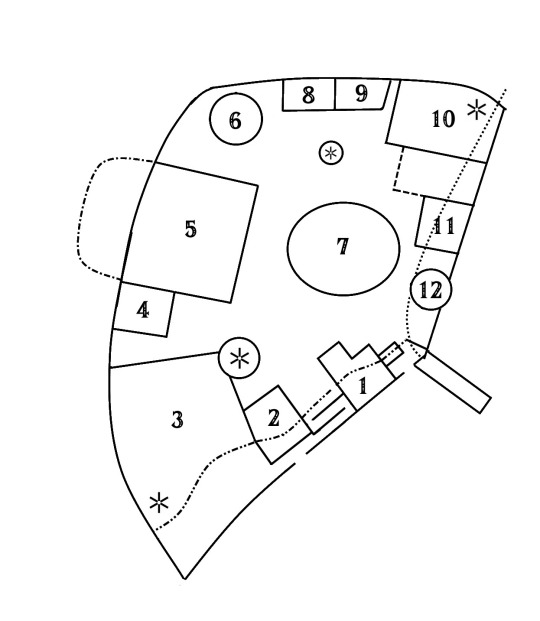
Legend of Zelda Theme Park - Skyward Realm

The Skyward Realm was a later addition to my theme park concept (just as fully explorable airborne environments didn't become a thing until relatively recently in the franchise). It obviously draws inspiration from Skyward Sword and the sky islands of Tears of the Kingdom, but you can also meet the Rito here, and elements from a few of the LoZ series' sky-themed dungeons are used for flavor.
Strikingly, the area is built to a much higher elevation than the rest of the park--it sits atop a structure as much as 100 feet tall (which doubles as a show building for a few rides). The edges of the structure are covered in artificial clouds to emphasize the "skyborne" nature of the area, and the buildings are decorated with colorful pinwheels and flags to catch the breeze. (Some of the larger ones are marked on the map with asterisks.) Only a small strip of the area's footprint is at ground level, to contain the entrances and/or exits of the escalators, elevators, and rides that make the Skyward Realm accessible.
Attractions
Ancient Cannon: In order to get from the Surface to the Sky, you could take an elevator or escalator...or you could try out this brief but intense ride, inspired by Twilight Princess. A powerful magnetic launch sends guests shooting up a steep slope to the upper level, where they disembark; the car then reverses gently down the track for the next bunch.
Sailcloth Plunge: By the same token, those looking to return to ground level might take this ride, a simple parachute drop.
Flight Range: Maybe the most technologically sophisticated ride in the park, this one combines arm-mounted vehicles with 3D screen effects and “virtual” bows and arrows so guests can test their archery skills at Revali’s own target-shooting range!
Landing Platform: A meet-and-greet for Rito characters (Revali, Kass, Medli), who actually “soar” in from a nearby tower (via zipline) when they’re ready for the guests!
Wing Ceremony: Echoing Universal’s Dueling Dragons, this relatively gentle suspended coaster features two interweaving tracks and red and blue cars with a Loftwing motif. Part of the track (marked by a dash-dot line) actually extends out over the edge!
Astral Observatory: Officially the highest point in Hyrule, this mysterious tower contains many beautiful star charts, astronomical instruments, and other details to peruse while waiting your turn to peer through one of the telescopes for an unparalleled (and AR-enhanced) view of the kingdom.
Eagus’s Sword Academy: Kids 12 and under receive foam swords and instruction in a variety of sword moves from none other than Eagus, the swordmaster of the Skyloft Knights Academy! Up to four “lessons” (shows) a day.
Shops
8. Oocca Pod Shop: Named for the odd little shop in the City in the Sky in Twilight Princess, this shop offers a variety of kites, gliders, and other airborne toys (but please don’t throw them off the edge of the Realm).
9. Brazen Beak Plumage Boutique: Named after the Rito Village clothing store in Breath of the Wild and providing much the same function here—souvenir clothing and feathered accessories such as headbands, hair clips, cockades, and costume wings.
Eateries
10. The Lumpy Pumpkin: Based on the inn of the same name from Skyward Sword, this buffet restaurant serves home-style food with pumpkin specialties.
11. Light Lunches: Heavy meals won't do for flying creatures, so this counter service restaurant offers a variety of prepackaged salads, fruit bowls, flaky pastries, and fluffy mousse desserts, for adventurers who don't want to be weighed down.
12. Luv & Bertie's Enhanced Elixirs: Another beverage location in the vein of the Potion Hut, this one referencing the potion-making couple from Skyward Sword.
Miscellaneous
The Skyward Realm has no Spirit Train station of its own, but is served by the one for Zora's Domain (marked but not labeled on this map). The train route does pass through a tunnel under the Realm, as shown by the dotted line.
6 notes
·
View notes
Text
You Must Try These Amazing Archery Games on Your Android Device
Shooting arrows from the bow is one of the oldest activities of mankind. If you have ever shot a sharp arrow from a fully stretched string, then you would know how relaxing it is. Keeping this fact in mind, there have been many archery games created which are challenging, addictive, and relaxing. If you own an Android device then there are plenty of options of archery games to choose from. They are available in various sizes with different graphics quality. In this article, we are going to look at the top archery games available for Android which will keep you thrilled. Let’s scroll through the list.
Archery Big Match
Archery Big Match is a simple but popular archery game that has got amazing graphics. All you have to do is to aim at the target and the more you will hit the bull’s eye, the more points you will score. They have added moving targets on higher levels to make it more challenging and the wind affecting the flight of your arrows makes it even more difficult. You can play this game offline in multiple modes. This game has support for 16 languages and can be downloaded for free from Google Play Store.
Archery Elite
Archery Elite is a good arcade archery game that comes with tons of challenges. There are several game modes and this game can be played in offline mode also. You can also challenge other players in the game if you are playing it in the online mode. It gives you a good platform to battle your skills of concentration and patience. This game will also allow you to hunt animated animals in the forest if you don’t want to shoot your arrows on targets. This game is available for free on Google Play Store.
Archery King
Archery King is one of the most popular archery games available for Android. You are going to love this game if you want a challenging archery game which is not easy to master. You will get to shoot targets, obstacles, and balloons if you are playing it in offline mode. This game also allows battle between two players in the online mode. You can also buy different bows and arrows with the coins you earn in the game. This game can be downloaded from Google Play Store for free.
Archery Master 3D
Archery Master 3D is a decent archery game that is popular for its graphics. You can play this game in four different locations. There are multiple bows and arrows available in the game to choose from. There are more than 100 levels in the game and if you think that you have mastered all of them, then you are free to challenge different players in the game in online mode. This game is available to be downloaded from Google Play Store for free and has got satisfying gameplay.
Archery Physics Shooting Challenge
Archery Physics Shooting Challenge is one of the best archery games available for Android. This game consists of 70 levels and all of those lives are not easy to pass. It is going to test your skills, concentration, and patience to cross these levels. As the name suggests, this game got some physics involved and some certain mechanics that control the game. This game has got all other basic features of a good archery game like offline play mode and challenging different players in online mode. Archery Physics Shooting Challenge has some advanced features than the other archery games and if you want to play this game then you can buy it for $0.99.
There are many archery games available on Google Play Store. We have listed the top archery games in this article which you can download on your Android device and enjoy archery on your phone.
SOURCE: You Must Try These Amazing Archery Games on Your Android Device
0 notes
Link
Written by R. Ann Parris on The Prepper Journal.
A lot of times, we get what we pay for. Sometimes, though, the best things in life are free … or very, very inexpensive. In the case of target practice, inexpensive and free targets offer not only a cost reduction, but actually provide better training.
For most of these, we’ll need repetitions of a couple of supplies, starting with a backer and attachments, so…
First Stop: Liquor Store
They have boxes free for the asking. Other sources can be the cigarette cartons many gas stations get, or used boxes from moving companies. Flattened Amazon boxes and pasteboard boxes we’ve emptied of cereal, pasta, etc. will also regularly work.
Total cost: Zilch
Second Stop: Bargain-basement Budget Store
We’re after some packing tape and-or some string, twine or yarn. For some purposes, the cheapo Dollar Tree stapler and staples will work instead. Sometimes the duct-like tape works.
It does not need to be good, for-real duct or Gorilla tape, but a lot of gift wrap-type tape isn’t quite enough.
Total cost now: $2+tax to $4+tax
If there’s some available and it doesn’t overtax the budget, binder clips and paperclips are super-duper handy for the range.
Small Trash & Recyclables
Small shoe boxes and shipping boxes, oatmeal and grits tubs, odd-shaped dish detergent and spray-cleaner bottles, and cracker and cereal boxes are handy all on their own. And, free – yay!
Those freebies have increased value for small game hunters and shooters who are aiming small to replicate long-distance shooting.
They’re even more useful if we can hang them as-is in their original shape from a frame/line by string or cord, or prop them up loosely on straightened metal coat hangers or tree branches so the wind can make them more challenging. Loosely attached, they’ll also bounce and swing a bit from hits, further replicating real-life challenges.
For hunters, value increases further since we can get a better idea of how different angles will affect the penetration and path of our shot through our target.
Add to total: Nada
(But don’t forget to bring something to attach them to like stapling or taping them to string, or those sticks from the yard.)
Branches
Sticks with multiple branches spaced out can accomplish a lot of what I’ll talk about with other holders, and do it absolutely free.
All we need to add are yarn/twine/thread or binder clips or clothespins (or clips made by breaking cheapo free clothing hangers), and whatever we’re shooting at, and drape it like people do for cutesy decorations.
(I have no idea why that’s cute in that iteration. But it was inspirational.)
If we fiddle a little, we can hang them from overhead lines using other clips, or with screw in hooks. Otherwise, we can stab them into the ground or fill an empty cereal box, coffee tub, or cut-down milk jug with dirt, mulch, rocks, charcoal, or crushed soda cans to prop them up.
As with other targets on the list, the size of items – from playing cards and partially inflated balloons to paper cups and tin-can tops – is greatly useful to small game hunters and for replicating long-distance shots.
The movement of targets from wind and impacts adds challenges, and having the targets swing back and forth behind each other is also great for shoot-no shoot training.
Add to total: Zippo
Pool Noodles!
I love these things. They have so many uses. A couple lengths of cheapo pool noodle can make a great add for our range kit, whether we’re heading to the backyard or off somewhere.
They’re lightweight, very adaptive in how they can be set up, hold numerous types and sizes of targets, and can be pegged and weighted to reduce movement or left to roll, twist, and blow for added challenge.
On the supply front:
– the pool noodle – $1-$2
– plastic forks – $1-$2
– some playing cards – $1-$2
(Go to the Dollar Tree for a multi-deck pack, use the gone-soft home decks, or ask a nearby casino if there is one – they punch decks and will let you have them as mementos. It doesn’t have to be poker cards; the kiddie multi-packs of Old Maid and Go Fish, flashcards, etc will work, too.)
Add to total: $3-$6+tax
We can also use small paper/plastic cups instead of cards, or even small and large paper plates. Used canning jar lids and emptied cartons and cereal boxes also work.
*Pool noodles work at most public ranges with overhead lines or target frames, although we need to be aware at ranges where there are rules about hitting the floor/ground and the side walls/berms instead of the rear berm.
Combining Those Oddballs
Pool noodles can hang vertically by punching a hole at the top and tying some cord, or we can slide them over anything relatively straight – sticks, straightened wire clothes hangers, garden stakes.
We can use them at full length or cut into shorter sections, which we can set up in ladders tie them at the ends so they mostly only blow back and forth a bit. Or, arrange tie them at the center so they spin at different rates and add some yaw to the bobbling and bouncing in wind and from hits.
The good ol’ backyard stick can also be used, stuck into the ground with short lengths of pool noodle springing out for a spread of targets.
We’re going to strategically slit some holes in our pool noodle for the forks and clothespins.
Playing cards can be set up pretty tight, so a 1/4” slit every 3-4” works. I tend to poke slits all the way through so I can balance a pair of targets going down or alternate which holes I’m using without any hassles.
Slice pairs to wiggle in clothespins.
I find it easiest to pull the clothespins in and out to affix whatever we’re shooting at. Just skip slots going down the pool noodle when using larger cups, paper plates, or pantry refuse instead of cards.
Do be aware that the pool noodle is going to be inclined to roll “down” with weight, so if we go for a horizontal ladder strung on something, we need to make sure whatever we’re shooting is tight enough to not fall out of the forks.
On top of being super adaptable in both target and how they get set up, there are weight and size advantages and the pure ease in creating targets with pool noodles compared to some types of folding or portable frames, which can be big for some people.
Balloons!
Head to a bargain-basement budget store and grab a bunch of balloons. We’re after a bag of multiple colors and the type we blow up with our lungs (not helium). They don’t have to be particularly sturdy. The ones that come with multiple shapes and sizes are a bonus.
Balloons have some singular advantages.
One, hanging, they offer movement. Especially in bunches of different colors, the movement can help us refine tight shoot-no shoot reactions or hone aim for times we need to make a window.
Draw 1-2 spare or pre-shot balloons from a bunch on the bench with you that match your hanging balloons. Those are either the good guys – don’t shoot – or the bad guys. We can also number balloons and roll dice to generate from-the-bench good-bad targets, or draw good guy and bad guy faces.
Balloons are also a fast and fairly easy way to generate “shoot-n-see” instant reactive targets. Since we can get anywhere from 12-50 for $1, it’s a little prep work, but pretty low cost compared to the real deal.
We can blow them up, pre-tie strings to the tails so they hang singly or as overlapping bunches, clip them directly with clothespins, or tape them or staple the tails to our backers. We can do some of the work sitting watching TV the night before or up to 1-2 days before our range date. (Any longer, and they’ll deflate.)
Add to total: $1-$2 (+tax)
Free & Cheapo Targets
I love free, cheap and easy stuff – especially when it works just as well as or better than something static and boring. It’s a little bit of work sometimes, but it’s usually a little bit of work.
When we’re ready to up our game on the square range with some selective-target and speed drills, prepping for hunting, or out to convert somebody with how fun shooting can be – or “just” entertaining our family – balloons, trash from our pantries and yards, and pool noodles have a lot to offer.
There are plenty of others, to include ways to jazz up the common paper plates we target for increased skill development, or replacing those plates with trash from our pantries.
Most of these methods, particularly, are also multi-platform friendly. From low-power BB trainers to pellet guns, rimfire and centerfire pistol or rifle, or archery platforms and even darts, they offer nice feedback as well as skills development.
For some of us, the instant feedback alone is big – and lower cost than high-vis reactive targets.
The understanding of angles from 3D targets and the shoot-don’t shoot drills that can be designed would make them valuable over static paper all on their own, even if they were a more expensive option.
Being less expensive, and in some cases free or nearly free, using things we can largely source around our yards and homes for better training than static cardboard and paper, with easy and minimal assembly or planning and time to set them up… really and truly, when it comes to both shooting and prepping, it just does not get much better than cheapo targets.
Follow The Prepper Journal on Facebook!
The post Better Training with Cheapo Targets appeared first on The Prepper Journal.
from The Prepper Journal
Don't forget to visit the store and pick up some gear at The COR Outfitters. How prepared are you for emergencies?
#SurvivalFirestarter #SurvivalBugOutBackpack #PrepperSurvivalPack #SHTFGear #SHTFBag
0 notes
Text
Archer’s Edge: Finding Your Range
Archer’s Edge: Finding Your Range
Its first week of hunting season and you have a buck standing broadside at 60 yards. Is this the right time to question if you can make the shot? By the time hunting season approaches you, the archer, should be comfortable and accurate at shooting 10-15 yards past your maximum range. If able, taking the time to be in the tree stand or ground blind and getting distances with a range finder will help prepare for those tough shots come season. Learn more on how to estimate your range and extend your maximum shot.
Working from being effective at 20 yards is just as crucial at becoming effective at 60. You want to ensure you are utilizing your sight accurately in order to be able to take a 20 yard and 40 yard shot with the same efficiency. A great way to do this is with some practice time at the range. A kill shot on a deer is roughly 8”. Mark this on the target, or use a 3D target with vital inset, for the next few steps. Set your pin on 20 yards and shoot at the kill zone on the target. You should be able to hit it dead center but anything inside the circle will drop your animal. Now move a yard closer and shoot again. Repeat until your shot grouping starts to drift upward. This is the minimum yardage you are able to use the 20 yard pin for. Start back at 20 yards and take a yard step back and repeat until your grouping moves down. This is the maximum effective yardage for the 20 yard pin. Repeat for your other pins. This will vary based on your sight: how many pins and what yardage they are set at. These steps will allow you to better understand how to work your sight in the field.
Stretching your limits on maximum yardage will take time and practice. Using a 4” vital target shot for this next exercise will help increase the effectiveness of the practice. Start at 10 yards and shoot 3 arrow groupings. When you get all 3 within the vital target mark then move back 10 yards. Repeat. Once all 3 arrows are in the 4” target circle, move back another 10 yards. Repeat. Continue this process until you are shooting consistently at 10-15 yards over your ideal range. Your max distance will be where your grouping starts to open up. Even with the improvements and advancements in bows there is still a maximum range recommended based on arrow speed and kinetic energy at impact. Keep this in mind to ensure you are effective in your kill shots. Expanding your range will boost your confidence and your success rate in the field can go up.
If you hunt from a tree stand it is best to practice at a downhill range. This can help you retain deadly accuracy from your tree stand come season. If able to practice from your tree stand it can be one of the most valuable archery practices available. Practicing in your gear is great too. It will ensure you know the sounds your jacket will make when you move and how your foot placement on the platform in your hunting boots will affect your posture versus practice with tennis shoes on the hard ground. One important aspect that is different at a down angle is the body movement. In a tree stand it is important to bend at the waist instead of adjusting your upper body form. Draw your bow as though you are making a flat range shot and then rotate your upper body down by bending at the waist. Having consistent anchor points when shooting will also help ensure your body, arms and head are in perfect alignment.
Remember that with tree stands the higher you go the harder the shot. In good wind and adequate coverage a 12 to 20 foot tree stand placement is suitable. Your yardage will shift a little with the increase in altitude but by bending at the waist you will effectively retain the horizontal shooting trajectory as if shooting from the ground. The gravity effect on the arrow will only be over the horizontal distance and the drop will be consistent with what you experience in your flat ground practice. Weird but true fact: if you drop an arrow and fire a perfectly horizontal arrow at the same time they will hit the ground at the exact same time too. This can help you realize that despite being up in a tree and having a harder shot based on deer position, coverage concerns or heavy wind – you don’t need to worry as much about adjusting your shot as long as you are bending at the waist and consistent on your groupings. Practicing on a 3D target from your tree stand is beneficial in order to understand the change in kill zone location on the deer. Instead of looking at it straight on you will find the angles that work best from the height of your stand and the yardage at which the deer is standing. If you are able to practice at a downhill range or from your stand you may want to zero in the pins on your sight from these places. It can increase your accuracy but remember to adjust as needed if you transition to the ground.
Tree stands aren’t the only places we bow hunt from and we aren’t always standing. If you hunt out of a ground blind try shooting from a chair at the range. If you are a mountain elk hunter or enjoy spotting and stalking antelope on the plains you might want to shoot from a kneeling position. Varying your positions to the type of hunt will keep you in the best shape and consistent with your groupings. Bottom line of any archery skills are the 3 P’s: practice, practice, practice.
https://ift.tt/2slv8z2
0 notes
Text
Best Compound Bow 2016 – 2017
Archery, once a male dominated sport is now becoming a sport of choice among women and children, young and old alike. People discovered that this competitive sport can also be enjoyed as a form of exercise and entertainment. With the growing diversity of its players, new designs of arrows were developed to cater to the growing needs and preferences of this new breed of archers. Among all the designs, the Compound bow is the most popular.
You can identify the bow because of its multiple strings and its cam system. The Cam is a system of pulleys found on each end of the limbs. This type of bow is popular for its widespread use in bow hunting, field and 3D archery. The ease of its use and application appeals to all types of archers. That is why there is a growing interest in the hunt for the best compound bows in the market.
BEST COMPOUND BOW REVIEWS
We are fortunate to live in an era wherein, there is a variety in the choices of compound bows that matches the diversity of its players. Choosing your own compound bow, either for the first time or to replace another, is a very personal thing for an archer. There are certain features that you look for that will match your shooting skills or will enhance it to become better. It could be as simple as choosing the right weight of the bow, its draw strength and draw length that you are most comfortable with.
Aside from its aesthetic appearance, you are also concerned about its performance and arrow speed. It may seem complicated, but once you are involved in this sport, those little details matter. To make your search easy, we have gathered a list of the Top Rated Compound Bows in Amazon, based on its ratings and consumer reviews.
TOP RATED COMPOUND BOW COMPARISON TABLE
DIFFERENT KINDS OF COMPOUND BOWS
In 1960, the first compound bow was invented by Holless Wilbur Allen, Jr. It took several years and several designs before he perfected the first compound bow. It was finally granted a patent in December 1969 and to this day, only PSE (Precision Shooting Equipment) has retained the right in manufacturing bows in the exact design of Allen’s concept.
The parent company of Browning Archery (formerly Archery Research) is PSE. Fortunately, there are several types of compound bows that evolved from the original design. The evolution of these various types of bows were the result of the increase in the different preferences and needs of the players.
With so many choices out in the market, it may be difficult to choose the best compound bows especially if you are just a beginner to the sport or you are already an expert and want some special effects to improve your skills. By reading a lot of compound bow reviews, you will be well educated on the features to look for and decide which one suits your needs.
SINGLE CAM
The simplest of all the compound bows, this design involves an idler wheel on the top end of the bow and an elliptical power-cam at the other. It uses only one bus cable and one string. The single cam bow has a smooth draw and quiet release making it one of the easiest bows to use and learn.
This equipment is highly recommended for first time archers and beginners of the sport. It is the least expensive bow and due to its basic design it requires the least maintenance.
The downside is, it does not exert too much force in releasing an arrow much less make a kill an animal during a hunt. It is best to use for target practise or in learning the basics of archery that is why it is often recommended for kids. The design of this bow is too basic making it harder to tune.
HYBRID CAM
The design of this bow is a combination of two different kinds of cams. One end of the limb is a control cam and on the bottom end of the other limb is a power cam. There are 3 types of cables connecting these two cams. These are the bow string, control cables and the bus cables. It is called the hybrid because it is a collaboration of features from a solo and twin cam bow. This model requires both cams to stop or rotate simultaneously.
The downside of this model is that more often than not, the two cams do not work at the same time or exert the same force. This causes reduced nock travel and a few timing issues. These can be resolved with a trip to the pro shop. Otherwise, this model perform exceptionally because the bow is known to be very quick and smooth with its release.
TWIN CAMS
This type of bow used 2 cams or pulley systems that are exactly synchronized with each other. These pulley could be round or elliptical and located on each end of the limbs. It also makes use of 2 bus cables and a bow string. One way to identify this model is to look for the signature yokes that hold the cams on each end of the limbs.
This bow has a solid back, very accurate aim, makes use of limb stops, level nock travel and arrows are shot in high speed. A downside of this model is that due to its complexity, it requires more tuning and maintenance checks. Otherwise, it’s an excellent hunting bow, it’s very quick with rarely an issue with its timing. Because of its strength, you have to develop a firm grip on this bow when using it. That’s the reason why it’s preferred by more seasoned archers.
BINARY CAMS
Very similar to the twin cams, the binary cams also has the feature of two cams that are synchronized with each other. The perfectly balanced cams are situated on both ends of the limb but are “slaved” or attached to each other. This means they move exactly in the same manner. The cams rotate in the same direction, with the same rate and force exerted. When the string is drawn and the arrow release is activated, the arrow is shot with ultimate precision, with a very high velocity and accuracy of aim.
This model boasts of a level nock travel, which ensures the arrow stays in place and comes out of your bow in a straight trajectory. Another distinct feature of this bow is it makes use of a bow string and 2 control cables. This bow if perfect to use by professional archers when they are out hunting for big game.
HOW TO CHOOSE A COMPOUND BOW
To summarize briefly, in choosing your first compound bow it must match up your eye dominance. It must also have draw length settings or cams that have adjustable draw length settings so you can modify it according to your form and as you grow with your skill. The bow must also has a light draw weight, so it will not be hard for you to control your shoot and draw your arrow.
For first time archers, it will be more practical and economical if you make the first purchase with the most affordable price. The bow is a worthy purchase if you can make the necessary adjustments or additions on it that will enable you to use it at least for the next 6 months while you are still honing your skills. Below is a list of the basic features you must look for when purchasing a compound bow. You may have heard of these terminologies a lot so we will explain in detail what they are about.
EYE DOMINANCE
Eye dominance is the archer’s visual preference. It is either the left or right eye that you want to use when you are aiming your arrow. Eye dominance could be strong or weak and doesn’t affect your hand dominance at all. There are studies that show that 2/3rd of the population are right eye dominant and 1/3 are left. Knowing which eye is dominant is important when choosing a bow. Usually, the hand you use in drawing the string is on the same side of your dominant eye.
To be able to tell which is you dominant eye, here are the easy tests:
Visualize an object that is located 10 to 20 feet away from you
Fully stretch your arms and hold out your hand. Create a circle with a 1 inch diameter
Keep both of your eyes open and use the circle to visually frame the object
While keeping your eye on the object, slowly pull your hands towards your face
Your hands will instinctively go to back to your dominant eye
There are rare cases that the archer does not have an eye preference. In this case, it is preferable to use the dominant hand in drawing the bow.
DRAW LENGTH
This is the distance from the nock point of the bow to the throat of the grip adding 1 ¾ inches. Simply, this the length of the arrow that you will need to use. To measure the draw length, stand against the wall with your back and stretch your arms out. Measure the distance from the middle finger of your left hand all the way to the middle finger of your right hand. It is basically the length of both arms and hand plus your chest. Minus 15 from the total and divide it by 2. That is your draw length.
Do not make your draw length longer than it is because it will affect the accuracy of your aim. Wingspan is your height in inches. Height minus 15 and divided by 2 is also your draw length. Using these metrics, it should be a very good starting point when you are buying your first bow.
AXLE TO AXLE LENGTH
This is the measurement of the length between the cams attached to the limbs of the bow. Cams are the wheel like devices that provides power to the bow. This measurement is important in selecting a bow that is fit for the type of hunting that you intend to do. You will not want a very long bow when you are hunting from the ground and you are “blind” due to space constraints. If you prefer to hunt stationed on a tree stand with open platforms then a longer bow is more appropriate.
With a longer bow, the axle-to-axle measurement is more forgiving when you are trying longer arrow shots. When shopping for a bow, ask for the assistance of a professional in determining the right measurements that fits your hunting needs. One tip would be to measure from the center of your top axle to the center of your bottom axle. The measure if taken with maxed out limb bolts to determine the exact distance.
DRAW WEIGHT
It is the amount of effort or work you need to exert in order to fully draw the bow. The measurement is expressed in pounds. In selecting a bow, pull the string back slowly and smoothly in order to measure your draw weight. A draw weight of 50 pounds indicates that the bow is sufficient enough to hunt for a white tail rabbit.
The rule of thumb is, the higher the draw weight means the faster the bow can release the arrow. With this you will need heavier arrow points and arrows. Compound bows are adjustable once it is over the 10 to 15# range. The weights are listed with the limbs bottomed out or on its maximum peak weight. The bow increases the peak weight then drops it to the holding weight.
The holding weight is usually 20 to 30% of peak weight. This means if an archer is using a 60# bow, it will hit 60# during the draw cycle, and drop down to 15# holding weight during anchor.
When selecting a bow, you can use the chart below as reference for your draw weight:
Small child 50-70 lbs. 10-15 lbs.
Child 70-100 lbs. 15-25 lbs.
Most women, boys from 100 - 130 lbs. 30-40 lbs.
Women above average strength; youth boys 130 - 150 lbs. 40-50 lbs.
Most men 150-180 lbs. Target 40-55 lbs.
Most men 150-180 lbs. Bow hunting or 3D 50-65 lbs.
Muscular young men and larger men 180 lbs. and up 60-70 lbs.
HOW DOES A COMPOUND BOW WORK?
No doubt, compound bows are the most popular type of bows in the US. It is any type of bow that makes use of cams, a pulley system or cables on a bow. The main goal of all these components is to reduce the amount of weight the archer needs to hold when fully drawing the bowstring.
This gives him the ease to use the bow, making him concentrate more on aiming for the target. In traditional archery, part of the challenge is to have a controlled and steady aim while holding on to the maximum draw weight. Pulleys enable compound bows to eliminate the difficulty in drawing the bowstring back on a bow with a high draw weight.
Cams are pulley systems that are found at the tips of a bow’s limbs and are asymmetrical in shape. These are designed to provide comfort and generate speed. The cams were designed to achieve a lesser drawing weight when drawing the string to make it easier to hold on to for a longer period. With these two parts, aiming is less difficult and it enhances the speed and accuracy of the arrow upon its release.
Increased speed is important not just because it makes the arrow travel farther, but also simplifies aiming and a flatter trajectory. Faster arrows also increase your chances of successfully killing an animal during a hunt. Ease in aiming and faster speed of arrows are the two stellar benefits of using a compound bow.
CONCLUSION
Seasoned bow hunters will agree that compound pound bows are the best equipment to use in outdoor hunting and indoor target practise. The design of this bow provides the convenience and ease of aiming the arrow with the least difficulty and a faster speed upon its release.
Hunting may be a tedious sport so bow hunters will need the comfort compound bows provide. Its ability to shoot precisely at targets from a far distance can be truly gratifying to a seasoned bow hunter. Once you indulge in this outdoor sport, you will discover all the challenges that need to be met with excellent archery equipment.
Possessing a superb piece of simple engineering that makes a huge impact on your shooting performance is definitely like having a feather in your cap. This is what a compound bow is exactly all about. That is why this bow is a priced possession of professional archers.
[/et_pb_text][/et_pb_column][/et_pb_row][/et_pb_section]
The following post Best Compound Bow 2016 – 2017 is available on: My
Compound Bow
0 notes
Text
Revolutionize Your Archery: 3D Targets in Motion | Where Every Shot Counts! #archery #3darchery
Experience the future of archery with Archery N Motion's innovative moving target platform. Our 3D targets come to life, challenging your precision and adding an exciting dynamic to your practice sessions. Elevate your skills, embrace the thrill, and make every shot count with Archery N Motion's cutting-edge technology. Order yours today and redefine your archery experience – where every shot counts! #archery #archerynmotion #archerypractice #3darcherytargets #movingtargetplatform #3darchery #archeryrange #indoorarchery #improvedaccuracy #outdoorarchery #bowhunting #bowhunt #bowhunter #dynamicarchery #dynamicshooting #movingtargetrevolution #revolution #hunting #improvedpractice #whereeveryshotcounts #archeryexperience #trending #changeiscoming #targetpractice #targetshooting #archerytarget
#archery#bowhunting#3d archery#archery range#hunting#moving target platform#moving targets#moving 3d archery target platform#archery competitions#archery practice#archery targets#indoor archery#outdoor archery#improved accuracy#revolution#archery experience#trending#trendingnow
0 notes
Text
archery #3darchery #movingtargetplatform #movingtargetrevolution #moving3darcheryrangetargets #archerynmotion #indoorarchery #outdoorarchery #trending #archeryranges #3darcheryevents #3dscenarioshooting #customerfeedback #customertestimonials #customerstatements #veteranownedsmallbusiness #bowhunting #hunting #archerypractice #fyp #trendingarchery #3darcherycompetitions #3darcherytournaments #newblogpost
#blogpost
#archery#bowhunting#3d archery#archery range#hunting#moving target platform#moving targets#moving 3d archery target platform#veteran owned small business
0 notes
Text
🏹 Unleash the Thrill: Archery N Motion's Moving Targets Revolutionize Your Shot! 🎯 #MovingTargetsRevolution #ArcheryNMotion
Experience a new era in archery! 🌟 Watch as multiple 3D archery targets come to life on Archery N Motion's Moving Target Platform, transforming your shooting routine from mundane to extraordinary. Say goodbye to stationary boredom and hello to enhanced shooting and improved accuracy!
🔥 Elevate your archery game – Order today and join the revolution! 🌐 http://archerynmotion.com
#ArcheryNMotion #MovingTargetsMagic #movingtargetrevolution #archery #3darchery #indoorarchery #outdoorarchery #3darcherycompetition #3darcherytournament #bowhunting #improvedaccuracy #movingtargetplatform #EnhancedShooting #BullseyeRevolution #ArcheryInnovation #OrderNow #WhereEveryShotCounts 🏹✨
#archery#bowhunting#3d archery#archery range#moving target platform#moving targets#moving 3d archery target platform#veteran owned small business
0 notes
Text
🏹 Precision in Motion: Archery N Motion's Moving Target Platform Strikes Gold! 🎯 #MovingTargetsMagic #ArcheryExcellence
Witness the artistry of archery come to life with Archery N Motion's Moving Target Platform! 🌟 From day-to-day practice to intense competitions, our platform redefines precision with arrows impacting 3D targets in mesmerizing motion. 🏹✨
🔥 Elevate your archery game for the 2024 season! Order yours today and experience the thrill: http://archerynmotion.com
🎯 Where every shot counts! 🎯
#MovingArchery #PrecisionPractice #ArcheryGoals #MovingTargetsChallenge #ArrowImpact #OrderNow #ArcheryNMotion #2024SeasonGoals #EveryShotCounts #ArcheryExcellence 🏹🌐
#archery#3d archery#bowhunting#archery range#hunting#moving 3d archery target platform#moving target platform#moving targets#veteran owned small business#archery practice#archery competitions#3d archery competitions#moving target system#where every shot counts#archery precision#new challenge#3d archery range
1 note
·
View note
Text
youtube
The Moving Target Revolution brings motion to 3D archery.
Learn more at http://archerynmotion.com
#archery#3d archery#bowhunting#archery range#hunting#moving 3d archery target platform#moving target platform#moving targets#veteran owned small business#youtube#Where every shot counts#Archery N Motion#Improved Accuracy#3D archery competition#3d archery tournament#archery practice#archery life#archery targets#archery target#Youtube
0 notes
Text
Unlocking Precision: Archery N Motion's Moving Target Platform
In the dynamic world of archery, precision and adaptability are paramount. Archery N Motion's moving target platform stands as a testament to innovation in the realm of 3D archery, offering a functional and user-friendly solution that elevates the archery experience. Let's dive into the intricacies of this cutting-edge platform, exploring its variety of 3D animal targets, swift target swaps, stability under simultaneous arrow strikes, versatile power options, and effortless portability.
youtube
🎯 Variety and Sizes of 3D Animal Targets
Archery N Motion understands that archers seek diversity in their training regimen. The moving target platform can support a vast array of 3D animal targets. From deer to bears, and turkeys to coyotes, archers can choose from a variety of sizes and species, tailoring their practice to the specific challenges they may encounter in the field. The platform is made to accommodate all major target manufacturers targets and target sizes.
🦌 Realistic Replication
The realism of these existing 3D animal targets on our moving target platform adds an immersive layer to archery practice. Archers no longer shoot at mere outlines; they engage with lifelike targets that move dynamically. This realistic replication not only hones shooting skills but also enhances the archer's ability to assess and respond to various hunting scenarios.
⚙️ Swift Target Swaps and Platform Stability
One of the standout features of Archery N Motion's platform is the speed and ease with which archers can swap targets. The platform's design ensures stability even during rapid target changes, maintaining a solid foundation for accurate shooting.
🔄 Effortless Target Transition
With a simple swap mechanism, archers can seamlessly transition between different 3D animal targets. This feature allows for a versatile training experience, enabling archers to focus on various aspects of their shooting technique and adapt to different hunting scenarios efficiently.
🎯 Stability under Simultaneous Arrow Strikes
A hallmark of Archery N Motion's moving target platform is its exceptional stability, even when faced with multiple simultaneous arrow strikes. The platform remains steadfast, providing a reliable and secure foundation for archers engaging with moving targets. This stability ensures that archers can shoot with confidence, maintaining accuracy and precision.
🔋 Versatile Power Options
To cater to the diverse needs of archery enthusiasts, Archery N Motion's moving target platform is equipped with a 12-volt base that offers versatile power options. Whether archers prefer the flexibility of solar panel energy, the convenience of a standard 120-volt wall outlet, or the portability of a generator, the platform adapts to various power sources seamlessly.
☀️ Solar-Powered Flexibility
Archers can harness the power of the sun by connecting a solar panel to the platform's 12-volt base. This eco-friendly option not only reduces the environmental impact but also allows for outdoor use without the constraints of traditional power sources.
🔌 Plug-and-Play Convenience
For indoor training or locations with ready access to power, the platform effortlessly connects to a standard 120-volt wall outlet or generator. The plug-and-play convenience ensures archers can set up their moving target practice sessions without unnecessary complications.
🌐 Effortless Portability
Archery N Motion's moving target platform boasts minimalistic components and connections, making it remarkably easy to relocate into different areas and scenarios. The platform's compact design and straightforward assembly allow archers to effortlessly transport it to various shooting locations, adapting to different terrains and environments.
🚗 On-the-Go Archery
The simplicity of the moving target platform's design facilitates quick disassembly and reassembly. Archers can set up their practice space swiftly, whether it's in their backyard, a designated archery range, or even a remote outdoor location. This on-the-go capability ensures that archers can tailor their training to diverse settings, enhancing the adaptability of their archery skills.
🏹 Elevate Your Archery Experience with Archery N Motion
Archery N Motion's moving target platform is more than just a tool; it's a gateway to an enhanced archery experience. With its realistic 3D animal targets, swift target swaps, stability under pressure, versatile power options, and effortless portability, this platform redefines what archers can achieve in their training sessions.
So, whether you're a bowhunter preparing for the unpredictability of the wild or a competitive archer seeking to elevate your precision, Archery N Motion's moving target platform is the key to unlocking a new level of archery mastery. Embrace the future of archery – where precision meets innovation, and every shot is a step closer to perfection. 🎯🦌
👍✨ Just like on all other social media platforms, please show your support by giving us a thumbs-up, sharing our content, and subscribing to stay updated with our latest posts! 📲💌🔔
#MovingTargets #ArcheryInnovation #PrecisionArchery #ArcheryNMotion #AdaptiveTraining #MovingTargetPlatform
#archery#3d archery#bowhunting#archery range#moving 3d archery target platform#hunting#moving targets#moving target platform#veteran owned small business#youtube#Youtube
0 notes
Last Seen Blogs

home-milf
MILF at Home

yume-strawberry-blog
Strawberry♥Loki

unikian
Untitled

wanderlustintheair
wanderlustintheair

ol1verdrawsyt
☆Oliver/Callum☆