#motorola 68882
Text
More Speed, More Power, Pretty Pictures
I added some crude functions to the ROM monitor on my Wrap030 project to read the root directory of a FAT16-fomatted disk and load binary files into memory to execute. This opens up a new option for developing programs and running them on the computer, and makes it easier to keep programs on-hand for loading when I demonstrate the computer.
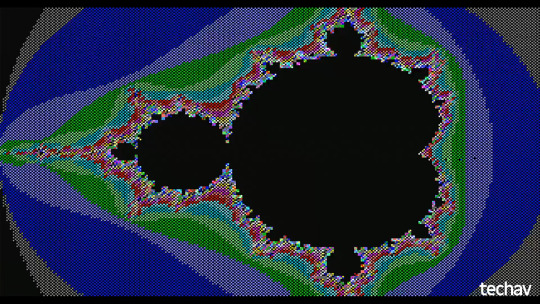
So what new program do I build first for running from disk? The same Mandelbrot renderer I've been using all along, of course! All I needed to do to get it running from disk was adjust a few load instructions to use PC-relative addressing and then change the vasm output to raw binary.
It ran without issue ... mostly. I had been noticing some instability with the system in general. It's not really related to the programming work I've been doing, it just tended to show itself more when doing the kind of FPU-intensive processing required for the Mandelbrot program. Sometimes the system wouldn't boot at all, sometimes it would continually reset. Other times it would run fine for a while, but randomly throw a coprocessor protocol exception (especially when using double- or extended-precision floating point values).
I had a pretty good idea of where this instability was coming from ...
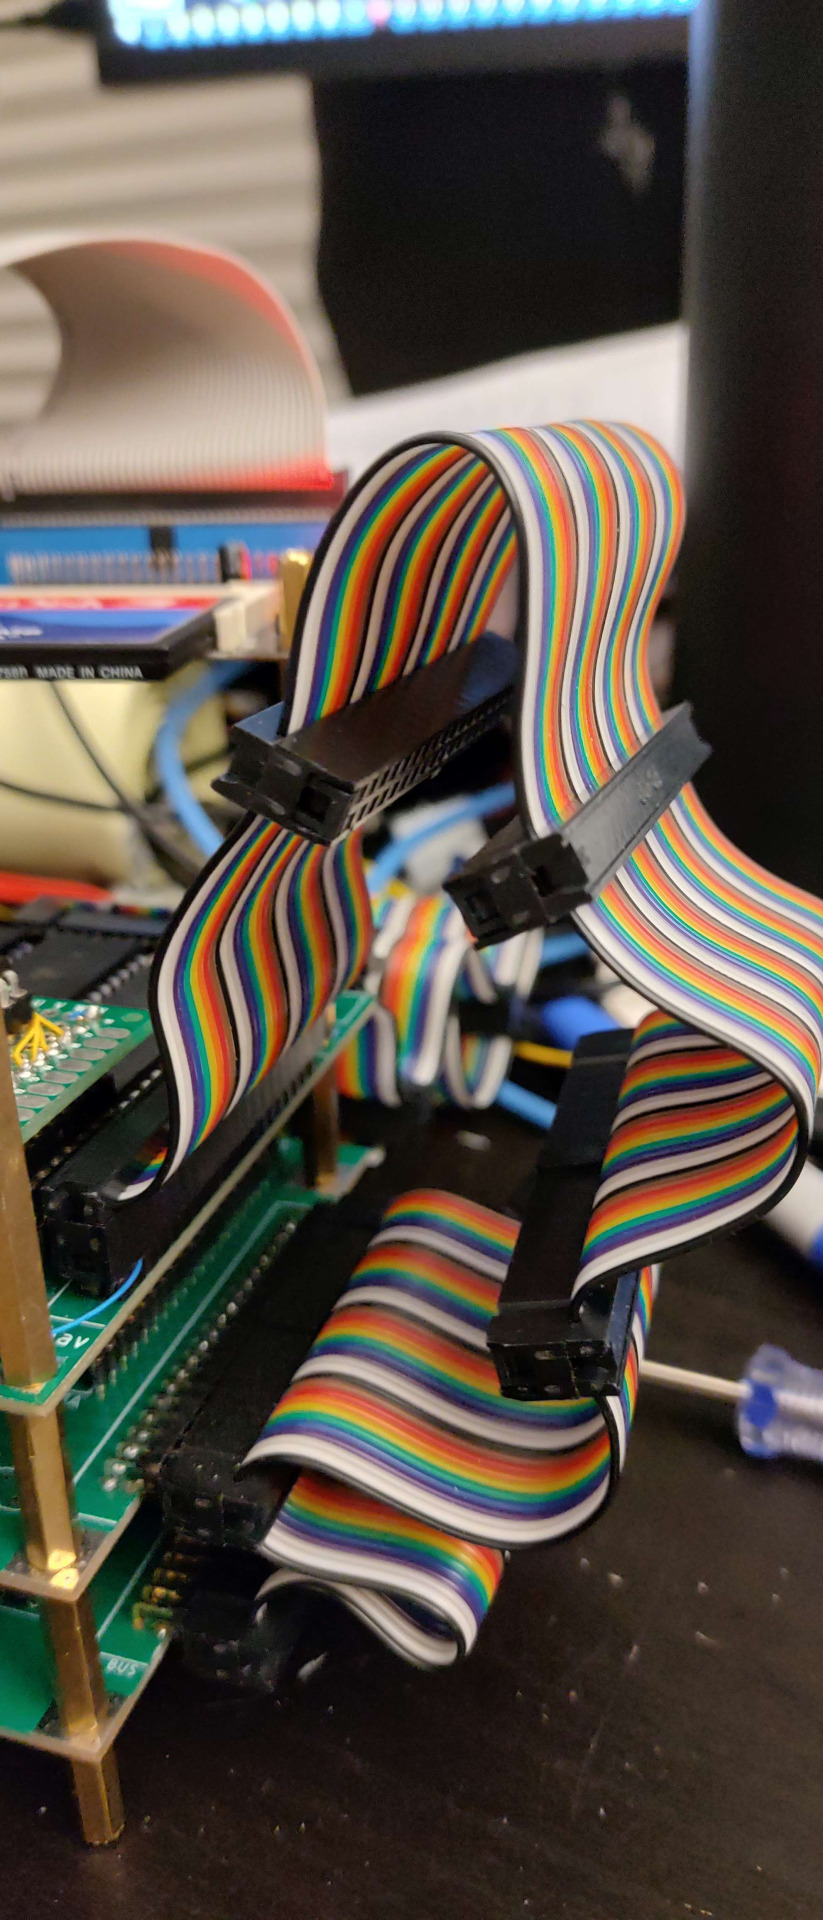
As someone on Discord put it, that's a pretty little antenna I've got there.
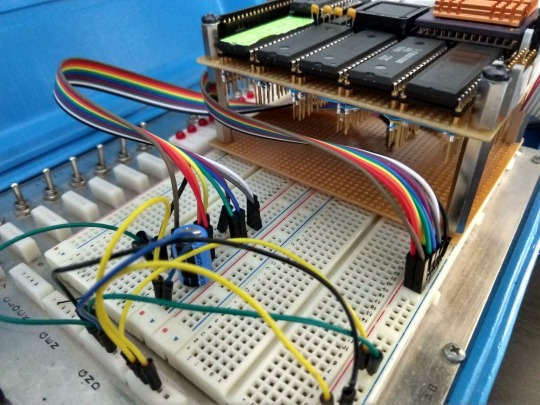
High speed computers don't like excessively-long wiring between components. I made the ribbon cables long because there were other boards I developed for this system. But, I'm only using the CPU board, the FPU + IDE mezzanine board, and the video generator board. All that extra wire is just making things more difficult.
A year ago, when I first put these three boards together, I had to bump the bus speed down to 25MHz to get it to run. I could run the CPU board up to 56MHz by itself, and I could get it to run with one expansion board or the other up to 40MHz, but with all three boards, 25MHz was the best I could do (out of the oscillators I had on hand). I have some 33MHz oscillators now, and while I could get it to run sometimes, it was obviously far more unstable.
It was time to trim those pretty little antennas.
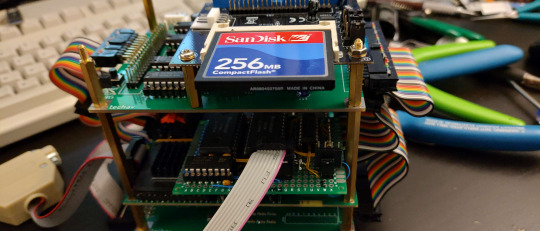
I left room for one more card, in case I can get my DRAM card working later, but trimmed a few inches off. The result? Rock solid at 25MHz now.
... and at 32MHz.
... but 40MHz still doesn't run.
I am quite pleased with that result. My target for this system in the beginning was 25MHz. That extra 30% speed increase is very noticeable, especially when running a program like the Mandelbrot renderer.
But I had a thought.
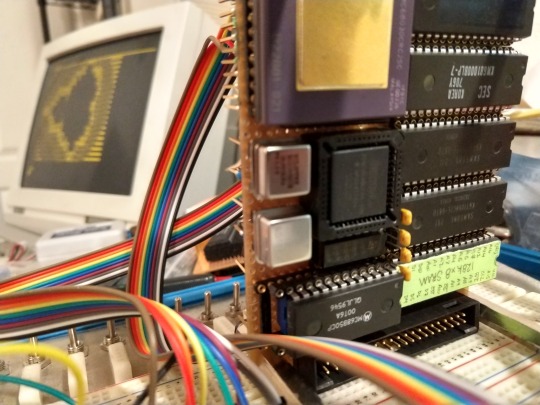
My FPU is rated for 25MHz, and here it's running solid at 32MHz along with the rest of the system. But my FPU board was designed to support the FPU running at a separate clock speed from the rest of the system (the 68881/68882 FPU is actually designed to support this, so I implemented it when I built my mezzanine board).
What would happen if I tried running the FPU even faster? Perhaps using that 40MHz oscillator that I couldn't use for the complete system?
Surprisingly, not a problem running the CPU at 32MHz and the FPU at 40MHz.
... or 50MHz
... or 55MHz
... or 67MHz!
Once again, I've run out of faster oscillators. This computer is running stable with its FPU clocked at over two and a half times its rated speed.
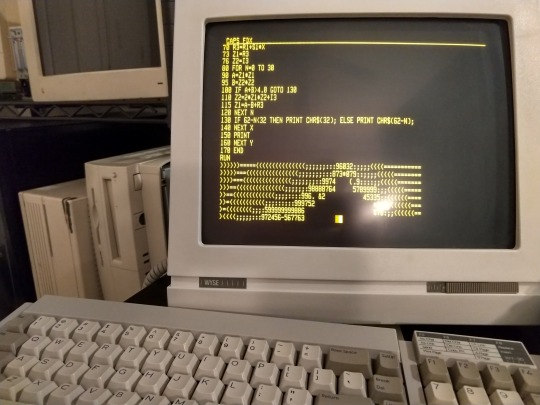
The video above is a real-time capture of the VGA output of this machine running that Mandelbrot renderer (now modified to use 96-bit extended-precision floating-point arithmetic!) with the CPU & main bus clocked at 32MHz and the FPU clocked at 67MHz. Some frames take minutes to render. Some complete in as little as seven seconds.
I am in awe. While I had big dreams when I first started working on this project six years ago, I never could have imagined it running this well at that kind of speed. I am very happy with how this project has turned out so far, and can't quite believe I actually built something like this.
I typically wrap up these posts with a plan of where to take the project next, but the project has already exceeded my expectations. There is so much it is already capable of now that I have a permanent storage option available. I guess I could try getting that DRAM card running to expand the main memory beyond 2MB, or try adding a keyboard and some text routines to complement the video card. Both are good options towards getting a proper operating system running, which has always been a goal of the project.
Either way, I'm sure I'll have fun with it.
#wrap030#mc68030#homebrew computing#retrocomputing#mandelbrot#motorola 68k#motorola 68030#homebrew computer#assembly programming#motorola 68882
18 notes
·
View notes
Photo
Amiga 3000 built on the success of A2000 but was entirely reworked and rethought as a high-end workstation. It used the new Motorola 32-bit 68030 CPU, 68882 math co-processor, and 32-bit system memory. A3000 marked the apex of classy design and outstanding build quality. https://ift.tt/2MNo6Pt
5 notes
·
View notes
Photo

Evening to you all today was a continuous slog at the paperwork still more to do but getting there. We had some new tech fitted today at TerrierByteIT HQ we now have (will have) continuous connection to our heating oil tank so no unhappy surprises like Xmas a few years back when it was all stolen, Right onto Trivia Time so D.Y.K What Happened on September 18th?. . 1926 James Cooley Was Born, James Cooley, co-creator of the fast Fourier transform, was born. Working with John Tukey, Cooley in 1965 worked out a vast improvement to a common mathematical algorithm called the Fourier transform. Although the algorithm had been useful in computing, its complexity required too much time. While working at IBM, Cooley built on Tukey's ideas for a swifter version. . 1989 NeXTSTEP OS Is Released, NeXT Computer releases version 1.0 of NeXTSTEP, an object-oriented, multitasking operating system. Originally designed to run on NeXT’s brand of computers, it was later ported to other architectures such as the Intel x86. Often considered years ahead of its time, NeXTSTEP brought to market many advanced features that were not seen together in any other operating system for nearly 10 years. Its powerful object-oriented development environment was also used for the creation of the word wide web. . 1990 – The NeXTstation is finally released. It used the 68040 Motorola processor running 33MHz and the 68882 math co-processor running at 25 MHz. 2.88 MB floppy, 8 MB RAM, monochrome monitor, all for $4.995.If you wanted 4096 colors, that would cost you – $7,995. . 1997 Apple acquired NeXT Computer to build their next-generation operating system upon the NeXTSTEP architecture, later named Mac OS X. Today’s iOS that runs on iPhone and iPads is descended from Mac OS X and NeXTSTEP. . #TerrierByteIT #Wifeidge #computerhistory #computer #technology #history #computerscience #tech #computerhistorymuseum #computers #retro #vintage #retrotech #trivia #oldtechnology #techhistory #technologyhistory #computinghistory #oldcomputer #oldschool #informationtechnology #thisdayinhistory #internethistory #historyoftechnology #retrocomputer #oldtech #museum #vintagecomputer https://www.instagram.com/p/Bn4jeHgh_I3/?utm_source=ig_tumblr_share&igshid=aj1z0jeaes8y
#terrierbyteit#wifeidge#computerhistory#computer#technology#history#computerscience#tech#computerhistorymuseum#computers#retro#vintage#retrotech#trivia#oldtechnology#techhistory#technologyhistory#computinghistory#oldcomputer#oldschool#informationtechnology#thisdayinhistory#internethistory#historyoftechnology#retrocomputer#oldtech#museum#vintagecomputer
1 note
·
View note
Text
Putting It All Together


I have a CPU board, I have an FPU board, and I have a video board. I know they all work; I know the CPU board works with the FPU board; I know the CPU board works with the video board. Time to bring them all together and see what happens.
It doesn't work.
Well that's disappointing. All the pieces work, and I can use one expansion board or the other, but if I try to use both together, the computer fails to boot.
It will still run if the address and data buses are connected to all three boards, but as soon as I connect the control bus to the third board, everything stops.
I tested the control bus signals one-by-one to see where things broke down. It wasn't RESET#, HALT#, or BERR# (though I really didn't expect them to be a problem). It wasn't the bus size selectors, R/W#, or the Address & Data Strobes. That really only left one thing — the DSACKx#, or Data Strobes Acknowledge, signals.
This is ... Not really surprising. I suspect that it was actually the DSACKx# signals that gave me so much trouble with my original prototype and with the 8kΩ pull-up resistors I used initially. These are wired-OR signals that get pulled low by peripherals or logic to acknowledge and end a bus transaction, and then the pull-up resistors return the signals to Vcc when de-asserted. With a lot of devices on the bus, or long signal traces, the capacitance starts to add up and a high resistor value for the pull-up can cause a slow rise time when the signal is de-asserted. If it gets too long, the CPU will detect the signal as still asserted when it starts the next bus transaction and end it really, resulting in the CPU reading garbage data from the bus.
There are a few ways I could fix this. I could use the equivalent of an AND gate to combine the disparate DSACKx# signals and send the result to the CPU, but this would require a significant amount of rework or even redesign. I could lower the pull-up resistance, but don't have any lower value SIP resistors or a good way to add parallel resistors to lower the value. Or I could try lowering the system clock speed to increase the timing tolerances.
That last option is easy — just replace the oscillator. I swapped out the 40Mhz oscillator for the next highest I had: 25MHz.
And it booted.
It's a little bit slower, but the computer is now running reliably with both the FPU and the Video board connected.
To make the most of the two boards together, I ported the Mandelbrot renderer from BASIC to 68k assembly using FPU instructions. The BASIC program renders a 60x22 image with 31 levels, output over serial as ASCII characters. My best time running the BASIC version was 14 seconds at 56MHz. This new assembly program renders a 160x100 image with 16 levels, output as video ... in just over four seconds at 25MHz.
That is an impressive time, but I'm hoping I can solve the problem with the DSACKx# signals so I can push the clock speed up again. I'd like to see how fast I can get this thing to run.
I also still want to modify EhBASIC to use the FPU. I'm interested to see what kind of a speed difference it would make running the original ASCII renderer.
#motorola 68030#motorola 68k#homebrew computer#vintage computer#BASIC programming#assembly programming#homebrew computing#motorola 68882
33 notes
·
View notes
Text
Extra Thinky Bits

Ever since I built my 68000 computer, I've used a BASIC Mandelbrot rendering program I got from RosettaCode as a test benchmark. On the 6MHz 68000 it took nearly 10 minutes to run. With the 68030 running at 56MHz using a 32-bit data bus with L1 cache enabled, the same BASIC program completed in around 14 seconds.
But we can do better. EhBASIC is written in assembly to use 32-bit single-precision floating point numbers internally, but all of its mathematical routines use the CPU's integer ALU. There are large sections of code that could theoretically be replaced by single instructions for the 68882 floating point math coprocessor (FPU).
Adding the FPU is where I stopped on my original wire-wrapped prototype. I simply never could get it working reliably. I've since learned that I had some logic errors that were probably causing more trouble than my chosen method of prototyping. But this meant it was probably best to start over, and if I'm starting over, a custom PCB with a CPLD to handle logic & timing would be much easier, much more flexible, and much more reliable.
Another tumblr user, Avics1967, had pointed out that logic error to me a while back. It turns out the 68882 FPU is picky about the setup time relationship between the FPU's Chip Select signal and the CPU's Address Strobe signal. Basically, the Chip Select signal can't be transitioning at the same time that the Address Strobe signal is falling, and there's a few nanoseconds on either side of that AS# transition where the CS# signal must be stable. My original design didn't take this into account.
This setup time target ended up being harder to hit than I anticipated. With my little system running at 40MHz, there is just 12.5ns between the CPU asserting the address bus and the CPU asserting its Address Strobe. I need to allow about 3ns for the FPU Chip Select signal to be stable before AS# falls.
I'm using a 10ns CPLD for logic.
My first draft for the logic also did not meet timing requirements, and with my bus speed and parts on hand it never would. Luckily, the 68882 also supports what Motorola called "Late Chip Select", where the CS# signal could be asserted after AS#. So that's what I ended up doing — I implement a delay synchronous to the CPU clock to assert CS# half a clock after AS#.
I ran into an interesting problem while testing though. I assembled a short program to add 2+3 and store the result in memory where I could check if the result of 5 was stored properly. What I got instead was an endless chain of bus errors. If I hit reset quickly enough I could see the very first error was actually an Address Error, and then came the endless chain of Bus Errors.
This made no sense. The FPU can generate some exceptions, like the Coprocessor Protocol Violation I had gotten with my last prototype. And if there was a problem with my logic, a Bus Error might be thrown if the FPU wasn't detected or didn't respond in time. But an Address Error?
Turns out the FPU wasn't the problem at all. There was a typo — a single missing # — in my monitor which caused the CPU to try to load an odd instruction as a pointer instead of the actual pointer to the exception handler routine. So something was indeed causing an exception, but I couldn't see what the exception actually was because it was immediately followed by an Address Error which also spawned a Bus Error.
Thankfully, my exception table is in RAM, so I was able to patch it live before running my test program. And the next time I tried testing the FPU? It worked!
I have no idea what was causing the initial exception, but the FPU has been working for me since.
Now it's time to write some more sophisticated programs to really test the FPU, and maybe modify BASIC to use the FPU instead of its built-in arithmetic functions.
37 notes
·
View notes
Text
Building a Faster SE
The Macintosh SE was the first Mac model to support internal expansion cards, by way of its Processor Direct Slot. As the name implies, the PDS connector exposes most of the 68000 processor signals. This makes it an ideal candidate for a CPU upgrade card. Many such products were available in the early 1990s, offering faster and newer processors, cache, additional memory etc.
The Motorola 68030 is a great option for accelerating an existing 68k system. It has the same instruction set, with a few additions, so all the same code will run. It also supports dynamic bus sizing, so it can easily interface with 8-, 16-, and 32-bit peripherals. And it supported clock speeds up to 50MHz. All around, it's a fairly easy 32-bit processor to start with, and it can be adapted to the 68000 bus with minimal additional logic.
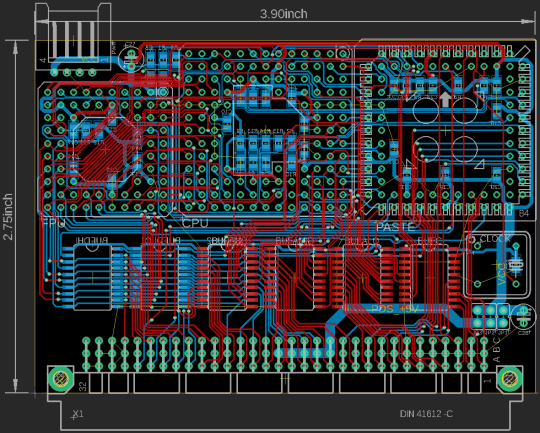
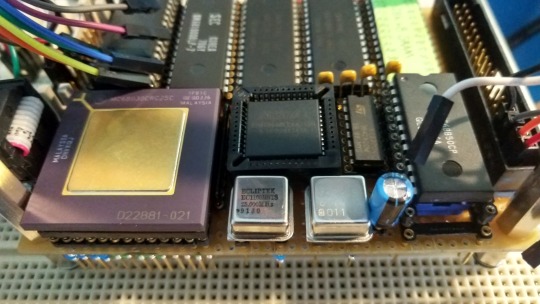
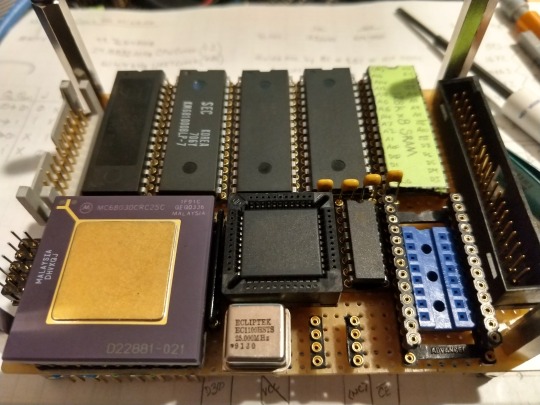
So I tried my hand at making a 68030 accelerator card for the Mac SE. It has a 68030 CPU & 68882 FPU, and uses an Atmel ATF1504 CPLD & some 74'245 buffers as glue logic adapting the 32-bit bus of the 68030 to the 16-bit bus of the 68000 and SE.
I've not added any cache or extra RAM. I thought it best to start small and get the basic bus translation working first. Ideally, this little card would be transparent to the OS, perhaps only needing a small init to enable the 68030 L1 cache or announce presence of the FPU.
If I can get this basic card to work, I might move on to adding L2 cache or 32-bit-wide RAM to help further accelerate the system.
#vintage computing#Macintosh SE#SE PDS#motorola 68k#Motorola#motorola 68000#Motorola 68030#Motorola 68882
21 notes
·
View notes
Text
More Power
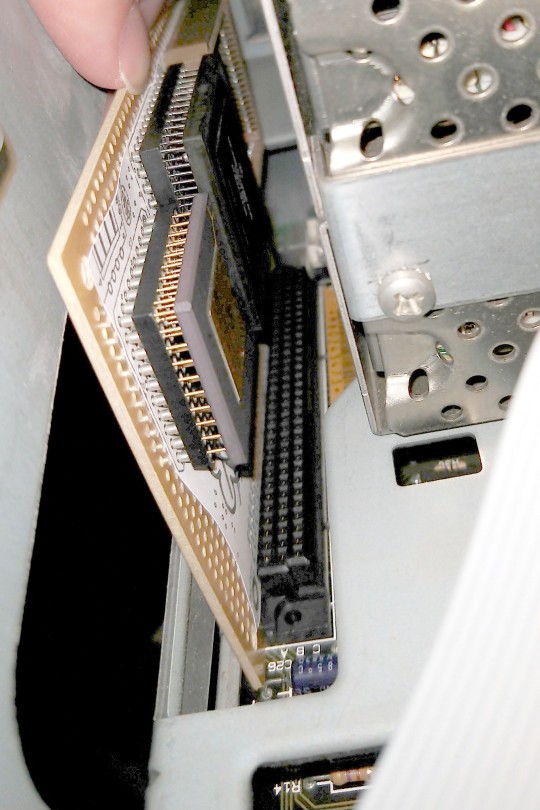
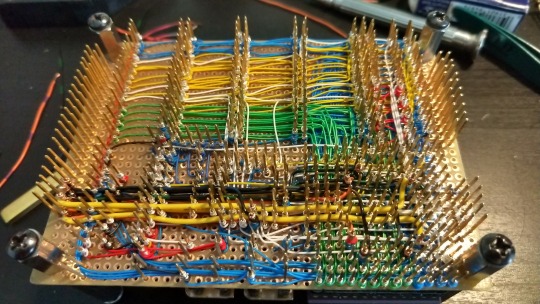
The Motorola 68030 CPU draws as much as half an amp of current at 5 Volts (contrast with, e.g., the Z80 CPU which draws only 20-40mA). I realized pretty quickly that the CPU just wouldn't run with only 30 gauge wrapping wire feeding its supply pins. In all my testing, I've been using breadboard wires directly connected to the CPU power and ground pins to get the thing running.
This is obviously not a good long-term solution, and it requires carefully re-placing the power leads every time I need to move the computer. There are over 120 pins on the under side of the CPU, and many power and ground pins are right beside each other. It would be very easy to accidentally create a direct short by misplacing a power lead onto a ground pin. I also intend to add a mezzanine board that will have the 68882 floating point co-processor and additional I/O, so I need to improve that wiring.
So I finally added some heavier wire to the power and ground pins, running to an expansion header. This minimizes the number of leads I need to run the machine from my test supply, and simplifies their connection.
As I plan out the mezzanine board, I'll need to plan on some way to connect a proper power supply that can run the whole computer. It's crazy to think I'll probably need a supply that can output at least 1 Amp at 5 Volts.
#vintage computing#Motorola#mc68030#single board computer#homebrew computer#68k computer#power supply#zilog z80
19 notes
·
View notes
Text
68030 Success
I gave up on the 6551 UART. I had no problems with the Motorola 6850 UART in my 68000 build, so I thought I'd give it a try.
The 6850 isn't quite as fully-featured as the 6551, but it's simple to interface and easy to use. In fact, because of the relationship between the 6800 and 6502 microprocessors, I didn't have to modify my logic to support the new UART. The timing, chip select, bus, are all virtually identical.
There is one important difference between the 6551 and the 6850 though. The 6850 does not have an internal baud rate generator like the 6551. It has options for an external BRG, or divide an incoming clock by 16 or 64. This means that the clock wired to the 6850 must be one of those multiples of a common baud rate.
The 6551 datasheet recommends a 1.8432MHz crystal for its baud rate generator. This frequency can be divided cleanly into the most common baud rates. Wired to the 6850, it would give the rates 115200 and 28800 as the two available options. While 28800 isn't terribly common, 115200 is the most common upper limit for modern serial devices.
My dumb terminal is not a modern serial device. It tops out at 38400 and does not support either of those options.
There are several crystal frequencies that are even multiples of all the common baud rates: 3.6864MHz, 4.332MHz, 6.144MHz, even 49.7664MHz.
That last one caught my eye while looking at available can oscillators at the local surplus shop. It's close enough to 50MHz to divide by 2 to run my 68030 CPU nearest its 25MHz limit, but divided by 81 it becomes 614.4kHz, which would divide in the 6850 to 38400 and 9600 — the highest supported rate of my terminal, and the most common rate.
I really wanted to be able to use the one crystal to run the CPU, all its logic, and the UART; and I really wanted to stick to just the one CPLD without additional logic. But, I've run into the limits of my CPLD. I don't have any I/O pins available to add the UART clock, and I don't have enough of the 64 macrocels available to add the divider.
So I pulled out the same design I used on my 68000 build: a 6.144MHz oscillator divided by 10 using a 74'192 decade counter. And there was really only one place on the board where I could put the new logic chip — under the UART.
This is convenient. My 68030 build is using the same UART at the same frequency as my 68000 build. This means I only need to update a few address to be able to run code from the older build on the new one.
This is what I've been waiting for. This Mandelbrot BASIC program takes ten minutes to run on my 68000. On the 68030, running BASIC from ROM it takes just over three minutes.
I can do better than that though. I've got a 120ns ROM on an 8-bit bus, but 70ns RAM on a full 32-bit bus. If I run BASIC from RAM instead, the Mandelbrot program only takes 55 seconds!
I can still do better. I'm still running the system at half speed, using a 25MHz oscillator, running the CPU at its minimum 12.5MHz. I need to get a 50MHz oscillator working, which will speed up both the CPU and the glue logic timing. I also got some new 512kBx8 SRAMs that are rated for 55ns that I should be able to run with no wait states at 25MHz. And my 6850 is the 68B50 variant, which can run at 2MHz, so I can also speed up the UART access logic, which was built for the 1MHz 6551. I'm even thinking of adding a second board with the 68882 FPU to help with math functions. This little thing should run quite fast.
17 notes
·
View notes
Photo

Okay folks It's Trivia Time here going right in lol So D.Y.K What happened on this day the 18th September? Let's go an see. . September 18th 1926 James Cooley Born, James Cooley, co-creator of the fast Fourier transform, was born. Working with John Tukey, Cooley in 1965 worked out a vast improvement to a common mathematical algorithm called the Fourier transform. Although the algorithm had been useful in computing, its complexity required too much time. While working at IBM, Cooley built on Tukey's ideas for a swifter version. . 1989 – 4 years after resigning from Apple, Steve Jobs and his newest company NeXT finally release the NeXTstepOS. It is a Unix based system, with some aspects of BSD and using the Mach kernal. This is the OS that will eventually merge into Apple when Jobs comes back. . 1990 – The NeXTstation is finally released. It used the 68040 Motorola processor running 33MHz and the 68882 math co-processor running at 25 MHz. 2.88 MB floppy, 8 MB RAM, monochrome monitor, all for $4.995.If you wanted 4096 colors, that would cost you – $7,995. . Catch me tomorrow guys when we will have yet another trivia post. Please don't forget pop along to wifeidge.uk an stock up on those beauty & skincare products. Look out for the epic 4D!! Tell Wifeidge I sent yah 😉👍. . Thats All For Today Thanks for reading. . TerrierByteIT, Keeping You Connected!!. . ☎️ telephone:️ 07759 552599 . 📧 e-mail: [email protected] . 🕸️ web:️ www.terrierbyteit.uk . 🌝📚 www.facebook.com/TerrierByteIT . . . . #TerrierByteIT #Wifeidge #wifeidge.uk #Younique #computerhistory #computer #technology #history #computerscience #tech #computerhistorymuseum #computers #retro #vintage #retrotech #trivia #oldtechnology #techhistory #technologyhistory #computinghistory #oldcomputer #oldschool #informationtechnology #thisdayinhistory #internethistory #historyoftechnology #retrocomputer #oldtech #museum #vintagecomputer https://www.instagram.com/p/B2kWt7HprQt/?igshid=1xwxii89d89jm
#terrierbyteit#wifeidge#younique#computerhistory#computer#technology#history#computerscience#tech#computerhistorymuseum#computers#retro#vintage#retrotech#trivia#oldtechnology#techhistory#technologyhistory#computinghistory#oldcomputer#oldschool#informationtechnology#thisdayinhistory#internethistory#historyoftechnology#retrocomputer#oldtech#museum#vintagecomputer
0 notes
Last Seen Blogs

lys-flowers
Simple Things

oliviabis1967
Untitled

squishlily
looking for wonderland...

anahmae
M.A.N. M.A.D.E. RADIO

what-a-cunning-boy-you-are
Hell...