#lasergrbl
Photo
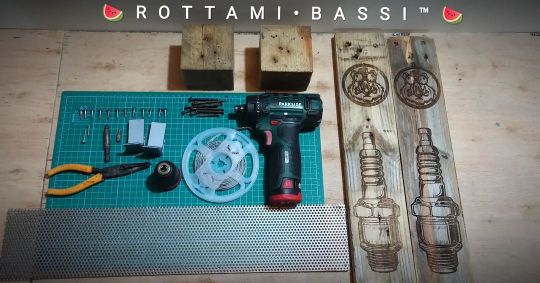
🚧𝙒𝙊𝙍𝙆 𝙄𝙉 𝙋𝙍𝙊𝙂𝙍𝙀𝙎𝙎🚧 🧢𝘏𝘈𝘛 𝘈𝘕𝘋 𝘒𝘌𝘠𝘊𝘏𝘈𝘐𝘕 𝘋𝘐𝘚𝘗𝘓𝘈𝘠 🔑 🍉𝙍𝙊𝙏𝙏𝘼𝙈𝙄 𝘽𝘼𝙎𝙎𝙄™🍉 🍍𝙎𝘾𝙍𝘼𝙋'𝙉 𝙇𝙊𝙒™🍍 🔧𝙊𝙁𝙁𝙄𝘾𝙄𝙉𝘼 𝘾𝙇𝘼𝙉𝘿𝙀𝙎𝙏𝙄𝙉𝘼🔩 @orturofficial @orturofficial @parkside_italia @pazzidiparkside #RottamiBassi™ #ScrapLow™ #OfficinaClandestina™ #expo #wooddisplay #lasercut #laserengraving #ortur #orturlasermaster2 #lasergrbl #inkscape #inkscapedesign #parkside #parksidetools #livarnoliving #led (presso Italy) https://www.instagram.com/p/Cj5010RrJoD/?igshid=NGJjMDIxMWI=
#rottamibassi™#scraplow™#officinaclandestina™#expo#wooddisplay#lasercut#laserengraving#ortur#orturlasermaster2#lasergrbl#inkscape#inkscapedesign#parkside#parksidetools#livarnoliving#led
0 notes
Text
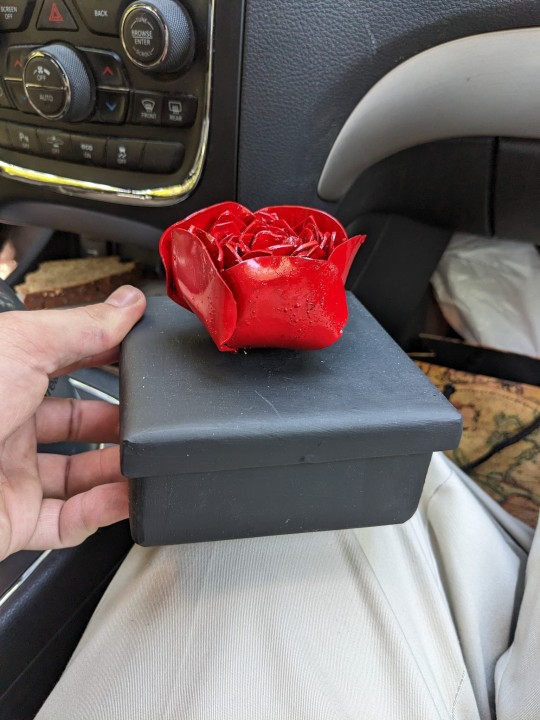
A gift given to @amistyshadow
It started as raw sheet metal. I plasma cut the layout of the box out of 1/8in steel, and the rose out of 3/32. First I bent everything (using a hand brake) to form, then welded the box together. Then I made the flower. The flower took the most time.
I started by welding the smallest petals to a thin rod. Then I used a torch to gently heat up and bend the petals into place. Once they cooled, I welded the next size to the rod, just below the first petals, and repeated this process. Once all the petals were on the rod, I drilled a hole in the lid, and welded the rod to the inside of the lid. The box is roughly 4in x 4in and 2in tall, not including the rose. I painted the rose with red spray paint. The box I hand painted, as I didn't want to risk getting the rose too dirty. I used some black acrylic paint from another project.
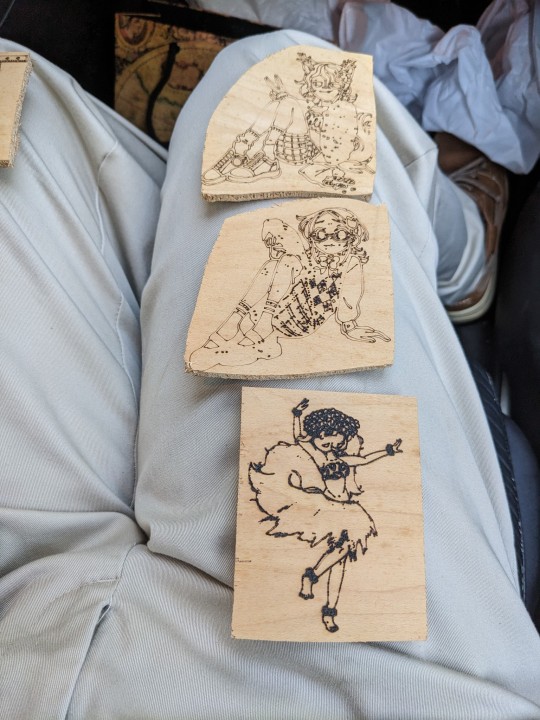
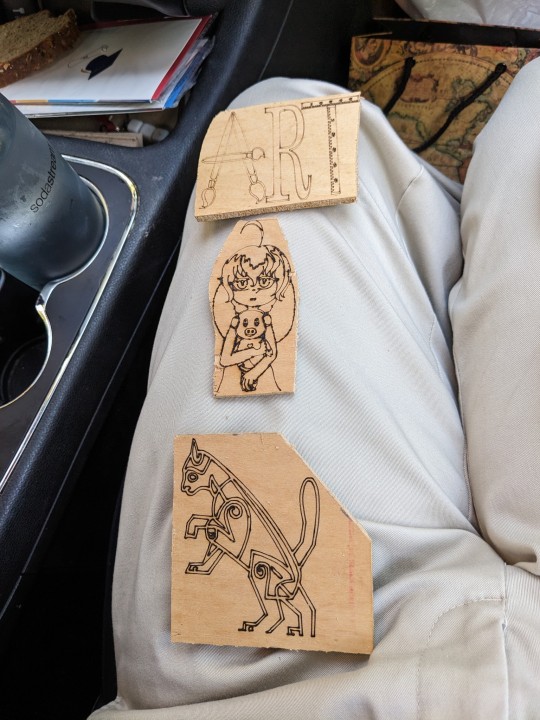
For the wood, used a 7watt laser engraver. I used inkscape to pull vector paths from some of her artwork, and used LaserGRBL to generate the code. On thin plywood, a power setting of 10% and maximum speed worked well. I used DALLE 2 to make the cat. I made the ART one from some stock images.
This was a fun project. I learned a lot about laser engravers. And nearly burned my house down on multiple occasions. Also, I think my room will always smell like campfires now. I should probably use it outside from now on.


5 notes
·
View notes
Text
What is ATOMSTACK A5 M50 Pro?
We will review and test the engraving and cutting performance of the ATOMSTACK A5 M50 Pro laser engraver. This engraver is basically the same as the ATOMSTACK A10 pro and ATOMSTACK X7 Pro, but it has a more affordable 5W M50 laser module. We'll test it with our standardized test range and a few extras. This will help you decide if this machine is best for you.
The ATOMSTACK A5 M50 Pro is mechanically identical to the A10 Pro and X7 Pro. But it comes with a less powerful - 5W M50 laser module.
The ATOM STACK A5 M50 Pro should be a very solid laser engraver because it has improved mechanics and added an offline touchscreen controller compared to the previous model - the A5 Pro.
We'll put it through a series of tests to show what this machine is capable of.
The A5 M50 Pro has a rectangular engraving area of 410*400mm and is equipped with a very high quality control panel with display and quality buttons. It also has an offline controller, so the laser can only be operated via its touchscreen. No computer required.
Assembly of the machine is simple, it takes less than half an hour to assemble it thanks to a good manual.
The ATOMSTACK A5 M50 Pro is equipped with a 5-watt M50 laser module.
The machine has a 32-bit controller board with a touchscreen offline controller.
I also recommend using OD6+ protection for more quality protection google. You only have one pair of eyes. protect them! These lasers work in the visible spectrum, and even reflections can be very harmful to your eyes!
Save your eyes! The included security google is not the best. Do yourself a favor and get a premium OD6+ safe Google Glass for better protection for your eyes!
The focusing process is the same as the ATOMSTACK A5 Pro we tested earlier. For the best cut, the head needs to be 3mm above the engraved surface. Focusing is done by placing the acrylic plate/spacer under the laser head and lowering the laser head onto the spacer. The spacer is 3mm thick and the head remains 3mm above the surface after tightening the z-axis screw.
The machine has a cool offline controller that allows us to use the machine without a computer. It is very handy for field jobs and projects that require a lot of the same cutting work. You set up your design in Lightburn or LaserGRBL as usual, but then instead of starting to engrave, you export it as gcode to the included SD card using the included SD card reader, which you can then select using touchreeen file, fine-tune parameters and continue sculpting your designs without using a computer.
It has a solid metal mushroom-style emergency knob that comes in handy when you need to shut down the machine in a hurry.
This is probably one of the best features I hope all lasers have someday. Limit switches allow you to automatically home the machine so that it always starts from the same position. This way, if you stop engraving or add another layer of work, or if the machine crashes mid-work, you can be sure that the machine will start working in the exact same spot you want. They decided to use cheap tactile switches instead of proper limit switches, but they worked fine.
The machine can be connected via USB or WiFi. You can also control it using a smartphone app on Android or iOS.
Engraving: Wood, Bamboo, Cardboard, Plastic, Leather, PCB Board, Alumina, Non-reflective, Electroplated and Painted Surface Metal, 304 Mirror Stainless Steel, Glass, Ceramic, Cotton, Slate
The ATOMSTACK A5 M50 Pro is also a reasonably capable cutter.
Cutting: cardboard, non-woven fabric, wood board, acrylic, some thin plastic sheets, sponge, etc.
To prevent your machine from rusting quickly, don't use plastics like PVC and vinyl, as they release hydrogen chloride gas when cutting, which is toxic and very corrosive.
Software and Supported Formats
You can use the ATOMSTACK A5 M50 Pro laser engraver with the free LaserGRBL software, which works fine, but is a bit clunky to use. It's great for some testing, but I went with Lightburn, which is more powerful and very intuitive to use. While it's not free, the license costs $60. However, the software offers a 1-month full-featured free trial, which will help you decide if it's worth it.
With LaserGRBL you can import vector files (NC, BMP, JPG, PNG, DXF…) and bitmap image files (bmp, jpg, png and gif),
Lightburn supports more formats: AI, SVG, DXF, PDF, HPGL, PLT, and RD for vector formats and PNG, JPEG, BMP, TIFF, TGA, and GIF for image formats.
We have done more or less standardized testing on all laser engravers and cutters. This way, it's easy to compare results between machines. Here you can see a video showing how the test is done, and below you will find detailed images of the test results along with instructions.
Our standard engraving patterns are designed to demonstrate engraving capabilities at different settings so you can see the effectiveness of the laser beam. Let's look at the results in more detail in the following sections.
The power level test pattern shows how the machine can engrave at different power levels at different speeds.
Power varies from 10% to 100% in 10% increments at speeds of 600, 1200, 1800 and 2400 mm/min. We omitted the low speed/high power shape because the beam burns too much at low speed. This leaves a large burnt blob that provides no practical information.
The interval scale test is used to show whether the laser focus shape is square or rectangular. The scan interval was gradually increased from 0.1 mm to 0.5 mm.
In this test, the beam shape of the ATOMSTACK A10 Pro looked very square, and the vertical and horizontal sculpting looked very balanced.
We'll be able to estimate the exact spot shape later when we test the engraving on anodized aluminum.
This is a test of engraving a small 20mm size photo while changing the maximum laser power.
Engraving of photos is slow because the laser head has to scan line by line like an inkjet printer. If you want to engrave a very large photo, be prepared to wait a few hours 🙂
As we can see below, the ATOMSTACK A5 M50 Pro does a very good job of photo sculpting.
Engraving of vector images is much faster because the laser head follows the lines directly. Although with this technique you cannot make grayscale images.
Our test included this cute tit bird photo in the upper right corner of the test piece. It only took a few minutes to carve the bird. In the software it is possible to set the shape to be filled with a pattern fill, in this one, the shape is swept to fill in 0.1mm steps. For large engravings, you can increase the step to 1mm or more to speed up the engraving. This way it will make a raster or grid on the black areas. But at other times there is more discussion on this.
Next, we tested the ATOMSTACK A5 M50 Pro on a piece of black anodized aluminum scrap.
Below are engraved test patterns to evaluate focus size in both directions and the effect of viewing speed. Next, we will further examine the various parts of the test mode.
The most important part is the interval scale. By scanning vertically and horizontally with different interval steps, we can approximate the size of the laser spot. From the results we can see that the laser spot of the ATOM STACK A5 M50 Pro is more or less rectangular because the pattern looks the same when scanned in the horizontal (X-axis) and vertical (Y-axis) directions.
The text engraving is done at 600mm/sec, which is pretty fast for such a small movement, so some wobble of the laser head can be seen in the corners. This can easily be avoided by lowering the acceleration and speed in the settings.
2 notes
·
View notes
Link
$2,394.99 $ Creality Laser Cutter Falcon 2 40W Laser Engraver & Cutter https://nzdepot.co.nz/product/creality-laser-cutter-falcon-2-40w-laser-engraver-cutter/?feed_id=147801&_unique_id=66143ed661232 Features: Work Display Specifications: Machine Power Max.240W Laser Module Output Power 40W Laser Spot Adjustable:0.1mm/0.15mm Wavelength 455+5mm Engraving Speed Max. 25000mm/min Working Area 400mm*415mm Certification IEC60825, FDA, CE, ROHS, FCC, UKCA, UL Report, PSE etc. Operating System Windows, MacOS Control Software LightBurn, LaserGRBL File Type(s) jpeg, jgp, png, bmp, svg, dxf, etc. Net Weight 7.4kg Gross Weight 10.94kg Product Size 664*570*193mm Package Size 725*625*150mm Voltage Input 100-240V 50-60Hz Voltage Output DC 24.0V 9A Connecting Interfaces TF Card, Type-C Manufacturer Part No: 1005010072 Brand: Creality Product Type: 40W UPC – Product Family: Laser Cutter Shipping Weight: 10 kg PB Part No: […] #
0 notes
Text
Creality Falcon 2: incisioni di Alta Qualità alla portata di tutti - Recensione

Dopo una stampante 3D, un incisore/tagliatore laser rappresenta uno degli strumenti di fabbricazione più utili per un creatore. Tuttavia, questi dispositivi sono solitamente costosi o poco efficaci. Ora, il nuovo Falcon2 della Creality si propone di offrire elevate prestazioni a un prezzo ragionevole. Riesce a mantenere questa promessa? Ho deciso di scoprirlo in questa recensione.
Laser CO2 vs. laser a stato solido
Il mercato dei tagliatori laser per hobbisti è dominato da due tipi di laser: i potenti ma costosi laser CO2 e i più accessibili, ma meno potenti, laser a stato solido.
I laser CO2 richiedono un grande tubo laser, il che aumenta il costo, il peso e la complessità della macchina.
I laser a stato solido emettono luce da un diodo, che è molto più compatto ma anche più difficile da utilizzare a livelli di potenza elevati. Data la loro compattezza, è possibile montare il laser direttamente su un carrello per semplificare la macchina e ridurre il peso.
Questi laser producono anche fasci a lunghezze d'onda diverse, influenzando la loro efficacia con diversi materiali. I laser CO2 tendono ad operare a circa 10.600nm (nell'intervallo infrarosso), mentre il laser a stato solido del Creality Falcon2 opera a circa 455nm (all'estremo inferiore dello spettro della luce visibile, vicino all'ultravioletto). Per aumentare la potenza del Falcon2, Creality ha utilizzato quattro diodi laser a stato solido (ciascuno capace di 6W) focalizzati in un unico fascio. Ciò risulta in una potenza totale di 22W, poiché apparentemente due watt vengono persi come spreco.
Sicura e Completa
Il laser del Creality Falcon2 è composto da quattro diodi laser da 6W, compressi utilizzando la compressione del punto FAC. Questo fornisce una potenza complessiva di 22W. La sicurezza è una priorità assoluta con il Falcon2 di Creality. Include cinque protezioni di sicurezza, tra cui:
- Pulsante di arresto di emergenza.
- Blocco di sicurezza.
- Funzione di arresto attivo.
- Interruttore di limite bidirezionale.
- Copertura protettiva per il laser (sono inclusi anche occhiali di protezione).
Oltre a queste caratteristiche, c'è un sistema di monitoraggio triplo che tiene traccia di eventuali problemi con il laser, la lente e il fuoco. In caso di rilevamento di una fiamma, verrà attivato un allarme istantaneo e la macchina si fermerà. Per la lente, riceverai un allarme quando è sporca per prevenire danni e rotture della lente. Evita di bruciare i tuoi disegni con l'Air Assist integrato. Non solo puoi regolarlo manualmente come necessario, ma se usi il software LightBurn, puoi scegliere le impostazioni dell'aria nel software.
Parlando di LightBurn, il Falcon2 è compatibile con LightBurn, LaserGRBL e altri strumenti di taglio/incisione laser. Tuttavia, sono incluse istruzioni per utilizzare i due strumenti menzionati. Puoi anche collegare direttamente l'incisore laser al tuo computer tramite un cavo USB o salvare i file di progetto su una scheda microSD da inserire nella macchina.
L'uso di una microSD ti permette di lavorare offline. La funzione Offline Dynamic Preview ti dà il potere di regolare le posizioni un millimetro alla volta.
Il design in lega di alluminio è incredibilmente stabile. Le ruote resistenti all'usura a forma di U, insieme a una guida scorrevole, garantiscono un movimento fluido durante il tuo progetto, assicurando che nessuna vibrazione anomala rovini i tuoi disegni. Se stai incidendo l'acciaio inossidabile, puoi aggiungere un tocco di colore al tuo progetto. Questa è una novità per Creality. Quando il metallo si riscalda, reagisce, facendo apparire centinaia di colori.
Unboxing
Appena ho scartato il Creality Falcon2 22W, me ne sono innamorato. Era quasi completamente assemblato. Ci vogliono solo tre passaggi per passare dalla scatola al montaggio completo.
- Telaio della macchina.
- Modulo laser.
- Modulo di assistenza ad aria.
- Alimentatore.
- 2 set di supporti di sollevamento (per diverse altezze).
- Cavo USB (USB-A a USB-C) e adattatore da USB-A a USB-C.
- Occhiali di sicurezza.
- Spazzola antistatica.
- Chiave di sicurezza.
- Blocco di misurazione.
- Lettore di schede SD.
- Piastra metallica di protezione per l'incisione.
- Tavola di legno di tiglio, quadrato in acciaio inossidabile, quadrati di feltro e quadrati di carta per i primi progetti.
- Pinzette.
- Panno senza polvere.
- Lente protettiva.
- Chiave inglese, chiavi a brugola e viti.
- Fascette per cavi.
- Piccola scatola di plastica con tutti gli accessori più piccoli al suo interno.
Per il taglio, avrai bisogno di un tappetino da taglio, come un tappetino a nido d'ape. Anche se Creality ne ha fornito uno per i miei test, non è incluso con l'incisore laser.
Primo avvio
Ho già detto che il montaggio è veloce? Ho dovuto attaccare il modulo laser al telaio, collegare il modulo Air Assist e impostare l'altezza delle gambe e finalmente tutto era pronto per la mia prima incisione.
La scheda microSD inclusa (che si trova all'interno del lettore di schede USB) include dettagli completi sul montaggio, sull'utilizzo dei file di progetto di esempio con LaserGRBL e LightBurn, e sul file di macchina che avrai bisogno di usare con il Creality Falcon2 22W insieme a LightBurn. Ho iniziato il mio test collegando direttamente al mio computer con il cavo incluso.
Dal disimballaggio all'impostazione del primo progetto, ci sono voluti circa 15 minuti. Ho impostato la piastra metallica e il tagliere a nido d'ape e ho avviato il progetto. Sono rimasto stupito dalla velocità di questa macchina.
Molto carina la funzionalità che permette di regolare il flusso di aria erogata dal "soffiatore" direttamente installata sul bordo di sinistra.
Incisione e test
Il passo successivo era testare la funzionalità di incisione. Questa volta ho utilizzato LightBurn. Anche se non è un software gratuito, è possibile ottenere una prova gratuita di 30 giorni con tutte le funzionalità, senza bisogno di carta di credito. Inutile descrivervi il test e proprio per questo vi lascio alla mia videorecensione.
https://youtu.be/XCpVTa0IRkQ
Conclusioni
Il tagliatore e incisore laser Creality Falcon2 da 22W è ideale sia per gli hobbisti principianti che per i professionisti. È incredibilmente veloce e preciso, con una varietà di funzioni di sicurezza integrate. Disponibile sia su Amazon utilizzando il codice sconto FN1107FF che sul sito ufficiale utilizzando il seguente codici sconto Falcon 2 da 22W Codice sconto:FN1106B
Read the full article
0 notes
Text
How to Make Your Own Laser Engraved Cutting Board
I'll show you how to make a laser engraved cut board and we'll walk you through the process from design to finish.
A cutting or serving board is an essential in any kitchen, it is where vegetables are cut and prepared and the surface on which they are presented and served.
Here we are using the atomstack a10 pro laser engraver.
Follow along as we design and engrave a custom cut board with a laser engraver.
how to carve wood
You can carve wood in several different ways. Over the years, I've shared two wood-burning techniques that are both affordable and easy to master.
Watch how to carve a cutting board
A wood burning tool is a handheld heating tool that burns wood. You can use it like a pen to draw patterns on any type of wood surface.
Burnt markers apply a substance to the wood that, when used in conjunction with a heat gun, burns the design into the wood. This marker can be used with a template to create detailed wood fired designs.
Both of these techniques are great ways to create small designs by hand without breaking the bank.
The next level up in engraving is the laser engraver. I own an Aufero Laser 2, a high quality machine built for crafters and hobbyists. This machine is perfect for my craft room, engraving and cutting dozens of materials.
Watch me unbox and create a simple project with this laser.
Can it be engraved on a cutting board
Yes, exactly! You can engrave custom text and images on the solid wood cutting board. These are great gifts for your friends and family.
Laser engraved cut boards require a few extra steps to ensure they work properly. Read on for all the details.
How to Design Graphics
The first step is to create a design to use on the cutting board. I love using Canva, an easy-to-use and very affordable online design program. There is a free version to try, and I recommend the pro version, which costs $119 per year. Try using Canva to create your own laser engraved designs.
Use a blank canvas and add design elements and text to create exactly what you want engraved on the cutting board.
Once the design is complete, export it as a PNG file.
Using LaserGRBL
There are 2 programs you can use to run your laser engraver; LaserGRBL and Lightburn. Lightburn is a more advanced paid program that allows you to design and create on a larger scale. I suggest you use LaserGRBL until you are happy with the machine, then upgrade as needed.
Connect your machine in LaserGRBL, click the unlock button at the bottom, and open the design file you just created in Canva.
For engraving on wood I use the following setup.
Line to Line Tracking
horizontal direction
8 lines per mm
These settings work perfectly for me, but I encourage you to experiment with different variations and see what you like.
Next, crop the design to remove any white space around it, and click Next. On the next screen, you'll set the dimensions of your design in millimeters, as well as the machine speed. Use the book icon in the Speed section to select the recommended settings for your machine and material.
Now that the design is ready, you need to set up the laser. Click on the center at the bottom of the screen, this will move the laser to the center of the design. From here we can focus the laser.
Loosen the setscrew, slide the cutting board under it, and place the amber acrylic piece on top of the wood. Tighten the setscrew and remove the acrylic. Now the distance of the laser to the wood is perfect.
Back in the LaserGRBL software, click the frame button. This will draw a frame around the design on the wood, it won't leave a mark, but it's a good way to see if your design ends up the way you want it to.
Once everything is properly placed, it's time to carve. Put on the goggles and click the green play button to start the sculpting process.
How to Finish a Carved Cutting Board
There are 2 more steps to ensure that this cutting board will work properly.
First, sand the surface and edges of the wood with 150-grit sandpaper. This removes any rough spots that would interfere with the food.
Wipe the cutting board with a soft cloth to remove surface dust.
Finally, coat with several coats of cutting board oil. This is food grade mineral oil that helps protect and nourish the wood. With regular use, the oil will ensure your boards don't dry out and crack over time. For a board of this thickness, I recommend 3 coats.
We cover how to make your own laser engraved cutting board, from start to finish. Be sure to watch the video and save this article for future reference.
There are also laser engraving machines with the same power: longer ray5 10w, sculptfun s10, twotrees tts-10
0 notes
Video
youtube
Wood Burned Chess Board Pattern and Chess Pieces! Great Gift Idea
Great gift idea - Wood Burned Chess Board! Using the Atomstack Laser Engraver we show you how to make a chess board out of wood! We use the Lasergrbl Software. Add this to your homemade gifts ideas!
0 notes
Text
Spss 22 premium


To get the Orb of Origin with commands, do "/give origins:orb_of_origin". The game is compatible with both Android and IOS devices, and if you are a PC user you can still play the game using an Android emulator. Our goal is to create a constantly growing community-funded resource of open content, for complete freedom and usability by professionals and hobbyists alike. Hướng dẫn cách tẩy tể bào chết vùng da đầu gối và khuỷu tay. Create with Adobe Stock artist-designed templates for Photoshop, Illustrator, InDesign, Premiere Pro, and Premiere Rush. launched this game from the adventure category.
Fill In 3D Mod is a Puzzle Android Game.
So tipos de textuais descritivos naruto shippuden. fillin3d) Can you collect them Fill-In Crosswords Mod unlimited money for android – APK download is a Word Android Game. So aiaa gnc 2015 fratello's pizza parma dr. Fill Up Run Game is an application that is classified in the Action category of the google app store.
rapids condos for sale india's got talent auditions date 2013 flyslot.
You can enjoy playing the game very fast, and this is all for free. Thoptv App Alternatives Get on this Page. The plot makes it so convenient by offering: 0 Download for PC – Thop App Live Cricket Mobile APK Get Online. About Gcash Hack Money a = some prime, b = another prime, and r = a/b (where a is smaller than b) w = 1/sqrt (p) (also experimented with w = 1/sqrt (p)*2 but I kept overshooting my a very small margin) x = a/p.

LINE Healthcare offers chat-based medical consultation service, enabling users to consult directly with the doctors through the LINE app. 20130 APK - Microsoft Word for Android is a great tool to create, edit, and share Word documents on the go. Whether it's Windows, Mac, iOs or Android, you will be able to download the images using download button.
sixaxis controller apk go launcher ex app 92060912908. Save templates inside Creative Cloud Libraries to organize your projects. 9% methanol – methanol was the hands down winner for getting the crystals.
Hi guys free load for all network! Eto lang ggwin niyo install POPSLIDE sa playstore magregister, once mkaregister may 500pts.
LaserGRBL is one of the best Windows GCode streamer for DIY Laser Engraver. LaserGRBL is able to load and stream GCode path to arduino, as well engrave images, pictures and logo with internal conversion tool. jp! [url= In other words, the Freenet protocol has minimal hooks to support metadata, and some code written as part of the Freenet project uses those hooks, but surprises might be in store for anyone who expects the sort of data/metadata interactions (e. Poly Haven is a small company based in South Africa, working with artists around the world. txt - Free ebook download as Text File (. Fillup freeload mod apk link Download WinRAR for Windows now from Softonic: 100% safe and virus free.
1 note
·
View note
Text
Grbl hex file download

G-code samples for 3d printer / cnc / engraving machine.
How to Setup GRBL & Control CNC Machine with Arduino.
GRBL - Home - Google.
Linux Grbl Software.
Grbl Mega 5X, RAMPS Board, TTL Laser pin solution - GRBL - LightBurn.
3D Printed CNC Mill 31 Steps (with Pictures) - Instructables.
Benbox, LaserGRBL firmware | upload / reupload / fixing.
Grbl 0.9 Nulled X64 Pc Full Version Activator - Trello.
Hex File Loader download | SourceF.
Uploading Grbl to the Arduino Uno - CNC Routers | 3DTEK.
How to get the correct version of Benbox and Firmware.
Cnc 3018 Pro Grbl Software Download.
HOW TO GET HEX FILE FROM ARDUINO ? 3 Steps - Instructables.
GitHub - grbl/grbl: An open source, embedded, high.
G-code samples for 3d printer / cnc / engraving machine.
To Install grbl you need two things: Arduino IDE download as if you are on a school computer latest grbl release. Download the latest grbl sourcecode as If you dont have the arduino ide yet, download and install it. Open the grbl and navigate to a folder simply called quot;grblquot. This hex file can be used with the Arduino Mega with a RAMPS board and the MKS Gen L V1.0 board. Just upload the Hex file with Xloader no need to use the Arduino IDE. Files in this download. grblU - This is the hex file for GRBL HotWire Mega 5X running on an Arduino Mega 2560 or MKS Gen L V1.0. We have some hex files (firmware) in our download center >>> G-code samples, images suitable for laser cutting/engraving, and a video guide of how to prepare g-code. Tested and ready g-codes for your engraving frame (GRBL 1.1H firmware). Good for Ortur, Eleksmaker, Neje, Atomstack, LE5040 Sainsmart (Genmitsu), Wainlux engraving (cutting machines).
How to Setup GRBL & Control CNC Machine with Arduino.
Start the Arduino IDE. Go to File -> Preferences and check Show verbose output during upload. Go to File -> Examples -> 01.Basics -> Blink, and then press upload to run the Blink example. At the top of the black window, that is positioned just below the source code of the Blink a LED example, you will see an avrdude command line similar to this.
GRBL - Home - Google.
Flashing GRBL using the Arduino IDE. 1. Download the Arduino IDE. 2. Clear the board's EEPROM. 3. Upload the GRBL firmware. The LongMill runs off the GRBL firmware, an open-source firmware that is designed for Arduino-based CNC machines. Sometimes your machine could use a re-flash of this firmware in the case that. LarryM December 6, 2016, 3:54pm #1. How to use Xloader to load a new version of grbl into the Arduino/X-controller. The left screenshot shows the window that Xloader displays when it starts. Enter the file path or browse to the file that you would like to load into the Arduino/X-controller. Select the device type you are going to load into.
Linux Grbl Software.
Recommended GRBL Versions to download: Download the new version: 1.1f ( Main Branch Merge - NEW) If you want to check and see if there is an even newer version, then go to the main GRBL page here in the release section. Now that you have your firmware downloaded and have extracted the file, we will walk through the rest of the process. 2. GRBL CNC Mini Laser - I rework old my project from Sketchup in 3dwarehouse (... Download files Like. Share. 1155 Downloads 161 Likes 18 Comments. Details. Uploaded: August 15th, 2020. Software: STL, Fusion 360, STEP / IGES, Rendering, Categories: 3D printing, Machine design,.
Grbl Mega 5X, RAMPS Board, TTL Laser pin solution - GRBL - LightBurn.
The Arduino Uno runs the Mill One by using a tailored version of the GRBL v1.1g firmware. This firmware is set up for ⅛ microstepping and can be flashed onto your Arduino by using the Arduino IDE. Click this to download the firmware, then follow these steps: Plug the Arduino into your computer with the USB cable (don't connect the power. Download it as.ZIP file and then follow these steps: Open the file and extract the files. Open the Arduino IDE, navigate to Sketch > Include Library > Add.ZIP Library…. Navigate to the extracted folder "grbl-master", in there select the "grbl" folder and click the open file.
3D Printed CNC Mill 31 Steps (with Pictures) - Instructables.
See the post here for full detail GRBL HotWire Mega 5X for CNC Foam Cutters The Hex file is pre-compiled and a little easier to install with Xloader. GRBL HotWire Mega 5X Windows Application v5.11 472.23 KB 2984 downloads. I renamed the file to shorten it, to ";. Although I have Arduino installed, I put it in /opt rather than among the system files. So I installed avrdude using: sudo apt install avrdude; To upload Grbl, open a terminal where the "hex" file is and type.
Benbox, LaserGRBL firmware | upload / reupload / fixing.
Last stable version: latest All versions: LaserGRBL Also source code of LaserGRBL is available under GPLv3 license.. LaserGRBL is free and. Now there is a useful little windows program that will do it for you called XLoader and you can download it here XLoader V1.0. It is simple to use and needs no real explanation. A picture will suffice. So if you want to supply compiled versions of your Arduino code without supplying the source code, this is an ideal way. Download and install Arduino IDE. Link A rduino IDE 1.x Download GRBL1.x firmware. Link G RBL1.x Code von GitHub... In the ZIP file you will find a folder "grbl", please copy it into the "libraries" folder of the Arduino IDE.
Grbl 0.9 Nulled X64 Pc Full Version Activator - Trello.
Open xloader and set up the Hex file and Device, but DO NOT select the com port yet. Press the RESET button on the Leonardo, and watch Device Manager, because the com port number will change (if it doesn't, hit RESET again until it does). Quickly set xloader to the current com port for the Leonardo, and hit upload, and it should work.
Hex File Loader download | SourceF.
Step 2: Installation. To Install grbl you need two things: Arduino IDE (download as if you are on a school computer) latest grbl release. Download the latest grbl sourcecode as If you dont have the arduino ide yet, download and install it. Open the grbl and navigate to a folder simply called "grbl". GRBL 1.1 Features. Overrides and Toggles Platform version only. Easily control the real time feed and speed overrides by enabling the Overrides widget in the Window menu. Jog Mode With older versions of GRBL UGS is pretty reliable when it comes to jogging, but there are limitations. With GRBL 1.1 this is no longer the case when using the new.
Uploading Grbl to the Arduino Uno - CNC Routers | 3DTEK.
Install the usb to serial driver from USB: 3018Pro\CNC Software\GRBL Software\driver\CH340SER.EXE; Download and flash the latest GRBL... For carving with the spindle use CNC software called Candle download the latest version of. gr86 gr parts. e39 aux fan switch used polaris ranger for sale in pa; houses near me gmc acadia ac pressure.
How to get the correct version of Benbox and Firmware.
1a. If you ask Aunt Google, you will find some links to downloadable GRBL files for 324u (e.g. Leonardo); but they all seem to be behind the latest "normal" GRBL versions, but it might sufficient anyway. 1b. Yes, it is possible to have GRBL work on "smaller" Arduinos, like a Nano, which is running here without problems on GRBL v0.9j. Once you can connect – follow these steps to upload a new firmware. Step 1 – Download XLoader. Step 2 – Download Latest GRBL Firmware. Step 3 – Unzip Downloaded GRBL Firmware. Step 4 – Install Grbl Firmware Uploader into Arduino Interface using XLoader. Step 4 – Backup your GRBL Settings (just in case).
Cnc 3018 Pro Grbl Software Download.
100000000c9426040c9438040c9438040c94532952100010000c94e0310c9438040c9438040c9438049b100020000c9438040c9438040c9438040c94d216b4. It is version 1.1L and is intended for true 4th (and 5th and 6th) axis movements. It is available on Github. Search for GRBL Mega 5X. It has Laser mode of course. It can easily be loaded with Arduino IDE or with the Hex file and XLoader. In the past I had some success mapping a curved surface and burning to that with a 'fake' 4th axis using.
HOW TO GET HEX FILE FROM ARDUINO ? 3 Steps - Instructables.
The 3018 is called upgraded because the new mounting for the X and Y rods and lead screws. If you have a 3018 Pro: 1.Download the firmware for a 3018 PRO. 2. Unzip this package and note the location of the directory created on your computer. The unzipped files include a file for the 3018 Pro GRBL 1.1f firmware.. How to use Xloader to load a new version of grbl into the Arduino/X-controller. The left screenshot shows the window that Xloader displays when it starts. Enter the file path or browse to the file that you would like to load into the Arduino/X-controller.
GitHub - grbl/grbl: An open source, embedded, high.
Download grbl controller v0.9 for free. System Utilities downloads - Grbl Controller by Zapmaker and many more programs are available... Windows Mac. Office Tools; Business;... Engravers controlled with Arduino GRBL, Mach3... and 3D printer controllers... PicEngrave Pro. Download. Click the Release tab to download pre-compiled files or just click here Grbl is a no-compromise, high performance, low cost alternative to parallel-port-based motion control for CNC milling. This version of Grbl runs on an Arduino Mega2560 only.
Other links:
0 notes
Text
A5 Pro Laser Engraving Machine Review
The Atomstack A5 Pro is a home assembly laser engraver like no other. First, the price of the laser engraver A5 Pro is higher than most other home build kits, followed by quality and power. Whether engraving or cutting 8mm layers, the precision and quality are excellent.
The open extruded aluminum frame design of the laser engraver A5 Pro and other self-build engravers is common among DIY hobbyist machines because they are easy to build and maintain. Protective goggles must be worn, and good ventilation is essential, which also limits where they can be used.
However, this laser engraver A5 Pro is very powerful and it is worth noting that Atomstack invested in high quality parts and a solid design for this machine.
It takes about an hour to assemble, but you might be able to put it together faster with a little concentration. The instructions show you how the machine is assembled, but some areas are a little hard to understand.
The point is to put the belt on the pulley; this requires loosening and tightening the seat belt. While this works for one axle, the other requires removing the pulley, putting it in the belt, and reinstalling the pulley. Likewise, cable guides require careful positioning. Put them in the wrong place and you need to backtrack the build to correct it.
Once all the pieces are put together, the design is very clean and there is no room for parts to be installed incorrectly - everything fits snugly with no gaps in the joints. That's fine, but it does make initial assembly quite tedious, though not to the point of being impossible.
Once built, it is ready to be tested with laserGRBL for PC or LightBurn for all other systems.
The Atomstack A5 Pro may be a build-your-own laser engraver, but it's still incredibly capable.
First, it features a 410 x 400mm work area, and the frame's open design allows you to slide large materials through in stages, up to 450mm wide.
A standout feature is the 10W laser output, which, along with compressed spot technology, enables the A5 Pro to cut 8mm layers at a time. The power of the laser is so high that it can also engrave hard surfaces such as stainless steel.
When you use the A5 Pro, the ultra-fine engraving accuracy of 0.01mm makes the engraving and cutting quality stand out. This precision enables high-quality image transfer to the material.
Due to the precision of the laser, the Atomstack uses a powerful autofocus design for the machine. The material height is adjusted manually via the big red knob on top of the laser, and the machine handles the fine-tuning. This alone can save a lot of time and improve the overall quality of your prints.
One feature of laser engravers that often annoys us is the need to be plugged into a computer all the time. It's nice to see a machine with an ESP32-DOWD-V3 chip and a 32-bit microprocessor built in to handle the files internally, so it doesn't need to be connected all the time.
A few professional safety features take this laser engraver to the next level. There's a large emergency stop button and a flame detector that activates if the material catches fire rather than being engraved or cut. Another safety feature is the internal gyroscope, which automatically activates the kill switch if the machine is tilted 15º or more.
Once the image, vector or cut files are loaded into the software and adjusted, they can be sent to the machine. The initial connection is simple, with the usual manual adjustments to material, initial position and laser height.
Once everything is adjusted, the power can be set and the engraver turned off. The power and precision of this laser engraver is immediately apparent. The initial engraving showed a high degree of detail, and the engraving was fast and precise.
As we've found with other self-build machines, it's important to make sure everything is nice and tight, the machine has good rigidity, and that the belts are tensioned before starting.
Upon closer inspection, the quality of the engraving is as good as that of Glowforge(Opens in a new tab). The only problem is that being an open design, the smell means you need to be in a well ventilated room and you need to wear protective glasses.
This is the first laser engraver we've seen to successfully cut thicker materials. In this test, we passed the 6mm layer without issue, producing nice clean edge lines.
Overall, for engraving and cutting, the Atomstack A5 Pro does an excellent job; our only concern is that there is no case for a machine of this power.
The build of some parts of this laser engraver tested me with the initial build, trying to get the belt to fit on the pulley and small screws into the aluminum extrusion. It's not hard, just tedious, the key is moving from the tight space of the kitchen table to the expansive space of the workshop.
Once built, the construction is solid, far exceeding what we've experienced with other laser engravers of this size. All these anodized parts are also more aesthetically pleasing.
It's all relatively easy to set up, though connecting to Wi-Fi via the iOS app or the machine is a little trickier. We also found that while there was a lot of information in the printed manual, we couldn't always follow some of the finer prints.
The Atomstack A5 Pro works very well, the structure is excellent, the attention to detail paid off in the quality and accuracy of the engraving and cutting.
The bottom line is that there is no case or extractor, but other than that, the machine is pretty much faultless.
The A5 Pro is the leader in the field, and while it's more expensive than other laser engravers, it's not a leap to make it unaffordable. The A5 Pro expandable is also a great option, with an attachment point on the tool head for an air pump to help extract some smoke and extra attachments that allow you to cut round objects like bottles.
The Atomstack A5 Pro is one of the best laser engravers we've seen, especially considering the price. If you're looking for a professional-grade laser engraver at an affordable price, the A5 Pro is the machine. Atomstack Laser Engraver will be your best choice!
Popular Searches: Laser Engraver for Wood, Laser Engraver for Metal, Laser Engraver for Acrylic, Laser Engraver for Leather, Laser Engraver for Glass,
0 notes
Link
0 notes
Video
youtube
Atomstack A5 PRO Laser Engraving Tiger
The Atomstack A5 Pro laser engraver can be compatible with various mature engraving software, such as LaserGRBL, LightBurn, support Win XP / Win 7 / Win 8 / XP / Win 10, and also support MAc system (LightBurn), engraving file format supports NC, BMP, JPG, PNG, DXF etc.
The all-aluminum alloy anodized structure design makes the laser engraver more durable, and improves the accuracy of engraving. The entire structure has been designed for quick assembly, and the assembly can generally be completed within 10-20 minutes.
1 note
·
View note
Link
All you need to know about #GRBL #firmware. Uploading on #makerbase.
https://endurancelasers.com/upgrading-of-a-board-with-the-grbl-firmware-for-laser-engraving-using-makerbase-mks-2-dlc-board/
Enjoy #photoengraving on #wood and #plywood with a new firmware
0 notes
Video
youtube
How to Make Chess Board With Laser Engraver - Free Download
Using the Atomstack Laser Engraver we show you how to make a chess board out of wood! We use the Lasergrbl Software. Add this to your homemade gifts ideas!
0 notes
Last Seen Blogs

royanzzz
Roy ann

secret-tenderness
Moonlight Cherry Blossoms

pharaohtsiann
💖Aries Deity✨

vicku
viryshills

lonelylonely18
ktn gtr