#ladywinchestercrafts
Text
From Cute to Creepy.
Probably my favorite thing to do is re purpose things I find in the store so I can make them my own style. Take these Easter signs and this guest room decoration.
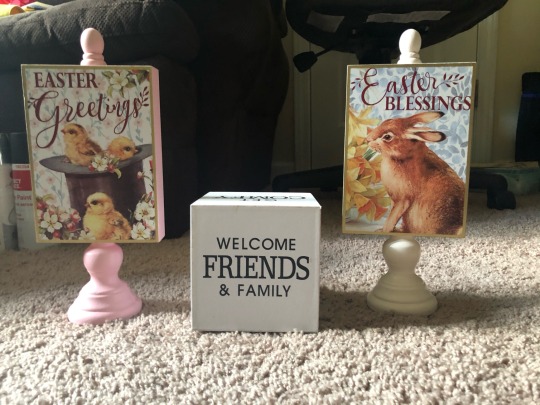
Cute on their own right? However, they’re just not my style. So this is how I took them from cute to my style!
Supply List:
- Some signs. I found all three of these items at Michael’s. The Easter signs were 70% off and the cube was 50% off. You can use literally anything you see in the store, these are just a couple of examples.
- Chalk paint. I used the brand Waverly, specifically the white and the grey color called elephant (I got both from WalMart).
- Painter’s tape (or masking tape).
- Scrapbook paper/ cardstock in a print you like. I’ll have a link to where I got the patterns I picked once we get to that part.
- Mod Podge. Any finish will do, I have matte on hand.
- An electric sander or sand paper.
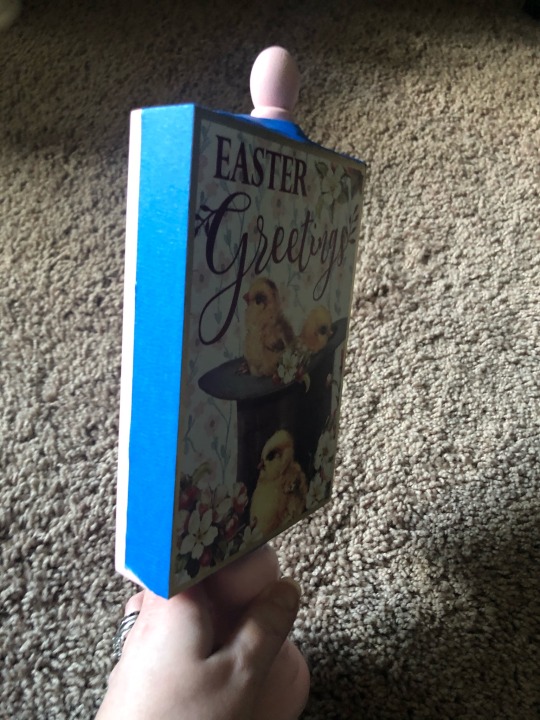
I started by using painter’s tape (you can also use masking tape) around the edges of the pink sign. I wanted to keep that pink color because it goes with what I’m going to use to cover up the image.
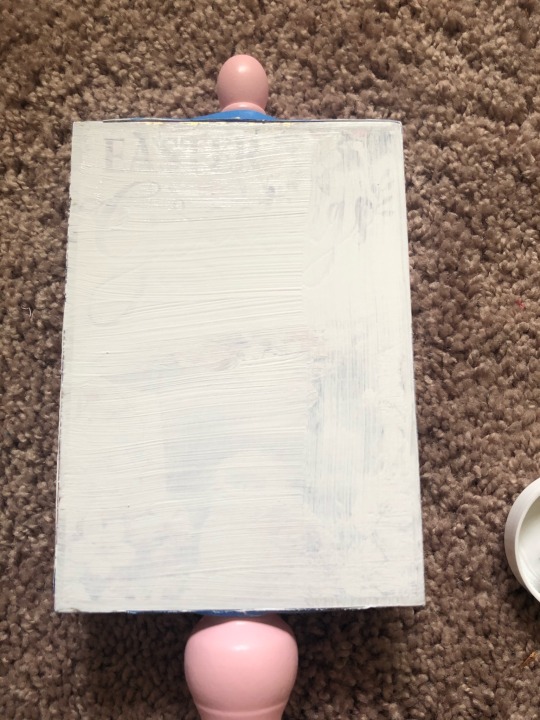
Just to make sure that the image of the chicks wouldn’t show through, I gave it 2 coats of white chalk paint. I love chalk paint because you don’t need a lot of it to cover up/ paint something plus it dries pretty quickly and matte.
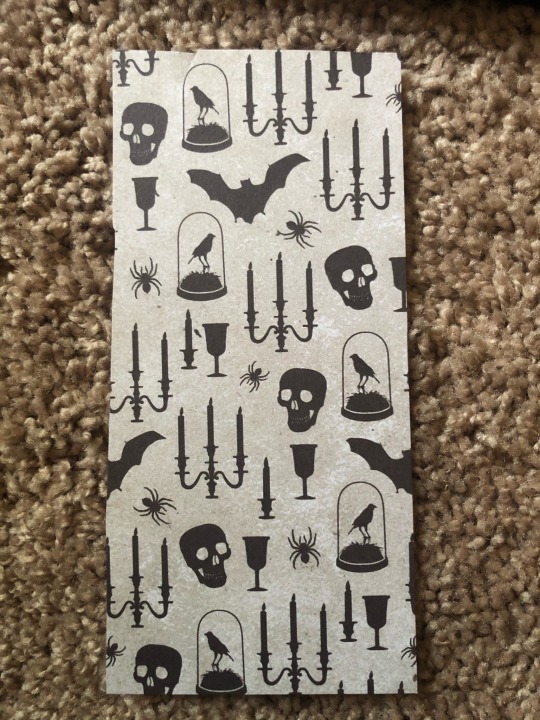
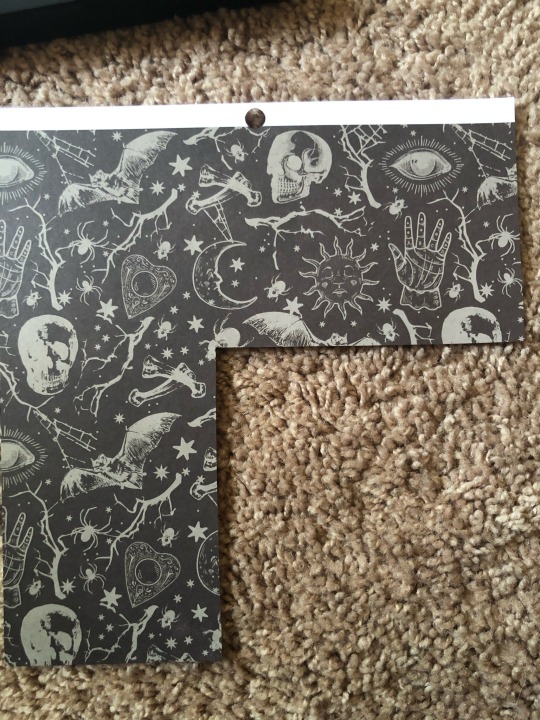
Once I had my image sufficiently covered, I picked out what paper I wanted to use. I picked this one because it’s just one of the best images I’ve ever seen!
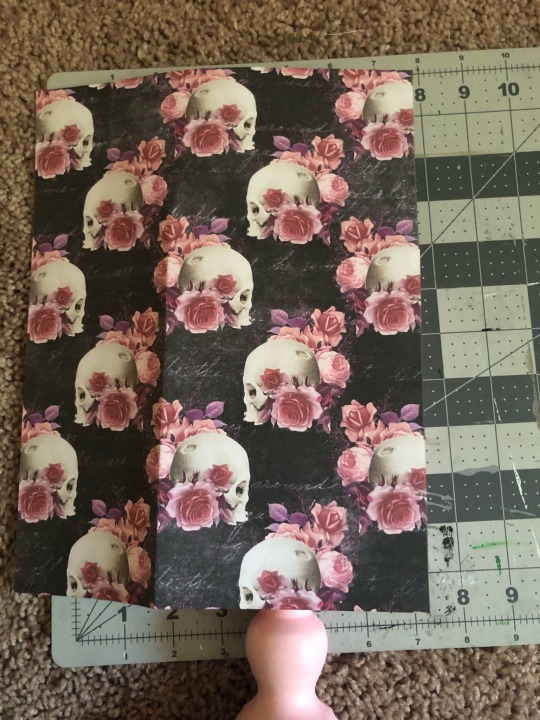
It’s perfectly dark and creepy with a dash of pretty flowers on it. I found it from THIS Etsy shop, which has been a GAME changer for me. I used to have to wait until Halloween when Michael’s gets all of their scrapbook paper in, but not anymore! I just selected the image I liked best (I found this one in the Pink Skulls Collection) and printed it out on some card stock paper I had on hand. I prefer card stock because it’s a little thicker (that’s what she said) than your regular printer paper.
To make sure the image would fit, I folded the paper to make creases where I wanted to cut. Normally, I’d trace out a pattern but this particular piece would not lay flat. Once I’d made the creases as defined as I could, I just cut along the lines and then checked it make sure it would fit, and trimmed off any excess.
Once I was happy with how it looked, I used some mod podge and a sponge brush to apply a thin layer on to the surface of the project and then placed the paper on top of it and smoothed it out to avoid bubbles.
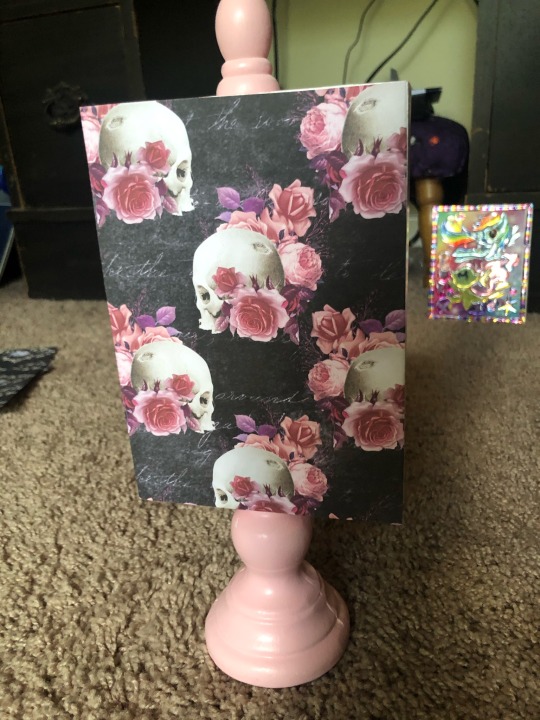
There you have it; this is how the first one turned out! I think I turned out really cute and kinda creepy all at the same time!
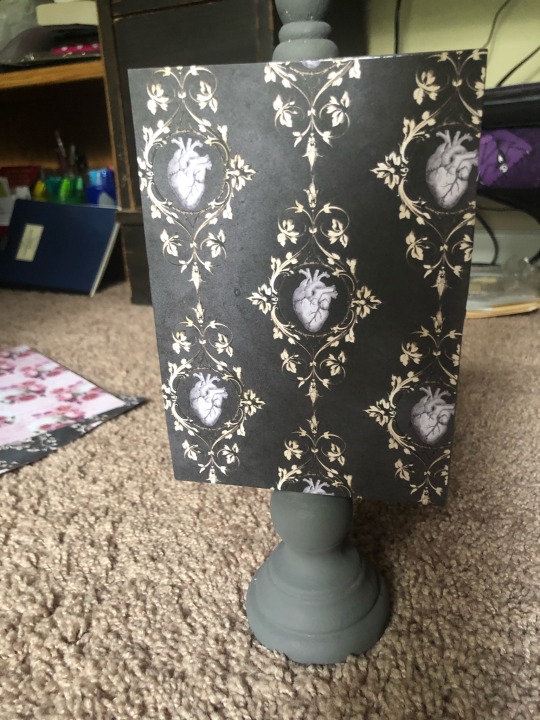
For the second sign, I did the same thing I did in the first. I Taped off the edges and painted the image over with the white chalk paint to make sure it was covered up. Once the paint is dry, I peeled off the painter’s tape and then painted the edges of the project with this grey chalk paint. After 2 coats, I was pretty pleased with how it turned out! I wasn’t worried about the paint job being perfect since it would be covered up any way.
The paper I picked for this sign was from the same Etsy shop I linked above. This came from THIS collection. It’s from the Edgar Allan Poe section (I’m a NUT for all things dealing with him.)
Anyway, so I repeated the same steps as in the first project to get the paper to fit (creased and cut) and then this is how it turned out:
Can you guess which Poe tale this paper is from?
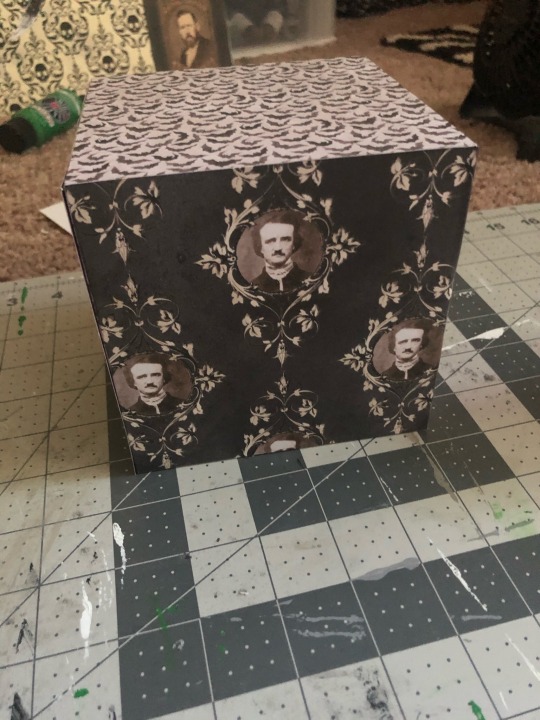
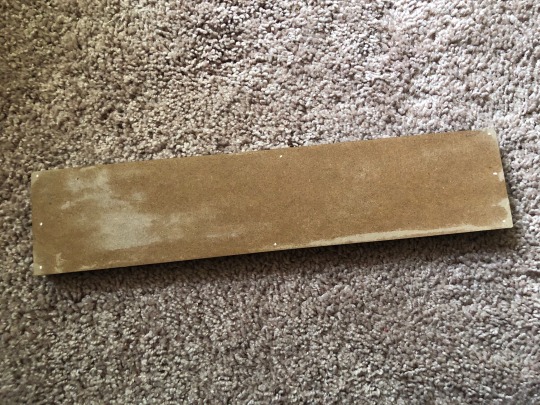
For the 3rd and final project, I wanted to recover this block I found. The first step though was to remove the rough texture from the block so that the paper would stick to the surface.
I have an electric sander that I used, but any sand paper would do the job (I’m really impatient).
So, once I had the rough texture off, this is what I was left with.
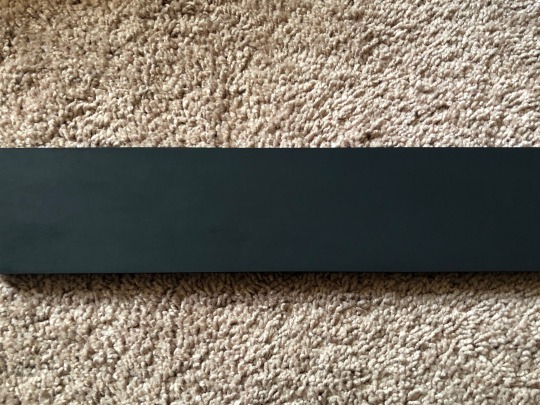
I picked out some paper I liked to cover all of the sides of the box and, since this laid flat, I was able to trace out the size that I wanted and cut it out. I, once again, used mod podge and my sponge brush to spread a thin layer on to the side I was covering and smoothed it out as I went to avoid bubbles or wrinkling.
I repeated this step until all of the sides were covered and this is how it turned out.
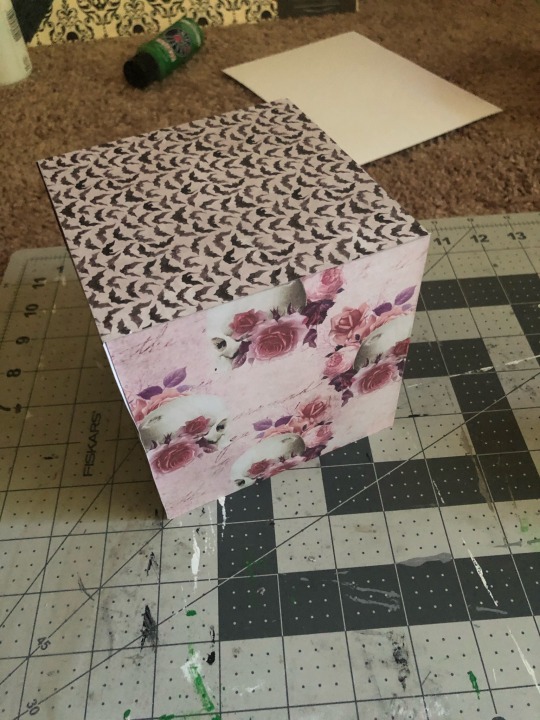
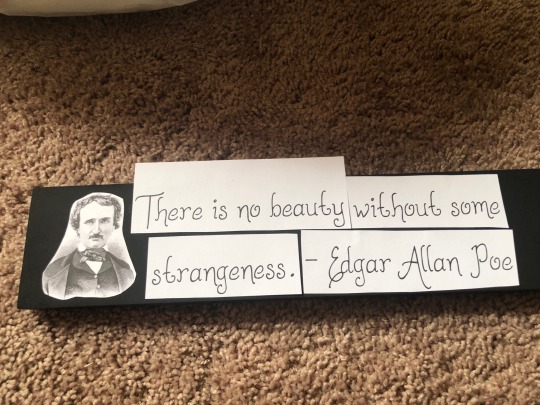
I couldn’t get enough of the Poe paper I found, so of course, I HAD to use this one one side of the project.
Now, where you put these is completely up to you. All three of these pieces are currently on a shelf at work, and I’ve already gotten a few compliments on them!
Hope you guys enjoyed this first round of DIYs, thanks for following! If you want to be tagged in posts like this, just let me know! Thanks again for all of your support, it really means a lot to me!
DIYers:
@flamencodiva @sandlee44 @screechingartisancashbailiff @algud
15 notes
·
View notes
Text
Road Sign
One of my favorite projects in my home is an on going one.
This started a few years ago, long before my husband and I bought our house. I thought it would be cool to have signs to fictional places along with the mileage from there to my our town, which is just outside of Atlanta, Ga.

Each sign starts pretty much the same, but the latest one I'm going to show you is was born from a cool little trick I've been seeing on YouTube.
Supply List:
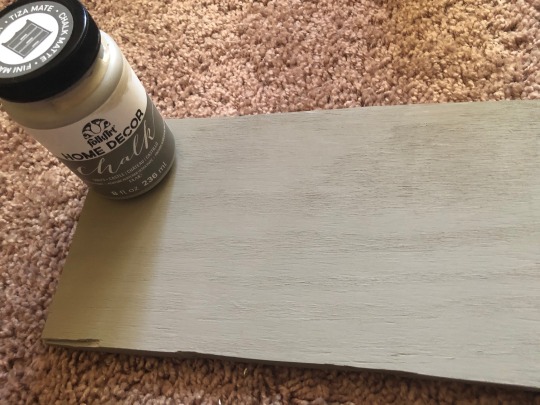
Wood (you can use any kind you have on hand. I've used everything from scrap wood to an old pallet that I broke down and cut. For this, however, I bought a 5x8 piece from Home Depot for around $5 and cut it down to size)
Paint (I used Folk Art chalk paint in the color Castle, found at Michael's)
Paint Pen (found at Michael's. I find this gives me a little more control than a traditional paint and brush)
Tape
Pen and pencil
Template (more on that later)
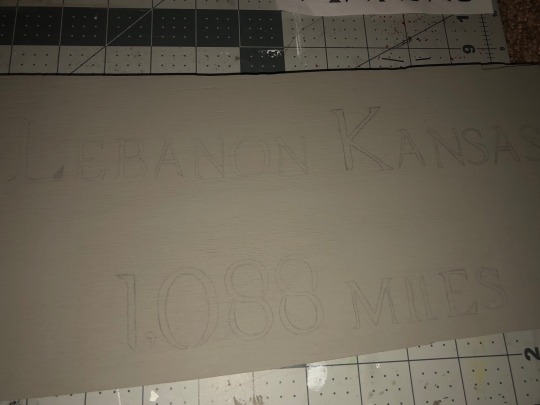
For this sign, I decided to go with the location of The Bunker in Supernatural. I just used Google Maps to figure out the distance.
I found the font on this AWESOME website called DaFont.com (it's called Supernatural Knight) and downloaded it on to my computer. You can use any font that's suitable for your project, I just wanted this to match the title card of the show.
I opened up a word document and then typed out Lebanon Kansas and the mileage and printed it out. Easy peasy, rice and cheesy!
Like I said in the supply list, I'd bought this piece of wood from Home Depot and cut it down. I believe they'll cut it in store for you, but the saw was down the day that I was there. So I headed to the next best place; my parent's house. My dad and I marked out how big I wanted the pieces (6 inches x 12 inches) and cut it down using a circular saw and a jigsaw.
Once my piece was the size I needed, I gave it 2 coats of the chalk paint and let it dry.
When the paint was dry, I cut out my template and placed it how I wanted it on my sign just like this.

When I had the placement the way I wanted it, I used the cool trick I learned from YouTube that I mentioned earlier. I used a pencil to shade the back of my template.

I taped it back into place and began to trace over the letters using a pen. I find that transfers the lead onto the projects better. When you pull back the template, you should have a perfect transfer of your letters, just like this.

I then took my Sharpie paint pen in metallic sliver and used it to fill in the letters how I wanted. I find this so relaxing, which is probably why I've done so many signs!

And this is how it turned out!

I'm so pleased with how it came out, now I've just got to decide where on the wall I'm going to hang it up!
I hope you guys enjoyed this latest project, make sure to like and share with your friends and followers. If this is your first time here, please consider hitting that follow button if you want to see more DIYs from me! Have a great day everyone!
DIYers:
@flamencodiva @sandlee44 @screechingartisancashbailiff @algud
12 notes
·
View notes
Text
Sign Makeovers.
So, I asked you guys, out of this batch of signs
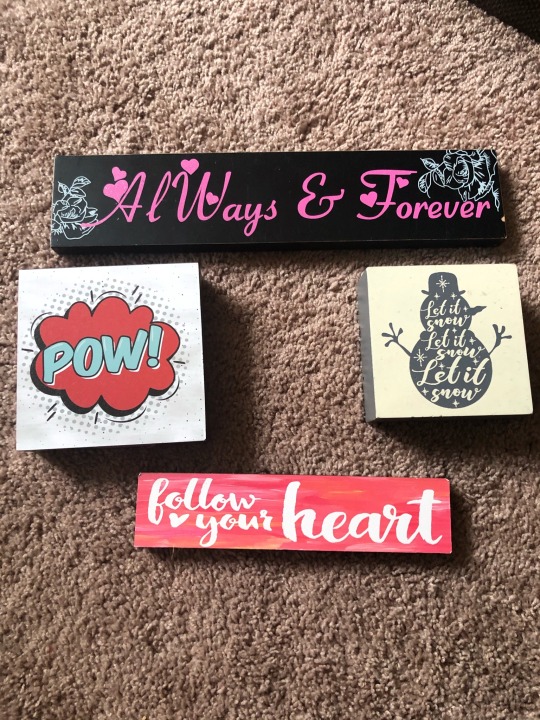
Which should I make over first?
The responses were “the big one” and “the top one” so I set out to do BOTH because I’ve got free time on my hands with this long weekend! Come along with me and I’ll tell you what I did to make these signs something really fun and cool.
Supply List:
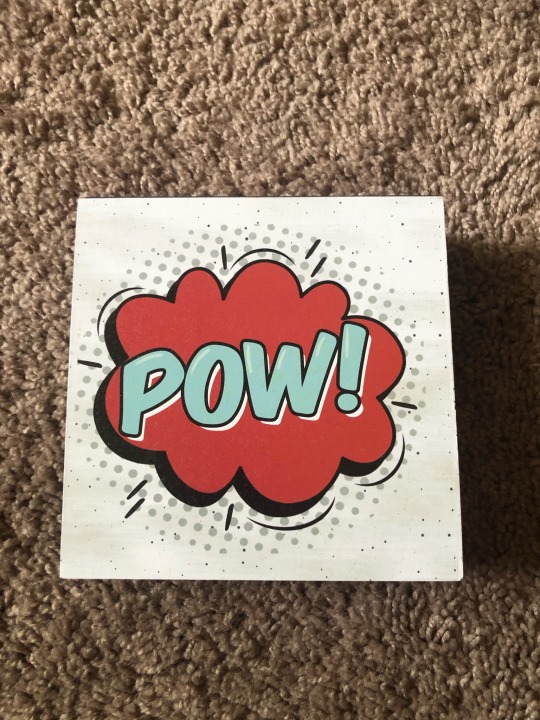
- Signs. I found the “Always and Forever” as well as the “Follow Your Heart” signs at my local GoodWill for $1 each. The POW and Let it Snow came from Burlington Coat Factory for $2 and 74 cents respectfully.
- Clip art. More on that later
- Scrapbook Paper
- Mod Podge
- Black and White Acrylic Paint
- Chalk Paint in the Elephant color (mine is by Waverly)
- Sharpie Paint Pens (I used red and silver)
- Electric Sander
So, for the “always and forever” the pink, glitter letters had to go, so I sanded it off with my electric sander. It took it off in just a few seconds and this is what I was left with.
The “wood” looks dark because I used a wet paper towel to wipe it down.
After two coats of black acrylic paint, I had this blank canvas to work with.
I decided I wanted to use this piece to make some sort of quote from my favorite poet/ King, Edgar Allan Poe. I searched on Pinterest (mainly my own boards, which can be found here) until I found a Poe quote that I wanted to use and I came up with “There’s no beauty without some strangeness”.
The image of Poe that I wanted to use came from THIS Etsy shop, where i purchased the clip art I mentioned in the supply list. I’d previously cut it out and put it to the side, because I knew it would come in handy later. I used Mod Podge to glue it on to the sign and moved on.
For the quote, I just typed it up on my computer and printed it out, then cut out the words and placed it on the sign how I wanted it and this is what I came up with:
I used the pencil transfer method I mentioned in a previous post to get the lettering perfectly on to the sign.
Once I had my quote transferred on to my sign, I traced over the pencil markings with my silver Sharpie paint pen and then let it dry.
While the paint was drying, I realized that the right side of the sign didn’t have any kind of visual interest, so I searched my craft stash and found some scrapbook paper I wanted to cut images from.
From this one I used the bird in the glass jar.
From this one I used the moon, the planchette and the sideways skull. I tried cutting out the sun but that proved to be too difficult for me, lol.
I cut out the images I wanted and then used Mod Podge to glue them on to the sign and this is how it looked in the end:

The perfect image of my King along with some strange and beautiful images, what more could a strange girl want?!
For the second sign, it was suggested that I do a Winchester Brothers sign, so this is the one that was selected.
I sanded it down to get rid of the weird texture that was on the sign and also to clear off the image that was on there.
I painted the sign with my elephant grey chalk paint (2 coats) and also painted the sides with black acrylic paint.
I decided it was high time I did the Game of Thrones and Supernatural Crossover I’d always wanted, so I found this image on Pinterest and printed it out.
I wasn’t able to include the part that says “salt and burn, the family business” (whomp, whomp) but I liked the image jut fine, so I was okay with it.
Using the same transfer method I referred to earlier, I traced this image on to my sign and then went over the pencil tracings with my paint pens in white and red.
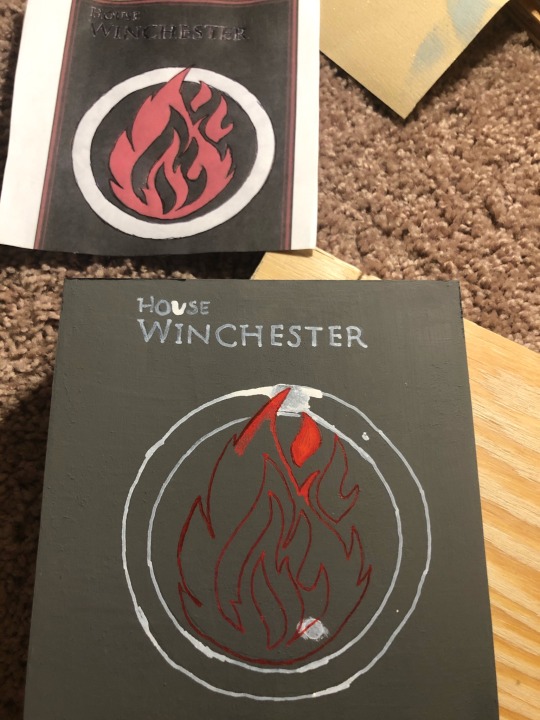
This is the “during” you can see how my paint pen dropped on to the sign, which I was NOT pleased about, but I had to keep moving along.
With some time, patience, and some white acrylic paint, this is what the finished product looks like.
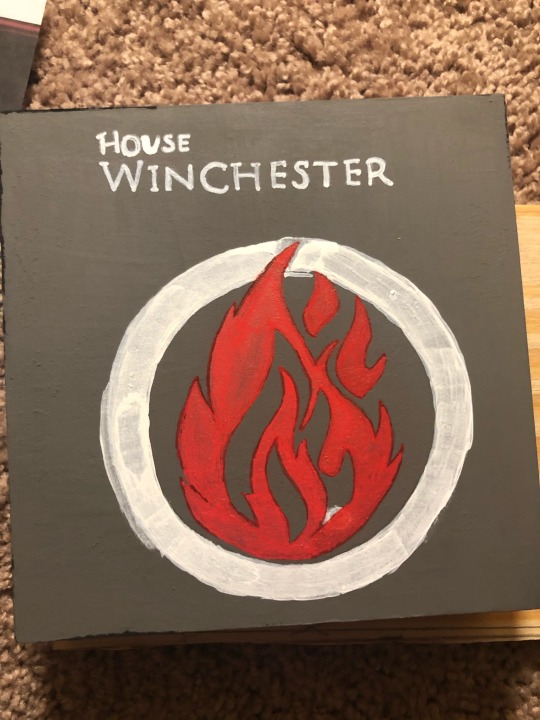
I plan on going back in with a finer brush and cleaning up that area where the paint dripped.
What do you guys think?! Pretty cool huh? What would you guys like to see me do with the remaining signs? Let me know in the comments!
If this is your first time here and you want to see more content from me, please hit that “follow” button and don’t forget to like and share this post with your friends and followers!
See ya’ll for the next one!
DIYers:
@flamencodiva @sandlee44 @screechingartisancashbailiff @algud
7 notes
·
View notes
Text
Snitches Get Cross Stitches!
Another VERY favorite thing of mine to do is cross stitch. I’ve had a lot of people say “oh, I wish I could cross stitch.”
Honestly? It’s about the easiest stitch you can do.
Supply List:
Embroidery Hoop (they’re fairly cheap, come in various sizes and materials (such as plastic and bamboo) and can be found at pretty much any store. I’ve even seen them at WalMart.)
Embroidery Fabric (I’ve gotten mine from Joanne’s, Michael’s and Hobby Lobby)
A Pattern (more on that later)
Embroidery Thread/ Floss (it comes in every shade of the rainbow, is EXTREMELY cheap and can be found nearly anywhere)
Sewing Needles
Time and patience.

When it comes to selecting the pattern, it depends on your skill level. You don’t want to pick anything too difficult and get discouraged right away. A lot of craft stores sell kits that come with everything you need, that’s an excellent launching pad if you’re just starting out.
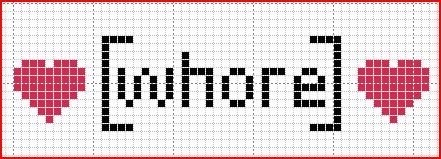
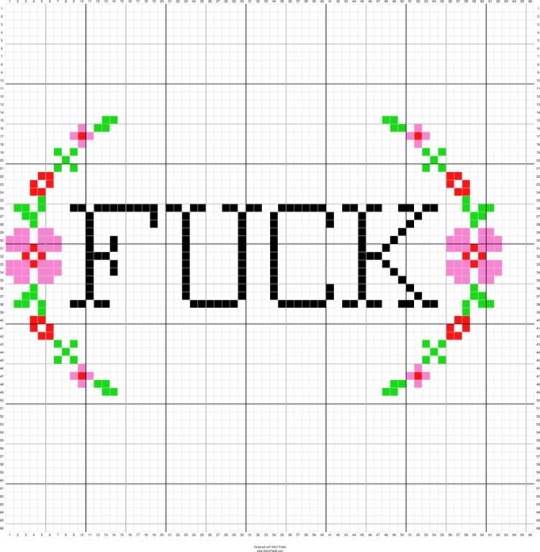
If you’re a little more advanced and you’re looking for fun patterns, Etsy has some really good ones. They have everything from rap lyrics, to swear words and even seasonal stuff. Just depends on what you’re looking for.
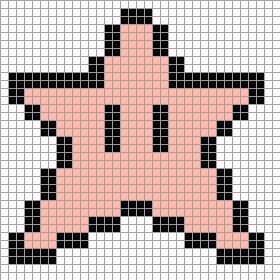
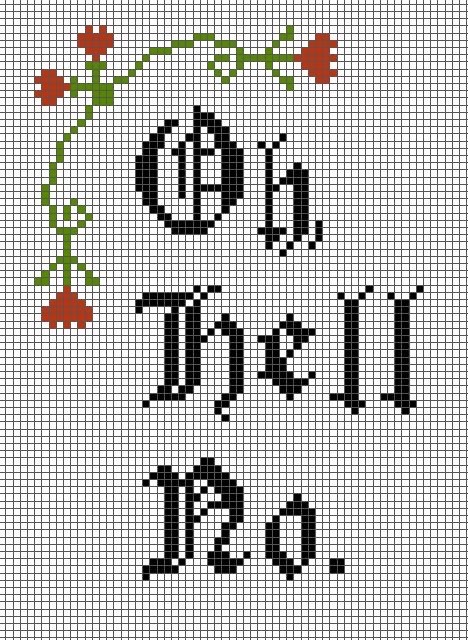
Pinterest also has easy to follow (and free!) patterns to follow. Here are just a few of my favorites.
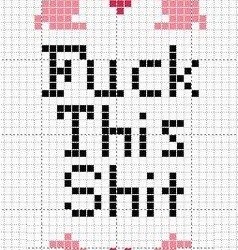
Each little square is a stitch, and how you make the stitch is so easy, it should be criminal.
Take your needle and thread it. Knot it at the end and find your starting point (your pattern will usually tell you where to start. Personally, I like to work from left to right). Then you make an X with your needle and thread. BOOM, you’ve just done your first cross stitch!
Now, you’ll need A LOT of time and patience; a lot of mishaps can happen and that’s okay! Your thread/ floss WILL knot, you can lose your stitch count....shit happens! When I get frustrated, I just walk away for a while and it’s no big deal. Your project isn’t going anywhere, it’ll be there when you get back. I promise!
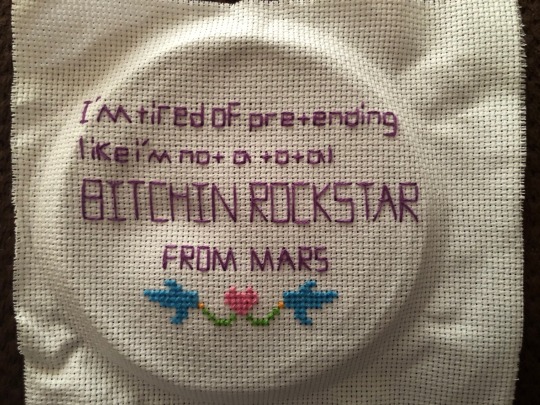
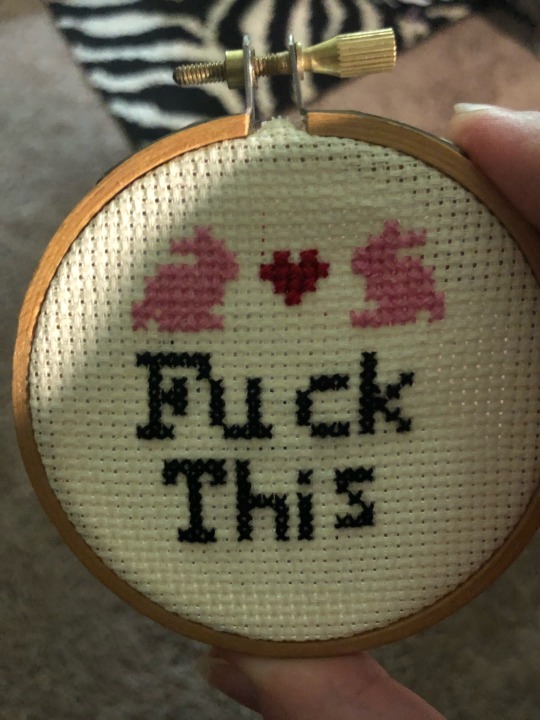
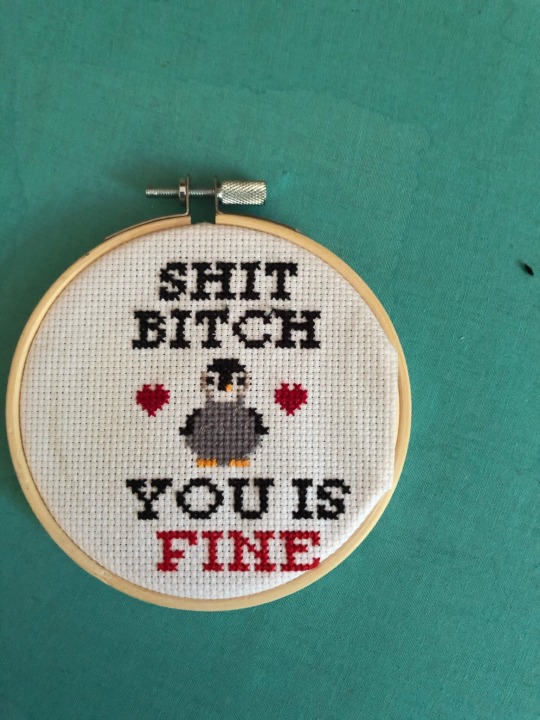
When you’re done, you can display your project however you like. The easiest way is in the hoop, which you can just hang up, like so.
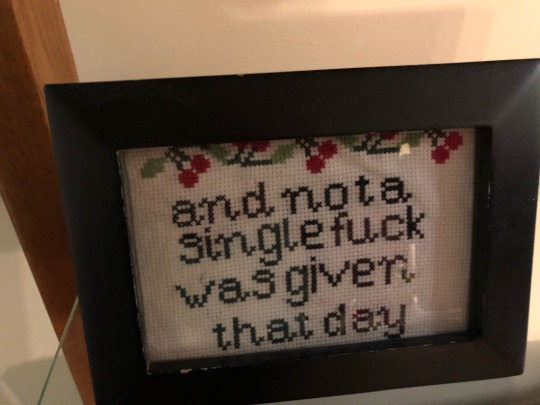
Or you can put it in a frame like this
If you guys want to see more patterns that I’ve used/ that I’m working on, let me know and I can make this a 2 part blog!
Hope you guys enjoyed this! Please don’t forget to like and share with your friends and followers and if you want to see more crafty content from me, hit that follow button!
See you guys for the next one!
DIYers:
@flamencodiva, @sandlee44, @screechingartisancashbailiff @algud
7 notes
·
View notes
Text
Snitches Get Cross Stitches! (Part 2)
Hey Guys!
So, since I talked about cross stitching last time, I thought it would be fun to share some of the patterns I’ve bought and am currently working on. Maybe one of the will inspire you to get stitching!
My Favorite Murder:
Stay Sexy. Don’t Get Murdered.
You’re in a cult, call your Dad
Get a job, buy your own shit, stay out of the forest
Supernatural:
Anti-Possession Symbol
Harry Potter:
Glasses and Scar
Random:
Ugandan Knuckles (aka Do you kno de wae?)
Here are some pictures that are also pretty easy to follow, especially if you’re just starting out/ want to experiment. **NOTE: these are not my patterns, I found them on Pinterest so all credit goes to the original posters**
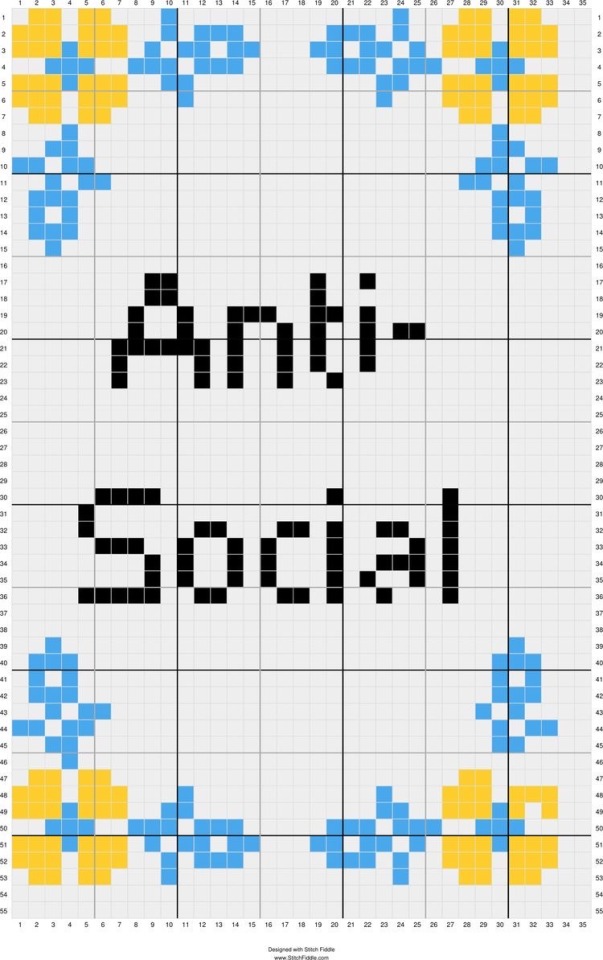

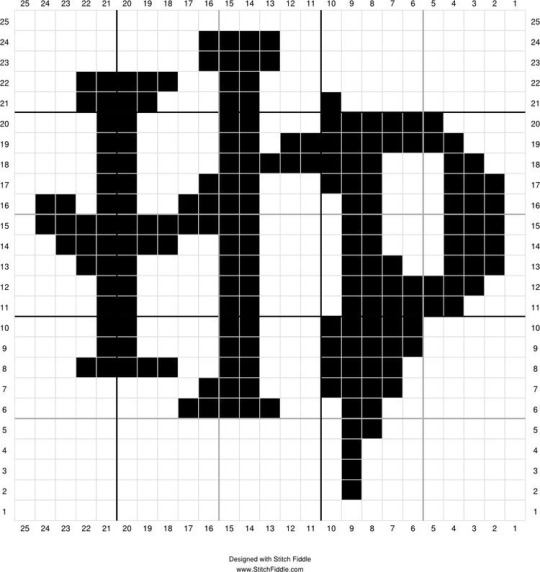
See the pattern above? Notice the numbers by the colors? When you go shopping for embroidery thread/ floss, those are the numbers you're going to want to look for. When you get patterns, this is standard for them to have.
Do you guys have any questions? I’ll answer them as best as I can and give the best advice that I can.
Hope you guys enjoyed and will consider liking and sharing this with your friends and followers. If this is your first time here and you want to see more content from me, please feel free to hit that follow button!
See you guys for the next one!
DIYers:
@flamencodiva @sandlee44 @algud @screechingartisancashbailiff
0 notes
Last Seen Blogs

idontknowsorryy
al1tt13m3ss3dup

gugutavo
Sem título

illustratingari
Crosshair’s Toothpick

runaalister
Rodrigues
approximately7hearses
just another ghoul