#its just a super quick 20 minute warm up doodle
Text
UH- UM- MY HAND SLIPPED-
Tw// suggestive material

#was reaallllyyy debating if i should post this one here#so im doing so when its hopefully quiet#its just a super quick 20 minute warm up doodle#but like idk how the tumblr would like stuff like this :'>#all my rise friends you didnt see this-#i have no shame-#HEHEHE ANYWAY I LOB THEM :D <3#tw // suggestive#?#just to be safe yk?#tryna think about others#HOPE YOU HAVE A LOVELY EVENING <3#MWAH!#tribbletalks#tribbleart#huskerdust#angel dust#husk#hazbin hotel#hazbin hotel fanart#hazbin fanart
2K notes
·
View notes
Text
Tutorial: Make a Canteen from a Birdhouse Gourd!
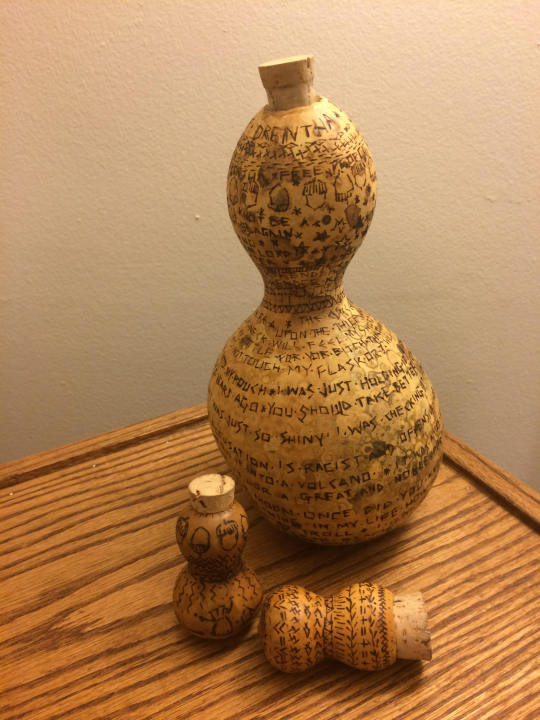
I’m always on the lookout for lightweight, character-appropriate ways to carry water around at Dagorhir events, so when I spotted birdhouse gourds drying in my gardener-mother’s back hall, I knew I had to beg one off her to turn into a canteen. The process was interesting enough that I thought I would share!
You’ll need:

Gulf Wax + a cup to pour it with.
A thoroughly dried birdhouse gourd
A craft knife
A handful of gravel
A dust mask (like the kind you wear to paint and sand around the house)
1 lb of paraffin wax (look for it by the canning supplies or buy it online. I buy Gulf Wax brand, which should be closer to ~$6 in physical stores)
A throwaway container for melting the wax (an empty tin can or plastic container works well)
A stove and a pot of water
If you’re playing along at home, you can buy pre-dried birdhouse gourds on eBay. These come in many different shapes, but they all have one thing in common: unlike, say, pumpkins or butternut squash, they have really thick rinds. This is why the drying is the important part: these thick-walled gourds are hollow when they’re dried, but it takes a long time for them to be ready— between six months and two years! My gourd was already dried, so I was ready to go.
Warnings:
You’ll be playing around with a fair number of hazardous processes and, in one case, a hazardous material (gourd dust, ick). Woodburners can burn YOU, and gourd-dust, when inhaled, can make you really sick, and hot wax is dangerous, flammable, and annoying to clean up. Take your time and be careful, and don’t let kids do this unsupervised!
Process:
1. Decorate your gourd!
I wanted my gourd-bottle to be interesting, so I used a cheap soldering iron from the hardware store to do some pyrography on its surface. I practiced on some wee gourds I’d bought from a merchant to get the technique down.
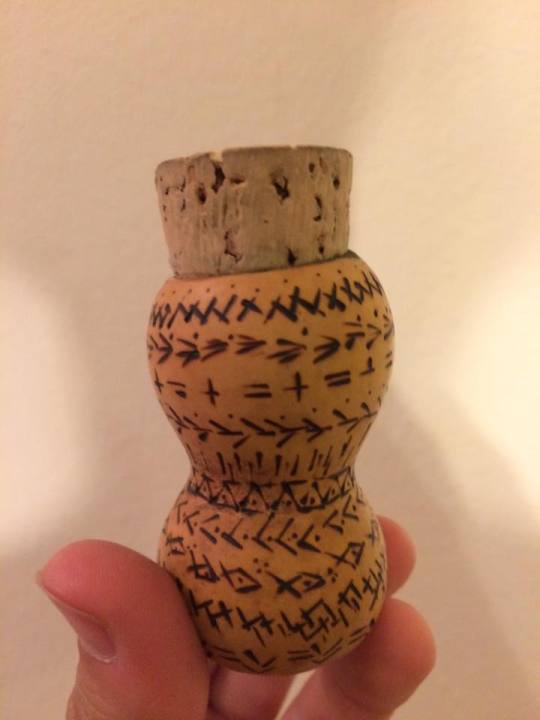
Here’s a tiny gourd I use to hold healing potions! The pattern was inspired by basic embroidery stitches.
The gourds have thick walls, so there was no danger of burning through it. Do ALL your wood burning decoration before you wax the gourd’s interior. Paraffin WILL catch on fire if it gets hot enough, so don’t try to use your iron on your finished gourd!
The gourd is decorated with instructions for how to find Drentha camp, a list of my names, titles, and boasts, a bunch of doodles, and a long curse detailing what will happen to anyone who steal its. It took a few sessions of Drentha’s Skype craft nights to finish it, but it wasn’t difficult— just tedious!
2. Cut the top opening

This will by the hole through which you’ll remove the gourd’s pith and seeds.
I had decent luck cutting through the top with a craft knife. The walls of the gourd may be thicker than you expect-- mine are about 1/4″ thick-- so work carefully. Some people have better luck cutting this hole open with a dremmel or by working around the opening with a thin drill bit.
Don’t make this hole too large. You may want to trace the cork you’ll use as a stopper to see how big the hole should be. You can always go larger, but you can’t fix a too-large hole.
3. Clean out your gourd.
The gourd is dried out, so it’s not wet or fleshy inside like a pumpkin, but it will need some work before the internal cavity is totally hollow: it still has pith and seeds inside.
The easiest way to get the gunk out is to drop a handful of sharp gravel into the gourd, shake it like blazes, and dump the ensuing dust, seeds, and gravel back out. Repeat until you’re not getting big pieces out. You might want to run a bent bit of wire along the inside to dislodge any stubborn seeds. Anything you don’t pull out will get encased in wax, though, so it doesn’t need to be perfect.
Warning: When you clean out your gourd, you’ll be producing a LOT of gourd-dust. Inhaling these particles can make you feel awful, so wear, and use, your dust mask! If you go without, you might come down with something crafters call the “gourd flu.” Even worse, the inside of your gourd might have been moldy, which is not something you want to introduce into your lungs. Buy and use a mask, dang it.
If your gourd has a “neck,” like mine, and the opening in it looks really small, try poking down through it and testing the “walls” of the gourd there. You might find that there are a few layers of papery pith there that you can punch through and pull back out, giving the gourd’s neck a larger opening so you can fill it with water faster.
4. Heat up your gourd.
Put your oven to 200 F, no higher, and put the gourd inside on the rack. This will gently heat the gourd up so the wax won’t instantly solidify when you pour it into the gourd. We want the wax to stay nice and liquid so we can slosh it around and coat every bit of the cavity. Heat the gourd for ~20 minutes.
Lay down some newspaper or paper towels on your work surface. You’ll have to work fast when the wax is ready, so everything should be in its place BEFORE you need it.
5. Melt your wax in a double-boiler.
Coating the inside of your gourd will make it waterproof, which will keep your water from tasting like old dried squash and prevent the inside of your canteen from getting moldy.
I used about half a box of Gulf Wax, or 1/2 lb, but you can get by with using a single block, depending on the size of your gourd.
I’m impatient, so I chopped my wax up into small pieces on my cutting board so it would melt faster. Paraffin is perfectly food-safe (though not exactly tasty), so no worries about toxicity here.

Paraffin is flammable, so rather than melt it directly over the stove, we’ll be making a quick and dirty double boiler. This just means we’ll put the container with the wax in a pot of hot water. I sacrificed a cheap Tupperware plastic container to hold my wax, but a clean aluminum can also works. (Since we’ll be pouring out hot wax later, the can might be even better— crimp the top of the can, a little, and it will have a spout that facilitates pouring out the wax!) In a double-boiler, the wax can’t get hotter than the temperature of boiling water, so there’s no anger of it catching on fire. Just make sure you don’t drop wax scraps onto the burner of the stove!

Put your wax-container in a small pot containing hot water to about half its height. Turn the stove to medium-low heat. Don’t walk away from it— again, paraffin is a synthetic that will catch on fire. The wax will melt faster if you stir it around a bit and break up any clumps that form.
Turn the stove off when the wax is melted. The hot water will keep the wax from solidifying.
6. Coat the inside of the gourd with melted wax.
You’ll be sloshing hot wax around in the next step, so put on some oven mitts and shoo small children and underfoot pets out of the way.

Grab your gourd from the oven (it shouldn’t be too hot to touch, but be careful anyway), and, working quickly, pour your wax into its interior. Slosh the wax around so it coats the cavity. Don’t worry if you’re not getting everything this pass— we’ll do another coat. When the wax starts to feel solid, not liquid (it’ll swish in a slightly different way), pour the excess wax out of the gourd back into your container.

Your used wax might look disgusting because it trapped bits of the gourd’s inside that you couldn’t get earlier. That’s fine! Better trapped in wax than in your body. My used wax was so gross that I decided to melt a new batch for the next coat. This is up to you.
7. Set the gourd aside to let the first coat cool.
Don’t put it back in the oven (you can turn that off, now). The first coat of wax needs to cool completely, or you’ll just melt it right back off when you pour more hot wax in for the second coat. After half an hour or so, it should be solidified enough for you to do coat #2.
8. Add another coat of wax.
Melt your wax again, but don’t put the gourd back in the oven. This second coat is to get the bits you missed the first time, so we don’t want to melt off the first coat.
Pour the wax into the gourd again and carefully swish it around, paying special attention to the neck and the top “bulb” of the gourd. Pour it out.
9. Stick the cork in while the wax is still warm.
While the wax is still hot around the opening of the gourd, jam your cork in so the wax will take the impression of its shape and create a good seal. You might need to cool the gourd and do a third coat for this, but that’s fine!
The outside doesn’t really need to be coated, so you’re basically done!
10. Rig up a strap for your gourd.
Once your cork fits in and the gourd is cool, you’re done waxing! Your gourd is now waterproof. Rig up a strap to carry it and carry it with pride! (I was rushing to prepare for a battle, so I just threw my Amtgard warrior sash around mine. It deserves something nicer!)

Since the walls of the gourd are so thick, my water stays cool even in the Florida heat. Also: I am super cute. ;)
My finished canteen is about 9″ tall and holds 40 oz water. I now can carry water to carry to the field without resorting to my ugly mundane Nalgene water bottle (which only holds 32 o!), and I have a new piece of kender-appropriate gear to add to my kit.
I had tons of fun making this, so I’m going to make some more wee containers. They would be perfect for holding shots of liquor, or for carrying salves and balms. Tiny pot of aloe for sunburns? A gob of lip balm? Small container for Tylenol or candy? There are so many uses for these beyond drinking gourds— and now we can ALL explore the possibilities!
(Huge thanks to my mom for giving me gourds, inspiring me to be crafty, and never judging me for being a weirdo. <3)
#canteen#larp#dagorhir#sca#tutorial#costuming#props#gourd#larping#soft kit#amtgard#birdhouse#pyrography#belegarth
25 notes
·
View notes
Last Seen Blogs

innermelbourne
Exploring Opportunities in Melbourne’s Cleaning Industry


and-so-he-rambled
Ravens Keep

ru10
Apps and Games

sandsstorms
unplugging reality