#it could not because not even the equation for a parabola was correct
Text
That sure sounds like something bad is going to happen to these teens just doing their homework.
#this is old but i never posted it#the context is we were playing with that character ai thing in april and i was trying to see if the thing could properly answer math#it could not because not even the equation for a parabola was correct#(so at the end of the story we had was eli crying about not know what a parabola is)#but what happened in the story is theyre parallel studying in liam&charlie's apartment when they hear screaming and police sirens#they look out the window and then look up and they see a man on the opposite apartment complex standing on the edge of the roof#drama ensues and charlie and joey have an extended interaction that makes me want them to be friends rather than acquainances thru eli#but that whole ordeal was not canon but it does open the door to my mind. so that ai shenanigans wasnt all negative#i dont touch the thing anymore tho. but i did find this pic again and remembered...i need to draw these kids more#and they are my kids now. i made them in high school so they were my peers but now they are my children#oc stuff#find eli#joey#charles#eli#also char and joey were able to talk the man down or at least distract him enough until EMTs were able to bring him down
17 notes
·
View notes
Text
Nether Portals and Linear Maps
If you’re an avid minecraft player, you probably know about how useful the nether dimension can be. If you have somewhere far across the overworld you need to get to, you can considerably shorten the distance by taking a trip through the nether. Some players will even have a network of portals corresponding to every important place in their world!
How does one go about planning the locations of all these portals? Let’s take a closer look at how they work, and how we can visualize them as a mathematical function relating overworld coordinates to nether coordinates, and vice-versa.
The basics
The reason nether travel is so efficient is because, in effect, distances traveled in the nether are shorter than distances in the overworld. The exact scale is a factor of 8: in other words, for every block you travel in the nether, you travel 8 blocks in the overworld.
This simple principle is what lets you jump between nearby portals in the nether to quickly cross vast distances in the overworld.

With that information, we can figure out exactly where to place our portals so that they link up nicely. If you know the coordinates of a portal in the overworld, you should be able to figure out where that portal ought to come out in the nether. This is where the mathematical concept of a linear map helps us visualize the situation.
What in the world is a linear map?
A map, or mapping, in mathematics is simply another word for a function. You’ve probably seen functions in school: they look something like f(x), and when you plug in a number x, you get a new value out. If your function is a parabola, then f(x) might give you the square of x, for example.
The truth is, a function doesn’t just need to use numbers. You can put anything you want into a function and get something out, as long as it makes sense. For example, you could have a function that takes a point in the overworld and converts it to a point in the nether. Isn’t that exactly what a nether portal does? You build it somewhere in the overworld, and then it automatically builds a new one at the corresponding point in the nether.
Let’s imagine our hypothetical mapping that takes a point in the overworld and converts it into a point in the nether. You can take any coordinate in the overworld, and it will correspond to some unique point in the nether, and vice versa. The “linear” part describes what kind of mapping we have. The important thing is that it’s a pretty simple conversion: you can imagine the nether like a scaled down version of the overworld.
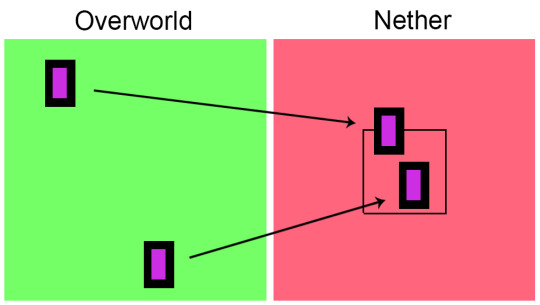
The black square in the nether portion of this image corresponds to the layout of the overworld that has essentially been scaled down in the nether-- notice that the portals are in the same relative positions, just closer together.
If you follow the Hermitcraft series, you may have seen their clever design for a nether hub that illustrates this idea pretty well. They created a giant scale map on the floor, showing how the overworld might look at each point. I assume the scale is 1/8, and the portals on the map correspond to the locations of the portals in the overworld. This way, it’s easy to imagine striding over a world that’s 1/8 its size when you take a shortcut through the nether!

[video source]
This is confusing, what does our “linear mapping” actually look like?
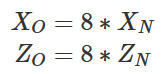
The way to convert between overworld and nether coordinates is actually pretty simple. Here are some functions you can use to find nether coordinates using overworld coordinates:
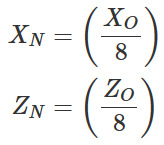
(The subscripts N and O show which X and Z coordinates correspond to the nether and overworld, respectively.)
This means that when you place a portal at a point X, Z in the overworld, a new portal will attempt to generate near the points X/8, Z/8 in the nether. Furthermore, a little algebra can show us how to find overworld coordinates from nether coordinates:
(As a bonus, this could be called the inverse mapping of the first one.)
I read this simple relationship on the Minecraft wiki, but I was actually a little skeptical. My portals don’t always show up at exactly the position I expect: if I place a portal at the overworld’s origin, (0,0), then my portal might actually show up some ways away from (0,0) in the nether. Is the real mapping more complicated? Should I add some kind of offset to those equations?
I decided to jump into a new world and take some empirical data. I went into the nether and started building nether portals, recording their coordinates, and seeing where they come out in the overworld. Here are some charts showing how the nether coordinates of my portals compare to their generated overworld coordinates:


These points follow a line very nicely! Notice the different scales of the axes. It turns out that each of these lines has a slope of just about 8, which is confirmed by the best fit lines (their equations are shown under the title of each chart). That’s what we expect, regardless of any potential offset-- every coordinate unit in the nether is worth 8 coordinate units in the overworld.
Notice the intercept of each line. That’s the part of the equation that’s added or subtracted from our x term. They’re very small-- remember we’re working in units of single blocks. An intercept of 1 or 2 blocks is pretty negligible, and the pictures confirm that each best fit line seems to intersect the origin pretty closely.
This means I was wrong about the possibility of an offset when converting between overworld and nether coordinates. Those equations posted above are exactly correct. If you build your overworld portal at a location of exactly (X,Z) then it will try to come out near (X/8, Z/8) in the nether, every time. Convenient, and quite easy to calculate!
The dirty and imprecise truth of how nether portals work
When I was collecting my empirical data for the charts, I also considered trying another experiment where I do the opposite of what I did above: build portals in the overworld, and see where they come out in the nether. Trying this method really highlighted some of the quirks of nether portals, and how they don’t cleanly follow all the rules I just laid out.
For one thing, the world of Minecraft is laid out in discrete blocks. After doing the calculations to find where a nether portal should come out, you will likely end up with decimal answers, not whole numbers. But you can’t have half of a block. In practice, our mapping can’t be one-to-one-- that is, every block in the overworld can’t correspond to a unique block in the nether, because if you think about it, a few nearby blocks in the overworld might all come out into one nether block. When deciding where a portal should come out, all that Minecraft can do is choose something close.
Another wrinkle is that when the player constructs a portal and goes through it, a new one won’t be immediately generated; first, the game checks to see if there is another valid portal near where it should come out. If so, the player will come out there instead. This is how the game makes it so portals don’t have to be exactly on the corresponding coordinates in each dimension. They just have to be close enough to be linked up.
Every time the player goes through a portal, the game will find the corresponding location in the other dimension, then search around 128 blocks in both coordinates for the closest nearby portal the player can come out. A new portal will only be generated if this check fails to find a valid portal.
Remember that distances in the nether are “compressed” compared to distances in the overworld. A distance of 128 blocks in the nether corresponds to 1024 blocks in the overworld. This means if you have two portals less than 1024 blocks apart in the overworld, they can come out of the same portal in the nether. You can easily make a lot of overworld portals take you to the same nether portal. If you think of portals as the “function” that takes the player from an overworld coordinate to a nether coordinate, then this function is definitely not one-to-one!

[photo source]
I got to experience this phenomenon firsthand when I was collecting empirical data. I tried constructing a few overworld portals so I could record where they generate in the nether. Embarrassingly, I took data for a couple portals before I realized they were all sending me to the same place in the nether. I wasn’t moving far enough for my portals to have to generate new ones in the nether.
There was another occasion where I built an overworld portal and something interesting happened. I moved far enough that this one would have to generate a new one in the nether, but it didn’t come out quite where I expected. My overworld coordinates were clearly not exactly 8 times the nether coordinates. Then I realized I was surrounded by a lava ocean. Rather than spit me out over lava, my portal looked for a safer location to generate, on a small island of netherrack.
It actually ended up a fair bit farther away than expected. When I tried going back through my portal to the overworld, I was greeted with unfamiliar terrain. My portal in the nether was so far away from where it was “supposed” to be, it couldn’t even link up with my original overworld portal, so it had to generate a new one!
This was kind of a complicated anecdote, so here’s an illustration that may help:
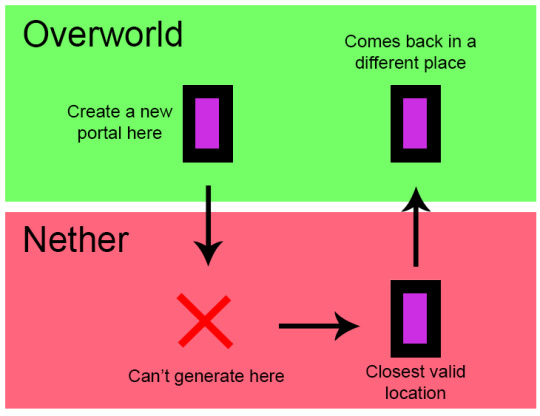
This is all to say, the behavior of nether portals in practice doesn’t exactly match up with our mathematical model. The game has some clever mechanics to make sure they generate in practical locations, but these can lead to some funny situations.
The only way to avoid these problems is to do the work yourself: make some calculations and build your portals exactly where you think they should go. Remember that your nether and overworld portals will always link up to the closest ones in their corresponding dimensions, so if you do it yourself, you can make them work exactly how you want! If you want my advice, try scrawling out a table to keep track of all your important world locations.

4 notes
·
View notes
Text
Desmos Pre-Conference 2018 Recap
This is a quick blogpost that I’m using to recap just some of the information from the Desmos Preconference before TMC18. I was dealing with some other stuff when I returned from TMC, and then I had to take a short few-day jaunt to see my parents/aunt/uncle. Now I’m finally home and starting to do things like write college recommendations and think about my new class for next year (Algebra II). But I’m afraid if I don’t take the time to reflect on some of what I took away from the conference, I will not end up using it. But at the same time, I feel like it’s so much stuff that to do it comprehensively, it will take too long and that’s keeping me from starting. So here’s my pledge: I’m just going to do what I can, and not worry about being incomplete, and then I’m going to #pushsend.
Tonight, I’m going to #pushsend on the desmos preconference day.

I went to one session, led by Heather Kohn, David Sabol, and Mary Bourassa. These three desmos fellows shared how they use Desmos in the classrooms. Here are a few gems:
Heather often creates handouts to accompany activities. For example, for Will it hit the hoop? she has a spreadsheet for kids to fill in (e.g. “Predict, Screens 5-11” “Analyze, Screens 12-19” and “Verify, Screens 20-26”).
I shy away from doing cardsorts (or even short activities) on desmos because I tend to have some groups finish way earlier than others. But this would happen even for paper cardsorts! So here are some tips. First, just so all groups start at the same time, you can pause the activity on the first screen (which you can have be an introductory screen). When everyone is ready and logged in, you can then unpause the activity which allows everyone to start at the same time. More importantly, you should create a slide after the cardsort/activity which links to another activity or has some extra practice for those kids to work on. And for extra fun, you can have this slide be a “marbleslides challenge.” But one tip is to use the teacher dashboard to pace the activity to the slide before the challenge, so that you can make sure kids aren’t rushing. (You can check in with the first group done and ask them a few questions to make sure they’re getting things.)
You can do a Which One Does Belong on Desmos (example: go to https://student.desmos.com and enter 5CK W7N). Have kids vote on which one doesn’t belong. You can then display how they voted! If no one picks one, after they finish and you discuss, you can have them go back and everyone has to pick the one that wasn’t picked… and then explain why that last one might also “not belong.”
David was worried about how kids will access desmos activity knowledge later. There’s a lot of digital work and verbal work in class, but then things aren’t archived. So here’s a great example of how David deals with this. He used Andrew Stadel’s “Math Mistakes with Exponent Rules.” On day 1, he used the first day PDF to have kids work the problems in class. Then on day 2, he screen grabbed the second day PDF and made a desmos cardsort (sorting them into true/false) and used the dashboard to showcase wrong answers and have class discussions. Also, after the cardsort, he had a screen that said: “Make a FALSE statement that a classmate may think is actually TRUE.” Then that night he created — using what kids wrote for their false statements — a paper copy with all these FALSE statements (sometimes there’s a true statement that a person wrote!) where kids had to identify the errors!
A great question in a desmos activity is to show a lot of work/visualizations/etc. and write: “What would you tell this student to reinforce what they know and correct their errors?” If the student work has some nice thinking and some subtle not-so-good thinking, this often will lead to solid class discussions.
Mary uses Desmos occasionally for assessments. There were only a few questions, but they involved deeper thinking (e.g. given a graph of part of a parabola, can you come up with the equation for the parabola?). The presenter asked her kids to do all their written work on paper handed out for the test. Yes, students could revise their work/answers based on what they saw on Desmos, but that had to be reflected in words/notes/changes on the written paper. So a student guessing-and-checking on desmos with no supporting work will not garner credit. (For students who finish early, put a screen with marbleslides challenge.) One big note: make sure that at the end of the test, every kid goes to a blank last screen, and then PAUSE the activity. That way kids can’t come back and rework problems or show other students particular questions on the assessment.
Rachel K. (attending the session) said that she often had kids project their laptops up to the airplay and lead the class through something they found/built/figured-out on the Desmos calculator, or will have one kid lead a desmos activity on the big screen.
I often worry about how to lead effective discussions on activities that kids are doing. For pre-existing Desmos built activities, there are “teacher tips” that help teachers figure out what to focus on and how to facilitate conversations. But more importantly, whether Desmos built or random-person built, every activity has a teacher PDF guide (Click on “Teacher guide” in the top right hand of the screen for the activity.) You can print this out and use this to help you come up with a specific list of things you want to talk about, and stop at those places (e.g. questions, places to pause, etc.)
After the session, I talked with Heather about this feeling I had when doing long activities with Desmos. Although I was constantly checking the dashboard, and walking around listening for conversations, I often felt useless and bored and like I was doing something wrong because I wasn’t … doing much. She let me know that she also feels this, but that’s part of it. Letting kids engage. But I realized that some of my best classes (without desmos) have me circulating and listening but not doing too much beyond that. I was “being less helpful.” So I think I just have to make sure that when I’m not doing much, it’s because kids are doing good things mathematically and conversationally, and that’s because I’ve orchestrated things to be that way.
As an interlude to this wall of text, here’s my favorite nerdy math picture from the day.
Yes, indeed, you see a 3-4-5 right triangle, and a visualization of the oft-taught “Pool Problem.” In Starburst. My kind of math manipulative!
For the remaining two sessions, I worked on playing with Computation Layer and refamiliarizing myself with it (I spent 3 days earlier this summer spending huge swaths of time on this… a huge shoutout to Jay Chow who helped immensely with this). Having CL experts in the room and granting myself three hours to play with CL was amaaahzing. I first reacquainted myself with some of the basics (a lot of which I had forgotten, but it came back fairly quickly) and then I decided to start trying to “desmosify” this calculus optimization activity.). I didn’t get too far in, and so far this is no better than the paper version of the activity, but I am proud of what I was able to do with my CL chops! (You can see what I made here.)
The keynote session was given by Robert Berry (the new NCTM president) and he gave an overview of the recent NCTM book Catalyzing Change (which I have bought but haven’t yet read!), talked about some big picture NCTM things (advocacy, membership, financial health), and then told us what has been happening on the ground level. He ended his session talking about technology and what excites him about that. He said that “Technology that supports and advance mathematical sense-making, reasoning, problem solving, and communication excites me” and that “Competence is about being participatory in mathematics – with each other, with the teacher, and with the mathematics.” He then said technology can be used for good or evil based on how technology affects the following things in the classroom:
Positionality [how students engage with each other, their teacher, the curriculum, the technology, etc.]
Identity [how students see themselves]
Agency [how students present themselves to the world? how do we create structures for that to happen?]
Authority [“shared intellectual authority”]
His latest NCTM President’s Message is precisely on this. Also, Robert is a totally awesome guy.

That’s me on the left, him in the middle, and friend and TMC keynote speaker Glenn Waddell on the right.
Lastly, Eli (founder of Desmos and super nice guy) showcased a new desmos feature for teachers: SNAPSHOTS. You can read about it here, but what I love is that it allows teachers to facilitate discussions more thoughtfully in line with the 5 practices. (I’d love any help finding or coming up with problems at the high school level that work well with the 5 practices… Most examples that I’ve seen are at the middle school level so it’s been hard to wrap my mind around how to find/create problems for a precalculus or calculus class that might make this approach work super well.)
My favorite slide of his was:
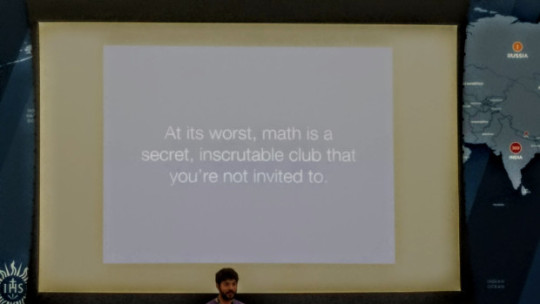
Eli keeps things simple, which allows me to read slides like this and think: “wait, in what ways does my teaching do that?”
And with that, it’s time to #pushsend.

Source: https://samjshah.com/2018/08/04/desmos-pre-conference-2018-recap/
0 notes
Text
Island of Dr. Brain – Won!
Written by Reiko
Easy if you can read a treble clef.
In the far corner of the room, I find a piano, which launches the music puzzle. This has three stages. “Lesson 1” is Sight Reading: clicking the correct note on the piano that matches each note on the staff. Lesson 2 is Placing Notes: clicking the correct place on the staff that matches each note played on the piano, which is just the inverse of sight reading.
The given melody.
Lesson 3 is Memorize the Tune, which is a bit harder than the first two. A melody is played while it appears on the staff, then it disappears, and I have to recreate the notes on the staff by memory, either ear or visual memory. But I can do a few notes at a time and then replay the melody as needed, so it’s not really all that difficult, just a bit tedious. I could have even used the above screenshot, but I didn’t look at it until after I’d already cleared the puzzle.
I should probably clarify that I do have some musical training but I’m not particularly skilled at either reading or playing music: I just sing in choir. As long as you can read a treble clef, understand note lengths and what sharps and flats are for, you can do this puzzle. It’s a precursor to the rather more difficult music puzzle in Lost Mind of Dr. Brain, which at higher levels requires the player to be able to read music well enough to be able to assemble a selection from measures that may have been transposed or flipped horizontally or vertically.
Once the puzzle is complete, which of course gives the Music Theory plaque, the game offers a free play option where you can plink around on the keyboard or put notes on the staff and have the game play the constructed melody. That’s a neat option. I don’t think any of the other puzzles have offered a free play option outside of redoing the actual puzzle.
This whole island has an engine??
The final room shakes when I enter it (every time even, if I go back and re-enter the room). Dr. Brain congratulates me on getting to the battery. But we’re not quite done yet. This room seems to be the control center of the island. I can’t do anything with the consoles right away, but there’s a large button on one wall with an obvious label: “Press Button”. Well, okay then. That pops open one console, which looks like it isn’t working properly.
I also notice another panel that displays a map of the island, including what looks like some kind of engine attached to the back. Wow, what a convoluted place. You can see representations of the various rooms we’ve traveled through to get to the control center at the bottom.
The squares are supposed to represent some kind of computer chip or board, I guess.
So next I have to repair the Navigation Computer by filling in gaps in the patterns of various kinds of computer components. One time I was given squares with various diagonal lines; another time they looked more like resistors with colored bands. Completing the four rows solves the puzzle and gives me the Visual Series plaque.
Then the game (not Dr. Brain’s voice, just a game message) instructs me to “Throw the lever forward.” Now that the computer is fixed, I can do that, but now I’m in danger because the volcano pressure has increased too much. When I push the lever forward, I’ve set the throttle to full (does this whole island move?), but the “Volcano Stack Computer” is broken. Something flies out of it, and an alarm goes off.
Leave it to Dr. Brain to mess with volcanoes.
I click on it, and I’m given a schematic of the computer with one component damaged and sparking. I click on that to remove it, and then I have to put it into the reprogrammer by solving the “Transistor Logic” puzzle. I have to test the old chip to determine its logic pattern and then program a new chip to replace it.
Testing the damaged chip.
The program is constructed using classic logic gates: AND, OR, NAND, NOR, XOR, etc. I have to construct a gate combination that will give a specified output pattern using up to four inputs. This can get kind of complex, actually, especially if I have to use three gates.
Instructions for the circuit programmer.
My winning circuit pattern.
In the particular pattern I get, I notice that only two of the inputs actually have any effect on the output. If D is 0, then then output is the inverse of B, but if D is 1, then the output is 1 (or D). Since AND has the effect of outputting 0 if both inputs are 0, and 1 otherwise, I can simply construct the gate combination that can be represented as “D AND NOT B”. A and C make no difference. This gives me the “Logic Gates” plaque and also allows me to win the game.
Before I describe the ending, I’m going to go back through the game from the beginning and revisit each of the puzzles to see what the differences are on the easier difficulty levels. You can always go back and redo earlier puzzles, which gives you more hint calls if you need them, and doing the puzzles again on multiple difficulty levels also adds bonus points.
Microscope puzzle on Standard: just lines.
Polyominoes: Doesn’t appear to be any different on different difficulty levels. It’s always a 6×8 rectangle with about a dozen pieces that must be fit inside. It’s possible that “easier” configurations are selected on the easier difficulties, but having completed the puzzle at least once at each level, I didn’t notice much difference.
Microscope: Decidedly easier. On Novice, the equations are both just perpendicular straight lines, one for the y-coordinate and one for the x-coordinate, which is trivial to solve. On Standard, both equations are linear with slope and offset factors. And, of course, on Expert, one of the equations was a parabola.
Sarcophagus Lock: Also easier. On Novice, there are only three very simple numerical sequences, and on Standard, there are four mostly simple sequences. On Expert there were six, and some sequences involved squares or varying patterns.
Towers of Hanoi: Requires moving four rings on Novice (which is just barely harder than three, really), five rings on Standard, and seven rings on Expert. So the Expert solution takes more than eight times as long as the Novice solution, and four times as long as on Standard.
That last twisty gray area is just one puzzle piece on Novice.
Jigsaw: The Novice level breaks the puzzle up into much larger pieces, so there are far fewer of them and the puzzle is far quicker to solve. I think it took me not much more than two minutes. On the Standard level, the pieces are the same size as on Expert, but the whole outside border is already done. This cut the solving time down by about a quarter for me, so I solved it in about fifteen minutes compared to twenty for the full puzzle.
Blinking Flamingoes: Made trivial on Novice by only having to set one flamingo, and while Standard requires two, it’s still a lot simpler than Expert’s three.
Word Search: Generated exactly the same way each time, with twenty foreign words hidden in the grid, but on Standard, only fifteen of the twenty need to be found, and on Novice, only ten. All twenty can still be found after completing the required number, but nothing extra happens if you do.
Cipher Bridge: Noticeably simpler on Standard: the quotes are shorter, and the scrambles are easier. Both word and sentence anagrams are used. On Novice, it gets even easier: no word anagrams are used, only scrambled sentences and misplaced spaces.
Botanical Garden: Same background image on each level, but only 12 animals need to be found on Standard, and only 8 on Novice. Honestly, the Novice level puzzle I played ended up being harder than the Standard because there were three tiny ant lions, two very close to each other. I don’t think there’s any reason why there should be even two of the same animal in any given puzzle, even on Expert, but especially on Novice. In the several times I played it, I saw at least twenty-five different animals. It’s really not that hard to make an algorithm that doesn’t repeat items from a list.
Novice level tells you outright what the element is.
Element Analysis: You may remember that on Expert, this involved analyzing objects that were comprised of three elements (plus trace elements). Well, on Standard, the objects only have two major elements, like a brass knob (copper + tin), and on Novice, the objects only have one element, and it’s usually named in the description of the object, like a silver earring. You just have to know the abbreviation, or you have to click the elements until you find it, that’s all.
Numeric Planning: Expert and Standard levels both use a 4×4 grid, so I’m not really sure how the Standard one was easier, but it was. The Novice level uses only a 3×3 grid, so it’s much quicker to guess and check options.
Spectrum Analyzer: The Expert level pattern involves six elements; on Standard it’s five; and on Novice it’s only three. I approach it the same way no matter how many there are, though: I test each individually and then combine the ones that match.
Antonym Anthill: Always asks two sets of three quotes, but on Novice, each quote has just one word that needs replacing. Standard has two words, and Expert has three. The lower levels also indicate when a particular quote has all words correct; I don’t think Expert did that.
Synonyms and Homonyms: Similar (ha), with two words per sentence on Novice and three words on Standard. On the synonym puzzle, the Novice level is particularly simple because only the rhyming words at the end need to be replaced.
Standard level matching
Novice level matching
Object Matching: On Expert, the objects were rather detailed masks with a lot of different but similar features. Standard has silhouettes of creatures that still have several different features, but not as many as on Expert. Novice just uses geometric shapes, which are a lot easier to match, of course. Each level still requires five sets.
Bookshelf: Standard asks the player to sort books, four per shelf, about various geographical features into categories like mountains and rivers. The Novice puzzle asks the player to sort books, three per shelf, about various instruments into categories like woodwinds and percussion.
Counterweight: Even on Standard, I found this to be the hardest puzzle in the game. Maybe I just need better mental math? Novice separated the liquids into different divisions of the bucket, and it also automatically determined which division of the bucket to pour into, but you still have to do the math to figure out how many of each size container will add up to the given total.
Elevator: Even on Expert this puzzle was sometimes trivial if the ratio was a whole number, so this puzzle didn’t differ much.
Robot Programming: As far as I can tell, it’s pretty much the same on all levels. The three cartridges themselves have three levels of difficulty, but you have to use all three anyway.
Genetics: On Standard, the combinations are simpler: I think all of the grandparents start with pure sets (AA or aa) of all the genes, rather than possible mixes. On Novice, there’s only one generation: the player must simply cross two creatures to get the right final mix among the children.
Art Concentration: Standard only requires identifying two of the three rows of paintings, so there are more examples already identified for comparison, and Novice only requires identifying one row of paintings.
Music: Fairly similar on all levels, but the selections of music are a bit shorter on the easier levels. Plus on Novice, the game chooses the correct length of note for you.
Visual Series: Novice and Standard generally offer more obvious series, such as a sequence of bands that rotates one place each square, but otherwise the puzzle is exactly the same. I played a couple different times, and one time on Standard I got a puzzle with colored dots that was inscrutable to me. It’s easy to shift back and forth between difficulties and generate a new puzzle, though.
Logic Gates: Only uses three inputs on Standard, compared to four on Expert. Only two on Novice, which is more or less trivial because the test area at the bottom will display the truth table for any single gate. Still, for anyone that doesn’t understand logic gates at all, Novice is a good place to start.
Island Ship of Dr. Brain
After I finish the logic gates puzzle, that fixes the computer at the heart of the island. The view cuts away to a side view of the island, which shows a huge engine attached to one end. The engine starts running, which pushes the whole island. It’s turned into a ship! The anchor is raised, and a flag emerges from one of the hills. Then the view zooms way out to the map from the very beginning with the copy-protection “puzzle,” where we see the island-ship moving around until it arrives at Dr. Brain’s castle in one corner.
Dr. Brain’s latest invention: The Lazy Scientist 2000 (my name)
There I see Dr. Brain lounging in his latest invention: a comfy lounge chair complete with fancy drink-holder, foot massagers, a fan, a book holder, and other amenities. He sent me off to get a battery to run this thing?? I guess it must use a lot of power to run all the automatic gadgets attached.
Full score for completing the game after doing each puzzle once with no hints.
Dr. Brain congratulates me on my score (calling it “unbelievable” since I scored full points). The maximum total score is 1000 points, but only 390 of those come from completing the game: the rest come from replaying the puzzles on multiple difficulties and from not using hints.
Then the credits roll, complete with little animated heads and comments from the staff. Actually, these aren’t real credits since they don’t give full names, just whatever name is given in the comment, which is usually just first name. After the credits finish, the game gives the option to go back and keep playing puzzles, replay the credits, or quit.
Brett is probably Brett Miller, for instance.
And that’s Island of Dr. Brain! Puzzly fun for the whole family! Next time we’ll take a look at how it stacks up.
Session Time: 4 hours 30 minutes
Total Time: 12 hours 0 minutes
source http://reposts.ciathyza.com/island-of-dr-brain-won/
0 notes
Last Seen Blogs

realfoodbar-blog
Real Food Bar - Plant-Based Meal Bar #nomorehangry

seeyourbn
See you spacecowboy

beefbungus
Owner Of The Other Account Bungus Beef-

blase-blogg
Queen

pikadude31451
Scrolly DeviantArt