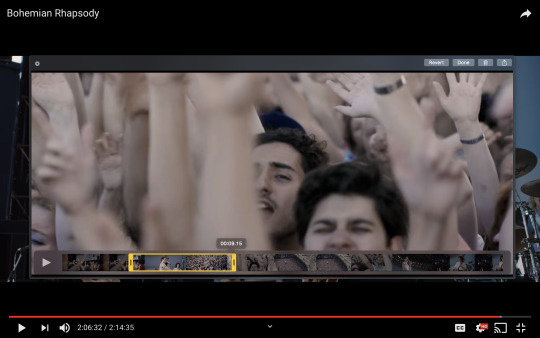
#i give up trying to crop this either its too blurry or too zoomed out
Text


nowhere like our places.
#i give up trying to crop this either its too blurry or too zoomed out#i realllyyy really like the idea of them going to extremely ugly places#they claim it and make it their own as hangout spots#dark and gritty my beloved#dazai osamu#chuuya nakahara#soukoku#skk#chuuya#dazai#bsd#bungo stray dogs#illustration#i missed you
4K notes
·
View notes
Text
My GIF making process!

I’ve been asked many times for a tutorial, but because I get really detailed, I always get overwhelmed by the idea. But I finally decided to buckle down!
Just so you know: I don’t use PSDs in this, and I don’t import layers to frames or anything like that. I like the hard way—at least in gif making, I believe you get higher quality gifs. Join me as I show you how to make gifs by loading videos directly into the Photoshop timeline and my coloring and sharpening techniques.
Tools used:
Mac OS X (only necessary for the first step, and there are other ways around it with a PC)
Adobe Photoshop
YouTube Purchases (any streaming service will work)
Topics covered:
Obtaining the Source Material
Loading the video file into Photoshop
Prepping, Cropping, and Resizing the Media
Adjustment Layers
Sharpening
Exporting
Obtaining the Source Material
There are a few different methods for obtaining video to work with. Proper YouTube videos are nice, but finding any major motion picture in that format is difficult, if not illegal.
Once I realized I could get really great quality video by doing screen recordings from streaming services, I stopped worrying about finding (and pirating) high resolution video files. So now, I just go to whichever streaming service I need to, pick out the movie or show, find the spot, and record small snippets.
Mac screen recording instructions:
On a Mac, Command+Shift+5 will bring up the screen recording dialogue.
Resize the frame of what you want to record within the browser.
Go to a second or two before, press the “record” button, and then begin playing the video, remembering to keep your cursor out of the recording box.
Use the Space bar to pause your video when you’ve gotten the snippet you need. Stop the screen recording by clicking the ⏹ button that is in your menu bar at the top of the screen.
Important: when the recording appears in the bottom right of your screen, click on it, and then trim the video on either end. This will help your computer convert the video file to the type that can be opened by Photoshop.
Click “done” and it will appear on your desktop, ready to be used!
PC Users: ??? Here’s a Google search I did for you
Loading the video file into Photoshop
Lots of people use this process for making gifs (a great tutorial!). I didn’t even know it existed until last summer, when I’d already been giffing for years. I wish I could still do something like that with these screen recordings, but the files are absolutely HUGE, especially on Macs with double retina displays, which actually increase the dpi by a lot. Making screencaps of them fills up my hard drive, almost immediately—even when I’ve got 20 gigs of free space to work with. So what do we do? We just. Open the file. In Photoshop. Et voila!
You can do this with any type of video, not just screen recordings.
Prepping, Cropping, and Resizing the Media
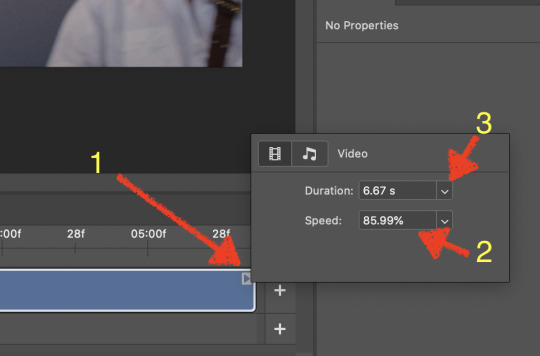
When Photoshop loads your videos up, it makes the video hilariously fast (something about frame conversion). You must slow it down for it to look natural. THIS MUST BE DONE BEFORE YOU RESZE. Your Photoshop timeline window should be at the bottom of the screen. See that little triangle in the top right of the video?
Click on it, and a menu will appear to change speed and duration.
Change the speed first- usually between 80-85% will seem realistic. (I actually went a little faster than I usually would on this at almost 86%—I don’t recommend this)
Press the button next to duration and pull the toggle all the way to the far right (if you don’t do this, full length of the video will be cut off).
Now you’ll want to crop it. Ever since Tumblr upped its GIF size limit, I have been playing around with 7:5 ratios, but let’s go with 3:2 for now. Use the Crop tool, pick out 3:2 in the top left (it may say 2:3, but you can switch that) and then find the most suitable spot in your gif for that. Hit enter on your keyboard.
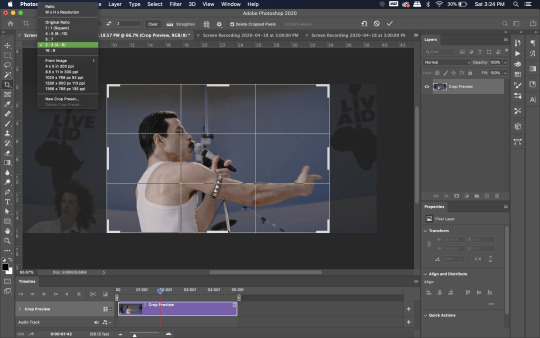
Some things to keep in mind when cropping:
Most videos come in 16:9 ratio (BoRhap is even wider). If it’s a wide shot, you’ll need to do the full 16:9 to not lose anything. Of course, experiment and find what’s right for you!
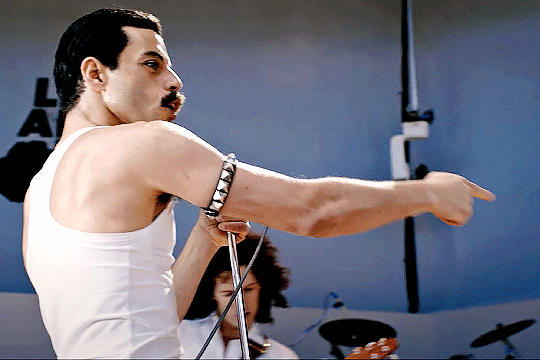
As you can see above, I moved forward in the timeline and made the crop to a point in the video when the broadest movement was happening.
Certain videos WILL have a black or red bar that may be imperceptible until you’ve already exported the gif. Just crop in a little tighter on top and bottom to avoid them.
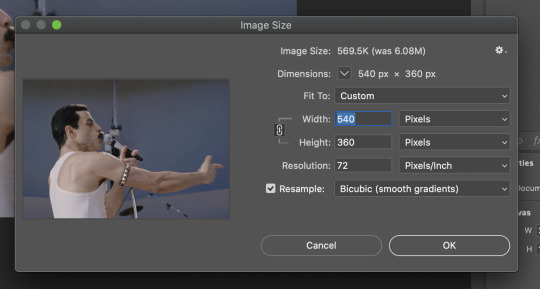
Now you’ll need to resize your gif to be the correct size for Tumblr. If you don’t use Tumblr’s exact dimensions, your gifs (as uploaded) will appear blurry or pixellated. We’re doing a full-width gif here, which is 540px. On a Mac, I use Command+Option+I (for “Image Size) to open the resize dialogue. You can also find it under Image->Image size...
Make sure to also have “Resample” checked. Lately I’ve been playing around to see if different options are better. Most GIF makers use “Bicubic Sharper (Reduction)” and they are not wrong to do so. I’ve just been unhappy with it lately, so I have been trying this other setting out, “Bicubic (smooth gradients)”.
Click OK. A dialogue may come up that asks if you want to convert to a Smart Object. The answer is yes, okay, do it. The only major caveat is that you can’t go back and change the timeline speed. That’s why we did it first. But you can preview the speed now that it’s smaller, and if you don’t like it, use Command+Z (or “Undo”) and go back a couple steps to get the speed you like.
You may find, especially on a Mac screen (and possibly other displays), that at 100% your gif looks too small to be 540px. That is the curse and blessing of working with super-high resolution hardware. Zoom in to 200% and proceed about your business. This is what it will look like on Tumblr.
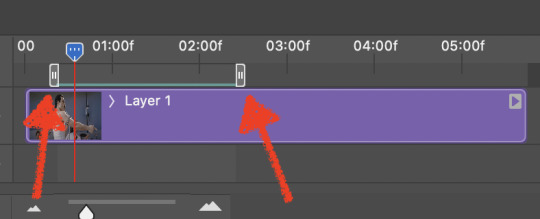
You may find it helpful at this point to begin by defining the beginning and end of your gif by moving around these bumpers. It’s safe to keep gifs under 02:00f in length. Under half of 01:00f will be way too short. (I tend to overshoot in length and then trim the beginning and the end once I see how big the gifs are upon exporting.)
Adjustment Layers
Now the creativity and fun begin!
There are a LOT of ways to get creative here. I’m going to keep it simple, very simple, but I strongly recommend opening up a new adjustment layer of each type and trying to figure out what each does!
You’ll find the adjustment layer menu at the bottom of the Layers window.

Curves
There are a lot of ways to make Curves work for you! It can do the job of Brightness/Contrast, it can do Levels, it can do Color Balance! We’re going to use it mainly to help with brightness here, but also to level out some of the tones. One of the quick tricks you can do is use the droppers on the left side of the Properties window. There are three- one with a white tip, one gray, one black. These can help define what your white tones are (and whether they need to be more of one color or another), and so on with your blacks. Sometimes it works, sometimes it doesn’t; in this case, I think it doesn’t:
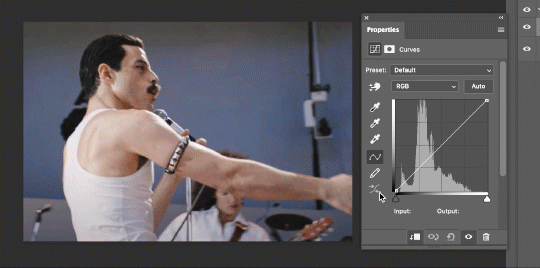
That looks totally blown out and somehow also too dark!
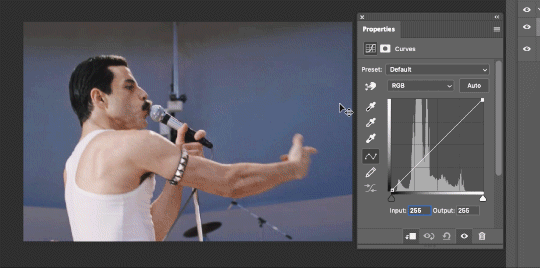
So instead, we’re going to use that little hand with the finger pointing out and some arrows pointing up and down. This lets you define which sections you want to get brighter or darker, and how much. It doesn’t do color correction. In the example below, you can see I dragged up on a white spot and down on a dark spot. Then, I moved points around on the curve itself to refine (which the gif here doesn’t show...).
Vibrance/Saturation x2
Next, I’ve been using @gwil-lee‘s Vibrance/Saturation trick (I know you said you learned it from someone else, but I learned it from you!).
Create a Vibrance Adjustment layer, bump the values up a bunch, and then change its Fill to somewhere between 2-9%. Change the Blend Mode to Color Burn. Then make a copy of that layer keeping everything the same, but make it Color Dodge. I can’t quite define what these do, but it makes it punchier!

Color Balance
Most people are familiar with this. For this gif, I’m going to make the shadows more Cyan/Blue and the highlights more Red/Yellow. Just a few points each.
Exposure
I brought the Exposure up a bit, but not enough for you to need to read about, haha.
Selective Color
Here’s where you make fine adjustments to colors. This particular scene is extremely simple, color-wise, so keep it simple. I’m going to bump up the cyans/blues, take up the black by just a point or two, and maybe bump up the yellows and reds a tiny bit. (And as always, remember, the “opposite” of cyan is red, the opposite of magenta is green, and the opposite of yellow is blue. CMY/RGB!)

I think at this point I’m going to call it with the adjustment layers. You can go absolutely hogwild with more of them! But at this point, I’m ready to start sharpening!

Sharpening
I do three sharpening filters these days. These are all under Filter->Sharpen. Make sure your media layer (default called Layer 1) is selected as we go through this! (Also, this can really take a toll on your processor, so don’t say I didn’t warn you.)
Sharpen- This layer does the basic job
Smart Sharpen (Amount: 10%, Radius: 10, Reduce Noise: 4% Gaussian Blur)- This layer gives texture
Smart Sharpen (Amount: 500, Radius: 0.3, Reduce Noise: 12% Gaussian Blur)- This layer gives refined sharpening and smoothing
Fiddle with these as needed! Let your gif play all the way through- this may go slowly as your processor works on it. Make sure the beginning and end points make sense.
Exporting
After You’re going to have to use File->Export->Save For Web (Legacy)... or use the shortcut of Shift+Option+Command+S. This could take some time for the dialogue to pop up! Be patient.
In my opinion, these are the best gif export settings for crisp edges and no noise:
Now you see how big the file is in the bottom left. Tumblr won’t let you upload anything bigger than 10MB and it’s safer to stay under 9MB, in my experience. When your gif is too big, you have a couple options. You can close the dialogue and change the length of your gif.
OR, you can uncheck “Interlaced” and bump up the lossy to 1 or or more. This will create noise. Sometimes, that’s a good thing!
Here’s without lossy:
Here’s WITH lossy: (Honestly in a fast moving gif like this, it’s almost imperceptible, but I can see it!)

And now that I’ve exported, I can see what there’s a little black line on the bottom! So I’m going to trim that off and call it good! You can see the full gifset here.
Hope you enjoyed! Reblog if you try this out or learned anything. Feel free to reach out with questions any time!
310 notes
·
View notes
Text
The iPhone 11 Pro camera is amazing, but it has a few notable issues
A cereal-covered donut at the Big E in Massachusetts is a perfect subject for the iPhone 11 Pro camera. Bright colors, sharp textures, and subject matter that can handle a little distortion from a wide-angle lens. (Stan Horaczek/)
Let's get it out of the way first: The new iPhone 11 Pro has the best overall smartphone camera system I've used. That may change when Google releases the Pixel 4 next month, but for now, the iPhone 11 Pro is the champ. And while I have no problem giving credit where it's due, I'm left with some extremely complicated feelings about Apple's new flagship imaging devices. Even beyond a few notable drawbacks, I wish it was simpler to know what's actually going on inside the camera.
If you only hope to point the camera at a subject and get usable—and often pretty impressive—shots, then the 11 Pro is unbeatable. But if you already know how to use a camera—even a previous iPhone camera—there’s a learning curve that might change at any time thanks to software updates, and it could have a real effect on the look of your photos and videos. Plus, the new phone is a reminder that iPhone photography—and smartphone shooting on the whole—is increasingly different than typical photography.
The hardware
The trio of cameras on the iPhone 11 Pro occupies a square on the back of the phone. (Apple/)
The iPhone 11 Pro comes with a trio of rear-facing cameras, including the familiar wide-angle and telephoto lens modules, as well as a new ultra-wide camera. If you’re serious about taking pictures and video and that guides your phone choice, you might as well jump on the Pro line and get an all-in-one package.
The lens selection makes sense for photographers. Professionals typically concentrate on three basic types of shots, including wide photos to set the scene, tight shots to provide intricate details, and standard middle shots to handle the bulk of the storytelling. Switching between the different camera modules on the 11 Pro makes this pretty straightforward and may even encourage some shooters to expand the kind of photos they capture. I can get behind that.
Shooting with each camera provides its own unique strengths and challenges, so let's break them down individually. You can check out high-res versions of all the comparison shots here.
The wide-angle
A plant store in Troy, NY, provides mixed light and lots of textures and the main camera handles it nicely. Using the depth function to blur the items in the foreground and background would make this look more like it was taken with a dedicated camera (Stan Horaczek/)
The iPhone 11 Pro’s main camera remains the standard wide-angle; it’s by far the most useful and also the most advanced. There’s a new sensor inside that seems to have improved the performance in low natural light. It’s hard to gauge, however, because the overall picture-taking process relies so heavily on the software tweaks. Apple has increased the maximum ISO (the rating that indicates the camera’s perceived sensitivity to light) from roughly 2,300 up to about 3,400. Raising that setting typically increases ugly noise that shows up in your photos, so Apple is either more confident in the sensor's inherent low-light chops or it has added more processing firepower to fix it later. The reality is probably a mixture of the two.
The lens maintains the same basic specs, including an f/1.8 aperture. I wouldn’t expect it to get much faster than that (lower numbers indicate wider apertures to let in more light, making the lens “fast”).
The telephoto lens
Portrait mode seems to have improved in some situations. Most of the blur comes from the natural characteristics of the lens, but I wouldn’t mind darker shadows on the jacket. (Stan Horaczek/)
Telephoto lenses have been showing up on iPhone flagships since the 7 Plus when we first encountered the Portrait mode. The telephoto lens gives shooters an angle of view equivalent to what you’d expect out of a roughly 52mm lens on a full-frame DSLR. Though that makes it a telephoto lens by the strict definition, photographers typically expect such lenses to fall somewhere north of at least 70mm. The extra reach allows shooters to pick their way through complicated environments and single out a subject. The iPhone's telephoto does a better job of this than the wide-angle, but it's not going to replace a dedicated longer lens.
The sensor inside the 52mm is still smaller than it is in the main wide-angle lens, but the maximum aperture goes from f/2.4 to f/2. Letting in more light is almost always welcome, but it’s a relatively small jump. So, if you’re expecting a huge change in the natural blur or low-light performance, you might be disappointed. It does, however, seem to have upped the focusing speed, which it desperately needed.
The super-wide lens
The super-wide camera provides a unique perspective, but its image quality isn’t as high as the main wide-angle camera. (Stan Horaczek/)
At a roughly 13mm equivalent, the super-wide lens is a new addition for the iPhone camera ecosystem. Like the telephoto, its sensor is smaller than the main camera’s, and it doesn’t have access to some of the other features like the new Night Mode (lots more on that in a moment), Portrait Mode, or optical image stabilization. Thankfully, super-wide lenses don’t suffer as much from camera shake, which makes the lack of lens-based stabilization less of an issue.
Some critics immediately discounted the new wide-lens as a novelty, but 13mm isn’t much wider than the wide-end of the 16-35mm zoom lens that photojournalists have been using for decades. Will people overuse it? Oh yeah. But it’s not inherently a special effects lens like a true fisheye.
The camera app bug
Before getting into the features, it's worth noting that some users (including me) have encountered an issue with the iOS 13 camera app in which the screen stays black for up to 10 seconds before you can actually do anything. The iOS 13.1 update is inbound and hopefully, that will fix it, but it's seriously annoying when it happens.
Night Mode
In some situations, Night Mode does a great job revealing details that would otherwise disappear into shadows. I actually turned down the Night Mode level from three seconds to one second because it tried making the grass too bright green. (Stan Horaczek/)
Last year, when Google introduced its Night Sight mode on the Pixel 3 smartphone, I was genuinely impressed. The company used the device's single camera to capture a number of low-light shots in quick succession. It then pulled information from those shots and mashed them into one finished image that was impressively bright, relatively accurate color-wise, and surprisingly full of details that a typical high-ISO photo would obliterate with digital noise.
The iPhone 11 Pro answers Night Sight with its own Night Mode, which uses a similar multi-capture strategy and immediately became a fundamental piece of the shooting experience. Point the iPhone camera at a dark scene and a Night Mode icon pops up automatically. You can turn it off if you want to, but you have to consciously make that choice.
The only light illuminating this scene was coming from the open door in the background. It was dark—around 1 EV. It's impressive that you can get the color of the room (it really is pink-ish) and the green in the plants. Bright areas of the frame will blow out in night mode, so best to crop them out when shooting if possible. (Stan Horaczek/)
The first time you see it, it’s like witchcraft: It brightens up the dark scene to the point where every object in the picture is recognizable. If you’re expecting it to create what you’d get with even the most basic pop-up flash, however, you might be disappointed. Night Mode is great in situations where the light is relatively flat.
Left: This gnome was shot in wide-angle with the Night Mode turned off. Right: With Night Mode on. (Stan Horaczek/)
It’s not always magic, though. Take Night Mode into a situation with mixed or highly-variable lighting conditions and things can get out of hand. Consider, for instance, the picture of a garden gnome above. I turned night mode off for the first version and was pleasantly surprised at how much detail I got and how sharp the image is. With Night Mode on, however, the sharpness is still solid, but the colors get bonkers.
Left: This bush was shot in wide-angle with the Night Mode turned off. Right: With Night Mode on. (Stan Horaczek/)
You can observe the same phenomenon here with this bush. It has the subtlety of a sledgehammer. Honestly, it reminds me of the overbearing processing that Samsung typically applies to its photos. Because Night Mode is on by default, it can be hard to fight through the initial urge to leave it on, even when you don’t need it. The picture pops up on screen, and you push the shutter because it's so nice and bright.
This shot was taken in a fully dark environment. It's grainy up close, but the skin tone doesn't look overly wild and you can still make out details in the fish. The camera details suggest this shot used a half-second exposure. The night mode was set to three seconds. (Stan Horaczek/)
When it comes to skin tones, the same flat-light rule applies. In this example, there’s one dim tungsten beam coming from camera right. Without night mode, it was totally unusable. The frame either came out black or absurdly blurry due to the long exposure required.
Mixing color temperatures in a portrait is hard, but Night Mode clearly does some work to try and even out the skin tone. (Stan Horaczek/)
In mixed-light conditions, however, things get more complicated. Few things make a person look less appealing in a photo than blending colors on their face. With Night Mode turned on, it can sometimes augment the effect by amplifying the light sources, making the subject look wacky and cartoonish. Unfortunately, that’s a pretty common scenario in places like bars, weddings, or events. Apple has already done considerable work to make the skin tones look more natural, but I expect this will improve over time.
Generally, I’d love to see Night Mode tone it down a bit. Take this example of these flowers under an ugly street light in the park for instance. The Night Mode version (on the right), ironically, takes away almost any indication that the photo was taken at night.
Left: These flowers were shot in wide-angle with the Night Mode turned off. Right: With Night Mode on. (Stan Horaczek/)
I would also like a little bit more freedom to experiment with it. Night Mode is capable of capture times all the way up to 30 seconds, but you can only access the full time if you put the iPhone on a tripod or something steady and it senses the lack of motion. I’m fine with a recommended length, but I’d like the opportunity to mess up the photos however I want. (Taking screwed-up shots is how you learn, after all.) Also, given that it’s kind of unclear if there’s any direct relationship between the length of the exposure and the overall brightness or characteristics of the image, I’d at least like to easily mess with the capture time and see what I can glean. That is, of course, until the next software update, which could change it completely.
A quick note about flash
I have seen some folks talk about how Night Mode makes flash obsolete. That's mostly true if we’re talking about smartphone flashes, which are little more than glorified LED flashlights. Take a look at this grid of images.
Starting in the top left and going clockwise: iPhone shot with Night Mode on, iPhone shot with the flash on auto (blech), and a Sony A6500 with the pop-up flash on. (Stan Horaczek/)
Not only does the actual flash from the Sony create much higher overall image quality and sharpness (thanks to the short duration of the flash that doesn’t leave room for camera shake), it would also overpower any possible mixed-light temperature situations that you might encounter. In short, if you were thinking about getting a real camera because you can use flash, Night Mode shouldn’t change that at all.
Making tricky choices
The same outdoor setting shot with the standard wide-angle lens on the left and the super-wide on the right. (Stan Horaczek/)
Manual exposure modes in smartphone cameras have always been a scam with fixed apertures and a lack of long-exposure functions. Still, it's still good for users to know what the camera is doing—or have the option to. The iPhone 11 Pro makes a lot of choices that it doesn’t tell you about.
For starters, when you press the 2x zoom button, you’d probably assume you’re going to be using the telephoto camera that literally doubles the focal length of the lens you’re using. But most of the time, like the iPhone XS, you’re actually just enabling 2x digital zoom on the main wide-angle camera. If you’re familiar with camera lenses, you know that shooting with a 52mm lens is fundamentally different than shooting on a 26mm lens and cropping, especially when it comes to the field of view and the relationship between objects in your frame.
I wanted to use the 52mm lens for this shot, but the camera automatically selected the standard wide-angle lens and digitally zoomed for some reason. (Stan Horaczek/)
Above, you’ll find a picture of a transaction happening at the excellent Troy, NY, farmer’s market. I pressed the 2x zoom on this image because it was plenty bright (the camera selected ISO 32) and I wanted to get as much natural blur as possible in front of and behind the subjects. It would also make the field of view easier to manage to crop out distractions like the guy in the sweatshirt on the left. It wasn’t until after I got back home that I realized the 2X zoom button simply cropped a picture from the wide-angle camera. It didn’t optically zoom—it digitally zoomed. As a result, the extrapolated image has some ugly artifacts and sharpening noise in it when I don’t think it should. I pushed a button for something I wanted and got something else.
These tomatoes were too close for the telephoto lens. (Stan Horaczek/)
Even though the portrait lens has a wider aperture now and the sensor has improved, I found that the 52mm doesn’t focus very close. This picture of some tomatoes, for instance, didn’t allow me to use the true telephoto lens because it couldn’t focus close enough to make the composition work. I would have had to leave a third of the bottom of the frame empty and then crop in post.
A similar effect comes into play with long exposures. Night Mode captures images for 30 seconds at a time, but it’s not a 30-second exposure—it’s just 30 seconds spent capturing shorter photos. The iPhone 11 Pro camera is technically capable of long exposures up to one second, but if you try to use that feature in an app like Halide or Lightroom, the camera is so slow and jittery that it’s unusable.
Use Night Mode long enough and you’ll get a feel for what the difference between a five-second shot and a 30-second shot looks like. Still, it hard to quantify it, and if it changes with the next software update or smartphone, you’ll get to figure it out again.
Where to start
Your head might be spinning with all these options and caveats, so let's track back a little. What is it exactly that you want to shoot? I, for one, picture a photo in my head before I even pick up the camera—smartphone or otherwise. Dig into the so-iconic-it's-cliche Ansel Adams book The Print and you'll find a perfect summary of how photographers visualize a photo, then use the tools at their disposal to make it happen. After all, you didn't really have a choice with film because you couldn't preview it.
The iPhone—and pretty much any other digital camera—shows you a picture so that it's as simple as saying, “OK, camera, that’s fine.” Now that the iPhone 11 Pro includes a super-wide angle camera, you can feel its effects even before you select it from the camera app.
The translucent sections of the screen aren't part of the picture, but they could be if you switch to the wider lens. I personally find it distracting. (Stan Horaczek/)
The section of the camera app behind the shutter button and at the top of the phone are now translucent when you use the regular wide-angle camera. It has its uses, like when there’s a distracting minivan parked at the edge of a street you’d like to capture, and you want to preview exactly how wide you can make your picture while still leaving the car out of the frame.
Personally, though, I find the whole effect extremely distracting. It’s not so bad when you’re looking directly at the phone—but when you’re trying to compose a shot at a weird angle, it can be hard to tell where the picture you’re taking ends and the extra stuff behind the translucent veil begins. On a few occasions, I’ve mis-framed shots because it threw me off. I’m sure I’ll learn to use it effectively eventually, seeing that the iPhone is teaching me about how to be a better iPhone photographer all the time.
In the menus, you can actually tell the camera to capture image information outside the view of the normal wide-angle camera and store it for a month in case you realize you hated your initial composition and want to go back and change it. I left this turned off, but if you're just learning how to compose photos and you want more flexibility, it could be a good learning tool.
I wanted the donuts in the center of the frame, but the translucent effect in the viewfinder threw off my composition. Yes, this is the second shot of donuts in this iPhone 11 Pro camera review. (Stan Horaczek/)
Once you actually select the super-wide lens, you’ll likely find a scene that you find “striking.” At a 13mm equivalent, you can capture the entirety of a skyline and a massive field of clouds above it. Or, you can cram the entirety of a scene—especially a small one—into a single picture without having to take multiple images or make a panorama.
The photo is, generally, a little underexposed because of how much space the bright sky takes up, but it does look "striking" as promised. The distortion at the bottom of the frame has compressed and elongated the human. I'd correct that with software before considering it finished and posting it. (Stan Horaczek/)
In general, I love having it as an option. Yeah, it’s wider than the standard lens, but it also makes objects in the frame appear to have more distance between them. So, when you’re trying to show how large and crowded a farmer’s market is, it makes a huge difference beyond the angle of view.
You need to pay attention to the edges and and corners more with the super-wide to make sure you don't end up with big, distracting dead spaces in the photos. The effect can be worth the extra effort. (Stan Horaczek/)
The same goes for nature and landscape photos. I couldn’t get this whole tree and the trademark landscape from Thacher Park in Upstate New York in a single frame with the standard lens. The super-wide handled it with no problem, though.
Nature photos look dramatic on the wide camera. In this shot, the HDR effect is going a little crazy and making things look a little unnatural (especially around the orange horizon). Still, it's a shot that would be practically impossible without the extra-wide camera. (Stan Horaczek/)
With that width, however, comes distortion—and the iPhone 11 Pro works too hard to correct it. Here’s a picture of a metal gate in which all the slats were relatively straight. You can see the distortion poking in, especially at the edges.
The lines on this gate were straight in real life. The super-wide camera adds distortion. (Stan Horaczek/)
You’ll also notice it in the photo above that includes a skyline—the buildings lean hard toward the center of the frame. The app does warn you though if you put a person near the edge of the frame because it knows that the distortion will make them look stretched, squished, and bad in general.
It's not a great picture, but it's made worse by my stupid thumb in the corner. (Stan Horaczek/)
Another drawback that I'm somewhat to blame for: My finger got in the way in quite a few of my wide-angle shots when I tried to hold the phone normally. The lens is so wide that it will easily catch your digit intruding on the frame if you’re not careful. So, I switched to holding the iPhone by the top and bottom instead of from the sides like I used to. Another lesson learned.
If you want a similar effect without the smaller sensor issues, you can opt for an accessory lens like the Moment Wide Angle, which modifies the look of the lens on the main camera.
Portrait Mode
I still think there's too much selective sharpening in Portrait Mode, which can make hair and eyes look too sharp and unnatural. (Stan Horaczek/)
Portrait Mode has come a long way since its start and it's better on the iPhone 11 than it ever has been, at least in the Apple ecosystem. I've typically liked Google's treatment of the fake blur on the Pixel camera slightly better because it looks more natural to me. The 11 Pro, however, seems considerably quicker than pretty much any portrait mode I've used when it comes to finding focus and taking the picture.
The blur can still look unnatural if you shoot something too complicated—I used it on a picture of some horse sculpture made of sticks and it created a real mess—but Portrait Mode is still very solid for headshots. The selective sharpening can get overbearing since it looks for specific elements like hair in an image. The beard hair in the selfie I took above has too much detail for my taste. A little blur can really help someone like me look more appealing in a photo.
I'm generally not much of a fan of the lighting effects, but that's mostly personal snobbery. The Natural light effect flattens the light too much for me, which makes for a very odd contrast against the over-sharpened features. The rest of them still feel like novelties to me, though they are improving. Still, if you want a black-and-white version of your photo, I think you're better off converting it in an app like Filmborn or Lightroom later. Or just slap an Instagram filter on it.
Lens flare
The lenses on the 11 Pro are obviously larger than those in the XS Pro. Larger lenses typically increase image quality, and that’s generally the case here, but I noticed way more lens flare with this model. Some of it is pretty gnarly.
Note the bar of lens flare on the graphics from the sign. (Stan Horaczek/)
The above photo shows one of the worst instances from my test run. The bright sign in the back is a digital screen. It’s a commonplace for tourists in my area to take photos because the historic theater often hosts big Broadway shows and national acts. You can see in the photo that a flipped image of what appeared on the screen appears as a ghost in the image itself. This typically happens when photographers put a filter of the front of their lens; the light hits the front glass of the lens itself, bounces back into the filter, and an inverted reflection shows up in the picture. You can typically fight it by removing the filter, but that’s not an option with the iPhone.
The front glass on the iPhone 11 Pro cameras do a great job protecting the lenses, but they seem to flare a ton. Even when it’s not as bad as the theater sign, it’s easy to catch a bright light in the frame that sends weird elements shooting across the picture.
The lens flare on the wide camera is pronounced, too. (Stan Horaczek/)
Some people like lens flare. J.J. Abrams has made a whole aesthetic out of it. But there are some major negatives to the distortion. First, flare reduces overall contrast in parts of your photo. Second, the flare itself illustrates a lens quirk that users typically don’t see called "onion ring bokeh"—an effect that stems from the aspherical lens elements inside the lens. It also occurs in standalone cameras, especially on lenses that try to cram a lot of glass and refractive power into a small body. You can recognize it by looking in the flare or the out-of-focus highlights in a photo for rings inside the blurry blobs.
You don't get to see the iPhone's true bokeh very often. (Stan Horaczek/)
You typically don’t see the iPhone camera’s real bokeh because the lenses are wide and the sensors are small, which downplays the amount of natural blur and allows the hardware to add its own effect with Portrait Mode. If you want to see it for yourself, however, a scene like this dewy grass in morning light illustrates it perfectly. Focusing the lens super close and providing lots of bright details causes all those little onion rings to pop out of the scene. Maybe you wouldn’t notice it, but once you do, it’s always there (almost like an eye floater). In the iPhone 11 Pro, it shows up more in the flare as well.
On top of the onion rings, I’ve noticed some other weird flare effects. This basic picture shot with the ultra-wide camera in a mall parking lot has a flare with decidedly red, green, and blue streaks. And if you don’t wipe the lenses off regularly before taking a picture, you can expect considerable haze over the images (but you should be wiping your camera lens regularly anyway).
I don’t think this flare is a huge issue or a deal-breaker, but it’s definitely something to keep in mind as you’re shooting with the iPhone 11 Pro.
The verdict
As I said at the start, I think the 11 Pro camera is the best smartphone camera package around at the moment. If you’re expecting it to compete with a dedicated camera, though, that’s still not the case, especially because it makes photos still look Apple-y. Of course, with software updates that may change. I wholeheartedly think the new camera is better than the iPhone XS, which really seemed to overdo it on the HDR effect that sometimes made people look orange and high-contrast situations look like a video game. But, under many lighting conditions, you probably won't notice an enormous difference (barring Night Mode).
The iPhone 11 Pro is on the left and the XS is on the right. Both of these floral scenes are full of contrast, texture, and red tones, all of which are tricky for digital cameras. (Stan Horaczek/)
The iPhone 11 Pro photos look better than the iPhone XS photos overall, and the flexibility of the super-wide angle lens makes it a very substantial upgrade. But it’s not a revolution.
Those frizzy hairs did not need that extra sharpening. (Stan Horaczek/)
You'll also have to accept some minor quirks. For instance, the iPhone camera reportedly increases sharpening on hair, including facial hair. The effect accentuates frizzy flyaways and makes details look too sharp. It sounds weird given that sharpness is typically a good feature in photos, but tell that to the weird artifacts that become painfully obvious in the final captures.
Even as you adjust the exposure settings in the iPhone camera app, the brightness of certain elements will change, while others won't really budge. So, if you're taking a picture of natural scenery in front of a blue sky, raising or lowering the exposure will make the greenery brighter or darker, though the sky will stay a very similar shade of blue that's hard to blow out, even if you try. The iPhone camera knows what's in the scene and is trying to maximize your chances of taking a good photo, even when you kind of want to take a bad one.
What's next?
Have you heard about the specter of Apple tech called Deep Fusion reportedly coming later this Fall? The AI-powered software will reportedly change the iPhone's photo and video performance drastically again. And it won't stop there. Once you learn to shoot with an iPhone camera, there's a good chance you're going to need to learn it all over again in a generation or two. Or you could just accept the iPhone's suggestions and shoot like it wants you to. It makes life a lot easier—and technicolored.
from Popular Photography | RSS https://ift.tt/2mYZMhV
0 notes
Text
A Guide to Shooting the Milky Way
This guide will be a walkthrough on the basics of Milky Way photography. It is best for beginners, but even intermediate and expert photographers might find something new! Plus, I always find it never hurts to refresh yourself on the basics.
Before we get to the good stuff, I’d like to start by saying that I hope you find this guide to be a bit different from the rest. I have found that most guides go on way too long and provide more detail than you could possibly need. This doesn’t sound like a bad thing, but it creates a problem. With that much information available, it tends to be overwhelming and hard to retain what you learn. By the time you’ve read through the countless pages, you’ve forgotten where you started!
The goal of this guide is to get you through the basics as quickly as possible so you can get out shooting! Think of this guide as the notes you would take during a lecture. When you start out, learning only the most important basics gives you more time to take photos of the Milky Way, which is by far the quickest way to learn and improve your art.
Camera Equipment
Photographers love to talk about equipment, but it’s honestly one of my least favorite topics. While it is important to know your gear, you will improve your photography much faster by going out and taking shots or viewing other photographers work, rather than researching/buying every piece of gear on the market.
Minimum Required Equipment
Tripod: You need a tripod (well built and sturdy). Invest now and it will last for years. A cheap tripod will be unsteady, leading to blurry images. I can’t stress enough how important a good tripod is!
Camera with manual mode: Manual mode means you can manually adjust the ISO, aperture and shutter speed.
Camera lens with a minimum f/4 aperture (preferably f/2.8 or smaller): The smaller the f-stop (f/4, f/2.8, etc,) the more light your lens can let it. The more light, the more star detail you can capture.
Preferred Equipment
Tripod: A tall, strong tripod with an excellent ball head.
Full-frame camera: While today’s crop sensor (and even some point and shoot cameras) can shoot stars, full-frame ISO performance will perform better.
14-24mm wide-angle lenses with minimum f/2.8 aperture: My favorite lens for milky way photography is a 24mm f/1.4.
Shutter release/Intervalometer: Allows for long than 30s exposure times and reduces camera vibrations when pressing the shutter.
Star tracker: A star tracker is a device that attaches to your tripod. You then mount your camera on the device and it follows (tracks) the stars as they move through the sky, allowing for longer exposure times (greater star detail). Learn more about exposure times in the camera settings section.
This item is definitely not necessary, but it will greatly improve the quality of your star shots. To keep things simple, we won’t be going over star trackers in this guide.
Preparation and Planning
Preparation and planning are two of the most important aspects of Milky Way photography. Knowing the moon phase, how much light pollution to expect, where the Milky Way arm will align and what the weather will be like are some of the biggest factors to a successful outing. You should also try and scout your destination during the daytime. Finding locations and compositions is extremely difficult in the dark.
(Note: I am not paid by or affiliated with any of the brands listed below)
Moon Phase
The moon is very bright, brighter than you probably remember. A full moon will keep most stars from being visible.
When shooting the Milky Way, you usually want to shoot between one week before and one week after a new moon for best results. The closer you are to the new moon, the better.
Tool: You can find moon phases easily online, but I find using either The Photographer’s Ephemeris or the Photo Pills app is extremely useful.
Light Pollution/Dark Skies
Humans give off a lot of light, especially in big cities. The closer you are to a city, the more this light pollution will affect your image, reducing the number of stars in your shot.
Tool: Using a site like darksitefinder.com makes it incredibly easy to see how much light pollution is in your area. The darker the area (blacker), the better it is for Milky Way shots.
Milky Way Alignment
Stars move through our sky as the Earth rotates. The Milky Way arm is no different. You will want to know where the Milky Way arm will be when you’re shooting.
The most common time to shoot the Milky Way in the northern hemisphere is March through October.
Tool: Using an app like Stellarium makes locating the Milky Way arm easy. I recommend that you set the Milky Way brightness to 8+ in the advanced settings.
Weather
Weather might be the biggest factor in Milky Way photography. If it is too cloudy, you won’t be able to see the stars. Knowing if clear or cloudy skies are forecasted can help you plan ahead.
Tool: You can find weather data almost anywhere, but a few of my favorites are cleardarksky.com, weather.gov or Google weather.
Focusing Your Lens
Ok, you have all the basic gear you need, you’ve done all your planning and preparations, and now it’s time to get out there and shoot! Right? Well…almost!
Without a property focused lens, it is impossible to achieve any success at Milky Way photography. Because of this, you will need to know how to focus your lens before you go out shooting. Because stars are very far away, one would think you could simply adjust your focus ring to infinity (or the ∞ symbol), but most lenses need to be adjusted slightly to ensure sharp focus. Don’t worry, though, I will teach you two methods: one you can do during the day, and one during the night.
Method One: Preset your focus during the day
Set up your camera with the lens you will be using.
Adjust your lens for the focal length you will be using; e.g. 24mm on a 14-24mm.
Focus on a far away object using autofocus.
Make any manual adjustments using the focus ring if needed. Today’s autofocus is so accurate, I rarely find that any adjustments are needed.
Take a couple of practice shots at a normal aperture, like f/8. Zoom in on the photo and double check that the object you’re focused on is sharp.
Once your shot is in focus, you have found your infinity focal point! You can now either tape your focus ring into place or use a marker to mark your exact focus point.
(Keep in mind, your exact focus point will change slightly if you adjust the focal length. If you decide to shoot at 14mm instead of 24mm, you would want to repeat the above steps.)
Method two: Using live view at night
Set up your tripod with your camera and lens.
Set your focus ring as close to the ∞ (infinity) symbol as possible.
Turn on live view and point your camera at the brightest star or object in the sky you can find (moon, planet, etc).
Find that source of light in live view and zoom all the way in.
Adjust your focus ring until the dot of light is as small as possible.
Congratulations, you have found your focal point and can start shooting!!
Camera Settings
Camera settings can be the most daunting part of learning to shoot the Milky Way. You can get started in most other types of photography with “Auto” and fumble your way through to some okay shots. This doesn’t work at night.
Everything in this settings category is designed around one principal: collect as much light as possible. Stars aren’t very bright, so to photograph them we need to adjust our gear to collect as much light as possible while keeping optimal image quality. The settings below will help you optimize your camera to capture as many stars as possible.
Shooting at night can be especially tricky because it’s dark, making it harder to use your camera. I advise you to practice changing your settings during the day or in your home before you go out in the dark.
(Note: Changing settings in the dark can be hard, but PLEASE don’t use flashlights or white lights if you are shooting around other people. If you have a headlamp, there is usually a red light setting, which is more acceptable, but still, be cautious and respectful when using it.)
Image Format
If your camera allows it, always shoot in RAW image format.
Aperture/F-stop
A basic review of aperture: The smaller your f-stop, the larger your aperture, which means the more light your lens can capture. This is one of the hardest topics to grasp, in my opinion, because it’s counter-intuitive. To shoot stars, you want a very large/wide aperture, which means you want a lower f-stop.
For example, f/8 is a medium f-stop, it has a normal-sized aperture. f/16 is a big f-stop, which means it has a small/shallow aperture. And finally, f/2.8 is a small f-stop and has a large/wide aperture.
Depending on your lens, it is usually best to go with your widest aperture (smallest f-stop) and then decrease it slightly.
For example, if you are shooting with a 24mm f/1.4, I would set it to f/1.4, then bump it up through f/1.6, f/1.8 and finally settle around f/2. You would do this because pushing your lens to its extremes (biggest and smallest apertures) will tend to result in lower image quality.
If your lens only goes to f/2.8 or f/4, I would recommend skipping the above advice to bump up the aperture.
This is because at f/2.8 or f/4, you need the ability to capture light more than you need perfect image quality.
Shutter Speed
You want a long exposure time to allow your sensor to collect more light. In a perfect world, we would be able to take minute+ long exposures with a low ISO, allowing for a large amount of light collection and a high image quality. Unfortunately, because the Earth spins, the stars move during our long exposures. This means our exposure can only be so long before we get “star trails”. To make things even more complicated, the longer your focal length, the shorter your exposures can be before your stars start to trail.
For example, a 16mm lens can usually shoot an exposure time of around 30 seconds, while a 50mm is closer to 10 seconds.
To prevent star trails and keep your stars pinpoints, we follow the 500 rule. The 500 rule calculates the longest exposure time you can shoot based on your lenses focal length. Keep in mind the 500 rule is just a rule of thumb and not an exact science. Aperture and ISO have no effect on the 500 rule
For full frame cameras: you simply divide 500 by your focal length:
16mm lens: 500/16 = 31.25 seconds
50mm lens: 500/50 = 10 seconds
For crop sensor cameras it’s a bit more complicated. You will need to know your camera’s sensor size. A full-frame camera’s sensor size is 35mm. A Nikon crop sensor has a 24mm sensor size. Every camera will be a little different. You divide 35 by your camera’s sensor size to get what is called your crop factor. Next, you divide 500 by your focal length times your crop factor
Nikon crop sensor size = 24mm:
35/24 = 1.46 crop factor
16mm lens: 500/(16×1.46) = 21.4 seconds
50mm lens: 500/(50×1.46) = 6.85 seconds
As I mentioned, the 500 rule is just a rule of thumb, so make adjustments as needed (zoom in on your LCD and see if there is star trailing).
ISO
ISO is usually the last setting you adjust once you have lowered your f-stop and found your longest exposure time. To find the best ISO requires a few test shots. Start with an ISO of around 1600 and take a shot. If it’s too dark, which it probably will be, increase the ISO. Continue increasing the ISO until the Milky Way is clearly visible.
With an f/2.8 lens, around ISO 6400 was usually my sweet spot. Depending on your camera, you will probably notice a lot of noise (grainy specks) in your photo. You might also run into your max ISO and not be able to go any higher.
High ISO capability is the main reason full-frame cameras are suggested for Milky Way photography. They are able to use higher ISO ratings with better image quality.
We won’t go into them in detail, but the main ways to combat noise and increase photo quality besides a full-frame or in addition to a full-frame camera include:
Post processing: noise reduction, median image stacking or shooting a pano
Using a star tracker
White Balance
If you are shooting in RAW and post-process your images, white balance doesn’t matter since you can manually adjust it in processing. I leave my white balance on auto and adjust later.
If you prefer to have untouched photos, a white balance around 4-5,000K usually works best.
Put it All Together!
Some common settings for me:
ISO 6400, 24mm, f/2, 20s – Using a 24mm f/1.4 lens
ISO 6400, 14mm, f/2.8, 30s – Using a 14mm f/2.8 lens
And there you have it, my intro guide into Milky Way photography!
P.S. If you enjoyed this article please consider joining my newsletter for heaps more great tips like this.
About the author: Ross Schram von Haupt is a landscape photographer based in Bellingham, Washington. The opinions expressed in this article are solely those of the author. You can find more of his work on his website, Facebook, and Instagram. This article was also published here.
source https://petapixel.com/2019/03/11/a-guide-to-shooting-the-milky-way/
0 notes
Text
A Guide to Shooting the Milky Way
This guide will be a walkthrough on the basics of Milky Way photography. It is best for beginners, but even intermediate and expert photographers might find something new! Plus, I always find it never hurts to refresh yourself on the basics.
Before we get to the good stuff, I’d like to start by saying that I hope you find this guide to be a bit different from the rest. I have found that most guides go on way too long and provide more detail than you could possibly need. This doesn’t sound like a bad thing, but it creates a problem. With that much information available, it tends to be overwhelming and hard to retain what you learn. By the time you’ve read through the countless pages, you’ve forgotten where you started!
The goal of this guide is to get you through the basics as quickly as possible so you can get out shooting! Think of this guide as the notes you would take during a lecture. When you start out, learning only the most important basics gives you more time to take photos of the Milky Way, which is by far the quickest way to learn and improve your art.
Camera Equipment
Photographers love to talk about equipment, but it’s honestly one of my least favorite topics. While it is important to know your gear, you will improve your photography much faster by going out and taking shots or viewing other photographers work, rather than researching/buying every piece of gear on the market.
Minimum Required Equipment
Tripod: You need a tripod (well built and sturdy). Invest now and it will last for years. A cheap tripod will be unsteady, leading to blurry images. I can’t stress enough how important a good tripod is!
Camera with manual mode: Manual mode means you can manually adjust the ISO, aperture and shutter speed.
Camera lens with a minimum f/4 aperture (preferably f/2.8 or smaller): The smaller the f-stop (f/4, f/2.8, etc,) the more light your lens can let it. The more light, the more star detail you can capture.
Preferred Equipment
Tripod: A tall, strong tripod with an excellent ball head.
Full-frame camera: While today’s crop sensor (and even some point and shoot cameras) can shoot stars, full-frame ISO performance will perform better.
14-24mm wide-angle lenses with minimum f/2.8 aperture: My favorite lens for milky way photography is a 24mm f/1.4.
Shutter release/Intervalometer: Allows for long than 30s exposure times and reduces camera vibrations when pressing the shutter.
Star tracker: A star tracker is a device that attaches to your tripod. You then mount your camera on the device and it follows (tracks) the stars as they move through the sky, allowing for longer exposure times (greater star detail). Learn more about exposure times in the camera settings section.
This item is definitely not necessary, but it will greatly improve the quality of your star shots. To keep things simple, we won’t be going over star trackers in this guide.
Preparation and Planning
Preparation and planning are two of the most important aspects of Milky Way photography. Knowing the moon phase, how much light pollution to expect, where the Milky Way arm will align and what the weather will be like are some of the biggest factors to a successful outing. You should also try and scout your destination during the daytime. Finding locations and compositions is extremely difficult in the dark.
(Note: I am not paid by or affiliated with any of the brands listed below)
Moon Phase
The moon is very bright, brighter than you probably remember. A full moon will keep most stars from being visible.
When shooting the Milky Way, you usually want to shoot between one week before and one week after a new moon for best results. The closer you are to the new moon, the better.
Tool: You can find moon phases easily online, but I find using either The Photographer’s Ephemeris or the Photo Pills app is extremely useful.
Light Pollution/Dark Skies
Humans give off a lot of light, especially in big cities. The closer you are to a city, the more this light pollution will affect your image, reducing the number of stars in your shot.
Tool: Using a site like darksitefinder.com makes it incredibly easy to see how much light pollution is in your area. The darker the area (blacker), the better it is for Milky Way shots.
Milky Way Alignment
Stars move through our sky as the Earth rotates. The Milky Way arm is no different. You will want to know where the Milky Way arm will be when you’re shooting.
The most common time to shoot the Milky Way in the northern hemisphere is March through October.
Tool: Using an app like Stellarium makes locating the Milky Way arm easy. I recommend that you set the Milky Way brightness to 8+ in the advanced settings.
Weather
Weather might be the biggest factor in Milky Way photography. If it is too cloudy, you won’t be able to see the stars. Knowing if clear or cloudy skies are forecasted can help you plan ahead.
Tool: You can find weather data almost anywhere, but a few of my favorites are cleardarksky.com, weather.gov or Google weather.
Focusing Your Lens
Ok, you have all the basic gear you need, you’ve done all your planning and preparations, and now it’s time to get out there and shoot! Right? Well…almost!
Without a property focused lens, it is impossible to achieve any success at Milky Way photography. Because of this, you will need to know how to focus your lens before you go out shooting. Because stars are very far away, one would think you could simply adjust your focus ring to infinity (or the ∞ symbol), but most lenses need to be adjusted slightly to ensure sharp focus. Don’t worry, though, I will teach you two methods: one you can do during the day, and one during the night.
Method One: Preset your focus during the day
Set up your camera with the lens you will be using.
Adjust your lens for the focal length you will be using; e.g. 24mm on a 14-24mm.
Focus on a far away object using autofocus.
Make any manual adjustments using the focus ring if needed. Today’s autofocus is so accurate, I rarely find that any adjustments are needed.
Take a couple of practice shots at a normal aperture, like f/8. Zoom in on the photo and double check that the object you’re focused on is sharp.
Once your shot is in focus, you have found your infinity focal point! You can now either tape your focus ring into place or use a marker to mark your exact focus point.
(Keep in mind, your exact focus point will change slightly if you adjust the focal length. If you decide to shoot at 14mm instead of 24mm, you would want to repeat the above steps.)
Method two: Using live view at night
Set up your tripod with your camera and lens.
Set your focus ring as close to the ∞ (infinity) symbol as possible.
Turn on live view and point your camera at the brightest star or object in the sky you can find (moon, planet, etc).
Find that source of light in live view and zoom all the way in.
Adjust your focus ring until the dot of light is as small as possible.
Congratulations, you have found your focal point and can start shooting!!
Camera Settings
Camera settings can be the most daunting part of learning to shoot the Milky Way. You can get started in most other types of photography with “Auto” and fumble your way through to some okay shots. This doesn’t work at night.
Everything in this settings category is designed around one principal: collect as much light as possible. Stars aren’t very bright, so to photograph them we need to adjust our gear to collect as much light as possible while keeping optimal image quality. The settings below will help you optimize your camera to capture as many stars as possible.
Shooting at night can be especially tricky because it’s dark, making it harder to use your camera. I advise you to practice changing your settings during the day or in your home before you go out in the dark.
(Note: Changing settings in the dark can be hard, but PLEASE don’t use flashlights or white lights if you are shooting around other people. If you have a headlamp, there is usually a red light setting, which is more acceptable, but still, be cautious and respectful when using it.)
Image Format
If your camera allows it, always shoot in RAW image format.
Aperture/F-stop
A basic review of aperture: The smaller your f-stop, the larger your aperture, which means the more light your lens can capture. This is one of the hardest topics to grasp, in my opinion, because it’s counter-intuitive. To shoot stars, you want a very large/wide aperture, which means you want a lower f-stop.
For example, f/8 is a medium f-stop, it has a normal-sized aperture. f/16 is a big f-stop, which means it has a small/shallow aperture. And finally, f/2.8 is a small f-stop and has a large/wide aperture.
Depending on your lens, it is usually best to go with your widest aperture (smallest f-stop) and then decrease it slightly.
For example, if you are shooting with a 24mm f/1.4, I would set it to f/1.4, then bump it up through f/1.6, f/1.8 and finally settle around f/2. You would do this because pushing your lens to its extremes (biggest and smallest apertures) will tend to result in lower image quality.
If your lens only goes to f/2.8 or f/4, I would recommend skipping the above advice to bump up the aperture.
This is because at f/2.8 or f/4, you need the ability to capture light more than you need perfect image quality.
Shutter Speed
You want a long exposure time to allow your sensor to collect more light. In a perfect world, we would be able to take minute+ long exposures with a low ISO, allowing for a large amount of light collection and a high image quality. Unfortunately, because the Earth spins, the stars move during our long exposures. This means our exposure can only be so long before we get “star trails”. To make things even more complicated, the longer your focal length, the shorter your exposures can be before your stars start to trail.
For example, a 16mm lens can usually shoot an exposure time of around 30 seconds, while a 50mm is closer to 10 seconds.
To prevent star trails and keep your stars pinpoints, we follow the 500 rule. The 500 rule calculates the longest exposure time you can shoot based on your lenses focal length. Keep in mind the 500 rule is just a rule of thumb and not an exact science. Aperture and ISO have no effect on the 500 rule
For full frame cameras: you simply divide 500 by your focal length:
16mm lens: 500/16 = 31.25 seconds
50mm lens: 500/50 = 10 seconds
For crop sensor cameras it’s a bit more complicated. You will need to know your camera’s sensor size. A full-frame camera’s sensor size is 35mm. A Nikon crop sensor has a 24mm sensor size. Every camera will be a little different. You divide 35 by your camera’s sensor size to get what is called your crop factor. Next, you divide 500 by your focal length times your crop factor
Nikon crop sensor size = 24mm:
35/24 = 1.46 crop factor
16mm lens: 500/(16×1.46) = 21.4 seconds
50mm lens: 500/(50×1.46) = 6.85 seconds
As I mentioned, the 500 rule is just a rule of thumb, so make adjustments as needed (zoom in on your LCD and see if there is star trailing).
ISO
ISO is usually the last setting you adjust once you have lowered your f-stop and found your longest exposure time. To find the best ISO requires a few test shots. Start with an ISO of around 1600 and take a shot. If it’s too dark, which it probably will be, increase the ISO. Continue increasing the ISO until the Milky Way is clearly visible.
With an f/2.8 lens, around ISO 6400 was usually my sweet spot. Depending on your camera, you will probably notice a lot of noise (grainy specks) in your photo. You might also run into your max ISO and not be able to go any higher.
High ISO capability is the main reason full-frame cameras are suggested for Milky Way photography. They are able to use higher ISO ratings with better image quality.
We won’t go into them in detail, but the main ways to combat noise and increase photo quality besides a full-frame or in addition to a full-frame camera include:
Post processing: noise reduction, median image stacking or shooting a pano
Using a star tracker
White Balance
If you are shooting in RAW and post-process your images, white balance doesn’t matter since you can manually adjust it in processing. I leave my white balance on auto and adjust later.
If you prefer to have untouched photos, a white balance around 4-5,000K usually works best.
Put it All Together!
Some common settings for me:
ISO 6400, 24mm, f/2, 20s – Using a 24mm f/1.4 lens
ISO 6400, 14mm, f/2.8, 30s – Using a 14mm f/2.8 lens
And there you have it, my intro guide into Milky Way photography!
P.S. If you enjoyed this article please consider joining my newsletter for heaps more great tips like this.
About the author: Ross Schram von Haupt is a landscape photographer based in Bellingham, Washington. The opinions expressed in this article are solely those of the author. You can find more of his work on his website, Facebook, and Instagram. This article was also published here.
from Photography News https://petapixel.com/2019/03/11/a-guide-to-shooting-the-milky-way/
0 notes
Last Seen Blogs

themooniseatingcookies
I think I should go to sleep.

itsjeonjk
˚ ༘ 💫 ⋆ 전정국

elektra1
Elle Elektra

lonelylittledevil-blog
Lonelylittledevil

pinkcarsupremacy
No brakes. No tyres. We are out of the points.